

Page 1
Instruction Manual
Hovercraft
ME-9838
No. 012-08990B
Page 2

Hovercraft Model No. ME-9838
2
®
Page 3

Model No. ME-9838 Hovercraft
Hovercraft
Model No. ME-9838
Equipment List
Included Equipment Replacement
Part Number*
Wood Platform (1.2 meter diameter, 1.9 cm thick)
Nylon Skirt
Rubber Bumper
Liquid Level
Connection Hose for Air Source
Hose Clamps (2)
648-08988
648-08985
622-08686
699-010
640-048
623-069
*Use Replacement Model Numbers to expedite replacement orders.
Additional Equipment Recommended
Cordless Air Source
Xplorer GLX
Force Platform (2)
SE-8806
PS-2002
PS-2141
Related Products
Hovercraft Kit -- Includes everything needed to build the Hovercraft except
the wood platform.
®
ME-9878
3
Page 4

Hovercraft Model No. ME-9838
Introduction
PASCO's Hovercraft is designed to help students experience frictionless motion, thus better
understand Newton's Laws. Its large platform provides enough area for the rider to
comfortably sit while riding. In addition, the durable Nylon skirt will withstand the rigors of
the classroom environment.
The optional Cordless Air Source (SE-8806) is a convenient way supply air to the Hovercraft,
however most vacuums/blowers used in a wood shop will also be sufficient to lift the
Hovercraft.
The Hovercraft is available in two varieties:
• Hovercraft (ME-9838) is assembled and ready to use
• Hovercraft Kit (ME-9878) requires the addition of the wood platform and needs to be
assembled according to the included instructions and drawings (See pages 8-9).
Equipment Setup and Basic Operation
1. Place the Hovercraft on a smooth, non-carpeted surface such as tile or wood flooring. An
unobstructed space of 10 meters in all directions is ideal.
2. Sit down in the center of the platform.
3. Connect the air source to the platform using the provided tubing or by inserting the blower
tube directly into the opening on the platform.
4. If using the tubing, a screwdriver is required to tighten the clamp around the blower output
tube.
5. Turn on the air source to inflate the Hovercraft skirt.
6. As the skirt inflates, the rider should center his/her weight using the level mounted on the
platform. If the rider is not centered, friction may be introduced.
7. Provide a brief push to the rider on the Hovercraft and observe the resulting motion.
NOTE: Never stand on the Hovercraft as it is very easy to lose your balance and fall.
4
®
Page 5

Model No. ME-9838 Hovercraft
Suggested Activities
Newton's 1st Law
Additional Equipment Required:
• Air Source (SE-8806)
Procedure:
1. Ask several students to stand about 5 meters from the Hovercraft to observe its motion.
2. Another student should be designated as the "catcher" to stop the Hovercraft.
3. A final student should be designated as the "marker" to place tape of the floor during its
motion.
4. Provide a brief push to the rider.
5. Ask the "marker" to mark the position of the Hovercraft each second after the "pusher"
releases the rider.
6. After moving across the floor for about 10 seconds, stop the Hovercraft.
Questions:
1. Describe the motion both during and after the push.
2. Draw a force diagram for the rider both during and after the push.
3. Describe the spacing between the marks on the floor. What do these marks suggest about
the motion the Hovercraft?
4. Describe the motion as the Hovercraft is stopped and draw a force diagram while
stopping.
5. Describe the causes of the motion that you observed throughout the motion.
6. Formulate a general rule to explain the motions you observed.
®
5
Page 6

Hovercraft Model No. ME-9838
Newton's 2nd Law
Additional Equipment Required:
• Air Source (SE-8806)
• Section of Rope
Procedure:
1. Ask several students to stand about
5 meters from the Hovercraft to
observe its motion.
2. Another student should be
designated as the "catcher" to stop
the Hovercraft.
3. A final student should be
designated as the "marker" to place tape of the floor during its motion.
4. Using a rope, provide a constant force to the rider for about 3 seconds.
5. Ask the "marker" to mark the position of the Hovercraft each second.
6. After moving across the floor for about 5 seconds, stop the Hovercraft.
Questions:
1. Describe the motion both during and after the pull.
2. Draw a force diagram for the rider both during and after the pull.
3. Describe the spacing between the marks on the floor. What do these marks suggest about
the motion of the Hovercraft?
4. Describe the motion as the Hovercraft is stopped and draw a force diagram while
stopping.
5. Describe the causes of the motion that you observed throughout the motion.
6. Formulate a general rule to explain the motions you observed.
6
®
Page 7

Model No. ME-9838 Hovercraft
Newton's 3rd Law
Additional Equipment Required:
• Air Source (SE-8806)
• Xplorer GLX (PS-2002)
• PASPORT Force Platform (2) (PS-2141)
Procedure:
1. Ask several students to stand about 5 meters from the Hovercraft to observe its motion.
2. Another student should be designated as the "catcher" to stop the Hovercraft.
3. The "pusher" should hold the Force Platform perpendicular to the ground.
4. The "rider" should place the other Force Platform up against the pusher's.
5. The pusher should provide a force to the rider for about 1 second.
6. After moving across the floor for about 5 seconds, stop the Hovercraft.
Questions:
1. Describe the motion both during and after the push.
2. Use the data from the Force Platforms to produce a graph with both the pusher's force and
the rider's force.
3. Draw a force diagram for the rider during the push.
4. Draw a force diagram for the pusher during the push.
5. Formulate a general rule about size and direction of forces between objects.
®
7
Page 8

Hovercraft Model No. ME-9838
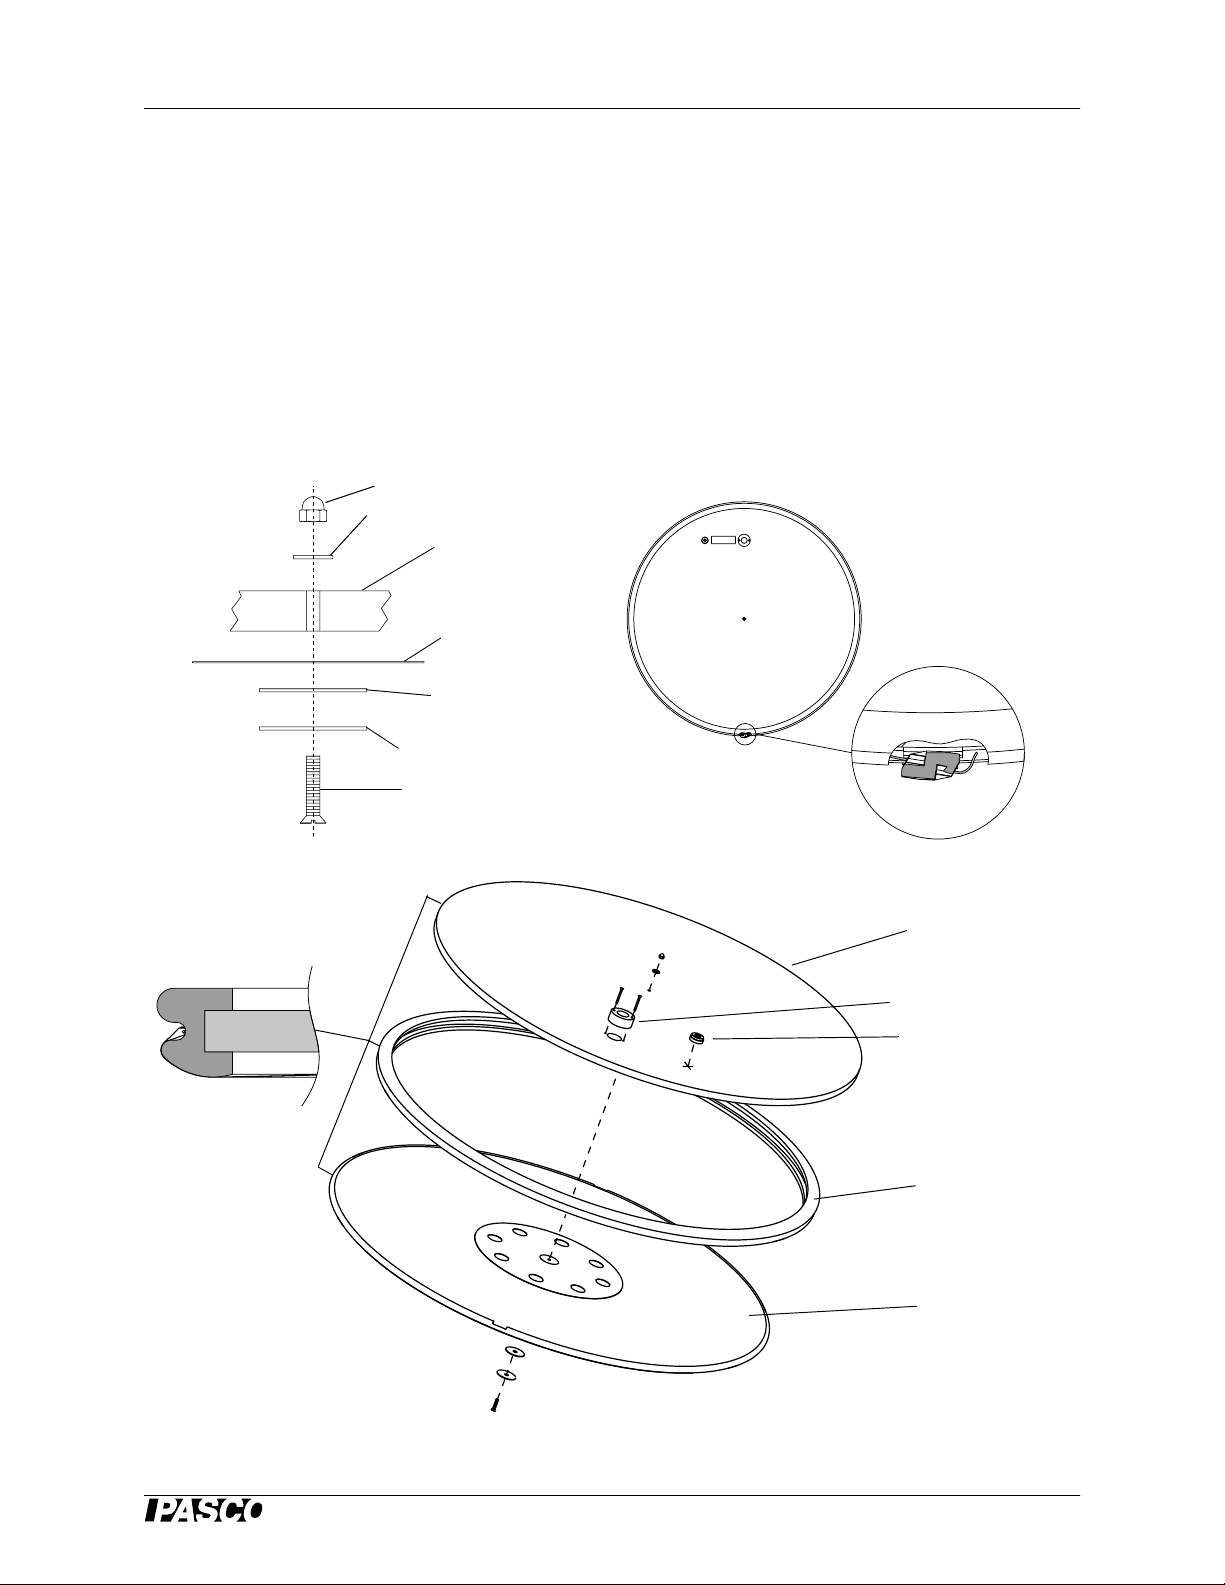
Hovercraft Kit Assembly Instructions:
1. Buy or cut a 46" diameter wood platform with a thickness of ¾"
2. Drill 1 ½" hole for air source (see figure 1)
3. Drill two 9/64" holes for air source adapter (see figure 1)
4. Drill 17/64" center hole (see figure 1)
Figure 1. wood platform layout
5. Paint wood platform (Optional)
6. Stretch the Rubber Bumper around the outside edge of the wood platform. You must force
a small section of the bumper onto the platform and work your way around the
circumference of the platform.
7. Secure the rubber bumper to the plywood with the provided staples.
8. Cut wire approximately 150" long and bend one end into a small loop.
9. Thread wire through skirt opening; loop end first.
10. Using the included hardware, attach the center of the skirt to the wood platform. (See
figure 2.)
11. Place the wood platform on a table with the bottom side up and drape the skirt around the
edge of the platform.
12. Feed each end of the wire into the gripple.
8
®
Page 9
Model No. ME-9838 Hovercraft
13. Pull the two ends taut until the skirt is held firmly in the groove of the rubber bumper.
Have another person walk around the bumper to be sure the skirt is in the groove as the
wires are pulled taut.To prevent leaks make sure the wires are cinched up very tight.
14. Trim the wires from each side of the gripple. Be sure the sharp wires do not stick out!
15. Using the included wood screws, attach the air source adapter to the top of the wood
platform (See Figure 4).
16. Use glue or double-sided tape to affix the bubble level to the top of the wood platform.
Place the level away from the center of the platform, so the rider can view the level easily
(See Figure 4)...
Cap Nut
Flat Washer
Top of Wood Platform
Skirt
Flat Washer
Flat Head Screw
Figure 2. Attach center of skirt
Rubber Washer
Figure 3. Gripple Detail
Wood Platform
Air Source Adapter
Bubble Level
Rubber Bumper
Skirt
Figure 4. Exploded View
®
9
Page 10

Model No. ME-9838 Hovercraft
Safety
Read the instructions before using this
product. Students should be supervised
by their instructors. When using this
product, follow the instructions in this
manual and all local safety guidelines
that apply to you.
Technical Support
For assistance with any PASCO product,
contact PASCO at:
Address: PASCO scientific
10101 Foothills Blvd.
Roseville, CA 95747-7100
Phone: (916) 786-3800
(800) 772-8700
Fax: (916) 786-3292
Web: www.pasco.com
Email: support@pasco.com
Limited Warranty
For a description of the product warranty,
see the PASCO catalog.
Copyright Notice
The PASCO scientific 012-08990B
Hovercraft Manual is copyrighted with all
rights reserved. Permission is granted to
non-profit educational institutions for
reproduction of any part of this manual,
providing the reproductions are used only in
their laboratories and classrooms, and are not
sold for profit. Reproduction under any other
circumstances, without the written consent
of PASCO scientific, is prohibited.
 Loading...