

Page 1
Instruction Manual
Manual No. 012-10461A
Physical Pendulum
Set
Model No. ME-9833
Page 2

Model No. ME-9833 Physical Pendulum Set
Table of Contents
Equipment ................................................................................................... 3
Introduction................................................................................................. 4
Basic Setups ............................................................................................... 4
Background Information............................................................................ 5
Experiment 1: Parallel Axis Theorem ....................................................... 7
Experiment 2: Minimum Period for an Oscillating Bar ......................... 11
Experiment 3: Moment of Inertia Based on Period of Oscillation........ 15
Experiment 4: Use a Physical Pendulum to Measure ‘g’ ...................... 19
Appendix A: Specifications ......................................................................23
Appendix B: DataStudio Instructions......................................................23
Appendix C: Technical Support, Copyright, Warranty ..........................24
Appendix D: Teacher’s Notes...................................................................25
®
2
Page 3
Physical Pendulum Set Model No. ME-9833
Physical Pendulum Set
Model No. ME-9833
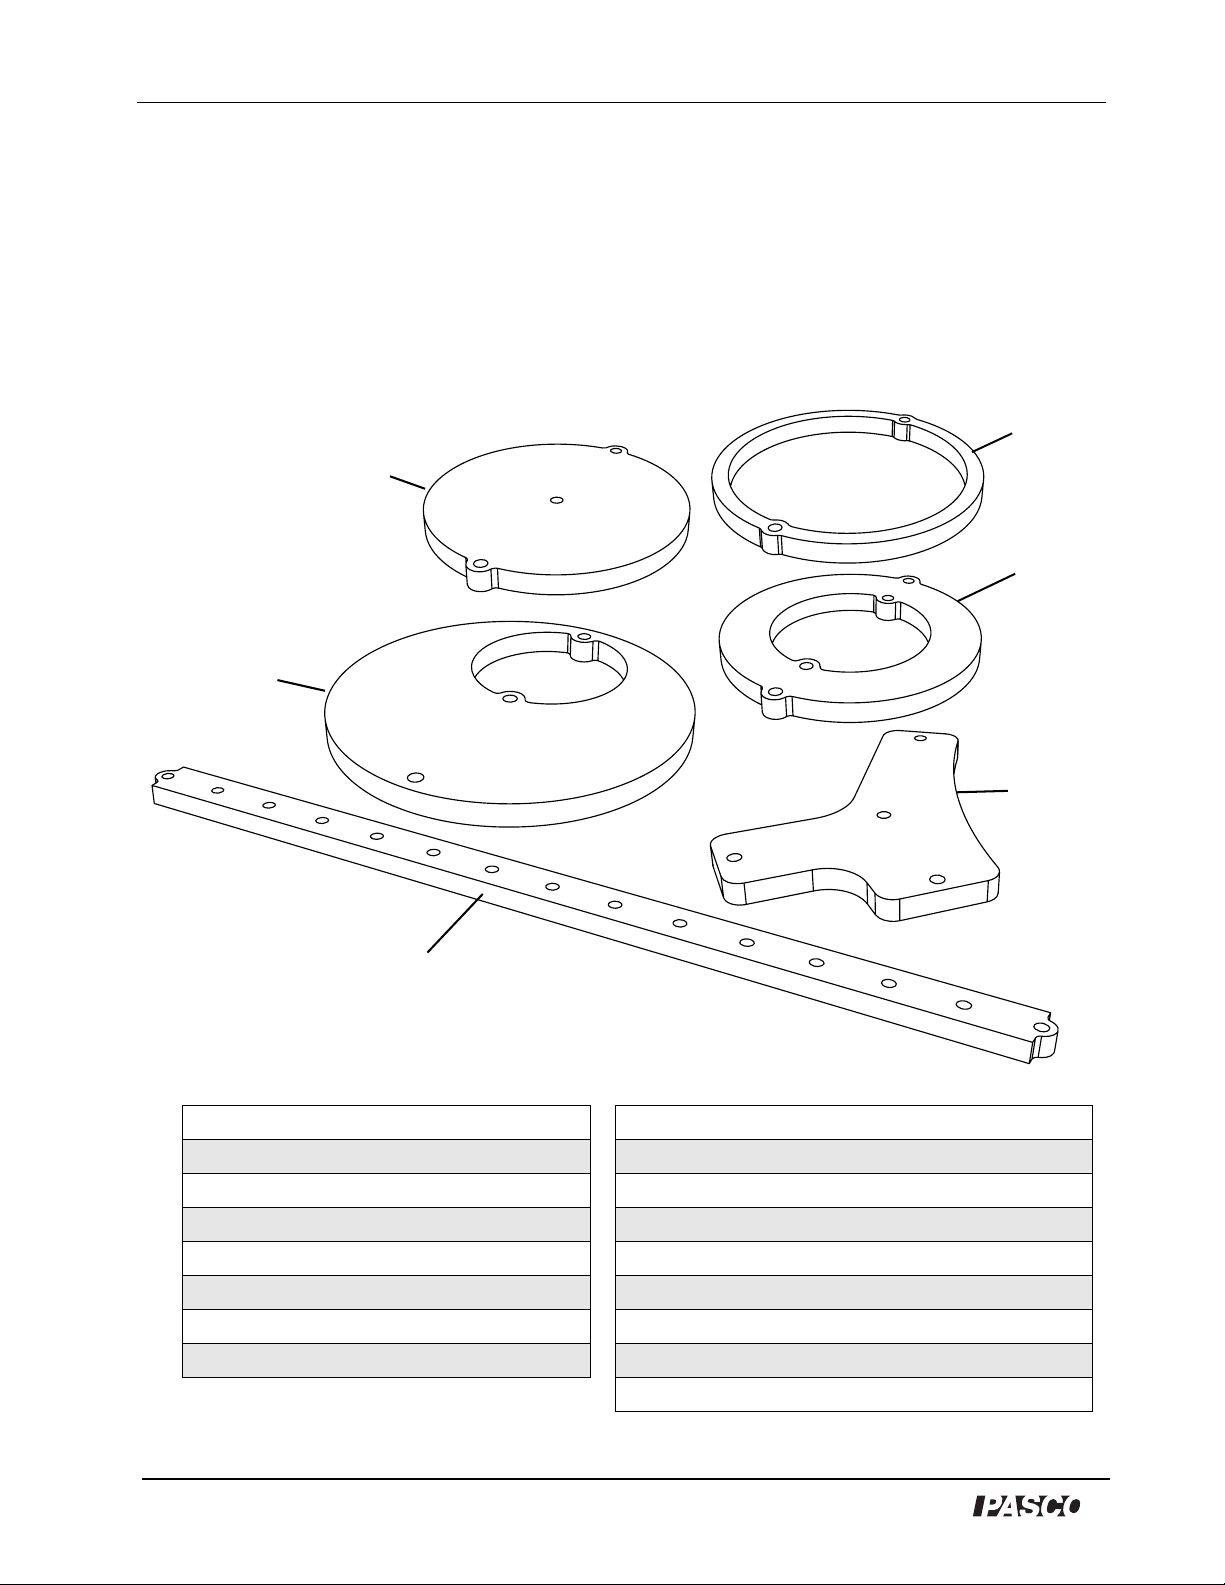
Equipment
4
3
5
2
6
1
Included Equipment Recommended Equipment
1. Pendulum Bar, 28 cm Rotary Motion Sensor (PS-2120 or CI-6538)
2. Offset Hole Base and Support Rod (see PASCO catalog)
3. Solid Disk Super Pulley with Clamp (ME-9448A)
4. Thin Ring Mass and Hanger Set (ME-8979)
5. Thick Ring PASCO Computer Interface (see PASCO catalog)
6. Irregular Shape Vernier Caliper (SF-9711)
7. Mounting Screws (qty. 6) (not shown) String or Thread (see PASCO catalog)
Balance (see PASCO catalog
3
®
Page 4
Model No. ME-9833 Physical Pendulum Set
Introduction
The Physical Pendulum Set consists of six parts: pendulum bar (28 cm), offset hole, solid disk, thin
ring, thick ring, and irregular shape. This set of objects allows the study of physical pendula,
moments of inertia, and the parallel axis theorem. It includes six mounting screws for attaching the
physical pendula to a Rotary Motion Sensor in order to measure the object’s acceleration due to an
applied torque, or the object’s period of oscillation when the pendulum swings freely.
Basic Setups
Using the Rotary Motion Sensor to Measure Moment of Inertia
You can use the Rotary Motion Sensor (RMS) to measure the motion of a rotating object as it is
accelerated by a net torque. The ratio of net torque to angular acceleration is the object’s moment of
inertia.
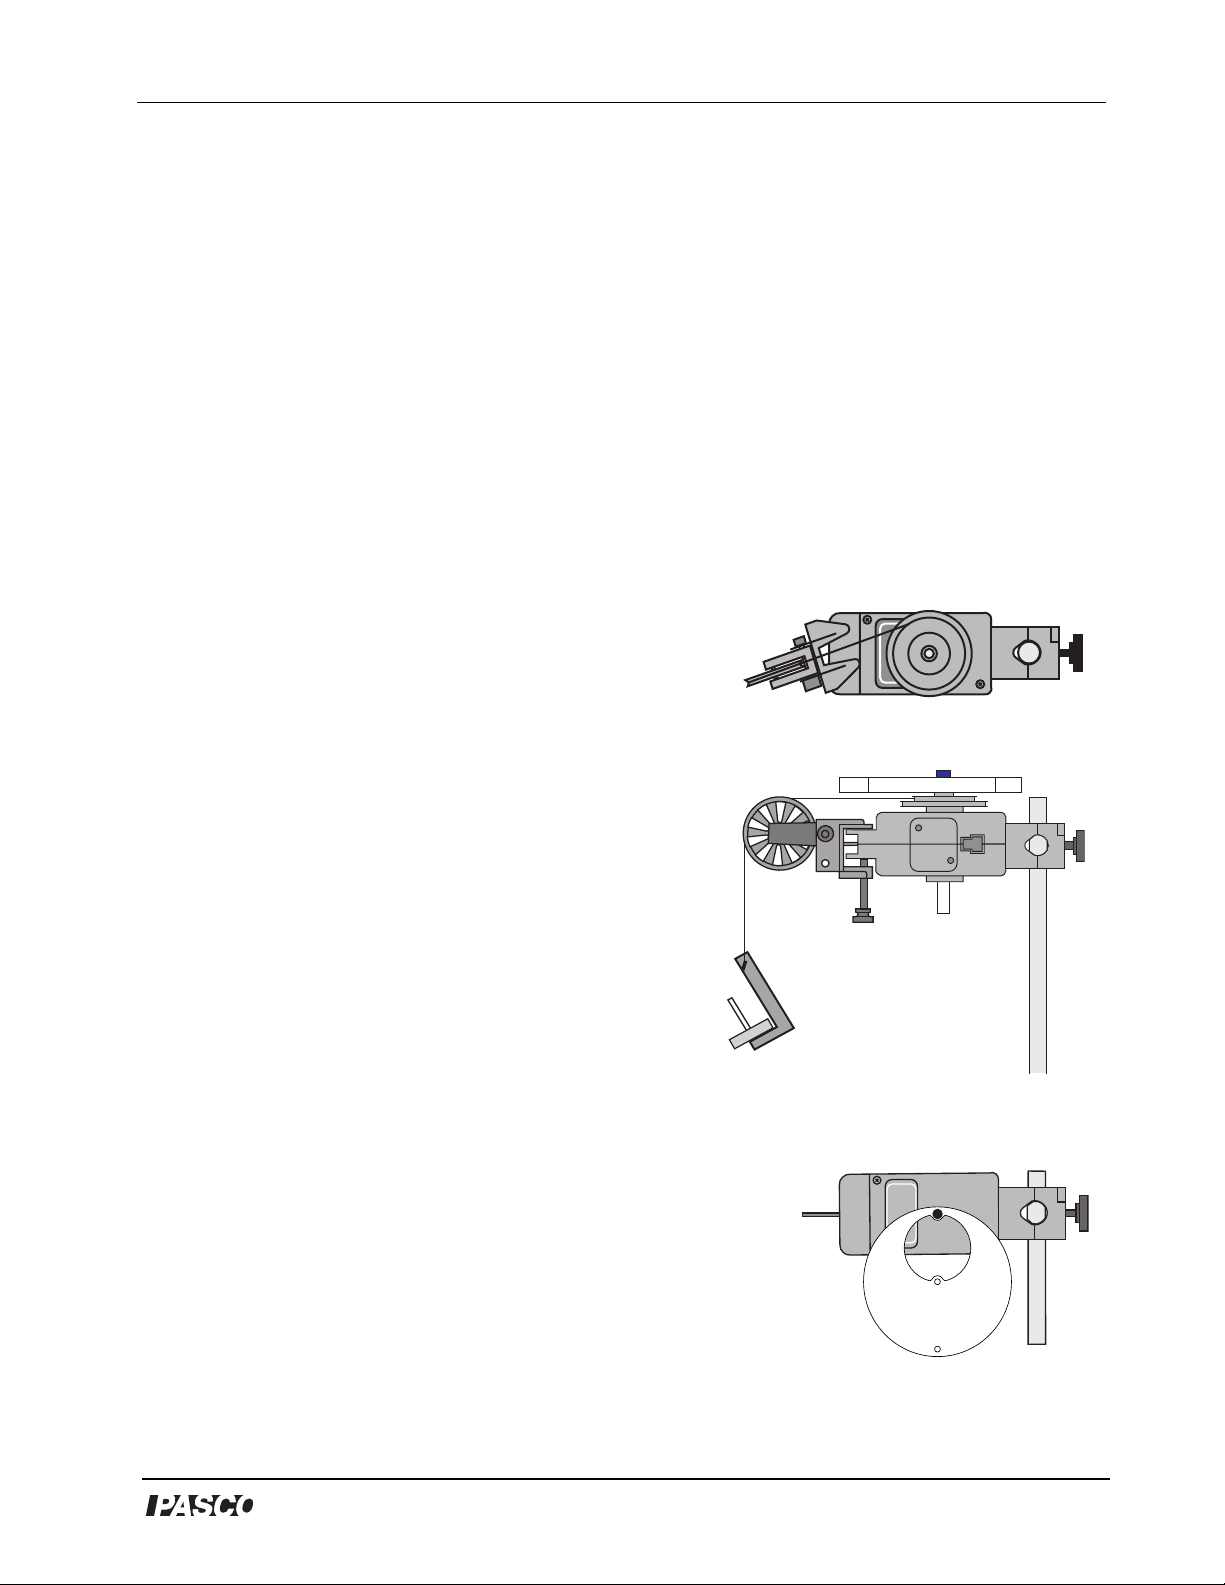
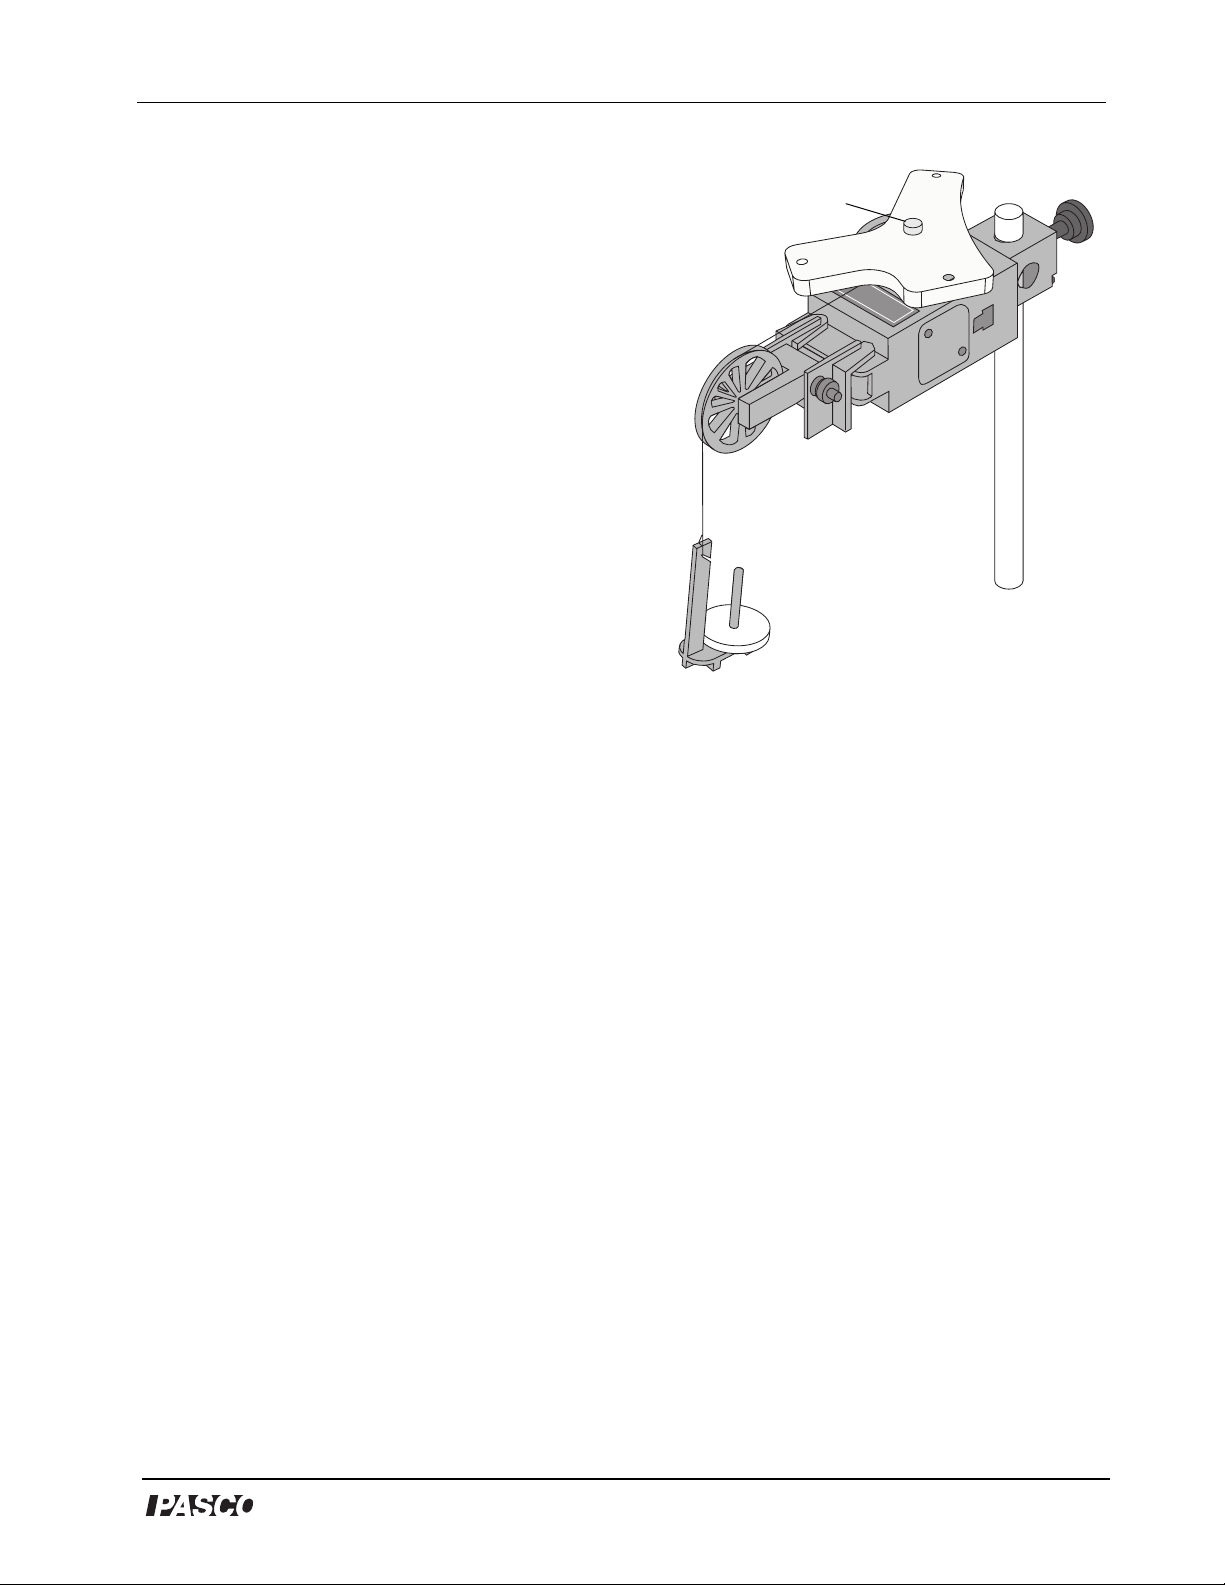
• Mount the Rotary Motion Sensor horizontally on a support
rod with the three step pulley on top.
• Arrange the three step pulley on the shaft on top of the sensor
so that the largest diameter step is nearest to the sensor.
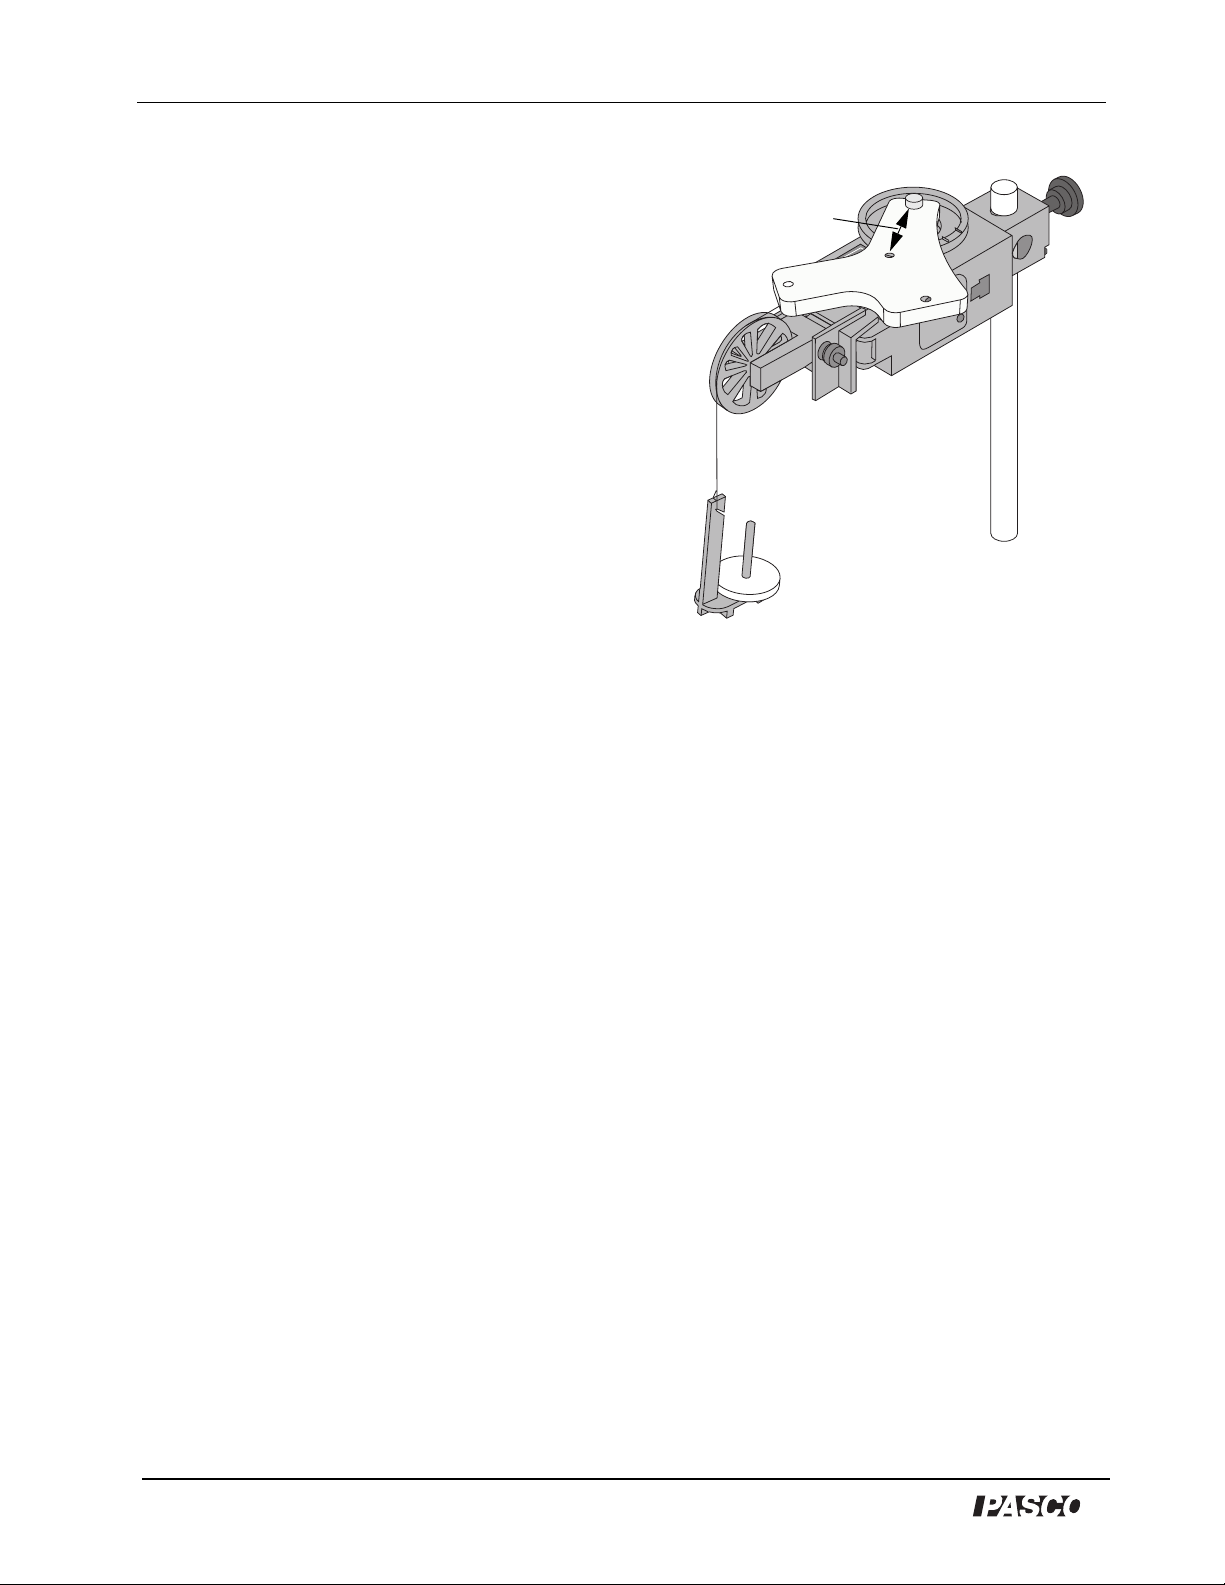
• Mount a Super Pulley with Clamp to the platform area at the
Figure 1: Top view - Adjust the
angle of the Super Pulley.
end of the sensor opposite to the support rod.
• Connect a string to one of the steps on the three step
pulley and drape the string over the Super Pulley. Adjust
the angle of the Super Pulley with Clamp so that the string
is tangent to the step on the three step pulley (see Fig. 2).
• Put the object to be measured onto the shaft of the sensor
above the three step pulley. Secure it in place with one of
the mounting screws.
• Attach a mass hanger to the end of the string that is draped
Figure 2: Moment
of Inertia setup
over the Super Pulley.
Using the Rotary Motion Sensor to Measure Period of Oscillation
You can use the Rotary Motion Sensor to measure the period of
oscillation of the objects in the Physical Pendulum Set.
• Mount the Rotary Motion Sensor horizontally on a support rod so
that the three step pulley is on one side (oriented vertically).
• Remove the mounting screw and the three step pulley.
• Use a mounting screw to attach the object to be measured to the
shaft of the sensor.
®
Object
Figure 3: Period of
oscillation setup
4
Page 5
Physical Pendulum Set Model No. ME-9833
Setting Up the Rotary Motion Sensor and Interface
Connect the Rotary Motion Sensor to the interface and connect the interface to a computer. For the
PASPORT Rotary Motion Sensor, connect the sensor’s plug to a compatible PASPORT interface
(e.g., USB Link, PowerLink, Xplorer, Xplorer GLX). For the ScienceWorkshop Rotary Motion
Sensor, connect the yellow plug to digital channel 1 and the black plug to digital channel 2 of a
compatible ScienceWorkshop interface (e.g., ScienceWorkshop 500 or ScienceWorkshop 750).
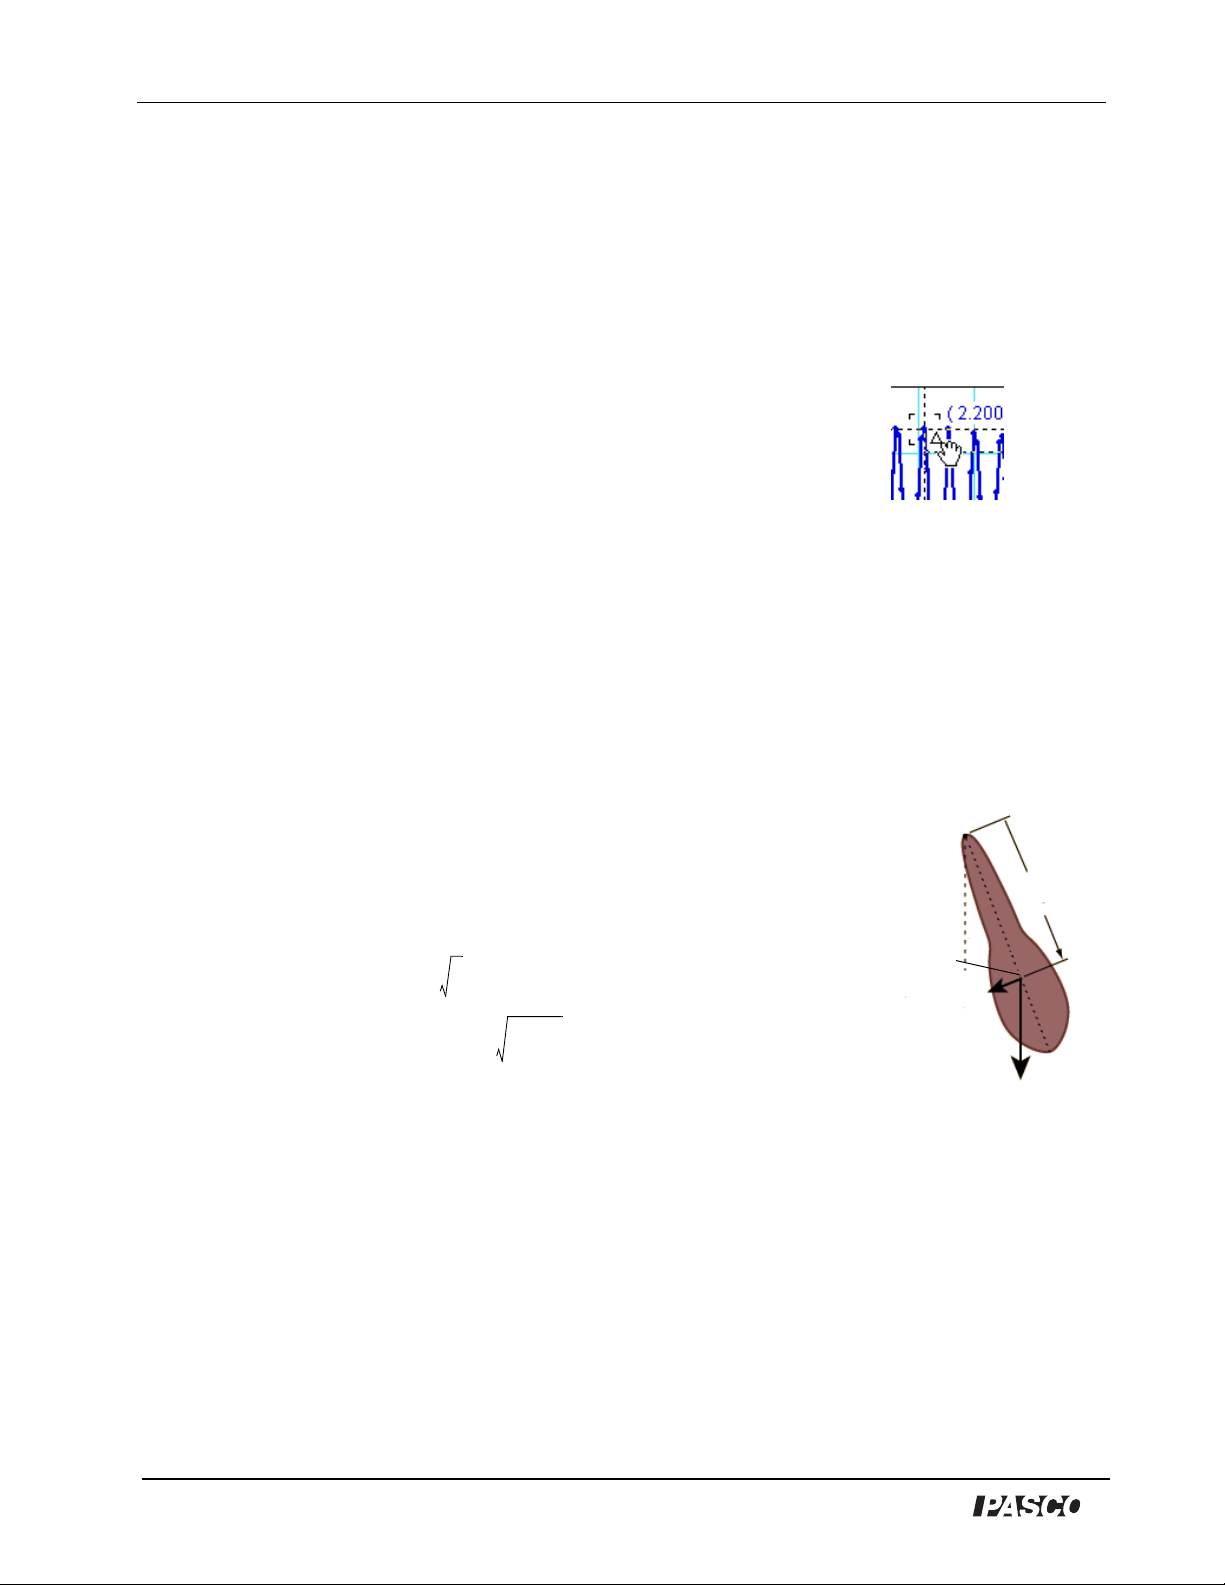
In general, the set up of the DataStudio program will be for
measuring angular acceleration or for measuring period. To
determine angular acceleration, find the slope of the plot of data on
an angular velocity versus time graph display. To determine period,
use the Smart Cursor to find the time for ten oscillations of the
physical pendulum and then divide the total time for ten oscillations
by ten.
Figure 4: Smart Cursor
For more information about setting up the DataStudio program, refer
to the Appendix.
Background Information
Pendulum Period
If a body is suspended from a fixed point other than its center of mass and set in motion, it has a
periodic motion that is very nearly simple harmonic motion. The period of
the angular motion depends on the pull of gravity and the moment of inertia
of the body.
For that reason, the physical pendulum is a useful device for determining the
acceleration due to gravity and the moment of inertia. The analytical
relationships for the period, T, are as follows:
for a simple pendulum:
T2π
and for a physical pendulum: where
L
----=
g
T2π
I
------------------=
MgL
cg
T is the period
L is the length of the simple pendulum
g is the acceleration due to gravity
I is the moment of inertia about an axis through the pivot point
M is the mass of the pendulum, and
is the distance from the pivot point to the center of gravity, cg
L
cg
The first equation is seen to be a special case of the second if ML
cg
2
formulas give good results if the angular amplitude is small.
Torque and Moment of Inertia
θ
cg
mgsinθ
Figure 5: Physical
pendulum
is substituted for I. These
L
cg
For an object accelerating about an axis, the torque is the product of the force and the moment arm
(the distance from the pivot point perpendicular to the line of action of the force):
5
®
Page 6

Model No. ME-9833 Physical Pendulum Set
τ Iα r ⊥F==
For the basic setup for measuring moment of inertia shown in Figure 2, where T is the
τ rT=
tension in the string and r is the radius of the step pulley to which the string is attached. The net
ΣFmgT– ma==
force is the difference between the tension, T, and the weight, mg, of the hanging
mass. Therefore, the tension, is where “a” is related to the angular acceleration, α, by
Tmgma–=
a = rα. The torque becomes:
τ rT rmg rma– rmg rm rα()–== =
τ rm g rα–()=
where the angular acceleration is measured by the Rotary Motion Sensor.
Parallel Axis Theorem
For a physical pendulum, the moment of inertia about an axis through the point of suspension can
be found using the parallel axis theorem, where I
I
pivotIcg
+=
ML
2
cg
is the moment of inertia
pivot
about the point of suspension, Icg is the moment of inertia about the center of mass, m is the mass of
the pendulum, and Lcg is the perpendicular distance from the pivot point to the center of mass. In
other words, the moment of inertia about a parallel axis is the moment of inertia about the center of
mass plus the moment of inertia of the entire object treated as a point mass at the center of gravity.
Description of the Experiments
1.Parallel axis theorem: Measure the moment of inertia, Icg, around the center of gravity of an
object, and the moment of inertia, I
center of mass. Confirm that I
pivot
, around a pivot point of the object that is not through the
pivot
= Icg + ML
2
where m is the mass of the object and Lcg is the
cg
distance from the pivot point to the center of gravity.
2.Minimum period of a bar: Given a bar of length, L, calculate Lcg, the distance from the pivot
point to the center of gravity that would give the minimum period of oscillation for the bar.
Measure the distance that gives the minimum period and compare it to the calculated result.
3.Determine moment of inertia: Use the period, T, of a physical pendulum to calculate the
moment of inertia, I. Compare the calculated value to the theoretical value for I.
4.Acceleration due to gravity: Measure the acceleration due to gravity, g, using period, T, moment
of inertia, I, mass, m, and the distance from the pivot point to the center of gravity, Lcg.
®
6
Page 7

Physical Pendulum Set Model No. ME-9833
Experiment 1: Parallel Axis Theorem
Equipment
Item
PASCO Interface and DataStudio software Base and Support Rod
Rotary Motion Sensor String or thread
Irregular Shape from Physical Pendulum Set Mass and Hanger Set
Super Pulley with Clamp Vernier calipers
Balance
Item
Theory
The moment of inertia about a parallel axis, I
, is the moment of inertia about the center of
pivot
gravity, Icm, plus the moment of inertia of the entire object treated as a point mass at the center of
gravity:
2
I
pivotIcm
where L is the perpendicular distance from the center of gravity (cog) to the pivot
ML
+=
point.
Procedure
Use the Rotary Motion Sensor to measure the angular acceleration of a rotating irregular shaped
object when it rotates about its center of gravity due to a net torque, and also when it rotates about a
parallel axis a distance “L” away from the center of gravity. Use the angular acceleration and the
known applied torque to determine the moment of inertia about the center of gravity and the
moment of inertia about the parallel axis.
Equipment Setup: Center of Gravity
1. Set up the Rotary Motion Sensor horizontally on a support rod so that the three step pulley is
on top. Start the DataStudio program on the computer and connect the sensor to the computer
interface.
2. Mount a Super Pulley with Clamp to the platform area at the end of the sensor opposite to
the support rod.
3. Connect a string to one of the steps on the three step pulley and drape the string over the
Super Pulley. Adjust the angle of the Super Pulley with Clamp so that the string is tangent
to the step on the three step pulley.
4. Use calipers to carefully measure the diameter of the step to which you attached the
string. Calculate the radius of the step and record it in the data table (Table 1).
5. Measure and record the mass, M, of the irregular shape object to be measured.
7
®
Page 8
Model No. ME-9833 Physical Pendulum Set
6. Put the object to be measured onto the shaft
of the sensor above the three step pulley.
Secure it in place with one of the mounting
screws.
7. Measure and record the mass, m, of a mass
hanger.
8. Attach the mass hanger to the end of the
string that is draped over the Super Pulley.
Data Recording: Center of Gravity
1. Wind the string about the step pulley so that
the mass hanger is just below the Super Pulley.
Hold the irregular shape in place.
2. Start recording data and then release the
irregular shape so that it rotates freely.
3. Stop recording data when the mass hanger
reaches its lowest point.
Mounting screw
Figure 1-1: Irregular shape
mounted on the RMS at
the center of gravity
4. Repeat the process a total of three times.
Analysis: Center of Gravity
Find the moment of inertia about the center of gravity.
1. Set up a graph display in the software of angular velocity versus time.
2. Select a region of the first run of angular velocity data and select ‘Linear Fit’ from the
‘Fit’ menu.
3. Record the value of the slope as the first value of angular acceleration around the center
of gravity.
4. Repeat the process for the other two runs of data.
5. Find the average angular acceleration, α
, and record it in the data table.
cg
6. Calculate the net torque, τ = rm(g - rα). Calculate the moment of inertia about the center
of gravity by dividing the net torque by the average angular acceleration. Record the result
τ
--------
as the moment of inertia about the center of gravity, Icg. ( )
=
I
cg
α
cg
Equipment Setup: Parallel Axis
1. Temporarily remove the irregular shape from the top of the Rotary Motion Sensor.
®
8
Page 9
Physical Pendulum Set Model No. ME-9833
2. Use calipers to carefully measure the
distance, Lcg, from the center of gravity to
Measure L
cg
one of the other pivot points on the irregular
shape. Record the measurement as Lcg, the
distance from the center of gravity to the
pivot point.
3. Replace the irregular shape on the Rotary
Motion Sensor by attaching it with one of the
mounting screws through the pivot point that
you used for the measurement.
Data Recording: Parallel Axis
1. Wind the string about the step pulley so that the
mass hanger is just below the Super Pulley. Hold
the irregular shape in place.
Figure 1-2: Irregular
shape mounted
through a parallel axis
2. Start recording data and then release the irregular shape so that it rotates freely.
3. Stop recording data when the mass hanger reaches its lowest point.
4. Repeat the process a total of three times.
Analysis: Parallel Axis
Find the moment of inertia about the parallel axis.
1. Use the same setup in the software to find the average angular acceleration.
2. Calculate the net torque (τ = rm(g - rα)). Calculate the moment of inertia about the
parallel axis by dividing the net torque by the average angular acceleration
the results as the moment of inertia about the parallel axis, I
3. Calculate ML
2
, the moment of inertia about the parallel axis of the irregular shape as if
cg
pivot
.
pivot
all its mass is concentrated at its center of gravity. Use the distance from the pivot point to
the center of gravity as L
cg
.
. Record
4. Calculate the sum of Icg and ML
parallel axis, I
pivot
.
5. Find the percent difference between I
percent difference. Set up a graph display in the software of angular velocity versus time.
Extensions
9
2
. Compare the sum to the moment of inertia about the
cg
and the sum of Icg and ML
pivot
2
and record the
cg
®
Page 10

Model No. ME-9833 Physical Pendulum Set
1.Repeat the procedure for the other two ‘legs’ of the irregular shape. Determine whether or not the
moment of inertia about the parallel axis (the pivot point) is equal to the sum of the moment of
inertia about the center of mass plus ML
2
.
cm
2.Repeat the procedure for another physical pendulum object, such as the solid disk.
Measurements and Calculations
Table 1: Parallel Axis Theorem for Irregular Shape
Item (units) 1 2 3
Object irregular shape
Mass of object, M (kg)
Step diameter (m)
Step radius, r (m)
Mass of hanger, m (kg)
α
, avg. angular accelerationcg (rad/s2)
cg
, torque, rm(g - rαcg) (N m)
τ
cg
I
, moment of inertia (kg m2)
cg
, distance - pivot to center of gravity (m)
L
cg
2
, moment of inertia, parallel axis (kg m2)
ML
cg
I
cg
α
pivot
τ
pivot
I
pivot
Percent difference, I
2
+ ML
(kg m2)
cg
, avg. angular acceleration
, torque, rm(g - rα
pivot
) (N m)
pivot
(rad/s2)
, moment of inertia, pivot point (kg m2)
and Icg + ML
pivot
2
cg
Questions
1. How does the value of the moment of inertia about the pivot point compare to the sum of the
moment of inertia about the center of gravity Icg plus ML
2
?
cg
2. Do your results confirm the parallel axis theorem? Why or why not?
3. How do you know that the center hole is the center of gravity?
®
10
Page 11

Physical Pendulum Set Model No. ME-9833
Experiment 2: Minimum Period for an Oscillating Bar
Equipment
Item
Item
PASCO Interface and DataStudio software Base and Support Rod
Rotary Motion Sensor Metric ruler
28-cm Bar from Physical Pendulum Set
The first section outlines the calculation of the distance from the pivot point to the center of mass of
a long bar that produces the minimum period of oscillation for the bar at small amplitudes. The next
section describes the measurements needed to determine the minimum period.
Calculating Distance for Minimum Period
1
2
------
Recall that the moment of inertia of a “long rod” about its center of gravity is: where M
I
cg
ML
=
12
is the mass of the long rod and L is the overall length of the rod. A more precise physical model of
the 28-cm Pendulum Bar as a rectangular-type rod has a moment of inertia about its center of
1
2b2
gravity that is: where M is the mass of the rectangular bar, “a” is the length, and
“b” is the thickness. However, if a>>b, can be used as a very good approximation.
------
I
cg
12
Ma
+()=
1
2
------
I
=
12
ML
cg
The parallel axis theorem enables us to write the moment of inertia of the bar about a pivot point
not at the center of gravity as: where Lcg is the distance from the pivot point to the
I
pivotIcg
2
ML
+=
cg
center of gravity.
The period of a physical pendulum depends on its moment of inertia, its mass, and the distance
I
from the pivot point to the center of gravity. The period is: . For the 28-cm Pendulum
T2π
pivot
-----------------=
mgL
cg
Bar, the period becomes:
T2π
1
------
ML
12
---------------------------------------- 2π
MgL
2
2
ML
+
cg
cg
Use calculus to find the derivative of the period, T, with respect to L
1
------
12
----------------------------==
L
gL
2
2
L
+
cg
cg
, the distance between the
cg
pivot and the center of gravity.
Set the derivative equal to zero and solve for L
11
. Confirm that the minimum distance is:
cg
1
----------
L
cg
L=
12
®
Page 12

Model No. ME-9833 Physical Pendulum Set
Measurement of Period for Different L
cg
Equipment Setup
1. Measure and record the length, L, of the bar.
2. Mount the Rotary Motion Sensor on a support rod so
that the shaft of the sensor is horizontal (parallel to the
table).
3. Use a mounting screw to attach the bar to the shaft of
the sensor through the first hole above the center hole of
the bar. In other words, attach the bar so the pivot point
is 2 cm above the center of gravity.
Computer Setup
1. Connect the sensor to a PASCO interface and connect the
interface to a computer.
2. On the computer, start the DataStudio program. Set up
the program so that it has a Graph display of Angular
Position (rad) versus Time (s).
Figure 2-1: Setup
Data Recording
1. Gently start the pendulum bar swinging
with a small amplitude (about 20 degrees
total).
2. Click ‘Start’ to begin recording data.
After about 25 seconds, click ‘Stop’ to
end recording data. Data will appear in
the graph of angular position versus time
and also in the graph of period versus
Figure 2-2: Graph display
time.
3. Move the mounting screw to the next hole (4 cm from the center hole).
4. Start the pendulum bar swinging and record data for about 25 seconds.
5. Repeat the process for the holes that are 6 cm, 8 cm, 10 cm, 12 cm, and 14 cm from the
center hole.
Analysis
1. Create a Table display to show period versus length. In the ‘Experiment’ menu, select ‘New
Empty Data Table’.
®
12
Page 13

Physical Pendulum Set Model No. ME-9833
2. Double click the label of the new Table display in
the Summary panel to open the Data Properties
window. Give the table a Measurement Name of
‘Period versus Length’, an ‘X’ Variable Name of
‘Length’ with ‘cm’ for units, and a ‘Y’ Variable
Name of ‘Period’ with ‘s’ for units.
3. Find the period of oscillation for the ‘2 cm’ setup.
(a) Click the ‘Smart Cursor’ button in the toolbar.
(b) Move the Smart Cursor to one of the first peaks
of Angular Position.
(c) Hover the cursor over the Smart Cursor until the
‘delta’ symbol appears.
(d) Click and drag the ‘delta’ symbol to the tenth
peak of Angular Position.
(e) Divide the time for ten oscillations by ten and
record the number as the period of oscillation.
Figure 2-3: Typical data
4. In the Table display, enter ‘2’ as the first length in
the ‘x’ column and the period of oscillation for the 2 cm length as the first period in the ‘y’
column. Continue to enter data points in the Table display.
5. Click and drag a Graph display icon from the ‘Displays’ part of the Summary panel to the
‘Data’ under ‘Period versus Length’ in the top part of the Summary panel. The Graph
display opens with ‘Period’ on the Y-axis and ‘Length’ on the X-axis.
6. Determine which length gives the minimum period of oscillation of the pendulum bar and
record this length in the data section.
Data Section
Length of pendulum bar, L: _________________
1
----------
Calculated value for length that gives minimum period ( ): _________________
L
cg
L=
12
Measured value for length that gives minimum period: __________________
Percent difference: ___________________
Questions
1. What is the percent difference between the calculated value for the length that gives
minimum period of oscillation and the measured value for the length?
2. Would a pendulum bar with different mass but with the same dimensions have a different
value for the length that gives minimum period of oscillation? Why or why not?
13
®
Page 14

Model No. ME-9833 Physical Pendulum Set
®
14
Page 15

Physical Pendulum Set Model No. ME-9833
Experiment 3: Moment of Inertia Based on Period of
Oscillation
Equipment
Item
PASCO Interface and DataStudio software Balance
Rotary Motion Sensor Vernier caliper
Physical Pendulum Set Mass and Hanger Set
Base and Support Rod String or thread
Item
Use the period of oscillation of a physical pendulum to calculate the moment of inertia. Measure the
moment of inertia and compare the measured value to the calculated value.
Background Information
The period of oscillation, T, of a physical pendulum depends on the moment of inertia about a pivot
point, I
The Parallel Axis Theorem states that the moment of inertia about a pivot point, I
, the mass, M, and the distance from the pivot point to the center of gravity, Lcg.
pivot
2
ML
T2π
I
pivot
------------------ 2π
MgL
cg
+
I
cg
-------------------------------==
MgL
cg
cg
pivot
, is equal to
the sum of the moment of inertia about the center of gravity, Icg, and the moment of inertia of the
object as if all its mass were at the center of gravity, ML
2
.
cg
Conversely, the moment of inertia about the center of gravity could be found as follows:
T2MgL
-------------------------
I
cg
4π
2
Measurement: Period of Oscillation
Equipment Setup
1. Measure and record the mass M, of the disk.
2. Measure and record the distance, L
, from the
cg
pivot point on the edge of the disk to the center of
the disk.
3. Mount the Rotary Motion Sensor on a support rod
so that the shaft of the sensor is horizontal (parallel
to the table).
15
–=
ML
2
cg
Figure 3-1: Setup
®
cg
Page 16

Model No. ME-9833 Physical Pendulum Set
4. Use a mounting screw to attach the disk to the shaft of the sensor through a hole on the
edge of the disk.
Computer Setup: Period of Oscillation
1. Connect the sensor to a PASCO interface and connect the interface to a computer.
2. On the computer, start the DataStudio
program. Set up the program so that it
has a Graph display of Angular Position
(rad) versus Time (s).
3. Open the ‘Setup’ window and increase
the sampling rate from 10 Hz to 100 Hz.
4. Open the Calculator and select
‘period(10,10,1,x)’ from the ‘Special’
menu in the Calculator. [This function
Figure 3-2: Calculator window
determines the period of oscillation
from the angular position versus time data.]
5. To define the variable ‘x’ in the Calculator, click the menu down arrow under ‘Variables’
and select ‘Data Measurement’. Select ‘Angular Position’ from the window that opens.
6. Click ‘Properties’ in the Calculator window. Give the function ‘Period’ as the
measurement name and the variable name. Enter ‘sec’ (seconds) as the unit.
7. Create a graph of ‘period versus time’. Click and drag the Graph icon from the Displays
list in the Summary panel to the period function in the Data section of the Summary panel.
8. In the ‘Statistics’ menu of the ‘period versus time’ Graph display, select ‘Mean’. Click the
‘Statistics’ button in the toolbar so that the legend box will show both the data run and the
mean.
Data Recording: Period of Oscillation
1. Gently start the disk swinging with a small amplitude (about 20 degrees total).
2. Click ‘Start’ to begin recording data. After about 25 seconds, click ‘Stop’ to end
recording data. Data will appear in the graph of angular position versus time and also in
the graph of period versus time.
3. Repeat the process for several more trials. Determine the average of the values of the
period of oscillation and record the average value in the Data Section.
®
16
Page 17

Physical Pendulum Set Model No. ME-9833
Analysis
1. Calculate the moment of inertia using the period, T, the mass, M, and the distance from the
pivot point to the center of gravity, Lcg.
I
cg
T2MgL
-------------------------
2
4π
cg
–=
ML
2
cg
2. Record the calculated value for the moment of inertia in the Data Section.
Measurement: Moment of Inertia
Equipment Setup
1. Set up the Rotary Motion Sensor horizontally on a support rod with the three step pulley on
top. Start the DataStudio program on the computer and connect the sensor to the computer
interface.
2. Mount a Super Pulley with Clamp to the platform area at the end of the sensor opposite to
the support rod.
3. Connect a string to one of the steps on the three step pulley and drape the string over the
Super Pulley. Adjust the angle of the Super Pulley with Clamp so that the string is tangent
to the step on the three step pulley.
4. Use calipers to carefully measure the diameter of the step to which you attached the
string. Calculate the radius of the step and record it in the Data Section.
5. Put the solid disk onto the shaft of the sensor above the three step pulley. Secure it in
place with one of the mounting screws.
6. Measure and record the mass, m, of a mass hanger.
7. Attach the mass hanger to the end of the string that is draped over the Super Pulley.
Data Recording
1. Wind the string about the step pulley so that the mass hanger is just below the Super Pulley.
Hold the irregular shape in place.
2. Start recording data and then release the irregular shape so that it rotates freely.
3. Stop recording data when the mass hanger reaches its lowest point.
4. Repeat the process a total of three times.
Analysis
Find the moment of inertia about the center of gravity.
1. Set up a graph display in the software of angular velocity versus time.
17
®
Page 18

Model No. ME-9833 Physical Pendulum Set
2. Select a region of the first run of angular velocity data and select ‘Linear Fit’ from the
‘Fit’ menu.
3. Record the value of the slope as the first value of angular acceleration around the center
of gravity.
4. Repeat the process for the other two runs of data.
5. Find the average angular acceleration, αcg, and record it in the Data Section.
6. Calculate the net torque, τ = rm(g - rα).
7. Calculate the moment of inertia about the center of gravity by dividing the net torque by
the average angular acceleration. Record the result as the moment of inertia about the
τ
center of gravity, Icg. ( )
--------
I
=
cg
α
cg
8. Determine the percent difference between the calculated moment of inertia and the
measured moment of inertia and record the result in the Data Section.
Table 2: Data Section
Item Value Item Value
Mass of solid disk, M: Mass of hanger, m:
Distance from pivot to center of
gravity, L
Average measured period of
oscillation, T:
Calculated value for moment of
inertia, I:
Radius of step pulley, r: Percent difference:
:
cg
Average angular acceleration, α
Torq ue, τ:
Measured value for moment of
inertia, I:
:
cg
Questions
1. How does your value for the calculated moment of inertia compare to the measured moment
of inertia?
2. Do your results support or disprove the idea that the moment of inertia of a physical
pendulum can be determined from its period of oscillation. Why or why not?
Extensions
Repeat the procedure for the thin ring, thick ring, and offset hole. To measure the moment of inertia
of the thin ring, for example, fasten it to the top of the solid disk, find the combined moment of
inertia and then subtract the moment of inertia of the solid disk.
®
18
Page 19

Physical Pendulum Set Model No. ME-9833
Experiment 4: Use a Physical Pendulum to Measure the
Acceleration Due to Gravity, g
The purpose of this experiment is to use a physical pendulum to measure the acceleration due to
gravity.
Equipment
Item
Item
PASCO Interface and DataStudio software Balance
Rotary Motion Sensor Vernier caliper
Physical Pendulum Set Base and Support Rod
Background Information
For small amplitudes of oscillation, the motion of a physical pendulum is approximately ‘simple
harmonic motion’ and its theoretical period of oscillation, T, is given by
I
pivot
------------------=
MgL
cg
where I
T2π
is the moment of inertia of the physical pendulum about its pivot point, M is the mass
pivot
of the pendulum, and Lcg is the distance from the pivot point to the center of gravity. The Parallel
Axis Theorem states that the moment of inertia about the pivot point, I
, is the sum of the
pivot
moment of inertia about the center of gravity, Icg, and the moment of inertia of the pendulum as if
all the mass is concentrated at the center of gravity. The period, T, is then given by
T2π
I
-------------------------------=
cg
MgL
+
ML
2
cg
cg
For a physical pendulum such as the 28-cm Pendulum Bar, the moment of inertia about the center
1
2b2
of gravity is very close to where “a” is the length of the physical pendulum and
------
12
Ma
+()Icg=
“b” is the width.
Solving for g gives
2
+
cg
2
L
cg
g4π
=
IcgML
⎛⎞
2
-------------------------------
⎜⎟
⎝⎠
MT
19
®
Page 20

Model No. ME-9833 Physical Pendulum Set
Procedure: Measurement of Period
Equipment Setup
1. Measure and record the length, a, and width, b, of the
bar.
2. Measure and record the mass, M, of the bar.
3. Mount the Rotary Motion Sensor on a support rod
so that the shaft of the sensor is horizontal
Figure 4-1: Equipment setup
(parallel to the table).
4. Use a mounting screw to attach the bar to the shaft of the sensor through the hole at the
end of the bar. In other words, attach the bar so the pivot point is at the very end of the bar.
Computer Setup
1. Connect the sensor to a PASCO interface
and connect the interface to a computer.
2. On the computer, start the DataStudio
program. Set up the program so that it
has a Graph display of Angular Position
(rad) versus Time (s).
3. Open the Calculator and select
‘period(10,10,1,x)’ from the ‘Special’
menu in the Calculator. [This function
Figure 4-2: Calculator window
determines the period of oscillation from
the angular position versus time data.]
4. To define the variable ‘x’ in the Calculator, click the menu down arrow under ‘Variables’
and select ‘Data Measurement’. Select ‘Angular Position’ from the window that opens.
5. Click ‘Properties’ in the Calculator window. Give the function ‘Period’ as the
measurement name and the variable name. Enter ‘sec’ (seconds) as the unit.
6. Create a graph of ‘period versus time’. Click and drag the Graph icon from the Displays
list in the Summary panel to the period function in the Data section of the Summary panel.
7. In the ‘Statistics’ menu of the ‘period versus time’ Graph display, select ‘Mean’. Click the
‘Statistics’ button in the toolbar so that the legend box will show both the data run and the
mean.
Data Recording
1. Gently start the pendulum bar swinging with a small amplitude (about 20 degrees total).
®
20
Page 21

Physical Pendulum Set Model No. ME-9833
2. Click ‘Start’ to begin recording data. After about 30 seconds, click ‘Stop’ to end
recording data. Data will appear in the graph of angular position versus time and also in
the graph of period versus time.
3. Repeat the process for two more trials.
Analysis
1. Determine the average period of oscillation, T, for the pendulum bar and record the value in
the Data Section.
2. Assume that the center of gravity is at the midpoint of the pendulum bar. Measure and
record the distance from the pivot point to the center of gravity, Lcg.
3. Calculate and record the theoretical moment of inertia about the center of gravity, Icg.
4. Calculate and record the acceleration due to gravity, g, based on the length from the pivot
point to the center of gravity, Lcg, mass, M, moment of inertia about the center of gravity,
Icg, and period, T.
5. Calculate and record the percent different between the measured value for g, acceleration
due to gravity, and the accepted value (9.8 m/s2).
Data Section
Length of pendulum bar, a: _________________ Width of pendulum bar, b: __________________
Mass of pendulum bar, M: _________________
Average period of oscillation, T: ________________
Distance from pivot to center of gravity, Lcg: ________________
Calculated value for the moment of inertia about the center of gravity, Icg: _______________
Calculated value for acceleration due to gravity, g: __________________
Percent difference: ___________________
Questions
1. How does the calculated value for g based on the period compare to the accepted value for g,
2
9.8 m/s
?
2. Do your results confirm that the acceleration due to gravity, g, can be measured
accurately using a physical pendulum? Why or why not?
21
®
Page 22

Model No. ME-9833 Physical Pendulum Set
®
22
Page 23

Physical Pendulum Set Model No. ME-9833
Appendix A: Specifications
Item Dimensions
Irregular shape L
1 = 0.051, Lcg 2 = 0.044, Lcg 3 = 0.035, thickness = 0.00635 m
cg
Solid disk Diameter = 0.08 m, thickness = 0.00635 m
Thin ring Outside diameter = 0.085 m, inside diameter = 0.075 m, thickness = 0.00635 m
Thick ring Outside diameter = 0.08 m, inside diameter = 0.04964 , thickness = 0.00635 m
Offset hole Outside diameter = 0.096 m, diameter of hole = 0.043 m, thickness = 0.00635 m
Pendulum bar Length = 0.28 m, width = 0.015 m , thickness = 0.00635 m
Appendix B: DataStudio Setup Instructions
The instructions below are for using DataStudio to plot graphs of Angular Position versus Time and
Angular Velocity versus Time. For information on the latest version of DataStudio, go to the
PASCO web site (www.pasco.com).
Procedure
PART 1: Connect the interface to the computer and the sensor to the interface.
PART 2: Open a new DataStudio file.
Start DataStudio.
If the Welcome to DataStudio screen opens, select ‘Create Experiment’.
If a PASPORT Rotary Motion Sensor is connected to the computer through a PASPORT interface, an empty Graph
display of Angular Position versus Time will open.
OR
If a ScienceWorkshop Rotary Motion Sensor is connected to the computer through a ScienceWorkshop interface,
click ‘Setup’ in the toolbar to open the Experiment Setup window. Click digital channel 1 to open the sensor selection
window and select ‘Rotary Motion Sensor’. Click ‘OK’ to close the sensor selection window. The sensor’s icon will
appear in the Experiment Setup window under the image of the interface.
PART 3: Change ‘Sample Rate’ and select ‘Measurements’ to display.
If the Experiment Setup window is not open, click ‘Setup’ in the Toolbar to open
the Experiment Setup window. The icon of the sensor will appear in the
Experiment Setup window under the image of the interface.
In the Setup window, change the ‘Sample Rate’ from the default to 100 Hz.
Under the ‘Measurements’ tab, select the measurement that you want to use
(for example, ‘Angular Position’ or ‘Angular Velocity’.) The ‘Measurement’ that
you select will appear in the Summary panel under ‘Data’.
PART 4: Set up a data display
If you are using PASPORT, the Graph display automatically opens with Angular Position versus Time.
OR
23
®
Page 24

Model No. ME-9833 Physical Pendulum Set
If you are using ScienceWorkshop, click and drag the Graph icon from the list under ‘Displays’ to the measurement
name under ‘Data’ that you want to display. An empty Graph display will open with the measurement name on the
vertical axis and ‘Time’ on the horizontal axis.
To change the measurement shown in the Graph display, click and drag the measurement name from the list under
‘Data’ to the vertical axis of the Graph display.
OR
To change the measurement shown in the Graph display, hover the cursor over the measurement name on the vertical
axis of the Graph display until the cursor changes to a ‘List’ icon. Click the mouse once to open the List and select the
measurement that you want to use.
Appendix C: Technical Support, Copyright, Warranty
For assistance with the Physical Pendulum Set (ME-9833) or any other PASCO products, contact
PAS CO a s f ol low s:
Address: PASCO scientific
10101 Foothills Blvd.
Roseville, CA 95747-7100
Phone: (916) 786-3800
FAX: (916) 786-7565
Web: www.pasco.com
Email: support@pasco.com
Copyright Notice
The PASCO scientific 012-10461A Physical Pendulum Set manual is copyrighted and all rights
reserved. However, permission is granted to non-profit educational institutions for reproduction of
any part of the 012-10461A Physical Pendulum Set manual, providing the reproductions are used
only for their laboratories and are not sold for profit. Reproduction under any other circumstances,
without the written consent of PASCO scientific, is prohibited.
Warranty
For a description of the product warranty, see the PASCO catalog.
®
24
Page 25

Physical Pendulum Set Model No. ME-9833
Appendix D: Teacher’s Notes
Sample Data for Experiment 1: Parallel Axis Theorem
The table shows typical data for the parallel axis theorem using the irregular shape physical
pendulum object. The three columns of data are for the three ‘legs’ of the irregular shape object.
Table 1: Parallel Axis Theorem for Irregular Shape
Item (units) 1 2 3
Object irregular shape A irregular shape B irregular shape C
Mass of object, M (kg) 0.06339 0.06339 0.06339
Step diameter (m) 0.0298 0.0298 0.0298
Step radius, r (m) 0.0149 0.0149 0.0149
Mass of hanger, m (kg) 0.00512 0.00512 0.00512
α
, avg. angular accelerationcg (rad/s2)
cg
τ
, torque, rm(g - rαcg) (N m) 0.0007347 0.0007347 0.0007347
cg
I
, moment of inertia, center of mass (kg m2)
cg
L
, distance - pivot to center of gravity (m) 0.0512 0.0439 0.0350
cg
2
, moment of inertia, parallel axis (kg m2)
ML
cg
I
cg
α
pivot
τ
pivot
I
pivot
Percent difference, I
2
+ ML
(kg m2)
cg
, avg. angular acceleration
, torque, rm(g - rα
) (N m) 0.00074417 0.00074332 0.00074199
pivot
pivot
(rad/s2)
, moment of inertia, pivot point (kg m2)
and Icg + mL
pivot
2
cg
11.0 11.0 11.0
0.00006679 0.00006679 0.00006679
0.00016610 0.00012216 0.00007765
0.00023289 0.00018895 0.00014444
3.03 3.78 4.953
0.00024560 0.00019717 0.00015050
5.1% 4.1% 4.0%
Questions
1. How does the value of the moment of inertia about the pivot point compare to the sum of the
2
moment of inertia about the center of gravity plus mL
cg
?
The values of the moment of inertia about the pivot point for all three ‘legs’ of the irregular shape
object compare well to the sum of the moment of inertia about the center of gravity plus mL
2
.
cg
2. Do your results confirm the parallel axis theorem? Why or why not?
The results confirm the parallel axis theorem because of the close agreement between measurement
and theory.
25
®
Page 26

Model No. ME-9833 Physical Pendulum Set
3. How do you know that the center hole is the center of gravity?
Answers will vary. One way to confirm that the center hole is the center of gravity is to balance the
irregular shape on a fingertip.
Sample Data for Experiment 2: Minimum Period of an Oscillating Bar
The screenshot shows typical data for the length from the pivot point to the center of gravity of an
oscillating pendulum bar and the corresponding period of oscillation for each length.
Calculations
1
----------
Derivation of the length for minimum period, . Find the derivative of the expression for
L
cg
L=
12
the period of oscillation, T.
T2π
dT
------------
dL
1
------
⎛⎞
L
12
⎜⎟
π
-------------------------------
⎜⎟
cg
⎝⎠
------
dT
------------
dL
⎛⎞
12
⎜⎟
π
-------------------------------
⎜⎟
cg
⎝⎠
gL
1
2
2
L
+
cg
cg
2
L
L
+
cg
gL
cg
Set the derivative equal to zero and solve for L
®
1
2
------
ML
12
-------------------------------------------=
–
+
MgL
1
---
1
⎛⎞
------
2
g
⎝⎠
12
---------------------------------------------------------------------------
×=
1
---
–
⎛⎞
2
------
2
⎝⎠
12
--------------------------------------------------------------
×=
. For example,
cg
ML
cg
L2L
+
1
2
L
2
cg
2
cg
gLcg()
2
L
+
cg
gL
(()
cg
gLcg2Lcg()–
2
2Lcg()
–
2
2
26
Page 27

Physical Pendulum Set Model No. ME-9833
------
12
1
L
2
2
L
2L
–+
cg
L
cg
1
2
------
1
----------
12
12
L=
L2L
cg
2
– 0==
cg
Data Section
Length of pendulum bar: 28 cm
Calculated value for length that gives minimum period: 8.0829 cm
Measured value for length that gives minimum period: 8 cm
Percent difference: 1.02%
Questions
1. What is the percent difference between the calculated value for the length that gives
minimum period of oscillation and the measured value for the length?
The percent difference between the calculated value for the length (8.0829 cm) and the measured
value for the length (8 cm) that gives minimum period of oscillation is 1.02%
2. Would a heavier bar or a lighter bar with the same dimensions have a different value for
the length that gives minimum period of oscillation? Why or why not?
No, a heavier or lighter bar with the same dimensions should have the same value for the length that
gives minimum period of oscillation. Mass is not a factor in the calculation of the length for
minimum period.
27
®
Page 28

Model No. ME-9833 Physical Pendulum Set
Sample Data for Experiment 3: Moment of Inertia Based on Period of Oscillation
Determine the calculated moment of inertia and the measured moment of inertia and record the
results in the Data Section.
Table 3: Data Section
Item Value Item Value
Mass of solid disk, M: 0.08818 kg Mass of hanger, m: 0.00512 kg
Distance from pivot to center of
gravity, L
Average measured period of
oscillation, T:
Calculated value for moment of
inertia, I:
Radius of step pulley, r: 0.0149 m Percent difference: 9.6%
:
cg
0.40 m
0.497 s Torque, τ: 0.000737 N m
0.000075 kg m
Average angular acceleration, α
2
Measured value for moment of
inertia, I:
:
8.87 rad/s
cg
0.000083 kg m
2
2
Questions
1. How does your value for the calculated moment of inertia compare to the measured moment
of inertia?
The value for the calculated moment of inertia compares relatively well with the measured moment
of inertia.
2. Do your results support or disprove the idea that the moment of inertia of a physical
pendulum can be determined from its period of oscillation. Why or why not?
The results support the idea that the moment of inertia of a physical pendulum can be determined
from its period of oscillation. The calculated and measured values for the moment of inertia
compare relatively well.
®
28
Page 29

Physical Pendulum Set Model No. ME-9833
Sample Data for Experiment 4: Use a Physical Pendulum to Measure the
Acceleration Due to Gravity, g.
The following are typical data for the experiment.
Data Section
Length of pendulum bar, a: 0.28 m Width of pendulum bar, b: 0.015 m
Mass of pendulum bar, M: 0.70 kg
Average period of oscillation, T: 0.876 s
Distance from pivot to center of gravity, Lcg: 0.14 m
Calculated value for the moment of inertia about the center of gravity, Icg: 0.0004586 kg m
Calculated value for acceleration due to gravity, g: 9.608 m/s
2
2
Percent difference: 1.95%
Questions
1. How does the calculated value for g based on the period compare to the accepted value for g,
9.8 m/s2?
The calculated value for g compares relatively well to the accepted value for g.
2. Do your results confirm that the acceleration due to gravity, g, can be measured
accurately using a physical pendulum? Why or why not?
The results confirm that the acceleration due to gravity, g, can be measured accurately using a
physical pendulum. The calculated value based on the measured period is very close to the accepted
value.
29
®
Page 30

Model No. ME-9833 Physical Pendulum Set
Notes
®
30
 Loading...