

Page 1
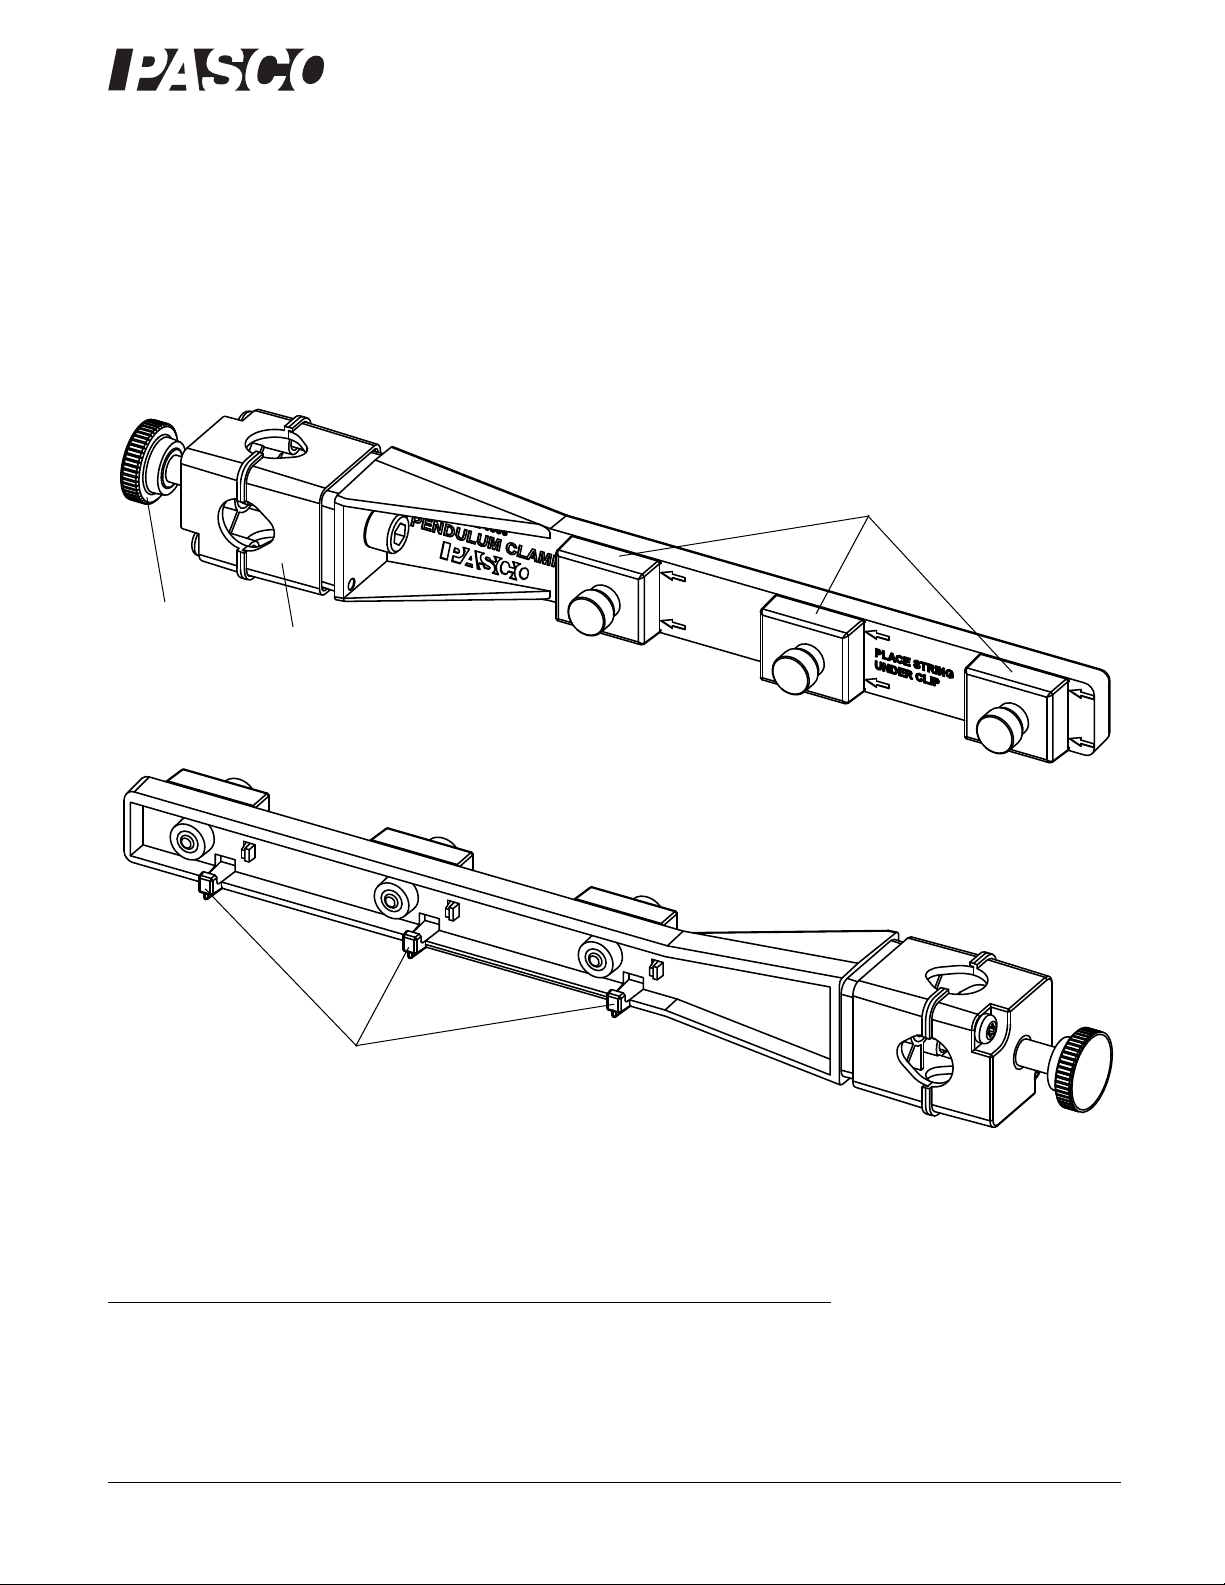
Pendulum Clamp
®
Rear view
Front view
String
holding
clips
Rod clamp
Hooks
Thumbscrew
ME-9506
Instruction Sheet
012-12873A
*012-12883*
Equipment
Included Item Part number
Pendulum Clamp
Thumbscrew, 1/4-20 x 0.88 in
ME-9506
617-016
800-772-8700 www.pasco.com
Page 2

®
Pendulum Clamp ME-9506
Recommended Items* Part number
Photogate Pendulum Set
PASCO Stopwatc h
Braided Physics String
Hooked Mass Set
ME-8752
ME-1234
SE-8050
SE-8759
Clamps and Bases* Part number
Large Table Clamp ME-9472
Aluminum Table Clamp ME-8995
Large Rod Base ME-8735
Small “A” Base ME-8976
Base and Support Rod ME-9355
Small Tripod Base and Rod SE-9451
Rods, Stainless Steel, 12.5 mm diameter* Part number
25 cm Rod, threaded ME-8988
60 cm Rod, threaded ME-8977
45 cm Rod, non-threaded ME-8736
90 cm Rod, non-threaded ME-8738
120 cm Rod, non-threaded ME-8741
Springs* Part number
Demonstration Spring Set ME-9866
Equal Length Spring Set ME-8970
Hooke’s Law Spring Set SE-8749
IDS Spring Set ME-8999
Multi-Length Spring Set ME-6848
Series/Parallel Springs ME-6842
*See the PASCO catalog or www.pasco.com
Introduction
The ME-9506 Pendulum Clamp is des i gned to fi t on a support rod up to 12.5 mm (1/2 inch) in diamet er. The clamp has t hree cli ps
for holding strings and three hooks for holding springs.
Recommended Equipment
Photogate Pendulum Set: This set includes a length of braided physics string and four pendula of the same size but with different
masses and materials (brass, aluminum, plastic, wood). The Photogate Pendulum Set is designed for use with a PASCO photogate
such as the ME-9204B Accessory Photo gate o r the ME-94 98A Photogate Head. The P A SCO photogate can be connected to a computer through a PASCO interface for recording and displaying data, or connected to a standalone timer such as the ME-8930 Smart
Timer or the ME-9215B Photogate Timer.
2
Page 3

®
Pendulum Clamp 012-12873A ME-9506
Support
rod
Clip
String
Thumbscrew
Bifilar Pendulum
Springs
Hook
Springs on Hooks
PASCO Stopwatch: This stopwatch is designed specifically for science timing and uses a single “AA” battery. The liquid crystal
display is visible indoors and outdoors and the display can be set to two different modes (MM:SS.SS or decimal). The precision is
0.1 seconds up to 3599.99 seconds or 1 second up to 359999 seconds.
Braided Physics String: This string resists stretching and will not unravel. It withstands up to 133 newtons of force and has a linear
density of 0.26 grams per meter. Each roll has 320 meters of string.
Hooked Mass Set: The masses have a cylindrical shape and range from 10 grams to 1000 grams (1 kg). The set includes a molded
plastic storage tray.
Usage.
Bifilar Pendulum
Mount the Pendulum Clamp on a support rod. Get a
piece of string or thread that is a little more than twice
as long as the longest length of the pendulum you
wish to make.
Loosen the thumbscrews of the first and third clips on
the clamp and slip the ends of the string or thread
under the edge of the clips. Note that each clip is
designed so that the string or thread is held under the edge that is the farthest from the rod clamp. Arrows next to each clip point the
way. Tighten the thumbscrews to hold the string in place.
Suspend a pendulum bob from the center of the string so that the string makes a “V” shape. The bifilar arrangement has an advantage because the pendulum bob will swing back-and-forth along a single plane.
Single or Multiple Setup
Of course, one, two or three separate pendula can b e s usp end ed from the pendulum clamp at the same time. To adjust the length of
the pendulum string, loosen the thumbscrew slightly and adjust the string. Tighten the thumbscrew to hold the string in place.
Springs
Hang springs from the hooks on the rear side of the pendulum clamp as shown.
3
Page 4

®
Pendulum Clamp ME-9506
Support
rod
Base
Multi-
clamp
Pulley
Support
Rod
Photogate
head
Pendulum
Clamp
Pendulum
bob
String
Pendulum and Photogate Setup
Pendulum and Photogate
One way to measure the period of a pendulum is to connect a
PASCO Photogate to a timer or computer interface. Let the pendulum bob interrupt the photogate’s infrared beam as it swings
to-and-fro.
Mount the Pendulum Clamp on a support rod. Attach a Photogate
Head to a pulley support rod and clamp the pulley support rod to
the support rod.
Suspend a bifilar pendulum from the pendulum clamp and adjust
the photogate head so that the center of the pendulum bob moves
through the infrared beam of the photogate.
NOTE: Start the pendulum swinging, but don’t start recording data
until the pendulum is swinging smoothly with no “wobble”.
Technical Support
For assistance with any PASCO product, contact PASCO at:
Address: PASCO s cientific
Phone: 916-786-3800 (world wid e)
Fax: (916) 786-7565
Web: www.pasco.com
Email: support@pasco.com
For more information about the Pendulum Clamp and the latest revision of this Instruction Sheet, visit the PASCO web site at
www.pasco.com and enter ME-9506 in the Search window.
Limited Warranty For a description of the product warranty, see the PASCO catalog. Copyright The PASCO scientific 012-12873A
Clamp Instruction Sheet
of this manual, providing the reproductions are used only in their laboratories and classrooms, and are not sold for profit. Reproduction under any
other circumstances, without the written consent of PASCO scientific, is prohibited. Trademarks PASCO and PASCO scientific are trademarks or
registered trademarks of PASCO scientific, in the United States and/or in other countries. All other brands, products, or service names are or may be
trademarks or service marks of, and are used to identify, products or services of, their respective owners. For more information visit
www.pasco.com/legal.
is copyrighted with all rights reserved. Permission is granted to non-profit educational institutions for reproduction of any part
10101 Foothills Blvd.
Roseville, CA 95747-7100
800-772-8700 (U.S.)
Pendulum
4
 Loading...