

NO
Bruksanvisning
Les bruksanvisningen grundig og vær
sikker på at du forstår innholdet før du
bruker gressklipperen.
FI
Käyttöopas
Lue käyttöopas huolella ja varmista, että
ymmärrät sen sisällön ennen kuin käytät
tätä ruohonleikkuria.
SE
Bruksanvisning
Läs bruksanvisning noggrannt och se till att
du förstår innehållet innan du använder
gräsklipparen.
DK
Brugsvejledning
Læs brugervejledningen grundigt, og sørg
for at forstå indholdet, inden De tager
plæneklipperen i brug.
DE
Betriebsanleitung
Diese Betriebsanleitung muß sorgfältig
durchgelesen werden. Stellen Sie sicher,
daß Sie deren Inhalt vor Verwendung des
Rasenmähers verstehen.
GB
Operator’s Manual
Read the operator’s manual carefully and
make sure that you understand the
contents before using the lawnmower.
FR
Manuel de l’Utilisateur
Lire attentivement le manuel de l’utilisateur
et veiller à bien comprendre son contenu
avant d’utiliser la tondeuse.
ES
Manual del operador
Lea el manual del operador con atención y
asegúrese de que comprende el contenido
antes de utilizar el cortacésped.
IT
Manuale d’uso
Leggere con attenzione il manuale d’uso e
accertarsi di capirne il contenuto prima di
usare il tosaerba.
PT
Manual do Operador
Leia cuidadosamente o manual do
operador e certifique-se de que
compreende todo o seu conteúdo antes de
usar a máquina de cortar relva.
NL
Handleiding voor de gebruiker
Lees de handleiding aandachtig door zodat
u de inhoud goed begrijpt voordat u de
grasmaaimachine in gebruik neemt.
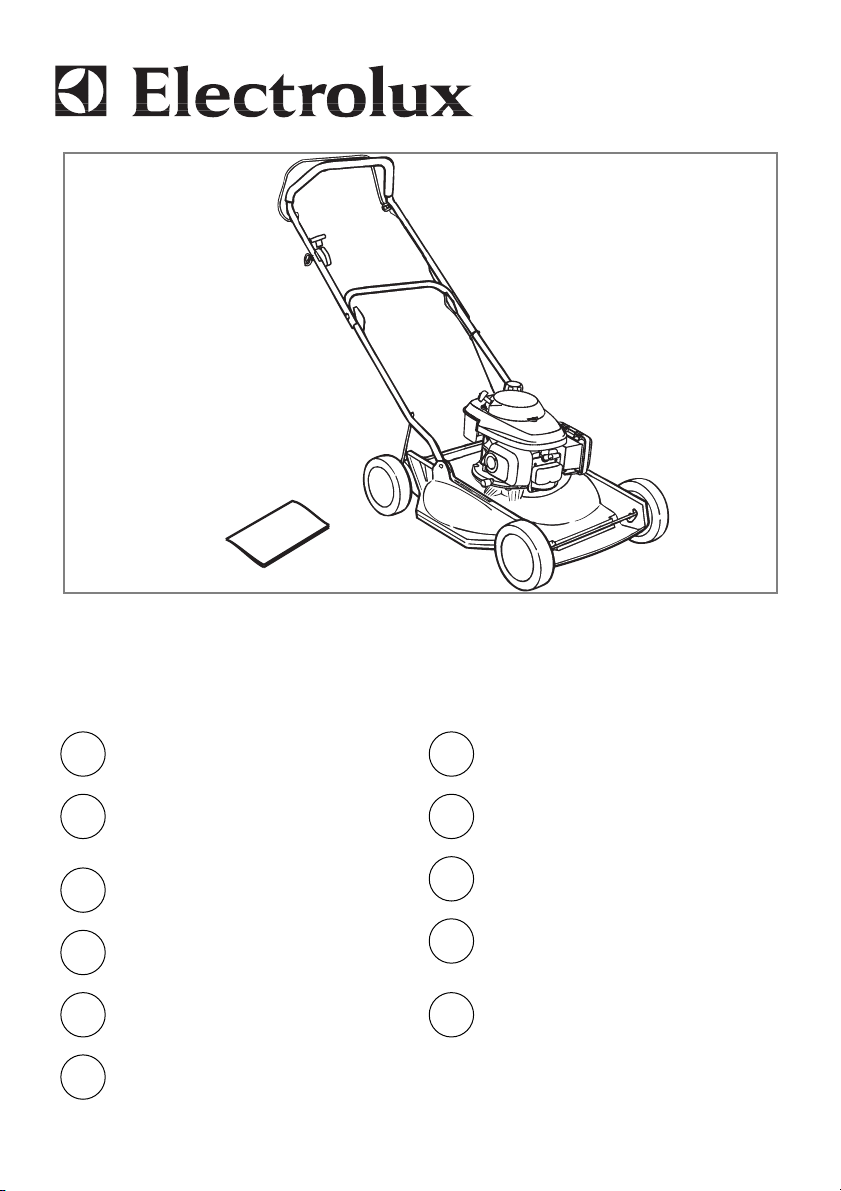
4546P BIO
B
F1 F2 F3
C D
M1
M2
G
A
N
P Q
R
E
JH K
L
T1 T2
S
1
2
3
4
5
1
2
3
4
5
7
8
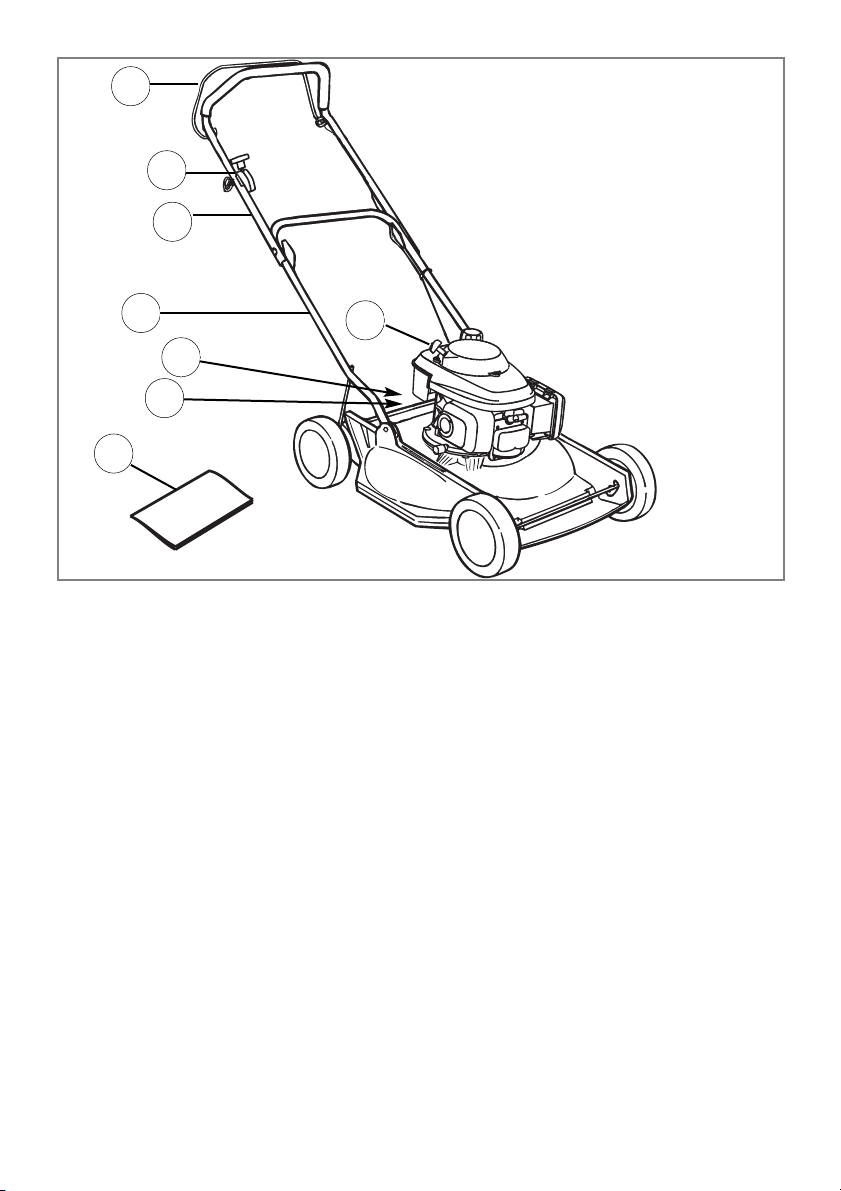
GB - Overview
1. Operator Presence Control
2. Choke Control Lever
3. Upper Handle
4. Lower Handle
5. Start Handle
6. Operator’s Manual
7. Rating Label
8. Warning Label
DE - Übersicht
1. Bedienerpräsenz-Kontrollvorrichtung
2. Chokeschalthebel
3. Holm, oben
4. Holm, unten
5. Anlassergriff
6. Bedienungsanleitung
7. Produkttypenschild
8. Warnetikett
FR - Apercu
1. Arceau de sécurité (CPO) (Contrôle
de Présence de l’Opérateur)
2. Manette de starter
3. Mancheron partie supérieure
4. Mancheron partie inférieure
5. Démarreur
6. Manuel d’utilisation
7. Plaquette d’identification
8. Etiquette d’avertissement
NL - Overzicht
1. Operator Presence Control (OPC
of Veiligheids hendel)
2. Regelhendel choke
3. Boven-duwboom
4. Beneden-duwboom
5. Startgreep
6. Gebruiksaanwijzing
7. Productlabel
8. Waarschuwingsetiket
NO - Oversikt
1. Start/Stopp bryter
2. Chokens kontrollspak
3. Håndtak, øvre
4. Håndtak, nedre
5. Starthåndtak
6. Bruksanvisning
7. Typeetiketten
8. Advarselsetikett
FI - Yleiskatsaus
1. Käynnistys/pysäytys-katkaisin
2. Ryypytyksen säätövipu
3. Kahva, ylempi
4. Kahva, alempi
5. Käynnistyskahva
6. Käyttöohje
7. Tuotteen arvokilpi
8. Varoitusnimike
SE - Översikt
1. Motorbromsbygel
2. Kontrollspak för choke
3. Handtag, övre
4. Handtag,nedre
5. Starthandtag
6. Bruksanvisning
7. Identifieringsetikett
8. Varningsetikett
DK - Oversigt
1. Start/stopkontakt
2. Chokerbetjeningsgreb
3. Håndtag, øverste
4. Håndtag, nederste
5. Starthåndtag
6. Brugsanvisning
7. Produktmærkat
8. Advarselsmœrkat
ES - Sumario
1. Interruptor de contacto
2. Palanca de control del
estrangulador
3. Guía, parte superior
4. Guía, parte inferior
5. Palanca de arranque
6. Instrucciones para el uso
7. Etiqueta indicadora del producto
8. Etiqueta de Advertencia
PT - Quadro
1. Interruptor de Ligar/Desligar
2. Alavanca de Controlo da Válvula
de Borboleta
3. Cabo superior
4. Cabo inferior
5. Cabo de arranque
6. Instruções de utilização
7. Etiqueta de Especificações do
Produto
8. Etiqueta de Aviso
IT - Sommario
1. Leva comando/controllo
2. Leva di comando starter
3. Manubrio superiore
4. Manubrio inferiore
5. Leva avviamento
6. Instruziono per l’uso
7. Etichetta con dati prodotto
8. Etichetta di pericolo
6

SAFETY PRECAUTIONS
Explanation of Symbols on the 4546P BIO
Warning
Read the user instructions carefully to make
sure you understand all the controls and what
they do.
Always keep the lawnmower on the ground when
mowing. Tilting or lifting the lawnmower may
cause stones to be thrown out.
Keep bystanders away. Do not mow whilst
people especially children or pets are in the
mowing area.
Beware of severing toes or hands. Do not put
hands or feet near a rotating blade.
Disconnect the spark plug before attempting
any maintenance, cleaning or adjustment, or if
you are going to leave the lawnmower
unattended for any period.
Blade continues to rotate after the machine is
switched off. Wait until all machine components
have completely stopped before touching them.
General
1. Never allow children or people unfamiliar with these
instructions to use the mower. Local regulations may
restrict the age of the operator.
2. Only use the lawnmower in the manner and for the
functions described in these instructions.
3. Never operate the lawnmower when you are tired, ill or
under the influence of alcohol, drugs or medicine.
4. The operator or user is responsible for accidents or
hazards occurring to other people or their property.
Fuel Safety
WARNING - Petrol is highly flammable
- Wear protective clothing when handling any fuels
and lubricants.
- Avoid contact with skin. If affected, wash liberally
with soap and water.
- Remove petrol and engine oil before transporting the
product.
- Store fuel in a cool place in a container specifically
designed for the purpose. In general plastic
containers are unsuitable
- refuel outdoors only and do not smoke while refuelling
- add fuel BEFORE starting the engine. Never remove
the cap of the fuel tank or add fuel while the engine is
running or when the engine is hot
- if petrol is spilled, do not attempt to start the engine
but move the machine away from the area of spillage
and avoid creating any source of ignition until petrol
vapours have dissipated
- replace all fuel tanks and container caps securely
- move the product away from the fuelling area before starting
- Fuel should be stored in a cool place away from
naked flames
Preparation
1. While using your product always wear substantial
footwear and long trousers.
2. The use of ear protection is recommended.
3. Make sure the lawn is clear of sticks, stones, bones, wire
and debris; they could be thrown by the blade.
4. Before using the machine and after any impact, check
for signs of wear or damage and repair as necessary.
5. Replace worn or damaged blades together with their
fixings in sets to preserve balance.
6. Have faulty silencers replaced.
Use
1. Do not operate the engine in a confined space where
exhaust fumes (carbon monoxide) can collect.
2. Use the lawnmower only in daylight or good artificial light.
3. Avoid operating your lawnmower in wet grass, where
feasible.
4. Take care in wet grass, you may lose your footing.
5. On slopes, be extra careful of your footing and wear
non-slip footwear.
6. Mow across the face of slopes, never up and down.
7. Exercise extreme caution when changing direction
on slopes.
8. Mowing on banks and slopes can be dangerous. Do
not mow on banks
or steep slopes.
9. Do not walk backwards when mowing, you could
trip. Walk, never run.
10. Never cut grass by pulling the mower towards you.
11. Release the blade brake lever to stop the engine
before pushing the mower across surfaces other than
grass and when transporting the lawnmower to and
from the area to be mowed.
12. Never operate the lawnmower with damaged guards
or without guards in place.
13. Do not overspeed the engine or alter governor
settings. Excessive speed is dangerous and
shortens lawnmower life.
14. Disengage all blade and drive clutches before starting.
15. Keep hands and feet away from the cutting means at all
times and especially when switching on the engine.
16. Do not tilt lawnmower when starting the engine
17. Never pick up or carry a lawnmower while the
engine is running.
18. Spark plug wire may be hot - handle with care.
19. Do not attempt any maintenance on your lawnmower
when the engine is hot.
20. Release the blade brake lever, to stop the engine, wait
until the blade has stopped, disconnect the spark plug
lead and wait until the engine has cooled:-
- before leaving the mower unattended for any period;
- before refuelling
- before clearing a blockage;
- before checking, cleaning or working on the appliance;
- if you hit an object. Do not use your lawnmower
until you are sure that the entire lawnmower is in a
safe operating condition;
- if the lawnmower starts to vibrate abnormally. Check
immediately. Excessive vibration can cause injury.
If not used properly this lawnmower can be dangerous! This lawnmower can cause serious injury to
the operator and others, the warnings and safety instructions must be followed to ensure reasonable
safety and efficiency in using this lawnmower. The operator is responsible for following the warning
and safety instructions in this manual and on the lawnmower.
ENGLISH - 1
STOP

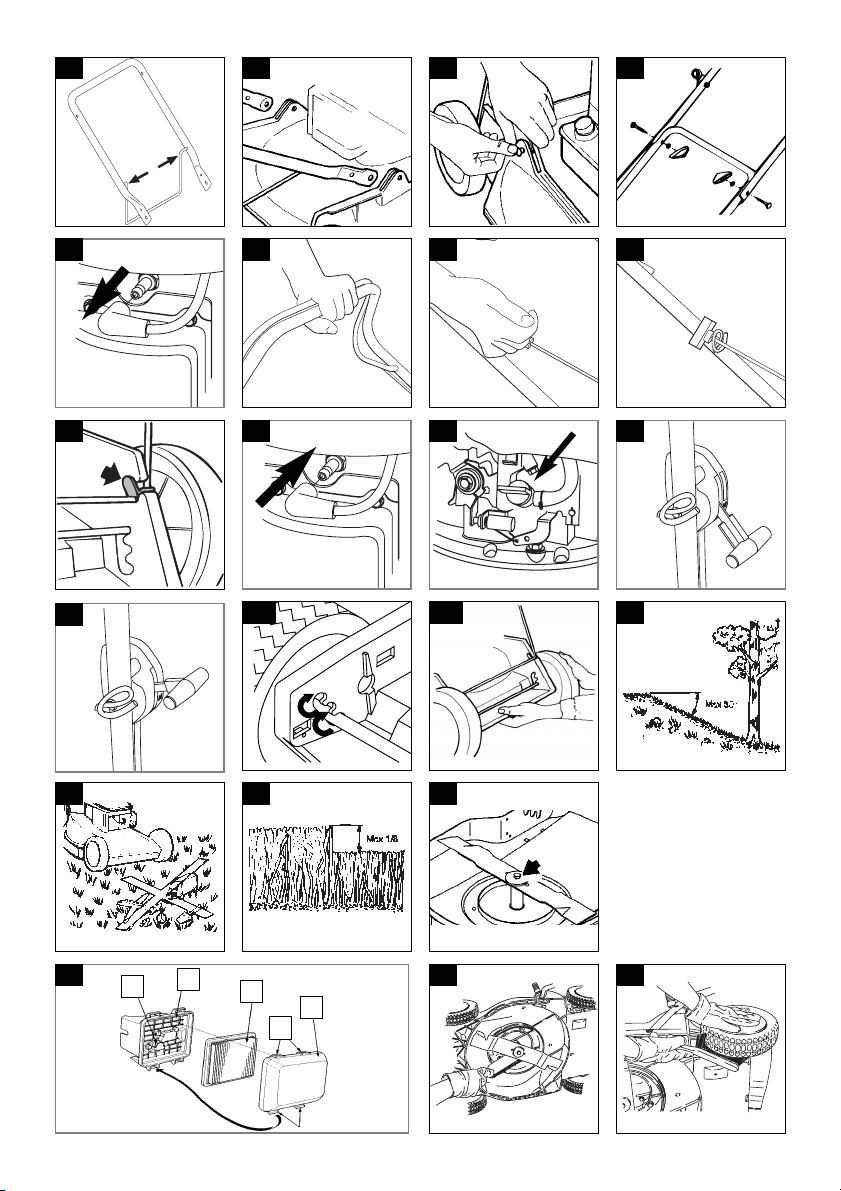
ASSEMBLY INSTRUCTIONS
1. Set the lower handlebar in place. (A)
2. Fit the lower handle ensuring that the formed ends
are located properley in corresponding slots either
side of the lawnmower (B).
3. Insert the plastic plugs on both sides. (C)
4. Assemble the upper handle.
Note: washer between wing nut and handle. (D)
RECOIL STARTER
You must release the brake by pulling the OPC lever
to the handle before pulling out the cord.
1. Disconnect the spark plug lead. (E)
2. Pull the Operator Presence Control to release the
brake on the engine. (F1)
3. Extend the pull cord fully. (F2)
4. Locate the cord in the pull cord guide positioned on
handle. (F3).
Handlebar Stop
• THE 2 HANDLEBAR STOPS MUST BE FITTED
BEFORE USE
1. In the packaging you will find 2 stops one marked H- and one marked -V-.
2. To lock the handlebar in a fixed position, attach the
stops as shown in the illustration (G).
3. Place -H- on the right side and -V- on the left side.
Adjusting the Cutting Height
1. Remove the spark plug lead before adjusting. (E)
2. Move the axles between the notches to achieve the
desired cutting height. (M1) & (M2)
CUTTING HEIGHT
STARTING & STOPPING
Fuel
Use a fresh, clean, unleaded regular automotive petrol
Do not fill the fuel tank inan enclosed area, when the engine
is hot orwhile you are smoking or near a naked flame.
Thoroughly clean around the fuel tank filler cap before filling,
this will help to prevent dirt being introduced into the fuel
system. Fuel should be stored in a cool place away from
naked flames. Do not fill the tank while the engine is
running. Fill the fuel tank through a funnel fitted with a fine
filter. Never fill fuel tank completely, only fill to the base of the
filler neck. When filling the fuel tank from empty, or when the
engine has previously run dry, a minimum of 400cc of fuel
must be added (to the level of the line indicated in the
diagram). Your carburettor is pre-set. Normally no further
adjustment is required.
Oil
Use 4-stroke automotive detergent oil. SAE 10W-30
is recommended for general use.
Fill with oil as instructed in your Engine Owners
Manual provided with your product.
To Start your Lawnmower
1. Connect the spark plug lead. (H).
2. Open the fuel tap (J).
3. Move the Choke control lever to the ‘Choke’ position
(K) when starting from cold, and to the ‘Run’ position
(L) when starting from hot.
4. Pull and firmly hold the Operator Presence Control to
the upper handle. (F1)
5. Pull the starting handle gently until you feel a
resistance, return the starting handle slowly.
6. Pull the starting handle firmly towards you to its full extent.
7. When the engine has warmed up make sure the
choke control lever is in the 'Run' (L) position.
To Stop your Lawnmower
• Blade continues to rotate after the machine has
switched off, rotating blades can cause injury.
1. Release the Operator Presence Control.
2. Close the fuel tap (J)
USE
Due to engine lubrication limitations, the mower should
not be used on slopes in excess of 30
0.
. (N)
Before mowing objects such as twigs, toys and stones
should be removed from the lawn. (P)
Avoid running the blade over foreign objects such as stones,
roots, etc., as it may cause engine damage. Mow the lawn twice
weekly during the most active periods of growth.
Never cut more than 1/3 of the length of the grass,
especially during dry periods. (Q)
Mow with a high cutting height setting the first time.
Examine the result and lower the mower to the desired setting.
Mow slowly or mow the grass twice if it is very long.
ENGLISH - 2
Maintenance and storage
1. Keep all nuts, bolts and screws tight to be sure the
lawnmower is in safe working condition.
2. Replace worn or damaged parts for safety.
3. Only use the replacement blade and blade bolt
specified for this product.
4. Never store the lawnmower with fuel in the tank
inside a building where fumes can reach an open
flame or spark.
5. Allow the engine to cool before storing in any enclosure.
6. To reduce fire hazard, keep the engine, silencer,
battery compartment and fuel storage area free of
grass, leaves or excessive grease.
7. If the fuel tank has to be drained, this should be
done outdoors.
8. Be careful during adjustment of the machine to
prevent entrapment of the fingers between the blade
and fixed parts of the machine.
SAFETY PRECAUTIONS
400cc

Removing & Fitting the Blade
WARNING
• Always handle the blade with care - sharp
edges could cause injury. USE GLOVES
• Spark plug lead may be hot - handle with care.
Removing the Blade
• Renew your metal blade after 50 hours
mowing or 2 years whichever is the sooner regardless of condition.
• If the blade is cracked or damaged replace it
with a new one.
1. Ensure the Operator Presence Control is released,
when the engine has stopped and the blade has
stopped rotating - disconnect the spark plug lead.
2. Fully close the fuel tap (J).
3. Turn your lawnmower on its side with the air
cleaner uppermost (see pic above).
4. Use spanner to loosen blade bolt by turning anticlockwise.
5. Remove the blade bolt, blade and washer.
6. Inspect for damage and clean as necessary.
Fitting the Blade
1. When reassembling the blade ensure that the
retaining washer is flat and not dished, tighten the
bolt to a torque of 35-40 Nm. (R)
Cleaning the Air Filter
S1 - Air Duct S2 - Air Cleaner Body
S3 - Filter S4 - Latch Tabs
S5 - Air Cleaner Cover
Never run the engine without a filter or with a dirty
filter. This will greatly reduce engine efficiency and
lead to engine damage.
Your lawnmower is fitted with an Air Cleaner, the
maintenance for which is as follows:-
• Check the filter before each use.
• Clean every 25 hrs or more frequently when
used in dusty areas.
• Replace filter every 200 hrs.
1. Press the latch tabs on the top of the air cleaner
cover and remove the cover.
2. Check the filter is clean and in good condition.
If the filter is dirty:-
Tap the air filter several times on a hard surface to
remove dirt, or blow compressed air through the air filter
from the clean side that faces the engine. Never try to
brush off dirt. Brushing will force dirt into the fibers.
3. Wipe dirt from the air cleaner body and cover
using a moist rag. Be careful to prevent dirt from
entering the air duct that leads to the carburetor.
4. Replace the filter and air cleaner cover.
Spark Plug
An oily or carboned spark plug makes starting
difficult and decreases the efficiency of the engine.
Periodically remove the spark plug and clean and
adjust when necessary.
Gap setting 0.028 - 0.031".
Do not remove spark plug when engine is hot. Do
not sand blast the spark plug to clean it.
Fault Finding
Engine Will Not Start
1. Ensure that the Operator Presence Control is
gripped firmly to the upper handle.
2. Check that there is sufficient fuel in the fuel tank
and the fuel tap is open
3. Check that the choke control lever is in the
correct position:- 'Run’ position (L) - for a hot
engine, 'Choke’ position (K) - for a cold engine.
4. The engine may have flooded. Remove and dry
the spark plug.
5. Petrol may be stale, replace. Once the petrol has
been replaced, it may take a little time for fresh
petrol to filter through.
6. Check that the blade bolt is tight. A loose blade
bolt could cause difficult starting.
7. If the engine will still not start - disconnect the spark
plug lead and consult you local approved Electrolux
Outdoor Products Service Centre/Dealer.
Lack of Engine Power and/or Overheating
1. Disconnect the spark plug lead and allow the
engine to cool down.
2. Clean grass clippings and debris from around the
engine and air inlets and the underside of the deck.
3. Clean the engine air filter
4. Petrol may be stale, replace. Once petrol has
been replaced, it may take a little time for fresh
petrol to filter through.
5. If the engine still lacks power and/or is
overheating, disconnect the spark plug lead and
consult you local approved Electrolux Outdoor
Products Service Centre/Dealer.
Excessive Vibration
1. Disconnect the spark plug lead.
2. Check that the blade is correctly fitted. 'See 'Fitting
and Removing the Blade'.
3. If the blade is damaged or worn, renew the blade.
4. If vibration persists - do not use - disconnect the
spark plug lead and consult your local approved
Electrolux Outdoor Products Service Centre/Dealer.
ENGLISH - 3
AIR
CLEANER
TIP
THIS
WAY
ONLY
Before any servicing to the
underside of your machine, close
the fuel tap, let the engine run
until it stops, disconnect the
spark plug lead and TIP THE
MACHINE ON ITS SIDE WITH
THE AIR CLEANER UPPERMOST.
IMPORTANT

Caring for your Lawnmower
If you do not intend to use your lawnmower for long
periods it is advisable to follow this procedure after use:
1. Stop the engine.
2. Fully close the fuel tap. (J)
3. Restart the engine.
4. As fuel runs out the engine will begin to stop, tilt the
lawnmower slightly.
5. Once the engine has stopped, release the Operator
Presence Control.
6. Disconnect the spark plug lead.
7. Remove all fuel from the fuel tank.
Cleaning - USE GLOVES
• Keep your lawnmower clean - grass clippings left in
any of the air intakes, around the engine or under
the deck could become a potential fire hazard.
• Do not clean with chemicals, including petrol, or
solvents - some can destroy critical plastic parts.
1. Remove grass from under the deck with a piece of
wood or similar.(T1)
2. Using a soft brush - remove grass clippings from
around the engine and from all air intakes.
3. Remove the fan, See 'Removing and Fitting the
Blade', and clean with a soft brush.(T2)
4. Wipe over the surface of your lawnmower with a dry cloth.
Transporting your Lawnmower
• Turn the fuel tap to the off position and transport with
the engine in a horizontal position.
• Never transport the lawnmower when it is running.
Storing Your Lawnmower
Turn the fuel tap to the off position and store in a cool,
dry, damp-proof and safe place with the engine in a
horizontal position. Service your lawnmower after the
last cut of the year as follows:-
At the end of the Mowing Season
1. Stop the engine.
2. Fully close the fuel tap. (J)
3. Restart the engine.
4. As fuel runs out the engine will begin to stop, tilt the
lawnmower slightly.
5. Once the engine has stopped, release the Operator
Presence Control.
6. Disconnect the spark plug lead.
7. Remove all fuel from the fuel tank.
8. Remove the spark plug lead and spark plug. Pour one
teaspoon (5ml) of oil through the spark plug hole. Pull the
starting handle 2 or 3 times. This will distribute oil on the
internal surfaces of the engine. Inspect, clean and replace
the spark plug. If a new spark plug is required contact your
local approved Electrolux Outdoor Products Service
Centre/Dealer. Do not re-connect the spark plug lead.
9. Clean the air filter. See 'Cleaning the Air Filter'.
10. Renew the blade if it is cracked, damaged or bent.
Renew the blade bolt if necessary. See 'Removing
and Fitting the Blade' for complete instructions.
11. Use only genuine EOP parts and accessories
specified for this product.
12. Clean your lawnmower thoroughly See 'Cleaning'.
13. Your local approved Electrolux Outdoor Products
Service Centre/Dealer will carry out any service or
repairs required.
14. Store your lawnmower in a cool, dry, damp-proof
and safe place.
Guarantee and Guarantee Policy
If any part is found to be defective due to faulty manufacture
within the guarantee period, Electrolux Outdoor Products,
through its Authorised Service Repairers will effect the
repair or replacement to the customer free of charge
providing:
(a) The fault is reported directly to the Authorised Repairer.
(b) Proof of purchase is provided.
(c) The fault is not caused by misuse, neglect or faulty
adjustment by the user.
(d) The failure has not occurred through fair wear and tear.
(e) The machine has not been serviced or repaired, taken
apart or tampered with by any person not authorised by
Electrolux Outdoor Products.
(f) The machine has not been used for hire.
(g) The machine is owned by the original purchaser.
(h) The machine has not been used outside of the country
for which it was specified.
(i) The machine has not been used commercially.
* This guarantee is additional to, and in no way
diminishes the customers statutory rights.
Failures due to the following are not covered, therefore it is
important that you read the instructions contained in this
Operator's Manual and understand how to operate and
maintain your machine:
Failures not covered by guarantee
* Replacing worn or damaged blades
* Failures as a result of not reporting an initial fault.
* Failures as a result of sudden impact.
* Failures as a result of not using the product in accordance
with the instructions and recommendations contained in this
Operator's Manual.
* Machines used for hire are not covered by this guarantee.
* The following items listed are considered as wearing parts
and their life is dependent on regular maintenance and are,
therefore not normally subject to a valid warranty claim:
Blades, cables, recoil ropes, filters.
* Caution!
Electrolux Outdoor Products does not accept liability under the
warranty for defects caused in whole or part, directly or indirectly
by the fitting of replacement parts or additional parts that are not
either manufactured or approved by Electrolux Outdoor
Products, or by the machine having been modified in any way.
Environmental Information
Electrolux Outdoor Products are manufactured under an
Environmental Management System (ISO 14001) using,
where practical, components manufactured in the most
environmentally responsible manner, according to company
procedures, and with the potential for recycling at the end of
the products’ life.
• Packaging is recyclable and plastic components have
been labelled (where practical) for categorised recycling.
• Awareness of the environment must be considered when
disposing of ‘end-of-life’ product.
• If necessary, contact your local authority for disposal information.
DISPOSAL OF FUELS AND LUBRICA
TING OILS
• Wear protective clothing when handling any fuels and lubricants.
• Avoid contact with skin.
• Remove petrol and engine oil before transporting the product.
• Contact your local authority for information of your nearest
Recycling/Disposal Station.
• Do NOT dispose of used fuels/oils with household waste
• Do NOT dispose of used fuels/oils to water.
• Waste fuels/oils are harmful, but can be recycled and
should be disposed of through the recognised facilities.
• Do NOT incinerate
Service Recommendations
• Your product is uniquely identified by a silver and black product rating label.
• We strongly recommend that your product is serviced at least every twelve months, more often in a
professional application.
ENGLISH - 4

5119509-02
Electrolux Outdoor Products
Aycliffe Industrial Park
NEWTON AYCLIFFE
Co.Durham DL5 6UP
ENGLAND
Telephone - (00) 44 1325 300303 Fax - (00) 44 1325 310339
UK Telephone - 01325 300303 Fax - 01325 310339
Our policy of continuous improvement means that the specification of products may be altered from time to time without prior notice.
Electrolux Outdoor Products manufacture products for a number of well known brands under various registered patents, designs and
trademarks in several countries.
© Electrolux Outdoor Products Ltd. Registered Office, Electrolux Works, Oakley Road, Luton LU4 9QQ
Registered number 974979 England
The Electrolux Group is the world’s largest producer of powered appliances for kitchen, cleaning and outdoor use. More than 55 million
Electrolux Group products (such as refrigerators, cookers, washing machines, vacuum cleaners, chain saws and lawn mowers) are
sold each year to a value of approx. USD 14 billion in more than 150 countries around the world.
BELGIQUE/BELGIË Flymo Belgique/België
Tel: 02 363 0311, Fax: 02 363 0391
ČESKÁ REPUBLIKA Electrolux, spol. s.r.o., oz Electrolux Outdoor Products,
Na Křečku 365, Praha 10 - Horní Měcholupy.
Tel: 02/7847 0164, Info-linka: 0800/110 220
Internet: www.partner-flymo.cz E-mail: info@husqvarna.cz
DANMARK Electrolux Outdoor Products, Flymo/Partner A/S,
Lundtoftegaardsvej 93A, DK 2800 Kgs.Lyngby
Tel: 45 87 75 77, Fax: 45 93 33 08, www.flymo-partner.dk
DEUTSCHLAND Flymo Deutschland
Tel: 097 21 7640, Fax:097 21 764202
ESTONIA Electrolux Estonia Ltd (Electrolux Eesti AS)
Tel: (372) 6650010
FRANCE Flymo France SNC
Tel 01 46 67 8141, Fax 01 43 34 2491
FINLAND SUOMI Electrolux Outdoor Products Finland
Tel: 00 358 9 39611, Fax: 00 358 9 3961 2644
ITALIA McCulloch Italiana s.r.l. - Via Como 72, 23868 Valmadrera
(LECCO) - ITALIA
Tel: 800 017829, Fax: 0341 581671
IRELAND Flymo Ireland
Tel: 01 4565222, Fax: 01 4568551
MAGYARORSZÁG Electrolux Lehel Kft
Tel: 00 36 1 251 41 47
NORGE Flymo/Partner, div. av Electrolux Motor a.s.
Tel: 69 10 47 90
NEDERLAND Flymo Nederland
Tel: 0172-468322, Fax: 0172-468219
ÖSTERREICH Husqvarna-Ges.m.b.H. Nfg. KG, Industriezeile 36, 4010 LINZ,
Tel: 0732 770101-0, Fax: 0732 770101-40,
email: office@husqvarna.co.at Internet: www.husqvarna.at
POLSKA Electrolux Poland Sp. z.o.o. Husqvarna, 01-612 Warszawa
Myslowicka 10/2
Tel:- (22) 8332949
SLOVENIJA Husqvarna-Ges.m.b.H. Nfg. KG, Industriezeile 36, 4010 LINZ,
Tel: 0732 770101-0, Fax: 0732 770101-40,
email: office@husqvarna.co.at Internet: www.husqvarna.at
SLOVENSKA Electrolux Slovakia s.r.o., Borova Sihot 211, 033 01 Lipt. Hradok
Tel: 044 522 14 19, Fax: 044 522 14 18, www.flymo-partner.sk
SCHWEIZ/SUISSE/SUIZZERA Flymo Schweiz/Suisse/Suizzera
Tel 062 889 93 50 / 889 94 25, Fax 062 889 93 60 / 889 94 35
SVERIGE Electrolux Outdoor Products, Sverige
Tel: 036 – 14 67 00, Fax: 036 – 14 60 70
UNITED KINGDOM Electrolux Outdoor Products United Kingdom
Tel: 01325 300303, Fax: 01325 310339
The Electrolux Group. The world’s No.1 choice.
 Loading...