

Page 1

Quick start guide
Hurtig brugerguide
Hızlı kullanım kılavuzu
Pikaopas
Краткое руководство по эксплуатации
Stručný návod na použitie
Hitri vodnik za uporabo
Ghid de utilizare rapidă
Σύντομος οδηγός χρήσης
Page 2

Page 3

Parrot Zikmu Solo
English .......................................................... 9
Dansk ........................................................... 35
Türkçe .......................................................... 55
Suomi ........................................................... 75
РУССКИЙ .................................................. 95
Slovensky ..................................................... 115
Slovenčina ................................................... 135
Română ....................................................... 155
Ελληνικά ..................................................... 175
Page 4
4
Page 5
Reset
5
Page 6
6
Page 7
7
Page 8
8
Page 9

Quick start guide
About this guide
In order to limit our paper consumption and as part of our environmentally friendly
and responsible approach, Parrot prefers to put user documents online rather than
print them out. This simplified guide to the Parrot Zikmu Solo is therefore limited
to providing you with the main instructions that will make it easy for you to use the
device. More information can be found on the support section o
f our website,
www.parrot.com
: the full manual, FAQs, tutorials, and more.
Contents
Getting started
iPod®
Wi-Fi®
Bluetooth®
Jack
Troubleshooting
General information
p.10
p.13
p.15
p.20
p.23
p.24
p.26
English 9
Page 10

Getting started
Note : For the purpose of readability, the iPod touch® and iPhone® (in music mode)
shall be designated by the term "iPod" in this manual. Compatible telephones or
tablet PCs shall be designated by the term "Smartphone".
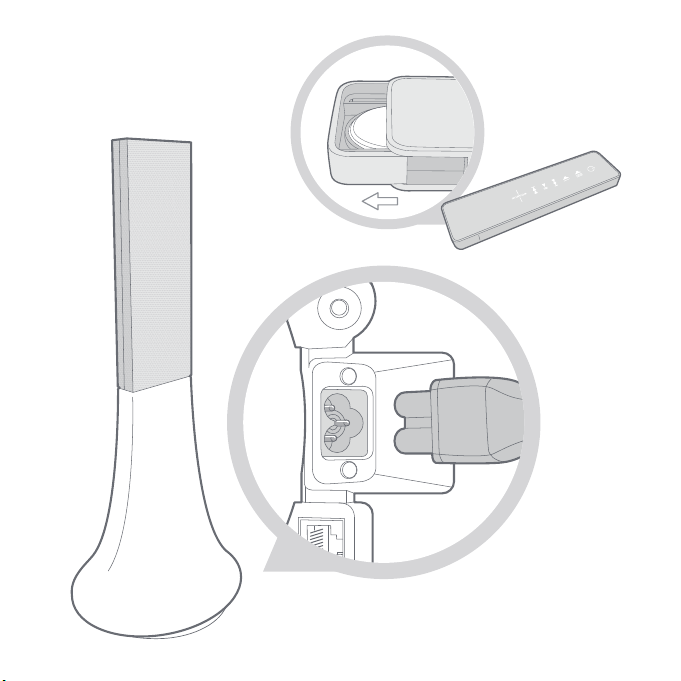
Connection to mains supply
Plug the speaker into an electrical outlet using the provided power cable (diagram
p.4).
>The speaker turns on automatically
. The icon blinks for a few seconds then
becomes steady.
Remote control
Insert the provided remote control battery into the specific battery compartment
(diagram p.4).
Note : Use only a CR2032 battery.
Turning the Parrot Zikmu Solo on / off
Press the of the remote control or control panel to turn the speaker on / off.
10 English
Page 11
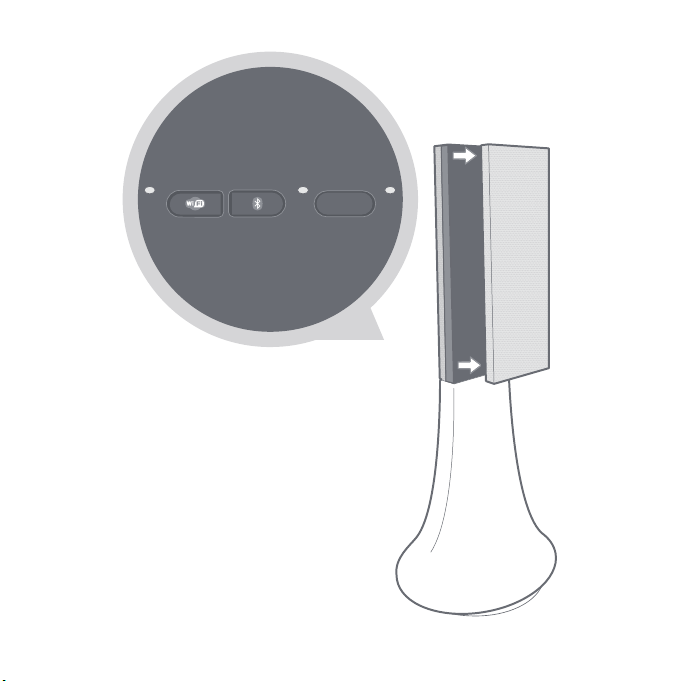
Removing the front grid
Wi-Fi,
Bluetooth
and Reset buttons are accessible by removing the magnetic Parrot
Zikmu Solo front grid (diagram p.5).
Button
Function
Short press : Establish Wi-Fi connection with a modem /
router supporting WPS technology (refer to the Wi-Fi >
Connection with WPS section).
Long press : Reset Wi-Fi and ethernet parameters.
Short press : Make the Parrot Zikmu Solo visible via
Bluetooth
. Press this button before connecting a
Bluetooth
device to the speaker for the first time (refer to the
Bluetooth > Connection section )
.
Long press : Delete all pairings (except the one of the
currently connected device).
Reset
Reboot the speaker.
English 11
Page 12

Selecting an audio source
The Parrot Zikmu Solo allows you to use several types of audio sources: computer
connected via Wi-Fi, computer or Smartphone connected via
Bluetooth
, iPod/
iPhone, analogue audio player, TV or DVD player with an optical audio output.
Press the SOURCE button of the remote control to switch among the active audio
sources.
If you start playing a music file fro
m a second source, this source is automatically
selected. The music currently played from the first source is automatically
suspended except if the first source is an analogue audio player connected via a
Jack cable.
Controlling the volume
Button
Function
Increase the volume.
Decrease the volume.
12 English
Page 13

iPod
Note : Refer to the Parrot Zikmu Solo support page for more information about the
compatible iDevice models.
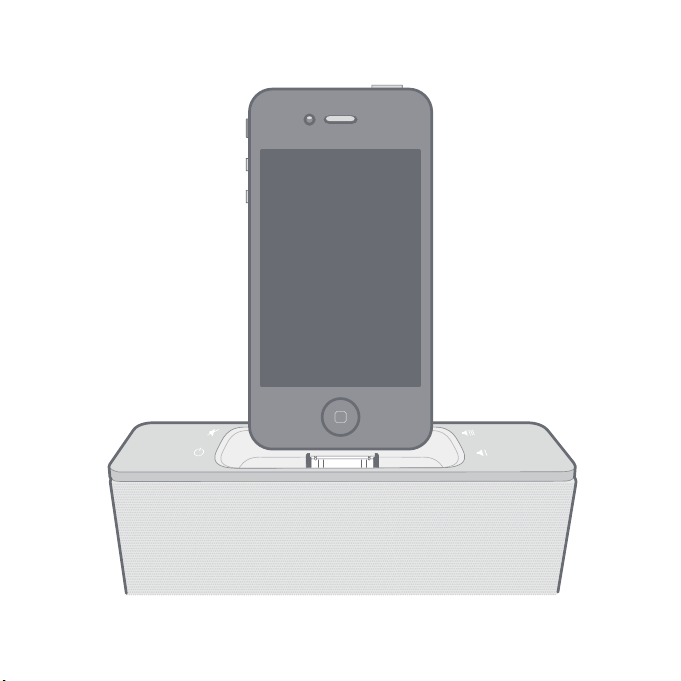
Using the dock adapter
Two dock adapters provided with the Parrot Zikmu Solo allow you to use the
speaker with iPhone 4S / iPhone 4 and iPhone 3GS / iPhone 3G. To use the Parrot
Zikmu Solo with another iDevice, use the dock adaptor supplied with the Apple
device.
To inse
rt the dock adapter, position it above the connector and press on both sides.
Connecting the iPod
Once the dock adapter is inserted on the speaker:
1.
Unplug the earphones from your iPod.
2.
Connect your iPod to the speaker (diagram p.6).
>The iPod battery charges until it is fully charged.
> You can now browse for a song on your iPod.
English 13
Page 14

Downloading the application
Login to the App StoreSM or Google Play® and download the free Parrot Audio
Suite application. This application will allow you to modify several audio settings
and connect the speaker to your Wi-Fi network easily.
14 English
Page 15

Wi-Fi
Before you begin
You can stream music via Wi-Fi to the Parrot Zikmu Solo from any computer with
the following operating systems : Windows
® XP (SP2 or SP3), Windows Vista®,
Windows
® 7 and Mac OS X 10 (and later versions).
To stream music via Wi-Fi on the Parrot Zikmu Solo while keeping an internet
connection, you need to have a wireless access point and to connect the Parrot
Zikmu
Solo to your Wi-Fi network. If you do not need an Internet connection on the
computer you are using with the Parrot Zikmu Solo, you can simply connect it to the
Wi-Fi network generated by the Parrot Zikmu Solo: SoloNet-xx.xx.
Note : The performance of the Parrot Zikmu Solo depends highly on the performance
of your modem / router. The sound quality of the Parrot Zikmu Solo may be affected if
there is
an obstacle or a wall between the speaker and your modem / router.
Reposition your speakers if necessary.
There are several ways to connect the Parrot Zikmu Solo to your Wi-Fi network.
The detailed connection procedures are available on the Parrot Zikmu Solo
complete user guide on our website www.parrot.com
.
English 15
Page 16

Connection with WPS
If your modem / router supports the WPS technology:
1.
Press the WPS button on your modem / router. Refer to the documentation of
your device for more information.
2.
Press the
button on the Parrot Zikmu Solo located behind the grid.
> The green light located next to this button blinks. It remains steady once the
connection is established.
Connection with an RJ45 cable
Note : The RJ45 cable, also called ethernet cabl e, is not provided with the Parrot
Zikmu Solo.
1.
Connect your computer to the Parrot Zikmu Solo using an RJ45 cable (diagram
p.8).
2.
On your computer, launch your
web browser and enter http://zikmu-solo.local/
wifi in the address bar.
> The list of available Wi-Fi networks will be displayed.
3.
Select your Wi-Fi network.
4.
Enter the WEP / WPA / WPA2 key if necessary then click on Apply.
16 English
Page 17

Connection with an iPhone
If you have an iPod Touch 2G (or later version) or iPhone 3 (or later version):
1.
Login to the App Store
SM
and download the Parrot Audio Suite free
application.
2.
Install your iPhone on the Parrot Zikmu Solo (diagram p.6) or connect it to the
speaker via
Bluetooth
(refer to the Bluetooth > Connection section).
3.
Launch the Parrot Audio Suite application and press Wi-Fi.
> The list of available Wi-Fi networks will be displayed.
4.
Select your Wi-Fi network. Enter the WEP / WPA / WPA2 key if necessary.
5.
Press Join.
> The Parrot Zikmu Solo is now connected to your Wi-Fi network.
Manual connection
The Parrot Zikmu Solo creates a Wi-Fi network by default. You can connect your
computer or Smartphone to this network in order to connect the Parrot Zikmu Solo
to yo
ur Wi-Fi network.
Note : If the Parrot Zikmu Solo has already been connected to a Wi-Fi network, it will
not create its own Wi-Fi network. To do so, you first need to reset the Parrot Zikmu
Solo Wi-Fi parameters by hol ding down the
button for 2 seconds.
1.
On your computer, scan for available Wi-Fi networks.
English 17
Page 18

2.
Join the "SoloNet-xx.xx" Wi-Fi network (as if you were trying to establish a
connection with a router / modem).
Note : You wil l temporarily lose your Internet acc ess. You can reconnect your
computer to your Wi-Fi network at the end of this procedure.
3.
Launch your web browser on your computer or Smartphone and enter http://
zikmu-solo.local (or http://[new-name].local if you changed the speaker
name) in the address bar.
4.
Click on Wi-Fi Configuration.
> The list of available Wi-Fi networks is displayed.
5.
Select your Wi-Fi network.
6.
Enter the WEP / WPA / WPA2 if necessary then click on Apply.
Using the web interface
The Parrot Zikmu Solo web interface allows you to control the playback of your
audio files and modify several audio settings. You can access this inte
rface from
your computer, Smartphone or tablet.
1.
Connect the Parrot Zikmu Solo to your Wi-Fi network using one of the
previously described methods.
2.
On your computer or Smartphone, launch your web browser.
3.
Enter http://zikmu-solo.local
(or http://[new-name].local if you changed the
speaker name) in the address bar.
Note : For more information about the web interfac e, refer to the corresponding
tutorial available on the Parrot Zikmu Solo support page on our website
www.parrot.com.
18 English
Page 19

speaker name) in the address bar.
Note : For more information about the web interfac e, refer to the corresponding
tutorial available on the Parrot Zikmu Solo support page on our website
www.parrot.com
.
English 19
Page 20

Bluetooth
Using the Parrot Zikmu Solo with a Smartphone
You can listen to music tracks stored on your Smartphone via the Parrot Zikmu
Solo. Your Smartphone must support the
Bluetooth®
A2DP profile (Advanced
Audio Distribution Profile).
Note: Depending on the model of your phone, you may need to authorize the
connection to the Parrot Zikmu Solo to allow further automatic connections.
Refer to
the user guide of your phone for more informati on.
Using the Parrot Zikmu Solo with a computer
You can stream music via
Bluetooth
to the Parrot Zikmu Solo from any PC
supporting
Bluetooth
technology and MAC OS X 10 (and later versions).
The detailed connection procedure depends on your computer and the
Bluetooth
software you are using. For more information, refer to your device user guide or to
the Parrot Zikmu Solo complete user guide on our website www.parrot.com.
20 English
Page 21

Connection
If you are using the Parrot Zikmu Solo with your Smartphone or computer, you need
to connect both devices. But if you are using your Smartphone or computer with
the Parrot Zikmu Solo for the first time, you need to pair both devices before
connecting them. The pairing process is only necessary once.
1.
Turn on the Parrot Zikmu Solo.
2.
Remove the front grid (diagram p.5).
3.
P
ress the button.
> The blue light located next to the button starts blinking. The Parrot Zikmu
Solo is now visible by the other
Bluetooth
devices for two minutes.
4.
From your Smartphone or computer, launch a
Bluetooth
peripherals search.
5.
Select « Zikmu-Solo ».
6.
If your Smartphone or computer asks you to enter a
Bluetooth
PIN code, enter
“0000”.
> The Parrot Zikmu Solo is now paired with your device. You can p
lace the
front grid back on the speaker.
7.
Connect both devices.
> You can now start playing the track on your Smartphone or computer and the
sound will come through the speaker.
English 21
Page 22

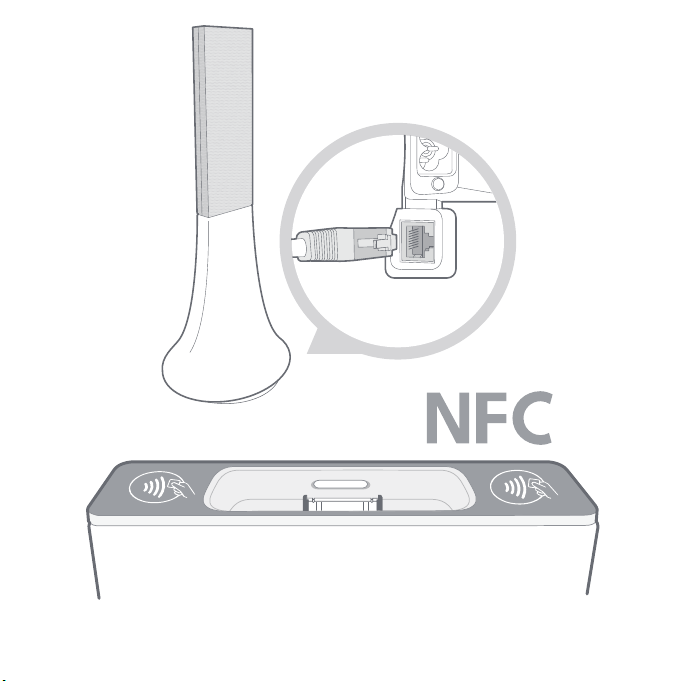
If your Smartphone supports the NFC function, connection is also possible by
touching the Parrot Zikmu Solo dock connector (diagram p.8). The area of the
Smartphone which needs to touch the speaker depends on the phone model. Refer
to your Smartphone user guide for more information.
22 English
Page 23

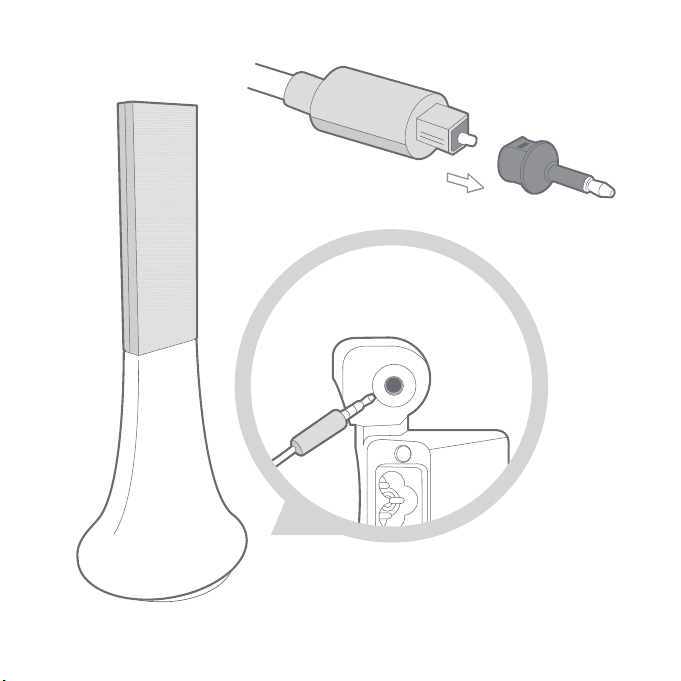
Jack
You can connect your analogue audio player (ex: CD player, TV) to the Parrot Zikmu
Solo via a jack / jack cable to stream music. To do so, connect the cable to the jack
connector located under the speaker (diagram p.7) and start playing a track.
If you wish to connect the Parrot Zikmu Solo to an audio player with an optical audio
output (TV or DVD player), use the provided to
slink / jack adapter (diagram p.7).
Note : Make sure that the connectors are inserted properly to avoid any disruption.
Note : To avoid any problem of sound saturation, increase the volume on the Parrot
Zikmu Solo rather than on your audio player. The audio mixer available on the Parrot
Audio Suite appl ication allows you to define a volume level by default for each sourc e
to avoid problems such as a
too high volume level after an audi o source change.
English 23
Page 24
Troubleshooting
Resetting the Parrot Zikmu Solo
If you have already configured your Parrot Zikmu Solo for Wi-Fi use and want to
reset the Wi-Fi parameters to their factory settings, remove the front grid
(diagram p.5) and hold down the button.
If you are having an issue with an audio player connected to the Parrot Zikmu Solo
via
Bluetooth:
1.
Turn off the audio player.
2.
Remove the front grid (diagram p.5) and hold down the
button.
3.
Reestablish the
Bluetooth
connection between the Parrot Zikmu Solo and the
audio player.
If you are having an issue with your Parrot Zikmu Solo and need to reboot the
speaker, remove the front grid (diagram p.5) and press the Reset button.
If you want to restore the Parrot Zikmu Solo factory settings, hold down the
button.
Note: These resets can also be done using the Parrot Audio Suite application.
24 English
Page 25

Pairing the remote control
If the Parrot Zikmu Solo remote control does not seem to work :
1.
Make sure the battery is correctly installed (diagram p.4).
2.
Restart the Parrot Zikmu Solo.
3.
Press the SOURCE and
buttons simultaneously. You have one minute to
perform this action once the Parrot Zikmu Solo is turned on.
Software update
Make sure you have the latest software update on your Parrot Zikmu Solo. Using
the Web interface you can easily identify whether a new software update is
available. If you require an update 'click' to download and install the latest version.
You can also check the software version
displayed information if you have an iPod.
To do so, install the iPod on the Parrot Zikmu Solo, then select Settings > General >
Information if you have an iPhone or Settings > Information if you have an iPod.
Browse through the displayed informations until "Parrot Zikmu Solo by Starck" is
displayed.
English 25
Page 26

Compatibility
If your phone does not seem to work with the Parrot Zikmu Solo, refer to the
compatibility page on our website to check if your phone is compatible with the
Parrot Zikmu Solo and to consult the corresponding pairing procedure :
www.parrot.com/uk/compatibility
.
For more information
Refer to the Parrot Zikmu Solo on our website : www.parrot.com/uk/support/
parrot-zikmu-solo.
26 English
Page 27

General information
Warranty
Without prejudice of legal warranty, Parrot products are warranted during 1 year
from the date of purchase for defects in materials and workmanship, provided that
no deterioration to the product has been made, and upon presentation of proof of
purchase (invoice) to the retailer. Warranty does not cover: upgrading of the
software items of the Parrot products with Bluetooth ce
ll phones for compatibility
purpose, data recovery, deterioration of the external aspect due to normal wear of
the product, any damage caused by accident, misuse, misapplication, or non-Parrot
products. Parrot is not responsible for storage, loss or damaged to data during
transit or repair. Any product wrongfully declared to be defective will be returned
to sender and inspection, process and carriage c
osts will be invoiced to him.
Correct disposal of This Product (Waste Electrical & Electronic Equipment)
This marking
shown on the product or its literature, indicates that it should not
be disposed with other household wastes at the end of its working life. To prevent
possible harm to the environment or human health from uncontrolled waste
disposal, please separate this from other types of wastes and recycle it responsibly
English 27
Page 28

to promote the sustainable reuse of material resources.
Household users should contact either the retailer where they purchased this
product, or their local government office, for details of where and how they can
take this item for environmentally safe recycling. Business users should contract
their supplier and the terms and conditions of the purchase contract. This product
shoul
d not be mixed with other commercial wastes for disposal.
Modifications
The explanations and specifications in this guide are given for information
purposes only and may be modified without prior notice. They are deemed to be
correct at time of going to press. The utmost care has been taken when writing this
guide,as part of the aim to provide you with accurate information. However, Parrot
shall not be
held responsible for any consequences arising from any errors or
omissions in the guide, nor for any damage or accidental loss of data resulting
directly or indirectly from the use of the information herein. Parrot reserves the
right to amend or improve the product design or user guide without any restrictions
and without any obligation to notify users. As part of our ongoing concern to
upgrade and imp
rove our products, the product that you have purchased may differ
slightly from the model described in this guide. If so, a later version of this guide
might be available in electronic format at Parrot’s website at www.parrot.com.
Registered Trademarks
Parrot, Parrot Zikmu Solo and the Parrot logo are registered trademarks of PARROT
SA.
The Bluetooth ® word mark and logos are registered trademarks owned by
Bluetooth SIG, Inc. and any use of such marks by Parrot S.A. is under license.
Bluetooth QDID : B013841, B013839, [-]
iPod, iPhone, Mac and Apple are trademarks of Apple Inc, registered in the US and
others countries.
Windows XP, W
indows Vista and Windows 7 are registered trademarks of
Microsoft Corporation in the US and other countries.
Wi-Fi ® is a registered trademark of the Wi-Fi Alliance. The Wi-Fi CERTIFIED logo
is a certification mark of the Wi-Fi Alliance.
Google Play is a trademark of Google Inc.
All other trademarks mentioned in this guide are protected and are the property of
their respective owners.
Declaration of Conf
ormity
We, Parrot S.A. of 174 quai de Jemmapes, 75010 Paris, France, declare under our
sole responsibility that our product, the Parrot Zikmu Solo speaker to which this
declaration relates are in conformity with appropriate standards EN300328,
EN300220, EN301489-17, IEC60065 following the provision of EMC 204/108/EEC,
28 English
Page 29

Parrot, Parrot Zikmu Solo and the Parrot logo are registered trademarks of PARROT
SA.
The Bluetooth ® word mark and logos are registered trademarks owned by
Bluetooth SIG, Inc. and any use of such marks by Parrot S.A. is under license.
Bluetooth QDID : B013841, B013839, [-]
iPod, iPhone, Mac and Apple are trademarks of Apple Inc, registered in the US and
others countries.
Windows XP, W
indows Vista and Windows 7 are registered trademarks of
Microsoft Corporation in the US and other countries.
Wi-Fi ® is a registered trademark of the Wi-Fi Alliance. The Wi-Fi CERTIFIED logo
is a certification mark of the Wi-Fi Alliance.
Google Play is a trademark of Google Inc.
All other trademarks mentioned in this guide are protected and are the property of
their respective owners.
Declaration of Conf
ormity
We, Parrot S.A. of 174 quai de Jemmapes, 75010 Paris, France, declare under our
sole responsibility that our product, the Parrot Zikmu Solo speaker to which this
declaration relates are in conformity with appropriate standards EN300328,
EN300220, EN301489-17, IEC60065 following the provision of EMC 204/108/EEC,
English 29
Page 30

electrical security 2006/95/CE and R&TTE 1999/5/EC directives.
Identification N. 394 149 496 R.C.S. PARIS
Parrot S.A.
Copyright © Parrot 2012. All rights reserved.
FCC Compliance Statement
This equipment has been tested and found to comply with the limits for a Class B
Digital Device, pursuant to Part 15 of the FCC Rules. These limits are designed to
provide reasonable protection aga
inst harmful interference in a residential
installation. This equipment generates, uses and can radiate radio frequency
energy and, if not installed and used in accordance with the instructions, may cause
harmful interference to radio communications. However, there is no guarantee
that interference will not occur in a particular installation. If this equipment does
cause harmful interference to radio o
r television reception, which can be
determined by turning the equipment off and on, the user is encouraged to try to
correct the interference by one or more of the following measures:
- Reorient or relocate the receiving antenna.
- Increase the distance between the equipment and receiver.
- Connect the equipment to an outlet on a circuit different from that to which the
receiver is connected.
IC Compliance Statement
This equipment has been tested and found to comply with the limits for a Class B
Digital Device, with Industry Canada Licence-exempt RSS-GEN 7.1.3. These limits
are designed to provide reasonable protection against harmful interference in a
residential installation. This equipment generates, uses and can radiate radio
frequency energy and, if not installed and
used in accordance with the instructions,
may cause harmful interference to radio communications. However, there is no
guarantee that interference will not occur in a particular installation. If this
equipment does cause harmful interference to radio or television reception, which
can be determined by turning the equipment off and on, the user is encouraged to
try to correct the interference by one or
more of the following measures:
- Reorient or relocate the receiving antenna.
- Increase the distance between the equipment and receiver.
- Connect the equipment to an outlet on a circuit different from that to which the
receiver is connected.
Important safety instructions
WARNING : To reduce the risk of fire or electric shock , do not expose this
apparatus to rain or moisture.
1. Read these instructions
.
30 English
Page 31

IC Compliance Statement
This equipment has been tested and found to comply with the limits for a Class B
Digital Device, with Industry Canada Licence-exempt RSS-GEN 7.1.3. These limits
are designed to provide reasonable protection against harmful interference in a
residential installation. This equipment generates, uses and can radiate radio
frequency energy and, if not installed and
used in accordance with the instructions,
may cause harmful interference to radio communications. However, there is no
guarantee that interference will not occur in a particular installation. If this
equipment does cause harmful interference to radio or television reception, which
can be determined by turning the equipment off and on, the user is encouraged to
try to correct the interference by one or
more of the following measures:
- Reorient or relocate the receiving antenna.
- Increase the distance between the equipment and receiver.
- Connect the equipment to an outlet on a circuit different from that to which the
receiver is connected.
Important safety instructions
WARNING : To reduce the risk of fire or electric shock , do not expose this
apparatus to rain or moisture.
1. Read these instructions
.
English 31
Page 32

2. Keep these instructions.
3. Heed all warnings.
4. Follow all instructions.
5. Do not use this apparatus near water.
6. Clean only with dry cloth.
7. Do not block any ventilation openings. Install in accordance with the
manufacturer’s instructions.
8. Do not install near any heat sources such as radiators, heat registers, stoves, or
other apparatus (including amplifiers) that produce heat.
9. Do not defe
at the safety purpose of the polarized or grounding-type plug. A
polarized plug has two blades with one wider than the other. A grounding type plug
has two blades and a third grounding prong. The wide blade or the third prong are
provided for your safety. If the provided plug does not fit into your outlet, consult
an electrician for replacement of the obsolete outlet.
10. Protect the power cord from be
ing walked on or pinched particularly at plugs,
convenience receptacles, and the point where they exit from the apparatus.
11. Only use attachments/accessories specified by the manufacturer.
12. Unplug this apparatus during lightning storms or when unused for long periods
of time.
13. Refer all servicing to qualified service personnel. Servicing is required when the
apparatus has been damaged in any way
, such as power-supply cord or plug is
damaged, liquid has been spilled or objects have fallen into the apparatus, the
apparatus has been exposed to rain or moisture, does not operate normally, or has
been dropped.
14. Do not expose this apparatus to dripping or splashing and ensure that no objects
filled with liquids, such as vases, are placed on the apparatus.
15. To completely disconnect this apparatus from the AC Mains, disconnect the
power supply cord plug from the AC receptacle.
16. The power cord which provides disconnection from mains supply shall remain
readily operable. Unplug this ap
paratus when unused for long periods of time.
17. Do not expose batteries to excessive heat such as sunshine, fire or the like.
18 . Do not dismantle the speakers and do not remove any screw of the device.
Maximum temperature: 40°C
32 English
Page 33

14. Do not expose this apparatus to dripping or splashing and ensure that no objects
filled with liquids, such as vases, are placed on the apparatus.
15. To completely disconnect this apparatus from the AC Mains, disconnect the
power supply cord plug from the AC receptacle.
16. The power cord which provides disconnection from mains supply shall remain
readily operable. Unplug this ap
paratus when unused for long periods of time.
17. Do not expose batteries to excessive heat such as sunshine, fire or the like.
18 . Do not dismantle the speakers and do not remove any screw of the device.
Maximum temperature: 40°C
English 33
Page 34

Page 35

Hurtig brugerguide
Om denne vejledning
Parrot foretrækker at lægge brugervejledningerne ud online i stedet for at få dem
trykt for at begrænse papirforbruget og af hensyn til miljøet. Denne korte Parrot
Zikmu Solo guide giver derfor kun de vigtigste anvisninger om, hvordan denne
enhed bruges på en nem måde. Du kan finde yderligere oplysninger under rubrikken Support på vores hjemmeside www.parrot.com: Komplet vejledning, FAQ,
undervisningsprogrammer...
Indholdsfortegnelse
p36. Første ibrugtagning
p39. iPod®
p41. Wi-Fi®
p45. Bluetooth®
p47. Jack
p48. Fejlfinding
p51. Generelle oplysninger
DANSK 35
Page 36

Første ibrugtagning
Bemærk: For en bedre læsbarhed betegnes iPod ® og iPhone® (i musikfunktion) med
udtrykket «iPod» i denne guide. Kompatible telefoner eller tablets betegnes med
udtrykket «Smartphone».
Tilslutning ved elstik
Forbind højttaleren med et elstik ved hjælp af den medfølgende el-ledning (skema s.4).
> Højttaleren tænder automatisk. Ikonet
dernæst tændt.
Fjernbetjening
Sæt batteriet (medfølger) ind i det rum, der er forudset til det (skema s.4).
Bemærk: Brug udelukkende et batteri af typen CR2032.
Tænding / slukning af Parrot Zikmu Solo
Tryk på knappen på ernbetjeningen eller kontrolpanelet for at tænde / slukke højttaleren.
36 DANSK
blinker i nogle sekunder og forbliver
Page 37

Sådan tages fronten af
For at få adgang til Wi-Fi, Bluetooth og Reset knapperne, skal du tage den magne-
tiske front af Parrot Zikmu Solo (skema s.5).
Knap Funktion
Kort tryk: Opret en Wi-Fi forbindelse med et
trådløst modem eller en trådløs router, der understøtter WPS teknologien (se afsnittet Wi-Fi > Tilslutning med WPS).
Langt tryk: Foretag ny initialisering af Wi-Fi og
ethernet parametre.
Kort tryk: Gør Parrot Zikmu Solo synlig via Blue-
tooth. Det er nødvendigt at trykke på denne knap
for at tilslutte en perifer Bluetooth enhed, som du
bruger for første gang sammen med højttaleren (se
afsnittet Bluetooth > Tilslutning)).
Langt tryk: Slet alle parringer (med undtagelse af
den, der er tilsluttet ved højttaleren).
Reset Initialiser højttaleren igen.
DANSK 37
Page 38

Valg af en audiokilde
Du kan bruge forskellige audiokilder sammen med Parrot Zikmu Solo: Computer
tilsluttet via Wi-Fi, computer eller smartphone tilsluttet via Bluetooth, iPod, analog audioafspiller, ernsyn eller DVD-afspiller med optisk digital audioudgang.
Tryk på knappen SOURCE på ernbetjeningen for at skifte mellem de aktive
audiokilder.
Hvis du under afspilning af et musiknummer starter en afspilning af et andet musiknummer fra en anden kilde, vil denne nye kilde automatisk blive valgt. Afspilningen af musiknummeret fra den første kilde sættes automatisk på pause, med
mindre det er en audioafspiller forbundet med højttaleren via Jack-stikket.
Indstilling af lydstyrke
Knap Funktion
Øg lydstyrken
Mindsk lydstyrken
38 DANSK
Page 39

iPod
Bemærk: Se siden med Parrot Zikmu Solo support for yderligere oplysninger om iDevices, der er kompatible med højttaleren.
Brug af sokkeladapter
Der følger to sokkeladaptere med Parrot Zikmu Solo. De svarer til adaptere til
iPhone 4S / iPhone 4 og iPhone 3GS / iPhone 3G. Hvis du vil bruge Parrot Zikmu
Solo med en iPod, skal du bruge den adapter, der følger med din iPod.
Hvis du vil sætte sokkeladapteren i, skal du placere den ovenover iPod stikket og
trykke på begge sider.
Tilslutning af iPod
Når du har valgt sokkeladapteren og sat den på højttaleren:
Tag din iPods høretelefoner af. 1.
Sæt din iPod på højttaleren (skema s.6). 2.
> iPod’en lader op. Nu kan du starte afspilning af en musikfil på din votre
iPod.
DANSK 39
Page 40

Downloading af applikation
Gå ind på App StoreSM eller Google Play® og hent Parrot Audio Suite applikationen gratis. Med denne applikation kan du blandt andet justere højttalerens
audioparametre og let forbinde højttaleren med dit Wi-Fi netværk.
40 DANSK
Page 41

Wi-Fi
Før du starter
Du kan føre musik over på Parrot Zikmu Solo via Wi-Fi fra alle PC’er med Windows® XP (SP 2 eller senere), Windows Vista®, Windows® 7 og Mac styresystemer fra og med version MAC OS X 10.
Hvis du ønsker at føre musik over på Parrot Zikmu Solo via Wi-Fi og samtidig
bevare en Internet opkobling, har du brug for et Wi-Fi adgangspunkt og for at
tilslutte Parrot Zikmu Solo ved dit Wi-Fi netværk. I modsat fald kan du forbinde
dig med det Wi-Fi netværk, som Parrot Zikmu Solo skaber: SoloNet-xx.xx.
Bemærk: Hvor godt Parrot Zikmu Solo fungerer i Wi-Fi funktion aænger hovedsageligt af, hvor godt dit modem / din router fungerer. Lydkvaliteten af Parrot Zikmu Solo
kan ligeledes være påvirket af visse forhindringer (vægge, rumadskillelser, metal…),
som befinder sig mellem dit Wi-Fi adgangspunkt og Parrot Zikmu Solo. Skift højttalerens placering, hvis du har transmissionsproblemer.
Parrot Zikmu Solo kan forbindes med dit Wi-Fi netværk på forskellige måder.
Fremgangsmåden for tilslutning er nærmere forklaret i den komplette guide til
Parrot Zikmu Solo, som du kan finde på vores hjemmeside www.parrot.com.
DANSK 41
Page 42

Tilslutning med WPS
Hvis dit trådløse modem/router understøtter WPS-teknologien:
Tryk på WPS-knappen til dit trådløse modem eller din trådløse router. Se 1.
dokumentationen til din anordning for yderligere informationer.
Tryk på knappen 2.
tiske front.
> Den grønne kontrollampe ved siden af knappen blinker. Den forbliver
tændt, når tilslutningen er oprettet.
på Parrot Zikmu Solo, som sidder bag den magne-
Tilslutning med RJ45 kabel
Bemærk: RJ45 kablet, også kaldet netværkskabel eller ethernet- kabel, følger ikke med
Parrot Zikmu Solo.
Forbind din computer med Parrot Zikmu Solo ved hjælp af et RJ45 kabel 1.
(skema s.8).
Start din webbrowser på din computer og skriv 2. http://zikmu-solo.local/wifi
på adresselinjen.
> Listen over tilgængelige Wi-Fi netværk vises.
Vælg dit Wi-Fi netværk. 3.
Indtast WEP / WPA / WPA2 nøglen, hvis du bliver bedt om det og klik på 4.
Apply.
42 DANSK
Page 43

Tilslutning med en iPod
Hvis du har en iPod Touch 2G (eller en senere version) eller iPhone 3 (eller en
senere version):
Gå ind på App StoreSM og hent Parrot Audio Suite applikationen gratis. 1.
Sæt din iPhone på Parrot Zikmu Solo (skema s.6) eller forbind den med 2.
højttaleren via Bluetooth (se afsnittet Bluetooth > Tilslutning).
Start applikationen Parrot Audio Suite og tryk på Wi-Fi. 3.
> Listen over tilgængelige Wi-Fi netværk vises.
Vælg dit Wi-Fi netværk. Indtast WEP / WPA / WPA2 nøglen, hvis du bliver 4.
bedt om det.
Tryk på Tilslut. 5.
> Nu er Parrot Zikmu Solo forbundet med dit Wi-Fi netværk.
Manuel tilslutning
I standard opretter Parrot Zikmu Solo et Wi-Fi netværk. Du kan forbinde dig med
dette netværk for at oprette forbindelsen mellem Parrot Zikmu Solo og dit Wi-Fi
netværk.
Bemærk: Hvis Parrot Zikmu Solo allerede har været forbundet med et Wi-Fi netværk,
vil den ikke oprette sit eget Wi-Fi netværk. Du skal først initialisere Parrot Zikmu Solos
Wi-Fi parametre ved at holde knappen trykket ind i 2 sekunder.
DANSK 43
Page 44

Start en søgning efter Wi-Fi netværk på din computer.1.
Forbind dig med netværket «SoloNet-xx.xx» (på samme måde som du 2.
forbinder dig med en router / et modem).
Bemærk: Du mister din internetadgang midlertidigt. Du kan forbinde dig med dit
trådløse modem / router igen, når denne fremgangsmåde er slut.
Start din webbrowser på din computer eller din smartphone og skriv http://3.
zikmu-solo.local på adresselinjen.
Klik på Wi-Fi Konfiguration. 4.
> Listen over tilgængelige Wi-Fi netværk vises.
Vælg dit Wi-Fi netværk. 5.
Indtast WEP / WPA / WPA2 nøglen, hvis du bliver bedt om det og klik på 6.
Apply.
Brug af web interface
Med Parrot Zikmu Solos web interface kan du styre afspilningen af dine audiofiler
og ændre mange parametre (audio, Bluetooth). Du kan få adgang til den fra din
computer, smartphone eller tablet.
Forbind Parrot Zikmu Solo med dit Wi-Fi netværk ved hjælp af en af meto-1.
derne beskrevet i de foregående afsnit.
Start din webbrowser på din computer eller din smartphone.2.
Skriv 3. http://zikmu-solo.local (eller http://[nyt-navn].local, hvis du har
ændret højttalerens navn) på adresselinjen.
> Nu vises Parrot Zikmu Solos web interface.
44 DANSK
Page 45

Bluetooth
Brug sammen med en smartphone
Du kan bruge Parrot Zikmu Solo til at lytte til musikalske filer lagret på din smartphone. For at det kan lade sig gøre, skal din smartphone understøtte Bluetooth®
A2DP (Advanced Audio Distribution Profile).
Bemærk: Se siden med kompatibilitet på vores hjemmeside for at undersøge, om din
telefon er kompatibel med Parrot Zikmu Solo og se den tilsvarende fremgangsmåde for
parring: www.parrot.com/uk/compatibility.
Brug sammen med en computer
Du kan overføre musik til Parrot Zikmu Solo via Bluetooth fra alle PC’er, som
understøtter Bluetooth teknologien og alle Mac fra og med version MAC OS X
10. Den nøjagtige fremgangsmåde for tilslutning mellem din computer og Parrot
Zikmu Solo kan variere i forhold til din computer og den Bluetooth version, du har.
For yderligere oplysninger, se vejledningen til din enhed eller siden med support
til Parrot Zikmu Solo på vores hjemmeside www.parrot.com.
DANSK 45
Page 46

Tilslutning
Før du bruger Parrot Zikmu Solo sammen med din smartphone eller din computer,
skal du først forbinde de to enheder. Men hvis det er første gang, du bruger dette
udstyr, skal du parre de to enheder, før du forbinder dem. Denne fremgangsmåde
er kun nødvendig én gang pr. enhed.
Tænd Parrot Zikmu Solo.1.
Tag den magnetiske front af højttaleren (skema s.5).2.
Tryk på knappen 3.
> Den blå kontrollampe ved siden af denne knap giver sig til at blinke. Nu
er Parrot Zikmu Solo synlig for de andre perifere Bluetooth enheder i 2
minutter.
På din smartphone eller din computer skal du starte en søgning efter peri-4.
fere Bluetooth enheder.
Vælg «Zikmu-Solo».5.
Indtast «0000», hvis du bliver bedt om en PIN-kode. 6.
> Nu er Parrot Zikmu Solo parret med din enhed.
> Du kan sætte fronten på Parrot Zikmu Solo igen.
Forbind de to enheder med hinanden og start afspilningen af en musikalsk 7.
fil på din smartphone eller din computer for at lytte til musik på højttaleren.
Hvis din smartphone har en NFC-funktion, kan du ligeledes foretage tilslutningen
ved at berøre Parrot Zikmu Solo ved iPhone tilslutningen (skema s.8). Hvordan
din smartphone skal røre ved højttaleren, aænger af din smartphones model.
Se vejledningen til din smartphone for yderligere oplysninger.
46 DANSK
.
Page 47

Jack
Du kan forbinde en analog audioafspiller (f.eks.: CD-afspiller, ernsyn) med Parrot Zikmu Solo ved hjælp af et audio jack / jack kabel. Det gør du ved at sætte
kablet i jack-stikket, der sidder ovenpå højttaleren (skema s.7), og starte afspilningen af den musikalske fil på din audioafspiller.
Hvis du ønsker at forbinde Parrot Zikmu Solo med en enhed, der har en optisk digital audioudgang, skal du bruge den medfølgende toslink / jack adapter (skema
s.7).
Bemærk: For at undgå problemer med mætning af lyden, er det bedst at øge lydstyrken på Parrot Zikmu Solo frem for på audioafspilleren. Med lydmixeren, der findes på
Parrot Audio Suite applikationen, kan du indstille den basale lydstyrke for de enkelte
kilder, og på denne måde undgår du dårlige overraskelser (for høj lydstyrke efter ændring af kilde).
Bemærk: Kontroller, at tilslutningsstikkene sidder korrekt for at undgå forstyrrelser.
DANSK 47
Page 48

Fejlfinding
Ny initialisering
For at initialisere Wi-Fi parametrene på Parrot Zikmu Solo, skal du tage fronten af
(skema s.5) og trykke i 2 sekunder på knappen
Hvis du har et problem med en audioafspiller forbundet med Parrot Zikmu Solo
via Bluetooth:
Sluk audioafspilleren.1.
Tag fronten af (skema s.5) og tryk i 2 sekunder på knappen 2.
Genopret 3. Bluetooth forbindelsen mellem Parrot Zikmu Solo og
audioafspilleren.
Hvis du har et problem med Parrot Zikmu Solo og ønsker at starte den igen, skal
du tage fronten af (skema s.5) og trykke på knappen Reset.
Hvis du ønsker at genoprette fabriksindstillingerne, tryk i 2 sekunder på
knappen .
Bemærk: Disse initialiseringer kan også foretages ved hjælp af Parrot Audio Suite
applikationen.
48 DANSK
.
.
Page 49

Brug sammen med ernbetjening
Hvis det ser ud som om ernbetjeningen til Parrot Zikmu Solo ikke fungerer:
Kontroller, at batteriet er sat korrekt i (skema s.4).1.
Genstart Parrot Zikmu Solo.2.
Tryk samtidigt på tasterne SOURCE og 3.
med højttaleren. Efter genstart af højttaleren har du et minut til at foretage
denne handling.
for at forbinde ernbetjeningen
Opdatering
Kontroller, at du har den sidste nye opdatering på din Parrot Zikmu Solo. Ved
hjælp af din web interface kan du let og med ganske få klik se, om der findes en
opdatering til din højttaler.
Du kan ligeledes kontrollere din højttalers version nummer, hvis du har en iPod.
Det gør du ved at forbinde din iPod med Parrot Zikmu Solo og derefter vælge
Indstillinger > Generel > Information, hvis du har en iPhone, eller Indstillinger >
Information hvis du har en iPod. Gennemse de viste informationer, indtil du får
«Parrot Zikmu Solo by Starck».
Kompatibilitet
Hvis det ikke lykkes dig at bruge din telefon sammen med Parrot Zikmu Solo, se
siden med kompatibilitet på vores hjemmeside for at kontrollere, om din telefon
er kompatibel med Parrot Zikmu Solo og se den tilsvarende fremgangsmåde for
parring: www.parrot.com/uk/compatibility.
DANSK 49
Page 50

For yderligere oplysninger
Se siden med support til Parrot Zikmu Solo på vores hjemmeside:
www.parrot.com/uk/support/parrot-zikmu-solo.
50 DANSK
Page 51

Generelle oplysninger
Garanti
Parrot produkterne er dækket af en 1-års garanti fra købsdatoen, hvad angår reservedele og reparation, med mindre produktet er blevet ændret, og ved præsentation af et bevis for køb (dato og sted for køb samt produktets serienummer)
hos forhandleren eller direkte hos Parrot. Garantien dækker ikke opdatering af
software indbefattet i Parrot produkter med Bluetooth® mobiltelefoner beregnet
til regnskabsføring, indhentning af data, udvendig beskadigelse af produktet på
grund af normal brug af produktet, enhver beskadigelse forårsaget af et uheld, en
unormal brug eller en ikke autoriseret brug af produktet, et ikke Parrot produkt.
Parrot er ikke ansvarlig for opbevaring, tab eller beskadigelse af data under transport eller reparation. Et produkt, der viser sig ikke at være fejlbehæftet, vil blive
returneret til afsenderen, som vil få tilsendt en regning for udgifter til behandling,
kontrol og transport.
Korrekt aaldsbortskaelse af dette produkt(elektrisk og
elektronisk udstyr)
Til dette formål har alle kommuner etableret indsamlingsordninger, hvor aald
af elektrisk og elektronisk udstyr gratis kan afleveres af borgerne på genbrugsstationer eller andre indsamlingssteder eller hentes direkte fra husholdningerne.
Nærmere information skal indhentes hos kommunens tekniske forvaltning.Bru-
DANSK 51
Page 52

gere af elektrisk og elektronisk udstyr må ikke bortskae aald af elektrisk og
elektronisk udstyr sammen med husholdningsaald. Brugere skal benytte de
kommunale indsamlingsordninger for at mindske den miljømæssige belastning i
forbindelse med bortskaelse af aald af elektrisk og elek-tronisk udstyr og øge
mulighederne for genbrug, genanvendelse og nyttiggørelse af aald af elektrisk
og elektronisk udstyr.
Ændringer
Forklaringerne og specifikationerne i denne guide er kun vejledende og kan blive
ændret uden forudgående varsel. De anses for at være korrekte på det tidspunkt,
hvor de bliver trykt. Denne guide er blevet udarbejdet med største omhu i den
hensigt at give dig den mest nøjagtige information. Parrot kan dog ikke drages til
ansvar for konsekvenserne af fejl eller udeladelser i denne guide, eller for beskadigelser eller utilsigtet tab af data, som direkte eller indirekte er et resultat af
brugen af informationen heri. Parrot forbeholder sig ret til at ændre eller forbedre
produktets design eller brugervejledningen uden nogen form for begrænsning og
uden forpligtigelse til at underrette brugerne herom. Da vi konstant bestræber os
på at opgradere og forbedre vores produkter, kan det produkt, du har købt, være
lidt forskellig fra den model, der er beskrevet i denne guide. Hvis det er tilfældet,
kan der fås en senere udgave af denne guide i elektronisk format på Parrots website www.parrot.com.
52 DANSK
Page 53

Overensstemmelseserklæring
Parrot SA, 174 quai de Jemmapes, 75010 Paris, Frankrig, erklærer under sit unikke
ansvar, at højttaleren Parrot Zikmu Solo er i overensstemmelse med de tekniske
standarder EN300328, EN300220, EN301489-17, IEC60065 iht. direktiverne
EMC 204/108/EØF, Elektrisk sikkerhed: 2006/95/EF og R&TTE: 1999/5/EF.
Handels- og Selskabsregistret (RSC) i Paris nr.394 149 496
Sikkerhedsanvisninger
OBS: For at reducere risikoen for antændelse eller elektriske stød, må dette apparat ikke udsættes for regn eller fugt.
1. Læs disse anvisninger.
2. Gem disse anvisninger til senere brug.
3. Tag hensyn til alle advarslerne.
4. Følg alle disse anvisninger.
5. Brug ikke dette apparat i nærheden af væsker.
6. Apparatet må kun rengøres med en tør klud.
7. Tilstop ikke ventilationsåbningerne. Installer apparatet under overholdelse af
fabrikantens anvisninger.
8. Installer ikke dette apparat i nærheden af en varmekilde, radiatorer, ovne eller
andre apparater (inklusiv forstærkere), som udvikler varme.
9. Apparatets polariserede stik eller stik til jordforbindelse må ikke ændres. Et
polariseret stik har to ben i metal, hvoraf det ene er bredere end det andet. Et stik
til jordforbindelserne har to ben i metal og en tredje gren til jordforbindelse. Det
bredeste ben i metal og grenen til jordforbindelse tillader en sikker brug af apparatet. Hvis de medfølgende stik ikke passer til din installation, skal du tilkalde en
DANSK 53
Page 54

elektriker for at få udskiftet din forældede installation.
10. Træd ikke på apparatets el-ledning og undgå at klemme stiktilslutningerne.
Opbevar den i et velegnet rum. Beskyt apparatets stiktilslutninger.
11. Brug kun de clips / tilbehørsdele, som fabrikanten anbefaler.
12. Tag apparatets stik ud i tilfælde af tordenvejr eller i en længere periode uden
brug.
13. Kontakt et autoriseret serviceværksted vedrørende ethvert indgreb på apparatet. Et indgreb er nødvendigt, hvis apparatet er beskadiget og f.eks. har en
beskadiget el-ledning, men også hvis en væske er blevet spildt på apparatet eller
hvis der er blevet ført genstande ind i det, samt hvis apparatet falder ned, bliver
væltet, udsættes for regnvejr eller fugt eller hvis det ikke fungerer korrekt.
14. Udsæt ikke dette apparat for fugt eller overstænkninger med væsker. Stil ikke
genstande, som f.eks. vaser, fyldt med væske ovenpå apparatet.
15. For at garantere at apparatets strømforsyning er helt arudt, skal apparatets
el-ledning tages ud af stikket.
16. Sørg for, at den ledning, der forbinder apparatet med et elstik, altid er let tilgængelig.
17. For at undgå enhver risiko for elektriske stød, må højttaleren ikke skilles ad og
skruerne under højttaleren må aldrig tages ud.
18. Adskil aldrig højttaleren og skru aldrig skruerne af.
Maksimal brugstemperatur: 40°C
Copyright
Copyright © 2012 Parrot.
54 DANSK
Page 55

Hızlı kullanım kılavuzu
Bu kılavuz hakkında
Kağıt tüketimini azaltmak ve çevreye karşı mümkün olduğunca sorumlu ve saygılı
davranma çabamız kapsamında, Parrot kullanıcı belgelerinin basılmasından ziyade, online olarak sunulmasını tercih etmektedir. Bu nedenle bu Parrot Zikmu Solo
basitleştirilmiş kılavuzu, bu cihazı kolayca kullanabilmenize olanak sağlayacak
başlıca bilgileri sunmaktadır. Web sitemizin Destek bölümünde daha fazla bilgi
bulabilirsiniz :www.parrot.com: komple kullanım kılavuzu, Sıkça Sorulan Sorular,
bilgilendirmeler, vb.
İçindekiler
sf.56 İlk kullanım
sf.59 iPod®
sf.61 Wi-Fi®
sf.65 Bluetooth®
sf.67 Jack
sf.68 Sorun halinde
sf.71 Genel bilgiler
TÜRKÇE 55
Page 56

İlk kullanım
Not: Daha iyi okunabilirlik için, iPod ® ve iPhone® (müzik modunda) bu el kitabında
«iPod» terimiyle ifade edilecektir. Uyumlu telefon ve tabletler «Akıllı telefon» terimiyle ifade edilecektir.
Elektrik şebekesi bağlantısı
Birlikte verilen besleme kablosunu kullanarak hoparlörü elektriğe bağlayın (şema
sf.4).
> Hoparlör otomatik olarak açılır.
yanık kalır.
Uzaktan kumanda
Pili (birlikte verilen) pil yuvasına takın (şema sf.4).
Not: Sadece CR2032 tipi bir pil kullanın.
Parrot Zikmu Solu’nun açılması / kapatılması
Hoparlörleri açmak/kapatmak için uzaktan kumanda veya kontrol paneli üzerin-
düğmesine basın.
deki
56 TÜRKÇE
simgesi birkaç saniye yanıp söner, ardından
Page 57

Ön yüzü çıkartmak
Wi-Fi, Bluetooth ve Reset (Sıfırlama) düğmesine erişmek için, Parrot Zikmu Solo’nun mıknatıslı ön yüzünü çıkartın (şema sf.5).
Düğmeler Görevler
Kısa basma: WPS teknolojisini destekleyen
bir modem veya router (yönlendirici) ile Wi-Fi
bağlantısı oluşturmak (bkz. Wi-Fi bölümü > WPS
ile bağlantı).
Uzun basma: Wi-Fi ve ethernet parametrelerini
yeniden başlatmak.
Kısa basma: Parrot Zikmu Solo’yu Bluetooth
üzerinden görünür kılar. Kulaklıkla birlikte ilk kez
kullanacağınız bir Bluetooth çevrebirim bağlamak
için mutlaka bu düğmeye basmanız gerekir(bkz.
bölüm Bluetooth > Bağlantı).
Uzun basma: Tüm eşleştirmeleri siler (hoparlöre
bağlı olan hariç).
Reset (Sıfırlama) Hoparlörü yeniden başlatır.
TÜRKÇE 57
Page 58

Bir ses kaynağının seçilmesi
Parrot Zikmu Solo ile birçok ses kaynağı kullanabilirsiniz: Wi-Fi üzerinden
bağlanmış bilgisayar, Bluetooth üzerinden bağlanmış bilgisayar veya Akıllı telefon,
iPod, analog müzik çalar, televizyon veya dijital optik çıkışlı DVD okuyucu.
Etkin ses kaynakları arasında değişim yapmak için uzaktan kumandanın KAYNAK
düğmesine basın.
Parça çalınırken, ikinci bir kaynaktan başka bir parçayı başlatırsanız, otomatik olarak bu yeni kaynak seçilecektir. Birinci kaynak hoparlöre Jack soketi ile bağlanmış
bir ses çalar ise, ilk kaynaktaki parça otomatik olarak duraklatılır.
Ses Ayarı
Düğmeler Görevler
Sesi arttırma
Sesi azaltma
58 TÜRKÇE
Page 59

iPod
Not: Hoparlörle uyumlu iDevices hakkında daha fazla bilgi almak için Parrot Zikmo
Solo destek sayfasına bakın.
Dock adaptörünün kullanılması
Parrot Zikmu Solo ile birlikte iki dock adaptörü verilir. iPhone 4S / iPhone 4 ve
iPhone 3GS / iPhone 3G adaptörlerine karşılık gelirler. Parrot Zikmu Solo’yu
bir iPod ile birlikte kullanmak isterseniz, iPod’unuzla birlikte verilen adaptörü
kullanın.
Dock adaptörünü takmak için, iPod soketinin üzerine yerleştirip, iki taraftan
bastırın.
iPod bağlantısı
Dock adaptörünü seçip hoparlöre taktıktan sonra:
iPod’unuzun kulaklıklarını çıkartın. 1.
iPod’unuzu hoparlöre takın (şema sf.6). 2.
> iPod şarj olmaya başlar. Şimdi iPod cihazınızda bir müzik dosyasını çalmaya başlayabilirsiniz.
TÜRKÇE 59
Page 60

Uygulamanın indirilmesi
App StoreSM veya Google Play® ‘e bağlanın ve ücretsizParrot Audio Suite
uygulamasını indirin. Bu uygulama özellikle hoparlörün ses ayarlarını yapmanıza
ve hoparlörü kolaylıkla Wi-Fi ağınızı bağlamanızı sağlar.
60 TÜRKÇE
Page 61

Wi-Fi
Başlamadan önce
Wi-Fi üzerinden Parrot Zikmu Solo üzerine Windows® XP (SP 2 veya üzeri), Windows Vista®, Windows® 7 işletim sistemlerine sahip tüm PC’ler ve MAC OS X 10
versiyonundan itibaren Mac bilgisayarlar ile müzik aktarabilirsiniz.
İnternet bağlantısını koruyarak Wi-Fi üzerinden Parrot Zikmu Solo’ya müzik aktarmak isterseniz, Bir Wi-Fi erişim noktasına ihtiyacınız olacak ve Parrot Zikmu
Solo’yu Wi-Fi ağınıza bağlamanız gerekecektir. Aksi halde, Parrot Zikmu Solo
tarafından oluşturulan Wi-Fi ağına bağlanabilirsiniz: SoloNet-xx.xx.
Not: Parrot Zikmu Solo’nun Wi-Fi modundaki performansları temelde modeminiz/
yönlendiricinizin performanslarına bağlıdır. Ayrıca Wi-Fi erişim noktanız ve Parrot
Zikmu Solo arasında bazı engeller bulunması da (duvarlar, bölmeler, metal, vb.) Parrot Zikmu Solo’nun ses kalitesini etkiler. Aktarma sorunları halinde hoparlörünüzün
yerini değiştirin.
Parrot Zikmu Solo hoparlörünüzü Wi-Fi ağınıza farklı şekillerde bağlayabilirsiniz.
Bağlantı prosedürleri www.parrot.com web sitemizde bulunan Parrot Zikmu Solo
kılavuzunda detaylı olarak anlatılmıştır.
TÜRKÇE 61
Page 62

WPS ile bağlantı
Modeminiz/yönlendiriciniz WPS teknolojisini destekliyorsa:
Kablosuz modeminizin veya kablosuz router’ınızın WPS düğmesine basın. 1.
Daha fazla bilgi için cihazınızın belgelerine bakın.
Parrot Zikmu Solo’nun mıknatıslı yüzünün arkasında bulunan düğmesine 2.
basın.
> Bu düğmenin yanında bulunan yeşil ışık yanıp söner. Bağlantı 3.
kurulduğunda yanık kalır.
RJ45 kablosu ile bağlantı
Not: Ağ kablosu veya ethernet kablosu adı da verilen RJ45 kablo, Parrot Zikmu Solo
ile birlikte verilmez.
Bilgisayarınızı bir RJ45 kablo kullanarak Parrot Zikmu Solo’ya bağlayın 1.
(şema sf.8).
Bilgisayarınızda web tarayıcınızı başlatın ve adres çubuğuna 2.
http://zikmusolo.local/wifi yazın.
> Kullanılabilir Wi-Fi ağlarının listesi görünür.
Wi-Fi ağınızı seçin. 3.
Sorulduysa, WEP / WPA / WPA2 anahtarını girin ve ardından 4. Uygula üzerine tıklayın.
62 TÜRKÇE
Page 63

iPhone ile bağlantı
Bir iPod Touch 2G (veya üst versiyon) veya iPhone 3 (veya üst versiyon) sahibiyseniz:
App StoreSM uygulamasına bağlanın ve ücretsiz Parrot Audio Suite 1.
uygulamasını indirin.
iPhone cihazınızı Parrot Zikmu Solo üzerine yerleştirin (şema sf. 6) veya 2.
Bluetooth üzerinden hoparlöre bağlayın (Bluetooth > Bağlantı bölümüne
bakın).
Parrot Audio Suite uygulamasını başlatın ve Wi-Fi üzerine basın. 3.
> Kullanılabilir Wi-Fi ağlarının listesi görünür.
Wi-Fi ağınızı seçin. Sorulduysa WEP / WPA / WPA2 anahtarını girin.4.
Katıl5. üzerine basın.
> Parrot Zikmu Solo artık Wi-Fi ağınıza bağlanmıştır.
Manüel bağlantı
Parrot Zikmu Solo varsayılan bir Wi-Fi ağı oluşturur. Parrot Zikmu Solo hoparlörü
Wi-Fi ağınıza bağlamak için bu ağa bağlanabilirsiniz.
Not: Parrot Zikmu Solo zaten bir Wi-Fi ağına bağlıysa, kendi Wi-Fi ağını
yaratmayacaktır. Bundan önce, düğmesini 2 saniye basılı tutarak Parrot Zikmu
Solo’nun Wi-Fi parametrelerini yeniden başlatmanız gerekir.
TÜRKÇE 63
Page 64

Bilgisayarınızda, Wi-Fi ağlarını aratmaya başlayın.1.
«SoloNet-xx.xx» ağına bağlanın (bir router/modem ile bağlantı kurmayla 2.
aynı şekilde).
Not: Geçici olarak internet bağlantınızı kaybedeceksiniz. Bu prosedürün sonunda
kablosuz modem/router’ınıza yeniden bağlanabilirsiniz.
Bilgisayarınız veya Akıllı telefonunuzdan, web tarayıcınızı başlatın ve adres 3.
çubuğuna http://zikmu-solo.local adresini yazın.
Wi-Fi Yapılandırması4. üzerine tıklayın.
> Kullanılabilir Wi-Fi ağlarının listesi görünür.
Wi-Fi ağınızı seçin. 5.
Sorulduysa, WEP / WPA / WPA2 anahtarını girin ve ardından Uygula üze-6.
rine tıklayın.
Web arayüzünün kullanılması
Parrot Zikmu Solo’nun web arayüzü ses dosyalarının okunmasını kontrol etmeyi
ve birçok parametrenin değiştirilmesini sağlar (ses, Bluetooth). Web arayüzüne
bilgisayarınız, Akıllı telefonunuz veya tabletle erişebilirsiniz.
Önceki bölümlerde anlatılan yöntemlerden birini kullanarak Parrot Zikmu 1.
Solo hoparlörü Wi-Fi ağınıza bağlayın.
Bilgisayarınız veya Akıllı telefonunuzdan, web tarayıcınızı başlatın.2.
Adres çubuğuna 3. http://zikmu-solo.local (veya hoparlörün adını
değiştirdiyseniz http://[yeni-isim].local) yazın.
> Parrot Zikmu Solo web arayüzü görünür.
Not: Bu web arayüzünün kullanımıyla ilgili daha fazla bilgi için, Parrot Zikmu Solo
destek sayfasındaki bilgilendirme bölümüne bakın.
64 TÜRKÇE
Page 65

Bluetooth
Akıllı telefonla birlikte kullanma
Parrot Zikmu Solo hoparlörü Akıllı telefonunuzda sakladığınız müzik dosyalarını
dinlemek için kullanabilirsiniz. Bunun için Akıllı telefonunuz Bluetooth® A2DP
(Gelişmiş Ses Dağıtım Profili) profilini desteklemelidir.
Not: Telefonunuzun Parrot Zikmu Solo ile uyumlu olup olmadığını öğrenmek ve ilgili eşleştirme prosedürünü görmek için web sitemizdeki uyumluluk sayfasına bakın:
www.parrot.com/uk/compatibility.
Bilgisayarla birlikte kullanma
Parrot Zikmo Solo hoparlöre Bluetooth teknolojisini destekleyen tüm PC’lerden
ve MAC OS X 10 versiyonundan itibaren Mac bilgisayarlardan Bluetooth üzerinden müzik aktarabilirsiniz. Bilgisayarınız ve Parrot Zikmu Solo arasındaki doğru
bağlantı prosedürü Bluetooth versiyonunuza göre değişiklik gösterebilir. Daha
fazla bilgi için, cihazınızın kullanım kılavuzuna ya da www.parrot.com internet
sitemizdeki Parrot Zikmu Solo destek sayfasına bakın.
TÜRKÇE 65
Page 66

Bağlantı
Parrot Zikmu Solo hoparlörü Akıllı telefon veya bilgisayarınızla birlikte kullanmadan önce, iki cihaz arasında bağlantı kurmanız gerekir. Ancak bu donanımı ilk
kez kullanıyorsanız, iki cihazı birbirine bağlamadan önce eşleştirmeniz gerekir. Bu
işleminin her cihaz için sadece bir kez yapılması gerekir.
Parrot Zikmu Solo hoparlörü açın.1.
Hoparlörün mıknatıslı yüzünü çıkartın (şema sf.5).2.
3.
düğmesine basın.
> Bu düğmenin yanındaki mavi lamba yanıp söner. Parrot Zikmu Solo artık 2
dakika boyunca diğer Bluetooth çevrebirimleri tarafından görülebilir.
Akıllı telefonunuz veya bilgisayarınızdan, 4. Bluetooth çevrebirimleri aratmaya
başlayın.
« Zikmu-Solo » yu seçin.5.
Bir PIN kodu sorulursa «0000» girin. 6.
> Parrot Zikmu Solo artık cihazınızla eşleşmiştir.
> Parrot Zikmu Solo’nun kapağını yeniden takabilirsiniz.
İki cihaz arasında bağlantı kurun, ardından hoparlör üzerinden müzik dinle-7.
mek için Akıllı telefonunuz veya bilgisayarınızdan bir müzik dosyası çalın.
Akıllı telefonunuzda NFC fonksiyonu varsa, iPhone soketinden, Parrot Zikmu Solo’ya dokunarak da bağlantıyı kurabilirsiniz (şema sf.8). Hoparlöre dokunmanız
gereken Akıllı telefonun yeri modeline göre değişiklik gösterir. Daha fazla bilgi için
Akıllı telefonunuzun kullanım kılavuzuna bakın.
66 TÜRKÇE
Page 67

Jack
Bir jack/jack ses kablosu kullanarak, Parrot Zikmu Solo’ya analog bir ses çalar (ör:
CD çalar, televizyon) bağlayabilirsiniz. Bunun için, kabloyu hoparlörlerden birinin altında bulunan jack soketine bağlayın (şema sf.7) ve ses çalarınızda müzik
dosyasını çalın.
Parrot Zikmu Solo hoparlörü dijital optik ses çıkışlı bir cihaza bağlamak isterseniz,
birlikte verilen toslink/jack adaptörünü kullanın (şema sf.7).
Not: Her türlü ses doygunluğu sorununu önlemek için, ses çalardan ziyade Parrot Zikmu Solo’nun ses seviyesindeki artışa öncelik verin. Parrot Audio Suite uygulamasındaki
miksaj tablosu her ses kaynağı için ses seviyesini ayarlamanızı ve her türlü kötü sürprizi
önlemenizi sağlar (ses kaynağını değiştirdikten sonra çok yüksek ses seviyesi).
Not: Her türlü bozukluktan kaçınmak için, soketlerin düzgün takıldığından emin
olun.
TÜRKÇE 67
Page 68

Sorun halinde
Yeniden başlatma
Parrot Zikmu Solo hoparlörün Wi-Fi parametrelerini yeniden başlatmak için, ön
yüzü çıkartın (şema sf.5) ve
Solo hoparlöre Bluetooth üzerinden bağlı bir ses çalarla ilgili sorun yaşarsanız:
Ses çaları kapatın.1.
Ön yüzü çıkartın (şema sf.5) ve 2.
Parrot Zikmu Solo ve ses çalar arasındaki 3. Bluetooth bağlantısını yeniden
kurun.
Parrot Zikmu Solo hoparlörle bir sorununuz varsa ve hoparlörü yeniden başlatmak
istiyorsanız, ön yüzü çıkartın (şema sf.5) ve Reset (Sıfırlama) düğmesine basın.
Fabrika ayarlarına dönmek istiyorsanız, tuşunu 2 saniye basılı tutun.
Not: Bu yeniden başlatma işlemleri Parrot Audio Suite uygulaması kullanılarak da
yapılabilir.
68 TÜRKÇE
düğmesini 2 saniye basılı tutun. Parrot Zikmu
düğmesini 2 saniye basılı tutun.
Page 69

Uzaktan kumandanın eşleştirilmesi
Parrot Zikmu Solo uzaktan kumandası çalışmıyor gibi görünüyorsa:
Pilin doğru takıldığından emin olun (şema sf.4).1.
Parrot Zikmu Solo hoparlörü yeniden başlatın.2.
Uzaktan kumandayı hoparlörle eşleştirmek için aynı anda 3. KAYNAK ve
tuşlarına basın. Bu işlemi yapmak için hoparlörü yeniden başlattıktan sonra
bir dakikanız vardır.
Güncelleme
Parrot Zikmu Solo hoparlörün son güncellemesine sahip olduğunuzdan emin olun.
Web arayüzünü kullanmak bir güncelleme olup olmadığını kolaylıkla öğrenmenizi
ve birkaç tıklama ile hoparlörünüzü güncellemenizi sağlar.
İpod cihazınız varsa, hoparlörün versiyon numarasını da kontrol edebilirsiniz. Bunun için, iPod cihazı Parrot Zikmu Solo hoparlöre bağlayın, ardından iPhone sahibiyseniz Ayarlar > Genel > Bilgiler, iPod sahibiyseniz Ayarlar > Bilgiler bölümlerini seçin. «Parrot Zikmu Solo by Starck» görününceye kadar bilgilere gözatın.
Uyumluluk
Telefonunuzu Parrot Zikmu Solo hoparlörle kullanamazsanız, telefonunuzun
Parrot Zikmu Solo ile uyumlu olup olmadığını öğrenmek ve ilgili eşleştirme
prosedürüne bakmak için web sitemizdeki uyumluluk sayfasına bakın: www.par-
rot.com/uk/compatibility.
TÜRKÇE 69
Page 70

Daha fazla bilgi için
Web sitemizdeki Parrot Zikmu Solo destek sayfasına bakın:
www.parrot.com/uk/support/parrot-zikmu-solo.
70 TÜRKÇE
Page 71

Genel bilgiler
Garanti
Parrot ürünlerinin, ürüne tadilat yapılmış olması durumu hariç, bayinize veya
doğrudan Parrot’a bir satın alma belgesi ibraz edilmek suretiyle (satın alma tarihi ve yeri, ürünün seri nosu) satın alma tarihinden itibaren 1 yıllık bir parça ve
işçilik garantisi vardır. Garanti, Parrot ürünlerine dâhil olan yazılımların uyumluluk amacıyla Bluetooth® cep telefonları yardımıyla güncelleştirilmesi, verilerin
kurtarılması, ürünün normal kullanımından kaynaklanan dış yıpranmasını, kaza ya
da ürünün anormal veya izinsiz kullanımı sonucunda oluşan veya Parrot ürünü
olmayan bir üründen dolayı meydana gelen herhangi bir zararı kapsamamaktadır
Parrot, verilerin depolanmasıyla veya nakliye ya da onarım sırasında verilerde
oluşabilecek kayıp veya zararlar ile ilgili hiçbir sorumluluk kabul etmez. Arızalı
olmadığı belirlenen her tür ürün göndericiye geri yollanacaktır ve işlem, kontrol ve
nakliye masrafları kendisine fatura edilecektir.
Değişiklikler
Bu kılavuzdaki açıklamalar ve tanımlamalar yalnızca bilgilendirmek amacıyla
verilmiştir ve önceden haber verilmeksizin değiştirilebilir. Baskıya girildiği sırada
doğru olduklarına inanılır. Size doğru bilgiler sağlamak amacının bir parçası ola-
TÜRKÇE 71
Page 72

rak, bu kılavuzun yazılmasında en büyük özen gösterilmiştir. Ancak, Parrot, bu
kılavuzun içindeki her tür hatadan veya eksik bilgiden dolayı meydana gelebilecek
hiçbir sonuçtan, ne de buradaki bilgilerin kullanımından doğrudan veya dolaylı
şekilde sonuçlanabilecek hiç bir hasardan veya veri kaybından dolayı sorumlu
tutulamaz. Parrot hiçbir kısıtlama getirilmeksizin ve kullanıcılara bilgi vermedes yönüne herhangi bir zorunluluğu olmaksızın, ürün tasarımını veya kullanım
kılavuzunu değiştirme veya iyileştirme hakkını saklı tutmaktadır. Ürünlerimizi
yükseltmeye ve iyileştirmeye göstermiş olduğumuz sürekli ilgimizin bir parçası
olarak, satın almış olduğunuz ürün bu kılavuzda tarif edilen modelden biraz farklı
olabilir. Bu durumda, Parrot’un www.parrot.com adresindeki İnternet sitesinde
bu kılavuzun daha yeni bir sürümü
elektronik formatta mevcut olabilir.
Uygunluk beyanı
Parrot SA, 174 quai de Jemmapes, 75010 Paris, Fransa, Parrot Zikmu Solo hoparlörün EMC 204/108/EEC, Elektrik güvenliği: 2006/95/CE ve R&TTE:1999/5/
EC yönergelerine göre EN300328, EN300220, EN301489-17, IEC60065 teknik
normlarına uygunluğu konusunda tek sorumlu olduğunu beyan eder.
RSC Paris n°394 149 496
Güvenlik talimatları
DİKKAT: Yangın veya elektrik çarpması risklerini azaltmak için, bu cihazı yağmur
ya fa neme maruz bırakmayın.
1. Bu talimatları okuyun.
2. Bu talimatları saklayın.
3. Tüm uyarıları dikkate alın.
72 TÜRKÇE
Page 73

4. Tüm talimatları takip edin.
5. Bu cihazı sıvı maddelerin yakınında kullanmayın.
6. Cihazı sadece kuru bir bezle temizleyin.
7. Havalandırma kanallarını tıkamayın. Cihazı üretici talimatlarına uygun şekilde
yerleştirin.
8. Cihazı bir ısı kaynağının yakınına yerleştirmeyin. Radyatörler, fırınlar ve diğer ısı
yayan cihazlar (amplifikatörler dahil).
9. Cihazın kutuplu soketlerinde ve topraklama kablolarında değişiklik yapmayın.
Kutuplu soketler biri diğerinden daha geniş olan iki metal fişten meydana gelir.
Topraklama soketleri bir topraklama ucu ve iki metal fişten meydana gelir. Metal fişlerden daha geniş olanı ve topraklama ucu cihazınızı güvenle kullanmanızı
sağlar. Birlikte verilen soketler elektrik donanımınıza uygun değilse, kullanılamayan
elektrik donanımızı değiştirmesi için bir elektrikçi çağırın.
10. Cihazın besleme kablosunun üzerine basmayın ve soketleri sıkıştırmaktan
kaçının. Bunları uygun bir toplama yerinde düzenli halde tutun. Cihazın soketlerini koruyun.
11. Sadece üreticinin belirttiği bağlantıları/aksesuarları kullanın.
12. Fırtına sırasında ya da uzun süre kullanmayacaksanız cihaz bağlantılarını
çıkartın.
13. Cihaz üzerinde yapılacak her türlü müdahalede, yetkili servislere başvurun.
Hasarlı bir besleme kablosu gibi, cihazda hasar görüldüğünde müdahale gerekir. Aynı zamanda cihaz üzerine bir sıvı döküldüğünde ya da içerisine yabancı
maddelerin girmesi halinde de müdahale edilmesi gerekir. Yine cihazın her türlü
düşme, devrilme, yağmur ya da neme maruz kalması ya da düzgün çalışmaması
da müdahale gerektirir.
14. Bu cihazı sıvı sıçramaları ya da sızıntılarına maruz kalmayacak şekilde
yerleştirin. Cihaz üzerin vazo gibi, içi sıvı dolu eşyalar koymayın.
TÜRKÇE 73
Page 74

15. Cihazın elektrik şebekesi bağlantısının kesildiğinden emin olmak için, cihazın
elektrik kablosunu prizden çekin.
16. Şebeke beslemesiyle bağlantıyı kesmeyi sağlayan besleme kablosunun daima
kolaylıkla çıkartılabilir olmasını sağlayın.
17. Her türlü elektrik çarpması riskini azaltmak için, hoparlörleri sökmeyin ve
altlarında bulunan vidaları çıkartmayın.
18. Hoparlörleri sökmeyin ve hiçbir vidayı çıkartmayın. Maksimum kullanma
sıcaklığı: 40 C°
Copyright
Copyright © 2012 Parrot.
74 TÜRKÇE
Page 75

Pikaopas
Tietoja oppaasta
Vähentääkseen paperinkulutusta ja toimiakseen mahdollisimman ympäristöystävällisesti Parrot julkaisee käyttäjädokumentit painetun version sijaan verkossa.
Tässä Parrot Zikmu Solon yksinkertaistetussa oppaassa esitetään tärkeimmät
ohjeet, joiden avulla tätä laitetta voidaan käyttää helposti. Lisätietoja on saatavilla Support-osiossa verkkosivullamme www.parrot.com : käyttöohje, FAQ, ope-
tusohjelmat jne.
Sisällysluettelo
s. 76 Ensimmäinen käyttökerta
s. 79 iPod ®
s. 81 Wi-Fi ®
s. 85 Bluetooth ®
s. 87 Jakki
s. 88 Ongelmanratkaisu
s. 91 Yleistä tietoa
SUOMI 75
Page 76

Ensimmäinen käyttökerta
Huom. Tässä käyttöoppaassa iPod®- ja iPhone®-laitteista (musiikkitilassa) käytetään selvyyden vuoksi termiä ”iPod”. Yhteensopivista puhelimista tai tableteista
käytetään termiä ”älypuhelin”.
Kytkentä verkkovirtaan
Kytke kaiutin pistorasiaan mukana toimitetulla virtajohdolla (kaavio s. 4).
> Kaiutin käynnistyy automaattisesti. Kuvake
ajan ja jää sitten päälle.
Kaukosäädin
Aseta paristo (sisältyy pakkaukseen) tätä varten varattuun paikkaan (kaavio
s. 4).
Huom. Käytä vain CR2032-tyyppistä paristoa.
Käynnistä/sammuta Parrot Zikmu Solo
Käynnistä/sammuta kaiutin painamalla kaukosäätimen tai ohjauspaneelin paini-
.
ketta
76 SUOMI
vilkkuu muutaman sekunnin
Page 77

Poista kansi
Poista Parrot Zikmu Solon magneettikansi, jotta pääset käyttämään Wi-Fi-, Bluetooth- ja Reset-painikkeita (kaavio s. 5).
Painikkeet Toiminnot
Lyhyt painallus : Muodosta Wi-Fi-yhteys langattomaan modeemiin tai reitittimeen, joka tukee
WPS-teknologiaa (ks. kohta Wi-Fi > Yhdistäminen
WPS:llä).
Pitkä painallus : Nollaa Wi-Fi- ja Ethernet-asetukset.
Lyhyt painallus : Lyhyt painallus: Parrot Zikmu
Solo näkyy Bluetoothin kautta. Sinun tulee ehdottomasti painaa tätä painiketta, jotta saat liitettyä
Bluetooth-oheislaitteen, jota käytät ensimmäistä
kertaa kaiuttimen kanssa (ks. kohta Bluetooth >
Yhdistäminen).
Pitkä painallus : Poistaa kaikki laiteparit (lukuun
ottamatta kaiuttimeen yhdistettyä paria).
Reset Nollaa kaiuttimen asetukset.
SUOMI 77
Page 78

Äänilähteen valinta
Parrot Zikmu Solon kanssa voidaan käyttää useita eri äänilähteitä: Wi-Fin kautta
yhdistetty tietokone, Bluetoothin kautta yhdistetty tietokone tai älypuhelin,
iPod, analoginen audiosoitin, TV tai DVD-laite, jossa on optinen digitaalinen äänilähtö.
Voit valita haluamasi äänilähteen aktiivisten äänilähteiden joukosta painamalla
kaukosäätimen SOURCE -painiketta.
Jos käynnistät musiikin kuuntelun aikana uuden musiikkitiedoston jostakin toisesta lähteestä, tämä uusi lähde valitaan automaattisesti. Ensimmäisen lähteen
musiikkikappale keskeytyy automaattisesti, paitsi silloin kun ensimmäinen lähde
on audiosoitin, joka on liitetty kaiuttimeen sen jakkiliittimen kautta.
Äänenvoimakkuuden säätäminen
Painikkeet Toiminnot
Nostaa äänenvoimakkuutta
Pienentää äänenvoimakkuutta
78 SUOMI
Page 79

iPod
Huom. Tarkista kaiuttimen kanssa yhteensopivat iDevices-laitteet Parrot Zikmu
Solon tukisivulta.
Telakkasovittimen käyttö
Parrot Zikmu Solon mukana toimitetaan kaksi telakkasovitinta. Ne vastaavat
iPhone 4S:n / iPhone 4:n ja iPhone 3GS:n / iPhone 3G:n sovittimia. Jos haluat
käyttää Parrot Zikmu Soloa iPodin kanssa, käytä iPodin mukana toimitettua sovitinta.
Telakkasovitin liitetään asettamalla se iPod-liittimen päälle, minkä jälkeen painamalla molemmilta sivuilta.
iPodin liittäminen
Kun olet valinnut ja liittänyt telakkasovittimen kaiuttimeen
Irrota kuulokkeet iPodista. 1.
Liitä iPod kaiuttimeen (kaavio s. 6). 2.
> iPod alkaa latautua. Voit nyt valita musiikkitiedoston iPodista ja nauttia
musiikista.
SUOMI 79
Page 80

Sovelluksen lataaminen
Siirry App StoreSM tai Google Play® -palveluun ja lataa ilmainen Parrot Audio
Suite -sovellus. Tämän sovelluksen avulla voit säätää kaiuttimen ääniasetuksia ja
liittää kaiuttimen helposti Wi-Fi-verkkoon.
80 SUOMI
Page 81

Wi-Fi
Ennen kuin aloitat
Voit siirtää musiikkia Wi-Fin kautta Parrot Zikmu Soloon kaikista PC-tietokoneista, joiden käyttöjärjestelmänä on Windows® XP (SP 2 tai myöhempi), Windows Vista®, Windows® 7, ja Mac-laitteista, MAC OS X 10 -versiosta lähtien.
Jos haluat siirtää musiikkia Wi-Fin kautta Parrot Zikmu Soloon säilyttäen samalla
internetyhteyden, tarvitset Wi-Fi-pääsypisteen ja sinun tulee liittää Parrot Zikmu Solo Wi-Fi-verkkoon. Muussa tapauksessa voit yhdistyä Parrot Zikmu Solon
muodostamaan Wi-Fi-verkkoon: SoloNet-xx.xx.
Huom. Parrot Zikmu Solon suoritusteho Wi-Fi-tilassa riippuu ensisijaisesti modeemin/reitittimen suoritustehosta. Parrot Zikmu Solon äänenlaatu voi heikentyä, jos
Wi-Fi-pääsypisteen ja Parrot Zikmu Solon välissä on esteitä (seinä, aita, metalli jne.).
Siirrä kaiutin toiseen paikkaan, jos siirto-ongelmia esiintyy.
Parrot Zikmu Solo voidaan yhdistää Wi-Fi-verkkoon usealla eri tavalla. Erilaiset
yhdistämistavat esitetään yksityiskohtaisesti Parrot Zikmu Solon käyttöohjeessa,
joka on saatavilla verkkosivulla www.parrot.com.
SUOMI 81
Page 82

Yhdistäminen WPS:llä
Jos modeemi/reititin tukee WPS-teknologiaa
Paina langattoman modeemin tai reitittimen WPS-painiketta. Katso laitteen 1.
dokumentaatiosta lisätietoja.
Paina Parrot Zikmu Solon painiketta 2.
takana.
> Painikkeen vieressä oleva vihreä merkkivalo vilkkuu. Merkkivalo jää päälle,
kun yhteys on muodostunut.
, joka sijaitsee magneettikannen
Yhdistäminen RJ45-kaapelilla
Huom. Parrot Zikmu Solon mukana ei toimiteta RJ45-kaapelia (eli verkkokaapeli tai
Ethernet-kaapeli).
Yhdistä tietokone Parrot Zikmu Soloon RJ45-kaapelilla (kaavio s. 8).1.
Avaa tietokoneen verkkoselain ja kirjoita osoitekenttään 2.
http://zikmusolo.local/wifi.
> Näkyviin tulee käytettävissä olevien Wi-Fi-verkkojen luettelo.
Valitse Wi-Fi-verkkosi. 3.
Syötä WEP-/WPA-/WPA2-avain, jos sitä pyydetään, ja paina 4. Apply.
82 SUOMI
Page 83

Yhdistäminen iPhonella
Jos sinulla on iPod Touch 2G (tai suurempi versio) tai iPhone 3 (tai suurempi
versio)
Siirry App StoreSM -palveluun ja lataa ilmainen Parrot Audio Suite -sovel-1.
lus.
Asenna iPhone-laitteesi Parrot Zikmu Soloon (kaavio s. 6) ja liitä se kaiutti-2.
meen Bluetoothin kautta (ks. kohta Bluetooth > Liittäminen).
Käynnistä Parrot Audio Suite -sovellus ja paina 3. Wi-Fi.
> Näkyviin tulee käytettävissä olevien Wi-Fi-verkkojen luettelo.
Valitse Wi-Fi-verkkosi. Syötä WEP-/WPA-/WPA2-avain, jos sitä pyy-4.
detään.
Paina Yhdistä. 5.
> Parrot Zikmu Solo on nyt yhdistetty Wi-Fi-verkkoon.
Manuaalinen yhdistäminen
Parrot Zikmu Solo muodostaa oletusarvona Wi-Fi-verkon. Voit liittyä tähän verkkoon Parrot Zikmu Solon yhteyden muodostamiseksi Wi-Fi-verkkoosi.
Huom. Jos Parrot Zikmu Solo on jo yhdistynyt Wi-Fi-verkkoon, se ei muodosta omaa
Wi-Fi-verkkoansa. Tätä ennen Parrot Zikmu Solon Wi-Fi-asetukset tulee nollata painamalla painiketta 2 sekunnin ajan.
SUOMI 83
Page 84

Käynnistä tietokoneesta Wi-Fi-verkkojen haku.1.
Liity verkkoon ”SoloNet-xx.xx” (samaan tapaan kuin muodostettaessa 2.
yhteys reitittimellä/modeemilla).
Huom. Internetyhteys katkeaa väliaikaisesti. Yhteys langattomaan modeemiin/
reitittimeen palautuu, kun toimenpide on päättynyt.
Avaa tietokoneen tai älypuhelimen verkkoselain ja kirjoita osoitekenttään 3.
http://zikmu-solo.local.
Valitse 4. Wi-Fi Configuration.
> Näkyviin tulee käytettävissä olevien Wi-Fi-verkkojen luettelo.
Valitse Wi-Fi-verkkosi. 5.
Syötä WEP-/WPA-/WPA2-avain, jos sitä pyydetään, ja valitse 6. Apply.
Verkkoliittymän käyttö
Parrot Zikmu Solon verkkoliittymällä voidaan ohjata äänitiedostojen lukua ja
muuttaa asetuksia (audio, Bluetooth). Verkkoliittymään päästään tietokoneelta,
älypuhelimesta tai tabletista.
Liitä Parrot Zikmu Solo Wi-Fi-verkkoosi jollakin edellisissä kohdissa kuva-1.
tuista menetelmistä.
Käynnistä tietokoneen tai älypuhelimen verkkoselain.2.
Kirjoita osoitekenttään http://zikmu-solo.local (tai http://[uusi-nimi], jos
olet vaihtanut kaiuttimen nimeä).
> Näkyviin tulee Parrot Zikmu Solon verkkoliittymä.
Huom. Saat lisätietoja tämän verkkoliittymän käytöstä Parrot Zikmu Solon tukisivun opetusohjelmasta.
84 SUOMI
Page 85

Bluetooth
Käyttö älypuhelimella
Voit käyttää Parrot Zikmu Soloa älypuhelimeen tallennettujen musiikkitiedostojen kuunteluun. Tällöin älypuhelimen tulee tukea Bluetooth® A2DP -profiilia
(Advanced Audio Distribution Profile).
Huom. Tarkista oman puhelimesi yhteensopivuus Parrot Zikmu Solon kanssa verkkosivultamme ja etsi lisätietoja vastaavasta parinmuodostuksesta: www.parrot.com/
uk/compatibility.
Käyttö tietokoneella
Voit siirtää musiikkia Bluetoothin kautta Parrot Zikmu Soloon kaikista PC-tietokoneista, jotka tukevat Bluetooth-teknologiaa, ja Mac-laitteista, MAC OS X 10
-versiosta lähtien. Tietokoneen ja Parrot Zikmu Solon yhteystapa riippuu tietokoneesta ja käytössä olevasta Bluetooth-versiosta. Lisätietoja saatavissa laitteen
käyttöohjeesta tai Parrot Zikmu Solon tukisivulta internetsivulta www.parrot.
com.
SUOMI 85
Page 86

Yhdistäminen
Ennen kuin voit käyttää Parrot Zikmu Soloa älypuhelimen tai tietokoneen kanssa,
sinun tulee liittää laitteet toisiinsa. Jos käytät laitetta ensimmäistä kertaa, laitteet
tulee yhdistää pareiksi ennen niiden yhdistämistä. Tämä toimenpide tarvitsee
suorittaa vain kerran kullekin laitteelle.
Käynnistä Parrot Zikmu Solo.1.
Poista kaiuttimen magneettikansi (kaavio s. 5).2.
Paina painiketta 3.
> Painikkeen vieressä oleva sininen merkkivalo alkaa vilkkua. Parrot Zikmu
Solo näkyy nyt muille Bluetooth-oheislaitteille 2 minuutin ajan.
Käynnistä älypuhelimesta tai tietokoneesta 4. Bluetooth-oheislaitteiden haku.
Valitse « Zikmu-Solo ».5.
Kirjoita «0000», jos sinua pyydetään syöttämään PIN-koodi. 6.
> Parrot Zikmu Solo on nyt yhdistetty pariksi laitteesi kanssa.
> Voit asettaa Parrot Zikmu Solon kannen takaisin.
Yhdistä laitteet ja käynnistä musiikkitiedosto älypuhelimesta tai tietoko-7.
neesta, jotta musiikki alkaa kuulua kaiuttimesta.
Jos älypuhelimessasi on NFC-toiminto, yhteys voidaan myös muodostaa koskettamalla Parrot Zikmu Soloa iPhone-liitännän kohdalla (kaavio s. 8). Älypuhelimen kohta, jolla kaiutinta tulee koskettaa, riippuu laitteen mallista. Etsi lisätietoja
älypuhelimen käyttöohjeesta.
86 SUOMI
.
Page 87

Jakki
Voit liittää analogisen audiosoittimen (esim. CD-soitin, TV) Parrot Zikmu Soloon
käyttämällä jakki/jakki-äänikaapelia. Kytke kaapeli kaiuttimen alla olevaan jakkiliittimeen (kaavio s. 7) ja käynnistä musiikkitiedosto audiosoittimesta.
Jos haluat yhdistää Parrot Zikmu Solon laitteeseen, jossa on digitaalinen optinen
äänilähtö, käytä mukana toimitettua toslink / jakki -sovitinta (kaavio s. 7).
Huom. Jotta vältät äänen särinään liittyvät ongelmat, on suositeltavaa nostaa
äänenvoimakkuutta Parrot Zikmu Solosta eikä audiosoittimesta. Parrot Audio Suite
-sovelluksesta saatavan äänenmiksausohjelman avulla voit säätää jokaisen lähteen
perusäänenvoimakkuuden, jotta ikäviä yllätyksiä ei pääse syntymään (liian korkea
äänenvoimakkuus lähteiden vaihtamisen jälkeen).
Huom. Tarkista, että liittimet on kiinnitetty kunnolla, jotta vältät häiriöt.
SUOMI 87
Page 88

Ongelmanratkaisu
Asetusten nollaus
Parrot Zikmu Solon Wi-Fi-asetusten nollaamiseksi poista kansi (kaavio s. 5) ja
paina painiketta
Jos audiosoittimessa, joka on liitetty Parrot Zikmu Soloon Bluetoothin kautta,
esiintyy ongelmia
Sammuta audiosoitin.1.
Poista kansi (kaavio s. 5) ja paina painiketta 2.
Muodosta 3. Bluetooth-yhteys uudestaan Parrot Zikmu Solon ja audiosoittimen välille.
Jos Parrot Zikmu Solossa esiintyy ongelmia ja haluat käynnistää laitteen uudestaan, poista kansi (kaavio s. 5) ja paina Reset-painiketta.
Jos haluat palauttaa tehdasasetukset, paina painiketta 2 sekunnin ajan.
Huom. Asetusten nollaukset voidaan myös suorittaa Parrot Audio Suite -sovelluksella.
88 SUOMI
2 sekunnin ajan.
2 sekunnin ajan.
Page 89

Kaukosäätimen liittäminen
Jos Parrot Zikmu Solon kaukosäädin ei toim
Tarkista, että paristo on sijoitettu oikein (kaavio s. 4).1.
Käynnistä uudelleen Parrot Zikmu Solo.2.
Yhdistä kaukosäädin kaiuttimeen painamalla samanaikaisesti 3. SOURCE - ja
-painikkeita. Tämä toimenpide tulee suorittaa yhden minuutin sisällä
kaiuttimen uudelleen käynnistämisestä.
Päivitys
Varmista, että Parrot Zikmu Solossa on viimeisin päivitys. Voit selvittää helposti
verkkoliittymän avulla, onko päivitystä saatavilla, ja voit päivittää kaiuttimen
muutamalla napsautuksella.
Jos käytössäsi on iPod, voit myös tarkistaa kaiuttimen versionumeron. Tätä varten yhdistä iPod Parrot Zikmu Soloon ja valitse Säädöt > Yleistä > Tietoja, jos
sinulla on iPhone, tai Säädöt > Tietoja, jos sinulla on iPod. Selaa näytön tietoja ja
valitse ”Parrot Zikmu Solo by Starck”.
Yhteensopivuus
Jos et pysty käyttämään Parrot Zikmu Soloa puhelimellasi, tarkista oman puhelimesi yhteensopivuus Parrot Zikmu Solon kanssa verkkosivultamme ja etsi lisätietoja vastaavasta parinmuodostuksesta : www.parrot.com/uk/compatibility.
SUOMI 89
Page 90

Lisätietoja
Lisätietoja Parrot Zikmu Solon tukisivulta verkkosivulta :
www.parrot.com/uk/support/parrot-zikmu-solo.
90 SUOMI
Page 91

Yleistä
Garantie
Op de Parrot producten rust gedurende 1 jaar vanaf de aankoopdatum garantie
op onderdelen en arbeidsloon, behoudens aan het product aangebrachte veranderingen, tegen overlegging van de koopbon (met datum en plaats van aankoop
en serienummer van het product) aan de leverancier. De garantie heeft geen betrekking op het voor doeleinden van compatibiliteit met de mobiele Bluetooth ®
telefoons updaten van de in de Parrot producten inbegrepen software, het terughalen van gegevens, de uitwendige verslechtering van het product tengevolge
van normaal gebruik van het product, per ongeluk veroorzaakte schade, abnormaal of ongeoorloofd gebruik van het product, een niet-Parrot product. Parrot is
niet aansprakelijk voor de opslag, het verlies of de beschadiging van gegevens tijdens het transport of de reparatie. Ieder product dat niet defect blijkt te zijn zal
aan de afzender worden geretourneerd en de kosten voor behandeling, verificatie en transport zullen hem in rekening worden gebracht. Wegens het technisch karakter van dit product raden wij u aan de installatie te laten verrichten
door uw garagehouder. Parrot is in geen geval aansprakelijk voor een verkeerde
werking veroorzaakt door een installatie die niet overeenkomt met de in de gebruiksaanwijzing gegeven aanwijzingen en/of een door uzelf uitgevoerde nietconforme installatie.
SUOMI 91
Page 92

Afgedankte elektrische en elektronische apparatuur (WEEE)
In overeenstemming met de Europese richtlijn 2002/96/EG betreende afgedankte elektrische en elektronische apparatuur (AEEA) geeft de vermelding van
het hierboven vermelde symbool op het product of de verpakking aan dat dit
artikel niet in de normale, niet-gesorteerde stedelijke afvalstroom mag worden
verwerkt. In plaats daarvan ligt de verantwoordelijkheid van de afvoer van dit
product bij de gebruiker, die het dient aan te bieden bij een inzamelpunt voor
de recyclage van afgedankte elektrische en elektronische apparatuur. De gescheiden inzameling van dit afval helpt de eventuele te recupereren materialen
terug te winnen of te recycleren en vermindert de impact ervan op het milieu en
de gezondheid van de mens. Voor meer informatie betreende de juiste afvoermethode.
Gedeponeerde handelsmerken
De naam en het logo Bluetooth® zijn gedeponeerde handelsmerken van Bluetooth® SIG, Inc. en gebruik van deze laatstedoor Parrot S.A. geschiedt onder li-
centie. QDID : B017641 B017642 B019338
App Store is een dienstmerk van Apple Inc.
Google Play is een merk van Google Inc.
Parrot en de Parrot logo’s zijn ingeschreven merken van PARROT SA in Frankrijk
en andere landen.
ZIK is een merk van Parrot SA.
Alle andere merken die in deze handleiding worden vermeld zijn beschermd en
eigendom van hun respectievelijke eigenaars.
92 SUOMI
Page 93

Vaatimustenmukaisuusvakuutus
Parrot SA, 174 quai de Jemmapes, 75010 Paris, France, vakuuttaa ja ottaa täyden vastuun siitä, että Parrot Zikmu Solo -kaiutin on teknisten standardien
EN300328, EN300220, EN301489-17, IEC60065 mukainen ja noudattaa direktiivejä EMC 204/108/EY, Sähköturvallisuus :2006/95/EY ja R&TTE :1999/5/EY.
RSC Paris n°394 149 496
Turvallisuusohjeita
VAROITUS: Tulipalo- tai sähköiskuvaaran vähentämiseksi älä altista tätä laitetta
sateelle tai kosteudelle..
1. Lue nämä ohjeet.
2. Säilytä nämä ohjeet.
3. Huomioi kaikki varoitukset.
4. Noudata kaikkia ohjeita.
5. Älä käytä laitetta nestemäisten aineiden lähellä.
6. Puhdista laite vain kuivalla liinalla.
7. Älä peitä ilmanvaihtoaukkoja. Asenna laite valmistajan ohjeiden mukaan.
8. Älä sijoita laitetta lähelle lämmönlähdettä, lämmittimiä, uuneja tai muita laitteita (mukaan lukien vahvistimet), jotka tuottavat lämpöä.
9. Älä muuta laitteen polarisoituja tai maadoituspistokkeita. Polarisoidut pistokkeet koostuvat kahdesta metallipiikistä, joista toinen on leveämpi. Maadoituspistokkeet koostuvat kahdesta metallipiikistä ja maadoitushaarasta. Leveämpi metallipiikki ja maadoitushaara varmistavat laitteen turvallisen käytön. Jos mukana
toimitetut pistokkeet eivät sovi pistorasiaasi, pyydä sähköasentajaa vaihtamaan
SUOMI 93
Page 94

vanhentunut pistorasia.
10. Älä kävele laitteen virtajohdon päällä ja estä pistokkeiden jäämistä puristuksiin. Sijoita se sopivaan säilytystilaan. Suojaa laitteen liittimet.
11. Käytä vain valmistajan hyväksymiä lisälaitteita/lisävarusteita.
12. Kytke laite irti verkkovirrasta ukonilman ajaksi tai kun laitetta ei käytetä pitkään aikaan.
13. Toimita laite tarvittaessa valtuutettuun huoltopalveluun. Huolto on tarpeen,
kun laitteessa ilmenee vikoja, kuten vahingoittunut virtajohto, tai kun laitteeseen
on joutunut nestettä tai muita vieraita esineitä, kun laite on pudonnut, kaatunut,
kastunut sateessa tai kostunut, tai kun se ei toimi kunnolla.
14. Älä sijoita laitetta niin, että se altistuu vuodoille tai roiskeille. Älä sijoita laitteen päälle nesteellä täytettyjä esineitä kuten maljakkoja.
15. Varmista, että laite on kytketty kunnolla irti sähköverkosta irrottamalla laitteen sähköjohto sähköpistokkeesta.
16. Varmista, että pääset aina helposti käsiksi sähköjohtoon, josta voit kytkeä
sähkön irti.
17. Sähköiskuvaaran vähentämiseksi älä pura osiin kaiuttimia tai irrota niiden alla
olevia ruuveja.
18. Älä pura osiin kaiuttimia tai avaa ruuveja.
Maksimikäyttölämpötila: 40 °C
Copyright
Copyright © 2012 Parrot.
94 SUOMI
Page 95

Краткое руководство по
эксплуатации
О настоящем руководстве
В целях сокращения потребления бумаги и в рамках нашего
ответственного подхода как можно лучшего сохранения окружающей
среды, Parrot отдает предпочтение размещению пользовательских
документов он-лайн по сравнению с их печатью. Поэтому, это упрощенное
руководство Parrot Zikmu Solo ограничивается предоставлением вам
основных инструкций, которые позволят вам легко пользоваться
данным устройством. Более подробную информацию вы можете
найти в разделе Поддержка нашего веб-сайта www.parrot.com: полные
инструкции, FAQ, обучающие программы...
Содержание
96
Первое включение
99
101
105
107
108
111
®
iPod
®
Wi-Fi
Bluetooth
Гнездо разъема
В случае проблем
Общая информация
®
РУССКИЙ 95
Page 96

Первое включение
Примечание: Для удобства чтения, iPod ® и iPhone® (в режиме музыки)
в настоящем руководстве будут обозначаться термином «iPod»
Совместимые телефоны или таблетки будут обозначаться термином
«Смартфон».
Подключение к сети
Подключите колонку к электрической розетке при помощи поставляемого
кабеля питания (схема стр. 4).
> Колонка включается автоматически. Иконка
секунд и остается включенной.
Дистанционное управление
Вставьте батарейку 9поставляется) в предусмотренное для этого место
(схема стр. 4)
Примечание: Пользуйтесь только батарейками типа CR2032.
Включение/Выключение Parrot Zikmu Solo
Нажмите на кнопку пульта дистанционного управления или пульта
управления, чтобы включить/выключить колонку.
96 РУССКИЙ
мигает несколько
Page 97

Снятие передней панели
Чтобы получить доступ к кнопкам Wi-Fi, Bluetooth и Reset, снимите
магнитную переднюю панель Parrot Zikmu Solo 9схема стр. 5).
Кнопки Функций
Кратковременное нажатие: Установка
соединения Wi-Fi с модемом или
беспроводным роутером, поддерживающим
технологию WPS (см. раздел Wi-Fi >
Соединение с WPS).
Продолжительное нажатие: Реинициализация
параметров Wi-Fi и Еthernet.
Кратковременное нажатие: Сделать Parrot Zikmu Solo видимым через Bluetooth.
Вы обязательно должны нажать эту кнопку,
чтобы подключить периферийное устройство
Bluetooth, которое вы используете 1-й
раз с колонкой (см. раздел Bluetooth >
Соединение).
Продолжительное нажатие: Удаление всех
сопряжений (за исключением подключенного
к колонке).
Reset
Реинициализация колонки.
РУССКИЙ 97
Page 98

Выбор аудиоисточника
С Parrot Zikmu Solo, вы можете использовать различные аудиоисточники:
подсоединенный через Wi-Fi компьютер, подсоединенный через Bluetooth компьютер или смартфон, iPod, аналоговый аудиоплеер, телевизор
или DVD-плеер с оптическим цифровым аудиовыходом.
Нажмите на кнопку SOURCE пульта дистанционного управления, чтобы
выбрать аудиоисточник среди активных источников.
Если во время проигрывания отрывка, вы включаете воспроизведение
другого отрывка со второго источника, автоматически выбирается
этот второй источник. Воспроизведение отрывка на первом источнике
автоматически устанавливается на паузу, если только речь не идет об
аудиоплеере, соединенном с колонкой через ее гнездовой разъем.
Регулировка громкости
Кнопки Функций
Увеличить громкость
Уменьшить громкость
98 РУССКИЙ
Page 99

iPod
Примечание: Более подробную информацию о совместимых с
колонкой устройствах iDevices смотрите на странице поддержки Parrot
Zikmu Solo.
Использование цокольного адаптера
С Parrot Zikmu Solo поставляется два цокольных адаптера. Они
соответствуют адаптерам iPhone 4S/ iPhone 4 и iPhone 3GS/ iPhone 3G.
Если вы хотите использовать Parrot Zikmu Solo с iPod, воспользуйтесь
адаптером, поставляемым с вашим iPod.
Чтобы вставить цокольный адаптер, установите его над разъемом iPod,
затем нажмите на обе стороны.
Разъем iPod
После того, как вы выбрали и вставили цокольный адаптер на колонку:
Отключите наушники вашего iPod. 1.
Вставьте ваш iPod на колонку (схема стр. 6). 2.
> iPod начинает заряжаться. Теперь, вы можете включить
воспроизведение музыкального файла на вашем iPod.
РУССКИЙ 99
Page 100

Загрузка приложения
Подсоединитесь к App StoreSM или Google Play® и загрузите бесплатное
приложение Parrot Audio Suite. Это приложение позволит вам, в
частности, настроить аудиопараметры колонки и легко подключить ее
к вашей сети Wi-Fi.
100 РУССКИЙ
 Loading...