


1
Parrot Zikmu by Starck
User guide

2
Contents
Getting started .......................................................................................................... 3
Installation ................................................................................................................................................ 3
Installation ..................................................................................................................................... 3
Maintenance and precautions ....................................................................................................... 4
Commands .............................................................................................................................................. 4
Turning the speakers on / off ........................................................................................................ 4
Selecting an audio source ............................................................................................................. 4
Adjusting the volume ..................................................................................................................... 5
Wi-Fi ........................................................................................................................... 6
Before you begin ..................................................................................................................................... 6
Set up ............................................................................................................................................ 6
Identifying the type of connection .................................................................................................. 7
Installing the Parrot Audio Suite .................................................................................................... 8
Establishing the connection with SES / WPS ............................................................................... 8
Establishing the connection without SES / WPS .......................................................................... 8
Resetting Wi-Fi parameters........................................................................................................... 9
Using the Zikmu with a computer connected to the access point via an Ethernet cable .............. 9
iPod .......................................................................................................................... 11
Compatibility ................................................................................................................................ 11
Installation ................................................................................................................................... 11
Commands .................................................................................................................................. 12
Bluetooth ................................................................................................................. 13
Using the Zikmu with a Bluetooth phone ............................................................................................... 13
Connecting a mobile phone / PDA to the Zikmu ......................................................................... 14
Using the Zikmu with several Bluetooth audio players ............................................................... 14
Using the Zikmu with a computer via Bluetooth .................................................................................... 15
Establishing the connection using the Parrot Audio Configuration Tool software ...................... 16
Establishing the connection with the Mac Bluetooth software .................................................... 17
Establishing the connection with the Toshiba Bluetooth software .............................................. 18
RCA .......................................................................................................................... 19
Parameters .............................................................................................................. 20
Controlling the balance ................................................................................................................ 21
Synchronizing Audio and Video signals ...................................................................................... 21
Using the Audio Mixer ................................................................................................................. 22
Using the high volume Fade-In ................................................................................................... 22
Bluetooth Parameters ............................................................................................................................ 23
Modifying the Bluetooth name ..................................................................................................... 23
Modifying the PIN code ............................................................................................................... 24
Software update ...................................................................................................... 25
Updating the Zikmu with a PC via Wi-Fi ................................................................................................ 25
Updating the Zikmu with a PC via Bluetooth ......................................................................................... 25
Before you begin ......................................................................................................................... 25
Widcomm Bluetooth software ..................................................................................................... 26
Toshiba Bluetooth software ......................................................................................................... 26
Updating the Zikmu with a Mac ............................................................................................................. 27

3
Getting
started
Connection to
mains supply
Plug both speakers into an
electrical outlet using the
provided power cables.
Remote control
Insert the remote control
battery into the specific battery
compartment.
Installation
Positioning the Zikmu
To get the best possible sound performances, we advise you to respect the following
recommendations:
Make sure that you correctly install the speakers at their respective positions: the iPod /
iPhone docking station must be on your right.
To get an accurate reproduction of the bass frequencies, make sure there is a minimal
distance of 40 cm between the back and lateral walls and the speaker. Bass frequencies
will get louder if you place your speakers closer to the walls.
The sound quality of the Zikmu can be degraded if there is an obstacle or a wall between
both speakers. Reposition your speakers if necessary.
Installation

4
WARNING
- Use only a CR2032 battery.
- Dispose of used batteries in compliance with current
recycling legislation in the country of use.
Maintenance and precautions
To remove dust and fingerprints from the speakers, use a damp cloth.
Do not use any kind of cleaning agent on the Zikmu.
The Zikmu is a high technology product. Please handle the speakers with care.
Commands
Turning the speakers on / off
Press the button of the remote control or control panel to turn on / off the speakers.
Selecting an audio source
The Zikmu allows you to use several types of audio sources: PC connected via Wi-Fi,
computer or audio player connected via Bluetooth, iPod/iPhone, analogue audio player
connected via a Jack / Cinch audio cable.
Press the SOURCE button of the remote control to switch among the active audio
sources.

5
Increase volume
Press the button
Decrease volume
Press the button
Mute the speakers
Press the button
If you start playing a music file from a second source:
- this source is automatically selected ;
- the music currently played from the first source is automatically suspended if
it this first source is an iPod / iPhone or an audio player connected via
Bluetooth.
Adjusting the volume

6
Wi-Fi
WARNING: The performance of the Zikmu depends highly on the performance of your modem
/ router.
Operating system
The Zikmu is compatible with the Windows XP (SP2 and later) and
Windows Vista SP1 operating systems.
Wi-Fi access point
You need an access to the internet to download the
necessary software and a Wi-Fi access point to establish
the connection with the Zikmu.
The sound quality of the Zikmu can be degraded if there is
an obstacle or a wall between both speakers. Reposition
your speakers if necessary.
Before you begin
Set up
7
Identifying the type of connection
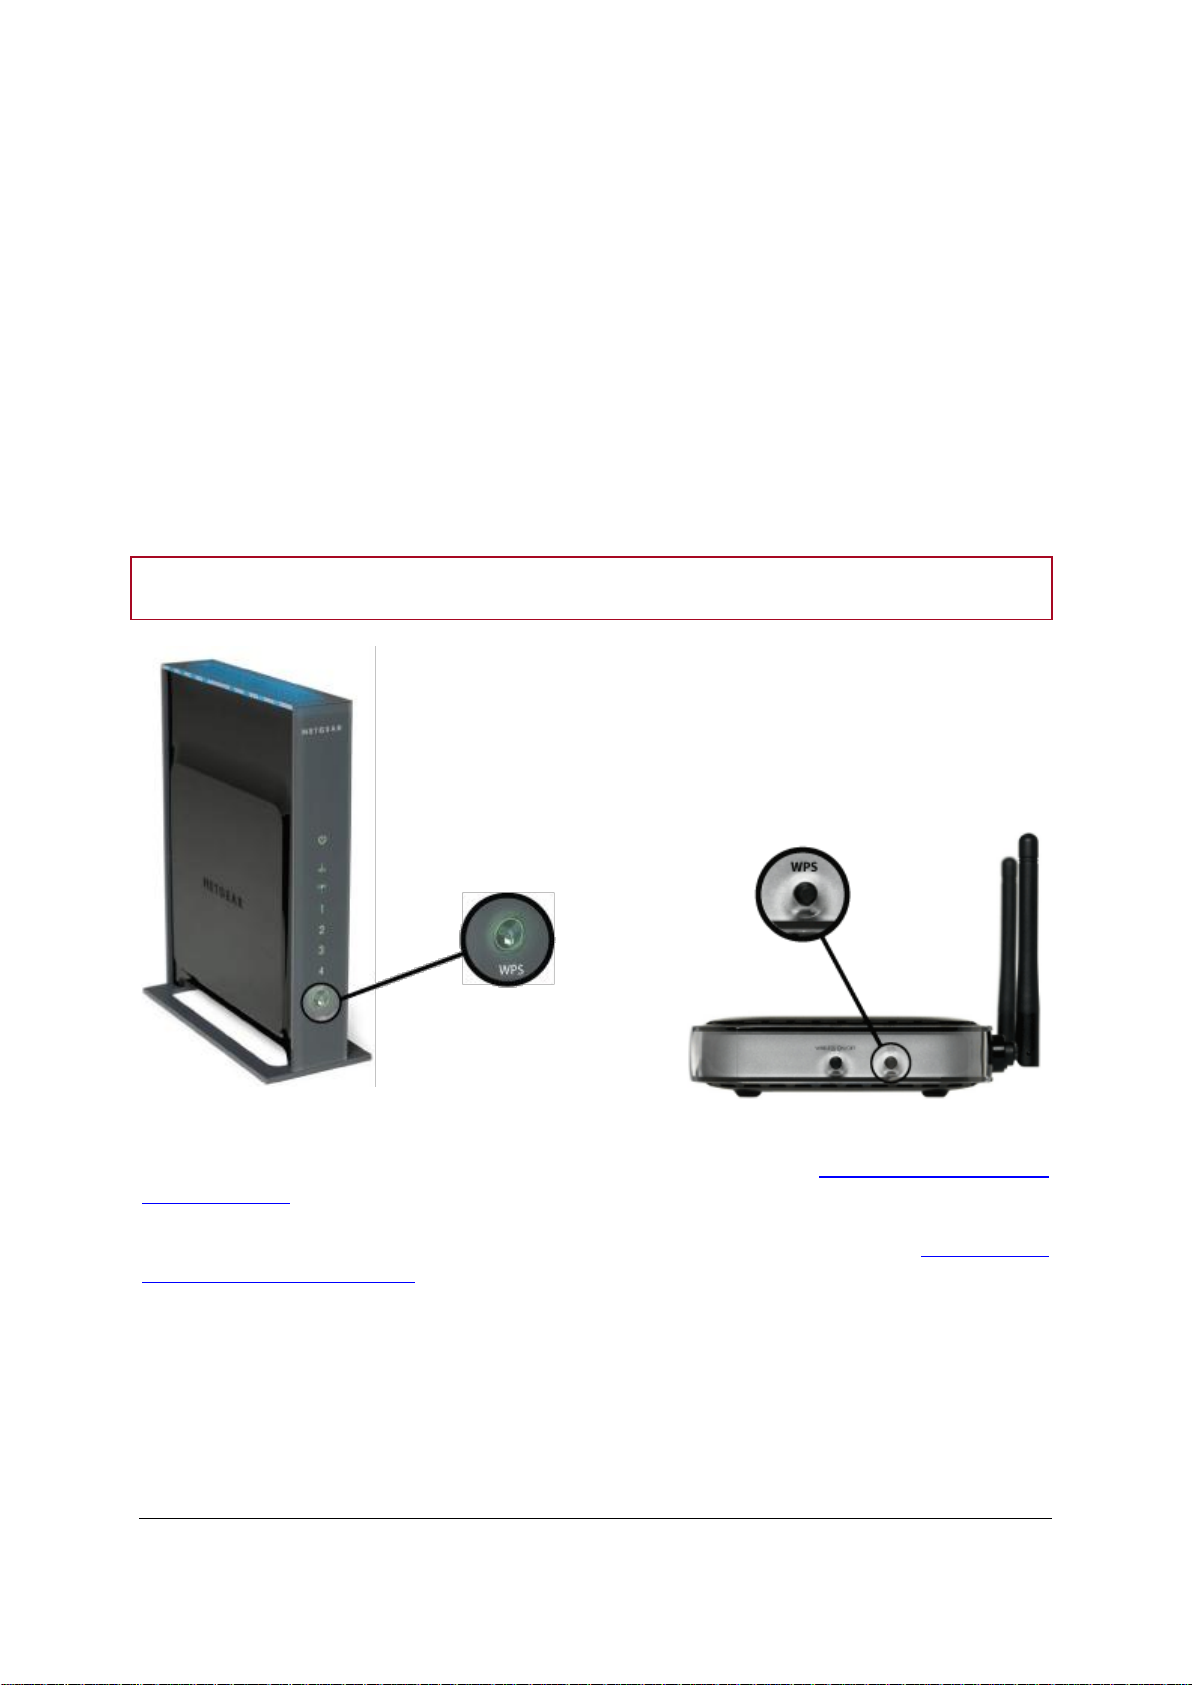
WARNING: Make sure you do not mistake the WPS button with a pairing button.
WPS routers
The type of connexion you have to establish with the Zikmu depends on the model of your modem /
router: you have to determine whether it supports the SES or WPS technologies.
WPS (Wi-Fi Protected Setup) or SES (Secure Easy Setup) technologies allow you to
establish a secured connection between several Wi-Fi devices simply by pressing a
button.
To find out whether your modem supports SES or WPS technologies, refer to the
documentation of your device. If you do not have this documentation:
- your modem / router cannot support these technologies if you were equipped with
it before 2007 ;
- there is a WPS button on WPS modems or routers.
► If your modem / router supports SES or WPS technologies, refer to the Establishing a connection
with SES / WPS section.
► If your modem / router does not support SES or WPS technologies, refer to the Establishing a
connection without SES / WPS section.

8
Description
The Parrot Audio Suite is composed of the Parrot Sound Manager and
Parrot Audio Configuration Tool software.
The Parrot Sound Manager software allows you to
establish the connection between your PC and the
speakers via Wi-Fi.
The Parrot Audio Configuration Tool software allows
you to modify several audio and Bluetooth parameters.
► Refer to the Parameters section for more information.
Download
You can download the Parrot Audio Suite (for PC) at the
following address: http://www.parrot.com/starck
Installation
Install the software and follow the displayed instructions:
1. Select your language and click on OK.
2. If you want to use the Wi-Fi function of the Zikmu, select Wi-Fi
Connection. If you want to use the Bluetooth function, select
Bluetooth Connection.
3. Specify your preferences concerning the installation and
click on OK.
> At the end of the installation, a confirmation window is
displayed. You can click on Close.
Installing the Parrot Audio Suite
Establishing the connection with SES / WPS
If your modem / router supports the SES or WPS technology:
1. Press the SES or WPS button of your modem / router. Refer to the documentation or your
device for more information.
2. Press the button of the Zikmu.
> The Zikmu is now connected to your Wi-Fi network.
Establishing the connection without SES / WPS
1. Press the pairing button of your modem / router. Refer to the documentation or your device for
more information.
9
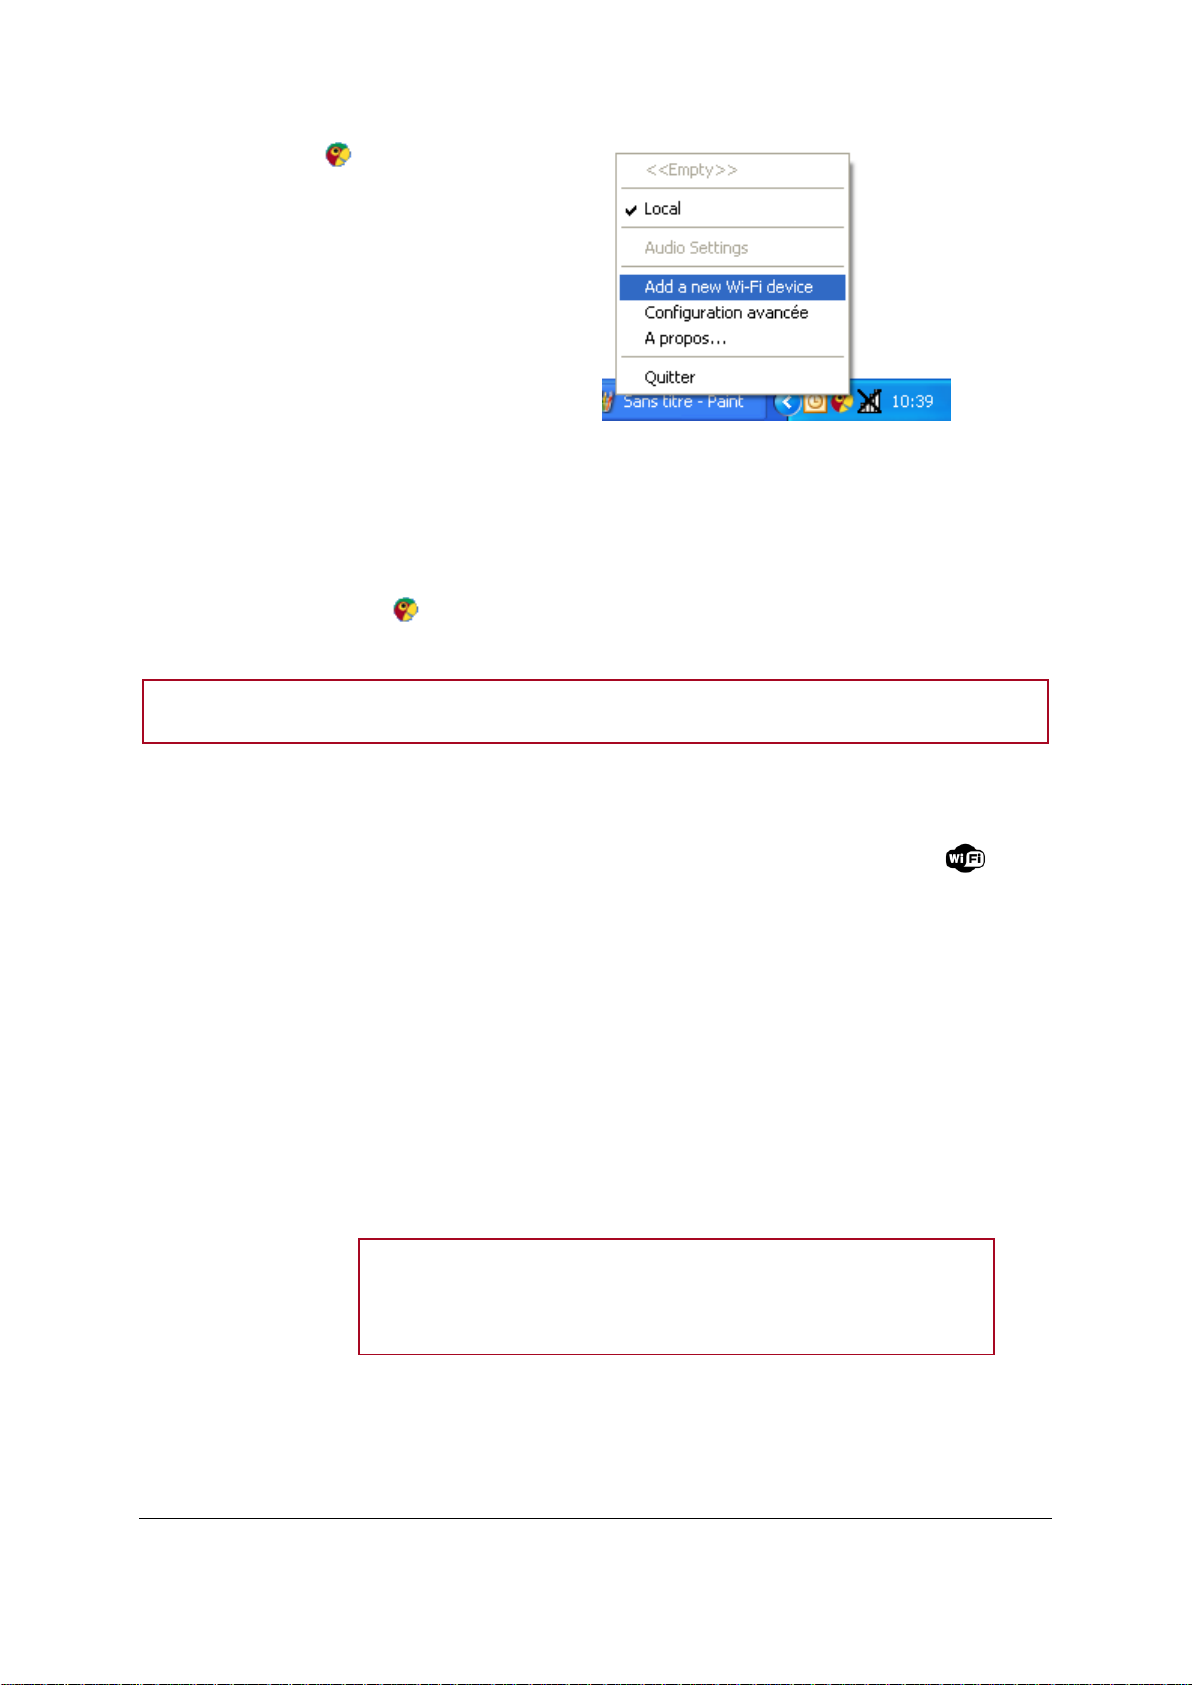
2. Click on the icon at the bottom right
of your screen and select Add a new Wi-
Fi device.
> The connection window is displayed.
3. Select No then click on Next.
> A confirmation window is displayed.
4. Click on Next.
> You will lose your internet connection during the configuration (5 minutes max). You will get
your internet connection back as soon as the configuration is over.
> A window allowing you to change the name of the Zikmu is displayed.
5. Enter a new name if necessary and click on Next.
> If you click on the icon at the bottom right of your screen, the Zikmu is now displayed
among the available Wi-Fi peripherals.
Note: You can modify this name subsequently using the Parrot Audio Configuration Tool software.
Before you begin
Identify the name of your Wi-Fi network.
Note: The name of this network is also referred to as SSID (Service
Set Identifier). It is generally located under your router. If you have
changed this name, use the new name.
If your network is secured, you need the WEP / WPA or
WPA2 protection code to establish the connection.
Resetting Wi-Fi parameters
If you encounter problems while connecting your PC to the Zikmu via Wi-Fi, hold down the button
until all control panel icons blink once.
Using the Zikmu with a computer connected to the access point via an
Ethernet cable
If your computer is connected to your access point via an Ethernet cable, then use the Parrot Audio
Configuration Tool software to establish the connection between your computer and the speakers.

10
Note: The WEP, WPA or WPA2 protection code is often written
under modems / routers or in the documentation provided with your
system. If you have changed this protection code, use the new code.
Connect your PC to the Zikmu via Bluetooth. Refer to the
Using the Zikmu with a computer via Bluetooth section for
more information.
Installation
1. Launch the Parrot Audio Configuration Tool and select the
Wi-Fi tab.
2. Enter the name of your network in the SSID field.
3. Select the type of network key and enter the key.
4. Select the DHCP option and click on Apply.

11
iPod
Using the dock
adapter
Use the dock adapter provided with your iPod or choose
the one fitting your iPhone among the adapters provided
with the Zikmu.
To insert the dock
adapter, position it
above the connector
and press on both
sides.
Connecting the iPod
/ iPhone
Once the dock adapter is inserted on the speaker:
1. Unplug the earphones from your iPod / iPhone.
2. Connect your iPod / iPhone to the speaker.
>The iPod / iPhone battery charges until it is fully charged.
> You can now browse for a song on your iPod / iPhone and
enjoy it.
Compatibility
You can use the Zikmu with the following devices: iPhone, iPhone 3G, iPod video, iPod
nano (1G, 2G, 3G, 4G) iPod classic, iPod touch (1G and 2G) and later models.
If you are using the Zikmu with an iPod nano 1G or an iPod video, only the remote control
can be used to control the volume and the playback.
Installation

12
Turning the iPod /
iPhone on / off
Hold down the button of the remote control for 2 seconds to turn on / off the
iPod / iPhone connected to the Zikmu.
Controlling the
music playback
Pause a song
Press the button.
Resume playback
Press the button.
Rewind or fast forward
Hold down the or buttons
for 2 seconds.
Skip to the previous / next
song
Press the or button.
Commands

13
Bluetooth
Using the Zikmu with a Bluetooth phone
Compatibility
You can listen to your music tracks stored on your mobile phone / PDA / smartphone via the Zikmu.
Your mobile phone must be able to support the Bluetooth® A2DP profile (Advanced Audio Distribution
Profile).
Pairing the Zikmu with a Bluetooth phone / PDA
Before using the Zikmu with your phone, both devices must be connected.
If you are using your phone with the speakers for the first time, you first have to pair both devices.
1. Press the button on the control panel.
> The icon starts flashing.
2. From your Bluetooth phone, search for Bluetooth peripherals.
3. Select « Parrot by Starck ».
> You are prompted to enter a PIN code.
4. Enter «0000» on your phone.

14
Notes:
- You can pair up to 10 devices with the Zikmu (mobile phone, PC, Bluetooth audio player…).
- If you attempts to pair an 11th device, the pairing of the device which has not been connected to the
Zikmu for the longest period will be deleted.
Connecting a mobile phone / PDA to the Zikmu
Before you start streaming music from your phone to the speakers, you must connect
both devices. Once they have been connected, simply start playing the track on your
phone and the sound will come through the speakers.
You can establish a connection between your phone and the speakers via the Bluetooth
menu on your phone.
Using the Zikmu with several Bluetooth audio players
You can pair up to 10 devices with the Zikmu. Yet it is impossible to stream music
simultaneously from several devices.
However, if an audio player is already streaming music, the other devices will not be able
to play their music through the Zikmu at the same time. To do so, you must stop the
player currently streaming.

15
Compatibility
The Zikmu is compatible with all PCs supporting Bluetooth technology.
If your PC is not Bluetooth enabled, connect a Bluetooth dongle.
You can also use the Zikmu with a Mac OS X Leopard (or later version).
Determining
the PC
Bluetooth
software
The connection procedure between your PC and the Zikmu depends on the
Bluetooth software you are using.
If your computer is equipped with the Windows XP OS, click on Start >
Control panel then select Bluetooth configuration. Select the General
tab.
If your computer is equipped with the Windows Vista OS, click on Start >
Parameters > Control panel then select Bluetooth devices. Select the
Hardware tab.
► If you are using the Widcomm Bluetooth software, refer to the
Establishing the connection using the Parrot Audio Configuration Tool
software section.
► If you are using a Mac OS X Leopard (or later versions), refer to the
Establishing the connection with the Mac Bluetooth software section.
► If you are using the Toshiba Bluetooth software, refer to the Establishing
the connection with the Toshiba Bluetooth software section.
Using the Zikmu with a computer via Bluetooth
Before you begin

16
Establishing the connection using the Parrot Audio Configuration Tool
1. Launch the Parrot Audio
Configuration Tool software.
> The Connection dialog box is
displayed.
2. Select the New option.
> The available Bluetooth devices list.
3. Press the button on the control panel.
4. Select the « Parrot by Starck » and click on
Connect.
> A pop-up appears in the bottom right on
your screen.
5. Click on this pop-up and enter « 0000 » in the Bluetooth PIN code field.
> A second pop-up may appear to confirm the connection.
6. Click on this pop-up and click on OK.
Note : Select the Auto-connect option to make the connection to the Zikmu automatic.
software
If your PC is equipped with the Widcomm Bluetooth software, use the Parrot Audio Configuration Tool
software to establish the connection.

17
Establishing the connection with the Mac Bluetooth software
1. Click on the Bluetooth icon located up
right of your screen.
2. Make sure the Bluetooth feature is turned
on. If it is not the case, click on
Bluetooth On, then click on Set up
Bluetooth Device.
6. Press the button on the control pannel
of the Zikmu.
7. Enter « 0000 » in the Passkey field and
click on Continue.
> The connection procedure is complete.
You can click on Quit.
3. Click on Continue.
4. Select Headset then click on Continue.
5. Select « Parrot by Starck » in the displayed list and click on Continue.

18
a. Click on the Bluetooth icon.
b. Select the Parrot by Starck.
c. Select the Use Headphone option.
1. Double-click on the icon.
> The Bluetooth Parameters window is
displayed.
2. Click on .
3. Select Express Mode then click on Next.
4. Press the button on the control panel of
the Zikmu.
5. Select Parrot by Starck and click on Next.
> The Bluetooth security window is
displayed.
6. Enter « 0000 » in the Bluetooth PIN code
field.
7. Right-click on the Parrot by Starck icon and
select Connect.
8. Select the Zikmu as headphone. To do so:
Establishing the connection with the Toshiba Bluetooth software
If you are using the Toshiba Bluetooth software, you have to connect the Zikmu to your computer
before using the Parrot Audio Configuration Tool. This step is only necessary once.

19
RCA
You can connect your audio player (ex: CD player) to
the speakers via a Jack – RCA cable to stream music.
Connect the audio player to one of the speakers - the
music will be sent via Bluetooth to the other speaker.
Make sure that the connectors are inserted properly to
avoid any disruption.
Notes :
- To get the best possible sound performances, use a high quality Jack / RCA cable.
- To avoid any problem of sound saturation, increase the volume on the Zikmu rather than on
your audio player.

20
Parameters
Use the Parrot Audio Configuration Tool software to modify the parameters below.
► Refer to the Establishing the connection with the Parrot Audio Configuration Tool software section
for more information.
Audio parameters
Using the equalizer
The equalizer is similar to the bass and treble controls on a stereo or radio.
To access this option, select the Audio tab.
Set up your preferences on bass, midrange and treble frequencies by dragging the left,
middle and right sliders respectively.
The pre-amp is the overall volume. Use it the same way than volume control.
You can choose one of the eleven equalizer presets (including jazz, rock, classical…) to
suit the style of music you are listening to. If you don’t find one corresponding to your
preferences, you can create your own presets while a song is playing. To do so :
1. Modify the frequencies according to your preferences.
> The Preset field changes to Custom.
2. Select Save in the Preset field.
3. Specify the destination, give it a name and save it.
> You can use this preset by selecting Load in the Preset field.

21
Controlling the balance
To control the balance setting, select the Audio tab.
Drag the Balance slider to change the balance between left and right speakers.
If the iPod / iPhone docking station is not on your right, select the Swap left / right option
to reverse the output.
Synchronizing Audio and Video signals
Use the Audio Delay option to synchronize audio and video signal or improve audio-only
performances. To access this option, select the Advanced option.
Use the Mode drop box to choose a preset according to your application (low delay for
video, higher delay for audio only).
You can also manually set up the delay according to your needs. To do so:
1. Select Customize in the Mode drop box.
2. Enter a value corresponding to the required delay.
3. Click on OK.

22
The audio mixer avoids big volume level jumps
between several audio sources thus avoiding
problems such as a too high volume level after
an audio source change.
To access this option, select the Advanced tab.
Then drag the sliders to the desired volume
levels.
The High volume Fade-in option allows you to define the time the sound will
take to get to the volume defined on the Control bar.
Select the Enable option then drag the slider to the desired level.
When the slider is positioned to the left, it approximately takes 20
seconds to reach the defined volume.
When the slider is positioned to the right, the time taken to reach
the defined volume is approximately null.
Using the Audio Mixer
Using the high volume Fade-In

23
Bluetooth Parameters
Select the Bluetooth tab to modify the parameters below.
Managing Bluetooth devices
Selecting the Bluetooth tab allows you to get the list of available or already used Bluetooth devices
and their status (connected / disconnected / streaming).
Click Refresh to get a new list of the available Bluetooth devices.
Select a device and click on Delete to close the connection with the selected local device.
Note that you will have to redo the pairing to connect to the device again.
Modifying the Bluetooth name
You have the possibility to modify the name of the Zikmu in order to recognize it easily while
performing a Bluetooth or Wi-Fi search.
1. Click on Change.
> The Change Bluetooth name dialog box is displayed.
2. Enter the new name.
3. Click on OK.

24
Modifying the PIN code
If you are using the Zikmu with a Bluetooth device with a fixed PIN code which is not « 0000 », you
can modify the PIN code of your speakers.
1. Click on Pair…
2. Select the Accept Pairing option.
3. Select the PIN Code option and enter the new PIN code.

25
Software
update
1. Click on Start > My network places if
your are using the Windows XP
operating system or on Start > Network
if you are using the Windows Vista
operating system.
2. Double click on the icon corresponding to
your speakers.
> The web interface of the Zikmu is
displayed.
> A pop-up is also displayed if a software
update is available.
3. Click on Update to start the software
update.
Depending on the computer you are using, there are several methods to update your Zikmu:
- Using a PC via Wi-Fi
- Using a PC via Bluetooth with the Widcomm Bluetooth software
- Using a PC via Bluetooth with the Toshiba Bluetooth software
- Using a Mac
Updating the Zikmu with a PC via Wi-Fi
Updating the Zikmu with a PC via Bluetooth
Before you begin
Turn on your speakers.
Download the update file available here.
Determine the Bluetooth software of your PC.

26
Widcomm Bluetooth software
Windows XP
Right-click on the downloaded update file and select Send to > Bluetooth then select
the Zikmu.
Windows Vista
1. Right-click on the downloaded update file and select Send to > Bluetooth
device.
2. Click on Browse and select the Zikmu.
3. Select the Use an access key and enter “0000”.
Toshiba Bluetooth software
1. Right-click on the downloaded update file and select Bluetooth > Search for other
peripherals.
2. Select the Zikmu and click on Send.

27
Updating the Zikmu with a Mac
1. Click on the icon and select System Preferences.
2. Double-click on the icon.
3. Click on and select Send File.
4. Select the downloaded update file and click on Send.
5. If a PIN code is requested, enter « 0000 ».
 Loading...