

Page 1

Quick start guide
Guide d’utilisation rapide
Guía de instalación rápida
Bedienungsanleitung
Guida all’uso
Gebruikershandleiding
Parrot
UNIKA
Page 2

http://www.parrot.com/nl/support/installatie-schema
Installatie van Parrot-systemen in meer dan 2500 verschillende automodellen
Page 3

Parrot UNIKA
Installation diagrams ........................
English..............................................
Français............................................
Español.............................................
Deutsch............................................
Italiano..............................................
Nederlands.......................................
Parrot MKi
Mode A ..............................
Mode B ..............................
Mode C ..............................
Mode D .............................
Parrot RKi8400
Mode A ..............................
Mode B ..............................
Mode C .............................
Mode D .............................
Parrot ASTEROID
Mode A ..............................
Mode B ..............................
Mode C ..............................
Mode D ..............................
Mode E ..............................
General information..........................
p.04
p.10
p.13
p.16
p.19
p.22
p.25
p.29
p.30
p.31
p.32
p.33
p.34
p.35
p.36
p.37
p.38
p.39
p.40
p.41
p.42
Page 4
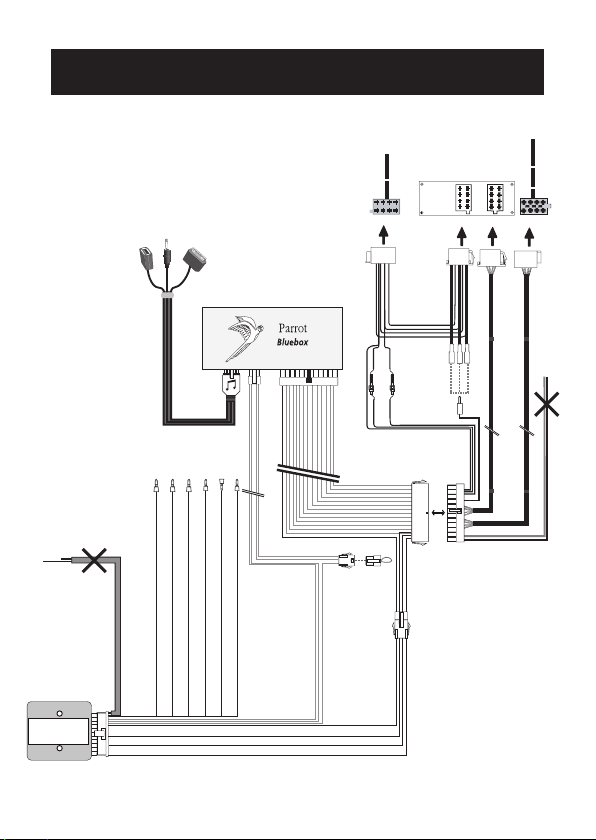
UNIKA
red
yellow & red
brown/
black & green/
red
yellow & blue
Car Radio
Mute in
123
cap
black
www.parrot.com
ground
K-Bus
Can High
Can LowV1V2
Mute
Parrot MKi9000
4
Page 5
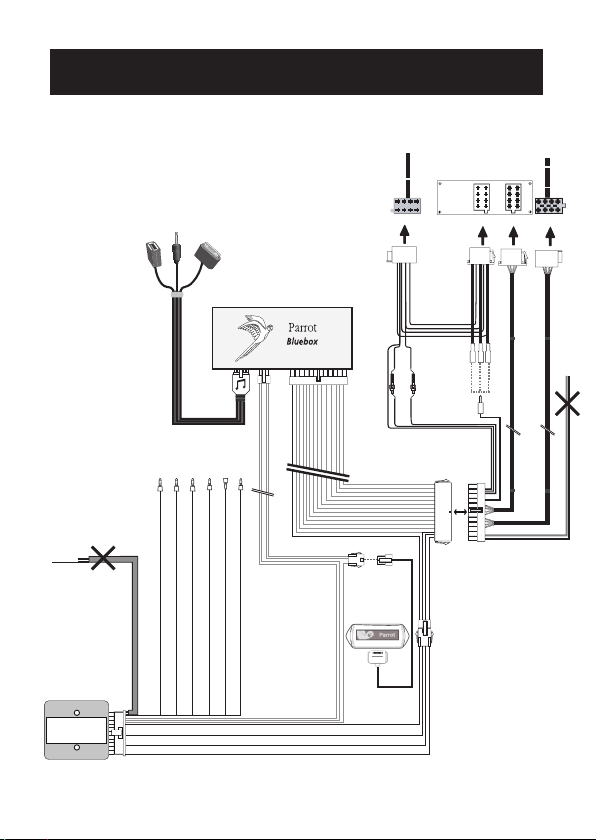
UNIKA
yellow & red
brown/
black & green/
red
yellow & blue
www.parrot.com
ground
K-Bus
Can High
Can Low
V 1
V2
Car Radio
Mute in
123
Mute
red
black
Parrot MKi9100
5
Page 6
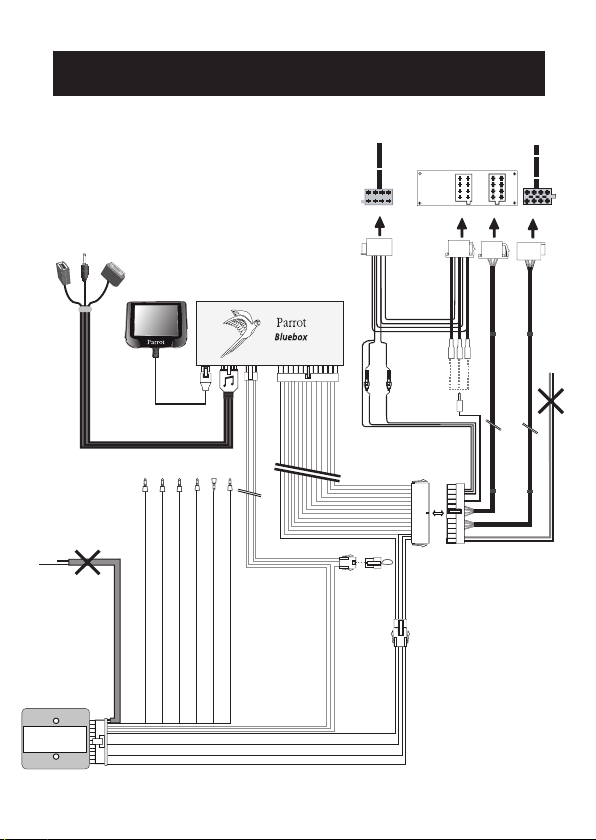
UNIKA
yellow & red
yellow & blue
cap
music cable
screen
www.parrot.com
brown/
black & green/
red
ground
K-Bus
Can High
Can Low
V 1
V2
Car Radio
Mute in
123
Mute
red
black
Parrot MKi9200
6
Page 7

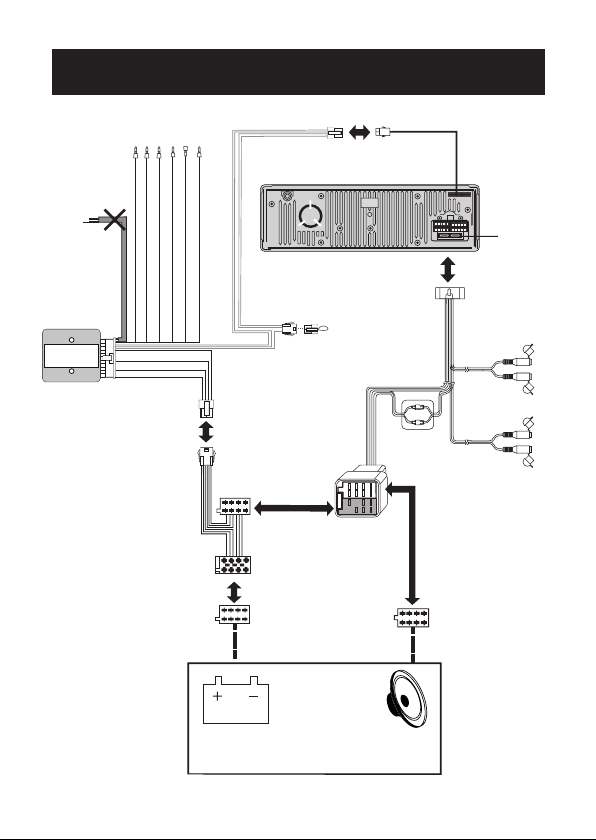
Gray
10A
Subwoofer
Parrot ASTEROID
7
Page 8
UNIKA
yellow & red
yellow & blue
ground
K-Bus
Can High
Can Low
V 1
V2
red
black
Vehicle
ISO plug
Fuse 15A
Line out
(Grey)
Line in
(Brown)
(optional)
R (Red)
L (white)
R (Red)
L (white)
Terminal
bullet
External car
amplifier
Connector
cap
Parrot RKi8400
8
Page 9

ON DIP
1 234
ON DIP
1 234
ON DIP
1 234
ON DIP
1 234
DIP switches
Resistive protocol without OEM radio
Protocole résistif sans radio OEM
Protocolo resistivo sin radio OEM
Widerstandsprotokoll ohne Radio OEM
Protocollo resistivo senza radio OEM
Weerstandsprotocol zonder OEM radio
Resistive protocol with OEM radio
Protocole résistif avec radio OEM
Protocolo resistivo con radio OEM
Widerstandsprotokoll mit Radio OEM
Protocollo resistivo con radio OEM
Weerstandsprotocol met OEM radio
CAN Bus / K Bus protocol
Protocole CAN Bus / K-BUS
Protocolo CAN Bus / K-BUS
Protokoll CAN Bus / K-BUS
Protocollo CAN Bus / K-BUS
Protocol CAN Bus / K-BUS
CAN protocol with external IGNITION
Protocole CAN Bus avec après-contact externe
Protocolo Can con “después contacto” externo
Can Protkoll extern über Zündung
Protocollo CAN con sottochiave esterno
Can protocol met extern na-contact
9
Page 10

English
UNIKA is a universal interface that allows you to control the Parrot MKi / RKi / ASTEROID
directly with the OEM steering wheel commands. UNIKA can work with car protocols such
as CAN, K-BUS or resistive systems.
Warning : We advise our customers to have the Parrot system fitted by a professional.
Installation
► Refer to the installation diagrams p.4 to 8. For more information, refer to the Installation
section of our website www.parrot.com.
Installation
of the Parrot
MKi / RKi /
ASTEROID
We recommend you to install the Parrot MKi / RKi / ASTEROID •
before installing the UNIKA.
Make sure the installation is correctly performed by checking if the •
«Good bye» message is displayed when you turn off the ignition.
► Refer to the documentation of your Parrot MKi / RKi / ASTEROID
for more information.
Selecting the
protocol
Installing the
UNIKA with a
Parrot MKi
10
Use the DIP switches on the UNIKA as indicated on the diagrams p.8
to select the protocol (resistive or CAN Bus / K-BUS) on which the vehicle
is based.
► If you do not know on which protocol your vehicle is based, refer to the
installation section of our website.
Warning: Make sure the Parrot UNIKA is not powered before selecting
the protocol.
Install the UNIKA interface between the Parrot MKi electronic box and the
vehicle wiring as described on the diagrams p.4 / 6.
Warning : Connect the ignition to the Parrot car kit if the vehicle is
based on a resistive or a K-Bus protocol. Don’t connect the ignition
if the vehicle is based on a CAN protocol as this signal is supplied by
the Parrot UNIKA.
Page 11
Installing the
UNIKA with
the Parrot
RKi8400 /
ASTEROID
Replace the MKi part on the UNIKA cable by the provided RKi / •
ASTEROID part.
Connect the UNIKA between the Parrot RKi8400 / ASTEROID and the •
vehicle wiring as described on the diagram p.7/8.
Communication
protocol
connection
UNIKA modes
The communication protocol connection (K-Bus / Can High / Can Low / V1
& V2 cables) depends on the model of your vehicle.
► Refer to the installation section of our website to get a complete fitting
procedure specific to your vehicle.
Depending on the steering wheel control in your vehicle, the UNIKA
interface will enable you to take full advantage of the telephone and music
functions in 5 different modes: Mode A (4 buttons), Mode B (5 buttons),
Mode C (6 buttons), Mode D (7 buttons), Mode E (8 buttons).The selection
of this mode depends on the protocol of the vehicle.
Note : Pictograms on the buttons depend on the model of the vehicles.
Resistive protocol
Defining the
mode
Specific case
Warning : Once the installation is complete, turn the ignition off until the UNIKA LED
switches off.
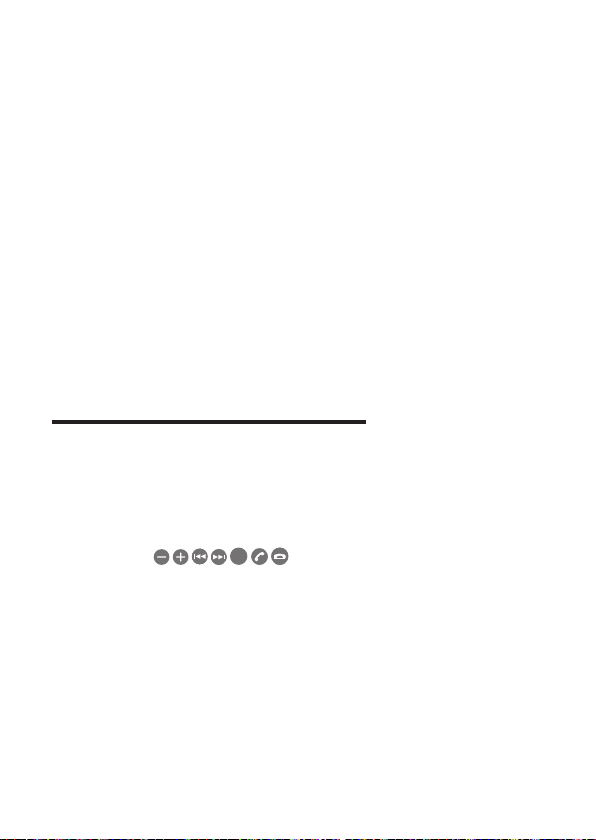
If your vehicle is based on a resistive protocol, you have to define the
mode manually:
1. Turn the ignition on.
> The Unika LED blinks red once.
2. Press the buttons on the steering wheel in the following order:
> Each time you press a button, the LED blinks in red.
If you do not have all these buttons on your steering wheel, hold down the
last button for two seconds until the LED turns green.
s r c
.
11
Page 12

CAN / K-BUS protocol
Defining the
mode
Checking the
wiring
Warning : Once the installation is complete, turn the ignition off until the UNIKA LED
switches off.
If your vehicle is based on a CAN Bus or K-BUS protocol, the mode (A, B,
C , D) is automatically defined. The LED blinks in red and turns green
once the mode is defined.
Once your UNIKA interface has been fitted, the LED should light up green
and should turn amber while pressing a button on your steering wheel.
If the LED does not light up, check the power supply connections. If the
LED is red or blinks red, check the CAN wire connections.
Refer to tables p.28 to 41.
Note: Pictograms on the buttons depend on the model of the vehicles.
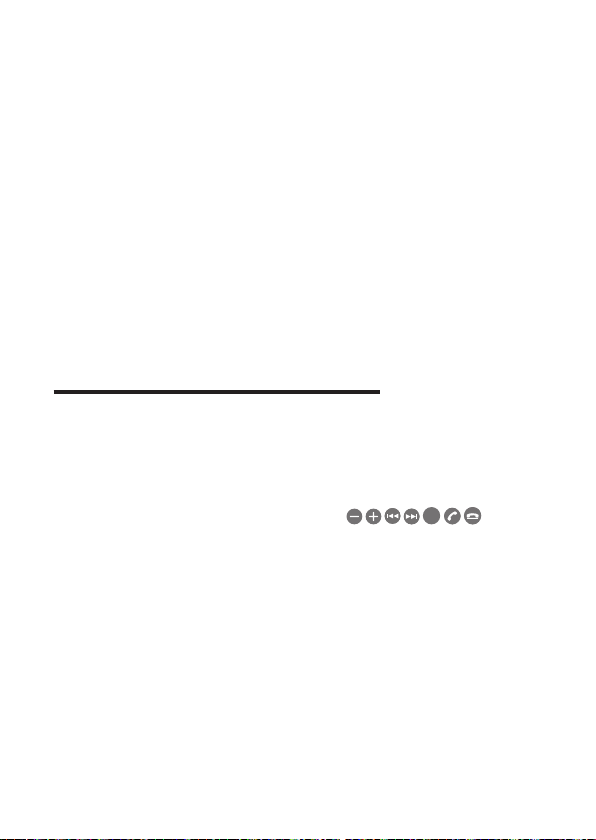
Note : If you are using the UNIKA with a Parrot MKi9000 you can clear the memory of the
kit by repeating the following sequence five times :
.
Reset procedure
In case of problem or if you have installed the UNIKA interface in another vehicle, •
reset the UNIKA by holding down the Reset button until the LED turns off (if the vehicle
is based on a CAN Bus / K-BUS protocol) or blinks red (resistive protocol). You can then
release the reset button.
If you have installed the UNIKA in another vehicle, make sure you do not have to •
modify the DIP switch settings.
12
Using the commands
Page 13

Français
L’UNIKA est une interface universelle permettant de relier les commandes aux volants de votre
véhicule au Parrot MKi / RKi / ASTEROID. Il est compatible avec les protocoles CAN, K-BUS
et résistifs.
Avertissement : Nous vous recommandons de faire appel à un professionnel
pour cette installation.
Installation
Installation
du Parrot
MKi / RKi /
Asteroid
Sélection du
protocole
Installation de
l’Unika avec
un Parrot MKi
Installez le Parrot MKi / RKi / ASTEROID avant de procéder à l’installation •
de l’UNIKA.
Assurez-vous que cette installation est correctement réalisée, en •
vérifiant la présence du message «Au revoir» sur l’écran lorsque vous
coupez le contact.
► Consultez la notice du Parrot MKi / RKi / ASTEROID pour plus
d’informations.
Sélectionnez le protocole sur lequel est basé votre véhicule en utilisant les
interrupteurs DIP sur le boitier de l’UNIKA, tel qu’indiqué sur les
schémas p.8.
Avertissement : Assurez-vous que l’UNIKA n’est pas branché avant
d’effectuer ce réglage.
► Si vous ignorez le protocole sur lequel est basé votre véhicule, consultez
la section Installation de notre site web www.parrot.com.
Installez l’interface UNIKA entre le boitier du Parrot MKi et la connectique
de votre véhicule, tel qu’indiqué sur les schémas p. 4 à 6.
Avertissement : Connectez l’après-contact au Parrot MKi si le
véhicule est basé sur un protocole résistif ou K-Bus. En revanche, le
signal 12V après-contact est fourni par l’UNIKA si le véhicule est basé
sur un protocole CAN.
13
Page 14
Installation de
l’Unika avec le
Parrot RKi8400
/ ASTEROID
Déconnectez la partie MKi du câble de l’Unika et connectez la partie RKi •
/ ASTEROID fournie.
Insérez la partie RKi / ASTEROID du câble de l’Unika entre l’autoradio et la •
connectique de votre véhicule tel qu’indiqué sur le schéma p.7/8.
Connexion du
protocole de
communication
Modes de
l’UNIKA
La connexion du protocole de communication (câbles K-Bus / Can High /
Can Low / V1 et V2) dépend du modèle de votre véhicule.
► Consultez la section Installation de notre site web pour une procédure
d’installation spécifique à votre véhicule.
En fonction de la configuration du volant de votre véhicule et du nombre
de boutons disponibles, l’UNIKA peut vous permettre d’utiliser les
fonctionnalités téléphonie et musique selon 5 modes : Mode A
(4 boutons), Mode B (5 boutons), Mode C (6 boutons), Mode D
(7 boutons), Mode E (8 boutons). La sélection du mode dépend du protocole sur lequel est basé votre véhicule.
Protocole résistif
Définition du
mode
Cas
particuliers
Note: Une fois l’installation de l’UNIKA terminée, coupez le contact jusqu’à ce que
la LED de l’UNIKA s’éteigne.
Si votre véhicule est basé sur un protocole résistif, vous devez définir le
mode manuellement. Pour cela, une fois l’installation réalisée :
1. Mettez le contact.
> La LED de l’UNIKA clignote une fois en rouge.
2. Appuyez sur les boutons des commandes au volant de votre
véhicule dans l’ordre suivant :
> Après chaque appui, la LED de l’UNIKA clignote une fois
en rouge.
Si votre véhicule ne dispose pas de tous ces boutons, appuyez 2 secondes
sur le dernier bouton disponible jusqu’à ce que la LED devienne verte.
s r c
.
14
Page 15
Protocole CAN / K-BUS
Définition du
mode
Vérification de
l’installation
Note: Une fois l’installation de l’UNIKA terminée, coupez le contact jusqu’à ce que la
LED de l’UNIKA s’éteigne.
Si votre véhicule est basé sur un protocole CAN Bus ou K-BUS, la sélection
du mode (A, B, C ou D) est automatique. Un clignotement rouge de la LED
indique que le processus est en cours. La LED devient verte une fois le
mode défini.
Une fois l’UNIKA installé, la diode de l’interface doit s’allumer en vert. Lorsque vous appuyez sur un bouton de vos commandes au volant, la couleur de
la LED doit devenir ambrée. Si c’est le cas, l’interface est prête à être utilisée.
Si cette diode ne s’allume pas, vérifier les tensions d’alimentation de votre
interface UNIKA. Si la LED est rouge ou clignote
Utilisation des commandes au volant
Consultez les tableaux p. 28 à 41 pour connaître les fonctions des différents boutons selon
le mode sélectionné.
Avertissement : Les logos sur les boutons peuvent varier selon les véhicules.
Note : Si vous utilisez l’UNIKA avec un Parrot MKi9000, vous pouvez effacer la mémoire du
kit en répétant 5 fois la séquence suivante :
.
Réinitialisation / réinstallation
Si vous souhaitez réinitialiser l’UNIKA ou si vous souhaitez l’installer dans un autre véhi-•
cule, mettez le contact puis maintenez le bouton Reset enfoncé jusqu’à ce que la LED
s’éteigne (si le véhicule est basé sur un protocole CAN Bus ou K-BUS) ou clignote en
rouge (protocole résistif) pour réinitialiser l’UNIKA.
En cas de réinstallation dans un véhicule différent, vérifiez qu’une modification n’est pas •
nécessaire au niveau des interrupteurs DIP.
15
Page 16

Español
UNIKA es una interfaz universal que permite utilizar los mandos del volante de su vehículo
con el Parrot MKi / RKi / ASTEROID. Es compatible con los protocolos CAN, K-BUS y
resistivos.
Advertencia : Le recomendamos referirse a un profesional para esta instalación.
Instalación
► Consulte los esquemas de instalación p.4 a 8. Para más información, consulte la
sección Instalación de nuestra página web www.parrot.com.
Instalación
del Parrot
MKi / RKi /
ASTEROID
Selección del
Protocolo
Instalación del
Unika con un
Parrot MKi
16
Le recomendamos que instale el Parrot MKi / RKi /ASTEROID antes de •
comenzar con la instalación del UNIKA.
Asegúrese también de que la instalación esté correctamente realizada, com-•
probando que al cortar el contacto aparece el mensaje «Adiós» en la pantalla.
► Consulte el manual del Parrot MKi / RKi / ASTEROID para más
información.
Utilice los interruptores DIP situados en una de las caras laterales de la
caja UNIKA para seleccionar el protocolo en el que se basa el vehículo.
► Consulte los esquemas p.8.
Advertencia: Asegúrese de que el Parrot UNIKA esté sin tensión antes
de realizar el ajuste.
► Si no conoce en qué protocolo está basado su vehículo, consulte la
sección Instalación de nuestra página web www.parrot.com.
Instale la interfaz UNIKA entre la caja del Parrot MKi y las conexiones de su
vehículo como se indica en los esquemas de la p. 4 a 6.
Advertencia: Conecte el “después contacto” al Parrot MKi si el vehículo
está basado en un protocolo resistivo o K-Bus. Por el contrario, si el
vehículo está basado en un protocolo CAN, la señal de 12V “después
contacto” la proporciona el UNIKA.
Page 17

Instalación
del Unika
con el Parrot
RKi8400 /
ASTEROID
Desconecte la parte MKi del cable del Unika y conecte la parte •
RKi / ASTEROID suministrada.
Introduzca la parte RKi / ASTEROID del cable del Unika entre la radio y •
las conexiones del vehículo como se indica en el esquema de la p.7/8.
Conexión del
protocolo de
comunicación
Modos de
UNIKA
La conexión del protocolo de comunicación (cables K-Bus / Can High /
Can Low / V1 y V2) depende del modelo de vehículo que tenga.
► Consulte la sección Instalación de nuestra página web para conocer el
proceso de instalación específico para su vehículo.
En función de la configuración del volante de su vehículo y del número de
botones disponibles, el UNIKA le puede permitir utilizar las funciones de
telefonía y música de 5 modos: Modo A (4 botones), Modo B (5 botones),
Modo C (6 botones), Modo D (7 botones), Mode E (8 botones). La selección del modo depende del protocolo en el que esté basado su vehículo.
Protocolo resistivo
Definición del
modo
Casos
particulares
Nota: Una vez finalizada la instalación del UNIKA, dé al contacto y córtelo después.
Espere a que el LED del UNIKA se apague.
Si su vehículo está basado en un protocolo resistivo, deberá definir el
modo manualmente. Para ello, una vez que haya finalizado la
instalación:
Ponga el contacto. 1.
> El LED del UNIKA parpadeará una vez en rojo
Pulse los botones de los mandos del volante del vehículo en el 2.
siguiente orden :
> Con cada pulsación, el LED del UNIKA parpadeará una vez en rojo.
Si su vehículo no tiene todos esos botones, pulse durante 2 s el último
botón disponible hasta que el LED pase al verde.
s r c
.
17
Page 18

Protocolo CAN Bus / K-BUS
Definición del
modo
Comprobación de la
instalación
Nota: Una vez finalizada la instalación del UNIKA, dé al contacto y córtelo después.
Espere a que el LED del UNIKA se apague.
Si su vehículo se basa en un protocolo CAN Bus o K-BUS, la selección del
modo (A, B, C o D) es automática. El parpadeo del LED en rojo indica que
el proceso está en curso. El LED pasará al verde cuando haya quedado
definido el modo.
Una vez que se haya instalado el UNIKA, el diodo de la interfaz se debe
encender en verde. Si pulsa algún botón de los mandos del volante, el
color del LED debe pasar a ámbar, lo que significa que la interfaz está lista
para ser utilizada. Si el LED no se enciende, compruebe la alimentación. Si
el LED está rojo o parpadea en rojo, compruebe las conexiones del CAN.
Utilización de los mandos
Consulte los cuadros p.28 a 41 para conocer las funciones de los distintos botones según
el modo seleccionado.
Nota: Los logotipos pueden variar según los vehículos.
Nota: Si utiliza el UNIKA con un Parrot MKi9000, podrá borrar la memoria del kit repitiendo
5 veces la siguiente secuencia:
.
Reinstalación
Si tiene algún problema o si vuelve a colocar el UNIKA en otro coche, ponga el contacto y
mantenga pulsado el botón Reset hasta que se apague el LED (si el vehículo está basado
en un protocolo CAN Bus o K-BUS) o parpadee en rojo (protocolo resistivo) para reiniciar
el UNIKA.
18
Page 19

Deutsch
UNIKA ist eine universell einsetzbare Schnittstelle für die Lenkradsteuerungen Ihres
Wagens und Parrot MKi / RKi / ASTEROID. UNIKA ist mit den Protokollen CAN und K-BUS
sowie mit Widerstandsprotokollen kompatibel.
Warnung : Für diese Installation sollten Sie einen Fachmann heranziehen.
Installation
► Bitte beachten Sie die Installationspläne auf den Seiten 4 bis 8. Für weitere Informationen
konsultieren Sie den Abschnitt „Installation“ auf unserer Website www.parrot.com.
Installation
des Parrot
MKi / RKi /
ASTEROID
Protokollauswahl
Installation von
Unika mit einem
Parrot MKi
Wir empfehlen, vor UNIKA zuerst Parrot MKi / RKi / ASTEROID zu in-•
stallieren.
Stellen Sie außerdem sicher, dass die Installation einwandfrei erfolgt ist. •
Beim Ausschalten muss auf dem Bildschirm die Nachricht „Auf Wiedersehen“ angezeigt werden.
Das Fahrzeugprotokoll wird mit den DIP-Schaltern seitlich am UNIKAGehäuse ausgewählt.
► Siehe hierzu die Abbildungen auf Seite 8.
Warnung: Vor den Einstellungen muss sichergestellt werden, dass
UNIKA nicht unter Spannung steht.
► Hinweise zum spezifischen Installationsverfahren für Ihr Fahrzeug
finden Sie im Bereich „Installation“ auf unserer Website.
Bauen Sie die UNIKA Schnittstelle zwischen dem Gehäuse des Parrot
MKi und dem Anschluss Ihres Fahrzeugs wie in den Abbildungen S. 4
bis 6 gezeigt ein.
Warnung: Bei Widerstandsprotokollen und K-Bus Protokollen muss
der Parrot MKi über Kontakt angeschlossen werden. Bei einem
CAN-Protokoll wird das 12V geschaltete Plussignal von der UNIKA
ausgegeben.
19
Page 20

Installation
von Unika mit
einem Parrot
RKi8400 /
ASTEROID
Den MKi-Teil des Unika-Kabels trennen und das gelieferte Teil •
RKi / ASTEROID anschließen.
Das RKi-Teil des Unika-Kabels zwischen Autoradio und Anschluss des •
Fahrzeugs einfügen, wie in der Abbildung auf S. 7/8 gezeigt.
Anschluss des
Kommunikationsprotokolls
UNIKABetriebsmodi
Der Anschluss des Kommunikationsprotokolls (K-Bus / Can High / Can
Low / V1 und V2 Kabel) ist von Ihrem Fahrzeugmodell abhängig.
► Hinweise zum spezifischen Installationsverfahren für Ihr Fahrzeug fin-
den Sie im Bereich „Installation“ auf unserer Website.
Welche Telefon- und Musikfunktionen Sie mit UNIKA bedienen
können, hängt von der Lenkradkonfiguration Ihres Fahrzeugs und von der
Tastenanzahl ab. Es gibt 5 Modi: Modus A (4 Tasten), Modus B (5
Tasten), Modus C (6 Tasten), Modus D (7 Tasten). Die Modusauswahl ist vom
Fahrzeugprotokoll abhängig.
Widerstandsprotokoll
Festlegen des
Modus
Sonderfälle
Anmerkung: Nach Abschluss der UNIKA-Installation muss die Zündung ein Mal ausund dann wieder eingeschaltet werden. Abwarten, bis die UNIKA-LED erlischt.
Bei Fahrzeugen mit Widerstandsprotokoll muss der Modus händisch
ausgewählt werden. Nach der Installation:
Zündung einschalten. 1.
> LED des UNIKA blinkt ein Mal rot auf.
Nun die Steuertasten am Lenkrad Ihres Fahrzeugs in folgender 2.
Reihenfolge betätigen:
> Nach jedem Tastendruck blinkt die LED ein Mal rot auf.
Wenn nicht alle Tasten in Ihrem Fahrzeug vorhanden sind, drücken Sie 2
Sekunden auf die letzte bei Ihnen verfügbare Taste, bis die LED grün wird.
s r c
.
20
Page 21

Protokoll CAN Bus / K-BUS
Festlegen des
Modus
Prüfung der
Anlage
Anmerkung: Nach Abschluss der UNIKA-Installation muss die Zündung ein Mal ausund dann wieder eingeschaltet werden. Abwarten, bis die UNIKA-LED erlischt.
Bei Fahrzeugen mit CAN Bus bzw. K-BUS Protokoll erfolgt die Modusauswahl (A, B, C oder D) automatisch. Während des Auswahlvorgangs
blinkt die LED rot, nach erfolgter Festlegung leuchtet die LED grün auf.
Nach der Installation muss die Schnittstellendiode grün aufleuchten. Die
LED-Farbe muss gelblich werden, sobald man eine der Lenkradsteuerungstasten betätigt. Das bedeutet, dass die Schnittstelle einsatzbereit ist. Wenn
die LED nicht aufleuchtet, muss die Stromversorgung überprüft werden.
Wenn die LED rot leuchtet oder blinkt, müssen die CAN-Anschlüsse überprüft werden.
Bedienung der Steuerungen
Die verschiedenen modusabhängigen Tastenfunktion entnehmen Sie bitte den Tabellen S.
28 bis 41.
Anmerkung: Die Symbole können je nach Fahrzeug anders aussehen.
Hinweis: Wenn Sie UNIKA mit einem Parrot Mki9000 verwenden, löscht man den Speicher
des Einbausatzes, indem man 5 Mal diese Tastenfolge wiederholt:
.
Bei Schwierigkeiten bzw. wenn UNIKA in ein anderes Fahrzeug eingebaut werden soll,
Neueinrichtung
schalten Sie die Zündung ein und halten Sie die Reset-Taste zur Neueinrichtung solange
gedrückt, bis die LED erlischt (im Fall eines CAN Bus oder K-BUS Protokolls), oder bis die
LED rot blinkt (Widerstandsprotokoll).
21
Page 22

Italiano
L’UNIKA è un’interfaccia universale che permette di utilizzare i comandi al volante del vostro
veicolo con il Parrot MKi / RKi / ASTEROID. È compatibile con i protocolli CAN, K-BUS e
resistivi.
Avvertenza : Per questa installazione, si consiglia di rivolgersi ad un tecnico professionista.
Installazione
►Consultare gli schemi di installazione da pag. 4 a 8. Per maggiori informazioni, consultare
la sezione Installazione del nostro sito web www.parrot.com.
Installazione
del Parrot
MKi / RKi /
ASTEROID
Selezione del
Protocollo
Installazione
dell’Unika con
un Parrot MKi
22
Vi consigliamo di installare il Parrot MKi / RKi / ASTEROID prima di procedere all’installazione dell’UNIKA. Assicurarsi anche che questa installazione venga correttamente eseguita, verificando la presenza del messaggio
« Arrivederci » sullo schermo quando si spegne il motore. Consultare le
istruzioni del Parrot MKi / RKi / ASTEROID per maggiori informazioni.
Utilizzare gli interruttori DIP posti su una delle facce laterali della centralina
UNIKA per selezionare il protocollo sul quale si basa il veicolo.
► Vedere gli schemi a p.8.
Avvertenza: assicurarsi che UNIKA non sia sotto tensione prima di
effettuare questa impostazione.
► Se non si conosce il protocollo sul quale si basa il veicolo, consultare la
sezione Installazione del nostro sito web www.parrot.com.
Installare l’interfaccia UNIKA tra l’involucro del Parrot MKi e le connessioni
del veicolo, come illustrato negli schemi delle pagine da 4 a 6.
Avvertenza: Se il veicolo si basa su un protocollo resistivo o K-Bus, collegare il dopo contatto al Parrot MKi. Se invece il veicolo si basa su un
protocollo CAN, il segnale a 12 V dopo il contatto è fornito dall’UNIKA.
Page 23

Installazione
dell’Unika
con il Parrot
RKi8400
ASTEROID
Scollegare la parte MKi / ASTEROID del cavo dell’Unika e collegare la parte •
RKi fornita.
Inserire la parte RKi / ASTEROID del cavo dell’Unika tra l’autoradio e le •
connessioni del veicolo, come mostrato nello schema a pagina 7/8.
Connessione
del protocollo
di
comunicazione
Modalità
dell’UNIKA
La connessione del protocollo di comunicazione (cavi K-Bus / Can High /
Can Low / V1 e V2) dipende dal modello del veicolo.
► Consultare la sezione Installazione del nostro sito web per trovare una
procedura d’installazione specifica del veicolo.
In funzione della configurazione del volante del proprio veicolo e del numero di tasti disponibili, l’UNIKA può consentire di utilizzare le funzionalità
di telefonia e musica secondo 5 modalità: Modalità A (4 tasti), Modalità B
(5 tasti), Modalità C (6 tasti), Modalità D (7 tasti), Modalità E (8 tasti). La
scelta della modalità dipende dal protocollo sul quale si basa il veicolo.
Nota: i loghi possono variare secondo i veicoli.
Protocollo resistivo
Definizione
della modalità
Casi
particolari
Nota: Una volta terminata l’installazione di UNIKA, togliere il positivo sottochiave.
Aspettare fino allo spegnimento del LED di UNIKA.
Se il proprio veicolo si basa su un protocollo resistivo, si dovrà definire manualmente la modalità. Per fare ciò, una volta eseguita l’installazione:
Accendere il motore. 1.
> Il LED dell’UNIKA lampeggia una volta in rosso.
Premere i tasti dei comandi al volante del proprio veicolo nel seguente 2.
ordine
> Ogni volta che si preme, il LED dell’UNIKA lampeggia una volta in
rosso.
Se il proprio veicolo non dispone di tutti questi tasti, premere per 2 sec
l’ultimo tasto disponibile finché il LED non diventa verde.
s r c
.
23
Page 24

Protocollo CAN / K-BUS
Definizione
della modalità
Verifica dell’
installazione
Nota: Una volta terminata l’installazione di UNIKA, dare e togliere il positivo
sottochiave. Aspettare fino allo spegnimento del LED di UNIKA.
Se il proprio veicolo si basa su un protocollo CAN Bus o K-BUS, la selezione
della modalità (A, B, C o D) è automatica. Un lampeggiamento rosso del
LED indica che il processo è in corso. Il LED diventa verde una volta definita
la modalità.
Una volta installato UNIKA, il LED dell’interfaccia deve accendersi in verde.
Quando si preme un tasto dei comandi al volante, il colore del LED deve
diventare ambrato. Se ciò avviene, l’interfaccia è pronta per l’uso. Se il LED
non si accende, verificare l’alimentazione. Se il LED è rosso o lampeggia in
rosso, verificare le connessioni del CAN.
Uso dei comandi
Consultare le tabelle da pag. 28 a 41 per conoscere le funzioni dei diversi tasti secondo la
modalità selezionata.
Nota: i loghi possono variare secondo i veicoli.
Nota: Se si utilizza l’UNIKA con un Parrot MKi9000, la memoria del kit può essere cancellata ripetendo per 5 volte la seguente sequenza:
.
Reinstallazione
In caso di problemi o se si è reinstallato l’UNIKA su un’altra autovettura, accendere il motore
poi mantenere il tasto Reset premuto fino a quando il LED non si spegne (se il veicolo si
basa su un protocollo CAN Bus o K-BUS) o lampeggia in rosso (protocollo resistivo) per
resettare l’UNIKA.
24
Page 25

Nederlands
De UNIKA is een universele interface, waardoor de stuurbediening van uw voertuig kan
worden gebruikt met de Parrot MKi / RKi / ASTERODI. Hij is compatibel met de protocollen
CAN, K-BUS en met weerstand.
Waarschuwing : Wij raden u aan de autoradio door een vakman te laten installeren.
Installatie
► Raadpleeg de installatieschema’s op pagina 4 tot 8. Voor meer informatie kunt u het
onderdeel Installatie op onze website www.parrot.com doornemen.
Installatie van
de Parrot
MKi / RKi /
ASTEROID
Keuze van het
protocol
Installatie van
de Unika
met een
Parrot MKi
Wij raden u aan om de Parrot MKi / RKi / ASTEROID te installeren voor-•
dat u de UNIKA installeert.
Verzeker u er ook van dat de installatie correct is uitgevoerd, door te •
controleren of het bericht ‘tot ziens’ op het scherm wordt getoond als u
het contact verbreekt.
Gebruik de DIP switches die zich op één van de zijkanten van de UNIKA
kast bevinden om het protocol te kiezen waarop het voertuig is gebaseerd.
► Zie de tekeningen op p.8.
Waarschuwing: controleer dat de UNIKA niet onder stroom staat
voordat u deze instelling uitvoert.
► Als u niet weet op welk protocol uw voertuig gebaseerd is, raadpleeg
dan het onderdeel Installatie op onze website www.parrot.com.
Installeer de UNIKA interface tussen de doos van de Parrot MKi en de
aansluiting van uw voertuig, zoals aangegeven op de schema’s op pagina
4 tot 6.
Waarschuwing: sluit het na-contact aan op de Parrot MKi als uw voertuig is gebaseerd op een weerstandprotocol of K-Bus. Daarentegen
wordt het 12V na-contact signaal door de UNIKA geleverd als uw
voertuig is gebaseerd op een CAN protocol.
25
Page 26

Installatie van
de Unika
met een Parrot
RKi8400 /
ASTEROID
Aansluiten van
het communicatieprotocol
Modussen
van de
UNIKA
Verwijder het MKi / ASTEROID deel van het UNIKA snoer en sluit het •
meegeleverde RKI deel aan.
Sluit het RKi / ASTEROID deel van het UNIKA snoer aan tussen de autora-•
dio en de aansluiting van uw voertuig, zoals aangegeven op het schema
op pagina 7/8.
De aansluiting van het communicatieprotocol (snoeren K-Bus / Can High /
Can Low / V1 en V2) hangt af van het model van uw voertuig.
► Raadpleeg het onderdeel Installatie op onze website voor een installatieprocedure die geschikt is voor uw voertuig.
Afhankelijk van de configuratie van het stuur van uw voertuig en het aantal
knoppen dat beschikbaar is, kunt u met de UNIKA de functies telefoon
en muziek gebruiken op vijf manieren: Modus A (4 knoppen), Modus B
(5 knoppen), Modus C (6 knoppen), Modus D (7 knoppen), Modus E (8
knoppen). De selectie van een modus hangt af van het protocol waarop
uw voertuig is gebaseerd.
Weerstandsprotocol
Bepaling van
de modus
Bijzondere
gevallen
Let op: wanneer de installatie van de UNIKA is voltooid, verbreekt u het contact en
maakt vervolgens weer contact. Wacht totdat de LED van de UNIKA uit gaat.
Als uw voertuig is gebaseerd op een weerstandsprotocol, moet u de modus
handmatig bepalen. U doet dit als volgt, nadat de installatie is voltooid:
U schakelt het contact in. 1.
> De UNIKA LED knippert één maal rood.
Druk op de knoppen van de stuurbediening van uw voertuig in de 2.
volgende volgorde
> Elke keer als u op een knop hebt gedrukt, knippert de UNIKA LED
één maal rood.
Als uw voertuig niet over al deze knoppen beschikt, drukt u twee seconden
op de laatste knop die beschikbaar is totdat de LED groen wordt.
s r c
.
26
Page 27

Bepaling van
de modus
De installatie
controleren
Let op: wanneer de installatie van de UNIKA is voltooid, verbreekt u het contact en
maakt vervolgens weer contact. Wacht totdat de LED van de UNIKA uit gaat.
Als uw voertuig is gebaseerd op een protocol CAN Bus of K-BUS, gebeurt
de selectie van de modus (A, B, C of D) automatisch. De LED knippert rood
om aan te geven dat het proces gaande is. De LED wordt groen wanneer
de modus is bepaald.
Wanneer de UNIKA is geïnstalleerd, moet de diode van de interface groen
gaan branden. Wanneer u op een knop drukt van de stuurbediening, moet
de LED amberkleurig worden. Indien dit het geval is, is de interface klaar
voor gebruik. Als de LED niet aan gaat moet u de voeding controleren. Als
de LED rood is of rood knippert controleer dan de CAN aansluitingen.
Gebruik van de bediening
Raadpleeg de tabellen op p. 28 tot 41 voor de functies van de verschillende knoppen
volgens de gekozen modus.
Let op: de logo’s kunnen per voertuig verschillen.
Let op: als u de UNIKA gebruikt met een Parrot MKi9000, kunt u het geheugen van de kit
Protocol CAN Bus / K-BUS
wissen door 5 maal de volgende sequentie te herhalen:
.
Als u een probleem tegenkomt of als u de UNIKA eerst in een ander voertuig heeft geïns-
Opnieuw installeren
talleerd, schakelt u het contact in en houdt vervolgens de knop Reset ingedrukt tot de LED
uit gaat (als het voertuig is gebaseerd op een CAN Bus of K-BUS protocol) of rood knippert
(weerstandsprotocol), om de UNIKA op nul te zetten.
27
Page 28

Caption
Short press / Appui court / Pulsación corta / Kurzer Druck /
Pressione breve / Kort drukken
2 short presses / 2 appuis courts / 2 pulsaciones corta /
2 x kurzer Druck / 2 pressioni brevi / 2 maal kort drukken
Long press / Appui long / Pulsación larga / Langer Druck /
Pressione prolungata / Lang drukken
Volume / Volumen / Lautstärke
Seek / Précédent/suivant / Vorige/volgende / Precedente/Successivo /
Anterior/siguiente / Zurück/weiter
s r c
Source / Fuente / Quelle / Fonte
Pick up - Hang up / Décrocher - Raccrocher / Descolgar - Colgar
/ Abheben - Auflegen / Rispondere - Riagganciare / Opnemen Ophangen
Voice recognition / Reconnaissance vocale / Spraakherkenning /
Riconoscimento vocale / Reconocimiento de voz / Spracherkennung
< 1s
> 2s
Warning : The mode (A / B / C / D / E) you will use depends on the number of available
buttons and not on the pictograms. For instance, if you have the
tons, you will use the UNIKA in mode B : while referring to the tables p.21/24, consider
s r c
buttons is replaced by the button.
the
Avertissement : Le mode (A / B / C / D / E) que vous utiliserez dépend uniquement du
nombre de boutons disponibles et non des pictogrammes sur ces derniers. Ex : Si vous
disposez des boutons
bleaux p.21 à 24, considérez que le bouton
Advertencia : El modo (A / B / C / D / E) que utilizará depende únicamente del número
de botones disponibles y no de los símbolos de éstos. Ej.: Si usted tiene los botones
, utilizará el UNIKA en modo B. En el cuadro p.21 a 24, considere que el
sustituye al botón
botón
Warnung : Der verwendete Modus hängt ausschließlich von der Tastenanzahl ab, nicht
von den Symbolen auf den Tasten. Beispiel: Sie verfügen über die Tasten
und verwenden dementsprechend UNIKA im Modus B. In den Tabellen auf Seiten 21
bis 24 entspricht die Taste
Avvertenza: la modalità (A / B / C / D / E) che si utilizzerà dipende esclusivamente dal
numero dei tasti disponibili e non dai simboli posti su questi ultimi. Es.: se si dispone
dei tasti
considerare che il tasto
Waarschuwing: de modus (A / B / C / D / E) die u gebruikt hangt uitsluitend af van het
aantal beschikbare knoppen en niet van de op de knoppen. Voorbeeld: als u beschikt
over de knoppen
21 tot 24, kunt u ervan uitgaan dat knop
, si utilizzerà l’UNIKA in modalità B. Sulle tabelle da p. 21 a 24,
, vous utiliserez l’UNIKA en mode B. Sur les ta-
s r c
.
der Taste
sostituisce il tasto
,gebruikt u de UNIKA in modus B. Op de tabellen op p.
remplace le bouton
s r c
.
s r c
.
de knop
s r c
vervangt.
but-
s r c
.
28
Page 29

Mode A
/
/
/
Enter the menu / Entrer dans le menu / Entrar en el menú / Öffnen
eines Menüs / Accedere al menu / Het hoofdmenu openen
Navigate through the menus / Naviguer dans le menu / Navegar por
los menús / Navigation in den Menüs / Consente di utilizzare i menu /
In de menu’s navigeren
Confirm menu choice / Confirmer / Validar la selección / Bestätigung
einer Auswahl / Confermare la selezione / De selectie valideren
Back menu / Menu précédent / Menú anterior / Rückkehr zum vorhergehenden Menü / Consente di tornare al menu precedente / Vorige menu
Adjust the volume / Modifier le volume / Ajustar el volumen / Einstellung
der Lautstärke / Modificare il volume / De geluidssterkte regelen
Answer an incoming call / Répondre à un appel / Descolgar una llamada
/ Entgegennehmen eines eingehenden Anrufs / Rispondere a una chiamata / Een inkomend gesprek opnemen
Refuse an incoming call / Refuser un appel / Colgar una llamada / Beenden eines eingehenden Anrufs / Rifiutare una chiamata / en inkomend
gesprek weigeren
Hang up / Raccrocher / Rechazar / Ablehnen / Riagganciare / Ophangen
Discreet mode / Mode discret / Modo discreto / Diskreter Modus /
Modalità privata / Privacy modus
Exit discreet mode / Sortir du mode discret / Salir del modo discreto
/ Beenden des Diskreter Modus / Disattivare la modalità privata / De
discrete modus opheffen
Start the voice recognition feature / Lancer la reconnaissance vocale /
Iniciar el modo de reconocimiento de voz / Aktivieren der Spracherkennung / Attivare la funzione di ricon. vocale / De modus Spraakherkenning sluiten
Redial function / Fonction Bis / Función de rellamada / Wiederholung
des letzten Anrufs / Funzione Bis / Bis functie
Mute Mic / Couper le microphone / Desactivar el micrófono / Das
Mikrofon deaktivieren / Disattivare il microfono / De microfoon in- of
uitschakelen
Next - previous track / Morceau suivant - précédent / Pista siguiente
- precedente / Vorhergehende - nächsten Stück / Brano precedente successivo
Play - Pause / Parar - reproducir música / Anhalten - Fortsetzen der
Wiedergabe / Interrompere - riprendere la lettura /
MKi
29
Page 30

Mode B
/
s r c
s r c
/
s r c
s r c
s r c
s r c
s r c
s r c s r c
s r c
/
30
MKi
Enter the menu / Entrer dans le menu / Entrar en el menú / Öffnen
eines Menüs / Accedere al menu / Het hoofdmenu openen
Navigate through the menus / Naviguer dans le menu / Navegar por
los menús / Navigation in den Menüs / Consente di utilizzare i menu /
In de menu’s navigeren
Confirm menu choice / Confirmer / Validar la selección / Bestätigung
einer Auswahl / Confermare la selezione / De selectie valideren
Back menu / Menu précédent / Menú anterior / Rückkehr zum vorhergehenden Menü / Consente di tornare al menu precedente / Vorige menu
Adjust the volume / Modifier le volume / Ajustar el volumen / Einstellung
der Lautstärke / Modificare il volume / De geluidssterkte regelen
Answer an incoming call / Répondre à un appel / Descolgar una llamada
/ Entgegennehmen eines eingehenden Anrufs / Rispondere a una chiamata / Een inkomend gesprek opnemen
Refuse an incoming call / Refuser un appel / Colgar una llamada / Beenden eines eingehenden Anrufs / Rifiutare una chiamata / en inkomend
gesprek weigeren
Hang up / Raccrocher / Rechazar / Ablehnen / Riagganciare / Ophangen
Discreet mode / Mode discret / Modo discreto / Diskreter Modus /
Modalità privata / Privacy modus
Exit discreet mode / Sortir du mode discret / Salir del modo discreto
/ Beenden des Diskreter Modus / Disattivare la modalità privata / De
discrete modus opheffen
Start the voice recognition feature / Lancer la reconnaissance vocale /
Iniciar el modo de reconocimiento de voz / Aktivieren der Spracherkennung / Attivare la funzione di ricon. vocale / De modus Spraakherkenning sluiten
Redial function / Fonction Bis / Función de rellamada / Wiederholung
des letzten Anrufs / Funzione Bis / Bis functie
Mute Mic / Couper le microphone / Desactivar el micrófono / Das
Mikrofon deaktivieren / Disattivare il microfono / De microfoon in- of
uitschakelen
Next - previous track / Morceau suivant - précédent / Pista siguiente
- precedente / Vorhergehende - nächsten Stück / Brano precedente successivo
Play - Pause / Parar - reproducir música / Anhalten - Fortsetzen der
Wiedergabe / Interrompere - riprendere la lettura /
Page 31

Mode C
/
/
/
MKi
Enter the menu / Entrer dans le menu / Entrar en el menú / Öffnen
eines Menüs / Accedere al menu / Het hoofdmenu openen
Navigate through the menus / Naviguer dans le menu / Navegar por
los menús / Navigation in den Menüs / Consente di utilizzare i menu /
In de menu’s navigeren
Confirm menu choice / Confirmer / Validar la selección / Bestätigung
einer Auswahl / Confermare la selezione / De selectie valideren
Back menu / Menu précédent / Menú anterior / Rückkehr zum vorhergehenden Menü / Consente di tornare al menu precedente / Vorige menu
Adjust the volume / Modifier le volume / Ajustar el volumen / Einstellung
der Lautstärke / Modificare il volume / De geluidssterkte regelen
Answer an incoming call / Répondre à un appel / Descolgar una llamada
/ Entgegennehmen eines eingehenden Anrufs / Rispondere a una chiamata / Een inkomend gesprek opnemen
Refuse an incoming call / Refuser un appel / Colgar una llamada / Beenden eines eingehenden Anrufs / Rifiutare una chiamata / en inkomend
gesprek weigeren
Hang up / Raccrocher / Rechazar / Ablehnen / Riagganciare / Ophangen
Discreet mode / Mode discret / Modo discreto / Diskreter Modus /
Modalità privata / Privacy modus
Exit discreet mode / Sortir du mode discret / Salir del modo discreto
/ Beenden des Diskreter Modus / Disattivare la modalità privata / De
discrete modus opheffen
Start the voice recognition feature / Lancer la reconnaissance vocale /
Iniciar el modo de reconocimiento de voz / Aktivieren der Spracherkennung / Attivare la funzione di ricon. vocale / De modus Spraakherkenning sluiten
Redial function / Fonction Bis / Función de rellamada / Wiederholung
des letzten Anrufs / Funzione Bis / Bis functie
Mute Mic / Couper le microphone / Desactivar el micrófono / Das
Mikrofon deaktivieren / Disattivare il microfono / De microfoon in- of
uitschakelen
Next - previous track / Morceau suivant - précédent / Pista siguiente
- precedente / Vorhergehende - nächsten Stück / Brano precedente successivo
Play - Pause / Parar - reproducir música / Anhalten - Fortsetzen der
Wiedergabe / Interrompere - riprendere la lettura /
31
Page 32

Mode D
/
/
/
32
MKi
Enter the menu / Entrer dans le menu / Entrar en el menú / Öffnen
eines Menüs / Accedere al menu / Het hoofdmenu openen
Navigate through the menus / Naviguer dans le menu / Navegar por
los menús / Navigation in den Menüs / Consente di utilizzare i menu /
In de menu’s navigeren
Confirm menu choice / Confirmer / Validar la selección / Bestätigung
einer Auswahl / Confermare la selezione / De selectie valideren
Back menu / Menu précédent / Menú anterior / Rückkehr zum vorhergehenden Menü / Consente di tornare al menu precedente / Vorige menu
Adjust the volume / Modifier le volume / Ajustar el volumen / Einstellung
der Lautstärke / Modificare il volume / De geluidssterkte regelen
Answer an incoming call / Répondre à un appel / Descolgar una llamada
/ Entgegennehmen eines eingehenden Anrufs / Rispondere a una chiamata / Een inkomend gesprek opnemen
Refuse an incoming call / Refuser un appel / Colgar una llamada / Beenden eines eingehenden Anrufs / Rifiutare una chiamata / en inkomend
gesprek weigeren
Hang up / Raccrocher / Rechazar / Ablehnen / Riagganciare / Ophangen
Discreet mode / Mode discret / Modo discreto / Diskreter Modus /
Modalità privata / Privacy modus
Exit discreet mode / Sortir du mode discret / Salir del modo discreto
/ Beenden des Diskreter Modus / Disattivare la modalità privata / De
discrete modus opheffen
Start the voice recognition feature / Lancer la reconnaissance vocale /
Iniciar el modo de reconocimiento de voz / Aktivieren der Spracherkennung / Attivare la funzione di ricon. vocale / De modus Spraakherkenning sluiten
Redial function / Fonction Bis / Función de rellamada / Wiederholung
des letzten Anrufs / Funzione Bis / Bis functie
Mute Mic / Couper le microphone / Desactivar el micrófono / Das
Mikrofon deaktivieren / Disattivare il microfono / De microfoon in- of
uitschakelen
Next - previous track / Morceau suivant - précédent / Pista siguiente
- precedente / Vorhergehende - nächsten Stück / Brano precedente successivo
Play - Pause / Parar - reproducir música / Anhalten - Fortsetzen der
Wiedergabe / Interrompere - riprendere la lettura
Page 33

Mode A
ASTEROID
/
/
/
Adjust the volume / Modifier le volume / Ajustar el volumen / Einstellung
der Lautstärke / Modificare il volume / De geluidssterkte regelen
Answer an incoming call / Répondre à un appel / Descolgar una llamada
/ Entgegennehmen eines eingehenden Anrufs / Rispondere a una chiamata / Een inkomend gesprek opnemen
Refuse an incoming call / Refuser un appel / Colgar una llamada / Beenden eines eingehenden Anrufs / Rifiutare una chiamata / en inkomend
gesprek weigeren
Discreet mode - exit discreet mode / Mode discret - sortir du mode
discret / Modo discreto - salir del modo discreto / Modalità privata disattivare la modalità privata / Diskreter Modus - beenden des Diskreter
Modus
Hang up / Raccrocher / Rechazar / Ablehnen / Riagganciare / Ophangen
Launch the player / Lancer le lecteur / Iniciar el lector / Spieler starten /
Avvia il lettore / De lezer starten
Next - previous / Suivant - précédent / Siguiente - precedente / Vorhergehende - nächsten / Precedente - successivo
33
Page 34

Mode B
ASTEROID
/
/
Adjust the volume / Modifier le volume / Ajustar el volumen / Einstellung
der Lautstärke / Modificare il volume / De geluidssterkte regelen
Answer an incoming call / Répondre à un appel / Descolgar una llamada
/ Entgegennehmen eines eingehenden Anrufs / Rispondere a una chiamata / Een inkomend gesprek opnemen
Refuse an incoming call / Refuser un appel / Colgar una llamada / Beenden eines eingehenden Anrufs / Rifiutare una chiamata / en inkomend
gesprek weigeren
Hang up / Raccrocher / Rechazar / Ablehnen / Riagganciare / Ophangen
Next - previous / Suivant - précédent / Siguiente - precedente / Vorhergehende - nächsten / Precedente - successivo
Discreet mode - exit discreet mode / Mode discret - sortir du mode
discret / Modo discreto - salir del modo discreto / Modalità privata disattivare la modalità privata / Diskreter Modus - beenden des Diskreter
Modus
Selecting a music source / Sélectionner une source audio / Seleccionar
una fuente de audio / Auswahl der Audioquelle / Selezionare l’audio
s r c
Launch the player / Lancer le lecteur / Iniciar el lector / Spieler starten /
Avvia il lettore / De lezer starten
34
Page 35

Mode C
ASTEROID
Adjust the volume / Modifier le volume / Ajustar el volumen / Einstellung
/
der Lautstärke / Modificare il volume / De geluidssterkte regelen
Answer an incoming call / Répondre à un appel / Descolgar una llamada /
Entgegennehmen eines eingehenden Anrufs / Rispondere a una chiamata
/ Een inkomend gesprek opnemen
Start the voice recognition feature (phone) / Lancer la reconnaissance
vocale (téléphone) / Iniciar el modo de reconocimiento de voz (teléfono)
/ Aktivieren der Spracherkennung (telefon) / Attivare la funzione di ricon.
vocale (telefono) / De modus Spraakherkenning sluiten (Telefoon)
- Refuse an incoming call / Refuser un appel / Colgar una llamada
/ Beenden eines eingehenden Anrufs / Rifiutare una chiamata / en
inkomend gesprek weigeren
- Hang up / Raccrocher / Rechazar / Ablehnen / Riagganciare
/ Ophangen
Discreet mode - exit discreet mode / Mode discret - sortir du mode
discret / Modo discreto - salir del modo discreto / Modalità privata disattivare la modalità privata / Diskreter Modus - beenden des Diskreter
Modus
Selecting a music source / Sélectionner une source audio / Seleccionar
una fuente de audio / Auswahl der Audioquelle / Selezionare l’audio
s r c
Launch the player / Lancer le lecteur / Iniciar el lector / Spieler starten /
Avvia il lettore / De lezer starten
/
Next - previous / Suivant - précédent / Siguiente - precedente / Vorhergehende - nächsten / Precedente - successivo
35
Page 36

Mode D
ASTEROID
Adjust the volume / Modifier le volume / Ajustar el volumen / Einstellung
/
der Lautstärke / Modificare il volume / De geluidssterkte regelen
Answer an incoming call / Répondre à un appel / Descolgar una llamada /
Entgegennehmen eines eingehenden Anrufs / Rispondere a una chiamata
/ Een inkomend gesprek opnemen
Refuse an incoming call / Refuser un appel / Colgar una llamada / Beenden eines eingehenden Anrufs / Rifiutare una chiamata / en inkomend
gesprek weigeren
Hang up / Raccrocher / Rechazar / Ablehnen / Riagganciare / Ophangen
Discreet mode - exit discreet mode / Mode discret - sortir du mode discret / Modo discreto - salir del modo discreto / Modalità privata - disattivare la modalità privata / Diskreter Modus - beenden des Diskreter Modus
Start the voice recognition feature (phone) / Lancer la reconnaissance
vocale (téléphone) / Iniciar el modo de reconocimiento de voz (teléfono)
/ Aktivieren der Spracherkennung (telefon) / Attivare la funzione di ricon.
vocale (telefono) / De modus Spraakherkenning sluiten (Telefoon)
Next - previous / Suivant - précédent / Siguiente - precedente / Vorherge-
/
hende - nächsten / Precedente - successivo
Ecran de veille / Screensaver / Slaapstandscherm / Salvapantalla /
Bildschirmschoner
Launch the player / Lancer le lecteur / Iniciar el lector / Spieler starten /
Avvia il lettore / De lezer starten
s r c
Selecting a music source / Sélectionner une source audio / Seleccionar
una fuente de audio / Auswahl der Audioquelle / Selezionare l’audio
36
Page 37

Mode E
ASTEROID
Adjust the volume / Modifier le volume / Ajustar el volumen / Einstellung
/
der Lautstärke / Modificare il volume / De geluidssterkte regelen
Answer an incoming call / Répondre à un appel / Descolgar una llamada /
Entgegennehmen eines eingehenden Anrufs / Rispondere a una chiamata
/ Een inkomend gesprek opnemen
Refuse an incoming call / Refuser un appel / Colgar una llamada / Beenden eines eingehenden Anrufs / Rifiutare una chiamata / en inkomend
gesprek weigeren
Hang up / Raccrocher / Rechazar / Ablehnen / Riagganciare / Ophangen
Discreet mode - exit discreet mode / Mode discret - sortir du mode discret / Modo discreto - salir del modo discreto / Modalità privata - disattivare la modalità privata / Diskreter Modus - beenden des Diskreter Modus
Start the voice recognition feature (phone) / Lancer la reconnaissance
vocale (téléphone) / Iniciar el modo de reconocimiento de voz (teléfono)
/ Aktivieren der Spracherkennung (telefon) / Attivare la funzione di ricon.
vocale (telefono) / De modus Spraakherkenning sluiten (Telefoon)
Next - previous / Suivant - précédent / Siguiente - precedente / Vorherge-
/
hende - nächsten / Precedente - successivo
Start the voice recognition feature (music) / Lancer la reconnaissance
vocale (musique) / Iniciar el modo de reconocimiento de voz (Música) /
Aktivieren der Spracherkennung (Musik) / Attivare la funzione di ricon.
Vocale (Musica) / De modus Spraakherkenning sluiten (Muziek)
Ecran de veille / Screensaver / Slaapstandscherm / Salvapantalla /
Bildschirmschoner
Launch the player / Lancer le lecteur / Iniciar el lector / Spieler starten /
s r c
Avvia il lettore / De lezer starten
37
Page 38

Mode A
RKi8400
/
/
Adjust the volume / Modifier le volume / Ajustar el volumen / Einstellung
der Lautstärke / Modificare il volume / De geluidssterkte regelen
Answer an incoming call / Répondre à un appel / Descolgar una llamada
/ Entgegennehmen eines eingehenden Anrufs / Rispondere a una chiamata / Een inkomend gesprek opnemen
Refuse an incoming call / Refuser un appel / Colgar una llamada / Beenden eines eingehenden Anrufs / Rifiutare una chiamata / en inkomend
gesprek weigeren
Hang up / Raccrocher / Rechazar / Ablehnen / Riagganciare / Ophangen
Next - previous / Suivant - précédent / Siguiente - precedente / Vorhergehende - nächsten / Precedente - successivo
38
Page 39

Mode B
RKi8400
/
s r c s r c
s r c
s r c
s r c
/
s r c s r c
s r c
s r c s r c
s r c
/
Adjust the volume / Modifier le volume / Ajustar el volumen / Einstellung
der Lautstärke / Modificare il volume / De geluidssterkte regelen
Answer an incoming call / Répondre à un appel / Descolgar una llamada
/ Entgegennehmen eines eingehenden Anrufs / Rispondere a una chiamata / Een inkomend gesprek opnemen
Refuse an incoming call / Refuser un appel / Colgar una llamada / Beenden eines eingehenden Anrufs / Rifiutare una chiamata / en inkomend
gesprek weigeren
Hang up / Raccrocher / Rechazar / Ablehnen / Riagganciare / Ophangen
Redial function / Fonction Bis / Función de rellamada / Wiederholung
des letzten Anrufs / Funzione Bis / Bis functie
Next - previous / Suivant - précédent / Siguiente - precedente / Vorhergehende - nächsten / Precedente - successivo
Discreet mode / Mode discret / Modo discreto / Diskreter Modus /
Modalità privata / Privacy mode
Exit discreet mode / Sortir du mode discret / Salir del modo discreto
/ Beenden des Diskreter Modus / Disattivare la modalità privata / De
discrete modus opheffen
Start the voice recognition feature / Lancer la reconnaissance vocale /
Iniciar el modo de reconocimiento de voz / Aktivieren der Spracherkennung / Attivare la funzione di ricon. vocale / De modus Spraakherkenning sluiten
Selecting a music source / Sélectionner une source audio / Seleccionar
una fuente de audio / Auswahl der Audioquelle / Selezionare l’audio
Next - previous / Suivant - précédent / Siguiente - precedente / Vorhergehende - nächsten / Precedente - successivo
39
Page 40

Mode C
s r c
/
s r c
s r c
/
s r c s r c
s r c
/
s r c s r c
40
RKi8400
Enter the menu / Entrer dans le menu / Entrar en el menú / Öffnen
eines Menüs / Accedere al menu / Het hoofdmenu openen
Navigate through the menus / Naviguer dans le menu / Navegar por
los menús / Navigation in den Menüs / Consente di utilizzare i menu /
In de menu’s navigeren
Confirm menu choice / Confirmer / Validar la selección / Bestätigung
einer Auswahl / Confermare la selezione / De selectie valideren
Back menu / Menu précédent / Menú anterior / Rückkehr zum vorhergehenden Menü / Consente di tornare al menu precedente / Vorige menu
Adjust the volume / Modifier le volume / Ajustar el volumen / Einstellung
der Lautstärke / Modificare il volume / De geluidssterkte regelen
- Answer an incoming call / Répondre à un appel / Descolgar una
llamada / Entgegennehmen eines eingehenden Anrufs / Rispondere a
una chiamata / Een inkomend gesprek opnemen
- Start the voice recognition feature / Lancer la reconnaissance vocale /
Iniciar el modo de reconocimiento de voz / Aktivieren der
Spracherkennung / Attivare la funzione di ricon. vocale / De modus
Spraakherkenning sluiten
- Refuse an incoming call / Refuser un appel / Colgar una llamada
/ Beenden eines eingehenden Anrufs / Rifiutare una chiamata / en
inkomend gesprek weigeren
- Hang up / Raccrocher / Rechazar / Ablehnen / Riagganciare
/ Ophangen
- Discreet mode / Mode discret / Modo discreto / Diskreter Modus
/ Modalità privata / Privacy modus
- Exit discreet mode / Sortir du mode discret / Salir del modo discreto
/ Beenden des Diskreter Modus / Disattivare la modalità privata / De
discrete modus opheffen
Redial function / Fonction Bis / Función de rellamada / Wiederholung des
letzten Anrufs / Funzione Bis / Bis functie
Mute Mic / Couper le microphone / Desactivar el micrófono / Das
Mikrofon deaktivieren / Disattivare il microfono / De microfoon in- of
uitschakelen
Selecting a music source / Sélectionner une source audio / Seleccionar
una fuente de audio / Auswahl der Audioquelle / Selezionare l’audio
Next - previous / Suivant - précédent / Siguiente - precedente / Vorhergehende - nächsten / Precedente - successivo
Play - Pause / Parar - reproducir música / Anhalten - Fortsetzen der
Wiedergabe / Interrompere - riprendere la lettura /
Page 41

Mode D
s r c
/
s r c
s r c
/
s r c s r c
/
s r c s r c
RKi8400
Enter the menu / Entrer dans le menu / Entrar en el menú / Öffnen
eines Menüs / Accedere al menu / Het hoofdmenu openen
Navigate through the menus / Naviguer dans le menu / Navegar por
los menús / Navigation in den Menüs / Consente di utilizzare i menu /
In de menu’s navigeren
Confirm menu choice / Confirmer / Validar la selección / Bestätigung
einer Auswahl / Confermare la selezione / De selectie valideren
Back menu / Menu précédent / Menú anterior / Rückkehr zum vorhergehenden Menü / Consente di tornare al menu precedente / Vorige menu
Adjust the volume / Modifier le volume / Ajustar el volumen / Einstellung
der Lautstärke / Modificare il volume / De geluidssterkte regelen
Answer an incoming call / Répondre à un appel / Descolgar una llamada /
Entgegennehmen eines eingehenden Anrufs / Rispondere a una chiamata
/ Een inkomend gesprek opnemen
Refuse an incoming call / Refuser un appel / Colgar una llamada / Beenden eines eingehenden Anrufs / Rifiutare una chiamata / en inkomend
gesprek weigeren
Hang up / Raccrocher / Rechazar / Ablehnen / Riagganciare / Ophangen
Discreet mode / Mode discret / Modo discreto / Diskreter Modus / Modalità privata / Privacy modus
Exit discreet mode / Sortir du mode discret / Salir del modo discreto
/ Beenden des Diskreter Modus / Disattivare la modalità privata / De
discrete modus opheffen
Start the voice recognition feature / Lancer la reconnaissance vocale /
Iniciar el modo de reconocimiento de voz / Aktivieren der Spracherkennung / Attivare la funzione di ricon. vocale / De modus Spraakherkenning
sluiten
Redial function / Fonction Bis / Función de rellamada / Wiederholung des
letzten Anrufs / Funzione Bis / Bis functie
Mute Mic / Couper le microphone / Desactivar el micrófono / Das
Mikrofon deaktivieren / Disattivare il microfono / De microfoon in- of
uitschakelen
Next - previous / Suivant - précédent / Siguiente - precedente / Vorhergehende - nächsten / Precedente - successivo
Play - Pause / Parar - reproducir música / Anhalten - Fortsetzen der
Wiedergabe / Interrompere - riprendere la lettura
41
Page 42

Warranty
Without prejudice of legal warranty, Parrot products are warranted during 1 year
from the date of purchase for defects in
materials and workmanship, provided that
no deterioration to the product has been
made, and upon presentation of proof of
purchase (date of purchase, location of sale
and product serial number) to the retailer or
Parrot directly. Warranty does not cover:
upgrading of the software items of the Parrot products with Bluetooth® cell phones
for compatibility purpose, data recovery,
deterioration of the external aspect due
to normal use of the product, any damage
caused by accident, misuse, misapplication, or non-Parrot products. Parrot is not
responsible for storage, loss or damaged to
data during transit or repair.
Any product wrongfully declared to
be defective will be returned to sender and inspection, process and carriage costs will be invoiced to him.
Due to the technical nature of this product,
we advise you to ask your auto electrician
to take care of the installation. Parrot shall
not be held responsible of any dysfunction caused by an installation which does
not follow the instructions provided in this
user guide or an incorrect installation.
Correct disposal of This Product
(Waste Electrical & Electronic Equipment)
This marking shown on the product or its literature, indicates that it should not be disposed with other household wastes at the
end of its working life. To prevent possible
harm to the environment or human health
from uncontrolled waste disposal, please
separate this from other types of wastes
and recycle it responsibly to promote the
sustainable reuse of material resources.
Household users should contact either the
42
General Information
retailer where they purchased this product,
or their local government office, for details
of where and how they can take this item
for environmentally safe recycling. Business
users should contract their supplier and
the terms and conditions of the purchase
contract. This product should not be mixed
with other commercial wastes for disposal.
Modifications
The explanations and specifications in this
guide are given for information purposes
only and may be modified without prior
notice. They are deemed to be correct at
time of going to press. The utmost care
has been taken when writing this guide,as
part of the aim to provide you with accurate information. However, Parrot shall not
be held responsible for any consequences
arising from any errors or omissions in the
guide, nor for any damage or accidental
loss of data resulting directly or indirectly
from the use of the information herein. Parrot reserves the right to amend or improve
the product design or user guide without
any restrictions and without any obligation
to notify users.
Declaration of conformity
We Parrot Sa, 174 Quai de Jemmapes,
75010 Paris, France, declare under our sole
responsibility that our product : Parrot UNIKA is in conformity with regard to directive
72/245/EEC, as last amended by directive
2006/28/EC and with regard to Regulation
n°10.
Caution
Changes or modifications not expressly
approved by the party responsible for compliance could void the user’sauthority to
operate the equipment.
Page 43

Informations générales
Garantie
Sans préjudice de la garantie légale, les
produits Parrot sont garantis, pièces et
main d’oeuvre, pendant 1 an à compter de
la date d’achat, sauf altération du produit,
et sur présentation d’une preuve d’achat
(date et lieu d’achat n° de série du produit)
au revendeur. La garantie ne couvre pas la
mise à jour des logiciels inclus dans les produits Parrot avec des téléphones mobiles
Bluetooth® à des fins de compatibilité, la
récupération de données, la détérioration
extérieure du produit due à une utilisation
normale du produit, tout dommage causé
par accident, une utilisation anormale ou
non autorisée du produit, un produit non
Parrot. Parrot n’est pas responsable du
stockage, de la perte ou de l’endommagement des données durant le transport ou la
réparation.
Tout produit s’avérant non défectueux sera
retourné à l’expéditeur et les frais de traitement, de vérification et de transport lui
seront facturés.
En raison de la technicité de ce produit,
nous vous recommandons de faire effectuer l’installation par votre garagiste. Parrot
ne saurait en aucun cas être responsable
de tout dysfonctionnement dû à une installation non conforme aux instructions figurant sur la notice et/ou une installation non
conforme effectuée par vous-même.
Comment recycler ce produit
Déchets d’équipements électriques et électroniques
Le symbole sur le produit ou sa documentation indique qu’il ne doit pas être éliminé en fin de vie avec les autres déchets
ménagers. L’élimination incontrôlée des
déchets pouvant porter préjudice à l’environnement ou à la santé humaine, veuillez
le séparer des autres types de déchets et
le recycler de façon responsable. Vous favoriserez ainsi la réutilisation durable des
ressources matérielles. Les particuliers
sont invités à contacter le distributeur leur
ayant vendu le produit ou à se renseigner
auprès de leur mairie pour savoir où et
comment ils peuvent se débarrasser de
ce produit afin qu’il soit recyclé en respectant l’environnement. Les entreprises sont
invitées à contacter leurs fournisseurs et
à consulter les conditions de leur contrat
de vente. Ce produit ne doit pas être éliminé avec les autres déchets commerciaux.
Modifications
Les explications et spécifications contenues dans ce guide utilisateur ne sont fournies qu’à titre d’information et peuvent être
modifiées sans notification préalable. Ces
informations sont correctes au moment de
l’impression et le plus grand soin est apporté lors de leur rédaction afin de vous fournir
des informations les plus précises possible.
Cependant, Parrot S.A. ne saurait être tenu
responsable, directement ou indirectement,
des éventuels préjudices ou pertes de données accidentelles résultant d’une erreur ou
omission au sein du présent document.
43
Page 44

Garantía
Sin perjudicar la garantía legal, Parrot garantiza sus productos, piezas y mano de
obra incluidos, por el período de 1 año a
partir de la fecha de compra, salvo en caso
de alteración del producto. Esta fecha de
compra debe estar certificada por una
prueba de compra original del producto
(fecha y lugar de compra, número de serie
del producto) presentada al dependiente.
La garantía no cubre: la actualización de
los programas incluidos en los productos
Parrot con teléfonos móviles dotados de
la funcionalidad Bluetooth® con objetivo
de compatibilidad, la recuperación de datos, la deterioración exterior del producto
causada por la utilización cotidiana del
producto, cualquier daño causado por un
accidente, un uso anormal o no autorizado
del producto, un producto de una marca diferente. Parrot no es responsable del almacenamiento de los datos, de sus pérdidas o
de daños ocurridos durante el transporte o
la reparación.
Cualquier producto que no sería defectuoso se retornará al cliente, y los gastos de intervención y de transporte serán a su carga.
Eliminación correcta de este producto
La presencia de esta marca en el producto
o en el material informativo que lo acompaña, indica que al finalizar su vida útil no
deberá eliminarse junto con otros residuos
domésticos. Para evitar los posibles daños
al medio ambiente o a la salud humana que
representa la eliminación incontrolada de
residuos, separe este producto de otros
tipos de residuos y recíclelo correctamente
para promover la reutilización sostenible de
recursos materiales.
Los usuarios particulares pueden contac-
Información general
tar con el establecimiento donde adquirieron el producto, o con las autoridades
locales pertinentes, para informarse sobre
cómo y dónde pueden llevarlo para que
sea sometido a un reciclaje ecológico y
seguro. Los usuarios comerciales pueden
contactar con su proveedor y consultar
las condiciones del contrato de compra.
Este producto no debe eliminarse mezclado con otros residuos comerciales.
Modificaciones
Las explicaciones y especificaciones
contenidas en este manual son meramente
informativas y pueden ser modificadas sin
previo aviso. Se consideran correctas en
el momento de enviar la publicación a imprenta. Este manual se ha redactado con el
máximo cuidado, con el fin de proporcionarle una información precisa.
Sin embargo, Parrot no asume responsabilidad alguna por las consecuencias derivadas de los errores u omisiones que pueda
haber en el manual, ni por los daños o pérdidas accidentales de datos que se produzcan como consecuencia directa o indirecta
del uso de la información aquí contenida.
Parrot se reserva el derecho a modificar o
mejorar el diseño del producto o el manual
de usuario sin restricciones y sin la obligación de notificárselo a los usuarios.
En aras de actualizar y mejorar nuestros
productos, es posible que el producto
que usted haya adquirido sea ligeramente
distinto al modelo que se describe en este
manual. En tal caso, tiene a su disposición
una versión más reciente de este manual
en formato electrónico en la página web de
Parrot: www.parrot.com.
Page 45

Allgemeine Hinweise
Änderungen
Die in dieser Anleitung enthaltenen Beschreibungen und technischen Kenndaten
dienen ausschließlich der Information und
können Änderungen ohne vorhergehende
Ankündigung unterliegen. Zum Zeitpunkt
des Drucks galten die enthaltenen Angaben
als zutreffend. Bei der Verfassung dieser
Anleitung wurde größte Sorgfalt auf deren
Inhalt angewendet, damit Ihnen möglichst
präzise Informationen bereitgestellt werden
können.
Parrot haftet jedoch weder für Folgen, die
sich aus ggf. in dieser Anleitung enthaltenen Fehlern oder Unterlassungen ergeben,
noch für Schäden oder den versehentlichen
Verlust von Daten als direkte oder indirekte
Folge der Verwendung der enthaltenen Informationen. Parrot behält sich das Recht
vor, das Produktdesign oder die Bedienungsanleitung zu ändern bzw. zu verbessern,
ohne dass diesbezüglich Beschränkungen
vorliegen und ohne jede Verpflichtung, die
Benutzer hiervon in Kenntnis zu setzen.
Korrekte Entsorgung dieses Produkts
(Elektromüll)
Die Kennzeichnung auf dem Produkt bzw.
auf der dazugehörigen Literatur gibt an,
dass es nach seiner Lebensdauer nicht zusammen mit dem normalen Haushaltsmüll
entsorgt werden darf. Entsorgen Sie dieses
Gerät bitte getrennt von anderen Abfällen,
um der Umwelt bzw. der menschlichen Gesundheit nicht durch unkontrollierte Müllbeseitigung zu schaden. Recyceln Sie das Gerät, um die nachhaltige Wiederverwertung
von stoffl ichen Ressourcen zu fördern.
Private Nutzer sollten den Händler, bei
dem das Produkt gekauft wurde, oder die
zuständigen Behörden kontaktieren, um in
Erfahrung zu bringen, wie sie das Gerät auf
umweltfreundliche Weise recyceln können.
Gewerbliche Nutzer sollten sich an Ihren
Lieferanten wenden und die Bedingungen
des Verkaufsvertrags konsultieren. Dieses
Produkt darf nicht zusammen mit anderem Gewerbemüll entsorgt werden.
Garantie
Unbeschadet der gesetzlichen Garantie gilt
für die Produkte von Parrot eine 1-jährige
Garantie ab Kaufdatum für Ersatzteile und
Reparaturkosten, sofern am Produkt keine
Änderungen vorgenommen werden. Für
die Inanspruchnahme der Garantie ist dem
Fachhändler ein Kaufnachweis (Datum und
Ort des Erwerbs, Seriennummer des Produkts) vorzulegen.
Die Garantie deckt weder die Aktualisierung der im Lieferumfang der Parrot-Produkte enthaltenen Softwareprogramme mit
Bluetooth®-Mobiltelefonen zu Kompatibilitätszwecken noch die Wiederherstellung
von Daten, die äußere Abnutzung der Produkte aufgrund einer normalen Produktverwendung, die auf einen Unfall oder eine
unsachgemäße bzw. nicht autorisierte Verwendung der Produkte zurückzuführenden
Schäden oder Produkte anderer Hersteller.
Parrot haftet keinesfalls für die Speicherung, den Verlust oder die Beschädigung
von Daten während des Transports oder im
Rahmen von Reparaturarbeiten.
Jedes Produkt, an dem keine Mängel
festzustellen sind, wird an den Absender
zurückgeschickt, wobei die Kosten für
Bearbeitung, Prüfung und Transport dem
Absender in Rechnung gestellt werden.
45
Page 46

Informazioni generali
Garanzia
Senza pregiudizio della garanzia legale, i
prodotti Parrot sono garantiti, per sostituzione pezzi e mano d’opera, per 1 anno
a partire dalla data di acquisto, salvo alterazioni del prodotto, e su presentazione
di una prova di acquisto (data e luogo di
acquisto, numero di serie del prodotto) al
rivenditore.
La garanzia non copre gli aggiornamenti dei
software inclusi nei prodotti Parrot con i telefoni cellulari Bluetooth® ai fini di compatibilità, il recupero di dati, il deterioramento
esterno del prodotto dovuto al normale uso
del prodotto stesso, i danni causati accidentalmente, da un uso anomalo o non autorizzato del prodotto, un prodotto non Parrot.
Parrot non è responsabile della memoria,
della perdita o del danneggiamento dei dati
durante il trasporto o la riparazione. Date le
caratteristiche tecniche del presente prodotto, l’installazione deve essere effettuata
da un tecnico. Parrot non potrà in alcun
caso essere ritenuta responsabile per eventuali problemi di funzionamento dovuti ad
un’installazione non conforme a quanto indicato nelle istruzioni e/o ad un’installazione
non conforme effettuata dall’utente stesso.
Corretto smaltimento del prodotto
(rifi uti elettrici ed elettronici)
Il marchio riportato sul prodotto o sulla sua
documentazione indica che il prodotto non
deve essere smaltito con altri rifi uti domestici
al termine del ciclo di vita. Per evitare eventuali danni all‘ambiente o alla salute causati
dall‘inopportuno smaltimento dei rifi uti, si
invita l‘utente a separare questo prodotto
da altri tipi di rifi uti e di riciclarlo in maniera
responsabile per favorire il riutilizzo sostenibile delle risorse materiali. Gli utenti domestici sono invitati a contattare il rivenditore
presso il quale è stato acquistato il prodotto
o l‘uffi cio locale preposto per tutte le informazioni relative alla raccolta differenziata e
al riciclaggio per questo tipo di prodotto.
Gli utenti aziendali sono invitati a contattare il proprio fornitore e verifi care i termini
e le condizioni del contratto di acquisto.
Questo prodotto non deve essere smaltito unitamente ad altri rifi uti commerciali.
Modifiche
Le spiegazioni e le specifiche riportate nella
presente guida sono solo a scopo informativo e possono subire modifiche senza preavviso. Tali informazioni sono da considerarsi
corrette al momento della pubblicazione. La
presente guida è stata redatta prestando
grande attenzione, al fine di fornire ai clienti
informazioni precise e attendibili. Tuttavia,
Parrot non può essere ritenuta responsabile per eventuali conseguenze derivanti da
omissioni o errori nella presente guida, né
per eventuali danni o perdite accidentali di
dati causati direttamente o indirettamente
dall’uso delle informazioni ivi contenute.
Parrot si riserva il diritto di modificare/migliorare il prodotto o la guida per l’utente
senza limitazione alcuna e senza l’obbligo di
notifica agli utenti. Poiché il costante impegno dell’azienda è volto a garantire continui
aggiornamenti e miglioramenti, il prodotto
acquistato dall’utente potrebbe risultare
leggermente diverso dal modello descritto
nella presente guida. In tal caso, verificare
la disponibilità di una versione aggiornata
della guida in formato elettronico nel sito
Web di Parrot all’indirizzo www.parrot.com.
46
Page 47

Algemene informatie
Garantie
Op de Parrot producten rust gedurende 1
jaar vanaf de verkoopdatum garantie op
onderdelen en arbeidsloon, behoudens aan
het product aangebrachte veranderingen,
tegen overlegging van de koopbon (met datum en plaats van aankoop en serienummer
van het product) aan de leverancier.
De garantie heeft geen betrekking op het
voor doeleinden van compatibiliteit met
de mobiele Bluetooth ® telefoons updaten
van de in de Parrot producten inbegrepen
software, het terughalen van gegevens, de
uitwendige verslechtering van het product
tengevolge van normaal gebruik van het
product, per ongeluk veroorzaakte schade,
abnormaal of ongeoorloofd gebruik van het
product, een niet-Parrot product. Parrot is
niet aansprakelijk voor de opslag, het verlies
of de beschadiging van gegevens tijdens
het transport of de reparatie. Ieder product
dat niet defect blijkt te zijn zal aan de afzender worden geretourneerd en de kosten
voor behandeling, verificatie en transport
zullen hem in rekening worden gebracht.
Wegens het technisch karakter van dit product raden wij u aan de installatie te laten
verrichten door uw garagehouder. Parrot
is in geen geval aansprakelijk voor een verkeerde werking veroorzaakt door een installatie die niet overeenkomt met de in de
gebruiksaanwijzing gegeven aanwijzingen
en/of een door uzelf uitgevoerde niet-conforme installatie.
Afgedankte elektrische en elektronische
apparatuur (WEEE)
In overeenstemming met de Europese richtlijn 2002/96/EG betreffende afgedankte
elektrische en elektronische apparatuur
(AEEA) geeft de vermelding van het hierboven vermelde symbool op het product
of de verpakking aan dat dit artikel niet in
de normale, niet-gesorteerde stedelijke
afvalstroom mag worden verwerkt. In plaats
daarvan ligt de verantwoordelijkheid van de
afvoer van dit product bij de gebruiker, die
het dient aan te bieden bij een inzamelpunt
voor de recyclage van afgedankte elektrische en elektronische apparatuur. De gescheiden inzameling van dit afval helpt de
eventuele te recupereren materialen terug
te winnen of te recycleren en vermindert de
impact ervan op het milieu en de gezondheid van de mens. Voor meer informatie betreffende de juiste afvoermethode.
Wijzigingen
De in deze handleiding gegeven uitleg en
technische gegevens dienen uitsluitend ter
informatie en kunnen zonder voorafgaande
kennisgeving worden gewijzigd. Deze gegevens worden geacht correct te zijn op het
moment van het ter perse gaan van deze
handleiding. Aan het opstellen van deze
handleiding is de uiterste zorg besteed in
het kader van ons streven u accurate informatie te
verschaffen.
Parrot zal echter niet aansprakelijk gesteld
kunnen worden voor de gevolgen die voortvloeien uit vergissingen of weglatingen in
deze handleiding, evenmin als voor enige
beschadiging of accidenteel verlies van
gegevens die direct of indirect voortkomen
uit het gebruik van de in deze handleiding
vervatte informatie. Parrot behoudt zich
het recht voor het productontwerp of de
gebruikershandleiding te wijzigen of verbeteren zonder enige beperkingen en zonder
de verplichting de gebruikers hiervan op de
hoogte te stellen.
474849
Page 48

Page 49

Page 50

Page 51

Technical support
If you have any questions regarding your Parrot product, contact our hotline by phone or using our technical contact
form available on our website (support section).
Italy :
Spain :
UK :
Germany :
USA :
China :
Hong Kong :
France :
Europe :
Our hotline is at your disposal from Monday to Friday. Refer to our website for more information about the service hours.
[+39] 02 59 90 15 97
[+34] 902 404 202
[+44] (0)844 472 2360
0900 1727768
[+1] (877) 9 Parrot (toll free)
[+86] 755 8203 3307
[+852] 2736 1169
01 48 03 60 69
[+33] 1 48 03 60 69 (Spoken languages : French, English and Spanish)
51
Page 52

www.parro t.com
 Loading...