


QUICK START
GUIDE
ࠌشᎅࣔ
ࠌش円ࣔ䢰


3
Diagrams...........................................
English..............................................
目录...................................................
目录...................................................
Technical specification.....................
General information..........................
p.04
p.09
p.19
p.27
p.35
p.37
Index
4
- Installing the frame
- 相框的安装
5
- Using the frame with a memory card
- 相框和记忆卡的使用
- Using the frame via USB
- 通过USB使用相框

6
- Using the frame with a USB flash drive / digital camera
- 相框和U盘/数码相机的使用
7
OK
Back
- Sending pictures from a phone via Bluetooth
- 手机蓝牙发送图片
8
- Using the frame with an NFC phone
- 相框和NFC(近场通信)手机的使用
9
Content
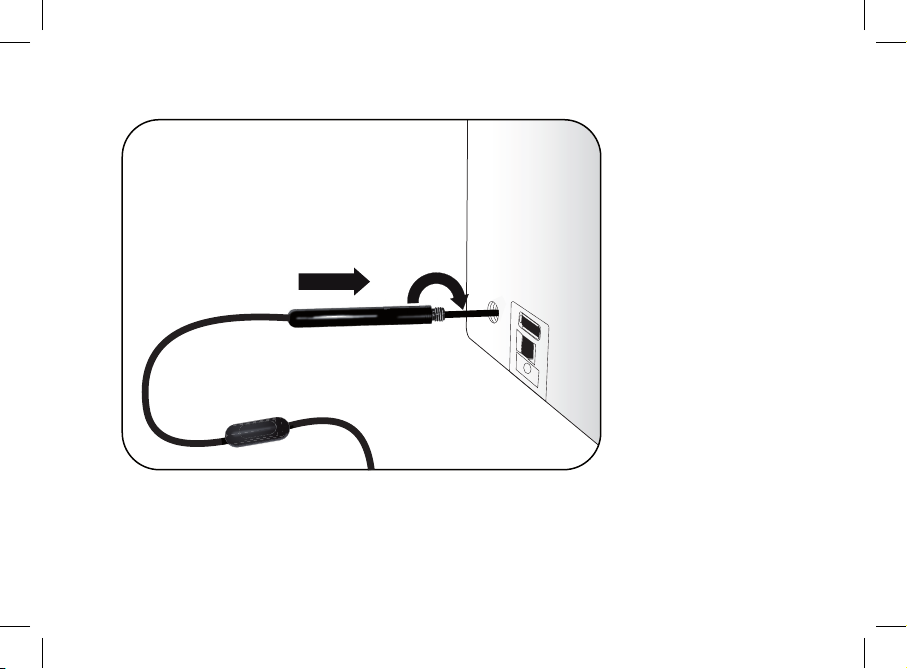
Installing the frame
► Refer to the diagram p.4.
1. Screw the metal rod into the back of the frame.
> If you rotate the frame, the picture displayed turns to
match the new position of the frame.
2. Connect the power cable connector to the transformer
and plug it into an electrical socket.
> The frame automatically switches on.
3. Select your country.
Scrolling through the menus
You can scroll through the menus using the buttons on the
back of the frame.
This button allows you to access the main
menu and to confirm a selection. It also
allows you to enter the context menu on
each picture.
Using the Parrot frame by Szekely for the 1st time..........
Installing the frame............................................................
Scrolling through the menus..............................................
Using the virtual keypad.....................................................
Using the Wi-Fi
®
function ..................................................
Connecting the frame to a Wi-Fi network..............................
Accessing the web interface.............................................
Receiving pictures by email...............................................
Display photo albums on line.............................................
Display pictures stored on a computer..............................
Transfer photos to the Parrot frame by Szekely via Wi-Fi...
Using the Bluetooth
®
function...........................................
Pairing the frame with your phone.....................................
Sending pictures from a Phone or PDA via Bluetooth......
Using the frame with an NFC phone..................................
Sending pictures from a PC via Bluetooth........................
Using the Parrot frame by Szekely via USB......................
Using the
frame with a computer.......................................
Using the frame with a USB flash drive
/ digital camera.................................................................
Using the frame with a memory card................................
Using the video mode.........................................................
Sending a video to the
frame............................................
Watching a video..............................................................
Managing the pictures........................................................
Copying / moving pictures................................................
Deleting pictures...............................................................
Arranging pictures.............................................................
Preparing a slideshow.......................................................
English
Using the Parrot frame by Szekely for the 1st time
09
09
09
10
10
10
11
11
12
12
12
13
13
13
13
14
14
14
14
15
15
15
15
15
15
16
16
17
10
Depending on the frame’s orientation,
these buttons allow you to select a
picture or navigate through the context
menus.
In slideshow mode, you can also use the navigation
buttons to access the context menu.
Depending on the frame’s orientation, the left or down
buttons also allow you to exit the menus.
You can also navigate through the menus of the
frame and browse through your pictures using
your PC. To do so, select the
icon on the web
interface. Refer to the Accessing the web interface
section for more information.
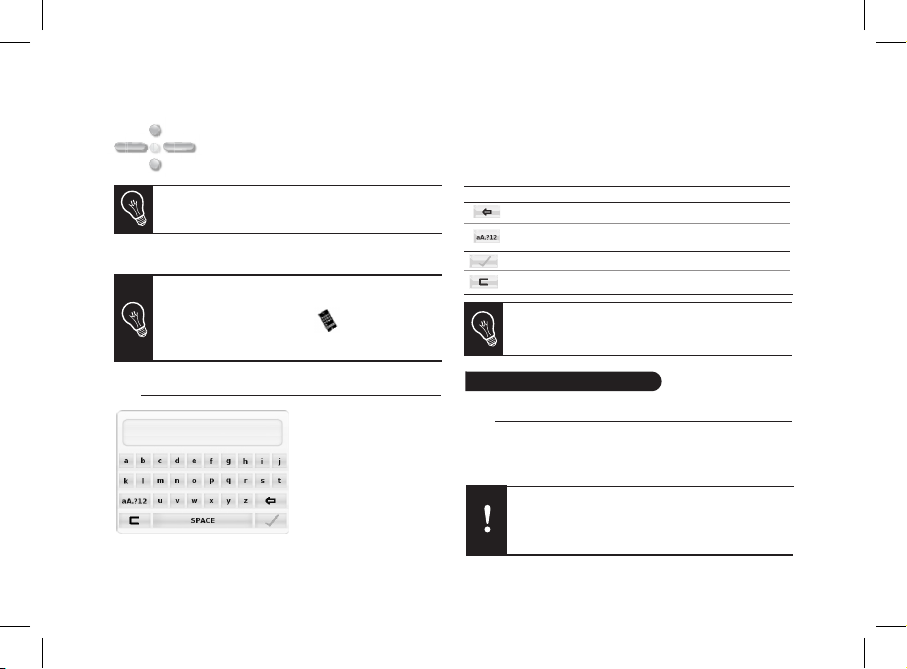
Using the virtual keypad
• The virtual keypad is
displayed when you
have to enter the WEP
or WPA code to esta-
blish a connection with
your Wi-Fi network.
The virtual keyboard
is also displayed if
you want to modify the
Bluetooth name of the frame or if you want to associate it
to a new E-mail address.
• Select a key using the navigation buttons then conrm by
pressing the central button.
Using the Wi-Fi function
Connecting the frame to a Wi-Fi network
1. Go to the main menu and select Settings > Wi-Fi >
Connection.
> The connection window appears.
You can also use the web interface to change the
name of the frame. Refer to the Accessing the web
interface section for more information.
Key Functions
Save the text
Display capital letters, figures, punctuation marks
and special characters
Delete a character
Go back to previous menu
Depending on the model of your modem or router,
you might have to press the synchronisation button.
Refer to your device’s documentation for more
information.
11
2. Select Configure.
> A Wi-Fi network search is launched.
3. Select your network from the provided list or select
Others to configure your network manually.
4. Enter your WEP or WPA code using the virtual keyboard
then select
.
> You are now connected to your Wi-Fi network.
> Once the connection has been established, a window
appears containing all the information relating to the
Wi-Fi connection.
• Once the connection has been established, you have the
possibility to activate / deactivate the connection. You
can do that by selecting Settings > Wi-Fi > Connection >
Activate / Deactivate.
Accessing the web interface
In order to access the web interface, make sure that
your PC is connected to the same Wi-Fi network as
the frame.
1. Read the IP address assigned to your frame. To do so,
select Settings > Info.
2. Launch your web browser and enter the IP address
in the address bar.
► Refer to the Connecting the frame to a Wi-Fi network
section for more information.
Receiving pictures by email
We advise you to create a specific email address
for your frame.
1. On the web interface, click on
.
2. In the Email account space, click on
to
associate an email address with frame.
3. Enter your connection identifiers in the
corresponding fields.
Refer to your email service documentation for
information on the server and the protocol.
> All the pictures that you receive on this email account from
now on can be accessed via the frame, by selecting Route >
Directory > Email.
You can also associate an email address directly
from the frame. To do so, select Settings > Wi-Fi >
Email > Add an Email account.
12
Display photo albums on line
1. Create an account on a photo server and mark the
identifier associated with the album that you wish to
display on the frame or note down the URL for the RSS
flow associated with this album.
2. On the web interface, click on
.
3. In the Registered feeds space, click on
to
associate an RSS flow with the frame.
4. Select your photo server, enter the identifier associated
with the selected album then the password if necessary or
enter the URL address of the RSS feed.
5. Click on Save.
> The images contained in the associated album can
then be accessed on the frame by selecting Route >
Directory > RSS Flow.
You can also associate RSS feeds directly from the
frame by selecting Adjustments > Wi-Fi > RSS >
Add new flow.
Display pictures stored on a computer
1. On your computer, activate sharing on the pictures
directories you wish to display on the frame.
2. On the web interface, click on
.
3. Click on Add a share and select your computer.
> The pictures contained in the shared directory are
accessible from then on the frame.
Transfer photos to the frame via Wi-Fi
1. If you are using:
- a PC, click on Start > Network Favourites > Entire
network > Microsoft Windows Network
- a Mac, select Go > Network.
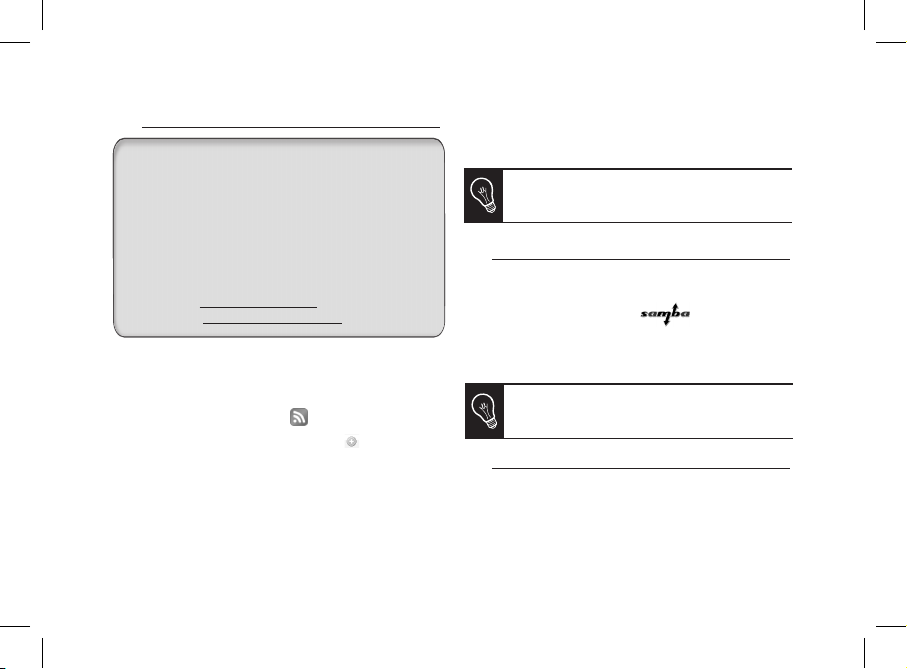
An RSS (Really Simple Syndication) feed is a flow of
free content coming from internet sites. Thanks to RSS
feeds and photo management and sharing tools on line
such as Flickr
TM
or PicasaTM, photo albums published on
the website can be displayed on your frame. Once the
RSS feed is associated to your frame, the photos are
automatically updated.
►
For more information, go to:
- http://www.flickr.com
- http://picasa.google.com
RSS Feed
You can also associate a computer directly from
the frame. To do so, select Settings > Wi-Fi > PC
connection > Add a share.
13
2. Double-click on the Frames directory.
> You will access the content of the frame.
You can also transfer your images on a peripheral
connected to frame.
3. Transfer the pictures into the Internal Memory file.
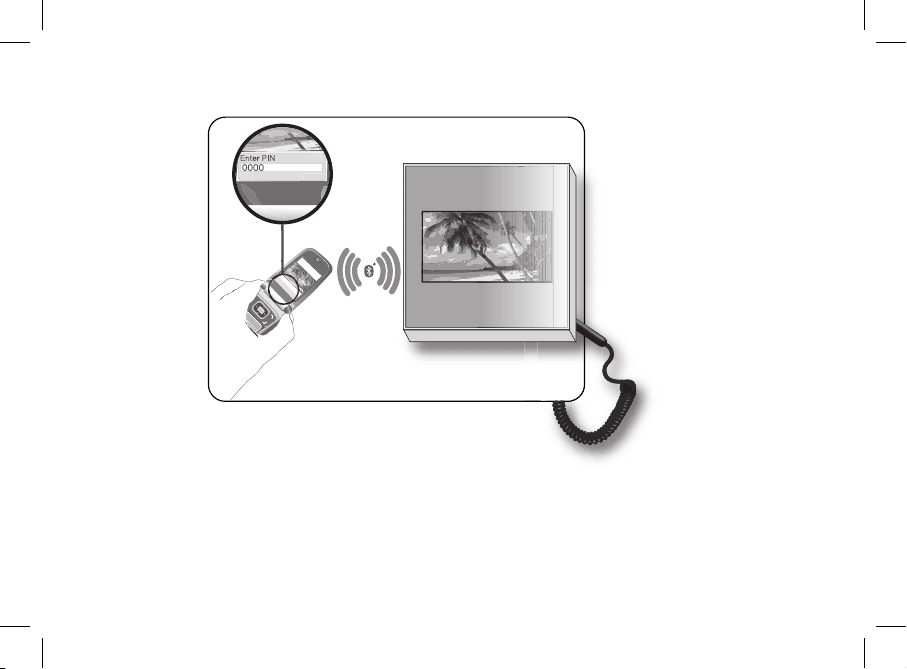
Using the Bluetooth function
Pairing the frame with your phone
Depending on the model of your phone / computer,
this phase might be optional. However, it will enable
you to send your photos to the frame more quickly.
1. Ensure that Bluetooth is activated on the frame.
To do so, press the central button and select Settings >
Bluetooth > Enabled.
2. Activate Bluetooth on your phone / computer then search
for Bluetooth devices. Refer to the user guide of your
device for more information.
3. Select «Szekely Frame» in the list of Bluetooth devices
proposed by your phone / computer.
4. On your phone / computer, enter the code «0000».
> Your two devices are now paired.
Sending pictures from a Phone or PDA via Bluetooth
1. Ensure that Bluetooth is activated on the frame.
To do so, press the central button and select Settings >
Bluetooth > Enabled.
2. Activate Bluetooth on your phone / PDA.
3. On your phone/PDA, go to the Pictures menu. Select a
picture and choose «Send via Bluetooth». Your device
starts searching for Bluetooth peripherals.
4. Once the search has finished, select « Szekely Frame».
5. If your device prompts you to enter a code, type «0000».
> The picture is then sent to the frame.
> During transmission, the Bluetooth icon appears on the
screen and the picture is displayed.
Several pictures can be sent at a time, though this
feature will depend on your device.
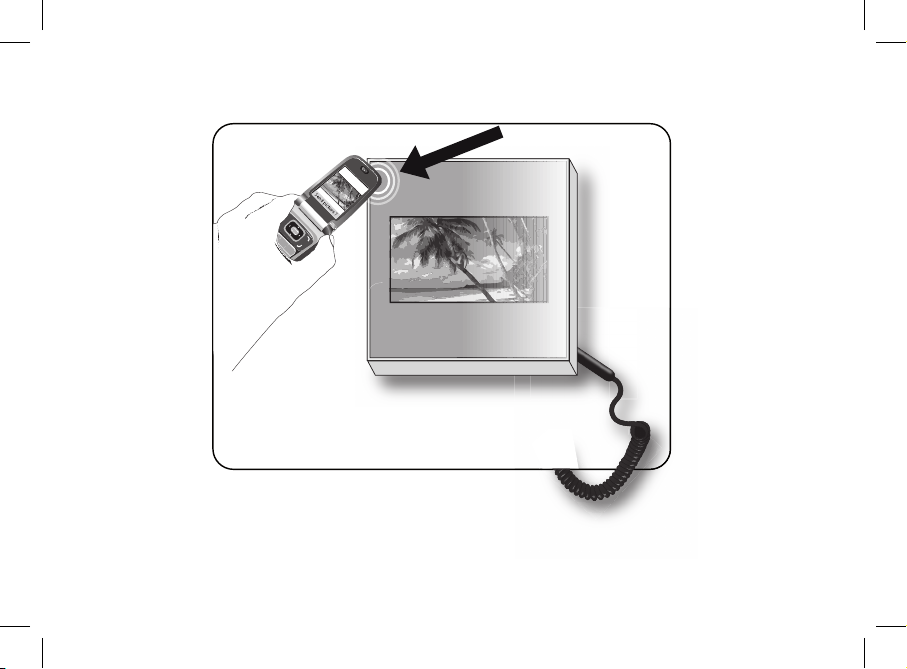
Using the frame with an NFC phone
To send a picture to the frame from an NFC phone:
1. On your phone, select the picture you want to send.
2. Touch the frame with your phone:
- on the top left of the frame if it is in landscape mode
- on the top right of the frame if it is in portrait mode.
14
> A confirmation message is displayed on your phone.
3. Select Yes.
Sending pictures from a PC via Bluetooth
(Windows, Linux)
1. Ensure that Bluetooth is activated on the frame.
To do so, press the central button and select Settings >
Bluetooth > Enabled.
2. Activate the Bluetooth feature on your computer.
3. Right-click on the picture that you wish to send and
choose «Send via Bluetooth».
> Your PC will search for any nearby Bluetooth
peripherals.
4. Select «Szekely Frame».
5. Type «0000» if your PC prompts you to enter a code.
> During transmission, the Bluetooth icon appears on the
screen and the picture is displayed.
It is also possible to send pictures from a Mac.
Using the Parrot frame by Szekely via USB
► Refer to the diagrams p.05.
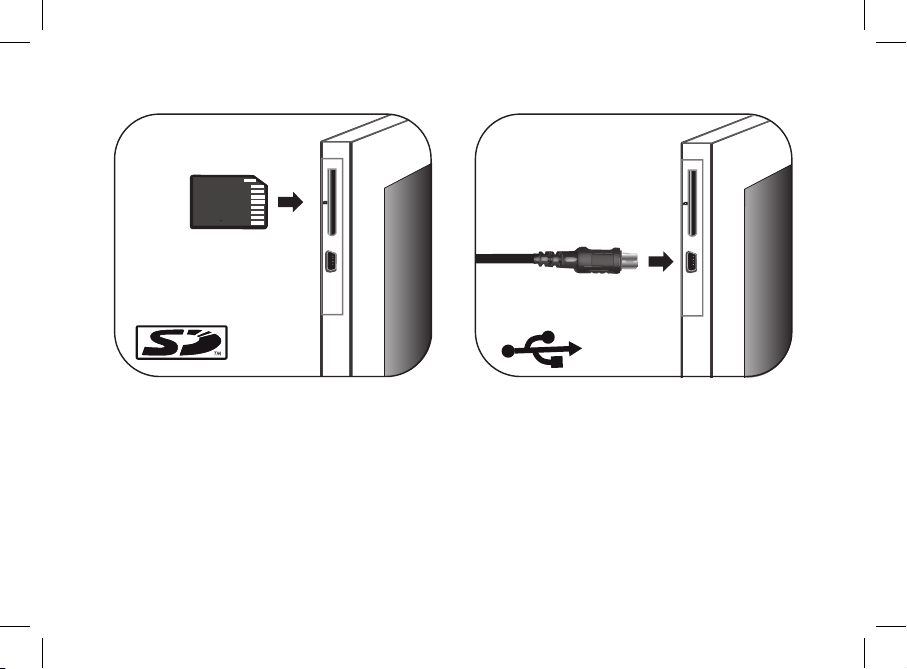
Using the frame with a computer
• To send pictures from a computer via USB:
1. Connect the frame to your PC with the USB cable.
> The computer detects a new device.
2. Copy your JPEG pictures to the frame as if you were
using an USB flash drive.
3. Disconnect the cable from the frame.
• Once connected to your computer, your frame works as
a USB flash drive. It means that you can copy, move,
rename and delete the pictures stored in the frame.
Using the frame with a USB flash drive /
digital camera
1. Insert your USB flash drive in the USB port located at the
back of the frame or connect your digital camera using
the USB cable provided with your camera. Refer to your
To disconnect the frame from your computer, double
click on the «Safely remove hardware» icon located
at the bottom right of your task bar.

15
digital camera user guide for more information.
> The JPEG pictures stored in the USB flash drive or in
the memory of the digital camera are displayed.
2. Press the central button and select Browse > Directory
> USB.
> You can now navigate through the content of your USB
flash drive or digital camera using the navigation buttons
and select a picture using the central button.
> You can then display, rotate, select, copy or move
the picture.
► Refer to the Managing the pictures section for
more information.
Using the frame with a memory card
► Refer to the diagrams p.05.
1. Insert the memory card into the appropriate slot.
> The JPEG pictures stored in the memory card are
displayed.
2. Press the central button and select Browse > Directory
> Memory card.
> You can now navigate through the content of your
memory card using the navigation buttons and select a
picture using the central button.
> You can then display, rotate, select, copy or move
the picture.
Using the video mode
Sending a video to the frame
You can transfer videos in 3GP formats to the frame as if you
were sending a picture.
► Refer to the sections concerning the image transfer for
more information.
Watching a video
• While navigating through the content of a directory, you
can play a video by pressing the central button and
selecting the Play option. You can then modify the volume
or select the next/previous video by using the navigation
buttons.
• In slideshow mode, you can activate the automatic
reading. To do so, select Slideshow > Video > Play.

16
Managing the pictures
Copying / moving pictures
Pictures you can see in the USB, SD Card and RSS feed
directories are not memorized in the internal memory of the
frame. The frame allows you to copy or move these pictures
into its internal memory. You can also copy / move your
pictures from or to an USB flash drive or a memory card.
To do so:
1. Press the central button and select Browse > Directory
then select the directory containing the pictures to copy /
move.
2. Select the picture you want to copy / move and press
the central button.
• If you only want to copy / move one picture:
a. Select the Copy or Move option.
b. Select the directory in which you want to copy /
move the picture.
c. Press the central button.
• If you want to copy / move several pictures:
a. Choose the Select option on each picture.
> A
icon is displayed on the picture.
b. On the last picture you want to copy / move,
select the Copy or Move option.
c. Select the directory in which you want to copy
/ move the pictures.
d. Press the central button.
Deleting pictures
1. Press the central button and select Browse > Directory
then select the directory containing the pictures to delete.
2. Select the picture you want to delete then press
the central button.
• If you only want to delete one picture:
a. Select the Delete option.
> A confirmation message is displayed.
b. Select Yes.
• If you want to delete several pictures:
a. Choose the Select option on each picture.
b. On the last picture you want to delete, select
the Delete option
> A confirmation message is displayed.
c. Select Yes.
Arranging pictures
Pictures are sorted by directory, by date or depending on
your preferences. To access pictures, press the central
button and select Browse.
• The Directory option allows you to access the pictures
sorted by type of transfer.
• The Date option allows you to access the pictures sorted
by date.

17
• The Customized option allows you to arrange pictures
from every directory.
1. Select one or several pictures then select the
Classify option.
> A cursor appears to indicate the picture position.
2. Use the cursor and press the central button to
select the new pictures location.
Preparing a slideshow
• Press the central button and select Slideshow.
• The following options are available to create your
slideshow:
- Browsing mode: visualize your pictures sorted
by directory, by date or depending on your
preferences.
- Timer: defines the slideshow display time.
Select the None option if you want to deactivate
the slideshow.
- Transition: defines the transition effect between the
photos in your slideshow.
- Video: activates / deactivates the automatic reading
of videos during slideshows.

18

19
ZH
目录
安装相框
► 见第4页图解
1.旋紧相框背面的金属支架。
>当您改变相框放置方向时,图像会自动旋转为相应的方向。
2.将相框连上变压器,接上电源。
>相框将自动启动。
3.选择您所在的国家。
菜单浏览
您可以使用相框背面的按钮浏览菜单。
按下确定按钮可进入主菜单,同时也可确认
您的选择和进入图像的功能菜单,然后对图
像作出旋转、复制或删除指令。
按动方向键可以依据相框放置方向浏览档案
内容,并可在功能菜单中移动选择。
首次使用Szekely Parrot相框..........................
安装相框........................................
菜单浏览........................................
虚拟键盘........................................
使用Wifi功能........................................
将相框连入Wifi网络..............................
进入网页界面....................................
通过电子邮件接收图像............................
查阅网络相簿....................................
查阅电脑中储存的照片............................
通过Wifi网络转移相框中的照片....................
蓝牙功能的使用......................................
将相框与电话相连................................
通过蓝牙从手机或PDA上发送照片......................
相框和近场通信手机的使用.........................
通过USB使用Szekely的Parrot相框......................
通过电脑使用相框.................................
相框和U盘/数码相机的使用.........................
相框和记忆卡的使用...............................
视频模式的使用......................................
转移视频文件.....................................
查阅视频文件.....................................
图像管理............................................
复制或移动图像...................................
删除图像.........................................
设置图片的出现顺序...............................
设置幻灯片.......................................
使用说明书
首次使用Szekely Parrot相框
19
19
19
20
21
21
21
21
22
22
22
23
23
23
23
23
23
24
24
24
24
24
25
25
25
25
25
26

2020
在幻灯片模式下,按动方向键则进入功能菜单,然后
可选择旋转,删除指令或打开图像相关信息等指令。
依据相框方向,按动左方向键或下方向键可返回前一级菜单或
离开当前菜单。
您或许会在电脑中使用相框的菜单功能。这时请在相
框的网页界面上选择
。请查阅进入网页界面章节
的内容了解更多信息。
虚拟键盘
•当您输入安全密码以连入无线网络时,虚拟键盘将自动出
现。
当您改变相框蓝牙名称或将相框连接一个新的电邮地址时,
键盘也会出现。
•按动方向键在虚拟键盘上选择需要键入的对象,再按中央按
钮确认。
按键 功能
储存文本
显示大写字母
删除一个文字或符号
回到上一级菜单
CANCEL
OK
ABC
?#*...
数字、标点符号、代号和特殊符号
您也可以在网页界面上改变相框名字。请参阅进入网
页界面章节的内容了解更多使用信息。

21
ZH
使用Wifi功能
将相框连入Wifi网络
1.进入主菜单,选择设置>Wifi>连线。
>连接窗口出现。
根据您的调制解调器和路由器的型号不同,此项功能可
能需要“同步”按钮的支持。请参阅设备资料文档以
获取更多信息。
2.选择配置。
>相框开始搜寻Wifi网络。
3.在清单中选择您的网络或选择其它以手动设置网络。
4.使用虚拟键盘输入WEP或WPA网络安全密码,选择
.
>您的相框将连接上Wifi网络。
>连接建立以后,将出现一个包含所有连接信息的窗口。
连接建立以后,您可以选择启动或关闭连接。欲实现此功能,
请选择设置>Wifi>连线>启动/关闭。
进入网页界面
在进入相框网页界面之前,确认您的电脑和相框连入
的是相同的Wifi网络。
1.记录下相框的IP地址。选择设置>信息。
2.打开网络浏览器,在地址栏里输入IP地址。
►
请参阅将相框连入Wifi网络章节的内容了解更多信息。
通过电子邮件接收图像
推荐您创建一个相框专用的电邮地址。
1. 在相框网页界面上,点击 .
2. 在信箱账号栏中,点击增添图标将相框连接上一个电邮
地址。
3. 在相应栏中填入用户名信息。请查阅您的电邮账号信息以
获取服务器和网络协议的相关资料。
>此后,您可以在相框中查阅该电邮账号接收的所用图像。
欲实现此功能请选择浏览>文档>电邮。
您也可以在相框上直接连接电邮地址。欲实现此功
能,请选择设置>Wifi>电邮>新增电邮。

22
查阅网络相簿
RSS简单信息聚合种子是来源于网站的一种免费资源。受益
于RSS技术及诸如FlickrTM或PicasaTM这样的网络照片管理
共享工具,您可以在相框上查阅网站上发布的相簿。您的
相框连接上RSS种子后,相框上的照片将自动更新。
►
欲了解更多信息,请访问以下网站:
- http://www.flickr.com
- http://picasa.google.com
RSS简单信息聚合种子
1. 在服务器上创建一个相簿账号,并对您希望在相框中显示
的相册做出标记,或记录下其识别符信息和RSS种子的地
址。
2. 在相框网页界面上,点击
。
3. 在已记录资源栏中,点击新建将相簿连接上一个新的RSS
种子。
4. 选择相簿服务器,输入对象相册的相关信息。您也许需要
输入相册密码或RSS种子地址。
5. 点击保存。
>此后您可以在相框中查阅连接到相簿中的图片。欲实现此
功能,请选择浏览>文档>RSS种子。
您也可以在相框上直接添加RSS种子,欲实现此功能,
请选择设置>Wifi>RSS种子>新增种子
查阅电脑中储存的照片
1. 在您的电脑中选出希望显示到相框的图片,开启文件共
享功能。
2. 在相框网页界面上,点击
.
3. 点击新增共享,选取您的电脑。
>此后您可以在相框中查阅共享文档里包含的图像。欲实现
此功能,请选择浏览>文档>电脑连线。
您同样也可以在相框上直接连接电脑,欲实现此功
能,请选择设置>无线网络>电脑连线>新增共享。
通过Wifi网络转移相框中的照片
1. 如果您使用:
-普通电脑,请点击开始>网上邻居>全部网络>Microsoft
Windows网络。
-苹果电脑,请选择开始>网络。
2. 双击“相框”文档。
> 相框内容将被打开。
3. 将图像转移到“内存记忆”文档中。

23
ZH
您也可以将图像转移到相框的其它外部设施中去
蓝牙功能的使用
将相框与电话相连
根据您手机和电脑型号的不同,这项功能不一定能
确保实现。
但尽管如此该功能可使您更快地发送相框里的图像。
1. 确认相框的蓝牙功能已经开启。请按下中央按钮,选择设
置>蓝牙>开启>是。
2. 开启手机或电脑的蓝牙功能,搜寻外部的蓝牙设备。请参
阅手机或电脑说明书获取更多信息。
3. 在可用蓝牙设备清单中选择Parrot_Specchio。
4. 在您的手机或电脑中输入密码0000。
>相框和另一设备将被连接上。
通过蓝牙从手机或PDA上发送照片
1. 确认相框的蓝牙功能已经开启。请按下中央按钮,选择设
置>蓝牙>开启>是。
2. 开启手机或PDA的蓝牙功能。
3. 在您的手机或PDA上进入图片菜单,选择一张图片,点选“
通过蓝牙发送”
>您的设备将搜寻外部蓝牙设备。
4. 搜索完成后,选择Parrot_Specchio。
5. 如果您的设备要求输入密码,请输入0000。
>图像将被发送至相框。
您也可以同时发送多幅图像。这项功能能否实现取决
于您的设备。
相框和近场通信手机的使用
1. 在您的手机上选取希望被转移的图片。
2. 用您的手机碰触相框。
-如果相框正处于风景模式则由上至左。
-如果相框正处于肖像模式则由上至右。
>您的手机上将出现一条确认信息。
3. 选择是。
通过USB使用Szekely的Parrot相框
通过电脑使用相框
•通过USB发送电脑上的图片。
1. 借由USB电缆/微型USB数据线将相框连接上电脑。

24
>电脑将发现有新设备。
2. 像使用U盘一样,以JPEG的格式复制图片并储存在相框中。
3. 断开相框的电缆线。
>图片将相继显示。
断开电缆线前,双击电脑屏幕右下方工具栏的图标,
选择“安全删除硬件”。.
•相框连接上您的电脑后如同一个简单的U盘,您可以复制、移
动、重命名和删除相框里的所有照片。
相框和U盘/数码相机的使用
1. 将您的U盘插入相框背面的USB槽中或用数据线连接您的数
码相机(如果相机支持批量储存图片)。请参阅您的U盘或
数码相机说明书获取更多信息。
>以JPEG格式储存在U盘或相机上的照片将会显示。
2. 按下中央按钮,选择浏览>文档>USB。
>您可以按动方向键在U盘或数码相机的内容中进行选择,
选定图像后按中央按钮确认。
>根据您的意愿,您可以显示、旋转、选择、删除、复制
或移动图像。
►
请参阅管理图像章节的内容了解更多信息。
相框和记忆卡的使用
1. 在正确位置插入记忆卡。
>以JPEG格式储存在记忆卡上的照片将会显示。
2. 按下中央按钮,选择浏览>文档>SD卡。
>您可以按动方向键在记忆卡的内容中进行选择,选定图像
后按中央按钮确认。
>根据您的意愿,您可以显示、旋转、选择、删除、复制
或移动图像。
视频模式的使用
转移视频文件
您可以像转移图片一样,将3GP格式的视频文件转移到相框
里。
►
请参阅转移图像的相关章节以了解更多信息。
查阅视频文件
• 当您浏览文档内容时,可按下中央按钮然后选择播放以播
放文件。
您可以调整音量或者通过方向键来选择上一或下一视频。
• 在幻灯片模式中,您可以开启视频文件的自动播放功能。欲
实现此功能,请选择幻灯片>视频>播放。

25
ZH
图像管理
复制或移动图像
当您查阅U盘、SD卡和RSS种子文档里的图像时,这些图像没
有被记忆在相框的内部储存卡里。您可以复制或移动这些图
像到相框内存记忆中,也能通过U盘或内存卡恢复相框内部储
存的图像。
U盘里的照片也能够被转移到内存卡中,反之亦然。
欲实现此功能 :
1. 请按下中央按钮,选择浏览>文档然后选择包含需复制或
移动图片的文档。
2. 选择您希望复制或移动的图片后,按中央按钮确认。
• 如果您只想复制或移动一张图片:
a.选择复制或移动选项。
b.选择您想将图片复制到的文档。
c.按下中央按钮。
• 如果您想复制或移动多张图片:
a.在每张想复制或移动的图片上按下选择。
图标显示在图片上方。
b.在最后一张想复制或移动的图片上选择复制或移动选
项。
c.选择您想将图片复制到的文档。
d.按下中央按钮。
删除图像
1. 按下中央按钮,选择浏览>文档然后选择包含需删除图片
的文档。
2. 选择您希望删除的图像,按下中央按钮。
• 如果您只想删除一张图片:
a) 选择删除选项。
>您将收到一条确认信息询问是否确定删除。
b) 选择是。
• 如果您想删除多张图片:
a.在每张想删除的图片上按下选择。
b.在最后一张您想删除的图片上选择删除选项。
>您将收到一条确认信息询问是否确定删除。
c.选择是。
设置图片的出现顺序
您在相框上查阅的图片是根据文档、日期或您的喜好分类的。
欲查阅相框内图片,请按下中央按钮,选择浏览
• 选择文档选项可根据传输类型来查阅所分类的图像。
• 选择日期选项可根据日期顺序查阅图像。
• 选择自定选项可根据您的意愿设定图像的出现顺序,无论
其位置在哪里。
您可以给图像排序。欲实现此功能:

26
1. 选择一张或多张图片,然后选择排序。
>一个游标尺将会出现,让您选择图像的新位置。
2. 在您希望放置图像的位置按下中央按钮。
>图片的新位置将被保存下来。
设置幻灯片
• 按下中央按钮,选择幻灯片。
• 您有下面几种排版方式:
- 浏览模式:以文档、日期、自定的分类顺序或随机方
式 查阅图片。
- 显示时间:选择图片显示的时间。
如果您希望关闭幻灯片功能,选择无选项。
- 转场:选择您喜欢的每张图片之间的转场。
- 视频:当一视频出现在所选的幻灯中,请选择相框状态。

27
ZH
目錄
安裝相框
►
見第4頁圖解
1.旋緊相框背面的金屬支架。
>當您改變相框放置方向時,圖像會自動旋轉為相應的方向。
2.將相框連上變壓器,接上電源。
>相框將自動啟動。
3.選擇您所在的國家。
菜單瀏覽
您可以使用相框背面的按鈕瀏覽菜單。
按下確定按鈕可進入主菜單,同時也可確認您的選擇和進入圖
像的功能菜單,然後對圖像作出旋轉、複製
或刪除指令。
按動方向鍵可以依據相框放置方向瀏覽檔案
內容,並可在功能菜單中移動選擇。
首次使用Szekely Parrot相框 ..........................
安裝相框........................................
菜單瀏覽........................................
虛擬鍵盤........................................
使用Wifi功能........................................
將相框連入Wifi網路..............................
進入網頁介面....................................
通過電子郵件接收圖像............................
查閱網絡相簿....................................
查閱電腦中儲存的照片............................
通過Wifi網路轉移相框中的照片....................
藍牙功能的使用......................................
將相框與電話相連................................
將相框與電話相連................................
通過藍牙從手機或PDA上發送照片...................
相框和近場通信手機的使用........................
通過USB使用Szekely的Parrot相框......................
通過電腦使用相框................................
相框和U盤/數碼相機的使用........................
相框和記憶卡的使用..............................
視頻模式的使用......................................
轉移視頻文件.....................................
查閱視頻文件.....................................
圖像管理............................................
複製或移動圖像..................................
刪除圖像........................................
設置圖片的出現順序..............................
設置幻燈片......................................
使用說明書
首次使用Szekely Parrot相框
27
27
27
28
29
29
29
29
30
30
30
31
31
31
31
31
32
32
32
32
32
32
32
33
33
33
33
34

2828
在幻燈片模式下,按動方向鍵則進入功能菜單,然後
可選擇旋轉,刪除指令或打開圖像相關信息等指令。
依據相框方向,按動左方向鍵或下方向鍵可返回前一級菜單或
離開當前菜單。
您或許會在電腦中使用相框的選單功能。這時請在相
框的網頁介面上選擇
。請查閱進入網頁介面章節
的內容瞭解更多資訊。
虚拟键盘
• 當您輸入安全密碼以連入無線網路時,虛擬鍵盤將自動
出現。
當您改變相框藍牙名稱或將相框連接一個新的電郵位址
時,鍵盤也會出現。
• 按動方向鍵在虛擬鍵盤上選擇需要鍵入的物件,
再按中央按鈕確認。
ᣝ䥉 ࡳ㛑
܆ᄬ᭛ᴀ
乃⼎ᆿᄫ↡
߾䰸ϔן᭛ᄫヺ㰳
ಲࠄϞϔ㋮㦰ஂ
CANCEL
OK
ABC
?#*...
ᭌԡǃ῭咲ヺ㰳ǃҷ㰳⡍⅞ヺ㰳
您也可以在網頁介面上改變相框名字。請參閱進入網
頁介面章節的內容瞭解更多使用資訊。

29
ZH
使用Wifi功能
將相框連入Wifi網路
1.進入主功能表,選擇設置>Wifi>連線。
>連接視窗出現。
根據您的數據機和路由器的型號不同,此項功能可能
需要“同步”按鈕的支援。請參閱設備資料文檔以獲
取更多資訊。
2.選擇配置。
>相框開始搜尋Wifi網路。
3.在清單中選擇您的網路或選擇其它以手動設置網路。
4.使用虛擬鍵盤輸入WEP或WPA網路安全密碼,選擇
.
>您的相框將連接上Wifi網路。
>連接建立以後,將出現一個包含所有連接資訊的視窗。
連接建立以後,您可以選擇啟動或關閉連接。欲實現此功能,
請選擇設置>Wifi>連線>啟動/關閉。
進入網頁介面
在進入相框網頁介面之前,確認您的電腦和相框連入
的是相同的Wifi網路。
1.記錄下相框的IP地址。選擇設置>信息。
2.打開網路流覽器,在位址欄裏輸入IP位址。
►
請參閱將相框連入Wifi網路章節的內容瞭解更多資訊。
通過電子郵件接收圖像
推薦您創建一個相框專用的電郵位址。
1. 在相框網頁介面上,點擊 .
2. 在信箱帳號欄中,點擊增添圖示將相框連接上一個電郵
位址。
3. 在相應欄中填入用戶名信息。請查閱您的電郵帳號資訊以
獲取服務器和網路協定的相關資料。
>此後,您可以在相框中查閱該電郵帳號接收的所用圖像。
欲實現此功能請選擇流覽>文檔>電郵。
您也可以在相框上直接連接電郵位址。欲實現此功
能,請選擇 設置>Wifi>電郵>新增電郵。

30
查閱網絡相簿
RSS简单信息聚合种子是来源于网站的一种免费资源。受益
于RSS技术及诸如FlickrTM或PicasaTM这样的网络照片管理
共享工具,您可以在相框上查阅网站上发布的相簿。您的
相框连接上RSS种子后,相框上的照片将自动更新。
►
欲了解更多信息,請訪問以下網站:
- http://www.flickr.com
- http://picasa.google.com
RSS簡單信息聚合種子
1. 在服務器上創建一個相簿帳號,並對您希望在相框中顯示
的相冊做出標記,或記錄下其識別符信息和RSS種子的地址。
2. 在相框網頁介面上,點擊 。
3. 在已記錄資源欄中,點擊新建將相簿連接上一個新的RSS
種子。
4. 選擇相簿服務器,輸入物件相冊的相關資訊。您也許需要
輸入相冊密碼或RSS種子地址。
5. 點擊保存。
>此後您可以在相框中查閱被連接相簿中的圖片。欲實現此
功能,請選擇流覽>文檔>RSS種子。
您也可以在相框上直接添加RSS種子,欲實現此功能,
請選 擇設置>Wifi>RSS種子>新增種子
。
查閱電腦中儲存的照片
1. 在您的電腦中選出希望顯示到相框的圖片,開啟檔共用
功能。
2. 在相框網頁介面上,點擊
.
3. 點擊新增共享,選取您的電腦。
>此後您可以在相框中查閱共用文件裏包含的圖像。
欲實現 此功能,請選擇流覽>文檔>電腦連線。
您同樣也可以在相框上直接連接電腦,欲實現此功
能,請選擇設置>無線網路>電腦連線>新增共享。
通過Wifi網路轉移相框中的照片
1. 如果您使用:
- 普通電腦,請點擊 開始>網上鄰居>全部網路>Microsoft
Windows網路。
- 蘋果電腦,請選擇開始>網路。
2. 雙擊“相框”文檔。
> 相框內容將被打開。
3. 將圖像轉移到“內存記憶”文檔中。

31
ZH
您也可以將圖像轉移到相框的其它外部設施中去。
藍牙功能的使用
將相框與電話相連
$
根據您手機和電腦型號的不同,這項功能不一定能
確保實現。
但儘管如此該功能可使您更快地發送相框裡的圖像。
1. 确认相框的蓝牙功能已经开启。请按下中央按钮,选择设
置>蓝牙>开启>是。
2. 开启手机或电脑的蓝牙功能,搜寻外部的蓝牙设备。请参
阅手机或电脑说明书获取更多信息。
3. 在可用蓝牙设备清单中选择Parrot_Specchio。
4. 在您的手机或电脑中输入密码0000。
>相框和另一设备将被连接上。
通過藍牙從手機或PDA上發送照片
1. 確認相框的藍牙功能已經開啟。請按下中央按鈕,選擇 設
置>藍牙>開啟>是。
2. 開啟手機或PDA的藍牙功能。
3. 在您的手機或PDA上進入圖片功能表,選擇一張圖片,點
選“通過藍牙發送”
>您的設備將搜尋外部藍牙設備。
4. 搜索完成後,選擇Parrot_Specchio。
5. 如果您的設備要求輸入密碼,請輸入0000。
>圖像將被發送至相框。
您也可以同時發送多幅圖像。
這項功能能否實現取決於 您的設備。
您也可以同时发送多幅图像。这项功能能否实现取决
于您的设备。
相框和近场通信手机的使用
1. 在您的手機上選取希望被轉移的圖片。
2. 用您的手機碰觸相框。
-如果相框正處於風景模式則由上至左。
-如果相框正處於肖像模式則由上至右。
>您的手機上將出現一條確認資訊。
3. 选择是。

32
通過USB使用Szekely的Parrot相框
通過電腦使用相框
• 通過USB發送電腦上的圖片。
1. 借由USB电缆/微型USB数据线将相框连接上电脑。
>电脑将发现有新设备。
2. 像使用U盤一樣,以JPEG的格式複製圖片並儲存在相框中。
3. 斷開相框的電纜線。
>圖片將相繼顯示。
斷開電纜線前,雙擊電腦屏幕右下方工具欄的圖標,
選擇“安全刪除硬件”。
•相框連接上您的電腦後如同一個簡單的U盤,您可以復制、移
動、重命名和刪除相框裡的所有照片。
相框和U盤/數碼相機的使用
1. 將您的U盤插入相框背面的USB槽中或用數據線連接您的數
碼相機(如果相機支持批量儲存圖片)。請參閱您的U盤或
數碼相機說明書獲取更多信息。
>以JPEG格式儲存在U盤或相機上的照片將會顯示。
2. 按下中央按鈕,選擇瀏覽>文檔>USB。
>您可以按動方向鍵在U盤或數碼相機的內容中進行選擇,
選定圖像後按中央按鈕確認。
>根據您的意願,您可以顯示、旋轉、選擇、刪除、複製
或移動圖像。
►
請參閱 管理圖像 章節的內容瞭解更多資訊。
相框和記憶卡的使用
1. 在正確位置插入記憶卡。
>以JPEG格式儲存在記憶卡上的照片將會顯示。
2. 按下中央按鈕,選擇流覽>文檔>SD卡。
>您可以按動方向鍵在記憶卡的內容中進行選擇,選定圖像
後按中央按鈕確認。
>根據您的意願,您可以顯示、旋轉、選擇、刪除、複製
或移動圖像。
視頻模式的使用
轉移視頻文件
您可以像轉移圖片一樣,將3GP格式的視頻檔轉移到相框裏。
►
請參閱轉移圖像的相關章節以瞭解更多資訊。
查閱視頻文件
• 當您流覽文檔內容時,可按下中央按鈕然後選擇播放以
播 放文檔。
您可以調整音量或者通過方向鍵來選擇上一或下一視頻
• 在幻燈片模式中,您可以開啟視頻檔的自動播放功能。欲實
現此功能,請選擇幻燈片>視頻>播放。

33
ZH
圖像管理
複製或移動圖像
當您查閱U盤、SD卡和RSS種子文檔裏的圖像時,這些圖像沒
有被記憶在相框的內部儲存卡裏。您可以複製或移動這些圖
像到相框內存記憶中,也能通過U盤和內存卡恢復相框內部儲
存的圖像。
U盤裏的照片也能夠被轉移到內存卡中,反之亦然。
欲實現此功能 :
1. 请按下中央按鈕,選擇流覽>文檔 然後選擇包含需複製或
移動圖片的文檔。
2. 選擇您希望複製或移動的圖片后,按中央按鈕確認。
• 如果您只想複製或移動一張圖片:
a.選擇複製或移動選項。
b.選擇您想將圖片複製到的文檔。
c.按下中央按鈕。
• 如果您想複製或移動多張圖片:
a.在每張想複製或移動的圖片上按下選擇。
圖示顯示在圖片上方。
b.在最後一張想複製或移動的圖片上選擇複製或移動選
項。
c.選擇您想將圖片複製到的文檔。
d.按下中央按鈕。
刪除圖像
1. 按下中央按鈕,選擇流覽>文檔然後選擇包含需刪除圖片
的文檔。
2. 選擇您希望刪除的圖像,按下中央按鈕。
• 如果您只想刪除一張圖片:
a) 選擇刪除選項。
>您將收到一條確認資訊詢問是否確定刪除。
b) 選擇是。
• 如果您想刪除多張圖片:
a.在每張想刪除的圖片上按下選擇。
b.在最後一張您想刪除的圖片上選擇刪除選項。
>您將收到一條確認資訊詢問是否確定刪除。
c.選擇是。
設置圖片的出現順序
您在相框上查閱的圖片是根據文檔、日期或您的喜好分類的。
欲查閱相框內圖片,請按下中央按鈕,選擇流覽
• 選擇文檔選項可根據傳輸類型來查閱所分類的圖像。
• 選擇日期選項可根據日期順序查閱圖像。
• 選擇自定選項 可根據您的意願設定圖像的出現順序,無論
其位置在哪裏。
您可以給圖像排序。欲實現此功能:

34
1. 選擇一張或多張圖片,然後選擇排序。
>一個游標尺將會出現,讓您選擇圖像的新位置。
2. 在您希望放置圖像的位置按下中央按鈕。
>圖片的新位置將被保存下來。
設置幻燈片
• 按下中央按鈕,選擇 幻燈片。
• 您有下面幾種排版方式:
-流覽模式:以文檔、日期、自定的分類順序或隨機方式
查 閱圖片。
-顯示時間:選擇圖片顯示的時間。
如果您希望關閉幻燈片功能,選擇無選項。
-轉場:選擇您喜歡的每張圖片之間的轉場。
-視頻:當一視頻出現在所選的幻燈中,請選擇相框狀態。

35
Input : 100-240 V~, 50-60 Hz, 0.2A
Output: 12Vdc, 1.2A
Power Supply
Screen resolution
Screen size LCD
Internal memory
Compatible memory cards
7’’
720 x 480 pixels
200 Mo
• SD, micro SD (with adapter), mini SD
(with adapter)
• SDHC (class 2, 4, 6), mini SDHC
(with adapter)
• MMC, MMC plus, MMC mobile (with
adapter), MMC micro (with adapter), RS MMC (with adapter)
Supported profiles
FTP / OPP / BIP
• Bluetooth v2.1 + EDR
• Wi-Fi b/g
• USB port (mini B & A type)
• SD/MMC card
Connections
Technical specification

36
Warranty
Without prejudice of legal warranty,
Parrot products are warranted during
1 year from the date of purchase for
defects in materials and workmanship,
provided that no deterioration to the
product has been made, and upon
presentation of proof of purchase
(date of purchase, location of sale and
product serial number) to the retailer or
Parrot directly.
Warranty does not cover: data
recovery, deterioration of the external
aspect due to normal use of the product, any damage caused by accident,
misuse, misapplication, or non-Parrot
products. Parrot is not responsible
for storage, loss or damaged to data
during transit or repair.
Any product wrongfully declared to be
defective will be returned to sender
and inspection, process and carriage
costs will be invoiced to him.
Correct disposal of This Product
(Waste Electrical & Electronic Equipment)
(Applicable in the European Union
and other European countries with
separate collection systems).
This marking shown on the product or its literature, indicates
that it should not be disposed
with other household wastes at
the end of its working life. To prevent
possible harm to the environment or
human health from uncontrolled waste
disposal, please separate this from
other types of wastes and recycle it
responsibly to promote the sustainable
reuse of material resources.
Household users should contact either
the retailer where they purchased this
product, or their local government
office, for details of where and how
they can take this item for environmentally safe recycling. Business users
should contract their supplier and the
terms and conditions of the purchase
contract. This product should not be
mixed with other commercial wastes
for disposal.
Modifications
The explanations and specifications
in this guide are given for information
purposes only and may be modified
without prior notice. They are deemed
to be correct at time of going to press.
The utmost care has been taken when
writing this guide,as part of the aim to
provide you with accurate information.
However, Parrot shall not be held
responsible for any consequences
arising from any errors or omissions
in the guide, nor for any damage
or accidental loss of data resulting
directly or indirectly from the use of the
information herein. Parrot reserves the
right to amend or improve the product
design or user guide without any
restrictions and without any obligation
to notify users. As part of our ongoing
concern to upgrade and improve our
products, the product that you have
purchased may differ slightly from the
General Information

37
model described in this guide.
If so, a later version of this guide might
be available in electronic format at Parrot’s website at www.parrot.com.
FCC Compliance Statement
This device complies with RSS 210 of
Industry Canada. Operation is subject
to the following two conditions:
(1) This device may not cause
interference, and
(2) This device must accept any
interference, including interference
that may cause undesired operation
of this device.
Caution: Exposure to Radio
Frequency Radiation
To comply with RF exposure complian-
ce requirements, a separation distance
of at least 20 cm must be maintained
between the antenna of this device
and all persons.
This device must not be co-located or
operating in conjunction with any other
antenna or transmitter.
To prevent radio interference to the
licensed service, this device is intended to be operated indoors and away
from windows to provide maximum
shielding. Equipment (or its transmit
antenna) that is installed outdoors is
subject to licensing.
Declaration of Conformity
We, Parrot S.A. of 174
quai de Jemmapes, 75010
Paris, France, declare
under our sole responsibility that
our product, the Parrot Digital Photo
Frame by Martin Szekely to which this
declaration relates, is in conformity
with appropriate standards EN 300328,
EN 301489-17, EN60950 following
the provision of Radio Equipment
and Telecommunication Equipment
directive, with requirements covering
EMC directive 89/336/EEC and Low
Voltage directive 73/23/EEC.
Identification N. 394 149 496 R.C.S.
PARIS Parrot S.A.
Protection and personal safety
Carefully read the user guide and
follow the indicated procedure when
setting up the device. Do not dismantle
or open the device and do not touch
the electronic components or the
drivers. Do not attempt to dismantle or
modify either of the speakers.
Never introduce any metal object to
avoid the risks of electric shocks,
fire, short circuits or dangerous
emissions. If your device shows signs
of faulty operation, call the approved
Parrot technical support centre or
an approved retailer. Never leave the
frame exposed to rain or chemical
products; do not place them in a damp
area or where they are likely to be
splashed with water. Never place your
device on a recipient containing any
type of liquid, which might seep inside
the device. Doing so will reduce the
risks of electric shocks, short circuits,
fire and injury.

38
Caution: Exposure to Radio
Frequency Radiation
The installer of this radio equipment
must ensure that the antenna is
located or pointed such that it
does not emit RF field in excess of
Health Canada limits for the general
population; consult Safety Code 6,
obtainable from Health Canada’s
website at www.hc-sc.gc.ca/rpb.
Copyrights
Copyright © 2008 Parrot. All rights
reserved. The total or even partial
reproduction, transmission or storage
of this guide in any form or by any
process whatsoever (electronic,
mechanical, photocopy, recording or
otherwise) is strictly prohibited without
prior consent from Parrot.
Important safety instructions
1. This apparatus shall not be exposed
to dripping or splashing and no object
lled with liquid, such as vases, shall
be placed on the apparatus.
2. The AC/DC adaptor which provides
disconnection from mains supply
shall remain readily operable. Unplug
this apparatus when unused for long
periods of time.
3. Read these instructions
4. Keep these instructions
5. Heed all warnings
6. Follow all instructions
7. Do not use this apparatus near
water.
8. Clean only with dry cloth.
9. Do not block any ventilation ope
nings. Install in accordance with the
manufacturer’s instructions.
10. Do not install near any heat as
radiators. Heat registers, stoves
or other apparatus (including ampli
fiers) that produce heat.
11. Do not defeat the safety purpose
of the polarized or grounding type
plug. A polarized plug has two blades
with one wider than the other. A grounding type plug has two blades and a
third grounding prong. The wide blade
or the third prong are provided for your
safety. If the provided plug does not fit
into your outlet, consult an electrician
for replacement of the obsolete outlet.
12. Only use attachments/accessories
specified by the manufacturer.
13. Unplug this apparatus during lightning storms or when unused for long
periods of time.
The exclamation point within
an equilateral triangle is in-
tended to alert the user to the
presence of important operating and
maintenance (servicing) instructions
in the literature accompanying the
product.
An equilateral triangle, is
intended to alert the user to
the presence of uninsulated
«dangerous voltage» within the
product’s enclosure that may be of
sufficient magnitude to constitute a
risk of electric shock to persons.

39
14. WARNING: To reduce the risk of
fire or electric shock, do not expose
this apparatus to rain or moisture and
objects lled with liquids, such as
vases, should not be placed on this
apparatus.. This apparatus is designed
for indoor use only.
Do not expose the frame to outside
temperatures below 5°C or above
40°C. The system could be damaged
or the cabinet warped. Avoid placing
the system near a source of heat or
exposing it to sunlight (even through
a window).
Similarly, excessively low temperatures and humidity could damage the
device.
Licences
Parrot logo and trademarks are the
property of PARROT SA.
The Bluetooth ® word mark and logos
are owned by the Bluetooth SIG, Inc.
and any use of such marks by Parrot
S.A. is under license.
Bluetooth QDID: B014408, B013839,
B013838
Wi-Fi is a registered mark of the Wi-Fi
Alliance. Wi-Fi CERTIFIED is a mark of
the Wi-Fi Alliance. The Wi-Fi
CERTIFIED logo is a certification mark
of the Wi-Fi Alliance.
Mac is a trademark of Apple
Computer, Inc., registered in the U.S.
and other countries.
Additional typefaces for this product
can be obtained at www.linotype.com.
All trademarks and trade names are
those of their respective owners.

40
质量保证书
在不损害用户合法权益的原则
上,Parrot的产品自购买日起的一年
内,在客户没有对产品自行修改、购买
证明一应俱全的条件下(需包含购买日
期、地点和产品序列号),经销商或
Parrot公司确保产品质量。本产品的质
量保证范围不包括恢复用户数据、正
常使用产品导致的外部损坏、由意外
事故造成的所有破损、不正常或不合
法的使用方法以及非Parrot生产的产
品。Parrot公司不对运输和修理过程中
的文件储存、丢失和损坏现象负责。所
有确认没有缺陷的产品将被寄回至发
件人,处理、检修和运输的费用由发
件人承担。
如何回收本产品
电子设备废料
产品上的标志和说明书均指明此产品不
应该在其寿命终止时与其它家庭废料一
起被销毁。
废料的不当处理可能会给环境和人类身
体健康造成损害。请您怀着责任感将废
弃的产品和其它种类废料分开并回收
来为资源的可持续利用尽一份力。专业
人员将与售出产品的经销商联系,或向
当地政府咨询,从而正确的回收处理此
产品而不破坏环境。企业将与供应商联
系,并查阅销售合同条款细则。此产品
不可与其它商业废料共同处理。
修正权
此产品说明书中的解释和规范只作为使
用信息,本公司有权在不提前发布通知
的情况下进行修改。为给您提供最为
准确的信息,我们在编撰该说明书时尽
量细心,因而以上提供的信息在印刷出
版时应是准确无误的。然而,Parrot
S.A.公司无法为此说明中可能存在的
错误和遗漏而造成的文件损毁或丢失
事故承担直接或间接的责任。Parrot
S.A.公司保留改善产品和说明书质量的
权利,公司没有义务将修改事宜提前
告知客户。
由于Parrot S.A.秉承不断改善产品质量
的原则,所以您购买的产品可能会与说
明书中描述的有细微的不同。在这种情
况下,请您在www.parrot.com.网站上查
阅新版本的电子版说明书。
使用信息

41
品質保證書
在不損害用戶合法權益的原則
上,Parrot的產品自購買日起的一年
內,在客戶沒有對產品自行修改、購買
證明一應俱全的條件下(需包含購買日
期、地點和產品序列號),經銷商或
Parrot公司確保產品質量。本產品的質
量保證範圍不包括恢復用戶數據、正
常使用產品導致的外部損壞、由意外
事故造成的所有破損、不正常或不合
法的使用方法以及非Parrot生產的產
品。Parrot公司不對運輸和修理過程中
的文件儲存、丟失和損壞現象負責。所
有確認沒有缺陷的產品將被寄回至發
件人,處理、檢修和運輸的費用由發
件人承擔。
如何回收本產品
電子設備廢料
產品上的標誌和說明書均指明此產品不
應該在其壽命終止時與其它家庭廢料一
起被銷毀。
廢料的不當處理可能會給環境和人類身
體健康造成損害。請您懷著責任感將廢
棄的產品和其它種類廢料分開並回收
來為資源的可持續利用盡一份力。專業
人員將與售出產品的經銷商聯繫,或向
當地政府諮詢,從而正確的回收處理此
產品而不破壞環境。企業將與供應商聯
繫,並查閱銷售合同條款細則。此產品
不可與其它商業廢料共同處理。
修正權
此產品說明書中的解釋和規範只作為使
用信息,本公司有權在不提前發布通知
的情況下進行修改。為給您提供最為準
確的信息,我們在編撰該說明書時盡量
細心,因而以上提供的信息在印刷出版
時應是準確無誤的。然而,Parrot SA公
司無法為此說明中可能存在的錯誤和遺
漏而造成的文件損毀或丟失事故承擔直
接或間接的責任。Parrot SA公司保留改
善產品和說明書質量的權利,公司沒有
義務將修改事宜提前告知客戶。
由於Parrot SA秉承不斷改善產品質量的
原則,所以您購買的產品可能會與說明
書中描述的有細微的不同。在這種情況
下,請您在www.parrot.com.網站上查閱
新版本的電子版說明書。
使用資訊

42

Co n t a i n s FCCiD : EW4DWMW014
C
o n t a i n s iC: 4250a -DWMW014
FCC iD : RK XMsZ
iC: 5119a-MsZ
Hotline
Our hotline is at your disposal from Monday to Friday between 9 am and 6 pm (GMT + 1)
Hot-line@parrot.com
Italy : [+39] 02 59 90 15 97
Spain : [+34] 902 404 202
UK : [+44] (0)844 472 2360
Germany : 0900 1727768
USA : [+1] (877) 9 Parrot (toll free)
Hong Kong : [+852] 2736 1169
France : 01 48 03 60 69
Europe : [+33] 1 48 03 60 69 (Spoken languages : French, English and Spanish)

www.parro t.com
 Loading...