


QUICK START
GUIDE
ユーザー ガイド


3
Diagrams...........................................
English..............................................
日本語................................................
Technical Specification....................
General information..........................
p.04
p.09
p.19
p.29
p.30
Index

4
- Installing the frame
-
フレームを設置する
5
- Using the frame with a memory card
- メモリーカードでフレームを使用する
- Using the frame via USB
- USB経由でフレームParrot by Szekelyを使用する

6
- Using the frame with a USB flash drive / digital camera
- USB経由で画像を送る
7
OK
Back
- Sending pictures from a phone via Bluetooth
- Bluetoothを経由して電話機 / PDAから写真を送る

8
- Using the frame with an NFC phone
- NFC電話機でフレームを使用する
9
Content
Installing the frame
► Refer to the diagram p.4.
1. Screw the metal rod into the back of the frame.
> If you rotate the frame, the picture displayed turns to
match the new position of the frame.
2. Connect the power cable connector to the transformer
and plug it into an electrical socket.
> The frame automatically switches on.
3. Select your country.
Scrolling through the menus
You can scroll through the menus using the buttons on the
back of the frame.
This button allows you to access the main
menu and to confirm a selection. It also
allows you to enter the context menu on
each picture.
Using the Parrot frame by Szekely for the 1st time..........
Installing the frame............................................................
Scrolling through the menus.............................................
Using the virtual keypad...................................................
Using the Wi-Fi
®
function ..................................................
Connecting the frame to a Wi-Fi network..............................
Accessing the web interface.............................................
Receiving pictures by email...............................................
Display photo albums on line.............................................
Display pictures stored on a computer..............................
Transfer photos to the Parrot frame by Szekely via Wi-Fi...
Using the Bluetooth
®
function...........................................
Pairing the frame with your phone.....................................
Sending pictures from a Phone or PDA via Bluetooth......
Using the frame with an NFC phone..................................
Sending pictures from a PC via Bluetooth........................
Using the Parrot frame by Szekely via USB......................
Using the
frame with a computer.......................................
Using the frame with a USB flash drive
/ digital camera.................................................................
Using the frame with a memory card................................
Using the video mode.........................................................
Sending a video to the
frame............................................
Watching a video..............................................................
Managing the pictures........................................................
Copying / moving pictures................................................
Deleting pictures...............................................................
Arranging pictures.............................................................
Preparing a slideshow.......................................................
English
Using the Parrot frame by Szekely for the 1st time
09
09
09
10
10
10
10
11
12
12
12
13
13
13
13
14
14
14
14
15
15
15
15
15
15
16
16
17
10
Depending on the frame’s orientation,
these buttons allow you to select a
picture or navigate through the context
menus.
In slideshow mode, you can also use the navigation
buttons to access the context menu.
Depending on the frame’s orientation, the left or down
buttons also allow you to exit the menus.
You can also navigate through the menus of the
frame and browse through your pictures using
your PC. To do so, select the
icon on the web
interface. Refer to the Accessing the web interface
section for more information.
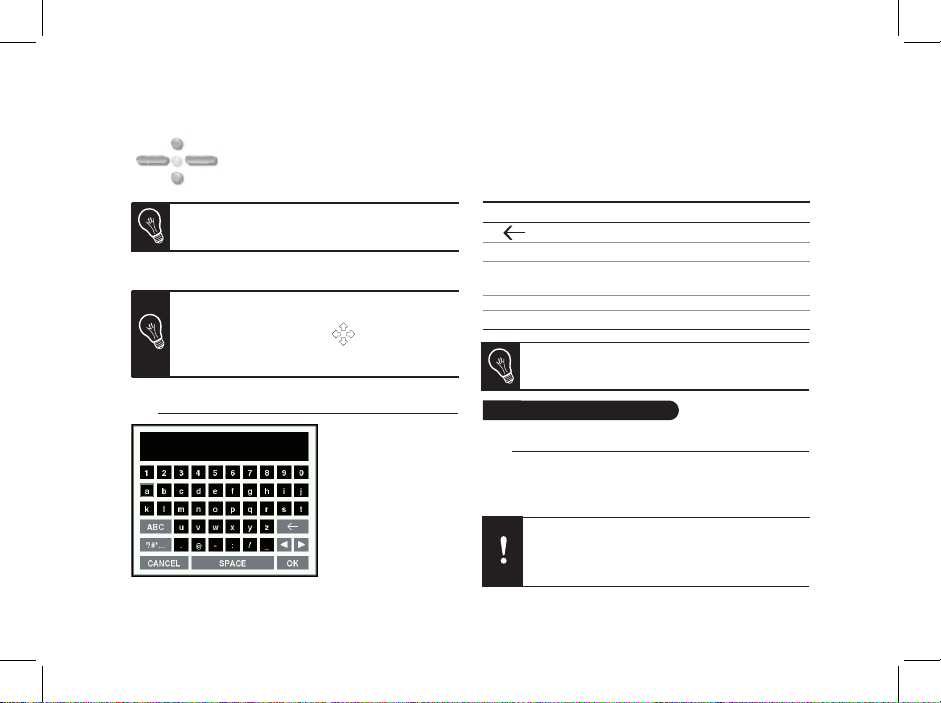
Using the virtual keypad
• The virtual keypad is
displayed when you
have to enter the WEP
or WPA code to esta-
blish a connection with
your Wi-Fi network.
The virtual keyboard
is also displayed if
you want to modify the
Bluetooth name of the frame or if you want to associate it
to a new E-mail address.
• Select a key using the navigation buttons then conrm by
pressing the central button.
Using the Wi-Fi function
Connecting the frame to a Wi-Fi network
1. Go to the main menu and select Settings > Wi-Fi >
Connection.
> The connection window appears.
You can also use the web interface to change the
name of the frame. Refer to the Accessing the web
interface section for more information.
Depending on the model of your modem or router,
you might have to press the synchronisation button.
Refer to your device’s documentation for more
information.
Key Functions
Save the text
Display capital letters
Delete a character
Go back to previous menu
CANCEL
OK
ABC
?#*.. .
Display punctuation marks
and special characters
11
2. Select Configure.
> A Wi-Fi network search is launched.
3. Select your network from the provided list or select
Others to configure your network manually.
4. Enter your WEP or WPA code using the virtual keyboard
then select OK.
> You are now connected to your Wi-Fi network.
> Once the connection has been established, a window
appears containing all the information relating to the
Wi-Fi connection.
• Once the connection has been established, you have the
possibility to activate / deactivate the connection. You
can do that by selecting Settings > Wi-Fi > Connection >
Activate / Deactivate.
Accessing the web interface
In order to access the web interface, make sure that
your PC is connected to the same Wi-Fi network as
the frame.
1. Read the IP address assigned to your frame. To do so,
select Settings > Info.
2. Launch your web browser and enter the IP address
in the address bar.
► Refer to the Connecting the frame to a Wi-Fi network
section for more information.
Receiving pictures by email
We advise you to create a specific email address
for your frame.
►For more information about the compatible mail
servers, refer to our website
www.parrot.com, compatibility section.
1. On the web interface, click on
.
2. In the Email account space, click on New to
associate an email address with frame.
3. Enter your connection identifiers in the
corresponding fields. Refer to your email service
documentation for information on the server and the
protocol.
> All the pictures that you receive on this email account
from now on can be accessed via the frame, by selecting
Route > Directory > Email.
You can also associate an email address directly
from the frame. To do so, select Settings > Wi-Fi >
Email > Add an Email account.

12
Display photo albums on line
1. Create an account on a photo server and mark the
identifier associated with the album that you wish to
display on the frame or note down the URL for the RSS
flow associated with this album.
2. On the web interface, click on
.
3. In the Registered feeds space, click on New to
associate an RSS flow with the frame.
4. Select your photo server, enter the identifier associated
with the selected album then the password if necessary or
enter the URL address of the RSS feed.
5. Click on Save.
> The images contained in the associated album can
then be accessed on the frame by selecting Route >
Directory > RSS Flow.
You can also associate RSS feeds directly from the
frame by selecting Adjustments > Wi-Fi > RSS >
Add new flow.
Display pictures stored on a computer
1. On your computer, activate sharing on the pictures
directories you wish to display on the frame.
2. On the web interface, click on
.
3. Click on Add a share and select your computer.
> The pictures contained in the shared directory are
accessible from then on the frame.
Transfer photos to the frame via Wi-Fi
1. If you are using:
- a PC, click on Start > Network Favourites > Entire
network > Microsoft Windows Network
- a Mac, select Go > Network.
An RSS (Really Simple Syndication) feed is a flow of
free content coming from internet sites. Thanks to RSS
feeds and photo management and sharing tools on line
such as Flickr
TM
or PicasaTM, photo albums published on
the website can be displayed on your frame. Once the
RSS feed is associated to your frame, the photos are
automatically updated.
►
For more information, go to:
- http://www.flickr.com
- http://picasa.google.com
RSS Feed
You can also associate a computer directly from
the frame. To do so, select Settings > Wi-Fi > PC
connection > Add a share.

13
2. Double-click on the Frames directory.
> You will access the content of the frame.
You can also transfer your images on a peripheral
connected to frame.
3. Transfer the pictures into the Internal Memory file.
Using the Bluetooth function
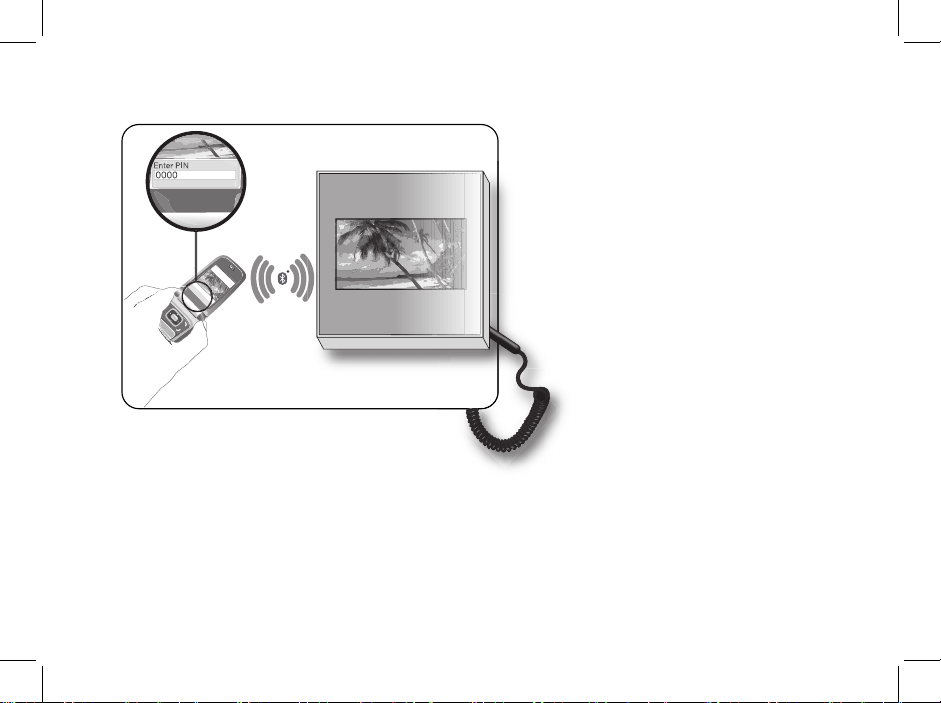
Pairing the frame with your phone
Depending on the model of your phone / computer,
this phase might be optional. However, it will enable
you to send your photos to the frame more quickly.
1. Ensure that Bluetooth is activated on the frame.
To do so, press the central button and select Settings >
Bluetooth > Enabled.
2. Activate Bluetooth on your phone / computer then search
for Bluetooth devices. Refer to the user guide of your
device for more information.
3. Select Parrot_Specchio in the list of Bluetooth devices
proposed by your phone / computer.
4. On your phone / computer, enter the code 0000.
> Your two devices are now paired.
Sending pictures from a Phone or PDA via Bluetooth
1. Ensure that Bluetooth is activated on the frame.
To do so, press the central button and select Settings >
Bluetooth > Enabled.
2. Activate Bluetooth on your phone / PDA.
3. On your phone/PDA, go to the Pictures menu. Select a
picture and choose «Send via Bluetooth». Your device
starts searching for Bluetooth peripherals.
4. Once the search has finished, select Parrot_Specchio.
5. If your device prompts you to enter a code, type 0000.
> The picture is then sent to the frame.
Several pictures can be sent at a time, though this
feature will depend on your device.
Using the frame with an NFC phone
To send a picture to the frame from an NFC phone:
1. On your phone, select the picture you want to send.
2. Touch the frame with your phone:
- on the top left of the frame if it is in landscape mode
- on the top right of the frame if it is in portrait mode.
> A confirmation message is displayed on your phone.
3. Select Yes.

14
Sending pictures from a PC via Bluetooth
(Windows, Linux)
1. Ensure that Bluetooth is activated on the frame.
To do so, press the central button and select Settings >
Bluetooth > Enabled.
2. Activate the Bluetooth feature on your computer.
3. Right-click on the picture that you wish to send and
choose «Send via Bluetooth».
> Your PC will search for any nearby Bluetooth
peripherals.
4. Select Parrot_Specchio.
5. Type 0000 if your PC prompts you to enter a code.
It is also possible to send pictures from a Mac.
Using the Parrot frame by Szekely via USB
► Refer to the diagrams p.05.
Using the frame with a computer
• To send pictures from a computer via USB:
1. Connect the frame to your PC with the USB cable.
> The computer detects a new device.
2. Copy your JPEG pictures to the frame as if you were
using a USB flash drive.
3. Disconnect the cable from the frame.
• Once connected to your computer, your frame works as
a USB flash drive. It means that you can copy, move,
rename and delete the pictures stored in the frame.
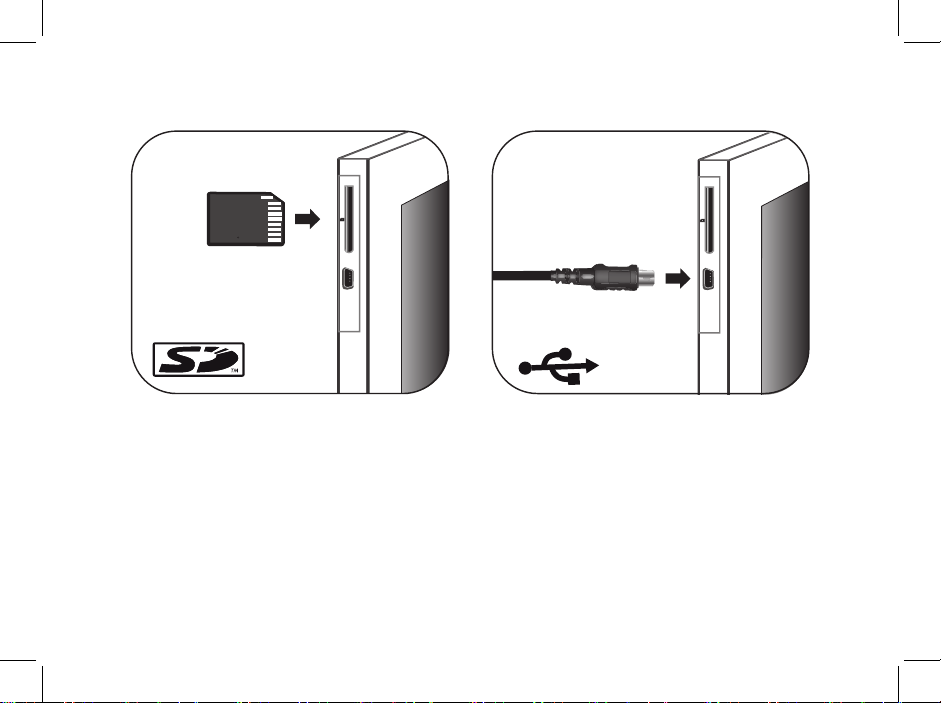
Using the frame with a USB flash drive /
digital camera
1. Insert your USB flash drive in the USB port located at the
back of the frame or connect your digital camera using
the USB cable provided with your camera. Refer to your
To disconnect the frame from your computer, double
click on the «Safely remove hardware» icon located
at the bottom right of your task bar.

15
digital camera user guide for more information.
> The JPEG pictures stored in the USB flash drive or in
the memory of the digital camera are displayed.
2. Press the central button and select Browse > Directory
> USB.
> You can now navigate through the content of your USB
flash drive or digital camera using the navigation buttons
and select a picture using the central button.
> You can then display, rotate, select, copy or move
the picture.
► Refer to the Managing the pictures section for
more information.
Using the frame with a memory card
► Refer to the diagrams p.05.
1. Insert the memory card into the appropriate slot.
> The JPEG pictures stored in the memory card are
displayed.
2. Press the central button and select Browse > Directory
> Memory card.
> You can now navigate through the content of your
memory card using the navigation buttons and select a
picture using the central button.
> You can then display, rotate, select, copy or move
the picture.
Using the video mode
Sending a video to the frame
You can transfer videos in 3GP formats to the frame as if you
were sending a picture.
► Refer to the sections concerning the image transfer for
more information.
Watching a video
• While navigating through the content of a directory, you
can play a video by pressing the central button and
selecting the Play option.
• In slideshow mode, you can activate the automatic
reading. To do so, select Slideshow > Video > Play.

16
Managing the pictures
Copying / moving pictures
Pictures you can see in the USB, SD Card and RSS feed
directories are not memorized in the internal memory of the
frame. The frame allows you to copy or move these pictures
into its internal memory. You can also copy / move your
pictures from or to an USB flash drive or a memory card.
To do so:
1. Press the central button and select Browse > Directory
then select the directory containing the pictures to copy /
move.
2. Select the picture you want to copy / move and press
the central button.
• If you only want to copy / move one picture:
a. Select the Copy or Move option.
b. Select the directory in which you want to copy /
move the picture.
c. Press the central button.
• If you want to copy / move several pictures:
a. Choose the Select option on each picture.
> A
icon is displayed on the picture.
b. On the last picture you want to copy / move,
select the Copy or Move option.
c. Select the directory in which you want to copy
/ move the pictures.
d. Press the central button.
Deleting pictures
1. Press the central button and select Browse > Directory
then select the directory containing the pictures to delete.
2. Select the picture you want to delete then press
the central button.
• If you only want to delete one picture:
a. Select the Delete option.
> A confirmation message is displayed.
b. Select Yes.
• If you want to delete several pictures:
a. Choose the Select option on each picture.
b. On the last picture you want to delete, select
the Delete option
> A confirmation message is displayed.
c. Select Yes.
Arranging pictures
Pictures are sorted by directory, by date or depending on
your preferences. To access pictures, press the central
button and select Browse.
• The Directory option allows you to access the pictures
sorted by type of transfer.
• The Date option allows you to access the pictures sorted
by date.

17
• The Customized option allows you to arrange pictures
from every directory.
1. Select one or several pictures then select the
Classify option.
> A cursor appears to indicate the picture position.
2. Use the cursor and press the central button to
select the new pictures location.
Preparing a slideshow
• Press the central button and select Slideshow.
• The following options are available to create your
slideshow:
- Browsing mode: visualize your pictures sorted
by directory, by date or depending on your
preferences.
- Timer: defines the slideshow display time.
Select the None option if you want to deactivate
the slideshow.
- Transition: defines the transition effect between the
photos in your slideshow.
- Video: activates / deactivates the automatic reading
of videos during slideshows.

18

19
日本語
フレームを設置する
1. フレームの裏面に金属棒を取り付けます。
> フレームの向きを変えると、写真はそれに合わせて自動
的に回転します。
2. 電源プラグを変圧器に差込み、変圧器をコンセントに接続
してください。
> フレームに自動的に電源が入ります。
3.フレームで使用する言語を選んでください。
メニュー画面を見る
フレームの裏面にあるボタンを使って、メニュー画面を見る
事ができます。メインメニューにアクセスするには、フレー
ム裏面のボタンを押してください。
決定ボタンを押すと、メインメニュー画面へ移動することが
できます。決定ボタンはまた、選択を決定
したり、各画像のコンテキストメニューを
表示させることができます。コンテキスト
メニューからは、画像を回転させたり、画
像のコピーや削除を行えます。
はじめてフレームを使用する.................................................
フレームを設置する...........................................................
メニュー画面を見る...........................................................
バーチャル・キーを使用する............................................
ワイヤレス機能を使用する......................................
フレームをワイヤレス・ネットワークへ接続する...........
ウェブ・インターフェースにアクセスする......................
Eメール経由で画像を受信する .......................................
アルバムをオンラインで閲覧可能にする..........................
コンピュータに保存されている写真を見る ....................
ワイヤレス経由でフレームに写真を転送する .................
フレームに写真を送る.....................................................
フレームを電話機と通信可能にする.................................
Bluetoothを経由して電話機 / PDAから写真を送る...........
NFC電話機でフレームを使用する....................................
Bluetoothを経由してPCから写真を送る...........................
USB経由でフレームParrot by Szekelyを使用する...
USBを使用して、コンピュータから送る...........................
USB経由で画像を送る........................................................
メモリーカードでフレームを使用する.....................
ビデオモードを使用する..........................................
ビデオを転送する................................................................
ビデオを見る.......................................................................
画像を整理する........................................................
画像をコピーまたは移動する.............................................
画像を削除する..................................................................
画像の表示順序を決める....................................................
スライドショーを設定する................................................
日本語
はじめてフレームを使用する
19
19
19
20
21
21
21
21
22
22
23
23
23
23
24
24
25
25
25
25
26
26
26
26
27
27
27
28

20
ナビゲーションボタンは、フレームの方向
に応じて、フォルダの中身やコンテキスト
メニューを見ることができます。
スライドショー モードではまた、コンテキストメニ
ューにアクセスして、画像を回転させたり、画像を
削除したり、画像に関する情報を見たりすることが
できます。.
フレームの方向によっては、左または下のナビゲーションボ
タンを押すと、一つ前のメニューに戻ったり、メニューを終
了することができます。
バーチャル・キーを使用する
フレームのBluetoothネームを変更する場合、あるいはフレー
ムを新しいEメールアドレスに関連付ける場合にも、バーチ
ャル・キーが表示されます。
• ナビゲーションボタンを使用してキーを選択した後、中央
のボタンを押して決定してください。
お使いのコンピュータから、フレームのメニューを
見ることもできます。そのためには、フレームのウ
ェブ・インターフェースから
を選択してくださ
い。詳しい情報は、「ウェブ・インターフェースに
アクセスする」をご覧ください。.
また、ウェブ・インターフェースからフレームの名
前を変更することもできます。詳しい情報は、「ウ
ェブ・インターフェースにアクセスする」をご覧
ください。
• ワイヤレス・ネットワーク
に接続するためにセキュリ
ティーコードを入力する必
要がある場合に、バーチャ
ル・キーが表示されます。
キー 機能
テキスト を登録する
大文字、数字、
句読点、マーク、特殊文字など の記号を表示する
1文字削除する
前のメニューに戻る
CANCEL
OK
ABC
?#*.. .

21
日本語
ワイヤレス機能を使用する
フレームをワイヤレス・ネットワークへ接続する
1. メインメニューから、 調整 > ワイヤレス > 接続を選択し
てください。
接続ウィンドウが表示されます。
お使いのモデムまたはルーターの型によっては、シ
ンクロナイズ ボタンを押す必要があります。詳しい
情報は、お使いの機械の説明書をご覧ください。
2. 設定するを選択してください。
フレームがワイヤレス・ネットワークを検索します。
3. 表示されたリストから該当するネットワークを選択する
か、 その他 を選択して、手動でネットワークの設定を行
ってください。
4. バーチャル・キーを使用して、使用するネットワークの
WEPキーまたは WPAキーを入力した後、OK を選択して
ください。
これでワイヤレス・ネットワークへの接続が完了です。
接続が完了すると、フレームのワイヤレス経由接続に関す
るすべての情報を含んだウィンドウが表示されます。
• 接続が完了したら、接続を有効 / 無効にすることができま
す。それには、調整 > ワイヤレス > 接続 > 有効 / 無効を選
択してください。
ウェブ・インターフェースにアクセスする
フレームのウェブ・インターフェースにアクセスする
には、お使いの PCがフレームと同じワイヤレス・ネッ
トワークに接続されていることを 確認してください。
1. フレームに割り当てられているIPアドレスを入力します。
それには、調整 > 情報を選択してください。
2. お使いのウェブブラウザを起動し、アドレスバーにIPアド
レスを入力してください。
► 詳しい情報は、「フレームをワイヤレス・ネットワーク
に接続する」をご覧ください。
Eメール経由で画像を受信する
フレーム専用のEメールアドレスを作成することを
お勧めします。
1 . ウェブ・インターフェースから、 をクリックして
ください。.
2. メールアカウントから新規 をクリックして、フレームに
メールアドレスを関連付けてください。
3. 該当する欄に、接続に必要な認証コードを入力してくだ
さい。サーバーやプロトコルに関する情報については、
お使いの電子メールの説明書をご覧ください。

22
> 今後このメールアカウントに受信する画像はすべて、フレ
ームからアクセスできるようになります。それには、閲覧 >
ドキュメント > Eメールを選択してください。
フレームから直接メールアドレスを関連付けるこ
ともできます。それには、調整 > ワイヤレス > Eメ
ール > Eメールアカウントを加える を選択してく
ださい。
アルバムをオンラインで閲覧可能にする
1. 写真サーバー上にアカウントを作成し、フレーム上で見
たいアルバムに関連付けられているユーザ名を探すか、
そのアルバムに関連付けられているRSSフィードのURLを
メモしてください。
2. ウェブ・インターフェースから、 をクリックしてく
ださい。
3. 登録済フィードのページから 新規 をクリックして、フレ
ームにRSSフィードを関連付けてください。
4. 利用する写真サーバーを選択した後、選択したアルバム
に 関連付けられているユーザ名(必要な場合はパスワー
ドも)を入力するか、またはRSSフィードのURL アドレス
を入力してください。
5. [登録]をクリックしてください。
> 関連付けたアルバムに含まれる画像を、今後フレームか
ら見ることがでるようになります。それには、閲覧 > ド
キュメント > RSSフィードを選択してください。
フレームから直接RSSフィードを関連付けること
もできます。それには、調整 > ワイヤレス > RSS
フィード > 新しいフィードを加える を選択してく
ださい。
コンピュータに保存されている写真を見る
1. お使いのコンピュータから、フレームで見たい写真ドキュ
メントの共有を有効にしてください。
2. ウェブ・インターフェースから、
をクリックして
ください。
3. 共有画像を追加 をクリックした後、お使いのコンピュー
RSS (Really Simple Syndication)フィードとは、インター
ネットサイト経由の無料コンテンツフィードです。RSS
フィードと、FlickrTM、PicasaTMなどのオンライン写真
管理・共有ツールを使うと、あなたのフレーム上で、イ
ンターネットサイト上に公開されているアルバムを
見ることができます。あなたのフレームにRSSフィード
を関連付けた後は、写真が自動的に更新されます。
さらに詳しい情報については、以下のサイトをご覧くだ
さい:- http://www.ickr.com
- http://picasa.google.com
RSSフィード

23
日本語
タを選択してください。
> 共有ドキュメントに含まれる画像を、今後フレームから
見ることができるようになります。それには、閲覧 > ドキ
ュメント > PC接続を選択してください。
ワイヤレス経由でフレームに写真を転送する
1. お使いのコンピュータが:
- PCの場合、起動 > お気に入りのネットワーク > すべ
てのネットワーク > Microsoft Windowsネットワーク
をクリックしてください。
- Macの場合、スタートメニュー > ネットワークを選択
してください。
2. 「フレーム」ドキュメントをダブルクリックしてくだ
さい。
> フレームの中身にアクセスします。
3. 内部メモリードキュメントに画像を転送してください。
フレームに写真を送る
フレームを電話機と通信可能にする
1. すべてのBluetooth®搭載ツールがフレームSzekelyを検知
できるよう、フレームの調整を行ってください。調整する
には、 調節 > Bluetooth > 鮮明度を選択してください。
2. お使いの電話機 / コンピュータのBluetooth機能をONにし
てください。(お使いの電話機の説明書をご参照いただく
か、当社ウェブサイト www.parrot.comのサポートページ
をご覧ください)。
3. お使いの電話機 / コンピュータから、Bluetooth 近接検知
を行ってください。
4. お使いの電話機 / コンピュータによって検知された
Bluetooth機器リストから、フレームSzekelyを選択してく
ださい。
5. お使いの電話機 / コンピュータに、コード「0000」を入
力してください。
>これで2つの機器は通信可能となります。
メモ:お使いの電話機またはコンピュータの機種に
よっては、このステップはオプションとなります。
この機能を使うと、あなたの写真をフレームにより
速く送ることができます。

24
Bluetoothを経由して電話機 / PDAから写真を送る
1. すべてのBluetooth搭載ツールがフレームSzekelyを検知で
きるよう、フレームの調整を行ってください。調整するに
は、 調節 > Bluetooth > 鮮明度を選択してください。
2. お使いの電話機 / PDAのBluetooth機能をONにしてくだ
さい。
3. 電話機 / PDAの画像メニューから画像を一つ選び、
「Bluetoothで送信する」を選択してください。
> お使いの機器がBluetooth近接検知を開始します。
4. 検知が完了したら、「フレームSzekely」を選択してく
ださい。
5. コード入力が必要な場合は、「0000」と入力してくだ
さい。
> フレームへ画像が送られます。
> 画像の転送中は、画像が少しずつ表示されていきます。
画面上にBluetoothアイコンが表示されます。
メモ:お使いの機種によっては、一度に複数の画像
を送信することができます。
NFC電話機でフレームを使用する
NFC電話機からフレームへ画像を転送するには:
1. お使いの電話機の中の転送したい画像を選択します。
2. 電話機でフレームにタッチしてください:
- フレームの向きを風景モードでお使いの場合は左上を
- フレームの向きを人物モードでお使いの場合は右上を
> 電話機に確認メッセージが表示されます。
3. はいを選択してください。
Bluetooth を経由してPCから写真を送る
(Windows, Linux)
1. すべてのBluetooth搭載ツールがフレームSzekelyを検知で
きるよう、フレームの調整を行ってください。調整するに
は、 調節 > Bluetooth > 鮮明度を選択してください。
2. お使いのコンピュータのBluetooth 機能をONにしてくだ
さい。
3. 送信したい画像を右クリックして、「Bluetooth経由で送
信する」を選択してください。
> PCが周辺のBluetooth近接検知を開始します。
4. 「フレームSzekely」を選択してください。
5. お使いのPCにコード入力が必要な場合は、「0000」と
入力してください。
>画像の転送中は画面にBluetoothアイコンが表示され、画
像が少しずつ表示されていきます。

25
日本語
USB経由でフレームParrot by Szekelyを使用する
USBを使用して、コンピュータから送る
1. USBケーブルを使って、フレームをコンピュータ
に接続してください。
> コンピュータが新しい周辺機器の検知を行います。
2. JPEGまたはGIF形式の画像を、写真フレームにコ
ピーしてください。
3. ケーブルをフレームから外してください。
> フレームが自動的に画像を保存します。
4. 新しい画像を転送したい場合は、この操作を繰 り返して
ください。
フレームとコンピュータの接続を切るには、タスク
バーの右下にある「ハードウェアを安全に取り外
す」アイコンをダブルクリックしてください。
• コンピュータに接続されると、フレームはUSBキーと同じ
ように機能します。したがって、フレームにある写真のコ
ピー・移動・名前の変更・削除などが行えます。
USB経由で画像を送る
1. USBキーをフレーム裏面にあるUSBポートに差し込んで
ください。または、USBケーブルを使ってデジタルカメラ
を接続してください
(お使いのカメラが大容量記憶デバイスと認識される場合)
。詳しい情報は、お使いのカメラの説明書をご覧くださ
い。
> USBキーまたはカメラに保存されているJPEG形式の写
真が表示されます。
2. 中央のボタンを押した後、閲覧 > ドキュメント > USBを
選択してください。
> これで、ナビゲーションボタンを使ってUSBキーまたは
デジタルカメラの中身を見ることができます。 また、中
央ボタンを押して画像を選択することができます。
> ご希望に応じて、画像の表示、回転、選択、削除、コピ
ー、移動などが行えます。
► さらに詳しい情報は、「画像を整理する」をご覧くださ
い。
メモリーカードでフレームを使用する
1. メモリーカードを適切な場所に挿入してください。
> USBキーまたはカメラに保存されているJPEG形式の写
真が表示されます。
2. 中央のボタンを押した後、閲覧 > ドキュメント > SDカー
ドを選択してください。
> これで、ナビゲーションボタンを使ってメモリーカード
の中身を見ることができます。 また、中央のボタンを押
して画像を選択することができます。
> ご希望に応じて、画像の表示、回転、選択、削除、コピ
ー、移動などが行えます。

26
ビデオモードを使用する
ビデオを転送する
3GP形式のビデオを、画像と同じようにフレームに転送する
ことができます。
► 詳しい情報は、画像の転送に関する説明をご覧ください
ビデオを見る
• ドキュメントの中身を見ている間、中央のボタンを押した
後にオプションの[ 読み込み]を選択して、ビデオの読み込
みを開始してください。
再生中はナビゲーションボタンを使って、音量を調節
したり、次のビデオまたは前のビデオを選択することがで
きます。
• スライドショーモードでは、ビデオの再生を自動的に開始
することができます。それには、スライドショー > ビデオ
> 読み込みを選択してください。
画像を整理する
画像をコピーまたは移動する
USB、SDカード、RSSフィード内の画像を見ている間、画
像はフレームの内部メモリーに記憶されません。
しかしフレームの内部メモリーに、これらの画像をコピーま
たは移動することができます。USBキーまたはメモリーカ
ード経由で、フレームの内部メモリーの画像を取り出すこ
ともできます。
USBキー内の写真をメモリーカードに移動したり、
その逆も可能です。
それには:
1. 中央のボタンを押した後に閲覧 > ドキュメント を選択
し、コピーまたは移動する画像を含むドキュメントを選択
してください。
2. コピーまたは移動したい画像を選択し、中央のボタンを
押してください。
• つの画像のみをコピーまたは移動したい場合:
a. コピー または 移動を選択してください。
b. コピーまたは移動したい画像の入ったドキュ
メントを選択してください。
c. 中央のボタンを押します。
• 複数の画像をコピーまたは移動したい場合
a. それぞれの画像について、オプションの 選

27
日本語
択 を選んでください。
> 選択アイコン
が画像の上に表示されま
す。
b. コピーまたは移動したい最後の画像で、オプ
ションの コピー または 移動を選択してくだ
さい。
c. コピーまたは移動したい画像の入ったドキュ
メントを選択してください。
d. 中央のボタンを押してください。
画像を削除する
1. 中央のボタンを押した後に閲覧 > ドキュメント を選択
し、削除したい画像を含むドキュメントを選択してくださ
い。
2. 削除したい画像を選択し、中央のボタンを押してくださ
い。
• 1つの画像のみを削除したい場合:
a. オプションの 削除を選択して
ください。
> 削除を確認するメッセージが表示されま
す。
b. はいを選択してください。
• 複数の画像を削除したい場合
a. それぞれの画像について、オプションの 選
択 を選んでください。
b. 削除したい最後の画像で、オプションの 削
除を選択してください。
> 削除を確認するメッセージが表示されま
す。
c. はいを選択してください。
画像の表示順序を決める
フレームに表示する画像は、ドキュメント、日付、お好みに
従って整理されます。フレームの画像にアクセスするには、
中央のボタンを押した後 閲覧を選択してください。
• オプションの ドキュメント から、転送方法によって整理さ
れた画像にアクセスすることができます。
• オプションの 日付から、日付ごとに整理された画像にアク
セスすることができます。
• オプションの お好みからは、画像の場所にかかわらず、そ
れらの表示順序を調整することができます。
これらの画像を整理することもできます。それには:
1. つまたは複数の画像を選択した後、整理する
を選択してください。
> カーソルが表示され、画像の新しい位置
を選択することができます。
2. その画像を移動したい場所にカーソルがきた
ら、中央のボタンを押してください。
> 画像の新しい位置が記録されます。
スライドショーを設定する
• 中央のボタンを押した後、スライドショーを選択してく
ださい。
• スライドショーについて以下の内容を設定できます:
- 閲覧モード:ドキュメント毎、日付毎、ランダム、 お好

28
みドキュメントなどに応じて写真を表示します。
- 表示時間:スライドショーで表示する画像の表示時間を
選択してください。
スライドショーを終了するには、オプションの[なし]
を選択してください。
- 画像の切り替え:画像間の切り替え方法を選択してく
ださい。
- ビデオ:選択したスライドショーにビデオが含まれる場
合の、フレームの対応を選択してください。

29
Technical specification
Input : 100-240 V~, 50-60 Hz, 0.2A
Output: 12Vdc, 1.2A
Power Supply
Screen resolution
Screen size LCD
Internal memory
Compatible memory cards
7’’
720 x 480 pixels
200 Mo
• SD, micro SD (with adapter), mini SD (with adapter)
• SDHC (class 2, 4, 6), mini SDHC (with adapter)
• MMC, MMC plus, MMC mobile (with adapter), MMC
micro (with adapter), RS- MMC (with adapter)
Supported profiles
FTP / OPP / BIP
• Bluetooth v2.1 + EDR
• Wi-Fi b/g
• USB port (mini B & A type)
• SD/MMC card
Connections
Bluetooth PIN code
0000

30
Warranty
Without prejudice of legal warranty,
Parrot products are warranted during
1 year from the date of purchase for
defects in materials and workmanship,
provided that no deterioration to the
product has been made, and upon
presentation of proof of purchase
(date of purchase, location of sale and
product serial number) to the retailer or
Parrot directly.
Warranty does not cover: data
recovery, deterioration of the external
aspect due to normal use of the product, any damage caused by accident,
misuse, misapplication, or non-Parrot
products. Parrot is not responsible
for storage, loss or damaged to data
during transit or repair.
Any product wrongfully declared to be
defective will be returned to sender
and inspection, process and carriage
costs will be invoiced to him.
Correct disposal of This Product
(Waste Electrical & Electronic Equipment)
(Applicable in the European Union
and other European countries with
separate collection systems).
This marking shown on the product or its literature, indicates
that it should not be disposed
with other household wastes at
the end of its working life. To prevent
possible harm to the environment or
human health from uncontrolled waste
disposal, please separate this from
other types of wastes and recycle it
responsibly to promote the sustainable
reuse of material resources.
Household users should contact either
the retailer where they purchased this
product, or their local government
office, for details of where and how
they can take this item for environmentally safe recycling. Business users
should contract their supplier and the
terms and conditions of the purchase
contract. This product should not be
mixed with other commercial wastes
for disposal.
Modifications
The explanations and specifications
in this guide are given for information
purposes only and may be modified
without prior notice. They are deemed
to be correct at time of going to press.
The utmost care has been taken when
writing this guide,as part of the aim to
provide you with accurate information.
However, Parrot shall not be held
responsible for any consequences
arising from any errors or omissions
in the guide, nor for any damage
or accidental loss of data resulting
directly or indirectly from the use of the
information herein. Parrot reserves the
right to amend or improve the product
design or user guide without any
restrictions and without any obligation
to notify users. As part of our ongoing
concern to upgrade and improve our
products, the product that you have
purchased may differ slightly from the
General Information

31
model described in this guide.
If so, a later version of this guide might
be available in electronic format at Parrot’s website at www.parrot.com.
FCC Compliance Statement
This device complies with part 15 of
a FCC rules Industry Canada. Operation is subject to the following two
conditions:
(1) This device may not cause
interference, and
(2) This device must accept any
interference, including interference
that may cause undesired operation
of this device.
This equipment has been tested and
found to comply with the limits for a
Class B digital device, pursuant to
part 15 of the FCC Rules. These limits
are designed to provide reasonable
protection against harmful interference
in a residential installation.
This equipment generates, uses
and can radiate radio frequency
energy and, if not installed and used
in accordance with the instructions,
may cause harmful interference to
radio communications. However, there
is no guarantee that interference will
not occur in a particular installation.
If this equipment does cause harmful
interference to radio or television
reception, which can be determined
by turning the equipment off and on,
the user is encouraged to try to correct
the interference by one or more of the
following measures:
- Reorient or relocate the receiving
antenna.
—Increase the separation between the
equipment and receiver.
—Connect the equipment into an
outlet on a circuit different from that to
which the receiver is connected.
—Consult the dealer or an experienced
radio/ TV technician for help.
“Changes or modifications not expressly approved by the party responsible
for compliance could void the user’s
authority to operate the equipment“
“This Class B digital apparatus complies with Canadian ICES-003”
Caution: Exposure to Radio
Frequency Radiation
To comply with RF exposure complian-
ce requirements, a separation distance
of at least 20 cm must be maintained
between the antenna of this device
and all persons.
This device must not be co-located or
operating in conjunction with any other
antenna or transmitter.
To prevent radio interference to the
licensed service, this device is intended to be operated indoors and away
from windows to provide maximum
shielding. Equipment (or its transmit
antenna) that is installed outdoors is
subject to licensing.
Declaration of Conformity
We, Parrot S.A. of 174 quai de
Jemmapes, 75010 Paris, France,
declare under our sole responsibility
that our product, the Parrot Specchio
by Martin Szekely to which this
declaration relates, is in conformity

32
with appropriate standards EN 300328,
EN 301489-17, EN60950 following
the provision of Radio Equipment
and Telecommunication Equipment
directive, with requirements covering
EMC directive 89/336/EEC and Low
Voltage directive 73/23/EEC.
Identification N. 394 149 496 R.C.S.
PARIS Parrot S.A.
Protection and personal safety
Carefully read the user guide and
follow the indicated procedure when
setting up the device. Do not dismantle
or open the device and do not touch
the electronic components or the
drivers. Do not attempt to dismantle or
modify either of the speakers.
Never introduce any metal object to
avoid the risks of electric shocks,
fire, short circuits or dangerous
emissions. If your device shows signs
of faulty operation, call the approved
Parrot technical support centre or
an approved retailer. Never leave the
frame exposed to rain or chemical
products; do not place them in a damp
area or where they are likely to be
splashed with water. Never place your
device on a recipient containing any
type of liquid, which might seep inside
the device. Doing so will reduce the
risks of electric shocks, short circuits,
fire and injury.
Caution: Exposure to Radio
Frequency Radiation
The installer of this radio equipment
must ensure that the antenna is
located or pointed such that it
does not emit RF field in excess of
Health Canada limits for the general
population; consult Safety Code 6,
obtainable from Health Canada’s
website at www.hc-sc.gc.ca/rpb.
Copyrights
Copyright © 2009 Parrot. All rights
reserved. The total or even partial
reproduction, transmission or storage
of this guide in any form or by any
process whatsoever (electronic,
mechanical, photocopy, recording or
otherwise) is strictly prohibited without
prior consent from Parrot.
Important safety instructions
1. This apparatus shall not be exposed
to dripping or splashing and no object
lled with liquid, such as vases, shall
be placed on the apparatus.
2. The AC/DC adaptor which provides
disconnection from mains supply
shall remain readily operable. Unplug
this apparatus when unused for long
periods of time.
3. Read these instructions.
4. Keep these instructions.
5. Heed all warnings.
The exclamation point within
an equilateral triangle is in-
tended to alert the user to the
presence of important operating and
maintenance (servicing) instructions
in the literature accompanying the
product.
An equilateral triangle, is
intended to alert the user to
the presence of uninsulated
«dangerous voltage» within the
product’s enclosure that may be of
sufficient magnitude to constitute a
risk of electric shock to persons.

33
6. Follow all instructions.
7. Do not use this apparatus near
water.
8. Clean only with dry cloth.
9. Do not block any ventilation ope
nings. Install in accordance with the
manufacturer’s instructions.
10. Do not install near any heat as
radiators. Heat registers, stoves
or other apparatus (including ampli
fiers) that produce heat.
11. Do not defeat the safety purpose
of the polarized or grounding type
plug. A polarized plug has two blades
with one wider than the other. A grounding type plug has two blades and a
third grounding prong. The wide blade
or the third prong are provided for your
safety. If the provided plug does not fit
into your outlet, consult an electrician
for replacement of the obsolete outlet.
12. Only use attachments/accessories
specified by the manufacturer.
13. Unplug this apparatus during lightning storms or when unused for long
periods of time.
14. WARNING: To reduce the risk of
fire or electric shock, do not expose
this apparatus to rain or moisture and
objects lled with liquids, such as
vases, should not be placed on this
apparatus.. This apparatus is designed
for indoor use only.
Do not expose the frame to outside
temperatures below 5°C or above
40°C. The system could be damaged
or the cabinet warped. Avoid placing
the system near a source of heat or
exposing it to sunlight (even through
a window).
Similarly, excessively low temperatures and humidity could damage the
device.
Licences
Parrot logo and trademarks are the
property of PARROT SA.
The Bluetooth ® word mark and logos
are owned by the Bluetooth SIG, Inc.
and any use of such marks by Parrot
S.A. is under license.
Bluetooth QDID: B014408, B013839,
B013838
Wi-Fi is a registered mark of the Wi-Fi
Alliance. Wi-Fi CERTIFIED is a mark of
the Wi-Fi Alliance. The Wi-Fi
CERTIFIED logo is a certification mark
of the Wi-Fi Alliance.
Mac is a trademark of Apple
Computer, Inc., registered in the U.S.
and other countries.
Additional typefaces for this product
can be obtained at www.linotype.com.
All trademarks and trade names are
those of their respective owners.

34

Co n t a i n s FCCi D: EW4D WMW014
C
o n t a i n s iC: 4 250a-DWM W014
FCC iD : RK XMsZ
iC: 5119a-MsZ
Hotline
Our hotline is at your disposal from Monday to Friday between 9 am and 6 pm (GMT + 1)
Hot-line@parrot.com
Italy : [+39] 02 59 90 15 97
Spain : [+34] 902 404 202
UK : [+44] (0)870 112 5872
Germany : 0900 1727768
USA : [+1] (877) 9 Parrot (toll free)
Hong Kong : [+852] 2736 1169
France : 01 48 03 60 69
Europe : [+33] 1 48 03 60 69 (Spoken languages : French, English, Spanish and German)

www.parro t.com
* TERMS & CONDITIONS: WWW.PARROT. COM
(GAGNEZ DES MUSIQUES AU FORMAT MP3
ET DES PRODUITS SANS FIL PARROT)
W
W
W
.
P
A
R
R
O
T
.
C
O
M
WIN
MP3
MUSIC FILES
AND PARROT
WIRELESS
PRODUCTS
*
 Loading...