

Page 1
User guide
English
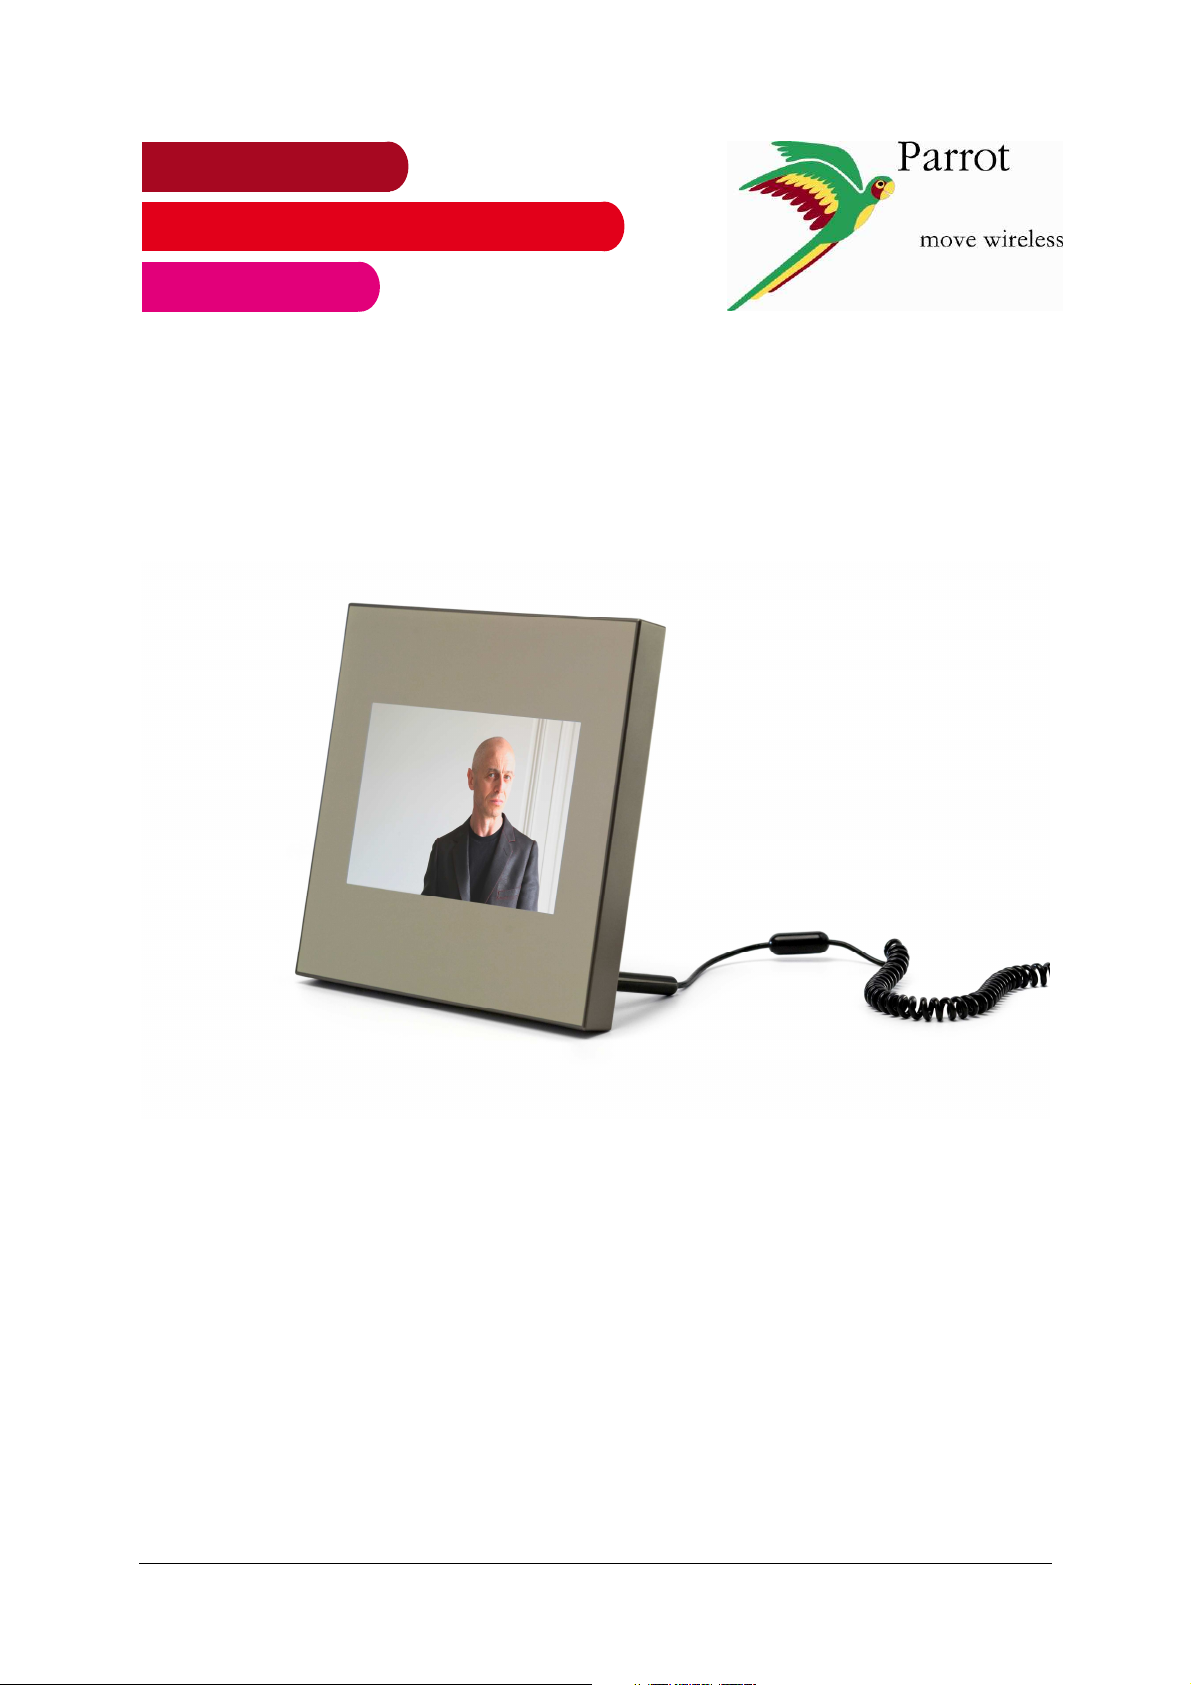
Parrot
Specchio
by Szekely
Parrot Specchio by Szekely – User guide 1
Page 2

Content
Using the Parrot frame by Szekely for the 1st time .......................................................... 4
Installing the frame ............................................................................................................ 4
Putting the Specchio in standby mode.............................................................................. 4
Navigating through the menus........................................................................................... 5
Using the virtual keypad .................................................................................................... 5
Connecting the Specchio to a Wi-Fi network.................................................................... 7
Before you begin ............................................................................................................... 7
Establishing an automatic connection ............................................................................... 7
Etablishing the connection................................................................................................ 7
Activating / desactivating the connection .......................................................................... 9
Accessing the web interface.............................................................................................. 9
Using the Wi-Fi function ....................................................................................................10
Receiving pictures by email..............................................................................................10
Display photo albums on line............................................................................................11
Display pictures stored on a computer.............................................................................12
Transfer photos to the frame via Wi-Fi..............................................................................12
Using the Bluetooth function.............................................................................................13
Using the Specchio via USB ..............................................................................................15
Using the frame with a computer......................................................................................15
Using the frame with a USB flash drive / digital camera ...................................................15
Using the frame with a memory card................................................................................16
Using the video mode ........................................................................................................17
Sending a video to the frame............................................................................................17
Watching a video..............................................................................................................17
Managing the pictures .......................................................................................................18
Copying or moving pictures..............................................................................................18
Deleting pictures...............................................................................................................18
Arranging pictures ............................................................................................................19
Preparing a slideshow ......................................................................................................19
Modifying parameters........................................................................................................20
Changing the frame language...........................................................................................20
Changing the frame name ................................................................................................20
Parrot Specchio by Szekely – User guide 2
Page 3

Setting up time and date ..................................................................................................20
Setting an alarm................................................................................................................20
Adjusting brightness.........................................................................................................21
Controlling the standby mode...........................................................................................21
Parrot Specchio by Szekely – User guide 3
Page 4
Using the Parrot frame by Szekely for the 1st time
The procedures described in this document are to be
followed with the frame in landscape mode.
Installing the
frame
Putting the
Specchio in
standby mode
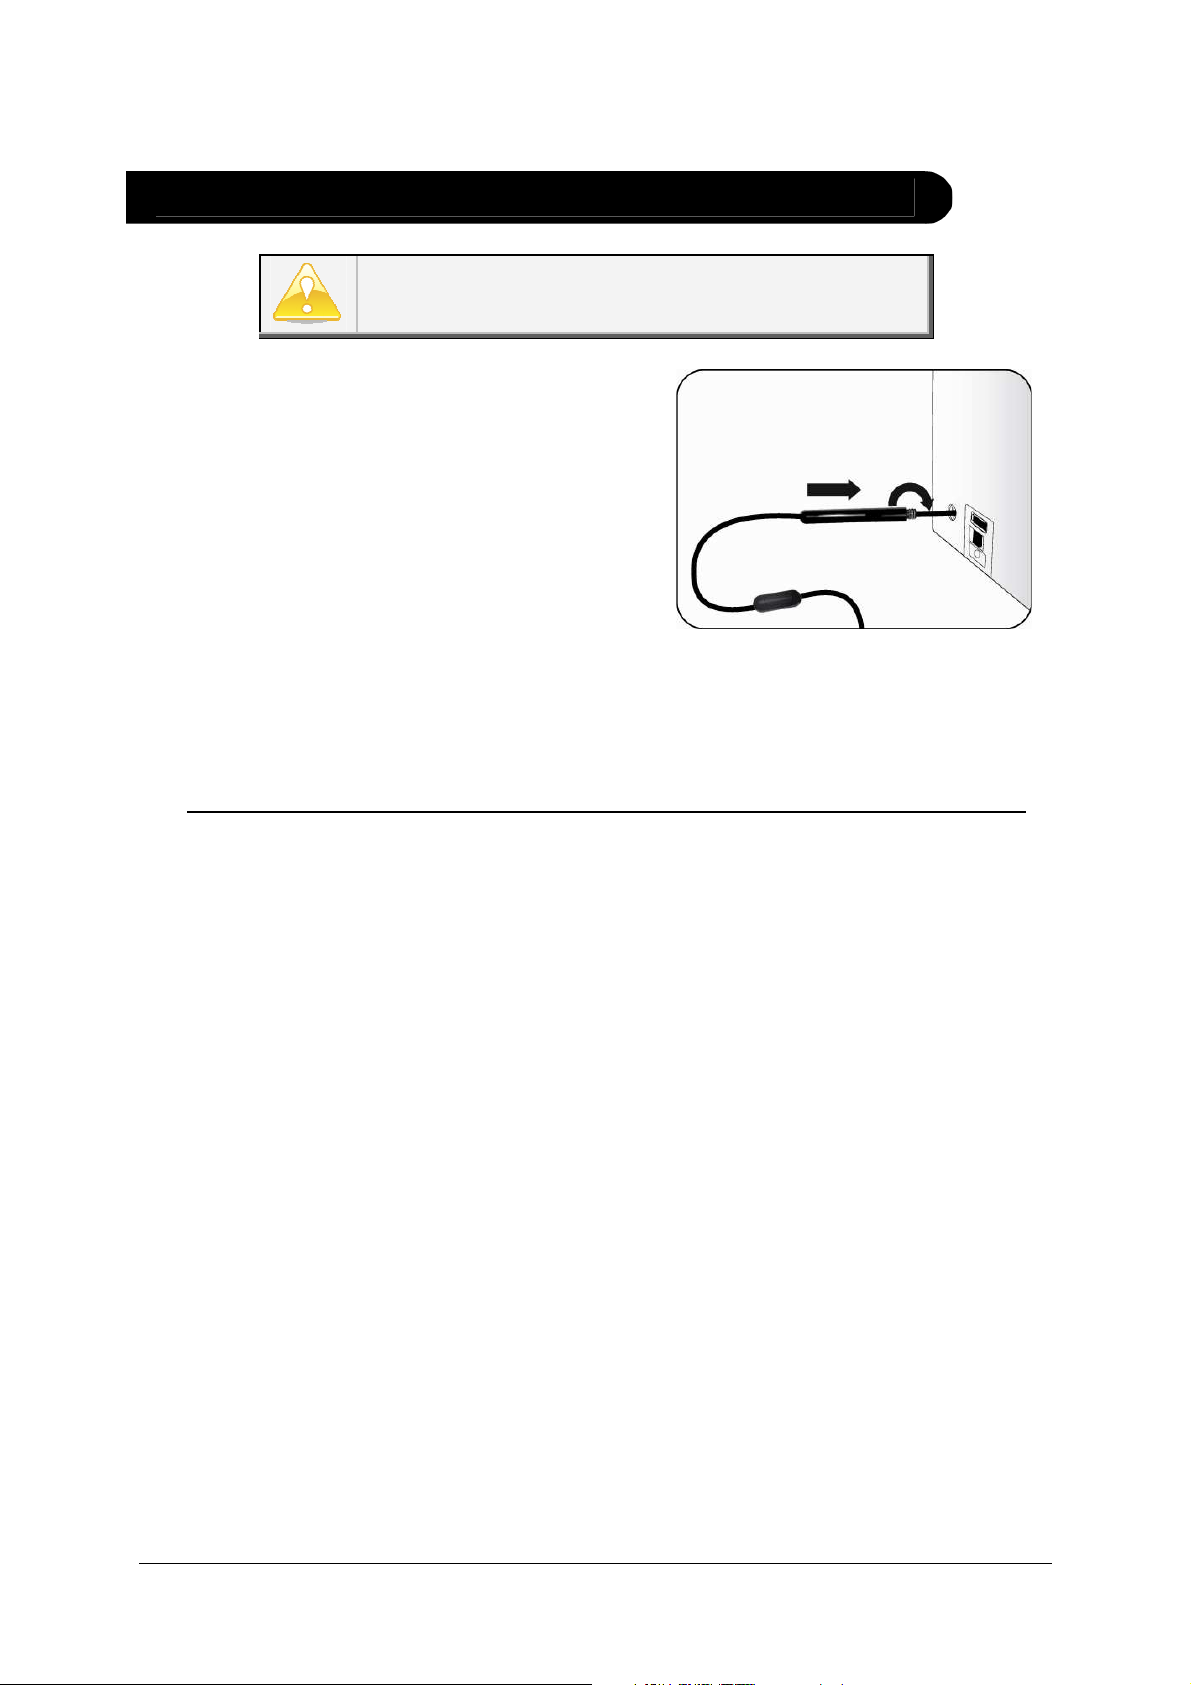
1. Screw the metal rod into
the back of the frame.
> If you rotate the frame,
the picture displayed turns
to match the new position
of the frame.
2. Connect the power cable connector to the transformer and plug it
into an electrical socket.
> The frame automatically switches on.
3. Select your country.
Use the switch located on the power cable to put the frame in
standby mode.
Use the same switch to get out of standby mode.
Parrot Specchio by Szekely – User guide 4
Page 5
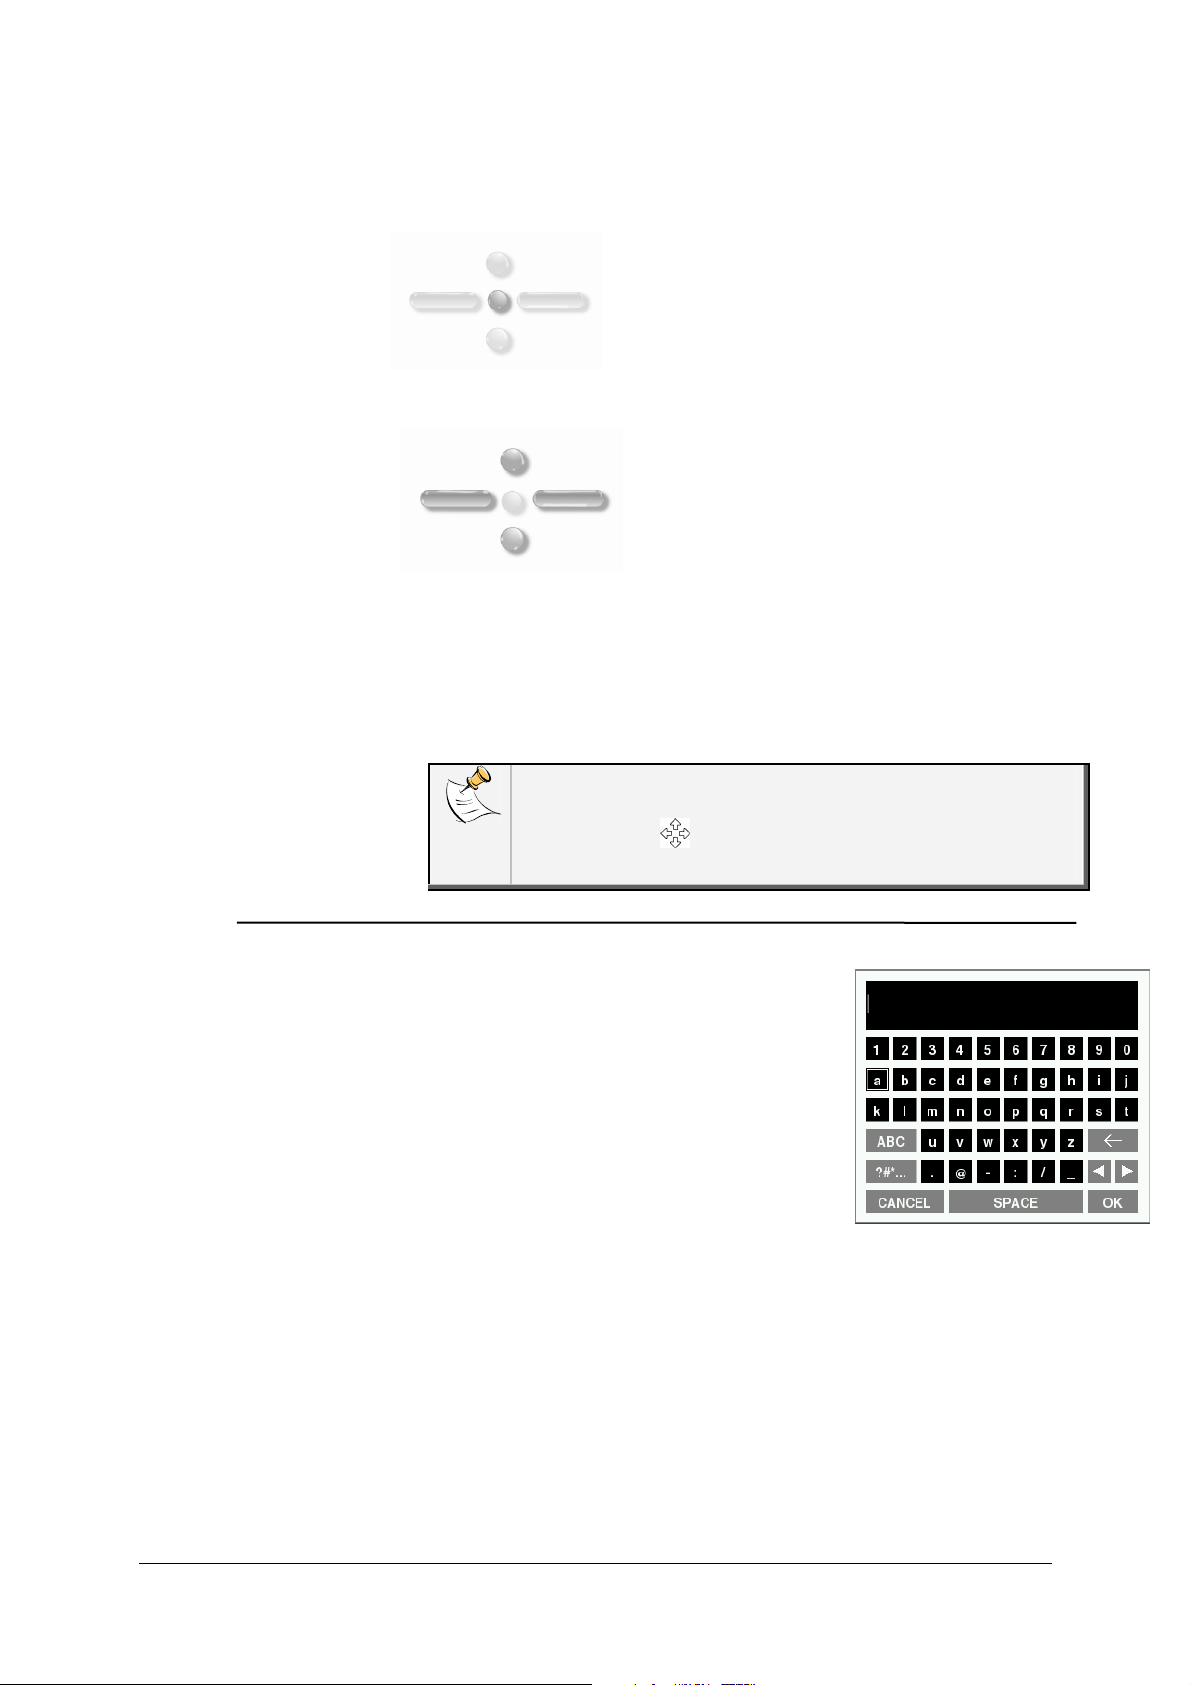
Navigating through
the menus
You can scroll through the menus using the buttons on the back of the
frame.
This button allows you to access
the main menu and to confirm a
selection. It also allows you to
enter the context menu on each
picture.
Depending on the frame’s
orientation, these buttons allow
you to select a picture or navigate
through the context menus. In
slideshow mode, you can also use
the navigation buttons to access
the context menu.
Depending on the frame’s orientation, the left or down buttons also allow
you to exit the menus.
You can also navigate through the menus of the
frame and browse through your pictures using your PC. To do
Using the
virtual keypad
so, select the icon on the web interface. Refer to the
Accessing the web interface section for more information.
The virtual keypad is displayed when you have
to enter the WEP or WPA code to establish a
connection with your Wi-Fi network.
The virtual keyboard is also displayed if you
want to modify the name of the frame or if you
want to associate it to a new E-mail address.
Parrot Specchio by Szekely – User guide 5
Page 6

Select a key using the navigation buttons then confirm by pressing the central
button.
Key Functions
ABC
?#*...
OK
CANCEL
Delete a character
Display capital letters
Display punctuation marks and special characters
Save the text
Go back to previous menu
Parrot Specchio by Szekely – User guide 6
Page 7
Connecting the Specchio to a Wi-Fi network
Before you
begin
Establishing an
automatic
connection
You first have to determine wether you can establish the connection
automatically or not. To do so, refer to the documentation of your
modem / router to see if it supports the SES or WPS technology.
WPS (WiFi Protected Setup) or SES (Secure Easy Setup)
technologies allow establish a secured connection between
several Wi-Fi devices simply by pressing a button.
► If your modem / router supports SES or WPS technology, refer to
the Establishing an automatic connection section.
► If your modem / router doe not support the SES or WPS
technology, refer to the Establishing the connection section.
If your modem / router supports the WPS or SES technology:
1. Go to the main menu and select Settings > Wi-Fi > Connection.
> The connection window appears.
Etablishing the
connection
2. Select Configure.
> A Wi-Fi network search is launched.
3. Select the Auto option.
4. Press the WPS button of your modem / router. Refer to the
documentation or your device for more information.
> You are now connected to your Wi-Fi network.
> Once the connection has been established, a window appears
containing all the information relating to the Wi-Fi connection.
You can also get the IP address of the Specchio by selecting
Settings > Informations.
Before you begin:
• Identify the name of your Wi-Fi network.
The name of this network is also referred to as SSID (Service
Set Identifier). It is generally located under your router. If you
have changed this name, use the new one.
Parrot Specchio by Szekely – User guide 7
Page 8

• If your network is secured, you need the WEP / WPA or WPA2
protection code to establish the connection.
The WEP, WPA or WPA2 protection code is often written
under modems / routers or in the documentation provided
with your system. If you have changed this protection code,
use the new one.
• Depending on the model of your modem or router, you might
have to press the synchronisation button. Refer to your
device’s documentation for more information.
1. Go to the main menu and select Settings > Wi-Fi > Connection.
> The connection window appears.
2. Select Configure.
> A Wi-Fi network search is launched.
3. Select your network from the provided list.
Select Others to configure your network manually (advanced
users only).
4. If your network is a secured one, enter the WEP or WPA protection
code then select OK.
Respect the case of characters while inserting your
network key.
If your protection code is a WEP code, do not enter any
space.
If your protection code is a WPA or WPA2 code, enter the
code exactly as it is written (with spaces if necessary).
> Once the connection has been established, a window
appears containing all the information relating to the Wi-Fi
connection.
You can also get the IP address of the Specchio by selecting
Settings > Informations.
Parrot Specchio by Szekely – User guide 8
Page 9

Activating /
desactivating
the connection
Accessing the
web interface
Once the connection has been established, you have the possibility to
activate / deactivate the connection. You can do that by selecting
Settings > Wi-Fi > Connection > Activate / Deactivate.
In order to access the web interface, make sure that your PC
is connected to the same Wi-Fi network as the frame.
Launch your web browser and enter Parrot_Specchio in the address
bar with or without http://.
If you have changed the name of the frame, enter the new name.
► Refer to the Modifying the frame name for more information.
Parrot Specchio by Szekely – User guide 9
Page 10

Using the Wi-Fi function
The web interface of the Specchio allows you to use the Wi-Fi function in
a quicker way if you want to associate several mail addresses or RSS
feeds.
Receiving
pictures by
email
We advise you to create a specific email address
for your frame.
1. On the web interface, click on .
2. In the Email account space, click on New to associate an
email address with frame.
3. Enter your connection identifiers in the corresponding fields.
Refer to your email service documentation for information on
the server and the protocol.
> All the pictures that you receive on this email account from
now on can be accessed via the frame, by selecting Route >
Directory > Email.
You can also associate an email address directly
from the frame. To do so, select Settings > Wi-Fi >
Email > Add an Email account.
Once the mail has been received, it takes approximately 5
minutes to receive the picture on the frame.
Parrot Specchio by Szekely – User guide 10
Page 11

Display photo
albums on line
An RSS (Really Simple Syndication) feed is a flow of
free content coming from internet sites. Thanks to RSS
feeds and photo management and sharing tools on line
such as FlickrTM or PicasaTM, photo albums published on
the website can be displayed on your frame. Once the
RSS feed is associated to your frame, the photos are
automatically updated.
► For more information, go to:
- http://www.flickr.com
- http://picasa.google.com
1. Create an account on a photo server and mark the identifier
associated with the album that you wish to display on the
frame or note down the URL for the RSS flow associated with
this album.
2. On the web interface, click on .
3. In the Registered feeds space, click on New to associate an
RSS flow with the frame.
4. Select your photo server, enter the identifier associated
with the selected album then the password if necessary or
enter the URL address of the RSS feed.
Respect the case of characters while inserting your identifiers
and password if necessary.
If you are using the Picasa photo management tool and if your
feed is protected by a password, make sure that the date of
the Specchio is correctly set.
► Refer to the Setting up time and date for more
information.
5. Click on Save.
> The images contained in the associated album can then be
accessed on the frame by selecting Route > Directory > RSS
Flow.
You can also associate RSS feeds directly from the
frame by selecting Adjustments > Wi-Fi > RSS >
Add new flow.
If you are using the Picasa application, make sure your
account is public. If not, you will have to change a parameter
using the web interface of the Specchio.
Deleting pictures in the RSS flow directory is impossible
Parrot Specchio by Szekely – User guide 11
Page 12

Display pictures
stored on a
computer
Transfer photos
to the frame via
Wi-Fi
1. On your computer, activate sharing on the pictures directories
you wish to display on the frame.
2. On the web interface, click on .
3. Click on Add a share and select your computer and the shared
file.
> The pictures contained in the shared directory are accessible
from then on the frame.
You can also associate a computer directly from
the frame. To do so, select Settings > Wi-Fi > PC
connection > Add a share.
1. If you are using:
- a PC with the Windows XP Operating system, click on Start
> Network Favourites > Entire network > Microsoft
Windows Network
- a PC with the Windows Vista Operating system, click on
Start > Network
- a Mac, select Go > Network.
2. Double-click on the Frame directory.
> You will access the content of the frame.
3. Transfer the pictures into the Internal Memory file.
You can also transfer your images on a peripheral
connected to frame.
Parrot Specchio by Szekely – User guide 12
Page 13

Using the Bluetooth function
Pairing the
frame with your
phone
Sending
pictures from a
Phone or PDA
via Bluetooth
> The picture is then sent to the frame.
Depending on the model of your phone / computer,
this phase might be optional. However, it will enable
you to send your photos to the frame more quickly.
1. Ensure that Bluetooth is activated on the frame. To do so,
press the central button and select Settings > Bluetooth >
Enabled.
2. Activate Bluetooth on your phone / computer then search
for Bluetooth devices. Refer to the user guide of your
device for more information.
3. Select Parrot_Specchio in the list of Bluetooth devices
proposed by your phone / computer.
4. On your phone / computer, enter the code 0000.
> Your two devices are now paired.
1. Ensure that Bluetooth is activated on the frame. To do so,
press the central button and select Settings > Bluetooth >
Enabled.
2. Activate Bluetooth on your phone / PDA.
3. On your phone/PDA, go to the Pictures menu. Select a picture
and choose «Send via Bluetooth». Your device starts
searching for Bluetooth peripherals.
4. Once the search has finished, select Parrot_Specchio.
5. If your device prompts you to enter a code, type 0000.
Several pictures can be sent at a time, though this feature will
depend on your device.
Parrot Specchio by Szekely – User guide 13
Page 14

Using the frame
with an NFC
phone
Thanks to the NFC technology, the Nokia 6212 Classic llows you to
send a picture to the frame with a simple gesture.
1. Turn on your Specchio and make sure Bluetooth is activated. To do
so, press the central button and select Settings > Bluetooth >
Enabled.
2. Select an image in the picture library of your mobile phone.
Refer to the phone documentation for more information.
3. Touch the front of the frame with your mobile as indicated on
the diagram.
> « Print ? » is displayed on the mobile phone screen.
4. Select Yes to send the picture.
You can also send several pictures to the frame. To do so:
1. Mark the pictures in the phone picture library by selecting
Option > Mark.
2. Touch the front of the frame with the mobile.
3. Select All to send the selected pictures.
Sending
pictures from a
PC via
Bluetooth
(Windows, Linux)
1. Ensure that Bluetooth is activated on the frame. To do so,
press the central button and select Settings > Bluetooth >
Enabled.
2. Activate the Bluetooth feature on your computer.
3. Right-click on the picture that you wish to send and choose
«Send via Bluetooth».
> Your PC will search for any nearby Bluetooth peripherals.
4. Select Parrot_Specchio.
5. Type 0000 if your PC prompts you to enter a code.
It is also possible to send pictures from a Mac.
Parrot Specchio by Szekely – User guide 14
Page 15

Using the Specchio via USB
Using the frame
with a computer
Using the frame
with a USB flash
drive / digital
camera
To send pictures from a computer via USB:
1. Connect the frame to your PC with the USB cable.
> The computer detects a new device.
2. Copy your JPEG pictures to the frame as if you were using a USB
flash drive.
3. Disconnect the cable from the frame.
To disconnect the frame from your computer, double click on
the «Safely remove hardware» icon located at the bottom right
of your task bar.
• Once connected to your computer, your frame works as a USB
flash drive. It means that you can copy, move, rename and delete
the pictures stored in the frame.
1. Insert your USB flash
drive in the USB port
located at the back of
the frame or connect
your digital camera
using the USB cable
located at the back of
the frame or use a USB / mini-USB cable to connect your
digital camera if it is recognized as a mass storage device
(refer to the documentation of your device for more
information on that point).
> The JPEG pictures stored on the USB flash drive or on
the digital camera are displayed.
2. Press the central button and select Browse > Directory
> USB.
> You can now navigate through the content of your USB
flash drive or digital camera using the navigation buttons
and select a picture using the central button.
> You can then display, rotate, select, copy or move
the picture.
Parrot Specchio by Szekely – User guide 15
Page 16

Using the frame with a memory card
1. Insert your memory card in the
appropriate slot.
> Pictures in JPEG format stored on the
memory card are displayed.
2. Press the central button and select Browse > Directory > SD Card.
> You can now browse through the content of your memory card using the navigation
buttons and select a picture using the central button.
> You can then display, rotate, select, copy or move the picture.
Parrot Specchio by Szekely – User guide 16
Page 17

Using the video mode
Sending a video
to the frame
Watching a video
You can transfer videos in 3GP formats to the frame as if you were
sending a picture.
► Refer to the sections concerning the image transfer for more
information.
• While navigating through the content of a directory, you can play
a video by pressing the central button and selecting the Play
option.
• In slideshow mode, you can activate the automatic reading. To
do so, select Slideshow > Video > Play.
Videos are displayed without sound.
Parrot Specchio by Szekely – User guide 17
Page 18

Managing the pictures
Copying or moving
pictures
• Pictures you can see in the USB, SD Card and RSS feed
directories are not memorized in the internal memory of the
frame.
• The frame allows you to copy or move these pictures into its
internal memory. You can also copy / move your pictures from
or to an USB flash drive or a memory card.
You can also transfer pictures from a USB flash drive to a
memory card and vice versa.
To do so:
1. Press the central button and select Browse > Directory
then select the directory containing the pictures to copy /
move.
2. Select the picture you want to copy / move and press
the central button.
• If you only want to copy / move one picture:
a. Select the Copy or Move option.
b. Select the directory in which you want to copy /
move the picture.
c. Press the central button.
• If you want to copy / move several pictures:
a. Choose the Select option on each picture.
> A icon is displayed on the picture.
b. On the last picture you want to copy / move,
select the Copy or Move option.
c. Select the directory in which you want to copy /
move the pictures.
d. Press the central button.
Deleting pictures
Parrot Specchio by Szekely – User guide 18
1. Press the central button and select Browse > Directory
then select the directory containing the pictures to delete.
2. Select the picture you want to delete then press the
central button.
• If you only want to delete one picture:
a. Select the Delete option.
> A confirmation message is displayed.
b. Select
Yes.
Page 19

Select one or several pictures then select the
• If you want to delete several pictures:
a. Choose the Select option on each picture.
b. On the last picture you want to delete, select
the Delete option.
> A confirmation message is displayed.
c. Select Yes.
Arranging pictures
Pictures are sorted by directory, by date or depending on your
preferences. To access pictures, press the central button and
select Browse.
• The Directory option allows you to access the pictures
sorted by type of transfer.
• The Date option allows you to access the pictures sorted
by date.
• The Customized option allows you to arrange pictures from
every directory.
1.
Classify.
> A cursor appears to indicate the picture position.
2. Use the cursor and press the central button to select the
new pictures location.
Preparing a
slideshow
• Press the central button and select Slideshow.
• The following options are available to create your
slideshow :
- Browsing mode: visualize your pictures sorted by
directory, by date or depending on your preferences.
- Timer: defines the slideshow display time.
Select None is you want to deactivate the slideshow.
- Transition: defines the transition effect between the
photos in your slideshow.
- Video: activates / deactivates the automatic reading of
videos during slideshows
Parrot Specchio by Szekely – User guide 19
Page 20

Modifying parameters
Changing the
frame language
To change the language of the Specchio:
1. Select Settings > System > Language.
2. Choose your language using the navigation buttons.
3. Press the left button to confirm your choice and exit the
menu.
Changing the
frame name
Setting up time
and date
The name of the frame allows you to identify the Specchio during a
Wi-Fi peripherals or a Bluetooth peripherals search. By default, the
name of the frame is Parrot_Specchio. To change this name:
1. Select Settings > System > Frame name>
Modify.
> The virtual keyboard is displayed.
2. Change the name of the frame.
3. Select OK.
> The name of the frame is automatically saved.
• Time and date can be automatically adjusted if the frame is
connected to your Wi-Fi network. To activate this option, select
Settings > System > Date/time then Adjustement > Automatic.
• If you prefer to modify time and date manually:
1. Select Settings > System > Date/time
puis Adjustement > Manual.
2. Adjust the time using the navigation buttons.
3. Press the right navigation button to confirm.
• To enable / disable the permanent date or time display, select
Display > Yes or No. This option also allow you to display time as
as screensaver while the frame is in standby mode.
• To modify the format of the displayed time, select Format >
24-hour or AM/PM.
Setting an alarm
1. Select Settings > System > Alarm.
2. Select Status > Activated.
3. Adjust the time then press the right button to confirm.
Parrot Specchio by Szekely – User guide 20
Page 21

4. Choose the ring and the repeat mode.
5. Press the left button to exit menu.
> Your alarm is activated.
> To deactivate it, select Settings > System > Alarm
puis Status > Disabled.
Adjusting
brightness
Controlling the
standby mode
1. Select Settings > System > Luminosity.
2. Adjust the brightness using the navigation buttons.
3. Press the validation button to confirm.
• If you want the frame to put itself in standby mode when the light
of your room fades down thanks to the light sensor. To do so,
select Settings > System > Standby mode then Automatic.
• You can also define a time range to put the frame in standby
mode:
1. Select Settings > System > Standby mode puis
Predefined time.
2. Adjust the time range using the navigation buttons.
3. Press the validation button to confirm.
• To exit standby mode, select Settings > System > Standby
mode then Deactivated.
• To activate standby mode, press the switch or select Settings >
System > Standby mode > Switch to standby mode.
Parrot Specchio by Szekely – User guide 21
 Loading...