

Page 1
PARROT
MKi9000
Quick start guide
Guide d’utilisation rapide
Guía de instalación rápida
Page 2

Kit content / Contenu de l’emballage / Contenido del paquete
Page 3

www.parrot.com
Parrot MKi9000
Installation diagrams........................
English.............................................
Français...........................................
Español............................................
General Information.........................
p.4
p.6
p.12
p.20
p.27
Page 4
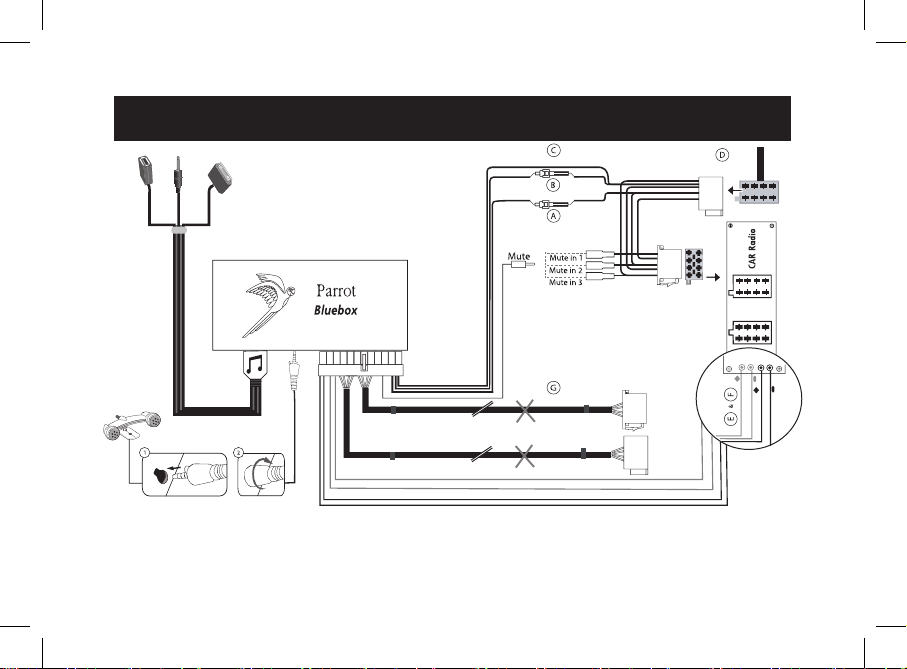
Parrot MKi9000 installation diagram - Car radio with “line in” input
www.parrot.com
• A : 12V ignition (orange)
• B : 12V constant power supply (red)
• C : Ground
• D : Connection to the vehicle’s power supply
• E : Line-out 1
1 : Line 1 + : white
2 : Line 1 - : brown
• F : Line-out 2
1 : Line 2 + : red
2 : Line 2 -: black
• G : This wiring is not used.
4
Page 5
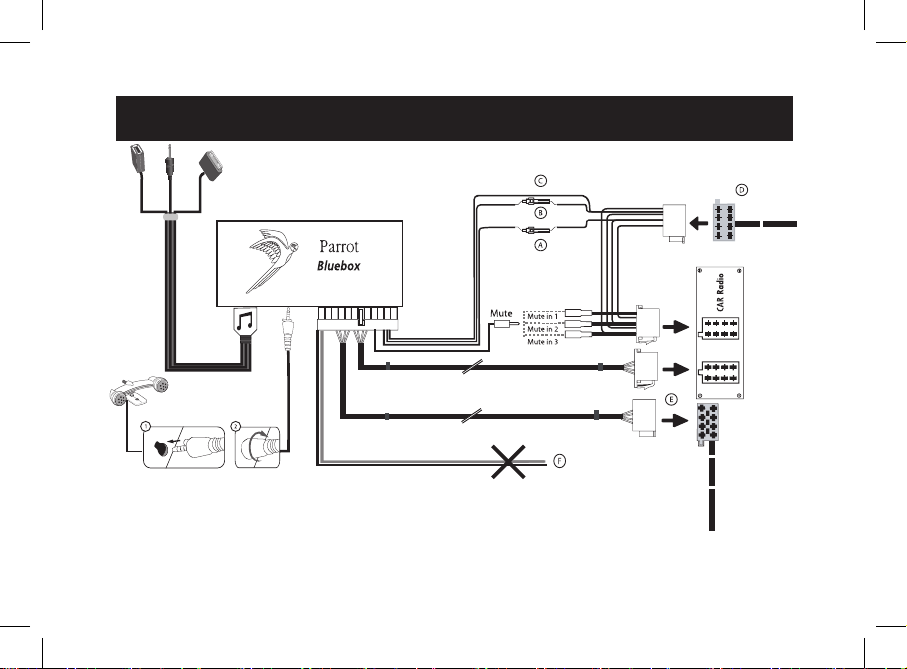
Parrot MKi9000 installation diagram - Car radio with ISO connectors
www.parrot.com
• A: 12V ignition (orange)
• B: 12V constant power supply (red)
• C: Ground
• D: Connection to the vehicle’s power supply
• E : Connection to the vehicle’s speakers
1. Rear right speaker (purple / purple-black)
2. Front right speaker (grey / grey-black)
3. Front left speaker (white / white-black)
4. Rear left speaker (green / green-black)
• F : This wiring is not used.
5
Page 6
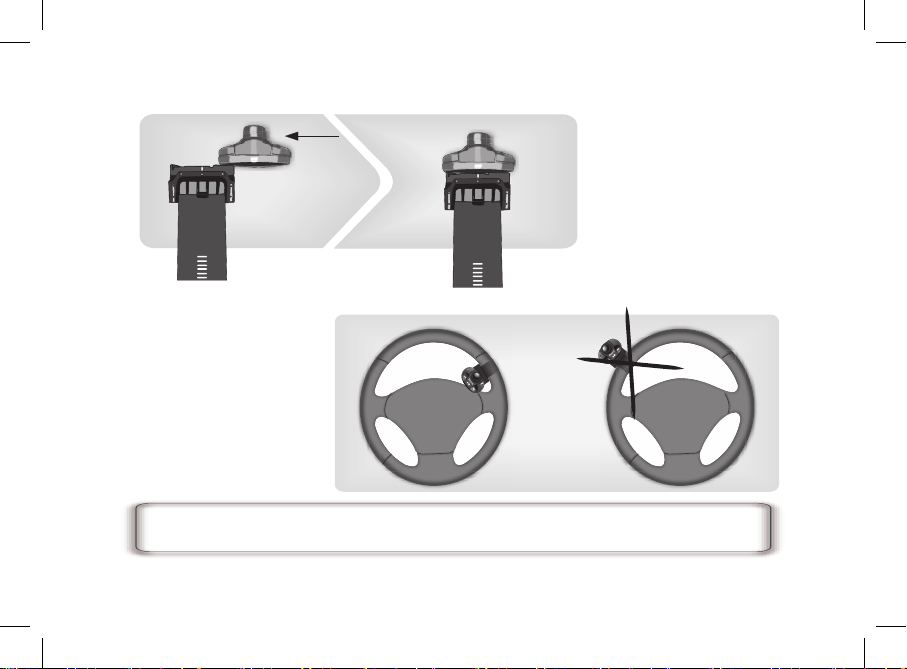
Installing the remote control on the steering wheel / Installation de la télécommande
sur le volant / Instalación del mando en el volante
6
Page 7
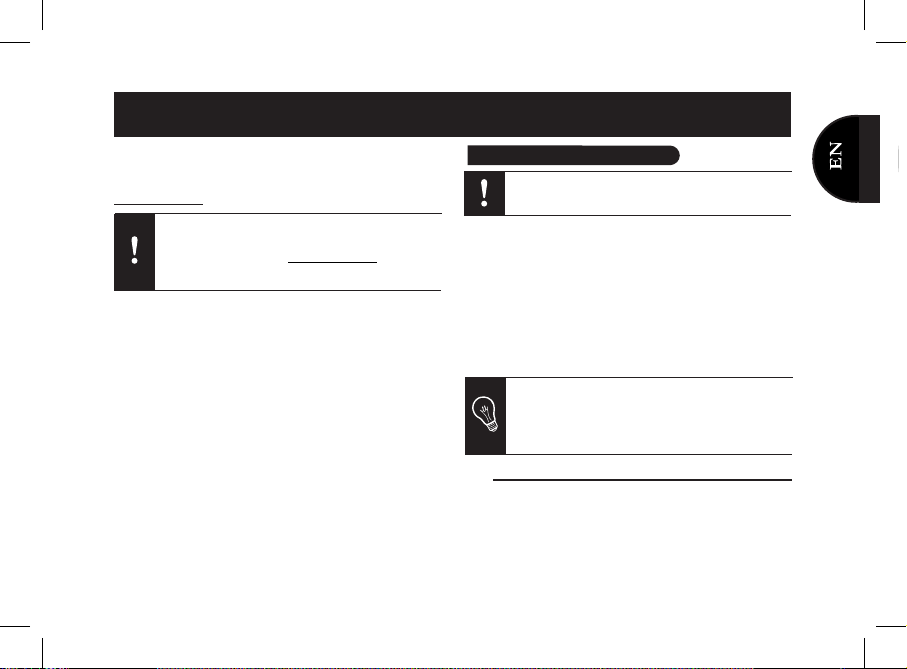
Installing the remote control on the dashboard / Installation de la télécommande sur
le tableau de bord / Instalación del mando en el salpicadero
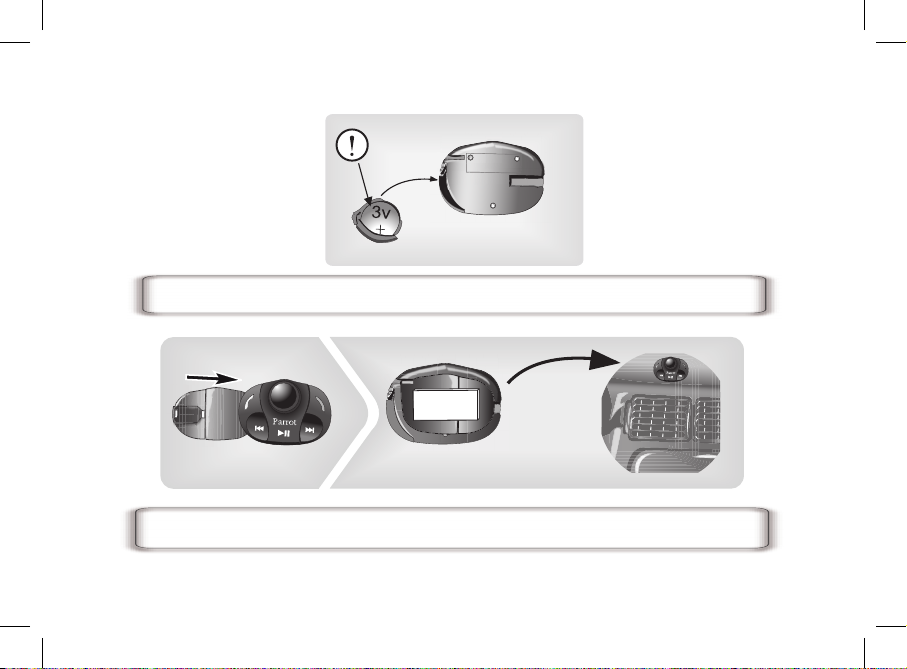
Inserting the remote control battery / Insertion de la pile de la télécommande /
inserción de las pilas del mando
7
Page 8

8
Page 9
This simplified guide of the Parrot MKi9000 gives you the
main instructions to easily use this product. For further
information, refer to the user guide available on our website
www.parrot.com.
• Prior to xing the hands-free kit’s different components
inside the car, connect the installation cables, control
keypad and double microphone to the electronic
control unit.
• The cables supplied with the kit feature ISO connectors
and two pairs of line-out jacks. The line-out jacks can be
used if your audio system features this option (use of an
amplier). Several set-ups are therefore possible
depending on the type of car stereo and your vehicle.
The mute function is used to cut the sound of
your car stereo to enable a phone call. The choice
of the mute-in jack depends on your car stereo’s
configuration.
Car stereo with an ISO connector
1. Connect the male connectors of the hands-free kit to the
car stereo.
English
English
The availability of some functionality only depends
on your mobile phone.
► Refer to our website www.parrot.com, in the
Compatibility section, for further information.
Installing the Parrot MKi9000
Installing the Parrot MKi9000............................................
Car stereo with an ISO connector................................
Car stereo with line-in jacks.........................................
Car stereo without ISO connectors..............................
Installing the kit’s power cable.....................................
Installing the audio connectors....................................
Installing the electronic box.........................................
Installing the remote control........................................
Installing the microphone.............................................
Usingt the Parrot MKi9000 for the 1st time........................
Navigating through the menus.....................................
Connecting a phone via Bluetooth ®...........................
Using the telephony function..............................................
Synchronising the phonebook.....................................
Recording voice tags...................................................
Receiving a calll...........................................................
Making a call................................................................
Making a call via voice recognition..............................
Using the voice commands..........................................
Using the Music function.....................................................
We would advise our customers to have the Parrot
MKi9000 fitted by a professional.
9
09
09
10
10
10
10
11
11
11
11
11
11
12
12
12
12
13
13
14
14
Page 10
10
With this type of set-up, the original connectors of
your vehicle’s audio system need not be removed.
On some vehicles, there is no ignition +12V on the
vehicle’s connectors. You must therefore connect
the orange power supply wire to the fuse box or
another ignition power source.
2. Join the vehicle’s audio and power supply cables to the
female connectors of the Parrot MKi9000.
3. On the installation cable, connect the free yellow wire to
one of the audio system’s corresponding mute-in jacks if
available (mute in 1, mute in 2 or mute in 3).
Car stereo with line-in jacks
• Use this type of connection by wiring a line-out jack
(brown & white wire or red & black wire) to your car
stereo’s line-in jack.
• Using the two pairs of line-out jacks will enable you to
take advantage of the streaming audio function in stereo
over your vehicle’s speakers.
• On the installation cable, connect the free yellow wire to
one of the audio system’s corresponding mute-in jacks if
available (mute in 1, mute in 2 or mute in 3).
Car stereo without ISO connectors
To simplify the wiring procedure, you will need to purchase an
ISO adapter cable. Refer to the range of ISO adapters on our
website: www.parrot.com.
Installing the kit’s power cable
• Refer to your car stereo’s wiring diagram.
• The red wire of the kit’s cable must correspond to the
constant +12V supply, the orange wire to the ignition +12V
and the black wire to ground.
• Check that the orange wire is not connected to the constant
+12V supply, as you could run down the vehicle’s battery,
preventing your hands-free kit from operating correctly.
• On some vehicles, the red and orange power supply
wires may need to be reversed. This can easily be done
by reversing the two fuse holders on the Parrot MKi9000
installation cable.
Installing the audio connectors
• Connect the music cable to the electronic box and
place the USB / iPod ® / Jack connectors into the glove
box, the central console or the parcel tray depending on the
configuration of your dashboard.
• To protect the connectors from dust, use the provided
protection cap.
Page 11
Installing the electronic box
Avoid installing the electronic box:
- near heating or air-conditioning system;
- on a spot directly exposed to sunlight;
- behind metal walls.
Installing the remote control
• Choose the place for the remote control inside your
vehicle. We would advise you to fit it in the centre of the
dashboard.
• If you want to place the remote control on the steering
wheel, make sure it is securely attached, so it does
not move when you are driving. Do not install the
remote control on the outside of the steering wheel, so
that it does not get in the way when driving. Refer to the
diagrams p.6.
• If you want to place the remote control on the dashboard,
stick the double-sided tape located on the at side of the
bracket to x it against the dashboard. You can then insert
the remote onto the bracket. Refer to the diagrams p.7.
Installing the microphone
The microphone must be aimed at the driver and can be
installed between the sun-visor and the internal rear-view
mirror.
Navigating through the menus
• Press the central jog dial to access the menus.
> The kit displays the name of the current menu.
• Browse through the menus by turning the wheel and
confirm with the green button or by pressing the scroll
wheel.
• To exit the menu, press the red button or wait a
few seconds.
Pairing a phone to the PARROT MKi9000
Prior to using your Parrot MKi9000 with your phone for the
very first time, you must initially pair both devices.
1. From your phone, search for Bluetooth peripherals
(refer to your phone’s user guide for more information).
2. Select «MKi9000» in the list.
3. Enter «0000» on your phone when prompted.
4. Press the green button to accept the pairing
> The Parrot MKi9000 says «Pairing successful» when
both devices are connected.
Using the Parrot MKi9000 for the 1st time
Depending on the model of your phone, step 3 and
step 4 may be inverted.
11
Page 12
Before using your Parrot MKi9000 telephony function, you
first have to connect both devices.
► Refer to the “Connecting a phone via Bluetooth” section
for more information.
Synchronising the phonebook
With some Bluetooth phones, the phonebook is automati-
cally synchronized in the kit’s memory. If your phone doesn’t
support automatic synchronization, you can also use the
Object Push function of your phone to send contacts from
your mobile to the car kit via Bluetooth. To do so:
1. From the main menu, select Phone > Receive contacts.
> The kit says « Waiting for contact ».
2. Refer to your phones’ user guide for more information
about sending contacts via Object Push.
Recording voice tags
You can make a call using voice recognition directly after
automatic synchronization or Object Push process. The
Parrot MKi9000 will automatically recognize the contact you
wish to call.
However, if the Parrot MKi9000 doesn’t understand the
name of one of your contacts or if a voice tag is too long,
you can record a new one. To do so, press the jog dial and
select Add voice tags.
Receiving a call
An incoming call is indicated by a ringtone.
Using the telephony function
12
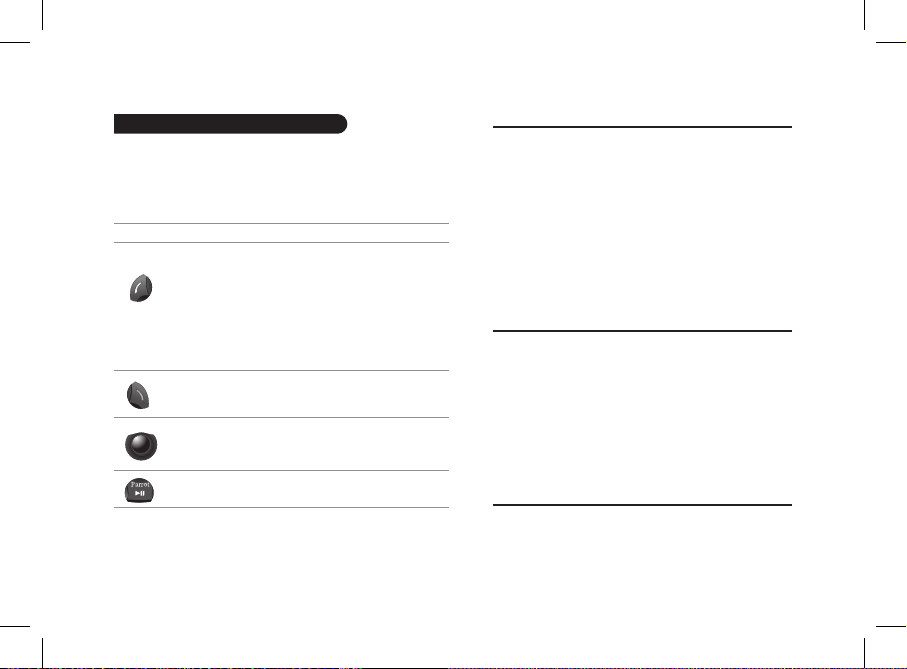
Button
Functions
Short press :
- Answer an incoming call
- Launch voice recognition mode
- Transfer the call appel sur le téléphone (mode
discret)
- Exit discreet mode
- Answer a second incoming call /
toggle between two calls
Long press : Call the last dialled number
- Reject an incoming call (or a second
incoming call)
- Hang up
Adjust the communication volume
Short press : Use the DTMF function
(to manage interactive vocal servers)
Mute / unmute the micro (secret mode)
Page 13
• If you want to answer the call, press the green button.
Then press the red button to end the call.
• If you want to refuse this call, press the red button.
• If the magic words are activated, you can use the voice
recognition feature to pick up and hang up.
► Refer to the «Using the vocal commands» section for
more information.
Making a call
• If the contact you want to call is in the phonebook of the
phone connected to the Parrot MKi9000:
1. Press the jog dial to enter the main menu and
select Phonebook.
> You access the phonebook of the connected phone.
2. Select a letter and push the jog dial;
> Once the contact chosen:
- Press the green key to call this contact;
- or use the jog dial to choose between different
numbers of the same contact.
• If the contact you want to call is not in the phonebook
of the phone connected to the Parrot MKi9000, use your
phone to make the call.
Making a call via voice recognition
1. Press the green button to launch the voice
recognition feature.
> A beep is emitted.
2. Say the « Call » keyword and the name of the contact
you want to call.
> The call is automatically launched if the voice tag is
correctly understood. If it is not the case, a confirmation
message is asked by the kit.
3. Confirm by saying « Yes » or « Call ».
> The call is initiated.
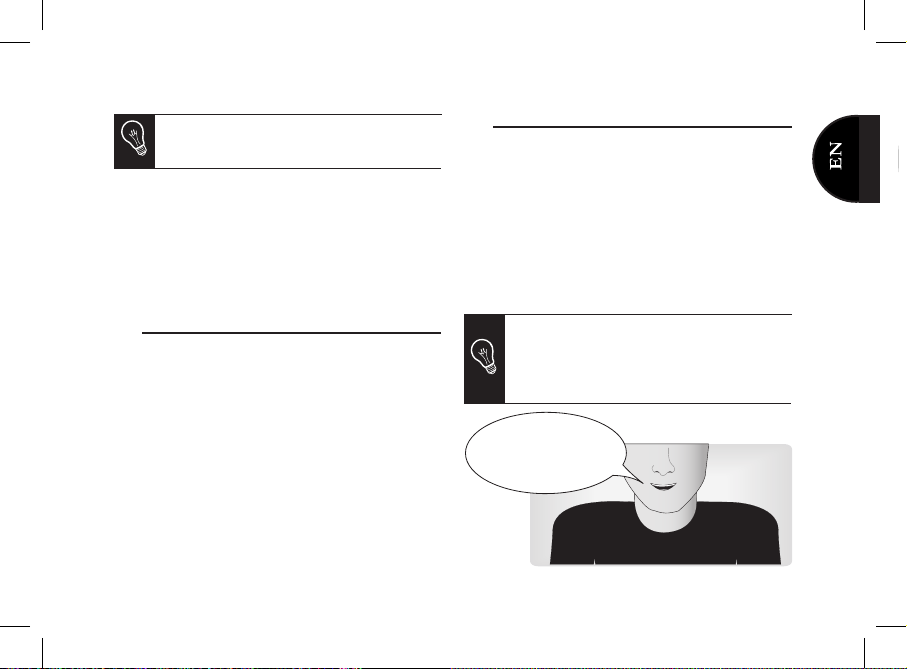
Bob!
Call Bob!
Call Bob at home!
Call Bob office!
Bob mobile!
13
The name of the caller is announced if his number
is known by the kit.
You can make a call via voice recognition using several combinations of keywords. For example, « call
‘Paul’» or simply « ‘Paul’ ». You can also associate
the type of number you want to call: «call ‘Paul’ at
home», «’Paul’ home », etc.
Page 14

Using the voice commands
To use the following voice commands, you must activate
the magic words. To do so, press the jog dial and select the
Activate magic words option.
• Use the USB, Jack or iPod connectors to connect the
Parrot MKi9000 to your audio player / iPod / mass storage
device.
• Press the Play button to launch the music function.
• To change the music source, press the jog dial to access
the source menu and select it in the following order :
- Phonebook (if available)
- iPod ;
- USB peripheral ;
- Audio player connected via Bluetooth ;
- Audio player connected via Line In
Using the Music function
The Next/Previous tracks functions are not available if the Parrot MKi9000 is connected to the audio
player via the jack/jack cable.
Press the Play button during 2 seconds to activate
/ deactivate the Virtual Bass effect..
14
Voice commands
Accept
Call, followed by the name
of the contact
- Reject
- Yes
- Call
Pick up an
incoming call
Actions
Call a contact
Reject an incoming call
Confirm a call
Interrupt the process
- Cancel
- No
Button
Functions
Short press:
- Start music mode
- Pause / resume playback
Long press: Change the music files source
- Short press: Go back to the beginning
of the track / get to the previous track
- Long press : Fast rewind
- Short press: Go to the next track
- Long press: Fast forward
Adjust the volume
Page 15

L’utilisation de certaines fonctionnalités dépend
uniquement de votre téléphone.
► Consultez notre site web www.parrot.com,
section Compatibilité pour plus d’informations.
Installer le Parrot MKi9000................................................
Autoradio avec connecteur ISO..................................
Autoradio avec entrées Line in....................................
Autoradio sans connecteurs ISO.................................
Installation du câble d’alimentation du kit...................
Installation des connecteurs audio..............................
Installation du boitier électronique...............................
Installation de la télécommande..................................
Installation du double microphone...............................
Utiliser le Parrot MKi9000 pour la 1ère fois......................
Naviguer dans les menus.............................................
Connecter un téléphone par Bluetooth ®....................
Utiliser la fonction téléphonie.............................................
Synchroniser le répertoire du téléphone......................
Recevoir un appel.........................................................
Emettre un appel..........................................................
Enregistrer des empreintes vocales.............................
Emettre un appel par reconnaissance vocale..............
Utiliser la fonction Musique................................................
15
15
16
16
16
17
17
17
17
17
17
17
18
18
19
19
20
20
21
15
Ce guide simplifié du Parrot MKi9000 vous donne les
instructions principales qui vous permettront d’utiliser
facilement cet appareil. Pour plus d’informations, consultez
le guide utilisateur disponible sur notre site web www.parrot.
com.
• Avant de xer les différents éléments du kit mains-libres
dans l’habitacle, commencez par connecter les différents
câbles sur le boîtier électronique. Retirez auparavant les
connecteurs d’origine du système audio de votre véhicule.
• Les câbles fournis sont équipés de connecteurs ISO ainsi
que de deux sorties Line. Les sorties Line peuvent être
utilisées si votre système audio possède cette option.
Plusieurs montages sont donc possibles selon le type de
votre autoradio et de votre véhicule.
Autoradio avec connecteur ISO
1. Branchez les connecteurs mâles du kit mains-libres
à l’autoradio.
Français
Installer le Parrot MKi9000
La fonction Mute permet d’interrompre le son de
votre autoradio pour laisser place à la communi-
cation. Le choix de l’entrée Mute dépend de la
configuration de votre autoradio.
Nous vous recommandons de faire appel à un professionnel pour l’installation du Parrot MKi9000.
Page 16

Avec ce type de montage, ne retirez pas les
connecteurs d’origine du système audio de votre
véhicule.
Sur certains véhicules, il n’y a pas de +12V après
contact sur les connecteurs du véhicule. Il est alors
nécessaire de brancher le fil d’alimentation orange
sur la boite à fusible ou sur une autre source
d’alimentation après contact.
16
2. Reliez les faisceaux audio et alimentation du véhicule aux
connecteurs femelles du Parrot MKi9000.
3. Sur le câble d’installation, reliez le l jaune libre à l’une des
entrées mute correspondante du système audio s’il en est
équipé (mute in1, mute in2 ou mute in3).
Autoradio avec entrées Line in
• Utilisez ce type de connexion en reliant une sortie « Line »
(fils marron et blanc ou fils rouge et noir) sur l’entrée
« Line » de votre système audio.
• L’utilisation des deux paires de sorties « Line » permet de
bénéficier de la fonction Streaming Audio en stéréo sur les
haut-parleurs de votre véhicule.
• Sur le câble d’installation, reliez le l jaune libre à l’une des
entrées mute correspondante du système audio s’il en est
équipé (mute in1, mute in2 ou mute in3).
Autoradio sans connecteurs « ISO »
Afin de faciliter le montage, vous devez vous procurer un
câble adaptateur ISO. Consultez la gamme d’adaptateur ISO
sur notre site internet : www.parrot.com.
Installation du câble d’alimentation du kit
• Consultez le schéma électrique de votre autoradio.
• Le l rouge du câble du kit doit correspondre au +12V
permanent, le l orange au 12V après-contact et le l noir
à la masse.
• Vériez que votre l orange n’est pas connecté au 12V
permanent, vous risqueriez de décharger la batterie du
véhicule et cela entraînerait un dysfonctionnement de votre
mains-libres.
• Sur certains véhicules, il est nécessaire d’inverser les ls
rouge et orange d’alimentation. Cette opération s’effectue
simplement en inversant les deux portes fusibles situés sur
le câble d’installation du Parrot MKi9000.
Page 17

Installation des connecteurs audio
• Reliez les connecteurs audio au boitier électronique et
installez les connecteurs audio (USB / iPod ®/ Jack) dans
la boîte à gants, la console centrale ou le vide poche en
fonction de la configuration de votre tableau de bord.
• Utilisez le bouchon de protection fourni.
Installation du boitier électronique
Evitez d’installer le boîtier :
- près du chauffage ou de la climatisation
- à un endroit exposé au soleil
- derrière des parois métalliques.
Installation de la télécommande
• Choisissez l’emplacement de la télécommande dans
l’habitacle de votre véhicule. Nous vous conseillons de le
positionner au centre de votre tableau de bord ou proche
de vous. Consultez les schémas p.6.
• Si vous la placez sur le volant, veillez à ce qu’elle soit
fermement attachée afin qu’elle ne bouge pas durant votre
conduite. Ne l’installez pas du côté extérieur du volant an
de ne pas vous gêner lors de la conduite. Consultez les
schémas p.7
• Si vous utilisez le second support, utilisez l’adhésif double
face situé au dos de celui-ci an de le coller sur le tableau
de bord. Vous pouvez ensuite insérer la télécommande sur
ce support.
Installation du double microphone
Le double microphone doit être dirigé vers le conducteur
et installé de préférence entre le pare-soleil et le rétroviseur
central.
Naviguer dans les menus
• Appuyez sur la molette centrale pour accéder aux menus.
> Le kit énonce le nom du menu atteint.
• Naviguez dans les menus en tournant la molette, et validez
avec le bouton vert ou en appuyant sur la molette.
• Pour sortir du menu, appuyez sur le bouton rouge ou
attendez quelques secondes.
Jumeler un téléphone par Bluetooth ®
Avant d’utiliser le Parrot MKi9000 avec votre téléphone, vous
devez connecter les deux appareils. Si c’est la 1ère fois que
vous utilisez ce téléphone avec le Parrot MKi9000, vous devez tout d’abord effectuer un jumelage des deux appareils :
Utiliser le Parrot MKi9000 pour la 1ère fois
17
Page 18

lorsque les deux appareils se seront détectés mutuellement,
il ne sera plus nécessaire de procéder à cette opération.
Si vous utilisez cet appareil avec le Parrot MKi9000 pour la
première fois :
1. Depuis votre téléphone, lancez une recherche de péri-
phériques Bluetooth. Consultez la notice de votre télé-
phone pour plus d’informations.
> La liste des périphériques Bluetooth s’affiche.
2. Une fois la recherche terminée, sélectionnez
« Parrot MKi9000 ».
3. Entrez « 0000 » lorsque le code PIN vous est demandé.
> Un prompt vocal vous demande de confirmer le
jumelage.
4. Appuyez sur la touche verte pour accepter le jumelage.
> Le Parrot MKi9000 annonce « Jumelage réussi ».
Avant d’utiliser la fonction téléphonie de votre Parrot
MKi9000, vous devez tout d’abord connecter votre téléphone/PDA à ce dernier.
► Consultez la section « Connecter un téléphone par
Bluetooth » pour plus d’informations.
Synchroniser le répertoire du téléphone
Avec certains téléphones Bluetooth, le répertoire du téléphone est automatiquement synchronisé dans la mémoire
du kit. Si votre téléphone ne supporte pas la synchronisation
automatique, vous pouvez aussi utiliser la fonctionnalité
Object Push de votre téléphone an d’envoyer des contacts
de votre téléphone vers le Parrot MKi9000 par Bluetooth.
Utiliser la fonction téléphonie
Selon le modèle de votre téléphone, les étapes 3 et
4 peuvent être inversées.
18
Bouton Fonctions
Appui court:
- Répondre à un appel entrant
- Lancer le mode de reconnaissance vocale
- Transférer l'appel sur le téléphone (mode
discret)
- Sortir du mode discret
- Répondre à un second appel entrant /
basculer entre plusieurs appels
Appui long : Initier un appel vers le dernier
numéro appelé
- Refuser un appel entrant (ou un second
appel entrant)
- Raccrocher
Régler le volume de la communication
Appui court : Activer la fonction DTMF
(afin de gérer les serveurs vocaux interactifs)
Désactiver / réactiver le micro (mode secret)
Page 19

Pour cela :
1. Appuyez sur la molette et sélectionnez
l’option Recevoir contacts.
2. Consultez la notice de votre téléphone pour connaître la
procédure d’envoi de contacts par Object Push.
Enregistrer des empreintes vocales
Vous pouvez initier un appel par reconnaissance vocale
directement après la synchronisation du répertoire de votre
téléphone avec la mémoire du Parrot MKi9000 ou l’envoi de
vos contacts par Object Push. Le Parrot MKi9000 reconnai-
tra automatiquement le contact de votre répertoire que vous
souhaitez appeler.
Toutefois, si le Parrot MKi9000 interprète mal le nom d’un de
vos contacts ou si vous souhaitez enregistrer une empreinte
vocale plus courte, il vous est possible d’enregistrer une
nouvelle empreinte. Pour cela, appuyez sur la molette et
sélectionnez l’option Ajouter une empreinte vocale.
Recevoir un appel
Un appel entrant est indiqué par une sonnerie.
• Si vous souhaitez accepter cet appel, appuyez sur la
touche verte. Appuyez ensuite sur la touche rouge pour
terminer l’appel.
• Si vous souhaitez refuser cet appel, appuyez sur la
touche rouge.
• Si vous avez activé les mots magiques, vous pouvez
utiliser les commandes vocales pour décrocher ou
raccrocher.
► Consultez la section «Utiliser les commandes vocales»
pour plus d’informations.
Emettre un appel
• Si le contact que vous souhaitez appeler se trouve dans le
répertoire du téléphone connecté au Parrot MKi9000:
1. Appuyez sur la molette et sélectionnez
l’option Répertoire.
2. Sélectionnez une lettre et appuyez sur la molette.
> Une fois le contact choisi :
- Appuyez sur le bouton vert pour lancer l’appel vers le
numéro par défaut.
- Utilisez éventuellement la molette pour choisir parmi
les différents numéros du contact.
• Si le contact que vous souhaitez appeler ne se trouve
pas dans le répertoire du téléphone connecté au Parrot
MKi9000, lancez l’appel à partir de votre téléphone.
19
Le nom du contact est annoncé si le numéro de
ce contact fait partie du répertoire du téléphone
connecté au Parrot MKi9000.
Page 20

Cette fonction n’est disponible que si vos contacts
ont été préalablement synchronisés dans le kit
mains libres.
Paul!
Appelle Paul!
Appeler Paul!
Appelle maison Paul!
Appeler maison Paul!
20
Vous avez la possibilité d’émettre un appel par
plusieurs combinaisons de mots clés. Par exemple,
« appelle ‘Paul’ », « appeler ‘Paul’ », ou simplement
« Paul ». Vous pouvez également y associer le
type de numéros de ce contact : « appelle ‘Paul’
‘maison’ », « appeler ‘Paul’ ‘à la maison’ » ou «
‘Paul’ ‘maison’ ».
Emettre un appel par reconnaissance vocale
1. Appuyez sur le bouton vert pour initier le processus de
reconnaissance vocale.
> Un signal sonore retentit pour vous informer du début
du processus de reconnaissance vocale.
2. Prononcez le mot-clé « Appeler » suivi du nom du
contact que vous souhaitez appeler.
> L’appel vers ce contact est automatiquement initié si
la commande vocale a été bien comprise. Dans le cas
contraire, le kit mains libres diffuse un message de
confirmation.
3. Confirmez en prononçant « Oui », « Appelle »
ou « Appeler ».
> L’appel vers ce contact est alors lancé.
Utiliser les commandes vocales
Pour utiliser les commandes vocales suivantes, vous devez
activer les mots magiques. Pour cela :
1. Appuyez sur la molette pour accéder au menu principal.
2. Sélectionnez l’opion Activer les mots magiques.
Page 21

• Utilisez les connecteurs USB, Jack ou iPod pour relier le
Parrot MKi9000 à votre lecteur audio / balladeur MP3 /
périphérique de stockage de masse.
• Appuyez sur le bouton Play pour lancer la fonction
Musique.
• Pour changer la source de musique, appuyez sur la
molette pour accéder au menu et sélectionnez la source
selon l’ordre suivant :
- répertoire du téléphone connecté (si disponible),
- iPod,
- périphérique USB,
- périphérique connecté par Bluetooth,
- appareil équipé d’une sortie Jack.
Utiliser la fonction Musique
Les fonctions Next/Previous ne sont pas disponibles si le Parrot MKi9000 est relié au lecteur audio
avec le câble jack/jack.
Commandes vocales
Décrocher un
appel entrant
Actions
- Accepter
- Décrocher
Initier un appel
Appeler, suivi du
nom du contact
Refuser un
appel entrant
- Rejeter
- Refuser
Confirmer un appel
Annuler l’appel
- Oui
- Appel
- Appeler
Annuler
Bouton
Fonctions
Appui court:
- Lancer le mode musique
- Suspendre / reprendre la lecture
Appui long: Changer la source des fichiers
musicaux
- Appui court : Revenir au début du
morceau / revenir au morceau précédent
- Appui long : Effectuer un retour rapide
- Appui court : Passer au morceau suivant
- Appui long : Effectuer une avance rapide
Modifier le volume
21
Appuyez sur le bouton Play 2 secondes pour
activer/désactiver l’effet Virtual Bass.
Page 22

Page 23

23
El uso de algunas funcionalidades depende únicamente de su teléfono.
► Consulte nuestro sitio web www.parrot.
com, rúbrica Compatibilidad, para obtener más
información.
Instalar el Parrot MKi9000................................................
Autorradio con conector ISO.....................................
Autorradio con entradas Line in.................................
Autorradio sin conectores ISO...................................
Instalación del cable de alimentación del kit.............
Instalación de los conectores de audio......................
Instalación de la caja electrónica................................
Instalación del mando a distancia...............................
Instalación del doble micrófono..................................
Utilizar el Parrot MKi9000 por primera vez......................
Navegar por los menús...............................................
Conectar un teléfono mediante Bluetooth®...............
Utilizar la función Telefonía................................................
Sincronización de la agenda del teléfono...................
Grabar etiquetas de voz..............................................
Recibir una llamada.....................................................
Realizar una llamada...................................................
Realizar una llamada por reconocimiento de voz.......
Utilizar la función Música...................................................
23
23
24
24
24
25
25
25
25
25
25
25
26
26
27
27
27
28
29
Esta guía simplificada del Parrot MKi9000 desarrolla las principales informaciones que le permiten utilizar fácilmente este
aparato. Para obtener más información, consulte el manual
de usuario disponible en nuestro sitio web www.parrot.com.
• Antes de jar los distintos elementos del kit manos libres
en el interior del vehículo, conecte los cables de instala ción a la caja electrónica. Elimine las conexiones de
origen del sistema audio de su vehículo.
• Los cables que se proporcionan con el kit van equipados
con conectores ISO y dos pares de salidas Line. Las
salidas Line pueden utilizarse si su sistema de audio está
equipado con esta opción (utilización de un amplificador).
Entonces, existen varios tipos de montaje, según su tipo
de autorradio y su vehículo.
Autorradio con conector ISO
1. Enchufe los conectores macho del kit manos libres
al autorradio.
Español
La función Mute permite interrumpir el sonido de
su autorradio para pasar al sonido de la comunicación. La elección de la entrada del Mute depende
de la configuración de su autorradio.
Instalar el PARROT MKi9000
Para esta instalación, recomendamos
a nuestros clientes que recurran a un profesional
del automóvil.
Page 24

24
Con este tipo de montaje, es necesario que no
elimine las conexiones de origen del sistema de
audio de su vehículo.
En algunos vehículos, no existe un +12V bajo
llave en los conectores del vehículo. En ese caso,
es necesario conectar el cable de alimentación
naranja en la caja de fusibles o en otra fuente de
alimentación bajo llave.
2. Conecte el cableado del audio y el eléctrico del vehículo a
los conectores hembra del Parrot MKi9000.
3. En el cable de instalación, conecte el cable amarillo libre a
una de las entradas Mute que se corresponda al sistema
de audio, si lo lleva (Mute in1, Mute in2 o Mute in3).
Autorradio con entradas Line in
• Utilice este tipo de conexión conectando una salida «Line»
(cables marrón y blanco o cables rojo y negro) a la entrada
«Line» de su sistema de audio.
• La utilización de dos pares de salidas «Line» permite apro-
vechar la función de Streaming Audio en estéreo a través
de los altavoces de su vehículo.
• Una, en el cable de instalación, el cable amarillo libre a una
de las entradas Mute y que se corresponden al sistema de
audio, si lo lleva (Mute in1, Mute in2 o Mute in3).
Autorradio sin conectores ISO
Para facilitar el montaje, debe conseguir un cable adaptador
ISO. Consulte la gama de adaptadores ISO en nuestro sitio
Internet: www.parrot.com.
Instalación del cable de alimentación del kit
• Consulte el esquema eléctrico de su autorradio.
• El cable rojo del cable del kit debe corresponderse con
el de +12V permanente, el cable naranja con el +12V bajo
llave y el cable negro a la masa.
• Compruebe que su cable naranja no está conectado al de
+12V permanente, ya que podría descargar la batería del
vehículo lo que provocaría un malfuncionamiento de su kit
manos libres.
• En algunos vehículos, es necesario invertir los cables rojo
y naranja de alimentación. Esta operación se efectúa
simplemente invirtiendo los dos porta-fusibles situados en
el cable de instalación del Parrot MKi9000.
Page 25

Instalación de los conectores de audio
• Conecte los conectores de audio a la caja electrónica e
instale los conectores (USB / iPod ® / Jack) en la guantera
o en la caja central en función de la conguración de su
salpicadero.
• Utilice el tapón protector provisto.
Instalación de la caja electrónica
Procure instalar la caja:
- al lado del aire acondicionado o del calentamiento
- en un punto expuesto al sol
- tras paredes metálicas
Instalación del mando a distancia
• Coloque el mando a distancia en el interior del vehículo.
Le recomendamos colocarlo al centro del salpicadero y
relativamente cercano.
• Si lo coloca en el volante, asegúrese de que sea bien
sujeto para que no pueda moverse durante el trayecto. No
instálelo en el lado exterior del volante para no molestarle
durante la conducción.
• Si utiliza el segundo soporte, pegue las bandas adhesivas
de doble cara en el soporte y péguelo en el salpicadero.
Después, se puede encajar el mando en este soporte.
Instalación del doble micrófono
El doble micrófono debe ser orientado hacia el conductor
y puede instalarse entre la visera y el retrovisor interno del
vehículo.
Navegar por los menús
• Pulse la rueda central para acceder a los menús.
> El kit enuncia el nombre del menú seleccionado.
• Navegue por los menús girando la rueda y valide pulsando
el botón verde o pulsando la rueda.
• Para salir del menú, pulse el botón rojo o espere algunos
segundos.
Conectar un teléfono mediante Bluetooth®
Antes de utilizar el Parrot MKi9000 con su teléfono, debe
conectar ambos dispositivos. Si es la primera vez que utiliza
este teléfono con el Parrot MKi9000, antes debe emparejar
ambos aparatos: una vez emparejados, no será necesario
realizar este proceso de nuevo.
Utilizar el PARROT MKi9000 por 1ª vez
25
Page 26

Si utiliza este dispositivo con el Parrot MKi9000 por primera
vez :
1. Desde su teléfono, inicie una búsqueda de periféricos
Bluetooth. Consulte el manual de usuario de su teléfono
para más información.
> Aparece la lista de los periféricos Bluetooth.
2. Una vez finalizada la búsqueda, seleccione
«Parrot MKi9000».
3. Introduzca «0000» cuando se requiere un código PIN.
> Un mensaje vocal le pide conrmar el emparejamiento.
4. Pulse el botón verde para aceptar el emparejamiento.
> El Parrot MKi9000 enuncia «emparejamiento realizado».
Antes de utilizar la función Telefonía de su Parrot MKi9000,
debe conectar su teléfono / PDA con el dispositivo.
► Consulte la sección «Conectar un teléfono mediante
Bluetooth» para más información.
Sincronización de la agenda del teléfono
Con algunos teléfonos Bluetooth, la agenda se sincroniza
automáticamente en la memoria del kit. Si su teléfono no
soporte la sincronización automática, también se puede
utilizar la función Object Push de su teléfono para enviar
contactos desde su teléfono hacia el Parrot MKi9000
mediante Bluetooth.
Utilizar la función Telefonía
Pulsación corta:
- Descolgar una llamada
- Iniciar el modo de reconocimiento de voz
- Transferir una llamada en su teléfono
(modo discreto)
- Salir del modo discreto
- Contestar a una segunda llamada /
navegar por varias llamadas
Pulsación larga: Llamar el último número marcado
- Rechazar una llamada (o una segunda llamada)
- Colgar
Ajustar el volumen de la comunicación
Pulsación corta: Activar la función DTMF
(para controlar los servidores vocales activos)
Activar / desactivar el micrófono (modo secreto)
Bóton
Funciones
26
Page 27

Para hacer esto:
1. Pulse la rueda y seleccione la opción «Recibir
contactos».
2. Consulte el manual de usuario de su teléfono para cono-
cer el proceso de envío de contactos mediante
Object Push.
Grabar etiquetas de voz
Todos sus contactos, tras la sincronización o el envío por
Object Push, están automáticamente dotados de una
etiqueta de voz en el Parrot MKi9000. Entonces, no necesita
registrar su propia etiqueta en cada contacto para realizar
una llamada mediante reconocimiento de voz.
Sin embargo, si el Parrot MKi9000 no reconoce el nombre de
uno de sus contactos, se puede grabar nueva etiqueta. Para
hacer esto, pulse la rueda y seleccione la opción «Añadir
una etiqueta de voz».
Recibir una llamada
Una llamada entrante se señala por un timbre.
• Si desea aceptar la llamada, pulse el botón verde. Pulse
después el botón rojo para acabar la llamada.
• Si desea rechazar la llamada, pulse el botón rojo.
• Si desea activar las palabras mágicas, se puede utilizar los
mandos vocales para descolgar o colgar.
► Consulte la sección «Utilizar los mandos vocales» para
más información.
Realizar una llamada
• Si el contacto que desea llamar está en la agenda del
teléfono conectado al Parrot MKi9000:
1. Pulse la rueda y seleccione la opción Agenda.
2. Seleccione una letra y pulse la rueda.
> Una vez seleccionado el contacto:
- Pulse el botón verde para realizar la llamada hacia el
número por defecto.
- Utilice la rueda para navegar por los distintos núme-
ros del mismo contacto.
• Si el contacto que desea llamar no está en la agenda del
teléfono conectado al Parrot MKi9000, realice la llamada
desde su teléfono.
El nombre del contacto se enuncia si el número
de este contacto está en la agenda del teléfono
conectado al Parrot MKi9000.
27
Page 28

Esta función está disponible solamente si sus
contactos han sido sincronizados previamente en
el kit manos libres.
Se puede realizar una llamada por varias combinaciones de palabras clave. Por ejemplo, « llame
a ‘Paul’ », « llamar ‘Paul’», o simplemente « Paul».
Se puede también añadir el tipo de número del
contacto: « llame a ‘Paul’ ‘casa’ », «llamar ‘Paul’ ‘à
la casa’ » o « ‘Paul’ ‘casa’ ».
Realizar una llamada por reconocimiento de voz
1. Pulse el botón verde para iniciar el proceso de reconoci-
miento de voz.
> Una señal sonora resuena para informarle del principio
del proceso de reconocimiento de voz.
2. Diga la palabra clave « Llamar » seguida del nombre del
contacto que desea llamar.
> La llamada a este contacto se inicia automáticamente si
el mando vocal ha sido bien entendido. Si no es el caso,
el kit manos libres enuncia un mensaje de conrmación.
3. Confirme pronunciando « Sí », « Llama » o « Llamar ».
> La llamada a este contacto se realiza.
Utilizar los mandos vocales
Para utilizar los mandos vocales de la tabla que sigue, hay
que activar las palabras mágicas. Para hacer esto:
1. Pulse la rueda para entrar en el menú principal.
2. Seleccione la opción Activar las palabras mágicas.
Pedro!
Llamar a Pedro!
Llamar a Pedro a la casa!
LLamar móvil Pedro !
Pedro oficina!
28
Page 29

• Utilice los conectores USB, Jack o iPod para conectar el
Parrot MKi9000 a su lector de audio / reproductor MP3 /
periférico de almacenamiento de masa.
• Pulse el botón Play para iniciar la función Música.
• Mantenga pulsado durante 2 segundos el botón Play
para cambiar de fuente de música en función del orden
siguiente:
- iPod
- periférico USB
- periférico conectado mediante Bluetooth
- dispositivo con salida Jack
Utilizar la función Música
Las funciones Next/Previous no están disponibles
si el Parrot MKi9000 está conectado mediante el
cable Jack/Jack.
Mandos vocales
Descolgar una llamada
Acciones
- Aceptar
- Descolgar
Llamar a un número
Llamar, seguido del nombre
del contacto
Rechazar una llamada - Rechazar
Confirmar una llamada
Interrumpir el proceso
- Sí
- Llama
- Llamar
Cancelar
Bóton
Funciones
Pulsación corta:
- Iniciar el modo música
- Parar / reproducir música
Pulsación larga: Cambiar la fuente de los
archivos de audio
- Pulsación corta: Regresar al principio de
una pista / regresar a la pista anterior
- Pulsación larga: Realizar un retroceso rápido
- Pulsación corta: Pasar a la pista siguiente
- Pulsación larga: Realizar un avance rápido
Ajustar el volumen
29
Page 30

30
Warranty
Without prejudice of legal warranty,
Parrot products are warranted during
1 year from the date of purchase for
defects in materials and workmanship,
provided that no deterioration to the
product has been made, and upon
presentation of proof of purchase
(date of purchase, location of sale and
product serial number) to the retailer or
Parrot directly.
Warranty does not cover: upgrading of
the software items of the Parrot products with Bluetooth® cell phones for
compatibility purpose, data recovery,
deterioration of the external aspect
due to normal use of the product,
any damage caused by accident,
misuse, misapplication, or non-Parrot
products. Parrot is not responsible
for storage, loss or damaged to data
during transit or repair.
Any product wrongfully declared to be
defective will be returned to sender
and inspection, process and carriage
costs will be invoiced to him.
Due to the technical nature of this
product, we advise you to ask your
garage mechanic to take care of the
installation. Parrot shall not be held
responsible of any dysfunction caused
by an installation which does not
follow the instructions provided in this
user guide or an incorrect installation.
Correct disposal of This Product
(Waste Electrical & Electronic Equipment)
(Applicable in the European Union
and other European countries with
separate collection systems).
This marking shown on the pro-
duct or its literature, indicates
that it should not be disposed
with other household wastes at
the end of its working life. To prevent
possible harm to the environment or
human health from uncontrolled waste
disposal, please separate this from
other types of wastes and recycle it
responsibly to promote the sustainable
reuse of material resources.
Household users should contact either
the retailer where they purchased this
product, or their local government
office, for details of where and how
they can take this item for environmen-
tally safe recycling. Business users
should contract their supplier and the
terms and conditions of the purchase
contract. This product should not be
mixed with other commercial wastes
for disposal.
Modifications
The explanations and specications
in this guide are given for information
purposes only and may be modified
without prior notice. They are deemed
to be correct at time of going to press.
The utmost care has been taken when
writing this guide,as part of the aim to
provide you with accurate information.
However, Parrot shall not be held
responsible for any consequences
arising from any errors or omissions
General Information
Page 31

31
in the guide, nor for any damage
or accidental loss of data resulting
directly or indirectly from the use of the
information herein. Parrot reserves the
right to amend or improve the product
design or user guide without any
restrictions and without any obligation
to notify users. As part of our ongoing
concern to upgrade and improve our
products, the product that you have
purchased may differ slightly from the
model described in this guide.
If so, a later version of this guide might
be available in electronic format at Parrot’s website at www.parrot.com.
FCC Compliance
Statement
This device complies with part 15 of
the FCC rules. Operation is subject to
the following two conditions:
(1). this device may not cause harmful
interference, and
(2). this device must accept any
interference received, including
interference that may cause unde
sired operation.
Note: The manufacturer is not responsible for any radio or tv interference
caused by unauthorized modifications
to this equipment. Such modifications
could void the user’s authority to
operate the equipment.
Declaration of Conformity
We, Parrot S.A. of 174 quai
de Jemmapes, 75010 Paris,
France, declare under our
sole responsibility that our product,
the Parrot MKi9000 to which this
declaration relates in conformity with
appropriate standards EN300328,
EN300220-1, for a class 2 receiver,
EN301489-17, EN301489-3, EN60950
following the provision of Radio
Equipment, Telecommunication
Equipment directive (1999/5/EC
R&TTE), with requirements covering
EMC directive 89/336/EEC, Low
Voltage directive 73/23/EEC and
automotive directive 2006/28/EC.
Identification N. 394 149 496 R.C.S.
PARIS - Parrot S.A.
Protection and personal safety
Carefully read the user guide and
follow the indicated procedure when
setting up the device. Do not dismantle
or open the device and do not touch
the electronic components or the
drivers. Do not attempt to dismantle or
modify either of the speakers.
Never introduce any metal object to
avoid the risks of electric shocks,
fire, short circuits or dangerous
emissions. If your device shows signs
of faulty operation, call the approved
Parrot technical support centre or
an approved retailer. Never leave the
Parrot MKi9000 exposed to rain or
chemical products; do not place them
in a damp area or where they are likely
to be splashed with water. Never place
your device on a recipient containing
any type of liquid, which might seep
inside the device. Doing so will reduce
the risks of electric shocks, short
circuits, re and injury.
Copyrights
Copyright © 2007 Parrot. All rights
Page 32

32
reserved. The total or even partial
reproduction, transmission or storage
of this guide in any form or by any
process whatsoever (electronic,
mechanical, photocopy, recording or
otherwise) is strictly prohibited without
prior consent from Parrot.
Licences
The Bluetooth ® word mark and logos
are owned by the Bluetooth SIG, Inc.
and any use of such marks by Parrot
S.A. is under license.
Bluetooth QDID :
B013655, B013858, B012423
iPod is a trademark of Apple Inc, regis-
tered in the US and others countries.
Other trademarks and trade names are
those of their respective owners.
Compatibility problems
Some special edition cars can be
released with some differences from
the original model. This could cause
some compatibility problems with the
interfaces.
Our company is not responsible of
compatibility problems caused by new
equipment or devices updated by the
car manufacturer without advise.
Speex & Flac Licences
Redistribution and use in source and
binary forms, with or without modification, are permitted provided that the
following conditions are met:
• Redistributions of source code must
retain the above copyright notice,
this list of conditions and the following
disclaimer.
• Redistributions in binary form must
reproduce the above copyright notice,
this list of conditions and the following
disclaimer in the documentation and/or
other materials provided with the
distribution.
• Neither the name of the Xiph.org
Foundation nor the names of its
contributors may be used to endorse
or promote products derived from this
software without specific prior written
permission.
This software is provided by the
copyright holders and contributors ``as
is’’ and any express or implied warran-
ties, including, but not limited to, the
implied warranties of merchantability
and fitness for a particular purpose
are disclaimed. In no event shall the
foundation or contributors be liable
for any direct, indirect, incidental,
special, exemplary, or consequential
damages (including, but not limited to,
procurement of substitute goods or
services; loss of use, data, or prots;
or business interruption) however
caused and on any theory of liability,
whether in contract, strict liability,
or tort (including negligence or otherwise) arising in any way out of the use
of this software, even if advised of the
possibility of such damage.
Page 33

33
Garantie
Sans préjudice de la garantie légale,
les produits Parrot sont garantis, pièces et main d’oeuvre, pendant 1 an à
compter de la date d’achat, sauf altération du produit, et sur présen¬tation
d’une preuve d’achat (date et lieu
d’achat n° de série du produit) au
revendeur ou à Parrot directement.
La garantie ne couvre pas la mise
à jour des logiciels inclus dans les
produits Parrot avec des téléphones
mobiles Bluetooth® à des fins de
compatibilité, la récupération de
données, la détérioration extérieure du
produit due à une utilisation normale
du produit, tout dommage causé par
accident, une utilisation anormale ou
non autorisée du produit, un produit
non Parrot. Parrot n’est pas responsa-
ble du stockage, de la perte ou de l’en-
dommagement des données durant le
transport ou la réparation.
Tout produit s’avérant non défectueux
sera retourné à l’expéditeur et les frais
de traitement, de vérification et de
transport lui seront facturés.
En raison de la technicité de ce
produit, nous vous recommandons de
faire effectuer l’installation par votre
garagiste. Parrot ne saurait en aucun
cas être responsable de tout dysfonc-
tionnement dû à une installation non
conforme aux instructions gurant sur
la notice et/ou une installation non
conforme effectuée par vous-même.
Comment recycler ce produit
Déchets d’équipements électriques et
électroniques
Le symbole sur le produit ou sa
documentation indique qu’il ne
doit pas être éliminé en n de
vie avec les autres déchets ménagers. L’élimination incontrôlée des
déchets pouvant porter préjudice à
l’environnement ou à la santé humaine,
veuillez le séparer des autres types
de déchets et le recycler de façon
responsable. Vous favoriserez ainsi la
réutilisation durable des ressources
matérielles.
Les particuliers sont invités à contacter
le distributeur leur ayant vendu le produit ou à se renseigner auprès de leur
mairie pour savoir où et comment ils
peuvent se débarrasser de ce produit
afin qu’il soit recyclé en respectant
l’environnement. Les entreprises sont
invitées à contacter leurs fournisseurs et à consulter les conditions de
leur contrat de vente. Ce produit ne
doit pas être éliminé avec les autres
déchets commerciaux.
Modifications
Les explications et spécications
contenues dans ce guide utilisateur ne
sont fournies qu’à titre d’information et
peuvent être modiées sans notica-
tion préalable. Ces informations sont
correctes au moment de l’impression
et le plus grand soin est apporté lors
de leur rédaction afin de vous fournir
des informations les plus précises
possible.
Cependant, Parrot S.A. ne saurait être
Informations générales
Page 34

tenu responsable, directement ou indi-
rectement, des éventuels préjudices
ou pertes de données accidentelles
résultant d’une erreur ou omission au
sein du présent document. Parrot S.A.
se réserve le droit d’amender ou améliorer le produit ainsi que son guide
utilisateur sans aucune restriction ou
obligation de prévenir l’utilisateur.
Dans le cadre de l’attention portée
par Parrot S.A. sur l’amélioration de
nos produits, il est possible que le
produit que vous avez acheté diffère
légèrement de celui décrit au sein du
présent document. Dans ce cas, vous
pourrez éventuellement trouver une
nouvelle version du guide utilisateur au
format électronique sur le site www.
parrot.com.
Déclaration de conformité
Parrot SA, 174 quai de
Jemmapes, 75010 Paris,
France, déclare sous son
unique responsabilité que le produit
décrit dans le présent guide utilisateur
est en conformité avec les normes
techniques EN300328, EN300220-1
(pour un récepteur de classe 2),
EN301489-17, EN301489-3, EN60950
suivant les dispositions de la directive
R&TTE 99/5/CE, ainsi qu’avec les
exigences de la directive EMC 89/336/
CE, de la directive 73/23/CEE relative
aux appareils à basse tension et de la
directive Automobile 2006/28/CE.
Copyright
Copyright © 2007 Parrot.
Tous droits réservés.
Marques déposées
Le nom et le logo Bluetooth sont des
marques déposées de Bluetooth ®
SIG, Inc. et toute utilisation de ces
derniers par Parrot S.A. est faite sous
licence.
iPod est une marque d’Apple Inc.,
déposée aux Etats-Unis et dans
d’autres pays.
Toutes les autres marques de commerce et marques déposées mentionnées
dans le présent document sont protégées par Copyright et sont la propriété
de leurs propriétaires respectifs.
Problèmes de compatibilité
Certaines voitures produites en édition
limitée peuvent présenter des différences par rapport au modèle original, ce
qui peut entraîner certains problèmes
de compatibilité avec cet appareil.
Parrot S.A. n’est pas responsable de
ces éventuels problèmes de compatibilité liés à ces équipements lancés
sans notification par le fabricant.
34
Page 35

Garantía
Sin perjudicar la garantía legal, Parrot
garantiza sus productos, piezas y
mano de obra incluidos, por el período
de 1 año a partir de la fecha de compra, salvo en caso de alteración del
producto. Esta fecha de compra debe
estar certificada por una prueba de
compra original del producto (fecha y
lugar de compra, número de serie del
producto) presentada al dependiente o
directamente a Parrot. La garantía no
cubre: la actualización de los programas incluidos en los productos Parrot
con teléfonos móviles dotados de la
funcionalidad Bluetooth® con objetivo
de compatibilidad, la recuperación
de datos, la deterioración exterior del
producto causada por la utilización
cotidiana del producto, cualquier
daño causado por un accidente,
un uso anormal o no autorizado del
producto, un producto de una marca
diferente. Parrot no es responsable del
almacenamiento de los datos, de sus
pérdidas o de daños ocurridos durante
el transporte o la reparación.
Cualquier producto que no sería defectuoso se retornará al cliente, y los
gastos de intervención y de transporte
serán a su carga.
Debido a la tecnicidad de este
producto, le recomendamos que
haga efectuar la instalación por su
garajista. Parrot no será responsable
de ninguna disfunción resultante de
una instalación no conforme con las
instrucciones dadas en el manual y/o
una instalación no conforme efectuada
por usted.
Eliminación correcta de este
producto
(material eléctrico y electrónico de
descarte)
La presencia de esta marca
en el producto o en el material
informativo que lo acompaña,
indica que al finalizar su vida útil no
deberá eliminarse junto con otros
residuos domésticos. Para evitar los
posibles daños al medio ambiente o
a la salud humana que representa la
eliminación incontrolada de residuos,
separe este producto de otros tipos
de residuos y recíclelo correctamente
para promover la reutilización sostenible de recursos materiales.
Los usuarios particulares pueden
contactar con el establecimiento
donde adquirieron el producto, o con
las autoridades locales pertinentes, para informarse sobre cómo y
dónde pueden llevarlo para que sea
sometido a un reciclaje ecológico y
seguro. Los usuarios comerciales
pueden contactar con su proveedor y
consultar las condiciones del contrato
de compra. Este producto no debe eliminarse mezclado con otros residuos
comerciales.
Modificaciones
Las explicaciones y especicaciones
contenidas en este manual son mera-
Información general
35
Page 36

mente informativas y pueden ser modificadas sin previo aviso. Se consideran
correctas en el momento de enviar la
publicación a imprenta. Este manual
se ha redactado con el máximo cui-
dado, con el fin de proporcionarle una
información precisa.
Sin embargo, Parrot no asume responsabilidad alguna por las consecuencias derivadas de los errores u omisiones que pueda haber en el manual, ni
por los daños o pérdidas accidentales
de datos que se produzcan como
consecuencia directa o indirecta del
uso de la información aquí contenida.
Parrot se reserva el derecho a modifi-
car o mejorar el diseño del producto o
el manual de usuario sin restricciones
y sin la obligación de notificárselo a
los usuarios.
En aras de actualizar y mejorar nues-
tros productos, es posible que el producto que usted haya adquirido sea
ligeramente distinto al modelo que se
describe en este manual. En tal caso,
tiene a su disposición una versión más
reciente de este manual en formato
electrónico en la página web de Parrot:
www.parrot.com.
Declaración de conformidad
Parrot SA, 174 quai de
Jemmapes, 75010 París,
Francia, declara bajo su
exclusiva responsabilidad la confor-
midad del producto descrito en este
mismo manual de usuario con las siguientes normas técnicas: EN300328,
EN300220-1 por un receptor de
clase 2, EN301489-17, EN301489-3,
EN60950 de acuerdo con las disposiciones de la directiva R&TTE 1999/5/
EC, de la directiva de Bajo Voltaje
EMC 89/336/EEC y de la directiva
Automóvil 2006/28/EC.
Número de identificación: N.394 149
496 R.C.S. París
Marcas registradas
El nombre y el logotipo Bluetooth son
marcas registradas de Bluetooth ®
SIG, Inc. y toda utilización de estos
últimos por Parrot S.A se hace con
una licencia.
Este producto está protegido por ciertos derechos de propiedad intelectual
de Microsoft. Queda totalmente prohibido el uso o la distribución de dicha
tecnología fuera de este producto
sin haber obtenido una licencia de
Microsoft.
Windows Media y el logo Windows
son marcas comerciales o marcas
registradas de Microsoft Corporation
en Estados Unidos y/u otros países.
iPod es una marca de Apple Inc.,
registrada en los Estados Unidos y en
otros países.
Technología de compresión de audío
MPEG Layer-3 utilizada bajo licencia
de Fraunhofer IIS y THOMSON.
Todas las otras marcas de comercio y
las marcas registradas mencionadas
en este documento están protegidas
por el Copyright y pertenecen a sus
respectivos propietarios.
Copyright
Copyright © 2007 Parrot.
Todos los derechos reservados.
36
Page 37

Cualquiera reproducción, que sea total
o parcial, del contenido de este docu-
mento con el objetivo de ser publicada
o difundida por cualquier medio y bajo
cualquiera forma que sea, incluso de
manera gratuita, está prohibida sin la
autorización previa y escrita de Parrot.
Problemas de compatibilidad
Es posible que algunos coches de
edición especial presenten algunas
diferencias respecto al modelo original.
Esto podría causar problemas de
compatibilidad con las interfaces.
Nuestra empresa no se responsabiliza
de los problemas de compatibilidad
causados por equipos o dispositivos
nuevos actualizados por el fabricante
del coche sin asesoramiento.
37
Page 38

383940
Page 39

Page 40

Page 41

41
Page 42

Hotline
Our hotline is at your disposal from Monday to Friday between 9 am and 6 pm (GMT + 1)
Hot-line@parrot.com
Italy : [+39] 02 86 39 14 63
Spain : [+34] 902 404 202
UK : [+44] (0)870 112 5872
Germany : 0900 1727768
USA : [+1] (877) 9 Parrot (toll free)
China : [+86] (0)21 6460 1944
Hong Kong: [+852] 2736 1169
France : 01 48 03 60 69
Europe : [+33] 1 48 03 60 69 (Spoken languages : French, English, Spanish and German)
FCC ID: RKXMK6000PLUS
Page 43

FRA
ENG
ESP
www.parro t.com
 Loading...