

Page 1

User Guide
English
Parrot MKi9200
Parrot MKi9200 – User guide 1
Page 2

Content
Content ................................................................................................................................ 2
Introduction ......................................................................................................................... 4
Installing the Parrot MKi9200 ............................................................................................. 5
Car stereo with ISO connectors ................................................................................................. 5
Car stereo with line-in............................................................................................................... 6
Car stereo without ISO connectors............................................................................................ 6
Installing the electronic box ...................................................................................................... 6
Installing the kit’s power cable.................................................................................................. 7
Checking the wiring .................................................................................................................. 7
Installing the audio connectors ................................................................................................. 7
Installing the remote control..................................................................................................... 7
Installing the double microphone.............................................................................................. 8
Installing the screen.................................................................................................................. 9
Using the Parrot MKi9200 for the 1st time .......................................................................10
Associating the control unit with the remote control ............................................................... 10
Navigating through the menus................................................................................................ 10
Adjusting the menu volume .................................................................................................... 10
Pairing and connecting a phone / PDA via Bluetooth ............................................................... 10
Synchronizing the phonebook................................................................................................. 11
Clearing the memory .............................................................................................................. 11
Using the Voice Recognition function ..............................................................................12
Making a call via voice recognition.......................................................................................... 12
Receiving a call via voice recognition....................................................................................... 13
Using the telephony function.............................................................................................14
Receiving a call ....................................................................................................................... 14
Making a call .......................................................................................................................... 14
Using the redial function......................................................................................................... 14
Using the discreet mode ......................................................................................................... 15
Using the secret mode ............................................................................................................ 15
Parrot MKi9200 – User guide 2
Page 3

Answering a second call.......................................................................................................... 15
Sending DTMFs...................................................................................................................... 16
Adjusting the.......................................................................................................................... 16
volume................................................................................................................................... 16
Using the Music function...................................................................................................17
Selecting a music source ......................................................................................................... 17
Using the remote control during music files playback .............................................................. 18
•
Pausing during playback ...................................................................................................................... 18
•
Fast rewinding / fast forwarding the current track ............................................................................. 18
•
Selecting music files............................................................................................................................. 18
•
Adjusting the volume........................................................................................................................... 18
•
Accessing to the audio effects menu ................................................................................................... 18
Modifying the display settings...........................................................................................19
Adjusting the brightness ......................................................................................................... 19
Changing the wallpaper .......................................................................................................... 19
•
Selecting a wallpaper proposed by default ......................................................................................... 19
•
Customizing the wallpaper .................................................................................................................. 19
Modifying the audio settings .............................................................................................21
Activating the vocal menus ..................................................................................................... 21
Adjusting the ringtone volume................................................................................................ 21
Activating the lateral noise detection...................................................................................... 21
Deactivating the Mute on Streaming....................................................................................... 21
Activating the spatialization.................................................................................................... 21
Activating the equalizer .......................................................................................................... 22
Activating the Virtual Super Bass effect................................................................................... 22
Activating the Repetition / Random options............................................................................ 22
Updating your Parrot MKi9200 ..........................................................................................23
Hotline.................................................................................................................................23
Parrot MKi9200 – User guide 3
Page 4
Introduction
The Bluetooth® technology enables voice and data to be sent via a short-distance radio
link. It allows several electronic devices to communicate with each other, particularly
phones and hands-free kits.
Parrot is drawing on its long years of experience in signal processing and voice recognition
technology to offer a hands-free car with superior audio quality during calls: The Parrot
MKi9200.
Once paired with your Bluetooth mobile phone, the Parrot MKi9200 enables you to establish
in a few seconds any phone conversations in your vehicle without needing to handle the
telephone, even leaving it in your pocket. Connection with your mobile is made in a
completely transparent way.
The user-independent voice recognition and voice synthesis are integrated in your Parrot
MKi9200, which dramatically ease the way of using them in every situation. And all the
connectors for any type of music are provided: iPod, iPhone, iTouch, USB keys, USB MP3
players, Bluetooth Stereo devices, CD players, MiniDisc…
A steering wheel control interface can be used to connect your vehicle’s steering wheel
controls to your Parrot hands-free kit. With this interface, you will be able to make phone
calls via the steering wheel controls while keeping your hands on the wheel. Refer to our
website www.parrot.com for more information.
Parrot MKi9200 – User guide 4
Page 5
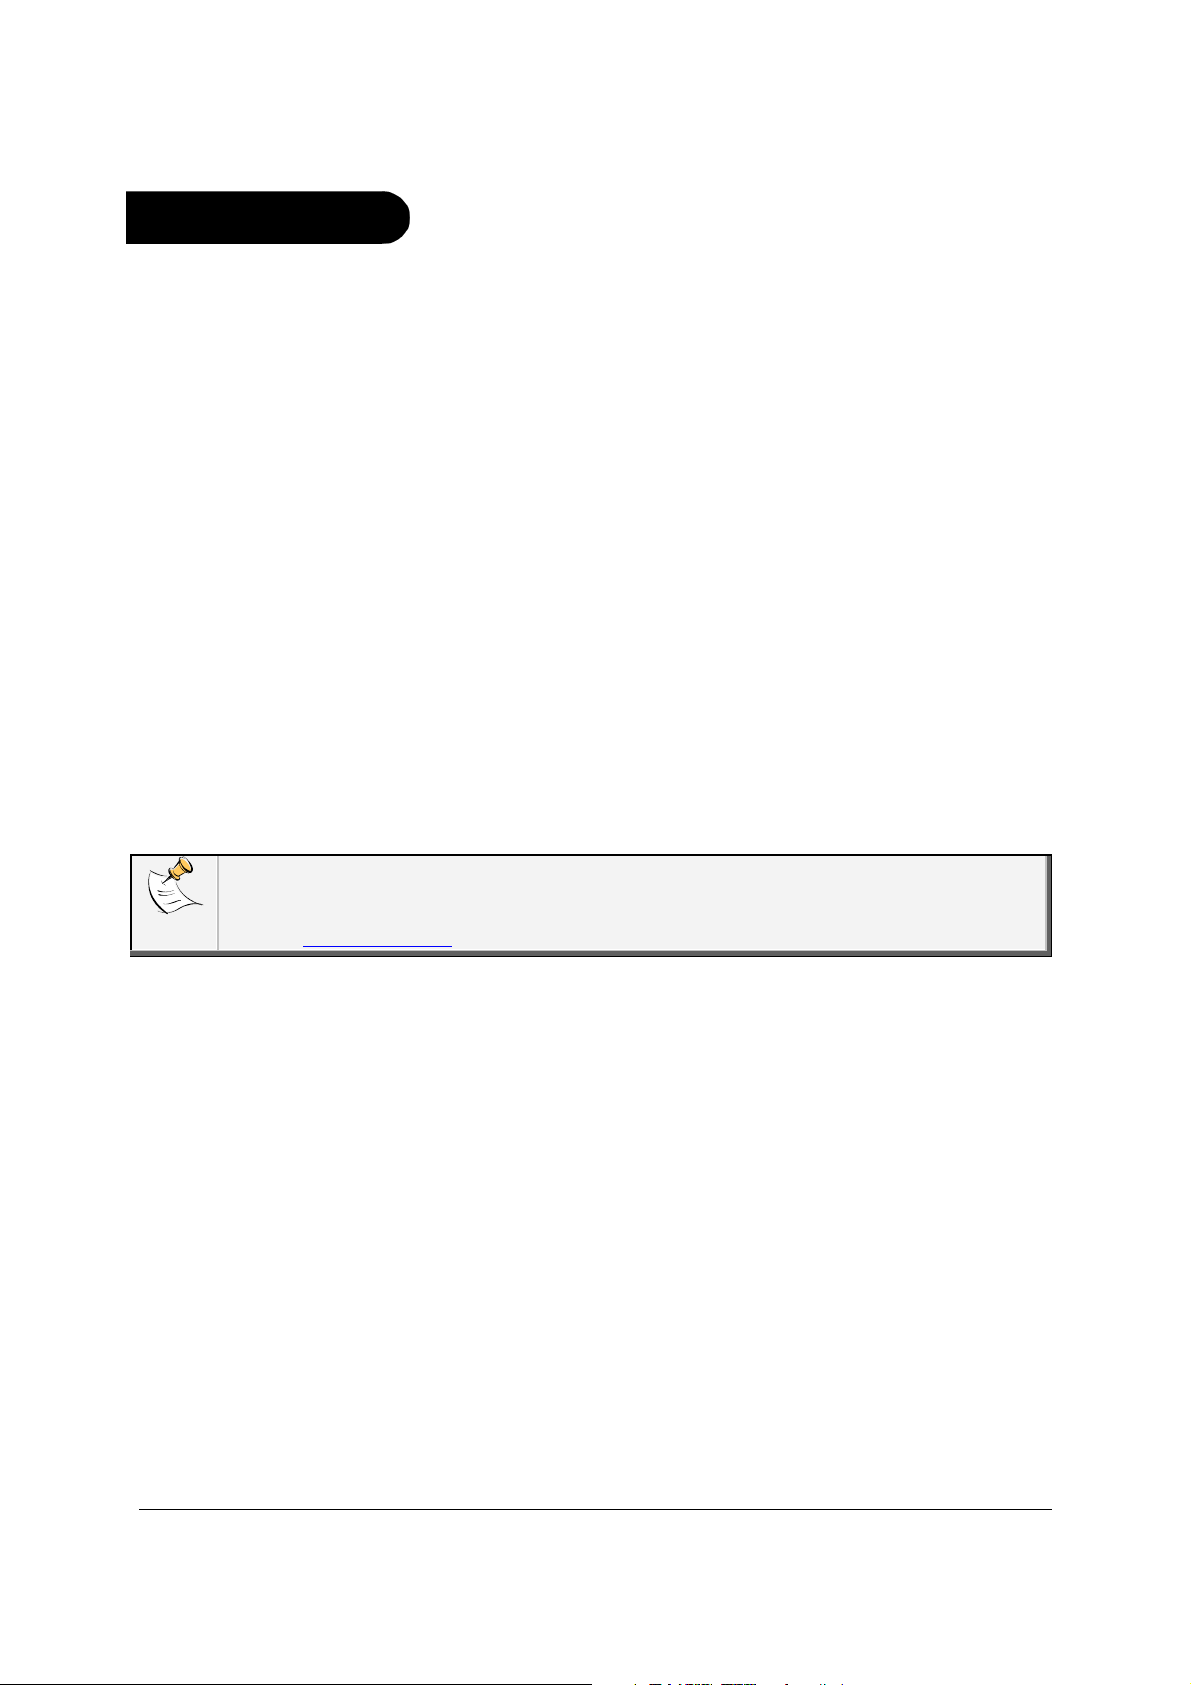
Installing the Parrot MKi9200
We advise our customers to have the Parrot
MKi9200 fitted by a professional.
•
Remove the audio system from your vehicles dashboard to access the wiring harness.
•
The cables supplied with the kit feature ISO connectors and two pairs of line-out jacks.
The line-out jacks can be used if your audio system features this option (use of an
amplifier). Several set-ups are therefore possible depending on the type of car stereo
and your vehicle.
•
The mute function is used to cut the sound of your car stereo to enable a phone call.
The choice of the mute-in jack depends on your car stereo’s configuration.
•
Make sure the cables are not pinched at the end of the installation process.
Car stereo with
ISO connectors
1. Connect the male connectors of the hands-free kit to the car
stereo.
2. Join the vehicle’s audio and power supply cables to the female
connectors of the Parrot MKi9200.
3. On the installation cable, connect the free yellow wire to one of the
audio system’s corresponding mute-in jacks if available (mute in 1,
mute in 2 or mute in 3).
Parrot MKi9200 – User guide 5
Page 6
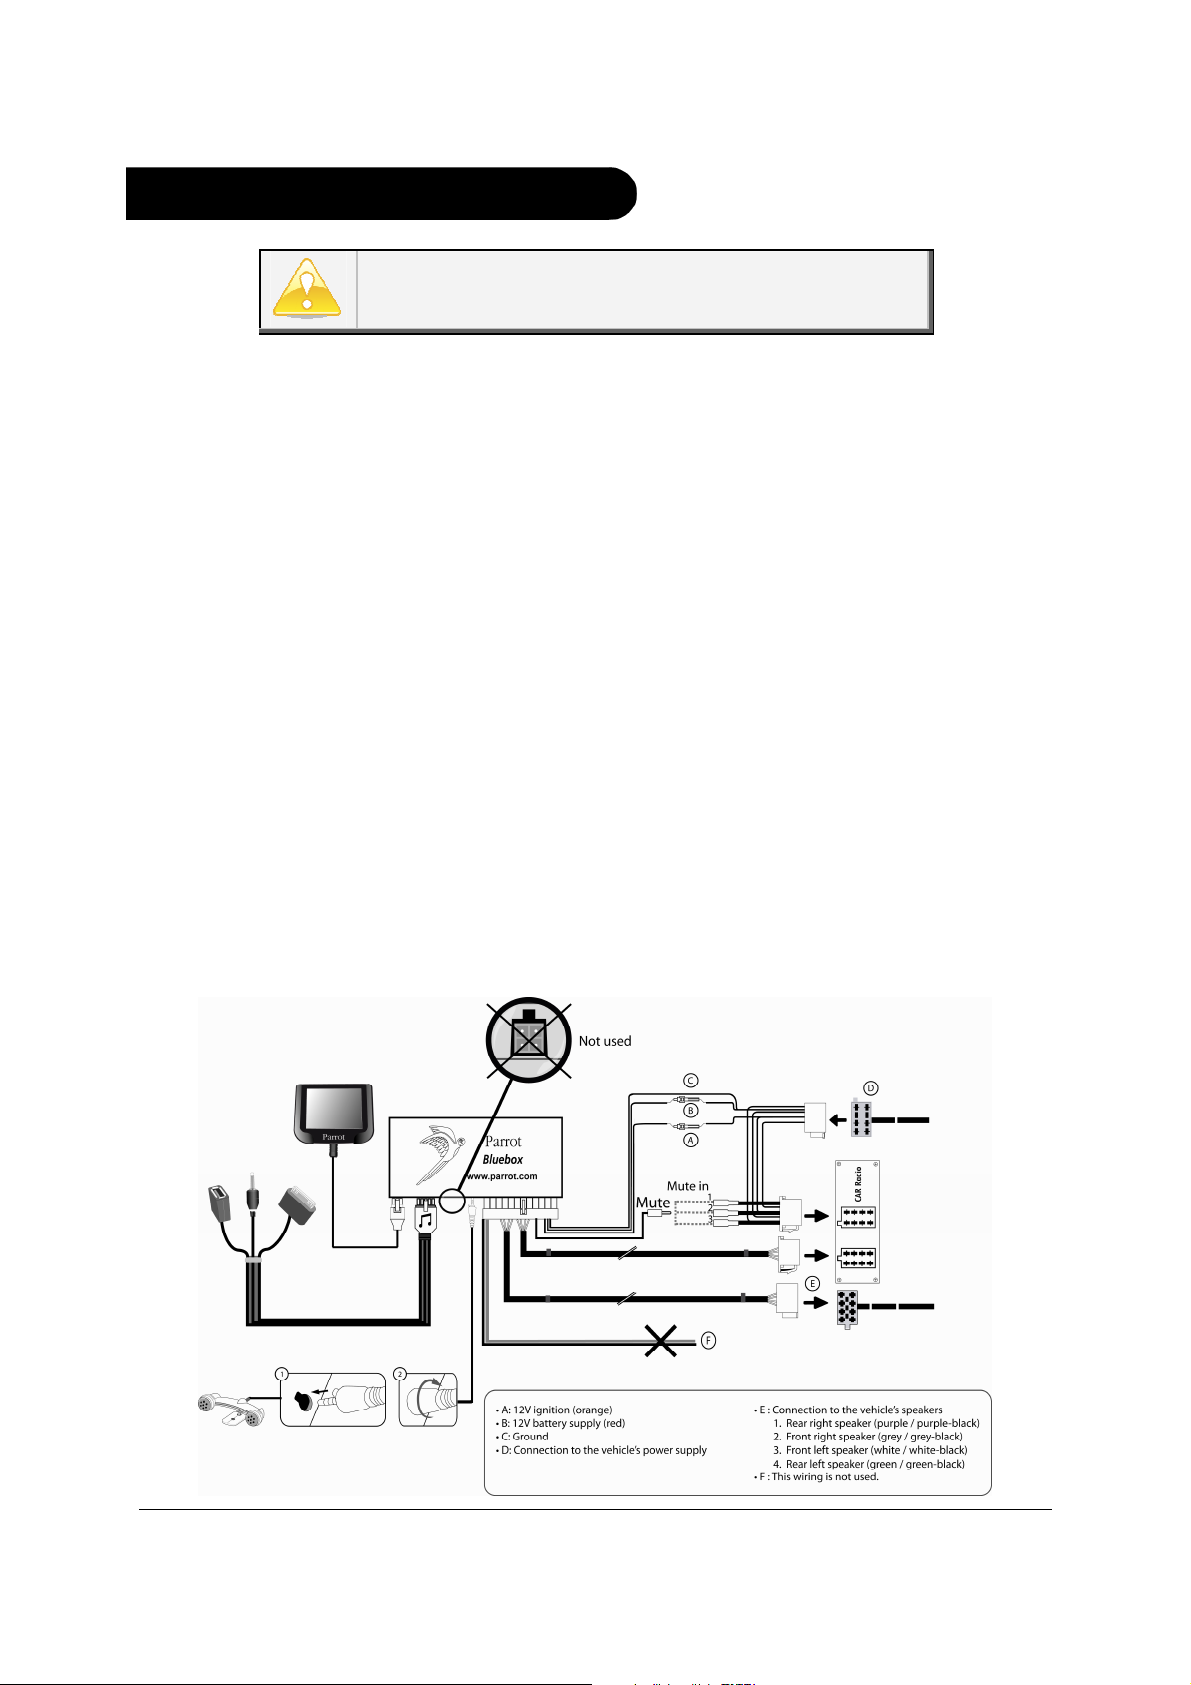
Car stereo with
line-in
•
Use this type of connection by wiring the line-out (brown & white
wire or red & black wire) to your car stereo’s line-in.
•
Using the two pairs of line-out will enable you to take advantage of
the streaming audio function in stereo over your vehicle’s speakers.
•
On the installation cable, connect the free yellow wire to the
corresponding audio system’s mute-input if available (mute in 1,
mute in 2 or mute in 3).
Car stereo
without ISO
connectors
Installing the
electronic
box
To simplify the wiring procedure, you will need to purchase an ISO
adapter cable. Refer to the range of ISO adapters on our website:
www.parrot.com.
Avoid installing the electronic box:
- near heating or air-conditioning system;
- on a spot directly exposed to sunlight;
- behind metal walls.
Parrot MKi9200 – User guide 6
Page 7
Installing the
kit’s power
cable
Checking the
wiring
Installing the
audio
connectors
Installing the
remote control
In order to check the wiring, connect the screen before placing it
on the dashboard.
► Refer to the Checking the wiring section for more information.
•
Refer to your car stereo’s wiring diagram.
•
The red wire of the kit’s cable must correspond to the constant +12V
supply, the orange wire to the ignition +12V and the black wire to
ground. Check that the orange wire is not connected to the constant
+12V supply, as you could run down the vehicle’s battery.
On some vehicles, there is no ignition +12V on the vehicle’s
connectors. You must therefore connect the orange power supply
wire to the fuse box or another ignition power source.
•
To perform the installation check, turn the ignition on then off once the
Parrot MKi9200 is installed: the message “Goodbye!” must be
displayed.
•
If it is not the case, it is necessary to inverse the positions of the red
and orange wires. Indeed, the red wire of the power cable must be
connected to the permanent 12V, the orange wire to the 12V ignition
and the black wire to the ground. This can be done simply by reversing
both fuse holders located on the Parrot wiring.
•
Connect the music cable to the electronic box and place the USB /
iPod / Jack connectors into the glove box, the central console or the
parcel tray depending on the configuration of your dashboard. Make
sure that the cable is not pinched.
•
Use the provided protection cap to protect the connectors.
•
Choose the place for the remote control inside your vehicle. We would
advise you to fit it in the center of the dashboard or close to the
steering wheel.
•
If you want to place the remote control on the steering wheel, make
sure it is securely attached, so that it does not move when you are
driving. Do not install the remote control on the outside of the steering
wheel, so that it does not get in the way when driving.
Parrot MKi9200 – User guide 7
Page 8

•
If you want to place the remote control on the dashboard, stick the
double-sided tape located on the flat side of the bracket to fix it
against the dashboard. You can then insert the remote onto the
bracket.
Installing the
double microphone
Once you have stuck the support on the dashboard, wait for
approximately 2 hours to make sure the adhesive tape
adheres well.
Parrots microphones are directional and need to be pointed
towards the user to pick up clear speech. The microphone should
be installed near the front roof light cluster, in the centre of the
vehicle with a clear path to the user.
Parrot MKi9200 – User guide 8
Page 9

Installing the
screen
•
Once you have stuck the support on the dashboard, wait for
approximately 2 hours to make sure the adhesive tape adheres
well.
•
Remember to remove your screen when leaving the vehicle to
avoid tempting any would-be thieves and to prevent prolonged
exposure to sunlight.
Parrot MKi9200 – User guide 9
Page 10

Using the Parrot MKi9200 for the 1st time
Associating
the control
unit with the
remote control
Navigating
through the
menus
Adjusting the
menu volume
If the remote control doesn’t seem to be associated to the electronic
box while using the Parrot MKi9200 for the first time, press several
times the button while holding down the and buttons until the
«Pairing remote control» message is said.
This has to be done during a 30 seconds period once the ignition is
turned on.
• Press the central jog wheel to access the menus.
> The kit says the name of the current menu.
• Browse through the menus by turning the wheel and confirm
with the button or by pressing the scroll wheel.
• To exit the menu, press the button or wait a few seconds.
To adjust the volume of the Parrot MKi9200, press the jog wheel and
select Settings > Audio > Menu Volume. Use the jog wheel to adjust
the desired volume then validate.
The Audio menu also allows you to deactivate the vocal menus.
For further information, refer to the Modifying the audio
settings section.
Pairing and
connecting a
phone / PDA via
Bluetooth
Prior to using your Parrot MKi9200 with your phone for the very first
time, you must initially pair both devices. The pairing process is only
required once.
1. Make sure the Parrot MKi9200 is set so that it is visible by all
Bluetooth ® devices. To do so, press the jog wheel and select
Settings > Bluetooth >Visibility. Then, make sure this option
is selected. If it is not the case, select it by pressing the jog
wheel.
The Parrot MKi9200 is visible by default.
2. Press the jog wheel and select Settings > Bluetooth > Pair
with…
.
Parrot MKi9200 – User guide 10
Page 11

Synchronizing
the phonebook
Clearing the
memory
> If your mobile phone’s model appears in the list, select it and
confirm by pressing the jog wheel.
> If your mobile phone model doesn’t appear in the list, select
the
Other phones option.
3. From your phone, search for Bluetooth peripherals. Refer to
your phone user guide for more information.
> The list of the available Bluetooth peripherals is displayed.
4. Select « Parrot MKi9200 » in the list.
5. Enter « 0000 » on your phone when you are prompted to enter
a PIN code.
> «Pairing successful» is displayed on the screen of the Parrot
MKi9200.
Once your phone is paired to the Parrot MKi9200, the connection
between both devices will be automatically established each time
you enter your vehicle if your screen is plugged in.
With some Bluetooth phones, the Parrot MKi9200 automatically
synchronizes the names and phone numbers in your mobile with its
phonebook. If your phone doesn’t support automatic synchronization,
you can also send contacts from your mobile to the car kit via Object
Push. To do so:
1. Press the jog wheel and select Phone > Receive contacts.
2. Refer to your phones ‘user guide for more information about
sending contacts via Object Push.
You can pair up to 10 devices with the Parrot MKi9200.
If you attempt to pair an 11 th phone, the « Memory full » message is
displayed on the screen of the Parrot MKi9200. You must then delete a
phone from the paired devices list. To do so, press the rotator and
select Settings > Bluetooth > Paired devices.
Parrot MKi9200 – User guide 11
Page 12

Using the Voice Recognition function
Before using your Parrot MKi9200 voice recognition function, you first have to connect it
with your phone / PDA.
► Refer to the Pairing and Connecting a phone via Bluetooth section for more
information.
Making a call via
voice recognition
This function is available if you have previously
synchronized your contacts in the kit.
1. Press the button to launch the voice recognition
feature.
> A beep is emitted.
2. Say the « Call » keyword and the name of the contact
you want to call.
> The call is automatically launched if the voice tag is
correctly understood.
> If it is not the case, a confirmation message is asked
by the kit.
You can make a call via voice recognition using several
combinations of keywords. For example, « call ‘Bob’» or
simply « ‘Bob’ ». You can also associate the type of
number you want to call: «call ‘Bob’ at home», «’Bob’
home », etc.
3. Confirm by saying « Yes » or « Call ».
> The call is initiated.
Parrot MKi9200 – User guide 12
Page 13

Receiving a call via
voice recognition
• The magic word «Accept» allows you to accept an
incoming call.
• The magic word «Refuse» allows you to reject an
incoming call.
To use the magic words, you must activate them. To do so :
1. Press the jog wheel and select Phone > Voice
Commands > Magic words.
2. Press the jog wheel to activate/deactivate the magic
words.
The magic words are activated by default.
Parrot MKi9200 – User guide 13
Page 14

Using the telephony function
Before using your Parrot MKi9200 telephony function, you first have to connect it with your
phone / PDA.
► Refer to the Pairing and Connecting a phone via Bluetooth section for more
information.
Receiving a
call
Making a call
An incoming call is indicated by a ringtone.
The name of the caller is announced and displayed if his details
are stored in the phonebook of the phone connected to the Parrot
MKi9200.
• If you want to answer the call, press the button. Then, press
the button to end the call.
• If you want to refuse this call, press the button.
• If the contact you want to call is in the phonebook of the phone
connected to the Parrot MKi9200:
1. Press the jog wheel to enter the main menu and select
Phonebook.
2. Select a letter and press the jog wheel.
> Once the contact chosen:
- Press the button to call this contact.
- Or use the jog wheel to choose between different
numbers of the same contact.
• If the contact you want to call is not in the phonebook of the
phone connected to the Parrot MKi9200, stop your vehicle in a
safe location, press the jog wheel and select Phonebook > Dial
a number. You can also make the call directly from your phone.
Using the
redial function
Hold down the key of the Parrot MKi900 for two seconds to redial
the last number dialled.
Parrot MKi9200 – User guide 14
Page 15

Using the
discreet mode
Using the
secret mode
Answering a
second call
• During a call, if you want to continue the conversation on your
phone (private conversation), press the button of the Parrot
MKi9200.
> The call is automatically transferred to the phone.
• If you want to switch back to the kit, press the button again.
•
During a call, if you want to deactivate the microphone, hold down
the button for two seconds.
•
Press the same button to activate it again.
The Parrot MKi9200 allows you to manage two calls simultaneously if
your phone supports this functionality. For further information, refer to
the user guide of your phone.
• To accept the second call
1. Press the button of the Parrot MKi9200.
> The first call is automatically put on hold.
2. Press the button of the Parrot MKi9200 or the green button of
your phone to switch from a call to another.
3. Press the button of the Parrot MKi9200 to end the current
call. You can also hang up directly from your phone.
> You are automatically in communication with the call
on hold.
• To reject the second call
Press the button of the Parrot MKi9200. You can also reject it directly
from your phone.
Parrot MKi9200 – User guide 15
Page 16

Sending
DTMFs
Adjusting the
volume
During a call, the Parrot MKi9200 allows you to send DTMFs to manage
your voice mail for example. To do so :
1. Press the jog wheel to access the DTMF menu.
> « 0 » is displayed by the kit.
2. Use the jog wheel to select your DTMF between the following
possibilities : 0,1,2,3,4,5,6,7,8,9,# or *.
3. Press the jog wheel to send this DTMF to your phone.
During a call, use the jog wheel on the Parrot MKi9200 or adjust the
volume directly on your phone.
> The volume setting is saved for subsequent calls.
The volume adjusted on the Parrot MKi9200 is not saved for the
calls on your phone.
Parrot MKi9200 – User guide 16
Page 17

Using the Music function
Selecting a
music source
• Use the USB, Jack or iPod connectors to connect the Parrot
MKi9200 to your audio player / iPod / USB stick.
If you are using the Parrot MKi9200 with the iPod Mini, iPod
Photo, iPod 3G and iPod Shuffle, then connect your iPod to
the Parrot MKi9200 using the Jack cable.
Make sure your iPod is updated before using it with the Parrot
MKi9200.
• The Parrot MKi9200 also allows you to play music files stored on an
SD card. To transfer music files:
1. Insert the SD card into the appropriate slot.
2. Connect the Parrot MKi9200 to your computer using a USB /
mini-USB cable.
3. Copy your music files in MP3 or WMA formats as if it was a
USB flash drive.
• Press the button to launch the music function. Press the jog
wheel to access the content of the selected source. If the tags of
your music files are correctly defined, you can select one of the
classification items (artists, genres, albums …) and press the jog
wheel.
• To change the music source, press the jog wheel and select your
audio source in the following order:
- iPod,
- USB peripheral,
- SD card
- audio player connected via
Bluetooth
,
- audio player connected via Line-in.
If your Parrot MKi9200 is connected to an iPhone and an USB
flash drive, the iPhone has priority: you can only browse through
your iPhone content.
Parrot MKi9200 – User guide 17
Page 18

While navigating through the menus or when the screensaver is
active, press the button to get back to the music player.
Using the
remote control
during music
files playback
• Pausing during playback
When playing music file, press the button to momentarily stop
playback.
Press the button again to resume playback of the music track.
• Fast rewinding / fast forwarding the current track
When playing a music file, hold down the and buttons to fast
rewind or forward the current track.
• Selecting music files
When playing a music file, press the and buttons to change to
the previous or next track by pressing the respectively.
During the music files playback, press the button to access the
content of the selected source. Then, you can navigate and change
the music file you’re listening to using the jog wheel.
The Next/Previous tracks functions are not available if the
Parrot MKi9200 is connected to the audio player via the Jack
connector.
• Adjusting the volume
When playing a music file, use the jog wheel to adjust the volume.
The volume for calls and the volume for the streaming audio
function work separately.
• Accessing to the audio effects menu
When playing a music file, hold down the button for 2 seconds to
access to the audio effects menu.
For more information about the audio settings of the Parrot
MKi9200, refer to the Modifying the audio settings section.
Parrot MKi9200 – User guide 18
Page 19

Modifying the display settings
Adjusting the
brightness
Changing the
wallpaper
You can adapt the screen brightness of the Parrot MKi9200. To do so,
press the jog wheel and select Settings > Brightness then select
Night Mode or Day Mode.
You can also adjust the brightness of the Parrot MKi9200 by
holding down the jog wheel.
You can change the wallpaper of the Parrot MKi9200 by selecting one
of the wallpapers proposed by default. You can also customize it by
sending a photo directly to the kit.
• Selecting a wallpaper proposed by default
1. Press the jog wheel and select Settings > Display > Wallpaper
then use the jog wheel to choose in the list wallpaper you want to
display.
2. Press the jog wheel to validate.
• Customizing the wallpaper
1. Make sure the Parrot MKi9200 is set so that it is visible by all
Bluetooth devices. To do so, press the jog wheel and select
Settings > Bluetooth > Visibility. Then, make sure this option is
selected. If it is not the case, select it by pressing the jog wheel.
2. Press the jog wheel then select Settings > Display >
Wallpaper > Customize > Add.
> « Waiting for a picture » is displayed on the Parrot MKi9200.
3. From your Bluetooth peripheral, send via Bluetooth the image you
want to display on the Parrot MKi9200.
► Refer to your device documentation for more information about
sending photos via Bluetooth.
Parrot MKi9200 – User guide 19
Page 20

To delete an image sent as wallpaper on your Parrot MKi9200,
press the jog wheel then select Settings > Display > Wallpaper
> Customize > Delete.
Parrot MKi9200 – User guide 20
Page 21

Modifying the audio settings
Activating the
vocal menus
Adjusting the
ringtone volume
Activating the
lateral noise
detection
Deactivating the
Mute on
Streaming
Activating the
spatialization
You can activate or deactivate the vocal menus of the Parrot
MKi9200. To do so, press the jog wheel and select Settings > Audio
> Spoken menus. Press the jog wheel to activate or deactivate this
option.
To adjust the volume of the ringtone which indicates an incoming call,
press the jog wheel and select Settings > Audio > Ringtone volume
then use the jog wheel to adjust the volume.
• The lateral noise detection of the Parrot MKi9200 allows you to
• To adjust this setting, press the jog wheel and select Settings >
• This option automatically mutes the tuner when a music file is
• You can deactivate this option, and so, mute the tuner manually
The spatialization of the Parrot MKi9200 offers you a threedimensional sound.
• To adjust this setting, press the jog wheel then select Audio
• After having activated the spatialization, you can modify its
adjust automatically the volume depending on the surrounding
noise.
Audio > Lateral noise detection. Press the jog wheel to activate
or deactivate this option.
played. This option is activated by default.
via the Mute cable. To do so, press the jog wheel then select
Settings > Audio > Mute on Streaming. Press the jog wheel to
deactivate this option.
effects > Spatialization. Press the jog wheel to activate or
deactivate this option.
characteristics. To do so, select Audio Effects > Settings >
Spatialization settings.
Parrot MKi9200 – User guide 21
Page 22

Activating the
equalizer
Activating the
Virtual Super
Bass effect
•
The equalizer allows you to adjust the low, medium and high
frequencies depending on your preferences. To activate or
deactivate it, press the jog wheel and select Audio effects >
Equalizer. Press the jog wheel to activate or deactivate this
option.
•
Also, you can choose between 10 default presets to adapt the
frequencies to the music style you are listening to. To do so, press
the jog wheel then select Audio > Settings > eq. settings. Then,
use the jog wheel to modify the frequencies.
Hold down the button for 2 seconds to access the audio
effects menu during playback.
•
The Virtual Super Bass effect allows you to amplify the low
frequencies. To activate or deactivate it, press the jog wheel and
select Audio effects > Virtual Super Bass. Press the jog wheel to
activate or deactivate this option.
•
You can change the settings of the Virtual Super Bass effect by
selecting Audio effects > Settings > Vsb preferences.
Activating the
Repetition /
Random options
Hold down the button for 2 seconds to access the audio
effects menu during playback.
•
To activate or deactivate the random playback of the music files,
press the jog wheel and select Audio effects > Settings >
Random. Press the jog wheel to activate or deactivate this
option....
•
To activate or deactivate the repetition of the music files, press
the jog wheel and select Audio effects > Settings > repetition.
Press the jog wheel to activate or deactivate this option.
If you use an iPod with your Parrot MKi9200, select the Audio
effects > Settings > Random (iPod) and Audio effects >
Settings > Repetition (iPod) options.
Hold down the button for 2 seconds to access the audio
effects menu during playback.
Parrot MKi9200 – User guide 22
Page 23

Updating your Parrot MKi9200
A detailed procedure which explains step by step the update process of your Parrot
MKi9200 is available on our website www.parrot.com.
Hotline
Our hotline is at your disposal from Monday to Friday, between 9 am and 6 pm (GMT +1) by
mail hot-line@parrot.com or by phone:
Italy: [+39] 02 59 90 15 97
Spain: [+34] 902 404 202
UK: [+44] (0)870 112 5872
Germany: 0900 1727768
USA: [+1] (877) 9 Parrot (toll free)
China: [+86] (0)21 6460 1944
Hong Kong: [+852] 2736 1169
France: 01 48 03 60 69
Europe: [+33] 1 48 03 60 69 (Spoken languages: French, English, Spanish and German)
Parrot MKi9200 – User guide 23
 Loading...