

PARROT
MKi9000
Quick start guide
Hurtiginstallasjonsveiledning
Käyttöopas


www.parrot.com
Parrot MKi9000
p.04
p.10
p.15
p.21
p.32
p.33
Installation diagrams........................
English..............................................
Norsk................................................
Suomi...............................................
תירבע................................................
General Information..........................
5
www.parrot.com
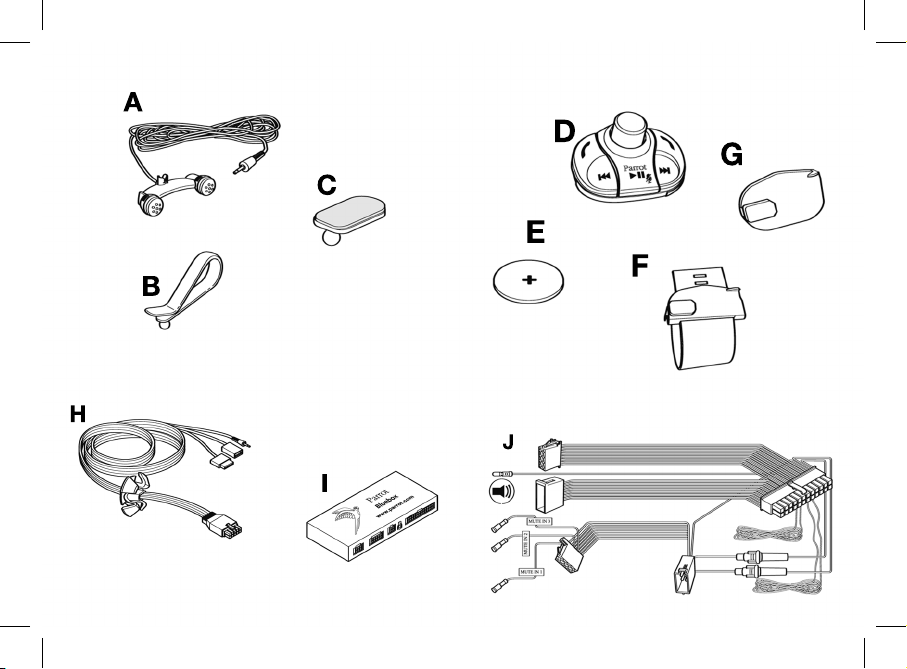
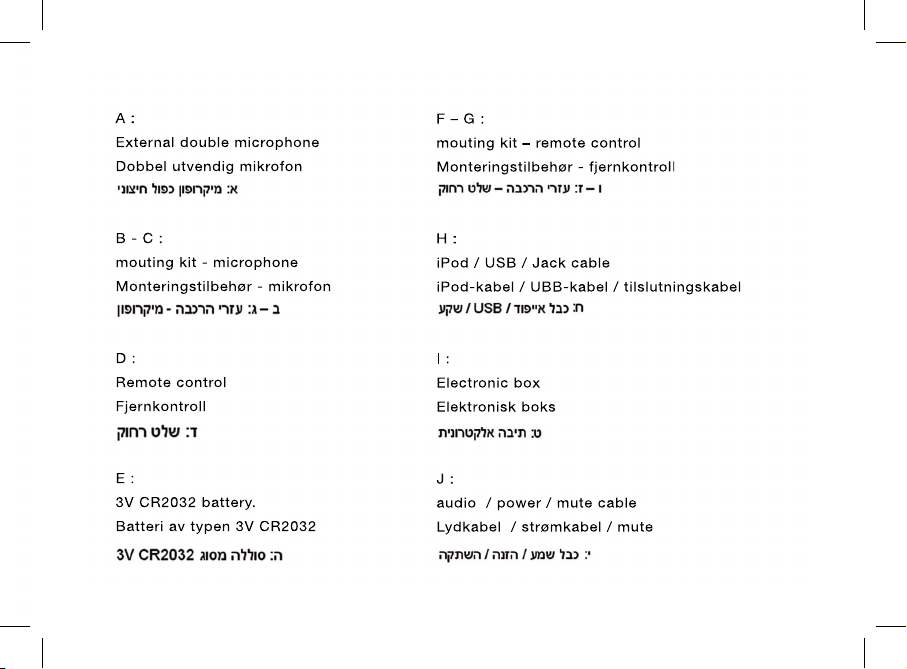
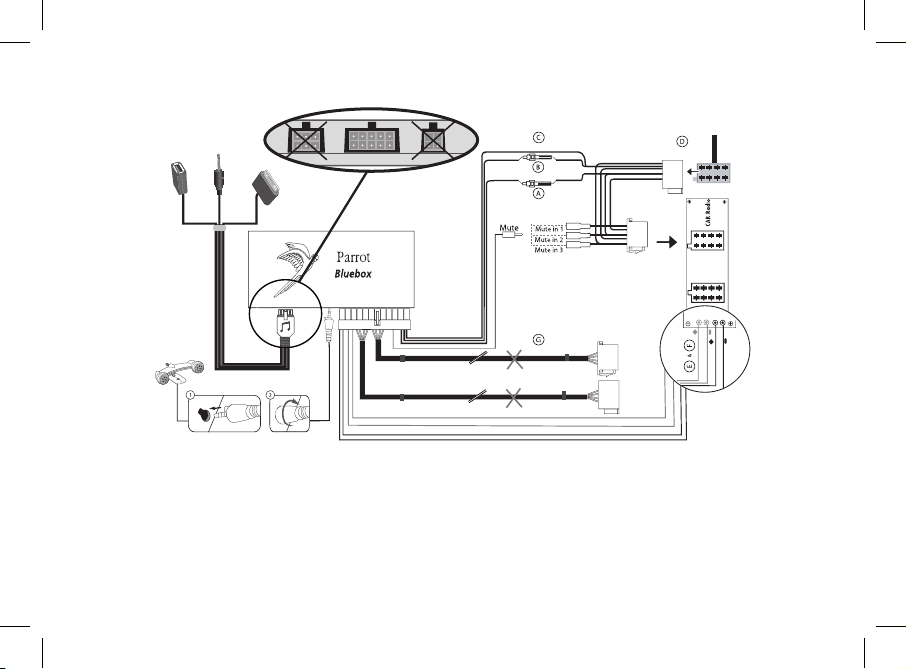
• A: 12V ignition (orange)
• B: 12V constant power supply (red)
• C: Ground
• D: Connection to the vehicle’s power supply
• E : Connection to the vehicle’s speakers
1. Rear right speaker (purple / purple-black)
2. Front right speaker (grey / grey-black)
3. Front left speaker (white / white-black)
4. Rear left speaker (green / green-black)
• F : This wiring is not used.
- Car stereo with an ISO connector
- Bilradio med ISO-tilkobling
- Autoradio ISO-liitännällä
6
www.parrot.com
• A : 12V ignition (orange)
• B : 12V constant power supply (red)
• C : Ground
• D : Connection to the vehicle’s power supply
• E : Line-out 1
1 : Line 1 + : white
2 : Line 1 - : brown
• F : Line-out 2
1 : Line 2 + : red
2 : Line 2 -: black
• G : This wiring is not used
- Car stereo with Line In input
- Bilradio med line-in inngang
- Autoradio Line In-sisäänmenoilla
7
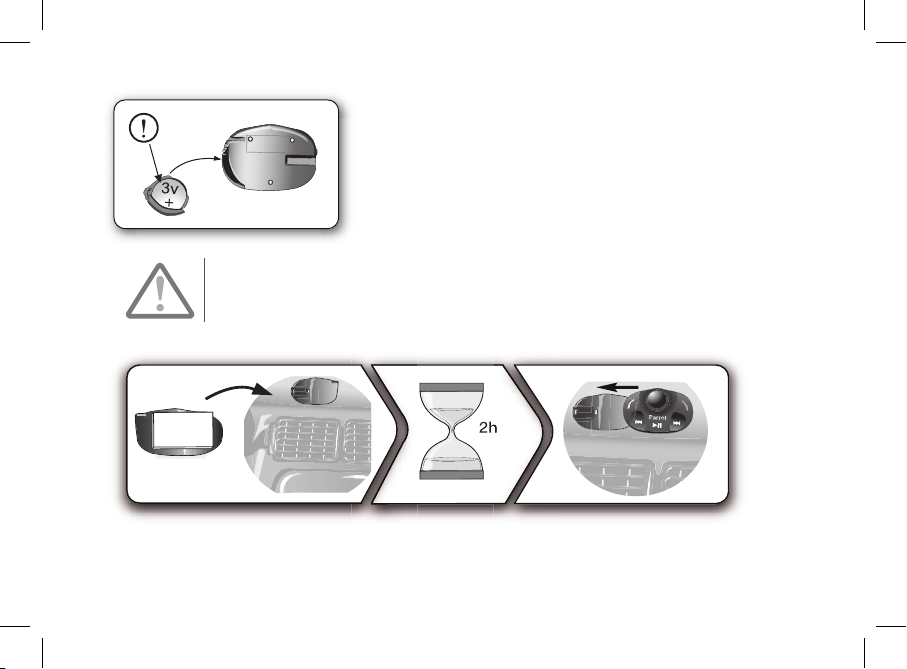
- Inserting the remote control battery
- Innsetting av batteriet til fjernkontrollen
- Kaukosäätimen pariston asennus
The remote control only works with a 3V CR2032 battery.
Fjernkontrollen fungerer kun ved hjelp av et batteri av typen 3V CR2032
Kaukosäädintä voi käyttää vain 3V CR2032-tyypin paristolla.
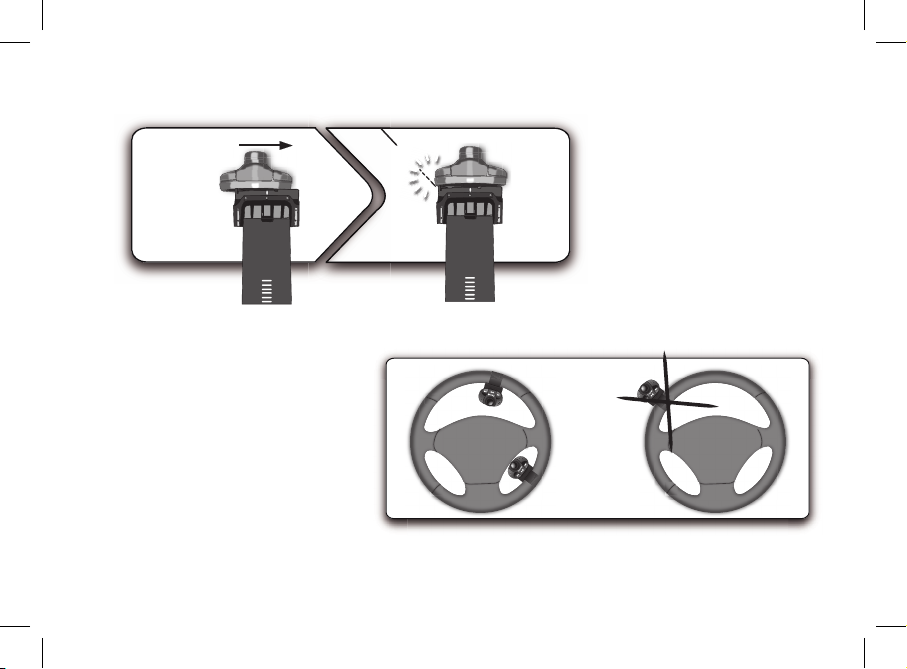
- Installing the remote control on the dashboard
- Montering av fjernkontrollen på dashboardet
- Älä asenna kaukosäädintä ratin ulkopuolelle
8
clic
- Do not install the remote
control on the outside of the
steering wheel
- Ikke monter fjernkontrollen på
yttersiden av rattet
- Kaukosäätimen asennus
kojelautaan
9
This simplified guide of the Parrot MKi9000 gives you the
main instructions to easily use this product. For further
information, consult our website www.parrot.com.
Contents
• Prior to xing the hands-free kit’s different components
inside the car, connect the installation cables, control
keypad and double microphone to the electronic
control unit.
• The cables supplied with the kit feature ISO connectors
and two pairs of line-out jacks. The line-out jacks can be
used if your audio system features this option (use of an
amplifier). Several set-ups are therefore possible
depending on the type of car stereo and your vehicle.
• The mute function is used to cut the sound of your car
stereo to enable a phone call. The choice of the mute-in
jack depends on your car stereo’s conguration.
English
English
The availability of some functionality only depends
on your mobile phone.
► Refer to our website www.parrot.com, in the
Compatibility section, for further information.
Installing the Parrot MKi9000
We would advise our customers to have the Parrot
MKi9000 fitted by a professional.
Installing the Parrot MKi9000..............................................
Car stereo with an ISO connector................................
Car stereo with Line-In jacks.......................................
Car stereo without ISO connectors..............................
Installing the kit’s power cable.....................................
Installing the audio connectors....................................
Installing the electronic box.........................................
Installing the remote control........................................
Installing the microphone.............................................
Using the Parrot MKi9000 for the 1st time.........................
Associating the electronic box with the remote
control..........................................................................
Selecting the language ...............................................
Navigating through the menus.....................................
Pairing and connecting a phone to
the Parrot MKi9000......................................................
Using the telephone function..............................................
Commands..................................................................
Receiving a calll...........................................................
Making a call via voice recognition..............................
Using the Music function.....................................................
Selecting a music source.............................................
Commands...................................................................
10
11
11
11
11
11
12
12
12
12
12
12
12
13
13
13
14
14
14
14
14
10
11
EN
On some vehicles, there is no ignition +12V on the
vehicle’s connectors. You must therefore connect
the orange power supply wire to the fuse box or
another ignition power source.
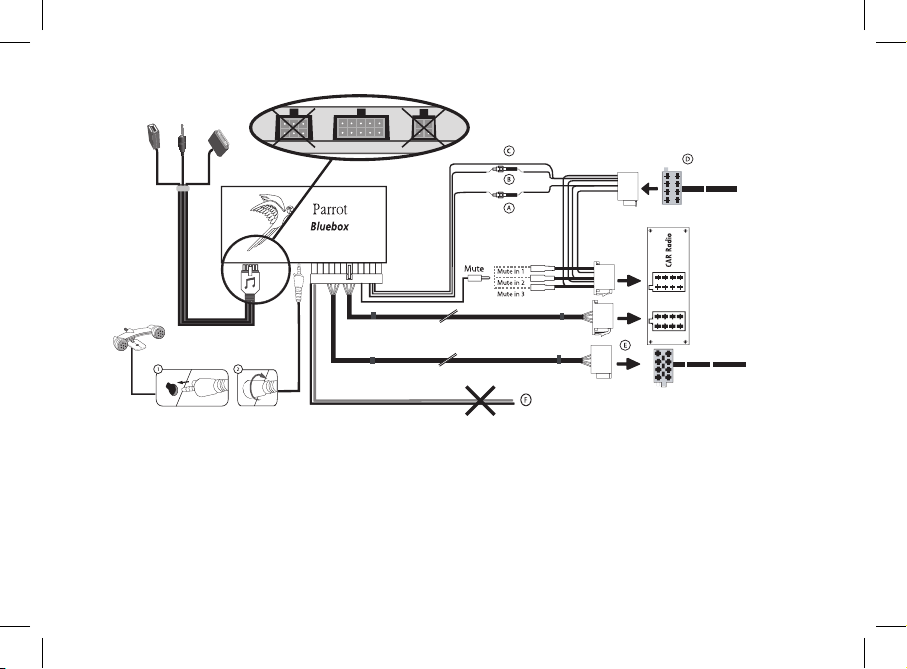
Car stereo with an ISO connector
1. Connect the male connectors of the hands-free kit to the
car stereo.
2. Join the vehicle’s audio and power supply cables to the
female connectors of the Parrot MKi9000.
3. On the installation cable, connect the free yellow wire to
one of the audio system’s corresponding mute-in jacks if
available (mute in 1, mute in 2 or mute in 3).
Car stereo with line-in jacks
• Use this type of connection by wiring a line-out jack
(brown & white wire or red & black wire) to your car
stereo’s line-in jack.
• Using the two pairs of line-out jacks will enable you to
take advantage of the streaming audio function in stereo
over your vehicle’s speakers.
• On the installation cable, connect the free yellow wire to
one of the audio system’s corresponding mute-in jacks if
available (mute in 1, mute in 2 or mute in 3).
Car stereo without ISO connectors
To simplify the wiring procedure, you will need to purchase
an ISO adapter cable. Refer to the range of ISO adapters on
our website: www.parrot.com.
Installing the kit’s power cable
• Refer to your car stereo’s wiring diagram.
• The red wire of the kit’s cable must correspond to the
constant +12V supply, the orange wire to the ignition +12V
and the black wire to ground.
• Check that the orange wire is not connected to the
constant +12V supply, as you could run down the vehicle’s
battery.
• On some vehicles, the red and orange power supply
wires may need to be reversed. This can easily be done
by reversing the two fuse holders on the Parrot MKi9000
installation cable.
Installing the audio connectors
• Connect the music cable to the electronic box and
place the USB / iPod / Jack connectors into the glove
box, the central console or the parcel tray depending on
the configuration of your dashboard.
• To protect the connectors from dust, use the provided
protection cap.

Installing the electronic box
Avoid installing the electronic box near heating or airconditioning system, on a spot directly exposed to sunlight or
behind metal walls.
Installing the remote control
• Choose the place for the remote control inside your
vehicle. We would advise you to fit it in the centre of the
dashboard.
• If you want to place the remote control on the steering
wheel, make sure it is securely attached, so it does
not move when you are driving. Do not install the
remote control on the outside of the steering wheel and
ensure it does not get in the way when driving.
• If you want to place the remote control on the dashboard,
stick the double-sided tape located on the flat side of the
bracket to x it against the dashboard. You can then insert
the remote onto the bracket. Refer to the diagrams p.8.
Installing the microphone
Parrots microphones are directional and need to be
pointed towards the user to pick up clear speech.
Where possible the microphone should be installed near the
front roof light cluster in the centre of the vehicle with a clear
path to the user.
Associating the control unit with the remote control
If the remote control doesn’t seem to be associated to the
electronic box while using the Parrot MKi9000 for the rst
time, press several times the red button while holding down
the Play and green buttons until the «Pairing remote control»
message is said. This has to be done during a 30 seconds
period once the ignition is turned on.
Selecting the language
While using the Parrot MKi9000 for the first time, use the jog •
wheel to browse through the available languages and press
the jog wheel to confirm your selection.
In case of a problem during language selection, hold down •
the red and green buttons for 2 seconds.
Navigating through the menus
• Press the central jog wheel to access the menus.
> The kit says the name of the current menu.
• Browse through the menus by turning the wheel and
confirm with the green button or by pressing the wheel.
• Press the red button or wait a few seconds to exit the menu.
Using the PARROT MKi9000 for the 1st time
12

Pairing and connecting a phone
to the Parrot MKi9000
Prior to using your Parrot MKi9000 with your phone for the
very first time, you must initially pair both devices.
1. From your phone, search for Bluetooth® peripherals.
2. Select «MKi9000» in the list.
3. Enter «0000» on your phone when prompted.
> The Parrot MKi9000 says «Pairing successful» .
> The connection will then be automatic as soon as you
enter your vehicle.
Before using your Parrot MKi9000 telephone function, you
first have to connect both devices.
► Refer to the Pairing and connecting a phone to the
Parrot MKi9000 section for more information.
Commands
Using the telephone function
13
EN
Button
Functions
Short press :
- Answer an incoming call
- Transfer the call on the phone
(discreet mode)
- Exit discreet mode
- Answer a second incoming call /
toggle between two calls
Long press : Call the last dialed number
- Reject an incoming call (or a second
incoming call)
- Hang up
Adjust the communication volume
Short press : Use the DTMF function
(to manage interactive vocal servers)
Mute / unmute the microphone (secret mode)

Receiving a call
An incoming call is indicated by a ringtone. The name of the
caller is announced if his details are known by the kit.
• If you want to answer the call, press the green button.
Then press the red button to end the call.
• If you want to reject this call, press the red button.
Making a call via voice recognition
Press the green button to make a call using the voice recognition of your phone (if your phone supports this feature).
Selecting a music source
• Use the USB, Jack or iPod connectors to connect the
Parrot MKi9000 to your audio player / iPod / USB stick.
If you are using the Parrot MKi9000 with the iPod
Mini, iPod Photo, iPod 3G and iPod Shuffle, then
connect your iPod to the Parrot MKi9000 using the
Jack cable.
Make sure your iPod is updated before using it with
the Parrot MKi9000.
• Press the Play button to launch the music function.
Press the Play button during 2 seconds to activate
/ deactivate the Virtual Bass effect.
• To change the music source, press the jog wheel to access
the source menu and select it in the following order :
- iPod (or iPhone) ;
- USB (MP3 player / USB ash drive) ;
- Audio Bluetooth (audio player supporting A2DP
profile connected via Bluetooth) ;
- Line In (analogue audio player).
Commands
Using the Music function
14
Button
Functions
Short press:
- Start music mode
- Pause / resume playback
Long press: Activate the Virtual Bass effect
Short press: Go back to the beginning
of the track / get to the previous track
Long press : Fast rewind
Short press: Go to the next track
Long press: Fast forward
Adjust the volume

Installere Parrot MKi9000....................................................
Bilradio med ISO-tilkobling.........................................
Bilradio med Line-in innganger ..................................
Bilradio uten ISO-tilkoblinger......................................
Installering av strømkabelen til settet..........................
Montering av lydtilkoblinger........................................
Montering av den elektroniske boksen.......................
Montering av fjernkontrollen.......................................
Installer den dobbelte mikrofonen..............................
Første gang den brukes.....................................................
Forbinde fjernkontrollen og den elektroniske boksen.
Velg språk ...................................................................
Navigere i menyene.....................................................
Pare og tilkoble en mobiltelefon til Parrot MKi9000....
Bruke telefonfunksjonen......................................................
Motta et anrop..............................................................
Foreta et anrop ved hjelp av stemmegjenkjenning......
Kommandoer...............................................................
Bruke musikkfunksjonen.....................................................
Velge en lydkilde..........................................................
Kommandoer................................................................
15
16
16
16
16
16
17
17
17
17
17
17
18
18
18
18
18
19
20
20
21
Funksjonene som er beskrevet i denne
håndboken er kun tilgjengelige dersom din
adresseliste inneholder latinske tegn. Dessuten
må uttalen og tonefallet til språket til Parrot
MKi9000 (engelsk som standard) overholdes.
15
NO
Denne forenklede veiledningen for Parrot MKi9000 gir deg
hovedinstruksjonene du trenger for å bruke apparatet på en
enkel måte.
Bruken av visse funksjoner avhenger utelukkende
av din telefon.
Innhold
Det anbefales å få en fagperson til å utføre denne
installasjonen.
• Før du fester de ulike delene av håndfrisettet i kabinen, så
begynn med å koble de ulike koblene til den elektroniske
boksen. Trekk først ut de opprinnelige tilkoblingene til
kjøretøyets lydsystem.
• De medfølgende kablene er utstyrt med ISO-tilkoblin
ger så vel som to Line-utganger. Line-utgangene kan
brukes dersom lydsystemet ditt har dette alternativet. Flere
monteringer er dermed mulig, avhengig av bilradiotypen og
kjøretøyet ditt.
• Lydløs-funksjonen gjør det mulig å avbryte lyden på
bilradioen for å gi plass til samtale. Valget av Lydløs-inn
gang avhenger av konfigureringen av bilradioen din.
Norsk
Installere Parrot MKi9000

16
Bilradio med ISO-tilkobling
1. Koble håndfrisettets støpsler til bilradioen.
2. Forbind kjøretøyets lyd- og strømsystem til stikkontaktene
på Parrot MKi9000.
3. På monteringskabelen forbinder du den gule frie
ledningen til en av de korresponderende lydløsinngangene
til lydsystemet, dersom det er utstyrt med dette (lydløs inn
1, lydløs inn 2 eller lydløs inn 3).
Bilradio med Line-in innganger
• Bruk denne typen tilkobling ved å forbinde en Line-utgang
(brune og hvite ledninger eller røde og svarte ledninger) til
Line-inngangen på ditt lydsystem.
• Bruken av de to Line-utgangene gjør det mulig å dra nytte
av funksjonen stereo lydstreaming på kjøretøyets
høyttalere.
• På monteringskabelen forbinder du den gule frie ledningen
til en av de korresponderende lydløsinngangene til
lydsystemet, dersom det er utstyrt med dette (lydløs inn 1,
lydløs inn 2 eller lydløs inn 3).
Bilradio uten ISO-tilkoblinger
For å gjøre monteringen lettere, må du anskaffe en ISOadapterkabel. Se utvalget av ISO-adaptere på internettsiden
vår: www.parrot.com.
Installering av strømkabelen til settet
• Se strømskjemaet for din bilradio.
• Den røde ledningen i kabelen til settet må stemme overnes
med +12V permanent, den oransje ledningen til 12V
tenning og den svarte ledningen til jordforbindelsen.
• Kontroller at din oransje ledning ikke er koblet til 12V
permanent, du risikerer å utlade bilbatteriet, noe som vil
medføre at håndfrisettet ikke fungerer.
• På visse kjøretøyer er det nødvendig å bytte om de røde
og oransje strømledningene. Dette utføres ganske enkelt
ved å bytte om på de to sikringsholderne som sitter på
monteringskabelen til Parrot MKi9000.
På visse kjøretøyer er det ikke noen +12V tenning
på tilkoblingene til kjøretøyet. Derfor er det nødvendig å koble den oransje strømledningen til sikringsboksen eller til en annen strømkilde til tenning.
Montering av lydtilkoblinger
• Forbind lydtilkoblingene til strømboksen og monter lydtilk
oblingene (USB/iPod/plugg) i hanskerommet eller midtkon
sollen, avhengig av konfigureringen av dashboardet dit.
• Bruk den medfølgende beskyttelsestoppen.

Montering av den elektroniske boksen
Unngå å montere boksen:
- nærme varme eller aircondition
- på et sted utsatt for direkte sollys
- bak metallvegger.
Montering av fjernkontrollen
• Velg plasseringen av fjernkontrollen i kjøretøyets kabin
Vi anbefaler at du plasserer den midt på dashboardet eller
nærme deg.
• Hvis du setter den på rattet, så sørg for at den er godt
festet, så den ikke rører på seg mens du kjører. Ikke
monter den på yttersiden av rattet, da risikerer den å
sjenere deg når du kjører. Se skjemaene s. 7.
• Hvis du bruker den andre støtten, så bruk den
dobbeltsidige tapen på baksiden av denne for å feste den
til dashboardet. Deretter kan du sette inn fjernkontrollen
på støtten. Se skjemaene s. 8.
Vent i omlag 2 timer etter at du har festet støtten
med tapen, og forsikre deg om at den er godt
festet til dashboardet.
Installer den dobbelte mikrofonen
Den dobbelte mikrofonen skal være vendt mot føreren
og helst installeres mellom solskjermen og det midtre
bakspeilet.
Det anbefales å installere den midt på instrumentbordet.
Forbinde fjernkontrollen og den elektroniske boksen
Dersom fjernkontrollen ikke synes å oppnå forbindelse til den
elektroniske boksen første gang du bruker Parrot Mki9000,
så trykk flere ganger på den røde knappen samtidig som du
holder Play-knappen og den grønne knappen inne. Dette må
gjøres i de første 30 sekundene etter at kjøretøyet startes,
inntil Parrot Mki9000 annonserer «Pairing remote control».
Velg språk
Føste gang du bruker Parrot Mki9000, så benytt hjulet til å
bla gjennom listen over tilgjengelige språk, og trykk deretter
på hjulet for å godkjenne valget ditt.
Hvis du gjør en feil når du skal velge språk, så hold inne den
røde og den grønne knappen samtidig i to sekunder.
17
NO
Første gang den brukes

Navigere i menyene
• Trykk på hjulet i midten for å få tilgang til menyene.
> Settet sier navnet på den aktuelle menyen.
• Naviger i menyene ved å dreie på hjulet, og godkjenn med
den grønne knappen eller ved å trykke på hjulet.
• Hvis du vil gå ut av menyen trykker du på den røde
knappen eller venter noen sekunder.
Pare og tilkoble en mobiltelefon til Parrot MKi9000
Dersom du bruker telefonen din sammen med Parrot
Mki9000 for første gang, må du utføre en paring av de to
apparatene: Når de to apparatene gjensidig har oppdaget
hverandre, er det ikke lenger nødvendig å foreta denne
operasjonen. Slik går du fram:
1. Fra telefonen utfører du et søk etter Bluetooth®.-enheter.
Se mer informasjon i håndboken til telefonen.
> Listen over Bluetooth-enheter vises.
2. Når søket er avsluttet, velger du ”Parrot MKi9000”.
3. Skriv inn ”0000” når du blir spurt om PIN-koden.
> Parrot MKi9000 annonserer « Pairing successful ».
Motta et anrop
Et innkommende anrop angis med en ringetone.
Navnet på kontakten vises dersom nummeret til kontakten
er registrert i adresselisten på telefonen som er forbundet til
Parrot MKi9000-en.
• Dersom du vil akseptere anropet, trykker du på den grønne
knappen. Trykk på den røde knappen for å avslutte
anropet.
• Dersom du vil avvise anropet, trykker du på den røde
knappen.
Foreta et anrop ved hjelp av stemmegjenkjenning
Foreta et anrop via talegjenkjenning Dersom telefonen din
støtter funksjonen talegjenkjenning, så trykk på den grønne knappen for å foreta et anrop ved bruk av funksjonen
talegjenkjenning på telefonen din.
Bruke telefonfunksjonen
18

Kommandoer
Velge en lydkilde
• Bruk USB-, Jack. eller iPod-tilkoblingene til å forbinde
Parrot MKi9000 til din lydleser / MP3-spiller / USB-nøkkel.
Koble din iPod til Parrot Mki9000 via jackkabelen
dersom du bruker de følgende iPod-modellene:
iPod Mini, iPod Photo, iPod 3G og iPod Shuffle.
Forsikre deg om at din iPod er oppdatert før du
bruker den sammen med Parrot Mki9000.
• Trykk på Play-knappen for å starte funksjonen Musikk.
Trykk i 2 sekunder på Play-knappen for å aktivere/
deaktivere effekten Virtual Bass.
• For å endre musikkilden trykker du på hjulet for å få
tilgang til menyen, og velger kilden i overensstemmelse
med følgende rekkefølge:
- iPod,
- USB-enhet,
- enhet tilkoblet via Bluetooth,
- apparat utstyrt med en Jack-utgang.
Knapp Funksjoner
Kort trykk:
- Besvare et innkommende anrop
- Overføre anropet til telefonen
(diskret modus)
- Gå ut av disk ret modus
- Besvare et annet innkommende anrop /
Langt trykk: Foreta et anrop til det senest
oppringte nummeret
- Avvise et innkommende anrop (eller et
annet innkommende anrop)
- Legge på
Justere samtalevolumet
Kort trykk:
- Aktivere funksjonen DTMF
(for å håndtere de interaktive stemme
serverne)
- Deaktivere /aktivere på nytt mikrofonen
(hemmelig modus)
Bruke musikkfunksjonen
19
NO

Knapp Funksjoner
Kort trykk:
- Starte modusen musikk
- Avbryte / fortsette lesingen
Langt trykk: Aktivere effekten Virtual Bass
Kort trykk: Gå tilbake til starten på stykket
/ gå tilbake til forrige stykke
Langt trykk: Foreta en hurtig tilbakespoling
Kort trykk: Gå til neste stykke
Langt trykk: Foreta en hurtig spoling
framover
Justere volumet
20
Kommandoer
Funksjonene forrige/neste er ikke tilgjengelige
dersom Parrot MKi9000 er forbundet til lydleseren
med Jack-kabelen.

Tiettyjen toimintojen käyttö riippuu ainoastaan
puhelimestasi.
► Mene nettisivullemme www.parrot.com, kohtaan
Yhteensopivuus, jos haluat lisätietoja.
Yhteenveto
Tässä käyttöoppaassa kuvatut toiminnot ovat
käytössä vain, jos hakemistosi toimii latinalaisilla
kirjaimilla. On tärkeää noudattaa Parrot MKi9000
-tuotteen käyttämän kielen ääntämystä ja
intonaatiota (alkuperäinen kieli on englanti).
PARROT MKi9000 -tuotteen asennus
Suosittelemme, että annat asiantuntijan asentaa
Parrot MKi9000-tuotteen.
• Ennen kuin kiinnität handsfree-laitteen eri osat autoon,
aloita liittämällä johdot elektroniseen koteloon. Irrota ensin
auton alkuperäisen audiojärjestelmän liittimet.
• Mukana tulevissa johdoissa on ISO-liitännät ja kaksi
Line-ulostuloa. Line-ulostuloja voidaan käyttää, jos autosi
audiojärjestelmä on varustettu kyseisellä vaihtoehdolla. On
olemassa siis useita asennusmahdollisuuksia autoradion ja
auton tyypistä riippuen.
• Mute-toiminnon avulla voit katkaista autoradion äänen ja
vaihtaa puhelutoimintoon. Mute-sisäänmenon valinta riippuu
autoradion kokoonpanosta.
Suomi
Parrot MKi9000 -tuotteen asennus....................................
Autoradio ISO-liitännällä .............................................
Autoradio Line in-sisäänmenoilla ................................
Autoradio ilman « ISO » -liittimiä ................................
Handsfree-setin virtajohdon asennus...........................
Audioliittimien asennus.................................................
Elektronisen kotelon asennus .....................................
Kaukosäätimen asennus..............................................
Tuplamikrofonin asennus.............................................
Parrot MKi9000 -tuotteen ensimmäinen käyttö...............
Kaukosäätimen ja elektronisen
kotelon yhdistäminen....................................................
Valikkojen selaaminen..................................................
Kännykän paritus ja liittäminen
Parrot MKi9000-tuotteeseen........................................
Puhelin-toiminnon käyttö..................................................
Puhelimen hakemiston synkronointi ............................
Komennot.....................................................................
Puheluun vastaaminen ...............................................
Musiikki-toiminnon käyttö.................................................
Audiolähteen valinta ....................................................
Komennot.....................................................................
FI
21
21
22
22
22
22
23
23
23
23
24
24
24
24
25
25
25
25
26
25
26

22
• Varmista, että Parrot MKi9000 -tuotteen johdot eivät ole
taitettu tai jumissa asennuksen jälkeen.
Autoradio ISO-liitännällä
1. Kytke handsfree-setin urosliittimet autoradioon.
2. Liitä audiojohdot ja auton virtalähde yhteen Parrot
MKi9000-tuotteen naarasliittimien kanssa.
3. Liitä asennuskaapelissa vapaa keltainen johto yhteen
audiojärjestelmää vastaavista mute-sisäämenoista, jos
audiojärjestelmässä on sellainen (mute in1, mute in2 tai
mute in3).
Autoradio Line in-sisäänmenoilla
• Käytä tämänkaltaista liitäntää liittämällä « Line » -ulostulo
(ruskea ja valkoinen johto tai punainen ja musta johto)
audiojärjestelmän « Line » -sisäänmenoon.
• Kahden « Line » -ulostuloparin käyttö mahdollistaa
Streaming Audio-toiminnon käytön stereo-tilassa
auton kaiuttimissa.
• Liitä asennuskaapelissa vapaa keltainen johdin yhteen
audiojärjestelmää vastaavista mute-sisäämenoista, jos
audiojärjestelmässä on sellainen (mute in1, mute in2 tai
mute in3).
Autoradio ilman « ISO » -liittimiä
Asennusta helpottaaksesi sinun tulee hankkia
ISO-adapterijohto. Tutustu ISO-adapterimallistoon
nettisivullamme: www.parrot.com.
Handsfree-setin virtajohdon asennus
• Tutustu autoradiosi kytkentäkaavioon.
• Setin kaapelin punaisen johtimen tulee vastata kiinteää
+12V jännitettä, oranssin johtimen katkottavaa 12V
jännitettä ja mustan johtimen auton runkoa.
• Varmista että oranssi johdin ei ole kytkettynä kiinteään12V
jännitteeseen. Muuten auton akku saattaa tyhjentyä ja
handsfree-laite saattaa vaurioitua.
• Joissakin autoissa punainen ja oranssi johdin on
vaihdettava keskenään. Tämä toimenpide käy helposti
vaihtamalla Parrot MKi9000 -tuotteen asennuskaapelissa
olevat sulakepesät keskenään.
Joidenkin autojen autoliittimissä ei ole katkottavaa
+12V jännitettä. Silloin on syytä kytkeä oranssi
johdin sulakerasiaan tai muuhun katkottavaan
virtalähteeseen.

Audioliittimien asennus
• Liitä audioliittimet elektroniseen koteloon ja asenna
audioliittimet (USB / iPod/ Jack) hansikaslokeroon, keskiko
teloon tai ovilokeroon riippuen kojelaudan konguraatiosta.
• Käytä mukana tulevaa suojakorkkia.
Elektronisen kotelon asennus
Vältä kotelon asentamista:
- lähelle lämmitystä tai ilmastointilaitetta
- suoraan auringonvaloon
- metallisen sisäseinän taakse.
Kaukosäätimen asennus
• Valitse kaukosäätimen paikka auton sisällä. Suosittelemme
kaukosäätimen asennusta kojelaudan keskelle tai
lähelle kuljettajaa.
• Jos asennat kaukosäätimen rattiin, tarkista että se on
tiukasti kiinni, niin ettei se liiku autoa ajaessasi. Älä asenna
kaukosäädintä ratin ulkopuolelle, muuten se saattaa häiritä
autolla ajoa.
• Jos käytät toista telinettä, käytä telineen selkäpuolella
olevaa kaksipuolista teippiä telineen kiinnittämiseen
kojelautaan. Sen jälkeen voit kiinnittää kaukosäätimen
telineeseen.
Ennen käyttöä odota noin 2 tuntia tarratelineen
kiinnityksen jälkeen, ja varmista että sen on tiukasti
kiinni kojelaudassa.
Tuplamikrofonin asennus
Tuplamikrofonin tulee olla käännettynä kuljettajaan päin,
ja sen tulee olla asennettuna mielellään häikäisysuojan ja
taustapeilin välissä. Suosittelemme mikrofonin asennusta
keskelle kojelautaa.
FI
23

Kaukosäätimen ja elektronisen
kotelon yhdistäminen
Jos ensimmäisen kerran Parrot MKi9000 -tuotetta käyttäessäsi kaukosäädin ei näytä olevan yhteydessä elektroniseen
koteloon, paina punaista nappia useaan kertaan samalla
kun pidät Play- ja vihreää nappia alhaalla. Suorita tämä
toimenpide 30 sekuntia auton käynnistyksen jälkeen, ja niin
kauan kunnes Parrot MKi9000 -tuotteessa lukee «Pairing
remote control».
Valikkojen selaaminen
• Mene valikkoihin painamalla keskivierityspyörää.
> Setti ilmoittaa ja näyttää valitun valikon nimen.
• Selaa valikkoja vierityspyörää kääntämällä, ja vahvista
valintasi vihreällä napilla tai painamalla vierityspyörää.
• Kun haluat poistua valikosta, paina punaista nappia tai
odotamuutama sekunti.
Kännykän paritus ja liittäminen
Parrot MKi9000-tuotteeseen
Kun käytät puhelintasi ensimmäisen kerran Parrot MKi9000
-tuotteen kanssa, sinun tulee parittaa molemmat laitteet
keskenään: kun laitteet ovat tunnistaneet toisensa, tätä
toimenpidettä ei enää tarvitse suorittaa. Mitä tehdä:
1. Etsi puhelimen avulla Bluetooth®-oheislaitteet. Katso
lisätietoja puhelimen käyttöohjeista.
> Bluetooth-oheislaitteiden luettelo näkyy puhelimessa.
2. Kun haku on päättynyt, valitse « Parrot MKi9000 ».
3. Näppäile « 0000 », kun puhelin kysyy PIN-koodia.
> Parrot MKi9000 ilmoittaa « Pairing successful ».
> Kun puhelin on yhdistetty Parrot MKi9000 -tuotteeseen,
liitäntä kahden laitteen välillä tapahtuu automaattisesti joka
kerta, kun menet sisään autoon.
PARROT MKi9000 -tuotteen ensimmäinen käyttö
24

Puhelin-toiminnon käyttö
Ennen kuin käytät Parrot MKi9000:n puhelin-toimintoa, sinun
tulee liittää puhelin/PDA handsfree-laitteeseen.
► Katso lisätietoja kohdasta Kännykän paritus ja liittäminen
Bluetoothin avulla.
Komennot
Puheluun vastaaminen
Soittoääni ilmoittaa tulevasta puhelusta.
Laite näyttää soittajan nimen, jos soittajan numero on Parrot
MKi9000 -tuotteeseen liitetyn puhelimen hakemistossa.
• Jos haluat vastata puheluun, paina vihreää nappia. Paina
punaista nappia, kun haluat lopettaa puhelun.
• Jos et halua vastata puheluun, paina punaista nappia.
Musiikki-toiminnon käyttö
Audiolähteen valinta
• Liitä Parrot MKi9000 musiikkisoittimeen / MP3-soittimeen /
USB-tikkuun käyttämällä USB-, Jack- tai iPod-liitintä.
$*
Liitä iPod-soitin Parrot MKi9000 -tuotteeseen
jack-johdon avulla, jos haluat käyttää seuraavia
iPod-soittimia: iPod Mini, iPod Photo, iPod 3G ja
iPod Shufe.
Varmista että iPod-soittimesi on päivitetty ennen
kuin käytät sitä Parrot MKi9000 -tuotteen kanssa.
• Paina Play-nappia ja käynnistä Musiikki-toiminto.
Lyhyt painallus:
- Vastaa tulevaan puheluun
- Käynnistää äänentunnistustilan
- Siirtää puhelun puhelimeen (hiljainen tila)
- Poistu hiljaisesta tilasta
- Vastaa toiseen tulevaan puheluun /
vuorottelee useiden puhelujen välillä
Pitkä painallus : Soittaa viimeiseen
soitettuun numeroon
- Kieltäytyy tulevasta puhelusta (tai toisesta
tulevasta puhelusta)
- Lopettaa puhelun
Säätää puhelun äänenvoimakkuuden
Lyhyt painallus :Aktivoi DTMF-toiminnon
(interaktiivisten äänipalvelimien hallinta)
Sulkee / aktivoi mikrofonin (secret-tila)
FI
25

• Kun haluat vaihtaa musiikkilähteen, paina vierityspyörää
ja mene valikkoon. Valitse audiolähde seuraavassa
järjestyksessä:
- iPod,
- USB-laite,
- Bluetooth-liitetty laite,
- Jack-ulostulolla varustettu laite.
Jos Parrot MKi9000 on liitetty iPhoneen ja USBtikkuun, iPhone on etuoikeutettu laite: voit käyttää
vain iPhonen sisältöä.
Komennot
Lyhyt painallus:
- Käynnistää musiikkitilan
- Sammuttaa / aloittaa uudestaan musiikintoiston
Pitkä painallus: Audioefektivalikkojen käyttö
Lyhyt painallus: Palaa kappaleen alkuun /
palaa edelliseen kappaleeseen
Pitkä painallus: Pikakelaus taaksepäin
- Lyhyt painallus: Menee seuraavaan
kappaleeseen
- Pitkä painallus: Pikakelaus eteenpäin
Äänenvoimakkuuden säätö
Edellinen/Seuraava-toiminnot eivät ole käytössä,
jos Parrot MKi9000 on liitetty musiikkisoittimeen
jack/jack-johdolla.
26

27
HE

28

29
HE

30

31
HE

32

33
Warranty
Without prejudice of legal warranty,
Parrot products are warranted during
1 year from the date of purchase for
defects in materials and workmanship,
provided that no deterioration to the
product has been made, and upon
presentation of proof of purchase
(date of purchase, location of sale and
product serial number) to the retailer or
Parrot directly.
Warranty does not cover: upgrading of
the software items of the Parrot products with Bluetooth® cell phones for
compatibility purpose, data recovery,
deterioration of the external aspect
due to normal use of the product,
any damage caused by accident,
misuse, misapplication, or non-Parrot
products. Parrot is not responsible
for storage, loss or damaged to data
during transit or repair.
Any product wrongfully declared to be
defective will be returned to sender
and inspection, process and carriage
costs will be invoiced to him.
Due to the technical nature of this
product, we advise you to ask your
garage mechanic to take care of the
installation. Parrot shall not be held
responsible of any dysfunction caused
by an installation which does not
follow the instructions provided in this
user guide or an incorrect installation.
Correct disposal of This Product
(Waste Electrical & Electronic Equipment)
(Applicable in the European Union
and other European countries with
separate collection systems).
This marking shown on the product or its literature, indicates
that it should not be disposed
with other household wastes at
the end of its working life. To prevent
possible harm to the environment or
human health from uncontrolled waste
disposal, please separate this from
other types of wastes and recycle it
responsibly to promote the sustainable
reuse of material resources.
Household users should contact either
the retailer where they purchased this
product, or their local government
office, for details of where and how
they can take this item for environmen-
tally safe recycling. Business users
should contract their supplier and the
terms and conditions of the purchase
contract. This product should not be
mixed with other commercial wastes
for disposal.
Modifications
The explanations and specications
in this guide are given for information
purposes only and may be modified
without prior notice. They are deemed
to be correct at time of going to press.
The utmost care has been taken when
writing this guide,as part of the aim to
provide you with accurate information.
However, Parrot shall not be held
responsible for any consequences
arising from any errors or omissions
General Information

34
in the guide, nor for any damage
or accidental loss of data resulting
directly or indirectly from the use of the
information herein. Parrot reserves the
right to amend or improve the product
design or user guide without any
restrictions and without any obligation
to notify users. As part of our ongoing
concern to upgrade and improve our
products, the product that you have
purchased may differ slightly from the
model described in this guide.
If so, a later version of this guide might
be available in electronic format at Parrot’s website at www.parrot.com.
FCC Compliance
Statement
This device complies with part 15 of
the FCC rules. Operation is subject to
the following two conditions:
(1). this device may not cause harmful
interference, and
(2). this device must accept any
interference received, including
interference that may cause unde
sired operation.
Note: The manufacturer is not responsible for any radio or tv interference
caused by unauthorized modifications
to this equipment. Such modifications
could void the user’s authority to
operate the equipment.
Declaration of Conformity
We, Parrot S.A. of 174 quai
de Jemmapes, 75010 Paris,
France, declare under our
sole responsibility that our product,
the Parrot MKi9000 to which this
declaration relates in conformity with
appropriate standards EN300328,
EN300220-1, for a class 2 receiver,
EN301489-17, EN301489-3, EN60950
following the provision of Radio
Equipment, Telecommunication
Equipment directive (1999/5/EC
R&TTE), with requirements covering
EMC directive 89/336/EEC, Low
Voltage directive 73/23/EEC and
automotive directive 2006/28/EC.
Identification N. 394 149 496 R.C.S.
PARIS - Parrot S.A.
Copyrights
Copyright © 2009 Parrot. All rights
reserved. The total or even partial
reproduction, transmission or storage
of this guide in any form or by any
process whatsoever (electronic,
mechanical, photocopy, recording or
otherwise) is strictly prohibited without
prior consent from Parrot.
Licences
The Bluetooth ® word mark and logos
are owned by the Bluetooth SIG, Inc.
and any use of such marks by Parrot
S.A. is under license.
Bluetooth QDID :
B013655, B013858, B012423
iPod is a trademark of Apple Inc, registered in the US and others countries.
Made for iPod means that an electronic accessory has been designed
to connect specifically to iPod and
has been certified by the developer to
meet Apple performance standards.
«Works with iPhone» means that
an electronic accessory has been
designed to connect specifically to

35
iPhone and has been certified by the
developer to meet Apple performance
standards.
Other trademarks and trade names are
those of their respective owners.
Compatibility problems
Some special edition cars can be
released with some differences from
the original model. This could cause
some compatibility problems with the
interfaces.
Our company is not responsible of
compatibility problems caused by new
equipment or devices updated by the
car manufacturer without advise.
Speex & Flac Licences
Redistribution and use in source and
binary forms, with or without modification, are permitted provided that the
following conditions are met:
• Redistributions of source code must
retain the above copyright notice,
this list of conditions and the following
disclaimer.
• Redistributions in binary form must
reproduce the above copyright notice,
this list of conditions and the following
disclaimer in the documentation and/or
other materials provided with the
distribution.
• Neither the name of the Xiph.org
Foundation nor the names of its
contributors may be used to endorse
or promote products derived from this
software without specific prior written
permission. This software is provided
by the copyright holders and contribu-
tors ``as is’’ and any express or implied
warranties, including, but not limited
to, the implied warranties of merchantability and fitness for a particular
purpose are disclaimed. In no event
shall the foundation or contributors be
liable for any direct, indirect, incidental,
special, exemplary, or consequential
damages (including, but not limited to,
procurement of substitute goods or
services; loss of use, data, or profits;
or business interruption) however
caused and on any theory of liability,
whether in contract, strict liability,
or tort (including negligence or otherwise) arising in any way out of the use
of this software, even if advised of the
possibility of such damage.
Generelle opplysninger
Garanti
Med forbehold for lovlig fastsatt garanti
er Parrots produkter garantert med
hensyn til deler og arbeid i ett (1) år
fra innkjøpsdato, bortsett fra dersom
produktet er endret. Kjøpsbevis (med
angivelse av innkjøpsdato og produktets
serienummer) må forelegges forhandler
eller Parrot direkte. Garantien dekker
ikke oppdatering av programvare som
er lastet inn i Parrots produkter med
Bluetooth®-mobiltelefoner med sikte
på kompatibilitet eller gjenoppretting
av data. Garantien dekker heller ikke
utvendige skader på produktet ved
normal bruk, skader grunnet ulykke,
unormal eller uautorisert bruk eller
bruk av produkter som ikke stammer
fra Parrot. Parrot er ikke ansvarlig for
lagring eller tap/ødeleggelse av data
under transport eller reparasjon.
Hvis det viser seg at det innsendte

produktet ikke er defekt, vil det
bli returnert til avsenderen, og
utgiftene forbundet med behandling,
kontroll og transport vil bli fakturert
vedkommende. Grunnet dette
produktets tekniske karakter anbefales
det å få utført installasjonen på
verkstedet. Parrot er ikke i noe tilfelle
ansvarlig for funksjonsfeil som skyldes
installasjon i strid med instruksjonene
i bruksanvisningen og/eller feil når du
selv har utført installasjonen.
Viktig merknad: Settet må kobles til 12V
permanent og til 12V etter tenning.
Korrekt avhending av dette produkt
(håndtering av elektrisk
og elektronisk avfall)
Denne merkingen som vises på
produktet eller dens dokumentasjon,
indikerer at den ikke skal
kastes sammen med ordinært
husholdningsavfall ved slutten av sin
levetid. For å hindre mulige skade
på miljøet eller menneskelig helse fra
ukontrollert avfallsavhending, vennligst
atskill dette fra andre typer avfall og
resirkuler det ansvarlig for å fremme
bærekraftig gjenbruk av materielle
res-surser. Husholdningsbrukere bør
kontakte enten forhandleren der de
kjøpte produktet, eller lokale myndigheter, for detaljer om hvor og hvordan
frakte denne artikkelen for miljømessig
trygg resirkulering.Forretningsbrukere
bør kontakte sin leverandør og
undersøke vilkårene i kjøpekontrakten.
Dette produktet skal ikke blandes med
kommersielt avfall som skal kastes.
Endringer Forklaringene og spesifikasjonene i denne veiledningen gis kun i informasjonsøyemed og kan endres uten
forvarsel. De anses for å være korrekte
på trykketidspunktet. Ved utarbeidelsen av denne veiledningen har vi gått
svært omhyggelig frem for å gi deg
nøyaktig informasjon. Men Parrot kan
ikke holdes ansvarlig for eventuelle følger som oppstår ved feil eller utelatelser i veiledningen, eller for skader eller
tap av data som direkte eller indirekte
skyldes bruken av informasjonene i
håndboken. Parrot forbeholder seg
retten til å endre eller forbedre produktets utforming eller innholdet i bruker-
veiledningen uten forbehold og uten
forpliktelse til å informere brukerne. I
rammen av vårt kontinuerlige arbeid
med å oppgradere og forbedre våre
produkter kan det være at produktet
du kjøpte er noe forskjellig fra modellen
som er beskrevet i denne veiledningen. Er dette tilfelle, kan en oppdatert
versjon av denne veiledningen være
tilgjengelig i elektronisk format på Parrots webområde på www.parrot.com.
Registrerte varemerker
Bluetooth-navnet og -logoen er
registrerte varemerker for Bluetooth
® SIG, Inc., og all bruk av disse
av Parrot S.A. skjer under lisens.
iPod er et merke fra Apple Inc. registrert
i USA og andre land.
Etiketten «Made for iPod” betyr at
et elektronisk tilbehør er blitt utviklet
spesielt for iPod og at dette utstyrets
utvikler garanterer at det oppfyller
Apples normer for ytelse.
Alle andre handelsmerker og registrerte
varemerker anført i dette dokumentet er
beskyttet av copyright-lovgivningen og
tilhører sine respektive eiere.
36

Takuu
Haittaamatta laillista takuuta, Parrottuotteilla sekä niiden osilla ja huollolla on 1 vuoden takuu ostopäivästä
lähtien, lukuunottamatta tuotteen
kulumista. Takuun voi todistaa ostotositteella (ostopäivä ja -paikka sekä
tuotteen sarjanumero) jälleenmyyjän
luona tai suoraan Parrot-yrityksessä.
Takuu ei kata Bluetooth® kännyköiden
kanssa toimivien Parrot-tuotteiden
sisältävien ohjelmistojen päivitystä
seuraavissa tarkoituksissa: yhteensopivuus, tietojen talteenotto, tuotteen ulkoinen kuluminen joka johtuu tuotteen
normaalista käytöstä, mikä tahansa
onnettomuuden, tuotteen epänormaalin tai luvattoman käytön tai muun kuin
Parrot-tuotteen aiheuttama vahinko.
Parrot ei ole vastuussa kuljetuksen
tai korjauksen aikana tapahtuvasta
tuotteen säilytyksestä, katoamisesta tai
tietojen vahingoittamisesta.
Tuote, josta ei löydy minkäänlaista
vahinkoa tai vikaa palautetaan lähettäjälle. Lähettäjä maksaa käsittely-,
tarkastus- ja kuljetuskulut. Tuotteen
teknisten ominaisuuksien takia suosittelemme, että annat huoltomiehen
asentaa sen. Parrotia ei voi missään
tapauksessa pitää vastuussa tuotteen
toimintahäiriöstä, joka johtuu asennuksesta, jossa ei ole otettu huomioon
käyttöoppaan ohjeita ja/tai käyttäjän
itsensä suorittamasta vääränlaisesta
asennuksesta.
Tuotteen kierrätys
Sähköiset ja elektroniset
laitteistojätteet
Tuotteessa ja sen käyttöoppaassa
oleva tunnus merkitsee, että tuotetta
ei saa hävittää tavallisten kotitalousjätteiden kanssa tuotteen käyttöajan
loputtua. Jätteiden valvomaton
hävittäminen voi aiheuttaa vahinkoa
ympäristölle ja ihmisen terveydelle. Älä
sekoita tuotetta muiden tyyppisten jätteiden kanssa, vaan kierrätä se oikealla
ja vastuullisella tavalla. Näin edistät
materiaalisten aineiden kestävää
uudelleenkäyttöä.
Yksityiset kuluttajat voivat ottaa
yhteyttä siihen jälleenmyyjään, joka on
myynyt tuotteen heille tai oman kunnan
palveluihin saadakseen tietoja tuotteen
hävittämisestä ja sen ympäristöys-
tävällisestä kierrätyksestä. Yritykset
voivat ottaa yhteyttä tavaratoimittajaansa ja hakea lisätietoja tuotteen
myyntisopimuksen ehdoista. Tuotetta
ei saa hävittää muiden kaupallisten
jätteiden kanssa.
Muutokset
Käyttöoppaan sisältämät ohjeet ja
tiedot ovat viitteellisiä ja niitä voidaan
muuttaa ilman ennakkoilmoitusta.
Käyttöoppaan tiedot ovat oikeita
oppaan tulostushetkellä. Tiedot on
kirjoitettu suurella huolella, jotta käyttäjä saisi käyttöönsä mahdollisimman
tarkat tiedot.
Parrot S.A. yritystä ei voida kuitenkaan
pitää vastuullisena suorasti tai
epäsuorasti mahdollisesta tahattomasta vahingosta tai tietojen katoamisesta,
joka johtuu kyseisestä käyttöoppaasta
puuttuvasta tai virheellisestä tiedosta.
Parrot S.A.
Yleiset tiedot

pidättää oikeuden korjata tai parantaa
tuotetta sekä sen käyttöopasta ilman
rajoituksia tai varoittamatta käyttäjää
siitä etukäteen.
Parrot S.A. kehittää jatkuvasti
tuotteitaan, joten ostamasi tuote
saattaa olla hieman erilainen kuin
käyttöoppaassa esitelty tuote. Siinä
tapauksessa voit yrittää hakea uuden
elektronisen version käyttöoppaasta
nettisivulla www.parrot.com.
Rekisteröity tavaramerkki
Bluetooth nimi ja logo ovat Bluetooth
®
SIG, Inc.in rekisteröimiä tavaramerkkejä.
Parrot S.A. käyttää edellä mainittuja
tavaramerkkejä luvanalaisesti.
iPod on Apple Inc. yrityksen tavarame-
rkki, joka on rekisteröity Yhdysvalloissa
ja muissa maissa.
« Made for iPod » -logo ilmaisee, että
elektroninen lisätarvike on kehitetty
erityisesti iPodia varten, ja että sen kehittäjä vahvistaa, että lisätarvike vastaa
Applen suorituskykynormeja.
« Works with iPhone » -logo ilmaisee,
että elektroninen lisätarvike on kehitetty
erityisesti iPhonea varten, ja että sen
kehittäjä vahvistaa, että lisätarvike
vastaa Applen suorituskykynormeja.
Kaikki muut käyttöoppaassa mainitut
kaupalliset merkit ja rekisteröidyt
tavaramerkit on suojeltu tekijänoikeuksilla (Copyright), ja ne ovat jokaisen
omistajan omaa omaisuutta.
Yhteensopivuusongelmat
Jotkut rajoitetusti valmistetut automallit
voivat sisältää hieman eroavaisuuksia
alkuperäiseen automalliin verrattuna.
Se voi aiheuttaa tiettyjä yhteensopivuusongelmia tämän tuotteen kanssa.
Parrot S.A. ei ole vastuussa mahdollisista yhteensopivuusongelmista
jotka johtuvat lisätyistä laitteistoista,
joista valmistaja ei ole etukäteen
ilmoittanut.
Allmän information
FCC ID: RKXMK6000PLUS
Hotline
Our hotline is at your disposal from Monday to Friday between 9 am and 6 pm (GMT + 1) - Hot-line@parrot.com
Italy : [+39] 02 59 90 15 97
Spain : [+34] 902 404 202
UK : [+44] (0)844 472 2360
Germany : 0900 1727768
USA : [+1] (877) 9 Parrot (toll free)
China : [+86] 755 8203 3307
Hong Kong : [+852] 2736 1169
France : 01 48 03 60 69
Europe : [+33] 1 48 03 60 69 (Spoken languages : French, English and Spanish)

www.parro t.com
 Loading...