

Page 1
PARROT
MINIKIT Slim Series
Quick start guide
Kiire paigaldusjuhend
Īsa lietošanas instrukcija
Trumpa naudojimosi instrukcija
Page 2
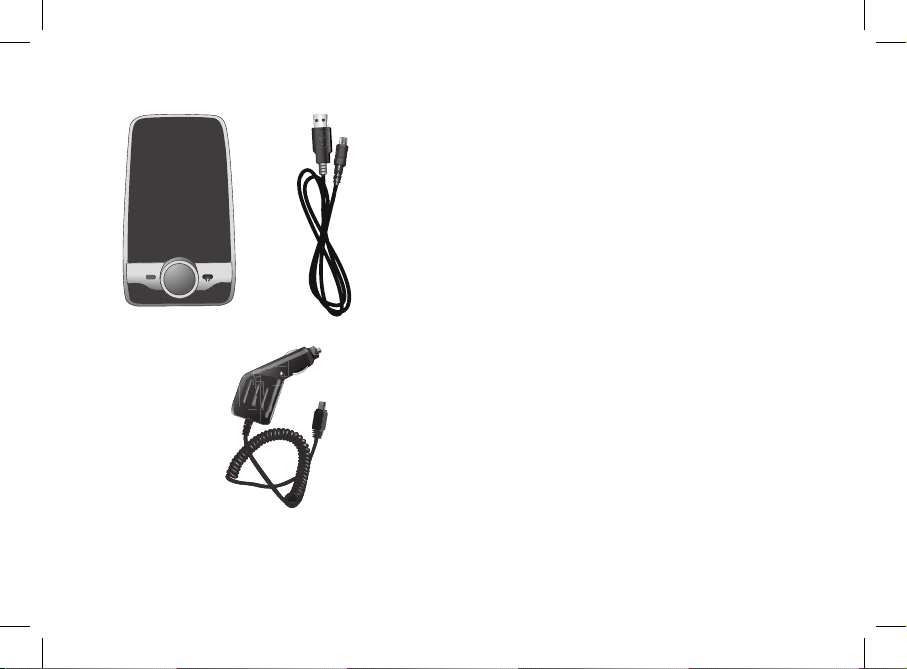
- 12 V accessory socket charger - mini USB
- 1 mini-USB tüüpi sigaretisüütaja pistikuga 12V laadija
- 1 mini USB tipa 12 V lādētājs, ko pievieno auto piesmēķētājam
- 1 mini USB tipo 12V įkroviklis iš cigarečių pridegiklio
- USB/mini USB cable
- 1 USB/Mini-USB kaabel
- 1 USB kabelis – mini USB
- 1 mini USB laidas
Page 3

www.parrot.com
Parrot MINIKIT Slim
English.............................................
Eesti.................................................
Latviešu...........................................
Lietuviškai.......................................
General Information.........................
p.05
p.09
p.13
p.17
p.21
Page 4
4
B
B
PIN code : 1234
A
A
PI
N co
de
: 1234
C
C
Reset
Mini USB
Page 5
5
English
English
Before you begin
About this
guide
In order to limit our paper consumption, and as part of our environmentally friendly and responsible approach, Parrot prefers to put user documents online rather than print them out.
This simplified guide to the MINIKIT Slim is therefore limited to providing you with the main instructions
that will make it easy for you to use the device. More information can be found on the Support & Down-
loads section of our website, www.parrot.com: the full manual, FAQs, tutorials, and more.
The explanations provided in this guide are for any MINIKIT Slim model (MINIKIT Slim, MINIKIT Limited Edition etc.)
If your MINIKIT Slim gets out of reach while driving, stop the vehicle in a safe location before picking or hanging up a call.
The MINIKIT Slim is a high technology product. Please handle the speaker with care. The cigar lighter charger of the MINIKIT Slim can only be used in cars. -
Warning
Download the latest update for free (and check the update procedure) on our website www.parrot.com,
in the Support & Downloads section. These updates will enable you to receive new features and improve
the product’s compatibility.
Software
updates
http://www.parrot.com/uk/support
Complete user guide, tutorials, software updates...
Page 6
6
English
Charging the MINIKIT Slim
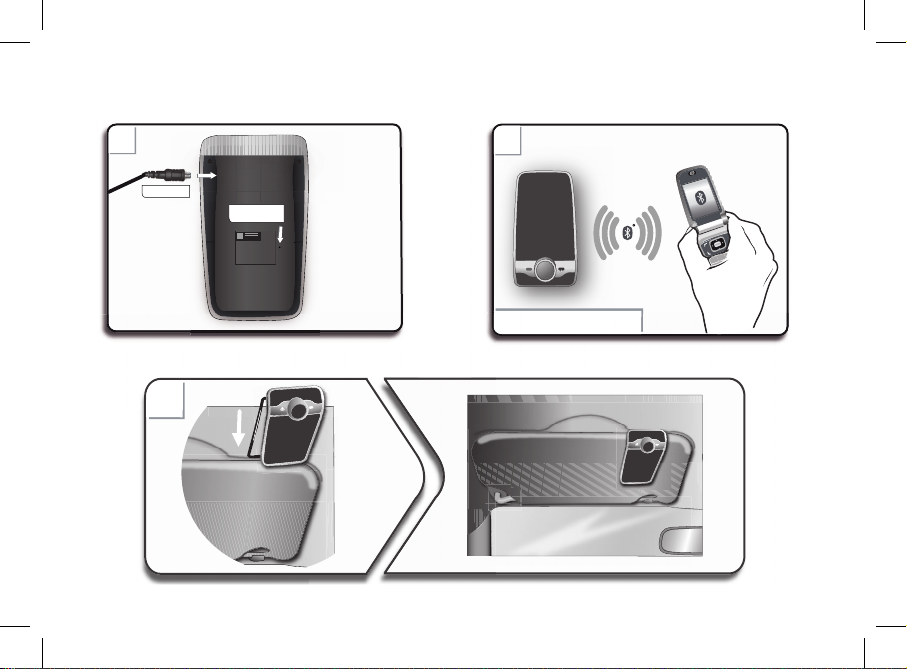
The MINIKIT Slim must be charged before being used for •
the first time. To do so, plug the charger into your vehicle’s
cigar lighter or connect the MINIKIT Slim to your computer
using the provided USB/mini-USB cable (► figure A p.4).
The LED located next to the mini-USB port turns red toin-•
dicate that the battery is being charged. The LED turns off
once the battery is fully charged.
When the battery level is low, the MINIKIT Slim emits a •
series of beeps.
Installing the MINIKIT Slim
Use the clip located on the back of the MINIKIT Slim to fix it to
the sun visor of your vehicle (► figure C p.4).
Turning the MINIKIT Slim on / off
Press the red • button to turn on the MINIKIT Slim.
Hold down the • button for 2 seconds to turn it off.
Accessing the MINIKIT Slim menu
Press the jog wheel to access the main menu. •
Browse through the menus by turning the jog wheel and •
confirm with the green button or by pressing the jog
wheel.
To exit the menu, press the red • button or wait for a
few seconds.
Pairing and connecting a phone / PDA
by Bluetooth®
Before using the MINIKIT Slim with your phone, you first •
have to pair both devices. The pairing process is only
required once.
From your 1. Bluetooth phone, search for Bluetooth
peripherals.
Select “MINIKIT Slim”.2.
Enter the “1234” PIN code and validate. 3.
> The MINIKIT Slim says «Pairing successful» when
both devices are paired.
Depending on the model of your phone, the connection •
will then be automatic as soon as you enter your vehicle.
Getting started
Page 7
Synchronising the phonebook
With some • Bluetooth phones, the phonebook is
automatically synchronized in the kit’s memory.
If your phone doesn’t support automatic synchronization, •
you can also send contacts manually from your mobile to
the car kit via Bluetooth. To do so:
From the main menu, select 1. Receive contacts.
> The kit says «Awaiting a contact».
Refer to your phones’ user guide for more informa-2.
tion about sending contacts (via Object Push).
Recording voice tags
All your contacts, after automatic synchronization or Object •
Push process, are directly provided with a voice tag in the
MINIKIT Slim. Consequently, you don’t have to record your
own voice tag on each contact to make a call via the voice
recognition process.
However, if the MINIKIT Slim doesn’t understand the name •
of one of your contacts or if a voice tag is too long, you can
record a new one. To do so, press the jog wheel and select
Add voice tags.
Receiving a call
An incoming call is indicated by a ringtone. The name of •
the caller is announced if his number is recorded in the
phonebook of the phone connected to the MINIKIT Slim.
If you want to answer the call, press the green button. Then •
press the red button to end the call.
If you want to refuse this call, press the red button.•
Making a call
To make a call via voice recognition:•
Press the green button to launch the voice recognition 1.
feature.
> The MINIKIT Slim asks you the name of the contact
you want to call.
Say the name of the contact and the type of number 2.
(«Work», «Cellphone»...) if there are several numbers
associated to your contact.
> The call is automatically launched if the voice tag is
correctly understood.
> If it is not the case, a confirmation message is asked
by the kit. Confirm by saying “Yes” or “Call”.
At any time, press the red key to exit voice recognition
mode.
7
English
Using the telephone function
Page 8

To make a call manually: •
Press the jog wheel to enter the main menu and select 1.
Phonebook.
> You access the phonebook of the connected phone.
Select a letter and push the jog wheel.2.
Once the contact chosen:3.
Press the green key to call this contact; Use the jog wheel to choose between different num- bers of the same contact.
Hold down the green key of the MINIKIT Slim for two •
seconds to redial the last dialled number.
Accessing the MINIKIT Slim menu
Use the jog wheel during a call to adjust the communication •
volume. The volume setting is saved for subsequent calls.
During a call, if you want to continue the conversation on •
your phone (private conversation), press the button of the
MINIKIT Slim.
During a call, the MINIKIT Slim allows you to send DTMFs •
to manage your voice mail for example. To do so, press
the jog wheel to access the DTMF menu.
The kit says «Memory full»
You can pair up to five devices. If you attempt to pair a sixth
phone, the kit says «memory full». You must clear the memory
by holding down both the red and green buttons for three
seconds. Doing so also clears all the contacts.
The kit seems to be frozen
In case of malfunction, you can reboot the MINIKIT Slim.
1. Press simultaneously the jog wheel and the Reset button
located at the back of the MINIKIT Slim (► figure A p.4).
2. Release the Reset button.
> You can now release the jog wheel.
The kit does not seem to work with my phone
Make sure your phone is compatible with the MINIKIT Slim. •
To do so, refer to the compatibility list of the MINIKIT Slim
available on our website www.parrot.com, in the Support
& Downloads section.
If your phone is compatible with the MINIKIT Slim, make •
sure you have the latest software version on your MINIKIT
This update and the update procedure are available on our
website www.parrot.com, in the Support & Downloads
section.
8
English
Troubleshooting
Page 9
9
Eesti
Eesti
Enne alustamist
Juhendist
Paberi tarbimise piiramiseks ning võimalikult vastutustundliku ja keskkonda austava tegutsemise nimel
eelistab Parrot riputada dokumendid kasutajatele üles internetti, mitte neid trükkida.
Käesolev Parrot MINIKIT Slim lihtsustatud juhend annab teile seega vaid peamised juhised, mis võimaldavad teil seadet lihtsalt kasutada. Rohkem infot leiate meie kodulehe www.parrot.com alajaotusest
Klienditugi ja allalaadimine: täieliku kasutusjuhendi, KKK, õppeprogrammid...
Värskendamine
Laadige tasuta alla oma toote tarkvara viimane versioon (ja uurige värskendusprotseduuri) meie
kodulehel www.parrot.com, alajaotus Klienditugi ja allalaadimine. Värskenduste abil saate kasutada uusi
funktsioone ning parandada toote ühilduvust.
http://www.parrot.com/uk/support
Complete user guide, tutorials, software updates...
Esimene kasutuskord........................
Telefon...............................................
Sagedasemad vead..........................
p.10
p.11
p.12
Kokkuvõte
Page 10
10
Eesti
Parrot MINIKIT Slim laadimine
Enne esimest kasutuskorda tuleb MINIKIT Slim aku laadida. •
Kasutage laadimiseks oma sõiduki sigaretisüütaja pesa või
ühendage MINIKIT Slim komplekti kuuluva USB / mini-USB
kaabli abil arvutiga (► joonis A, lk .4).
Laadimist näitab mini-USB liitmiku küljel olevas LEDis •
süttiv punane valgus. Kui laadimine on lõppenud, LED
kustub. Laadimise kestus on 3 tundi ja 30 minutit.
Aku tühjenedes annab MINIKIT Slim sellest märku lühikeste •
helisignaalidega.
Parrot MINIKIT Slim paigaldamine
Kinnitage Parrot MINIKIT Slim selle tagaküljel olevat kinnitus
kasutades sõiduki päikesevarju külge. (► joonist lk .4).
MINIKIT Slim sisse-/väljalülitamine
Minikit SLIM sisselülitamiseks vajutage nupule •
Minikit SLIM väljalülitamiseks hoidke nuppu •
2 sekundit all.
Menüüs liikumine
Vajutage keskmisele nupule, et avada menüüd. •
> Komplekt nimetab ja näitab avatud menüü nime.
Liikuge menüüdes nuppu keerates ning kinnitage rohelise •
nupuga või keskmisele nupule vajutades.
Menüüst väljumiseks vajutage punasele nupule või oodake •
mõni sekund.
Mobiiltelefoni sobitamine ja ühendamine
Parrot MINIKIT Slim-ga.
Kui te kasutate telefoni Parrot MINIKIT Slim-ga esimest •
korda, peate kaks seadet omavahel sobitama: kui mõlemad
seadmed on teineteist tuvastanud, ei ole seda toimingut
vaja enam teha. Selleks:
äivitage oma telefonis Bluetooth® välisseadmete 1.
otsing. Uurige edasise informatsiooni saamiseks oma
telefoni kasutusjuhendit.
> Telefon näitab Bluetoothi välisseadmete nimekirja.
Otsingu lõppemisel valige „Parrot MINIKIT Slim“.2.
Kui teilt küsitakse PIN-koodi, sisestage „1234“. 3.
> Parrot MINIKIT Slim teatab: „Pairing successful“.
> Kui teie telefon on Parrot MINIKIT Slim-ga sobitatud,
on nende kahe seadme vaheline ühendus automaatne
iga kord, kui te autosse istute.
Esimene kasutuskord
Page 11

Telefoniraamatu sünkroniseerimine
Mõne Bluetooth telefoni puhul sünkroniseeritakse telefoni •
kontaktid automaatselt komplekti mällu. Sünkroniseeritakse ainult telefoni mällu salvestatud kontaktid.
Kui teie telefon ei toeta automaatset sünkroniseerim •
ist, võite telefoni kontaktid saata Parrot MINIKIT Slim-le ka
Bluetooth’i kaudu. Selleks:
Vajutage keskmisele nupule ning valige 1. Receive
contacts.
Uurige oma telefoni kasutusjuhendit, saatmaks 2.
kontakte Object Pushi kaudu.
Tunnussõnade salvestamine
Parrot MINIKIT Slim määrab kõigile kontaktidele pärast •
sünkroniseerimist või Object Push-funktsiooni kasutades
saatmist tunnussõna. Nii langeb ära vajadus salvestada
igale kontaktile eraldi häälvalimise kasutamiseks vajalik
tunnussõna.
Ent juhul, kui Parrot MINIKIT Slim mõne kontakti nime •
valesti tõlgendab või kui soovite salvestada lühema
tunnussõna, saate seda muuta. Selleks vajutage nupule
ning valige Add voice tags.
Kõne vastuvõtmine
Sissetuleva kõne märguanne on helin. Kontakti nimi teatat •
akse, kui kontakti number on salvestatud MINIKIT Slim-ga
ühendatud telefoni telefoniraamatusse.
Kui te soovite kõne vastu võtta, vajutage rohelisele nupule. Vajutage seejärel kõne lõpetamiseks punasele
nupule.
Kui te ei soovi kõnet vastu võtta, vajutage punasele nupule.
Kui te olete aktiveerinud „võlusõnad“, saate kasutada •
häälkäsklusi sissetuleva kõne vastu võtmiseks või sellest
keeldumiseks.
Võlusõna « - Accept» abil saate sissetuleva kõne vastu
võtta.
Võlusõna « - Reject» abil saate sissetulevast kõnest
keelduda.
Kõne tegemine
Kõne tegemiseks kõnetuvastuse abil:•
Vajutage rohelisele nupule, et alustada kõnetuvastuse 1.
protsessi.
> MINIKIT Slim küsib teilt kontakti nime, kellele te
tahate helistada.
11
Eesti
Telefon
Page 12

Nimetage kontakti nimi, kellele te tahate helistada, ja 2.
selle järel numbri tüüp («Work», «Cellphone»...)
kui kontaktil on mitu numbrit.
> Kõne kontaktile algab automaatselt, kui häälkäsklus
oli arusaadav.
> Vastupidisel juhul edastab käed-vabad komplekt
kinnitussõnumi. Kinnitage, öeldes «Yes», «call» .
Kõnetuvastusrežiimist väljumiseks vajutage suvalisel
hetkel punasele nupule.
Kui kontakt, kellele te soovite helistada, asub Parrot •
MINIKIT Slim-ga ühendatud telefoni telefoniraamatus:
Vajutage nupule ning valige 1. Phonebook.
Valige üks täht ning vajutage nupule. 2.
Kui kontakt on valitud, vajutage rohelisele nupule, 3.
alustamaks kõnet vaikimisi numbrile, või kasutage
nuppu, et valida kontakti erinevate numbrite vahel
(«Work», «Cellphone»...).
Kui te soovite helistada viimasena valitud numbrile, •
vajutage kahe sekundi jooksul rohelisele nupule.
MINIKIT Slim teatab „Mälu täis“
MINIKIT Slim’iga saab siduda kuni 5 seadet. Juhul kui lisate
kuuenda telefoni, teatab komplekt „Mälu täis“. Sellisel juhul
tuleb MINIKIT Slim mälu kustutada, hoides rohelist ja punast
nuppu korraga 3 sekundit all. See kustutab ka kõik kontaktid.
Tundub, et MINIKIT Slim on lukustunud
Töötõrgete korral saab MINIKIT Slim’i lähtestada. Selleks:
Vajutage korraga nupule ja MINIKIT Slim tagaküljel 1.
olevale Reset-nupule (► joonis A lk p.4).
Laske Reset-nupp lahti. 2.
> Nüüd võite vabastada ka teise nupu.
MINIKIT Slim ei tööta minu telefoniga
Kontrollige oma telefoni ühilduvust MINIKIT Slim’iga. •
MINIKIT Slim ühilduvuse nimekirja leiate meie kodulehe
www.parrot.com alajaotusest Klienditugi ja allalaadimine
Juhul kui kasutatav telefon on nimekirjas, võib olla vajalik
MINIKIT Slim’i tarkvara värskendamine.
MINIKIT Slim värskendamisprotseduuri leiate meie •
kodulehe www.parrot.com alajaotusest Klienditugi ja
allalaadimine.
12
Eesti
Sagedasemad vead
Page 13

13
Latviešu
Latviešu
Vispirms
Par šo
instrukciju
Lai saudzētu vidi un ierobežotu papīra patēriņu, Parrot dod priekšroku elektroniskai, nevis drukātai
dokumentācijai.
Tāpēc Parrot MINIKIT Slim lietošanas īsā instrukcija satur tikai galvenās norādes par to, kā ērti lietot šo
ierīci. Vairāk informācijas varat atrast Tehniskās palīdzības un lejupielādes sadaļā mūsu mājas lapā
www.parrot.com: tur ir pilna instrukcija, atbildes uz bieži uzdotiem jautājumiem, paskaidrojumi utt.
Programmatūras
atjaunināšana
Bez maksas lejupielādējiet jaunāko produkta versiju un iepazīstieties ar atjaunināšanas procedūru mūsu
interneta vietnes www.parrot.com sadaļā Tehniskā palīdzība un lejupielāde. Atjauninājumi Jums ļaus izmantot produkta jaunās funkcijas un uzlabot tā saderību.
http://www.parrot.com/uk/support
Complete user guide, tutorials, software updates...
Pirmā lietošana.....................................
Tālrunis..................................................
Biežākās problēmas.............................
p.14
p.15
p.16
Kopsavilkums
Page 14

14
Latviešu
Parrot MINIKIT Slim uzlādēšana
Pirms ierīces pirmās lietošanas MINIKIT Slim ir jāuzlādē. •
Šim nolūkam izmanto auto piesmēķētāja kontaktligzdu vai
MINIKIT Slim savieno ar personālo datoru, izmantojot
komplektā iekļauto USB / mini USB kabeli (► A attēls 4.
lpp).
LED indikators līdzās mini USB pieslēguma vietai •
iedegas sarkans, tādējādi norādot, ka notiek uzlādēšana.
Kad uzlādēšana ir pabeigta, LED indikators nodziest.
Uzlādēšana ilgst 3,5 stundas.
Kad akumulators ir stipri izlādējies, MINIKIT Slim sāk •
pīkstēt.
Parrot MINIKIT Slim instalēšana
Ar klipsi, kas ir Parrot MINIKIT Slim aizmugurē, piestipriniet
ierīci pie automašīnas saulessarga. (► A attēls 4. lpp).
MINIKIT Slim ieslēgšana/izslēgšana
Lai ieslēgtu MINIKIT Slim, uz īsu mirkli nospiediet pogu•
Lai izslēgtu MINIKIT Slim, nospiediet pogu • uz 2
sekundēm.
Pārvietošanās izvēlnēs
Nospiediet centrālo pogu, lai atvērtu izvēlnes. •
> Komplekts uzrāda izvēlnes nosaukumu.
Pārvietojieties izvēlnēs, grozot pogu, un apstipriniet veikto •
izvēli ar zaļo pogu vai nospiežot centrālo pogu.
Lai aizvērtu izvēlni, nospiediet sarkano pogu vai pagaidiet •
dažas sekundes.
Mobilā tālruņa sapārošana un savienošana
ar Parrot MINIKIT Slim
Ja pirmo reizi lietojat tālruni ar Parrot MINIKIT Slim, tad •
Jums jāveic abu ierīču sapārošana: kad abas ierīces viena
otru būs atradušas, šo operāciju vairāk nevajadzēs atkārtot.
Lai to izdarītu:
Tālrunī uzsāciet Bluetooth® perifērijas ierīču 1.
meklēšanu.
Par to sīkāk skatiet sava tālruņa lietošanas instrukcijā.
> Parādās Bluetooth perifērijas ierīču saraksts.
Kad meklēšana ir pabeigta, sarakstā izraugieties 2.
«Parrot MINIKIT Slim».
Kad ierīce pieprasa PIN kodu, ievadiet «1234» 3.
> Parrot MINIKIT Slim paziņo «Pairing successful».
> Kad tālrunis ir sapārots ar Parrot MINIKIT Slim, savienojums starp ierīcēm automātiski izveidosies ik reizi, kad iekāpsiet mašīnā un ieslēgsiet auto aizdedzi.
Pirmā lietošana
Page 15

Kontaktu saraksta sinhronizācija
Dažiem Bluetooth tālruņiem kontaktu saraksts automātiski •
tiek sinhronizēts brīvroku komplekta atmiņā.Tiek sinhronizēti
tikai tālruņa atmiņā saglabātie kontakti.
Ja jūsu tālrunis neatbalsta automātisko sinhronizāciju, jūs •
varat nosūtīt kontaktus no tālruņa uz Parrot MINKIT Slim ar
Bluetooth palīdzību.
Lai to izdarītu:•
Nospiediet centrālo pogu un izvēlieties1. Receive
contacts.
Par kontaktu saraksta nosūtīšanu, izmantojot Object 2.
Push, sīkāk lasiet sava tālruņa lietošanas instrukcijā.
Balss paraugu ierakstīšana
Ierīcē Parrot MINIKIT Slim pēc kontaktu sinhronizācijas vai •
pārsūtīšanas ar Object Push visiem kontaktiem automātiski
tiek piešķirti balss paraugi. Tāpēc Jums nav jāieraksta savs
balss paraugs katram kontaktam, lai veiktu zvanu ar balss
atpazīšanu.
Taču jums ir iespējams ierakstīt jaunu paraugu, ja •
Parrot MINIKIT Slim nepareizi interpretē kāda Jūsu
kontakta vārdu vai arī vēlaties ierakstīt īsāku balss paraugu.
Lai to izdarītu, nospiediet centrālo pogu un izvēlieties
iespēju Add voice tags.
Zvana pieņemšana
Par ienākošo zvanu paziņo signāls. Ja kontakta vārds •
ir ierakstīts MINIKIT Slim pievienotā tālruņa kontaktu
sarakstā, tad tiek paziņots kontakta vārds.
Ja gribat pieņemt šo zvanu, tad nospiediet zaļo taustiņu. Pēc sarunas beigām nospiediet sarkano
taustiņu.
Ja negribat pieņemt šo zvanu, tad nospiediet sarkano taustiņu.
Ja esat aktivizējis atslēgvārdus, tad varat tos izmantot, lai •
pieņemtu vai noraidītu ienākošo zvanu.
Atslēgvārds - « Accept » ļauj pieņemt ienākošo
zvanu.
Atslēgvārds - « Reject » ļauj noraidīt ienākošo zvanu.
Zvanīšana
Lai piezvanītu, izmantojot balss atpazīšanu:•
Nospiediet zaļo pogu, lai uzsāktu balss atpazīšanas 1.
procedūru.
> MINIKIT Slim Jums jautā tā kontakta vārdu, kuram
vēlaties zvanīt.
Nosauciet tā kontakta vārdu, kuram vēlaties zvanīt, 2.
un numura nosaukumu («Work», «Cellphone»...)
15
Latviešu
Tālrunis
Page 16

ja šim kontaktam ir norādīti vairāki numuri.
> Ja balss komanda ir saprasta, tad automātiski tiek
zvanīts šim kontaktam.
> Pretējā gadījumā brīvroku komplekts lūdz
apstiprināt turpmāko rīcību. Sniedziet apstiprinājumu,
pasakot «yes», vai «call».
Balss atpazīšanas režīmu jebkurā brīdī varat izslēgt,
nospiežot sarkano taustiņu.
Ja kontakts, kuram gribat zvanīt, ir Parrot MINIKIT Slim •
pievienotā tālruņa kontaktu sarakstā:
Nospiediet centrālo pogu un izvēlieties 1. Phonebook.
Izvēlieties vajadzīgo burtu un nospiediet centrālo 2.
pogu.
Pēc kontakta izvēlēšanās nospiediet zaļo pogu, lai 3.
sastādītu numuru pēc noklusējuma, vai izmantojiet centrālo pogu, lai izvēlētos vienu no šī kontakta
numuriem («Work», «Cellphone»...).
Ja vēlaties atkārtoti zvanīt uz pēdējo sastādīto numuru, uz •
divām sekundēm nospiediet zaļo pogu.
MINIKIT Slim paziņojums «Atmiņa ir pilna».
Ar MINIKIT Slim maksimāli varat sapārot 5 aparātus.
Kad sapārojat sesto tālruni, ierīce paziņo: «Atmiņa pilna».
Tad jums ir jāizdzēš MINIKIT Slim atmiņas saturs; lai to
izdarītu, 3 sekundes turiet vienlaicīgi nospiestu zaļo un
sarkano taustiņu. Līdz ar to tiks izdzēsti arī visi kontakti.
Iespējams, ka MINIKIT Slim ir „ uzkāries ”
Tādā gadījumā varat restartēt MINIKIT Slim. Lai to izdarītu:
Vienlaicīgi nospiediet centrālo pogu un Reset pogu, kas 1.
atrodas MINIKIT Slim aizmugurē (► A attēls 4. lpp).
Atlaidiet Reset pogu. 2.
> Tagad varat atlaist centrālo pogu.
Manu tālruni nav iespējams lietot ar MINIKIT Slim
Pārbaudiet sava tālruņa saderību ar MINIKIT Slim. •
Ar MINIKIT Slim saderīgo tālruņu sarakstu varat atrast
mūsu interneta vietnes www.parrot.com sadaļā Tehniskā
palīdzība un lejupielāde. Ja Jūsu tālrunis ir uzrādīts kā
saderīgs, tad iespējams, ka Jums vajag veikt MINIKIT Slim
programmatūras aktualizāciju.
MINIKIT Slim programmatūras aktualizācijas procedūras •
aprakstu varat atrast mūsu interneta vietnes
www.parrot.com sadaļā Tehniskā palīdzība un lejupielāde.
16
Latviešu
Biežākās problēmas
Page 17

17
Lietuviškai
Lietuviškai
Prieš pradedant naudotis
Apie šią
instrukciją
Siekiant sumažinti popieriaus sunaudojimą ir kiek įmanoma tausoti aplinką, „Parrot“ siekia, kad kiek
įmanoma plačiau būtų naudojama elektroninė šios instrukcijos versija ir ji būtų spausdinama ant popieriaus tik tada, kai to tikrai reikia.
Šioje trumpoje „Parrot MINIKIT Slim“ naudojimosi instrukcijoje pateikiami pagrindiniai nurodymai, kaip
paprastai naudotis šiuo prietaisu. Išsamesnės informacijos galite rasti pagalbos skyrelyje ir daug ką
atsisiųsti iš mūsų tinklalapio adresu www.parrot.com: išsami instrukcija, DUK, mokomoji medžiaga...
Atnaujinimai
Naujausius produkto atnaujinimus galite atsisiųsti iš www.parrot.com tinklalapyje esančio pagalbos
skyrelio su nuorodomis į atsisiuntimus (žr. informaciją apie atnaujinimų procedūrą). Atnaujinimai suteiks
galimybę naudotis naujomis funkcijomis ir pagerinti produkto suderinamumą.
http://www.parrot.com/uk/support
Complete user guide, tutorials, software updates...
Naudojantis pirmą kartą................................
Telefonas........................................................
Dažniausios problemos................................
p.18
p.19
p.20
Atnaujinimai
Page 18

18
Lietuviškai
Įkraukite „Parrot MINIKIT Slim
Prieš naudojantis pirmą kartą, „MINIKIT Slim“ reikės įkrauti. •
Šiam tikslui naudokite automobilio cigarečių pridegiklio lizdą ir pajunkite savo „MINIKIT Slim“ prie asmeninio
kompiuterio naudodami pridedamą USB / mini USB laidą
(► paveikslėlis A, psl. 4).
Raudonas indikatorius šalia mini USB laido rodo, kad •
įkrovimas vyksta. Baigus įkrovimą, LED indikatorius
nebešvies. Įkrovimo trukmė yra apie 3 val. 30 min.
Pradėjus sekti baterijai, „MINIKIT Slim“ ims pypsėti.•
„Parrot MINIKIT Slim“ pajungimas
Pritvirtinkite „Parrot MINIKIT Slim“ ant atlenkiamo automobilio
skydelio nuo saulės specialiu spaustuku. Žiūrėkite
(► paveikslėlis A, psl. 4).
„MINIKIT Slim“ įjungimas/išjungimas
Spauskite • mygtuką norėdami įjungti „MINIKIT Slim
Spauskite • mygtuką ir jį palaikykite 2 sekundes
norėdami išjungti „MINIKIT Slim“.
Navigavimas po meniu
Spauskite ratelio centrą, kad įeitumėte į meniu. •
> Prietaisas meniu rodo meniu punktus, kuriuos naudojate.
aviguokite po meniu sukdami reguliatorių ir spauskite žalią •
mygtuką arba spauskite reguliatorių.
Norėdami išeiti iš meniu, spauskite raudoną mygtuką arba • •
palaukite kelias sekundes.
Telefono pajungimas ir suporinimas su
Parrot MINIKIT Slim
Jei naudojate telefoną su „Parrot MINIKIT Slim“ pirmą •
kartą, reikia prieš tai suporinti šiuos prietaisus: jei prietaisai
vienas su kitu nebus suderinti, jais naudotis nebus
įmanoma. Norint tai padaryti:
Telefone nustatykite ir įjunkite Bluetooth® prietaisų 1.
paiešką. Dėl išsamesnės informacijos, žiūrėkite
telefono instrukciją.
> Bus rodomas rastų „Bluetooth“ prietaisų sąrašas.
Kai baigsite iešką, prietaisų sąraše pasirinkite „Parrot 2.
MINIKIT Slim“.
Jei bus pareikalauta PIN kodo, įveskite „1234“. 3.
> „Parrot MINIKIT Slim“ turi rodyti «Pairing successful».
> Kai telefonas bus suporintas su „Parrot MINIKIT
Slim“, vėliau šie 2 prietaisai vienas su kitu susisieks
automatiškai kai tik įlipsite į savo automobilį.
Naudojantis pirmą kartą
Page 19

Telefoniraamatu sünkroniseerimine
Tam tikrų telefonų su Bluetooth funkcija, turinys •
automatiškai sinchronizuojamas su prietaiso atmintimi.
Tačiau atkreipiame dėmesį, kad tik telefono atmintyje
esantys kontaktai gali būti sinchronizuojami.
Jei Jūsų telefonas nepalaiko automatinio sinchronizavimo, •
informaciją iš telefono su „Parrot MINIKIT Slim“ galite
sinchronizuoti rankiniu būdu per Bluetooth.
Norint tai padaryti:•
Nuspauskite ratelį ir pasirinkite1. Receive contacts.
Jei reikėtų išsamesnės informacijos apie tai, kaip 2.
siųsti kontaktus iš telefono naudojantis „Object Push“
funkcija, žiūrėkite telefono instrukciją.
Balso komandų išsaugojimas
Visi Jūsų kontaktai atlikus telefono sinchronizavimą arba •
kontaktų perkėlimą iš telefono į „Parrot MINIKIT Slim“ bus
automatiškai perkelti kartu su balso komandų žymomis.
Jums nereikės papildomai ar iš naujo priskirti balso
komandų ar balso žymų perkeltiems kontaktams norint
rinkti numerius balsu.
Tačiau jei „Parrot MINIKIT Slim“ neteisingai nuskaitytų •
ar surinktų kontaktą pagal priskirtą balso žymą, galite iš
naujo įrašyti balso žymą ar tiesiog sukurti naują kontaktą.
Norėdami tai padaryti, spauskite ratelį ir pasirinkite
komandą „Add voice tags “.
•
Skambučio gavimas
Apie įeinanti skambutį informuojama skambučio tonu. •
Kontakto vardas skelbiamas tada, kai kontaktas yra įrašytas
telefonų knygoje, susietoje su MINIKIT Slim.
Jei norite priimti skambutį, spauskite žalią mygtuką. Tada spauskite raudoną mygtuką, kad baigtumėte
pokalbį.
Jei norite atmesti skambutį, spauskite raudoną mygtuką.
Jei esate nustatęs komandų balso atpažinimo žodžius, •
galite naudotis balso komandomis skambučių priėmimui ar
atmetimui.
Pasakius žodį - «Accept» įeinantis skambutis bus
priimtas.
Pasakius žodį - «Reject» įeinantis skambutis bus
atmestas.
Kaip skambinti
Skambinimas renkant balso komandomis:•
Spauskite žalią mygtuką, kad įjungtumėte 1.
balsokomandų atpažinimą.
> „MINIKIT slim“ paklaus kuriam iš kontaktinių
asmenų norite skambinti.
19
Lietuviškai
Telefonas
Page 20

Ištarkite kontaktinio asmens vardą, kuriam norite 2.
skambinti ir pasirinkite jo telefoną jei įvestas ne vienas
numeris («Work», «Cellphone»...).
> Įrangai teisingai supratus balso komandą, bus
skambinama automatiškai.
> Kitu atveju įranga pateiks instrukciją veiksmui patvirtinti. Patvirtinkite pasakydami «Yes» arba «Call».
Bet kuriuo metu galite paspausti raudoną mygtuką,
kad išeitumėte iš balso komandų režimo.
Jei kontaktas, kuriam norite skambinti yra mobiliojo telefono, •
sujungto su „Parrot MINIKIT Slim“ kontaktų sąraše:
Spauskite ratelį ir pasirinkite 1. Phonebook.
Pasirinkite raidę ir spauskite mygtuką.2.
Kai pasirinksite kontaktą, spauskite žalią mygtuką 3.
norėdami pradėti skambinti pirminiu numeriu, arba
naudokitės rateliu norėdami pasirinkti kitą šio kontakto
numerį («Work», «Cellphone»...).
Jei norite dar kartą rinkti ką tik rinktą numerį, paspauskite ir •
dvi sekundes palaikykite žalią mygtuką.
„MINIKIT Slim“ rodo užrašą „Pilna atmintis“.Su „MINIKIT Slim“
galima suporinti iki 5 prietaisų. Jei suporinsite šeštą prietaisą,
atsiras užrašas „Atmintis pilna“. Jums reikės ištrinti „MINIKIT
Slim“ atmintį paspaudžiant ir tris sekundes palaikant raudoną
ir žalią mygtukus kartu. Atminkite, kad tokiu atveju ištrinsite
visus kontaktus.
Užsiblokavo „MINIKIT Slim“ Šios problemos atveju rekomenduojame perjungti („restartuoti“) „MINIKIT Slim“.
Norint tai padaryti:
Tuo pat metu spauskite ratelį ir perjungimo („Reset“) 1.
mygtuką, esantį ant „MINIKIT Slim“ nugarėlės
(► paveikslėlis A, psl. 4).
Atleiskite „Reset“ mygtuką. 2.
> Tada atleiskite ratelį.
Mano telefonas neveikia su „MINIKIT Slim“
Patikrinkite savo telefono suderinamumą su „MINIKIT Slim“. •
Informacijos apie telefonus, suderinamus su „MINIKIT
Slim“, rasite mūsų tinklalapyje www.parrot.com, pagalbos
ir atsisiuntimų skyrelyje.
Jei Jūsų telefonas yra suderinamų telefonų sąraše, tačiau •
neveikia, reikės atnaujinti „MINIKIT Slim“ programinę įrangą.
Informacijos suderinimo su „MINIKIT Slim“ procedūrą rasite
mūsų tinklalapyje www.parrot.com, pagalbos ir atsisiuntimų
skyrelyje.
20
Lietuviškai
Dažniausios problemos
Page 21

21
Warranty
Without prejudice of legal warranty,
Parrot products are warranted during
1 year from the date of purchase for
defects in materials and workmanship,
provided that no deterioration to the
product has been made, and upon presentation of proof of purchase (date of
purchase, location of sale and product
serial number) to the retailer.
Warranty does not cover: upgrading of
the software items of the Parrot products with Bluetooth® cell phones for
compatibility purpose, data recovery,
deterioration of the external aspect
due to normal use of the product, any
damage caused by accident, misuse,
misapplication, or non-Parrot products.
Parrot is not responsible for storage,
loss or damaged to data during transit
or repair.
Any product wrongfully declared to be
defective will be returned to sender and
inspection, process and carriage costs
will be invoiced to him.
Information relating to the battery and
to the charger
Safety precautions
Charging : Only use the cigar-lighter
adaptable charger provided.
Never use a damaged charger.
Remember to charge the device before
storing for a long period of time.
Temperature: Do not leave your device
in hot or cold areas (car in direct sunlight or parked in a garage in winter).
Always store in area where temperatures remain stable.
The charger and the device can become
hot during charging Do not cover.
Protection against water and dampness: Do not use your device under the
rain or in/near any damp area.
Leak: Do not disassemble the device.
In the event of battery leakage, avoid
contact of the liquid with skin and
eyes. If contact occurs, rinse affected
areas with plenty of water and contact
a doctor.
Preserving lifespan of batteries and
charger
Charging: If the battery is not used for
a long period of time, its charge level
diminishes of its own accord.
When the battery is entirely charged,
disconnect it from the charger. Overcharge may reduce the battery’s lifespan.
Do not leave the cigar-lighter adaptable charger connected when it is not
in use.
Temperature: Very low or very high temperatures may affect the battery charge
capacity and battery lifespan.
Disposal: You must dispose of your
product in accordance with the laws
and regulations in force. Since the device contains electronic components
and a battery, it must not be disposed
of with household waste.
Contact your local authority to find out
more about disposal options and recycling.
General Information
Page 22

22
Correct disposal of This Product
(Waste Electrical & Electronic
Equipment)
This marking shown on the product or its literature, indicates
that it should not be disposed
with other household wastes at
the end of its working life. To prevent
possible harm to the environment or
human health from uncontrolled waste
disposal, please separate this from
other types of wastes and recycle it
responsibly to promote the sustainable
reuse of material resources.
Household users should contact either
the retailer where they purchased this
product, or their local government office, for details of where and how they
can take this item for environmentally
safe recycling. Business users should
contract their supplier and the terms
and conditions of the purchase contract.
This product should not be mixed with
other commercial wastes for disposal.
Modifications
The explanations and specifications
in this guide are given for information
purposes only and may be modified
without prior notice. They are deemed
to be correct at time of going to press.
The utmost care has been taken when
writing this guide,as part of the aim to
provide you with accurate information.
However, Parrot shall not be held responsible for any consequences arising
from any errors or omissions in the
guide, nor for any damage or accidental
loss of data resulting directly or indirectly from the use of the information herein.
Parrot reserves the right to amend or
improve the product design or user guide without any restrictions and without
any obligation to notify users. As part
of our ongoing concern to upgrade and
improve our products, the product that
you have purchased may differ slightly
from the model described in this guide.
If so, a later version of this guide might be available in electronic format at
Parrot’s website at www.parrot.com.
FCC Compliance Statement
This device complies with part 15 of the
FCC rules. Operation is subject to the
following two conditions:
(1). this device may not cause harmful
interference, and
(2). this device must accept any
interference received, including
interference that may cause unde
sired operation.
Note: The manufacturer is not
responsible for any radio or tv
interference caused by unauthorized
modifications to this equipment. Such
modifications could void the user’s
authority to operate the equipment.
FCC §15.105 statement:
This equipment has been tested and
found to comply with the limits for a
Class B digital device, pursuant to
part 15 of the FCC Rules. These limits
are designed to provide reasonable
protection against harmful interference
in a residential installation.
This equipment generates, uses and
can radiate radio frequency energy and,
Page 23

23
if not installed and used in accordance
with the instructions, may cause harmful
interference to radio communications.
However, there is no guarantee that
interference will not occur in a particular
installation. If this equipment does
cause harmful interference to radio
or television reception, which can be
determined by turning the equipment
off and on, the user is encouraged to
try to correct the interference by one or
more of the following measures:
—Reorient or relocate the receiving
antenna.
—Increase the separation between the
equipment and receiver.
—Connect the equipment into an outlet
on a circuit different from that to which
the receiver is connected.
—Consult the dealer or an experienced
radio/TV technician for help.
Canada Class B statement:
This Class B digital apparatus complies
with Canadian ICES-003
Cet appareil numérique de la classe B
est conforme à la norme NMB-003 du
Canada.
Declaration of Conformity
We, Parrot S.A. of 174 quai de
Jemmapes, 75010 Paris, France,
declare under our sole responsibility that
our product, the MINIKIT Slim to which
this declaration relates in conformity
with appropriate standards EN300328,
EN301489-17, EN60950 following
the provision of Radio Equipment
and Telecommunication Equipment
directive (1999/5/EC R&TTE), with
requirements covering EMC directive
2004/108/EC, Low Voltage directive
73/23/EEC and automotive directive
72/245/EEC amended by 2006/28/EC
directive.
Identification N. 394 149 496
R.C.S. PARIS - Parrot S.A.
Copyrights
Copyright © 2009 Parrot.
Licences
The Bluetooth ® word mark and logos
are owned by the Bluetooth SIG, Inc.
and any use of such marks by Parrot
S.A. is under license.
NXT is a trademark of New Transducers
Limited.
Bluetooth QDID :
B013654, B013838, B012423
Other trademarks and trade names are
those of their respective owners.
Page 24

24
Üldteave
Garantii
Ilma et see piiraks seaduslikku garantiiaega, on Parroti toodetel, nii osadel
kui tehtud tööl, garantiiaeg 1 aasta
alates ostukuupäevast, tingimusel, et
toodet ei ole muudetud, ning ostutõendi
esitamisel (toote ostukuupäev ja -koht,
seerianumber) edasimüüjale või otse
Parrotile.
Garantii ei kata Parroti toodetega kaasas olevate tarkvarade uuendusi Bluetooth® mobiiltelefonide ühildamiseks,
andmete taastamist, toote normaalsest
kasutamisest tulenevat toote välist kahjustust, ühtegi õnnetusest, toote eba-
normaalsest või lubamatust kasutamisest tulenevat kahjustust;
tooteid, mis ei ole Parroti omad.
Parrot ei vastuta transpordi või
remondi ajal andmete hoidmise, kaotamise või kahjustamise eest.
Mittedefektne toode saadetakse saatjale tagasi ning talle esitatakse käsitlemise, kontrollimise ja transpordikulude
arve. Toote tehnilisuse tõttu soovitame
lasta teha paigalduse automehaanikul.
Parrotit ei saa mingil juhul pidada vastutavaks väärtalituse eest, mis tuleneb
kasutusjuhendis toodud juhistele mittevastavast
paigaldusest ja/või teie enda poolt tehtud ebaõigest paigaldusest.
Toote ümbertöötlemine
Elektriliste ja elektrooniliste seadmete
jäätmed
Sümbol tootel või selle dokumentatsioon
näitab, et toodet ei tohi kasutusaja lõppedes visata ära koos olmejäätmetega.
Jäätmete kontrollimatu äraviskamine
võib kahjustada keskkonda või inimtervist, seepärast eraldage toode teistest
jäätmetest ning laske see vastutustundlikult ümber töödelda. Nii soodustate
materiaalsete ressursside jätkusuutlikku
taaskasutamist.
Eraisikutel soovitatakse võtta ühendust toote müünud edasimüüjaga
või uurida kohalikust omavalitsusest,
kus ja kuidas saab tootest vabaneda,
et see töödeldaks ümber keskkonnasäästlikult. Ettevõtetel soovitatakse
võtta ühendust oma varustajatega
ning uurida oma müügilepingu tingimusi. Toodet ei tohi ära visata koos
teiste ettevõtetes tekkivate jäätmetega.
Informatsioon aku ja laadija kohta
Turvajuhised
Laadimine:
Kasutage ainult komplekti kuuluvat sigaretisüütaja pistikuga laadijat. Rangelt on
keelatud kasutada vigastatud laadijat.
Enne pikemaajalist hoiulepanekut laadige seadme aku täis.
Temperatuur:
Ärge jätke seadet väga kõrge või väga
madala temperatuuriga kohtadesse
(päikese kätte pargitud autosse või
talvel garaažis seisvasse autosse). Võimaluse säilitage seda toatemperatuuril.
Laadija ja toode võivad laadimise käigus kuumeneda. Ärge katke neid kinni.
Kaitse vee ja niiskuse eest:
Ärge kasutage seadet vihma käes või
mistahes muus niiskes keskkonnas.
Lekked:
Page 25

Keeratud on seadme lahtimonteerimine. Juhul kui aku lekib, vältige vedeliku sattumist nahale või silma. Kui
see siiski juhtub, loputage saastunud
piirkonnad viivitamatult veega ja pöörduge arsti poole.
Akude ja laadija töökorras hoidmine
Laadimine:
Kui aku pikemat aega kasutamata seisab, tühjeneb see järk-järgult iseenesest.
Kui aku on täis laetud, ühendage see
laadija küljest lahti: liiglaadimine võib
selle eluiga tunduvalt lühendada.
Kui Te laadijat ei kasuta, ärge jätke
seda sigaretisüütaja liitmikku.
Temperatuur:
Liiga madalad või kõrged temperatuurid
võivad mõjutada akude mahtuvust ja
vähendada nende eluiga.
Kõrvaldamine:
Seade tuleb kõrvaldada kooskõlas kehtiva seadusandlusega. Kuna antud
seadme koosseisu kuuluvad elektroo-
nilised detailid ja aku, tuleb see kõrvaldada olmejäätmetest eraldi. Täiendava
informatsiooni saamiseks kõrvaldamise
ja taaskasutuse kohta võtke ühendust
kohalike võimudega.
Muudatused
Käesolevas kasutusjuhendis toodud
selgitused ja täpsustused on vaid teavitava iseloomuga ning neid võib muuta
ilma eelneva teavitamiseta. Trükkimise
hetkel on teave õige ning selle kirja panemisel vaadatakse hoolikalt,
et teieni jõudev teave oleks võimalikult
täpne.
Sellegipoolest ei saa Parrot S.A. pidada
otseselt või kaudselt vastutavaks
võimalike kahjustuste või juhuslike
andmete kadumise eest, mis tulenevad
käesolevas dokumendis sisalduvast
veast või puudujäägist. Parrot S.A. jätab
endale õiguse toodet ja kasutusjuhendit
muuta või parandada ilma igasuguse
piiranguta või
kohustuseta kasutajat hoiatada.
Kuna Parrot S.A. püüab oma tooteid pidevalt täiustada, on võimalik,
et teie ostetud toode erineb pisut
käesolevas dokumendis kirjeldatust.
Sellisel juhul leiate kasutusjuhendi
uue versiooni elektroonilisel kujul internetileheküljelt www.parrot.com.
25
Page 26

Vispārīga informācija
Garantija
Neatkarīgi no juridiskās garantijas
Parrot produktiem tiek dota detaļu
un izpildījuma garantija uz 1 gadu no
iegādes brīža, ja vien nav patvaļīgi
mainīta produkta konstrukcija. Līdz
ar garantijas prasību izplatītājam vai
tieši Parrot jāiesniedz dokuments, kas
apliecina produkta iegādi (ar iegādes
datumu un vietu, kā arī produkta sērijas
numuru).
Garantija neattiecas uz programmatūras
atjauninājumiem, ieskaitot Parrot
programmatūru, kas nodrošina Bluetooth® mobilo tālruņu saderību, uz
datu atgūšanu, uz produkta ārējiem
bojājumiem tā normālās lietošanas
rezultātā, uz bojājumiem, kas radušies
nelaimes gadījuma, nenormālas vai
neatļautas produkta lietošanas rezultātā,
uz produktu, kas nav Parrot ražojums.
Parrot neatbild par datu glabāšanu, zudumu vai bojāšanu transportēšanas vai
labošanas rezultātā.
Ja produktam netiek atklāti defekti, tad
to atgriež sūtītājam, un tādā gadījumā
sūtītājs sedz apstrādes, pārbaudes
un transporta izmaksas. Ņemot vērā
produkta tehnisko raksturu, produkta
uzstādīšanu iesakām veikt autoservisā.
Parrot nekādā veidā nav atbildīga par
jebkuru ierīces darbības traucējumu,
kura iemesls ir instrukcijai neatbilstoša
uzstādīšana un/vai nepareiza
uzstādīšana, ko esat veicis pats.
Kā utilizēt produktu
Elektrisko un elektronisko ierīču
utilizācija.
Šis simbols uz produkta vai
tā dokumentācijā norāda, ka
produktu pēc nolietošanās nedrīkst
izmest mājsaimniecības atkritumos.
Nekontrolēta atkritumu izmešana var
radīt kaitējumu apkārtējai videi vai
cilvēku veselībai, tāpēc lūdzam produktu utilizēt atsevišķi no citiem atkritumiem un atbildīgā veidā. Tādējādi
veicināsiet vērtīgu materiālo resursu
atkārtotu izmantošanu.
Privātpersonas lūdzam sazināties
ar produkta pārdevēju vai vērsties
pašvaldības iestādēs, lai uzzinātu, kur
un kā šis produkts utilizējams videi
nekaitīgā veidā. Uzņēmumus lūdzam
sazināties ar piegādātāju un iepazīties
ar pirkuma līguma nosacījumiem.
Šo produktu nedrīkst izmest kopā
ar citiem komerciāliem atkritumiem.
Informācija par akumulatoru un
lādētāju
Drošības noteikumi
Uzlādēšana
Lietojiet tikai komplektā iekļauto lādētāju,
kas pievienojams auto piesmēķētājam.
Nekad nelietojiet bojātu lādētāju.
Atcerieties, ka pirms ilgas glabāšanas
ierīce ir jāuzlādē.
Temperatūra
Neatstājiet ierīci karstumā vai aukstumā
(piemēram, automašīnu stāvvietā
karstā saulē vai ziemā garāžā). Centieties glabāt ierīci istabas temperatūrā.
Uzlādēšanas laikā gan lādētājs, gan
pati ierīce var sakarst. Tos nedrīkst
apsegt.
26
Page 27

Pasargāšana no ūdens un mitruma
Ierīci nedrīkst lietot lietū vai citādā
mitrumā.
Noplūdes
Aizliegts ierīci izjaukt. Ja akumulatoram parādās noplūde, tad sargiet no
izplūstošā šķidruma ādu un acis. Ja šis
šķidrums tomēr nonāk uz ādas vai acīs,
tad nekavējoties noskalojiet skarto vietu
ar ūdeni un vērsieties pie ārsta.
Akumulatora un lādētāja saudzēšana
Uzlādēšana
Ja ierīci ilgi nelieto, tad pilnībā uzlādēts
akumulators pamazām izlādējas. Pēc
akumulatora uzlādēšanas atvienojiet to no lādētāja, jo lieka uzlāde var
samazināt akumulatora kalpošanas
laiku. Kad nelietojat lādētāju, atvienojiet
to no auto piesmēķētāja.
Temperatūra
Ļoti zema vai ļoti augsta temperatūra
var ietekmēt akumulatora uzlādes
līmeni un kalpošanas laiku.
Utilizācija
Ierīces utilizācija ir jāveic saskaņā ar
likumu un noteikumu prasībām. Ierīce
satur elektroniskas detaļas un akumulatoru, tāpēc to nedrīkst izmest
kopā ar mājsaimniecības atkritumiem.
Lai vairāk uzzinātu par utilizācijas un
pārstrādes iespējām, sazinieties ar
vietējo pašvaldību.
Izmaiņas
Paskaidrojumiem un specikācijām,
kas iekļautas šajā lietotāja instrukcijā, ir
tikai informatīvs raksturs, un tās var tikt
mainītas bez iepriekšēja brīdinājuma.
Šī informācija ir pareiza instrukcijas
publicēšanas brīdī un sagatavota pēc
iespējas rūpīgāk, lai Jums sniegtu
iespējami precīzākas ziņas.
Tomēr Parrot S.A. neuzņemas ne tiešu,
nedz netiešu atbildību par jebkādu
kaitējumu vai nejaušu datu zudumu
sakarā ar kļūdām vai informācijas
trūkumu šajā dokumentā. Parrot S.A.
patur tiesības neierobežoti pilnveidot
vai uzlabot produktu, kā arī tā lietošanas
instrukciju, par to iepriekš nebrīdinot
lietotāju.
Tā kā Parrot S.A. turpina uzlabot savus
produktus, tad ir iespējams, ka produkts,
kuru esat iegādājies, mazliet atšķiras no
tā, kas aprakstīts šajā dokumentā. Tādā
gadījumā interneta vietnē www.parrot.
com varat atrast lietošanas instrukcijas
jauno versiju elektroniskā formātā.
Saderības problēmas
Daži automobiļi, kas izgatavoti ierobežotā
daudzumā, var atšķirties no oriģinālā
modeļa, un tas var apgrūtināt saderību
ar šo ierīci. Parrot S.A. nav atbildīga
par saderības problēmām sakarā ar
šiem izstrādājumiem, ko ražotājs izlaidis bez iepriekšēja brīdinājuma.
27
Page 28

Bendroji informacija
Garantija
Be jokių apribojimų ir išskirtinių garantijų,
„Parrot“ produktams suteikiama garantija detalėms ir darbų kokybei 1 metams
nuo įsigijimo datos pateikus pirkimą
liudijančius dokumentus (pirkimo data ir
vieta, pirkto produkto serijos numeris),
jei produktas buvo įsigytas iš atstovybės
ar tiesiogiai š „Parrot“, išskyrus atvejus,
jei neteisingai ar aplaidžiai naudojamasi
produktu.
Garantija neapima programinės įrangos,
susijusios su „Parrot“ ir mobiliųjų
produktų su Bluetooth® atnaujinimu,
mobiliųjų telefonų suderinamumo,
duomenų gavimo ar siuntimo garantijos, produkto natūralaus nusidėvėjimo
dėl naudojimo, produkto apgadinimo ar
sugadinimo dėl nelaimingo atsitikimo,
neteisingo naudojimo ar naudojimo
ne pagal „Parrot“ instrukcijas. „Parrot“
neatsako už duomenų išsaugojimą,
praradimą ar apgadinimą transportavimo ar remonto metu.
Produktai su defektu nebus grąžinami
siuntėjui, nebus kompensuojamos
apgadintų ar sugedusių produktų
siuntimo ar transportavimo išlaidos.
Atsižvelgiant į produkto techninę
speciką, jį rekomenduojame pajungti
ir instaliuoti garažo patalpose. „Parrot“
neprisiima jokios atsakomybės dėl produkto gedimų ar apgadinimų pajungimo
ar instaliavimo
metu jei nesilaikoma nurodytų
instrukcijų ir/ar pajungimas bei instaliavimas atliekamas neteisingai.
Kai išmesti atitarnavusį produktą
Elektros ir elektronikos prietaisai
kaip atliekos
Šis simbolis ant produkto ar jo
pakuotės, ar jo instrukcijoje, nu-
rodo, kad atitarnavusio produkto negalima išmesti kartu su buitinėmis atliekomis. Produkto išmetimas su buitinėmis
atliekomis prieštarauja įstatymams
ir teisės aktams, kenkia aplinkai ir
žmogaus sveikatai. Tinkamai utilizuodami atitarnavusius produktus tausosite
aplinką ir saugosite sveikatą.
Jei kiltų klausimų dėl to, kaip ir kur
utilizuoti atitarnavusį produktą, susi-
siekite su pardavėju ar gamintojo atstovu, ar su savo savivaldos institucijos
specialistais, kurie patars Jums kaip
ir kur išmesti produktą, kaip priduoti jį
perdirbimui, kad nebūtų daroma žala
aplinkai. Įmonėms rekomenduojame
susisiekti su gamintoju ar tiekėju ir
pasitikslinti informaciją dėl pardavimo
sąlygų. Šį produktą draudžiama išmesti
kartu su komercinėmis atliekomis.
Informacija, susijusi su baterija ir
įkrovikliu
Atsargumo priemonės
Įkrovimas:
Įkrovimui naudokite tik automobilinį
įkroviklį. Niekada nenaudokite apgadinto įkroviklio. Įkraukite prietaisą jei jį ketinate palikti nenaudojamą ilgesnį laiką.
Temperatūra:
Nepalikite prietaiso dideliame šaltyje ar
dideliame karštyje (pvz. garaže žiemą ar
ant automobilio palangės karštą dieną).
Stenkitės visada prietaisą laikyti kambario temperatūroje. Prietaisas ir įkroviklis
28
Page 29

įkrovimo metu gali įkaisti. Neuždenkite
įkrovimo metu.
Saugokite nuo vandens ir drėgmės:
Nenaudokite prietaiso lietuje ar šalia
didelės drėgmės šaltinių.
Išmetimas:
Neardykite šio prietaiso. Jei iš prietaiso
baterijos ištekėtų elektrolito, saugokitės,
kad elektrolito nepatektų ant odos ar
rankų. Jei elektrolito patektų ant odos ar
rankų, nedelsdami plaukite kuo didesniu
vandens kiekiu ir kreipkitės medicininės
pagalbos.
Kad baterija ir įkroviklis tarnautų ilgai Įkrovimas:
Palikus prietaisą nenaudojamą ilgesniam laikui, baterija gali savaime
išsikrauti. Kai baterija iki galo įsikraus,
atjunkite įkroviklį: jei įkroviklis bus prijungtas, taip sutrumpinsite baterijos tarnavimo laiką. Nepalikite įjungto įkroviklio
jei juo neįkraudinėjate baterijos.
Temperatūra:
Itin aukšta ar itin žema temperatūra gali
turėti nemažai įtakos baterijos veikimo
trukmei ir jos tarnavimo laikui.
Išmetimas:
Visada išmeskite atitarnavusį prietaisą
laikydamiesi įstatymų ir kitų atitinkamų
reikalavimų. Neišmeskite šio prietaiso
kartu su buitinėmis atliekomis, nes
šiame prietaise yra elektronikos detalių
ir baterija. Informacijos apie tokio prietaiso tinkamą išmetimą ir perdirbimą
suteiks vietos valdžios institucijos.
Modikacijos
Paaiškinimai ir specikacijos, kurias
galite rasti šioje naudojimosi instrukcijoje, skirtos tik informavimo tikslais ir
turinys gali būti keičiamas be išankstinio
įspėjimo. Ši informacija pateikiama tokia, kokia ji buvo spausdinimo metu ir
siekiama visomis priemonėmis
užtikrinti, kad tiek esama, tiek atnaujinta
informacija būtų kiek įmanoma tiksli.
Tačiau „Parrot S.A.“ negali nei tiesiogiai,
nei netiesiogiai atsakyti už
bet kokią žalą ar netyčinius nuosto-
lius dėl šiame dokumente pateiktų
duomenų, jų klaidų ar nepakankamumo.
„Parrot S.A.“ pasilieka teisę keisti ar pagerinti produktus bei atitinkamai keisti ir
tobulinti šią naudojimosi instrukciją
be išankstinio įspėjimo vartotojui.
Atsižvelgiant į tai, kad „Parrot S.A.“
nuolatos siekia tobulinti produktus, Jūsų
įsigytas produktas gali šiek tiek skirti
nuo šiame dokumente
esančios informacijos. Tokiu atveju
naujausią naudojimosi instrukcijos
versiją galite atsisiųsti elektroniniu formatu iš mūsų tinklalapio adresu www.
parrot.com.
Problemos dėl suderinamumo
Tam tikri automobiliai, kurie gaminami
kaip ribota produkcijos partija, gali skirtis nuo pagrindinio bazinio modelio ir
dėl to gali iškilti įrangos suderinamumo
problemų. „Parrot S.A.“ neatsako už
tokias su suderinamumu susijusias problemas, apie kurias
įrangos gamintojas nebuvo ar negalėjo
būti tinkamai ir laiku informuotas.
29
Page 30

30
Page 31

FCC ID: RKXMYNOS2
Hotline
Our hotline is at your disposal from Monday to Friday between 9 am and 6 pm (GMT + 1) - Hot-line@parrot.com
Italy : [+39] 02 59 90 15 97
Spain : [+34] 902 404 202
UK : [+44] (0)844 472 2360
Germany : 0900 1727768
USA : [+1] (877) 9 Parrot (toll free)
China : [+86] 755 8203 3307
Hong Kong : [+852] 2736 1169
France : 01 48 03 60 69
Europe : [+33] 1 48 03 60 69 (Spoken languages : French, English and Spanish)
Trademark of New Tr ansducers Limited
Page 32

www.parro t.com
 Loading...