

User Guide
English
Parrot DS3120
1

Table of contents
Using the Parrot DS3120 for the first time ............................................................. 4
Setting up the Parrot DS3120................................................................................. 4
Changing the language of the Parrot DS3120 ........................................................ 5
Display .................................................................................................................... 5
Navigating through the menus................................................................................ 6
Parrot DS3120 idle mode........................................................................................ 7
Using the FM Radio function ................................................................................... 8
Saving preset stations ............................................................................................ 8
Listening to a saved frequency ............................................................................... 9
Using the Audio Streaming function ..................................................................... 10
Using an audio player with the Parrot DS3120 via USB connection.................... 10
Playing music files stored on an SD card ............................................................. 11
Using an audio player with the Jack cable ........................................................... 11
Using the Parrot DS3120 during music playback ................................................. 12
Using the context menu during music playback................................................... 13
Connecting a Bluetooth device with the Parrot DS3120 ..................................... 14
Pairing an audio player with the Parrot DS3120 ................................................... 14
Connecting an audio player to the Parrot DS3120 ............................................... 14
Special pairing modes .......................................................................................... 15
Using the telephony function................................................................................. 16
Using the phonebook............................................................................................ 16
Making a call......................................................................................................... 16
Using the redial function ....................................................................................... 16
Receiving a call ..................................................................................................... 17
Using the Parrot DS3120 during a call.................................................................. 17
Using the context menu during a call ................................................................... 17
Using the voice recognition function .................................................................... 18
Using the clock and alarm functions .................................................................... 19
Setting up time and date....................................................................................... 19
Setting an alarm.................................................................................................... 20
Using the timer function........................................................................................ 21
Changing the Parrot DS3120 parameters............................................................. 22
Changing the name of the Parrot DS3120 ............................................................ 22
Controlling the display parameters ....................................................................... 22
Sending a picture to the Parrot DS3120 ............................................................... 22
Controlling the audio parameters ......................................................................... 24
Updating the Parrot DS3120 .................................................................................. 25
Technical specification .......................................................................................... 25
Bluetooth .............................................................................................................. 25
Compatible memory cards ................................................................................... 25
2
Introduction
The Bluetooth wireless technology enables audio information and data to be sent via a
short-distance radio link. Parrot draws on its long years of experience in the Bluetooth technology to offer you an innovative system, the Parrot DS3120.
The Parrot DS3120 will allow you to listen to FM radio and music files stored on a SD card
or USB peripherals. Its telephony function will also provide you the comfort of using a hands
free kit at home.
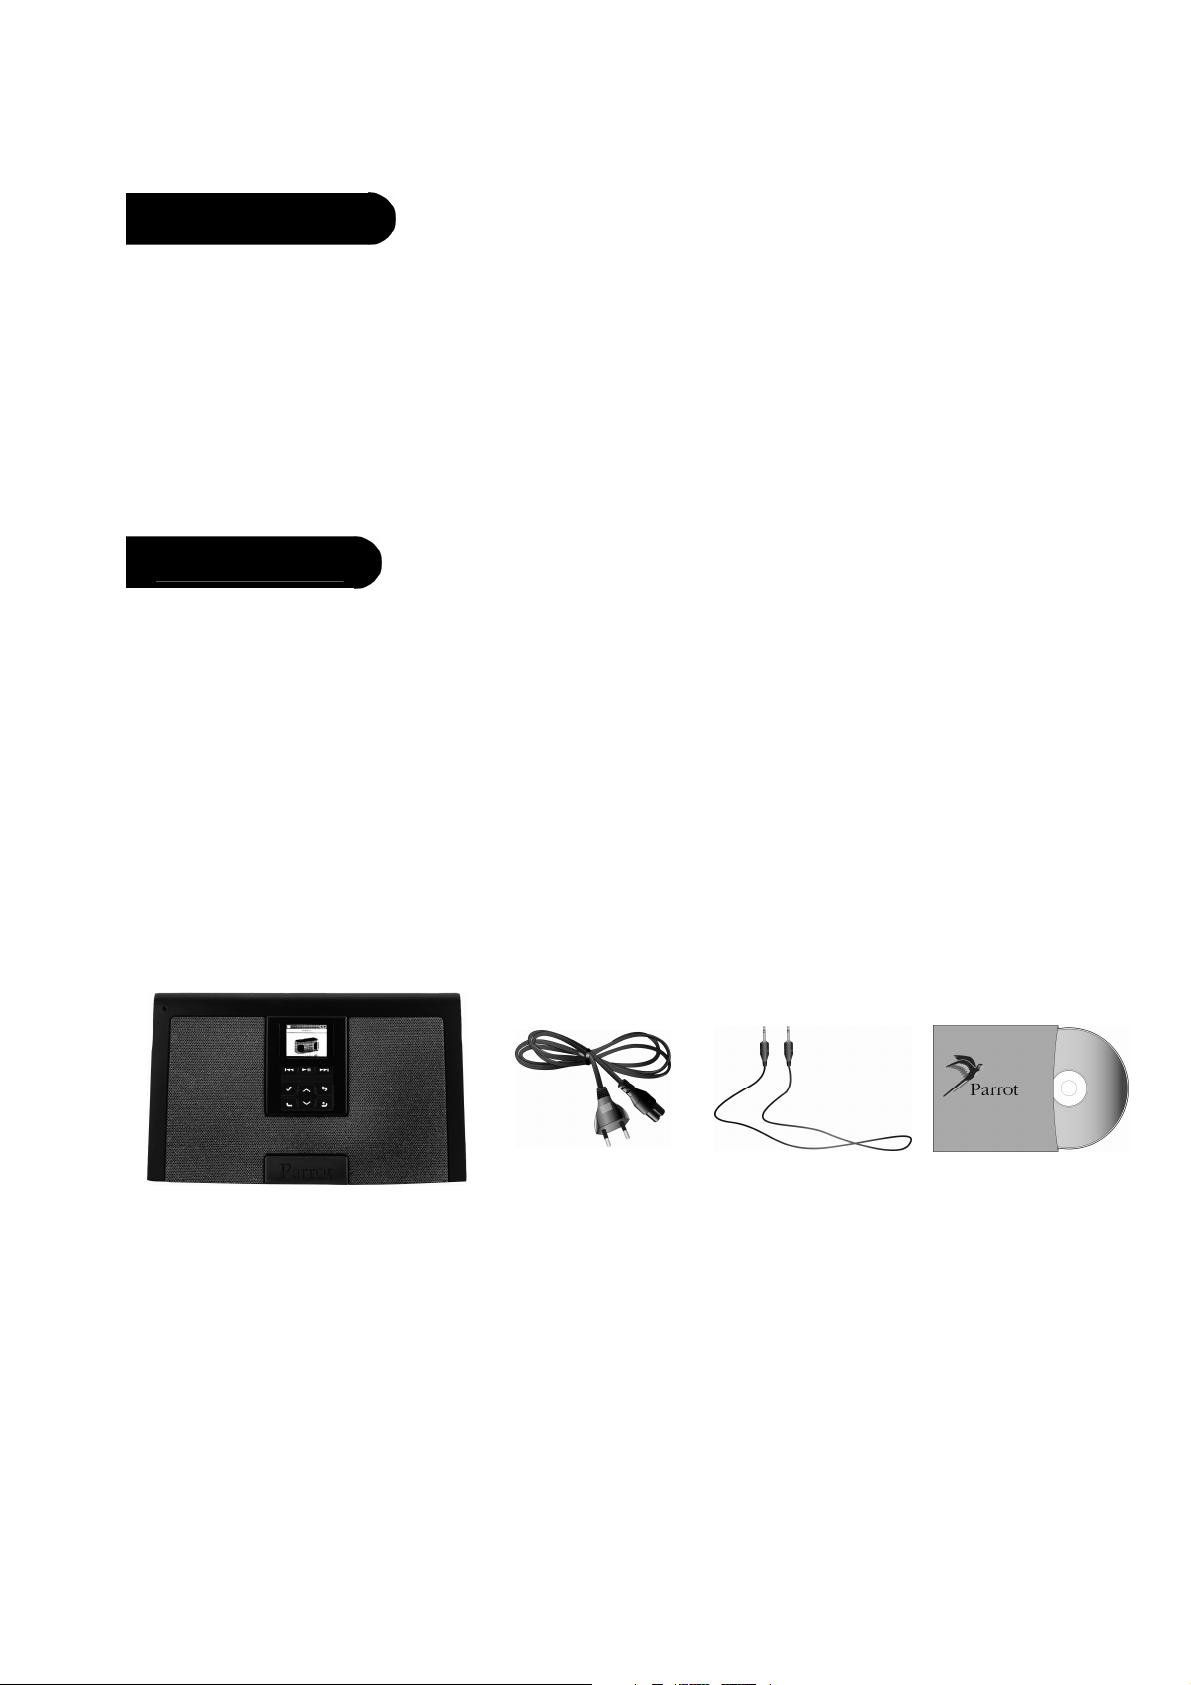
Kit content
The kit contains: • A Parrot DS3120
• A jack/jack audio cable (3.5mm)
• Mains cable
• A CD-ROM containing:
- Parrot Audio Configuration Tool
- Acrobat Reader
- Parrot Software Update Tool
- Parrot DS3120 user guide in pdf format
- Parrot Audio Configuration Tool user guide in pdf
• Quick start guide
• Parrot products guide
3
Using the Parrot DS3120 for the first time
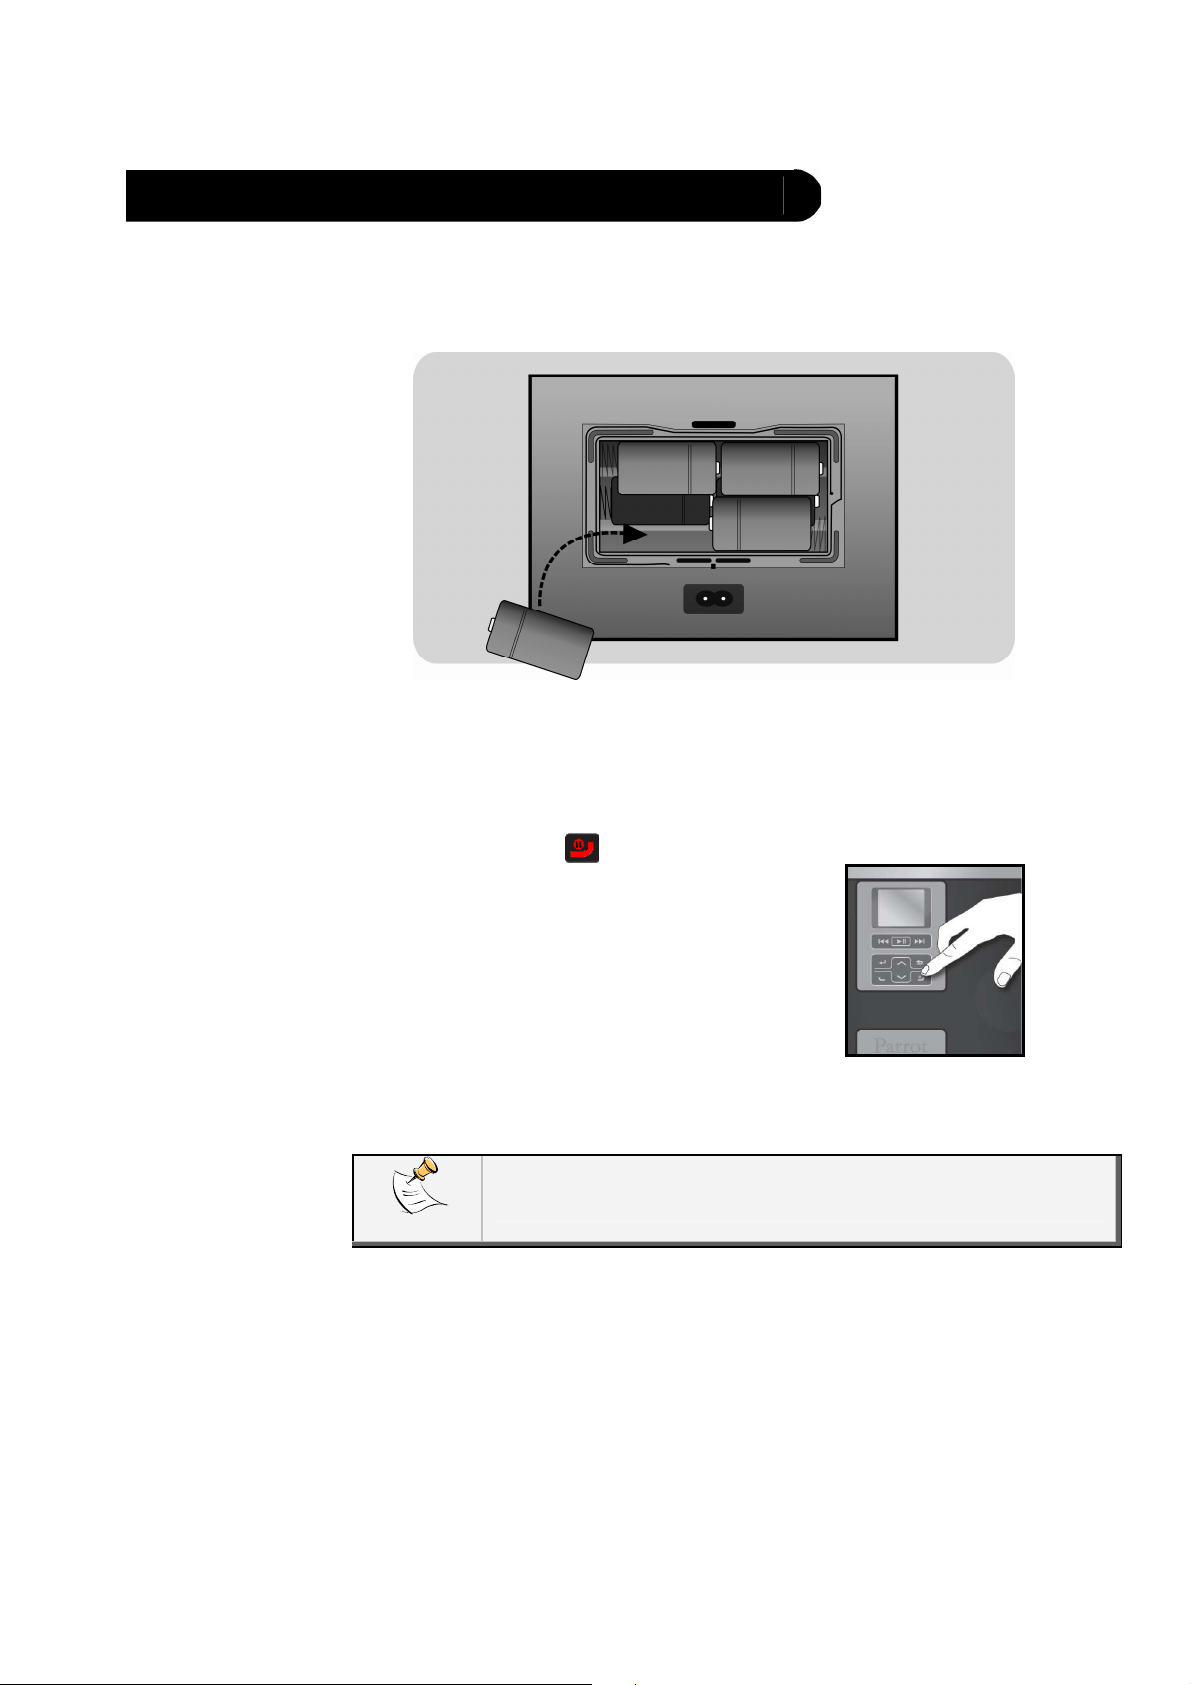
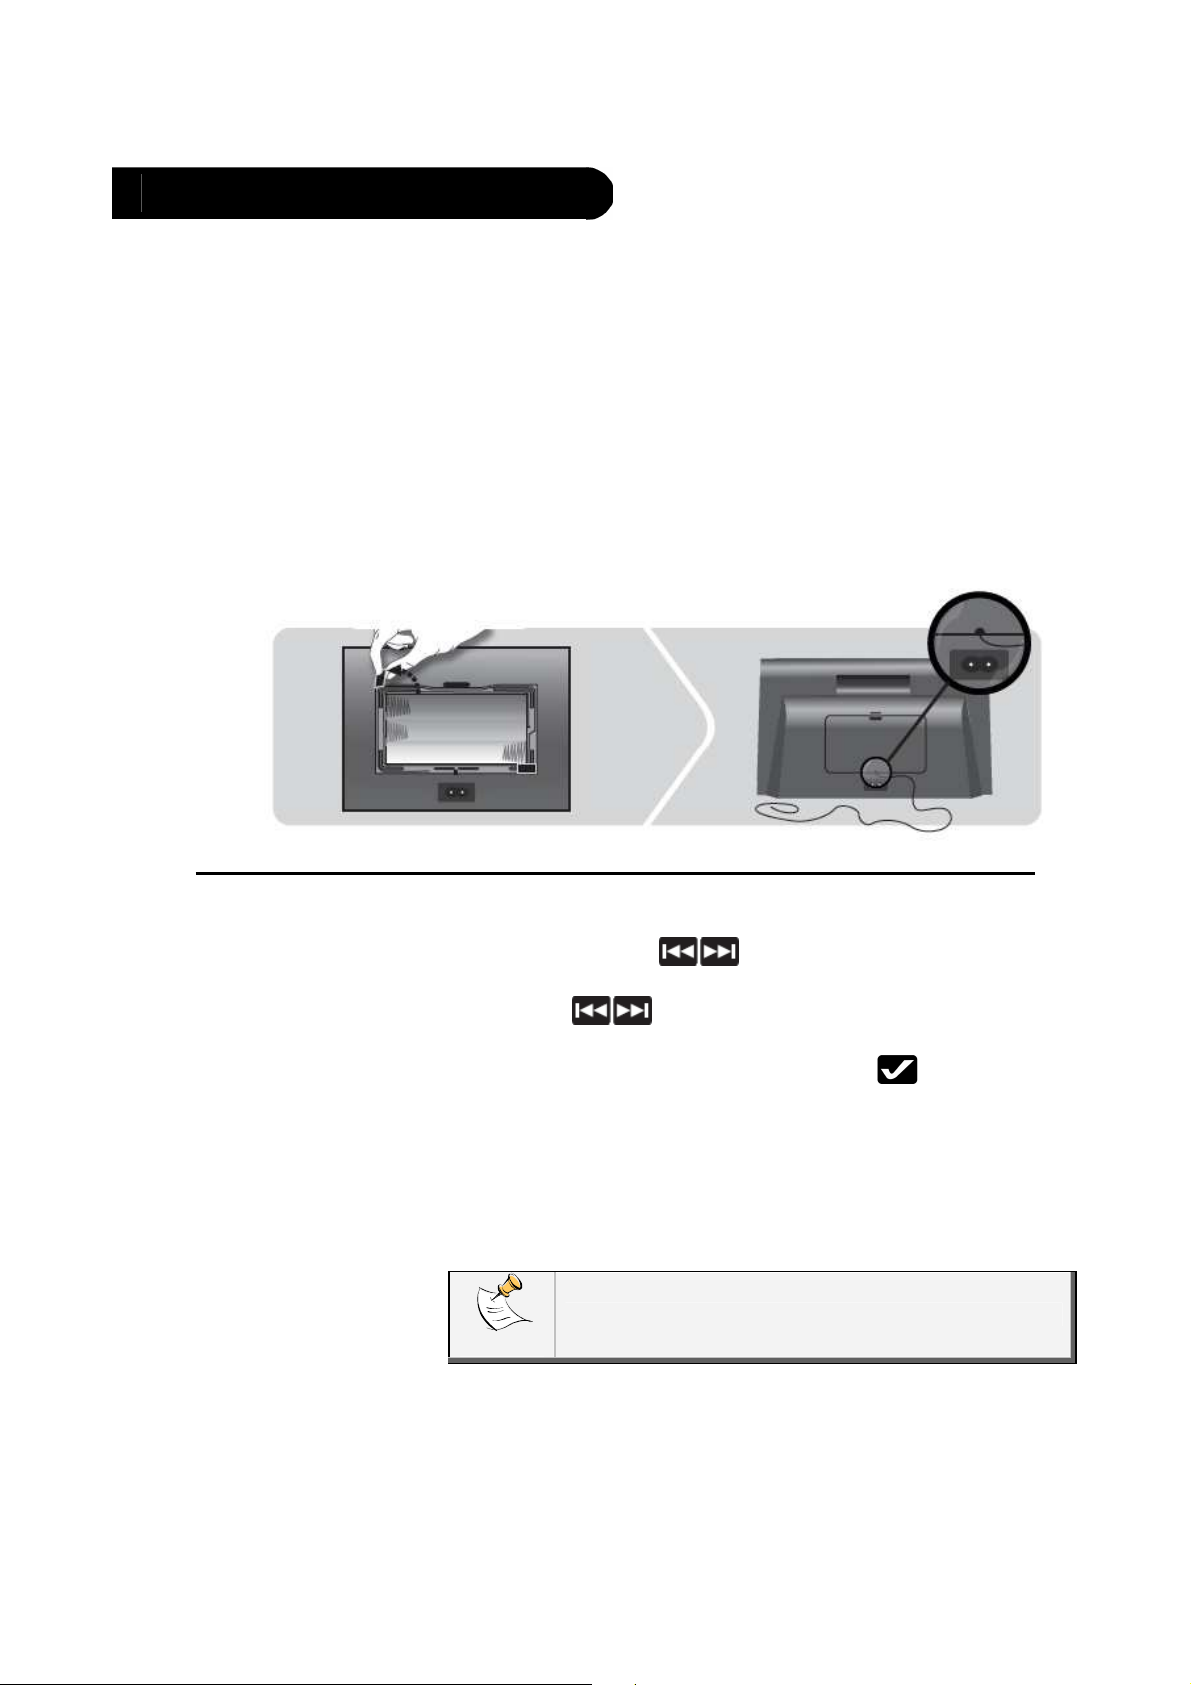
Setting up the
Parrot DS3120
1. Connect the mains cable to the Parrot DS3120 or insert the
batteries observing the + and - polarity signs indicated in the
batteries compartment.
2. Get the antenna out of the batteries compartment to improve
the reception quality.
► Refer to the « Unrolling the antenna » section for further
information.
3.
Hold down the button until the screen
lights on.
Use the same button to turn off the Parrot
DS3120.
If the Parrot DS3120 is in idle mode, press any button to display the
main menu.
4
Changing the
language of the
Parrot DS3120
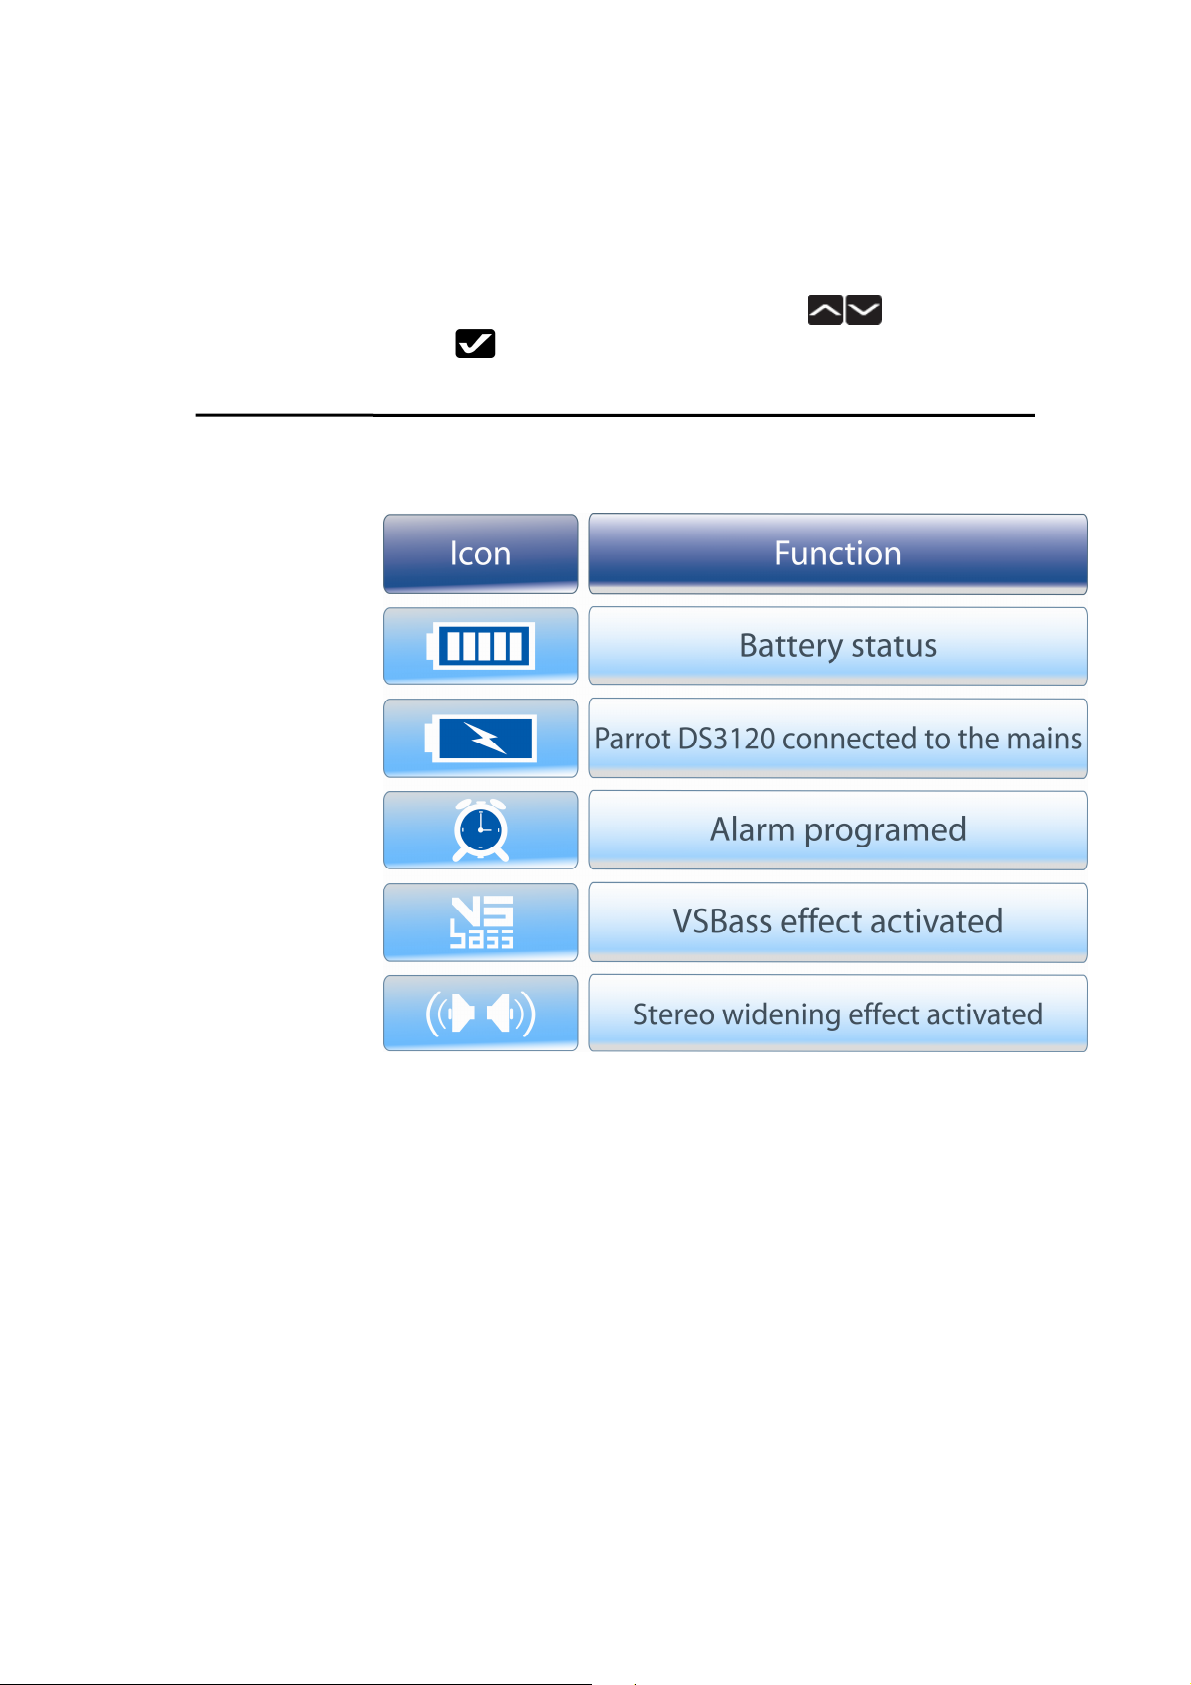
Display
The default language of the Parrot DS3120 is English. If you want to
change it :
1.
In the main menu, select Settings > Languages.
> The list of available languages is displayed.
2.
Select the language by using the arrows and press
.
5
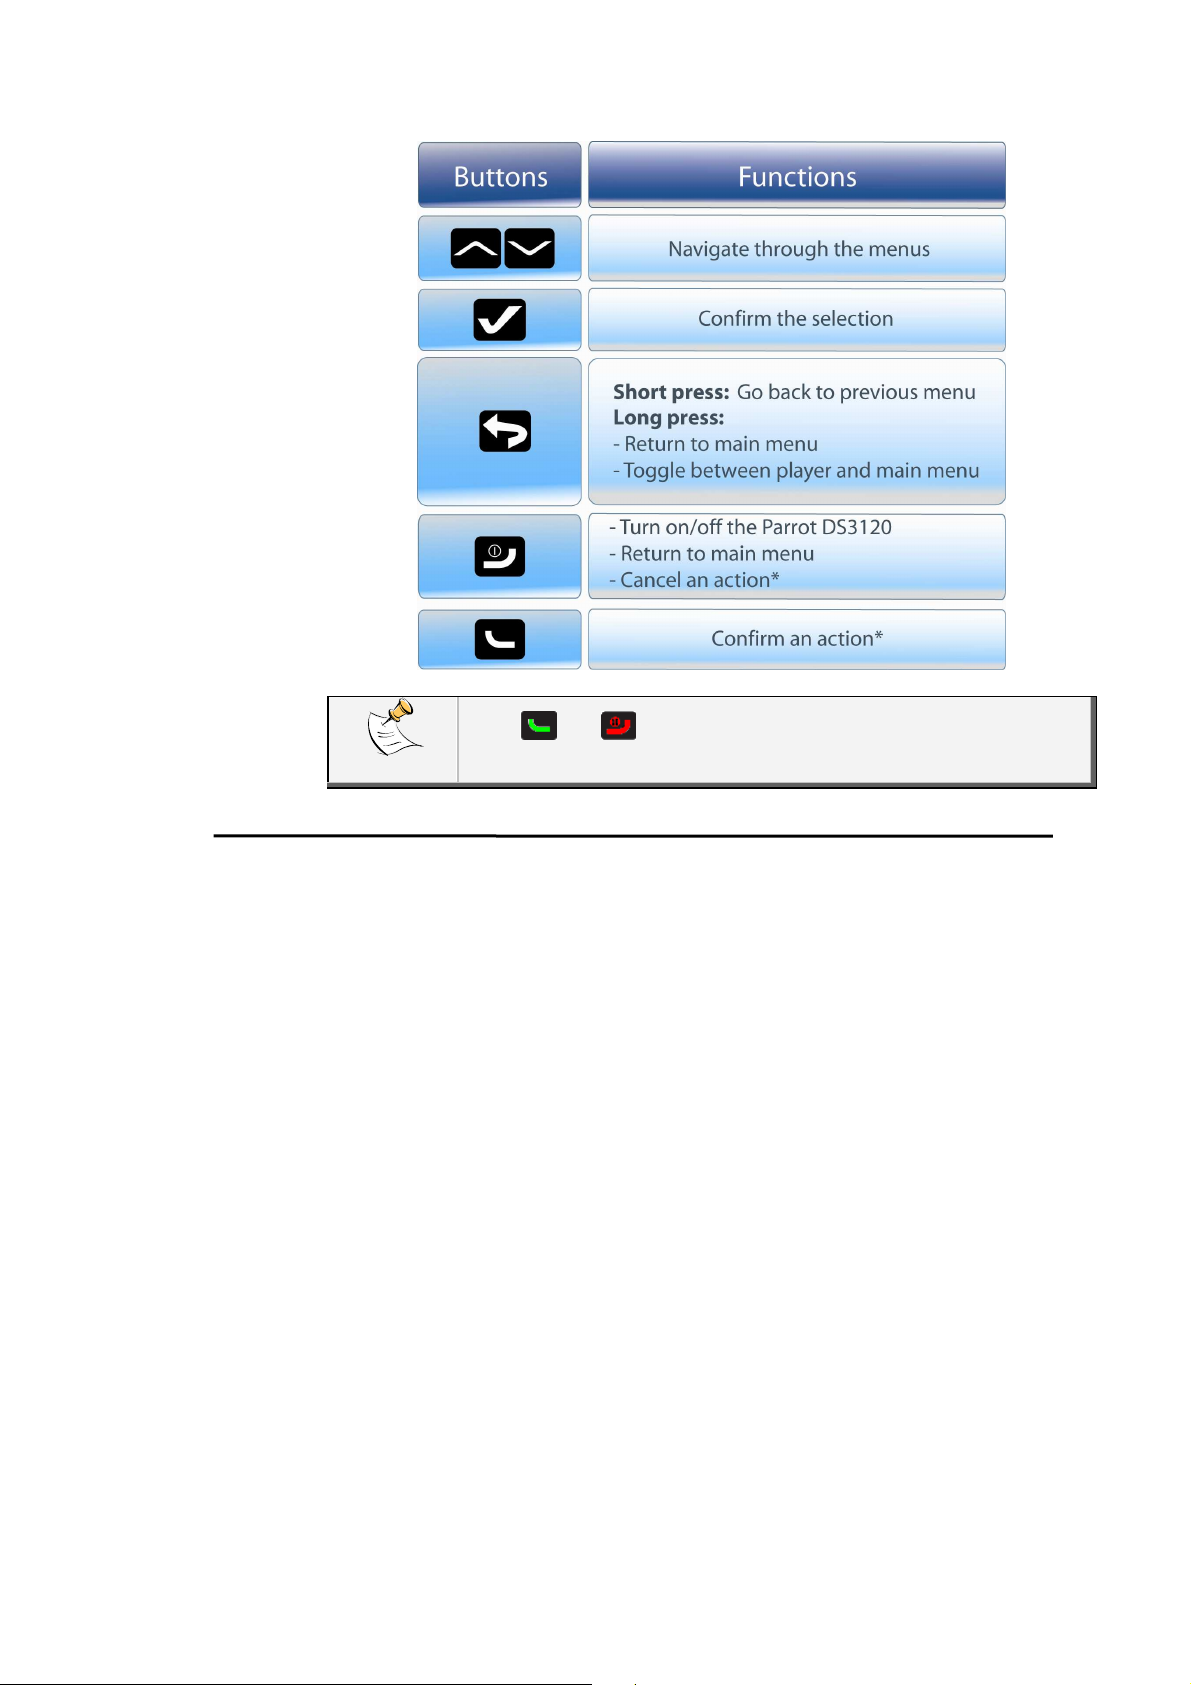
Navigating
through the
menus
* The and buttons permits to confirm or cancel an action if
this possibility is proposed through a pop-up.
6
Parrot DS3120
idle mode
• The Parrot DS3120 automatically switches to idle mode after a determined
period of inactivity.
- If your Parrot DS3120 is connected to the mains, the time and the
background image are displayed.
- If you use the Parrot DS3120 with batteries, the time and the
background image are not displayed.
• The backlight switches on when you press any button or when you start a
Bluetooth connection.
• You can change the backlight delay. To do so:
1.
In the main menu, select Settings > Display > Idle delay.
2.
Select a period of time and press .
*
The idle mode does not prevent the alarm triggering.
7
Using the FM Radio function
Unrolling
the antenna
To enjoy the best reception quality possible, use the antenna located in the
batteries compartment. To do so :
1. Open the lid of the batteries compartment.
2. Remove the 4 plastic parts located on the 4 corners of the
compartment.
3. Unroll the antenna and get it out making sure it is located on
the slot as indicated on the diagram below.
4. Close the lid of the batteries compartment.
Saving preset
stations
1.
2.
From the main menu, select Radio > FM Radio.
> Briefly press the buttons to change manually the
radio frequency.
> Hold the buttons to perform a quick tuning.
Once you selected a frequency, press the button during 2
seconds.
> Then, you can :
• Select the Append to presets option to add this
frequency to the already saved ones.
• Select an already saved frequency if you want to erase
it.
You can save up to 20 frequencies.
8

Listening to a
saved frequency
1.
2.
From the main menu, select Radio > Presets.
> The list of the saved frequencies is displayed.
Select the frequency you want to listen to and press .
9

Using the Audio Streaming function
Before using the Audio Streaming function, you must first connect your audio player to the
Parrot DS3120. If you are using this device with the Parrot DS3120 for the 1st time, you will
have to pair both devices.
► Refer to the «Connecting a Bluetooth device with the Parrot DS3120 » section for further
information.
Using an audio
player with the
Parrot DS3120 via
USB connection
The Parrot DS3120 enables you to play music files stored on
standard types of MP3 players but also on mass storage peripherals
(USB flash drive, external hard disk).
Make sure the external hard disk used with the Parrot
DS3120 consumes less than 500 mA.
1. Connect the audio player to the Parrot DS3120.
> The peripheral content is automatically displayed.
> To reach the peripheral content from the main menu, select
USB/SD and your audio player.
2. To visualize your audio player / USB flash drive content:
• If the tags of your music files are correctly defined,
select one of the following options: Playlist, Artist,
Album, Songs, and Genres.
• If the tags of your music files are not defined, select
Browse by directory, then:
- Use the arrows to browse the content of
your audio player.
- Press to enter a music folder or to start playing
a music file.
- Press
to reach the previous folder (or select
« Root »).
10

Playing music
files stored on
an SD card
Using an audio
player with the
Jack cable
1. Insert the SD card into the appropriate slot.
> The content of the SD card is automatically displayed.
Depending on the content of your peripheral, the
> To reach later the peripheral content from the main menu, select
USB/SD, then select the peripheral you want to browse.
2. To visualize the content of your SD card:
• If the tags of your music files are correctly defined, select one
of the following options: Playlist, Artist, Album, Songs and
Genres.
• If the tags of your music files are not defined, select Browse by
directory, then:
- Use the arrows to browse the content of your audio
player.
- Press to enter a music folder or to start playing a music
file.
- Press
1. Use the 3.5 mm Jack/Jack cable to connect your audio player
to the Parrot DS3120.
display of its content can take up to 30 seconds.
►
Refer to the technical specifications for further
information about the compatible SD cards.
to reach the previous folder (or select « Root »).
2.
From the main menu, select
Line in and press .
11

3. Play the music file from your audio player.
> The sound is directly streamed through the speakers of the
Parrot DS3120.
Using the
Parrot DS3120
during music
playback
The Next / Previous functions are not available if the
Parrot DS3120 is connected to the audio player via the
Jack/Jack cable.
12

Using the context
menu during
music playback
Press to enter the context menu.
You can access the following functionalities to:
• Change the audio parameters, activating the equalizer or the
audio effects.
► Refer to the « changing audio parameters » section for further
information.
• Enable the random playback:
- Random: random playback of the music files in the selected
playlist.
The
Random
mode.
- Auto-album: random selection and playback of an album at
the end of the current selection
- Auto-song: random playback of all music files stored on the
peripheral at the end of the current selection.
• Enable the repeat option of one or more music files:
- Repeat mode - off : repeat option deactivated;
- Repeat mode - song : only one track is repeated;
- Repeat mode - album
repeated;
- Repeat mode - all: All the music files stored on the
peripheral are repeated.
option can be applied to every repeat
:
all the music files of an album are
13

Connecting a Bluetooth device with the Parrot DS3120
To use the Parrot DS3120 with your cell phone or audio player (device on which your audio
files are stored), you must connect both devices.
Moreover if you are using your cell phone / audio player with the Parrot DS3120 for the first
time, you must pair both devices before connecting them. The pairing operation is only
necessary once, except if you reset the device.
Pairing an audio
player with the
Parrot DS3120
Connecting an
audio player to the
Parrot DS3120
The Parrot DS3120 can be paired to 10 audio players. Pairing an11th
device will cancel the pairing of the device which has not been connected
to the Parrot DS3120 for the longest period.
1. From your Bluetooth device, launch a Bluetooth peripherals
search and select « Parrot DS3120 ».
► Refer to your device’s user guide for further information
2.
Enter « 0000 » on your device when you are prompted to.
> A pop-up is displayed to confirm the pairing.
3.
Press to accept the pairing.
> Pairing successful » is displayed on the Parrot DS3120.
> You can now connect both devices then use the telephony or
audio streaming functions depending on the type of device you
just paired.
Once you have paired both devices :
1.
From the main menu, select Bluetooth.
> The list of devices paired with the Parrot DS3120 is
displayed.
2.
Select the device you want to use and press .
> You may have to accept the connection with the Parrot
DS3120 on your device.
You can change the Bluetooth friendly name of the
Parrot DS3120.
►
Refer to the « changing the name of the Parrot
DS3120 » section for further information.
14

Special pairing
modes
Depending on your phone, you may have problems during the pairing
process. If your phone doesn’t appear when you select Bluetooth :
1.
From the main menu, select Settings > Bluetooth > Pair
with…
2.
If your phone doesn’t appear in this new list, select the New
peripherals option.
► Visit the Compatibility section of our website
www.parrot.com
for further information.
15

Using the telephony function
Before using the telephony function of your Parrot DS3120, you must first connect it to your
phone/PDA. If you are using this device with the Parrot DS3120 for the first time, you will
have to pair both devices before connecting them.
►
Refer to the “Connecting a Bluetooth device to the Parrot DS3120” section for more
information.
The use of some functionality (voice recognition, phone’s call history
recovery) only depends on your phone.
► Refer to our website www.parrot.com, in the Support section, for further
information.
Using the
phonebook
Making a call
The synchronization of your phonebook with the Parrot DS3120 is
automatic with numerous phones.
However, if your phone doesn’t support this automatic
synchronization, you can send your contacts from your phone to the
Parrot DS3120 via Object Push. To do so:
1.
From the Parrot DS3120 main menu, select Settings >
Bluetooth > Object Push.
> Waiting for a contact is displayed on the screen.
2. Refer to your phone user guide for further information about
the Object Push process.
1.
From the main menu, select Phone > Phonebook to access
the phonebook of the phone which is connected to the Parrot
DS3120.
2.
Select the contact and press to make the call.
Using the redial
function
1.
From the main menu, select Phone > Call history.
> The list of the 20 last calls (answered, missed and dialled) is
displayed.
2.
Select the contact and press to make the call.
If your phone does not allow the call history recovery, the
call history of the Parrot DS3120 is reset each time you
disconnect your phone from it.
16

Receiving a call
Using the Parrot
DS3120 during a
call
A pop-up is displayed on the screen of the Parrot DS3120 to warn you
when there is an incoming call.
• If you want to accept this call, press . Then, press to end the
call.
• If you want to reject this call, press .
Using the context
menu during a
call
Press to enter the context menu.
It enables you to:
• transfer the current call to your cell phone,
• access the phonebook of the phone connected to the Parrot
DS3120,
• Browse the list of the 20 last calls (answered, missed and
dialled).
17

Using the voice
recognition
function
• The use of the voice recognition function depends
solely on your phone.
►
• You must first record the voice tags on your phone.
Visit the Support section on our website at
www.parrot.com for more information.
If your phone supports this technology:
1.
Hold the button.
2. Say the name of the contact you wish to call.
> If the voice tag is recognized, the name of the contact is
displayed on a pop up and the call is automatically made.
If your phone does not support the voice recognition
technology, the previous procedure realizes a call
towards the last dialled number.
18

Using the clock and alarm functions
Setting up time
and date
Time and date will be automatically displayed if the location of the Parrot
DS3120 enables the reception of a RDS signal. To do so, make sure the
Use RDS Time option is activated.
The reception takes 2 to 5 minutes, depending on the signal intensity.
To ensure the best quality of reception possible, make
sure the antenna is correctly unrolled from the batteries
If the location of the Parrot DS3120 does not allow this automatic
synchronization, a pop-up is displayed to ask you if you want to set up
the time manually.
If you want to set up the time manually, select Alarm / Clock > Clock
from the main menu :
- Use the arrows to adjust time and date.
- Press
- Press to return to the previous digit.
Check or uncheck the 24 hours option to visualize the time at the 24h
format or AM/PM.
From the main menu, select Settings > Display > Time in title to
visualize the time on the screen of the Parrot DS3120.
compartment.
►
Refer to the «Unrolling the antenna» section for
further information.
to confirm.
19

Setting an alarm
The Parrot DS3120 allows you to set a simple and a recurring alarm.
A reminder pops up if the alarm triggers while you are
already using the Parrot DS3120.
1.
From the main menu, select Alarm / Clock > Alarms >
Alarme or Recurring alarm depending on the alarm you want
to activate.
2.
Select the Enabled option to activate the alarm.
3.
Select Time and press to set the triggering time of the
alarm.
4. Select the type of melody among the following possibilities:
•
For a ringtone, select Buzzer.
• For an audio file stored on an SD card or on an USB
peripheral (already connected), select File and select
the audio file or the Random File option.
If the audio files are stored on an MP3 player, the audio
player must be turned on to enable the playback of the
selected audio file as alarm.
If the peripheral is not available playback is replaced by
a ringtone of the Parrot DS3120.
• For the radio, select FM Radio.
The FM station used as alarm is the latest station
emitted.
5.
Select the Volume option to adjust the volume of the alarm
when it triggers.
6. If you have chosen a recurring alarm, select the checkbox of
the day or days of the week you wish to repeat the alarm.
The idle mode and the standby mode do not prevent
the alarm triggering.
7. When the alarm triggers :
• press to shut it.
• press to interrupt it for 5 minutes.
20

Using the timer
function
The timer function allows you to switch the system off automatically
through a determined period of time.
This function is independent from the idle mode described in the « Idle
mode » section.
1.
From the main menu, select Alarm / Clock > Sleep timer
2.
Select the Enabled option and choose the time you want to
determine before the system switches off using the
arrows.
3.
When the time is adjusted, press .
> The Parrot DS3120 will turn off automatically.
21

Changing the Parrot DS3120 parameters
Changing the name
of the Parrot
DS3120
Controlling the
display parameters
Sending a picture
to the Parrot
DS3120
From the main menu, select Settings > Bluetooth > Friendly name if
you wish to change the name by which your Parrot DS3120 will be
seen by other Bluetooth devices.
From the main menu, select Settings > Display. This menu will allow
you to:
• define how long the Parrot DS3120 will keep the backlight on
during a period of inactivity;
• control the brightness of the screen;
• select a screensaver.
The Parrot DS3120 allows you to send a picture into its internal
memory to use it as screensaver.
To do so :
1.
From the main menu, select Settings > Display >
Screensaver.
2.
Select the Wallpaper option.
► Refer to the «Sending a picture to the Parrot DS3120 » section for
further information.
To send a picture from a PC :
1. Pair your PC with the Parrot DS3120.
► Refer to the « Pairing an audio player with the Parrot
DS3120 » for further information.
2.
Right click on the Bluetooth icon on the toolbar and select
Quick connect > File transfer then your Parrot DS3120.
22

> The file transfer window is displayed.
3. Copy the picture you want to send and paste it into the file
transfer window.
Make sure the picture you want to send is in JPEG
> The transfer is in progress.
or JPG format.
> Once the transfer is complete, the previous wallpaper is
automatically replaced by the picture you just sent.
To transfer a picture from a cell phone, pair both devices and refer to
your device’s user guide for further information.
23

Controlling the
audio parameters
From the main menu, select Settings > Audio to have access to the
following options:
•
VSBass : Bass amplification.
•
Stereo widening: Widening of the sound field.
•
Equalizer: This option allows you to choose one of the eleven
equalizer presets (including jazz, rock, classical…) to suit the style of
music you are listening to.
If you want to define your own presets, select the
Custom
frequencies,
frequency.
option then :
- use the arrows to change the
- press to skip to the next frequency
- press to go back to the previous
24

Updating the Parrot DS3120
• You can update the software of your Parrot DS3120 by Bluetooth, USB or via SD
card. An update offers you new features and improves compatibility with a larger
number of phones.
• If you wish to realize the update via Bluetooth, you need a PC equipped with
Bluetooth technology, and the Parrot Software Update Tool as interface.
• You will find the Parrot Software Update Tool and detailed instructions about the
different kinds of updating process of the Parrot DS3120 in the Support section of
our website at www.parrot.com.
Technical specification
• Power supply :
-
Input: 100- 220 V~, 50-60 Hz
- Output: 12Vdc, 2A
• Dimensions : 150 x 300 x 100 mm
• Weight : 1.5 kg
Bluetooth
Compatible
memory cards
-
• Bluetooth 2.0 + EDR
• Bluetooth PIN code : 0000
• Supported profiles : A2DP, AVRCP, FTP, OPP, SPP
• SD, micro SD (with adapter), mini SD (with adapter)
• SDHC (class 2, 4, 6), mini SDHC (with adapter)
• Memory Card MMC, MMC plus, MMC mobile (with adapter), MMC
micro (with adapter), RS-MMC mini (with adapter)
25
 Loading...