

Page 1

ParkZone™ products are distributed exclusively by
Horizon Hobby, Inc.
4105 Fieldstone Road
Champaign, IL 61822
© 2005 Horizon Hobby, Inc.
www.parkzone.com
PKZ1206
7558
Page 2

Instruction Manual
FM Radio: 3 proportional channels
Battery: 8.4V 900mAh Ni-MH
Charger: Variable rate DC peak detect
Wing: Z-Foam™
Wingspan: 37 in (950mm)
Length: 27 in (700mm)
Weight: 21 oz (580 g)
Motor: 480 Power direct drive
Charge-and-Fly™ Park Flyer
Page 3
F-27B Stryker Instruction Manual
Congratulations on your purchase of the ParkZone
™
F-27B Stryker.™ Your Stryker has come with everything
needed to get you in the air—all in one box! You will
only need to attach the vertical fins, attach the nose,
and charge the battery prior to flight.
Everyone at ParkZone is committed to giving you the
most enjoyable flight experience you can have.
In order to ensure a safe and successful flight,
we ask that you do not fly until you have read
these instructions thoroughly.
Your F-27B Stryker comes with a fully proportional
3-channel FM radio system with full control of throttle,
steering and pitch. If you have not successfully flown
one of HobbyZone’s Zone 1 or 2 aircraft, or any other
radio controlled aircraft, we strongly recommend that
you seek the help of an experienced radio control pilot
during your beginning flights.
Crash damage is not covered under the warranty!
Your F-27B Stryker comes with special software that
gives you the ability to change flight modes as you
gain more experience and become more advanced
in your flying. There are two independent modes to
select from. This is done easily with a switch on
the transmitter.
Step 1
Step 2
Transmitter
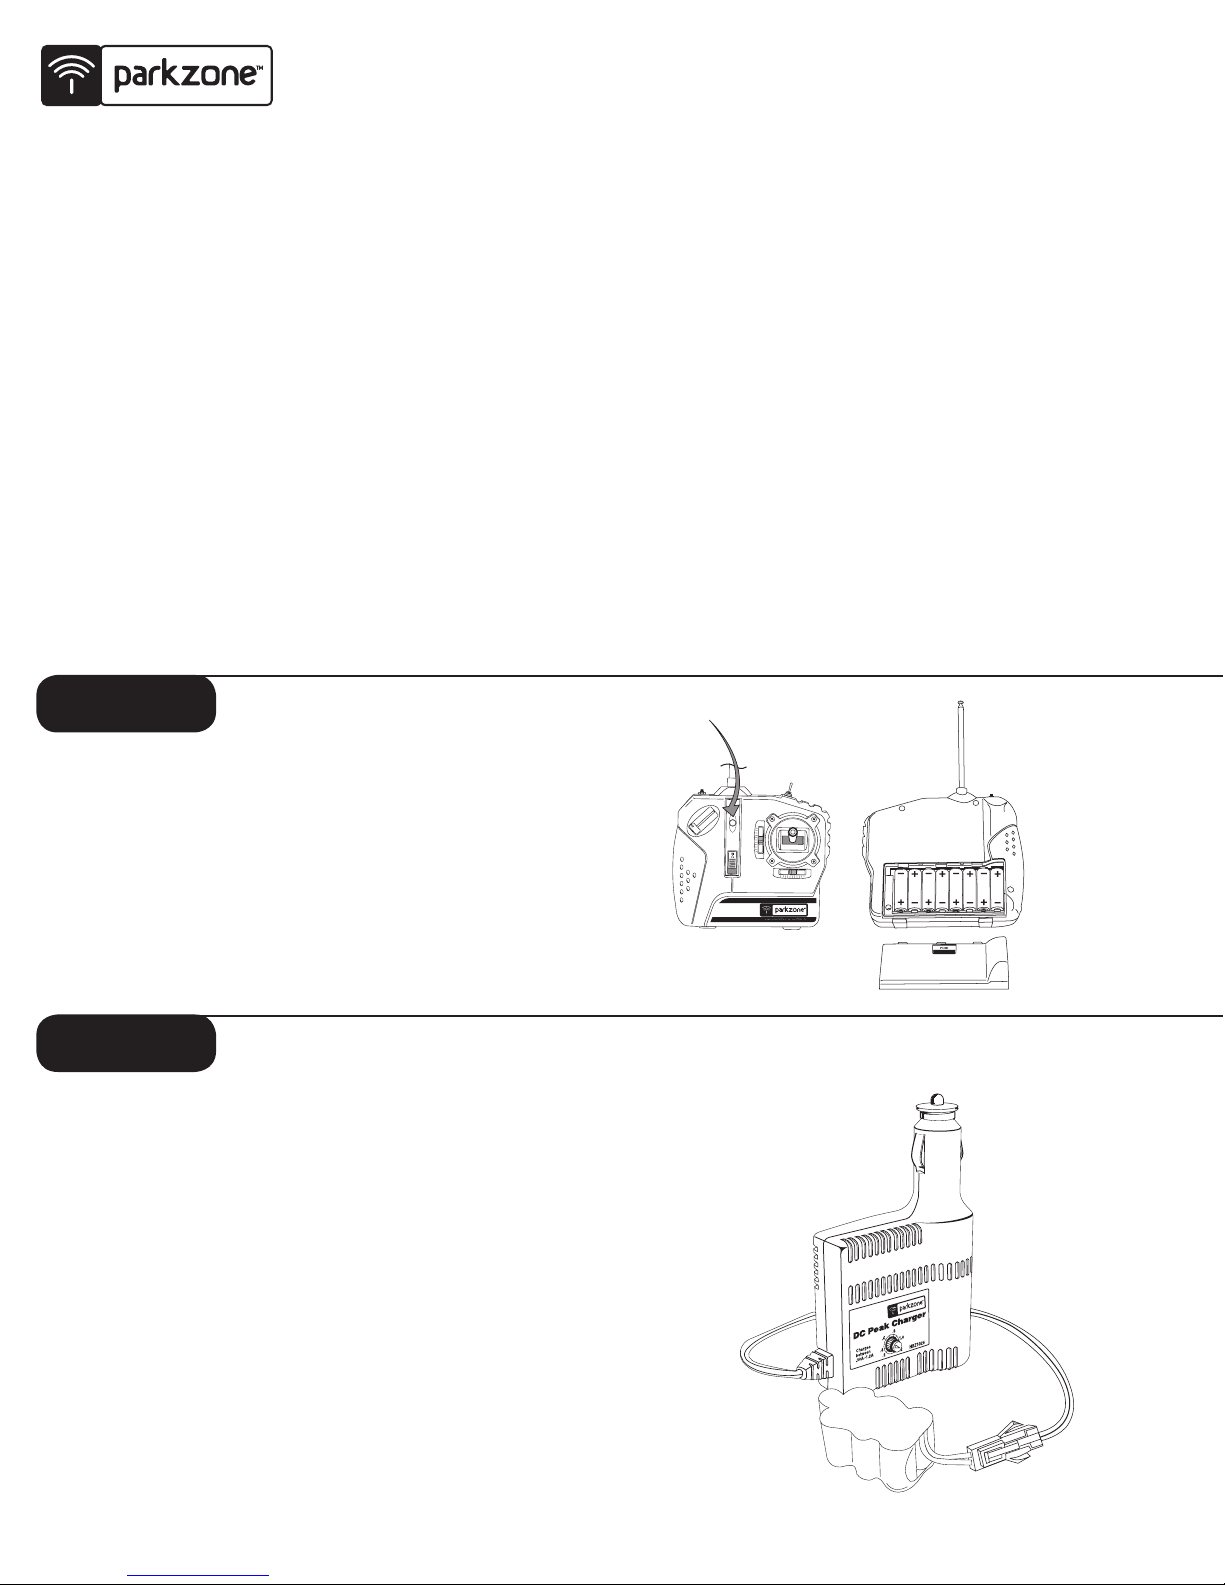
1. Insert 8 new “AA” batteries (supplied) into the
transmitter, observing proper polarity.
2. Turn switch on to ensure the batteries have been
installed correctly. Once this is confirmed, turn radio off.
2
Charging the Aircraft Battery
Your ParkZone charger uses unique peak detection
circuitry that ensures an accurate charge every time and
protects your Ni-Cd and Ni-MH batteries from the dangers
of over-charging. During the charge cycle, it continuously
monitors the charge curve and automatically switches to
trickle charge when the peak is detected.
Important: The F-27B Stryker airplane battery should be
charged shortly before flying. If you charge the battery 12 to
24 hours prior to flying, you will need to “re-peak” the battery
before you fly by repeating the charging steps.
Page 4
3
Step 2
Step 3
300mAh 6V Ni-MH .4 amps 40 minutes
600mAh
4.8V–8.4V Ni-MH
.8 amps 40 minutes
900mAh
7.2V–8.4V Ni-MH 1.2 amps 40 minutes
BATTERY CAPACITY
MAX. CHARGE RATE
CHARGE TIME
Note: Charge times are
estimates only for fully
discharged battery
packs. Actual charge
times may vary.
continued
DC Peak Detection Charger Features:
• Variable charge rate from 0.3–1.2 amps
• Trickle charge
• Uses automobile 12V power outlet
• Charges 4- to 7-cell Ni-Cd and Ni-MH
battery packs
• LED charge indicator
Charging the Aircraft Battery:
1. Using the dial on the side of the charger,
select the charge rate to 1.2 amps.
Battery Capacity: 8.4V 900mAh Ni-MH
Typical Charge Time: 40 minutes
2. Connect the battery pack to the charger.
3. Connect the charger to the 12V power outlet in your
automobile. The LED will continually blink while the
battery charges.
4. Charging is finished when the LED indicator glows
steadily. You should also notice at this time that the
battery is warm to the touch.
Note: Damage to the charger and battery
will occur if you exceed the maximum charge
rate recommended.
Note: Do not leave the charger and battery
unattended during the charge process. While
charging, place the battery on a heat-resistant
surface and constantly monitor the temperature
of the battery pack. If the battery becomes hot at
any time during the charge process, discontinue
charging immediately. Do not allow children to
charge battery packs without adult supervision.
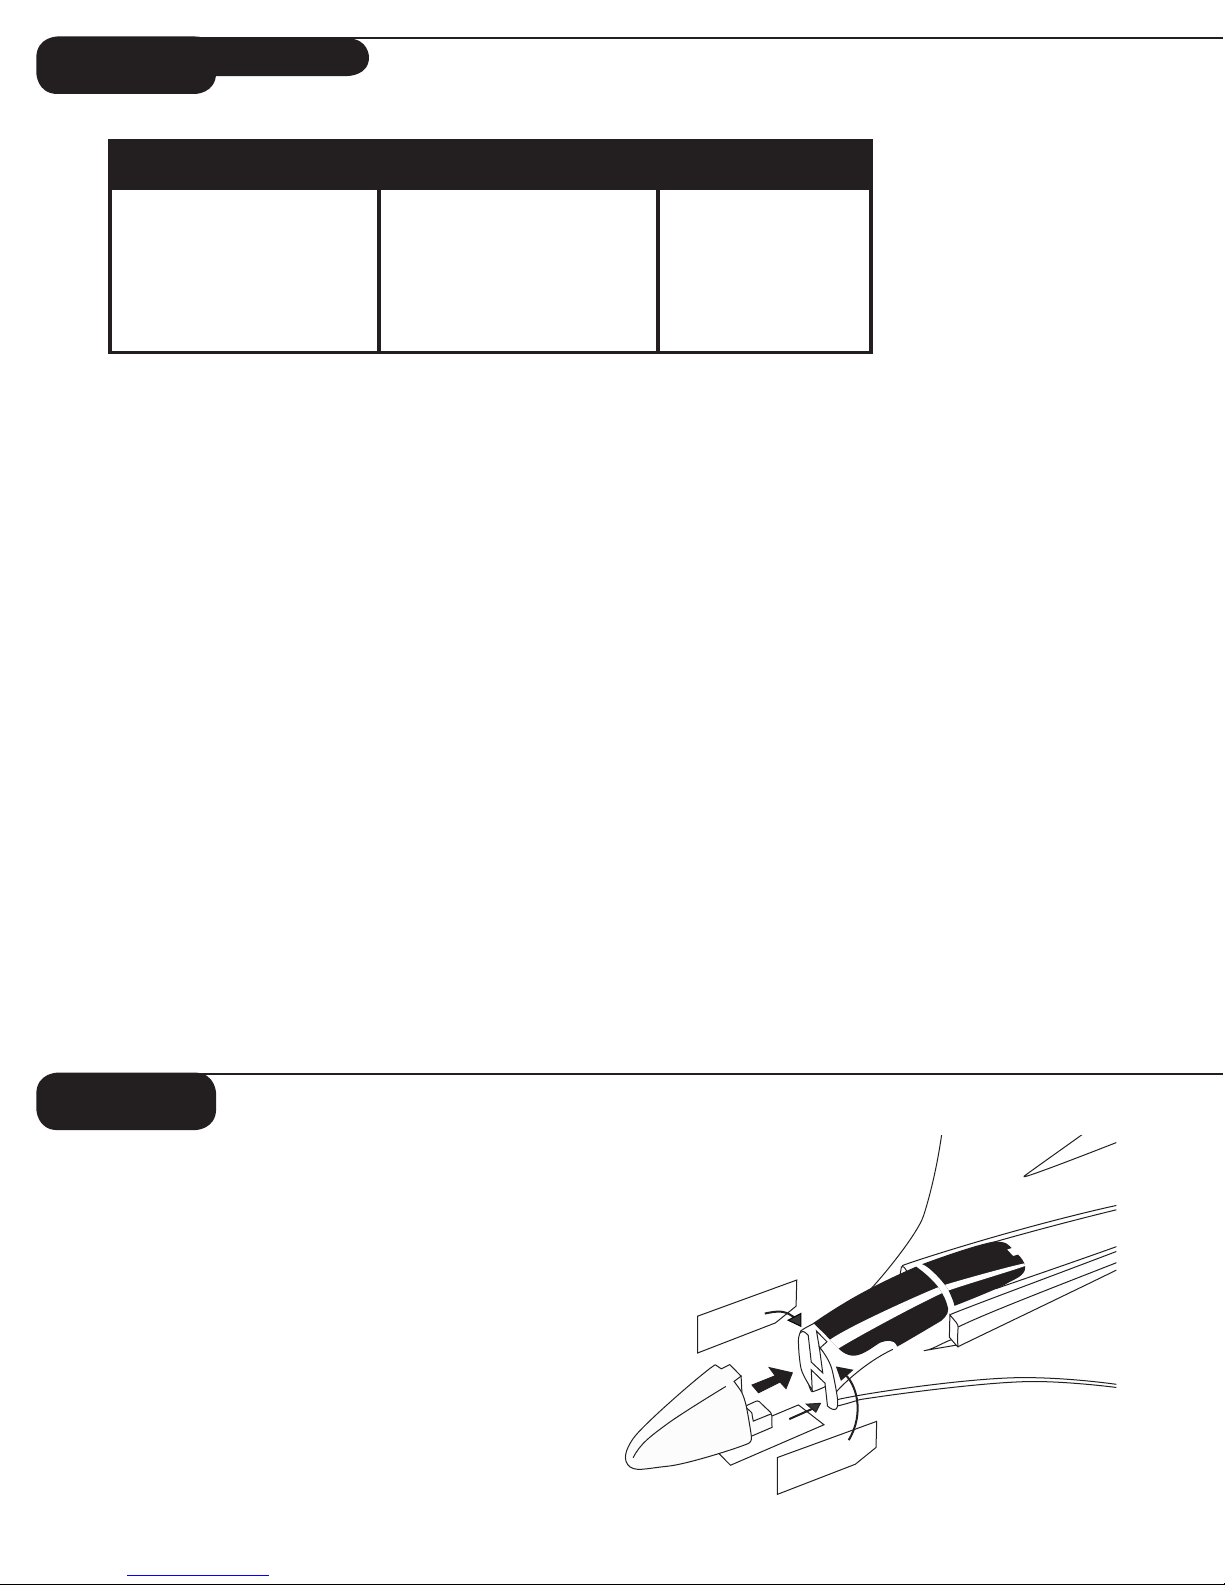
Attaching the nose
1. Locate the nose inside the box.
2. Trial fit the nose without peeling the paper off of
the tape. This will give you a good idea of what the
fit will be like.
3. Peel the paper off the tape and carefully attach
the nose.
4. To add support, apply the included decals to the
side and bottom of the nose/fuselage
Page 5
4
Step 5
Motor Test
1. Make sure the throttle slider is in the “off” position.
2. Turn on transmitter.
3. Remove battery cap from top of the fuselage (see above).
4. Plug the flight battery into the connector inside
the fuselage.
5. Secure battery inside fuselage cavity and replace the
battery cap.
6. Your F-27B Stryker
has a built-in throttle-arming feature
which needs to “see” the throttle slider in the off position
before it will spin the propeller. Be sure the propeller is
clear of obstructions before arming the throttle in order
to avoid injury or damage. Advance the throttle forward
and the propeller should spin at a high speed. The
throttle-arming feature will need to be activated
each time the battery is plugged into the airplane.
Adult Supervision Required
WARNING: Keep everything clear of the propeller and hold
the plane securely. A moving propeller can cause severe
injury.
ON
OFF
Step 4
Note: Double-sided tape is on the
front edge of both fins. Peel the paper
from the tape in order to secure the
vertical fins into the fuselage.
Battery Cap
Attaching the vertical fins
You will need to attach the two vertical fins to
the fuselage. These fins will help to give the F-27B
Stryker
™
stability.
1. Locate both fins from box.
2. Peel the paper from the double-sided tape.
3. Slide the fins into the slots on fuselage and
push down to secure them.
Page 6
5
Step 6
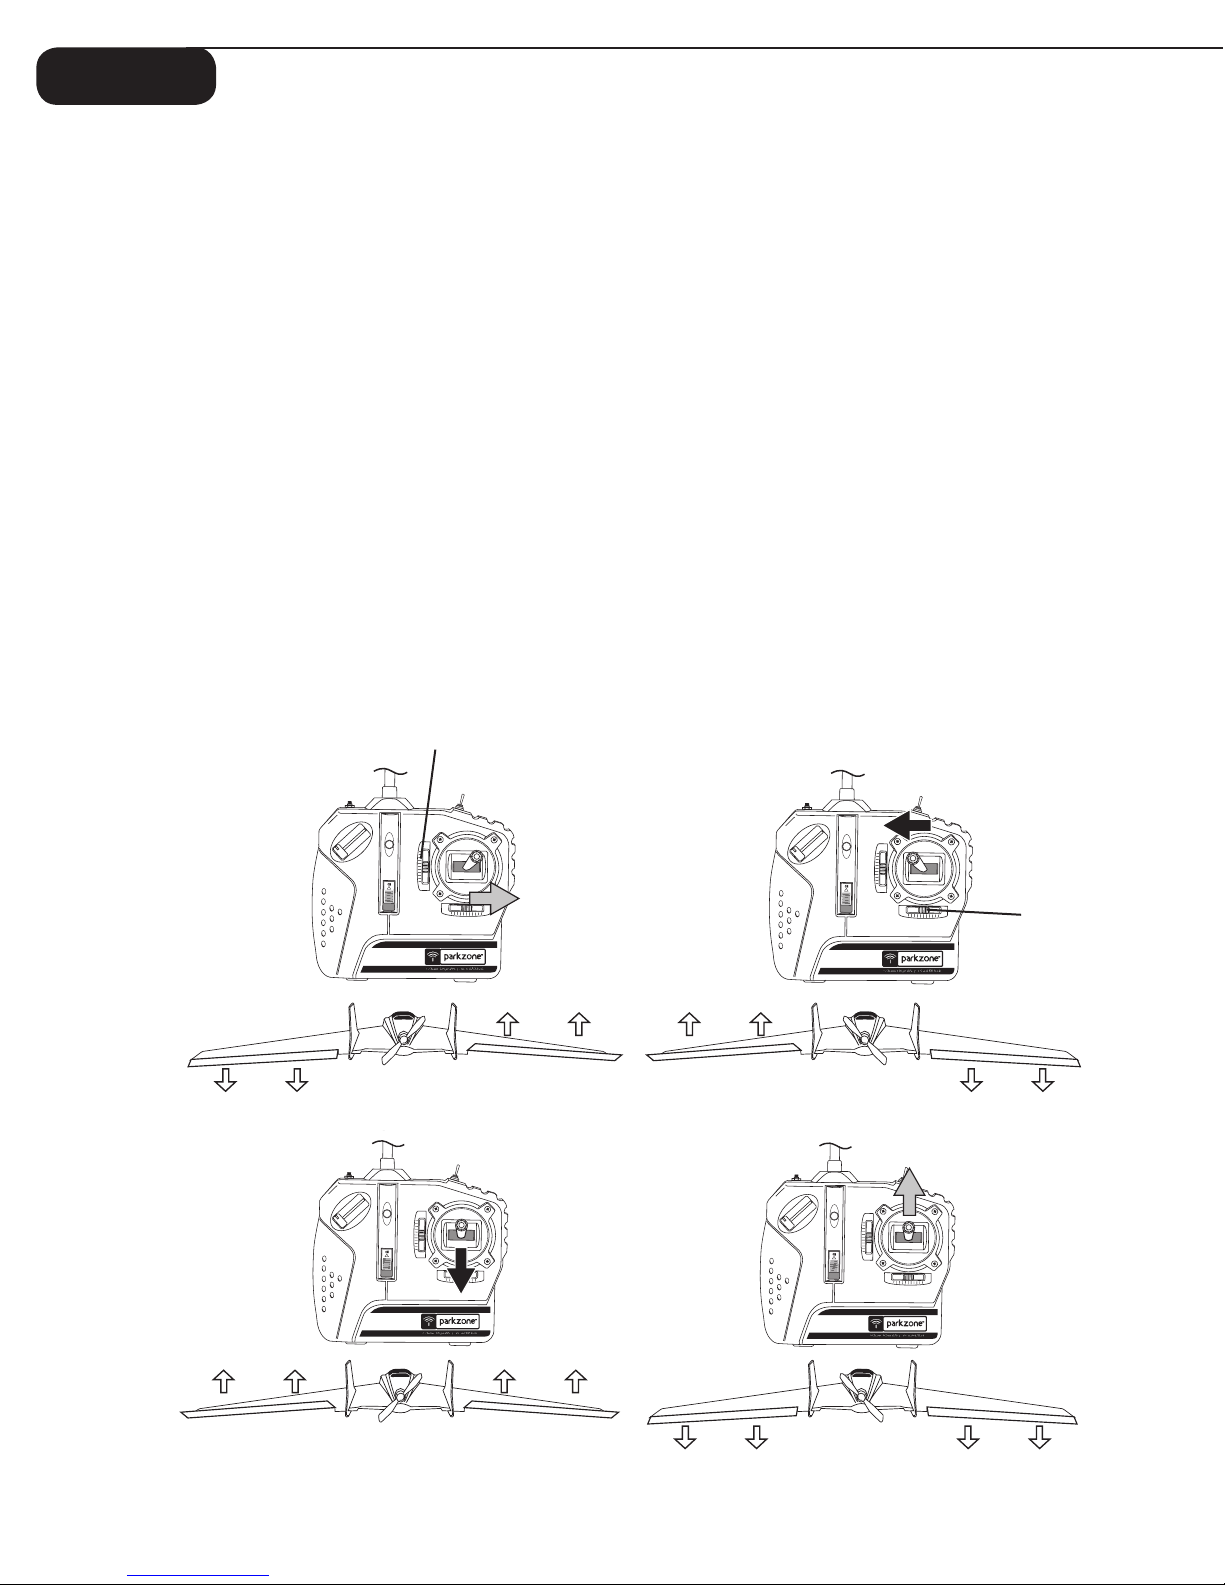
Elevon Test
Warning: Keep everything clear of the propeller before
starting the control test in the event that you accidentally
turn on the motor.
Your F-27B Stryker
™
features two large elevons that
provide directional control. To test the elevons to ensure
they function correctly, follow these simple steps:
1. Turn on transmitter.
2. Install and plug in fully charged aircraft battery. With
the stick at neutral and both trim levers centered, the
elevons should be at neutral. If this is not the case, you
can make small adjustments to the trim levers.
3. Give the transmitter full right on the stick. As you are
looking from the tail of the aircraft, the right elevon
should deflect upward, and the left downward
(in Image 1).
4. Give the transmitter full left on the stick. The left elevon
should deflect upward and the right downward
(in Image 2).
5. Pull back on the stick and the elevons should both
deflect equally upward (in Image 3).
6. Push forward on the stick and the elevons should deflect
equally downward (in Image 4).
If you encounter any problems with your F-27B Stryker
responding properly to the transmitter, do not fly.
Call Horizon Hobby’s Product Support staff at
1-877-504-0233.
Elevator
Trim
Aileron
Trim
Image 1
Image 3
Image 2
Image 4
Page 7

6
Step 7
Mode Change Flight Control System
Your F-27B Stryker
™
is equipped with Mode Change
Flight Control
™
software that allows you to choose two
ways to fly. A switch on top of the transmitter allows you to
easily select the desired mode.
Mode A: In this mode, you will be limited in the amount of
travel of the control surfaces (elevons), allowing for smooth
and more manageable control. We recommend that you
begin flying in this mode until you become more familiar
with the F-27B Stryker. A label on the transmitter will show
the position of the switch (pushed back away from pilot)
when in Mode A.
Mode B: The travel of the elevons are no longer limited.
This mode is absolutely ideal for extreme aerial combat
with an optional Sonic Combat Module
™
(HBZ4020), pylon
racing, inverted flight and other outrageous flying maneu
vers. However, your F-27B Stryker will also be much easier
to crash in Mode B as well. This mode is recommended for
advanced pilots only. The transmitter label will show the
position of the switch (all the way toward pilot when hold
-
ing transmitter) when in Mode B.
Note: It is possible to change the flight modes during flight.
This should be done at higher altitudes to minimize the risk
of crashing.
Step 8
Transmitter Decal
Receiver/ESC
Your F-27B Stryker comes with a specially-designed
receiver/ESC unit that allows you great flexibility in the
event that you choose to reuse the radio system in another
model. There are three jumpers that are located in the
receiver that can be changed (added/removed) that allow
you to make changes if you so choose.
Jumper 1—Mix of Elevator and Rudder
You can add the jumper to utilize software that will allow
a slight mix of elevator and rudder. In this mode, when
rudder input is given, a slight amount of up elevator is
added. By doing this, the nose of the airplane will be more
likely to “stay up” when rudder input is given. This can be
of great help to pilots that are transitioning from 2- to 3channel aircraft and are not experienced with pitch control.
Jumper 2—V-Tail/Standard Tail
Tail control: Your F-27B Stryker comes with the plane set
for V-tail/elevon function. However, you can add this jumper
and switch the function to conventional “T” tail. Again, this
allows for great flexibility in the event you want to reuse the
radio system.
Jumper 3—Auto Cutoff
Your F-27B Stryker comes with the jumper included
in the third port. This sets the auto cutoff to function with
6- to 9-cell Ni-MH battery packs. If you remove the jumper,
the auto cutoff will function with a 3S Li-Po battery pack.
When your F-27B Stryker goes into auto cutoff, prepare to
land your aircraft immediately. You will maintain control of
steering and pitch, but you will not have access to throttle
at this time. You can “blip” the throttle to try to re-arm, but
only attempt this once as you are preparing to land.
Page 8

7
Choose a Large, Open Grassy Field
• A large, open grass field is required to fly your
F-27B Stryker. The Stryker can achieve speeds of up
to 50 mph, so it covers ground fast. The bigger the
field, the better.
• It is essential to have a minimum of 300 feet of clear
space in all directions from the pilot. If you ignore this
direction, you will have problems.
• Make certain that you do not fly near trees, buildings,
or other areas that can restrict your view or interfere
with your flying.
Step 9
Propellers
Your F-27B Stryker comes with the propeller installed
that should be used with the stock 7-cell Ni-MH battery
or the optional 8-cell Ni-MH battery pack. However, there
is an additional propeller that is included for use when
you choose to power your F-27B with a 3S Li-Po battery.
The Li-Po prop (5 x 3) will prevent excessive current draw
on the electronics, which will lead to permanent damage
to the ESC, motor and your Li-Po battery pack. When
deciding to power your F-27B Stryker with a 3S Li-Po,
always replace the stock prop with the 5 x 3 propeller.
Step 8
continued
Functions of Rx Jumpers
Default positions of jumpers for F-27B Stryker
™
are shown in bold.
Jumper Present Jumper Absent
Jumper 1 Flight-Trak™ On Flight-Trak Off
Jumper 2 “T” tail control “V” tail/Elevon control
Jumper 3 6–9 cell Ni-MH 3S Li-Po
Page 9

Step 10
Choose a Calm Day
You want to fly! However, you need to make sure that
your flights, especially the initial ones, are done with little
to no wind (less than 7mph).
To check wind conditions:
1. Tie the included red ribbon to the transmitter antenna.
2. Hold the transmitter antenna so that it is parallel to the
ground and note how much the ribbon moves in the
wind. If the ribbon hangs down, conditions are right to
fly. However, if the angle between the antenna and the
ribbon is less than 20 degrees, it is too windy to fly.
Step 11
Range Test
You will need two people to perform the range test:
one to hold the plane and the other to give input to
the transmitter.
Warning: The person holding the plane should be sure the
propeller does not come into contact with any part of their
clothing or body.
1. One person holds the transmitter, while the other person
walks 100 paces away with the airplane.
2. Be sure the throttle slider is in the “off” position.
3. Extend the transmitter antenna completely and turn the
transmitter on.
4. Plug the airplane battery into the fuselage.
5. As soon as the throttle slider is advanced, the propeller
should spin quickly.
6. As the first person moves the transmitter controls at
the same time, the other person watches to be sure the
airplane’s motor and tail controls operate smoothly.
100 paces
Step 12
Seek Assistance from an Experienced Radio Control Pilot
VERY IMPORTANT
: The 3-channel control system is
designed for the experienced radio control pilot and is
not intended for the first-time flyer. It is best to have, at
the very least, HobbyZone
®
Zone 2 experience. First-time
pilots of the ParkZone
™
F-27B Stryker™ should seek the
assistance of an experienced RC flyer until the additional
third channel (pitch control) has been competently
mastered.
Crash damage is not covered under the warranty.
20º
8
Page 10

Flying the F-27B Stryker
1. After launching, your F-27B Stryker will climb at full
throttle. Keep the throttle full on until you have reached
an altitude of about 50 feet. At the same time, make
sure that you are continuing to keep the airplane
directed into the wind.
2. Make right and left adjustments as necessary to keep
the plane headed directly into the wind. After you have
reached 50 feet of altitude, you can begin to make
directional changes that you desire.
3. Use the trim levers on the transmitter to help with
trimming for level flight. If you still need some
additional trim adjustment to the elevons, you can
detach the clevis from the control surface horn and turn
the clevis in or out to raise or lower the elevon until the
desired adjustment is made.
4. Remember—control range is 2,500 feet. Do not allow
the plane to get too far away from you. When the plane is
further in the air, it is harder to see and the winds are
stronger.
5. Always keep the plane upwind from you, so it will not
be carried away from you by the wind.
6. Flying in too much wind is by far the number one
reason for those who are inexperienced to crash or
have fly-aways.
7. Do not try to climb too fast by pulling all the way back
on the stick (up elevator), or your plane may enter into
a stall. Climb by giving small amounts of elevator.
8. Damage/bends to the wings or tails can greatly affect
flight control. Replace the damaged parts immediately.
Step 14
Step 13
Hand Launching the F-27B Stryker
™
1. Make certain that the aircraft battery is fully charged.
2. Make sure the throttle slider is in the “off” position
before turning on the transmitter.
3. Turn on the transmitter. Make certain transmitter
switch is on correct mode.
4. Plug in aircraft battery.
5. Place the fingers of your launching hand into the molded
place on the bottom of the aircraft.
6. With the power off, throw your F-27B Stryker firmly
with a slight angle upwards, directly into the wind.
7. After throwing, immediately give full throttle.
Warning: If you give throttle before you throw your F-27B
into the air, you could cause yourself severe physical harm.
Please use caution.
8. Keep steering into the wind and hold at full throttle
until you have reached an altitude of at least 50 feet.
9. When you have reached this safe altitude, it is safe
to steer in the desired direction as well as adjust the
throttle input to help control altitude and speed.
WIND
9
Page 11

10
Step 15
Throttle Adjustment
1. Climb to an altitude of 150 feet or more with full throttle.
2. To achieve and maintain a level “cruising” altitude,
reduce the power by moving the throttle slider down
to approximately 50% of full-on. The thottle slider is
proportional, so you can add or reduce throttle in small
increments, as needed, to maintain the altitude that
you desire.
3. To reduce altitude, reduce throttle.
4. To increase altitude, increase throttle.
continued
Step 14
Sharp Turns
In order to make a sharper turn, move the stick in the
desired direction and add some up elevator (pull back on
stick). The plane will make a sharper banking turn.
Note: With the throttle slider set at low or off (gliding), the
plane will not turn as fast as when you are flying at or
near full throttle.
Sharp Turn
Full Throttle
Reduced
Throttle
Approx. 50% Throttle
Full
Throttle
Throttle
Lever
Off
Full
On
Page 12

11
Reduce power at 10 feet.
Step 16
Using Elevator
Your F-27B Stryker
™
is equipped with a third channel for
elevator (pitch control). Pulling back on the stick provides
up elevator. This allows for better flares for landing, better
climb rates, more effective turns, and better aerobatics.
However, pulling too far back on the elevator to climb too
quickly could cause the airplane to enter a stall (make the
nose of the plane come down). To avoid crashing from a
stall, always maintain enough altitude to recover.
Just after a stall has occurred, the nose of the airplane
will fall and the plane will look like it is diving. To pull out
of a stall, simply pull back slowly on the stick (partial up
elevator) once your F-27B Stryker has built up airspeed.
Remember, pulling back too quickly or for too long will once
again cause the airplane to enter a stall. Effectively avoiding
and recovering from stalls requires experience. Always seek
the help of an experienced radio control pilot if you are not
familiar with pitch control. Failure to do so, could result in a
crash and significant damage to your airplane.
Step 18
Step 17
Landing Your F-27B Stryker
When you begin to notice that your F-27B Stryker no
longer climbs well under full power (normally after approxi
mately 10–15 minutes), the battery is getting low and it is
time to land. Bring in your Stryker directly into the wind and
toward the desired landing spot. Gradually reduce throttle
to reach an altitude of approximately 10 feet. At this point,
reduce the throttle even more and your plane should glide
in for a soft landing.
Note: Your F-27B Stryker should be landed on a smooth
surface (such as grass) since there is no landing gear.
Landing on rough surfaces such as asphalt or concrete
can damage your Stryker and is not recommended.
Expert Tip: As you get better and more experienced at fly
ing, try adding a bit of “up” elevator just prior to landing to
“flare” the plane. With some practice, your landings should
become smooth and on target.
WARNING: Do not attempt to catch the airplane or injury
may occur. Remember, there is a spinning propeller on
the plane that can cause injury! Also, be sure to cut power
to the motor right before you land to prevent damage to
the propeller.
Aerobatic Flight
Your F-27B Stryker comes out of the box with the
controls set for softer responses and at the outer holes of
the control surfaces. However, once you get used to the
flight characteristics and want to perform more aerobatic
maneuvers you can change the amount of throw that is
permitted by moving to the inner holes of the control horns.
After making any adjustments, always turn on the
transmitter and center the transmitter trim levers, making
sure the control surfaces are adjusted evenly.
Note: By making these changes, the controls will be much
more responsive. But this makes the airplane much less
forgiving and easier to stall. Remember, crash damage is
not covered under the warranty.
Page 13

12
X-Port
™
Your F-27B Stryker™ comes equipped with HobbyZone’s
exclusive X-Port
™
feature. This allows you to add the
Sonic Combat Module
™
(HBZ4020) to your F-27B Stryker
for incredible aerial combat.
With the SCM, you can engage in aerial combat with other
X-port equipped aircraft. When you successfully “hit”
another person’s SCM-equipped aircraft, a high-pitched
sound is emitted. This signals that their motor is disabled
for approximately 10 seconds, while they maintain the
ability to steer. This will allow them the opportunity to make
a safe landing or position themselves to counterattack.
Simply attach the SCM on the designated space on the top
of the fuselage.
The firing button is at the top of the transmitter. When
the button is pushed, a high-pitched sound will be heard
signaling the SCM has been activated.
Step 19
Range is about 80 feet
Step 20
Repairing Damage
If you happen to crash and your F-27B Stryker is in need of repair, you can
use CA or epoxy. The foam will bond quite nicely with careful repair work.
However, if damage is severe, or if the wings and/or tail is bent, it is best to
replace these parts prior to your next flight. See page 16 of this manual for a
detailed listing of replacement parts.
Page 14

13
Warnings and Safety
1. Read and follow this manual completely, observing all
instructions and safety directions. Otherwise, serious
injury and damage can occur. Think safety first.
2. Keep propeller away from body parts, even when it
isn’t spinning, as the transmitter could be turned on
accidentally, causing the propeller to spin. Beware of
hair becoming entangled in the propeller, especially
while launching the F-27B Stryker.
™
3. Do not fly when it’s too windy or you may lose control
and crash, causing injury or damage. Never fly near
people, vehicles, train tracks, buildings, power lines,
water, hard surfaces, or trees. Never allow anyone to
attempt to catch the airplane while it’s in flight or
serious injury can result.
4. Adult supervision is recommended for pilots ages 14
and under.
5. Battery charging: Only use a battery charger intended
for use with the flight battery. Never leave charger
unattended while charging, to help prevent overcharging.
Place the battery on a heat-resistant surface; do not lay
it on carpet or upholstery while charging.
6. Never cut into the battery charger or airplane wires or
serious injury can occur. Causing the battery to “short
out” (crossing negative and positive bare wires) can
cause fire, serious injury, and damage.
7. Hold the plane securely, and keep all body parts away
from the propeller when the flight battery is plugged in.
When you finish flying the F-27B Stryker, always unplug
the battery before you turn off the transmitter.
8. Never fly on the same frequency as another RC vehicle
in your area. The frequency of the F-27B Stryker is
shown on stickers on the back of the transmitter and
on the plane.
Success Tips
1. Don’t fly in winds over 7 mph!
2. Less-experienced pilots should always get help from
an experienced radio control pilot during first flights,
especially if the pilot has only flown a 2-channel aircraft.
3. Choose your flying field carefully–grass and soft ground
with 600-foot diameter is optimal for flying and will
lengthen the life of the F-27B Stryker. Make sure there
are no obstacles that will get in your way when flying,
such as trees or buildings. Make sure you do not fly
where pedestrians could be hurt by the airplane.
4. Remember that holding the stick full over for too long
can cause the airplane to spiral dive and crash.
At the very first sign of the F-27B Stryker beginning to
spiral down, immediately release the stick, and give the
opposite turn control to the spiral. After this is done and
you once again have control of the airplane, pull back on
the elevator to level flight and level the wings.
5. Don’t attempt to fly or do maneuvers beyond your
flying abilities without seeking the assistance of an
experienced pilot.
6. If you’re gliding with the motor off, allow the
F-27B Stryker more area for turns.
7. At your flying field, position yourself to keep the sun
at your back and out of your eyes. Wear sunglasses
on bright days.
8. Keep the F-27B Stryker upwind, especially on windy
days, to prevent it from “flying away.” The wind is
normally stronger at higher altitudes than it is on
the ground.
9. Keep your plane in front of you so you don’t have
to turn in circles as you fly. Try to avoid flying
directly overhead.
Page 15

14
Unit does not operate
1. Transmitter “AA” batteries are depleted or installed
incorrectly, indicated by a dim or unlit LED on
transmitter or the low battery alarm.
2. No electrical connection.
3. Flight battery not charged.
1. Check polarity installation or replace
with fresh “AA” batteries.
2. Push connectors together until they
“click.”
3. Charge battery fully.
Aircraft keeps turning in
one direction
1. Elevons not set up correctly.
2. Vertical fins have moved/changed.
1. Check elevons; review control surfaces.
2. Reattach/straighten vertical fins.
Aircraft will not climb 1. Battery is not fully charged.
2. Elevon trim may be incorrect.
1. Charge battery fully shortly before
flying.
2. Adjust elevator trim.
Aircraft keeps
pitching up steeply
1. Wind is too gusty or strong. 1. Postpone flying until the wind calms
down.
Aircraft will not trim
correctly with levers
1. Trim levers on transmitter not enough
to correct.
1. Remove clevis from control horn and
turn clevis in or out to raise or lower
elevon to desired position.
PROBLEM
POSSIBLE CAUSE
SOLUTION
Troubleshooting
Page 16

15
Horizon Hobby, Inc. guarantees your F-27B Stryker
™
to
be free from defects in material and workmanship at the
date of purchase. This warranty does not cover any com
ponent parts, or damage by use or modification. In no case
shall Horizon Hobby’s liability exceed the original purchase
cost of this item. Further, Horizon Hobby reserves the right
to change or modify this warranty without notice.
This warranty covers only those products purchased
from an authorized Horizon Hobby dealer. Third party
transactions are not covered by this warranty. Proof of
purchase is required for warranty claims. Due to the nature
and operation of your F-27B, the warranty does not extend
beyond the initial pre-use testing. Carefully check the parts
and operation BEFORE your first use. If you discover defects
during pre-use testing, please call our Product Support Team
toll-free at 877-504-0233 for technical support.
In that Horizon Hobby has no control over the final
assembly, or material used for final assembly, no liability
shall be assumed nor accepted for any damage resulting
from use by the user of the final user-assembled product.
By the act of using the user-assembled product, the user
accepts all resulting liability. Please note that once
assembly has been started, you must contact Horizon Hobby,
Inc. directly regarding any warranty questions. Please do not
contact your local hobby shop regarding warranty issues.
This will enable Horizon to better answer your questions and
service you in the event you need warranty assistance.
Horizon Hobby, Inc. reserves the right to inspect any
and all equipment involved in a warranty claim. Repair or
replacement decisions are at the sole discretion of Horizon
Hobby, Inc. Collateral damage is not covered under this
warranty. If you, as the buyer or owner, are not prepared to
accept the liability associated with the use of this product,
you are advised to return it immediately in new and unused
condition to the place of purchase.
If you have any questions concerning your ParkZone
™
F-27B Stryker, please contact our Product Support staff tollfree at 1-877-504-0233.
If your product requires inspection, please follow these steps
in order to return it to us:
1. Call our Product Support team for return authorization.
2. Use the “Service and Repair Checklist” from
www.horizonhobby.com under the support tab or write a
detailed letter that includes:
• Your name, address, home phone number, and daytime
phone number;
• A list of the products being shipped for inspection or
repair;
• A detailed account of the type of problems you are
incurring; and
• The payment method you wish to use for any purchases
or charges, including credit card type, number, expiration
date and your name as it appears on the card.
3. Submit proof of purchase, including purchase date and
retailer information.
4. Make sure that the batteries are unplugged and removed.
Please use packing material to separate them from the
product.
5. Pack all components and accessories in the original box,
and then pack it in a sturdy box with packing materials
for safe shipping.
6. For inspection and/or repair, please ship your product to:
Horizon Service Center
Attn: ParkZone Department
4105 Fieldstone Road
Champaign, IL 61822
We suggest you ship your product(s) back to us via a carrier
that provides package tracking and/or signature required.
Horizon Hobby, Inc. is only responsible for product once it
arrives and is accepted at our facility. Most carriers require
optional insurance to cover damage or loss in transit, so
please consider this when shipping merchandise.
Warranty Service
Providing all warranty conditions have been met, defec
tive parts will be repaired or replaced without charge and
shipped to you via ground freight prepaid. Again, crash or
other collateral damage or expense is not covered under
warranty. Proof of purchase date and location is required
for all warranty service.
Non-Warranty Service
If our inspection finds the repair cost exceeds $50 or more
than 50% of the value of your product, we will contact
you with a repair estimate and advise you of the available
options.
If you have any warranty questions that have not been
answered by the information listed above, please call our
Product Support staff at 1-877-504-0233.
Warranty and Follow-Up Procedures
Page 17

16
Item Description Retail
PKZ1002 Propeller (7&8 cell high pitch): F-27B $2.99
PKZ1004 5x3 Li-Po Propeller: F-27B $2.99
PKZ1130 Mini Servo (5W) w/Arms: F-27B, J-3 $9.99
PKZ1131 Servo Gear Set w/Accessories $2.49
PKZ1203 Decal Sheet: F-27B $6.99
PKZ1206 Instruction Manual: F-27B $0.99
PKZ1212 Battery Hatch: F-27B $3.49
PKZ1213 Complete Hatch Set: F-27B $7.99
PKZ1214 Double-Sided Tape (400mm): F-27B $1.99
PKZ1215 Painted Nose w/Decal: F-27B $3.99
PKZ1216 480 Motor w/Leads: F-27B $10.99
PKZ1218 Clevis and Pushrod (2): F-27B $2.49
PKZ1220 Vertical Fins (2): F-27B $7.99
PKZ1233 Elevons (2) w/Control Horns: F-27B $3.99
PKZ1234 Motor Mount w/Hardware: F-27B $3.29
PKZ1241 Tx: CH 1, 26.995: F-27B, P-51D $32.99
PKZ1242 Tx: CH 2, 27.045: F-27B, P-51D $32.99
PKZ1243 Tx: CH 3, 27.095: F-27B, P-51D $32.99
PKZ1244 Tx: CH 4, 27.145: F-27B, P-51D $32.99
PKZ1245 Tx: CH 5, 27.195: F-27B, P-51D $32.99
PKZ1246 Tx: CH 6, 27.255: F-27B, P-51D $32.99
PKZ1551 ESC/Rx CH 1, 26.995: F-27B $28.99
PKZ1552 ESC/Rx CH 2, 27.045: F-27B $28.99
PKZ1553 ESC/Rx CH 3, 27.095: F-27B $28.99
PKZ1554 ESC/Rx CH 4, 27.145: F-27B $28.99
PKZ1555 ESC/Rx CH 5, 27.195: F-27B $28.99
PKZ1556 ESC/Rx CH 6, 27.255: F-27B $28.99
PKZ1267 Bare Fuselage (unpainted): F-27B $19.99
HBZ1013 8.4V 7C 900mAh Battery Pack Ni-MH $29.99
HBZ1026 Variable Rate DC Peak Charger (1.2 Amp) $19.99
HBZ1058 Transmitter Antenna $4.99
HBZ6057 Transmitter Battery Cover $2.50
F-27B Stryker Optional Parts:
HBZ2004 Propeller (6-cell low pitch) $2.99
PKZ1023 *9.6V 8C 900mAh Ni-MH Battery Pack w/Lead $29.99
HBZ1012 7.2V 6C 900mAh Ni-MH Battery Pack $24.99
HBZ4020 Sonic Combat Module $23.99
HBZ4025 Stealth Target w/Sensor $23.99
THP21003S Thunder Power 11.1V 2100mAh Li-Po Battery $79.95
EFLC3005 Celectra DC Li-Po Charger (1–3 cell) $53.99
PKZ1519 1.8 Amp Variable Rate DC Peak Charger (5–10 cell Ni-MH $29.99
HBZ1081 Charger Connector w/Wire: 900mAh $1.00
HBZ1083 Large Battery Connector $.79
NOTE: Some replacement parts are also HobbyZone
®
replacement parts and may reflect that in packaging.
* 9.6V 8-cell battery pack must be charged with a hobby-quality charger. The charger that comes with the F-27B
Stryker
™
will not properly charge this battery pack. We recommend the ParkZone™ 1.8 amp variable rate DC peak
charger for 5- to
10-cell battery packs (PKZ1519).
Replacement Parts
Keep your F-27B in the air! Check www.parkzone.com to find your local hobby store, or to buy online,
visit horizonhobby.com
Page 18

17
Page 19

18
Page 20

19
 Loading...