

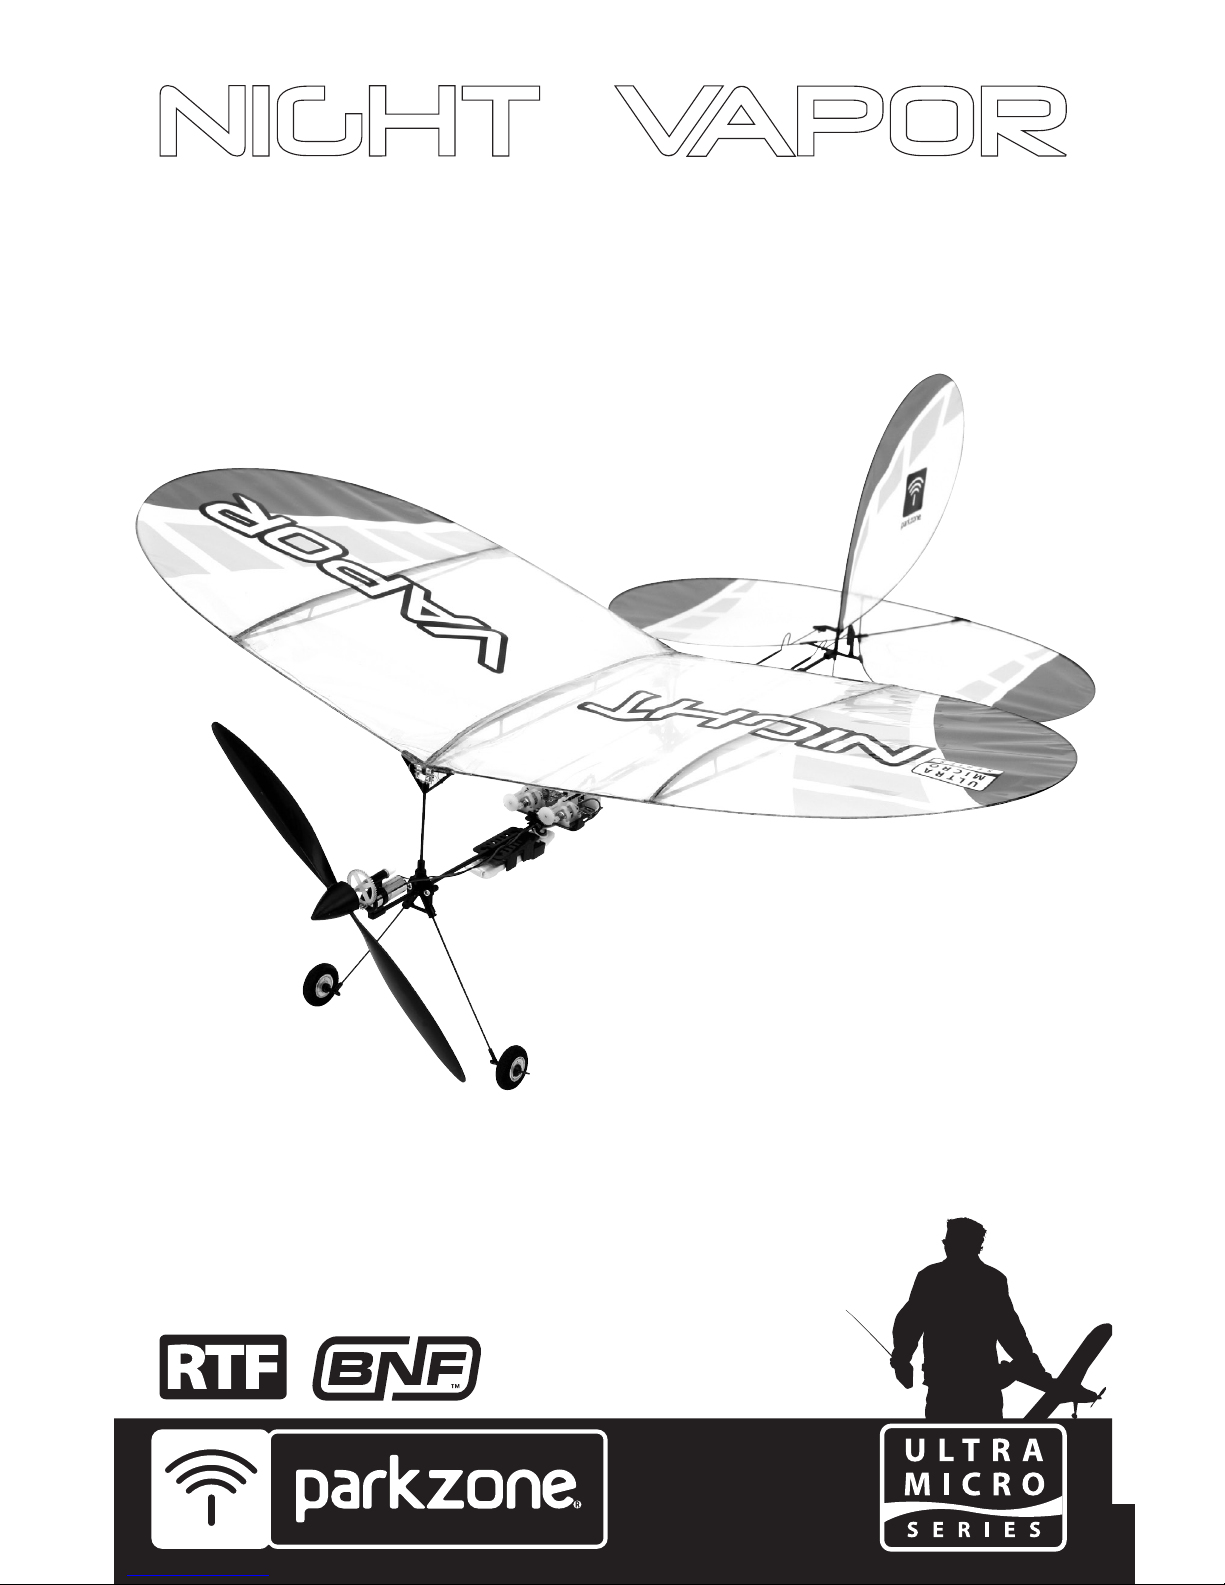
Page 1
Instruction Manual | Bedienungsanleitung
Manuel d’utilisation | Manuale di istruzioni
TM
Page 2
2
ENDEFRIT
As the user of this product, you are solely responsible for operating in a manner that does not endanger
yourself and others or result in damage to the product or the property of others.
• Always keep a safe distance in all directions around your model to avoid collisions or injury. This model is
controlled by a radio signal subject to interference from many sources outside your control. Interference
can cause momentary loss of control.
• Always operate your model in open spaces away from full-size vehicles, traffic and people.
• Always carefully follow the directions and warnings for this and any optional support equipment (char-
gers, rechargeable battery packs, etc.).
• Always keep all chemicals, small parts and anything electrical out of the reach of children.
• Always avoid water exposure to all equipment not specifically designed and protected for this purpose.
Moisture causes damage to electronics.
• Never place any portion of the model in your mouth as it could cause serious injury or even death.
• Never operate your model with low transmitter batteries.
• Always keep aircraft in sight and under control.
• Always use fully charged batteries.
NOTICE
All instructions, warranties and other collateral documents are subject to change at the sole discretion
of Horizon Hobby, LLC. For up-to-date product literature, visit www.horizonhobby.com and click on the
support tab for this product.
Meaning of Special Language
The following terms are used throughout the product literature to indicate various levels of potential
harm when operating this product:
WARNING: Procedures, which if not properly followed, create the probability of property damage,
collateral damage, and serious injury OR create a high probability of superficial injury.
CAUTION: Procedures, which if not properly followed, create the probability of physical property
damage AND a possibility of serious injury.
NOTICE: Procedures, which if not properly followed, create a possibility of physical property damage
AND little or no possibility of injury.
WARNING: Read the ENTIRE instruction manual to become familiar with the features of the
product before operating. Failure to operate the product correctly can result in damage to the
product, personal property and cause serious injury.
This is a sophisticated hobby product. It must be operated with caution and common sense and
requires some basic mechanical ability. Failure to operate this Product in a safe and responsible
manner could result in injury or damage to the product or other property. This product is not intended
for use by children without direct adult supervision. Do not use with incompatible components or
alter this product in any way outside of the instructions provided by Horizon Hobby, LLC. This manual
contains instructions for safety, operation and maintenance. It is essential to read and follow all the
instructions and warnings in the manual, prior to assembly, setup or use, in order to operate correctly
and avoid damage or serious injury.
14
+
AGE RECOMMENDATION:
Not for
children under 14 years.
This is not a toy.
WARNING AGAINST COUNTERFEIT PRODUCTS: If you
ever need to replace your Spektrum receiver found in a Horizon
Hobby product, always purchase from Horizon Hobby, LLC or a Horizon
Hobby authorized dealer to ensure authentic high-quality Spektrum
product. Horizon Hobby, LLC disclaims all support and warranty with
regards, but not limited to, compatibility and performance of counterfeit
products or products claiming compatibility with DSM or Spektrum
technology.
Safety Precautions and Warnings
Page 3
3
EN DE FR IT
• NEVER LEAVE CHARGING BATTERIES UNATTENDED.
• NEVER CHARGE BATTERIES OVERNIGHT.
• By handling, charging or using the included Li-Po battery, you assume all risks associated with lithium
batteries.
• If at any time the battery begins to balloon or swell, discontinue use immediately. If charging or discharging, discontinue and disconnect. Continuing to use, charge or discharge a battery that is ballooning or
swelling can result in fire.
• Always store the battery at room temperature in a dry area for best results.
• Always transport or temporarily store the battery in a temperature range of 40–120º F (5–49º C). Do not
store the battery or aircraft in a car or direct sunlight. If stored in a hot car, the battery can be damaged
or even catch fire.
• Always charge batteries away from flammable materials.
• Always inspect the battery before charging and never charge damaged batteries.
• Always disconnect the battery after charging, and let the charger cool between charges.
• Always constantly monitor the temperature of the battery pack while charging.
• ONLY USE A CHARGER SPECIFICALLY DESIGNED TO CHARGE LI-PO BATTERIES. Failure to charge the bat-
tery with a compatible charger may cause fire resulting in personal injury and/or property damage
• Never discharge Li-Po cells to below 3V under load.
• Never cover warning labels with hook and loop strips.
• Never leave charging batteries unattended.
• Never charge batteries outside recommended levels.
• Never attempt to dismantle or alter the charger.
• Never allow minors to charge battery packs.
• Never charge batteries in extremely hot or cold places (recommended between 40–120° F or 5–49° C) or
place in direct sunlight.
CAUTION: All instructions and warnings must be followed exactly. Mishandling of Li-Po batteries can
result in a fire, personal injury, and/or property damage.
• Always keep transmitter powered on while aircraft is powered.
• Always remove batteries before disassembly.
• Always keep moving parts clean.
• Always keep parts dry.
• Always let parts cool after use before touching.
• Always remove batteries after use.
• Always ensure failsafe is properly set before flying.
• Never operate aircraft with damaged wiring.
• Never touch moving parts.
Safety Precautions and Warnings, continued
Battery Charging Warnings
Page 4

4
ENDEFRIT
Specications
Wingspan .................14.75 in (375mm)
Length ...................15.25 in (387mm)
Weight (with battery) .........16.4 g (0.6 oz)
Battery ...................70mAh 3.7V 14C Li-Po
Charger .................. 1S 3.7V DC Lithium Polymer Battery Charger (included)
Transmitter ................ 3+ channel with Spektrum™ 2.4GHz DSM2®/DSMX® technology
On-Board Electronics ........3-channel Rx/ESC with LED port
Table of Contents
Safety Precautions and Warnings ....................................................2–3
Battery Charging Warnings ...........................................................3
Specifications .....................................................................4
Night Vapor RTF Contents ............................................................5
Night Vapor BNF Contents ............................................................5
First Flight Preparation ..............................................................5
Battery Charging ................................................................... 6
Installing the Flight Battery in the Airplane ...............................................7
Transmitter and Receiver Binding ...................................................... 7
Transmitter Specific Binding Instructions .................................................8
Additional Binding Information ........................................................8
Transmitter Control Identification. . . . . . . . . . . . . . . . . . . . . . . . . . . . . . . . . . . . . . . . . . . . . . . . . . . . . . . 9
LED Identification .................................................................10
Control Test ......................................................................10
Reversing the Flight Controls. . . . . . . . . . . . . . . . . . . . . . . . . . . . . . . . . . . . . . . . . . . . . . . . . . . . . . . . . 11
Control Centering .................................................................12
Dual Rate Function (RTF Only), and CG .................................................12
Receiver Control Unit Description, Arming and Motor Control Test .............................12
Flying Checklist ...................................................................13
Replacing/Removing the Landing Gear .................................................14
Replacing the Vertical Fin ...........................................................15
Replacing the Wing ................................................................ 16
Replacing the Propeller ............................................................. 17
Replacing the Prop Shaft ............................................................ 17
Replacement Parts ................................................................19
Optional Parts ....................................................................19
Troubleshooting Guide. . . . . . . . . . . . . . . . . . . . . . . . . . . . . . . . . . . . . . . . . . . . . . . . . . . . . . . . . . . . . . 20
Limited Warranty .................................................................. 21
Contact Information ...............................................................22
FCC Information ..................................................................23
IC Information .................................................................... 23
Compliance Information for the European Union ..........................................23
Page 5
5
EN DE FR IT
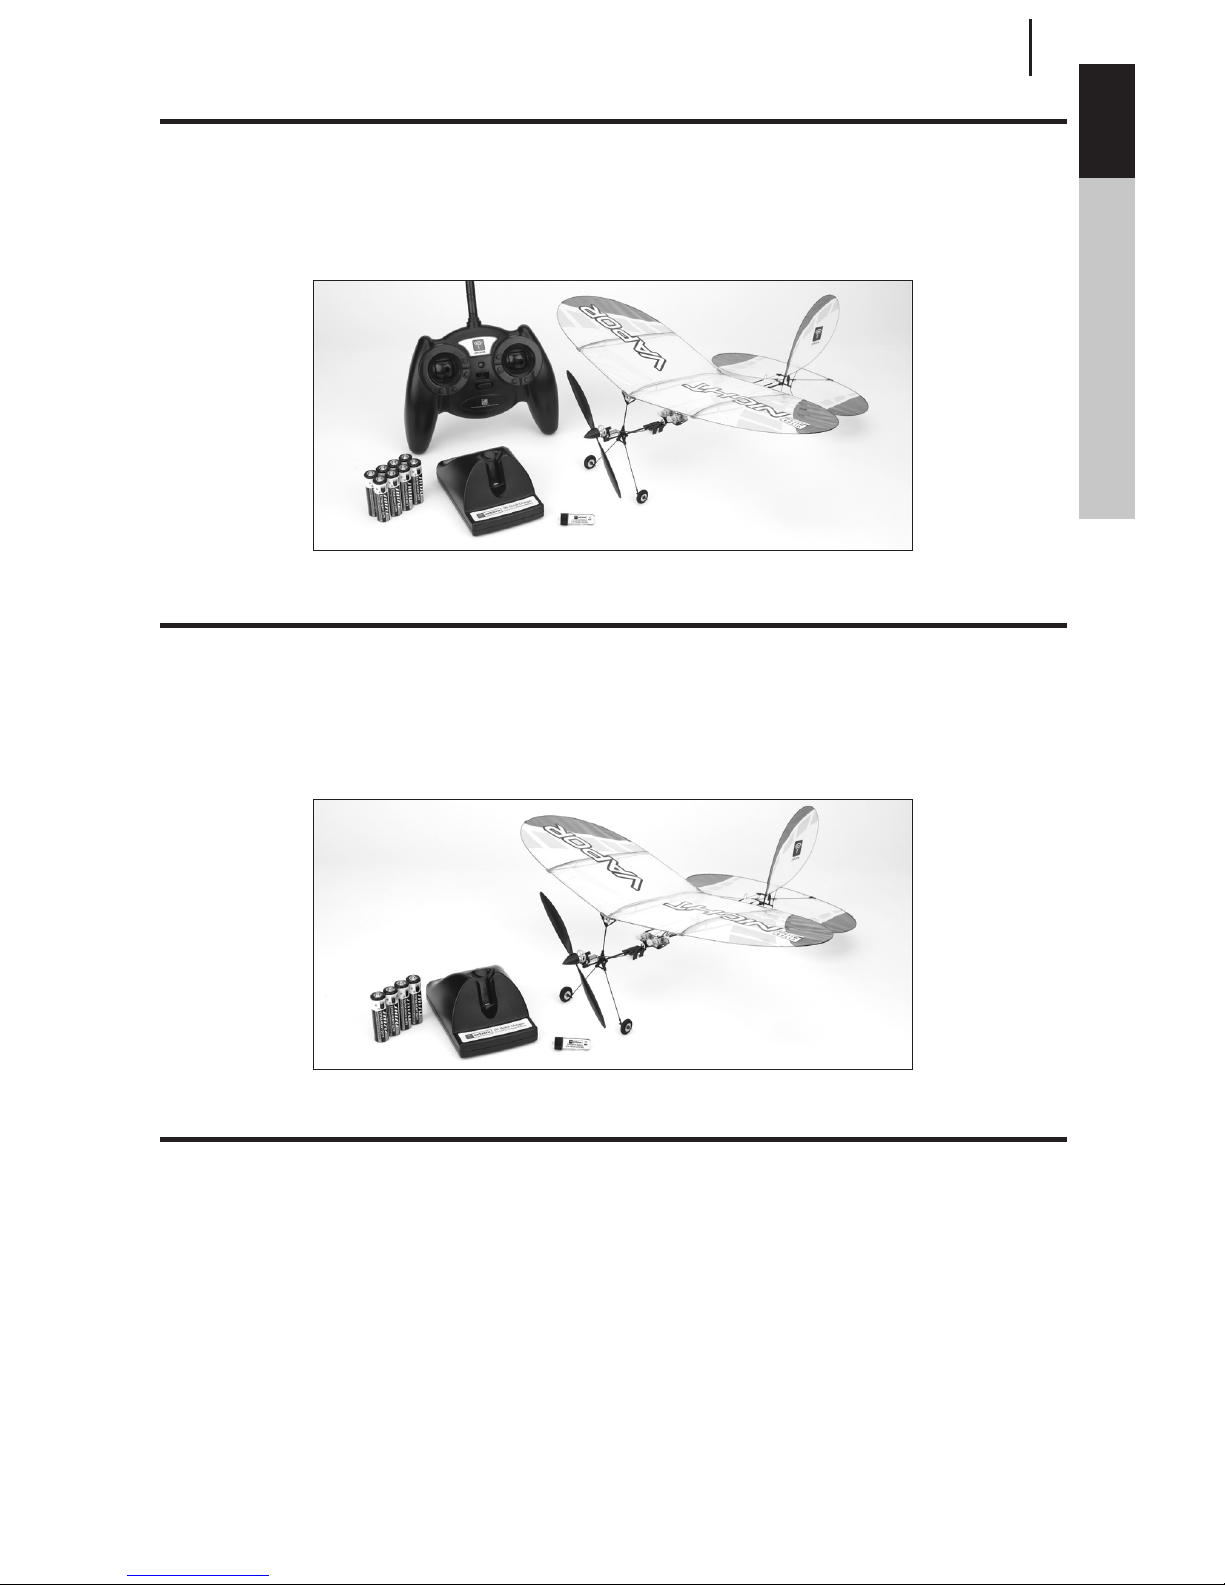
Night Vapor BNF Contents
• Night Vapor Airframe
• 4 AA batteries
• 70mAh 3.7V 14C Li-Po battery
• 1S 3.7V DC Li-Po battery charger, 0.3A charge rate
A DSM2/DSMX-compatible aircraft transmitter is required to complete your Night Vapor.
First Flight Preparation
Please note this checklist is not intended to be a replacement for the content included in this manual.
Although it can be used as a quick start guide, we strongly suggest reading through this manual completely
before proceeding.
Remove and inspect contents.
Install 4 AA batteries into the battery charger.
Install 4 AA batteries into the included transmitter (RTF only).
Begin charging the flight battery.
Bind the receiver to your chosen Spektrum or JR DSM2/DSMX equipped transmitter (BNF only).
Test the controls.
Familiarize yourself with the controls.
Confirm or set up control throws.
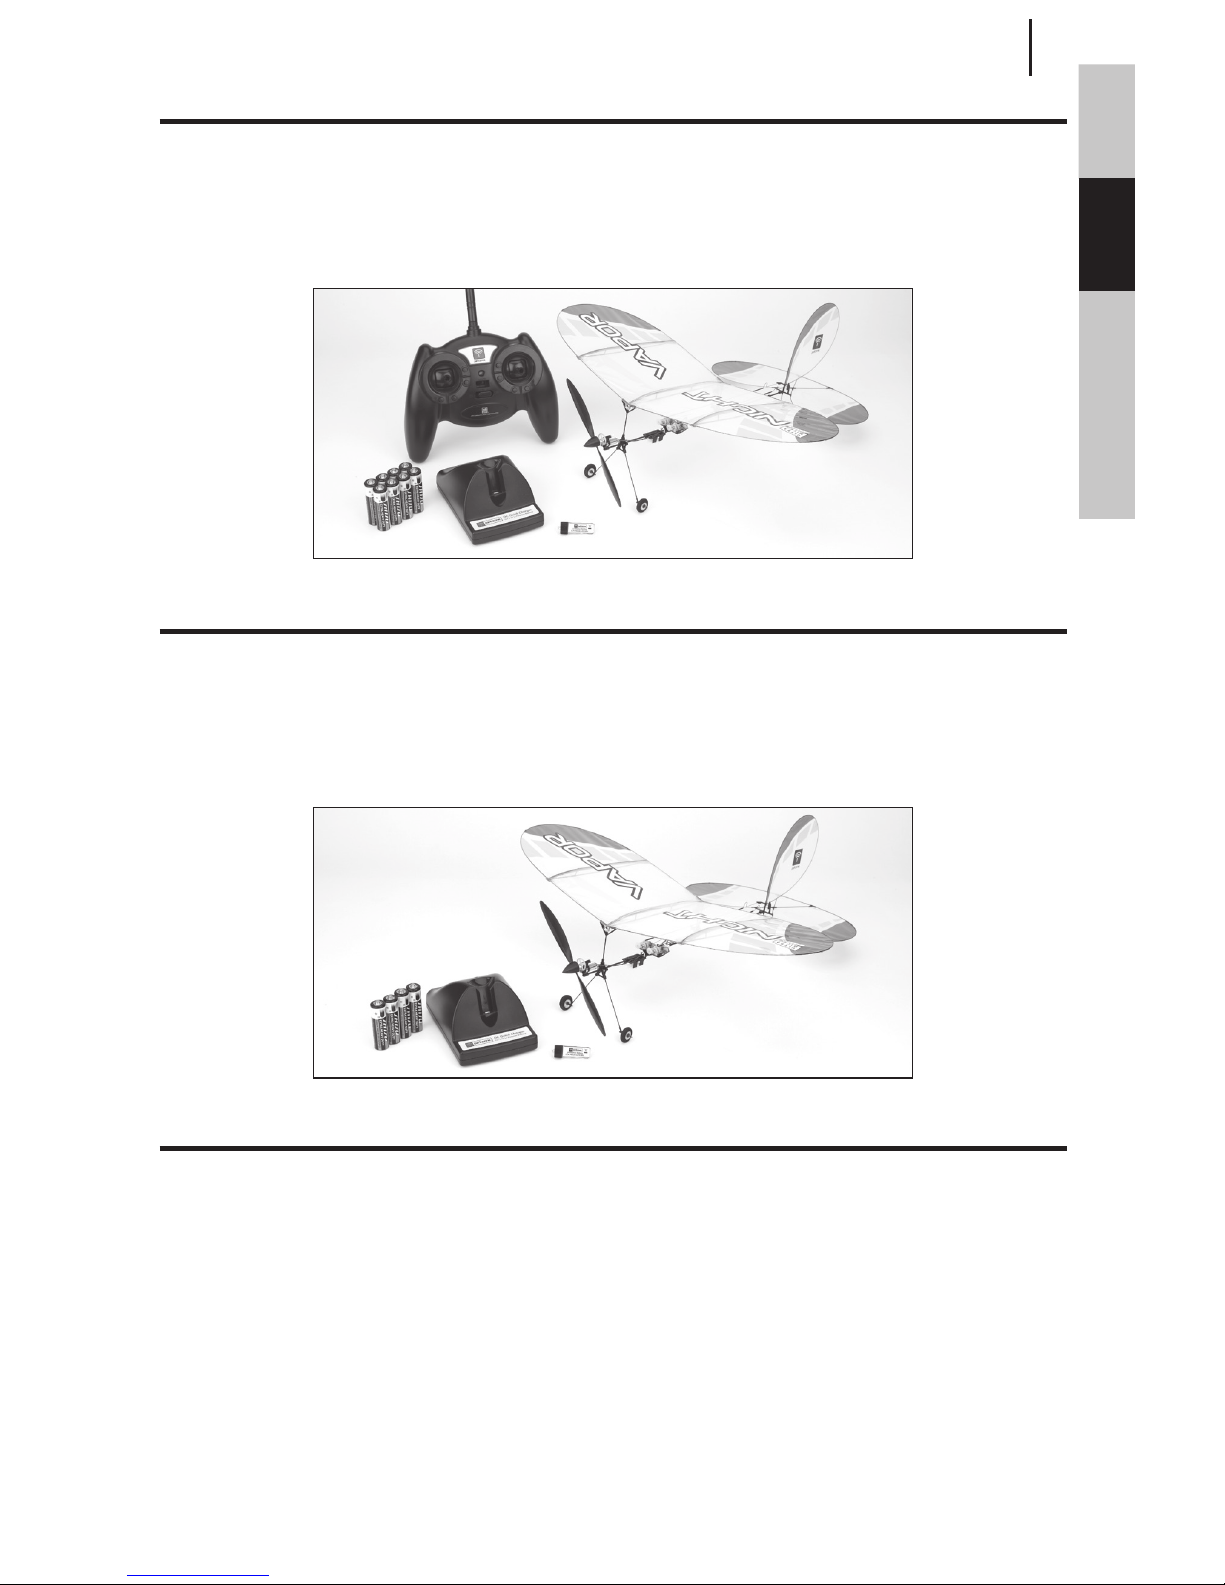
Night Vapor RTF Contents
• Night Vapor Airframe
• 8 AA batteries
• 70mAh 3.7V 14C Li-Po battery
• 2.4GHz DSM2/DSMX Transmitter
• 1S 3.7V DC Li-Po battery charger, 0.3A charge rate
Page 6

6
ENDEFRIT
Battery Charging
See the Battery Warning and Guidelines section and familiarize yourself thoroughly with it before continuing.
Follow these steps to charge the Li-Po battery with the included charger.
1. Remove the cover on the bottom of the charger and install four of the included AA batteries, noting
proper polarity. Replace the cover after the AA batteries are installed.
2. Slide the battery into the slot on the charger. The end cap of the battery is specifically designed to
allow the battery to be slid into the slot easily one way (usually with the label on the battery facing
outward) to prevent reverse polarity connection. However, check for proper alignment and polarity
before proceeding to the next step.
3. Gently press the battery and its connector into the charge jack/connector located at the bottom of the
slot in the charger.
4. When you make the connection successfully, the LED light on the charger turns solid red, indicating
charging has begun.
5. Charging a fully discharged (not over-discharged) 70mAh battery takes approximately 30–40 minutes.
As the battery nears full charge, the LED begins to blink. When the battery is fully charged, the LED
light blinks approximately every 20 seconds or goes out entirely.
Note: The Li-Po battery included with your Night Vapor arrives partially charged, so the initial charge
may only take 15–20 minutes.
Note: You can expect to charge the Li-Po flight battery 10–15 times before needing to replace the AA
batteries in the charger. Replacing the included batteries with alkaline batteries results in more
charge cycles.
Note: If the LED remains on for longer than 40 minutes while charging and/or 5 seconds after
removing the Li-Po fight battery, replace the AA batteries in the charger.
CAUTION: Only use a charger specifically designed to charge a Li-Po battery. Failure to do so
could result in fire causing injury or property damage.
CAUTION: Never exceed the recommended charge rate.
Page 7
7
EN DE FR IT
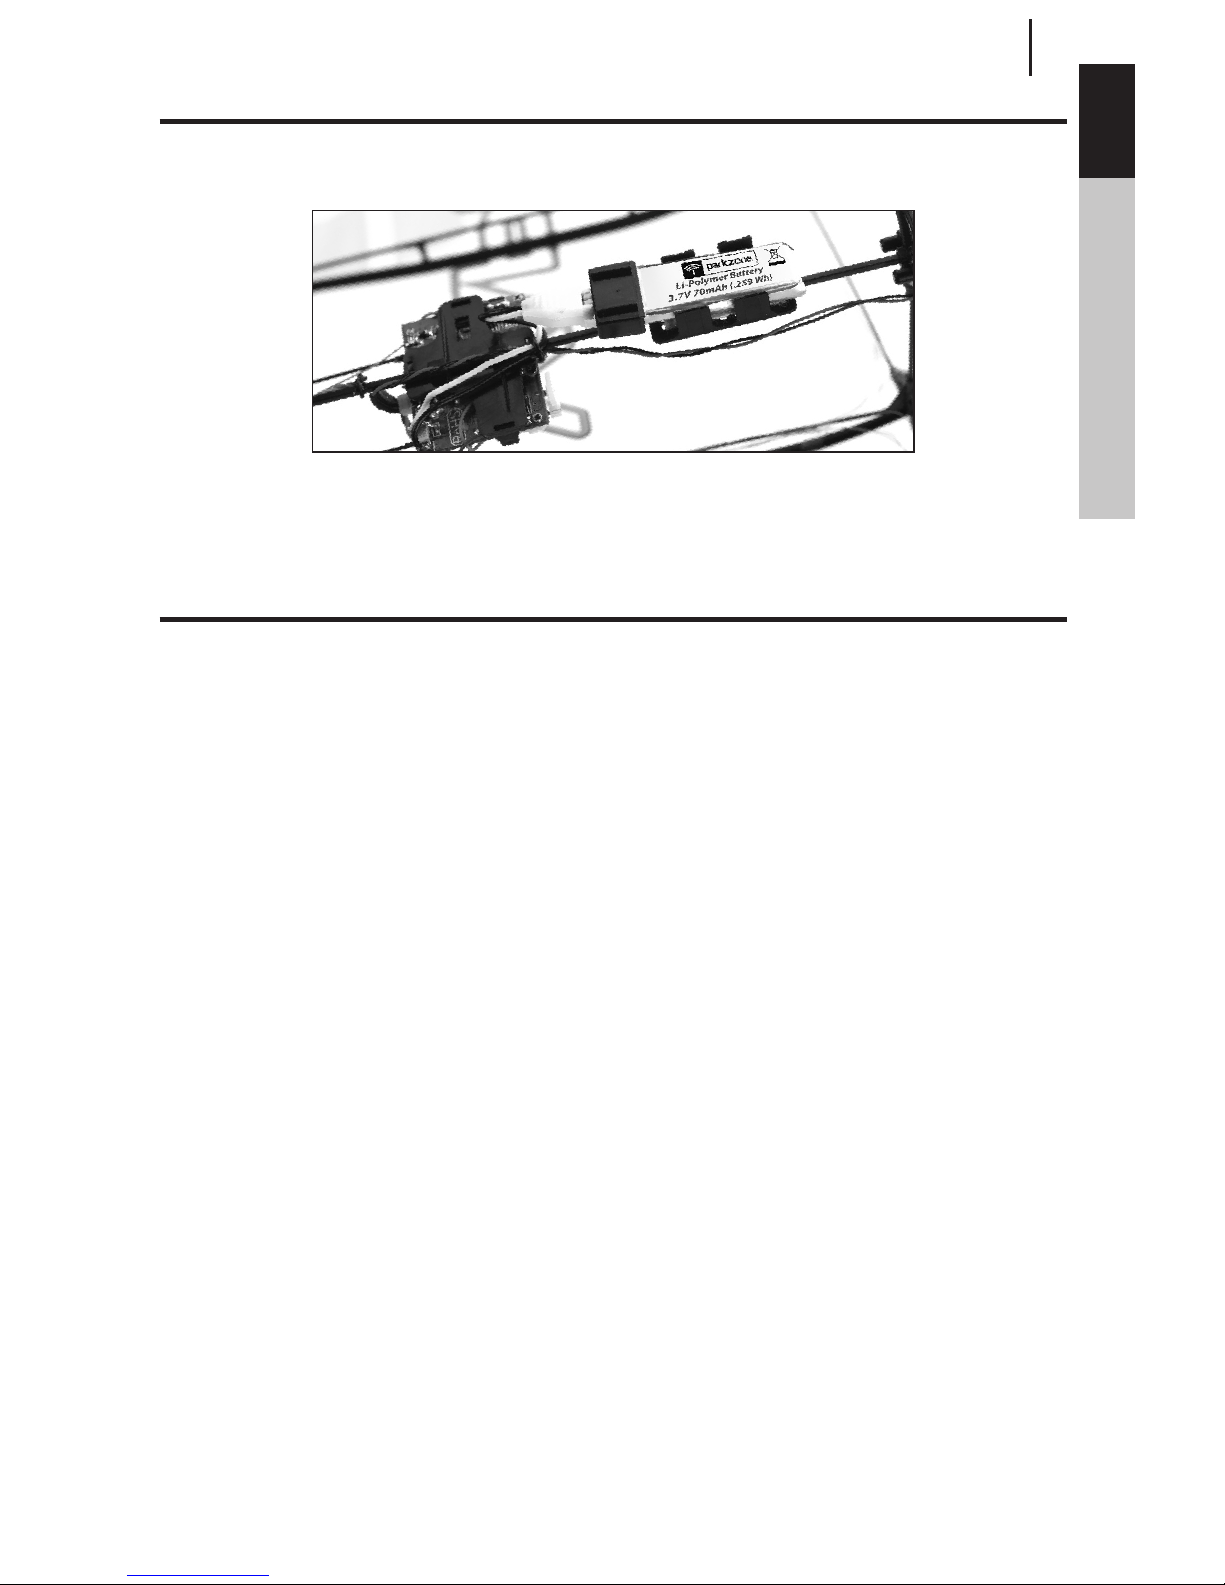
Installing the Flight Battery in the Airplane
Once the Li-Po battery is fully charged, you can install it in the airplane. This is done by placing it into the
battery holder on the bottom of the fuselage. Make sure the plug faces the rear of the airplane.
Note: The battery holder can slide forward and backwards to allow for Center of Gravity adjustment.
Note: Always disconnect the Li-Po from the receiver of the airplane when not flying. Failure to
do so will render the battery unusable.
Transmitter and Receiver Binding
Your Night Vapor RTF comes pre-bound to the included DSM2/DSMX transmitter. If you should need to rebind your airplane follow the simple directions below.
Setting the Airplane for Binding
1. Make sure the flight battery is disconnected from the receiver unit and the transmitter is turned off.
2. Plug in the flight battery into the airplane. When the LED on the receiver begins to flash rapidly, then
immediately proceed to instruction for your transmitter below.
Note: Although the transmitter included in your Night Vapor is 4-channel capable, the airplane is a
3-channel aircraft with proportional throttle, elevator, and rudder control. For this reason, the
rudder control is on the right stick.
Page 8
8
ENDEFRIT
Transmitter Specic Binding Instructions
MLP4DSM Transmitter
1. When you see the LED on the receiver begin to flash rapidly, push the left stick on the transmitter
inward into the case (NOT pulling down on throttle stick) until you hear it click.
2. While pushing the stick in, power on the transmitter; release the stick once the transmitter is powered
on. The transmitter will beep and the LED on the face of the transmitter will pulse.
3. Once the transmitter stops beeping it will take a second or two to connect with the airplane.
Note: It can be difficult at times to see the LED blink (indicating you are in bind mode), therefore slowly
count to five once you have connected the battery and the airplane should enter bind mode at
that time.
Binding is the process of programming the receiver of the control unit to recognize the GUID (Globally
Unique Identifier) code of a single specifi c transmitter. You need to ‘bind’ your chosen Spektrum™ DSM2/
DSMX technology equipped aircraft transmitter to the receiver for proper operation.
Any full range JR or Spektrum DSM2/DSMX transmitter can bind to the receiver. Please visit
www.bindnfly.com for a complete list of compatible transmitters.
NOTICE: When using a Futaba® transmitter with a Spektrum DSM module, reversing the throttle channel is
required.
Additional Binding Information
Prior to each flight, power on your transmitter and wait for five seconds before you plug the flight battery
into the receiver. This allows time for the transmitter to scan and secure two open frequencies. If you plug
the flight battery in too quickly and miss the link, the receiver may inadvertently enter bind mode. If this
occurs leave the transmitter on, then disconnect and reconnect the flight battery.
Page 9

9
EN DE FR IT
Transmitter Control Identication
Note: Before each flight you should ALWAYS turn the transmitter on before connecting the flight battery
to the receiver unit. After each flight, be sure you always disconnect the flight battery from the
receiver unit before powering the transmitter off.
Mode 1
Elevator Function
Rudder/Throttle Functions
Elevator Trim
Throttle Trim
Rudder Trim
Mode 2
Throttle Function
Rudder/Elevator Functions
Throttle Trim
Elevator Trim
Rudder Trim
Page 10
10
ENDEFRIT
LED Identication
The Night Vapor is equipped with six LED lights. Below is a description of what each individual light
looks like.
• There are 3 LED lights on the leading edge of the wing. These lights are a bright white color and
remain solid.
• There are 2 LED lights on the trailing edge of the wing. The light on the right side of the wing (looking
from the front) will blink red, and the one on the left (looking from the front) will blink green.
• There is 1 LED light located near the tail of the aircraft. This light blinks blue.
Control Test
You must test the controls prior to the first flight to ensure none of the servos, linkages, or parts were
damaged during shipping and handling and that the controls function in the correct directions.
Turn the transmitter on first and lower the throttle stick and trim completely. Then, plug the battery into the
battery receiver unit.
Note: The connectors on the battery lead are keyed to prevent reverse polarity connection. However, if
you force them together in the wrong orientation and with the wrong polarity it is still possible to
damage the battery and/or receiver unit.
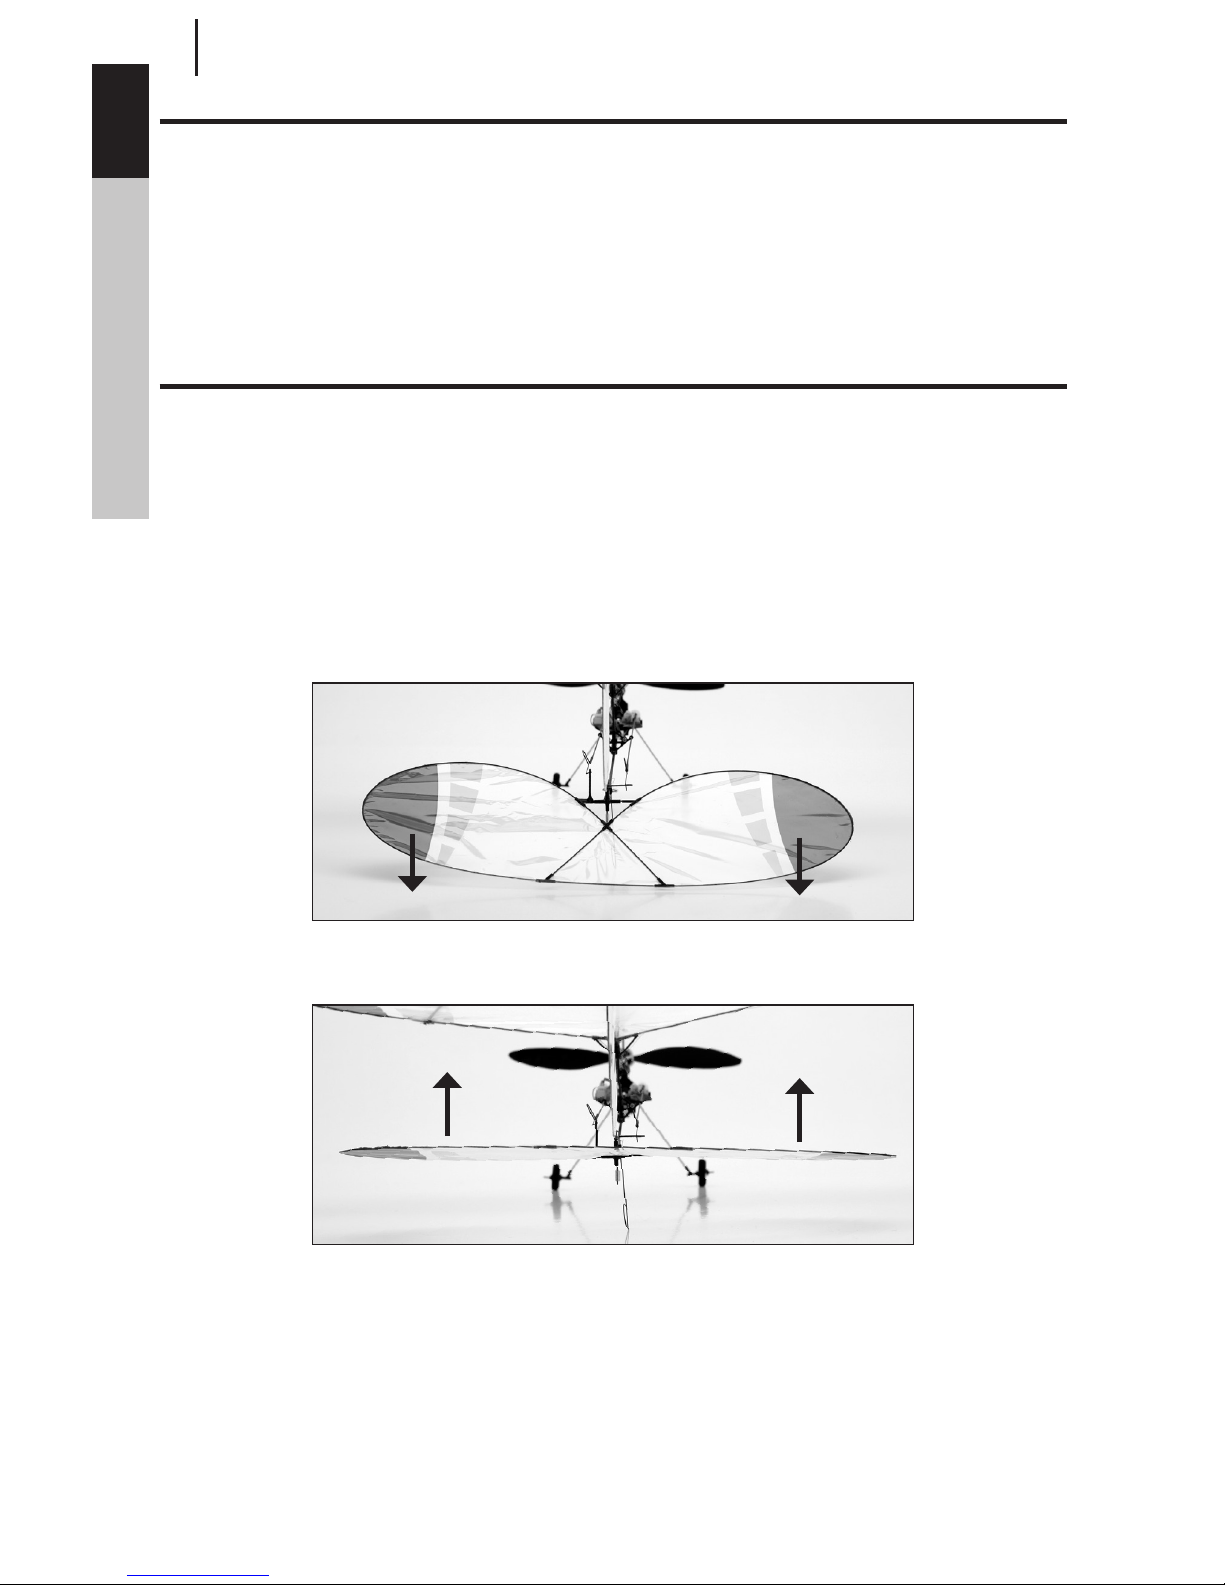
Move the elevator stick on the transmitter forward and back to check elevator pitch control. When the stick
is pushed forward the elevator should move down.
When the elevator stick is pulled back, the elevator should move up.
Page 11
11
EN DE FR IT
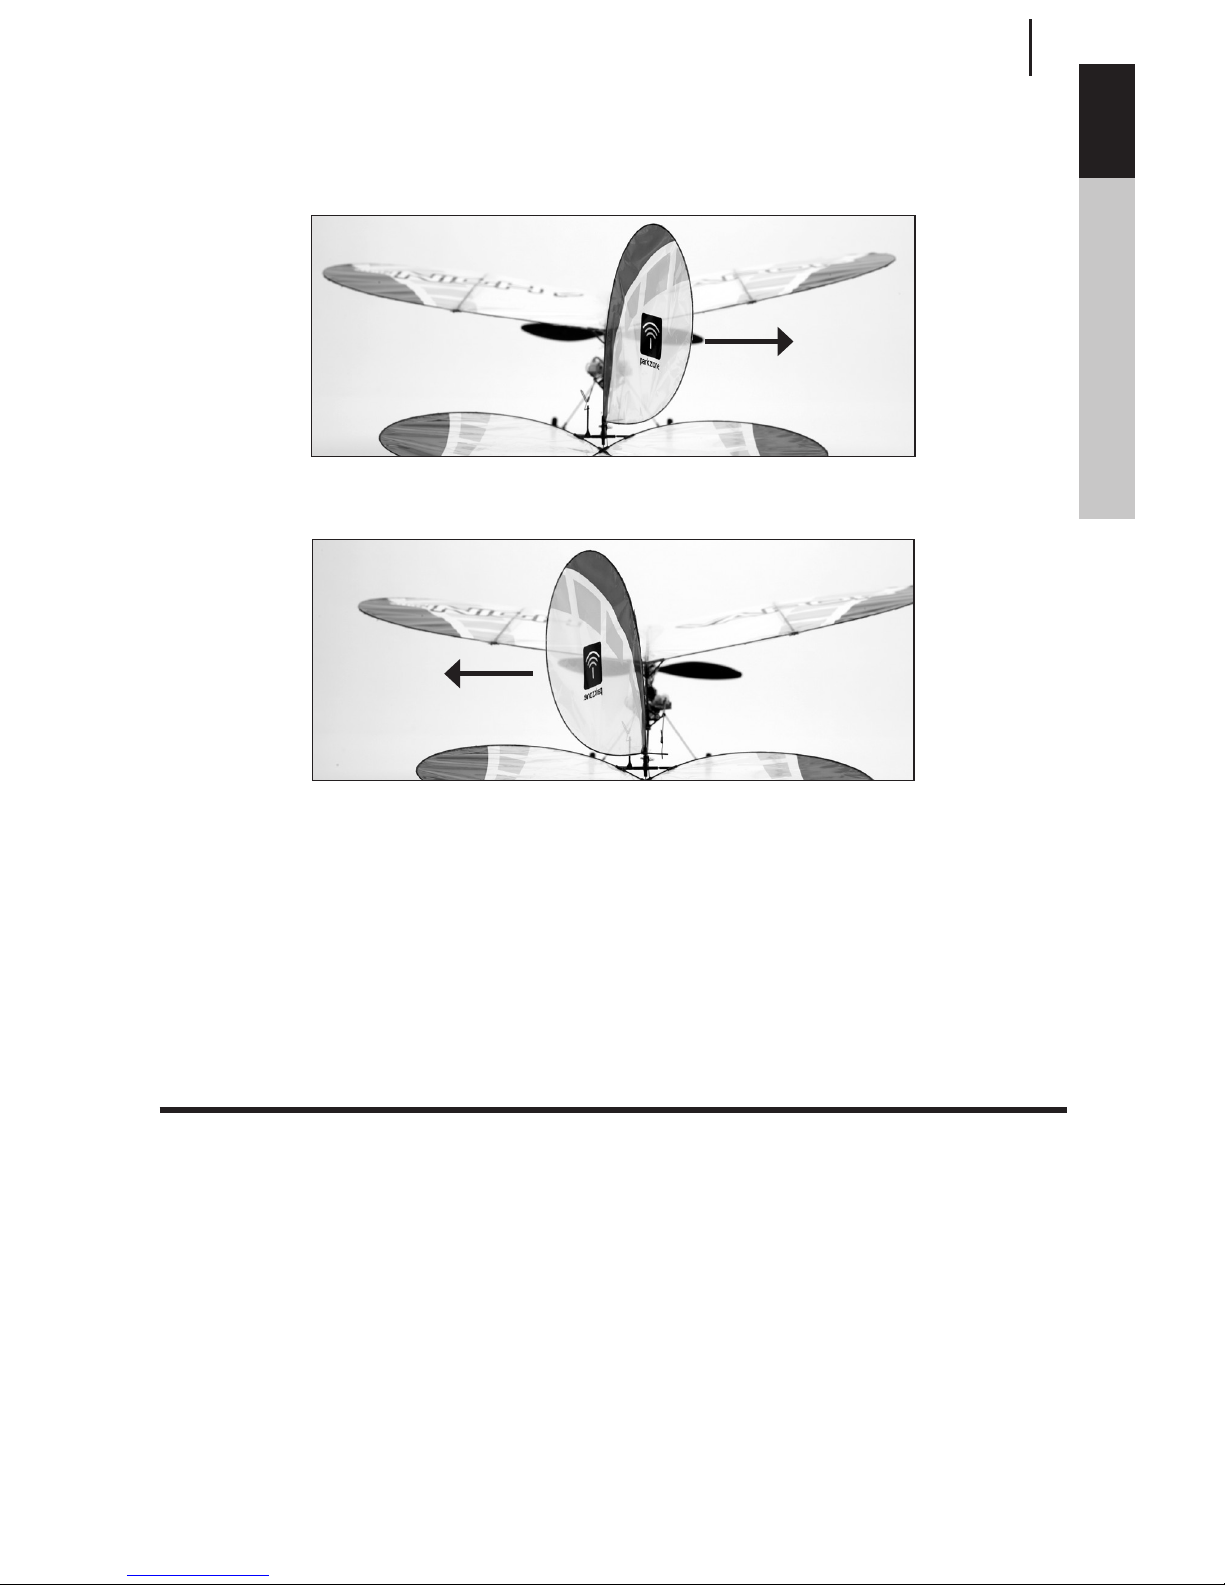
Move the rudder stick left and right to check yaw control. When the stick is pushed to the right, the rudder
should also move right.
Note: On 3-channel aircraft, like the Vapor, the rudder is controlled by the stick usually used by the
ailerons on 4-channel aircraft.
With the rudder stick pushed to the left, the rudder should move left.
If at any time during the test the controls respond in the opposite direction of operation of the flight controls,
follow your transmitter’s instructions to reverse the flight controls.
Once you’ve confirmed the flight control directions, all controls should be functioning properly. However, if
you continue to encounter problems with your Night Vapor responding properly to the transmitter, do not fly.
Digital Trims
The ParkZone 4-channel 2.4GHz DSM2/DSMX transmitter features digital trim buttons on all controls to
make fine adjustments. Center the control surfaces using the trims. If there is not enough electronic trim
available, it may be necessary to adjust the loops in the control linkages to center the surfaces.
Reversing the Flight Controls
The transmitter included with the Night Vapor is the same transmitter included in the PKZ Ember 2, Vapor,
and Ultra Micro RTF versions. It also functions identically to the transmitter included with the E-flite mCX
and mSR (MLP4DSM).
Attention: For reversing with other transmitters, please refer to that transmitter’s
instruction manual.
Should the Night Vapor’s electronic components be used in another aircraft, you may find it necessary to
reverse the operation of flight control surfaces.
Reversing the rudder and elevator operation can be accomplished by following the steps below.
1. Be certain the battery is unplugged from the aircraft and the transmitter turned off.
2. Push down on the digital trim button for the surface you would like to reverse.
a. Top elevator trim button—elevator normal
b. Bottom elevator trim button—elevator reverse
c. Left rudder trim button—rudder normal
Page 12
12
ENDEFRIT
d. Right rudder trim button—rudder reverse
3. Continue holding the desired digital trim button down and turn the transmitter on.
4. Hold the digital trim buttons down for approximately five
seconds until tones are heard, confirming the selection.
5. Connect the flight battery and complete the flight control test, confirming all surfaces are operating in
the correct direction.
Control Centering
In the event of an accident or before your first flights, check to make sure the flight control surfaces are
centered. It is much better to do this mechanically due to the mechanical limits of linear servos.
1. Make sure the transmitter trims are centered, and if your transmitter has them, sub-trims are set to 0.
2. Check to see if any of the flight control surfaces are not centered.
3. If the surface is not centered, use a pair of pliers and carefully lengthen or shorten the pushrod by
bending the U-shape in the pushrod.
Dual Rate Function (RTF Only) and CG
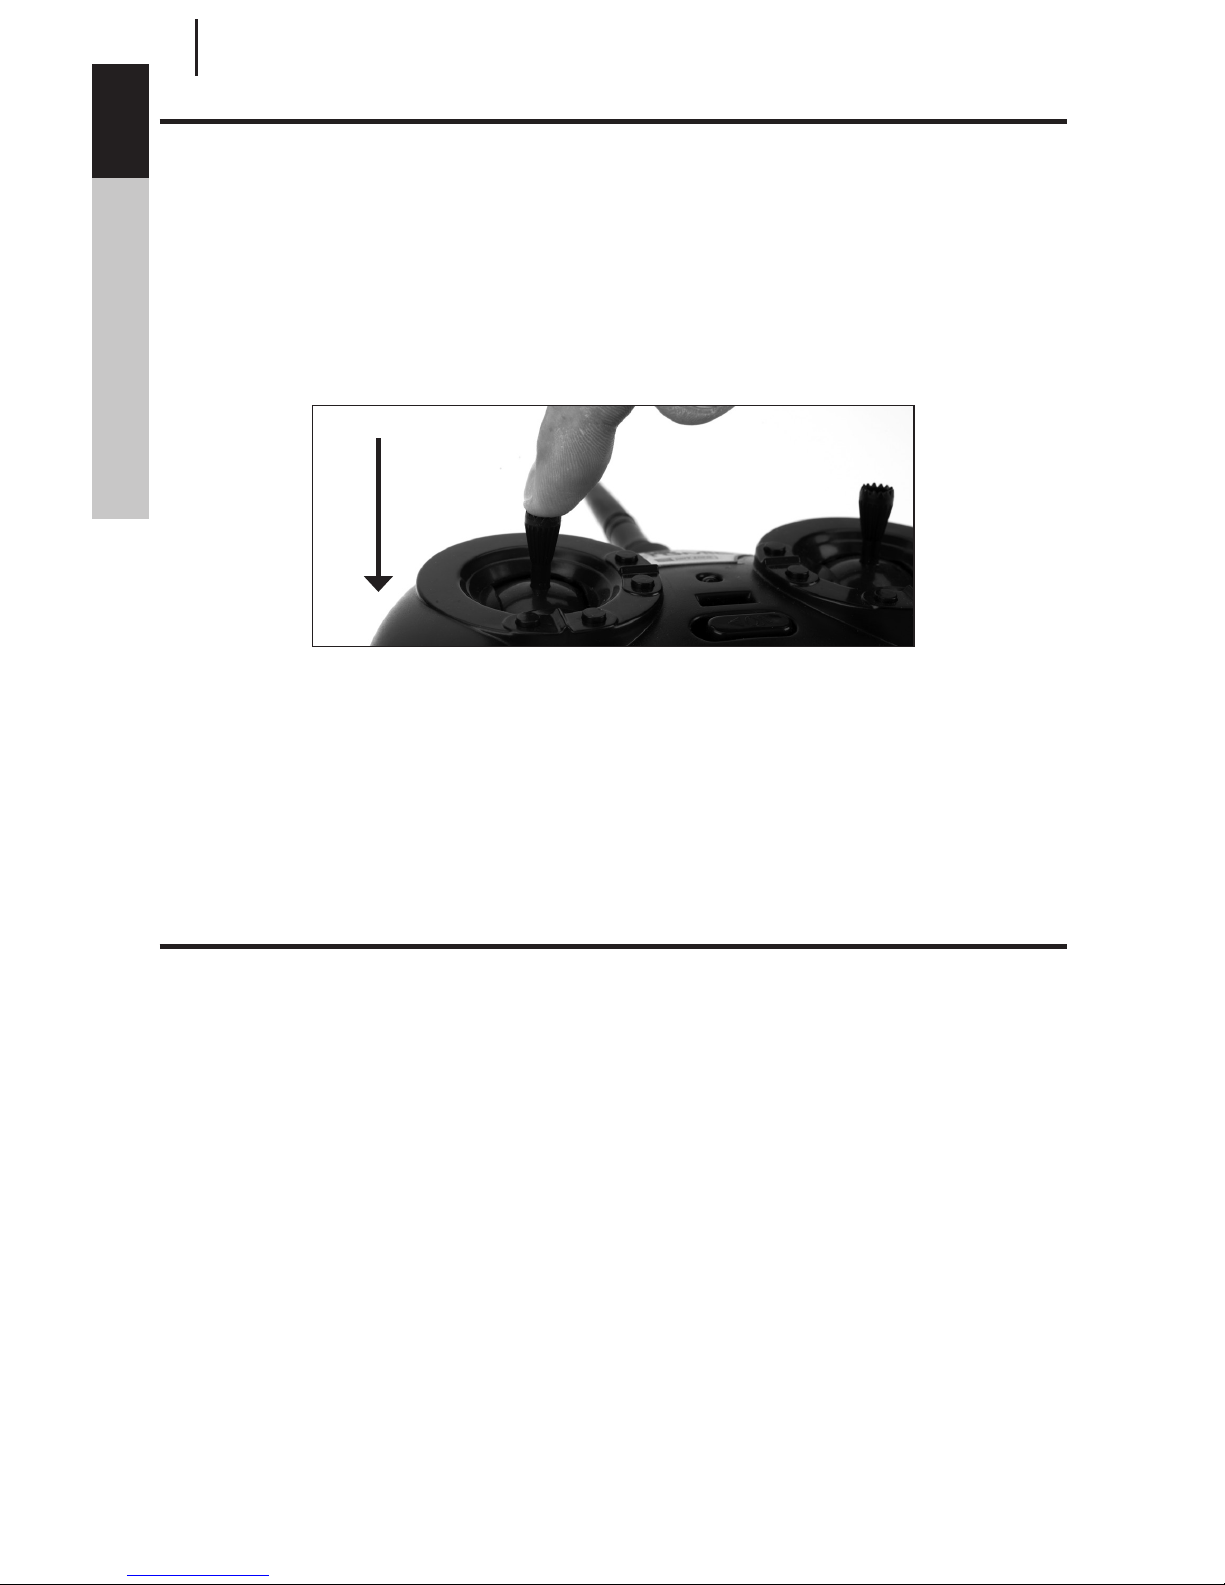
The 4-channel 2.4GHz DSM2 transmitter included with the Night Vapor features dual rate capability. The
default setting is high rate. To access the low-rate function, press IN on the right gimbal. The LED light on
the transmitter will blink, alerting you the transmitter is on low rate. To return to high rate, push IN again on
the right stick.
Note: ParkZone STRONGLY recommends using the LOW-RATE setting for conducting the first
flight of your Night Vapor.
Center of Gravity
The Night Vapor’s front wing mount should be positioned at approximately 28–30mm behind the front of the
fuselage for the initial flights, with the front battery tray positioned at approximately 10–12mm behind the
front wing mount. The Night Vapor will fly at a wide range of CG positions, allowing you to alter the flying
characteristics of the aircraft. You may also experiment and add a little “trim” to the elevator to bring the
nose up slightly in flight. This allows the airplane to fly even slower.
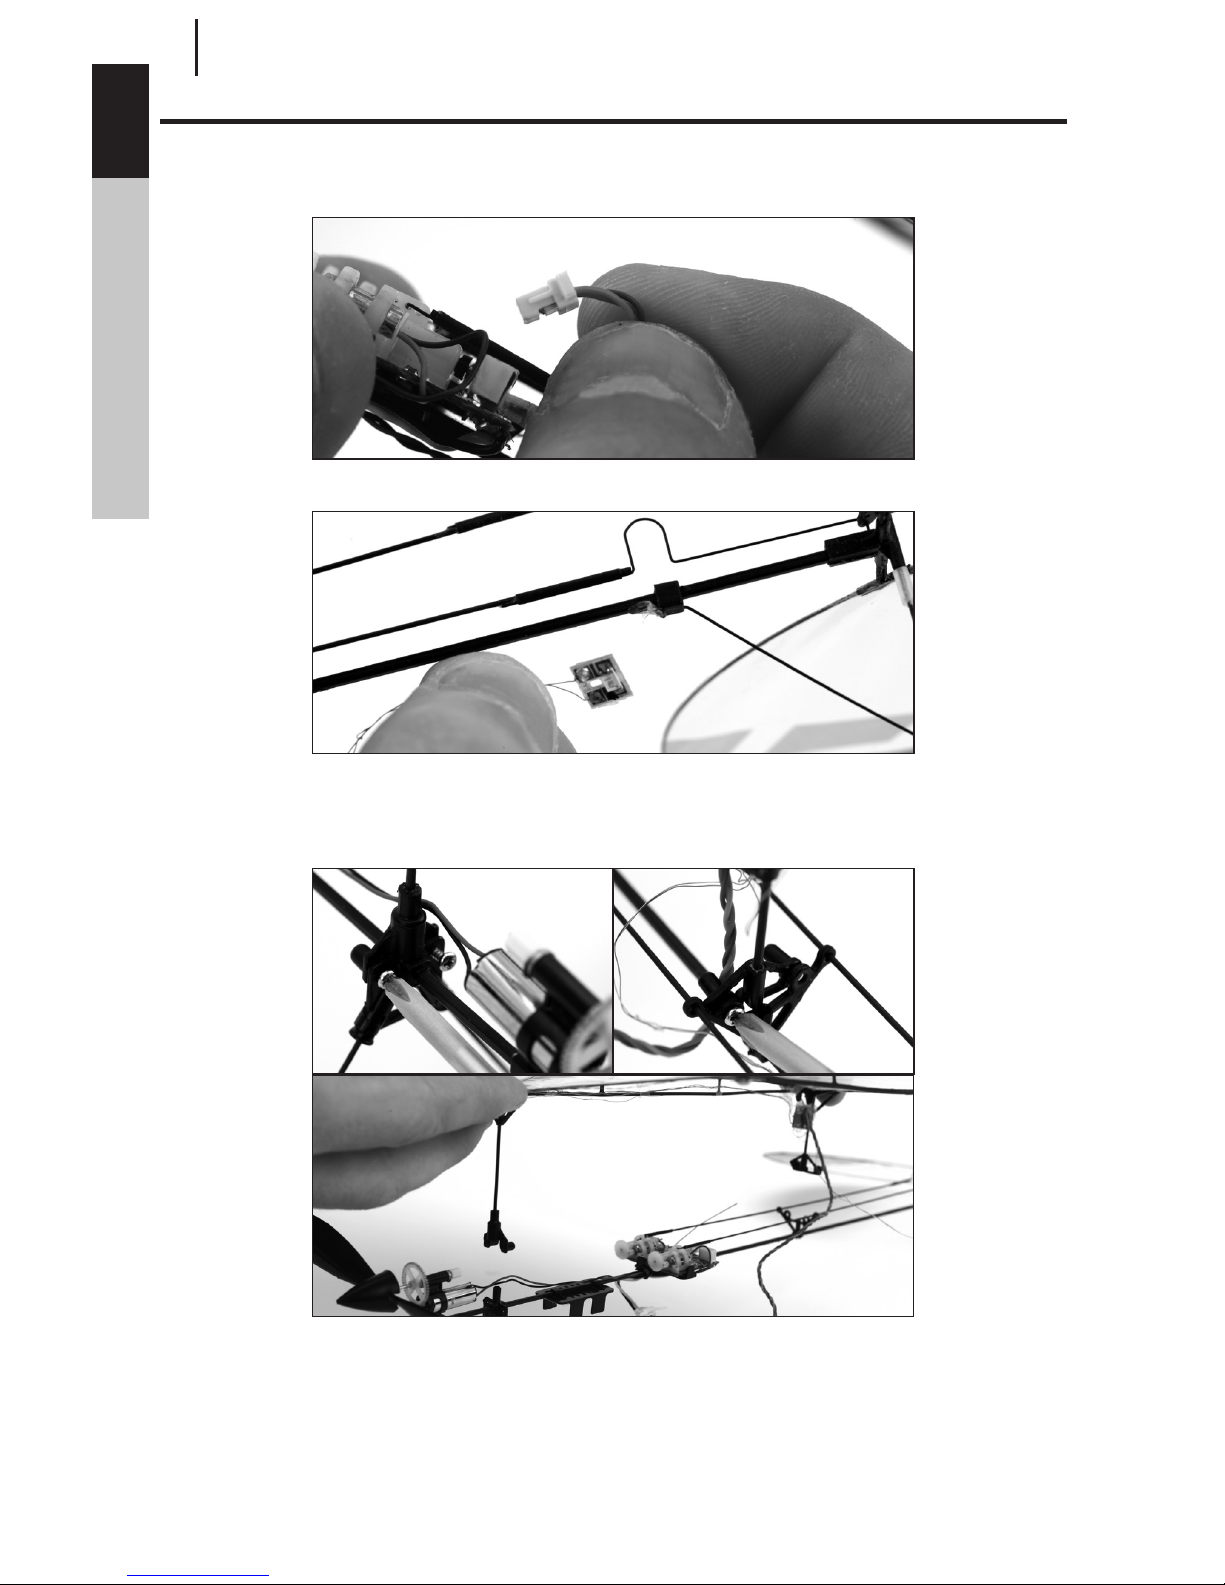
Receiver Control Unit Description, Arming and Motor Control Test
The receiver installed on your Night Vapor is a lightweight combination of main motor electronic speed
control, servos and Spektrum DSM2-compatible receiver. The receiver unit is also equipped with a status
indicator LED.
Before each flight ALWAYS turn the transmitter on before connecting the flight battery to the receiver unit.
Never connect the flight battery to the receiver unit before powering the transmitter on. After each flight,
always disconnect the flight battery from the receiver unit before powering the transmitter off.
Note: The only time you should connect the flight battery to the receiver unit before powering on
the transmitter is when binding the receiver to the transmitter. Please see the Transmitter and
Receiver Binding section of this manual for more information.
Page 13

13
EN DE FR IT
The following checklist contains the steps to ensure proper arming and operation of the receiver unit, as
well as the proper motor response.
• The throttle stick MUST be set in the lowest possible position, and for most transmitters, the throttle
trim must also be set to the lowest possible position in order for the receiver unit to arm. If this is
the first test flight, or a test flight following repairs, you should also center the rudder, elevators, and
aileron trims.
• When the status LED on the receiver becomes solid blue, the receiver unit is initialized and ready for
flight. Also, as long as you had the throttle stick in the idle position and the throttle trim in the lowest
possible position during initialization process, the ESC/motor will now be armed. Use caution as the
propeller will spin with throttle stick input.
Note: If the status LED on the receiver does not become solid blue, review the following.
• If after blinking red the status LED becomes solid blue, but you have no control of the motor, you have
a positive Radio Frequency (RF) link between the transmitter and receiver, but the throttle stick and
throttle trim may not be set to the correct positions. Check that the throttle stick is in the lowest
possible position, and that the throttle trim is set to the middle or a lower-than-middle position. If you
now have control of the motor proceed to the next step of the checklist.
• If the blinking blue status LED keeps flashing, you do not have a positive RF link between the
transmitter and receiver. Check to be sure the transmitter has been powered on. If the transmitter is
powered on and functioning properly, disconnect the flight battery from the receiver unit, then
reconnect it. The receiver unit should initialize and arm properly.
Note: If you inadvertently enter Bind Mode, the LED on the receiver flashes red continuously. If this
occurs cycle the flight battery while the transmitter is on (if previously bound). If your receiver
will not initialize and arm after following the guidelines listed above, then rebind the receiver.
Once you place the airplane in a safe area, free of obstructions, and are clear of the propeller, you can safely
begin to power up the model for proper operation of the motor.
• Advance the throttle stick upward slowly, just until the propeller begins to spin, DO NOT attempt to fly
the airplane at this time. Note the direction the propeller spins. If viewed from the front of the airplane,
the propeller will spin counterclockwise. If it is spinning backwards, disconnect the battery and reverse
the polarity of the motor’s input power leads.
Flying Checklist
Always turn the transmitter on first.
Plug the flight battery into the lead from the receiver.
Allow the receiver to initialize and arm properly.
Fly the model.
Land the model.
Unplug the flight battery from the receiver.
Always turn the transmitter off last.
Page 14

14
ENDEFRIT
Replacing/Removing the Landing Gear
To remove the landing gear, follow these steps:
1. Gently grasp the landing gear base and pull the landing gear out of the mounts.
Note: It may be difficult to remove the landing gear the first time.
2. Push the new landing gear legs into the mounting columns until the landing gear clicks into place.
Note: For slower flight, the model can be flown without the landing gear if desired. It is recommended
to slide the battery forward to compensate for the weight of the landing gear.
Page 15
15
EN DE FR IT
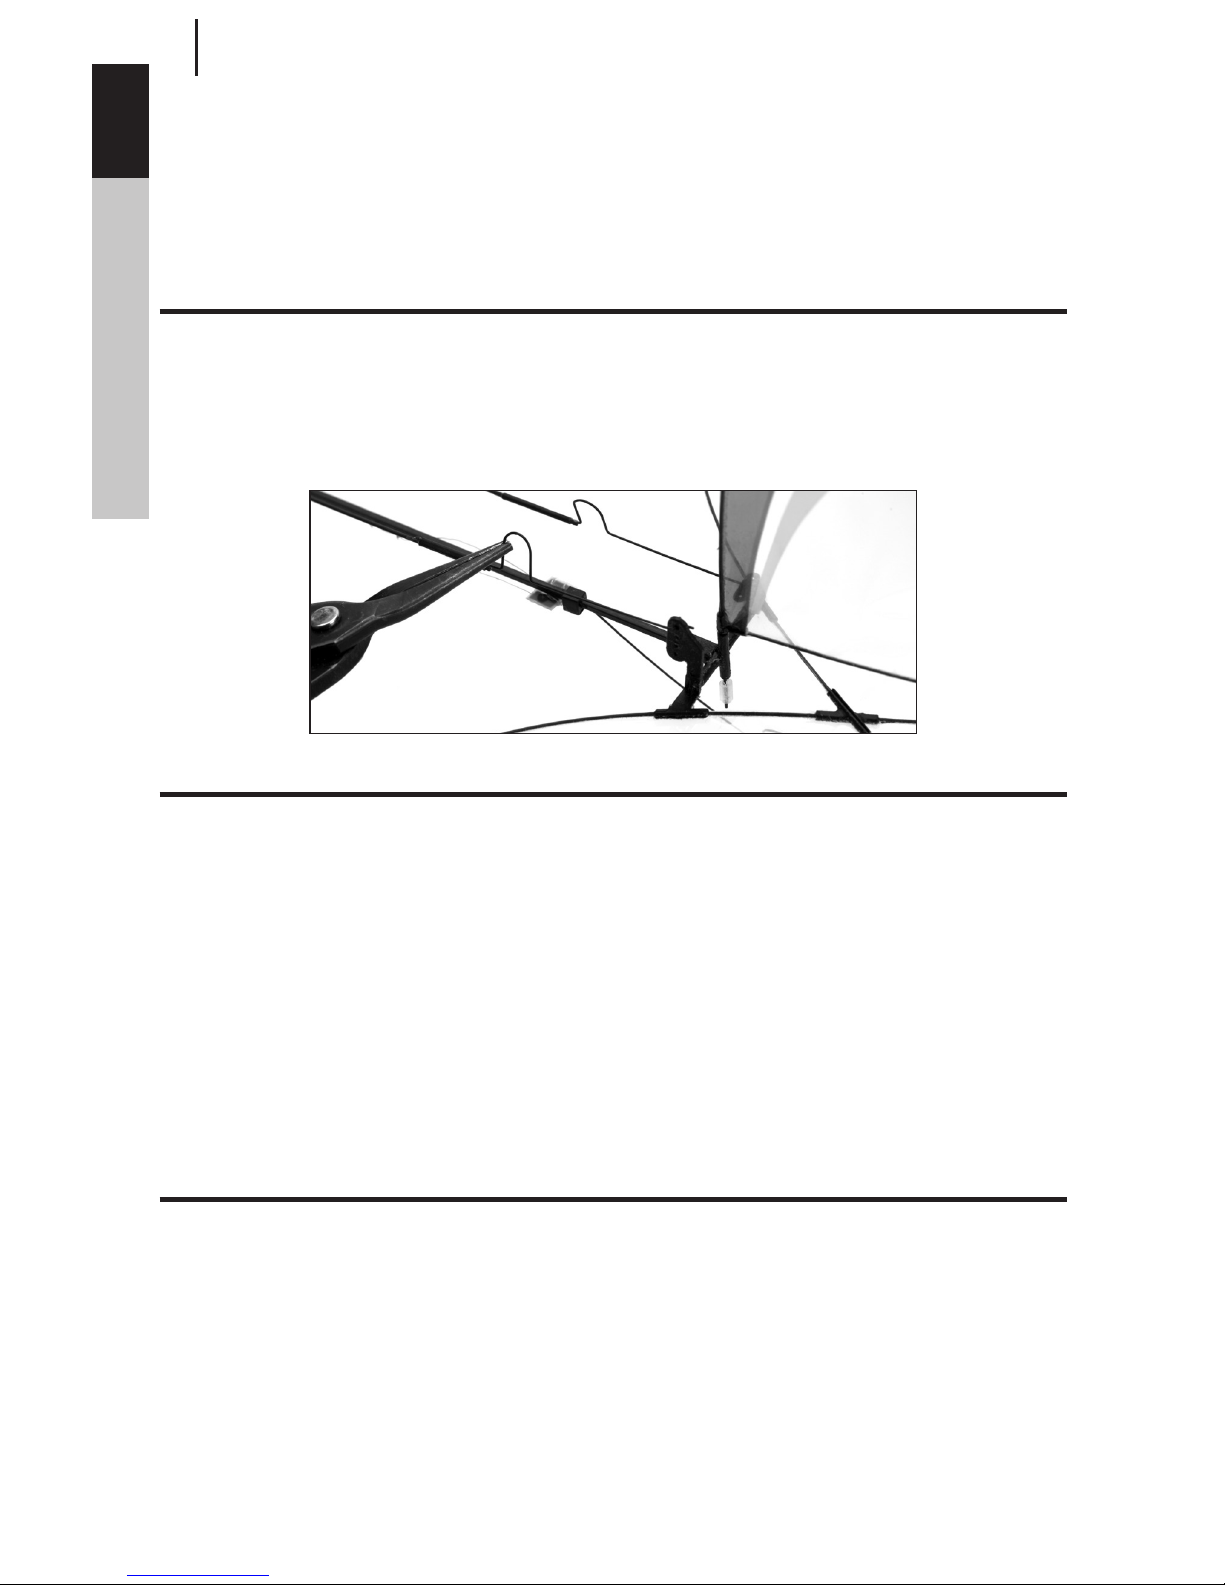
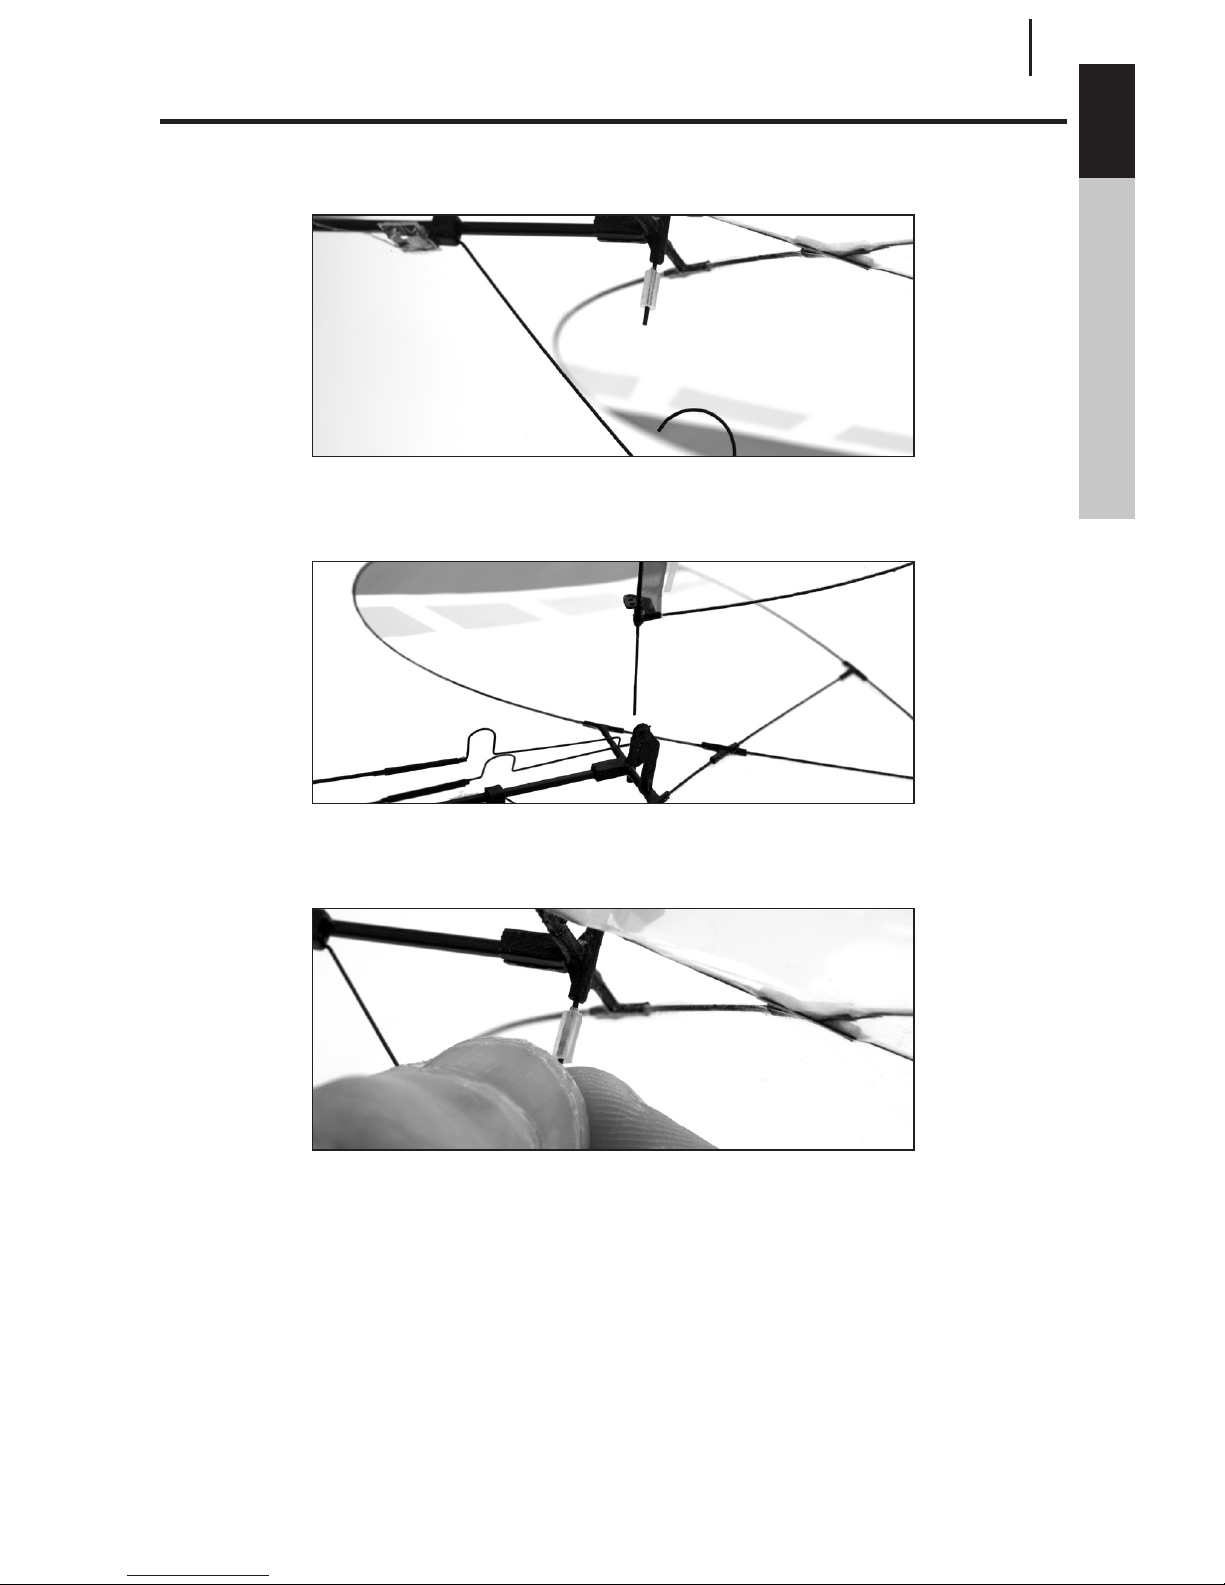
Replacing the Vertical Fin
To replace the vertical fin on your Night Vapor, follow the steps listed below.
1. Gently remove the clear pressure fitting tube located on the bottom of the aircraft.
2. Gently disconnect the pushrod from the control horn.
3. Slide the vertical fin out of the mounting column.
4. Reconnect the pushrod to the new vertical fin, and slide the vertical fin into the housing.
5. Slide the clear pressure fitting tube back into place.
Note: When replacing the pressure fitting tube, do not jam it against the column; this will not allow the
vertical fin to move freely throughout its range of motion.
Page 16
16
ENDEFRIT
Replacing the Wing
All LEDs on the wing are permanently attached. The new wing will include a new set of LEDs. To replace the
wing follow the steps below:
1. Disconnect the main LED wire from the receiver board.
2. Remove the LED that is attached to the tail of the aircraft.
Note: The LED is tack glued to the fuselage and it will be necessary to very carefully break the glue
joint loose.
3. Loosen the four screws on the wing mounting columns, and gently pull the wing off.
4. Slide the new wing back into place, and tighten the wing to the mounting columns.
5. Install the LED located near the tail, and tack glue it into place. Then, reconnect the main LED wire to
the receiver board.
Note: Use only a very small amount of hot glue or rubber cement to attach the LED to the fuselage.
Other adhesives may damage the LED.
Page 17
17
EN DE FR IT
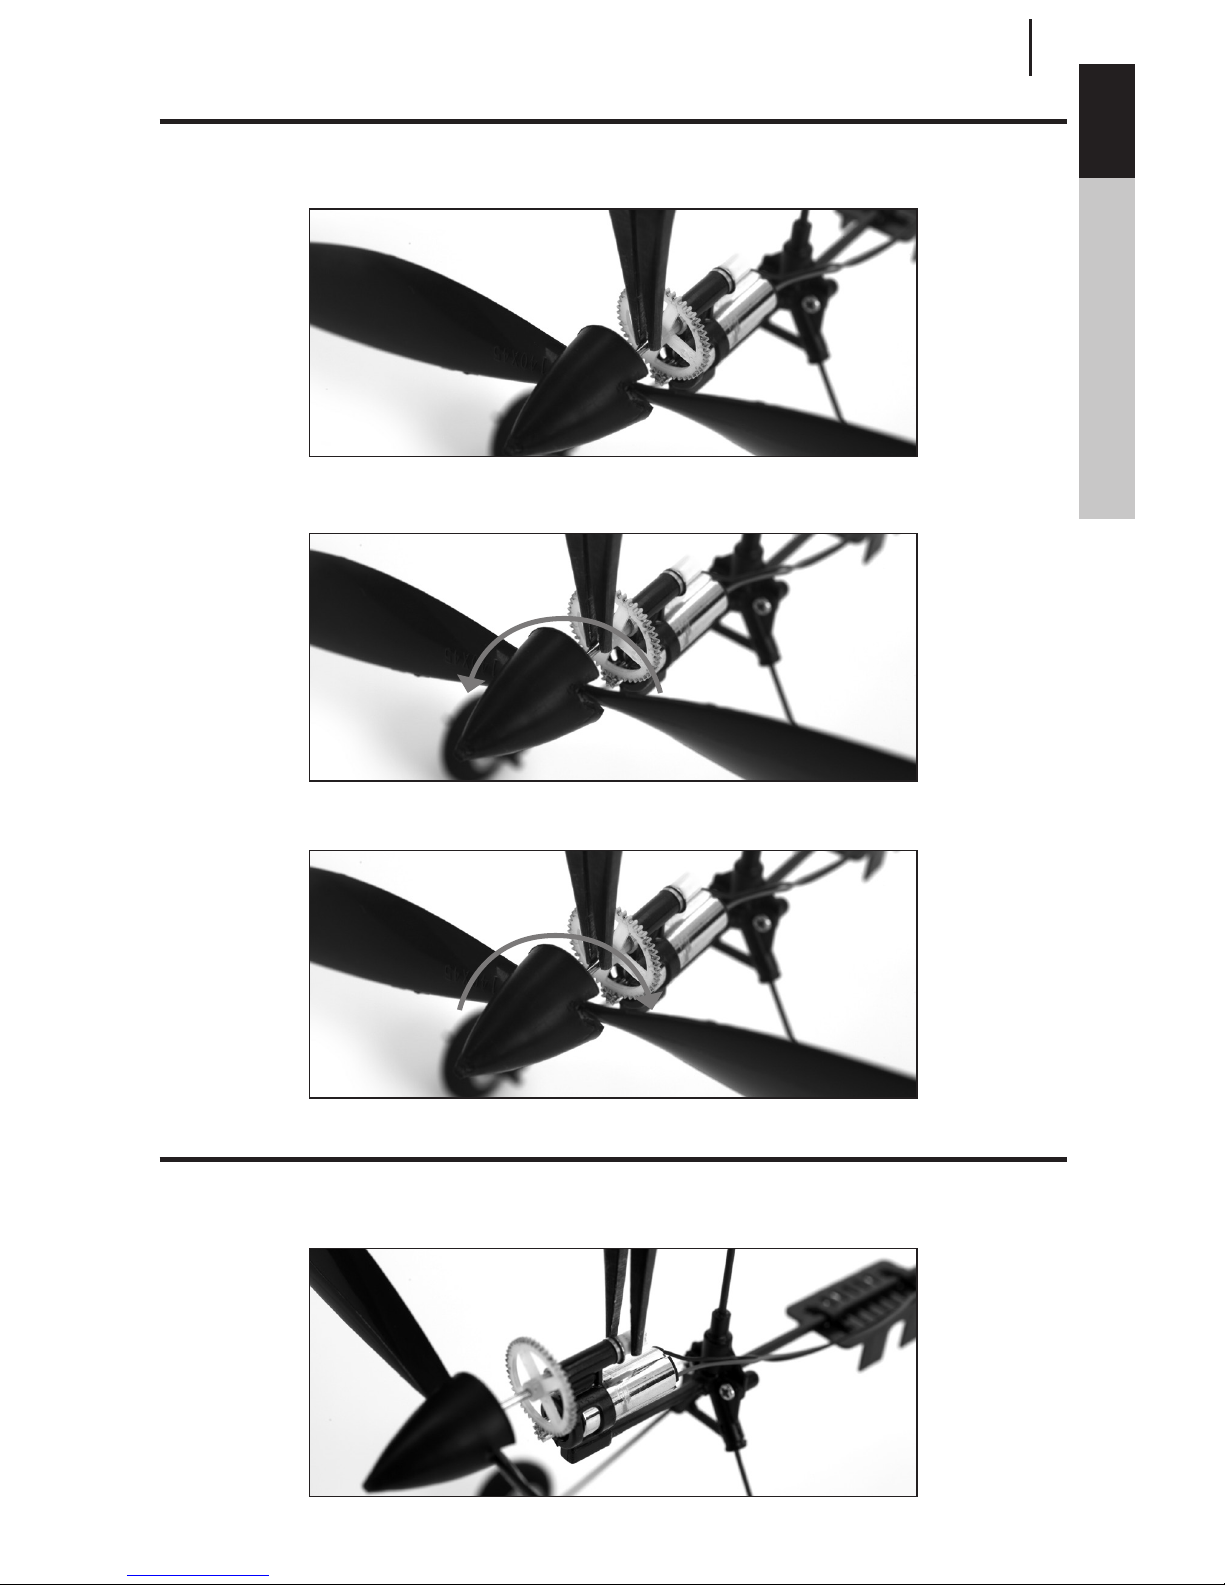
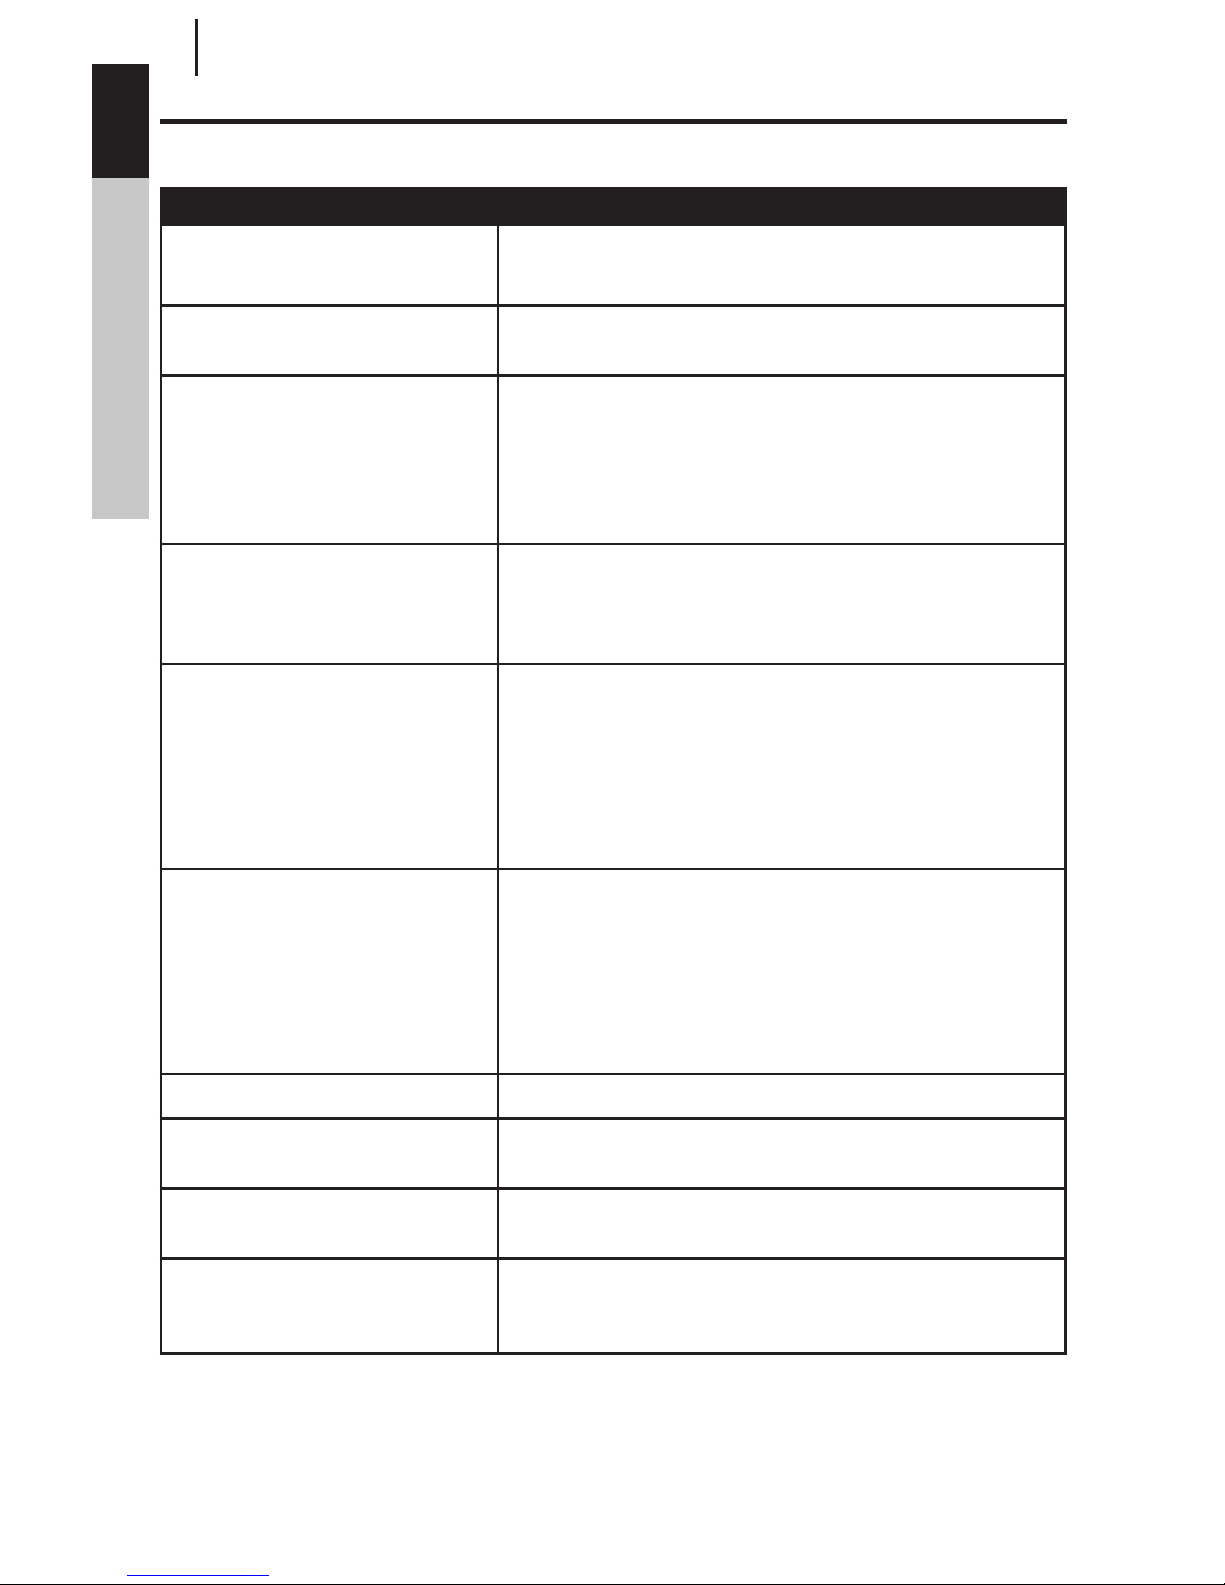
Replacing the Propeller
The propeller is threaded onto the shaft of the gearbox.
1. To remove the propeller, use needle-nose pliers or hemostats to grip the shaft.
2. Spin the propeller counterclockwise to remove the old propeller.
3. Thread the new 140mm x 45mm prop and spinner clockwise onto the gearbox shaft.
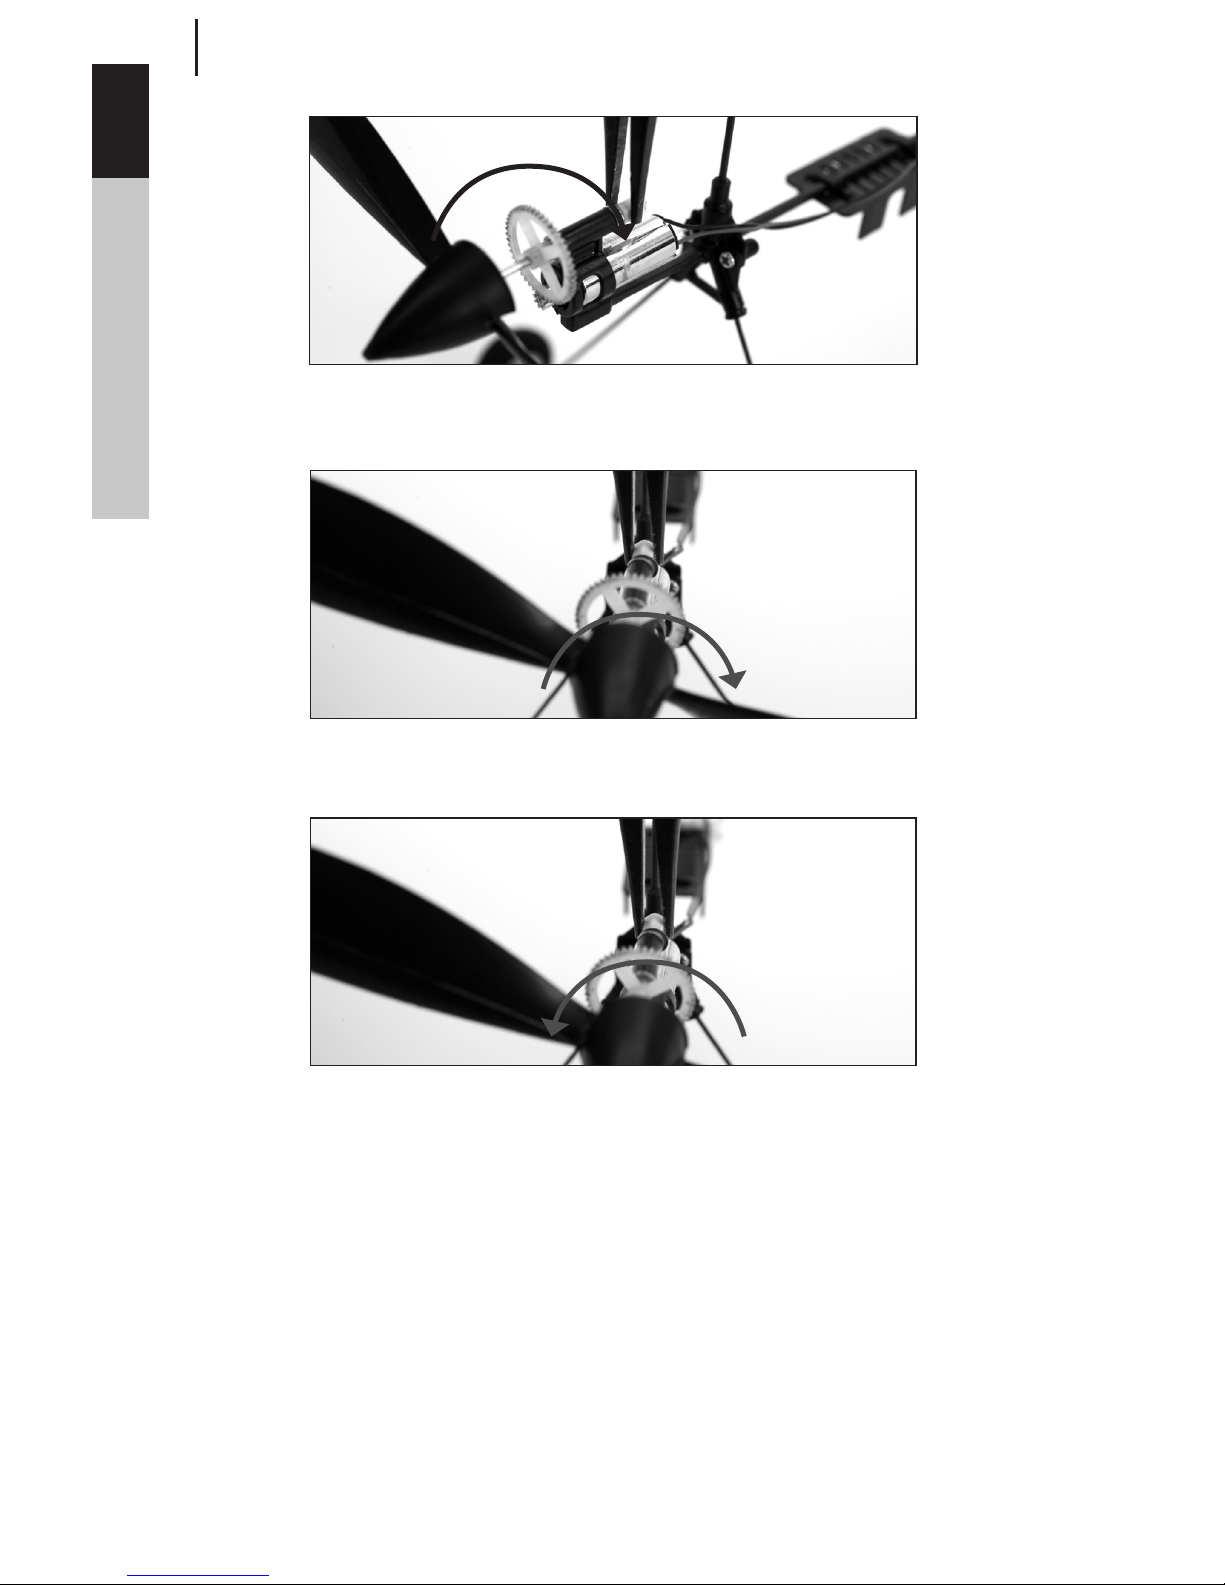
Replacing the Prop Shaft
You may need to replace the prop shaft in the gearbox should it become damaged. To replace the prop shaft:
1. Gently grasp the white nylon nut located at the back of the prop shaft using needle-nose pliers or
hemostats.
Page 18
18
ENDEFRIT
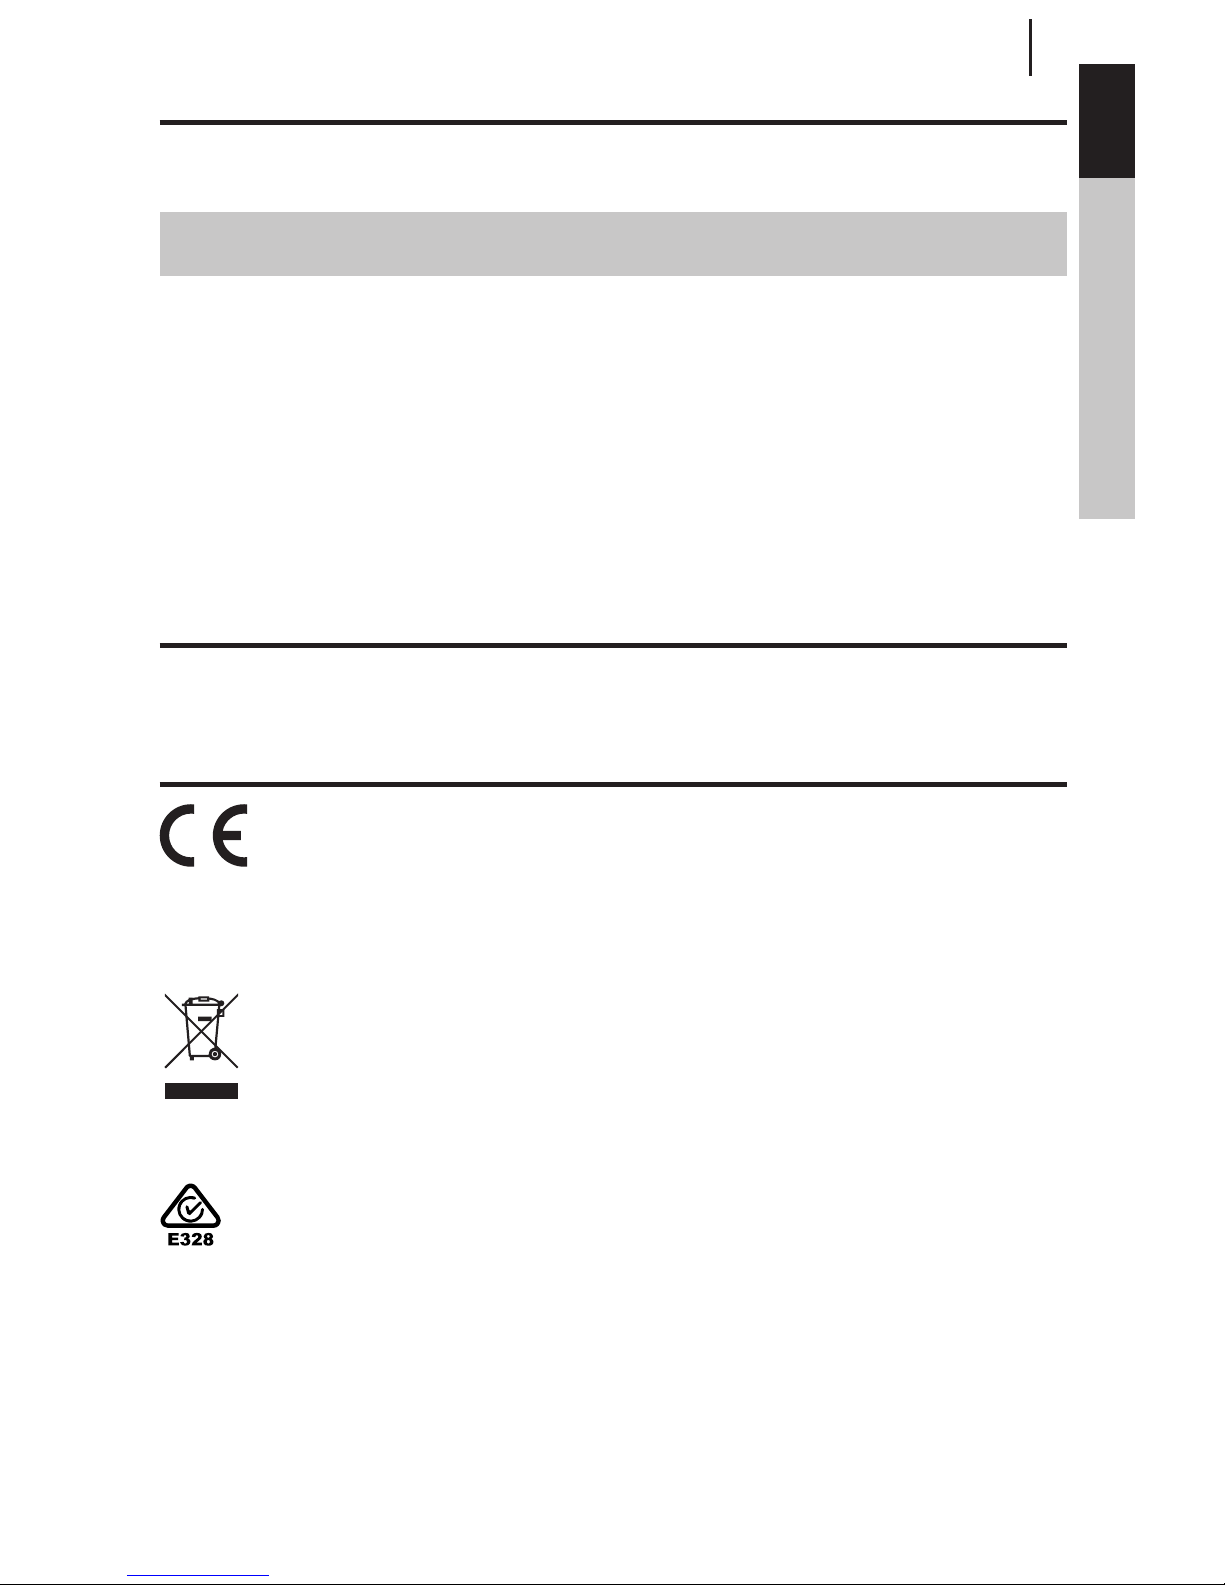
2. While holding the nylon nut, rotate the spur gear clockwise. The prop shaft will thread out of the nut.
3. Gently pull on the spur gear and the prop shaft will slide out of the gearbox.
4. Thread the 140mm x 45mm prop and spinner onto the new prop shaft by holding the spur gear and
turning the prop clockwise.
5. Slide the new prop shaft into the gearbox.
6. Place the nylon nut on the back of the prop shaft. Spin the prop and spur gear counterclockwise. The
nylon nut will thread onto the prop shaft.
7. While holding the nylon nut in place, gently turn the spur gear counterclockwise to ensure the nut is
snug.
Page 19

19
EN DE FR IT
Replacement Parts
PKZ3001. . . . . . . . . . . . . . 3.7V 70mAh Li-Po Battery
PKZ3240. . . . . . . . . . . . . . DC 3.7V LiPo Charger
PKZ3302. . . . . . . . . . . . . . Propeller with Spinner (140mm x 45mm)
PKZ3307. . . . . . . . . . . . . . Tail Skid: Vapor/Night Vapor
PKZ3316. . . . . . . . . . . . . . Main Motor: Vapor/Night Vapor
PKZ3322. . . . . . . . . . . . . . Pushrod Set: Vapor/Night Vapor
PKZ3327. . . . . . . . . . . . . . Gearbox without Motor: Vapor/Night Vapor
PKZ3328. . . . . . . . . . . . . . Prop Shaft with Gear (2): Vapor/Night Vapor
PKZ3341. . . . . . . . . . . . . . Transmitter, 2.4GHz with Spektrum DSM2/DSMX
PKZU1106 ............Main Landing Gear Set: Night Vapor
PKZU1120 ............Main Wing with Lights: Night Vapor
PKZU1124 ............Horizontal Stabilizer: Night Vapor
PKZU1125 ............Rudder: Night Vapor
PKZUA3352 ...........3-Ch Rx/ESC with LED port, DSM2/DSMX
PKZU1161 ............Fuselage with Electronics: Night Vapor
PKZU1170 ............Replacement Airframe (no electronics or motor): Night Vapor
PKZU1167 ............Bare Fuselage: Night Vapor
SPM6835 .............Replacement Servo Mechanics
EFLH1067 .............Replacement Servo Retaining Collars
Optional Parts
PKZ3052. . . . . . . . . . . . . . Battery Connector with Wire
EFLB1501S25 ..........150mAh 3.7V 12C Li-Po Battery*
EFLC1004 .............4-Port 3.7V Li-Po Charger
EFLC1005 .............AC to 6V DC Adapter (United States)
EFLC1005AU. . . . . . . . . . . AC to 6V DC Adapter (Australia)
ELFC1005EU ...........AC to 6V DC Adapter (Europe)
EFLC1005UK. . . . . . . . . . . AC to 6V DC Adapter (United Kingdom)
SPM6825 .............Linear Servo Reverser
. . . . . . . . . . . . . . . . . . . . . DX5e DSMX 5-channel Transmitter
. . . . . . . . . . . . . . . . . . . . . DX6i DSMX 6-Channel Transmitter
. . . . . . . . . . . . . . . . . . . . . DX7s DSMX 7-Channel Transmitter
. . . . . . . . . . . . . . . . . . . . . DX8 DSMX Transmitter
*Note: For longer flight times try using a larger capacity high-quailty battery such as the E-flite
150mAh (EFLB1501S) Li-Po battery.
Page 20
20
ENDEFRIT
Troubleshooting Guide
If you have any problems with setup or programming that cannot be fixed by the Troubleshooting Guide,
please see page 23 and call the appropriate Horizon Product Support office.
Problem Possible Solutions
Aircraft will not “throttle up” but all
other controls seem to function
Lower throttle trim and/or throttle stick to their lowest settings
Reverse throttle channel on specific transmitter if applicable
Propeller or motor shaft is broken
Replace with Prop with Spinner (PKZ3302) or Prop Shaft
(PKZ3328)
Aircraft appears to show significant
decrease in flight time
Recharge flight battery completely
Replace AA batteries in charger or use AC to 6V DC Adapter and
recharge flight battery completely
Replace PKZ3001 battery and read the “Battery Warnings and
Guidelines” section of manual
Charger light stays on after Li-Po
battery is disconnected, or remains
on for longer than 40 minutes when
charging
Replace AA batteries in charger
Aircraft appears to have less power
Lubricate the bushings of the gearbox
Lubricate the bushings of the motor
In cold weather, prior to flight, make sure the flight batteries
are warm
Use a larger capacity battery (unless it will not physically fit
without modification)
LED on aircraft remains flashing and
cannot be controlled by transmitter
Unplug and reconnect flight battery
Move transmitter (powered on) a few feet from the aircraft prior
to reconnecting the flight battery
Move transmitter and aircraft away from large metal objects
when binding/linking
Rebind the aircraft to the desired compatible transmitter
LED on aircraft will not illuminate Replace with Main Wing with Lights (PKZU1120)
Aircraft appears to roll, yaw and pitch
towards a certain direction
Trim control surfaces using the transmitter until the aircraft no
longer moves that direction
Controls appear to be reversed after
binding to a different transmitter
Read the “Control Test” section of manual
Aircraft does not function after
connecting flight battery and the
aircraft smells burnt
Replace the PKZUA1152 receiver board and check for correct
polarity when connecting the flight battery
Page 21

21
EN DE FR IT
What this Warranty Covers – Horizon Hobby, LLC,
(Horizon) warrants to the original purchaser that the product
purchased (the “Product”) will be free from defects in materials
and workmanship at the date of purchase.
What is Not Covered – This warranty is not transferable and
does not cover (i) cosmetic damage, (ii) damage due to acts
of God, accident, misuse, abuse, negligence, commercial use,
or due to improper use, installation, operation or maintenance,
(iii) modification of or to any part of the Product, (iv) attempted
service by anyone other than a Horizon Hobby authorized
service center, (v) Product not purchased from an authorized
Horizon dealer, or (vi) Product not compliant with applicable
technical regulations, or (vii) use that violates any applicable
laws, rules, or regulations.
OTHER THAN THE EXPRESS WARRANTY ABOVE, HORIZON
MAKES NO OTHER WARRANTY OR REPRESENTATION, AND
HEREBY DISCLAIMS ANY AND ALL IMPLIED WARRANTIES,
INCLUDING, WITHOUT LIMITATION, THE IMPLIED
WARRANTIES OF NON-INFRINGEMENT, MERCHANTABILITY
AND FITNESS FOR A PARTICULAR PURPOSE. THE
PURCHASER ACKNOWLEDGES THAT THEY ALONE HAVE
DETERMINED THAT THE PRODUCT WILL SUITABLY MEET THE
REQUIREMENTS OF THE PURCHASER’S INTENDED USE.
Purchaser’s Remedy – Horizon’s sole obligation and
purchaser’s sole and exclusive remedy shall be that Horizon
will, at its option, either (i) service, or (ii) replace, any Product
determined by Horizon to be defective. Horizon reserves the
right to inspect any and all Product(s) involved in a warranty
claim. Service or replacement decisions are at the sole
discretion of Horizon. Proof of purchase is required for all
warranty claims. SERVICE OR REPLACEMENT AS PROVIDED
UNDER THIS WARRANTY IS THE PURCHASER’S SOLE AND
EXCLUSIVE REMEDY.
Limitation of Liability – HORIZON SHALL NOT BE LIABLE
FOR SPECIAL, INDIRECT, INCIDENTAL OR CONSEQUENTIAL
DAMAGES, LOSS OF PROFITS OR PRODUCTION OR
COMMERCIAL LOSS IN ANY WAY, REGARDLESS OF
WHETHER SUCH CLAIM IS BASED IN CONTRACT,
WARRANTY, TORT, NEGLIGENCE, STRICT LIABILITY OR ANY
OTHER THEORY OF LIABILITY, EVEN IF HORIZON HAS BEEN
ADVISED OF THE POSSIBILITY OF SUCH DAMAGES. Further,
in no event shall the liability of Horizon exceed the individual
price of the Product on which liability is asserted. As Horizon
has no control over use, setup, final assembly, modification
or misuse, no liability shall be assumed nor accepted for any
resulting damage or injury. By the act of use, setup or assembly,
the user accepts all resulting liability. If you as the purchaser or
user are not prepared to accept the liability associated with
the use of the Product, purchaser is advised to return the
Product immediately in new and unused condition to the place
of purchase.
Law – These terms are governed by Illinois law (without regard
to conflict of law principals). This warranty gives you specific
legal rights, and you may also have other rights which vary from
state to state. Horizon reserves the right to change or modify
this warranty at any time without notice.
WARRANTY SERVICES
Questions, Assistance, and Services – Your local
hobby store and/or place of purchase cannot provide warranty
support or service. Once assembly, setup or use of the Product
has been started, you must contact your local distributor or
Horizon directly. This will enable Horizon to better answer your
questions and service you in the event that you may need
any assistance. For questions or assistance, please visit our
website at www.horizonhobby.com, submit a Product Support
Inquiry, or call the toll free telephone number referenced in the
Warranty and Service Contact Information section to speak with
a Product Support representative.
Inspection or Services – If this Product needs to be inspected or serviced and is compliant in the country you live and
use the Product in, please use the Horizon Online Service Request submission process found on our website or call Horizon
to obtain a Return Merchandise Authorization (RMA) number.
Pack the Product securely using a shipping carton. Please note
that original boxes may be included, but are not designed to
withstand the rigors of shipping without additional protection.
Ship via a carrier that provides tracking and insurance for lost
or damaged parcels, as Horizon is not responsible for merchandise until it arrives and is accepted at our facility. An Online
Service Request is available at http://www.horizonhobby.com/
content/service-center_render-service-center. If you do not
have internet access, please contact Horizon Product Support
to obtain a RMA number along with instructions for submitting your product for service. When calling Horizon, you will be
asked to provide your complete name, street address, email
address and phone number where you can be reached during business hours. When sending product into Horizon, please
include your RMA number, a list of the included items, and a
brief summary of the problem. A copy of your original sales
receipt must be included for warranty consideration. Be sure
your name, address, and RMA number are clearly written on
the outside of the shipping carton.
NOTICE: Do not ship LiPo batteries to Horizon. If you
have any issue with a LiPo battery, please contact the
appropriate Horizon Product Support office.
Warranty Requirements – For Warranty consideration, you
must include your original sales receipt verifying the proof-ofpurchase date. Provided warranty conditions have been met,
your Product will be serviced or replaced free of charge. Service
or replacement decisions are at the sole discretion of Horizon.
Non-Warranty Service – Should your service not be
covered by warranty, service will be completed and payment
will be required without notification or estimate of the expense
unless the expense exceeds 50% of the retail purchase cost.
By submitting the item for service you are agreeing to payment
of the service without notification. Service
Limited Warranty
Page 22

22
ENDEFRIT
Contact Information
estimates are available upon request. You must include this
request with your item submitted for service. Non-warranty
service estimates will be billed a minimum of ½ hour of
labor. In addition you will be billed for return freight. Horizon
accepts money orders and cashier’s checks, as well as Visa,
MasterCard, American Express, and Discover cards. By
submitting any item to Horizon for service, you are agreeing
to Horizon’s Terms and Conditions found on our website
http://www.horizonhobby.com/content/service-center_renderservice-center.
ATTENTION: Horizon service is limited to
Product compliant in the country of use and
ownership. If received, a non-compliant Product
will not be serviced. Further, the sender will be
responsible for arranging return shipment of the
un-serviced Product, through a carrier of the
sender’s choice and at the sender’s expense.
Horizon will hold non-compliant Product for a
period of 60 days from notification, after which
it will be discarded.
10/2015
Country of
Purchase
Horizon Hobby Contact Information Address
United States
of America
Horizon Service Center
(Repairs and Repair Requests)
servicecenter.horizonhobby.com/
RequestForm/
4105 Fieldstone Rd
Champaign, Illinois, 61822
USA
Horizon Product Support
(Product Technical Assistance)
productsupport@horizonhobby.com
877-504-0233
Sales
websales@horizonhobby.com
800-338-4639
European
Union
Horizon Technischer Service service@horizonhobby.eu
Hanskampring 9
D 22885 Barsbüttel,
Germany
Sales: Horizon Hobby GmbH +49 (0) 4121 2655 100
Page 23
23
EN DE FR IT
EU Compliance Statement:
RTF PKZU1100: Horizon Hobby, LLC hereby declares that this product is in compliance with the essential
requirements and other relevant provisions of the RED and EMC Directives.
BNF PKZU1180: Horizon Hobby, LLC hereby declares that this product is in compliance with the essential requirements
and other relevant provisions of the RED and EMC Directives.
A copy of the EU Declaration of Conformity is available online at: http://www.horizonhobby.com/content/support-render-compliance.
Instructions for disposal of WEEE by users in the European Union
This product must not be disposed of with other waste. Instead, it is the user’s responsibility to dispose of their
waste equipment by handing it over to a designated collections point for the recycling of waste electrical and
electronic equipment. The separate collection and recycling of your waste equipment at the time of disposal will
help to conserve natural resources and ensure that it is recycled in a manner that protects human health and the
environment. For more information about where you can drop off your waste equipment for recycling, please contact your
local city office, your household waste disposal service or where you purchased the product.
Compliance Information for the European Union
This device complies with Industry Canada licence-exempt RSS standard(s). Operation is subject to the following two
conditions: (1) this device may not cause interference, and (2) this device must accept any interference, including
interference that may cause undesired operation of the device.
FCC Information
IC Information
This device complies with part 15 of the FCC Rules. Operation is subject to the following two conditions: (1) This device
may not cause harmful interference, and (2) this device must accept any interference received, including interference that
may cause undesired operation.
CAUTION: Changes or modifications not expressly approved by the party responsible for compliance could void
the user’s authority to operate the equipment.
NOTE: This equipment has been tested and found to comply with the limits for a Class B digital device, pursuant to
part 15 of the FCC Rules. These limits are designed to provide reasonable protection against harmful interference in a
residential installation. This equipment generates, uses and can radiate radio frequency energy and, if not installed and
used in accordance with the instructions, may cause harmful interference to radio communications. However, there is no
guarantee that interference will not occur in a particular installation. If this equipment does cause harmful interference to
radio or television reception, which can be determined by turning the equipment off and on, the user is encouraged to try
to correct the interference by one or more of the following measures:
• Reorient or relocate the receiving antenna.
• Increase the separation between the equipment and receiver.
• Connect the equipment into an outlet on a circuit different from that to which the receiver is connected.
• Consult the dealer or an experienced radio/TV technician for help.
Page 24

24
ENDEFRIT
Als Benutzer dieses Produkts sind ausschließlich Sie für den Betrieb auf eine Weise verantwortlich, die sie selbst
oder andere nicht gefährdet, bzw. die zu keiner Beschädigung des Produkts oder des Eigentums anderer führt.
• Halten Sie stets in allen Richtungen einen Sicherheitsabstand zu Ihrem Modell ein, um Kollisionen und
Verletzungen zu vermeiden. Dieses Modell wird über ein Funksignal gesteuert. Funksignale können von
außerhalb gestört werden, ohne dass Sie darauf Einfluss nehmen können. Dies kann zu einem vorübergehenden Verlust der Steuerungskontrolle führen.
• Betreiben Sie Ihr Modell stets auf offenen Geländern, weit ab von Automobilen, Verkehr und Menschen.
• Befolgen Sie die Anweisungen und Warnungen für dieses Produkt und jedwedes optionales Zubehörteil
(Ladegeräte, wiederaufladbare Akkus etc.) stets sorgfältig.
• Halten Sie sämtliche Chemikalien, Kleinteile und elektrische Komponente stets außer Reichweite von Kindern.
• Feuchtigkeit beschädigt die Elektronik. Vermeiden Sie den Wasserkontakt aller Komponenten, die dafür nicht
speziell ausgelegt und entsprechend geschützt sind.
HINWEIS
Allen Anweisungen, Garantien und anderen zugehörigen Dokumenten sind Änderungen nach Ermessen
von Horizon Hobby, LLC vorbehalten. Aktuelle Produktliteratur finden Sie unter www.horizonhobby.com im
Support-Abschnitt für das Produkt.
Begriffserklärung
Die folgende Begriffe werden in der gesamte Produktliteratur verwendet, um die Gefährdungsstufen im
Umgang mit dem Produkt zu defiieren:
WARNUNG: Verfahren können bei nicht ordnungsgemäßer Durchführung womöglich Schäden an Eigentum,
Kollateralschäden UND schwere Verletzungen ODER höchstwahrscheinlich oberfl ächliche Verletzungen
verursachen.
ACHTUNG: Verfahren können bei nicht ordnungsgemäßer Durchführung womöglich Schäden an
physischem Eigentum UND schwere Verletzungen verursachen.
HINWEIS: Verfahren können bei nicht ordnungsgemäßer Durchführung womöglich Schäden an physischem
Eigentum UND geringfügige oder keine Verletzungen verursachen.
WARNUNG: Lesen Sie die GESAMTE Bedienungsanleitung, um sich vor Inbetriebnahme mit den
Funktionen des Produkts vertraut zu machen. Eine nicht ordnungsgemäße Bedienung des Produkts
kann das Produkt und persönliches Eigentum schädigen und schwere Verletzungen verursachen.
Dies ist ein hoch entwickeltes Produkt für den Hobbygebrauch. Es muss mit Vorsicht und Umsicht bedient
werden und erfordert einige mechanische Grundfertigkeiten. Wird das Produkt nicht sicher und umsichtig
verwendet, so könnten Verletzungen oder Schäden am Produkt oder anderem Eigentum entstehen.
Dieses Produkt ist nicht für den Gebrauch durch Kinder ohne direkte Aufsicht eines Erwachsenen
vorgesehen. Versuchen Sie nicht, das Produkt ohne Zustimmung von Horizon Hobby, LLC zu zerlegen,
mit nicht-kompatiblen Komponenten zu verwenden oder beliebig zu verbessern. Dieses Handbuch
enthält Sicherheitshinweise sowie Anleitungen zu Betrieb und Wartung. Es ist unerlässlich, dass Sie alle
Anleitungen und Warnungen in diesem Handbuch vor dem Zusammenbau, der Einrichtung oder der
Inbetriebnahme lesen und diese befolgen, um eine korrekte Bedienung zu gewährleisten und Schäden
bzw. schwere Verletzungen zu vermeiden.
14
+
Altersempfehlung:
Nicht für Kinder
unter 14 Jahren.
Dies ist kein Spielzeug
Warnung gegen gefälschte Produkte: Sollten Sie
jemals einen Empfänger aus einem Horizon Hobby
Produkt wechseln wollen, kaufen Sie diesen bitte bei Horizon
Hobby oder einem autorisierten Horizon Hobby Händler um sicher
zu stellen, dass Sie ein authentisches qualitativ hochwertiges
Spektrum Produkt erhalten. Horizon Hobby LLC lehnt jedwede
Haftung, Garantie oder Unterstützung sowie Kompatibilitäts- oder
Leistungsansprüche zu DSM oder Spektrum in Zusammenhang
mit gefälschten Produkten ab.
Sicherheitsmaßnahmen und Warnungen
Page 25
25
EN DE FR IT
• LADENSIENIEMALSAKKUSUNBEAUFSICHTIGT.
• LADENSIENIEMALSAKKUSÜBERNACHT.
• Durch Handhabung, Aufladung oder Verwendung des mitgelieferten Li-Po-Akkus übernehmen Sie alle mit
Lithiumakkus verbundenen Risiken.
• Sollte der Akku zu einem beliebigen Zeitpunkt beginnen, sich aufzublähen oder anzuschwellen, stoppen
Sie die Verwendung unverzüglich. Falls dies beim Laden oder Entladen auftritt, stoppen Sie den Lade-/
Entladevorgang, und entnehmen Sie den Akku. Wird ein Akku, der sich aufbläht oder anschwillt, weiter
verwendet, geladen oder entladen, besteht Brandgefahr.
• Lagern Sie den Akku stets bei Zimmertemperatur an einem trockenen Ort.
• ABei Transport oder vorübergehender Lagerung des Akkus muss der Temperaturbereich zwischen
40°F und 120°F (ca. 5°C bis 49°C) liegen. Akku oder Modell dürfen nicht im Auto oder unter direkter
Sonneneinstrahlung gelagert werden. Bei Lagerung in einem heißen Auto kann der Akku beschädigt werden
oder sogar Feuer fangen.
• Laden Sie die Akkus immer weit entfernt von brennbaren Materialien.
• Überprüfen Sie immer den Akku vor dem Laden und laden Sie niemals defekte oder beschädigte Akkus.
• Trennen Sie immer den Akku nach dem Laden und lassen das Ladegerät abkühlen.
• Überwachen Sie ständig die Temperatur des Akkupacks während des Ladens.
• Verwenden Sie ausschließlich ein Ladegerät das speziell für das Laden von LiPo Akkus geeignet ist. Das
Laden mit einem nicht geeignetem Ladegerät kann Feuer und / oder Sachbeschädigung zur Folge haben.
• Entladen Sie niemals ein LiPo Akku unter 3V pro Zelle unter Last.
• Verdecken Sie niemals Warnhinweise mit Klettband.
• Laden Sie niemals Akkus ausserhalb ihrer sicheren Grenzen.
• Versuchen Sie nicht das Ladegerät zu demontieren oder zu verändern.
• Lassen Sie niemals Minderjährige unter 14 Jahren Akkus laden.
• Laden Sie niemals Akkus an extrem kalten oder heißen Plätzen (empfohlenerTemperaturbereich 5 – 49°)
oder im direkten Sonnenlicht.
ACHTUNG: Alle Anweisungen und Warnhinweise müssen genau befolgt werden. Falsche Handhabung
von Li-Po-Akkus kann zu Brand, Personen und/oder Sachwertschäden führen.
• Nehmen Sie niemals ein Element des Modells in Ihren Mund, da dies zu schweren Verletzungen oder sogar
zum Tod führen könnte.
• Betreiben Sie Ihr Modell niemals mit schwachen Senderbatterien.
• Halten Sie das Fluggerät stets unter Blickkontakt und Kontrolle.
• Fliegen Sie nur mit vollständig aufgeladenen Akkus.
• Halten Sie den Sender stets eingeschaltet, wenn das Fluggerät eingeschaltet ist.
• Entfernen Sie stets den Akku, bevor Sie das Fluggerät auseinandernehmen.
• Halten Sie bewegliche Teile stets sauber.
• Halten Sie die Teile stets trocken.
• Lassen Sie die Teile stets auskühlen, bevor Sie sie berühren.
• Entfernen Sie nach dem Flug stets den Akku.
• Stellen Sie immer sicher, dass der Failsafe vor dem Flug ordnungsgemäß eingestellt ist.
• Betreiben Sie das Fluggerät niemals bei beschädigter Verkabelung.
• Berühren Sie niemals sich bewegende Teile.
Sicherheitsmaßnahmen und Warnungen, Fortsetzung
Warnungen zum Laden
Page 26

26
ENDEFRIT
Spezikationen
Spannweite ...............375mm
Länge ....................387mm
Gewicht (ohne Akku) .........16,4g
Akku .....................70mAh 3,7V 14C 1S LiPo Akku
Ladegerät .................1S 3,7V DC LiPo Akku Ladegerät (enthalten)
Sender ...................3+ Kanal mit Spektrum 2,4 Ghz DSM2/DSMX Technologie
On Board Elektronik .........3 Kanal Empfänger/Regler mit LED Anschluß
Inhaltsverzeichnis
Sicherheitsmaßnahmen und Warnungen ............................................. 24–25
Warnungen zum Laden .............................................................25
Spezifikationen ...................................................................26
Night Vapor RTF Lieferumfang ........................................................27
Night Vapor RTF Lieferumfang ........................................................27
Vorbereitung für den Erstflug. . . . . . . . . . . . . . . . . . . . . . . . . . . . . . . . . . . . . . . . . . . . . . . . . . . . . . . . . 27
Aufladen der Batterie ..............................................................28
Einbau des Flugakkus .............................................................. 29
Binden von Sender und Empfänger ....................................................29
Senderspezifische Bindeanweisungen. . . . . . . . . . . . . . . . . . . . . . . . . . . . . . . . . . . . . . . . . . . . . . . . . . 30
Zusätzliche Bindeinformationen ......................................................30
Sender Kontroll Identifikation ........................................................31
LED Beleuchtung .................................................................32
Test der Flugsteuerung .............................................................32
Reversieren (Umdrehen) der Steuerfunktion .............................................33
Zentrieren der Ruderflächen .........................................................34
Dual Rate Funktion (RTF Version) und Schwerpunkt (CG) .................................... 34
Beschreibung des Empfängers, Motor-Funktions Test ......................................34
Checkliste zum Fliegen ............................................................. 35
Austausch des Fahrwerkes ..........................................................36
Austausch des Seitenruders .........................................................37
Austausch der Tragfläche ...........................................................38
Austausch des Propellers ...........................................................39
Austausch der Propellerwelle ........................................................39
Ersatzteile ....................................................................... 41
Optionale Teile ...................................................................41
Hilfestellung zur Fehlersuche und Behebung ............................................. 42
Garantie und Service Informationen ...................................................43
Kontakt Informationen .............................................................. 44
Konformitätshinweise für die Europäische Union .......................................... 44
Page 27
27
EN DE FR IT
Night Vapor RTF Lieferumfang
• Night Vapor
• 8 AA Batterien
• 70mAh 3,7V 14C LiPo Akku
• 1S 3,7 DC LiPo Akku Ladegerät 0,3A Ladestrom
ZumBetriebwirdeinDSM2/DSMXkompatiblerFugzeugSenderbenötigt.
Vorbereitung für den Erstug
Bitte beachten Sie, dass diese Checkliste kein Ersatz für den in diesem Handbuch inbegriffenen Inhalt
ist. Obwohl sie als Schnellstarteinstieg betrachtet werden kann, empfehlen wir Ihnen dringend, dieses
Handbuch vor dem Fortfahren vollständig durchzulesen.
Entnehmen Sie alle Bauteile und überprüfen sie auf etwaige Beschädigungen
Setzen Sie 4 AA Batterien in das Ladegerät ein.
Setzen Sie 4 AA Batterien in den Sender ein. (nur RTF)
Laden Sie den Flugakku
Binden Sie den Empfänger mit einem DSM2/DSMX kompatiblen Empfänger (nur BNF Version)
Testen Sie die Kontrollen
Machen Sie sich mit dem Kontrollen vertraut
Suchen Sie einen geeigneten Platz zum Fliegen
Night Vapor RTF Lieferumfang
• Night Vapor
• 8 AA Batterien
• 70mAh 3,7V 14C LiPO Akku
• 2,4 GHz DSM2/DSMX Sender
• 1S 3,7 DC LiPO Akku Ladegerät 0,3A Ladestrom
Page 28

28
ENDEFRIT
Auaden der Batterie
Gehen Sie zum Abschnitt Warnhinweise und Richtlinien zu den Akkus und machen Sie sich gründlich damit
vertraut, bevor Sie fortfahren. Befolgen Sie diese Schritte, um den LiPo-Akku mit dem inbegriffenen Ladegerät aufzuladen.
1. Entfernen Sie den Deckel von der Unterseite des Ladegeräts und setzen Sie vier der im Lieferumfang
enthaltenen AA-Batterien unter Beachtung der richtigen Polarität ein. Setzen Sie den Deckel nach dem
Einsetzen der AA-Batterien Akkus wieder an.
2. Schieben Sie den Akku in den Schlitz auf dem Ladegerät ein. Die Endkappe des Akkus ist speziell aus-
gelegt, damit der Akku nur in einer Richtung (in der Regel mit dem Etikett auf dem Akku nach außen
weisend) in den Schlitz eingeschoben werden kann, damit ein Verpolen der Anschlüsse verhindert
werden kann. Prüfen Sie trotzdem auf richtige Ausrichtung und Polarität, bevor Sie mit dem nächsten
Schritt fortfahren.
3. Drücken Sie den Akku und seinen Stecker sanft in die Ladebuchse auf der Unterseite des Schlitzes im
Ladegerät.
4. Ist der Akku korrekt eingesetzt leuchtet die LED auf dem Ladegerät Rot und zeigt damit den
Ladevorgang an.
5. Das Aufladen eines vollständig entladenen (nicht tief entladenen) 150-mAh-Akkus dauert ungefähr 30
bis 40 Minuten. Wenn der Akku fast vollständig aufgeladen ist, beginnt die LED-Leuchte zu blinken.
Wenn der Akku vollständig aufgeladen ist, blinkt die LED-Leuchte ungefähr alle 20 Sekunden und geht
dann ganz aus.
Hinweis: Der mit in Ihrem Night Vapor gelieferte LiPo-Akku ist teilaufgeladen. Daher dauert die Erstau-
fladung nur ungefähr 15 bis 20 Minuten.
Hinweis: Sie können erwarten, den LiPo-Flugakku ungefähr 15 bis 20 Mal aufzuladen, bevor Sie die
AA-Batterien im Ladegerät austauschen müssen. Das Ersetzen der mit gelieferten Batterien
durch alkalische Batterien führt zu mehr Aufladungszyklen, als mit den inbegriffenen Akkus.
Hinweis: Bleibt die LED beim Aufladen länger als 40 Minuten an und / oder 5 Sekunden nach dem
Entfernen des LiPo-Flugakkus, tauschen Sie die AA-Batterien im Ladegerät.
ACHTUNG: Verwenden Sie nur ein Ladegerät, das speziell auf die Aufladung eines LiPo- Akkus
ausgelegt ist. Sonst kann ein Brand entstehen, der Personen- und/oder Sachschäden verursachen
kann.
ACHTUNG: Wählen Sie niemals einen höheren Ladestrom als empfohlen.
Page 29

29
EN DE FR IT
Einbau des Flugakkus
Ist der Akku vollständig geladen, können Sie ihn in die Akkuhalterung einsetzen. Achten Sie bitte dabei
darauf, dass der Akku dabei nach vorne zeigt.
Hinweis: Zur Veränderung des Schwerpunktes können Sie den Akkuhalter nach vorne oder hinten
schieben.
Hinweis:TrennenSienachdemFliegenimmerdenAkkuvomEmpfänger.SolltenSiedieses
nichttun,wirdderAkkudadurchtiefentladenundistnichtmehrzuverwenden.
Binden von Sender und Empfänger
Ihr Night Vapor ist bereits mit dem mitgelieferten Sender gebunden. Sollten Sie den Sender und Empfänger
neu binden wollen, folgen Sie bitte den unten stehenden Anweisungen.
Vorbereitung des Flugzeuges zur Bindung
1. Stellen Sie sicher, dass der Sender und ausgeschaltet und der Akku nicht mit dem Empfänger verbun-
den ist.
2. Schließen Sie den Flugakku an den Empfänger an. Die LED fängt an zu blinken. Folgen Sie nun den
senderspezifischen Anweisungen zum Binden.
Hinweis: Der mitgelieferte Sender ist ein 4 Kanal Sender. Da zum Betrieb nur drei Kanäle benötigt
werden, befindet sich die Steuerfunktion des Seitenruders auf der Position des Querruders
auf dem rechten Knüppel.
Page 30

30
ENDEFRIT
Senderspezische Bindeanweisungen
MLP4DSMSender
1. Drücken Sie bitte wenn die LED auf dem Sender anfängt zu blinken den linken Stick in den Sender ein
(Eindrücken NICHT Runter) bis Sie ein Klick hören.
2. Schalten Sie den Sender mit eingedrückten Knüppel ein. Lassen Sie danach den Knüppel los. Der
Sender piept und die LED auf dem Sender blinkt.
3. Nachdem der Sender aufgehört hat zu piepen dauert es ein bis zwei Sekunden bis der Empfänger
gebunden hat.
Hinweis: Sollte es schwierig sein die LED blinken zu sehen, zählen Sie bitte langsam bis 5 nachdem
Sie den Akku verbunden haben, der Empfänger sollte sich nun im Bindemodus befinden.
Beim Bindeprozess wird der Empfänger programmiert, um den GUID- (Global eindeutiger Identifi kations-)
Code eines einzelnen speziellen Senders zu erkennen. Für einen ordnungsgemäßen Betrieb müssen Sie
Ihren gewählten Flugzeugsender mit Spektrum DSM2/DSMX-Technologie an den Empfänger „binden“.
Ihren gewählten Flugzeugsender mit Spektrum DSM2/DSMX-Technologie an den Empfänger „binden“.
Empfänger gebunden werden. Bitte besuchen Sie www.bindnfly.com für eine Liste der kompatiblen Sender.
Hinweis:Bei Sendern von Futaba mit einem Spektrum DSM2-Modul muss der Gaskanal umgekehrt (reversiert) werden.
Zusätzliche Bindeinformationen
Schalten Sie bitte immer zuerst den Sender ein und warten dann ca. 5 Sekunden bevor Sie den Flugakku
mit dem Empfänger verbinden. In dieser Zeit scant der Sender das Band und sichert zwei freie Frequenzen.
Sollten Sie den Empfänger zu schnell einschalten kann es sein, dass die Verbindung nicht zustande kommt
und der Empfänger in den Bindemode wechselt. Sollte diese passieren, lassen Sie bitte den Sender eingeschaltet und verbinden den Empfänger erneut.
Page 31

31
EN DE FR IT
Sender Kontroll Identikation
Hinweis: Schalten Sie vor dem Fliegen immer erst den Sender ein und verbinden dann den Flugakku.
Nach dem Flug trennen Sie immer erst den Flugakku und schalten dann den Empfänger aus.
Mode 1
Höhenruder Funktiion
Seitenruder Gas Funktion
Höhenruder Trimmung
Gas Trimmung
Seitenruder Trimmung
Mode 2
Gas Funktion
Seiten / Höhenruder Funktion
Gas Trimmung
Höhenruder Trimmung
Seitenruder Trimmung
Page 32

32
ENDEFRIT
LED Beleuchtung
Der Night Vapor ist mit sechs LED ausgerüstet.
• Vorne am Flügel befinden sich 3 LEDs. Diese LEDs leuchten weiss.
• An den Außenseiten der Tragflächen befinden sich 2 weitere LEDs. Die LED auf der rechten Seite (von
vorne betrachtet) blinkt Rot , die LED auf der linken Seite blinkt Grün.
• Eine blau blinkende LED ist am Heck des Flugzeuges befestigt.
Test der Flugsteuerung
Bitte überprüfen Sie vor dem ersten Flug die Flugsteuerung um sicherzugehen, dass bei dem Transport kein
Servo oder Ansteuerung beschädigt worden ist.
Schalten Sie den Sender zuerst ein und bringen den Gas Stick in die unterste Position. Danach schließen Sie
den Flugakku an.
Hinweis:Der Stecker des Akkus und der des Empfängers sind so gefertigt, dass sie nur in eine
Richtung passen, um ein Verpolen zu vermeiden. Wird der Stecker mit Gewalt falsch herum
eingesteckt, kann dieses den Akku oder den Empfänger beschädigen.
Bewegen Sie zur Überprüfung des Höhenruders den Höhenruderstick nach vorne und hinten. Wenn der Stick
nach vorne bewegt wird, sollte das Höhenruder nach unten gehen. Dieses bewegt die Nase des Flugzeuges
nach unten.
Wenn der Höhenruderstick nach hinten bewegt wird, sollte das Höhenruder nach oben gehen. Diese bewegt
die Nase des Flugzeuges nach oben.
Page 33

33
EN DE FR IT
Bewegen Sie den Seitenruderstick nach links und rechts. Wir der Stick nach rechts gedrückt, sollte sich das
Seitenruder ebenfalls nach rechts bewegen.
Hinweis: Bei einem drei Kanal Flugzeug wie der Vapor wird das Seitenruder mit dem Stick gesteuert,
dass normalerweise bei einem 4 Kanal Flugzeug die Querruder steuert.
Wird der Stick nach links gedrückt,sollte sich das Seitenruder ebenfalls nach links bewegen.
Sollte bei diesem Test ein Ruder nicht in die beschriebene Richtungen laufen, ist es notwendig die Steuerfunktion am Sender umzudrehen (zu reversieren) Bitte folgen Sie hierzu den Anweisungen wie die Funktion
zu reversieren ist.
Sind alle Einstellungen vorgenommen, sollten die Kontrollen einwandfrei wie beschrieben laufen.
DigitaleTrimmungen
Ihr ParkZone 4 Kanal 2.4Ghz DSM2/DSMX Sender ist mit einer digitalen Trimmung ausgestettet. Nutzen
Sie diese zur Feineinstellung und zur Zentrierung der Ruderflächen. Sollte der Trimmweg nicht ausreichen
biegen Sie mit einer Spitzzange die Drahtschleife des Rudergestänges zusammen oder auseinander.
Reversieren (Umdrehen) der Steuerfunktion
Der Sender der mit Ihrer Night Vapor geliefert wird ist der gleiche Sender der mit der PKZ Ember2, Vapor
und den Ultra Micro RTF Flugzeugen geliefert wird. Von den Funktionen her identisch sind auch die Sender
die mit den E-flite mCX und mSR geliefert werden.
Hinweis:FürdieReversefunktionvonanderenSendernsehenSiebitteinderBedienungsanlei-
tungdesentsprechendenSendersnach.
Sollten die elektronischen Komponenten der Night Vapor in einem anderem Flugzeug Verwendung finden,
kann es notwendig sein die Ruderfunktionen zu reversieren:
Gehen Sie dazu bitte wie folgt vor:
1. Stellen Sie bitte sicher, dass der Sender ausgeschaltet und der Flugakku nicht angeschlossen ist.
2. Drücken Sie bitte die digitale Trimmung des Ruders welches Sie reversieren möchten
a. oberer Trimmbutton - Höhenruder normal
b. untere Trimmbutton - Höhenruder reversiert
c. linker Seitenrudertrimmbutton - Seitenruder normal
Page 34

34
ENDEFRIT
d. rechter Seitenrudertrimmbutton - Seitenruder reversiert
3. Halten Sie den gewünschten Trimmbutton gedrück und schalten den Sender ein
4. Halten Sie den Button für ca 5 Sekunden gedrückt bis einen Quittungston hören
5. Schließen Sie dem Flugakku an und testen die Steuerung, ob alle Kontrollen nun in die gewünschte
Richtung arbeiten.
Zentrieren der Ruderächen
Bitte stellen Sie nach einer Reparatur oder vor Ihrem Erstflug sicher, dass die Ruderflächen zentriert sind.
Um nicht an die mechanischen Grenzen der Servos zu kommen, empfiehlt es sich die Zentrierung manuell
durch zu führen.
1. Stellen Sie sicher, dass die Sendertrimmung und falls vorhanden die Sub Trimmung in der Mitte steht.
2. Überprüfen Sie ob Ruderflächen nicht in der Mitte stehen.
3. Sollte ein Ruder nicht zentriert sein, nutzen Sie bitte eine kleine Spitzzange um den Bügel zusammen
oder auseinander zu drücken
Dual Rate Funktion (RTF Version) und Schwerpunkt (CG)
Der 4 Kanal 2.4 Ghz DSM2/DSMX Sender ist mit einer Dual Rate Funktion ausgestattet. Um die kleinen
Ausschläge zu aktivieren, drücken Sie bitte den rechten Stick in das das Gehäuse. Die LED auf dem Sender
fängt an zu blinken und zeigt Ihnen damit die Umstellung an. Um auf die Einstellung mit den großen Ausschlägen zu wechseln drücken Sie erneut den Stick in das Gehäuse.
Hinweis:ParkZoneempehltIhnenfürdieerstenFlügedringenddieEinstellungderkleinen
Ruderausschläge.
DerSchwerpunkt(CG)
Die vordere Flügebefestigung sollte sich ca 28 - 30mm hinter dem Ende des Hauptträgers befinden und der
Akkuträger ca. 10 - 12mm hinter der vorderen Flügebefestigung. Die Night Vapor erlaubt Ihnen einen weiten
Einstellungsbereich des Schwerpunktes. Sie können das Höhenruder auch etwas nach oben trimmen um
die Flugzeugnase etwas zu heben. Dadurch fliegt das Flugzeug noch etwas langsamer.
Beschreibung des Empfängers, Motor-Funktions Test
Der Empfänger in Ihrer Night Vapor ist eine leichte Kombination eines Fahrtenreglers mit Servos und einem
Spektrum DSM2/DSMX kompatiblen Empfänger. Der Empfänger ist mit einer Status LED ausgestattet.
Vor jedem Flug ist immer erst der Sender und danach der Flugakku mit dem Empfänger zu verbinden. Stellen Sie sicher, dass Sie nach jedem Flug erst immer den Flugakku vom Empfänger trennen und danach erst
den Sender ausschalten.
Hinweis: Die einzige Gelegenheit den Flugakku vor dem Einschalten des Sender mit dem Empfän-
ger zu verbinden, ist dann wenn Sie den Empfänger mit dem Sender neu binden möchten.
Schauen Sie bitte dazu unter dem Kapitel -Binden von Sender und Empfänger- nach.
Page 35

35
EN DE FR IT
Die folgende Checkliste beinhaltet die Schritte, die Sie befolgen sollten, um einen einwandfreien Betrieb des
Empfängers sicher zu stellen.
• Der Gasstick muß in der Motor AUS / Leerlaufposition stehen, die Gastrimmung sollte ebenfalls in der
untersten möglichen Postion stehen, um der Empfangseinheit ein Scharfschalten zu ermöglichen.
Fliegen Sie das Modell zum ersten Mal oder nach einer Reparatur, zentrieren Sie bitte auch die Trimmungen von Höhen-, Seiten- und Querruder.
• Leuchtet die Status LED des Empfängers dauerhaft Rot, hat sich der Empfänger initalisiert und ist
fertig für den Flug. Die Initialisierung ist nur dann möglich, wenn der Gasstick und die Trimmung auf
Motor AUS / Leerlauf stehen. Bitte beachten Sie, dass nun der Motor sofort anfängt zu drehen wenn
Sie Gas geben.
Hinweis: Sollte die Status LED nicht dauerhaft Rot leuchten oder Sie haben keine Motorsteuerung oder
Verbindung von Sender zu Empfänger, beachten Sie bitte folgende Punkte zur Problemlösung:
• Die LED blinkt, wird dann dauernd Rot, Sie haben aber keine Kontrolle über die Motorfunktion. Sie
haben in diesem Fall eine positive Verbindung von Sender zu Empfänger, haben aber den Gaskanal
nicht in der untersten Motor AUS / Leerlaufposition oder die Trimmung nicht in einer Position unter
der Mitte gebracht. Bringen Sie den Gasstick und die Trimmung in die beschriebenen Positionen, Sie
sollten dann Kontrolle über den Motor haben. Fahren Sie in diesem Fall bitte mit dem nächsten Schritt
der Checkliste fort.
• Wenn die LED weiterhin blinkt, haben Sie keine Verbindung von Sender zu Empfänger. Bitte stellen Sie
sicher, dass der Sender eingeschaltet ist und die Senderkontrollleuchte leuchtet. Arbeitet der Sender
einwandfrei, verbinden Sie den Flugakku erneut mit dem Empfänger. Jetzt sollte sich der Empfänger
initialisieren und scharf schalten.
Hinweis: Sollten Sie unbeabsichtigt den Binden Modus aktiviert haben, wird die LED auf dem Empfän-
ger dauerhaft Rot blinken. Trennen Sie bitte in diesem Fall mit eingeschalteten und vorher
gebundenen Sender den Flugakku und verbinden ihn erneut. Sollte sich der Empfänger nach
Befolgen dieser Schritte nicht initialisieren, wenden Sie sich bitte an Ihren Fachhändler oder
den technischen Service.
Placieren Sie das Modell auf einer sicheren offenen Fläche frei von Hindernissen und Sie können vorsichtig
den Motor anlaufen lassen.
• Geben Sie langsam Gas bis der Propeller anfängt zu drehen. Fliegen Sie noch nicht und überprüfen
erst die Drehrichtung des Propellers. Wenn Sie von vorne auf den Motor schauen, dreht der Propeller
gegen den Uhrzeigersinn. Dreht der Motor in die andere Richtung, trennen Sie den Akku vom Regler
und drehen Sie den Stecker des Motoranschlusses.
Checkliste zum Fliegen
Schalten Sie immer den Sender zuerst ein.
Schließen Sie dann den Flugakku an.
Lassen Sie dem Empfänger etwas Zeit zum initialisieren und scharfschalten.
Fliegen Sie das Modell
Landen Sie das Modell
Trennen Sie den Flugakku vom Empfänger
Schalten Sie den Sender IMMER zuletzt aus
Page 36

36
ENDEFRIT
Austausch des Fahrwerkes
Um das Fahrwerk auszuwechseln gehen Sie bitte wie folgt vor:
1. Fassen Sie vorsichtig ein Fahrwerksbein an und ziehen es aus dem Halter.
Hinweis:Das Herausziehen des Fahrwerkdrahtes könnte bei dem ersten Wechsel etwas schwerer sein.
2. Drücken Sie das neue Fahrwerksbein in den Halter bis es einrastet.
Hinweis: Für langsameren Flug kann das Modell auch ohne Fahrwerk geflogen werden. Es empfiehlt
sich dann den Akkuhalter zum Einhalten des Schwerpunktes etwas nach vorne zu schieben.
Page 37

37
EN DE FR IT
Austausch des Seitenruders
Um das Seitenruder auszutauschen gehen Sie bitte wie folgt vor:
1. Entfernen Sie bitte vorsichtig das klare Stück Schlauch am unteren Ende des Ruders.
2. Stecken sie das Rudergestänge vorsichtig vom Ruderhorn ab.
3. Schieben Sie das Seitenruder aus der Halterung.
4. Verbinden Sie das Rudergestänge mit dem Ruderhorn und schieben das Seitenruder in die Halterung.
5. Schieben Sie den Schlauch unten wieder auf die Ruderachse
Hinweis: Üben Sie bitte bei dem Aufstecken des Schlauches keinen zu großen Druck aus.Dieses
könnte die Lagerung beschädigen und das Ruder könnte dann nicht mehr frei schwingen.
Page 38

38
ENDEFRIT
Austausch der Tragäche
Die LEDs sind dauerhaft mit der Tragfläche verbunden. Wenn Sie die Tragfläche austauschen tauschen Sie
die LEDs mit aus. Um die Tragfläche zu wechseln gehen Sie bitte wie folgt vor:
1. Trennen Sie bitte den LED Stecker vom Empfänger.
2. Entfernen Sie bitte die LED am Heck des Flugzeuges.
Hinweis: Die LED am Heck ist geklebt. Zum Entfernen muß die Klebung durch vorsichtiges Brechen
gelöst werden.
3. Lösen Sie bitte die vier Halteschrauben und nehmen die Tragfläche ab.
4. Schieben Sie bitte die neue Tragfläche in die Halterungen.
5. Kleben Sie die Heck LED an die Stelle wo Sie die alte LED gelöst haben und stecken den LED Stecker
wieder auf den Empfänger.
Hinweis: Nutzen Sie zum Kleben eine kleine Menge von Heißkleber oder gummibasierenden Kleber.
Andere Klebstoffe könnten die LED beschädigen.
Page 39

39
EN DE FR IT
Austausch des Propellers
1. Um den Propeller auszuwechseln benötigen Sie eine Zange oder Pinzette. Halten Sie damit die Propel-
lerwelle fest.
2. Drehen Sie den Propeller zum Lösen gegen den Uhrzeigersinn
3. Drehen Sie den neuen 140 x 45mm Propeller mit Spinner im Uhrzeigersinn auf die Welle.
Austausch der Propellerwelle
Im Fall einer Beschädigung kann es sinnvoll sein, die Propellerwelle zu wechseln. Gehen Sie dazu bitte wie
folgt vor:
1. Halten Sie mit einer kleinen Spitzzange oder Pinzette die Nylonmutter am Ende der Propellerwelle fest.
Page 40

40
ENDEFRIT
2. Drehen Sie mit gehaltener Nylon Schraube den Propeller im Uhrzeigersinn. Die Welle dreht sich aus
der Schraube.
3. Ziehen Sie vorsichtig die Welle aus der Halterung.
4. Drehen Sie den 140mm x 45mm Propeller und Spinner auf die neue Propellerwelle. Halten Sie dabei
die Welle am Zahnrad fest und drehen den Propeller im Uhrzeigersinn.
5. Schieben Sie den Propeller mit Welle in das Getriebe.
6. Halten Sie die Nylonmutter an das Gewinde und drehen die Propellerwelle gegen den Uhrzeigersinn.
Die Nylonmutter dreht sich so auf das Gewinde.
7. Stellen Sie sicher, dass die Mutter fest genug angezogen ist.
Page 41

41
EN DE FR IT
Ersatzteile
PKZ3001. . . . . . . . . . . . . . . . . . 3.7V 70mAh LiPo Akku
PKZ3240. . . . . . . . . . . . . . . . . . DC 3.7V LiPo Charger
PKZ3302. . . . . . . . . . . . . . . . . . Propeller mit Spinner (140mm x 45mm)
PKZ3307. . . . . . . . . . . . . . . . . . Vapor Spornrad
PKZ3316. . . . . . . . . . . . . . . . . . Vapor Antriebsmotor
PKZ3322. . . . . . . . . . . . . . . . . . Vapor Schubstangen
PKZ3327. . . . . . . . . . . . . . . . . . Vapor Getriebe ohne Motor
PKZ3328. . . . . . . . . . . . . . . . . . Vapor Luftschraubenwelle plus Getriebe (2)
PKZ3341. . . . . . . . . . . . . . . . . . Vapor 2.4GHz Sender
PKZU1106 ................FahrwerkSet: Night Vapor
PKZU1120 ................Tragfläche: Night Vapor
PKZU1124 ................Höhenleitwerk: Night Vapor
PKZU1125 ................Seitenruder: Night Vapor
PKZUA1152 ...............3-Ch Rx/ESC with LED port, DSM2/DSMX
PKZU1161 ................Rumpf mit Elektronik: Night Vapor
PKZU1170 ................Night Vapor Ersatzrumpf
PKZU1167 ................PKZU1167
SPM6835 .................Ersatzeinheit Servos
EFLH1067 .................Sicherung Servo
Optionale Teile
PKZ3052. . . . . . . . . . . . . . . . . . Parkzone Ladekabel Micro Lipo Akkus
EFLB1501S25 ..............150mAh 3.7V 12C LiPo Akku*
EFLC1004 .................4-Port 3.7V LiPo Ladegerät
EFLC1005 .................AC to 6V DC Adapter (United States)
EFLC1005AU. . . . . . . . . . . . . . . AC to 6V DC Adapter (Australia)
ELFC1005EU ...............AC to 6V DC Adapter (Europa)
EFLC1005UK. . . . . . . . . . . . . . . AC to 6V DC Adapter (United Kingdom)
SPM6825 .................Linear Servo Reverser
. . . . . . . . . . . . . . . . . . . . . . . . . Spektrum DX5e DSMX 5 Kanalsender ohne Empfänger
. . . . . . . . . . . . . . . . . . . . . . . . . DX6i DSMX 6-Kanal Sender
. . . . . . . . . . . . . . . . . . . . . . . . . Spektrum DX7s 7 Kanal Sender
. . . . . . . . . . . . . . . . . . . . . . . . . Spektrum DX8 nur Sender
*Hinweis: Für längere Flugzeiten nutzen Sie bitte Akkus mit mehr Kapazität wie die E-flite 150mAh
(EFLB1501S25) LiPo Akku.
Page 42

42
ENDEFRIT
Hilfestellung zur Fehlersuche und Behebung
Sollten Sie ein Problem haben , dass nicht durch diese Hilfestellung gelöst werden kann, ersehen Sie bitte
auf Seite 48 die Adresse des technischen Service.
Problem MöglicheLösung
Flugzeug nimmt kein Gas an, alle
anderen Funktionen arbeiten einwandfrei
Bringen Sie den Gasstick und die Trimmung in die unterste
mögliche Position
Reversieren Sie den Gaskanal
Propeller oder Motor Welle
gebrochen
Ersetzen Sie den Propeller und Spinner Art Nr. PKZ3302 und /
oder die Propellerwelle Art Nr. PKZ3328
Flugzeit verringert sich signifikant
Laden Sie den Flugakku vollständig
Ersetzen Sie die AA Batterien im Ladegerät und laden Sie die
Akkus erneut
Ersetzen Sie den Flugakku PKZ1034 und lesen Sie bitte die
Richtlinien zur Handhabung und Warnungen zum Umgang mit
LiPo Akkus
Status LED auf dem Ladegerät
leuchtet weiter. nachdem der Akku
getrennt worden ist oder benötigt
zum Laden länger als 40 Minuten
Ersetzen Sie die AA Batterien im Ladegerät
Flugzeug hat wenig Leistung
Schmieren Sie die Welle oder das Getriebe
Lassen Sie bei kalten Wetter vor dem Flug den Akku nicht
auskühlen
Nutzen Sie ein Akku mit mehr Kapazität
LED am Empfänger blinkt und das
Flugzeug kann nicht gesteuert
werden
Trennen Sie den Flugakku und verbinden ihn erneut
Binden Sie das Flugzeug mit dem gewünschten Sender
Stellen Sie den eingeschalteten Sender etwas vom Flugzeug
entfernt und verbinden den Flugakku erneut
Beleuchtungs LED´s leuchten nicht Ersetzen Sie die Tragfläche mit neuen LEDs
Flugzeug dreht oder steuert in eine
bestimte Richtung
Trimmen Sie das Flugzeug bis es nicht mehr in eine bestimmte
Richtung fliegt
Ruderfunktionen laufen falsch herum
nach der Bindung an einen anderen
Sender
Lesen Sie bitte den Abschnitt Funktionskontrolle
Flugzeug funktioniert nicht nach dem
Verbinden des Flugakku und riecht
verbrannt
Ersetzen Sie das PKZUA1152 Empfänger Board und vergewissern
Sie sich, dass die Polaritätsmarkierungen auf dem Akku und
Stecker in die gleiche Richtung zeigen
Page 43

43
EN DE FR IT
Warnung–Ein ferngesteuertes Modell ist kein Spielzeug.
Es kann, wenn es falsch eingesetzt wird, zu erheblichen
Verletzungen bei Lebewesen und Beschädigungen
an Sachgütern führen. Betreiben Sie Ihr RC-Modell
nur auf freien Plätzen und beachten Sie alle Hinweise
der Bedienungsanleitung des Modells wie auch der
Fernsteuerung.
Garantiezeitraum–Exklusive Garantie Horizon
Hobby LLC (Horizon) garantiert, dass dasgekaufte
Produkt frei von Material- und Montagefehlern ist. Der
Garantiezeitraum entspricht den gesetzlichen Bestimmung
des Landes, in dem das Produkt erworben wurde. In
Deutschland beträgt der Garantiezeitraum 6 Monate
und der Gewährleistungszeitraum 18 Monate nach dem
Garantiezeitraum.
EinschränkungenderGarantie–(a) Die Garantie wird
nur dem Erstkäufer (Käufer) gewährt und kann nicht übertragen werden. Der Anspruch des Käufers besteht in der
Reparatur oder dem Tausch im Rahmen dieser Garantie.
Die Garantie erstreckt sich ausschließlich auf Produkte, die
bei einem autorisierten Horizon Händler erworben wurden. Verkäufe an dritte werden von dieser Garantie nicht
gedeckt. Garantieansprüche werden nur angenommen,
wenn ein gültiger Kaufnachweis erbracht wird. Horizon
behält sich das Recht vor, diese Garantiebestimmungen
ohne Ankündigung zu ändern oder modifizieren und widerruft dann bestehende Garantiebestimmungen.
(b) Horizon übernimmt keine Garantie für die Verkaufbarkeit
des Produktes, die Fähigkeiten und die Fitness des
Verbrauchers für einen bestimmten Einsatzzweck des
Produktes. Der Käufer allein ist dafür verantwortlich, zu
prüfen, ob das Produkt seinen Fähigkeiten und dem vorgesehenen Einsatzzweck entspricht.
(c) Ansprüche des Käufers ¬ Es liegt ausschließlich im
Ermessen von Horizon, ob das Produkt, bei dem ein
Garantiefall festgestellt wurde, repariert oder ausgetauscht
wird. Dies sind die exklusiven Ansprüche des Käufers, wenn
ein Defekt festgestellt wird.
Horizon behält sich vor, alle eingesetzten Komponenten zu
prüfen, die in den Garantiefall einbezogen werden können.
Die Entscheidung zur Reparatur oder zum Austausch liegt
nur bei Horizon. Die Garantie schließt kosmetische Defekte
oder Defekte, hervorgerufen durch höhere Gewalt, falsche
Behandlung des Produktes, falscher Einsatz des Produktes,
kommerziellen Einsatz oder Modifikationen irgendwelcher
Art aus.
Die Garantie schließt Schäden, die durch falschen Einbau,
falsche Handhabung, Unfälle, Betrieb, Service oder
Reparaturversuche, die nicht von Horizon ausgeführt wurden aus.
Ausgeschlossen sind auch Fälle die bedingt durch (vii) eine
Nutzung sind, die gegen geltendes Recht, Gesetze oder
Regularien verstoßen haben.
Rücksendungen durch den Käufer direkt an Horizon oder
eine seiner Landesvertretung bedürfen der Schriftform.
Schadensbeschränkung–Horizon ist nicht für direkte
oder indirekte Folgeschäden, Einkommensausfälle oder
kommerzielle Verluste, die in irgendeinem Zusammenhang
mit dem Produkt stehen verantwortlich, unabhängig ab
ein Anspruch im Zusammenhang mit einem Vertrag,
der Garantie oder der Gewährleistung erhoben werden.
Horizon wird darüber hinaus keine Ansprüche aus einem
Garantiefall akzeptieren, die über den individuellen Wert
des Produktes hinaus gehen. Horizon hat keinen Einfluss
auf den Einbau, die Verwendung oder die Wartung des
Produktes oder etwaiger Produktkombinationen, die vom
Käufer gewählt werden. Horizon übernimmt keine Garantie
und akzeptiert keine Ansprüche für in der folge auftretende
Verletzungen oder Beschädigungen. Mit der Verwendung
und dem Einbau des Produktes akzeptiert der Käufer alle
aufgeführten Garantiebestimmungen ohne Einschränkungen
und Vorbehalte.
Wenn Sie als Käufer nicht bereit sind, diese Bestimmungen
im Zusammenhang mit der Benutzung des Produktes zu
akzeptieren, werden Sie gebeten, dass Produkt in unbenutztem Zustand in der Originalverpackung vollständig bei
dem Verkäufer zurückzugeben.
Sicherheitshinweise–Dieses ist ein hochwertiges
Hobby Produkt und kein Spielzeug. Es muss mit Vorsicht
und Umsicht eingesetzt werden und erfordert einige
mechanische wie auch mentale Fähigkeiten. Ein Versagen,
das Produkt sicher und umsichtig zu betreiben kann zu
Verletzungen von Lebewesen und Sachbeschädigungen
erheblichen Ausmaßes führen. Dieses Produkt ist nicht
für den Gebrauch durch Kinder ohne die Aufsicht eines
Erziehungsberechtigten vorgesehen. Die Anleitung enthält
Sicherheitshinweise und Vorschriften sowie Hinweise für die
Wartung und den Betrieb des Produktes. Es ist unabdingbar, diese Hinweise vor der ersten Inbetriebnahme zu lesen
und zu verstehen. Nur so kann der falsche Umgang verhindert und Unfälle mit Verletzungen und Beschädigungen
vermieden werden.
Fragen,HilfeundReparaturen–Ihr lokaler
Fachhändler und die Verkaufstelle können eine
Garantiebeurteilung ohne Rücksprache mit Horizon nicht
durchführen. Dies gilt auch für Garantiereparaturen. Deshalb
kontaktieren Sie in einem solchen Fall den Händler, der
sich mit Horizon kurz schließen wird, um eine sachgerechte
Entscheidung zu fällen, die Ihnen schnellst möglich hilft.
WartungundReparatur–Muss Ihr Produkt gewartet
oder repariert werden, wenden Sie sich entweder an Ihren
Fachhändler oder direkt an Horizon.
Rücksendungen / Reparaturen werden nur mit einer von
Horizon vergebenen RMA Nummer bearbeitet. Diese
Nummer erhalten Sie oder ihr Fachhändler vom technischen Service. Mehr Informationen dazu erhalten Sie im
Garantie und Service Informationen
Page 44

44
ENDEFRIT
Serviceportal unter www. Horizonhobby.de oder telefonisch
bei dem technischen Service von Horizon.
Packen Sie das Produkt sorgfältig ein. Beachten Sie,
dass der Originalkarton in der Regel nicht ausreicht, um
beim Versand nicht beschädigt zu werden. Verwenden
Sie einen Paketdienstleister mit einer Tracking Funktion
und Versicherung, da Horizon bis zur Annahme keine
Verantwortung für den Versand des Produktes übernimmt.
Bitte legen Sie dem Produkt einen Kaufbeleg bei, sowie
eine ausführliche Fehlerbeschreibung und eine Liste aller
eingesendeten Einzelkomponenten. Weiterhin benötigen
wir die vollständige Adresse, eine Telefonnummer für
Rückfragen, sowie eine Email Adresse.
Non-WarrantyService–Garantieanfragen werden nur
bearbeitet, wenn ein Originalkaufbeleg von einem autorisierten Fachhändler beiliegt, aus dem der Käufer und das
Kaufdatum hervorgeht. Sollte sich ein Garantiefall bestätigen
wird das Produkt repariert oder ersetzt. Diese Entscheidung
obliegt einzig Horizon Hobby.
KostenpichtigeReparaturen–Liegt eine kostenpflichtige Reparatur vor, erstellen wir einen Kostenvoranschlag,
den wir Ihrem Händler übermitteln. Die Reparatur wird
erst vorgenommen, wenn wir die Freigabe des Händlers
erhalten. Der Preis für die Reparatur ist bei Ihrem
Händler zu entrichten. Bei kostenpflichtigen Reparaturen
werden mindestens 30 Minuten Werkstattzeit und die
Rückversandkosten in Rechnung gestellt. Sollten wir nach
90 Tagen keine Einverständniserklärung zur Reparatur
vorliegen haben, behalten wir uns vor, das Produkt zu vernichten oder anderweitig zu verwerten.
ACHTUNG:KostenpichtigeReparaturen
nehmenwirnurfürElektronikundMotoren
vor.MechanischeReparaturen,besonders
beiHubschraubernundRC-Carssindextrem
aufwendigundmüssendeshalbvomKäufer
selbstvorgenommenwerden.
10/2015
EU-Konformitätserklärung
:
RTF PKZU1100 : Horizon LLC erklärt hiermit, dass dieses Produkt konform zu den essentiellen
Anforderungen der RED und EMC Direktive.
BNF PKZU1180 : Horizon LLC erklärt hiermit, dass dieses Produkt konform zu den essentiellen Anforderungen der
RED und EMC Direktive.
Eine Kopie der Konformitätserklärung ist online unter folgender Adresse verfügbar :
http://www.horizonhobby.com/content/support-render-compliance.
Land des Kaufs Horizon Hobby
Telefonnummer/
E-Mail-Adresse
Adresse
European Union
Horizon Technischer Service service@horizonhobby.eu
Hanskampring 9
D 22885 Barsbüttel, Germany
Sales: Horizon Hobby GmbH +49 (0) 4121 2655 100
EntsorgungvonElektro-undElektronik-AltgeräteninderEuropäischenUnion
Dieses Produkt darf nicht mit anderem Abfall entsorgt werden. Stattdessen obliegt es dem Benutzer, das
Altgerät an einer designierten Recycling- Sammelstelle für elektrische und elektronische Geräte abzugeben.
Die getrennte Sammlung und Wiederverwertung Ihres Altgeräts zum Zeitpunkt der Entsorgung hilft, Rohstoff
e zu sparen und sicherzustellen, dass bei seinem Recycling die menschliche Gesundheit und die Umwelt
geschützt werden. Weitere Informationen, wo Sie Ihr Altgerät zum Recycling abgeben können, erhalten Sie bei Ihrer
lokalen Kommunalverwaltung, Ihrem Haushaltsabfall Entsorgungsdienst oder bei der Verkaufsstelle Ihres Produkts.
Kontakt Informationen
Konformitätshinweise für die Europäische Union
Page 45

45
EN DE FR IT
REMARQUE
Toutes les instructions, garanties et autres documents de garantie sont sujets à la seule discrétion de
Horizon Hobby, LLC. Veuillez, pour une littérature produits bien à jour, visiter www.horizonhobby.com et
cliquer sur l’onglet de support de ce produit.
Signification de certains mots
Les termes suivants servent, dans toute la documentation des produits, à désigner différents niveaux de
blessures potentielles lors de l’utilisation de ce produit :
AVERTISSEMENT : Procédures qui, si elles ne sont pas correctement suivies, peuvent entraîner des
dégâts matériels, dommages collatéraux et des blessures graves éventuellement un décès OU créer un
risque élevé de blessure superficielle.
ATTENTION : Procédures qui, si elles ne sont pas correctement suivies, peuvent entraîner des dégâts
matériels ET éventuellement des blessures graves.
REMARQUE : Procédures qui, si elles ne sont pas correctement suivies, peuvent éventuellement
entraîner des dégâts matériels ET créent un très faible risque de blessure.
AVERTISSEMENT : Lisez la TOTALITE du manuel d’utilisation afin de vous familiariser avec les
caractéristiques du produit avant de le faire fonctionner. Une utilisation incorrecte du produit peut
avoir comme résultat un endommagement du produit lui-même, des dégâts matériels voire entraîner des
blessures graves.
Ceci est un produit de loisirs perfectionné. Il doit être manipulé avec prudence et bon sens et requiert
quelques aptitudes de base à la mécanique. L’incapacité à manipuler ce produit de manière sûre et
responsable peut provoquer des blessures ou des dommages au produit ou à d’autres biens. Ce produit
n’est pas destiné à être utilisé par des enfants sans la supervision directe d’un adulte. N’essayez pas
de modifier ou d’utiliser ce produit avec des composants incompatibles hors des instructions fournies
par Horizon Hobby, LLC. Ce manuel comporte des instructions de sécurité, de mise en œuvre et
d’entretien. Il est capital de lire et de respecter toutes les instructions et avertissements du manuel avant
l’assemblage, le réglage ou l’utilisation afin de le manipuler correctement et d’éviter les dommages ou
les blessures graves.
En tant qu’utilisateur de ce produit, il est de votre seule responsabilité de le faire fonctionner d’une manière qui
ne mette en danger ni votre personne, ni de tiers et qui ne provoque pas de dégâts au produit lui-même ou à la
propriété d’autrui.
• Gardez une bonne distance de sécurité tout autour de votre modèle, afin d’ éviter les collisions ou les blessures.
Ce modèle est contrôlé par un signal radio, qui peut être soumis à des interférences provenant de nombreuses
sources hors de votre contrôle. Une interférence peut provoquer une perte momentanée de contrôle.
• Faites toujours fonctionner votre modèle dans une zone dégagée, à l’écart de voitures, du trafic et des
personnes.
• Respectez toujours scrupuleusement les instructions et les mises en garde concernant ce produit et tous
les équipements optionnels/complémentaires (chargeurs, packs de batteries rechargeables, etc.) que vous
utilisez.
• Tenez tous les produits chimiques, les petites pièces et les composants électroniques, hors de portée des enfants.
• Évitez toujours d’exposer à l’eau tout équipement non spécifiquement conçu et protégé à cet effet.
L’humidité endommage les composants électroniques.
Précautions et avertissements liés à la sécurité
14
+
14 ans
et plus.
Ceci
n’est pas un jouet.
AVERTISSEMENT CONTRE LES PRODUITS CONTREFAITS : Si un jour
vous aviez besoin de remplacer un récepteur Spektrum trouvé dans un
produit Horizon Hobby, achetez-le uniquement chez Horizon Hobby, LLC ou chez
un revendeur officiel Horizon Hobby, vous serez sûr d’obtenir un produit Spektrum
authentique de haute qualité. Horizon Hobby, LLC décline tout service et garantie
concernant la compatibilité et les performances des produits contrefaits ou des
produits clamant la compatibilité avec Spektrum ou le DSM.
Page 46

46
ENDEFRIT
• Ne léchez ni ne mettez jamais en bouche quelque partie de votre modèle que ce soit - risque de blessures
graves voire de danger de mort.
• Ne faites jamais fonctionner votre modèle lorsque les batteries de l’émetteur sont faibles.
• Gardez toujours l’aéronef à vue et gardez-en toujours le contrôle.
• Utilisez toujours des batteries complètement chargées.
• Gardez toujours l’émetteur en marche lorsque l’aéronef est en marche.
• Enlevez toujours les batteries avant démontage.
• Veillez toujours à ce que les pièces en mouvement soient propres.
• Veillez toujours à ce que toutes les pièces soient sèches.
• Laissez toujours le temps aux pièces de refroidir avant de les toucher.
• Enlevez toujours les batteries après utilisation.
• Assurez-vous toujours que la sécurité (failsafe) est configurée correctement avant de voler.
• Ne faites jamais voler un aéronef dont le câblage est endommagé.
• N’entrez jamais en contact avec des pièces en mouvement.
Précautions et avertissements liés à la sécurité, suite
• NE LAISSEZ JAMAIS LA BATTERIE ET LE CHARGEUR SANS SURVEILLANCE DURANT
L’UTILISATION.
• NE CHARGEZ JAMAIS LES BATTERIES DURANT LA NUIT.
• En manipulant, en chargeant ou en utilisant la batterie Li-Po incluse, vous assumez tous les risques associés
aux batteries au lithium.
• Si la batterie commence à gonfler ou à se dilater, cessez immédiatement de l’utiliser. Si vous étiez en train
de la charger ou de la décharger, interrompez la procédure et déconnectez-la. Continuer à utiliser, charger ou
décharger une batterie qui gonfle ou se dilate peut provoquer un incendie.
• Pour obtenir les meilleurs résultats, entreposez toujours la batterie à température ambiante, dans un endroit sec.
• Lorsque vous transportez la batterie ou que vous la stockez temporaire-ment, la température doit toujours
être comprise entre 5 et 49 ºC. Ne stockez en aucun cas la batterie ou l’avion dans une voiture ou à un
endroit directement exposé à la lumière du soleil. Laissée dans une voiture chaude, la batterie peut se
détériorer ou même prendre feu.
• Chargez toujours les batteries à distance de tout matériau inflammable.
• Faites toujours l’inspection de la batterie avant la charge, et ne chargez jamais des batteries hors d’usage ou
endommagées.
• Déconnectez toujours la batterie après la charge, et laissez le chargeur se refroidir entre les charges.
• Surveillez toujours en continu la température du pack de batteries au cours de la charge.
• UTILISEZ EXCLUSIVEMENT UN CHARGEUR CONÇU SPÉCIFIQUEMENT POUR CHARGER DES BATTERIES LI-PO.
Le fait de charger la batterie avec un chargeur non compatible peut être à l’origine d’un incendie provoquant
des blessures corporelles et/ou des dégâts matériels.
• Ne déchargez jamais les cellules Li-Po en dessous de 3 V.
• Ne couvrez jamais les étiquettes d’avertissement avec des bandes auto-agrippantes.
• Ne laissez jamais sans surveillance des batteries en cours de charge.
• Ne chargez jamais les batteries sans respecter les niveaux recommandés.
• N’essayez jamais de démonter ou de modifier le chargeur.
• Ne laissez jamais des mineurs charger des packs de batteries.
• Ne chargez jamais les batteries dans des endroits extrêmement chauds ou froids (la plage de températures
recommandées se situe entre 5 et 49 °C) ou à la lumière directe du soleil.
ATTENTION : Les instructions et avertissements doivent scrupuleusement être suivis. Une
mauvaise manipulation de batteries Li-Po peut provoquer un incendie, des blessures corporelles et/
ou des dégâts matériels.
Avertissements de charge
Page 47

47
EN DE FR IT
Caractéristiques
Envergure .................37,5 cm (375mm)
Longueur .................38,7 cm (387mm)
Poids (avec batterie) .........16,4 g (0,6 oz)
Batterie ...................LiPo 70 mAh 3,7 V 14C
Chargeur ................. 1S 3,7 V DC pour batterie lithium polymère (inclus)
Emetteur .................. 3 voies avec technologie 2,4 GHz DSM2/DSMX Spektrum
Electronique embarquée ......Récepteur 3 voies/CEV avec prise pour DEL
Table des matières
Précautions et avertissements liés à la sécurité .......................................45–46
Avertissements de charge ........................................................... 46
Caractéristiques .................................................................. 47
Contenu du Night Vapor RTF .........................................................48
Contenu du Night Vapor BNF .........................................................48
Préparation au premier vol ..........................................................48
Charge de la batterie ..............................................................49
Installation de la batterie de vol dans l’avion ............................................. 50
Affectation (binding) de l’émetteur au récepteur ..........................................50
Instructions spécifiques d’affectation pour les émetteurs ...................................51
Informations complémentaires pour l’affectation ..........................................51
Contrôle de l’appairage de l’émetteur ..................................................52
Identification des DEL ..............................................................53
Test des commandes ..............................................................53
Inversion des commandes de vol .....................................................54
Centrage des commandes ..........................................................55
Fonction double débattement (RTF seul), et centre de gravité (CG) ............................55
Description de l’unité de réception, initialisation et contrôle de la commande moteur ..............56
Check-list de vol .................................................................. 57
Remplacer/enlever le train d’atterrissage ...............................................57
Remplacement de la dérive verticale ...................................................58
Remplacement de l’aile. . . . . . . . . . . . . . . . . . . . . . . . . . . . . . . . . . . . . . . . . . . . . . . . . . . . . . . . . . . . . 59
Remplacement de l’hélice ........................................................... 60
Remplacement de l’arbre d'hélice ..................................................... 60
Pièces de rechange. . . . . . . . . . . . . . . . . . . . . . . . . . . . . . . . . . . . . . . . . . . . . . . . . . . . . . . . . . . . . . . . 62
Pièces optionnelles ................................................................62
Guide de dépannage ............................................................... 63
Garantie et réparations .............................................................64
Informations de contact ............................................................65
Information IC .................................................................... 65
Informations de conformité pour l’Union Européenne ......................................65
Page 48

48
ENDEFRIT
Contenu du Night Vapor BNF
• Cellule Night Vapor
• 4 batteries AA
• Batterie LiPo 70 mAh 3,7 V 14C
• Chargeur de batterie LiPo 1S 3,7 V DC, charge 0,3 A
Un émetteur pour avions compatible DSM2/DSMX est nécessaire pour compléter votre Night Vapor.
Préparation au premier vol
Veuillez noter que cette check-list n’est pas destinée à remplacer le contenu de ce manuel. Bien qu’elle
puisse être utilisée comme guide de démarrage rapide, nous recommandons instamment de lire l’ensemble
du manuel avant d’aller plus avant.
Retirez le contenu de la boite et inspectez-le.
Installez 4 batteries AA dans le chargeur de batteries.
Installez 4 batteries AA dans l’émetteur inclus (RTF seul).
Commencez à charger la batterie de vol.
Affectez le récepteur à l’émetteur Spektrum ou JR DSM2/DSMX de votre choix (BNF uniquement).
Testez les commandes.
Familiarisez-vous avec les commandes.
Confirmez ou réglez la course des commandes.
Trouvez une zone adaptée au vol.
Contenu du Night Vapor RTF
• Cellule Night Vapor
• 8 batteries AA
• Batterie LiPo 70 mAh 3,7 V 14C
• Emetteur DSM2/DSMX 2,4 GHz
• Chargeur de batterie LiPo 1S 3,7 V DC, charge 0,3 A
Page 49

49
EN DE FR IT
Charge de la batterie
Consultez la section traitant des avertissements et
directives relatifs à la batterie et familiarisez-vous
complètement avec celle-ci avant de continuer.
Suivez ces étapes pour charger la batterie LiPo avec
le chargeur inclus.
1. Retirez le cache situé sur le bas du chargeur
et installez quatre des batteries AA fournies, en
respectant leur polarité. Remettez le cache en
place après avoir installé les batteries AA.
2. Faites glisser la batterie dans la fente du
chargeur. L’extrémité de la batterie est
spécifiquement conçue pour permettre à la
batterie de glisser facilement dans la fente
dans un sens (habituellement avec l’étiquette
vers l’avant) afin d’empêcher une inversion
de polarité. Vérifiez néanmoins l’exactitude
de l’alignement et de la polarité avant de
poursuivre.
3. Pressez doucement la batterie et son con-
necteur dans la prise de charge/connecteur
situé sur le bas de la fente du chargeur.
4. Lorsque la connexion se fait correctement,
la DEL sur le chargeur passe au rouge fixe,
indiquant que la charge a commencé.
5. La charge d’une batterie de 70 mAh complètement déchargée (sans l’être de manière
excessive) prend de 30 à 40 minutes environ.
Lorsque la charge est presque complète, la
DEL commence à clignoter. Lorsque la batterie
est complètement chargée, la DEL clignote
toutes les 20 secondes environ voire s’éteint
complètement.
A noter: La batterie LiPo fournie avec votre
Night Vapor est livrée partiellement
chargée. La charge initiale ne prend
donc que de 15 à 20 minutes.
A noter: Vous pourrez charger la batterie de
vol LiPo de 10 à 15 fois environ avant
de devoir remplacer les batteries
AA du chargeur. En remplaçant les
batteries fournies par des batteries alcalines, vous augmenterez le nombre
de cycles de charge.
A noter: Si la DEL reste allumée pendant plus
de 40 minutes lors de la charge et/ou
5 secondes après que vous ayez retiré
la batterie de vol LiPo, remplacez les
batteries AA du chargeur.
ATTENTION: utilisez exclusivement un
chargeur conçu spécifiquement pour
charger une batterie LiPo. Ne pas
respecter cette injonction peut provoquer
un incendie, des blessures corporelles ou
des dégâts matériels.
ATTENTION: Ne jamais dépasser
l’intensité de charge recommandée.
Page 50

50
ENDEFRIT
Installation de la batterie de vol dans l’avion
Une fois la batterie LiPo complètement chargée, vous pouvez l’installer dans l’avion. Cette opération
s’effectue en la plaçant dans le réceptacle de batterie situé sur le bas du fuselage. Assurez-vous que la
prise soit orientée vers l’arrière de l’avion.
A noter: Le réceptacle de batterie peut glisser vers l’avant ou l’arrière pour permettre un ajustement
du centre de gravité.
A noter: Déconnectez toujours la batterie LiPo du récepteur lorsque l’avion ne doit pas voler. Ne
pas le faire rendra la batterie inutilisable.
Aectation (binding) de l’émetteur au récepteur
Lorsque vous le recevez, votre Night Vapor RTF est, déjà affecté à l’émetteur DSM2/DSMX inclus. Si vous
deviez avoir à réaffecter votre avion, faites-le en suivant les instructions ci-après.
Préparation de l’avion pour l’affectation
1. Assurez-vous que la batterie de vol est déconnectée du module de réception et que l’émetteur est
éteint.
2. Raccordez la batterie de vol à l’avion. Lorsque la DEL sur le récepteur se met à clignoter rapidement,
passez immédiatement aux instructions concernant votre émetteur ci-après.
A noter: Bien que l’émetteur accompagnant votre Night Vapor puisse travailler avec 4 voies, l’avion
lui-même ne travaille qu’avec 3 voies, commande des gaz proportionnelle, commande de la
gouverne de profondeur et commande de la direction. C’est pour cette raison que la commande de direction est assurée par la manette droite.
Page 51

51
EN DE FR IT
Instructions spéciques d’aectation pour les émetteurs
Emetteur MLP4DSM
1. Lorsque vous constatez le clignotement rapide de la DEL sur le récepteur, appuyez sur la manette
gauche de l’émetteur en poussant vers l’intérieur du coffret (NE PAS enfoncer la manette des gaz)
jusqu’à l’entendre cliquer.
2. Tout en maintenant la manette enfoncée, allumez l’émetteur, relâchez la manette une fois l’émetteur en
route. L’émetteur va produire un bip et la DEL présente sur le dessus de l’émetteur se mettra à clignoter.
3. Une fois que l’émetteur cesse de produire des bips il lui faudra une seconde ou deux pour se connecter à l’avion.
A noter: Il peut, à certains moments, être difficile de voir la DEL (signalant ainsi que vous êtes en
mode d'affectation) clignoter; pour cette raison, comptez lentement jusqu’à cinq une fois
que vous avez branché la batterie et l’avion devrait entrer dans le mode d’affectation à ce
moment-là.
L’affectation est le processus qui programme le récepteur pour qu’il reconnaisse le code (appelé GUID Globally Unique Identifi er) d’un émetteur spécifi que. Vous devez « affecter » l’émetteur Spektrum pour
avions à technologie DSM2/DSMX de votre choix au récepteur afi n d’assurer un fonctionnement correct.
N’importe quel émetteur JR® ou Spektrum DSM2/DSMX peut être affecté au récepteur AS3X™ DSM2/
DSMX. Rendez-vous sur le site www.bindnfly.com pour la liste complète des émetteurs compatibles.
REMARQUE : si vous utilisez un émetteur Futaba® avec un module Spektrum DSM, il est recommandé
d’inverser la voie des gaz.
Informations complémentaires pour l’aectation
Avant chaque vol, allumez votre émetteur et attendez environ cinq secondes avant de brancher la batterie
de vol sur le récepteur. Cela laisse à l’émetteur le temps de scanner et de s’assurer que deux fréquences
sont libres. Si vous branchez la batterie de vol trop rapidement et que vous ratez la liaison, le récepteur peut
se mettre, par erreur, en mode d’affectation. Si cela arrive, laissez l’émetteur allumé puis déconnectez et
reconnectez la batterie de vol.
Page 52

52
ENDEFRIT
Contrôle de l’appairage de l’émetteur
A noter: Avant chaque vol, allumez TOUJOURS l'émetteur en premier avant de connecter la batterie au
récepteur. Après chaque vol, déconnectez toujours en premier la batterie de vol du module de
réception avant d’éteindre l'émetteur.
Mode 1
Fonction profondeur
Fonctions
gouverne de
direction/gaz
Trim de profondeur
Trim des gaz
Trim de gouvernail
Mode 2
Fonction gaz
Fonctions
gouverne de
direction/
profondeur
Trim des gaz
Trim de profondeur
Trim de gouvernail
Page 53

53
EN DE FR IT
Identication des DEL
Le Night Vapor est doté de six points lumineux à DEL. Vous en trouverez ci-dessous une description.
• 3 feux à DEL sont intégrés au bord d'attaque de l’aile. Ces points lumineux de couleur blanche restent
allumés en permanence.
• 2 feux à DEL sont intégrés au bord de fuite de l’aile. Le feu à DEL présent sur le bord droit de l’aile
(avion vu de face) clignote en rouge, celui se trouvant sur la gauche (avion toujours vu de face)
clignote en vert.
• Le dernier feu à DEL est monté tout près de la queue de l’avion. Ce dernier clignote en bleu.
Test des commandes
Vous devez tester les commandes avant le premier vol afin de vous assurer que les servos, les liaisons
et les pièces n’ont pas été endommagés pendant le transport et la manipulation, et que les commandes
fonctionnent dans le bon sens.
Allumez d’abord l’émetteur et ramenez à fond vers l’arrière la manette et le trim des gaz. Branchez ensuite
la batterie sur son raccordement au niveau du module de réception.
A noter: Les connecteurs de branchement de batterie ont une forme spécifique, destinée à éviter
une connexion avec inversion de polarité. Néanmoins et si vous les forcez dans le mauvais
sens et avec la mauvaise polarité, vous risquez d'endommager la batterie et/ou le module de
réception.
Déplacez le manche de profondeur de l’émetteur d’arrière en avant pour vérifier la commande de profondeur. La gouverne doit se déplacer vers le bas lorsque la manette est poussée vers l’avant.
Elle doit se déplacer vers le haut lorsque la manette est tirée vers l’arrière.
Page 54

54
ENDEFRIT
Déplacez la manette de la gouverne de direction de gauche à droite pour vérifier la commande de lacet. La
gouverne doit se déplacer vers la droite lorsque la manette est poussée vers la droite.
A noter: Sur un avion 3 voies comme l’est le Vapor, la gouverne de direction est commandée par la
manette utilisée normalement pour les ailerons dans le cas d’un aéronef 4 voies.
La gouverne de direction doit se déplacer vers la gauche lorsque la manette de direction est poussée vers la
gauche.
Si, à quelque moment du test que ce soit, les commandes répondent dans la direction opposée au fonctionnement
des commandes, suivez les instructions propres à votre émetteur pour inverser les commandes de vol.
Toutes les commandes devraient fonctionner normalement une fois que vous aurez confirmé leur direction. Néanmoins, et si vous continuez à avoir des problèmes de réponse des commandes aux ordres de
l’émetteur, ne faites pas voler votre Night Vapor.
Trims numériques
L’émetteur DSM2/DSMX 2,4 GHz 4 voies ParkZone est doté de fonctions de trims (compensateurs) numériques positionnés à proximité des manettes de commande afin de peaufiner les réglages. Utilisez les trims
pour centrer les gouvernes. Si le débattement du trim électronique est insuffisant, ajustez mécaniquement
les boucles des tringles de commande afin de centrer les surfaces.
Inversion des commandes de vol
L’émetteur inclus dans le Night Vapor est le même émetteur que celui inclus dans les versions PKZ Ember
2, Vapor, et Ultra Micro RTF. Il a également un fonctionnement identique à celui de l'émetteur inclus avec les
E-flite mCX et mSR (MLP4DSM).
A noter: Pour procéder à une inversion avec d'autres émetteurs, veuillez vous référer au manuel
d’utilisation de l'émetteur.
En cas d’utilisation des composants électroniques du Night Vapor sur un autre aéronef, il se peut qu’il vous
faille inverser le fonctionnement de surfaces de commande.
L’inversion du fonctionnement des gouvernes de direction et de profondeur pourra être réalisée en suivant
les étapes décrites ci-après.
Page 55

55
EN DE FR IT
1. Assurez-vous que la batterie de vol est déconnectée de l’aéronef et que l’émetteur est éteint.
2. Enfoncez le bouton de trim numérique correspondant à la surface dont vous souhaitez changer la
direction.
a. Bouton de trim de profondeur haut — profondeur normale
b. Bouton de trim de profondeur bas — profondeur inversée
c. Bouton de trim de direction gauche — direction normale
c. Bouton de trim de direction droit — direction inversé
3. Maintenez le bouton de trim numérique approprié enfoncé et mettez l’émetteur en fonction.
4. Maintenez les boutons de trim numériques enfoncés pendant cinq secondes environ, jusqu’à entendre
des sons qui confirment la sélection.
5. Connectez la batterie de vol et terminez le test des commandes de vol pour confirmer que toutes les
commandes fonctionnent dans la bonne direction.
Centrage des commandes
En cas d’accident ou avant vos premiers vols, contrôlez le centrage (neutre) des surfaces de commandes de vol. Il
vaut mieux réaliser cette opération mécaniquement en raison des limites mécaniques des servos linéaires.
1. Assurez-vous que les trims de l’émetteur sont centrés et que les sub-trims (si tant est que votre
émetteur en soit doté) sont réglés sur 0.
2. Vérifiez que toutes les gouvernes de vol sont centrées (=au neutre).
3. En cas de gouverne non centrée, utilisez une pince et rallongez ou raccourcissez la tringle avec précaution en pliant le U.
Fonction double débattement (RTF seul), et centre de gravité (CG)
L’émetteur 4 voies 2,4 GHz DSM2/DSMX inclus avec le Night Vapor est doté d’une capacité de double
débattement (dual rate). Le paramétrage par défaut est débattements «grands». Pour accéder à la fonction
débattement «petits», APPUYEZ sur la manette droite. La DEL présente sur le dessus de l’émetteur se mettra
à clignoter, vous alertant que l’émetteur se trouve en mode débattement «petits». Pour revenir au mode
débattement «grands», appuyez une nouvelle fois sur la manette droite.
A noter: ParkZone recommande FORTEMENT d’utiliser le mode DEBATTEMENT «PETITS» lors de
l’exécution des premiers vols de votre Night Vapor.
Centre de gravité
Pour les premiers vols, le support avant de l’aile du Night Vapor devrait être disposé entre 28 et 30 mm en
recul par rapport à l’avant du fuselage, l’avant du réceptacle batterie devant se trouver entre 10 et 12 mm
approximativement du support d’aile avant. Le Night Vapor se laisse piloter sur une large plage de positions
du CG (centre de gravité) ce qui vous permettra de modifier les caractéristiques de vol de l’aéronef. Rien
ne vous interdit d’expérimenter et donc d’ajouter un peu de « trim » à la profondeur de manière à relever
légèrement le nez de l’avion en vol. Cela permet à l’avion de voler plus lentement encore.
Page 56

56
ENDEFRIT
Description de l’unité de réception, initialisation
et contrôle de la commande moteur
Le récepteur, très léger, installé dans votre Night Vapor est une combinaison de contrôleur électronique de
vitesse (CEV) du moteur principal, de servos et d’un récepteur Spektrum compatible DSM2/DSMX. L’unité de
réception est également équipée d’une DEL d’indication d’état.
Avant chaque vol, allumez TOUJOURS l’émetteur en premier avant de connecter la batterie au récepteur. Ne
connectez jamais la batterie de vol au récepteur avant d’allumer l’émetteur. Après chaque vol, déconnectez
toujours en premier la batterie de vol de l’unité de réception avant d’éteindre l’émetteur.
A noter: La seule fois où vous aurez à connecter la batterie de vol au module de réception avant
d’allumer l’émetteur est celle de l’affectation du récepteur à l’émetteur (bind). Pour plus
d’informations, reportez-vous à la section Affectation de l’émetteur et du récepteur du
présent manuel.
La check-list ci-après contient les étapes à respecter pour assurer une initialisation et un fonctionnement
corrects de l’unité de récepteur ainsi qu’une réponse correcte du moteur.
• La manette des gaz DOIT être mise sur la position la plus basse possible et, pour la plupart des
émetteurs, le trim des gaz doit aussi être mis sur cette position afin d’initialiser le module de réception. S’il s’agit du premier vol d’essai ou d’un essai après réparations, vous devriez également centrer
les trims de direction, de profondeur et d’ailerons.
• Lorsque la DEL du récepteur passe au bleu fixe, le module de réception est initialisé et prêt au vol. De
plus, et si vous aviez la manette des gaz en position basse et le trim des gaz dans la position la plus
basse possible pendant l’initialisation, le CEV (ESC)/ moteur sont maintenant initialisés. Faire attention:
l’hélice peut maintenant tourner à la moindre sollicitation du manche des gaz.
• A noter: Si la DEL d’état du récepteur ne passe pas au bleu fixe, revoyez les points suivants.
• Si la DEL d’état passe au bleu fixe après avoir clignoté mais que vous n’avez pas le contrôle du
moteur, la liaison radio RF entre l’émetteur et le récepteur est bonne mais la manette des gaz et le trim
des gaz ne sont sûrement pas dans la bonne position. Vérifiez que la manette des gaz est dans la position la plus basse possible et que le trim des gaz est en position médiane ou en dessous. Si vous avez
maintenant le contrôle du moteur, passez à l’étape suivante de la check-list.
• Si la DEL d’état bleue continue de clignoter, vous ne disposez pas d’une bonne liaison radio RF entre
l’émetteur et le récepteur. Assurez-vous que l’émetteur a été allumé. Si l’émetteur est allumé et fonctionne correctement, déconnectez la batterie de vol de l’unité de réception avant de la reconnecter. Le
module de réception devrait à présent s’initialiser et s’armer correctement.
A noter: Si vous entrez en mode Affectation par erreur, la DEL du récepteur ne cessera de clignoter
en rouge. Dans ce cas, débrancher et rebrancher la batterie de vol, l’émetteur étant resté
allumé (dans les cas où l’affectation était bonne auparavant). Si votre récepteur ne s’initialise
et ne s’arme pas après avoir suivi les directives ci-dessus, réaffectez le récepteur (procédure
complète).
Une fois l’avion placé dans une zone sûre, exempt d’obstacles et que vous êtes à bonne distance de l’hélice,
vous pouvez mettre le moteur en route et augmenter la puissance progressivement.
• Pousser la manette des gaz lentement vers le haut jusqu’à ce que l’hélice se mette à tourner.
N’ESSAYEZ PAS de faire voler l’avion à ce moment-là. Notez le sens de rotation de l’hélice. L’avion vu
de face, l’hélice doit tourner dans le sens antihoraire. Si elle tourne en sens inverse, déconnectez la
batterie et inversez la polarité des raccordements d’alimentation du moteur.
Page 57

57
EN DE FR IT
Check-list de vol
Allumez toujours l’émetteur en premier.
Branchez la batterie de vol sur le récepteur.
Laissez le récepteur s’initialiser et s’armer correctement.
Faites voler le modèle.
Faites-le atterrir.
Débranchez la batterie de vol du récepteur.
Eteignez toujours l’émetteur en dernier.
Remplacer/enlever le train d’atterrissage
Pour enlever le train d’atterrissage, procédez aux étapes suivantes:
1. Agrippez doucement la base du train d’atterrissage et extrayez-la de ses points d’ancrage.
A noter: Il se peut qu’enlever le train d’atterrissage la première fois demande un certain effort.
2. Placez les pattes du nouveau train d’atterrissage dans les colonnes de montage et appuyez jusqu’à ce
qu'elles s’y cliquent en place.
A noter: On pourra, pour pouvoir voler plus lentement, faire voler l’avion sans train d’atterrissage. Il
est recommandé de faire glisser la batterie vers l’avant afin de compenser le poids du train
d’atterrissage.
Page 58

58
ENDEFRIT
Remplacement de la dérive verticale
Pour remplacer la dérive verticale de votre Night Vapor, procédez aux étapes suivantes:
1. Enlevez avec précaution le tube de fixation (par pression) transparent se trouvant en dessous de l’aéronef.
2. Déconnectez avec précaution la tige du bras de commande.
3. Faites glisser la dérive verticale hors de la colonne de montage.
4. Reconnectez la tige à la nouvelle dérive verticale et glissez la dérive verticale dans le logement.
5. Faites glisser le petit tube de pression transparent pour le remettre en place.
A noter: Veillez, lors de la remise en place du tube de fixation, à ne pas le coincer contre la colonne.
Cela empêcherait la dérive verticale d’avoir toute sa liberté de débattement.
Page 59

59
EN DE FR IT
Remplacement de l’aile
Toutes les DEL que comporte l’aile y sont fixées une fois pour toutes. La nouvelle aile comportera un nouvel
ensemble de DEL. Pour remplacer l’aile, procédez aux étapes suivantes:
1. Débranchez le câble principal des DEL de la platine du récepteur.
2. Enlevez la DEL fixée à la queue de l’aéronef.
A noter: La DEL est collée au fuselage par un point de colle ce qui implique qu’il faudra rompre, avec
d’infimes précautions, le dit point de colle.
3. Desserrez les quatre vis présentes sur les colonnes de fixation de l’aile et retirez l’aile tout doucement.
4. Faites glisser la nouvelle aile en place et fixez-la aux colonnes de montage.
5. Installez la DEL devant être positionnée près de la queue et maintenez-la en place à l’aide d’un point
de colle. Ensuite, reconnectez le câble principal des DEL à la platine du récepteur.
A noter: N’utiliser que le minimum de colle chaude ou de colle caoutchouc pour fixer la DEL au fuse-
lage. D’autres types d’adhésif pourraient endommager la DEL.
Page 60

60
ENDEFRIT
Remplacement de l’hélice
L’hélice est vissée sur l’arbre du réducteur.
1. Pour enlever l’hélice, utilisez une pince à bec fin ou hémostatique pour maintenir l’arbre d’hélice.
2. Faites tourner l’hélice dans le sens antihoraire pour l’enlever.
3. Vissez la nouvelle hélice 140 mm x 45 mm et son cône dans le sens horaire sur l’arbre du réducteur.
Remplacement de l’arbre d’hélice
Vous serez peut-être amené à remplacer l’arbre d’hélice (dans le réducteur) en cas de dégâts.
Pour remplacer l’arbre d’hélice:
1. Saisissez doucement l’écrou en nylon blanc situé à l’arrière de l’arbre d’hélice avec une pince à bec
fin ou une pince hémostatique.
Page 61

61
EN DE FR IT
2. Tout en maintenant l’écrou en nylon, faites tourner la couronne dans le sens horaire. L’arbre d’hélice
s’extraira de l’écrou.
3. Tirer doucement sur la couronne et l’arbre d’hélice sortira du réducteur.
4. Vissez l’hélice 140 mm x 45 mm et son cône sur le nouvel arbre d’hélice en maintenant la couronne et
en tournant l’hélice dans le sens horaire.
5. Introduisez le nouvel arbre d’hélice dans le réducteur.
6. Replacez l’écrou en nylon à l’arrière de l’arbre d’hélice. Faites tourner l’hélice et la couronne dans le
sens antihoraire. L’écrou en nylon se vissera sur l’arbre d’hélice.
7. Tout en maintenant en place l’écrou en nylon, faites tourner doucement la couronne en sens antihoraire pour vous assurer que l’écrou est bien serré.
Page 62

62
ENDEFRIT
Pièces de rechange
PKZ3001. . . . . . . . . . . . . . . . . . Batterie LiPo 3,7 V 70 mAh
PKZ3240. . . . . . . . . . . . . . . . . . Chargeur LiPo courant continu 3,7 V
PKZ3302. . . . . . . . . . . . . . . . . . Hélice avec cône (140 mm x 45 mm)
PKZ3307. . . . . . . . . . . . . . . . . . Patin de queue: Vapor/Night Vapor
PKZ3316. . . . . . . . . . . . . . . . . . Moteur principal: Vapor/Night Vapor
PKZ3322. . . . . . . . . . . . . . . . . . Jeu de tiges: Vapor/Night Vapor
PKZ3327. . . . . . . . . . . . . . . . . . Réducteur sans moteur: Vapor/Night Vapor
PKZ3328. . . . . . . . . . . . . . . . . . Arbre d’hélice avec réducteur (2): Vapor/Night Vapor
PKZ3341. . . . . . . . . . . . . . . . . . Emetteur 2,4 GHz avec Spektrum DSM2/DSMX
PKZU1106 ................Jeu de train d’atterrissage principal: Night Vapor
PKZU1120 ................Aile principale avec feux: Night Vapor
PKZU1124 ................Plan stabilisateur horizontal: Night Vapor
PKZU1125 ................Gouverne de direction: Night Vapor
PKZUA1152 ...............Récepteur 3 voies /CEV avec port de DEL, DSM2/DSMX
PKZU1161 ................Fuselage avec composants électroniques: Night Vapor
PKZU1170 ................Fuselage de rechange Night Vapor
PKZU1167 ................Fuselage nu: Night Vapor
SPM6835 .................Pièces de rechange mécaniques servo
EFLH1067 .................Jeu de bagues de maintien servo de rechange
Pièces optionnelles
PKZ3052. . . . . . . . . . . . . . . . . . Connecteur de batterie avec câble
EFLB1501S25 ..............Batterie LiPo 150 mAh 3,7 V 12C*
EFLC1004 .................Chargeur LiPo 4 ports 3,7 V
EFLC1005 .................Adaptateur 6 V courant alternatif vers courant continu (Etats-Unis)
EFLC1005AU. . . . . . . . . . . . . . . Adaptateur 6 V courant alternatif vers courant continu (Australie)
ELFC1005EU ...............Adaptateur 6 V courant alternatif vers courant continu (Europe)
EFLC1005UK. . . . . . . . . . . . . . . Adaptateur 6 V courant alternatif vers courant continu (Royaume-Uni)
SPM6825 .................Inverseur de servo linéaire
. . . . . . . . . . . . . . . . . . . . . . . . . Emetteur DX5e DSMX 5 voies
. . . . . . . . . . . . . . . . . . . . . . . . . Emetteur DX6i DSMX 6 voies
. . . . . . . . . . . . . . . . . . . . . . . . . Emetteur DX7s DSMX 7 voies
. . . . . . . . . . . . . . . . . . . . . . . . . Emetteur DX8 DSMX 8 voies
*A noter: Pour obtenir des durées de vol plus longues, vous pouvez utiliser une batterie de qualité de
capacité plus importante comme les batterie LiPo E-flite 150 mAh (EFLB1501S).
Page 63

63
EN DE FR IT
Guide de dépannage
Si vous avez un problème quelconque avec le réglage ou la programmation qui ne puisse être résolu
avec le guide de dépannage, reportez-vous à la page 72 et appelez le bureau d’assistance produit Horizon
approprié.
Problème Solutions possibles
L’avion ne « prend pas les gaz »,
mais toutes les autres commandes
semblent fonctionner
Abaissez la manette et/ou le trim des gaz au minimum
Inversez la voie des gaz sur l’émetteur utilisé (si disponible)
L’hélice ou l’arbre de moteur sont
cassés
Remplacez-les par une hélice avec cône (PKZ3302) ou un arbre
d’hélice (PKZ3328)
La durée de vol de l’avion diminue
de manière significative
Rechargez complètement la batterie de vol
Remplacez les batteries AA du chargeur ou utilisez un adaptateur
alternatif vers courant continu 6V et rechargez complètement la
batterie de vol
Remplacez la batterie PKZ3001 et voyez la section du manuel
concernant les «avertissements et directives relatifs à la batterie»
Le voyant du chargeur reste allumé,
après la déconnection de la batterie
LiPo ou pendant plus de 40 minutes
au cours de la charge
Remplacez les batteries AA du chargeur
L’avion semble avoir moins de
puissance
Lubrifiez les bagues du réducteur
Lubrifiez les bagues du moteur
Par temps froid, assurez-vous, avant le vol, que les batteries de
vol sont chaudes (15°C)
Utilisez une batterie de plus grande capacité (sauf si elle ne
convient pas sans modification)
La DEL de l’aéronef continue à
clignoter et ne peut être contrôlée
par l’émetteur
Débranchez et reconnectez la batterie de vol
Eloignez l’émetteur (allumé) à quelques pas de l’avion avant de
reconnecter la batterie de vol
Eloignez l’émetteur et l’avion de gros objets en métal lors de
l’affectation/liaison
Réaffectez l’avion à l’émetteur compatible souhaité
Les DEL de l'aéronef ne s'allume pas
Remplacez par une aile principale avec feux lumineux
(PKZU1120)
L’avion s’incline, tourne ou tangue
dans une direction donnée
Réglez les gouvernes à l’aide de l’émetteur jusqu’à ce que
l’avion ne se déplace plus dans cette direction
Les commandes sont inversées après
l’affectation à un autre émetteur
Lisez la section « Test des commandes » du manuel
L’avion ne fonctionne pas après avoir
connecté la batterie de vol et sent
le brûlé
Remplacez le module de réception PKZUA1152 et vérifiez que les
polarités sont correctes lors de la connexion de la batterie de vol
Page 64

64
ENDEFRIT
Durée de la garantie – Garantie exclusive - Horizon
Hobby, LLC (Horizon) garantit que le Produit acheté (le «
Produit ») sera exempt de défauts matériels et de fabrication à sa date d’achat par l’Acheteur. La durée de garantie
correspond aux dispositions légales du pays dans lequel le
produit a été acquis. La durée de garantie est de 6 mois et
la durée d’obligation de garantie de 18 mois à l’expiration
de la période de garantie.
Limitations de la garantie – (a) La garantie est donnée
à l’acheteur initial (« Acheteur ») et n’est pas transférable.
Le recours de l’acheteur consiste en la réparation ou en
l‘échange dans le cadre de cette garantie. La garantie
s’applique uniquement aux produits achetés chez un revendeur Horizon agréé. Les ventes faites à des tiers ne sont pas
couvertes par cette garantie. Les revendications en garantie
seront acceptées sur fourniture d’une preuve d’achat valide
uniquement. Horizon se réserve le droit de modifier les
dispositions de la présente garantie sans avis préalable et
révoque alors les dispositions de garantie existantes.
(b) Horizon n’endosse aucune garantie quant à la vendabilité
du produit ou aux capacités et à la forme physique de
l’utilisateur pour une utilisation donnée du produit. Il est
de la seule responsabilité de l’acheteur de vérifier si
le produit correspond à ses capacités et à l’utilisation
prévue.
(c) Recours de l’acheteur – Il est de la seule discrétion
d‘Horizon de déterminer si un produit présentant un
cas de garantie sera réparé ou échangé. Ce sont là
les recours exclusifs de l’acheteur lorsqu’un défaut est
constaté.
Horizon se réserve la possibilité de vérifier tous les éléments utilisés et susceptibles d’être intégrés dans le cas de
garantie. La décision de réparer ou de remplacer le produit
est du seul ressort d’Horizon. La garantie exclut les défauts
esthétiques ou les défauts provoqués par des cas de force
majeure, une manipulation incorrecte du produit, une utilisation incorrecte ou commerciale de ce dernier ou encore des
modifications de quelque nature qu’elles soient.
La garantie ne couvre pas les dégâts résultant d’un montage ou d’une manipulation erronés, d’accidents ou encore
du fonctionnement ainsi que des tentatives d’entretien ou de
réparation non effectuées par Horizon. Les retours effectués
par le fait de l’acheteur directement à Horizon ou à l’une de
ses représentations nationales requièrent une confirmation
écrite.
Limitation des dommages – Horizon ne saurait être
tenu pour responsable de dommages conséquents directs
ou indirects, de pertes de revenus ou de pertes commerciales, liés de quelque manière que ce soit au produit et ce,
indépendamment du fait qu’un recours puisse être formulé
en relation avec un contrat, la garantie ou l’obligation de
garantie. Par ailleurs, Horizon n’acceptera pas de recours
issus d’un cas de garantie lorsque ces recours dépassent la
valeur unitaire du produit. Horizon n’exerce aucune influence
sur le montage, l’utilisation ou la maintenance du produit
ou sur d’éventuelles combinaisons de produits choisies par
l’acheteur. Horizon ne prend en compte aucune garantie et
n‘accepte aucun recours pour les blessures ou les dommages pouvant en résulter. Horizon Hobby ne saurait être
tenu responsable d’une utilisation ne respectant pas les lois,
les règles ou règlementations en vigueur.
En utilisant et en montant le produit, l’acheteur accepte sans
restriction ni réserve toutes les dispositions relatives à la
garantie figurant dans le présent document. Si vous n’êtes
pas prêt, en tant qu’acheteur, à accepter ces dispositions en
relation avec l’utilisation du produit, nous vous demandons
de restituer au vendeur le produit complet, non utilisé et
dans son emballage d’origine.
Indications relatives à la sécurité – Ceci est un
produit de loisirs perfectionné et non un jouet. Il doit être
utilisé avec précaution et bon sens et nécessite quelques
aptitudes mécaniques ainsi que mentales. L’incapacité à
utiliser le produit de manière sûre et raisonnable peut provoquer des blessures et des dégâts matériels conséquents.
Ce produit n’est pas destiné à être utilisé par des enfants
sans la surveillance par un tuteur. La notice d’utilisation
contient des indications relatives à la sécurité ainsi que des
indications concernant la maintenance et le fonctionnement
du produit. Il est absolument indispensable de lire et de
comprendre ces indications avant la première mise en
service. C’est uniquement ainsi qu’il sera possible d’éviter
une manipulation erronée et des accidents entraînant des
blessures et des dégâts. Horizon Hobby ne saurait être tenu
responsable d’une utilisation ne respectant pas les lois, les
règles ou règlementations en vigueur.
Questions, assistance et réparations – Votre revendeur spécialisé local et le point de vente ne peuvent
effectuer une estimation d’éligibilité à l’application de la
garantie sans avoir consulté Horizon. Cela vaut également
pour les réparations sous garantie. Vous voudrez bien, dans
un tel cas, contacter le revendeur qui conviendra avec Horizon d’une décision appropriée, destinée à vous aider le plus
rapidement possible.
Maintenance et réparation – Si votre produit doit faire
l’objet d’une maintenance ou d‘une réparation, adressezvous soit à votre revendeur spécialisé, soit directement
à Horizon. Emballez le produit soigneusement. Veuillez
noter que le carton d‘emballage d’origine ne suffit pas, en
règle générale, à protéger le produit des dégâts pouvant
survenir pendant le transport. Faites appel à un service
de messagerie proposant une fonction de suivi et une assurance, puisque Horizon ne prend aucune responsabilité
pour l’expédition du produit jusqu’à sa réception acceptée.
Veuillez joindre une preuve d’achat, une description détaillée
des défauts ainsi qu’une liste de tous les éléments distincts
envoyés. Nous avons de plus besoin d’une adresse
Garantie et réparations
Page 65

65
EN DE FR IT
complète, d’un numéro de téléphone (pour demander des
renseignements) et d’une adresse de courriel.
Garantie et réparations – Les demandes en garantie
seront uniquement traitées en présence d’une preuve
d’achat originale émanant d’un revendeur spécialisé agréé,
sur laquelle figurent le nom de l’acheteur ainsi que la date
d’achat. Si le cas de garantie est confirmé, le produit sera
réparé. Cette décision relève uniquement de Horizon Hobby.
Réparations payantes – En cas de réparation payante,
nous établissons un devis que nous transmettons à votre
revendeur. La réparation sera seulement effectuée après
que nous ayons reçu la confirmation du revendeur. Le prix
de la réparation devra être acquitté au revendeur. Pour les
réparations payantes, nous facturons au minimum 30 min-
utes de travail en atelier ainsi que les frais de réexpédition.
En l’absence d’un accord pour la réparation dans un délai
de 90 jours, nous nous réservons la possibilité de détruire le
produit ou de l’utiliser autrement.
ATTENTION : Nous n’effectuons de réparations payantes que pour les composants
électroniques et les moteurs. Les réparations
touchant à la mécanique, en particulier celles
des hélicoptères et des voitures radiocommandées, sont extrêmement coûteuses et
doivent par conséquent être effectuées par
l’acheteur lui-même.
10/2015
Déclaration de conformité de l’union européenne :
RTF PKZU1100 : Horizon Hobby, LLC déclare par la présente que ce produit est en conformité avec les
exigences essentielles et les autres dispositions des Directives RED et CEM.
BNF PKZU1180 : Horizon Hobby, LLC déclare par la présente que ce produit est en conformité avec les exigences
essentielles et les autres dispositions des Directives RED et CEM.
Une copie de la déclaration de conformité Européenne est disponible à :
http://www.horizonhobby.com/content/support-render-compliance.
Pays d’achat Horizon Hobby
Numéro de téléphone/
Adresse de courriel
Adresse
Union
européenne
Horizon Technischer Service service@horizonhobby.eu
Hanskampring 9
D 22885 Barsbüttel, Germany
Sales: Horizon Hobby GmbH +49 (0) 4121 2655 100
Le présent appareil est conforme aux CNR d’Industrie Canada applicables aux appareils radio exempts de licence.
L’exploitation est autorisée aux deux conditions suivantes : (1) l’appareil ne doit pas produire de brouillage, et (2)
l’utilisateur de l’appareil doit accepter tout brouillage radioélectrique subi, même si le brouillage est susceptible d’en
compromettre le fonctionnement.
Instructions relatives à l’élimination des D3E pour les utilisateurs résidant
dans l’Union Européenne
Ce produit ne doit pas être éliminé avec d’autres déchets. Il est de la responsabilité de l’utilisateur d’éliminer
les équipements rebutés en les remettant à un point de collecte désigné en vue du recyclage des déchets
d’équipements électriques et électroniques. La collecte et le recyclage séparés de vos équipements usagés
au moment de leur mise au rebut aideront à préserver les ressources naturelles et à assurer le recyclage des déchets de
manière à protéger la santé humaine et l’environnement. Pour plus d’informations sur les points de collecte de vos équipements usagés en vue du recyclage, veuillez contacter votre mairie, votre service de collecte des ordures ménagères
ou le magasin dans lequel vous avez acheté le produit.
Informations de contact
Informations de conformité pour l’Union Européenne
Information IC
Page 66

66
ENDEFRIT
AVVISO
Istruzioni, garanzie e tutti gli altri documenti accessori sono soggetti a modifiche a totale discrezione di
Horizon Hobby, LLC. Per avere una documentazione aggiornata sul prodotto, visitare il sito Web
www.horizonhobby.com e fare clic sulla scheda di supporto per questo prodotto.
Significato di termini specialistici
I seguenti termini vengono utilizzati in tutta la documentazione relativa al prodotto per indicare il livello di
eventuali danni collegati all’utilizzo di questo prodotto:
AVVERTENZA: procedure che, se non debitamente seguite, possono provocare danni materiali, danni
collaterali e lesioni gravi O comportare un’alta probabilità di lesioni superficiali.
ATTENZIONE: procedure che, se non debitamente seguite, possono provocare danni fisici a oggetti E
gravi lesioni a persone.
AVVISO: procedure che, se non debitamente seguite, espongono al rischio di danni alle cose E a una
possibilità minima o nulla di lesioni personali.
AVVERTENZA: Leggere TUTTO il manuale di istruzioni e prendere familiarità con le caratteristiche
del prodotto, prima di farlo funzionare. Se il prodotto non è utilizzato in modo corretto potrebbero
verificarsi danni al prodotto, alle persone o alle cose, causando gravi lesioni.
Questo è un sofisticato prodotto di hobbistica. Esso deve essere manipolato con cautela e giudizio e richiede
qualche conoscenza di base di meccanica. Se il prodotto non è utilizzato in maniera sicura e responsabile
potrebbero verificarsi lesioni o danni al prodotto stesso o ad altre proprietà. Questo prodotto non è concepito per essere usato dai bambini senza la diretta supervisione di un adulto. Non tentare in nessun caso di
smontare il prodotto, di utilizzarlo con componenti non compatibili o di potenziarlo senza previa approvazione
di Horizon Hobby, LLC. Questo manuale contiene istruzioni relative a sicurezza, utilizzo e manutenzione del
prodotto. È fondamentale leggere e seguire tutte le istruzioni e le avvertenze nel manuale prima di montare,
mettere a punto o usare il prodotto, al fine di usarlo correttamente e di evitare danni o lesioni gravi.
14
+
Almeno 14
anni. Non è
un giocattolo.
AVVERTENZA CONTRO PRODOTTI CONTRAFFATTI: Se fosse
necessario sostituire un componente Spektrum trovato in un prodotto
Horizon Hobby, bisogna acquistarlo sempre da Horizon Hobby, LLC o da un
rivenditore autorizzato Horizon Hobby per essere certi di avere prodotti
originali Spektrum di alta qualità. Horizon Hobby rifiuta qualsiasi supporto o
garanzia riguardo, ma non limitato a, compatibilità e prestazioni di prodotti
contraffatti o prodotti che vantano compatibilità con DSM o Spektrum.
Precauzioni per la Sicurezza e Avvertenze
L’utente di questo prodotto è l’unico responsabile del corretto utilizzo del medesimo in maniera che non sia
pericoloso, sia nei propri riguardi che nei confronti di terzi e non danneggi il prodotto stesso o l’altrui proprietà.
• Mantenere sempre la distanza di sicurezza in tutte le direzioni attorno al modellino per evitare collisioni o
danni. Questo modello funziona con comandi radio soggetti all’interferenza di altri dispositivi non controllabili dall’utilizzatore. Si possono verificare interferenze e perdite momentanee di controllo.
• Utilizzare sempre il modello in spazi liberi da auto, traffico e persone.
• Seguire scrupolosamente i consigli e le avvertenze sia per il modello che per tutti gli accessori (carica-
batteria, pacchi batteria ricaricabili, ecc.).
• Tenere le sostanze chimiche, i piccoli oggetti o gli apparati sotto tensione elettrica fuori dalla portata dei
bambini.
• Evitare il contatto con l’acqua di tutti i dispositivi che non sono stati appositamente progettati per funzionare in acqua. L’umidità danneggia i componenti elettronici.
• Non mettere in bocca le parti del modello poiché potrebbe essere pericoloso e perfino mortale.
• Non far funzionare il modello se le batterie della trasmittente sono poco cariche.
• Tenere sempre il velivolo in vista e sotto controllo.
• Usare sempre batterie completamente cariche.
• Tenere sempre il trasmettitore acceso quando il velivolo viene alimentato.
Page 67

67
EN DE FR IT
• Rimuovere sempre le batterie prima dello smontaggio.
• Tenere sempre libere le parti mobili.
• Tenere sempre i componenti asciutti.
• Lasciar sempre raffreddare i componenti dopo l’uso prima di toccarli.
• Rimuovere sempre le batterie dopo l’uso.
• Accertarsi sempre che il failsafe sia impostato correttamente prima del volo.
• Non utilizzare mai velivoli con cablaggio danneggiato.
• Non toccare mai i componenti in movimento.
Precauzioni per la Sicurezza e Avvertenze, Continua
• NON LASCIARE MAI INCUSTODITE LE BATTERIE IN CARICA.
• NON CARICARE MAI LE BATTERIE DURANTE LA NOTTE SENZA SUPERVISIONE.
• Usando e caricando le batterie LiPo si assumono tutti i rischi ad esse collegati.
• Interrompere sempre il processo di carica se la batteria scotta al tatto o inizia a deformarsi (gonfiarsi)
durante la carica. In caso contrario si potrebbe causare un incendio.
• Conservare le batterie in una stanza temperata e asciutta, per avere il migliore rendimento.
• Trasportare o conservare le batterie con una temperatura da 5 a 49°C. Non lasciarle in un’auto esposta al
sole per evitare che si danneggino o provochino danni.
• Tenere le batterie e il caricabatterie lontano da materiali infiammabili.
• Controllare sempre la batteria prima di caricarla, evitando le batterie esaurite o danneggiate.
• Scollegare sempre la batteria e il caricabatterie dopo la carica e attendere che si raffreddino tra una
carica e l’altra.
• Durante la carica tenere sotto controllo la temperatura della batteria.
• USARE SOLO UN CARICATORE SPECIFICO PER LE BATTERIE LiPo. In caso contrario si potrebbero
provocare incendi con danni e lesioni.
• Non scaricare le batterie al di sotto di 3,0V per cella sotto carica.
• Non coprire l’etichetta delle batterie con le fascette di fissaggio.
• Tenere sotto controllo batteria e caricatore durante la carica.
• Non caricare le batterie al di fuori dei valori consigliati.
• Non cercare di smontare o modificare il caricatore.
• Non permettere ai bambini inferiori a 14 anni di caricare le batterie.
• Non caricare mai le batterie in luoghi estremamente caldi o freddi (si raccomanda 5-49° C) o esposti alla
luce diretta del sole.
ATTENZIONE: Se non si utilizza questo prodotto con attenzione e non si osservano le seguenti
avvertenze potrebbero verificarsi malfunzionamenti, problemi elettrici, eccessivo sviluppo di calore,
incendi e, in definitiva, lesioni e danni materiali.
Avvertenze per la carica
Page 68

68
ENDEFRIT
Speciche
Apertura alare ..............37,50 cm (375mm)
Lunghezza ................38,70 cm (387mm)
Peso (batteria inclusa) ........16,4 g (17,01 g)
Batteria ...................70mAh 3.7V 14C LiPo
Caricabatterie .............. Batteria ai litio polimeri 1S 3.7V DC Caricabatterie (incluso)
Trasmittente ............... 3+ canali con Spektrum 2.4GHz DSM2/DSMX tecnologia
Elettronica di bordo ..........Rx/ESCa 3 canali con porta LED
Indice
Precauzioni per la Sicurezza e Avvertenze ............................................66–67
Avvertenze per la carica ............................................................67
Specifiche ....................................................................... 68
Contenuti di Night Vapor RTF .........................................................69
Contenuti di Night Vapor BNF ........................................................69
Preparazione al primo volo ..........................................................69
Carica della batteria ...............................................................70
Istallazione della batteria di volo ......................................................71
Collegamento del trasmettitore e del ricevitore ...........................................71
Istruzioni specifiche per il collegamento del trasmettitore ...................................72
Ulteriori informazioni sul Binding ...................................................... 72
Identificazione di controllo del trasmettitore .............................................73
Identificazione LED ................................................................74
Test di prova ..................................................................... 74
Invertire i Comandi di Volo ..........................................................75
Test di controllo ..................................................................76
Funzione Dual Rate (solo RTF) e CG ...................................................76
Descrizione dell’Unità Ricevente, Test di controllo del Motore e dell’Innesco .....................76
Lista di controllo per il volo ..........................................................77
Istallazione/smontaggio del carrello di atterraggio .........................................78
Sostituire la pinna verticale .......................................................... 79
Sostituire l’ala ...................................................................80
Sostituire l’elica ..................................................................81
Sostituire l’albero di trasmissione .....................................................81
Pezzi di ricambio .................................................................. 83
Pezzi opzionali ...................................................................83
Guida alla risoluzione dei problemi ....................................................84
Garanzia e policy per le riparazioni ....................................................85
Informazioni per i contatti ...........................................................86
Informazioni sulla conformità per l’Unione Europea ........................................ 86
Page 69

69
EN DE FR IT
Contenuti di Night Vapor BNF
• Modello Night Vapor
• 4 batterie AA
• batteria 70mAh 3.7V 14C LiPo
• Caricabatteria 1S 3.7V DC LiPo, 0.3A CC
Un trasmettitore DSM2/DSMX compatibile è necessario per completare la dotazione del vostro Night
Vapor.
Preparazione al primo volo
Questa lista non va interpretata come sostitutiva del contenuto del manuale di istruzioni Sebbene possa essere considerata come una guida per l’avvio veloce, si raccomanda vivamente l’utente di leggere il manuale
Controllate il contenuto della confezione.
Mettete le 4 pile AA nel caricabatteria.
Mettete le 4 batterie AA nel trasmettitore incluso (RTF soltanto).
Iniziate la carica della batteria di volo.
Collegare il ricevitore al trasmettitore in dotazione Spektrum o JR DSM2/DSMX (BNF soltanto).
Provate i comandi.
Familiarizzate con i comandi.
Confermate o regolate l’escursione dei comandi.
Trovate un posto adeguato dove volare.
Contenuti di Night Vapor RTF
• Modello Night Vapor
• 8 batterie AA
• batteria 70mAh 3.7V 14C LiPo
• Trasmittente DSM2/DSMX 2.4GHz
• Caricabatteria 1S 3.7V DC LiPo, 0.3A CC
Page 70

70
ENDEFRIT
Carica della batteria
Leggere attentamente le Avvertenze e il Modo di
utilizzo delle batterie prima di proseguire. caricare
la batteria LiPo con il caricabatteria incluso nella
confezione.
1. Togliete il coperchio sul fondo del caricabatteria
e installare le quattro pile AA incluse
rispettando la polarità. Riposizionare il
coperchio dopo che le pile sono state installate.
2. Infilate la batteria nell'apposito alloggiamento
del caricabatteria. L’estremità della batteria è
specificatamente progettata per far si che la
stessa possa essere posizionata agevolmente
(solitamente con l’etichetta rivolta verso
l’esterno) per evitare una connessione a
polarità inversa. Controllare comunque che
allineamento e polarità siano corretti prima di
procedere al passaggio successivo.
3. Inserite con una leggera pressione la batteria
e i connettori all’interno del jack/ connettore di
carica situato sul fondo dell’alloggiamento del
caricabatteria.
4. Se la connessione è stata effettuata correttamente, il LED rosso del caricabatteria rimane
fisso, ad indicare che il processo di carica è
iniziato.
5. La carica di una batteria completamente scarica (non eccessivamente scaricata) da 70mAh
richiede all’incirca 30-40 minuti. Quando la
carica è quasi completata, il LED inizia a lampeggiare. Quando la carica è completa, il LED
lampeggia per circa 20 secondi o si spegne.
Nota: La batteria LiPo inclusa nella confezione
del Night Vapor è già parzialmente
carica, di conseguenza la prima carica
potrebbe richiedere solo 15-20 minuti.
Nota: Sarà possibile effettuare 10-15 cicli di
ricarica prima di dover sostituire le pile
AA nel caricabatteria. La sostituzione
delle pile AA. La sostituzione comprende
le batterie alcaline con più cicli di carica.
Nota: Se il LED rimane acceso per più di
40 minuti durante la carica e/o per
5 secondi dopo che la LiPo di volo è
stata rimossa, sostituite le pile AA nel
caricabatteria.
ATTENZIONE: utilizzare solo caricabat-
terie specifi camente progettati per
caricare batterie LiPo. In caso contrario, si
potrebbero sviluppare incendi che possono
provocare lesioni personali o danni
materiali.
ATTENZIONE: Non superare mai la
corrente di carica consigliata.
Page 71

71
EN DE FR IT
Istallazione della batteria di volo
Una volta che la LiPo è completamente carica, potete installarla. Per farlo, posizionatela nell’apposito
alloggiamento sul fondo della fusoliera. Assicuratevi che l’etichetta sia rivolta verso la parte posteriore
dell’aeroplano.
Nota: L’alloggiamento della batteria può scorrere in avanti e all’indietro per permettere la variazione
del Centro di Gravità.
Nota: Disconnettere sempre la LiPo dal ricevitore dell’aereo quando non è in volo. In caso con-
trario la batteria potrà diventare inutilizzabile.
Collegamento del trasmettitore e del ricevitore
Night Vapor RTF viene fornito già collegato al trasmettitore DSM2/DSMX incluso. Nel caso in cui si renda
necessario effettuare il re-binding tra trasmittente e modello, seguite le istruzioni riportate di seguito.
Impostare l’aereo per il collegamento.
1. Confermare che la batteria di volo sia sconnessa dal ricevitore e che il trasmettitore sia spento.
2. Istallare la batteria di volo nell’aereo. Quando il LED rosso inizia a lampeggiare rapidamente allora
bisogna subito procedere con le istruzioni per il trasmettitore.
Nota: Anche se il trasmettitore inclusi nel Night Vapor è a 4 canali, l’aereo è a 3 canali interamente
proporzionale che utilizza i controlli di acceleratore, timone ed elevatore. Per questo motivo, il
controllo dei timone è sulla barra destra.
Page 72

72
ENDEFRIT
Istruzioni speciche per il collegamento del trasmettitore
Trasmettitore MLP4DSM
1. Quando si vede il LED della ricevente che inizia a lampeggiare, spingete lo stick di sinistra della
trasmittente verso l’interno della trasmittente (NON abbassando lo stick dell’acceleratore) fino a sentire
il click.
2. Mentre effettuate questa operazione, accendete la trasmittente e poi rilasciate lo stick. La trasmittente
emetterà un bip e il LED sulla superficie inizierà a lampeggiare.
3. Quando la trasmittente non emette più il suono, il sistema si collega nel giro di un paio di secondi.
Nota: A volte può risultare difficile vedere il LED lampeggiare (segno che siete in modalità bind), vi
consigliamo quindi di contare lentamente fino a cinque dopo aver collegato la batteria. Il modello
dovrebbe essere a quel punto in modalità bind.
Il collegamento è il processo di programmazione del ricevitore dell’unità di controllo per il riconoscimento
del codice unico di identifi cazione (GUID, Globally Unique Identifi er) di un trasmettitore. Per un corretto
funzionamento, è necessario collegare il trasmettitore dell’aeromodello con tecnologia Spektrum™ DSM2/
DSMX al ricevitore.
È possibile collegare qualsiasi trasmettitore JR® o Spektrum DSM2/DSMX a copertura totale al ‘ricevitore
DSM2/DSMX. Per un elenco completo dei trasmettitori compatibili, visitare il sito ‘www.bindnfly.com.
AVVISO: se si utilizza un trasmettitore Futaba® con un modulo Spektrum DSM, è necessario invertire il
canale del throttle.
Ulteriori informazioni sul Binding
Prima di ogni volo, accendete il vostro trasmettitore e attendere circa 5 secondi prima di inserire la batteria
di volo nel ricevitore. Questo lasso di tempo è necessario al trasmettitore per scansionare e assicurarsi
le due frequenze aperte. Se la batteria di volo viene collegata troppo presto si perde il collegamento e la
ricevente entra inavvertitamente nella modalità binding. In questo caso, lasciare la trasmittente accesa, poi
disconnettere e riconnettere la batteria di volo.
Page 73

73
EN DE FR IT
Identicazione di controllo del trasmettitore
Nota: Prima di ogni volo accendere SEMPRE la trasmittente prima di collegare la batteria di volo alla
ricevente. Al termine di ogni volo, scollegare sempre la batteria di volo dalla ricevente prima di
spegnere la trasmittente.
Modalità 1
Funzione
dell’Elevatore
Funzioni timone/Gas
Trim
dell’elevatore
Trim del Gas
Trim del timone
Modalità 2
Funzione del Gas
Funzioni timone/elevatore
Trim del Gas
Trim dell’elevatore
Trim del timone
Page 74

74
ENDEFRIT
Identicazione LED
Night Vapor è dotato di 6 luci a LED. Qui in basso è presente una descrizione delle singole luci.
• Ci sono 3 LED sul bordo dell’ala. Le luci sono di color bianco e rimangono fisse.
• Ci sono 2 LED sul bordo dell’ala. La luce nella parte destra dell’ala (guardando dalla zona frontale)
lampeggerà in rosso e quella a sinistra (guardando dalla zona frontale) lampeggerà in verde.
• C’è 1 LED vicino alla coda dell’aereo. La luce è blu.
Test di prova
È importante provare i comandi prima del primo volo per assicurarsi che durante la spedizione non si sia
danneggiato alcun servocomando, collegamento o altre parti e verificare che i comandi funzionino correttamente nelle giuste direzioni.
Per prima cosa, accendere la trasmittente e mettere leva e trim del gas completamente al minimo. Quindi
collegate la batteria al ricevitore.
Nota: I connettori ed i cavi della batteria sono fatti in modo da evitare l’inversione di polarità. Tuttavia,
se vengono forzati insieme nella posizione non corretta e/o con una polarità sbagliata,è possibile
che la batteria e/o l’unità ricevente vengano danneggiate.
Muovete lo stick dell’elevatore sulla trasmittente avanti e indietro per controllare il passo. Spingendo in
avanti lo stick, l’elevatore dovrebbe andare verso il basso.
Quando lo stick dell’elevatore viene spinto indietro, l’elevatore dovrebbe muoversi verso l’alto.
Page 75

75
EN DE FR IT
Muovete la leva del timone da sinistra a destra per controllare l’imbardata. Quando la leva è spinta verso
destra, il timone dovrebbe andare a destra.
Nota: Negli aerei a 3 canali, come il Vapor, il timone è controllato dalla barra normalmente utilizzata
dagli alettoni negli aerei a 4 canali.
Quando la leva è spinta verso sinistra, il timone dovrebbe andare a sinistra.
Se durante questi test i comandi dovessero rispondere al contrario, seguite le istruzioni della vostra trasmittente per invertire i comandi di volo.
Una volta che le direzioni dei comandi di volo sono state confermate, tutti i comandi dovrebbero funzionare
correttamente. Tuttavia, se si continuano ad avere problemi di risposta del Night Vapor al trasmettitore, non
procedere con il volo.
Trim digitali
La trasmittente ParkZone 2.4GHz DSM2/DSMX è dotata di pulsanti per il trim digitale su tutti i controlli per
consentire una migliore regolazione. Centrare le superfici di controllo usando i trim. Se il trim elettronico non
fosse sufficiente, regolate meccanicamente i collegamenti di controllo per centrare le superfici.
Invertire i Comandi di Volo
La trasmittente inclusa nella confezione del Night Vapor funziona esattamente come quella inclusa nelle
confezioni dei seguenti modelli: PKZ Ember 2, Vapor, and Ultra Micro RTF. Funziona anche allo stesso modo
del trasmettitore incluso con i modelli E-flite mCX e mSR (MLP4DSM).
Nota: Per l’inversione con altri trasmettitori si prega di fare riferimento all’altro manuale di
istruzioni.
Nel caso in cui utilizziate le componenti elettroniche del Night Vapor con un altro modello, sarà necessario
invertire il funzionamento delle superfici dei comandi di volo.
Per invertire il funzionamento del timone e dell’elevatore seguite i passaggi riportati di seguito.
1. Assicuratevi che la batteria sia scollegata dall’aeromodello e che la trasmittente sia spenta.
2. Spingete il tasto del trim digitale relativo alla superficie che volete invertire.
a. Tasto alto del trim dell’elevatore - elevatore normale
b. Tasto basso del trim dell’elevatore - elevatore invertito
Page 76

76
ENDEFRIT
c. Tasto di sinistra del trim del timone - timone normale
d. Tasto di destra del trim del timone - timone invertito
3. Continuate a mantenete premuto il tasto del trim digitale desiderato e accendete la trasmittente.
4. Mantenete premuto ancora per circa cinque secondi il tasto del trim digitale fino a sentire il segnale
acustico che conferma la selezione.
5. Completate i test di controllo per la batteria di volo e il test di volo, assicurandovi che le superfici
funzionino nelle corrette direzioni.
Test di controllo
Qualora si verifichi un incidente e in ogni caso prima del vostro primo volo, assicuratevi che i comandi di
volo siano centrati. È sicuramente consigliato effettuare questo controllo meccanicamente a causa dei limiti
tecnici dei servocomandi lineari.
1. Assicuratevi che i trim della trasmittente siano centrati e, qualora ne sia provvista, che i sub-trim siano
settati a 0.
2. Verificare se qualcuno dei comandi di volo non sia centrato.
3. Se i comandi non sono centrati, aiutatevi con un paio di pinze per allungare o accorciare delicatamente
l’asta di spinta piegandola leggermente ad U.
Funzione Dual Rate (solo RTF) e CG
La trasmittente 2.4GHz DSM2/DSMX a 4 canali inclusa nella confezione di Night Vapor è dotata della
funzione dual rate. Il setting iniziale è programmato per la massima escursione (high rate). Per accedere alla
funzione di escursione bassa (low rate), premete IN sullo stick di destra. Il LED sulla trasmittente inizierà
a lampeggiare, segnalando che la vostra trasmittente è ora in modalità escursione bassa. Per tornare alla
modalità iniziale, pigiate nuovamente IN nello stick destro.
Nota: ParkZone raccomanda VIVAMENTE l'utilizzo del settaggio LOW RATE per i primi voli con
Night Vapor.
Centro di gravità
Il supporto di montaggio frontale dell’ala di Night Vapor dovrebbe essere posizionato a circa 28–30mm dietro la
parte frontale della fusoliera per i voli iniziali, con il vassoio frontale della batteria posizionato a circa 10–12mm
dietro il supporto di montaggio frontale dell’ala. Night Vapor volerà con una vasta gamma di posizioni del CG
consentendovi di modificare le caratteristiche di volo dell’aereo. Si può anche sperimentare ed aggiungere un
po’ di “trim” all’elevatore per far alzare un po’ l’aereo in volo. Ciò farà volare l’aereo un po’ più lentamente.
Descrizione dell’Unità Ricevente, Test di controllo del Motore e dell'Innesco
La ricevente installata sul Night Vapor è una combinazione leggerissima di regolatore di velocità del motore,
di servocomandi e una ricevente compatibile Spektrum DSM2/DSMX. L’unità ricevente è anche dotata di un
LED indicatore di stato.
Prima di ogni volo accendere SEMPRE la trasmittente prima di collegare la batteria di volo alla ricevente.
Non collegare mai la batteria di volo alla ricevente prima di aver acceso la trasmittente. Al termine di ogni
volo, scollegare sempre la batteria di volo dalla ricevente prima di spegnere la trasmittente.
Page 77

77
EN DE FR IT
Nota: L’unica circostanza in cui si deve collegare prima la batteria di volo alla ricevente prima di
accendere la trasmittente. è quando si deve effettuare il binding tra ricevente e trasmittente. Si
prega di fare riferimento alla sezione del collegamento fra il trasmettitore e il ricevitore di questo
manuale, per ottenere ulteriori informazioni.
La lista di controllo che segue riporta i passaggi necessari ad effettuare un corretto innesco e utilizzo
dell’unità ricevete, insieme alla corretta risposta del motore.
• Lo stick del gas DEVE trovarsi al minimo regime possibile e, per molte trasmittenti, anche il trim del
gas deve essere settato più vicino possibile al minimo per permettere l’innesco della ricevente. Se si
tratta del primo volo o di un volo di prova conseguente a delle riparazioni, è necessario centrate anche
i trim del timone, dell’elevatore e dell’alettone.
• Quando il LED di stato blu rimane fisso, l’unità ricevente è inizializzata e pronta per il volo. Inoltre, fin-
tanto che lo stick del gas è al minimo e il trim del gas è nella posizione più bassa durante il processo
di inizializzazione, il regolatore di velocità del motore non viene innescato. Fate attenzione poiché
l’elica inizierà a ruotare azionando lo stick.
Nota: Se il LED di stato non rimane blu fisso controllare i seguenti punti:
• Se il LED di stato dopo aver lampeggiato rimane blu, ma il motore non risponde, vuol dire che il col-
legamento con le frequenze radio (RF) è ben impostato con la ricevente, ma lo stick e il trim del gas
potrebbero essere nella posizione errata. Verificate che lo stick sia nella posizione più bassa possibile
e che il trim sia posizionato al centro o più basso del centro. Se ora siete in grado di controllare il
motore, potete passare alla fase successiva.
• Se il LED blu continua a lampeggiare, vuol dire che non avete il collegamento di frequenze con la
ricevente. Controllate che la trasmittente sia accesa. Se la trasmittente è accesa e funziona correttamente, scollegate la batteria di volo dalla ricevente e poi ricollegatela. La ricevente dovrebbe inizializzarsi e innescarsi conformemente.
Nota: Se siete inavvertitamente entrati in modalità Bind, il LED sulla ricevente inizierà a lampeggiare.
Se si verifica questa eventualità, fate effettuare un ciclo alla batteria di volo con la trasmittente
accesa (se avete già effettuato il binding). Se la ricevente continua a non inizializzarsi e a non
funzionare dopo aver seguito le precedenti indicazioni, sarà allora necessario effettuare nuovamente il binding.
Dopo aver collocato l’aeroplano in un’area adeguata, libera da ostacoli e voi stessi siete lontani dall’elica,
potete iniziare a dare gas.
• Spostate la leva del gas lentamente in avanti, quanto basta affinché l’elica inizi a ruotare, NON tentate
di far decollare l’aeroplano ancora. Prendete nota del verso in cui l’elica ruota. Guardandola di fronte,
dovrebbe girare in senso antiorario. Se invece gira dal verso contrario, scollegate la batteria e invertite
la polarità dei cavi di alimentazione del motore.
Lista di controllo per il volo
Accendere sempre prima la trasmittente.
Collegare la batteria di volo al cavo del ricevitore.
Attendere che il ricevitore si inizializzi e si armi correttamente.
Decollare.
Atterrare.
Scollegare la batteria di volo dalla ricevente.
Spegnere sempre la trasmittente per ultima.
Page 78

78
ENDEFRIT
Istallazione/smontaggio del carrello di atterraggio
Per smontare il carrello di atterraggio seguire queste fasi:
1. Avvicinate delicatamente il carrello ed estrarlo dal suo supporto.
Nota: La prima volta può essere difficile smontare il carrello di atterraggio.
2. Spingere il nuovo carrello nelle due colonne di montaggio finchè non si inserisce con un click.
Nota: Per dei voli brevi è possibile volare anche senza il carrello di atterraggio. Si raccomanda di far
scorrere la batteria in avanti per compensare il peso del carrello di atterraggio.
Page 79

79
EN DE FR IT
Sostituire la pinna verticale
Per sostituire la penna verticale sul Night Vapor bisogna seguire le fasi elencate qui sotto.
1. Rimuovere delicatamente il tubo di pressione ubicato in basso sull'aereo.
2. Disconnettere delicatamente l’asta di spinta dall’antenna di controllo.
3. Far scorrere la pinna verticale fuori dalla colonna di montaggio.
4. Riconnettere la barra di montaggio nella nuova pinna verticale e far scorrere la pinna nel suo alloggiamento.
5. Far scorrere il tubo di pressione al suo posto.
Nota: Quando si sostituisce il tubo di pressione non bisogna incastrarlo nella colonna; altrimenti la
pinna verticale non si sposterà liberamente entro il suo range di movimento.
Page 80

80
ENDEFRIT
Sostituire l’ala
Tutti i LED sull’ala sono collegati in maniera permanente. La nuova ala includerà un nuovo set di LED. Per
sostituire l’ala bisogna seguire queste fasi:
1. Disconnettere il cavo del LED principale dalla scheda del ricevitore.
2. Rimuovere il LED vicino alla coda dell’aereo.
Nota: Il LED è incollato alla fusoliera e bisogna fare molta attenzione a non rompere i punti di incollaggio.
3. Allentare le 4 viti delle colonne di montaggio e tirare leggermente l’ala.
4. Far scorrere la nuova ala al suo posto e stringerla alle colonne di montaggio.
5. Montare il LED vicino alla coda e incollarlo al suo posto. Poi, riconnettere il cavo del LED principale
dalla scheda del ricevitore.
Nota: Usare solo pochissima colla a caldo o mastice per incollare il LED alla fusoliera. Altri adesivi
possono danneggiare il LED.
Page 81

81
EN DE FR IT
Sostituire l’elica
L’elica è avvitata sull’albero della scatola del riduttore di giri.
1. Per rimuovere l’elica, usate un paio di pinze con becchi ad ago o pinze emostatiche per stringere
l'albero dell’elica.
2. Fate ruotare l’elica in senso antiorario per rimuoverla.
3. Avvitate l’elica e lo spinner nuovi da 140mm x 45mm in senso orario sull’albero della scatola del cambio.
Sostituire l’albero di trasmissione
Nel caso in cui dovesse danneggiarsi, potrebbe essere necessario sostituire l’albero dell’elica. Sostituzione
dell'albero dell’elica:
1. Afferrate delicatamente il dado bianco con inserto in nylon posizionato nella parte posteriore.
Page 82

82
ENDEFRIT
2. Mantenete fermo il dado e ruotate in senso orario l’ingranaggio cilindrico a denti dritti. Mantenete
fermo il dado e ruotate in senso orario l’ingranaggio cilindrico a denti dritti
3. Tirate delicatamente l’ingranaggio e l’albero dell’elica scivolerà fuori.
4. Avvitate l’elica e lo spinner nuovi da 140mm x 45mm tenendo fermo l’ingranaggio e ruotano l’elica in
senso orario.
5. Fate scivolare il nuovo albero dell’elica all’interno della scatola del cambio.
6. Riposizionate il dado nella parte posteriore dell’albero dell’elica. Ruotate l’elica e l’ingranaggio in senso
antiorario. Il dado si avviterà all’albero dell’elica.
7. Mantenete il dado nella corretta posizione e ruotate delicatamente l’ingranaggio in senso antiorario per
assicurarvi che il dado sia ben fissato.
Page 83

83
EN DE FR IT
Pezzi di ricambio
PKZ3001. . . . . . . . . . . . . . Batteria 3.7V 70mAh LiPo
PKZ3240. . . . . . . . . . . . . . DC 3.7V caricatore LiPo
PKZ3302. . . . . . . . . . . . . . Elica con spinner (140mm x 45mm)
PKZ3307. . . . . . . . . . . . . . Sistema a slitta della coda: Vapor/Night Vapor
PKZ3316. . . . . . . . . . . . . . Motore principale: Vapor/Night Vapor
PKZ3322. . . . . . . . . . . . . . Set asta di spinta: Vapor/Night Vapor
PKZ3327. . . . . . . . . . . . . . Cambio senza motore: Vapor/Night Vapor
PKZ3328. . . . . . . . . . . . . . Albero dell'elica con cambio (2): Vapor/Night Vapor
PKZ3341. . . . . . . . . . . . . . Trasmettitore, 2.4GHz con Spektrum DSM2/DSMX
PKZU1106 ............Set del Carrello di Atterraggio principale: Night Vapor
PKZU1120 ............Ala principale con luci: Night Vapor
PKZU1124 ............Stabilizzatore orizzontale: Night Vapor
PKZU1125 ............Timone: Night Vapor
PKZUA1152 ...........3-Ch Rx/ESC con porta LED, DSM2/DSMX
PKZU1161 ............Fusoliera con Elettronica: Night Vapor
PKZU1170 ............Cellula di ricambio (niente elettronica o motore): Night Vapor
PKZU1167 ............Fusoliera semplice: Night Vapor
SPM6835 .............Sostituzione meccaniche del servo
EFLH1067 .............Pezzi di ricambio colletti di ritenuta del servo
Pezzi opzionali
PKZ3052. . . . . . . . . . . . . . Connettore della batteria con cablaggio
EFLB1501S25 ..........Batteria* 150mAh 3.7V 12C LiPo
EFLC1004 .............Caricabatterie LiPo 4-Porte 3.7V
EFLC1005 .............Adattatore AC a 6V DC (Stati Uniti)
EFLC1005AU. . . . . . . . . . . Adattatore AC a 6V DC (Australia)
ELFC1005EU ...........Adattatore AC a 6V DC (Europa)
EFLC1005UK. . . . . . . . . . . Adattatore AC a 6V DC (Regno Unito)
SPM6825 .............Invertitore del servo lineare
. . . . . . . . . . . . . . . . . . . . . DX5e DSMX Trasmettitore 5 canali
. . . . . . . . . . . . . . . . . . . . . DX6i DSMX Trasmettitore 6 canali
. . . . . . . . . . . . . . . . . . . . . DX7s DSMX Trasmettitore 7 canali
. . . . . . . . . . . . . . . . . . . . . DX8 DSMX Solo trasmettitore
*Nota: Per i primi voli lunghi bisogna provare a usare una batteria con una maggiore capacità come
E-Flite batterie LiPo 150mAh (EFLB1501S25).
Page 84

84
ENDEFRIT
Guida alla risoluzione dei problemi
Se incontrate dei problemi con il montaggio o con la programmazione che non riuscite a risolvere attraverso
la Guida alla risoluzione dei problemi, consultate pagina 96 e contattate il servizio di assistenza Horizon di
competenza.
Problema Soluzioni possibili
Nell’aereo non funziona il “throttle
su” ma tutti gli altri comandi sembrano funzionare
Mettere la leva del gas e/o il trim al minimo
Ove applicabile, invertite il canale del gas nel trasmettitore
L’elica o l’albero del motore è rotto
Sostituite con un’elica con spinner (PKZ3302) o con albero
dell’elica (PKZ3328)
Durante il volo, l’aereo mostra una
significativa perdita di motore
Ricaricate completamente la batteria di volo
Sostituite le pile AA nel caricabatterie o usate un caricatore Ca a
6V CC e ricaricare completamente la batteria di volo
Sostituite la batteria PKZ3001 e consultate la sezione “Avverten-
ze e Modo d’uso della Batteria” del manuale
La luce di ricarica rimane accesa
dopo che la batteria LiPo è stata
scollegata, o rimane accesa per più
di 40 minuti durante la carica
Sostituite le pile AA nel caricabatteria
L’aeroplano sembra avere meno
potenza
Lubrificate le boccole della scatola del cambio
Lubrificate le boccole della scatola del motore
Quando è particolarmente freddo, assicuratevi che le batterie
siano calde prima del volo
Utilizzate una batteria con una potenza maggiore (a meno che
ciò non implichi modifiche strutturali per l’alloggio della stessa)
Il LED sull’aereo rimane
lampeggiante e non può essere
controllato dal trasmettitore
Scollegare e ricollegare la batteria di volo
Allontanare il trasmettitore (sempre acceso) di alcuni passi
dall’aereo prima di riconnettere la batteria di volo
Spostare il trasmettitore e l’aereo da oggetti metallici durante il
collegamento
Effettuare il rebinding dell’aeromodello con il trasmettitore
compatibile desiderato
Il LED sull’aereo inizierà a
lampeggiare
Sostituite con un’ala principale munita di luci (PKZUP1002)
L’aeromodello sembra
rollare,imbardare o picchiare verso
una determinata direzione
Trimmate i comandi usando la trasmittente finché il modello non
cessa di muovere in quella direzione
I comandi sembrano invertiti dopo
aver effettuato il binding ad un’altra
trasmittente
Consultare la sezione “Prova dei Comandi” del manuale
L’aeromodello non funzione dopo
aver collegato la batteria di volo e si
sente odore di bruciato
Sostituite l’asse PKZUA1152 e controllate la corretta polarità
quando collegate la batteria di volo
Page 85

85
EN DE FR IT
Periodo di garanzia – Garanzia esclusiva - Horizon
Hobby, LLC, (Horizon) garantisce che i prodotti acquistati (il
“Prodotto”) sono privi di difetti relativi ai materiali e di eventuali errori di montaggio. Il periodo di garanzia è conforme
alle disposizioni legali del paese nel quale il prodotto è stato
acquistato. Tale periodo di garanzia ammonta a 6 mesi e si
estende ad altri 18 mesi dopo tale termine.
Limiti della garanzia – (a) La garanzia è limitata
all’acquirente originale (Acquirente) e non è cedibile a terzi.
L’acquirente ha il diritto a far riparare o a far sostituire la
merce durante il periodo di questa garanzia. La garanzia
copre solo quei prodotti acquistati presso un rivenditore
autorizzato Horizon. Altre transazioni di terze parti non sono
coperte da questa garanzia. La prova di acquisto è necessaria per far valere il diritto di garanzia. Inoltre, Horizon si
riserva il diritto di cambiare o modificare i termini di questa
garanzia senza alcun preavviso e di escludere tutte le altre
garanzie già esistenti.
(b) Horizon non si assume alcuna garanzia per la disponibilità
del prodotto, per l’adeguatezza o l’idoneità del prodotto
a particolari previsti dall’utente. è sola responsabilità
dell’acquirente il fatto di verificare se il prodotto è adatto
agli scopi da lui previsti.
(c) Richiesta dell’acquirente – spetta soltanto a Horizon, a
propria discrezione riparare o sostituire qualsiasi prodotto
considerato difettoso e che rientra nei termini di garanzia.
queste sono le uniche rivalse a cui l’acquirente si può
appellare, se un prodotto è difettoso.
Horizon si riserva il diritto di controllare qualsiasi componente
utilizzato che viene coinvolto nella rivalsa di garanzia. Le
decisioni relative alla sostituzione o alla riparazione sono a
discrezione di Horizon. Questa garanzia non copre dei danni
superficiali o danni per cause di forza maggiore, uso errato
del prodotto, un utilizzo che viola qualsiasi legge, regolamentazione o disposizione applicabile, negligenza, uso ai fini
commerciali, o una qualsiasi modifica a qualsiasi parte del
prodotto.
Questa garanzia non copre danni dovuti ad una installazione
errata, ad un funzionamento errato, ad una manutenzione
o un tentativo di riparazione non idonei a cura di soggetti
diversi da Horizon. La restituzione del prodotto a cura
dell’acquirente, o da un suo rappresentante, deve essere
approvata per iscritto dalla Horizon.
Limiti di danno – Horizon non si riterrà responsabile per
danni speciali, diretti, indiretti o consequenziali; perdita di
profitto o di produzione; perdita commerciale connessa al
prodotto, indipendentemente dal fatto che la richiesta si basa
su un contratto o sulla garanzia. Inoltre la responsabilità di
Horizon non supera mai in nessun caso il prezzo di acquisto
del prodotto per il quale si chiede la responsabilità. Horizon
non ha alcun controllo sul montaggio, sull’utilizzo o sulla
manutenzione del prodotto o di combinazioni di vari prodotti.
Quindi Horizon non accetta nessuna responsabilità per danni
o lesioni derivanti da tali circostanze. Con l’utilizzo e il mon-
taggio del prodotto l’utente acconsente a tutte le condizioni,
limitazioni e riserve di garanzia citate in questa sede.
Qualora l’utente non fosse pronto ad assumersi tale
responsabilità associata all’uso del prodotto, si suggerisce
di restituire il prodotto intatto, mai usato e immediatamente
presso il venditore.
Indicazioni di sicurezza – Questo è un prodotto
sofisticato di hobbistica e non è un giocattolo. Esso deve
essere manipolato con cautela, con giudizio e richiede delle
conoscenze basilari di meccanica e delle facoltà mentali di
base. Se il prodotto non verrà manipolato in maniera sicura e
responsabile potrebbero risultare delle lesioni, dei gravi danni
a persone, al prodotto o all’ambiente circostante. Questo
prodotto non è concepito per essere usato dai bambini
senza una diretta supervisione di un adulto. Il manuale del
prodotto contiene le istruzioni di sicurezza, di funzionamento
e di manutenzione del prodotto stesso. È fondamentale leggere e seguire tutte le istruzioni e le avvertenze nel manuale
prima di mettere in funzione il prodotto. Solo così si eviterà
un utilizzo errato e di preverranno incidenti, lesioni o danni.
Domande, assistenza e riparazioni – Il vostro negozio
locale e/o luogo di acquisto non possono fornire garanzie di
assistenza o riparazione senza previo colloquio con Horizon.
questo vale anche per le riparazioni in garanzia. Quindi in
tale casi bisogna interpellare un rivenditore, che si metterà in
contatto subito con Horizon per prendere una decisione che
vi possa aiutare nel più breve tempo possibile.
Manutenzione e riparazione – Se il prodotto deve
essere ispezionato o riparato, si prega di rivolgersi ad
un rivenditore specializzato o direttamente ad Horizon. il
prodotto deve essere Imballato con cura. Bisogna far notare
che i box originali solitamente non sono adatti per effettuare
una spedizione senza subire alcun danno. Bisogna effettuare
una spedizione via corriere che fornisce una tracciabilità e
un’assicurazione, in quanto Horizon non si assume alcuna
responsabilità in relazione alla spedizione del prodotto.
Inserire il prodotto in una busta assieme ad una descrizione
dettagliata degli errori e ad una lista di tutti i singoli componenti spediti. Inoltre abbiasmo bisogno di un indirizzo
completo, di un numnero di telefono per chiedere ulteriori
domande e di un indirizzo e-mail.
Garanzia a riparazione – Le richieste in garanzia
verranno elaborate solo se è presente una prova d’acquisto
in originale proveniente da un rivenditore specializzato
autorizzato, nella quale è ben visibile la data di acquisto. Se la
garanzia viene confermata, allora il prodotto verrà riparato o
sostituito. Questa decisione spetta esclusivamente a Horizon
Hobby.
Riparazioni a pagamento – Se bisogna effettuare una
riparazione a pagamento, effettueremo un preventivo che
verrà inoltrato al vostro rivenditore. La riparazione verrà effettuata dopo l’autorizzazione da parte del vostro rivenditore. La
somma per la riparazione dovrà essere pagata al vostro
Garanzia e policy per le riparazioni
Page 86

86
ENDEFRIT
rivenditore. Le riparazioni a pagamento avranno un costo
minimo di 30 minuti di lavoro e in fattura includeranno le
spese di restituzione. Qualsiasi riparazione non pagata e non
richiesta entro 90 giorni verrà considerata abbandonata e
verrà gestita di conseguenza.
ATTENZIONE: Le riparazioni a pagamento sono
disponibili solo sull’elettronica e sui motori. Le
riparazioni a livello meccanico, soprattutto per
gli elicotteri e le vetture RC sono molto costose
e devono essere effettuate autonomamente
dall’acquirente.
10/2015
Dichiarazione di conformità UE:
RTF PKZU1100: Horizon Hobby, LLC con la presente dichiara che il prodotto è conforme ai requisiti
essenziali e ad altre disposizioni rilevanti delle direttive RED e EMC.
BNF PKZU1180: Horizon Hobby, LLC con la presente dichiara che il prodotto è conforme ai requisiti essenziali e ad
altre disposizioni rilevanti delle direttive RED e EMC.
Una copia della dichiarazione di conformità per l’Unione Europea è disponibile a:
http://www.horizonhobby.com/content/support-render-compliance.
Istruzioni per lo smaltimento RAEE da parte degli utenti dell’Unione Europea
Questo prodotto non deve essere smaltito assieme ai rifiuti domestici. Al contrario, l’utente è responsabile
dello smaltimento di tali rifiuti, che devono essere portati in un centro di raccolta designato per il riciclaggio
di rifiuti elettrici e apparecchiature elettroniche. La raccolta differenziata e il riciclaggio di tali rifiuti provenienti
da apparecchiature, nel momento dello smaltimento aiuteranno a preservare le risorse naturali e garantiranno
un riciclaggio adatto a proteggere il benessere dell’uomo e dell’ambiente. Per maggiori informazioni sui centri di raccolta,
contattare il proprio ufficio locale, il servizio di smaltimento rifiuti o il negozio presso il quale è stato acquistato il prodotto.
Paese di acquisto Horizon Hobby Telefono / indirizzo e-mail Indirizzo
Unione Europea
Horizon Technischer Service service@horizonhobby.eu
Hanskampring 9
D 22885 Barsbüttel, Germany
Sales: Horizon Hobby GmbH +49 (0) 4121 2655 100
Informazioni per i contatti
Informazioni sulla conformità per l’Unione Europea
Page 87

87
EN DE FR IT
Page 88

© 2018 Horizon Hobby, LLC.
ParkZone® products are distributed exclusively by Horizon Hobby, LLC.
US 7,898,130. US D578,146. PRC ZL 200720069025.2. Other patents pending.
The Spektrum trademark is used with permission of Bachmann Industries, Inc.
DSMX is a trademark of Horizon Hobby, LLC., registered in the US. All other marks are trademarks or
registered trademarks of Horizon Hobby, LLC.
www.parkzone.com
RTF PKZU1100, BNF PKZU1180
Updated 7/18
18147.2
 Loading...