

Page 1

PEBS 900 SE
BELT SANDER
Operation and Safety Notes
ΤΑΙΝΙΟΛΕΙΑΝΤΗΡΑΣ
Υποδείξεις χειρισμού και ασφαλείας
BÅNDSLIBER
Brugs- og sikkerhedsanvisninger
BANDSCHLEIFER
Bedienungs- und Sicherheitshinweise
Page 2

Before reading, unfold the page containing the illustrations and familiarise yourself with all functions of the
device.
Før du læser, vend siden med billeder frem og bliv bekendt med alle apparatets funktioner.
Πριν ξεκινήσετε την ανάγνωση, ανοίξτε τη σελίδα με τις εικόνες και εξοικειωθείτε με όλες τις λειτουργίες της
συσκευής.
Klappen Sie vor dem Lesen die Seite mit den Abbildungen aus und machen Sie sich anschließend mit allen
Funktionen des Gerätes vertraut.
GB / IE / CY Operation and Safety Notes Page 5
DK Brugs- og sikkerhedsanvisninger Side 15
GR / CY Υποδείξεις χειρισμού και ασφαλείας Σελίδα 25
DE / AT / C H Bedienungs- und Sicherheitshinweise Seite 37
Page 3
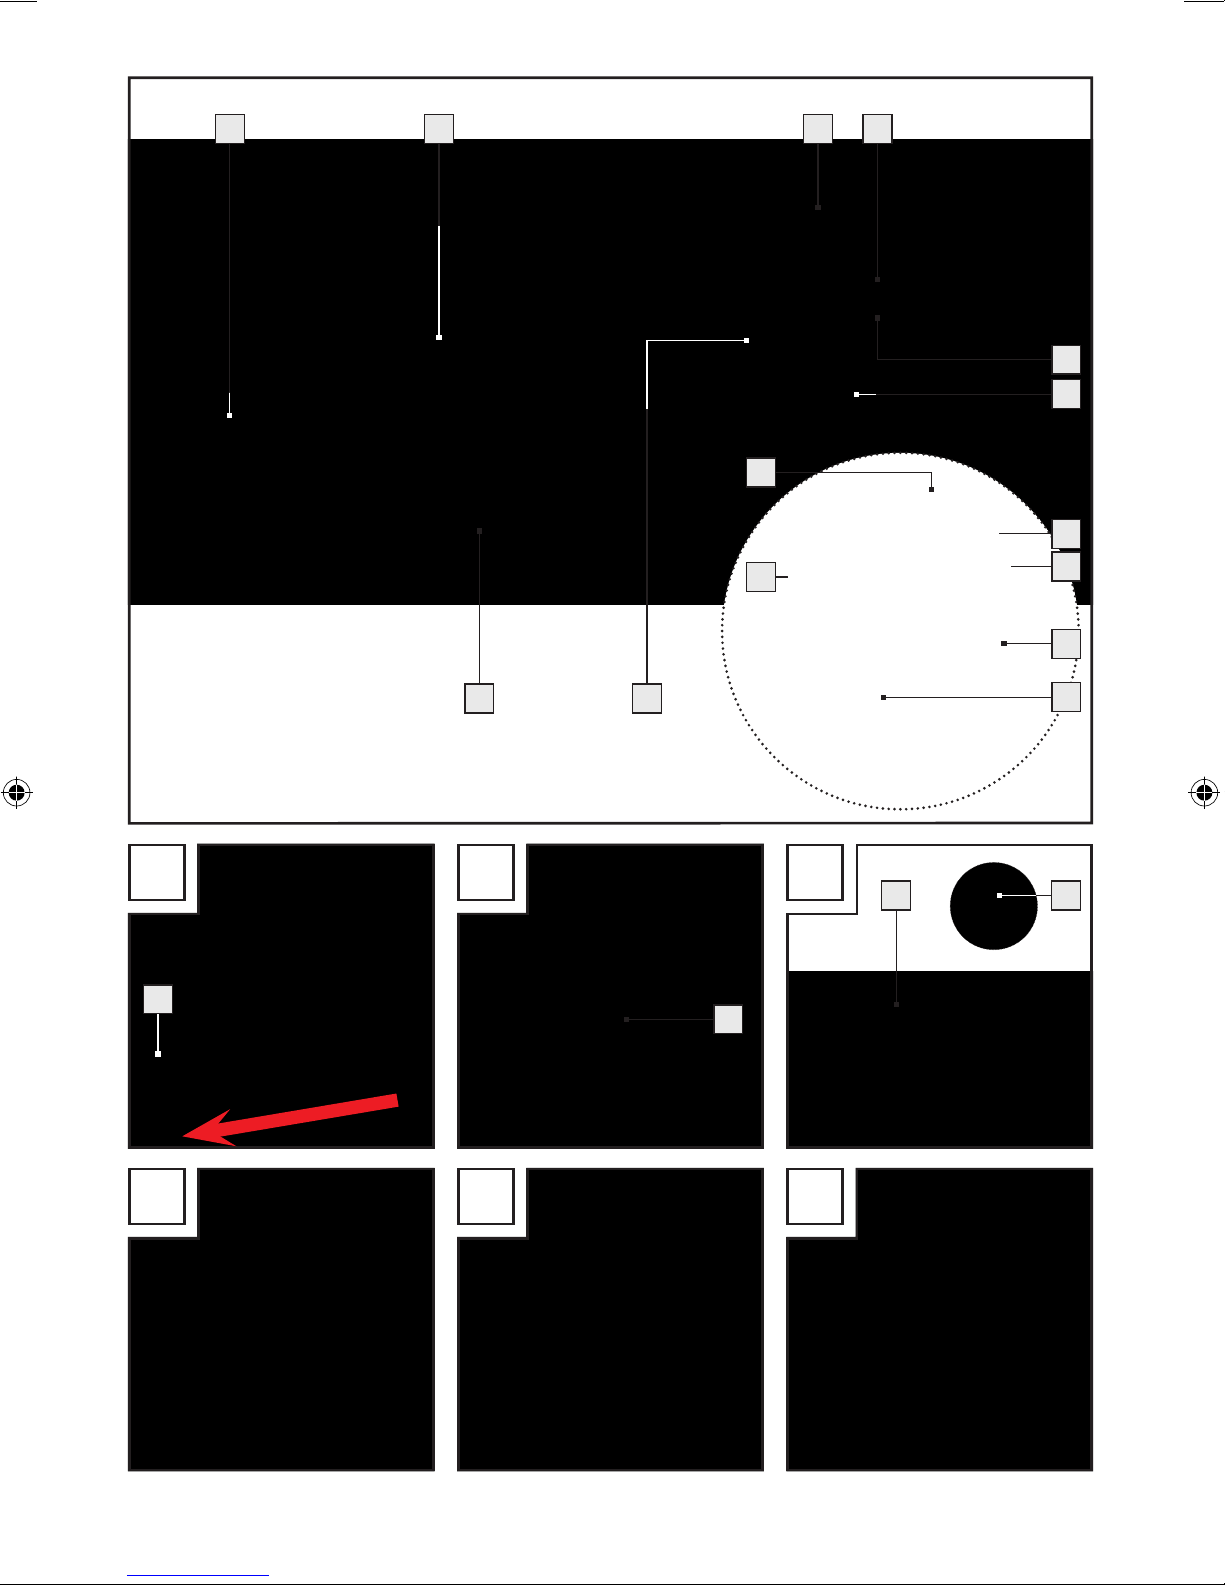
7 8
16
15
1
2
3
4
12
13
14
6
5
A B C
9
6
D E F
14
10 11
Page 4

Table of contents
Introduction
Proper use ......................................................................................................................Page 6
Features and equipment ...............................................................................................Page 6
Included items ...............................................................................................................Page 7
Technical information ....................................................................................................Page 7
General safety advice for electrical power tools
1. Workplace safety .....................................................................................................Page 7
2.
Electrical safety .........................................................................................................Page 8
3. Personal safety ..........................................................................................................Page 8
4.
Careful handling and use of electrical power tools ................................................Page 8
Safety advice for belt sanders ......................................................................................Page 9
Preparing for usea
Tensioning / changing the sanding belt .......................................................................Page 10
Advice on use ................................................................................................................Page 10
Vacuum dust extraction .................................................................................................Page 10
Operation
Switching on and off .....................................................................................................Page 11
Selecting the correct rotational speed and sanding belt ............................................Page 11
Using the sander in a fixed mounting ..........................................................................Page 12
Tips and tricks ................................................................................................................Page 12
Maintenance and cleaning .........................................................................Page 13
Service centre ........................................................................................................Page 13
Warranty ...................................................................................................................Page 13
Disposal ......................................................................................................................Page 13
Declaration of conformity / Producer ................................................Page 14
5 GB/IE/CY
Page 5
Introduction
The following pictograms are used in these operating instructions / on the device:
Read instruction manual! Safety class II
Wear hearing protection, dust
Observe caution and safety notes!
protection mask, protective glasses
and protective gloves.
Caution – electric shock!
Danger to life!
Explosive material! For indoor use only!
n
V
W
0
~
Rated idle running speed
Voltage
Watts (Effective power)
Belt sander PEBS 900 SE
Q
Introduction
Please make sure you familiarise your-
self fully with the way the device works
before you use it for the first time and
that you understand how to handle electrical power tools correctly. To help you do this please read
the accompanying operating instructions.
Keep these instructions in a safe place. If you pass
the device on to anyone else, please ensure that
you also pass on all the documentation.
Q
Proper use
The belt sander is designed for dry sanding of
large surfaces of wood, plastic, metal, plaster and
painted surfaces. The device may only be used for
dry sanding. Always use a sanding belt and grade
of grit suitable for the particular surface you are
sanding. The speed selected should also be appropriate for the material. The device is not intended
for commercial use. Any other use or modification
to the device shall be considered as improper use
Keep children away from electrical
power tools!
Risk of loss of life by electric shock
from damaged mains lead or mains
plug!
Dispose packaging and appliance in
an environmentally-friendly way!
and could give rise to considerable dangers. The
manufacturer will not accept liability for loss or
damage arising from improper use.
Q
Features and equipment
1
Belt speed adjuster wheel
2
Locking knob
3
ON / OFF switch
4
Toothed belt cover
5
Dust extraction spout
6
Belt adjuster screw
7
Auxiliary handle
8
Ventilation slots
9
Tensioning lever
10
Dust collection box
11
Extraction adapter
Fixed mounting kit:
12
Mounting frame
13
Clamp plates 2 x
14
Screw clamps 2 x
15
Spacer plates 2 x
16
Screw
6 GB/IE/CY
Page 6

Introduction / General safety advice for electrical power tools
Q
Included items
Check that all the items and accessories
are present immediately after unpacking
the device:
1 Belt sander PEBS 900 SE
1 Sanding belt
1 Dust collection box
1 Extraction adapter
(for external vacuum dust extraction)
1 Fixed mounting kit
1 Operating instructions
Q
Technical information
Belt sander: Parkside PEBS 900 SE
Nominal voltage: 230 V ~ 50 Hz
Nom. power input: 900 W
No-load belt speed: 180 - 340 m / min
No-load speed: n
345 - 645 min
0
Sanding belt 75 x 533 mm
Protection class: II /
Noise and vibration data:
Values determined in accordance with EN 60745.
The sound pressure level (A-weighted) of the
device is typically 86 dB (A). Uncertainty K = 3 dB.
The sound level while working can exceed
100 dB (A).
-1
Note: If you wish to make an accurate assessment
of the vibration loads experienced during a particular period of working, you should also take into
account the intervening periods of time when the
device is switched off or is running but is not actually in use. This can result in a much lower vibration
load over the whole of the period of working.
The PEBS 900 SE belt sander has full-wave electronics with additional control electronics, soft start
with inrush current limiting.
General safety advice for
electrical power tools
WARNING!
and instructions! Failure to observe the safety
advice and instructions may result in electric shock,
fire and / or serious injury.
KEEP ALL THE SAFETY ADVICE AND INSTRUCTIONS IN A SAFE PLACE FOR FUTURE REFERENCE! THE TERM “ELECTRICAL TOOL” USED
IN THE SAFETY ADVICE REFERS TO ELECTRICAL
TOOLS POWERED BY MAINS ELECTRICITY (BY
MEANS OF A MAINS LEAD) AND ELECTRICAL
TOOLS POWERED BY RECHARGEABLE BATTERIES (WITHOUT A MAINS LEAD).
Read all the safety advice
1. Workplace safety
Wear ear protection!
Total vibration, EN 60745:
Vibration emission value a
Uncertainty K < 1.5 m / s
WARNING!
The vibration level given in these
= 2,928 m / s
h,D
2
instructions has been measured in accordance with
a standardised measurement procedure specified
in EN 60745 and can be used to compare devices.
Different uses of the device give rise to different vibration levels and in many cases they may exceed the
values given in these instructions. It is easy to underestimate the vibration load if the electrical power tool is
used regularly in particular circumstances.
a) Keep your working area clean and
well lit. Untidy or poorly lit working areas
can lead to accidents.
2
b)
Do not work with the device
in potentially explosive environments in which there
are inflammable liquids, gases or
dusts. Electrical power tools create sparks,
which can ignite dusts or fumes.
c)
Keep children and other peo-
ple away while you are operating the electrical tool.
Distractions can cause you to lose control of
the device.
7 GB/IE/CY
Page 7
General safety advice for electrical power tools
2. Electrical safety
To avoid danger to life from
electric shock:
a)
The mains plug on the device must match
the mains socket. The plug must not
be modified in any way. Do not use
an adapter plug with devices fitted
with a protective earth. Unmodified
plugs and matching sockets reduce the risk of
electric shock.
b) Avoid touching earthed surfaces such
as pipes, radiators, ovens and refrigerators with any part of your body.
There is an increased risk of electric shock if
your body is earthed
c) Keep the device away from rain or
moisture. Water entering an electrical device
increases the risk of electric shock.
d)
device, to hang up the device or to pull
the mains plug out of the mains socket.
Keep the mains lead away from heat,
oil, sharp edges or moving parts of the
device. Damaged or tangled mains leads
increase the risk of electric shock.
e) When working outdoors with an
electrical power tool always use extension cables that are also approved
for use outdoors. The use of an extension
cable suitable for outdoor use reduces the risk
of electric shock.
f) Use a residual current device (RCD)
for protection if operating the electrical power tool in a moist environment
is unavoidable. The use of an RCD reduces
the risk of electric shock.
Do not use the mains lead for
any purpose for which it was
not intended, e.g. to carry the
.
drugs, alcohol or medication. One moment of carelessness when using the device
can lead to serious injury.
b)
personal protective equipment such as dust
masks, non-slip safety shoes, safety helmets or
ear protectors, appropriate to the type of electrical power tool used and work undertaken,
reduces the risk of injury.
c) Avoid unintentional operation of the
device. Check that the electrical power
tool is switched off before you connect
it to the mains, pick it up or carry it.
Accidents can happen if you carry the device
with your finger on the ON / OFF switch or with
the device switched on.
d) Remove any setting tools or spanners
before you switch the device on. A tool
or spanner left attached to a rotating part of a
device can lead to injury.
e) Avoid placing your body in an unnat-
ural position. Keep proper footing
and balance at all times. By doing this
you will be in a better position to control the
device in unforeseen circumstances.
f) Wear suitable clothing. Do not wear
loose clothing or jewellery. Keep your
hair, clothing and gloves clear of moving parts. Loose clothing, jewellery or long
hair can become trapped in moving parts.
g) If vacuum dust extraction and collection
devices are fitted do not forget to
that they are properly connected
correctly used. The use of these devices re-
duces the hazard presented by dust.
4.
Careful handling and use of
Wear personal protective
equipment and always wear
safety glasses. The wearing of
check
and
electrical power tools
3. Personal safety
a) Remain alert at all times, watch what
you are doing and always proceed
with caution. Do not use the device if
you are tired or under the influence of
8 GB/IE/CY
a) Do not overload the device. Always
use an electrical power tool that is
intended for the task you are undertaking. By using the right electrical power
tool for the job you will work more safely and
achieve a better result.
Page 8
General safety advice for electrical power tools
b) Do not use an electrical power tool if
its switch is defective. An electrical power
tool that can no longer be switched on and off
is dangerous and must be repaired.
c) Pull the mains plug from the socket
before you make any adjustments to
the device, change accessories or
when the device is put away. This pre-
caution is intended to prevent you from unintentionally starting the device.
d) When not in use always ensure that
electrical power tools are kept out of
reach of children. Do not let anyone
use the device if he or she is not familiar with it or has not read the
instructions and advice. Electrical power
tools are dangerous when they are used by
inexperienced people.
e) Look after the device carefully. Check
that moving parts are working properly and move freely. Check for any
parts that are broken or damaged
enough to detrimentally affect the
functioning of the device. Have damaged parts repaired before you use
the device. Many accidents have their ori-
gins in poorly maintained electrical power
tools.
f) Keep cutting tools clean and sharp.
Carefully maintained cutting tools with sharp
cutting edges are less likely to jam and are
easier to control.
g) Use the electrical power tool, accesso-
ries, inserted tools etc. in accordance
with these instructions and advice,
and the stipulations drawn up for this
particular type of device. In doing this,
take into account the working conditions and the task in hand. The use of
electrical power tools for purposes other than
those intended can lead to dangerous situations.
Safety advice for
belt sanders
J DANGER OF FIRE FROM FLYING
SPARKS! Sanding metal creates flying sparks.
For this reason, always make sure that nobody
is placed in any danger and that there are no
inflammable materials near the working area.
J When undertaking prolonged sanding of
wood, and in particular when working on materials that give rise to dusts that are hazardous
to health, the sander must be connected to a
suitable external dust extraction device.
J Ensure that there is adequate ventilation when
working on plastic, paint, varnish etc.
J The belt sander is designed for the dry sanding
of large surfaces of wood, plastic, metal and
plaster and painted surfaces. The device is to
be used for dry sanding only.
J Do not sand materials containing asbestos.
Asbestos is a known carcinogen.
WARNING!
Sanding paints containing lead, some types of
wood and metal for example may give rise to
hazardous or poisonous dusts and represents a
risk to the health of the person operating the
device and to anyone near the work area.
J Securely support the workpiece. Use clamps or
a vice to grip the workpiece firmly. This is much
safer than holding it with your hand.
J Never support yourself by placing your hands
near or in front of the device or the workpiece
surface. A slip can result in injury.
J If a dangerous situation arises, pull the mains
plug immediately out of the mains socket.
J Always work with the mains lead leading
away from the rear of the device.
J Avoid contact with the moving sanding belt.
J Do not work on moistened materials or damp
surfaces.
J Always switch on the device before placing it
against the workpiece. After sanding, lift the device from the workpiece before switching it off.
J When working always hold the device securely
with both hands (see Fig. D). Always keep
proper footing and balance.
POISONOUS DUSTS!
Wear safety glasses and a dust
protection mask!
9 GB/IE/CY
Page 9
General safety advice for electrical power tools / Preparing for use
J Switch the device off and allow it to come to
a complete standstill before you put it down.
J When taking a break from your work, before
carrying out any tasks on the device itself (e.g.
changing the sanding belt) and when you are
not using the device, always pull the mains
plug out of the mains socket.
Q
Preparing for use
Q
Tensioning / changing
the sanding belt
WARNING!
you carry out any work on the belt sander always
pull the plug out of the mains socket.
1. Then release the tensioner for the sanding belt
by moving the tensioning lever
wards (see fig. A). The tensioner is now open
and the sanding belt can be removed.
2. Next insert a new sanding belt or change the
belt for one suitable for a different material or
one with a different grit size.
IMPORTANT: The direction of the arrows on
the inside of the sanding belt must agree with
that on sander housing.
3. Press the tensioning lever
initial position.
Adjusting the sanding belt:
j Pick up the device, switch it on and turn it over.
Adjust the belt tracking by turning the adjuster
screw
flush with and runs parallel to the edge of the
device (Fig. B.).
IMPORTANT: Always make sure that the
sanding belt does not cut into the housing.
Check the sanding belt regularly and if necessary re-adjust it using the adjuster screw
6
RISK OF INJURY! Before
9
fully out-
9
back into its
until the edge of the sanding belt is
6
.
duce good sanding results. By adopting this
approach you will also prolong the life of your
sanding belts and obtain a smoother workpiece surface.
Sanding and surfaces:
The sanding output and the quality of the surface
finish obtained are determined by the belt speed
and the grade of grit on the sanding belt (see the
section on “Selecting the correct rotational speed
and sanding belt”).
Sanding procedure:
j With the sander switched on, bring it into con-
tact with the workpiece and move it forward
carefully. Work in parallel and overlapping
widths. Always work in the direction of the grain
to avoid undesirable transverse sanding marks.
After sanding always lift the device from the
workpiece before switching it off.
Q
Vacuum dust extraction
WARNING!
the danger of fire when working with electrical devices that have a dustbox or can be connected to a
vacuum cleaner. Under certain conditions the
wood dust in the dust collection box (or in the vacuum‘s dust bag) may self-ignite, e.g. as a result of
flying sparks generated when abrading metals or
metal objects left in wood. This can happen particularly if the wood dust is mixed with paint residue
or other chemicals and the abraded particles are
hot from prolonged abrasion. Therefore you must
empty the device’s dust collection box and the vacuum cleaner’s dust bag before taking a break or
stopping work and always avoid overheating of the
abraded particles and the device.
Wear a dust mask!
DANGER OF FIRE! There is
Q
Advice on use
Light sanding pressure is enough:
j Apply light sanding pressure only. The weight
of the belt sander alone is adequate to pro-
10 GB/IE/CY
Dust extraction using the dust
collection box:
j Slide the dust collection box
extraction spout
(Fig. C).
5
on the side of the device
10
on to the dust
Page 10

Preparing for use / Operation
Emptying the dust collection box:
j Pull the dust collection box
extraction spout
10
box
and empty it.
5
. Open the dust collection
10
off the dust
Dust extraction using external vacuum
extraction:
WARNING!
If there is an explosive mixture
of dust and air you must use a vacuum device especially intended for that purpose.
DANGER OF FIRE! Do not use vacuum dust
extraction (dust collection box or vacuum cleaner)
when sanding metals (flying sparks).
1. Push the extraction adapter
extraction spout
5
on the side of the device
11
on to the dust
(see Fig. C).
2. Slide the hose of a suitable dust extraction de-
vice approved for that purpose (e.g. a workshop
vacuum cleaner) on to the extraction adapter
11
To switch on continuous operation mode:
j Press the ON / OFF switch
3
, and keep it
pressed, then press the locking knob
To switch off continuous operation mode:
j Press and then release the ON / OFF switch
Q
Selecting the correct rotational
speed and sanding belt
You can select the belt speed using the belt speed
adjuster wheel
The optimum belt speed depends on the workpiece
and the workpiece material. Always confirm the
best speed by carrying out a small test. The following table lists some recommended values to help
you determine the optimum speed.
.
Material / type of
work
1
even whilst the sander is running.
Softwood
2
.
3
.
Q
Operation
Q
Switching on and off
The PEBS 900 SE belt sander has full-wave electronics with additional control electronics, soft start
with inrush current limiting.
When operating the belt sander you can select
between intermittent or continuous operation mode.
For short sanding tasks use the intermittent operation
mode. For longer sanding tasks we recommend the
continuous operation mode. Whilst working in your
selected mode the device functions as follows:
To switch on intermittent operation mode:
j Press the ON / OFF switch
3
.
Coarse finish
60
(Grit grade)
Fine finish (Grit grade) 240
Preselected rotation
high (5-6)
speed
Material / type of
Hardwood
work
Coarse finish
60
(Grit grade)
Fine finish (Grit grade) 180
Preselected rotation
high (5-6)
speed
Material / type of
Chipboard
work
Coarse finish
60
(Grit grade)
Fine finish (Grit grade) 150
Preselected rotation
high (5-6)
speed
To switch off intermittent operation mode:
j Release the ON / OFF switch
3
.
11 GB/IE/CY
Page 11
Operation
Material / type of
work
Coarse finish
Removing paint /
varnish
60
(Grit grade)
Fine finish (Grit grade) ––
Preselected rotation
high (5-6)
speed
Material / type of
Sanding varnish
work
Coarse finish
150
(Grit grade)
Fine finish (Grit grade) 320
Preselected rotation
low (1-2)
speed
Material / type of
Rust removal
work
Coarse finish
40
(Grit grade)
Fine finish (Grit grade) 120
Preselected rotation
medium / high (3-4)
speed
Material / type of
Plastic
work
Coarse finish
120
(Grit grade)
Fine finish (Grit grade) 240
Preselected rotation
low / medium (2-3)
speed
Q
Using the sander in
a fixed mounting
The fixed mounting kit allows you to use the device
for sanding vertically or horizontally by fastening
it on to a flat stable surface (e.g. workbench).
Sanding horizontally (see Fig. E):
j Place the belt sander on to the mounting frame
12
and guide the dust extraction spout 5
through the opening of the mounting frame
Tighten the screws
j Place the two clamp plates
16
.
13
on to the holes
provided on the opposite side and screw the
clamp plates tight with the provided screws.
j Insert the pins of the screw clamps
14
holes on one of the long sides of the mounting
frame
frame
12
(see Fig. E). Attach the mounting
12
by tightening the screw clamps 14.
Sanding vertically (see Fig. F):
j Insert the pins of the screw clamps
14
holes on one of the short sides of the mounting
frame
12
. Attach the mounting frame 12 to a
flat, stable surface (e.g. workbench) by tightening the screw clamps
14
.
j Place the belt sander on to the mounting frame
and guide the dust extraction spout
the opening of the mounting frame
the screws
j Place the two clamp plates
16
.
13
provided on the opposite side and screw the
clamp plates tight with the provided screws.
5
12
on to the holes
12
into the
into the
12
through
. Tighten
.
Material / type of
work
Coarse finish
Non-ferrous metals
(e.g. aluminium)
80
(Grit grade)
Fine finish (Grit grade) 150
Preselected rotation
medium / high (3-4)
speed
12 GB/IE/CY
Q
Tips and tricks
j Never use the same sanding belt to sand wood
and metal.
j Worn or ripped sanding belts can damage
the workpiece. Change sanding belts at the
appropriate time.
j Keep the sanding belt properly tensioned so
that it does not hang down too much and
become unusable due to nicks, creases etc.
Page 12
Maintenance and cleaning / Service centre / Warranty / Disposal
Q
Maintenance and cleaning
WARNING!
you carry out any work on the belt sander always
pull the mains plug out of the mains socket.
The belt sander is designed to be maintenance-free.
j Clean the device frequently. This should be done
immediately after you have finished using it.
j Use a dry cloth to clean the device - never use
petrol, solvents or cleaners that attack plastic.
j Always keep the ventilation slots clear.
j Remove any adhering dust with a narrow
paint brush.
Q
Service centre
J
J
WARNING!
paired only by qualified specialist
personnel using original manufacturer parts only. This will ensure that your de-
vice remains safe to use.
WARNING!
lead needs to be replaced, always
have the replacement carried out by
the manufacturer or its service centre.
This will ensure that your device remains safe
to use.
RISK OF INJURY! Before
Have your device re-
If the plug or mains
The appliance is intended solely for private, not
commercial, use.
If this product has been subjected to improper or
inappropriate handling, abuse, or interventions not
carried out by one of our authorised sales and
service outlets, the warranty will be considered void.
This warranty does not affect your statutory rights.
GB
DES UK LTD
Tel.: 0871 5000 700 (£ 0,10 / minute)
e-mail: support.uk@kompernass.com
IE
Kompernaß Service Ireland
Tel.: 1850 930 412 (0,082 €/Min.)
* Standard call rates apply.
Mobile operators may vary.
e-mail: support.ie@kompernass.com
Q
Disposal
The packaging is wholly composed of
environmentally-friendly materials that can
be disposed of at a local recycling centre.
Q
Warranty
This appliance is guaranteed for 3 years
from the date of purchase. It has been
carefully produced and meti-culously
checked before delivery. Please keep
your receipt as proof of purchase. Contact
your service centre by telephone in case
of questions pertaining to the warranty.
Your goods can be transmitted free of
cost only in this manner. This warranty
applies only to the initial purchaser and
is non-transferable.
The warranty covers only material or manufacturing
faults, not normal wear or damage to fragile parts
such as switches or rechargeable batteries.
Do not dispose of electrical
power tools with the household
rubbish!
In accordance with European Directive
2002 / 96 / EC (covering waste electrical and electronic equipment) and its transposition into national
legislation, worn out electrical power tools must be
collected separately and taken for environmentally
compatible recycling.
Contact your local refuse disposal authority for
more details of how to dispose of your worn out
electrical devices.
13 GB/IE/CY
Page 13

Declaration of conformity / Producer
Q
Declaration of conformity /
Producer
We, Kompernaß GmbH, Burgstr. 21,
D-44867 Bochum, Germany, hereby declare that
this product complies with the following EU directives:
Machinery Directive
(98 / 37 / EC)
EU Low Voltage Directive
(2006 / 95 / EC):
EN 60745-1, EN 60745-2-4
Electromagnetic Compatibility
(2004 / 108 / EC):
EN 50366, EN 55014-1, EN 61000-3-2,
EN 61000-3-3, EN 55014-2
Type / Description of product:
Parkside belt sander PEBS 900 SE
Bochum, 31.10.2009
Hans Kompernaß
- Managing Director -
We reserve the right to make technical modifications
in the course of further development.
14 GB/IE/CY
Page 14

Indholdsfortegnelse
Indledning
Anvendelse efter formålet .............................................................................................Side 16
Udrustning .....................................................................................................................Side 16
Leverancens indhold .....................................................................................................Side 17
Tekniske data .................................................................................................................Side 17
Generelle sikkerhedsinstrukser for elektrisk værktøj
1. Sikkerhed på arbejdsstedet ......................................................................................Side 17
2.
Elektrisk sikkerhed .....................................................................................................Side 18
3. Personlig sikkerhed ...................................................................................................Side 18
4.
Omhu i omgangen med og anvendelsen af elektriske redskaber .........................Side 19
Sikkerhedsbestemmelser for båndslibemaskine ..........................................................Side 19
Ibrugtagning
Indspændig / udskiftning af slibebånd ........................................................................Side 20
Råd om arbejdet ...........................................................................................................Side 20
Støvopsugning ...............................................................................................................Side 20
Betjening
Igangsætning og slukning ............................................................................................Side 21
Indstilling af omdrejningstal og valg af slibebånd ......................................................Side 21
Stationært arbejde ........................................................................................................Side 22
Tips og tricks ..................................................................................................................Side 22
Pasning og rengøring .....................................................................................Side 22
Service .........................................................................................................................Side 23
Garanti ........................................................................................................................Side 23
Bortskaffelse ..........................................................................................................Side 23
Konformitetserklæring / Fremstiller ...................................................Side 24
15 DK
Page 15

Indledning
I denne betjeningsvejledning / på apparatet anvendes der følgende piktogrammer:
Læs betjeningsvejledningen! Beskyttelsesklasse II
Følg advarsels- og
sikkerhedsanvisningerne!
Fare for elektrisk stød!
Livsfare!
Eksplosionsfare! Kun til indendørs anvendelse!
n
V
W
0
~
Måling-tomgangshastighed
Volt (Vekselspænding)
Watt (Effektivt)
Båndsliber PEBS 900 SE
Q
Indledning
Dae anbefales at bære sikkerhedsbriller, høreværn, åndedrætsbeskyttelse
og sikkerhedshandsker.
Børn skal holdes borte fra elektrisk
værktøj!
Hvis ledningen eller stikket er beskadiget, er der risiko for livsfarligt elektrisk
stød!
Bortskaf emballagen og maskinen
miljøvenligt efter forskrifterne!
for alvorlige uheld. Fremstilleren påtager sig intet
ansvar for skader som følge af anvendelse i strid
med formålet.
Før De tager apparatet i brug den første
gang bør De sætte Dem ind i dets funkti-
oner og gøre Dem fortrolig med den
korrekte behandling af elektriske redskaber. Dette
kan De gøre med den følgende betjeningsvejldning.
Den skal opbevares godt. Alle medfølgende dokumenter skal følge med hvis De overlader apparatet
til andre.
Q
Anvendelse efter formålet
Båndslibemaskinen er kontrueret til tørslibning af
flader af træ, syntetiske materialer, metal og spartelmasse samt lakerede overflader. Maskinen må
kun anvendes til tørslibning. Vær opmærksom på at
der til behandling af de forskellige materialer skal
anvendes passende slibeplader med forskellig
kornstørrelse, og at omdrejningstallet ligeledes skal
tilpasses efter materialet. Apparatet er ikke beregnet
til erhvervsmæssig anvendelse. Enhver anden anvendelse eller forandring af maskinen gælder som
værende i strid med formålet og indeholder risiko
Q
Udrustning
1
Justeringshjul for båndhastighed
2
Fastgørelsesknap
3
Hovedafbryder
4
Tandremsafdækning
5
Opsugningsstuds
6
Justeringsskrue for båndløb
7
Ekstra-håndgreb
8
Ventilationsslids
9
Spændestang
10
Støvfangsboks
11
Opsugningsadapter
Stationært montagesæt:
12
Montageramme
13
Klemmeplader 2 x
14
Skruetvinger 2 x
15
Afstandsplader 2 x
16
Skrue
16 DK
Page 16

Indledning / Generelle sikkerhedsinstrukser for elektrisk værktøj
Q
Leverancens indhold
Umiddelbart efter udpakning af apparatet kontrolleres leverancens indhold:
1 Båndslibemaskine PEBS 900 SE
1 Slibebånd
1 Støvopfangningsboks
1 Opsugeradapter (til ekstern støvopsugning)
1 Stationært montagesæt
1 Betjeningsvejledning
Q
Tekniske data
Båndsliber: Parkside PEBS 900 SE
Nominel spænding: 230 V ~ 50 Hz
Nominelt indtag: 900 W
Tomgangsbåndhastighed: 180 - 340 m / min
Tomgangsomdrejningstal: n
345 - 645 min
0
Slibebånd: 75 x 533 mm
Sikkerhedsklasse: II /
Støj- og vibrationsinformationer:
Værdierne er målt i henhold til EN 60745.
Det A-målte lydtryksniveau i apparatet andrager
typisk 86 dB (A). Usikkerhed K = 3 dB. Støjniveauet
kan under arbejdet overskride 100 dB (A).
-1
Obs: For at opnå en nøjagtig vurdering af svingningsbelastningen i et bestemt arbejdstidsrum er
man også nødt til at medregne de tidspunkter, hvor
apparatet er slukket, eller ganske vist er tændt, men
egentlig ikke anvendes. Dette kan reducere svingningsbelastningen over hele tidsrummet betydeligt.
Båndsliberen PEBS 900 SE råder over fuldakselteknik med ekstra styringselektronik, softstart med
startstrømsbegrænsning.
Generelle sikkerhedsinstrukser for elektrisk
værktøj
ADVARSEL!
og anvisninger skal læses! Forsømmelighed
over for sikkerhedsinstrukserne og anvisninger kan
resultere i elektriske stød, brand og / eller alvorlige
kvæstelser.
ALLE SIKKERHEDSINSTRUKSER OG ANVISNINGER SKAL OPBEVARES TIL SENERE BRUG!
BEGREBET „ELEKTROVÆRKTØJ“ DER ANVENDES
I SIKKERHEDSANVISNINGERNE, RELATERER
SIG TIL ELEKTRISKE REDSKABER DER ANVENDES
MED LEDNING TIL LYSNETTET OG TIL AKKUMULATORDREVNE ELEKTRISKE REDSKABER
(UDEN LEDNING TIL LYSNETTET).
Alle sikkerhedsinstrukser
Anvend høreværn!
Samlede svingningsværdier, EN 60745:
Svingningsemissionsværdi a
Usikkerhed K < 1,5 m / s
ADVARSEL!
Det i disse anvisninger angivne
h,D
2
= 2,928 m / s
svingningsniveau er blevet målt svarende til en i
EN 60745 normeret målemetode og kan anvendes til sammenligning af apparater.
Svingningsniveauet skal ændre sig svarende til
anvendelse af det elektriske redskab og kan i nogle
tilfælde ligge over den værdi der er angivet i disse
anvisninger. Svingningsbelastningen kan undervurderes hvis det elektriske redskab jævnligt bliver
anvendt på en sådan måde.
1. Sikkerhed på arbejdsstedet
a) Arbejdsområdet skal være ryddeligt
2
og have god belysning. Uorden og
ubelyste arbejdsområder kan være årsag til
ulykker.
b)
Apparatet må ikke anvendes
i eksplosionstruede omgivelser hvor der befinder
sig brændbare væsker, luftarter eller
støvpartikler. Elektriske redskaber danner
gnister der kan antænde dampe eller støv.
c)
Børn og andre personer skal
holdes på afstand når redskabet bliver benyttet. Hvis
17 DK
Page 17

Generelle sikkerhedsinstrukser for elektrisk værktøj
man bliver afledt, kan man miste kontrollen
over apparatet.
2. Elektrisk sikkerhed
Forebyg livsfarlige
elektriske stød:
a)
Apparatets stik skal passe til stikdåsen.
Stikket må ikke ændres på nogen
måde. Der må ikke anvendes adapeterstik sammen med apparatet der har
sikkerhedsjording. Uændrede stik og passen-
de stikdåser nedsætter risikoen for elektrisk stød.
b) Undgå kropskontakt med jordede
overflader som f.eks. rør, varmeapparater, komfurer og køleskabe. Der
er øget risiko ved et elektrisk stød hvis legemet
har jordforbindelse.
c) Apparatet skal beskyttes mod regn
og væde. Hvis der trænger vand ind i et elektrisk apparater der forøget risiko for elektrisk stød.
d)
stikket ud med. Ledningen skal holdes
på afstand varme, olie, skarpe kanter
eller dele af apparatet der er i bevægelse. Beskadigede eller forsnoede ledninger
forhøjer risikoen for elektrisk stød.
e) Til arbejde med elektriske redskaber
under åben himmel, skal der anvendes forlængerledninger der også er
godkendt til udendørs anvendelse.
Anvendelsen af en sådan ledning nedsætter
risikoen for elektrisk stød.
f) Hvis det ikke er til at undgå at elektrisk
værktøj skal bruges i fugtige omgivelser, skal der anvendes en fejlstrømskontakt. En sådan forringer risikoen for elektrisk stød.
Ledningen må ikke benyttes
til at bære maskinen i, hænge
den op i eller til at trække
3. Personlig sikkerhed
med fornuften i behold. Undlad at
bruge apparatet hvis De er træt eller
under indflydelse af euforiserende
stoffer, alkohol eller medikamenter. Et
øjebliks uopmærksomhed under benyttelse af
apparatet kan føre til alvorlige kvæstelser.
b)
sikkerhedsudstyr, som f.eks. støvmaske, skridsik-
kert fodtøj, sikkerhedshjelm eller høreværn, alt
efter det elektriske redskabs art og anvendelse,
nedsætter risikoen for tilskadekomst.
c) Undgå utilsigtet igangsætning. Der skal
drages omsorg for at det elektriske
redskab er slået fra før det bliver forbundet med elektricitetsforsyningen,
når det tages op eller bliver båret.
Hvis man har en finger på afbryderen eller apparatet er slået til medens det bliver båret, kan
dette have ulykker til følge.
d) Indstillingsredskaber eller skruenøg-
ler skal fjernes før apparatet bliver
startet. Et stykke værktøj eller en nøgle der
sidder i en bevægelig del af apparatet, kan
afstedkomme kvæstelser.
e) Undgå at indtage anormal kropshold-
ning. De skal sørge for at De står
sikkert og hele tiden er i balance. På
den måde kan apparatet bedre kontrolleres i
uventede situationer.
f) Ifør Dem egnet beklædning. Den må
ikke være vid, og smykker skal lægges
væk. Hår, beklædningsdele og handsker skal holdes borte fra bevægelige
dele. Hvis De har langt hår, bør De bruge et
hårnet. Løst siddende beklædning, smykker eller
hår kan blive grebet af dele der bevæger sig.
g) Hvis der monteres opsugnings- og op-
fangsanordninger, skal disse være
sluttet til og anvendes korrekt. Anven-
delse af den slags anordninger nedsætter
faremomenterne som følge af støv.
Ifør Dem personligt sikker-
hedsudstyr, og bær altid
sikkerhedsbriller. Personligt
a) Bevar hele tiden opmærksomheden,
pas på hvad De foretage Dem og gå
til værks med det elektriske værktøj
18 DK
Page 18

Generelle sikkerhedsinstrukser for elektrisk værktøj
4.
Omhu i omgangen med og
anvendelsen af elektriske
redskaber
a) Undgå at overbelaste apparatet.
Anvend det elektriske redskab der er
bestemt til Deres arbejde. Med det pas-
sende elektriske værktøj er det bedre og mere
sikkert at arbejde i det angivne effektområde.
b) Tag ikke elektriske redskaber i brug
hvor kontakten er defekt. Et elektrisk apparat der ikke kan tændes eller slukkes, er farligt og skal repareres.
c) Stikket skal strækkes ud af stikkon-
takten før der må foretages indstillinger af maskinen, tilbehørsdele bliver
udskiftet, eller maskinen lægges væk.
Disse sikkerhedstiltag forhindrer utilsigtet igangsætning af apparatet.
d) Elektriske redskaber der ikke er i brug,
skal opbevares uden for børns rækkevidde. Lad ikke personer benyttet
apparatet hvis de ikke er fortrolig med
det eller ikke har læst disse anvisnin
Elektrisk værktøj er farligt hvis det benyttes af
uerfarne personer.
e) Apparatet skal behandles med omhu.
Det skal kontrolleres om bevægelige
dele af apparatet fungerer fejlfrit og
ikke er fastklemt, om noget dele er
knækket eller beskadiget så apparatets funktion er forstyrret. Beskadigede dele skal repareres før apparatet
tages i brug. Mange uheld skyldes dårligt
vedligeholdte elektriske apparater.
f) Skærende værktøjer skal holdes skar-
pe og rene. Ordentligt vedligeholdte skæreredskaber med skarpe ægge klemmer sig ikke
så ofte fast og er lettere at føre.
g) Redskabet, tilbehør, udskiftelige dele
osv. skal anvendes i overensstemmelse
med disse anvisninger og sådan som
det er foreskrevet for denne særlige
type apparat. Her skal der også tages
hensyn til arbejdsbetingelserne og den
opgave der skal udføres. Anvendelse af
elektriske redskaber til andre formål end de angivne kan føre til farlige situationer.
ger.
Sikkerhedsbestemmelser
for båndslibemaskine
J BRANDFARE FRA FLYVENDE GNISTER!
Ved slibning af metal opstår der gnister. Sørg
derfor altid for at ingen personer kan komme
til skade, og at der ikke befinder sig nogen
brændbare materialer i nærheden af arbejdsområdet.
J Under behandling af træ og i særdeleshed af
materialer hvor der kan opstå sundhedsskadeligt
støv, skal apparatet forbindes med en egnet
ekstern opsugningsanordning.
J Ved behandling af syntetiske stoffer, maling, lak
osv. skal der sørges for tilstrækkelig udluftning.
J Båndsliberen er konstrueret til tør slibning af
træ, syntestisk materiale, matel og spatelmasse
samt lakerede flader. Apparatet må kun anvendes til tørslibning.
J Asbestholdigt materiale må ikke behandles.
Asbest gælder som kræftfremkaldende.
ADVARSEL!
der opstår ved slibning f.eks. af blyholdige
farver, visse træsorter og metaller er skadelige /
giftige og udgør en trussel mod den betjenende
persons helbred eller for personer der befinder
sig i nærheden.
J Emnet skal sikres. Der bør benyttes spændean-
ordninger / skruetvinge til at holde emnet fast.
Dette er mere sikkert end med hænderne.
J Støt under ingen omstændigheder med hæn-
derne ved siden af eller foran maskine og det
stykke der skal behandles. Hvis De mister fæstet, er der risiko for at komme til skade.
J I tilfælde af fare skal stikket omgående trækkes
ud af stikdåsen.
J Ledningen skal altid føres bagud og bort fra
maskinen.
J Undgå berøring med det løbende slibebånd.
J Undlad at behandle fugtige materialer eller
fugtige flader.
J Apparatet føres hen mod emnet i løbende
tilstand. Efter behandlingen skal apparatet løftes bort fra emnet medens det er i gang; først
derefter kan der slukkes.
GIFTIGT STØV! Støvdannelser
Der skal bruges øjenbeskyttelse og
åndedrætsværn!
19 DK
Page 19

Generelle sikkerhedsinstrukser for elektrisk værktøj / Ibrugtagning
J Under arbejdet skal apparatet altid holdes fast
med begge hænder (se også illustration D).
Sørg for at De står sikkert.
J Apparatet skal komme i fuldstændig stilstand
og slukkes før det kan lægges bort.
J I arbejdspauser, før alle arbejder på apparatet
(f.eks. udskiftning af slibepapir) og når det ikke
er i brug skal stikket altid trækkes ud.
Q
Ibrugtagning
Q
Indspændig / udskiftning
af slibebånd
ADVARSEL!
Stikket skal altid trækkes ud før der gennemføres
arbejder på båndsliberen.
1. Først skal spændeanordningen for slibebåndet
løsnes ved at spænde-stangen
ud (se illustration A). Spændeanordningen er
nu åbnet, og slibebåndet kan tages ud.
2. Det nye slibebånd sættes i henholdsvis skiftes
hvis der skal behandles andet materiale, eller
der skal anvendes en anden kornstørrelse.
VIGTIGT: Pileretningerne på indersiden af
slibebåndet og på apparatets indfatning skal
passe med hinanden.
3. Spændestangen
udgangsposition.
Justering af slibebåndet:
j Apparatet tages op, sættes i gang og vendes
om. Nu kan båndløbet justeres ved at justeringsskruen
ligger tæt og parallelt med apparatets kant
(illustration B).
VIGTIGT: Sørg hele tiden for at slibebåndet
ikke gnaver sig ind i indfatningen. Båndløbet
skal jævnligt kontrolleres og om nødvendigt
indstilles med justeringsskruen
FARE FOR PERSONSKADER!
9
drejes helt
9
trykkes tilbage i sin
6
drejes så kanten af slibebåndet
6
.
Q
Råd om arbejdet
Et ringe slibetryk er tilstrækkeligt:
j Der arbejdes med et ringe tryk. Båndsliberens
egenvægt er tilstrækkelig til at opnå et godt
sliberesultat. Derudover bliver slidtagen på
slibebåndet nedsat på denne måde; emnets
overflade bliver glattere.
Abslibning og overflade:
Afslibningseffekten og overfladekvaliteten bestemmes
af båndets hastighed og kornstørrelsen på slibebå
(se også afsnittet ”Indstilling af af omdrejningstal og
slibebånd”).
Slibningen:
ndet
j Apparatet anbringes på emnet i løbende til-
stand, og der arbejdes med mådelig fremskydning. Slibningen udføres parallelt og overlappende i forhold til slibebanerne. Til undgåelse
af forstyrrende tværløbende slibespor skal der
kun slibes i fibrenes retning. Når behandlingen
er færdig, skal maskinen løftes bort fra emnet
og først derefter slukkes.
Q
Støvopsugning
ADVARSEL!
elektriske apparater der råder over en støvopfangsboks eller er forbundet med støvsugeren over en
støvopsugningsanordning, frembyder brandfare! Under ugunstige forhold, som f.eks. flyvende gnister,
slibning af metal eller metalrester i træ, kan træstøvet i støvopfangsboksen (eller i støvsugerposen) gå
i selvantændelse. Dette kan især ske når træstøvet
er blandet op med lakrester eller andre kemiske
stoffer og slibegodset er varmt efter længere tids
arbejde. Undgå altså for enhver pris en overophedning af slibegodset og af apparatet, og tøm altid
støvopfangsboksen resp. støvsugerposen før pauser i arbejdet.
BRANDFARE! Arbejde med
20 DK
Ifør Dem en
støvbeskyttende maske!
Page 20

Ibrugtagning / Betjening
Støvopsugning med støvopfangsboks:
j Støvopfangsboksen
opsugningsstudsen
10
skubbes ind over
5
på siden af apparatet
(illustration C).
Tømning af støvopfangsboksen:
j Srøvopfangsboksen
studsen
5
. Støvopfangsboksen 10 åbnes og
10
trækkes af opsugnings-
tømmes.
Støvopsugning med fremmedopsugning:
ADVARSEL!
Til eksplosive støvarter / luftblandinger skal der anvendes en dertil specielt egnet
opsuger.
BRANDFARE! Ved slibning af metaller (flyvende
gnister) må der ikke anvendes støvopsugning
(støvopfangsboks eller støvsuger).
1. Opsugningsadapteren
sugningsstudsen
11
anbringes på op-
5
på siden af apparatet
(se illustration C).
2. Slangen til en tilladt støvopsugningsanordning
(f.eks. til en værkstedsstøvsuger) skydes ind
over opsugningsadapteren
11
.
Frakobling af momentandrift:
j Afbryderkontakten
3
slippes.
Aktivering af langtidsdrift:
j Der trykkes på afbryderkontakten
trykket, og der trykkes på låseknappen
3
, den holdes
2
.
Frakobling af langtidsdrift:
j Der trykkes på afbryderkontakten
3
som
derefter slippes.
Q
Indstilling af omdrejningstal
og valg af slibebånd
Med justeringshjulet til båndhastighed 1 kan
omdrejningstallet indstilles – også når apparatet er
i gang. Den optimale båndhastighed er afhængig
af det emne resp. materialet der skal behandles.
Prøv selv at finde frem til det bedste omdrejningstal
vefd et praktisk forsøg. I den følgende tabel er der
angivet uforpligtende værdier der kan lette det at
finde frem til den optimale indstilling.
Q
Betjening
Q
Igangsætning og slukning
Båndsliberen PEBS 900 SE har massiv akselektronik
med ekstra styringselektronik, blød motorstart med
startstrømsbegrænsning.
I betjeningen af båndsliberen kan der indstilles på
momentan- og langtids drift. Til kortvarige opgaver
indstilles den på momentandrift. Til længerevarende
opgaver anbefales det at indstilles på langtidsdrift.
Den ønskede indstilling fungerer på følgende måde:
Materiale /
Blødt træ
abejdsområde
Grovslibning (korning) 60
Finslibning (korning) 240
Indstilling af
højt (5-6)
omdrejningstaæ
Materiale /
Hårdt træ
arbejdsområde
Grovslibning (korning) 60
Finslibning (korning) 180
Indstilling af
højt (5-6)
omdrejningstal
Materiale /
Spånplader
abejdsområde
Grovslibning (korning) 60
Finslibning (korning) 150
Aktivering af momentandrift:
j Der trykkes på afbryderkontakten
Indstilling af
3
.
omdrejningstal
Højt (5-6)
21 DK
Page 21

Betjening / Pasning og rengøring
Materiale /
abejdsområde
Fjernelse af maling / lak
Grovslibning (korning) 60
Finslibning (korning) ––
Indstilling af omdrej-
Højt (5-6)
ningstal
Materiale /
Slibning af lakker
abejdsområde
Grovslibning (korning) 150
Finslibning (korning) 320
Indstilling af
Lavt (1-2)
omdrejningstal
Materiale /
abejdsområde
Rustafslibning af
stål
Grovslibning (korning) 40
Finslibning (korning) 120
Indstilling af
middel / højt (3-4)
omdrejningstal
Materiale /
Kunststoffer
abejdsområde
Horisontalt arbejde (se illustration E):
j Båndsliberen anbringes på montagerammen
og opsugningsstudsen
gerammens åbning
j De to klemmeplader
beregnede huller på den overfor liggende side,
og disse skrues fast med de forberedte skruer.
j Boltene til skruetvingerne
ringer på en af montagerammens langsider
(se illustration E). Montagerammen
ved at skruetvingerne
Vertikalt arbejde (se illustration F):
j Boltene til skruetvingerne
ringer på en af montagerammens
Montagerammen
fast flade (f.eks. en høvlbænk) ved at skruetvingerne
14
drejes fast til.
5
føres gennem monta-
12
- Skruen
13
anbringes på de dertil
14
spændes fast.
14
12
anbringes på en jævn
16
spændes til.
14
stikkes ind i udbo-
12
stikkes ind i udbo-
12
korte sider.
befæstes
j Båndsliberen anbringes på montagerammen
og opsugningsstudsen
gerammens åbning
j De to klemmeplader
beregnede huller på den overfor liggende side,
og disse skrues fast med de forberedte skruer.
5
føres gennem monta-
12
- Skruen 16 spændes til.
13
anbringes på de dertil
12
12
12
Grovslibning (korning) 120
Finslibning (korning) 240
Indstilling af
lavt / middel (2-3)
omdrejningstal
Materiale /
abejdsområde
No-ferro-metaller
(f.eks. alu)
Grovslibning (korning) 80
Finslibning (korning) 150
Indstilling af
middel / højt (3-4)
omdrejningstal
Q
Stationært arbejde
Med det stationære montagesæt kan apparatet
fastgøres for arbejde vertikale eller horisontalt på
en jævn, fast flade (f.eks. en høvlbænk).
Q
Tips og tricks
j Træ og metal må ikke behandles med det
samme slibebånd.
j Nedslidte eller forrevne slibebånd kan beskadige
emnet. Sørg derfor for at slibebåndene bliver
skiftet ud i rette tid.
j Slibebåndene opbevares bedst hængende
idet de bliver udbrugelige hvis de foldes eller
knækkes.
Q
Pasning og rengøring
ADVARSEL!
FARE FOR PERSONSKADER!
Stikket skal altid trækkes ud af stikkontakten, før der
må udføres noget arbejde på båndslibemaskinen.
Båndsliberen er pasningsfri.
j Apparatet bør rengøres regelmæssigt efter
arbejdets afslutning.
22 DK
Page 22

Pasning og rengøring / Service / Garanti / Bortskaffelse
j Til rengøring af apparatet anvendes der et tørt
stykke stof og under ingen omstændigheder
benzin, opløsningsmidler eller rengøringsmidler
der angriber syntetisk materiale.
j Ventilationsåbningerne skal altid holdes frie.
j Aflejret slibestøv fjernes med en pensel eller
blød børste.
Q
Service
J
J
Q
Garanti
På dette apparat får du 3 års garanti fra
købsdato. Apparatet er produceret med
stor omhu og er kontrolleret omhyggeligt
før levering. Opbevar kassebonen som
bevis for købet. Ring til det pågældende
servicested i tilfælde af, at garantien skal
tages i brug. Kun på denne måde kan vi
sikre dig en gratis indsendelse af din vare.
ADVARSEL!
kun repareres af kvalificerede fagfolk
og kun med originale reservedele.
På den måde er der garanti for at maskinens
sikkerhed bibeholdes.
ADVARSEL!
eller ledning skal udføres af fremstilleren eller dennes kundetjeneste.
Dermed er der garanti for at maskinens sikkerhed bibeholdes.
Deres apparater må
Udskiftning af stik
DK
Kompernass Service Danmark
Hornbækvej 473
DK-3080 Tikøb
Tel.: +45 4975 8454
Fax: +45 4975 8453
e-mail: support.dk@kompernass.com
Q
Bortskaffelse
Emballagen består af mljøvenlige
materialer og kan smides ud på de
lokale genbrugsstationer.
Elektriske apparater hører
ikke til i husholdningsaffaldet!
I henhold til Europæisk direktiv 2002 / 96 / EC om
udtjente elektriske apparater og dets omsætning til
national lov skal brugte elektriske redskaber indsamles særskilt og bringes til miljvenlig genindvinding.
Mulighederne for at komme af med et udtjent apparat
kan De få at vide hos de lokale myndigheder.
Garantiydelsen gælder kun for materiale- og fabrikationsfejl, men ikke for sliddele eller for beskadigelser på skrøbelige dele, f.eks. kontakter eller batterier.
Produktet er kun beregnet til brug i private husholdninger og ikke til erhvervsmæssig anvendelse.
Ved misbrug og ukorrekt behandling, vold og ved
indgreb, som ikke er udført af vores autoriserede
serviceafdeling, bortfalder garantien. De rettigheder,
som du er sikret ved lov, begrænses ikke af denne
garanti. Denne garanti gælder kun i forhold til den
første køber og kan ikke videregives.
23 DK
Page 23

Konformitetserklæring / Fremstiller
Q
Konformitetserklæring /
Fremstiller
Vi, Kompernaß GmbH, Burgstr. 21,
D-44867 Bochum, Tyskland, erklærer hermed for
dette produkt overensstemmelse med de følgende
EF-direktiver:
Maskindirektiv
(98 / 37 / EC)
EF-lavspændingsdirektiv
(2006 / 95 / EC):
EN 60745-1, EN 60745-2-4
Elektromagnetisk fordragelighed
(2004 / 108 / EC):
EN 50366, EN 55014-1, EN 61000-3-2,
EN 61000-3-3, EN 55014-2
Type / betegnelse på produktet:
Parkside Båndslibemaskine PEBS 900 SE
Bochum, 31.10.2009
Hans Kompernaß
- direktør -
Tekniske ændringer af hensyn til den videre
udvikling forbeholdes.
24 DK
Page 24

Πίνακας περιεχομένων
Eισαγωγή
Χρήση σύμφωνα με τους κανονισμούς .......................................................................Σελίδα 26
Εξοπλισμός ...................................................................................................................Σελίδα 26
Περιεχόμενα παράδοσης .............................................................................................Σελίδα 27
Τεχνικά δεδομένα ..........................................................................................................Σελίδα 27
Γενικέ υποδείξει ασφάλεια για ηλεκτρικά εργαλεία
1. Θέση εργασίας-ασφάλεια ........................................................................................Σελίδα 27
2.
Ηλεκτρική ασφάλεια .................................................................................................Σελίδα 28
3. Ασφάλεια ατόμων .....................................................................................................Σελίδα 28
4.
Ασφαλής λειτουργία και χρήση ηλεκτρονικών συσκευών ......................................Σελίδα 29
Υποδείξεις ασφάλειας για μηχανές λείανσης με ιμάντα ............................................Σελίδα 29
Θέση σε λειτουργία
Τάνυση / αντικατάσταση ιμάντα λείανσης ...................................................................Σελίδα 30
Υποδείξεις εργασίας ....................................................................................................Σελίδα 31
Αναρρόφηση σκόνης ...................................................................................................Σελίδα 31
Χειρισό
Ενεργοποίηση και απενεργοποίηση ............................................................................Σελίδα 31
Επιλογή αριθμούς στροφών και ιμάντα λείανσης ......................................................Σελίδα 32
Στατική εργασία ............................................................................................................Σελίδα 33
Συμβουλές και τρικ .......................................................................................................Σελίδα 33
Συντήρηση και καθαρισό ......................................................................Σελίδα 33
Σέρβι ...........................................................................................................................Σελίδα 34
Εγγύηση .....................................................................................................................Σελίδα 34
Απόσυρση ................................................................................................................Σελίδα 34
ήλωση συόρφωση /Κατασκευαστή ......................................Σελίδα 35
25 GR/CY
Page 25

Εισαγωγή
Σε αυτέ τι οδηγίε χρήση / συσκευή πορούν να χρησιοποιηθούν τα
παρακάτω εικονογράατα:
Διαβάστε την οδηγία χρήσεως! Κατηγορία προστασίας II
Προσέχετε τις προειδοποιητικές υποδείξεις και τις υποδείξεις ασφαλείας!
Προσοχή για ηλεκτροπληξία!
Κίνδυνος ζωής!
Κίνδυνος έκρηξης!
Ονομαστικές στροφές κατά
n
V
W
0
~
τη λειτουργία εν κενώ
Volt (Εναλλασσόμενη τάση)
Watt (Αποτελεσματική ισχύς)
Ταινιολειαντηρα PEBS 900 SE
Q
Eισαγωγή
Εξοικειωθείτε με τις λειτουργίες της
συσκευής
λειτουργία και πληροφορηθείτε σχετικά
με την ορθή συναναστροφή με ηλεκτρονικές συσκευές.
Για το λόγο αυτό διαβάστε τις παρακάτω οδηγίες
λειτουργίας. Φυλάξτε τις οδηγίες αυτές. Παραδώστε όλα τα έγγραφα κατά τη μεταβίβαση της συσκευής σε τρίτο.
Q
Χρήση σύφωνα ε του
πριν από την πρώτη θέση σε
κανονισού
Η μηχανή λείανσης με ιμάντα έχει σχεδιαστεί για
στεγνή λείανση επιφανειών ξύλου, συνθετικών υλικών,
μετάλλων, ασταριών καθώς και βερνικωμένων επιφανειών. Η μηχανή επιτρέπεται να χρησιμοποιείται
μόνο για στεγνή λείανση. Παρακαλούμε λάβετε
υπόψη σας ότι κατά την επεξεργασία των διαφόρων
υλικών θα πρέπει να χρησιμοποιούνται τα κατάλληλα ελάσματα λείανσης με διαφορετική υφή και ο
αριθμός στροφών θα πρέπει να προσαρμόζεται.
Φοράτε προστατευτικά γυαλιά, ωτοασπίδες, μάσκα στόματος που προστατεύει
από τη σκόνη και προστατευτικά γάντια.
Κρατήστε τα παιδιά μακριά από
ηλεκτρικά εργαλεία!
Κατάλληλο μόνο για χρήση
σε εσωτερικούς χώρους!
Κίνδυνος θάνατος από ηλεκτροπληξία όταν είναι ελαττωματικό το καλώδιο ή το βύσμα δικτύου!
Απομακρύνετε τη συσκευασία και τη
συσκευή φιλικά προς το περιβάλλον!
Η συσκευή δεν προορίζεται για βιομηχανική εφαρμογή. Οποιαδήποτε άλλη χρήση ή τροποποίηση
του μηχανήματος θεωρείται ως αντικανονική και
εγκυμονεί σοβαρούς κινδύνους ατυχημάτων. Ο
κατασκευαστής δεν αναλαμβάνει καμία ευθύνη για
φθορές που οφείλονται σε μη ορθή χρήση.
Q
Εξοπλισό
1
Ρυθμιστικός τροχός ταχύτητας ιμάντα
2
Κουμπί ρύθμισης
3
Διακόπτης ΕΝΤΟΣ / ΕΚΤΟΣ
4
Κάλυμμα οδοντωτού ιμάντα
5
Στόμιο αναρρόφησης
6
Ρυθμιστική βίδα για πορεία ιμάντα
7
Πρόσθετη χειρολαβή
8
Οπή αερισμού
9
Μοχλός τάνυσης
10
Κουτί συλλογής σκόνης
11
Προσαρμογέας αναρρόφησης
Στατικό σετ συναρολόγηση:
12
Πλαίσιο συναρμολόγησης
13
Πλάκες στερέωσης 2 x
14
Σφιγκτήρες 2 x
15
Πλάκες απόστασης 2 x
16
Βίδα
26 GR/CY
Page 26

Εισαγωγή / Γενικές υποδείξεις ασφάλειας για ηλεκτρικά εργαλεία
Q
Περιεχόενα παράδοση
Ελέγξτε αέσω ετά το ξεπακετάρισα
τη συσκευή τα περιεχόενα παράδοση:
ενδέχεται να υπερβαίνει τις τιμές που αναφέρονται
στις παρούσες οδηγίες. Το φορτίο δονήσεων ενδέχεται να υποτιμηθεί, σε περίπτωση που το ηλεκτρικό
εργαλείο χρησιμοποιείται τακτικά κατά τέτοιο τρόπο.
1 tαινιολειαντηρας PEBS 900 SE
1 ιμάντας λείανσης
1 κουτί συλλογής σκόνης
1 προσαρμογέας αναρρόφησης (για εξωτερική
αναρρόφηση σκόνης)
1 στατικό σετ συναρμολόγησης
1 οδηγίες χειρισμού
Q
Τεχνικά δεδοένα
Tαινιολειαντηρα: Parkside
PEBS 900 SE
Ονομαστική τάση: 230 V ~ 50 Hz
Κανονική απορροφούμενη
ισχύς: 900 W
Ταχύτητα
ιμάντα ρελαντί: 180 - 340 m / min
Αριθμός στροφών ρελαντί: n
345 - 645 U / min
0
Ιμάντας λείανσης: 75 x 533 mm
Κλάση προστασίας: II /
Πληροφορίε θορύβου και δονήσεων:
Τιμές υπολογισμένες σύμφωνα με πρότυπο EN 60745.
Η υπολογισμένη στάθμη ακουστικής πίεσης A της
συσκευής ανέρχεται χαρακτηριστικά σε 86 dB (A).
Ανασφάλεια K = 3 dB. Η στάθμη ακουστικής πίεσης
ενδέχεται κατά την εργασία να υπερβεί τα 100 dB (A).
Φοράτε ωτοασπίδε!
Συνολικές τιμές δονήσεων, EN 60745:
Τιμή εκπομπής δονήσεων a
Αστάθεια K < 1,5 m / s
2
= 2,928 m / s
h,D
2
Υπόδειξη: Για τον ακριβή υπολογισμό της επιβάρυνσης κραδασμών κατά τη διάρκεια ενός ορισμένου χρονικού διαστήματος εργασίας θα πρέπει να
ληφθούν υπόψη και οι χρόνοι κατά τους οποίους
η συσκευή είναι απενεργοποιημένη ή λειτουργεί χωρίς όμως να παράγει πραγματικά έργο. Αυτό μπορεί
να μειώσει σημαντικά την επιβάρυνση κραδασμών
για το συνολικό χρονικό διάστημα εργασίας.
Ο tαινιολειαντηρας PEBS 900 SE διαθέτει υπεραυτόματο ηλεκτρονικό σύστημα με πρόσθετο ηλεκτρονικό ρυθμιστικό σύστημα, σύστημα ομαλής εκκίνησης
με περιορισμό ενεργοποίησης.
Γενικέ υποδείξει
ασφάλεια για
ηλεκτρικά εργαλεία
ΠΡΟΕΙΟΠΟΙΗΣΗ!
υποδείξει ασφάλεια και οδηγίε! Οι παραβ-
ιάσεις κατά την τήρηση των υποδείξεων ασφάλειας
και των οδηγιών ενδέχεται να προκαλέσουν ηλεκτ ροπληξία, πυρκαγιά ή / και σοβαρούς τραυματισμούς.
ΔΙΑΦΥΛΑΞΤΕ ΟΛΕΣ ΤΙΣ ΥΠΟΔΕΙΞΕΙΣ
ΑΣΦΑΛΕΙΑΣ ΚΑΙ ΤΙΣ ΟΔΗΓΙΕΣ ΓΙΑ
ΜΕΛΛΟΝΤΙΚΗ ΧΡΗΣΗ! Ο ΟΡΟΣ ΠΟΥ
ΧΡΗΣΙΜΟΠΟΙΕΙΤΑΙ ΣΤΙΣ ΥΠΟΔΕΙΞΕΙΣ
ΑΣΦΑΛΕΙΑΣ „ΗΛΕΚΤΡΟΝΙΚΟ ΕΡΓΑΛΕΙΟ“
ΑΝΑΦΕΡΕΤΑΙ ΣΕ ΗΛΕΚΤΡΙΚΑ ΕΡΓΑΛΕΙΑ ΠΟΥ
ΛΕΙΤΟΥΡΓΟΥΝ ΜΕ ΤΟ ΔΙΚΤΥΟ (ΜΕ ΚΑΛΩΔΙΟ
ΔΙΚΤΥΟΥ) ΚΑΙ ΣΕ ΑΥΤA ΠΟΥ ΛΕΙΤΟΥΡΓΟΥΝ
ΜΕ ΜΠΑΤΑΡΙΑ (ΧΩΡΙΣ ΚΑΛΩΔΙΟ ΔΙΚΤΥΟΥ).
ιαβάστε όλε τι
ΠΡΟΕΙΟΠΟΙΗΣΗ!
Η αναφερόμενη στις
παρούσες οδηγίες στάθμη δονήσεων μετρήθηκε με
τυποποιημένη μέθοδο μέτρησης σύμφωνα με το
πρότυπο EN 60745 και μπορεί να χρησιμοποιηθεί
για τη σύγκριση της συσκευής.
Η στάθμη δονήσεων μεταβάλλεται ανάλογα με τη
χρήση του ηλεκτρικού εργαλείου και μερικές φορές
1. Θέση εργασία-ασφάλεια
α) ιατηρείτε το χώρο εργασία σα
καθαρό και καλά φωτισένο.
Η ακαταστασία καθώς και ο ελλιπής φωτισμός
του χώρου εργασίας μπορεί να οδηγήσει σε
ατυχήματα.
27 GR/CY
Page 27

Γενικές υποδείξεις ασφάλειας για ηλεκτρικά εργαλεία
β) Μην εργάζεστε ε τη συσκευή
σε περιβάλλον όπου υφίσταται κίνδυνο έκρηξη, στο
οποίο υπάρχουν εύφλεκτα υγρά,
αέρια ή σκόνη. Τα ηλεκτρονικά εργαλεία
παράγουν σπίθες, οι οποίες μπορεί να
αναφλέξουν τη σκόνη ή τους ατμούς.
γ)
χρήση του. Σε περίπτωση μη τήρησης ίσως
χάσετε τον έλεγχο της συσκευής.
Κρατήστε τα παιδιά και άλλα
άτοα ακριά από το ηλεκτρονικό εργαλείο κατά τη διάρκεια
2. Ηλεκτρική ασφάλεια
Αποφύγετε τον κίνδυνο για τη
ζωή από ηλεκτροπληξία:
α) Το βύσα σύνδεση συσκευή θα
πρέπει να ταιριάζει στην πρίζα.
Απαγορεύεται η τροποποίηση ε
οποιοδήποτε τρόπο του βύσατο.
Απαγορεύεται η χρήση βύσατο
προσαρογέα αζί ε συσκευέ ε
προστατευτική γείωση. Το ανέπαφο βύσμα
και η κατάλληλη πρίζα μειώνουν τον κίνδυνο
πρόκλησης ηλεκτροπληξίας.
β) Αποφύγετε τη σωατική επαφή ε
γειωένε επιφάνειε, όπω σωλήνε,
θεραντικά σώατα, εστίε και ψυγεία.
Υφίσταται υψηλός κίνδυνος ηλεκτροπληξίας
όταν το σώμα σας γειωθεί.
γ) Κρατήστε τη συσκευή ακριά
βροχή και την υγρασία. Η εισχώρηση
νερού μέσα σε μία ηλεκτρονική συσκευή
αυξάνει τον κίνδυνο ηλεκτροπληξίας.
δ)
αναρτήσετε ή για να τραβήξετε το βύσα
από την πρίζα. Κρατήστε το καλώδιο
ακριά από θερότητα, λάδι, αιχηρέ
ακέ ή κινούενα εξαρτήατα συσκ
Κατεστραμμένο ή τυλιγμένο καλώδιο αυξάνει τον
κίνδυνο πρόκλησης ηλεκτροπληξίας.
ε) Για χρήση ηλεκτρονική συσκευή σε
εξωτερικού χώρου, χρησιοποιήστε
Μην χρησιοποιείτε το καλώδιο
για άλλο λόγο, για να εταφέρετε τη συσκευή, για να την
από τη
ευή.
όνο καλώδιο επέκταση που είναι
κατάλληλο για εξωτερική χρήση. Η
χρήση ενός καλωδίου κατάλληλο για εξωτερική
χρήση μειώνει τον κίνδυνο ηλεκτροπληξίας.
ζ) Σε περίπτωση που είναι αναπόφευκτη
η λειτουργία του ηλεκτρικού εργαλείου
σε υγρό περιβάλλον, χρησιοποιείτε
προστατευτικό διακόπτη συνολικού
ρεύατο προ το σφάλα. Η χρήση
προστατευτικού διακόπτη συνολικού ρεύματος
προς το σφάλμα μειώνει τον κίνδυνο
ηλεκτροπληξίας.
3. Ασφάλεια ατόων
α) Επιδείξτε εγάλη προσοχή, έχετε
πάντοτε επίγνωση των πράξεών σα
και δείξτε ιδιαίτερη συναίνεση στην
εργασία που πραγατοποιείτε ε
το ηλεκτρονικό εργαλείο. Μην
χρησιοποιείτε τη συσκευή όταν δεν
είσαστε συγκεντρωένοι ή όταν
νοιώθετε κούραση ή ενώ βρίσκεστε υπό
την επήρεια ναρκωτικών, αλκοόλ ή
φαράκων. Ακόμα και μόλις μία στιγμή
αφηρημάδας κατά τη χρήση της συσκευής μπορεί
να οδηγήσει σε σοβαρούς τραυματισμούς.
β)
γυαλιά. Ο προσωπικός προστατευτικός
εξοπλισμός όπως είναι αναπνευστική μάσκα,
προστατευτικά παπούτσια που δεν γλιστράνε,
προστατευτικό κράνος ή ωτοασπίδες,
ανάλογα με το είδος και την εφαρμογή του
μειώνουν τον κίνδυνο πρόκλησης τραυματισμών.
γ) Αποφεύγετε την αθέλητη θέση σε
λειτουργία. Βεβαιωθείτε ότι το ηλεκτρικό εργαλείο είναι απενεργοποιηένο
προτού το συνδέσετε στην ηλεκτρική
τροφοδοσία ή το πάρετε και το
εταφέρετε. Εάν κατά τη μεταφορά της
συσκευής έχετε το δάκτυλό σας στο διακόπτη
ΕΝΤΟΣ / ΕΚΤΟΣ ή η συσκευή είναι ενεργοποιημένη, ενδέχεται να προκληθούν ατυχήματα.
δ) Αποακρύνετε τα εργαλεία ρύθιση ή
τα κλειδιά προτού ενεργοποιήσετε τη
Φοράτε προσωπικό
προστατευτικό εξοπλισό και
πάντα προστατευτικά
28 GR/CY
Page 28

Γενικές υποδείξεις ασφάλειας για ηλεκτρικά εργαλεία
συσκευή. Ενα εργαλείο ή ένα κλειδί που
βρίσκεται πάνω σε ένα περιστρεφόμενο
εξάρτημα συσκευής μπορεί να προκαλέσει
τραυματισμούς.
ε) Αποφεύγετε αντικανονική στάση του
σώατό σα. Φροντίζετε ώστε να
υπάρχει πάντα σταθερή θέση και
διατηρείτε ανά πάση στιγή την
ισορροπία σα. Ετσι μπορείτε να ελέγχετε
καλύτερα τη συσκευή και ιδιαίτερα σε
απρόσμενες καταστάσεις.
ζ) Φοράτε κατάλληλο ρουχισό.
Μην φοράτε φαρδιά ρούχα και
κοσήατα. Κρατήστε τα αλλιά, το
ρουχισό και τα γάντια ακριά από τα
κινούενα εξαρτήατα. Ο φαρδύς
ρουχισμός που δεν έχει στενή εφαρμογή, τα
κοσμήματα ή τα μαλλιά μπορεί να πιαστούν
από τα κινούμενα εξαρτήματα.
η) Κατά τη συναρολόγηση διατάξεων
αναρρόφηση και συλλογή, φροντί
στε ώστε αυτέ να έχουν συνδεθεί και
να χρησιοποιούνται σωστά. Η χρήση
τέτοιου είδους διατάξεων μειώνει τον κίνδυνο
από τη σκόνη.
4.
Ασφαλή λειτουργία και χρήση
ηλεκτρονικών συσκευών
α) Μην υπερφορτώνετε τη συσκευή.
Χρησιοποιήστε το ηλεκτρονικό
εργαλείο που είναι κατάλληλο για την
εργασία σα. Με το κατάλληλο
ηλεκτρονικό εργαλείο μπορείτε να εργαστείτε
καλύτερα και με μεγαλύτερη ασφάλεια εντός
του καθορισμένου τομέα απόδοσης.
β) Μην χρησιοποιείτε ηλεκτρονικό
εργαλείο, του οποίου ο διακόπτη
είναι ελαττωατικό. Ενα ηλεκτρονικό
εργαλείο που δεν μπορεί να ενεργοποιηθεί ή
να απενεργοποιηθεί είναι επικίνδυνο και θα
πρέπει να επιδιορθωθεί.
γ)
Πριν προβείτε σε ρυθίσει τη ηχανή
σε αντικατάσταση εξαρτηάτων ή σε
απόθεση τη ηχανή, αποσυνδέετε το
βύσα από την ηλεκτρική πρίζα. Αυτά
τα προστατευτικά μέτρα μειώνουν τον κίνδυνο
αθέμιτης εκκίνησης της συσκευής.
δ) Φυλάξτε τα ηλεκτρονικά εργαλεία που
δεν χρησιοποιείτε ακριά από
παιδιά. Μην επιτρέπετε τη χρήση τη
συσκευή σε άτοα, τα οποία δεν
είναι έπιστα ή τα οποία δεν έχουν
διαβάσει τι οδηγίε. Τα ηλεκτρονικά
εργαλεία είναι επικίνδυνα όταν χρησιμοποιούνται
από άπειρα άτομα.
ε) Φροντίστε τη συσκευή ε προσοχή.
Ελέγχετε αν τα κινούενα εξαρτήατα
λειτουργούν άψογα και δεν πλοκάρουν, αν υπάρχουν σπασένα ή
κατεστραένα εξαρτήατα έτσι ώστε
να επηρεάζεται αρνητικά η λειτουργία
τη συσκευή. Αναθέστε την επιδιό
των ελαττωατικών εξαρτη άτων πριν
από τη χρήση στη συσ κευή. Πολλά
ατυχήματα οφείλονται σε ηλεκτρονικές συσκευές
που δεν έχουν συντηρηθεί σωστά.
ζ) ιατηρήστε τα εργαλεία κοπή αιχηρά
και καθαρά. Τα προσεγμένα εργαλεία κοπής
μπλοκάρουν λιγότερο και κόβουν πιο εύκολα.
η) Χρησιοποιήστε το ηλεκτρονικό εργα-
λείο, το εξάρτηα, τα εργαλεία εφαρογή κ.τ.λ. σύφωνα ε τι οδηγίε
και ε τον τρόπο που περιγράφεται για
αυτό τον ειδικό τύπο συσκευή. Λάβετε
υπόψη σα τι συνθήκε εργασία και
δραστηριότητε που πρέπει να πραγατοποιηθούν. Η χρήση ηλεκτρονικών εργαλείων
για εφαρμογή άλλη από αυτή που προδιαγράφεται μπορεί να οδηγήσει σε επικίνδυνες καταστάσεις.
Υποδείξει ασφάλεια
για ηχανέ λείανση
ε ιάντα
J ΚΙΝΥΝΟΣ ΠΥΡΚΑΓΙΑΣ ΑΠΟ ΣΠΙΝ-
ΘΗΡΙΣΜΟ! Κατά τη λείανση μετάλλων δημι-
,
ουργείται σπινθιρισμός. Φροντίστε ώστε να
μην μπαίνουν σε κίνδυνο άτομα και να μην
υπάρχουν εύφλεκτα υλικά κοντά στον τομέα
εργασίας.
ρθωση
του
τι
29 GR/CY
Page 29

Γενικές υποδείξεις ασφάλειας για ηλεκτρικά εργαλεία / Θέση σε λειτουργία
J Συνδέστε τη συσκευή σε μία κατάλληλη εξωτερική
διάταξη αναρρόφησης κατά την επεξεργασία
ξύλου και ειδικά υλικών, κατά την οποία δημιουργείται σκόνη που βλάπτει την υγεία.
J Κατά την επεξεργασία πλαστικών, χρωμάτων,
λακών κ.τ.λ. φροντίστε για επαρκή αερισμό.
J Ο tαινιολειαντηρας προορίζεται για στεγνή λεί-
ανση επιφανειών ξύλου, πλαστικού, μετάλλου
και επιχρισμάτων καθώς και λακαρισμένων
επιφανειών. Η συσκευή επιτρέπεται να χρησιμοποιείται μόνο για στεγνή λείανση.
J Απαγορεύεται η επεξεργασία υλικών που
περιέχουν ασβέστιο. Το αμίαντο θεωρείται ως
καρκινογόνο.
ΠΡΟΕΙΟΠΟΙΗΣΗ!
Οι βλαβερές / τοξικές σκόνες που προέρχονται
από τη λείανση π.χ. βαφών που περιέχουν
μόλυβδο, μερικών ειδών ξύλου και μετάλλων,
αποτελούν κίνδυνο για την υγεία του χειριστή
ή των ατόμων που βρίσκονται πλησίον.
Φοράτε προστατευτικά γυαλιά και
μάσκα προστασίας από σκόνη!
ΤΟΞΙΚΕΣ ΣΚΟΝΕΣ
J Ασφαλίστε το προς κατεργασία κομμάτι. Χρη-
σιμοποιείτε σύστημα σύσφιγξης / μέγγενη για
να σταθεροποιήσετε το προς κατεργασία κομμάτι.
Ετσι σταθεροποιείται καλύτερα σε σχέση με το
χέρι σας.
J Μην στηρίζετε ποτέ τα χέρια σας δίπλα ή
μπροστά από τη μηχανή και την προς κατεργασία επιφάνεια, διότι σε περίπτωση ολίσθησης
υπάρχει κίνδυνος τραυματισμού.
J Σε περίπτωση κινδύνου αποσυνδέετε αμέσως
το βύσμα από την ηλεκτρική πρίζα.
J Οδηγείτε πάντα το καλώδιο ηλεκτρικής σύνδε-
σης προς τα πίσω μακριά από το μηχάνημα.
J Αποφύγετε την επαφή με τον ιμάντα λείανσης
που βρίσκεται σε λειτουργία.
J Απαγορεύεται η επεξεργασία υγρών υλικών ή
υγρών επιφανειών.
J Οδηγήστε τη συσκευή πάνω στο τεμάχιο επεξερ-
γασίας μόνο όταν αυτή είναι ενεργοποιημένη.
Ανυψώστε τη συσκευή από το τεμάχιο επεξεργασίας μετά το πέρας της επεξεργασίας και
μόνο τότε απενεργοποιήστε τη.
J Κρατάτε πάντα τη συσκευή κατά τη διάρκεια
της εργασίας σταθερά με τα δύο σας χέρια
(βλέπε και Εικ. D). Φροντίστε ώστε να στέκεστε
σταθερά.
J Επιτρέψτε στη συσκευή να ακινητοποιηθεί
εντελώς και απενεργοποιήστε τη προτού την
εναποθέσετε.
J Αποσυνδέστε το βύσμα δικτύου από την πρίζα
κατά τα διαλείμματα εργασίας, πριν από όλες
τις εργασίες στη συσκευή (π.χ. αντικατάσταση
του χαρτιού λείανσης) καθώς και κατά τις περιόδους αχρηστίας της συσκευής.
Q
Θέση σε λειτουργία
Q
Τάνυση / αντικατάσταση
ιάντα λείανση
!
ΠΡΟΕΙΟΠΟΙΗΣΗ!
ΤΡΑΥΜΑΤΙΣΜΟΥ! Αποσυνδέετε πάντα το βύσμα
από την πρίζα προτού πραγματοποιήσετε εργασίες στον τριβέα με ιμάντα.
1. Στη συνέχεια λύστε τη διάταξη τάνυσης για τον
ιμάντα λείανσης ανυψώνοντας το μοχλό τάνυ-
9
σης
Στο σημείο αυτό ανοίγει η διάταξη τάνυσης
και μπορείτε να απομακρύνετε τον ιμάντα λείανσης.
2. Τοποθετήστε ένα νέο ιμάντα λείανσης ή αντικαταστήστε τον για να επεξεργαστείτε άλλα υλικά
ή για να αλλάξετε την υφή.
ΣΗΜΑΝΤΙΚΟ: Η φορά των βελών στην
εσωτερική πλευρά του ιμάντα λείανσης και στο
περίβλημα συσκευής θα πρέπει να συμφωνούν.
3. Πιέστε το μοχλό τάνυσης
του θέση.
Ρύθιση ιάντα λείανση:
εντελώς προς τα πάνω (βλέπε Εικ. A).
j Ανυψώστε τη συσκευή, ενεργοποιήστε τη και
αρχίστε την περιστροφή της. Ρυθμίστε στο σημείο
αυτό τη φορά ιμάντα στρέφοντας κατά τέτοιο
τρόπο τη ρυθμιστική βίδα
του ιμάντα λείανσης να βρεθεί στο κέντρο και
σε παράλληλη θέση με την ακμή συσκευής
(Εικ. Β).
ΣΗΜΑΝΤΙΚΟ: Προσέξτε ώστε ο ιμάντας λείανσης να μην εισέλθει σε καμία περίπτωση στο
περίβλημα. Ελέγχετε τακτικά τη φορά ιμάντα
και ρυθμίστε τον εφόσον κριθεί απαραίτητο με
τη ρυθμιστική βίδα
ΚΙΝΥΝΟΣ
9
ξανά στην αρχική
6
, έως ότου η ακμή
6
.
30 GR/CY
Page 30

Q
Υποδείξει εργασία
Αρκεί ελάχιστη πίεση λείανση:
j Εργαστείτε με ελάχιστη πίεση λείανσης. Το ίδιο
το βάρος του τριβέα με ιμάντα αρκεί για καλή
απόδοση λείανσης. Επιπλέον, μπορείτε να
επωφεληθείτε από τον εν λόγω τρόπο εργασίας
τριβής ιμάντα λείανσης, η επιφάνεια του τεμαχίου επεξεργασίας λειαίνεται.
Εκχωάτωση και επιφάνεια:
Η απόδοση εκχωμάτωσης και οι παράγοντες επιφάνειας καθορίζονται από την ταχύτητα ιμάντα και
την υφή ιμάντα λείανσης (βλέπε και Τμήμα »Αριθμός
στροφών και επιλογή ιμάντα λείανσης«).
ιαδικασία λείανση:
j Τοποθετήστε την ενεργοποιημένη συσκευή
πάνω στο τεμάχιο επεξεργασίας και εργαστείτε
με την απαιτούμενη πρόωση. Πραγματοποιήστε
τη διαδικασία λείανσης σε παράλληλη θέση
και καλύπτοντας τους ιμάντες λείανσης. Προς
αποφυγή ενοχλητικών, εγκάρσιων ιχνών λείανσης
εργαστείτε μόνο προς τη φορά των ινών. Μετά
την αποπεράτωση της κατεργασίας σηκώνετε
τη μηχανή από το κομμάτι και μετά την απενεργοποιείτε.
Θέση σε λειτουργία / Χειρισμός
και συσκευής και εκκενώνετε πριν από τα διαλείμματα εργασίας το κουτί συλλογής σκόνης ή το
σάκο σκόνης της συσκευής αναρρόφησης.
Φοράτε ία άσκα που
προστατεύει από τη σκόνη!
Αναρρόφηση σκόνη ε κουτί συλλογή
σκόνη:
j Ωθήστε το κουτί συλλογής σκόνης
στο στόμιο αναρρόφησης
συσκευής (Εικ. C).
Εκκένωση κουτιού συλλογή σκόνη:
5
j Τραβήξτε το κουτί συλλογής σκόνης
το στόμιο αναρρόφησης
συλλογής σκόνης
10
Αναρρόφηση σκόνη ε ξένη συσκευή
αναρρόφηση:
ΠΡΟΕΙΟΠΟΙΗΣΗ!
κής σκόνης / μείγματος αέρα θα πρέπει να χρησιμοποιήσετε μία συσκευή αναρρόφησης που είναι
κατάλληλη για το σκοπό αυτό.
ΚΙΝΥΝΟΣ ΠΥΡΚΑΓΙΑΣ! Κατά τη λείανση
μετάλλων (σπινθιρισμός) απαγορεύεται η χρήση
αναρρόφησης σκόνής (κουτί συλλογής σκόνης ή
συσκευή αναρρόφησης σκόνης).
5
. Ανοίξτε το κουτί
και αδειάστε το.
Σε περίπτωση εκρηκτι-
10
πάνω
στην πλευρά
10
από
Q
Αναρρόφηση σκόνη
ΠΡΟΕΙΟΠΟΙΗΣΗ!
ΚΙΝΥΝΟΣ
ΠΥΡΚΑΓΙΑΣ! Κατά τις εργασίες με ηλεκτρονικές
συσκευές, οι οποίες διαθέτουν ένα κουτί συλλογής
σκόνης ή έχουν συνδεθεί μέσω μίας διάταξης
αναρρόφησης σκόνης με μία συσκευή αναρρόφησης σκόνης, υφίσταται κίνδυνος πρόκλησης
πυρκαγιάς! Κάτω από αντίξοες συνθήκες, όπως
π.χ. σε σπινθιρισμό, κατά τη λείανση μετάλλου ή
υπολειμμάτων μετάλλου σε ξύλο, υπάρχει πιθανότητα
ανάφλεξης της σκόνης ξύλου μέσα στο κουτί συλλογής σκόνης (ή στο σάκο σκόνης της συσκευής
αναρρόφησης). Κάτι τέτοιο έχει περισσότερες πιθανότητες να συμβεί, όταν η σκόνη ξύλου αναμειγνύεται με υπολείμματα λάκας ή άλλες χημικές ουσίες
και ο παράγοντας λείανσης θερμαίνεται μετά από
μακροχρόνια εργασία. Ως εκ τούτου αποφύγετε
οπωσδήποτε την υπερθέρμανση παράγοντα λείανσης
1. Ωθήστε τον προσαρμογέα αναρρόφησηςς
πάνω στο στόμιο αναρρόφησης
5
στην
11
πλευρά συσκευής (Εικ. C).
2. Συνδέστε το λάστιχο σε μία επιτρεπόμενη
διάταξη αναρρόφησης σκόνης (π.χ. συσκευή
αναρρόφησης σκόνης συνεργείου) από τον
προσαρμογέα αναρρόφησης
Q
Χειρισό
Q
Ενεργοποίηση και
11
.
απενεργοποίηση
Η μηχανή λείανσης με ιμάντα PEBS 900 SE διαθέτει
ηλεκτρονικό σύστημα συμπαγούς άξονα με πρόσθετο
ηλεκτρονικό σύστημα ελέγχου, απαλή εκκίνηση με
περιορισμό ρεύματος εισόρμησης.
31 GR/CY
Page 31

Χειρισμός
Εχετε τη δυνατότητα επιλογής κατά τη διάρκεια
λειτουργίας τριβέα με ιμάντα μεταξύ στιγμιαίας
και διαρκούς λειτουργίας. Για σύντομες εργασίες
χρησιμοποιήστε τη στιγμιαία λειτουργία. Για εργασίες που διαρκούν πολύ σας προτείνουμε τη διαρκεί
λειτουργία. Ο χειρισμός της ρύθμισης που εσείς
επιθυμείτε λειτουργεί ως εξής:
Ενεργοποίηση στιγιαία λειτουργία:
j Πατήστε το διακόπτη ΕΝΤΟΣ / ΕΚΤΟΣ
3
.
Απενεργοποίηση στιγιαία λειτουργία:
j Αφήστε ελεύθερο το διακόπτη ΕΝΤΟΣ /
ΕΚΤΟΣ
Ενεργοποίηση διαρκού λειτουργία:
j Πατήστε το διακόπτη ΕΝΤΟΣ / ΕΚΤΟΣ
κρατήστε τον πατημένο και πατήστε το κουμπί
ρύθμισης
3
.
3
,
2
.
Υλικό επεξεργασί-
Ελαφρύ ξύλο
α / τοέα επεξεργασία
Χονδροειδής λείανση
60
(υφή)
Λεπτή λείανση (υφή) 240
Προεπιλογή αριθμού
υψηλή (5-6)
στροφών
Υλικό επεξεργασί-
Σκληρό ξύλο
α / τοέα επεξεργασία
Χονδροειδής λείανση
60
(υφή)
Λεπτή λείανση (υφή) 180
Προεπιλογή αριθμού
υψηλή (5-6)
στροφών
Υλικό επεξεργασί-
Μοριοσανίδε
α / τοέα επεξεργασία
Χονδροειδής λείανση
60
(υφή)
Απενεργοποίηση διαρκού λειτουργία:
j Πατήστε το διακόπτη ΕΝΤΟΣ / ΕΚΤΟΣ
3
και
αφήστε τον ελεύθερο.
Q
Επιλογή αριθού στροφών
και ιάντα λείανση
Με τη βοήθεια του ρυθμιστικού τροχού ταχύτητας
ιμάντα
στροφών – ακόμα και όταν η συσκευή βρίσκεται σε
λειτουργία. Η βέλτιστη ταχύτητα ιμάντα εξαρτάται
από το προς επεξεργασία τεμάχιο επεξεργασίας ή
το υλικό. Μπορείτε μόνοι σας να διαπιστώσετε τον
εκάστοτε καλύτερο αριθμό στροφών κατά την πρακτική εξάσκηση. Στον παρακάτω πίνακα μπορείτε να
βρείτε μη δεσμευτικές τιμές, οι οποίες θα σας διευκολύνουν κατά την προσπάθεια διαπίστωσης βέλτιστων
τιμών.
1
μπορείτε να προεπιλέξετε τον αριθμό
Λεπτή λείανση (υφή) 150
Προεπιλογή αριθμού
υψηλή (5-6)
στροφών
Υλικό επεξεργασία / τοέα επεξερ-
Αποάκρυνση
χρωάτων / λακών
γασία
Χονδροειδής λείανση
60
(υφή)
Λεπτή λείανση (υφή) ––
Προεπιλογή αριθμού
υψηλή (5-6)
στροφών
Υλικό επεξεργασί-
Λείανση λακών
α / τοέα επεξεργασία
Χονδροειδής λείανση
150
(υφή)
Λεπτή λείανση (υφή) 320
32 GR/CY
Προεπιλογή αριθμού
στροφών
χαμηλή (1-2)
Page 32

Χειρισμός / Συντήρηση και καθαρισμός
Υλικό επεξεργασία / τοέα επε-
Εκτριβή σκουριά
από ατσάλι
ξεργασία
Χονδροειδής λείανση
40
(υφή)
Λεπτή λείανση (υφή) 120
Προεπιλογή αριθμού
μέση / υψηλή (3-4)
στροφών
Υλικό επεξεργασί-
Πλαστικά
α / τοέα επεξεργασία
Χονδροειδής λείανση
120
(υφή)
Λεπτή λείανση (υφή) 240
Προεπιλογή αριθμού
χαμηλή / μέση (2-3)
στροφών
Υλικό επεξεργασία / τοέα επεξεργασία
Χονδροειδής λείανση
Μη σιδηρούχα
έταλλα (π.χ. αλου-
ίνιο)
80
(υφή)
Λεπτή λείανση (υφή) 150
Προεπιλογή αριθμού
μέση / υψηλή (3-4)
στροφών
Q
Στατική εργασία
Με το σετ στατικής συναρμολόγησης μπορείτε να
στερεώσετε τη συσκευή για οριζόντια ή κάθετη εργασία πάνω σε μία επίπεδη, σταθερή επιφάνεια
(π.χ. τραπέζι εργασίας).
Οριζόντια εργασία (βλέπε Εικ. Ε):
j Τοποθετήστε τον τριβέα με ιμάντα πάνω στο
πλαίσιο συναρμολόγησης
στόμιο αναρρόφησης
πλαισίου συναρμολόγησης 12. Σφίξτε τη βίδα 16.
j Εισάγετε και τις δύο πλάκες στερέωσης
στις προβλεπόμενες διατρήσεις στην απέναντι
πλευρά και βιδώστε τις εκεί με τις βίδες που
έχετε προετοιμάσει.
j Εισάγετε τα μπουλόνια των σφιγκτήρων
στις διατρήσεις σε μία από τις μακριές
πλευρές του πλαισίου συναρμολόγησης
12
και οδηγήστε το
5
μέσω της οπής του
13
14
12
(βλέπε εικ. E). Στερεώστε το πλαίσιο συναρμολόγησης
σφιγκτήρες
12
βιδώνοντας σταθερά τους
14
.
Κάθετη εργασία (βλέπε Εικ. F):
j Εισάγετε τα μπουλόνια των σφιγκτήρων
14
στις διατρήσεις σε μία από τις κοντές πλευρές
του πλαισίου συναρμολόγησης
το πλαίσιο συναρμολόγησης
12
. Στερεώστε
12
σε μία επίπεδη,
σταθερή επιφάνεια (π.χ. τραπέζι εργασίας)
στρέφοντας τους σφιγκτήρες
14
.
j Τοποθετήστε τον τριβέα με ιμάντα πάνω στο
πλαίσιο συναρμολόγησης
στόμιο αναρρόφησης
πλαισίου συναρμολόγησης
16
βίδα
.
j Εισάγετε και τις δύο πλάκες στερέωσης
στις προβλεπόμενες διατρήσεις στην απέναντι
πλευρά και βιδώστε τις εκεί με τις βίδες που
έχετε προετοιμάσει.
Q
Συβουλέ και τρικ
12
και οδηγήστε το
5
μέσω της οπής του
12
. Σφίξτε τη
13
j Απαγορεύεται η επεξεργασία ξύλου και μετάλ-
λου με τον ίδιο ιμάντα λείανσης.
j Οι φθαρμένοι ή η κομμένοι ιμάντες λείανσης
μπορεί να καταστρέψουν το τεμάχιο επεξεργασίας. Ως εκ τούτου αντικαταστήστε εγκαίρως
τους ιμάντες λείανσης.
j Φυλάξτε τους ιμάντες λείανσης σε αναρτημένη
κατάσταση, διότι τα λυγίσματα κ.τ.λ. μπορεί να
τους καταστήσουν άχρηστους.
Q
Συντήρηση και καθαρισό
ΠΡΟΕΙΟΠΟΙΗΣΗ!
ΚΙΝΥΝΟΣ
ΤΡΑΥΜΑΤΙΣΜΟΥ! Πριν από την εκτέλεση εργα-
σιών στη μηχανή λείανσης με ιμάντα αποσυνδέετε
πάντα το βύσμα από την ηλεκτρική πρίζα.
Ο tαινιολειαντηρας δεν χρειάζεται συντήρηση.
j Καθαρίζετε τακτικά τη συσκευή, αμέσως μετά
το πέρας της εργασίας.
j Για τον καθαρισμό της συσκευής χρησιμοποιή-
στε ένα στεγνό πανί και όχι βενζίνη, διαλυτικά
ή καθαριστικά.
33 GR/CY
Page 33

Συντήρηση και καθαρισμός / Σέρβις / Εγγύηση / Απόσυρση
j Διατηρείτε πάντα ελεύθερες τις οπές εξαερισμού.
j Απομακρύνετε τη σκόνη λείανσης που επικολ-
λάται με ένα πινέλο.
Q
Σέρβι
J
J
ΠΡΟΕΙΟΠΟΙΗΣΗ!
επιδιόρθωση των συσκευών σα όνο
σε εκπαιδευένο, ειδικό προσωπικό
που χρησιοποιεί
ντικά ανταλλακτικά
μπορεί να διασφαλιστεί το γεγονός ότι διατηρείται το επίπεδο ασφάλειας της συσκευής.
ΠΡΟΕΙΟΠΟΙΗΣΗ!
αντικατάσταση του βύσατο και
συνδετικού αγωγού πάντα στον κατασκευαστή τη συσκευή ή στην υπηρε
εξυπηρέτηση πελατών. Με τον τρόπο αυτό
μπορεί να διασφαλιστεί το γεγονός ότι διατηρείται το επίπεδο ασφάλειας της συσκευής.
αποκλειστικά αυθε-
Αναθέστε την
. Με τον τρόπο αυτό
Αναθέστε την
του
σία
Σε περίπτωση καταχρηστικού και / ή ακατάλληλου
χειρισμού, άσκησης βίας και επεμβάσεων, οι οποίες δεν εκτελέστηκαν από υποκατάστημα σέρβις που
έχουμε εξουσιοδοτήσει εμείς, δεν ισχύει η εγγύηση.
Τα νόμιμα δικαιώματά σας δεν περιορίζονται από
την παρούσα εγγύηση.
GR
Kompernass Service Greece
Tel.: 801 200 10 18 (local charge 0,031 € /
minute (including VAT 19 %)
e-mail: support.gr@kompernass.com
Q
Απόσυρση
Η συσκευασία αποτελείται αποκλειστικά
από υλικά που σέβονται το περιβάλλον.
Αποσύρετέ τη με τη βοήθεια των κατά
τόπους υπηρεσιών ανακύκλωσης.
Q
Εγγύηση
Για τη συσκευή αυτή έχετε εγγύηση 3 ετών
από την ηεροηνία αγορά. Η συσκευή
κατασκευάστηκε αξιόπιστα και ελέγχθηκε
προσεκτικά πριν την παράδοσή τη.
Παρακαλούε διαφυλάξτε την απόδειξη
τη ταειακή ηχανή ω αποδεικτικό
αγορά. Σε περίπτωση εγγυητική αξίωση
παρακαλούε να απευθυνθείτε τηλεφωνικά στην αρόδια υπηρεσία σέρβι τη χώρα σα. Μόνο έτσι πορεί να διασφαλιστεί
η δωρεάν αποστολή του προϊόντο σα.
Η εγγύηση αυτή ισχύει μόνο για τον πρώτο αγοραστή και δεν μπορεί να μεταβιβαστεί. Η εγγυητική
παροχή ισχύει μόνο για σφάλματα υλικού ή κατασκευής. Δεν ισχύει για εξαρτήματα φθοράς ή για
βλάβες σε εύθραυστα εξαρτήματα, π.χ. διακόπτη ή
μπαταρίες. Το προϊόν προβλέπεται μόνο για ιδιωτική και όχι για επαγγελματική χρήση.
Απαγορεύεται η απόσυρση ηλε-
κτρονικών εργαλείων αζί ε τα
οικιακά απορρίατα!
Σύμφωνα με την Ευρωπαϊκή Οδηγία 2002 / 96 / EC
σχετικά με τις ηλεκτρονικές συσκευές και τις παλιές
ηλεκτρονικές συσκευές και την αναφορά στο εθνικό
δίκαιο θα πρέπει οι χρησιμοποιημένες ηλεκτρονικές
συσκευές να συλλέγονται σε ξεχωριστό χώρο και να
ανακυκλώνονται οικολογικά.
Δυνατότητες απόσυρσης των χρησιμοποιημένων
συσκευών θα πληροφορηθείτε από τη διαχείριση
κοινότητας ή πόλης σας.
34 GR/CY
Page 34

Q
ήλωση συόρφωση /
Κατασκευαστή
Εμείς, η εταιρία Kompernaβ GmbH, διεύθυνση
Burgstr. 21, D-44867 Bochum, Γερμανία, δηλώνουμε δια του παρόντος ότι το παρόν προϊόν συμμορφώνεται προς τις ακόλουθες Οδηγίες της ΕΚ:
Οδηγία ηχανηάτων
(98 / 37 / EC)
Οδηγία χαηλή τάση ΕΕ
(2006 / 95 / EC):
EN 60745-1, EN 60745-2-4
Ηλεκτροαγνητική συβατότητα
(2004 / 108 / EC):
EN 50366, EN 55014-1, EN 61000-3-2,
EN 61000-3-3, EN 55014-2
Δήλωση συμμόρφωσης / Κατασκευαστής
Τύπο / χαρακτηρισό προϊόντο:
Tαινιολειαντηρας Parkside PEBS 900 SE
Bochum, 31.10.2009
Hans Kompernaß
- Διευθυντής -
Διατηρούμε το δικαίωμα τεχνικών τροποποιήσεων
λόγω μετεξέλιξης του προϊόντος.
35 GR/CY
Page 35

36
Page 36

Inhaltsverzeichnis
Einleitung
Bestimmungsgemäßer Gebrauch .................................................................................Seite 38
Ausstattung ....................................................................................................................Seite 38
Lieferumfang ..................................................................................................................Seite 39
Technische Daten ..........................................................................................................Seite 39
Allgemeine Sicherheitshinweise für Elektrowerkzeuge ...Seite 39
1. Arbeitsplatz-Sicherheit ..............................................................................................Seite 40
2. Elektrische Sicherheit ................................................................................................Seite 40
3. Sicherheit von Personen ...........................................................................................Seite 40
4. Verwendung und Behandlung des Elektrowerkzeugs ............................................Seite 41
Sicherheitshinweise für Bandschleifer ..........................................................................Seite 41
Inbetriebnahme
Schleifband einspannen / wechseln ............................................................................Seite 42
Arbeitshinweise .............................................................................................................Seite 42
Staubabsaugung ...........................................................................................................Seite 43
Bedienung
Ein- und Ausschalten .....................................................................................................Seite 43
Drehzahl und Schleifband wählen ...............................................................................Seite 44
Stationäres Arbeiten .....................................................................................................Seite 44
Tipps und Tricks .............................................................................................................Seite 45
Wartung und Reinigung ...............................................................................Seite 45
Service .........................................................................................................................Seite 45
Garantie .....................................................................................................................Seite 45
Entsorgung ...............................................................................................................Seite 46
Konformitätserklärung / Hersteller ....................................................Seite 46
37 DE/AT/CH
Page 37

Einleitung
In dieser Bedienungsanleitung / am Gerät werden folgende Piktogramme verwen
Bedienungsanleitung lesen! Schutzklasse II
Tragen Sie einen Gehörschutz, eine
Atem- / Staubschutzmaske, Schutzbrille
und eine Schutzhandschuhe.
Kinder vom Elektrowerkzeug
fernhalten!
Lebensgefahr durch elektrischen
Schlag bei beschädigtem Netzkabel
oder -stecker
Entsorgen Sie Verpackung und Gerät
umweltgerecht!
n
V
W
Warn- und Sicherheitshinweise
beachten!
Vorsicht vor elektrischem Schlag!
Lebensgefahr!
Explosionsgefahr! Nur zur Verwendung in Innenräumen!
Bemessungs-Leerlaufdrehzahl
0
Volt (Wechselspannung)
~
Watt (Wirkleistung)
det:
Bandschleifer PEBS 900 SE
Q
Einleitung
Machen Sie sich vor der ersten Inbetrieb-
nahme mit den Funktionen des Gerätes
vertraut und informieren Sie sich über den
richtigen Umgang mit Elektrowerkzeugen. Lesen Sie
hierzu die nachfolgende Bedienungsanleitung.
Bewahren Sie diese Anleitung auf. Händigen Sie alle
Unterlagen bei Weitergabe des Gerätes an Dritte aus.
Q
Bestimmungsgemäßer
Gebrauch
Der Bandschleifer ist für trockenes Flächenschleifen
von Holz, Kunststoff, Metall und Spachtelmasse
sowie lackierten Oberflächen ausgelegt. Das Gerät
darf nur für Trockenschliff verwendet werden. Beachten
Sie bitte, dass Sie zur Bearbeitung der verschiedenen
Materialien entsprechende Schleifblätter mit unterschiedlicher Körnung einsetzen und die Drehzahl
ebenfalls dem Material anpassen. Das Gerät ist
nicht für den gewerblichen Einsatz bestimmt. Jede
andere Verwendung oder Veränderung der Maschine
gilt als nicht bestimmungsgemäß und birgt erhebliche
Unfallgefahren. Für aus bestimmungswidriger Verwendung entstandene Schäden übernimmt der
Hersteller keine Haftung.
Q
Ausstattung
1
Stellrad Bandgeschwindigkeit
2
Feststellknopf
3
EIN- / AUS-Schalter
4
Zahnriemenabdeckung
5
Absaugstutzen
6
Justierschraube für Bandlauf
7
Zusatz-Handgriff
8
Lüftungsschlitze
9
Spannhebel
10
Staubfangbox
11
Absaugadapter
38 DE/AT/CH
Page 38

Einleitung / Allgemeine Sicherheitshinweise für Elektrowerkzeuge
Stationär-Montage-Set:
12
Montagerahmen
13
Klemmplatten 2 x
14
Schraubzwingen 2 x
15
Abstandsplatten 2 x
16
Schraube
Q
Lieferumfang
Kontrollieren Sie unmittelbar nach dem
Auspacken des Gerätes den Lieferumfang:
1 Bandschleifer PEBS 900 SE
1 Schleifband
1 Staubfangbox
1 Absaugadapter (zur externen Staubabsaugung)
1 Stationär-Montage-Set
1 Bedienungsanleitung
WARNUNG!
Der in diesen Anweisungen
angegebene Schwingungspegel ist entsprechend
einem in EN 60745 genormten Messverfahren
gemessen worden und kann für den Gerätevergleich
verwendet werden.
Der Schwingungspegel wird sich entsprechend
dem Einsatz des Elektrowerkzeugs verändern und
kann in manchen Fällen über dem in diesen Anweisungen angegebenen Wert liegen. Die Schwingungsbelastung könnte unterschätzt werden, wenn
das Elektrowerkzeug regelmäßig in solcher Weise
verwendet wird.
Hinweis: Für eine genaue Abschätzung der
Schwingungsbelastung während eines bestimmten
Arbeitszeitraumes sollten auch die Zeiten berücksichtigt werden, in denen das Gerät abgeschaltet ist oder
zwar läuft, aber nicht tatsächlich im Einsatz ist. Dies
kann die Schwingungsbelastung über den gesamten
Arbeitszeitraum deutlich reduzieren.
Q
Technische Daten
Bandschleifer: Parkside PEBS 900 SE
Nennspannung: 230 V~ 50 Hz
Nennaufnahme: 900 W
LeerlaufBandgeschwindigkeit: 180 - 340 m / min
Leerlaufdrehzahl: n
345 - 645 / min
0
-1
Schleifband: 75 x 533 mm
Schutzklasse: II /
Geräusch- und Vibrationsinformationen:
Messwerte ermittelt entsprechend EN 60745.
Der A-bewertete Schalldruckpegel des Gerätes
beträgt typischerweise 86 dB (A). Unsicherheit
K = 3 dB. Der Geräuschpegel beim Arbeiten kann
100 dB (A) überschreiten.
Gehörschutz tragen!
Schwingungsgesamtwerte nach EN 60745:
Schwingungsemissionswert a
Unsicherheit K < 1,5 m / s
2
= 2,928 m / s
h,D
2
Der Bandschleifer PEBS 900 SE verfügt über Vollwellenelektronik mit zusätzlicher Regelelektronik,
Softstart mit Einschaltstrombegrenzung.
Allgemeine
Sicherheitshinweise
für Elektrowerkzeuge
WARNUNG!
hinweise und Anweisungen. Versäumnisse
bei der Einhaltung der Sicherheitshinweise und Anweisungen können elektrischen Schlag, Brand
und / oder schwere Verletzungen verursachen.
BEWAHREN SIE ALLE SICHERHEITSHINWEISE
UND ANWEISUNGEN FüR DIE ZUKUNFT AUF.
DER IN DEN SICHERHEITSHINWEISEN VERWENDETE BEGRIFF „ELEKTROWERKZEUG“
BEZIEHT SICH AUF NETZBETRIEBENE ELEKTROWERKZEUGE (MIT NETZKABEL) UND AUF AKKUBETRIEBENE ELEKTROWERKZEUGE (OHNE
NETZKABEL).
Lesen Sie alle Sicherheits-
39 DE/AT/CH
Page 39

Allgemeine Sicherheitshinweise für Elektrowerkzeuge
1. Arbeitsplatz-Sicherheit
a) Halten Sie Ihren Arbeitsbereich sauber
und gut beleuchtet. Unordnung und unbeleuch-
tete Arbeitsbereiche können zu Unfällen führen
b) Arbeiten Sie mit dem Elektro-
werkzeug nicht in explosionsgefährdeter Umgebung, in der
sich brennbare Flüssigkeiten, Gase oder
Stäube befinden. Elektrowerkzeuge erzeugen
Funken, die den Staub oder die Dämpfe entzünden können.
c)
fern. Bei Ablenkung können Sie die Kontrolle
über das Gerät verlieren.
Halten Sie Kinder und andere
Personen während der Benutzung des Elektrowerkzeugs
2. Elektrische Sicherheit
von Hitze, Öl, scharfen Kanten oder sich
bewegenden Geräteteilen. Beschädigte
oder verwickelte Kabel erhöhen das Risiko
eines elektrischen Schlages.
e) Wenn Sie mit einem Elektrowerkzeug
.
im Freien arbeiten, verwenden Sie
nur Verlängerungskabel, die auch für
den Außenbereich zugelassen sind.
Die Anwendung eines für den Außenbereich
geeigneten Verlängerungskabels verringert das
Risiko eines elektrischen Schlages.
f) Wenn der Betrieb des Elektrowerk-
zeuges in feuchter Umgebung nicht
vermeidbar ist, verwenden Sie einen
Fehlerstromschutzschalter. Der Einsatz
eines Fehlerstromschutzschalters vermindert
das Risiko eines elektrischen Schlages.
3. Sicherheit von Personen
Vermeiden Sie Lebensgefahr
durch elektrischen Schlag:
a) Der Anschlussstecker des Elektrowerk-
zeuges muss in die Steckdose passen.
Der Stecker darf in keiner Weise verändert werden. Verwenden Sie keine
Adapterstecker gemeinsam mit
schutzgeerdeten Elektrowerkzeugen.
Unveränderte Stecker und passende Steckdosen
verringern das Risiko eines elektrischen Schlages.
b) Vermeiden Sie Körperkontakt mit
geerdeten Oberflächen, wie von
Rohren, Heizungen, Herden und Kühlschränken. Es besteht ein erhöhtes Risiko
durch elektrischen Schlag, wenn Ihr Körper
geerdet ist.
c) Halten Sie Elektrowerkzeuge von Re-
gen oder Nässe fern. Das Eindringen von
Wasser in ein Elektrogerät erhöht das Risiko
eines elektrischen Schlages.
d)
oder um den Stecker aus der Steckdose
zu ziehen. Halten Sie das Kabel fern
Zweckentfremden Sie das
Kabel nicht, um das Elektrowerkzeug
zu tragen, aufzuhängen
a)
Seien Sie stets aufmerksam, achten Sie
darauf, was Sie tun und gehen Sie mit
Vernunft an die Arbeit mit einem Elektrowerkzeug. Benutzen Sie kein Elektrowerkzeug, wenn Sie müde sind oder
unter dem Einfluss von Drogen, Alkohol
oder Medikamenten stehen. Ein Moment
der Unachtsamkeit beim Gebrauch des Elektrowerkzeuges kann zu ernsthaften Verletzungen führen.
b) Tragen Sie persönliche
Schutzausrüstung und immer
eine Schutzbrille. Das Tragen
persönlicher Schutzausrüstung wie Staubmaske,
rutschfeste Sicherheitsschuhe, Schutzhelm
oder Gehörschutz, je nach Art und Einsatz des
Elektrowerkzeuges, verringert das Risiko von
Verletzungen.
c) Vermeiden Sie eine unbeabsichtigte
Inbetriebnahme. Vergewissern Sie sich,
dass das Elektrowerkzeug ausgeschaltet
ist, bevor Sie es an die Stromversorgun
anschließen, es aufnehmen oder tragen.
Wenn Sie beim Tragen des Elektrowerkzeuges
den Finger am Schalter haben oder das Gerät
bereits eingeschaltet an die Stromversorgung
anschließen, kann dies zu Unfällen führen.
g
40 DE/AT/CH
Page 40

Allgemeine Sicherheitshinweise für Elektrowerkzeuge
d) Entfernen Sie Einstellwerkzeuge oder
Schraubenschlüssel, bevor Sie das Elektrowerkzeug einschalten. Ein Werkzeug
oder Schlüssel, der sich in einem drehenden
Geräteteil befindet, kann zu Verletzungen führen.
e)
Vermeiden Sie eine abnormale Körper-
haltung. Sorgen Sie für einen sicheren
Stand und halten Sie jederzeit das Gleichgewicht. Dadurch können Sie das Elektrowerk-
zeug in unerwarteten Situationen besser kontrollieren.
f) Tragen Sie geeignete Kleidung.
Tragen Sie keine weite Kleidung oder
Schmuck. Halten Sie Haare, Kleidung
und Handschuhe fern von sich bewegenden Teilen. Lockere Kleidung, Schmuck
oder lange Haare können von sich bewegenden Teilen erfasst werden.
g) Wenn Staubabsaug- und -auffangein-
richtungen montiert werden können,
vergewissern Sie sich, dass diese angeschlossen sind und richtig verwendet
werden. Die Verwendung einer Staubabsau-
gung kann Gefährdungen durch Staub verringern.
4. Verwendung und Behandlung
des Elektrowerkzeugs
diesem nicht vertraut sind oder diese
Anweisungen nicht gelesen haben.
Elektrowerkzeuge sind gefährlich, wenn sie von
unerfahrenen Personen benutzt werden.
e) Pflegen Sie Elektrowerkzeuge mit
Sorgfalt. Kontrollieren Sie, ob bewegliche Teile einwandfrei funktionieren
und nicht klemmen, ob Teile gebrochen
oder so beschädigt sind, dass die
Funktion des Elektrowerkzeuges beeinträchtigt ist. Lassen Sie beschädigte
Teile vor dem Einsatz des Gerätes
reparieren. Viele Unfälle haben ihre Ursache
in schlecht gewarteten Elektrowerkzeugen.
f) Halten Sie Schneidwerkzeuge scharf
und sauber. Sorgfältig gepflegte Schneid
zeuge mit scharfen Schneidkanten verklemmen
sich weniger und sind leichter zu führen.
g) Verwenden Sie Elektrowerkzeug,
Zubehör, Einsatzwerkzeuge usw.
entsprechend diesen Anweisungen.
Berücksichtigen Sie dabei die Arbeitsbedingungen und die auszuführende
Tätigkeit. Der Gebrauch von Elektrowerkzeugen
für andere als die vorgesehenen Anwendungen
kann zu gefährlichen Situationen führen.
werk-
a) Überlasten Sie das Gerät nicht. Ver-
wenden Sie für Ihre Arbeit das dafür
bestimmte Elektrowerkzeug. Mit dem
passenden Elektrowerkzeug arbeiten Sie besser
und sicherer im angegebenen Leistungsbereich.
b) Benutzen Sie kein Elektrowerkzeug,
dessen Schalter defekt ist. Ein Elektrowerkzeug, das sich nicht mehr ein- oder ausschalten
lässt, ist gefährlich und muss repariert werden.
c) Ziehen Sie den Stecker aus der Steck-
dose, bevor Sie Geräteeinstellungen
vornehmen, Zubehörteile wechseln
oder das Gerät weglegen. Diese Vor-
sichtsmaßnahme verhindert den unbeabsichtigten Start des Elektrowerkzeuges.
d) Bewahren Sie unbenutzte Elektro-
werkzeuge außerhalb der Reichweite
von Kindern auf. Lassen Sie Personen
das Gerät nicht benutzen, die mit
Sicherheitshinweise
für Bandschleifer
J BRANDGEFAHR DURCH FUNKENFLUG!
Wenn Sie Metalle schleifen entsteht Funkenflug.
Achten
Personen
brennbaren Materialien in der Nähe des Arbeitsbereiches befinden.
J Schließen Sie beim Bearbeiten von Holz und
insbesondere wenn Materialien bearbeitet
werden, bei denen gesundheitsgefährdende
Stäube entstehen, das Gerät an eine geeignete
externe Absaugvorrichtung an.
J Sorgen Sie bei der Bearbeitung von Kunststoffen,
Farben, Lacken etc. für ausreichende Belüftung.
J
Der Bandschleifer ist für trockenes Flächenschleifen
von Holz, Kunststoff, Metall und Spachtelmasse sowie lackierten Oberflächen ausgelegt. Das Gerät
darf nur für Trockenschliff verwendet werden.
Sie deshalb unbedingt darauf, dass keine
gefährdet werden und sich keine
41 DE/AT/CH
Page 41

Allgemeine Sicherheitshinweise für Elektrowerkzeuge / Inbetriebnahme
J Asbesthaltiges Material darf nicht bearbeitet
werden. Asbest gilt als krebserregend.
WARNUNG!
Schleifen von z. B. bleihaltigen Anstrichen,
einigen Holzarten und Metallen entstehenden
schädlichen / giftigen Stäube stellen eine
Gesundheitsgefährdung für die Bedienperson
oder in der Nähe befindliche Personen dar.
Tragen Sie Schutzbrille und Staub-
GIFTIGE STÄUBE! Die beim
schutzmaske!
J Sichern Sie das Werkstück. Benutzen Sie
Spannvorrichtungen / Schraubstock, um das
Werkstück festzuhalten. Es ist damit sicherer
gehalten, als mit Ihrer Hand.
J Stützen Sie auf keinen Fall die Hände neben
oder vor dem Gerät und der zu bearbeitenden
Fläche ab, da bei einem Abrutschen Verletzungsgefahr besteht.
J Ziehen Sie bei Gefahr sofort den Netzstecker
aus der Steckdose.
J Führen Sie das Netzkabel immer nach hinten
vom Gerät weg.
J Vermeiden Sie den Kontakt mit dem laufenden
Schleifband.
J Bearbeiten Sie keine angefeuchteten Materialien
oder feuchte Flächen.
J Führen Sie das Gerät immer eingeschaltet gegen
das Werkstück. Heben Sie das Gerät nach der
Bearbeitung vom Werkstück ab und schalten
Sie es erst dann aus.
J Halten Sie das Gerät während der Arbeit immer
fest mit beiden Händen (siehe auch Abb. D).
Sorgen Sie für einen sicheren Stand.
J Lassen Sie das Gerät vollständig zum Stillstand
kommen und schalten Sie es aus, bevor Sie
es ablegen.
J Ziehen Sie bei Arbeitspausen, vor allen Arbeiten
am Gerät (z.B. Wechsel des Schleifpapiers)
und bei Nichtgebrauch immer den Netzstecker
aus der Steckdose.
Q
Inbetriebnahme
Q
Schleifband einspannen /
wechseln
WARNUNG!
Ziehen Sie den Netzstecker immer aus der Steckdose,
bevor Sie Arbeiten am Bandschleifer durchführen.
1. Lösen Sie zunächst die Spannvorrichtung für
das Schleifband, indem Sie den Spannhebel
ganz herausschwenken (siehe Abb. A). Die
Spannvorrichtung ist nun geöffnet und das
Schleifband lässt sich entnehmen.
2. Legen Sie nun ein neues Schleifband auf bzw.
wechseln Sie es aus, um anderes Material zu
bearbeiten oder die Kornstärke zu wechseln.
WICHTIG: Die Pfeilrichtungen auf der Innenseite
des Schleifbandes und am Gerätegehäuse
müssen übereinstimmen.
3. Drücken Sie den Spannhebel
Ausgangsposition.
Schleifband justieren:
j Nehmen Sie das Gerät hoch, schalten Sie es
ein und drehen es um. Justieren Sie nun den
Bandlauf, indem Sie die Justierschraube
drehen, bis die Kante des Schleifbandes bündig
und parallel mit der Gerätekante verläuft (Abb B).
WICHTIG: Achten Sie unbedingt darauf, dass
sich das Schleifband nicht am Gehäuse einschleift.
Prüfen Sie regelmäßig den Bandlauf und regeln Sie
ihn, wenn nötig, mit der Justierschraube
Q
Arbeitshinweise
Geringer Schleifdruck genügt:
j Arbeiten Sie mit geringem Schleifdruck. Das
Eigengewicht des Bandschleifers reicht für gute
Schleifleistungen aus. Zusätzlich schonen Sie
durch diese Arbeitsweise den Verschleiß des
Schleifbandes und die Oberfläche des Werkstückes wird glatter.
VERLETZUNGSGEFAHR!
9
wieder in die
6
so
6
nach.
9
42 DE/AT/CH
Abtrag und Oberfläche:
Die Abtragsleistung und die Oberflächengüte werden
von der Bandgeschwindigkeit und der Kornstärke
Page 42

Inbetriebnahme / Bedienung
des Schleifbandes bestimmt (siehe auch Abschnitt
»Drehzahl und Schleifband wählen«).
Schleifvorgang:
j Platzieren Sie das Gerät eingeschaltet auf dem
Werkstück und arbeiten Sie mit mäßigem Vorschub. Führen Sie den Schleifvorgang parallel
und überlappend zu den Schleifbahnen durch.
Zur Vermeidung von störenden, querlaufenden
Schleifspuren nur in Faserrichtung schleifen. Heben Sie das Gerät nach der Bearbeitung vom
Werkstück ab und schalten Sie es erst dann aus.
Q
Staubabsaugung
WARNUNG!
Arbeiten mit Elektrogeräten, die über eine Staubfangbox verfügen oder durch eine Staubabsaugvorrichtung mit dem Staubsauger verbunden werden
können, besteht Brandgefahr! Unter ungünstigen Bedingungen, wie z.B. bei Funkenflug - beim Schleifen
von Metall oder Metallresten in Holz - kann sich
Holzstaub in der Staubfangbox (oder im Staubbeutel des Staubsaugers) selbst entzünden. Dies kann
insbesondere dann geschehen, wenn der Holzstaub
mit Lackresten oder anderen chemischen Stoffen
vermischt ist und das Schleifgut nach langem Arbeiten heiß ist. Vermeiden Sie deshalb unbedingt
eine Überhitzung des Schleifguts und des Gerätes
und entleeren Sie vor Arbeitspausen stets die Staubfangbox bzw. den Staubbeutel des Staubsaugers.
Tragen Sie eine
Staubschutzmaske!
Staubabsaugung mit Staubfangbox:
j Schieben Sie die Staubfangbox
Absaugstutzen
BRANDGEFAHR! Beim
10
auf den
5
an der Geräteseite (Abb. C).
Staubabsaugung mit einer
Fremdabsaugung:
WARNUNG!
Bei explosivem Staub / Luftge-
misch müssen Sie einen dazu speziell geeigneten
Absauger verwenden.
BRANDGEFAHR! Beim Schleifen von Metallen
(Funkenflug) keine Staubabsaugung (Staubfangbox
oder Staubsauger) verwenden.
1. Schieben Sie den Absaugadapter
Absaugstutzen
5
an der Geräteseite (siehe
11
auf den
Abb. C).
2. Schieben Sie den Schlauch einer zulässigen
Staubabsaugvorrichtung (z.B. eines Werkstattstaubsaugers) auf den Absaugadapter
Q
Bedienung
Q
Ein- und Ausschalten
11
.
Der Bandschleifer PEBS 900 SE verfügt über
Vollwellenelektronik mit zusätzlicher Regelelektronik,
Sanftanlauf mit Einschaltstrombegrenzung.
Sie können beim Betrieb des Bandschleifers zwischen
Moment- und Dauerbetrieb auswählen. Benutzen Sie
für kurze Arbeiten den Momentbetrieb. Für länger
andauernde Arbeiten empfehlen wir den Dauerbetrieb. Die Bedienung Ihrer gewünschten Einstellung
funktioniert wie folgt:
Momentbetrieb einschalten:
j Drücken Sie den EIN- / AUS-Schalter
3
.
Staubfangbox entleeren:
j Ziehen Sie die Staubfangbox
stutzen
und entleeren Sie diese.
5
. Öffnen Sie die Staubfangbox
10
vom Absaug-
10
Momentbetrieb ausschalten:
j Lassen Sie den EIN- / AUS-Schalter
3
Dauerbetrieb einschalten:
j
Drücken Sie den EIN- / AUS-Schalter 3, halten
Sie ihn gedrückt und drücken Sie den Feststellknopf
2
.
los.
43 DE/AT/CH
Page 43

Bedienung
Dauerbetrieb ausschalten:
j
Drücken Sie den EIN- / AUS-Schalter 3 und
lassen Sie ihn los.
Q
Drehzahl und Schleifband wählen
Mit dem Stellrad Bandgeschwindigkeit 1 können
Sie die Drehzahl auch bei laufendem Gerät wählen.
Die optimale Bandgeschwindigkeit ist abhängig von
dem zu bearbeitenden Werkstück bzw. Material.
Ermitteln Sie die jeweils beste Drehzahl immer selbst
in einem praktischen Versuch. In der nachfolgenden
Tabelle finden Sie unverbindliche Werte, die Ihnen
die Ermittlung erleichtern.
Werkstoff /
Weichholz
Arbeitsbereich
Grobschliff (Körnung) 60
Werkstoff /
Lacke anschleifen
Arbeitsbereich
Grobschliff (Körnung) 150
Feinschliff (Körnung) 320
Drehzahlvorwahl niedrig (1-2)
Werkstoff /
Stahl entrosten
Arbeitsbereich
Grobschliff (Körnung) 40
Feinschliff (Körnung) 120
Drehzahlvorwahl mittel / hoch (3-4)
Werkstoff /
Kunststoffe
Arbeitsbereich
Grobschliff (Körnung) 120
Feinschliff (Körnung) 240
Drehzahlvorwahl niedrig / mittel (2-3)
Feinschliff (Körnung) 240
Drehzahlvorwahl hoch (5-6)
Werkstoff /
Hartholz
Arbeitsbereich
Grobschliff (Körnung) 60
Feinschliff (Körnung) 180
Drehzahlvorwahl hoch (5-6)
Werkstoff /
Spanplatten
Arbeitsbereich
Grobschliff (Körnung) 60
Feinschliff (Körnung) 150
Drehzahlvorwahl hoch (5-6)
Werkstoff /
Arbeitsbereich
Farbe / Lacke entfernen
Grobschliff (Körnung) 60
Feinschliff (Körnung) ––
Drehzahlvorwahl hoch (5-6)
Werkstoff /
Arbeitsbereich
Nichteisen-Metalle
(z.B. Alu)
Grobschliff (Körnung) 80
Feinschliff (Körnung) 150
Drehzahlvorwahl mittel / hoch (3-4)
Q
Stationäres Arbeiten
Mit dem Stationär-Montage-Set können Sie das Gerät
für eine horizontale oder vertikale Arbeit auf einer
ebenen, festen Fläche (z.B. Werkbank) befestigen.
Horizontales Arbeiten (siehe Abb. E):
j Setzen Sie den Bandschleifer auf den Montage-
rahmen
durch die Öffnung des Montagerahmens
Ziehen Sie die Schraube
j
Stecken Sie die beiden Klemmplatten 13 auf
die vorgesehenen Lochungen an der gegenüberliegenden Seite und schrauben Sie diese mit
den vorbereiteten Schrauben fest an.
j Stecken Sie die Bolzen der Schraubzwingen
in die Bohrungen an eine der langen Seite des
Montagerahmens
12
und führen den Absaugstutzen 5
16
an.
12
(siehe Abb. E). Befestigen
12
.
14
,
44 DE/AT/CH
Page 44

Bedienung / Wartung und Reinigung / Service / Garantie
14
12
durch Festdrehen
.
Sie den Montagerahmen
der Schraubzwingen
Vertikales Arbeiten (siehe Abb. F):
j Stecken Sie die Bolzen der Schraubzwingen
14
in die Bohrungen an eine der kurzen Seite des
Montagerahmens
tagerahmen
12
. Befestigen Sie den Mon-
12
an einer ebenen festen Fläche
(z.B. Werkbank) durch Festdrehen der Schraubzwingen
14
.
j Setzen Sie den Bandschleifer auf den Montage-
rahmen
durch die Öffnung des Montagerahmens
Ziehen Sie die Schraube
j Stecken Sie die beiden Klemmplatten
die vorgesehenen Lochungen an der gegenüberliegenden Seite und schrauben Sie diese mit
den vorbereiteten Schrauben fest an.
Q
Tipps und Tricks
12
und führen den Absaugstutzen 5
16
an.
13
12
auf
.
j Niemals mit dem selben Schleifband Holz und
Metall bearbeiten.
j Verschlissene oder eingerissene Schleifbänder
können das Werkstück beschädigen. Wechseln
Sie die Schleifbänder deshalb rechtzeitig aus.
j Bewahren Sie Schleifbänder nur hängend auf,
da sie durch Knicke etc. unbrauchbar werden.
Q
Service
J
WARNUNG!
Lassen Sie Ihre Ge-
räte von der Servicestelle oder einer
,
Elektrofachkraft und nur mit OriginalErsatzteilen reparieren. Damit wird si-
chergestellt, dass die Sicherheit des Gerätes erhalten bleibt.
J
WARNUNG!
Lassen Sie den Austausch des Steckers oder der Netzleitung immer vom Hersteller des Gerätes
oder seinem Kundendienst ausführen.
Damit wird sichergestellt, dass die Sicherheit
des Gerätes erhalten bleibt.
Q
Garantie
Sie erhalten auf dieses Gerät 3 Jahre
Garantie ab Kaufdatum. Das Gerät wurde
sorgfältig produziert und vor Anlieferung
gewissenhaft geprüft. Bitte bewahren
Sie den Kassenbon als Nachweis für den
Kauf auf. Bitte setzen Sie sich im Garantiefall mit Ihrer Servicestelle telefonisch
in Verbindung. Nur so kann eine kostenlose Ein
werden.
sendung Ihrer Ware gewährleistet
Diese Garantie gilt nur gegenüber
dem Erstkäufer und ist nicht übertragbar.
Q
Wartung und Reinigung
WARNUNG!
VERLETZUNGSGEFAHR!
Ziehen Sie den Netzstecker immer aus der Steckdose,
bevor Sie Arbeiten am Bandschleifer durchführen.
Der Bandschleifer ist wartungsfrei.
j Reinigen Sie das Gerät, direkt nach Abschluss
der Arbeit.
j Verwenden Sie zur Reinigung des Gerätes ein
trockenes Tuch und keinesfalls Benzin, Lösungsmittel oder Reiniger, die Kunststoff angreifen.
j Halten Sie Lüftungsöffnungen immer frei.
j Entfernen Sie anhaftenden Schleifstaub mit
einem Pinsel.
Die Garantieleistung gilt nur für Material- oder
Fabrikationsfehler, nicht aber für Verschleißteile
oder für Beschädigungen an zerbrechlichen Teilen,
z.B. Schalter oder Akkus. Das Produkt ist lediglich
für den privaten und nicht für den gewerblichen
Gebrauch bestimmt.
Bei missbräuchlicher und unsachgemäßer Behandlung, Gewaltanwendung und bei Eingriffen, die nicht
von unserer autorisierten Service-Niederlassung
vorgenommen wurden, erlischt die Garantie. Ihre
gesetzlichen Rechte werden durch diese Garantie
nicht eingeschränkt.
45 DE/AT/CH
Page 45

Garantie / Entsorgung / Konformitätserklörung / Hersteller
DE
Schraven
Service- und Dienstleistungs GmbH
Gewerbering 14
47623 Kevelaer, Germany
Tel.: +49 (0) 180 5 008107
(14 Ct/Min. aus dem dt. Festnetz
ggf. abweichende Preise aus den
Mobilfunknetzen)
Fax: +49 (0) 2832 3532
e-mail: support.de@kompernass.com
AT
Kompernass Service Österreich
Tel.: 0820 899 913 (0,20 EUR/min.)
e-mail: support.at@kompernass.com
CH
Kompernass Service Switzerland
Tel.: +41 (0) 848 000 525
(max. 0,0807 CHF/min.)
e-mail: support.ch@kompernass.com
Q
Konformitätserklärung /
Hersteller
Wir, Kompernaß GmbH, Burgstr. 21,
D-44867 Bochum, Deutschland, erklären hiermit
für dieses Produkt die Übereinstimmung mit
folgenden EG-Richtlinien:
Maschinenrichtlinie
(98 / 37 / EC)
EG-Niederspannungsrichtlinie
(2006 / 95 / EC):
EN 60745-1, EN 60745-2-4
Elektromagnetische Verträglichkeit
(2004 / 108 / EC):
EN 50366, EN 55014-1, EN 61000-3-2,
EN 61000-3-3, EN 55014-2
Typ / Bezeichnung des Produktes:
Bandschleifer PEBS 900 SE
Bochum, 31.10.2009
Q
Entsorgung
Die Verpackung besteht aus umweltfreund-
lichen Materialien, die Sie über die ört-
lichen
Recyclingstellen entsorgen können.
Werfen Sie Elektrowerkzeuge
nicht in den Hausmüll!
Gemäß Europäischer Richtlinie 2002 / 96 / EC
über Elektro- und Elektronik-Altgeräte und Umsetzung
in nationales Recht müssen verbrauchte Elektrowerkzeuge getrennt gesammelt und einer umweltgerechten Wiederverwertung zugeführt werden.
Möglichkeiten zur Entsorgung des ausgedienten
Gerätes erfahren Sie bei Ihrer Gemeinde- oder
Stadtverwaltung.
Hans Kompernaß
- Geschäftsführer -
Technische Änderungen im Sinne der
Weiterentwicklung sind vorbehalten.
46 DE/AT/CH
Page 46

IAN 37835
KOMPERNASS GMBH
Burgstraße 21
D-44867 Bochum
© by ORFGEN Marketing
Last Information Update · Tilstand af information · Έκδοση των
πληροφοριών · Stand der Informationen: 10 / 2009 · Ident.-No.:
PEBS 900 SE102009-GB / IE / CY / DK / GR / DE / AT / CH
 Loading...