

Page 1
IAN 75636
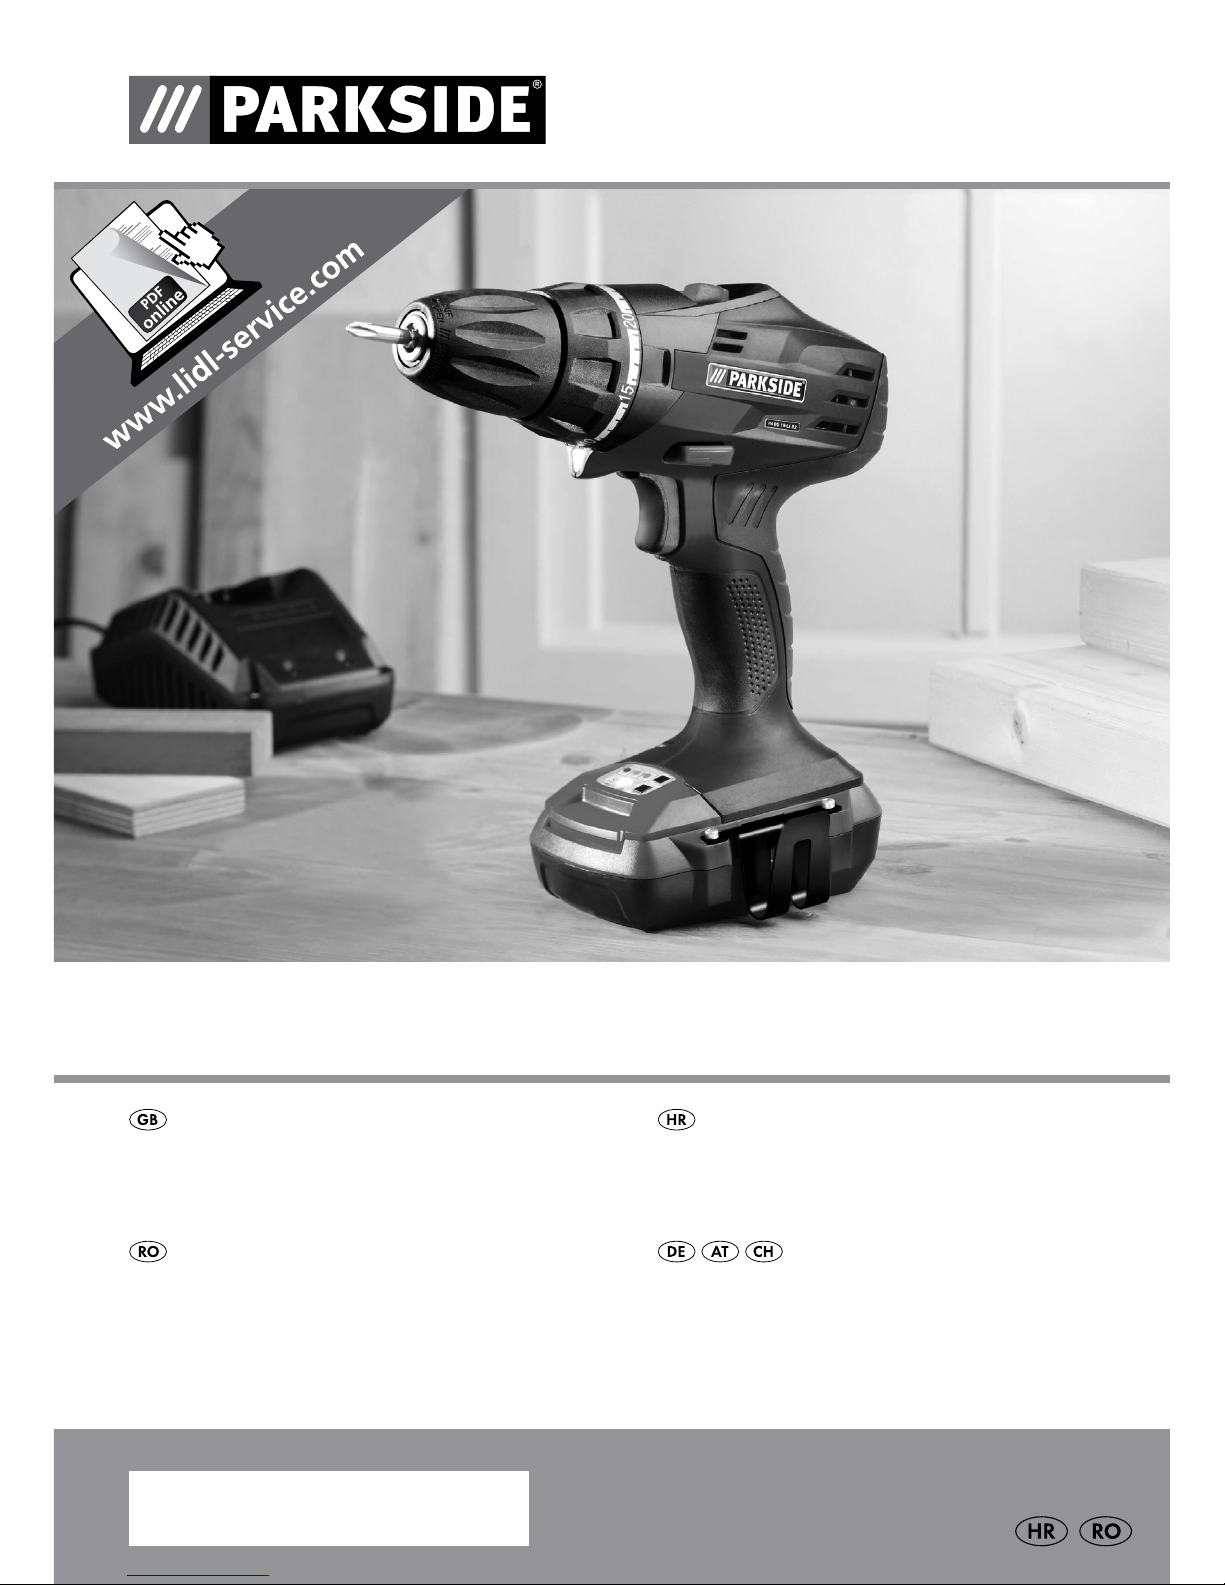
CORDLESS DRILL PABS 18-Li B2
AKKU-BOHRSCHRAUBER
Bedienungs- und Sicherheitshinweise
Originalbetriebsanleitung
AKU ODVIJ AČ
Upute za posluživanje i za Vašu sigurnost
Prijevod originalnih uputa za uporabu
MAȘINĂ DE ÎNȘURUBAT CU
ACUMULATOR
Instrucţiuni de utilizare şi de siguranţă
Traducerea instrucţiunilor de utilizare originale
CORDLESS DRILL
Operation and Safety Notes
Translation of original operation manual
Page 2
GB Operation and Safety Notes Page 5
HR Upute za posluživanje i za Vašu sigurnost Stranica 17
RO Instrucţiuni de utilizare şi de siguranţă Pagina 27
DE / AT / CH Bedienungs- und Sicherheitshinweise Seite 39
Before reading, unfold the page containing the illustrations and familiarise yourself with all functions of the
device.
Prije nego što pročitate tekst, otvorite stranicu sa slikama i upoznajte se na osnovu toga sa svim funkcijama
uređaja.
Înainte de a citi instrucţiunile, priviţi imaginile şi familiarizaţi-vă cu toate funcţiile aparatului.
Klappen Sie vor dem Lesen die Seite mit den Abbildungen aus und machen Sie sich anschließend mit allen
Funktionen des Gerätes vertraut.
Page 3
A B
12
5
C
1
2
3
1413
6
7
11
10
9
8
15
6
1617
7
4
Page 4

Page 5

5 GB
Table of contents
Introduction
Intended purpose ................................................................................................................................ Page 6
Equipment Components ...................................................................................................................... Page 6
Scope of delivery ................................................................................................................................ Page 7
Technical Data ....................................................................................................................................Page 7
General safety advice for electrical power tools
1. Workplace safety ........................................................................................................................... Page 8
2. Electrical safety ............................................................................................................................... Page 8
3. Personal safety ................................................................................................................................ Page 8
4. Careful handling and use of electrical power tools .....................................................................Page 9
5. Use and handling of the cordless electrical power tool ..............................................................Page 9
6. Service ............................................................................................................................................. Page 10
Safety advice relating to cordless drill drivers ..................................................................................Page 10
Attention - Service lines! ...................................................................................................................... Page 10
Original ancillaries / accessories .......................................................................................................Page 10
Before first use
Charging the battery pack .................................................................................................................Page 10
Insertion / removal of a battery pack into the appliance ..................................................................Page 11
Checking battery status ......................................................................................................................Page 11
Changing tools .................................................................................................................................... Page 11
Torque pre-selection ............................................................................................................................ Page 11
2 Gear Drive .......................................................................................................................................Page 12
Preparing the tool for use
Switching On / Off .............................................................................................................................. Page 12
Switching the LED light on and off .....................................................................................................Page 12
Adjusting the speed ............................................................................................................................Page 12
Switching direction of rotation ...........................................................................................................Page 12
Tips and Tricks ..................................................................................................................................... Page 12
Cleaning and Maintenance .............................................................................................. Page 13
Service ...............................................................................................................................................Page 13
Warranty ......................................................................................................................................... Page 13
Disposal ............................................................................................................................................ Page 14
Conformity Declaration / Manufacturer ................................................................ Page 15
Page 6

6 GB
Introduction
Cordless drill PABS 18-Li B2
Q
Introduction
We congratulate you on the purchase of
your new device. You have chosen a
high
quality product. The instructions for use
are part of the product. They contain important information concerning safety, use and disposal. Before using the product, please familiarise yourself
with all of the safety information and instructions
for use. Only use the unit as described and for the
specified applications. If you pass the product on
to anyone else, please ensure that you also pass
on all the documentation with it.
Q
Intended purpose
This appliance is designed for drilling and screwing
into wood, plastic and metal. Use the appliance only
as described and only for the purposes indicated.
Any other uses, and modifications to the appliance,
are deemed to be improper usage and may result
in serious physical injury. The manufacturer accepts
no responsibility for damage(s) resulting from
improper usage. The appliance is not intended for
commercial use.
Q
Equipment Components
1
Gear selector switch
2
Direction of rotation switch / lock
3
ON / OFF Switch / R.P.M. regulator
4
Bit holder
5
Belt clip
The following pictograms are used in these operating instructions / on the device:
Read instruction manual! Safety class II
Observe caution and safety notes! Drill chuck, Made In Germany
Caution – electric shock!
Danger to life!
Spindle lock
Explosive material! Drill setting (torque preselect)
W
Watts (Effective power) Wear ear protection.
n
0
Design no-load speed
Keep children away from electrical
power tools!
V
~
Voltage For indoor use only!
Ah
Amp (Battery capacity)
Check that the device, mains lead
and plug are in good condition!
Nm
Newton metre (torque)
Dispose packaging and appliance in
an environmentally-friendly way!
DC (current and voltage type)
Do not dispose of rechargeable
batteries with your household refuse!
Page 7
7 GB
6
Rechargeable battery pack
7
Battery pack release button
8
LED light button
9
LED light
10
Rechargeable battery display LED
11
Rechargeable battery charge state button
12
LED working light
13
Drill chuck
14
Torque pre-selector
15
Fast charger
16
Red charge-control LED
17
Green charge-control LED
Q
Scope of delivery
1 Cordless drill with rechargeable battery pack
1 Bit PH2 50 mm
1 Fast charger
1 Carry case
1 Directions for use
Q
Technical Data
PABS 18-Li B2 Cordless drill:
Nominal voltage: 18 V
Idle-running speed: 1st gear: max. 400 min
-1
Idle-running speed: 2nd gear: max. 1400 min
-1
Drill chuck
clamping range: max. 10 mm
Maximum
drill diameter: Steel: 10 mm,
Wood: 30 mm
Max. torque: 35 Nm
PABS 18-Li B2-1 Battery Pack:
Type: LITHIUM-ION
Nominal voltage: 18 V
Capacity: 1.5 Ah
Energy content: 27 Wh
PABS 18-Li B2-2 Fast Charger:
INPUT
Nominal voltage: 230 V∼, 50 Hz
Power input: 55 W
OUTPUT
Nominal voltage: 18 V
Charging current 2 A
Charging time: approx. 60 min
Protection class: II /
Noise and vibration data:
Measured values for noise are determined in accordance with EN 60745. The A-weighted noise level
of the electrical power tool are typically:
Sound pressure level: 76 dB(A)
Sound power level: 87 dB(A)
Uncertainty K: 3 dB
Total vibration (vector sum of three directions) is
calculated in accordance with EN 60745:
Screwing: Vibration emission value
a
h,D
= 0.865 m / s2,
uncertainty K = 1.5 m / s
2
,
Drilling: Vibration emission value
a
h
= 2.546 m / s2,
uncertainty K = 1.5 m / s
2
.
The vibration level specified in
these instructions was measured in accordance with
an EN 60745 standardised measurement process
and can be used to compare equipment. The vibration emission value specified can also serve as a
preliminary assessment of the exposure.
The vibration level will change according to the application of the electrical tool an in some cases may
exceed the value specified in these instructions. Regularly using the electric tool in such a way may
make it easy to underestimate the vibration.
Note: If you wish to make an accurate assessment
of the vibration loads experienced during a particular
period of working, you should also take into account
the intervening periods of time when the device is
switched off or is running but is not actually in use.
This can result in a much lower vibration load over
the whole of the period of working.
Introduction / General safety advice for electrical power tools
Page 8
8 GB
General safety advice for
electrical power tools
Read all the safety advice
and instructions! Failure to observe the safety
advice and instructions may result in electric shock,
fire and / or serious injury.
Keep all the safety advice and instructions
in a safe place for future reference!
The term “electrical tool” used in the safety advice
refers to electrical tools powered by mains electricity (by means of a mains lead) and electrical tools
powered by rechargeable batteries (without a
mains lead).
1. Workplace safety
a) Keep your working area clean and
well lit. Untidy or poorly lit working areas
can lead to accidents.
b)
Do not work with the device
in potentially explosive environments in which there are
inflammable liquids, gases or dusts.
Electrical power tools create sparks, which can
ignite dusts or fumes.
c)
Keep children and other
people away while you are
operating the electrical tool.
Distractions can cause you to lose control of
the device.
2. Electrical safety
a)
The mains plug on the device must match
the mains socket. The plug must not
be modified in any way. Do not use
an adapter plug with devices fitted
with a protective earth. Unmodified
plugs and matching sockets reduce the risk of
electric shock.
b) Avoid touching earthed surfaces such
as pipes, radiators, ovens and refrigerators with any part of your body.
There is an increased risk of electric shock if
your body is earthed
.
c) Keep the device away from rain or
moisture. Water entering an electrical device
increases the risk of electric shock.
d)
Do not use the mains lead for
any purpose for which it was
not intended, e.g. to carry the
device, to hang up the device or to pull
the mains plug out of the mains socket.
Keep the mains lead away from heat,
oil, sharp edges or moving parts of the
device. Damaged or tangled mains leads
increase the risk of electric shock.
e) When working outdoors with an
electrical power tool always use extension cables that are also approved
for use outdoors. The use of an extension
cable suitable for outdoor use reduces the risk
of electric shock.
f) Use a residual current device (RCD)
for protection if operating the electrical power tool in a moist environment
is unavoidable. The use of an RCD reduces
the risk of electric shock.
3. Personal safety
a) Remain alert at all times, watch what
you are doing and always proceed
with caution. Do not use the device if
you are tired or under the influence of
drugs, alcohol or medication. One mo
ment
of carelessness when using the device can lead
to serious injury.
b) Wear personal protective equipment
and always wear safety glasses. The
wearing of personal protective equipment such
as dust masks, non-slip safety shoes, safety
helmets or ear protectors, appropriate to the
type of electrical power tool used and work
undertaken, reduces the risk of injury.
c) Avoid unintentional operation of the
device. Check that the electrical power
tool is switched off before you connect
it to the mains, pick it up or carry it.
Accidents can happen if you carry the device
General safety advice for electrical power tools
Page 9

9 GB
with your finger on the ON / OFF switch or with
the device switched on.
d) Remove any setting tools or spanners
before you switch the device on. A tool
or spanner left attached to a rotating part of a
device can lead to injury.
e) Avoid placing your body in an unnat-
ural position. Keep proper footing
and balance at all times. By doing this
you will be in a better position to control the
device in unforeseen circumstances.
f) Wear suitable clothing. Do not wear
loose clothing or jewellery. Keep your
hair, clothing and gloves clear of moving parts. Loose clothing, jewellery or long
hair can become trapped in moving parts.
g) If vacuum dust extraction and collection
devices are fitted do not forget to
check
that they are properly connected and
correctly used. The use of these devices
reduces the hazard presented by dust.
4.
Careful handling and use
of electrical power tools
a) Do not overload the device. Always
use an electrical power tool that is
intended for the task you are undertaking. By using the right electrical power
tool for the job you will work more safely and
achieve a better result.
b) Do not use an electrical power tool if
its switch is defective. An electrical power
tool that can no longer be switched on and off
is dangerous and must be repaired.
c) Pull the mains plug out of the socket
and / or remove the rechargeable battery before you make any adjustments
to the device, change accessories or
when the device is put away. This pre-
caution is intended to prevent the device from
unintentionally starting.
d) When not in use always ensure that
electrical power tools are kept out of
reach of children. Do not let anyone use
the device if he or she is not familiar
with it or has not read the instructions
and advice. Electrical power tools are dan-
gerous when they are used by inexperienced
people.
e) Look after the device carefully. Check
that moving parts are working properly and move freely. Check for any
parts that are broken or damaged
enough to detrimentally affect the
functioning of the device. Have damaged parts repaired before you use
the device. Many accidents have their origins
in poorly maintained electrical power tools.
f) Keep cutting tools clean and sharp.
Carefully maintained cutting tools with sharp
cutting edges are less likely to jam and are
easier to control.
g) Use the electrical power tool, accesso-
ries, inserted tools etc. in accordance
with these instructions and advice, and
the stipulations drawn up for this particular type of device. In doing this, take
into account the working conditions
and the task in hand. The use of electrical
power tools for purposes other than those intended can lead to dangerous situations.
5. Use and handling of the cordless electrical power tool
a) Charge a rechargeable battery unit
using only the charger recommended
by the manufacturer. Chargers are often
designed for a particular type of rechargeable
battery unit. There is the danger of fire if other
types of rechargeable battery units are used.
b)
Only the rechargeable battery units su
pplied are to be used with an electrical
power tool. The use of other rechargeable bat-
t
ery units may lead to the danger of injury or fire.
c) When they are not being used, store
rechargeable battery units away from
paperclips, coins, keys. nails, screws
or other small metal objects that could
cause the contacts to be bridged. Short-
circuiting the contacts of a rechargeable battery
unit may result in heat damage or fire.
General safety advice for electrical power tools
Page 10
10 GB
d) Fluids may leak out of rechargeable
battery units if they are misused. If
this happens, avoid contact with the
fluid. If contact occurs, flush the affected area with water. Seek additional
medical help if any of the fluid gets
into your eyes. Escaping battery fluid may
cause skin irritation or burns.
CAUTION! DANGER OF EX-
PLOSION! The batteries must
never be recharged!
6. Service
a) Have your device repaired at the ser-
vice centre or by qualified specialist
personnel using original manufacturer
parts only. This will ensure that your device
remains safe to use.
Safety advice relating
to cordless drill drivers
Hold the device by the
insulated handle surfaces when you
are undertaking work where there is
the danger of the screw striking hidden
electricity cables or the device’s mains
lead. Contact of the screw with a live wire could
cause metal parts of the device to become live
and lead to electric shock.
Children or persons who lack the knowledge or
experience to use the device or whose physical,
sensory or intellectual capacities are limited
must never be allowed to use the device without
supervision or instruction by a person responsible for their safety. Children must never be
allowed to play with the device.
Securely support the workpiece. A workpiece
held in a clamp or vice is kept more securely in
place than one held by your hand.
POISONOUS DUSTS!
Harmful / noxious dusts generated from your
work represent a risk to the health of the person
operating the device and to anyone near the
work area. Wear safety glasses and a dust mask!
Do not drill any material containing
asbestos. Asbestos is a known carcinogen.
Hold the electrical power tool firmly.
High reaction torques may occur momentarily
during tightening or loosening of screws.
If the inserted tool jams, switch off the
electrical power tool immediately. Be
prepared for high reaction torques as they may
cause kickback. The inserted tool may jam if
the electrical power tool is overloaded or is
held at an angle to the workpiece.
Before you carry out any tasks on the
device, transport or store it, make sure
that the direction of rotation switch is
in the middle position (lock). To prevent
the device from starting up unintentionally.
Q
Attention - Service lines!
DANGER! Take steps to ensure that
you do not hit upon any service lines
(electricity, gas, water) when working with electrical appliances. Check, if
need be with a service line detector, before
you start to cut or bore into a surface.
Q
Original ancillaries /
accessories
Use only the ancillaries and accessories
that are detailed in the operating
instructions. The use of ancillaries and ac-
cessories other than those recommended in the
operating instructions could lead to an increased
risk of personal injury for you.
Q
Before first use
Q
Charging the battery pack
DANGER OF ELECTRIC
SHOCK! Before cleaning or servicing the
charging station or the battery pack always
ensure that the plug is not in the mains socket.
General safety advice for electrical power tools / Before first use
Page 11
11 GB
Note! A new battery pack, or one that has not
been in use for an extended period, must be charged
up before the first / renewed usage.
The battery pack attains its full capacity after ca.
3–5 charging cycles.
CAUTION! Always ensure the plug is removed
from the mains socket before inserting a battery pack
into, or removing one from, the charging station.
Never charge the battery pack if the ambient
temperature is less than 10 °C or greater than
40 °C.
1. Insert the battery pack
6
into the quick-
charger
15
(see Fig. C).
2. Insert the mains plug into the mains socket. The
flashing green charge indicator LED
17
shows
that charging is in progress.
3. The charging process is completed when the
green charge indicator LED
17
light up and the
accumulator pack
6
is ready for operation.
4. If the red charge indicator LED
16
lights up, the
quick battery charger
15
is in standby mode;
the accumulator pack
6
is not connected.
5. If the red charge indicator LED
16
starts flas-
hing, this means that the accumulator pack
6
has become too hot; no charging process.
Never charge the battery pack for a second time
immediately after a fast charging process has
been completed. This can give rise to the battery
pack becoming overcharged and to a reduced
service life of the battery and charging station.
Switch the charger off for at least 15 minutes
between two successive charging procedures.
Remove the power plug from the wall socket.
Q
Insertion / removal of a battery
pack into the appliance
Ensure that the appliance is switched off before inserting the battery. The insertion of a battery into an
electrical appliance that is switched on can lead to
accidents.
Inserting the rechargeable battery pack:
Move the rotation switch 2 into the middle
position (lock) and push the rechargeable battery pack
6
into the handle until it engages.
Removing the rechargeable battery pack:
Press the release button 7 and remove the
rechargeable battery pack
Q
Checking battery status
To check the battery status, press the battery
LED button
11
(refer to main diagram). The
status or residual capacity will be indicated in
the battery LED
10
as follows:
GREEN / RED / ORANGE = maximum charge /
capacity
RED / ORANGE = medium charge / capacity
RED = weak charge – recharge battery
Q
Changing tools
Your cordless electric drill / screwdriver has a fully
automatic spindle lock
and is fitted with an
enclosed keyless chuck incorporating the latest
technology from
”Made in Germany”.
Once the motor has come to a halt, the drive shaft
is automatically locked, so that the chuck
13
can
be opened simply by turning it
.
After you have inserted the required bit and fixed it
in place by turning the chuck
, you can immediately continue working. The spindle lock releases
itself automatically when the motor is started (by
operation of the ON / OFF switch
3
).
Q
Torque pre-selection
You can adjust the torque by using 14 torque preselection. The torque levels regulate a range of up
to ca. 35 Nm.
Select a low setting for small screws, soft work
material.
Before first use
Page 12
12 GB
Select a high setting for large screws, hard
work materials and for the extraction of screws.
For drilling, push the selector to the setting for
drilling, in that you adjust the torque pre-selector
to the position
.
For drilling tasks, also push the gear selector
switch
1
to the front (Position: 2).
Q
2 Gear Drive
CAUTION! Move the gear selector switch 1
only after the device has come to a standstill.
Failure to observe this advice may result in damage
to the device.
In the first gear (Gear selector switch
1
in Position: 1)
A speed of up to approx. 400 rpm can be achieved
and a high torque. This setting is intended for use w
ith
all screwing tasks and for accessories (see example
Fig. B).
In the second gear (Gear selector switch
1
in Position: 2)
It achieves a speed of up to approx. 1400 rpm, for
the carrying out of drilling tasks (see example Fig. A).
Q
Preparing the tool for use
Q
Switching ON /OFF
Switching on:
To start the appliance squeeze on the ON /
OFF switch
3
and then keep it pressed down.
The LED working light
12
comes on with a slightly
or fully pressed ON /OFF switch
3
and illumi-
nates the working area in poor lighting conditio
ns.
Switching off:
To stop the appliance, release the ON / OFF
switch
3
.
Switching the LED light on and off
Switching on:
Press the LED light button 8 to switch on the
LED light
9
.
Switching off:
Press the LED light button 8 again to switch
off the LED light
9
.
Q
Adjusting the speed
The ON / OFF switch 3 has a variable speed control device. Slight pressure on the ON / OFF switch
3
will cause the rotation speed to slow down. With
increased pressure, the rotational speed will increase.
Note: The integrated engine brake means that the
device will come to a fast standstill.
Q
Switching direction of rotation
To switch the direction of rotation, push the
direction of rotation switch
2
to either the
right or to the left.
Q
Tips and Tricks
Before you use the appliance, check to see
that the screw or drill bit is properly fitted, i.e.
located centrally in the chuck.
Screw bits are designated with their dimensions
and their shape. If you are unsure, always try
the particular screw bit out to see whether it sits
in the screw head without any free play.
Torque:
Smaller screws and bits in particular can be
easily damaged if you adjust the appliance
with too high a torque and/or rotation speed.
Hard screwdriving conditions (into metal):
Particularly high torques can occur, for example
with metal screws tightened by socket tool bits.
Select a lower rotation speed.
Before first use / Preparing the tool for use
Page 13
13 GB
Preparing the tool for use / Cleaning and Maintenance / Service / Warranty
Soft screwdriving conditions (e.g. into
soft wood):
You should also select a low speed in order not to
damage the wood workpiece surface through contact with the metal screw head. Use a countersinker.
When drilling into wood, metal and other
materials, take note of the following advice:
With small diameter drill bits use a high drill
speed. For large diameter drill bits, use a low
drill speed.
For hard materials, select a low drill speed.
For soft materials, select a high drill speed.
Secure or fix down the workpiece (if possible)
in a clamp or vice.
Mark the intended position of the hole with a
centre punch or a nail and select a low drill speed
for drilling.
Take the rotating drill bit out of the hole frequently
so that swarf or drill dust can be re-moved and
the hole and tool is ventilated.
Drilling in metal:
Use a metal drill bit (HSS). For the best results,
you should cool the bit with oil. Metal drill bits
can also be used to drill into plastic.
Drilling in stone:
Use a circular shafted masonry drill bit with a
hardened metal tip.
Drilling in wood:
Normally you should use a wood drill with a
centring point. For deep holes, use an auger type
bit. For large diameter holes, use a forstner bit.
You can screw small screws into soft wood
without the need for pre-drilling.
Q
Cleaning and Maintenance
CAUTION! Place the direction of rotation
switch
2
into the middle position before carrying out any tasks on the device, e.g. changing
tools or maintenance, or before transporting or
storing the device. Inadvertent operation of the
ON / OFF switch
3
may result in injury.
Pull the mains lead out of the mains socket eve-
ry time and remove the battery before you clean
or maintain the device.
The Cordless drill is maintenance-free.
Always keep the device clean, dry and free of
oil or grease.
Clean the device immediately after you have
finished using it.
Do not allow any liquids to enter the device.
Use a cloth to clean the housing. Never use
petrol, solvents or cleaning agents that might
attack plastic.
Q
Service
Have your device repaired
at the service centre or by qualified
specialist personnel using original
manufacturer parts only. This will ensure
that your device remains safe to use.
If the plug or lead needs
to be replaced, always have the
replacement carried out by the manufacturer or its service centre. This will
ensure that your device remains safe to use.
Q
Warranty
The warranty for this appliance is for 3
years from the date of purchase. The appliance has been manufactured with care
and meticulously examined before delivery. Please retain your receipt as proof
of purchase. In the event of a warranty
claim, please make contact by telephone
with our Service Department. Only in this
way can a post-free despatch for your
goods be assured.
The warranty covers only claims for material and
maufacturing defects, but not for transport damage,
for wearing parts or for damage to fragile components, e.g. buttons or batteries. This product is for private use only and is not intended for commercial use.
Page 14
14 GB
Warranty / Disposal
The warranty is void in the case of abusive and improper handling, use of force and internal tampering not carried out by our authorized service branch.
Your statutory rights are not restricted in any way
by this warranty.
The warranty period will not be extended by repairs
made unter warranty. This applies also to replaced
and repaired parts. Any damage and defects extant
on purchase must be reported immediately after
unpacking the appliance, at the latest, two days after
the purchase date. Repairs made after the expiration
of the warranty period are subject to payment.
GB
Service Great Britain
Tel.: 0871 5000 720
(0,10 GBP/Min.)
e-mail: kompernass@lidl.co.uk
IAN 75636
Q
Disposal
The packaging comprises exclusively en-
vironmentally-friendly material. Dispose
of it in your local recycling containers.
Do not dispose of electrical
appliances with your domestic
waste!
According to the European Directive 2002 / 96 / EC,
concerning used electrical and electronic appliances
and its implementation in national law, superannuated electrical appliances must be collected and
disposed of via an environmentally suitable recycling facility.
Do not dispose of rechargeable
batteries with your household
refuse!
Defective or worn out rechargeable batteries must
be recycled according to Directive 2006 / 66 / EC.
Dispose of batteries and appliances over the existing
collection facilities.
Your local communal or municipal authorities can
provide information on how to dispose of the worn
out appliance.
Page 15
15 GB
Conformity Declaration / Manufacturer
Q
Conformity Declaration /
Manufacturer
We, Kompernaß GmbH, the person responsible for
documents: Mr Semi Uguzlu, Burgstr. 21, D-44867
Bochum, Germany, hereby declare that this product
complies with the following standards, normative
documents and EU directives:
Machinery Directive
(2006 / 42 / EC)
EC Low Voltage Directive
(2006 / 95 / EC)
Electromagnetic compatibility
(2004 / 108 / EC)
Applicable harmonized standards
EN 60745-1:2009+A11
EN 60745-2-1:2010, EN 60745-2-2:2010
EN 55014-1:2006+A1+A2
EN 55014-2:1997+A1+A2
EN 61000-3-2:2006+A1+A2
EN 61000-3-3:2008
EN 60335-1:2002+A1+A11+A12+A2+A13+A14
EN 60335-2-29:2004
EN 62233:2008
Type / Appliance Designation:
Cordless drill PABS 18-Li B2
Date of manufacture (DOM): 07–2012
Serial number: IAN 75636
Bochum, 31.07.2012
Semi Uguzlu
- Quality Manager -
We reserve the right to make technical modifications
in the course of further development.
Page 16

16
Page 17

17 HR
Popis sadržaja
Uvod
Uporaba u skladu sa namjenom .................................................................................................. Stranica 18
Oprema ......................................................................................................................................... Stranica 18
Opseg isporuke ............................................................................................................................. Stranica 19
Tehnički podaci ............................................................................................................................. Stranica 19
Opće sigurnosne upute za električni alat
1. Sigurnost na radnom mjestu .................................................................................................... Stranica 20
2. Električna sigurnost ................................................................................................................... Stranica 20
3. Sigurnost osoba ........................................................................................................................ Stranica 20
4. Pažljivo postupanje s električnim uređajima i njihovo korištenje ........................................... Stranica 21
5. Uporaba i rukovanje akumulatorskim alatom ........................................................................ Stranica 21
6. Servis ......................................................................................................................................... Stranica 22
Sigurnosne upute za akumulatorsku bušilicu ............................................................................... Stranica 22
Pažnja, vodovi! ............................................................................................................................. Stranica 22
Originalna oprema / dodatni uređaji .......................................................................................... Stranica 22
Prije stavljanja u rad
Punjenje paketa baterija ............................................................................................................... Stranica 22
Umetanje paketa baterija u uređaj / vađenje paketa baterija ................................................... Stranica 23
Provjeravanje aku-stanja ............................................................................................................... Stranica 23
Zamjena alata ............................................................................................................................... Stranica 23
Određivanje okretnog momenta unaprijed ................................................................................. Stranica 23
2-brzinski mjenjač ......................................................................................................................... Stranica 24
Stavljanje u rad
Uključivanje / Isključivanje ............................................................................................................ Stranica 24
Uključivanje / isključivanje LED-svjetiljke ...................................................................................... Stranica 24
Podešavanje brzine....................................................................................................................... Stranica 24
Promjena smjera okretanja ........................................................................................................... Stranica 24
Savjeti i trikovi ............................................................................................................................... Stranica 24
Održavanje i čišćenje ...................................................................................................... Stranica 25
Servis ............................................................................................................................................ Stranica 25
Jamstveni list.......................................................................................................................... Stranica 25
Zbrinjavanje ........................................................................................................................... Stranica 26
Izjava o sukladnosti / proizvođač ........................................................................ Stranica 27
Page 18

18 HR
Uvod
Aku odvijač PABS 18-Li B2
Q
Uvod
Čestitamo Vam na kupnji novog uređaja.
Ovom kupnjom odlučili ste se za visokok-
valitetan proizvod. Uputa za uporabu je
sastavni dio ovog proizvoda. Ona sadrži važne
upute o sigurnosti, uporabi i uklanjanju otpada. Prije
upotrebe proizvoda upoznajte se sa svim njegovim
uputama za korištenje i sigurnosnim uputama. Koristite ovaj proizvod u skladu s navedenim uputama
te u navedene svrhe. Ukoliko proizvod dajete nekoj
drugoj osobi, predajte toj osobi također i sve upute.
Q
Uporaba u skladu sa namjenom
Ovaj uređaj je namijenjen za bušenje i odvijanje u
drvetu, plastici i metalu. Koristite uređaj isključivo
na opisani način i u navedenim područjima primjene.
Svaki drugi način uporabe i svaka promjena uređaja
smatra se nenamjenskom i krije znatnu opasnost od
nastanka nezgode. Proizvođač ne preuzima odgovornost od štete nastale uslijed korištenja uređaja
protivnog njegovoj namjeni. Uređaj nije namjenjen
za komercijalnu uporabu.
Q
Oprema
1
Prekidač za odabir stupnja brzine
2
Prekidač za odabir smjera okretanja / blokada
3
Prekidač Uklj.-Isklj. / Regulator broja okretaja
U ovim uputama za uporabu / na uređaju rabi se slijedeće prikaze:
Čitati upute za rukovanje! Zaštitna klasa II
Obratiti pažnju na upozoravajuće
i sigurnosne upute!
Zaglavnik za svrdlo, Made In Germany
Čuvajte se strujnog udara!
Opasnost po život!
Aretiranje osovine
Opasnost od eksplozije!
Stupanj bušenja
(odabir okretnog momenta)
W
W (Efektivna snaga) Nosite zaštitu za sluh.
n
0
Određivanje broja praznohodne
brzine vrtnje
Držite djecu podalje od
električnog alata!
V
~
V (Naizmjenični napon)
Isključivo namijenjeno za uporabu
u unutarnjim prostorijama!
Ah
Amper-sati (Kapacitet akumulatora)
Vodite računa o tome, da se ne ošteti
uređaj, mrežni kabel i utikač!
Nm
Newton metar (okretni moment)
Materijal ambalaže i uređaj zbrinite
na način neškodljiv za okoliš!
Istosmjerna struja (struja i vrsta napona) Akumulator ne bacajte u kućni otpad!
Page 19

19 HR
4
Držač bita
5
Pričvršćenje pojasa
6
Komplet akumulatora
7
Tipka za deblokiranje kompleta akumulatora
8
Tipka LED-svjetiljke
9
LED-svjetiljka
10
LED pokazivača akumutalora
11
Tipka stanje akumulatora
12
Radna LED-svjetiljka
13
Zaglavnik za svrdlo
14
Regulator za odabir okretnog momenta unaprijed
15
Uređaj za brzo punjenje
16
Crvena LED-signalizacija za kontrolu punjenja
17
Zelena LED-signalizacija za kontrolu punjenja
Q
Opseg isporuke
1 aku bušilica / odvijač s u aku-pakovanjem
1 bit PH2 50 mm
1 uređaj za brzo punjenje
1 kovčeg za nošenje
1 uputstvo za uporabu
Q
Tehnički podaci
PABS 18-Li B2 aku-bušilica/odvijač:
nazivni napon: 18 V
broj okretaja u
praznom hodu: 1. hod: maksimalno
400 min
-1
broj okretaja u
praznom hodu: 2. hod: maksimalno
1400 min
-1
raspon zaglavnika
za svrdlo: maksimalno 10 mm
maksimalan
promjer bušotine: čelik: 10 mm,
drvo: 30 mm
maksimalan
okretni moment: 35 Nm
PABS 18-Li B2-1 aku-pakovanje:
tip: LITHIUM-ION
nazivni napon: 18 V
kapacitet: 1,5 Ah
sadržaj energije: 27 Wh
PABS 18-Li B2-2 uređaj za brzo punjenje:
ULAZ / Input :
nazivni napon: 230 V∼, 50 Hz
potrošnja: 55 W
IZLAZ / Output:
nazivni napon: 18 V
struja punjenja: 2 A
trajanje punjenja: oko 60 min
zaštitna klasa: II /
Informacija o buci i vibraciji:
Mjerna vrijednost za buku utvrđena sukladno
EN 60745. A-ocjenjena razina buke električnog
alata iznosi tipično:
Razina zvučnog tlaka: 76 dB(A)
Razina snage zvuka: 87 dB(A)
Nesigurnost K: 3 dB
Ukupne vrijednosti titranja (vektorski zbroj triju
smjerova) su istražene sukladno EN 60745:
Vijak: Vrijednost emisije titranja
a
h,D
= 0,865 m / s2,
Nesigurnost K= 1,5 m / s
2
,
Bušenje: Vrijednost emisije titranja
a
h
= 2,546 m / s2,
Nesigurnost K= 1,5 m / s
2
.
Razina titranja, navedena u
ovim uputama, je istražena i određena sukladno
normiranom postupku mjerenja, koji je naveden u
EN 60745 i koji je prikladan za uspoređivanje stroja.
Navedena vrijednost emisije titranja se može koristiti
i za uvodnu procjenu izloženosti.
Razina titranja je promijenljiva, ovisno o korištenju
električnog alata, te može u pojedinim slučajevima
ležati iznad vrijednosti, navedene u ovim uputama.
Razina opterećenja titranja može biti podcjenjena,
ako se električni alat redovito koristi na takav način.
Uputa: Za precizno ocjenjivanje titrajnog otperećenja tijekom određenog radnog vremena, potrebno
je također uzeti u obzir vremena kad je stroj isključen,
ili je uključen ali se zapravo ne rabi. To može znatno
smanjiti titrajno opterećenje, tijekom cijelog radnog
vremena.
Uvod
Page 20

20 HR
Opće sigurnosne upute
za električni alat
Pročitajte sigurnosne
upute kao i sve ostale upute! U slučaju ne
pridržavanja sigurnosnih uputa kao i ostalih uputa,
prijeti opasnost od strujnog udara, požara i / ili teških ozljeda.
Sačuvajte sve sigurnosne upute kao i sve
ostale upute za ubuduće!
U sigurnosnim uputa rabljeni izraz „električni alat“
odnosi se na električne uređaje sa mrežnim pogonom (sa mrežnim kabelom) i na električni alat sa
akumula
torskim pogonom (bez mrežnog kabela).
1. Sigurnost na radnom mjestu
a) Vodite uvijek računa o tome, da Vaše
radno mjesto bude čisto i dobro osvjetljeno. Nered i ne osvjetljeno područje
rada, može uzrokovati nezgode.
b)
Ne rabite stroj u području gdje
prijeti opasnost od eksplozije,
gdje se nalaze zapaljive teku-
ćine, plinovi ili prašine. Električni alati proiz-
vode iskre, koje mogu zapaliti prašinu ili pare.
c)
Za vrijeme uporabe elek
tričnog alata, držite djecu i druge
osobe izvan dohvata istoga.
U slučaju nepažnje, možete izgubiti kontrolu
nad strojem.
2. Električna sigurnost
a) Mrežni utikač uređaja mora odgova-
rati utičnici. Utikač se ni na kakav
način ne smije mijenjati. Ne koristite
adapterske utičnice zajedno s zaštitno
uzemljenim uređajima. Neizmijenjeni
utikači i odgovarajuće utičnice smanjuju rizik
električnog udara.
b) Izbjegavajte dodir tijela s uzemljenim
površinama kao što su cijevi, radijato-
ri, pećnice i hladnjaci. Postoji povećana
opasnost od električnog udara ukoliko je vaše
tijelo uzemljeno.
c) Uređaj držite podalje od kiše i vlage.
Prodiranje vode u unutrašnjost uređaja povećava opasnost električnog udara.
d)
Ne koristite kabel u neke
druge svrhe, npr. za nošenje
uređaja, vješanje uređaja ili
za izvlačenje utikača iz utičnice. Kabel
držite podalje od topline, ulja, oštrih
rubova i pokretnih dijelova uređaja.
Oštećeni ili spetljani kabel ili utikač povećava
rizik električnog udara.
e) Kod rada na otvorenome koristite
samo produžni kabel koji je dozvoljen
za korištenje na otvorenome. Upotreba
produžnog kabla namijenjenog za korištenje
na otvorenome smanjuje rizik električnog udara.
f) Ako je korištenje električnog alata u
vlažnim prostorima neizbježno, rabite
zaštitnu strujnu sklopku. Korištenje zaštit-
ne strujne sklopke, smanjuje rizik strujnog udara.
3. Sigurnost osoba
a) Budite uvijek pozorni, vodite računa
o tome što radite i razumno pristupite
radu s električnim alatom. Ne rabite
stroj, ako ste umorni ili pod utjecajem
droga, alkohola ili lijekova. Jedan trenu
tak
nepažnje za vrijeme korištenja stroja, može
uzrokovati teške ozljede.
b) Nosite osobnu zaštitnu opremu i uvijek
zaštitne očale. Korištenje osobne zaštitne
opreme, kao maske za prašinu, protuklizne
zaštitne cipele, zaštitnu kacigu ili štitnik za uši,
ovisno o vrsti i uporabi električnog alata,
smanjuje rizik od ozljeda.
c) Spriječite slučajno uključenje. Uvjerite
se u to, da je električni alat isključen,
prije uključenja na struju, podizanja
ili nošenja. Ako pri nošenju uređaja držite
prst na sklopki za UKLJUČENJE / ISKLJUČENJE
ili ako je uređaj uključen, prijeti opasnost od
nezgode.
Opće sigurnosne upute za električni alat
Page 21

21 HR
d) Prije uključenja stroja, uklonite alat
za podešavanje ili vijčani ključ. Alat ili
ključ, koji se nalazi u rotirajućem dijelu stroja,
može prouzročiti ozljede.
e) Izbjegavajte nenaravan polažaj tijela.
Vodite računa o tome da sigurno stojite
na tlu i održavate vlastitu ravnotežu.
Na taj način bolje možete kontrolirati uređaj,
posebno u neočekivanim situacijama.
f) Nosite prikladnu odjeću. Ne nosite
široku odjeću ili nakit. Držite kosu,
odjeću i rukavice dalje od pomičnih
dijelova. Opuštena odjeća, nakit ili duga kosa
mogu biti zahvaćeni od pomičnih dijelova.
g) Ako se montira uređaje za usisavanje
i prihvaćanje prašine, uvjerite se u
to da su priključeni i da se pravilno
koriste. Uporaba tih uređaja, smanjuje
ugrožavanje od prašine.
4.
Pažljivo postupanje s
električnim uređajima i
njihovo korištenje
a) Nemojte uređaj preopterećivati.
Koristite onaj električni uređaj koji
odgovara za Vaš rad. S odgovarajućim
električnim uređajem bolje i sigurnije ćete raditi u navedenom području rada.
b) Ne koristite električni uređaj s neisprav-
nim prekidačem. Električni uređaj koji se više
ne može uključiti i isključiti opasan je i treba
ga dati popraviti.
c) Izvucite utikač iz utičnice i / ili otklonite
akumulator, prije namještanja uređaja,
zamjene pribora ili odlaganja uređaja.
Ta mjera zaštite spriječava slučajno uključenje
električnog alata.
d) Čuvajte ne korišteni električni uređaj
tako da nije na dohvatu djeci. Ne
dopustite da uređaj koriste osobe
koje s njim nisu upoznate ili koje nisu
pročitale upute. Električni alati su opasni
kada ih korite osobe bez iskustva.
e) Pažljivo održavajte uređaj. Kontroli-
rajte da li pokretni dijelovi uređaja
besprijekorno funkcioniraju i da ne
zapinju, da dijelovi nisu slomljeni ili
tako oštećeni da je funkcija uređaja
upitna. Molimo da oštećene dijelove
dadete popraviti prije korištenja uređaja. Brojne nesreće imaju uzrok zbog loše
održavanih električnih alata.
f) Alat za rezanje treba biti oštar i čist.
Brižljivo njegovani alat za rezanje sa oštrim
reznim rubovima, manje zaglavi i jednostavniji
je za rukovanje.
g) Rabite električni alat, opremu i ugrad-
ni alat, itd. sukladno ovim uputama i
na način kako je propisano za ovaj
posebni tip uređaja. Pri tome uzmite
u obzir radne uvjete i rad koji se izvodi.
Uporaba električnog alata za drugu osim
predviđene primjene, može uzrokovati opasne
situacije.
5. Uporaba i rukovanje
akumulatorskim alatom
a) Koristite samo one akumulatore koje
je preporučio proizvođač. Kod električnih
uređaja za koje su namijenjene samo određene
vrste akumulatora, postoji opasnost od izbijanja
požara ako se koriste sa drugim vrstama akumulatora.
b) Akumulatore koristite samo u za njih
posebno namijenjenim uređajima.
Upotreba drugih akumulatora može dovesti
do ozljeda i opasnosti od izbijanja požara.
c) Držite neupotrjebljene akumulatore
daleko od kontakta s metalnim predmetima poput uredskih spajalica,
kovanica, ključeva, čavala i sl. Malih
metalnih predmeta koji bi mogli prouzročiti
prekid kontakta. Nakon takvog kontakta bi mogao uslijediti kratki spoj koji bi za posljedicu
mogao imati opekline ili čak prouzročiti požar.
d) Kod neispravne upotrebe iz akumulato-
ra može iscuriti tekućina. Izbjegavajte
svaki kontakt s tom tekućinom. Nakon
mogućeg kontakta obavezno mjesto
kontakta isperite vodom. Ako tekućina
dođe u dodir s očima, odmah potražite
pomoć liječnika. Tekućina iz akumulatora u
Opće sigurnosne upute za električni alat
Page 22

22 HR
Opće sigurnosne upute za električni alat / Prije stavljanja u rad
kontaktu s kožom može prouzročiti ozljede i
opekline kože.
OPREZ! OPASNOST OD
EKSPLOZIJE! Nikada ne punite
baterije koje nisu punjive!
6. Servis
a) Električne naprave smiju popravljati
samo ovlašteni serviseri ili električari.
Time ćete zadržati sigurnost vaših uređaja.
Sigurnosne upute za
akumulatorsku bušilicu
Držite uređaj na izoli-
ranim držkama, dok izvodite radove
pri kojima vijak može zahvatiti skrivene električne vodove ili vlastiti mrežni
kabel. Dodir vijka sa vodom pod naponom
može također metalne dijelove uređaja staviti
pod napon i prouzročiti strujni udar.
Ovaj uređaj nije namijenjen osobama (uključivši
djecu) s ograničenim tjelesnim, senzoričnim ili
umnim sposobnostima i / ili koje nemaju iskustvo
ili znanje u ophođenju s uređajem, osim ako su
pod nadzorom osobe koja je zadužena za njihovu sigurnost ili ako bi rabili uređaj prema
njenim uputama. Dijeca trebaju biti pod nadzorom, kako se nebi igrala s uređajem.
Učvrstite predmet koji obrađujete. Koristite za-
tezne naprave ili škripac kako bi učvrstili predmet. Na taj način naprava je bolje učvršćena
nego vašom rukom.
OTROVNI PRAH !
Tijekom upotrebe naprave nastaju opasne /
otrovne čestice prašine koje mogu prouzročiti
opasnosti po zdravlje osoba koje se koriste
napravom ili osoba u neposrednoj blizini. Tijekom rada sa napravom uvijek koristite zaštitne
naočale i masku za zaštitu od prašine!
Ne obrađujte nikad materijale koji
sadrže azbest. Azbest izaziva rak.
Električni uređaj držite čvrsto u ruci.
Kod zatezanja i odvrtanja vijaka, može doći
do brzih i snažnih momenata otporne reakcije
uređaja.
Odmah isključite električni uređaj iz
struje u slučaju smetnji ili blokade uređaja. Budite izuzetno oprezni kod rada stroja
i momenata reakcije ,koji mogu prouzročiti povratni udarac. Alat kojim radite blokira, ako
dođe do preopterećenja električnog uređaja ili
ako se alat zaglavi u predmetu koji obrađujete.
Kod radova na uređaju, kao i kod
transporta, odnosno pospremanja
uređaja, obratni sklopnik (zaporka)
postavite na srednju poziciju. Tako ćete
priječiti ne namjerno uključivanje uređaja.
Q
Pažnja, vodovi!
OPASNOST! Provjerite, da ne naletite
na vodove struje, vode ili plina, kada
radite sa električnim uređajima. Eventu-
alno izvršite provjeru pomoću uređaja za traženje vodova, prije nego što bušite ili otvarate zid.
Q
Originalna oprema /
dodatni uređaji
Upotrebljavajte isključivo opremu i
dodatne uređaje navedene u uputama
za uporabu. Uporaba drugih alata i druge
opreme, koja nije navedena u ovim uputama,
može dovesti do opasnosti od ozljeda.
Q
Prije stavljanja u rad
Q
Punjenje paketa baterija
OPASNOST OD
STRUJNOG UDARA! Prije čišćenja i servisi-
ranja punjača ili paketa baterija uvijek izvucite
mrežni utikač.
Uputa!
Novi paket baterija ili paket, koji dugo
nije radio, prije prve uporabe mora biti napunjen.
Svoj puni kapacitet paket baterija dostiže nakon
ca. 3–5 ciklusa punjenja.
Page 23

23 HR
Prije stavljanja u rad
OPREZ! Uvijek izvucite mrežni utikač prije
vađenja paketa baterija iz punjača ili prije njegovog
postavljanja.
Nikada ne punite paket baterija, kada je vanj-
ska temperatura ispod 10 °C ili iznad 40 °C.
1. Stavite akumulatore
6
u uređaj za brzo pu-
njenje
15
(vidi sliku C).
2. Utaknite mrežni utikač u utičnicu. LED za kontrolu punjenja
17
koja sad treperi zeleno, pokazuje
postupak punjenja.
3. Odmah čim LED za kontrolu punjenja
16
prestane treperiti i stalno svijetli zeleno, postupak
punjenja je okončan, te se baterijski sklop
6
može odmah koristiti.
4. Ukoliko LED za kontrolu punjenja
16
zasvijetli
zeleno, punjač za brzo punjenje
15
nalazi se u
Standby-modu; baterijski sklop
6
nije priključen.
5. Ukoliko LED za kontrolu punjenja
16
zasvijetli
crveno, baterijski sklop
6
je postao prevruć;
postupak punjenja je prekinut.
Nikada ne vršite ponovno punjenje paketa
baterija neposredno nakon jednog brzog punjenja. Postoji opasnost da se paket baterija
prepuni, nakon čega bi vijek trajanja punjača i
same baterije bio skraćen.
Punjač između dva postupka punjenja isključite
na minimalno 15 minuta. U tu svrhu izvucite
mrežni utikač.
Q
Umetanje paketa baterija u
uređaj / vađenje paketa baterija
Osigurajte da uređaj bude isključen, prije nego što
umećete bateriju. Umetanje baterije u uključeni
električni uređaj može dovesti do nezgode.
Postavljanje kompleta akumulatora:
Namjestite preklopnik smjera vrtnje 2 na sred-
nji položaj (blokiranje) i pustite da komplet
akumulatora
6
zaglavi u držki.
Vađenje aku-pakovanja:
Pritisnite tipku za deblokiranje 7 i izvadite
aku-pakovanje.
Q
Provjeravanje aku-stanja
Pritisnite za provjeravanje aku-stanja tipku
Akku-LED
11
(vidi također glavni prikaz). Stanje
tj. ostatak kapaciteta će Akku-LED
10
prikazati
kako sljedi:
ZELENO / CRVENO / NARANČASTO = maksimalno punjenje / kapacitet
CRVENO / NARANČASTO = srednje punjenje / kapacitet
CRVENO = slabo punjenje – aku puniti
Q
Zamjena alata
Vaša baterijska bušilica sa funkcijom odvijanja raspolaže potpuno automatskom blokadom igle
i ona je opremljena sa jednostrukim steznikom
„Made in Germany“ od
.
Kada motor miruje, dolazi do blokade pogonske
osovine, tako da steznik za brzo umetanje svrdla
13
možete otvoriti
okretanjem.
Nakon što ste umetnuli željeni alat i nakon što ste
ga okretanjem steznika
učvrstili, možete odmah
nastaviti sa radom. Blokada igle automatski se otpušta
pokretanjem motora (aktiviranje prekidača Uklj. /
Isklj.
3
).
Q
Određivanje okretnog
momenta unaprijed
Preko funkcije određivanja okretnog momenta unaprijed
14
možete podesiti snagu okretanja. Stupnjevi
okretnog momenta reguliraju područje do ca. 35 Nm.
Odaberite nizak stupanj za male vijke i mekane
podloge.
Odaberite visok stupanj za velike vijke, tvrde
podloge, odnosno ako vadite vijke.
Za radove bušenja odaberite stupanj na taj
način, da podešavanje okretnog momenta
postavite
u odgovarajuću poziciju.
Za radove bušenja gurnite prekidač za mijenja-
nje brzine
1
prema naprijed (pozicija: 2).
Page 24

24 HR
Q
2-brzinski mjenjač
OPREZ! Obratni sklopnik pritisnite 1 samo
kada je uređaj u stanju mirovanja.
U protivnom postoji opasnost oštećivanja uređaja.
U prvoj brzini (Prekidač za mijenjanje
brzina
1
u položaju: 1)
postižete broj okretaja od ca. 400 min
-1
i velik okretni
moment. Ova postavka je prikladna za sve radove
odvijanja i zatezanja vijaka, ali i za uporabu alata
(v. primjer prik. B).
U drugoj brzini (Prekidač za mijenjanje
brzina
1
u položaju: 2) postižete broj okretaja
od ca. 1400 min
-1
za izvedbu radova bušenja
(v. primjer prik. A).
Q
Stavljanje u rad
Q
Uključivanje / Isključivanje
Uključivanje:
Za pokretanje uređaja aktivirajte prekidač
Uklj. / Isklj.
3
i držite ga pritisnutog.
Radna LED-svjetiljka
12
svijetli pri lagano ili
potpuno stisnutom sklopkom za Uklj.-Isklj.
3
i
omogućuje tako osvjetljenje radnog područja
pri nedostatnom svjetlu.
Isključivanje:
Za isključivanje uređaja prekidač Uklj. /
Isklj.
3
pustite.
Uključivanje/isključivanje
LED-svjetiljke
Uključivanje:
Pritisnite LED-svjetiljku 8, kako bi uključili
LED-svjetiljku
9
.
Isključivanje:
Ponovno pritisnite tipku LED-svjetiljka 8, kako
bi isključili LED-svjetiljku
9
.
Q
Podešavanje brzine
Prekidač Uklj.-Isklj. 3 posjeduje variabilanu reguliraciju brzine. Lagan pritisak na prekidač Uklj.-Isklj.
3
prouzročuje nizak broj okretaja. Sa povećavanjem
pritiska se povećava i broj okretaja.
Uputa
: Integrirana motorna kočnica brine za
brzo zaustavljanje.
Q
Promjena smjera okretanja
Smjer okretanja možete promijeniti tako, što
ćete prekidač za promjenu smjera
2
pritisnuti
na desnu, odnosno lijevu stranu.
Q
Savjeti i trikovi
Prije rada prekontrolirajte, da li su umeci za
bušenje ili odvijanje korektno postavljeni i da li
su centrirano postavljeni u steznik.
Umeci za odvijanje označeni su svojim dimen-
zijama i svojim oblikom. Ukoliko ste nesigurni,
uvijek prvo isprobajte, da li umetak čvrsto leži
u glavi steznika.
Okretni moment:
Posebno mali vijci i umeci mogu biti oštećeni,
ako na uređaju postavite previsok okretni
moment i / ili previsok broj okretaja.
Uvijanje u tvrdo (u metal):
Posebno visoki okretni momenti nastaju primje-
rice kod vijčanog povezivanja uz uporabu
ključnih umetaka. Postavite nizak broj okretaja.
Uvijanje u meko (npr. u meko drvo):
Radite također sa niskim brojem okretaja, kako
ne biste primjerice površinu drveta prilikom
kontakta sa metalnim vijkom oštetili. Upotrijebite
konične alate.
Prilikom bušenja u drvo, metal i druge
materijale obavezno uzmite u obzir:
Kod malog promjera svrdla bušite sa visokim
brojem okretaja, a kod velikog promjera svrdla
sa niskom brojem okretaja.
Prije stavljanja u rad / Stavljanje u rad
Page 25

25 HR
Stavljanje u rad / Održavanje i čišćenje / Servis / Jamstveni list
Kod tvrdog materijala odaberite nizak broj
okretaja, a kod mekog materijala visok broj
okretaja.
Osigurajte ili (po mogućnosti) učvrstite predmet
obrade u uređaju za zatezanje.
Označite mjesto, na kojem treba biti izbušena
rupa pomoću kirnera ili čavla i za početno
bušenje odaberite nizak broj okretaja.
U više navrata rotirajuće svrdlo izvucite iz rupe,
da biste odstranili nastalu nečistoću i da bi
rupu ventilirali.
Bušenje u metalu:
Koristite svrdla za metal (HSS). Za postizanje
najboljih rezultata trebali biste svrdlo hladiti u
ulju. Svrdla za metal možete koristiti i za bušenje plastičnih materijala.
Bušenje u kamenu:
Koristite svrdlo za kamen sa glavom od tvrdog
metala.
Bušenje u drvetu:
Koristite svrdlo za drvo sa centrirnim vrhom; za
duboke rupe koristite takozvano „spiralno svrdlo“,
a za velik promjer bušenja Forstner-svrdlo. Male
vijke možete u mekano drvo umetnuti i bez pripremnog bušenja rupe.
Q
Održavanje i čišćenje
PAŽNJA! Kod svih radova na uređaju npr.
izmjena alata ili održavanje, kao i kod transporta
ili pospremanja uređaja, obratni sklopnik
2
postavite na srednju poziciju. Kod ne namjernog
pritiskanja prekidača za UKLJUČIVANJE /
ISKLJUČIVANJE
3
postoji opasnost od ozlje-
đivanja.
Prije nego što počnete s čišćenjem ili održava-
njem uređaja izvucite mrežni utikač iz utičnice i
izvadite akumulator.
Baterijska bušilica sa funkcijom odvijanja ne zahtijeva servisiranje.
Uređaj se stalno mora držati čistim, suhim bez
ulja i masnoća.
Uređaj očistite odmah po njegovoj upotrebi.
U unutrašnjost uređaja ne smiju dospjeti nika-
kve tekućine. Za čišćenje kućišta koristite samo
mekanu krpu. Nikada nemojte koristiti benzin,
otapala ili sredstva za čišćenje koja bi mogla
nagrizati plastiku.
Q
Servis
Električne naprave
smiju popravljati samo ovlašteni ser-
viseri ili električari. Time ćete zadržati
sigurnost vaših uređaja.
Zamjenu utikača ili
mrežnih vodova neka izvodi uvijek
proizvođač ili korisnička služba. Time
ćete zadržati sigurnost vaših uređaja.
Q
Jamstveni list
Na ovaj uređaj vrijedi jamstvo u trajanju
od 3 godine od datuma kupovine. Uređaj
je pažljivo proizveden i prije isporuke
brižljivo kontroliran. Molimo sačuvajte
blagajnički račun kao dokaz o kupnji.
Molimo da se u slučaju ostvarivanja prava
na jamstvo telefonski povežete sa Vašom
servisnom ispostavom. Samo na taj način
vaša roba može biti besplatno uručena.
Jamstvo vrijedi samo za greške materijala i izrade, a
ne za transportne štete, potrošne dijelove ili oštećenja
lomljivih dijelova, na primjer prekidača ili baterija.
Proizvod je namijenjen isključivo za privatnu, a ne
za gospodarstvenu uporabu.
U slučaju nestručnog rukovanja, rukovanja protivnog
namjeni uređaja, primjene sile i zahvata, koji nisu
izvršeni od strane našeg ovlaštenog servisnog
predstavništva, važenje jamstva prestaje. Vaša zakonska prava ovim jamstvom ostaju netaknuta.
Jamstveni rok se ne produžava uslijed ostvarivanja
prava na jamstvo. To vrijedi i za zamijenjene i popravljene dijelove. Eventualno već prilikom kupovine
prisutna oštećenja i nedostaci moraju biti javljena
Page 26

26 HR
Jamstveni list / Zbrinjavanje / Izjava o sukladnosti / Proizvođač
neposredno nakon raspakiranja, ali najkasnije dva
dana nakon datuma kupovine. Popravke vršene nakon
isteka jamstvenog roka podliježu obavezi plaćanja.
Proizvođač:
Kompernaß GmbH
Burgstraße 21
44867 Bochum (Germany)
Njemačka
HR
Servis Hrvatska
Tel.: 0800 777 999
e-mail: kompernass@lidl.hr
IAN 75636
Q
Zbrinjavanje
Ambalaža se u potpunosti sastoji od
materijala neškodljivog za okoliš.
Zbrinite ga u mjesnim reciklažnim
spremnicima.
Ne bacajte električne uređaje
u kućno smeće!
U skladu sa europskom smjernicom 2002 / 96 / EC
o starim električnim i elektroničnim uređajima i
prilagođavanjem sa nacionalnim pravom istrošeni
električni uređaji moraju biti odvojeno sakupljani i
predati procesu recikliranja neškodljivom za okoliš.
Akumulator ne bacajte
u kućni otpad!
Defektne ili istrošene baterije moraju u skladu sa
smjernicom 2006 / 66 / EC biti reciklirane.
Baterije i / ili uređaj vratite preko ponuđenih
sabirnih institucija.
Mogućnosti za zbrinjavanje isluženog uređaja
možete doznati u upravi vaše mjesne zajednice ili
vašeg grada.
Q
Izjava o sukladnosti /
Proizvođač
Mi, Kompernaß GmbH, odgovorni za ovu dokumentaciju: gospodin Semi Uguzlu, Burgstr. 21,
D-44867 Bochum, Njemačka, ovim izjavljujemo da
je ovaj proizvod u skladu sa slijedećim normama,
normativnim dokumentima i EZ smjernicama:
Strojne smjernice
(2006 / 42 / EC)
EG-smjernica za nizak napon
(2006 / 95 / EC)
Elektromagnetsko podnošenje
(2004 / 108 / EC)
Primijenjene harmonizirane norme
EN 60745-1:2009+A11, EN 60745-2-1:2010
EN 60745-2-2:2010, EN 55014-1:2006+A1+A2
EN 55014-2:1997+A1+A2
EN 61000-3-2:2006+A1+A2
EN 61000-3-3:2008
EN 60335-1:2002+A1+A11+A12+A2+A13+A14
EN 60335-2-29:2004, EN 62233:2008
Tip / naziv uređaja:
Aku odvijač PABS 18-Li B2
Date of manufacture (DOM): 07–2012
Serijski broj: IAN 75636
Bochum, 31.07.2012
Semi Uguzlu
- Menadžer kakvoće -
Izjava o sukladnosti za ovaj proizvod dostupna je
na internet stranici www.lidl.hr.
Pridržavamo pravo tehničkih izmjena u
smislu daljnjeg razvoja.
Page 27

27 RO
Cuprins
Introducere
Utilizare conform scopului .............................................................................................................. Pagina 28
Dotare .............................................................................................................................................. Pagina 29
Pachet de livrare ............................................................................................................................. Pagina 29
Date tehnice .................................................................................................................................... Pagina 29
Indicaţii generale de siguranţă pentru uneltele electrice
1. Siguranţa la locul de muncă ...................................................................................................... Pagina 30
2. Siguranţă electrică ...................................................................................................................... Pagina 30
3. Siguranţa persoanelor ................................................................................................................ Pagina 30
4. Utilizarea şi deservirea uneltei electrice .................................................................................... Pagina 31
5. Utilizarea şi deservirea uneltei cu acumulator .......................................................................... Pagina 32
6. Service ......................................................................................................................................... Pagina 32
Indicaţii de siguranţă pentru maşina de găurit şi înşurubat cu acumulator ................................. Pagina 32
Atenţie cabluri! ................................................................................................................................ Pagina 33
Accesorii originale / -aparate adiţionale ....................................................................................... Pagina 33
Înainte de punerea în funcţiune
Încărcare pachet acumulator ......................................................................................................... Pagina 33
Introducerea / scoaterea pachetului de acumulator din aparat .................................................. Pagina 33
Verificarea stării acumulatorului ..................................................................................................... Pagina 33
Schimbarea sculelor........................................................................................................................ Pagina 34
Pre-selectare moment de rotaţie ..................................................................................................... Pagina 34
Transmisie cu 2 viteze ..................................................................................................................... Pagina 34
Punere în funcţiune
Pornire- / Oprire............................................................................................................................... Pagina 34
Pornire / oprire lumină LED ............................................................................................................. Pagina 34
Reglarea vitezei .............................................................................................................................. Pagina 35
Comutarea direcţiei de rotaţie ....................................................................................................... Pagina 35
Indicii şi trucuri ................................................................................................................................. Pagina 35
Curăţare şi întreţinere ...................................................................................................... Pagina 35
Service ........................................................................................................................................... Pagina 36
Garanţie ....................................................................................................................................... Pagina 36
Înlăturare .................................................................................................................................... Pagina 36
Declaraţie de conformitate / Producător .......................................................... Pagina 37
Page 28

28 RO
Introducere
Mașină de înșurubat cu acumulator
PABS 18-Li B2
Q
Introducere
Vă felicităm pentru achiziţia aparatului
dumneavoastră. Aţi ales un produs de
înaltă calitate. Manualul de utilizare
reprezintă o parte integrantă a acestui produs. Acesta
conţine informaţii importante referitoare la siguranţă,
la utilizare şi la eliminarea ca deşeu. Înainte de utilizarea acestui produs, familiarizaţi-vă mai întâi cu
instrucţiunile de utilizare şi de siguranţă. Folosiţi
produsul numai în modul descris şi numai în domeniile de utilizare indicate. Predaţi toate documentele
aferente în cazul în care înstrăinaţi produsul.
Q
Utilizare conform scopului
Acest aparat este conceput pentru găurirea şi înşurubarea în lemn, material plastic şi metal. Folosiţi
aparatul numai în modul descris şi numai în domeniile de utilizare indicate. Orice altă utilizare sau modificare a aparatului este considerată ca o utilizare
necorespunzătoare scopului şi reprezintă pericole
considerabile de accidente. Pentru daunele cauzate de o utilizare necorespunzătoare scopului, producătorul nu preia nicio responsabilitate. Nu este
destinat utilizării comerciale.
În acest manual de utilizare sunt folosite / următoarele pictograme pe aparat:
Citiţi manualul de utilizare! Clasă de protecţie II
Respectaţi indicaţiile de avertizare
şi siguranţă!
Mandrină de găurire cu strângere
rapidă
Atenţie pericol de electrocutare!
Pericol de moarte!
Blocare pivot
Pericol de explozie! Treaptă de găurire
W
Watt (Putere) Purtaţi căşti de protecţie.
n
0
Turaţie de măsurare la regim de mers
în gol
Ţineţi copii la distanţă faţă de
uneltele electrice!
V
~
Volţi (tensiune alternativă)
Numai pentru utilizarea în spaţiile
interioare!
Ah
Amper-oră (capacitate acumulator)
Aveţi grijă la starea ireproşabilă a
aparatului, cablului de reţea şi ştecărului de reţea!
Nm
Newtonmetru (moment de rotaţie)
Înlăturaţi ambalajul şi aparatul
în mod ecologic!
Curent continuu
(Tipul de curent şi tensiune)
Nu aruncaţi acumulatoarele
la gunoiul menajer!
Page 29

29 RO
Introducere
Q
Dotare
1
Întrerupător de selectare treaptă de viteză
2
Comutator direcţie de rotaţie / Blocaj
3
Întrerupător PORNIT-/OPRIT/Reglare turaţie
4
Suport dublu
5
Suport pentru centură
6
Set acumulatori
7
Tastă de deblocare a setului de acumulatori
8
Tastă lumină LED
9
Lumină LED
10
Afişaj LED pentru acumulatori
11
Tastă pentru starea acumulatorilor
12
Lumină de lucru LED
13
Mandrină de găurire cu strângere rapidă
14
Pre-selectare moment de rotaţie
15
Aparat de încărcare rapidă
16
LED roşu de control încărcare
17
LED verde de control încărcare
Q
Pachet de livrare
1 Mașină de înșurubat cu acumulator împreună cu
pachet de acumulator
1 Bit PH2 50 mm
1 Aparat de încărcare rapidă
1 Geantă
1 Manual de utilizare
Q
Date tehnice
Maşină de găurit şi înşurubat cu
acumulator PABS 18-Li B2:
Tensiune nominală: 18 V
Turaţie în gol: 1. Treapta: max.
400 min
-1
Turaţie în gol: 2. Treapta: max.
1400 min
-1
Zonă de strângere
mandrină de găurire: max. 10 mm
Diametru maxim de găurire: Oţel: 10 mm,
Lemn: 30 mm
Moment de rotaţie maxim: 35 Nm
Pachet acumulator PABS 18-Li B2-1 :
Tip: IONI DE LITIU
Tensiune nominală: 18 V
Capacitate: 1,5 Ah
Conţinut energie: 27 Wh
Aparat de încărcare rapidă
PABS 18-Li B2-2:
INTRARE / Input:
Tensiune nominală: 230 V∼, 50 Hz
Consum de putere: 55 W
IEŞIRE / Output:
Tensiune nominală: 18 V
Curent de încărcare: 2 A
Durată de încărcare: cca. 60 min
Clasă de protecţie: II /
Informaţii privind emisiile de zgomot
şi vibraţii:
Valoare de măsurare determinată conform
EN 60745. Nivelul de zgomot A-determinat a
uneltei electrice este în mod tipic:
Nivel presiune acustică: 76 dB(A)
Nivel de putere acustică: 87 dB(A)
Coeficient de nesiguranţă K: 3 dB
Valori totale de oscilaţie (sumă vectorială a trei
direcţii) determinată conform EN 60745:
Şuruburi: Valoare emisie de oscilaţii
a
h,D
= 0,865 m / s2,
Coeficient de nesiguranţă
K= 1,5 m / s
2
,
Găurire: Valoare emisie de oscilaţii
a
h
= 2,546 m / s2,
Coeficient de nesiguranţă
K= 1,5 m / s
2
.
Nivelul de vibraţii menţionat
în prezentele instrucţiuni a fost măsurat conform unui
procedeu de măsurare standardizat cuprins în EN
60745 şi poate fi utilizat pentru compararea aparatelor. Valorile de emisii de oscilaţii menţionate pot
fi utilizate și pentru o estimare introductivă a expunerii.
Nivelul de oscilaţii se va modifica conform utilizării
uneltei electrice şi poate depăşi în unele cazuri valoarea menţionată în indicaţii. Solicitarea prin oscilaţii
Page 30

30 RO
Introducere / Indicaţii generale de siguranţă pentru uneltele electrice
s-ar putea subaprecia atunci când, unealta electrică
este folosită în mod regulat în asemenea mod.
Indicaţie: Pentru o evaluare precisă a solicitării
prin oscilaţii în timpul unei anumite perioade de
lucru trebuie luate în considerare şi timpii, în care
aparatul este oprit sau pornit dar nu este folosit.
Aceasta poate reduce considerabil solicitarea prin
oscilaţii pentru întreaga perioadă de lucru.
Indicaţii generale
de siguranţă pentru
uneltele electrice
Citiţi toate indicaţiile de
siguranţă şi instrucţiunile. Nerespectarea in-
dicaţiilor şi intsrucţiunilor de siguranţă poate cauza
electrocutarea, incendiu şi / sau acccidente grave.
Păstraţi toate indicaţiile de siguranţă şi
instrucţiunile pentru viitor.
Termenul de „Unealtă electrică”, utilizat în indicaţiile de siguranţă se referă la uneltele electrice care
funcţionează conectate la reţea (cu cablu de reţea)
şi la cele care funcţionează cu acumulatoare (fără
cablu de reţea).
1. Siguranţa la locul de muncă
a) Ţineţi locul dvs. de muncă curat şi bine
iluminat. Dezordinea şi zone de lucru prost
iluminate pot cauza accidente.
b)
Nu lucraţi cu unealta electrică
în medii cu pericol de explozie,
în care se află lichide, gaze
sau prafuri inflamabile. Uneltele electrice
generează scântei, care pot aprinde praful
sau vaporii.
c)
Ţineţi copii şi alte persoane la
distanţă atunci când, lucraţi cu
unealta electrică. Atunci când
atenţia vă este distrasă puteţi pierde controlul
asupra aparatului.
2. Siguranţă electrică
a) Ştecărul de conectare trebuie să cores-
pundă prizei. Ştecărul nu are voie să
fie modificat în niciun fel. Nu folosiţi
niciun ştecăr cu adaptor împreună cu
unelte electrice împământate. Ştecărele
nemodificate şi prizele corespunzătoare reduc
riscul unei electrocutări.
b) Evitaţi contactul cu suprafeţe împă-
mântate, cum ar fi ţevile, corpurile de
încălzire, cuptoarele şi frigiderele. Există
risc mărit de electrocutare atunci când, corpul
dvs. este în contact cu un obiect împământat.
c) Protejaţi uneltele electrice de ploaie şi
umiditate. Pătrunderea apei într-un aparat
electric măreşte riscul unei electrocutări.
d)
Nu folosiţi cablul pentru a
purta unealta electrică, pentru a o suspenda sau pentru
a scoate ştecărul din priză. Protejaţi
cablul de căldură, ulei, muchii ascuţite
sau componentele aparatului, care se
află în mişcare. Cablurile deteriorate sau
răsucite măresc riscul unei electrocutări.
e) Atunci când lucraţi cu o unealtă electri-
că în aer liber, folosiţi numai cabluri de
prelungire, care sunt autorizate pentru
folosirea în aer liber. Utilizarea unui cablu
de prelungire autorizat pentru folosirea în aer
liber, reduce riscul unei electrocutări.
f) Atunci când folosirea uneltei electrice
într-un mediu umed nu se poate evita,
folosiţi un întrerupător de protecţie
contra curentului eronat. Utilizarea unui
întrerupător de protecţie contra curentului eronat reduce riscul unei electrocutări.
3. Siguranţa persoanelor
a) Fiţi întotdeauna atent, aveţi grijă la
ceea ce faceţi şi procedaţi raţional în
timpul lucrului cu unealta electrică. Nu
folosiţi unelte electrice atunci când,
sunteţi obosit, vă aflaţi sub influenţa
drogurilor, alcoolului sau unui trata-
Page 31

31 RO
Indicaţii generale de siguranţă pentru uneltele electrice
ment medical. Un moment de neatenţie în
timpul utilizării uneltei electrice poate cauza
accidente grave.
b) Purtaţi echipament personal de pro-
tecţie şi întotdeauna ochelari de protecţie. Purtarea echipamentului personal de
protecţie ca şi masca, încălţăminte antiderapantă, cască sau căşti de protecţie, în funcţie de
tipul şi utilizarea uneltei electrice reduce riscul
unei accidentări.
c) Evitaţi o pornire neintenţionată a unel-
tei electrice. Asiguraţi-vă că, unealta
electrică este oprită înainte de a o conecta la alimentarea cu curent, a o
ridica sau purta. Atunci când aveţi degetul
pe întrerupător în timpul purtării aparatului sau
atunci când aparatul este conectat la alimentarea cu curent în stare pornită, se pot întâmpla
accidente.
d) Înlăturaţi instrumentele de reglare sau
cheile franceze înainte de a porni unealta electrică. Un instrument sau o cheie, care
se află în partea aflată în rotaţie a aparatului,
poate cauza accidente.
e) Evitaţi o poziţie neobişnuită a corpului.
Asiguraţi o stabilitate corespunzătoare
şi menţineţi-vă tot timpul echilibrul.
Astfel puteţi controla mai bine unealta electrică
într-o situaţie neaşteptată.
f) Purtaţi îmbrăcăminte corespunzătoare.
Nu purtaţi îmbrăcăminte largă sau bijuterii. Menţineţi părul, îmbrăcămintea
şi mănuşile la distanţă faţă de piesele
aflate în mişcare. Îmbrăcămintea largă, bi-
juteriile sau părul lung pot fi prinse de piesele
ce se află în mişcare.
g) Atunci când se pot monta echipamente
de aspirare şi de colectare a prafului,
asiguraţi-vă că acestea sunt conectate
şi corect utilizate. Utilizarea unui echipament
de aspirare a prafului poate reduce periclitarea prin praf.
4. Utilizarea şi deservirea
uneltei electrice
a) Nu suprasolicitaţi aparatul. Folosiţi
pentru lucrul vostru unealta electrică
prevăzută pentru acesta. Cu unealta
electrică corespunzătoare lucraţi mai bine şi
mai sigur în domeniul de putere indicat.
b) Nu folosiţi o unealtă electrică al cărei
întrerupător este defect. O unealtă elec-
trică, care nu se mai poate porni sau opri, este
periculoasă şi trebuie reparată.
c) Scoateţi ştecărul din priză şi / sau înlă-
turaţi acumulatorul înainte de a efectua
lucrări de reglare la aparat, schimba
accesorii sau depozita aparatul. Această
măsură preventivă împiedică o pornire neintenţionată a uneltei electrice.
d) Nu păstraţi uneltele electrice nefolosite
la îndemâna copiilor. Nu lăsaţi persoanele, care nu cunosc aparatul sau
nu au citit instrucţiunile, să folosească
aparatul. Uneltele electrice sunt periculoase
atunci când sunt folosite de persoane neexperimentate.
e) Întreţineţi uneltele electrice cu atenţie.
Controlaţi dacă, componentele mobile
funcţionează ireproşabil, dacă nu sunt
blocate sau dacă, unele componente
sunt rupte sau deteriorate astfel încât
funcţionarea uneltei electrice să fie
limitată. Dispuneţi repararea componentelor defecte înainte de utilizarea
aparatului. Multe accidente sunt cauzate
de unelte electrice necorespunzător întreţinute.
f) Păstraţi uneltele de debitare ascuţite
şi curate. Uneltele de debitare întreţinute cu
atenţie, cu muchii de tăiere ascuţite, se blochează mai puţin şi se pot ghida mai uşor.
g) Utilizaţi uneltea electrică, accesoriile,
instrumentele ş.a.m.d. conform acestor
instrucţiuni. De asemenea, luaţi în
considerare condiţiile de lucru şi activitatea, pe care o desfăşuraţi. Utilizarea
uneltelor electrice în alte scopuri decât cele
prevăzute poate crea situaţii periculoase.
Page 32

32 RO
Indicaţii generale de siguranţă pentru uneltele electrice
5. Utilizarea şi deservirea
uneltei cu acumulator
a) Încărcaţi acumulatoarele numai în
aparate de încărcat recomandate de
producător. Pentru un aparat de încărcat,
care este prevăzut pentru un anumit tip de
acumulatoare, exsită pericol de incendiu atunci
când, este folosit pentru încărcarea unui tip
diferit de acumulator.
b) Folosiţi numai acumulatoarele prevă-
zute pentru aceasta în uneltele electrice.
Utilizarea altor tipuri de acumulatoare poate
cauza accidente sau pericole de incendiu.
c) Ţineţi acumulatorul nefolosit la distan-
ţă faţă de agrafe de birou, monezi,
chei, cuie, şuruburi sau alte obiecte de
metal, care pot cauza formarea unei
punţi de contacte. Un scurt circuit al con-
tactelor de acumulator poate avea ca urmare
arsuri sau incendii.
d) În caz de utilizare incorectă se poate
scurge lichid din acumulator. Evitaţi
contactul cu acesta. În caz de contact
întâmplător clătiţi cu apă. Atunci când
lichidul vă intră în ochi, solicitaţi ajutorul unui medic. Lichidul ce se scurge din
acumulator poate cauza iritaţii ale pielii sau
arsuri.
ATENŢIE! PERICOL DE EXPLO-
ZIE! Nu încărcaţi niciodată baterii,
ce nu pot fi reîncărcate!
6. Service
a) Dispuneţi repararea aparatului numai
de către persoane calificate şi numai
cu piese de schimb originale. Astfel se
asigură păstrarea siguranţei aparatului.
Indicaţii de siguranţă
pentru maşina de găurit şi
înşurubat cu acumulator
Ţineţi unealta electrică
numai de mânerele izolate atunci
când, efectuaţi lucrări la care, unealta
electrică poate atinge cabluri de curent
ascunse sau propriul cablu de curent.
Contactul cu un cablu conductor de tensiune
poate supune tensiunii şi componentele din metal ale aparatului şi pot cauza electrocutarea.
Acest aparat poate fi folosit de către persoane
(inclusiv copii) cu capacităţi fizice, senzoriale
sau psihice limitate sau cu lipsă de experienţă
şi / sau cunoştinţe doar dacă, sunt supravegheate
de către o persoană responsabilă de siguranţa
acestora sau dacă, au primit instrucţiuni de folosire a aparatului. Copii trebuie supravegheaţi
pentru a nu se juca cu aparatul.
Asiguraţi piesa de lucru. O piesă de lucru fixată
cu un dispozitiv de prindere sau cu o menghină este mai sigură decât una ţinută cu mâna.
PRAFURI TOXICE!
Prafurile toxice/otrăvitoare, ce se formează în
timpul prelucrării reprezintă un pericol pentru
sănătatea utilizatorului maşinii sau pentru persoanele din apropriere. Purtaţi ochelari de protecţie şi mască de protecţie contra prafului!
Nu prelucraţi material ce conţine az-
best. Azbestul cauzează apariţia cancerului.
Ţineţi bine unealta electrică. La strângerea
şi deşurubarea şuruburilor pot apărea pentru
perioade scurte momente de reacţie.
Opriţi imediat unealta electrică atunci
când, instrumentul de lucru blochează.
Fiţi pregătit pentru momentele de reacţie înalte,
care cauzează un recul. Scula de lucru se blochează atunci când, unealta electrică este suprasolicitată sau se prinde în piesa de lucru.
La lucrările la aparat, ca şi transportul
respectiv depozitarea, aduceţi comutatorul pentru direcţia de rotaţie în
poziţia de mijloc (blocaj). Astfel împiedicaţi
o pornire neintenţionată a uneltei electrice.
Page 33

33 RO
Indicaţii generale de siguranţă pentru … / Înainte de punerea în funcţiune
Q
Atenţie cabluri!
PERICOL! Înainte de a lucra cu o
unealtă electrică asiguraţi-vă să nu
atingeţi niciun cablu de curent, nicio
conductă de gaz sau de apă. Dacă este
necesar verificaţi mai întâi cu un detector de
conducte, înainte de a găuri sau tăia un perete.
Q
Accesorii originale / -aparate
adiţionale
Folosiţi numai accesorii şi aparate adi-
ţionale, care sunt indicate în manualul
de utilizare. Utilizarea altor instrumente de
lucru sau altor accesorii decât cele recomandate
în manualul de utilizare poate reprezenta un
pericol de accidentare.
Q
Înainte de punerea în funcţiune
Q
Încărcare pachet acumulator
PERICOL DE ELEC-
TROCUTARE! Înainte de curăţarea şi întreţine-
rea aparatului de încărcat sau pachetului de acumulator scoateţi întotdeauna ştecărul de reţea.
Indicaţie! Un pachet nou de acumulator sau unul
ce nu a fost folosit o perioadă mai îndelungată, trebuie încărcat înainte de prima / o nouă utilizare.
Pachetul de acumulator îşi atinge capacitatea completă abia după cca. 3–5 cicluri de încărcare.
ATENŢIE! Scoateţi întotdeauna ştecărul de
reţea, înainte de a scoate respectiv introduce pachetul de acumulator din / în aparatul de încărcat.
Nu încărcaţi niciodată pachetul de acumulator
dacă, temperatura înconjurătoare este sub
10 °C sau peste 40 °C.
1. Introduceţi pachetul de acumulator
6
în apa-
ratul de încărcare rapidă
15
(vezi fig. C).
2. Introduceţi ștecărul în priză. Indicatorul de încărcare cu LED
17
verde, care luminează acum
intermitent, indică procesul de încărcare.
3. De îndată ce se aprinde indicatorul de încărcare cu LED verde 17, procesul de încărcare s-a
încheiat şi acumulatorul
6
este pregătit de uti-
lizare.
4. Dacă se aprinde indicatorul de încărcare cu LED
roşu
16
, încărcătorul rapid 15 se află în modul
stand-by; acumulatorul
6
nu este conectat.
5. Dacă luminează intermitent indicatorul de
încărcare cu LED roşu
16
, acumulatorul 6 s-a
încălzit prea tare; nicio încărcare.
Nu încărcaţi niciodată pentru a doua oară pa-
chetul de acumulator imediat după încărcarea
rapidă. Există pericolul ca pachetul de acumulator să fie suprasolicitat şi astfel să se reducă
durata de viaţă a acumulatoarelor şi aparatului
de încărcat.
Opriţi aparatul de încărcat între procese conse-
cutive de încărcare pentru minim 15 minute.
Pentru aceasta scoateţi ştecărul de reţea.
Q
Introducerea / scoaterea
pachetului de acumulator
din aparat
Asiguraţi ca aparatul să fie oprit înainte de a introduce acumulatorul în acesta. Introducerea unui
acumulator într-o unealtă electrică, ce este pornită,
poate cauza accidente.
Introducerea pachetului de acumulator:
Acţionaţi comutatorul direcţiei de rotaţie 2 în
poziţia de mijloc (de blocare) şi fixaţi setul de
acumulatori
6
în mâner.
Scoaterea pachetului de acumulator:
Apăsaţi tasta de deblocare 7 şi scoateţi
pachetul de acumulator.
Q
Verificarea stării acumulatorului
Pentru verificarea stării acumulatorului apăsaţi
tasta LED acumulator
11
(vezi fig.principală).
Starea respectiv puterea reziduală se afişează
după cum urmează la LED-ul de acumulator
10
:
Page 34

34 RO
Înainte de punerea în funcţiune / Punere în funcţiune
VERDE / ROŞU / PORTOCALIU = încărcare
maximă / Putere
ROŞU / PORTOCALIU = încărcare medie /
Putere
ROŞU = încărcare slabă – Încărcare acumulator
Q
Schimbarea sculelor
Maşina dvs. de găurit şi înşurubat cu acumulator
are o blocare complet automată a pivotului
şi este dotată cu o mandrină de găurire cu un singur manşon „Made in Germany“ de la
.
Atunci când motorul este oprit, ansamblul de transmisie este blocat astfel încât, mandrina de găurire cu
strângere rapidă
13
poate fi deschisă prin rotire .
După ce aţi introdus scula dorită şi aţi strâns-o prin
rotirea mandrinei de găurire
, puteţi continua
imediat cu lucrul. Blocarea pivotului se desprinde
automat prin pornirea motorului (Apăsarea întrerupătorului PORNIT- / OPRIT
3
).
Q
Pre-selectare moment de rotaţie
Puteţi regla puterea de rotaţie prin butonul de pre –
selectare a momentului de rotaţie
14
. Treptele momentului de rotaţie reglează domeniul până la cca.
35 Nm.
Selectaţi trepte inferioare pentru şuruburi mici,
respectiv materiale moi.
Selectaţi o treaptă superioară pentru şuruburi
mari, materiale dure respectiv la deşurubarea
şuruburilor.
Pentru lucrările de găurit alegeţi treapta de
găurit prin aducerea în poziţie a butonului de
pre-selectare a momentului de rotaţie
.
De asemenea, împingeţi pentru lucrările de
găurit întrerupătorul de selectare a treptelor de
viteză
1
în faţă (poziţia: 2).
Q
Transmisie cu 2 viteze
ATENŢIE! Activaţi întrerupătorul de selectare
a vitezei
1
numai atunci când, aparatul este oprit.
În caz contrar există pericol de deteriorare a aparatului.
În prima treaptă de viteză (Întrerupătorul de selectare a treptei de viteză
1
în
poziţia: 1)
atingeţi o turaţie de cca. 400 min
-1
şi un moment de
rotaţie mare. Această reglare se pretează la toate
lucrările de înşurubare, dar şi pentru utilizarea accesoriilor (vezi exemplu Fig. B).
În a doua treaptă de viteză (Întrerupătorul de selectare a treptei de viteză
1
în
poziţia: 2)
atingeţi o turaţie de cca. 1400 min
-1
pentru efectua-
rea lucrărilor de găurire (vezi exemplu Fig. A).
Q
Punere în funcţiune
Q
Pornire- / Oprire
Pornire:
Pentru punerea în funcţiune a aparatului apăsaţi
întrerupătorul PORNIT- / OPRIT
3
şi menţineţi-l
apăsat.
Lumina de lucru LED
12
se aprinde atunci când
întrerupătorul PORNIT- / OPRIT
3
este uşor sau
complet apăsat şi permite iluminarea zonei de
lucru în condiţii nefavorabile de lumină.
Oprire:
Pentru oprirea aparatului eliberaţi întrerupătorul
PORNIT- / OPRIT
3
.
Pornire / oprire lumină LED
Pornire:
Apăsaţi tasta luminii LED-ului 8, pentru a porni
lumina LED-ului
9
.
Oprire:
Apăsaţi din nou tasta luminii LED-ului 8, pentru
a opri lumina LED-ului
9
.
Page 35

35 RO
Punere în funcţiune / Curăţare şi întreţinere
Q
Reglarea vitezei
Întrerupătorul PORNIT- / OPRIT 3 are o reglare
variabilă a vitezei. O apăsare uşoară pe întrerupătorul PORNIT-/ OPRIT
3
cauzează o turaţie redusă.
Odată ce presiunea creşte, turaţia creşte de asemenea.
Indicaţie: Frâna de motor integrată asigură o
oprire rapidă.
Q
Comutarea direcţiei de rotaţie
Puteţi schimba direcţia de rotaţie prin întoarce-
rea comutatorului direcţiei de rotaţie
2
către
dreaptă respectiv stânga.
Q
Indicii şi trucuri
Verificaţi înainte de utilizare dacă, scula de în-
şurubat respectiv de găurit este corect montată,
adică este centrată în mandrina de găurire.
Biturile de şuruburi sunt marcate cu dimensiu-
nea şi forma lor. Dacă sunteţi nesigur, încercaţi
întotdeauna mai întâi dacă bitul este fixat fără
joc în capul şurubului.
Moment de rotaţie:
Mai ales şuruburile şi biturile mai mici pot fi
deteriorate atunci când, reglaţi un moment de
rotaţie sau / şi o turaţie prea mare la maşină.
Înşurubare în materiale dure (în metal):
Momente de rotaţie deosebit de mari se for-
mează de ex.: la înşurubările de metal prin
utilizarea biturilor. Selectaţi o turaţie redusă.
Înşurubare în material moale (de ex.: în
lemn moale):
Înşurubaţi şi în acest caz cu o turaţie redusă,
pentru a nu deteriora de ex: suprafaţa de lemn
la contactul cu capul şurubului din metal. Folosiţi un adâncitor.
La găurirea lemnului, metalului şi altor
materiale respectaţi în mod obligatoriu:
La utilizarea burghielor cu diametru mic reglaţi
o turaţie mare, iar la utilizarea burghielor cu diametru mare reglaţi o turaţie redusă.
La materialele dure reglaţi o turaţie redusă, iar
la materiale moi reglaţi o turaţie mare.
Asiguraţi sau fixaţi piesa de lucru (dacă este
posibil) într-un dispozitiv de prindere.
Marcaţi locul, în care veţi găuri cu un cui sau un
dorn şi reglaţi pentru început o turaţie redusă.
Scoateţi burghiul, ce se roteşte, de mai multe
ori din gaura de găurire, pentru a înlătura aşchiile sau praful şi pentru a o aerisi.
Găurire în metal:
Folosiţi burghie din metal (HSS). Pentru cele mai
bune rezultate trebuie să răciţi burghiul cu ulei.
Puteţi folosi burghie din metal şi pentru găurirea
materialului plastic.
Găurire în piatră:
Folosiţi un burghiu pentru piatră din aliaj dur.
Găurire în lemn:
Folosiţi un burghiu pentru lemn cu vârf de cen-
trare, pentru găurirea adâncă folosiţi un „Burghiu
elicoidal“, pentru diametre mari de găurire folosiţi un burghiu tip Forstner. Puteţi înşuruba şuruburile mici în lemn moale şi fără a găuri în
prealabil.
Q
Curăţare şi întreţinere
ATENŢIE! Înainte de toate lucrările la aparat,
de ex.: schimbarea sculelor de lucru sau lucrările de întreţinere, cât şi la transportul sau depozitarea aparatului, aduceţi comutatorul direcţiei
de rotaţie
2
în poziţia de mijloc. În caz contrar
există pericol de accidente la activarea neintenţionată a întrerupătorului PORNIT- / OPRIT
3
.
Înainte de toate lucrările de curăţare şi întreţi-
nere scoateţi ştecărul de reţea din priză şi
scoateţi acumulatorul.
Page 36

36 RO
Curăţare şi întreţinere / Service / Garanţie / Înlăturare
Maşina de găurit şi înşurubat nu necesită întreţinere.
Aparatul trebuie să fie tot timpul curat, uscat şi
fără ulei sau lubrifianţi.
Curăţaţi aparatul imediat după terminarea lu-
crărilor.
Nu au voie să pătrundă lichide în interiorul
aparatului. Pentru curăţarea carcasei folosiţi o
lavetă. Nu folosiţi niciodată benzină, soluţii sau
substanţe de curăţare, care atacă materialul
plastic.
Q
Service
Dispuneţi repararea
aparatelor dvs. de către un punct de
service sau de către un electrician şi
numai cu piese de schimb originale.
Astfel se asigură păstrarea siguranţei aparatului.
Dispuneţi schimbarea
ştecărului sau cablului de reţea întot-
deauna numai de către producătorul
uneltelor electrice sau de către serviciul clienţi al acestuia. Astfel se asigură
păstrarea siguranţei aparatului.
Q
Garanţie
Pentru acest aparat primiţi o garanţie de
3 ani de la data achiziţiei. Aparatul a fost
produs cu atenţie şi verificat înainte de livrare. Vă rugăm să păstraţi bonul de casă
ca dovadă de achiziţie. În caz de o reclamaţie privind garanţia, contactaţi telefonic
punctul nostru de service. Doar astfel se
poate asigura o transmitere gratuită a
mărfii dvs.
Garanţia este valabilă numai pentru defecte de
material sau de fabricare, însă nu pentru deteriorări
din cauza transportului, piese de uzură sau deteriorarea pieselor sensibile, ca de ex.: întrerupătoare
sau acumulatoare. Produsul este destinat numai
uzului privat şi nu celui comercial.
În caz de utilizare necorespunzătoare, supunerea
la şocuri şi alte intervenţii, care se efectuează de
un punct de service neautorizat de noi, garanţia
devine nulă. Drepturile dvs. legale nu sunt limitate
de această garanţie.
Durata de garanţie nu se prelungeşte prin acordarea acesteia. Aceasta este valabil şi pentru piesele
schimbate şi reparate. Defecţiunile sau lipsurile
existente deja la achiziţie trebuie anunţate imediat
după despachetare, însă cel mai târziu după două
zile de la data achiziţiei. Reparaţiile necesare după
expirarea perioadei de garanţie se efectuează
contra cost.
RO
Service România
Tel.: 0800896637
e-mail: kompernass@lidl.ro
IAN 75636
Q
Înlăturare
Ambalajul este din materiale ecologice,
care pot fi înlăturate în punctele locale
de reciclare.
Nu aruncaţi uneltele electrice la
gunoiul menajer!
Conform Directivei Europene 2002 / 96 / CE privind
aparatele vechi electrice, electronice şi aplicarea
dreptului naţional uneltele electrice uzate trebuie
colectate separat şi aduse la un punct ecologic de
reciclare.
Nu aruncaţi acumulatoarele la
gunoiul menajer!
Acumulatoarele defecte sau consumate trebuie reciclate conform Directivei 2006 / 66 / EC. Predaţi
acumulatorul şi / sau aparatul la punctele de colectare.
Posibilităţi de înlăturare ale produsului dvs. le puteţi
afla în localitatea dvs. sau la administraţia locală.
Page 37

37 RO
Declaraţie de conformitate /Producător
Q
Declaraţie de conformitate /
Producător
Noi, Kompernaß GmbH, responsabil documentaţie:
Dl. Semi Uguzlu, Burgstr. 21, D-44867 Bochum,
Germania, declarăm prin prezenta că, acest produs
corespunde umrătoarelor norme, documentelor
normative şi Directivelor CE:
Directiva referitoare la maşini
(2006 / 42 / CE)
Directiva CE refertioare la tensiune joasă
(2006 / 95 / CE)
Compatibilitatea electromagnetică
(2004 / 108 / CE)
Norme aplicate armonizate
EN 60745-1:2009+A11
EN 60745-2-1:2010, EN 60745-2-2:2010
EN 55014-1:2006+A1+A2
EN 55014-2:1997+A1+A2
EN 61000-3-2:2006+A1+A2
EN 61000-3-3:2008
EN 60335-1:2002+A1+A11+A12+A2+A13+A14
EN 60335-2-29:2004
EN 62233:2008
Tip / Denumire aparat :
Mașină de înșurubat cu acumulator PABS 18-Li B2
An de producţie: 07–2012
Număr serie: IAN 75636
Bochum, 31.07.2012
Semi Uguzlu
- Manager de calitate -
Ne rezervăm dreptul la modificări în sensul dezvoltării continue.
Page 38

38
Page 39

39 DE/AT/CH
Inhaltsverzeichnis
Einleitung
Bestimmungsgemäßer Gebrauch .......................................................................................................Seite 40
Ausstattung ..........................................................................................................................................Seite 40
Lieferumfang ........................................................................................................................................ Seite 41
Technische Daten ................................................................................................................................ Seite 41
Allgemeine Sicherheitshinweise für Elektrowerkzeuge
1. Arbeitsplatz-Sicherheit .................................................................................................................... Seite 42
2. Elektrische Sicherheit ...................................................................................................................... Seite 42
3. Sicherheit von Personen .................................................................................................................Seite 42
4. Verwendung und Behandlung des Elektrowerkzeugs .................................................................. Seite 43
5. Verwendung und Behandlung des Akkuwerkzeugs .....................................................................Seite 44
6. Service ............................................................................................................................................. Seite 44
Sicherheitshinweise für Akku-Bohrschrauber .....................................................................................Seite 44
Achtung Leitungen! .............................................................................................................................Seite 45
Originalzubehör / -zusatzgeräte ........................................................................................................ Seite 45
Vor der Inbetriebnahme
Akku-Pack laden .................................................................................................................................. Seite 45
Akku-Pack ins Gerät einsetzen / entnehmen ......................................................................................Seite 45
Akkuzustand prüfen ............................................................................................................................Seite 45
Werkzeuge wechseln .........................................................................................................................Seite 46
Drehmomentvorwahl ........................................................................................................................... Seite 46
2-Gang Getriebe ................................................................................................................................Seite 46
Inbetriebnahme
Ein- / Ausschalten.................................................................................................................................Seite 46
LED-Leuchte ein- / ausschalten ............................................................................................................Seite 46
Geschwindigkeit einstellen .................................................................................................................Seite 46
Drehrichtung umschalten ....................................................................................................................Seite 47
Tipps und Tricks ................................................................................................................................... Seite 47
Wartung und Reinigung .....................................................................................................Seite 47
Service ...............................................................................................................................................Seite 48
Garantie ........................................................................................................................................... Seite 48
Entsorgung ..................................................................................................................................... Seite 48
Konformitätserklärung / Hersteller ..........................................................................Seite 49
Page 40

40 DE/AT/CH
Einleitung
Akku-Bohrschrauber PABS 18-Li B2
Einleitung
Wir beglückwünschen Sie zum Kauf
Ihres neuen Gerätes. Sie haben sich
damit für ein hochwertiges Produkt entschieden. Die Bedienungsanleitung ist Teil dieses
Produkts. Sie enthält wichtige Hinweise für Sicherheit, Gebrauch und Entsorgung. Machen Sie sich
vor der Benutzung des Produkts mit allen Bedienund Sicherheitshinweisen vertraut. Benutzen Sie das
Produkt nur wie beschrieben und für die angegebenen Einsatzbereiche. Händigen Sie alle Unterlagen bei Weitergabe des Produkts an Dritte mit aus.
Bestimmungsgemäßer
Gebrauch
Dieses Gerät ist zum Bohren und Schrauben in Holz,
Kunststoff und Metall bestimmt. Benutzen Sie das
Gerät nur wie beschrieben und für die angegebenen
Einsatzbereiche. Jede andere Verwendung oder
Veränderung des Gerätes gilt als nicht bestimmungsgemäß und birgt erhebliche Unfallgefahren. Für
aus bestimmungswidriger Verwendung entstandene
Schäden übernimmt der Hersteller keine Haftung.
Nicht für den gewerblichen Einsatz bestimmt.
Ausstattung
1
Gangwahlschalter
2
Drehrichtungsumschalter / Sperre
In dieser Bedienungsanleitung / am Gerät werden folgende Piktogramme verwendet:
Bedienungsanleitung lesen! Schutzklasse II
Warn- und Sicherheitshinweise
beachten!
Schnellspannbohrfutter
Vorsicht vor elektrischem Schlag!
Lebensgefahr!
Spindelarretierung
Explosionsgefahr! Bohrstufe
W
Watt (Wirkleistung) Tragen Sie einen Gehörschutz!
n
0
Bemessungs-Leerlaufdrehzahl
Kinder vom Elektrowerkzeug
fernhalten!
V
~
Volt (Wechselspannung) Nur zur Verwendung in Innenräumen!
Ah
Ampere-Stunde (Akku-Kapazität)!
Auf Unversehrtheit von Gerät,
Netzkabel und Netzstecker achten!
Nm
Newtonmeter (Drehmoment)
Entsorgen Sie Verpackung und Gerät
umweltgerecht!
Gleichstrom
(Strom- und Spannungsart)
Werfen Sie Akkus nicht in
den Hausmüll!
Page 41

41 DE/AT/CH
3
EIN- / AUS-Schalter / Drehzahlregulierung
4
Bithalterung
5
Gürtelhalterung
6
Akku-Pack
7
Taste zur Entriegelung des Akku-Pack
8
Taste LED-Leuchte
9
LED-Leuchte
10
Akku-Display-LED
11
Taste Akkuzustand
12
LED-Arbeitsleuchte
13
Bohrfutter mit Radial-Verriegelung
14
Drehmomentvorwahl
15
Schnell-Ladegerät
16
Rote Ladekontroll-LED
17
Grüne Ladekontroll-LED
Lieferumfang
1 Akku-Bohrschrauber mit Akku-Pack
1 Bit PH2 50 mm
1 Schnell-Ladegerät
1 Tragekoffer
1 Bedienungsanleitung
Technische Daten
PABS 18-Li B2 Akku-Bohrschrauber:
Nennspannung: 18 V
Leerlaufdrehzahl: 1. Gang: max. 400 min
-1
Leerlaufdrehzahl: 2. Gang: max. 1400 min
-1
Bohrfutterspannbereich: max. 10 mm
Maximaler
Bohrdurchmesser: Stahl: 10 mm,
Holz: 30 mm
Max. Drehmoment: 35 Nm
PABS 18-Li B2-1 Akku-Pack:
Typ: LITHIUM-ION
Nennspannung: 18 V
Kapazität: 1,5 Ah
Energiegehalt: 27 Wh
PABS 18-Li B2-2 Schnell-Ladegerät:
EINGANG / Input:
Nennspannung: 230 V∼, 50 Hz
Leistungsaufnahme: 55 W
AUSGANG / Output:
Nennspannung: 18 V
Ladestrom: 2 A
Ladedauer: ca. 60 min
Schutzklasse: II /
Geräusch- und Vibrationsinformationen:
Messwert für Geräusch ermittelt entsprechend
EN 60745. Der A-bewertete Geräuschpegel des
Elektrowerkzeugs beträgt typischerweise:
Schalldruckpegel: 76 dB(A)
Schallleistungspegel: 87 dB(A)
Unsicherheit K: 3 dB
Schwingungsgesamtwerte (Vektorsumme dreier
Richtungen) ermittelt entsprechend EN 60745:
Schrauben: Schwingungsemissionswert
a
h,D
= 0,865 m / s2,
Unsicherheit K= 1,5 m / s2,
Bohren: Schwingungsemissionswert
a
h
= 2,546 m / s2,
Unsicherheit K= 1,5 m / s
2
.
Der in diesen Anweisungen
angegebene Schwingungspegel ist entsprechend
einem in EN 60745 genormten Messverfahren gemessen worden und kann für den Gerätevergleich
verwendet werden. Der angegebene Schwingungsemissionswert kann auch zu einer einleitenden Einschätzung der Aussetzung verwendet werden.
Der Schwingungspegel wird sich entsprechend dem
Einsatz des Elektrowerkzeugs verändern und kann
in manchen Fällen über dem in diesen Anweisungen
angegebenen Wert liegen. Die Schwingungsbelast
ung
könnte unterschätzt werden, wenn das Elektrowerkzeug regelmäßig in solcher Weise verwendet wird.
Hinweis: Für eine genaue Abschätzung der
Schwingungsbelastung während eines bestimmten
Arbeitszeitraumes sollten auch die Zeiten berücksichtigt werden, in denen das Gerät abgeschaltet
ist oder zwar läuft, aber nicht tatsächlich im Einsatz
ist. Dies kann die Schwingungsbelastung über den
gesamten Arbeitszeitraum deutlich reduzieren.
Einleitung
Page 42

42 DE/AT/CH
Allgemeine
Sicherheitshinweise
für Elektrowerkzeuge
Lesen Sie alle Sicherheits-
hinweise und Anweisungen. Versäumnisse
bei der Einhaltung der Sicherheitshinweise und
Anweisungen können elektrischen Schlag, Brand
und / oder schwere Verletzungen verursachen.
Bewahren Sie alle Sicherheitshinweise
und Anweisungen für die Zukunft auf.
Der in den Sicherheitshinweisen verwendete Begriff
„Elektrowerkzeug“ bezieht sich auf netzbetriebene
Elektrowerk
zeuge (mit Netzkabel) und auf akkube-
triebene Elektrowerkzeuge (ohne Netzkabel).
1. Arbeitsplatz-Sicherheit
a) Halten Sie Ihren Arbeitsbereich sauber
und gut beleuchtet. Unordnung und unbeleuch-
tete Arbeitsbereiche können zu Unfällen führen.
b)
Arbeiten Sie mit dem Elektrowerkzeug nicht in explosions-
gefährdeter Umgebung, in
der sich brennbare Flüssigkeiten, Gase
oder Stäube befinden. Elektrowerkzeuge
erzeugen Funken, die den Staub oder die
Dämpfe entzünden können.
c)
Halten Sie Kinder und andere
Personen während der Benut-
zung des Elektrowerkzeugs
fern. Bei Ablenkung können Sie die Kontrolle
über das Gerät verlieren.
2. Elektrische Sicherheit
a) Der Anschlussstecker des Elektrowerk-
zeuges muss in die Steckdose passen.
Der Stecker darf in keiner Weise verändert werden. Verwenden Sie keine
Adapterstecker gemeinsam mit
schutzgeerdeten Elektrowerkzeugen.
Unveränderte Stecker und passende Steckdosen
verringern das Risiko eines elektrischen Schlages.
b) Vermeiden Sie Körperkontakt mit ge-
erdeten Oberflächen, wie von Rohren,
Heizungen, Herden und Kühlschränken.
Es besteht ein erhöhtes Risiko durch elektrischen
Schlag, wenn Ihr Körper geerdet ist.
c) Halten Sie Elektrowerkzeuge von Re-
gen oder Nässe fern. Das Eindringen von
Wasser in ein Elektrogerät erhöht das Risiko
eines elektrischen Schlages.
d)
Zweckentfremden Sie das
Kabel nicht, um das Elektro-
werkzeug zu tragen, aufzuhängen oder um den Stecker aus der
Steckdose zu ziehen. Halten Sie das
Kabel fern von Hitze, Öl, scharfen
Kanten oder sich bewegenden Geräteteilen. Beschädigte oder verwickelte Kabel
erhöhen das Risiko eines elektrischen Schlages.
e) Wenn Sie mit einem Elektrowerkzeug
im Freien arbeiten, verwenden Sie nur
Verlängerungskabel, die auch für den
Außenbereich zugelassen sind. Die
Anwendung eines für den Außenbereich
geeigneten Verlängerungskabels verringert
das Risiko eines elektrischen Schlages.
f) Wenn der Betrieb des Elektrowerk-
zeuges in feuchter Umgebung nicht
vermeidbar ist, verwenden Sie einen
Fehlerstromschutzschalter. Der Einsatz
eines Fehlerstromschutzschalters vermindert
das Risiko eines elektrischen Schlages.
3. Sicherheit von Personen
a)
Seien Sie stets aufmerksam, achten Sie
darauf, was Sie tun und gehen Sie mit
Vernunft an die Arbeit mit einem Elektrowerkzeug. Benutzen Sie kein Elektrowerkzeug, wenn Sie müde sind oder
unter dem Einfluss von Drogen, Alkohol oder Medikamenten stehen. Ein
Moment der Unachtsamkeit beim Gebrauch
des Elektrowerkzeuges kann zu ernsthaften
Verletzungen führen.
b) Tragen Sie persönliche Schutzausrüstung
u
nd immer eine Schutzbrille. Das Tragen
persönlicher Schutzausrüstung wie Staubmaske,
Allgemeine Sicherheitshinweise für Elektrowerkzeuge
Page 43

43 DE/AT/CH
rutschfeste Sicherheitsschuhe, Schutzhelm oder
Gehörschutz, je nach Art und Einsatz des
Elektrowerkzeuges, verringert das Risiko von
Verletzungen.
c) Vermeiden Sie eine unbeabsichtigte
Inbetriebnahme. Vergewissern Sie sich,
dass das Elektrowerkzeug ausgeschaltet ist, bevor Sie es an die Stromversorgung anschließen, es aufnehmen
oder tragen. Wenn Sie beim Tragen des
Elektrowerkzeuges den Finger am Schalter ha
ben
oder das Gerät bereits eingeschaltet an die
Stromversorgung anschließen, kann dies zu
Unfällen führen.
d) Entfernen Sie Einstellwerkzeuge oder
Schraubenschlüssel, bevor Sie das
Elektrowerkzeug einschalten. Ein Werk-
zeug oder Schlüssel, der sich in einem drehenden
Geräteteil befindet, kann zu Verletzungen führen.
e) Vermeiden Sie eine abnormale Körper-
haltung. Sorgen Sie für einen sicheren
Stand und halten Sie jederzeit das
Gleichgewicht. Dadurch können Sie das
Elektrowerkzeug in unerwarteten Situationen
besser kontrollieren.
f) Tragen Sie geeignete Kleidung. Tragen
Sie keine weite Kleidung oder Schmuck.
Halten Sie Haare, Kleidung und Handschuhe fern von sich bewegenden
Teilen. Lockere Kleidung, Schmuck oder lange
Haare können von sich bewegenden Teilen
erfasst werden.
g) Wenn Staubabsaug- und -auffangein-
richtungen montiert werden können,
vergewissern Sie sich, dass diese
angeschlossen sind und richtig verwendet werden. Die Verwendung einer
Staubabsaugung kann Gefährdungen durch
Staub verringern.
4. Verwendung und Behandlung
des Elektrowerkzeugs
a) Überlasten Sie das Gerät nicht. Ver-
wenden Sie für Ihre Arbeit das dafür
bestimmte Elektrowerkzeug. Mit dem
passenden Elektrowerkzeug arbeiten Sie besser
und sicherer im angegebenen Leistungsbereich.
b) Benutzen Sie kein Elektrowerkzeug,
dessen Schalter defekt ist. Ein Elektrowerk-
zeug, das sich nicht mehr ein- oder ausschalten
lässt, ist gefährlich und muss repariert werden.
c) Ziehen Sie den Stecker aus der Steck-
dose und / oder entfernen Sie den
Akku, bevor Sie Geräteeinstellungen
vornehmen, Zubehörteile wechseln
oder das Gerät weglegen. Diese
Vorsichtsmaßnahme verhindert den unbeabsichtigten Start des Elektrowerkzeuges.
d) Bewahren Sie unbenutzte Elektrowerk-
zeuge außerhalb der Reichweite von
Kindern auf. Lassen Sie Personen das
Gerät nicht benutzen, die mit diesem
nicht vertraut sind oder diese Anweisungen nicht gelesen haben. Elektrowerk-
zeuge sind gefährlich, wenn sie von unerfahrenen
Personen benutzt werden.
e) Pflegen Sie Elektrowerkzeuge mit
Sorgfalt. Kontrollieren Sie, ob bewegliche Teile einwandfrei funktionieren
und nicht klemmen, ob Teile gebrochen
oder so beschädigt sind, dass die Funktion des Elektrowerkzeuges beeinträchtigt ist. Lassen Sie beschädigte Teile vor
dem Einsatz des Gerätes reparieren.
Viele Unfälle haben ihre Ursache in schlecht
gewarteten Elektrowerkzeugen.
f) Halten Sie Schneidwerkzeuge scharf
und sauber. Sorgfältig gepflegte Schneid-
werkzeuge mit scharfen Schneidkanten verklemmen sich weniger und sind leichter zu führen.
g) Verwenden Sie Elektrowerkzeug,
Zubehör, Einsatzwerkzeuge usw.
entsprechend diesen Anweisungen.
Berücksichtigen Sie dabei die Arbeitsbedingungen und die auszuführende
Tätigkeit. Der Gebrauch von Elektrowerkzeuge
n
für andere als die vorgesehenen Anwendungen
kann zu gefährlichen Situationen führen.
Allgemeine Sicherheitshinweise für Elektrowerkzeuge
Page 44

44 DE/AT/CH
5. Verwendung und Behandlung
des Akkuwerkzeugs
a) Laden Sie die Akkus nur in Ladegeräten
auf, die vom Hersteller empfohlen
werden. Für ein Ladegerät, das für eine
bestimmte Art von Akkus geeignet ist, besteht
Brandgefahr, wenn es mit anderen Akkus
verwendet wird.
b) Verwenden Sie nur die dafür vorgese-
henen Akkus in den Elektrowerkzeugen.
Der Gebrauch von anderen Akkus kann zu
Verletzungen und Brandgefahr führen.
c) Halten Sie den nicht benutzten Akku
fern von Büroklammern, Münzen,
Schlüsseln, Nägeln, Schrauben oder
anderen kleinen Metallgegenständen,
die eine Überbrückung der Kontakte
verursachen könnten. Ein Kurzschluss zwi-
schen den Akkukontakten kann Verbrennungen
oder Feuer zur Folge haben.
d) Bei falscher Anwendung kann Flüssig-
keit aus dem Akku austreten. Vermei
den
Sie den Kontakt damit. Bei zufälligem
Kontakt mit Wasser abspülen. Wenn
die Flüssigkeit in die Augen kommt,
nehmen Sie zusätzlich ärztliche Hilfe
in Anspruch. Austretende Akkuflüssigkeit
kann zu Hautreizungen oder Verbrennungen
führen.
VORSICHT! EXPLOSIONSGE-
FAHR! Laden Sie nichtaufladbare
Batterien niemals auf.
6. Service
a) Lassen Sie Ihr Elektrowerkzeug nur von
qualifiziertem Fachpersonal und nur
mit Original-Ersatzteilen reparieren.
Damit wird sichergestellt, dass die Sicherheit
des Elektrowerkzeugs erhalten bleibt.
Sicherheitshinweise für
Akku-Bohrschrauber
Halten Sie das Gerät an
den isolierten Griffflächen, wenn Sie
Arbeiten ausführen, bei denen die
Schraube verborgene Stromleitungen
oder das eigene Netzkabel treffen kann.
Der Kontakt der Schraube mit einer spannungsführenden Leitung kann auch metallene Geräteteile
unter Spannung setzen und zu einem elektrischen
Schlag führen.
Dieses Gerät ist nicht dafür bestimmt, durch Per-
sonen (einschließlich Kinder) mit eingeschränkten
physischen, sensorischen oder geistigen Fähigkeit
en
oder mangels Erfahrung und / oder mangels
Wissen benutzt zu werden, es sei denn, sie
werden durch eine für ihre Sicherheit zuständige
Person beaufsichtigt oder erhielten von ihr Anweisungen, wie das Gerät zu benutzen ist. Kinder
sollten beaufsichtigt werden, um sicherzustellen,
dass sie nicht mit dem Gerät spielen.
Sichern Sie das Werkstück. Ein mit Spannvor-
richtungen oder Schraubstock festgehaltenes
Werkstück ist sicherer gehalten als mit Ihrer Hand.
GIFTIGE
STÄUBE!
Die durch die Bearbeitung entstehenden
schädlichen / giftigen Stäube stellen eine
Gesundheitsgefährdung für die Bedienperson
oder in der Nähe befindliche Personen dar.
Tragen Sie Schutzbrille und Staubmaske!
Bearbeiten Sie kein asbesthaltiges
Material. Asbest gilt als krebserregend.
Halten Sie das Elektrowerkzeug fest.
Beim Festziehen und Lösen von Schrauben kön
nen
kurzfristig hohe Reaktionsmomente auftreten.
Schalten Sie das Elektrowerkzeug so-
fort aus, wenn das Einsatzwerkzeug
blockiert. Seien Sie auf hohe Reaktionsmo
mente
gefasst, die einen Rückschlag verursachen. Das
Einsatzwerkzeug blockiert, wenn das Elektrowerkzeug überlastet wird oder es im zu bearbeitenden Werkstück verkantet.
Bei Arbeiten am Gerät, sowie Transport
bzw. Aufbewahrung bringen Sie den
Drehrichtungsumschalter in die Mittelposition (Sperre). So verhindern Sie unbe-
absichtigtes Anlaufen des Elektrowerkzeuges.
Allgemeine Sicherheitshinweise für Elektrowerkzeuge
Allgemeine Sicherheitshinweise für Elektrowerkzeuge / Vor der Inbetriebnahme
Page 45

45 DE/AT/CH
Achtung Leitungen!
GEFAHR! Vergewissern Sie sich, dass
Sie nicht auf Strom-, Gas- oder Wasserleitungen stoßen, wenn Sie mit einem
Elektrowerkzeug arbeiten. Prüfen Sie
ggf. mit einem Leitungssucher, bevor Sie in eine
Wand bohren bzw. aufschlitzen.
Originalzubehör / -zusatzgeräte
Benutzen Sie nur Zubehör und Zusatz-
geräte, die in der Gebrauchsanweisung
angegeben sind. Der Gebrauch anderer als
in der Bedienungsanleitung empfohlener Einsatzwerkzeuge oder anderen Zubehörs kann
eine Verletzungsgefahr für Sie bedeuten.
Vor der Inbetriebnahme
Akku-Pack laden
STROMSCHLAGGE-
FAHR!
Ziehen Sie vor Reinigung und Wartung von
Ladegerät oder Akku-Pack immer den Netzstecker.
Hinweis! Ein neuer oder lange Zeit nicht genutzter
Akku-Pack muss vor der ersten / erneuten Benutzung
aufgeladen werden.
Seine volle Kapazität erreicht der Akku-Pack nach
ca. 3–5 Ladezyklen.
VORSICHT! Ziehen Sie immer den Netzstecker,
bevor Sie den Akku-Pack aus dem Ladegerät
nehmen bzw. einsetzen.
Laden Sie den Akku-Pack nie, wenn die
Umgebungstemperatur unterhalb 10 °C oder
oberhalb 40 °C liegt.
1. Setzen Sie den Akku-Pack
6
in das Schnell-
Ladegerät
15
ein (siehe Abb. C).
2. Stecken Sie den Netzstecker in die Steckdose.
Die nun blinkende grüne Ladekontroll-LED
17
zeigt den Ladevorgang an.
3. Sobald die grüne Ladekontroll-LED
17
aufleuchtet, ist der Ladevorgang abgeschlossen
und der Akku-Pack
6
einsatzbereit.
4. Leuchtet die rote Ladekontroll-LED
16
auf,
befindet sich das Schnell-Ladegerät
15
im
Standby-Modus; der Akku-Pack
6
ist nicht
angeschlossen.
5. Blinkt die rote Ladekontroll-LED
16
auf, ist der
Akku-Pack
6
zu heiß geworden; kein Ladevor-
gang.
Laden Sie einen Akku-Pack niemals unmittelbar
nach dem Schnell-Ladevorgang ein zweites
Mal auf. Es besteht die Gefahr, dass der AkkuPack überladen und dadurch die Lebensdauer
von Akku und Ladegerät verringert wird.
Schalten Sie das Ladegerät zwischen aufeinan-
derfolgenden Ladevorgängen für mindestens
15 Minuten ab. Ziehen Sie dazu den Netzstecker.
Akku-Pack ins Gerät
einsetzen / entnehmen
Stellen Sie sicher, dass das Gerät ausgeschaltet ist,
bevor Sie den Akku einsetzen. Das Einsetzen eines
Akkus in ein Elektrowerkzeug, das eingeschaltet ist,
kann zu Unfällen führen.
Akku-Pack einsetzen:
Bringen Sie den Drehrichtungsumschalter 2
in Mittelstellung (Sperre) und lassen Sie den
Akku-Pack
6
in den Griff einrasten.
Akku-Pack entnehmen:
Drücken Sie die Taste zur Entriegelung 7 und
entnehmen Sie den Akku-Pack.
Akkuzustand prüfen
Drücken Sie zum Prüfen des Akkuzustands die
Taste Akku-LED
11
(siehe auch Hauptabbildung).
Der Zustand bzw. die Restleistung wird in der
Akku-LED
10
wie folgt angezeigt:
GRÜN / ROT / ORANGE = maximale Ladung /
Leistung
Vor der Inbetriebnahme
Allgemeine Sicherheitshinweise für Elektrowerkzeuge / Vor der Inbetriebnahme
Page 46

46 DE/AT/CH
ROT / ORANGE = mittlere Ladung / Leistung
ROT = schwache Ladung – Akku aufladen
Werkzeuge wechseln
Ihr Akku-Bohrschrauber hat eine vollautomatische
Spindelarretierung
und ist mit einem einhülsigen Bohrfutter „Made in Germany“ von
ausgestattet.
Beim Stillstand des Motors wird der Antriebsstrang
verriegelt, so dass Sie das Schnellspannbohrfutter
13
durch Drehen
öffnen können.
Nachdem Sie das gewünschte Werkzeug eingesetzt
und durch Drehen des Bohrfutters
festgespannt
haben, können Sie sofort weiter arbeiten. Die Spindelarretierung löst sich automatisch mit Starten des
Motors (Betätigung des EIN- / AUS-Schalters
3
).
Drehmomentvorwahl
Sie können über die Drehmomentvorwahl 14 die
Drehkraft einstellen. Die Drehmomentstufen regeln
den Bereich bis ca. 35 Nm.
Wählen Sie eine niedrige Stufe für kleine
Schrauben, bzw. weiche Werkstoffe.
Wählen Sie eine hohe Stufe für große Schrauben,
harte Werkstoffe, bzw. beim Herausdrehen von
Schrauben.
Wählen Sie für Bohrarbeiten die Bohrstufe, indem
Sie die Drehmomentvorwahl in die
Position ein-
stellen.
Schieben Sie für Bohrarbeiten auch den Gang-
wahlschalter
1
nach vorne (Position: 2).
2-Gang Getriebe
VORSICHT! Betätigen Sie den Gangwahl-
schalter
1
nur bei Stillstand des Gerätes.
Ansonsten droht Beschädigung des Gerätes.
Im ersten Gang (Gangwahlschalter 1 in
Position: 1)
erreichen Sie eine Drehzahl von ca. 400 min
-1
und
ein hohes Drehmoment. Diese Einstellung eignet
sich für alle Schraubarbeiten, aber auch zur Verwendung von Zubehör (s. Beispiel Abb. B).
Im zweiten Gang (Gangwahlschalter
1
in Position: 2)
erreichen Sie eine Drehzahl von ca. 1400 min
-1
zur
Durchführung von Bohrarbeiten (s. Beispiel Abb. A).
Inbetriebnahme
Ein- / Ausschalten
Einschalten:
Drücken Sie zur Inbetriebnahme des Gerätes
den
EIN- / AUS-Schalter
3
und halten Sie ihn gedrückt.
Die LED-Arbeitsleuchte
12
leuchtet bei leicht oder
vollständig gedrücktem EIN- / AUS-Schalter
3
und ermöglicht so das Ausleuchten des Arbeitsbereiches bei ungünstigen Lichtverhältnissen.
Ausschalten:
Lassen Sie zum Ausschalten des Gerätes den
EIN- / AUS-Schalter
3
los.
LED-Leuchte ein- / ausschalten
Einschalten:
Drücken Sie die Taste LED-Leuchte 8, um die
LED-Leuchte
9
einzuschalten.
Ausschalten:
Drücken Sie die Taste LED-Leuchte 8 erneut,
um die LED-Leuchte
9
auszuschalten.
Geschwindigkeit einstellen
Der EIN- / AUS-Schalter 3 verfügt über eine variable
Geschwindigkeitsregelung. Leichter Druck auf den
EIN- / AUS-Schalter 3 bewirkt eine niedrige Drehzahl
.
Mit zunehmendem Druck erhöht sich die Drehzahl.
Vor der Inbetriebnahme / Inbetriebnahme
Page 47

47 DE/AT/CH
Hinweis: Die integrierte Motorbremse sorgt für
einen schnellen Stillstand.
Drehrichtung umschalten
Wechseln Sie die Drehrichtung, indem Sie den
Drehrichtungsumschalter
2
nach rechts bzw.
links durchdrücken.
Tipps und Tricks
Überprüfen Sie vor dem Betrieb, ob der
Schraub- bzw. Bohreinsatz korrekt angebracht
ist, d.h. zentriert im Bohrfutter sitzt.
Schraub-Bits sind mit ihren Maßen und der
Form gekennzeichnet. Falls Sie sich unsicher
sind probieren Sie immer zuerst aus, ob das Bit
ohne Spiel im Schraubkopf sitzt.
Drehmoment:
Speziell kleinere Schrauben und Bits können
beschädigt werden, wenn Sie ein zu hohes
Drehmoment oder / und eine zu hohe Drehzahl
an der Maschine einstellen.
Harter Schraubfall (in Metall):
Besonders hohe Drehmomente entstehen z.B.
bei Metallverschraubungen unter Verwendung
von Steckschlüsseleinsätzen. Wählen Sie eine
niedrige Drehzahl.
Weicher Schraubfall (z.B. in Weichholz):
Schrauben Sie auch hier mit geringer Drehzahl,
um z.B. die Holzoberfläche beim Kontakt mit
dem Schraubkopf aus Metall nicht zu beschädigen. Verwenden Sie einen Senker.
Beim Bohren in Holz, Metall und anderen
Materialien unbedingt berücksichtigen:
Benutzen Sie bei kleinem Bohrer-Durchmesser
eine hohe Drehzahl und bei großem BohrerDurchmesser eine niedrige Drehzahl.
Wählen Sie bei harten Materialien eine niedrige
Drehzahl, bei weichem Material eine hohe
Drehzahl.
Sichern oder befestigen Sie (wenn möglich)
das Werkstück in einer Spannvorrichtung.
Markieren Sie die Stelle, an der gebohrt werden
soll mit einem Körner oder einem Nagel und wählen Sie zum Anbohren eine niedrige Drehzahl.
Ziehen Sie den drehenden Bohrer mehrmals
aus dem Bohrloch, um Späne oder Bohrmehl
zu entfernen und es zu lüften.
Bohren in Metall:
Verwenden Sie Metallbohrer (HSS). Für beste
Ergebnisse sollten Sie den Bohrer mit Öl kühlen.
Metallbohrer können Sie auch zum Bohren in
Kunststoff verwenden.
Bohren in Gestein:
Verwenden Sie einen Hartmetallbestückten
Steinbohrer.
Bohren in Holz:
Verwenden Sie einen Holzbohrer mit Zentrier-
spitze, für tiefe Bohrungen verwenden Sie einen
„Schlangenbohrer”, für große Bohr-Durchmesser
einen Forstner-Bohrer. Kleine Schrauben in
weichem Holz können Sie auch ohne Vorbohren
direkt eindrehen.
Wartung und Reinigung
VORSICHT! Bringen Sie vor sämtlichen Arbeiten
am Gerät, z.B. Werkzeugwechsel oder Wartung,
sowie beim Transport oder der Aufbewahrung
des Gerätes den Drehrichtungsumschalter
2
in Mittelstellung. Bei unabsichtlicher Betätigung
des EIN- / AUS-Schalters
3
besteht ansonsten
Verletzungsgefahr.
Ziehen Sie vor allen Reinigungs- und Wartungs-
arbeiten den Netzstecker aus der Steckdose
und entnehmen Sie den Akku.
Der Akku-Bohrschrauber ist wartungsfrei.
Das Gerät muss stets sauber, trocken und frei
von Öl oder Schmierfetten sein.
Reinigen Sie das Gerät direkt nach Abschluss
der Arbeit.
Inbetriebnahme / Wartung und Reinigung
Page 48

48 DE/AT/CH
Wartung und Reinigung / Service / Garantie / Entsorgung
Es dürfen keine Flüssigkeiten in das Innere des
Gerätes gelangen. Verwenden Sie zum Reini
gen
des Gehäuses ein Tuch. Verwenden Sie niemals
Benzin, Lösungsmittel oder Reiniger, die Kunststoff angreifen.
Service
Lassen Sie Ihr Elektro-
werkzeug von der Servicestelle oder
einer Elektrofachkraft und nur mit
Original-Ersatzteilen reparieren. Damit
wird sichergestellt, dass die Sicherheit des Elektrowerkzeuges erhalten bleibt.
Lassen Sie den Austausch
des Steckers oder der Netzleitung im-
mer vom Hersteller des Gerätes oder
seinem Kundendienst ausführen. Damit
wird sichergestellt, dass die Sicherheit des
Gerätes erhalten bleibt.
Garantie
Sie erhalten auf dieses Gerät 3 Jahre Garantie ab Kaufdatum. Das Gerät wurde
sorgfältig produziert und vor Anlieferung
gewissenhaft geprüft. Bitte bewahren Sie
den Kassenbon als Nachweis für den Kauf
auf. Bitte setzen Sie sich im Garantiefall mit
Ihrer Servicestelle telefonisch in Verbin
dung.
Nur so kann eine kostenlose Einsendung
Ihrer Ware gewährleistet werden.
Die Garantieleistung gilt nur für Material- oder Fabrikationsfehler, nicht aber für Transportschäden,
Verschleißteile oder für Beschädigungen an zerbrechlichen Teilen, z. B. Schalter oder Akkus.
Das Produkt ist lediglich für den privaten und nicht
für den gewerblichen Gebrauch bestimmt.
Bei missbräuchlicher und unsachgemäßer Behandlung, Gewaltanwendung und bei Eingriffen, die nicht
von unserer autorisierten Service-Niederlassung
vorgenommen wurden, erlischt die Garantie. Ihre
gesetzlichen Rechte werden durch diese Garantie
nicht eingeschränkt.
Die Garantiezeit wird durch die Gewährleistung nicht
verlängert. Dies gilt auch für ersetzte und reparierte
Teile. Eventuell schon beim Kauf vorhandene Schäden
und Mängel müssen sofort nach dem Auspacken
gemeldet werden, spätestens aber zwei Tage nach
Kaufdatum. Nach Ablauf der Garantiezeit anfallende
Reparaturen sind kostenpflichtig.
DE
Service Deutschland
Tel.: 01805772033
(0,14 EUR / Min. aus dem dt.
Festnetz, Mobilfunk max.
0,42 EUR / Min.)
E-Mail: kompernass@lidl.de
IAN 75636
AT
Service Österreich
Tel.: 0820 201 222
(0,15 EUR/Min.)
E-Mail: kompernass@lidl.at
IAN 75636
CH
Service Schweiz
Tel.: 0842 665566
(0,08 CHF/Min., Mobilfunk
max. 0,40 CHF/Min.)
E-Mail: kompernass@lidl.ch
IAN 75636
Entsorgung
Die Verpackung besteht aus umweltfreundlichen Materialien, die Sie über
die örtlichen Recyclingstellen entsorgen
können.
Werfen Sie Elektrowerkzeuge
nicht in den Hausmüll!
Page 49

49 DE/AT/CH
Gemäß Europäischer Richtlinie 2002 / 96 / EC über
Elektro- und Elektronik-Altgeräte und Umsetzung in
nationales Recht müssen verbrauchte Elektrower
kzeuge
getrennt gesammelt und einer umweltgerechten
Wiederverwertung zugeführt werden.
Werfen Sie Akkus nicht in
den Hausmüll!
Defekte oder verbrauchte Akkus müssen gemäß
Richtlinie 2006 / 66 / EC recycelt werden.
Geben Sie Akku und / oder Gerät über die angebotenen Sammeleinrichtungen zurück.
Möglichkeiten zur Entsorgung des ausgedienten
Gerätes erfahren Sie bei Ihrer Gemeinde- oder
Stadtverwaltung.
Konformitätserklärung /
Hersteller
Wir, Kompernaß GmbH, Dokumentenverantwortli
cher:
Herr Semi Uguzlu, Burgstr. 21, D-44867 Bochum,
Deutschland, erklären hiermit, dass dieses Produkt
mit den folgenden Normen, normativen Dokumenten
und EG-Richtlinien übereinstimmt:
Maschinenrichtlinie
(2006 / 42 / EC)
EG-Niederspannungsrichtlinie
(2006 / 95 / EC)
Elektromagnetische Verträglichkeit
(2004 / 108 / EC)
angewandte harmonisierte Normen
EN 60745-1:2009+A11
EN 60745-2-1:2010, EN 60745-2-2:2010
EN 55014-1:2006+A1+A2
EN 55014-2:1997+A1+A2
EN 61000-3-2:2006+A1+A2
EN 61000-3-3:2008
EN 60335-1:2002+A1+A11+A12+A2+A13+A14
EN 60335-2-29:2004
EN 62233:2008
Typ / Gerätebezeichnung:
Akku-Bohrschrauber PABS 18-Li B2
Herstellungsjahr: 07–2012
Seriennummer: IAN 75636
Bochum, 31.07.2012
Semi Uguzlu
- Qualitätsmanager -
Technische Änderungen im Sinne der
Weiterentwicklung sind vorbehalten.
Entsorgung / Konformitätserklärung / Hersteller
Page 50

IAN 75636
KOMPERNASS GMBH
Burgstraße 21
D-44867 Bochum
© by ORFGEN Marketing
Last Information Update · Stanje informacija
Versiunea informaţiilor · Stand der Informationen:
07 / 2012 · Ident.-No.: PABS18-LiB2072012-HR / RO
 Loading...