

Page 1
AIR SANDBLASTING GUN
AIR SANDbLASTINg gUN
Operation and Safety Notes
DRUCKLUFTSANDSTRAHLPISTOLE
Bedienungs- und Sicherheitshinweise
PNEUMATSKI PIŠTOLJ
ZA PJESKARENJE
Upute za posluživanje i za Vašu sigurnost
Page 2

Before reading, unfold the page containing the illustrations and familiarise yourself with all functions
of the device.
Prije nego što pročitate tekst, otvorite stranicu sa slikama i upoznajte se na osnovu toga sa svim
funkcijama uređaja.
Klappen Sie vor dem Lesen die Seite mit den Abbildungen aus und machen Sie sich anschließend
mit allen Funktionen des Gerätes vertraut.
GB Operation and Safety Notes Page 5
HR Upute za posluživanje i za Vašu sigurnost Stranica 17
DE / AT / CH Bedienungs- und Sicherheitshinweise Seite 29
Page 3
A EB
1.
2.
C ED
215
34
6 109 12 138 117
Page 4

Table of contents
Introduction
Proper use ............................................................. Page 7
Features and equipment ...................................... Page 7
Included items ......................................................Page 8
Technical data ...................................................... Page 8
Safety advice ................................................ Page 9
Operation
Connecting the compressed air source ..............Page 10
Filling the blast medium container ....................... Page 11
Using the air sandblasting gun............................ Page 11
Cleaning ............................................................Page 12
Service ................................................................ Page 12
Warranty ..........................................................Page 13
Disposal ............................................................. Page 14
Declaration of Conformity /
Manufacturer ............................................... Page 14
5 GB
Page 5
The following icons / symbols are used in
this instruction manual:
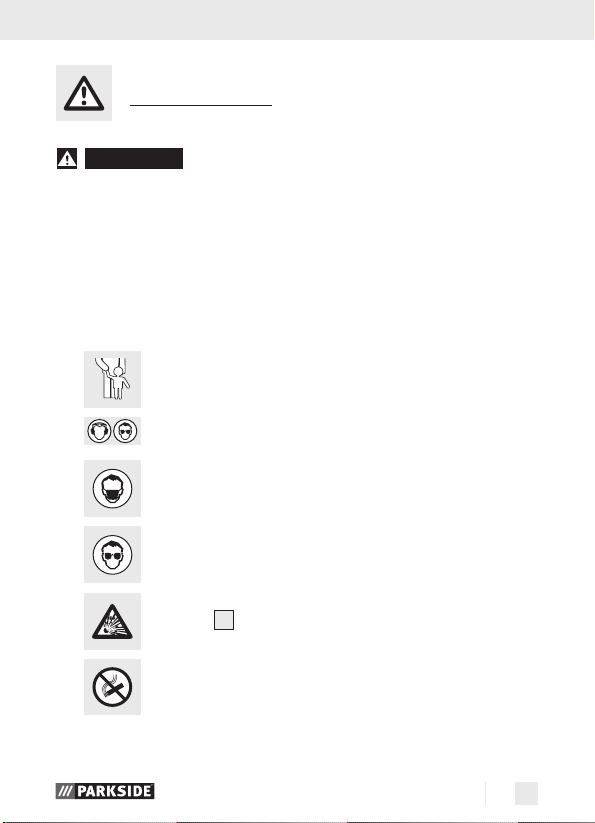
Read instruction manual!
Observe caution and safety notes!
Risk of explosion!
Wear hearing protection, dust protection mask
and protective glasses.
Keep children away from the device!
No smoking!
Dispose packaging and appliance in an environmentallyfriendly way!
6 GB
Page 6
Introduction
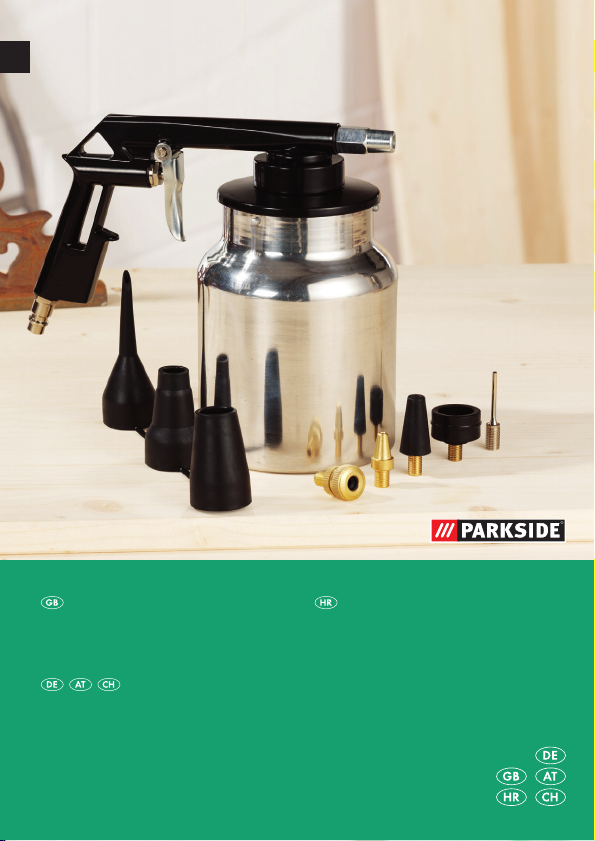
Air sandblasting gun
Q
Introduction
Please make sure that you familiarise yourself fully with the
way the air sandblasting gun works before you use it for the
first time and that you understand how to handle compressed
air sand blasting guns correctly. To help you do this, please read the
accompanying operating instructions. Keep these instructions in a safe
place. If you pass the air sandblasting gun on to anyone else, please
ensure that you also pass on all the documentation. Keep these instructions in a safe place. If you pass the device on to anyone else, please
ensure that you also pass on all the documentation.
Q
Proper use
This device is intended for the removal of rust and paint from metal
surfaces. Any other use or modification to the device shall be considered
as improper use and could give rise to considerable risk of accident.
We will not accept liability for loss or damage arising from improper
use. The device is intended for private, domestic use only.
Q
Features and equipment
1
Air sandblasting gun
2
Trigger
3
Plug-in nipple for compressed air connection
4
Blast medium container
5
Blast nozzle
7 GB
Page 7
Introduction
Accessory (see Figs. D):
6
Cap for 11, 12,
7
Ball needle
8
Universal adapter, for valves with internal Ø of approx. 9 mm
9
Universal adapter, for valves with internal Ø of approx. 6 mm
10
Valve adapter, e.g. for cycle tyre valves
11
Universal adapter
12
Adapter for screw valves, e.g. on inflatable dinghies
13
Adapter for deflator valves
Q
Included items
1 Air sandblasting gun
1 Operating instructions
1 Valve set (for use with a compressor)
Q
Technical data
Max. Working pressure: 8 bar
Recommended working air pressure: 6.3 – 8 bar
Compressed air consumption: 130 – 260 l / min
Nozzle ø: 2,8 mm
Container capacity: 1000 ml
Required air quality: Cleaned and oil-free
Working settings: Working air pressure setting at
13
the pressure reducer max. 8 bar.
8 GB
Page 8
Safety advice
Safety advice
WARNING!
minor failures to observe the safety advice and instructions could lead
to severe injury.
KEEP ALL THE SAFETY ADVICE AND INSTRUCTIONS IN A SAFE
PLACE FOR FUTURE REFERENCE.
J Check the device for damage before bringing it into
use. Do not use the device if you discover any defects.
Read all the safety advice and instructions. Even
J Keep children and other people away while
you are operating the air sandblasting gun.
Distractions can cause you to lose control of the device.
J For your own safety, wear suitable personal
protective equipment.
J Wear an approved dust mask /
protective hood
J Wear protective glasses!
J RISK OF EXPLOSION! Do not use the air sandblast-
1
ing gun
flames, fires or gas-operated water heaters.
in environments containing gases, open
J NO SMOKING!
J Work in adequately ventilated spaces only.
9 GB
Page 9

Safety advice / Operation
J Never use oxygen or other combustible gas as the
energy source.
J Never exceed the maximum working air pressure of
8 bar.
J DANGER OF INJURY! Disconnect the device from the compressed
air source before carrying out any repairs or maintenance of the
device or moving it to another location.
J DANGER OF INJURY! Disconnect the device from the compressed
air source before filling it with blast medium.
J Use only materials for the blast medium that are suit-
able for the air sandblasting gun. Do not use quartz
sand. There is the danger of toxic silicon dust forming.
J Take precautions to ensure that other people are not
contaminated (dust generation).
J Ensure that the spent blast medium is trapped and
collected so that it can be disposed of in an environmentally compatible manner.
Q
Operation
Q
Connecting the compressed air source
1
NOTE: Operate the air sandblasting gun
densate- and oil-free compressed air and never exceed the maximum
working air pressure at the device of 8 bar.
NOTE: The compressed air source must be fitted with a (filter) / pressure reducer so that the air pressure can be regulated.
j Connect the air sandblasting gun to a suitable compressed air
source by connecting the quick-release coupling of the air supply
hose with the plug-in nipple
locks itself in place automatically.
3
to the air sandblasting gun 1. It
only with cleaned, con-
10 GB
Page 10
Operation
Q
Filling the blast medium container
J Always use a suitable blast medium for your sand blasting work.
NOTE: We recommend using a silica-free blast medium
(e.g. ground blast furnace slag) with a grading of 0.2 mm – 0.8 mm.
j Ensure that the blast medium is completely dry and not too coarse.
NOTE: The maximum particle size is 0.8 mm.
j Turn the bayonet cap of the blast medium container
j Pull the blast medium container
j Fill the blast medium container
blast medium.
4
off downwards.
4
with the desired amount of
j Ensure that the maximum capacity of the container (1000 ml) is
not exceeded.
j Screw the blast medium container
by inserting and turning it on to the container lid (see Figs. A).
Q
Using the air sandblasting gun
4
back on and lock it in place
(see Figs. B, C)
j Carefully prepare the workpiece before sand blasting it.
Clean it if necessary.
NOTE: Deposits of dust and grease can have a considerably
detrimental effect on the result.
j Carefully mask or tape off everything that is not to be sand blasted.
j Ensure that there is always a minimum distance of 20 cm between
the air sandblasting gun
1
and the surface being sand blasted.
4
to open it.
Switching on:
j Press the trigger
2
to start operating the air sandblasting gun 1.
11 GB
Page 11
Operation / Cleaning / Service
Switching off:
j Release the trigger
j After you finish work, disconnect the device from the compressed
air source.
NOTE: First disconnect the hose from the compressed
air source and only then disconnect the compressed
air supply hose from the device. This will ensure that the
compressed air supply hose does not wave around in an uncontrolled manner.
Q
Cleaning
J DANGER OF INJURY! Always disconnect the device from the
compressed air source before you clean or maintain it.
j Clean the air sandblasting gun
after you finish working. Blow out the air sandblasting gun
the blast medium container
j Store the air sandblasting gun
Q
Service
2
to stop operating the air sandblasting gun 1.
1
and blast medium container 4
1
4
with compressed air.
1
in a dry, enclosed room.
and
WARNING!
J
paired only by qualified specialist personnel using
original manufacturer parts only. This will ensure that your
air sandblasting gun remains safe to use.
12 GB
Have your air sandblasting gun re-
Page 12

Q
Warranty
Warranty
This appliance is guaranteed for 3 years
purchase. It has been care
checked before delivery. Please keep your receipt as
proof of purchase. Contact your service
in case of questions pertaining to the warranty. Your
goods can
This warranty applies only to the initial
non-transferable.
The warranty covers only material or manufacturing faults, not normal
wear or damage to fragile parts such as switches or rechargeable
batteries. The appliance is intended solely for private, not commercial,
use. If this product has been subjected to improper or inappropriate
handling, abuse, or interventions not carried out by one of our authorised sales and service outlets, the warranty will be considered void.
This warranty does not affect your statutory rights.
GB
DES Ltd
Units 14-15
Bilston Industrial Estate
Oxford Street
Bilston (Great Britain)
WV14 7EG
Tel.: 0870 / 787-6177
Fax: 0870 / 787-6168
e-mail: support.uk@kompernass.com
be transmitted free of cost only in this manner.
fully produced and meti-culously
from the date of
centre by telephone
purchaser and is
13 GB
Page 13

Disposal / Declaration of Conformity / Manufacturer
Q
Disposal
The packaging is made entirely of recyclable materials,
which you may dispose of at local recycling facilities.
Do not dispose of the device with household rubbish!
For details of disposing of the appliance at the end of its useful life,
please contact your district or city council.
Q
Declaration of Conformity /
Manufacturer
We, Kompernaß GmbH, Burgstr. 21, D-44867 Bochum, Germany,
declare that this product complies with the following EU directives:
Machinery Directive
(98 / 37 / EC)
Applicable harmonised standards: EN 1953:1998
Type / Device description:
Air sandblasting gun
14 GB
Page 14

Declaration of Conformity / Manufacturer
Bochum, 30.06.2009
Hans Kompernaß
- Managing Director -
We reserve the right to make technical modifications in the course of
further development.
15 GB
Page 15

16
Page 16

Popis sadržaja
Uvod
Namjenska uporaba ....................................... Stranica 19
Oprema ........................................................... Stranica 19
Opseg pošiljke ................................................ Stranica 20
Tehnički podatci .............................................. Stranica 20
Sigurnosne upute .................................Stranica 21
Opsluživanje
Priključivanje pneumatskog izvora .................Stranica 22
Punjenje spremnika tvari za pjeskarenje ........Stranica 23
Uporaba pneumatskog pištolja
za pjeskarenje .................................................Stranica 23
Čišćenje .........................................................Stranica 24
Servis .............................................................. Stranica 25
Jamstveni list............................................Stranica 25
Zbrinjavanje .............................................Stranica 26
Objašnjenje konformnosti /
Proizvođač .................................................Stranica 27
17 HR
Page 17

U ovim uputama za rukovanje će slijedeći piktogrami /
simboli biti korišteni:
Čitati upute za rukovanje!
Obratiti pažnju na upozoravajuće i sigurnosne upute!
Opasnost od eksplozije!
Nosite zaštitu za uši, masku za zaštitu od prašine
od prašine i zaštitne naočale.
Držite djecu podalje od uređaja!
Zabranjeno pušenje!
Materijal ambalaže i uređaj zbrinite na način
neškodljiv za okoliš!
18 HR
Page 18

Uvod
Pneumatski pištolj za pjeskarenje
Q
Uvod
Prije prvog stavljanja u pogon, upoznajte se sa funkcijama
pneumatskog pištolja za pjeskarenje i raspitajte se o ispravnom
ophođenju s pneumatskim pištoljem za pjeskarenje. Pročitajte
za to slijedeće upute za uporabu. Brižljivo sačuvajte ove upute. U slučaju
prosljeđivanja pneumatskog pištolja za pjeskarenje trećim osobama,
izručite također svu pripadajuću dokumentaciju. Brižljivo sačuvajte ove
upute. U slučaju prosljeđivanja uređaja trećim osobama, izručite također
svu pripadajuću dokumentaciju.
Q
Namjenska uporaba
Ovaj uređaj je namijenjen za otklanjanje hrđe i boje sa metalnih
površina. Svaka druga uporaba ili promjene na uređaju, smatrat će se
nenamijenskim i mogu predstavljati znatnu opasnost od nezgode. Ne
preuzimamo nikakvu odgovornost za štete nastale od nenamjenske
uporabe. Uređaj je isključivo namijenjen za privatne svrhe.
Q
Oprema
1
pneumatski pištolj za pjeskarenje
2
okidna poluga
3
utična nazuvica za zračni priključak
4
spremnik tvari za pjeskarenje
5
mlazna sapnica
19 HR
Page 19

Uvod
Oprema (vidite prikaz D):
6
nastavak za 11, 12,
7
igla za loptu
8
univerzalni adapter, za ventile sa unutarnjim Ø od cca. 9 mm
9
univerzalni adapter, za ventile sa unutarnjim Ø od cca. 6 mm
10
ventilski adapter, npr. za ventile na zračnicama bicikle
11
universalni adapter
12
adapter za vijčane ventile, npr. kod gumenih čamaca
13
adapter za odušne ventile
Q
Opseg pošiljke
1 pneumatski pištolj za pjeskarenje
1 upute za uporabu
1 komplet ventila (za uporabu sa kompresorom)
Q
Tehnički podatci
Maks. radni tlak: 8 bar
Preporučeni radni tlak: 6,3 – 8 bari
Potrošnja zraka: 130 – 260 l / min
Sapnica ø: 2,8 mm
Zapremina spremnika: 1.000 ml
Potrebna kakvoća zraka: pročišćen i oslobođen od ulja
Namještene vrijednosti za rad: Namješteni radni tlak na reduktoru
13
tlaka ili filterski tlakomjer maks. 8 bar.
20 HR
Page 20

Sigurnosne upute
Sigurnosne upute
UPOZORENJE!
Propusti kod pridržavanja sigurnosnih i inih uputa mogu prouzročiti
teške ozljede.
SAČUVAJTE SVE SIGURNOSNE I OSTALE UPUTE ZA UBUDUĆE.
J Prije stavljanja u pogon, provjerite uređaj na moguća
oštećenja. Ukoliko uređaj sadrži manjkavosti, nesmije ga se ni u
kojem slučaju stavljati u pogon.
Pročitajte sve sigurnosne i ine upute.
J Držite djecu i druge osobe tijekom korištenja
podalje od uređaja. Ako Vam se skrene pažnja,
mogli bi izgubiti kontrolu nad uređajem.
J Rabite za Vašu osobnu zaštitu prikladna
zaštitna sredstva za tijelo.
J Nosite dozvoljenu masku protiv prašine /
zaštitnu kapu!
J Nosite zaštitne očale!
J OPASNOST OD EKSPLOZIJE! U području gdje se
nalaze plinovi / otvoreni plamenovi / vatra / pripremnici
tople vode s pogonom na plin, zabranjena je uporaba
pneumatskog pištolja za pjeskarenje
1
.
J ZABRANJENO PUŠENJE!
21 HR
Page 21

Sigurnosne upute / Opsluživanje
J Radite isključivo u dostatno prozračenim prostorijama.
J Ne rabite kisik ili gorive plinove kao izvor energije.
J Ne prekoračujte nikad maksimalni radni tlak od 8 bar.
J OPASNOST OD OZLJEDA! Prije popravki i redovitog održa-
vanja, kao i prije transporta odmaknite uređaj od izvora komprimiranog zraka.
J OPASNOST OD OZLJEDA! Za punjenje uređaja s tvari za
pjeskarenje, odmaknite ga od izvora komprimiranog zraka.
J Rabite isključivo materijale, koji su prikladni za
pneumatski pištolj za pjeskarenje. Ne rabite kremeni
pijesak. Prijeti opasnost od stvaranja otrovne silikozne prašine.
J Poduzmite mjere, kako nebi smetali drugim osobama
(stvaranje prašine).
J Osigurajte, da se tvar za pjeskarenje sakupi, kako bi
je se moglo otkloniti na način koji štiti okoliš.
Q
Opsluživanje
Q
Priključivanje pneumatskog izvora
UPUTA: Uporaba pneumatskog pištolja za pjeskarenje 1 isključivo
je dozvoljena sa očišćenim komprimiranim zrakom, oslobođenim od
kondenzata i ulja, te nesmije prekoračiti maksimalni radni tlak od 8 bar
na uređaju.
UPUTA: Kako bi mogli regulirati tlak zraka, izvor komprimiranog zraka
treba biti opremljen sa (filterskim)-reduktorom zraka.
j Priključite pneumatski pištolj za pjeskarenje na prikladan izvor
komprimiranog zraka, na način da spojite brzu spojku opskrbne
cijevi sa utičnom nazuvicom
pjeskarenje
1
. Zapor slijedi automatski.
3
na pneumatskom pištolju za
22 HR
Page 22

Opsluživanje
Q
Punjenje spremnika tvari za pjeskarenje
J Rabite za izvođenje pjeskarenja isključivo prikladnu tvar za
pjeskarenje.
UPUTA: Preporučujemo silikozno neštetno mlazno sredstvo
(mlivena visokopećna šljaka) sa granulacijom 0,2 mm – 0,8 mm.
j Vodite računa o tome, da je tvar za pjeskarenje potpuno suha i ne
previše krupnozrnata.
UPUTA: Maksimalna veličina zrna iznosi 0,8 mm.
j Otvorite bajunetni zapor spremnika tvari za pjeskarenje
zaokretom.
j Odvucite spremnik tvari za pjeskarenje
dolje.
4
povlačenjem prema
j Napunite željenu količinu tvari za pjeskarenje u spremnik tvari za
pjeskarenje
4
.
j Vodite računa o tome, da ne prekoračite maksimalnu zapremninu
spremnika od 1.000 ml.
j Nakon toga ponovno zavijte spremnik tvari za pjeskarenje
tako da ga utaknete i okrenete i na taj način aretirate na poklopcu
spremnika (vidite prikaz A).
Q
Uporaba pneumatskog pištolja
za pjeskarenje (vidite prikaz B,C)
4
jednim
4
,
j Brižljivo pripremite izradak kojeg će se pjeskariti.
Ukoliko je potrebno očistite ga.
UPUTA: Naslage prašine i masti znatno utječu na rezultat.
j Brižljivo pokrijte tj. prelijepite sve, što se neće pjeskariti.
j Vodite računa o tome, da uvijek održite razmak od najmanje
20 cm između pneumatskog pištolja za pjeskarenje
koju želite pjeskariti.
1
i površine
23 HR
Page 23

Opsluživanje / Čišćenje
Uključivanje:
j Pritisnite okidnu polugu
pjeskarenje
Isključivanje:
1
u pogon.
j Otpustite okidnu polugu
pjeskarenje
1
.
j Nakon završetka rada, odvojite uređaj od izvora komprimiranog
zraka.
UPUTA: Otpustite prvo gipku cijev od izvora komprimiranog zraka i otklonite tek nakon toga opskrbnu
cijev od uređaja. Na taj način spriječavate nekontrolirano
mlataranje opskrbne cijevi.
Q
Čišćenje
J OPASNOST OD OZLJEDA! Prije čišćenja, obvezno odvojite
uređaj od pneumatske opskrbe.
j Nakon završetka rada, čistite pneumatski pištolj za pjeskarenje
i spremnik tvari za pjeskarenje 4. Za to ispušite pneumatski pištolj za pjeskarenje
miranim zrakom.
j Skladištite pneumatski pištolj za pjeskarenje
prostorijama.
2
, kako bi stavili pneumatski pištolj za
2
, kako bi isključili pneumatski pištolj za
1
i spremnik tvari za pjeskarenje 4 kompri-
1
isključivo u suhim
1
24 HR
Page 24

Q
Servis / Jamstveni list
Servis
UPOZORENJE!
J
Vašem pneumatskom pištolju za pjeskarenje isključivo
kvalificiranom stručnom osoblju i isključivo s originalnim
rezervnim dijelovima. Na taj način se održava sigurnost
pneumatskog pištolja za pjeskarenje.
Q
Jamstveni list
Na ovaj uređaj dajemo jamstvo u trajanju 3 godine od
datuma kupnje. Ovo jamstvo vrijedi za područje Republike
Hrvatske. Uređaj je pažljivo proizveden i prije isporuke
brižljivo kontroliran. Jamčimo da će raditi bez greške
uzrokovane eventualnom lošom izradom i lošim materijalima. Svi eventualno nastali kvarovi bit će besplatno
otklonjeni u ovlaštenom servisu. Jamstvo se priznaje samo
uz predočenje računa.
telefonski
možete besplatno ostvariti svoja jamstvena prava.
Jamstvo vrijedi samo za greške u materijalu i izradi, a ne za potrošne
dijelove ili za oštećenja lomljivih dijelova, npr. prekidača ili baterija.
Uređaj je namijenjen isključivo za privatnu, a ne za gospodarsku
upotrebu. U slučaju zloupotrebe ili nenamjenske upotrebe, primjene
sile, kao i u slučaju zahvata koji nisu načinjeni od strane ovlaštenog
servisa jamstvo prestaje vrijediti. Ovo jamstvo ne utječe na potrošačka
prava u odnosu na prodavača važeća u državi kupnje.
povežete s ovlaštenim servisom. Samo tako
Prepustite izvođenje popravki na
Molimo Vas da se u slučaju kvara
25 HR
Page 25

Jamstveni list / Zbrinjavanje
Proizvođač:
Kompernaß GmbH
Burgstraße 21
D-44867 Bochum (Germany)
Njemačka
HR
Ovlašteni servis:
Microtec sistemi d.o.o.
Koprivnička 27 a
10000 Zagreb
Tel. 01/3692-008
email: support.hr@kompernass.com
Proizvođač:
KOMPERNASS GMBH
BURGSTRASSE 21
D-44867 BOCHUM, Njemačka
Uvoznik
Lidl Hrvatska d.o.o. k.d.,
p.p. 61
10020 Novi Zagreb
Q
Zbrinjavanje
Omot se sastoji od materijala koji ne ugrožavaju okoliš i
koje možete otkloniti preko lokalnih mjesta za reciklažu.
26 HR
Page 26

Zbrinjavanje / Objašnjenje konformnosti / Proizvođač
Ne bacajte uređaj u kućni otpad!
Mogućnosti za uklanjanje istrošenog uređaja možete doznati kod
Vaše općinske ili gradske uprave.
Q
Objašnjenje konformnosti /
Proizvođač
Mi, Kompernaß GmbH, Burgstr. 21, D-44867 Bochum, Njemačka,
dajemo za ovaj proizvod suglasnost sa slijedećim EG smjernicama:
Strojne smjernice
(98 / 37 / EC)
Primjenjene harmonizirane norme: EN 1953:1998
Tip / Opis uređaja:
Pneumatski pištolj za pjeskarenje
Bochum, 30.06.2009
Hans Kompernaß
- poslovođa -
U smislu daljeg razvoja zadržane su tehničke izmjene.
27 HR
Page 27

28
Page 28

Inhaltsverzeichnis
Einleitung
Bestimmungsgemäßer Gebrauch ........................Seite 31
Ausstattung ...........................................................Seite 31
Lieferumfang .........................................................Seite 32
Technische Daten .................................................Seite 32
Sicherheitshinweise .................................Seite 33
Bedienung
Druckluftquelle anschließen ................................Seite 34
Strahlgutbehälter befüllen ...................................Seite 35
Druckluft-Sandstrahlpistole verwenden ...............Seite 35
Reinigung .........................................................Seite 36
Service ................................................................Seite 37
Garantie ............................................................Seite 37
Entsorgung ......................................................Seite 39
Konformitätserklärung /
Hersteller ..........................................................Seite 39
29 DE/AT/CH
Page 29

In dieser Bedienungsanleitung werden folgende
Piktogramme / Symbole verwendet:
Bedienungsanleitung lesen!
Warn- und Sicherheitshinweise beachten!
Explosionsgefahr!
Tragen Sie einen Gehörschutz, eine Atem- /
Staubschutzmaske, und eine Schutzbrille.
Kinder vom Gerät fernhalten!
Rauchen verboten!
Entsorgen Sie Verpackung und Gerät umweltgerecht!
30 DE/AT/CH
Page 30

Einleitung
Druckluft-Sandstrahlpistole
Q
Einleitung
Machen Sie sich vor der ersten Inbetriebnahme mit den
Funktionen der Druckluft-Sandstrahlpistole vertraut und in-
formieren Sie sich über den richtigen Umgang mit DruckluftSandstrahlpistolen. Lesen Sie hierzu die nachfolgende Bedienungsanleitung. Bewahren Sie diese Anleitung gut auf. Händigen Sie alle
Unterlagen bei Weitergabe der Druckluft-Sandstrahlpistole an Dritte
ebenfalls aus. Bewahren Sie diese Anleitung gut auf. Händigen Sie
alle Unterlagen bei Weitergabe des Gerätes an Dritte ebenfalls aus.
Q
Bestimmungsgemäßer Gebrauch
Dieses Gerät ist zur Entfernung von Rost und Farbe auf Metallflächen bestimmt. Jede andere Verwendung oder Veränderung des Gerätes gilt als
nicht bestimmungsgemäß und birgt erhebliche Unfallgefahren. Für aus
bestimmungswidriger Verwendung entstandene Schäden übernehmen
wir keine Haftung. Das Gerät ist nur für den privaten Einsatz bestimmt.
Q
Ausstattung
1
Druckluft-Sandstrahlpistole
2
Abzugshebel
3
Stecknippel für Luftanschluss
4
Strahlgutbehälter
5
Strahldüse
31 DE/AT/CH
Page 31

Einleitung / Sicherheitshinweise
Zubehör (siehe Abb. D):
6
Aufsatz für 11, 12,
7
Ballnadel
8
Universaladapter, für Ventile mit Innen-Ø von ca. 9 mm
9
Universaladapter, für Ventile mit Innen-Ø von ca. 6 mm
10
Ventiladapter, z.B. für Fahrradreifenventile
11
Universaladapter
12
Adapter für Schraubventile, z.B. von Badebooten
13
Adapter für Entlüftungsventile
Q
Lieferumfang
1 Druckluft-Sandstrahlpistole
1 Bedienungsanleitung
1 Ventilkit (zur Verwendung mit einem Kompressor)
Q
Technische Daten
Max. Arbeitsdruck: 8 bar
Empfohlener Arbeitsdruck: 6,3 – 8 bar
Luftverbrauch: 130 – 260 l / min
Düse ø: 2,8 mm
Behälterinhalt: 1000 ml
Benötigte Luftqualität: gereinigt und ölfrei
Einstellwerte für das Arbeiten: eingestellter Arbeitsdruck am Druckmin-
13
derer oder Filterdruckmesser max. 8 bar.
32 DE/AT/CH
Page 32

Sicherheitshinweise
Sicherheitshinweise
WARNUNG!
Anweisungen. Versäumnisse bei der Einhaltung der Sicherheitshin-
weise und Anweisungen können schwere Verletzungen verursachen.
BEwAHREN SIE ALLE SICHERHEITSHINwEISE UND ANwEISUNGEN
FüR DIE ZUKUNFT AUF.
J Kontrollieren Sie das Gerät vor Inbetriebnahme auf
etwaige Beschädigungen. Sollte das Gerät Mängel aufweisen,
darf es auf keinen Fall in Betrieb genommen werden.
Lesen Sie alle Sicherheitshinweise und
J Halten Sie Kinder und andere Personen wäh-
rend der Benutzung des Geräts fern. Bei Ablen-
kung können Sie die Kontrolle über das Gerät verlieren.
J
Verwenden Sie für Ihren persönlichen Schutz
geeignete Körperschutzmittel.
J Tragen Sie eine zulässige Staubmaske /
Schutzhaube!
J Tragen Sie eine Schutzbrille!
J EXPLOSIONSGEFAHR! In einer Umgebung in der
sich Gase / offene Flammen / Feuer / gasbetriebene
Warmwasserbereiter befinden darf die Druckluft-Sand-
strahlpistole
1
nicht benutzt werden.
J RAUCHEN VERBOTEN!
33 DE/AT/CH
Page 33

Sicherheitshinweise / Bedienung
J Arbeiten Sie nur in ausreichend belüfteten Räumen.
J Verwenden Sie als Energiequelle keinen Sauerstoff
oder brennbare Gase.
J Überschreiten Sie niemals den maximalen Arbeitsdruck
von 8 bar.
J VERLETZUNGSGEFAHR! Entfernen Sie vor Reparatur- und In-
standhaltungsarbeiten sowie vor einem Transport das Gerät von
der Druckluftquelle.
J VERLETZUNGSGEFAHR! Entfernen Sie das Gerät zum Befüllen
mit Strahlgut von der Druckluftquelle.
J Verwenden Sie nur für die Druckluft-Sandstrahlpistole
geeignete Materialien. Verwenden Sie keinen Quarzsand. Es besteht die Gefahr der Bildung von giftigem Silikosestaub.
J Treffen Sie Vorkehrungen, dass andere Personen nicht
belästigt werden (Staubentwicklung).
J Sorgen Sie dafür, dass das Strahlmittel aufgefangen
wird, um es umweltgerecht entsorgen zu können.
Q
Bedienung
Q
Druckluftquelle anschließen
HINWEIS: Die Druckluft-Sandstrahlpistole 1 darf ausschließlich mit
gereinigter, kondensat- und ölfreier Druckluft betrieben werden und darf
den maximalen Arbeitsdruck von 8 bar am Gerät nicht überschreiten.
HINWEIS: Damit Sie den Luftdruck regulieren können, muss die Druckluftquelle mit einem (Filter)-Druckminderer ausgestattet sein.
j Schließen Sie die Druckluft-Sandstrahlpistole an eine geeignete
Druckluftquelle an, indem Sie die Schnellkupplung des Versorgungsschlauches mit dem Stecknippel
1
verbinden. Die Verriegelung erfolgt automatisch.
3
an der Druckluft-Sandstrahlpistole
34 DE/AT/CH
Page 34

Bedienung
Q
Strahlgutbehälter befüllen
J Verwenden Sie bei Ihren Sandstrahlarbeiten ausschließlich geeig-
netes Strahlgut.
HINWEIS: Wir empfehlen Silikose unschädliches Strahlmittel
(gemahlene Hochofenschlacke) mit der Körnung 0,2 mm – 0,8 mm.
j Achten Sie darauf, dass das Strahlgut absolut trocken und nicht zu
grobkörnig ist.
HINWEIS: Die maximale Korngröße beträgt 0,8 mm.
4
wieder an,
4
j Öffnen Sie den Bajonettverschluss des Strahlgutbehälters
durch eine Drehung.
j Ziehen Sie den Strahlgutbehälter
4
nach unten ab.
j Füllen Sie die gewünschte Menge an Strahlgut in den Strahlgutbe-
4
hälter
ein.
j Achten Sie darauf, dass Sie den maximale Behälterinhalt von
1000 ml nicht überschreiten.
j Schrauben Sie anschließend den Strahlgutbehälter
indem Sie ihn durch eine Steck- und Drehbewegung am Behälterdeckel arretieren (siehe Abb. A).
Q
Druckluft-Sandstrahlpistole verwenden
(siehe Abb. B, C)
j Bereiten Sie das zu bestrahlende Werkstück sorgfältig vor.
Säubern Sie es gegebenenfalls.
HINWEIS: Staub- und Fettablagerungen beeinträchtigen das
Ergebnis erheblich.
j Decken bzw. kleben Sie alles sorgfältig ab, was nicht bestrahlt
werden soll.
j Achten Sie darauf, immer 20 cm Mindestabstand zwischen Druckluft-
Sandstrahlpistole
1
und der zu bestrahlenden Fläche einzuhalten.
35 DE/AT/CH
Page 35

Bedienung / Reinigung
Einschalten:
j Drücken Sie den Abzugshebel
1
in Betrieb zu nehmen.
Ausschalten:
j Lassen Sie den Abzugshebel
1
pistole
auszuschalten.
j Trennen Sie das Gerät nach Abschluss der Arbeit von der Druck-
luftquelle.
HINWEIS: Lösen Sie zuerst den Schlauch von der
Druckluftquelle und entfernen Sie erst danach den
Versorgungsschlauch von dem Gerät. So vermeiden Sie
ein unkontrolliertes Herumwirbeln des Versorgungsschlauches.
Q
Reinigung
J VERLETZUNGSGEFAHR! Trennen Sie das Gerät unbedingt
von der Druckluftversorgung, bevor Sie es reinigen.
j Reinigen Sie die Druckluft-Sandstrahlpistole
behälter
Druckluft-Sandstrahlpistole
Druckluft aus.
j Bewahren Sie die Druckluft-Sandstrahlpistole
Räumen auf.
4
nach Abschluss der Arbeit. Blasen Sie hierzu die
2
um die Druckluft-Sandstrahlpistole
2
los um die Druckluft-Sandstrahl-
1
und den Strahlgut-
1
und den Strahlgutbehälter
1
nur in trockenen
4
mit
36 DE/AT/CH
Page 36

Q
Service
Service / Garantie
J
WARNUNG!
pistole nur von qualifiziertem Fachpersonal und nur
mit Originalersatzteilen reparieren. Damit wird sicherge-
stellt, dass die Sicherheit der Druckluft-Sandstrahlpistole erhalten bleibt.
Q
Garantie
Sie erhalten auf dieses Gerät 3 Jahre Garantie ab Kaufdatum. Das Gerät wurde sorgfältig produziert und vor
Anlieferung gewissenhaft geprüft. Bitte bewahren Sie den
Kassenbon als Nachweis für den Kauf auf. Bitte setzen
Sie sich im Garantiefall mit Ihrer Servicestelle telefonisch
in Verbindung. Nur so kann eine kostenlose Einsendung
Ihrer Ware gewährleistet werden. Diese Garantie gilt
nur gegenüber dem Erstkäufer und ist nicht übertragbar.
Die Garantieleistung gilt nur für Material- oder Fabrikationsfehler, nicht
aber für Verschleißteile oder für Beschädigungen an zerbrechlichen
Teilen, z.B. Schalter oder Akkus. Das Produkt ist lediglich für den privaten
und nicht für den gewerblichen Gebrauch bestimmt. Bei missbräuchlicher
und unsachgemäßer Behandlung, Gewaltanwendung und bei Eingriffen,
die nicht von unserer autorisierten Service-Niederlassung vorgenommen
wurden, erlischt die Garantie. Ihre gesetzlichen Rechte werden durch
diese Garantie nicht eingeschränkt.
Lassen Sie Ihre Druckluft-Sandstrahl-
37 DE/AT/CH
Page 37

Garantie
DE
Schraven
Service- und Dienstleistungs GmbH
Gewerbering 14
47623 Kevelaer, Germany
Tel.: +49 (0) 180 5 008107(14 Ct / Min. aus dem dt.
Festnetz ggf. abweichende Preise aus den
Mobilfunknetzen)
Fax: +49 (0) 2832 3532
e-mail: support.de@kompernass.com
AT
Kompernaß Service Österreich
Rittenschober KG
Gmundner Strasse 10
4816 Gschwandt (Austria)
Tel.: (+43) 0 76 12 / 6 26 05 16
Fax: (+43) 0 76 12 / 62 60 56
e-mail: support.at@kompernass.com
CH
Kompernass Service Switzerland
Tel.: +41 (0) 848 000 525
e-mail: support.ch@kompernass.com
38 DE/AT/CH
Page 38

Entsorgung / Konformitätserklärung / Hersteller
Q
Entsorgung
Die Verpackung besteht aus umweltfreund
die Sie über die örtlichen
Recyclingstellen entsorgen können.
lichen Materialien,
Werfen Sie das Gerät nicht in den Hausmüll!
Möglichkeiten zur Entsorgung des ausgedienten Gerätes erfahren Sie
bei Ihrer Gemeinde- oder Stadtverwaltung.
Q
Konformitätserklärung / Hersteller
Wir, Kompernaß GmbH, Burgstr. 21,
D-44867 Bochum, Deutschland, erklären hiermit für dieses Produkt
die Übereinstimmung mit folgenden EG-Richtlinien:
Maschinenrichtlinie
(98 / 37 / EC)
Angewandte harmonisierte Normen: EN 1953:1998
Typ / Gerätebezeichnung:
Druckluft-Sandstrahlpistole
39 DE/AT/CH
Page 39

Konformitätserklärung / Hersteller
Bochum, 30.06.2009
Hans Kompernaß
- Geschäftsführer -
Technische Änderungen im Sinne der Weiterentwicklung
sind vorbehalten.
40 DE/AT/CH
Page 40

IAN 33000
KOMPERNASS GMBH
Burgstraße 21
D-44867 Bochum
© by ORFGEN Marketing
Last Information Update · Stanje informacija
Stand der Informationen: 06 / 2009
Ident.-No.: 062009 - GB / HR / DE / AT / CH
 Loading...