

Parkmate RVM-045DVRHD User Manual
RVM-045DVRHD User Manual
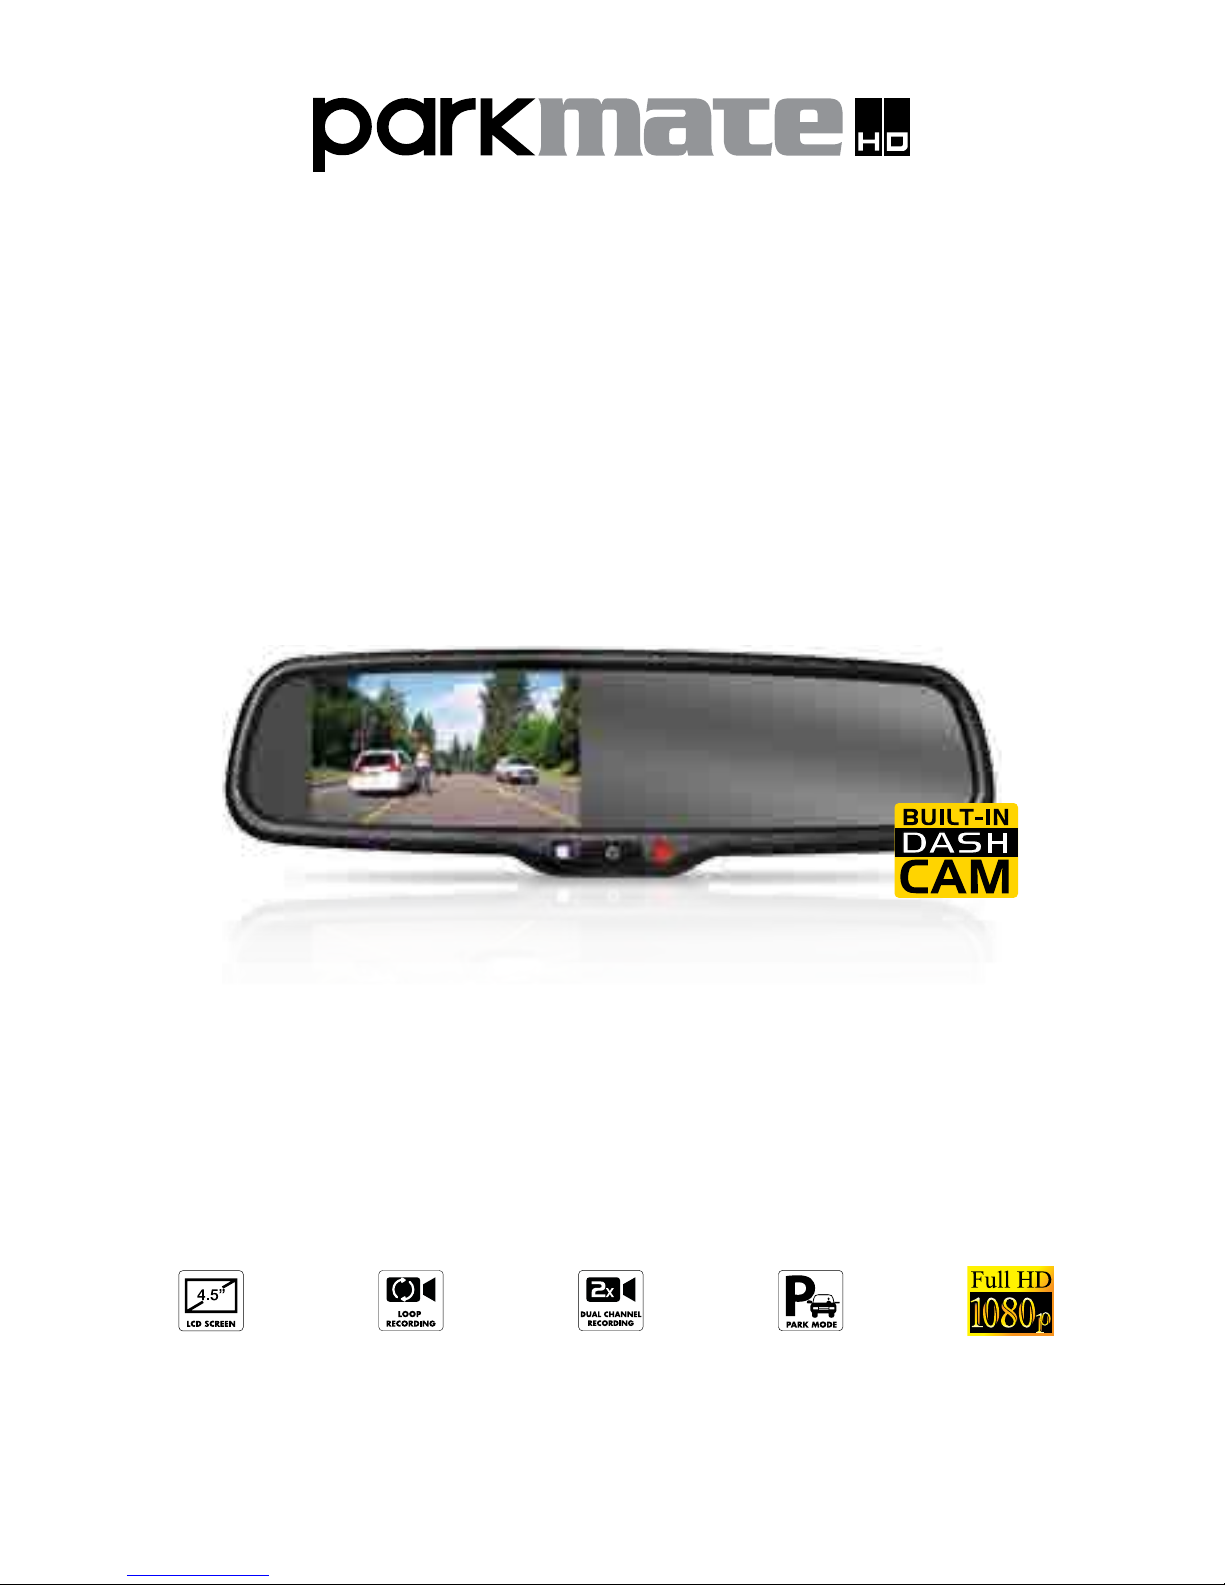
4.5”REAR VIEW MIRROR MONITOR
WITH BUILT-IN FULL HD DASH CAM DVR


2
Thank you for purchasing Parkmate’s RVM-045DVRHD rear view mirror monitor with integrated
HD Dash Cam DVR. This state of the art Parkmate product is packed with features including a
front facing dash cam that can be coupled with an optional rear facing camera.
The DVR can record both video feeds simultaneously to capture incidents and accidents that
may happen in front of, or behind your vehicle. The RVM-045DVRHD will also automatically
display the rear view camera feed in your mirror monitor when reverse gear is selected.
This product uses the most advanced technology and components to provide you with a long
service life and integrates perfectly with the factory look of your vehicle to add a high level of
safety and security to your driving experience.
Please note: Although this product will allow you to view and record driving footage, and reduce
blind spots, it does not remove the responsibility of driving the vehicle from the driver. The legal
responsibility and safe driving practice remains with the driver at all times.
You have purchased this Parkmate product with the understanding that its use is intended as an
aid only. We highly recommend that you have this product professionally installed to ensure that it
will provide the functions it is set out to perform.

3
Table of contents
Chapter One: Product Introduction ..................................................................... 4
1.1 Product overview ............................................................................................................ 4
1.2 Package contents ............................................................................................................ 4
1.3 Product features .............................................................................................................. 4
1.4 Product specification ....................................................................................................... 4
1.5 Introduction to button functions ........................................................................................ 5
1.6 Introduction to cables .................................................................................................. 5-6
1.7 Mounting bracket ..............................................................................................................6
Chapter Two : Product Installation ........................................................................7
2.1 How to install DVR rear view mirror ................................................................................... 7
2.2 How to install (optional) rear view camera ......................................................................... 8
Chapter Three: Basic Function ............................................................................. 9
3.1 Optional rear view camera ................................................................................................ 9
3.2 Start-Up and Shut Down .................................................................................................. 9
3.3 Inserting a Micro SD Card ................................................................................................ 9
3.4 Removing the Micro SD Card ........................................................................................... 9
3.5 LED Indicator ................................................................................................................... 9
3.6 Remote Control .............................................................................................................. 10
Chapter Four: Adjust the settings....................................................................... 10
4.1 Using the menu .............................................................................................................. 10
4.2 Initial Settings ................................................................................................................. 11
4.2.1 Setting time & date ................................................................................................ 11
4.2.2 Date Stamp (Video) ............................................................................................... 11
4.2.3 Plate Number & Video Stamp ................................................................................ 12
4.3 Video Screen .................................................................................................................. 12
Chapter Five: Video Menu ................................................................................... 13
5.1 Resolution ..................................................................................................................... 13
5.2 Dual Record ................................................................................................................... 13
5.3 Timelapse Record .......................................................................................................... 14
5.4 Motion Detection ........................................................................................................... 14
5.5 Gravity Sensing .............................................................................................................. 15
5.6 Parking Monitor ...............................................................................................................15
5.7 Photo Screen ..................................................................................................................16
Chapter six: Photo Menu ..................................................................................... 16
6.1 Capture Mode .................................................................................................................16
6.2 Resolution .......................................................................................................................17
6.3 Sequence ........................................................................................................................17
6.4 Anti-shaking ....................................................................................................................18
6.5 Date Stamp (photo) .........................................................................................................18
6.6 Playback Screen .............................................................................................................19
Chapter Seven: Playback Menu .......................................................................... 19
7.1 Delete ....................................................................................................................... 19-20
7.2 Protect ............................................................................................................................20
7.3 Slideshow .......................................................................................................................21
Chapter Eight: Setting Menu ............................................................................... 21
8.1 Date/Time .......................................................................................................................21
8.2 Format ............................................................................................................................22
8.3 Screen Saver ...................................................................................................................22
8.4 Delayed Shut down .........................................................................................................23
8.5 Default Settings ...............................................................................................................23
Chapter Nine: Menu ............................................................................................. 24
9.1 Video Menu .....................................................................................................................24
9.2 Photo Menu ....................................................................................................................25
9.3 Playback Menu ...............................................................................................................26
9.4 Settings Menu .................................................................................................................26

4
Chapter One: Product Introduction
1.1 Product Overview
Parkmate’s RVM-045DVRHD rear view mirror monitor with integrated HD Dash Cam DVR is an
invaluable accessory that not only acts as your eyewitness on the road, it also offers potentially
life saving safety features to protect you and your family.
This product is equipped with a 120° degree wide angle camera and the integrated DVR can
record high definition video and still images from two separate camera inputs simultaneously at
30 frames per second. The 4.5 inch screen automatically adjusts to ambient lighting conditions
and is equipped with a dedicated remote control for convenient operation. Also featuring
G-Sensor and Motion Detection automatically triggered recording, the RVM-045DVRHD is a
powerful, convenient and simple to use device that will enhance your driving experience.
1.2 Package Contents
Package contents:
• 1 x 4.5” Rear-view Mirror Monitor with integrated HD Dash Cam DVR
• 1 x Rear view camera connector
• 1 x Video extension cable
• 1 x Manual
• 1 x Remote Control
• 1 x Generic Mounting Bracket
1.3 Product Features
• Factory Replacement Mirror Monitor • 4.5” Colour LCD Mirror Monitor
• In-built Digital Video Recorder • In-built Full HD Front Camera
• Automatic Start Up Record & Shut Down • Time & Date Stamped Recorded Files
• Continuous Loop Recording • Reverse Camera Ready
• Park Mode Capable • G-sensor auto file save
• Motion detection • Single or Dual Camera Display & Record
1.4 Product Specifications
Micro SD Card 32GB (Class 6 or higher)
Image Sensor High Denition
Front Camera Image Quality Full HD (1920 x 1080)
Display Resolution 720 x 526
Memory Storage Micro SD Card
Focus Range 12m - Innite
Photo Format JPEG
Video format MOV
Audio Built In - Microphone & Speaker
Working temperature -20° - 70°C
Language English, Spanish, Dutch, Chinese , Korean, Japanese, Russian
5
1.5 Introduction to Button Function
1.6 Introduction to Cables
Rear Camera Recording Display
Front Camera Recording
Light Sensor
Indicator - Flashes when recording
Auto dimming LCD
Short press: on/off screen display
Long press: on/off DVR
The front camera records video and
still images in front of your car.
Rotation angle: X-150, Y-360, Z-150
Mounting Bracket
Wire Harness
Mounting Arm
Connects to ignition / 12v
Plug connects to rear view mirror
connects to the reverse light
ground
B+
Connects to the car 12v battery
connect extension
cable to either AV1
or AV2
6
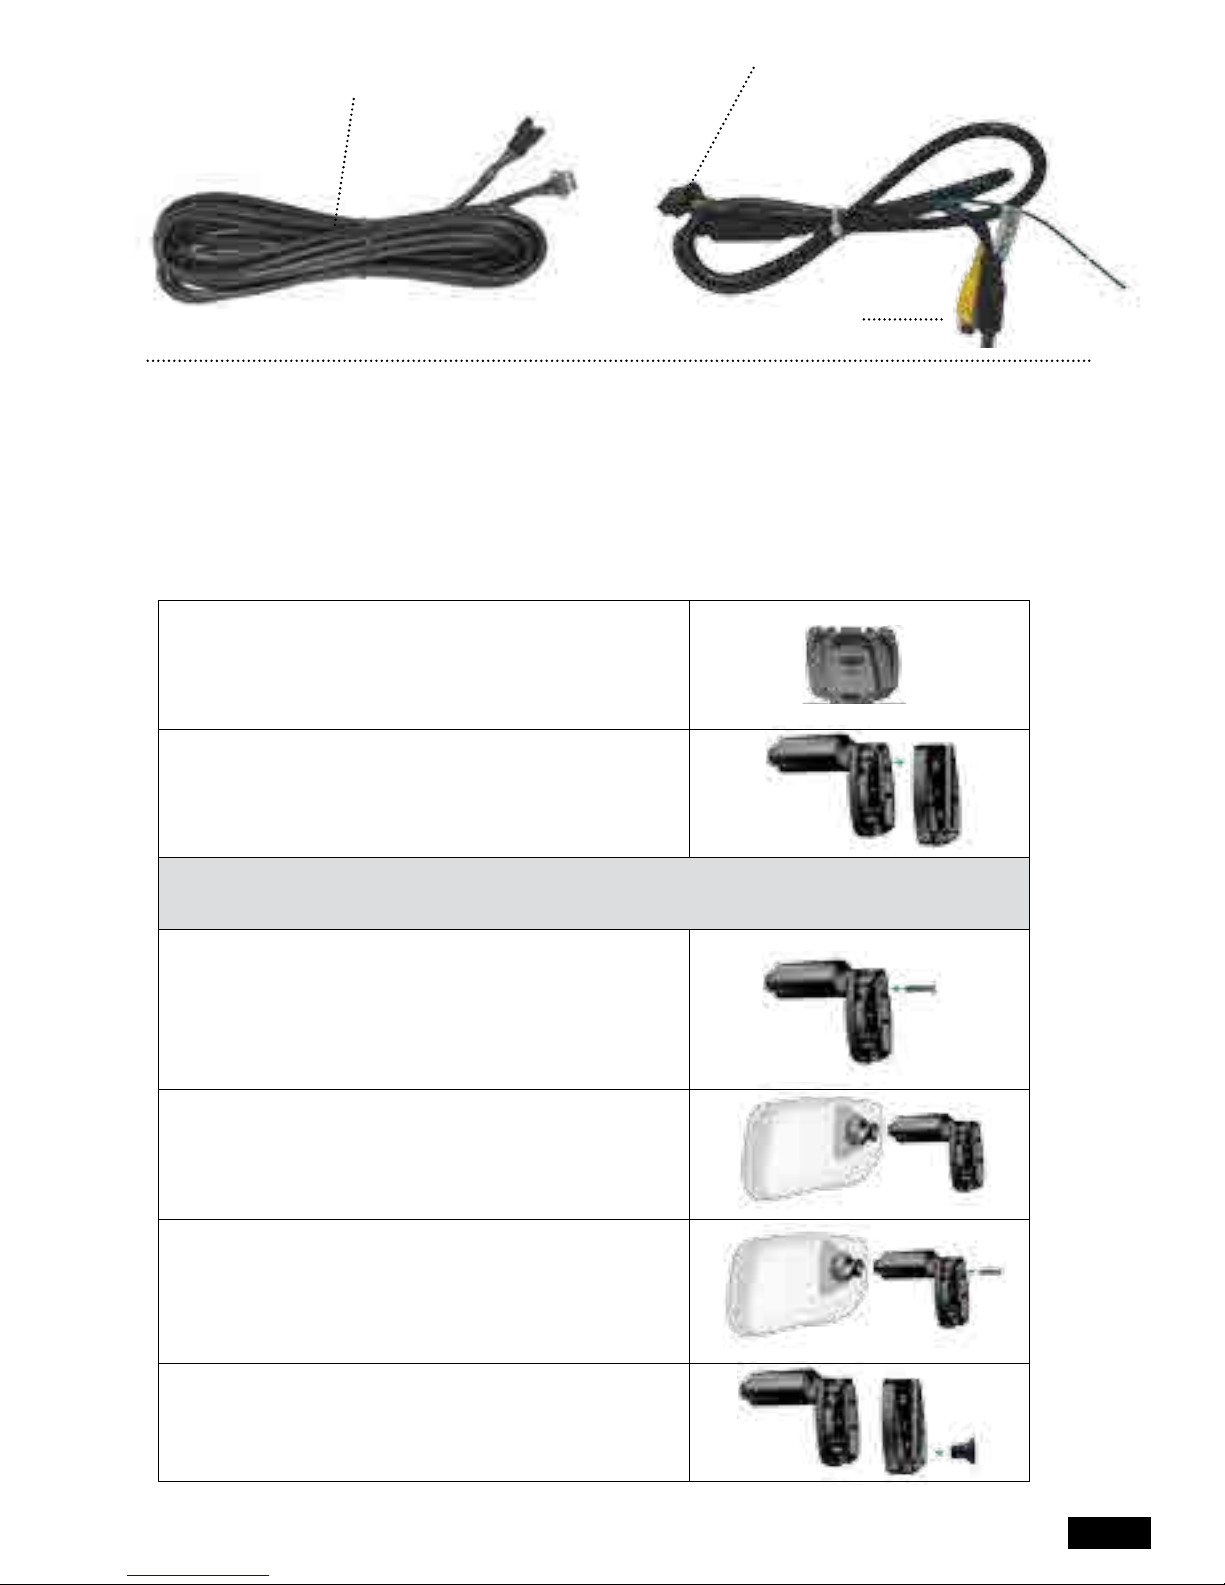
1.7 Mounting Bracket/Arm
The RVM-045DVRHD comes with a generic mounting bracket suitable for most vehicles. If your
vehicle’s mounting plate is not compatible with the generic bracket provided, Parkmate has a
range of vehicle specific mounting brackets available at www.parkmate.com.au or from your
local Parkmate dealer.
FITTING VEHICLE SPECIFIC MOUNTING BRACKETS (sold separately)
1. Unscrew the screw on the underside of the attached bracket.
2. Remove the generic bracket from the mounting arm.
If your replacement bracket includes a mounting arm continue onto step 3.
If your replacement bracket DOES NOT include a mounting arm please go to step 6.
Please note that this step is only required if the replacement
bracket includes a mounting arm.
3. Remove the screw from the barrel of the mounting arm by inserting
a Philips head screwdriver into the opening at the base of the arm
and unscrewing the screw securing the mounting arm to the mirror
monitor’s ball joint.
Please note that this step is only required if the replacement
bracket includes a mounting arm.
4. Remove the mounting arm from the mirror monitor’s ball joint.
Please note that this step is only required if the replacement
bracket includes a mounting arm.
5. Insert the replacement arm and fix to the mirror monitor’s ball joint
using the included screw.
6. Fix your replacement bracket to the mounting arm using the included
screw.
Rear view camera connector
(plug into extension cable)
To rear camera
Extension Cable
7
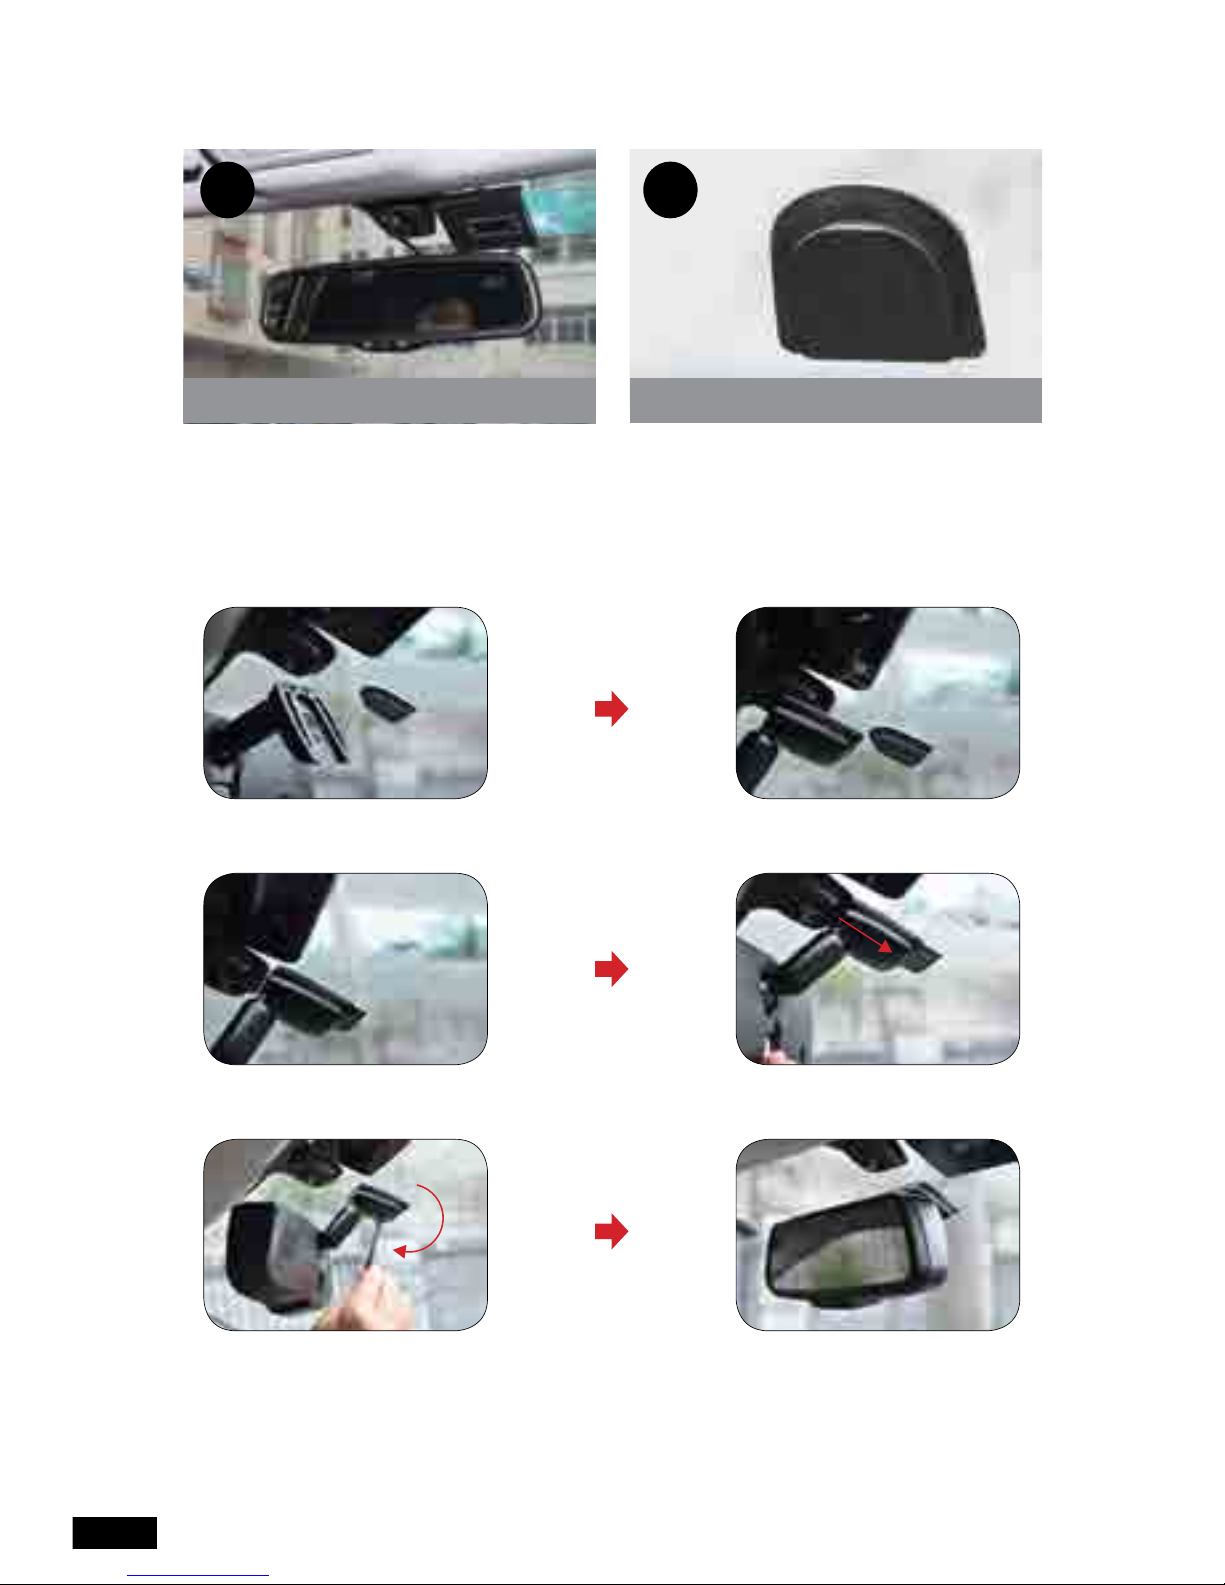
Chapter Two: Product Installation
2.1 How to Install RVM-045DVRHD Rear View Mirror
Different vehicles use different mounting brackets depending on the manufacturer.
Note: While the mirror in some vehicles is easy to remove, in some it may be a difficult process.
If you find it difficult to remove your factory installed rear-view mirror, please do not force it as you
could break your windscreen. In the case of difficult mirror removal, we recommend you seek a
professional to dismantle the original rear view mirror.
Line up the mounting bracket
with the universal mount
Insert the bracket into the top of the Slide the bracket into position in the
mount aligning both edges direction specified
Fix the bracket in place by tightening
the screw in the direction specified
with a hex/allen key
It is highly recommended that you seek the professional help of an auto installer before removing
your original windscreen mirror base and fitting the RVM-045DVRHD.
Original Mirror
1
Base on windsheild
2
8
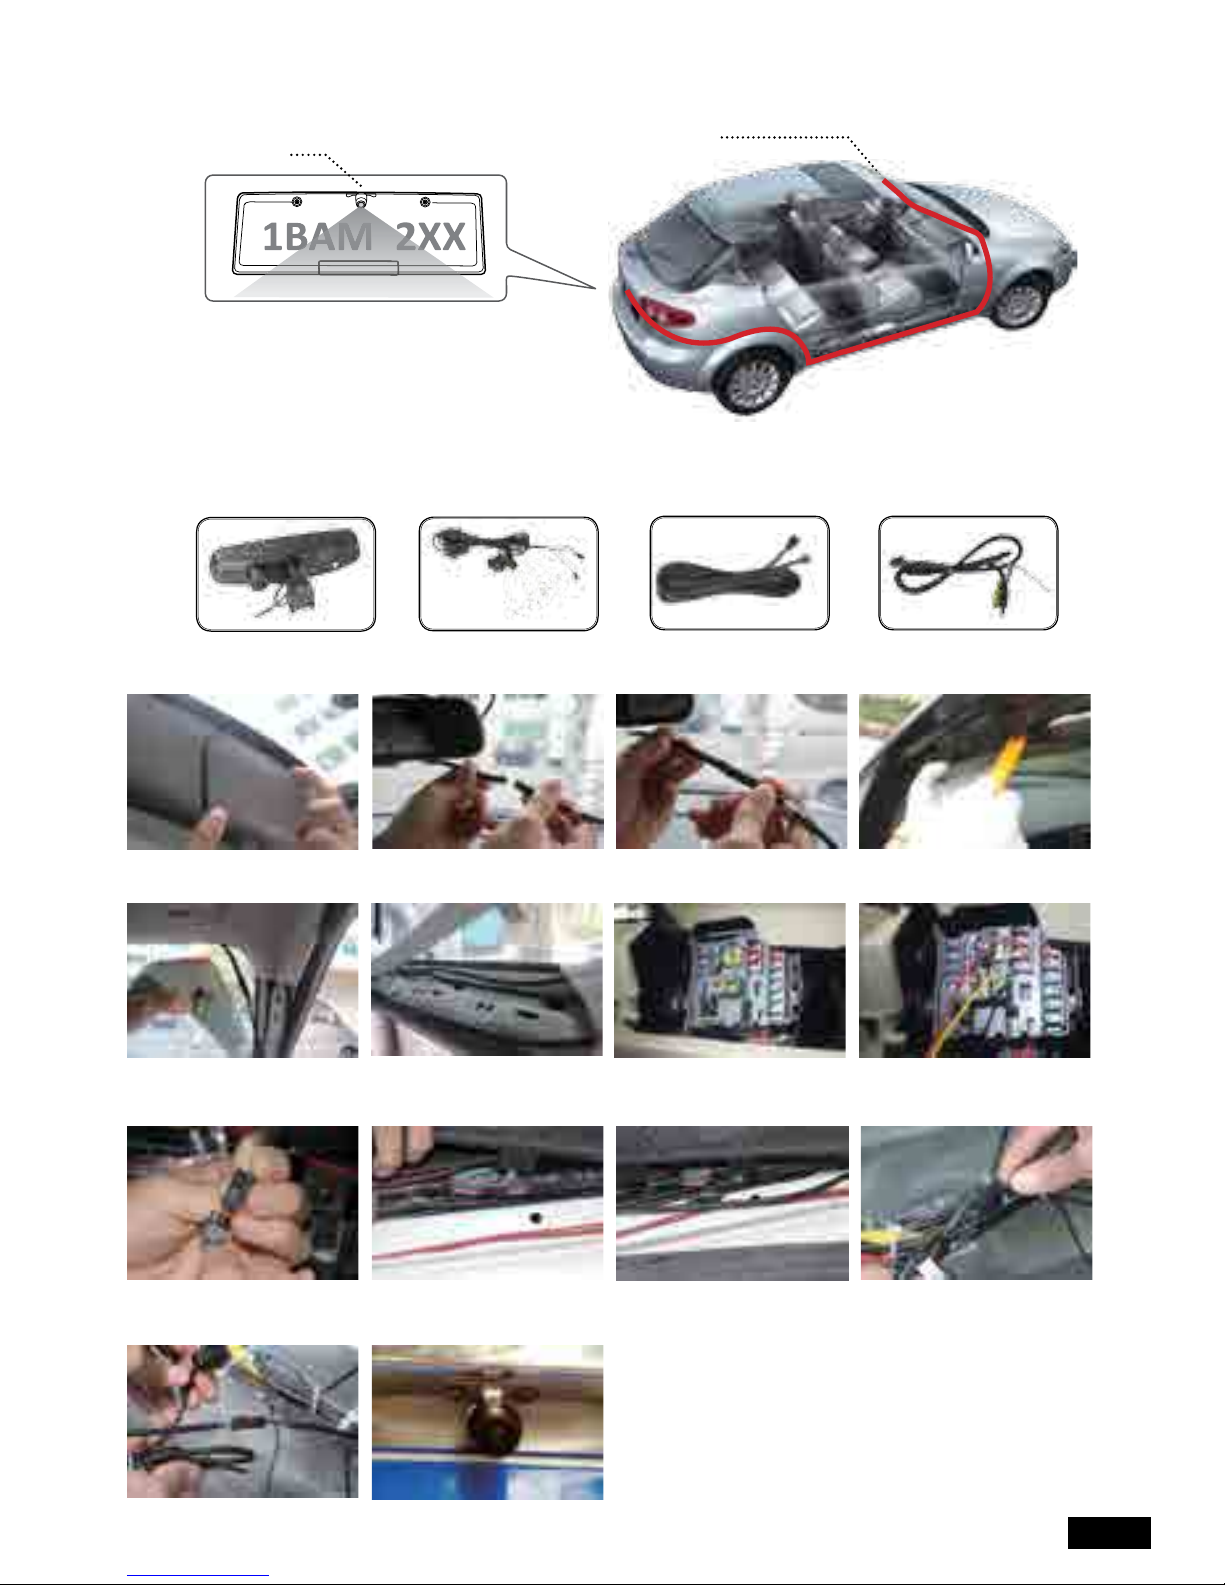
2.2 How to install the (optional) rear view camera
The rear view camera is usually installed above the middle of the license plate frame.
If your vehicle does not already have a
reverse camera installed it is recommended
you install a camera above the rear number
plate as close to the centre of the vehicle as possible. Installing a rear camera will allow for both
front and rear simultaneous recording and rear view blind spot viewing when the reverse gear is
selected. The optional rear view camera is sold separately.
If you install an optional rear view camera, please ensure
you select a high quality camera as it will be functional at
all times while the vehicle is operational and recording to
the DVR. We also recommend you select a wide angle
camera that clearly captures both rear view traffic and
reverse parking viewing angles. To view the complete
range of Parkmate rear view cameras, visit
www.parkmate.com.au
DVR rear view
mirror monitor
1. Tuck the RVM-045DVRHD’s cable
into your vehicle’s headliner.
5. Carefully remove the clips from
your vehicles pillar panel.
9. To install a rear view camera,
connect the extension cable the
wire harness.
13. Run the rear camera to the
desired installation location.
11. Run the extension cable to the
rear of your vehicle.
2. Connect the included wire
harness to the RVM-045DVRHD.
6. Run the cable along the roof and
down the pillar replacing the liner
and panel.
10. Unclip and lift your vehicle’s
floor liner.
14. Install the camera following the
rear view camera instructions.
12. Connect your rear view camera
(not included) to the extension
cable.
3. Ensure that the connection is
secure.
7. Run the cable to your vehicle’s
internal fuse box.
4. Carefully remove the clips from
your vehicle’s headliner..
8. Connect the red wire to the 12V
ignition power, and the yellow
cable to the 12V Battery power.
Cable
Extension cable Rearview camera connector
(to optional camera)
Rear view Mirror Monitor
General Installation location
Camera (Not Included)
 Loading...