

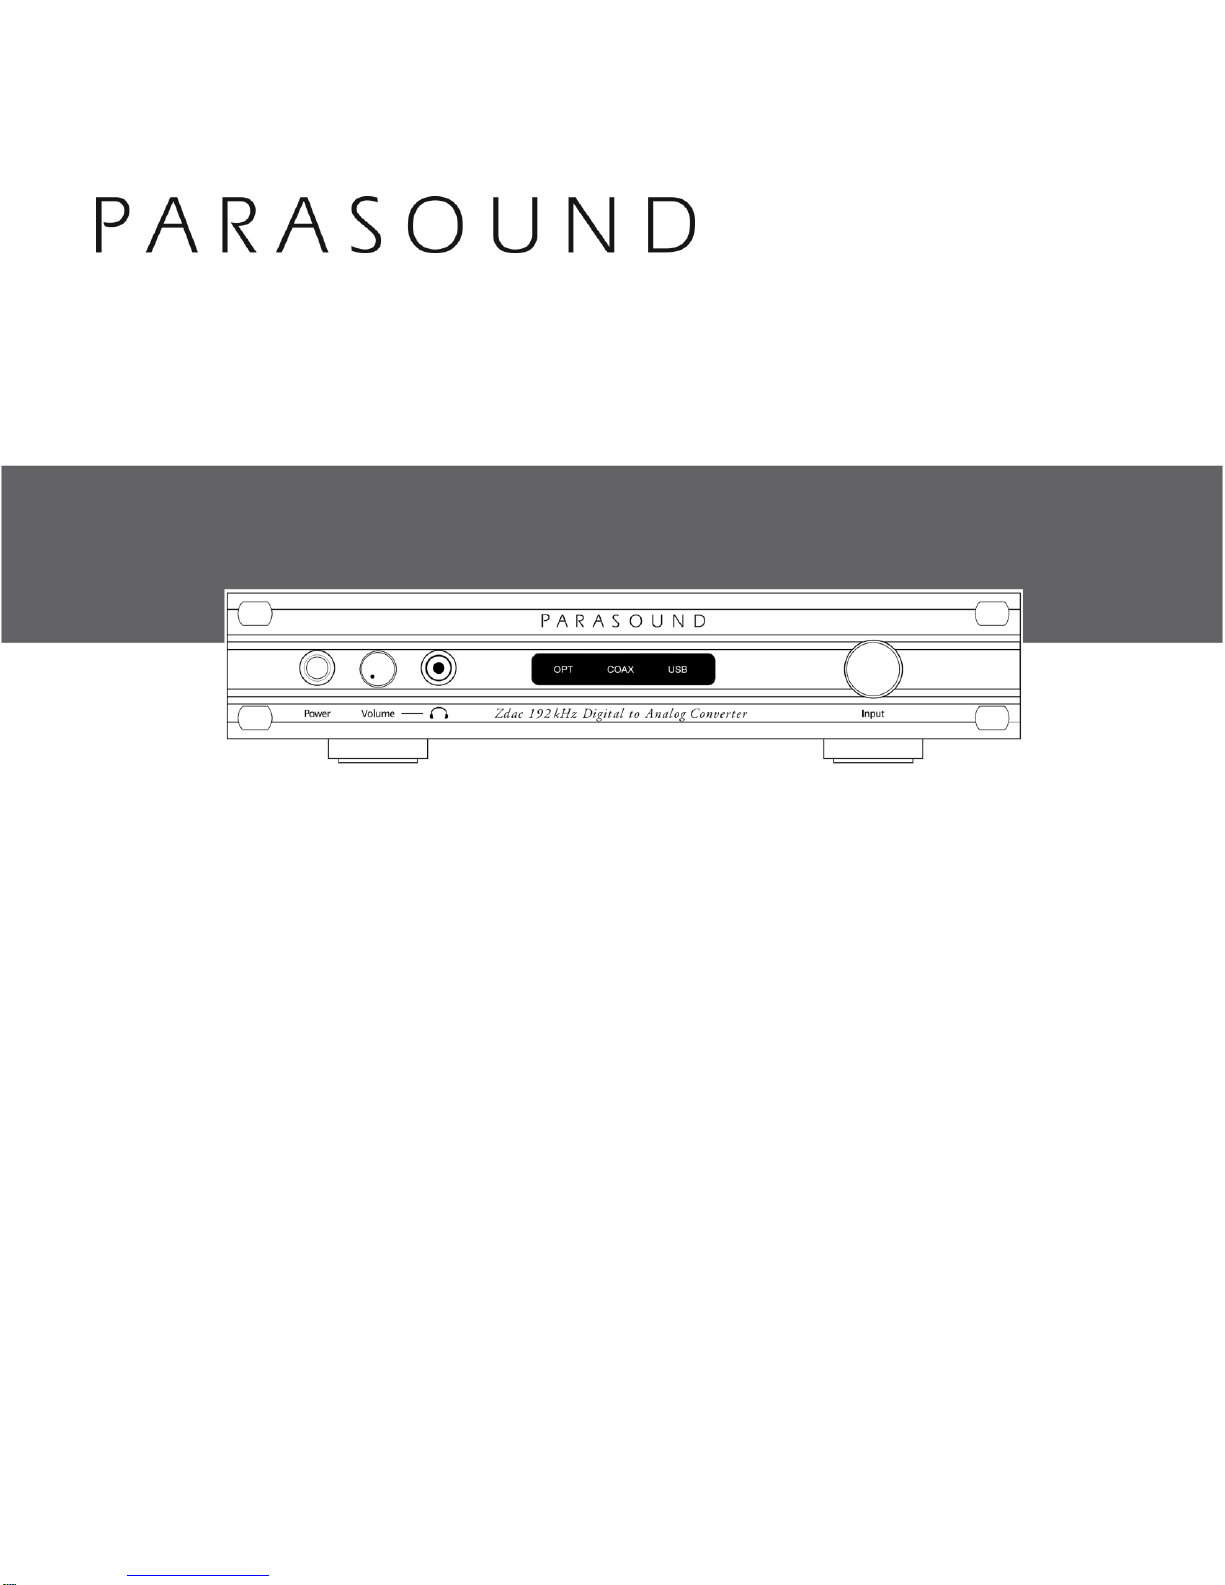
Zdac
192 kHz Digital to Analog Converter
OWNER’S GUIDE

2
INTRODUCTION
Congratulations on your purchase of this precision audio component and thank you for selecting
Parasound. We are proud to offer you this versatile audio component, knowing that it will bring
you many years of enjoyment and dependable operation. Please take a few moments to read the
following instructions so you can enjoy the benefits of your new Zdac’s advanced performance
capabilities.
You can find details of the Zdac’s specifications and advanced technology at
www.parasound.com.
Enjoy.
The Parasound Staff
www.parasound.com
Keep your Purchase Receipt/Bill of Sale and Keep the Carton for Future
Reference
Record the 5 digit serial number located on the bottom side of your Zdac in the space below. Also note
your Parasound dealer’s name and telephone number. Your purchase receipt/bill of sale is required to
determine if your Zdac is eligible for Parasound warranty service. We recommend that you make an
extra copy of your original purchase receipt/bill of sale and store it inside the Zdac’s carton. If the Zdac
should require warranty repair you will need its original carton and foam packing inserts to ship it.
Please do not throw away the carton or foam packing inserts.
Parasound Zdac Serial # ______________________________
Parasound Dealer: ___________________________________
Parasound Dealer Phone Number: _______________________
Date of Purchase: ____________________________________
Important Warranty information
There is no Parasound warranty for this unit if it was not purchased from an Authorized
Parasound Dealer. Investigate warranty coverage statements made by unauthorized dealers very
carefully, as Parasound will not provide service under our warranty and you will need to depend
entirely upon the unauthorized dealer for warranty service. A list of Authorized Parasound Dealers and
detailed warranty information is available at www.parasound.com or you can call Parasound at (415)
397-7100 between 8:30 am and 4 pm Pacific time.
A missing or altered serial number could indicate that this unit was re-sold by an unauthorized
dealer or is stolen merchandise. If this unit is missing its serial number or the serial number has
been altered, you should return it to your dealer immediately for a full refund.

3
Table of Contents
Introduction .................................................. 2
Placement and Ventilation Guidelines .............................. 4
115V / 230V AC Mains Voltage .................................... 5
Connecting Your Zdac .......................................... 6
Operating Your Zdac ........................................... 8
Zdac Headphone Listening ....................................... 8
USB Computer Setup ........................................... 9
Use With a DVD or Blu-ray Player ................................. 9
Frequently Asked Questions and Troubleshooting ................... 10
If You Require Assistance or Warranty Repair ....................... 11
Specifications ................................................ 12
4
Unpacking your Zdac & Placement Guidelines
Unpacking Your Zdac
Carefully remove your Zdac from its shipping carton and locate its AC power cord and USB cable.
While you are unpacking your Zdac, inspect it thoroughly for possible shipping damage and tell your
Parasound dealer immediately if you find any. If possible, save and store both the inner and outer
cartons and–most especially–the foam packing inserts, to protect the Zdac if you have to move it or ship
it. This would be a good time to make a copy of your sales receipt to store with the Zdac’s original
packing.
Again: Do not throw away the Zdac carton or foam packing inserts.
Placement Guidelines
Install your Zdac away from heat sources such as heating ducts, radiators, or other
heat-producing components. Always position the Zdac horizontally. Observe the following
ventilation guidelines when installing the Zdac in an equipment rack or any other enclosed
space:
You should never install the Zdac in an unventilated equipment cabinet or compartment because hot air
will not exhaust adequately to prevent overheating. Air won’t often circulate adequately in a cabinet or
enclosure whose front and back sides are open; pockets of intense heat can still develop around any
heat-producing equipment. Allow a few inches of empty space on each side and above the unit and try
to avoid crowding or stacking the Zdac tightly between other components. A ventilation fan is also
recommended where other heat-producing equipment must be mounted close to the Zdac.
If you’re installing the Zdac yourself, use input and output cables that are long enough to
leave at least two feet of slack; that will enable you to pull the Zdac out of a cabinet to check
or to change connections without inadvertently disconnecting cables. If you’re putting the
Zdac inside a cabinet, it needs a space that’s at least 11 inches wide so you’ll be able to
turn it around for access to its rear panel connections.
Rack Mounting Your Parasound Zdac (black Zdac only)
The Zdac occupies only half the width of a single rack space in a standard 19" equipment
rack. For rack mounting, you can fasten it to another Parasound Z model by using the Parasound
SBS (Side-by-Side) mounting kit (sold separately). You can also mount a single Zdac in the
rack with the accessory Zblank panel extender. The SBS includes four rack mount bolts plus four
pairs of plastic “shoulder washers.” The washers are important because they insulate the
Zdac front panel (and chassis) from the metal equipment rack and from the four mounting
bolts. Place these washers on both sides of the front panel before the mounting bolts are screwed
into the rack rail.
Note: Only black Zdacs can be rack mounted. Silver Zdacs cannot be rack mounted.
Note: Tighten each bolt just enough to keep the unit secure in the rack to avoid deforming the
shoulder washers. Eliminating metal-to-metal contact reduces the likelihood of creating a ground loop
that might introduce hum into your system.
5
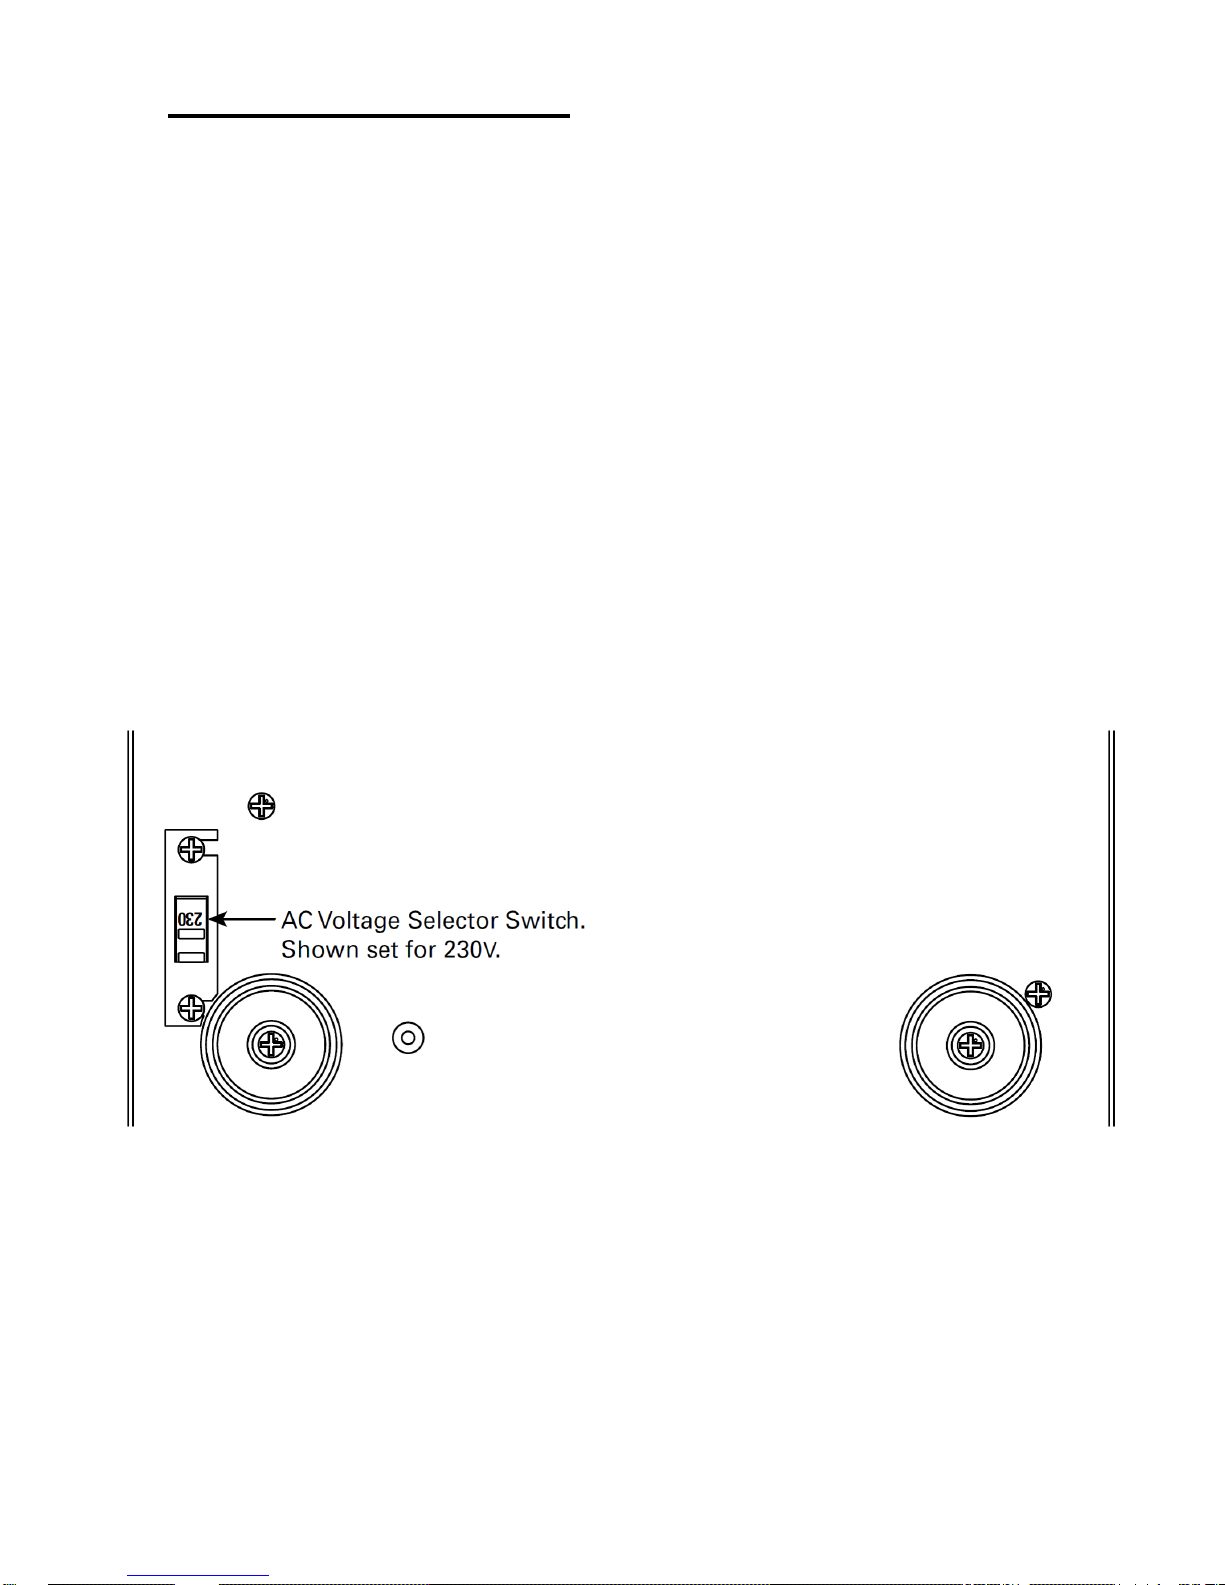
AC Voltage Selection
Check the 115V/230V Voltage switch before plugging in the Zdac’s AC power cord!
Make sure the 115V/230V Voltage Selector switch on the Zdac’s bottom side is set for the correct
AC line (mains) voltage before you plug in the Zdac’s power cord. The unit can be seriously
damaged if this switch is set incorrectly for your AC mains voltage.
In the 115V position the Zdac can safely operate with AC Line voltages between 110V-120V which is
correct for North America, including Mexico, and also in Taiwan. In some countries, such as Brazil, AC
voltages are different by region. Most other countries require setting it to 230V. With the 230V setting
the Zdac can operate safely with AC line voltages between 220V-240V.
If you are not certain of your local AC voltage call your dealer. The following website will also be helpful:
http://en.wikipedia.org/wiki/Mains_electricity_by_country#Voltage_ranges
Note: A Zdac that has been damaged by connection to the incorrect AC voltage is not covered
by the Parasound warranty.
(Zdac Bottom)

6
Connecting your Zdac
Always disconnect the AC cords to your Zdac and preamplifier or amplifier before plugging in
or unplugging the its audio output jacks. Inserting or removing an output cable while the preamp
or power amp are turned on can result in a blast of sound that can damage your loudspeakers. Make
sure there is no strain or tension on any cables that could cause them to pull loose.
Zdac Input Connections
You can connect up to three digital sources to the Zdac:
Opt (Optical)
The optical input is a Toslink receiver. It is compatible with any Toslink-equipped digital source
component. The Zdac optical input accepts these standard sampling rates: 8 kHz, 11.025 kHz, 16 kHz,
32 kHz, 44.1 kHz, 48 kHz, 88.2 kHz, 96 kHz, 176.4 kHz and 192 kHz. It accepts16 bit and 24 bit word
lengths.
Note: 176.4 kHz and 192 kHz require a very short optical cable. Be careful when handling the optical
cable. It has limited flexibility and it cannot be bent at a sharp angle without impairing its ability to
transfer the digital signal from your source to the Zdac.
Coax (Coaxial)
The Coax input connector is an RCA jack, also called S/PDIF. It is compatible with any S/PDIF coaxial
digital output. The coaxial input accepts these standard sampling rates: 8 kHz, 11.025 kHz, 16 kHz, 32
kHz, 44.1 kHz, 48 kHz, 88.2 kHz, 96 kHz, 176 kHz & 192 kHz. It accepts16 bit and 24 bit word lengths.
Note: Please use a 75 ohm digital interconnect cable. Standard audio and video interconnect
cables do not have the correct 75 ohms impedance and impedance mismatches compromise digital
transmission by causing high amounts of jitter. While the Zdac is virtually immune to jitter, we
recommend that you do not introduce compromises into the digital signal chain.
Note: It is equally important to use a 75 ohm interconnect if your source component is equipped with
a BNC output connector instead of an RCA jack. Use an interconnect cable that is terminated with a
BNC plug rather than an RCA plug which requires an RCA-BNC adapter.
USB
The USB connector is a USB type B. The USB accepts sampling rates of 44.1 kHz, 48kHz, 88.2 kHz
and 96 kHz. It accepts 16 bit and 24 bit word lengths. The Zdac uses the USB 1.1 Audio standard
which allows use of 15’ (5 m) cables without any performance penalty.

7
Analog audio Output Connections
Balanced Out
The balanced output uses two XLR jacks. Connect these to the balanced XLR inputs on your
preamplifier (or directly to a power amp when using a digital source with its own volume control). XLR
connectors have separate pins for audio – and for ground. The XLR connectors in the Zdac follow audio
industry convention: Pin 2 is +, Pin 3 is -, Pin 1 is ground.
Unbalanced Out
The RCA jacks connect to any line level input jacks on your preamplifier or directly to a power amp if
your digital source has its own volume control.
Note: The Balanced and Unbalanced Outputs are “live” simultaneously and you can connect them to
different preamps or controllers. For example, you can connect the XLR out jacks to the XLR
balanced inputs on your music system’s stereo preamplifier. Then you can connect the RCA jacks to
the input jacks on a multi-room controller to enjoy music in other rooms of your house.
Using The Zdac Without a Preamplifier
The Zdac can be connected directly to a power amplifier without using a separate preamplifier. This is
only possible if the digital sources connected to the Zdac each have their own volume controls.
Examples are a PC running Windows 7 and connected with its USB or some music servers such as
Sonos® or Squeezebox®. Never connect the Zdac directly to a power amplifier if you have a digital
source without its own volume control connected to one of the Zdac’s inputs. This could result in a
very loud blast of sound that could damage your loudspeakers or hearing. Non-variable digital
sources include all CD/DVD/Blu-ray players, cable/sat boxes and the optical output from an HD
television.
Note: We do not recommend connecting the Zdac directly to a power amplifier if you are using
Windows XP® or a Mac®. The volume controls in Windows 7 and Windows XP operate differently.
With Windows 7 the main volume control slider (in the tool bar) will control the volume output from the
Zdac. With Windows XP (and Mac OS®) volume is only controlled by the volume slider in the
application you are using for music playback so some computer system sounds may be very loud
compared to the the music you are listening too.
AC Line Cord
Verify that the Zdac AC Voltage Selector switch is set for your AC mains voltage.
Connect your digital sources and analog preamplifier before you plug in the AC cord.
The power cord supplied with your Zdac is a high quality IEC type AC cord. If possible, plug your Zdac
into the same AC wall outlet, power strip or line conditioner as your digital source components, analog
preamplifier and power amplifier. If the AC ground potential varies between your AC outlets the result
can be an audible 60Hz (or 50Hz) hum.

8
Operating your Zdac
Front Panel Operation
Power Button
Pushing the Power button turns on the Zdac.
The most recently selected digital input will illuminate green to indicate that the Zdac is on.
There is no separate power on indicator.
Pushing the Power button again turns off the Zdac. The Zdac does not have a standby indicator.
Input Selector Knob
This selects the digital input you wish to hear. The mute circuit employs precision relays so you won’t
hear any transient popping or thumping noises when you select the inputs.
Note: Avoid changing Zdac inputs while your system is playing at very high volume.
Input Indicators
The selected input will illuminate green. Available inputs are Opt, Coax and USB.
Headphone Jack
The Zdac headphone jack accepts a standard 1/8” (3.5 mm) stereo mini plug. It is driven by a high
current, low noise operational amplifier running in pure class A. It can drive headphones from 32 ohms
to 600 ohms at substantial undistorted listening levels. If your headphones use a ¼” (6.3mm) plug you
can use a 6.3 mm-to-3.5 mm stereo adaptor for the Zdac headphone jack. Some headphones include
this adapter.
Note: The Zdac’s Analog XLR and RCA output jacks will be automatically muted whenever you
insert a headphone plug into the Zdac headphone jack.
Headphone Volume Knob
The headphone volume knob controls a high quality analog potentiometer. It adjusts only the output
level of the headphone jack and it has no effect on the Analog XLR or RCA jack output level.
Note: Headphones can create dangerously high sound pressures levels without audible distortion
you would hear from loudspeakers at comparable volume levels. Please do not listen at high
volumes for an extended time. When you listen with headphones you won’t have the benefit of
family (or neighbors) telling you to “turn it down!”

9
USB - Computer Setup
First power up your computer, then connect the USB cable (included in the Zdac carton) and then turn
on the Zdac. The first time you connect your Zdac to a computer it will automatically install the correct
drivers. Next you will need to ensure that the Zdac is set as the computer’s default audio output device.
Follow these instructions to assign the Zdac as the default audio device.
For a Windows® PC
- Right click on the loudspeaker icon in the bottom right of your screen (on the tool bar)
- Select “Playback Devices”
- When the “Sound” window pops up click on the “Zdac” and then click “Set as Default”
- Click “OK” to close the “Sound” window
Note: If for some reason you cannot find the loudspeaker icon you will need to go to the sound
options in the Control Panel and select the Zdac as the default playback device.
For a Mac® with OS X
- Go to the Apple Menu
- Select “System Preferences”
- Select “Sound” from the Hardware Menu
- Select “ZDAC” in the Sounds Menu
Playing Music From Your Computer
Once initial setup is complete your Zdac will be ready for use with your PC or Mac. Simply start playing
any music on your computer and it will be sent to the Zdac via the USB cable. Any sound that you would
normally hear through your computer speakers will now be heard through the Zdac and accompanying
audio system.
Note: For the highest quality sound playback we recommend leaving your computer’s volume control
at 100%. Then use the volume control of your accompanying stereo system to set the listening level.
Using a Blu-ray or DVD player with the Zdac
If you use a Blu-ray or DVD player with the Zdac you must set the player’s digital audio output to Stereo
PCM (2.0). The Zdac will accept only two-channel stereo PCM.

10
Frequently Asked Questions
Why is there no sound from my speakers?
- Check that input and output cables are plugged in all the way at both ends.
- Are your preamplifier and power amplifier turned on? Is the correct input selected on the preamplifier?
- Make sure you have selected the correct input on your Zdac.
- Are your headphones plugged in to the Zdac?
- If you are trying to listen to a DVD or Blu-ray, ensure that you have set the DVD/Blu-ray player to
output only Stereo PCM Audio (2.0). The Zdac will not decode Dolby Digital or DTS surround sound.
- If you are trying to listen to a connection from an HD TV, ensure that you have set the TV to output
only Stereo PCM Audio (2.0). The Zdac will not decode Dolby Digital or DTS surround sound.
Why is there no sound from my headphones?
- Check that input cables are plugged in all the way at both ends.
- Make sure you have selected the correct input.
- Is the headphone volume knob turned down?
I have a USB problem
- Check if the Zdac is recognized as a USB device in your computer’s control panel.
If not, remove the USB cable from the computer and re-insert it. Your computer should indicate that it
has found and identified the Zdac. If it doesn’t, then try rebooting it with the Zdac connected.
- Turn off the Zdac for about 10 seconds and turn it on again.
- Is your computer operating correctly? Is the music playing or paused?
I can hear a hum or buzzing noise from my speakers and headphones
- Cable TV is the most common source of hum. If you have a cable TV box connected to your audio
system temporarily remove the cable from the Cable TV box. If the hum goes away the problem is the
cable TV ground. You will need a Cable TV ground isolator which is an inexpensive device that
attaches between your TV cable and the Cable TV box.
- Light Dimmers can cause noise in your audio. Try turning lights that are controlled by dimmers all the
way off. If the hum goes away the problem is the effect the dimmers have on your AC power. A line
conditioner might help.
- Ground Loops are a common cause of hum and buzzing noise. Finding a ground loop is a process of
elimination. Unplug your source components one at a time. When the hum goes away you’ve
identified the source of the ground loop. You might be able to stop the hum by attaching a wire from
the chassis of the offending component to the chassis or ground screw of your preamplifier.

11
Maintaining Your Zdac
Your Zdac requires no periodic maintenance and has no user serviceable parts inside.
To avoid risk of electric shock do not remove the top cover. To keep it clean use only a soft
cloth moistened with a few drops of clear water or window cleaner. Never use any solvents or
abrasives.
Are You Having Difficulty?
Warranty Repair
Call your Parasound dealer first. If the dealer can’t help you with your problem we encourage
you to call Parasound’s Technical Service Department at 415-397-7100, Monday - Friday, 8am
- 4pm Pacific time. We can suggest other diagnostic tests you can easily perform.
If we determine that your Zdac should be returned to Parasound or an Authorized
Parasound Warranty Center for inspection and possible servicing, we will provide the location of
a warranty center near you or shipping instructions for the unit’s return to Parasound.
Read your accompanying Parasound Limited Warranty carefully to understand the applicable
rights and limitations. This section provides instructions for obtaining repairs, both for units covered
under the Parasound Limited Warranty and for units or situations which are outside the Warranty.
Unit is not eligible for repair under the terms of the Parasound warranty if:
1. Unit was not purchased from a Parasound Authorized Dealer.
2. You do not have the original bill of sale or sales receipt from a Parasound Authorized Dealer.
3. You are not the original owner. The Parasound warranty is not transferable.
4. Unit’s serial number was removed, modified, or defaced.
5. Unit shows evidence of abuse and/or misuse.
6. Unit was modified in any way.
7. A prior repair was attempted by an unauthorized repair station.
Before You Return Any Unit to Parasound for Service
Before you send your unit to Parasound, you will need to obtain a specific Return Authorization
(RA) number and shipping instructions from Parasound’s Technical Department. The RA
number must be clearly marked on the outer carton. Use the original factory packing materials
and arrange adequate insurance to cover its value. You must include a copy of your purchase
receipt, since this document establishes the validity of this unit’s warranty. Warranty repairs are
only performed by Parasound or Parasound Authorized warranty centers when your purchase
receipt is from a Parasound Authorized Dealer or Parasound Authorized Reseller.
Do not ship to Parasound by the USPS- we will not accept delivery. We will also refuse delivery
of units whose cartons show evidence of damage caused by inadequate packing.

12
Specifications and Details
Supports Incoming Digital Word Lengths: 16 bit - 24 bit
Supports Incoming Digital Sampling Frequencies:
Opt & Coax: 8 kHz, 11.025 kHz, 16 kHz, 32 kHz, 44.1 kHz, 48 kHz, 88.2 kHz, 96 kHz, 176.4 kHz, 192 kHz.
USB: 44.1 kHz, 48 kHz, 88.2 kHz and 96 kHz
USB Streaming Controller: Texas Instruments TAS1020B
Upsampling Frequency: 422 kHz / 24 bit (all inputs)
Sample Rate Converter: Analog Devices AD1895
D to A Converter: Analog Devices AD1853
Frequency Response: 20 Hz to 20 kHz ±0.2 dB
Channel Balance: < 0.05 dB, 20 Hz - 20 kHz
Channel Separation: > 95 dB, 20 Hz - 20 kHz
Signal to Noise Ratio: 110 dB, A-weighted
THD + Noise: < 0.015 %
Audio Output Level:
Unbalanced: 2.1 V rms
Balanced: 4.2 V rms
Output Impedance:
Line out: 160 ohms, balanced or unbalanced
Headphone out: 10 ohms
AC Power Requirement: 10 watts
110-130 VAC 60 Hz
220-240 VAC 50 Hz, voltage is selected on the chassis bottom
Dimensions:
Width: 9.5” - 241 mm (black); 8.5” - 220 mm (silver)
Depth: 10” - 254 mm
Height, with feet: 2” - 51 mm; without feet:1.75” - 45 mm
Weight:
Net: 5 lbs (2.3kg)
Shipping: 8 lbs (3.7kg)
Rack Mount Accessory (Black Zdac only):
SBS: Side by Side Mounting bracket, purchased separately
Zblank: Panel extender, purchased separately
(Silver Zdacs cannot be rack mounted)
Specifications and features subject to change or improvement without notice. Rev 1.1, Copyright 2013

13
Installation Notes:

14
Parasound Products, Inc. 2250 McKinnon Ave, San Francisco, CA 94124
Customer Service: 415-397-7100
www.parasound.com
 Loading...