

Parasound HINT 6 Owner's Manual
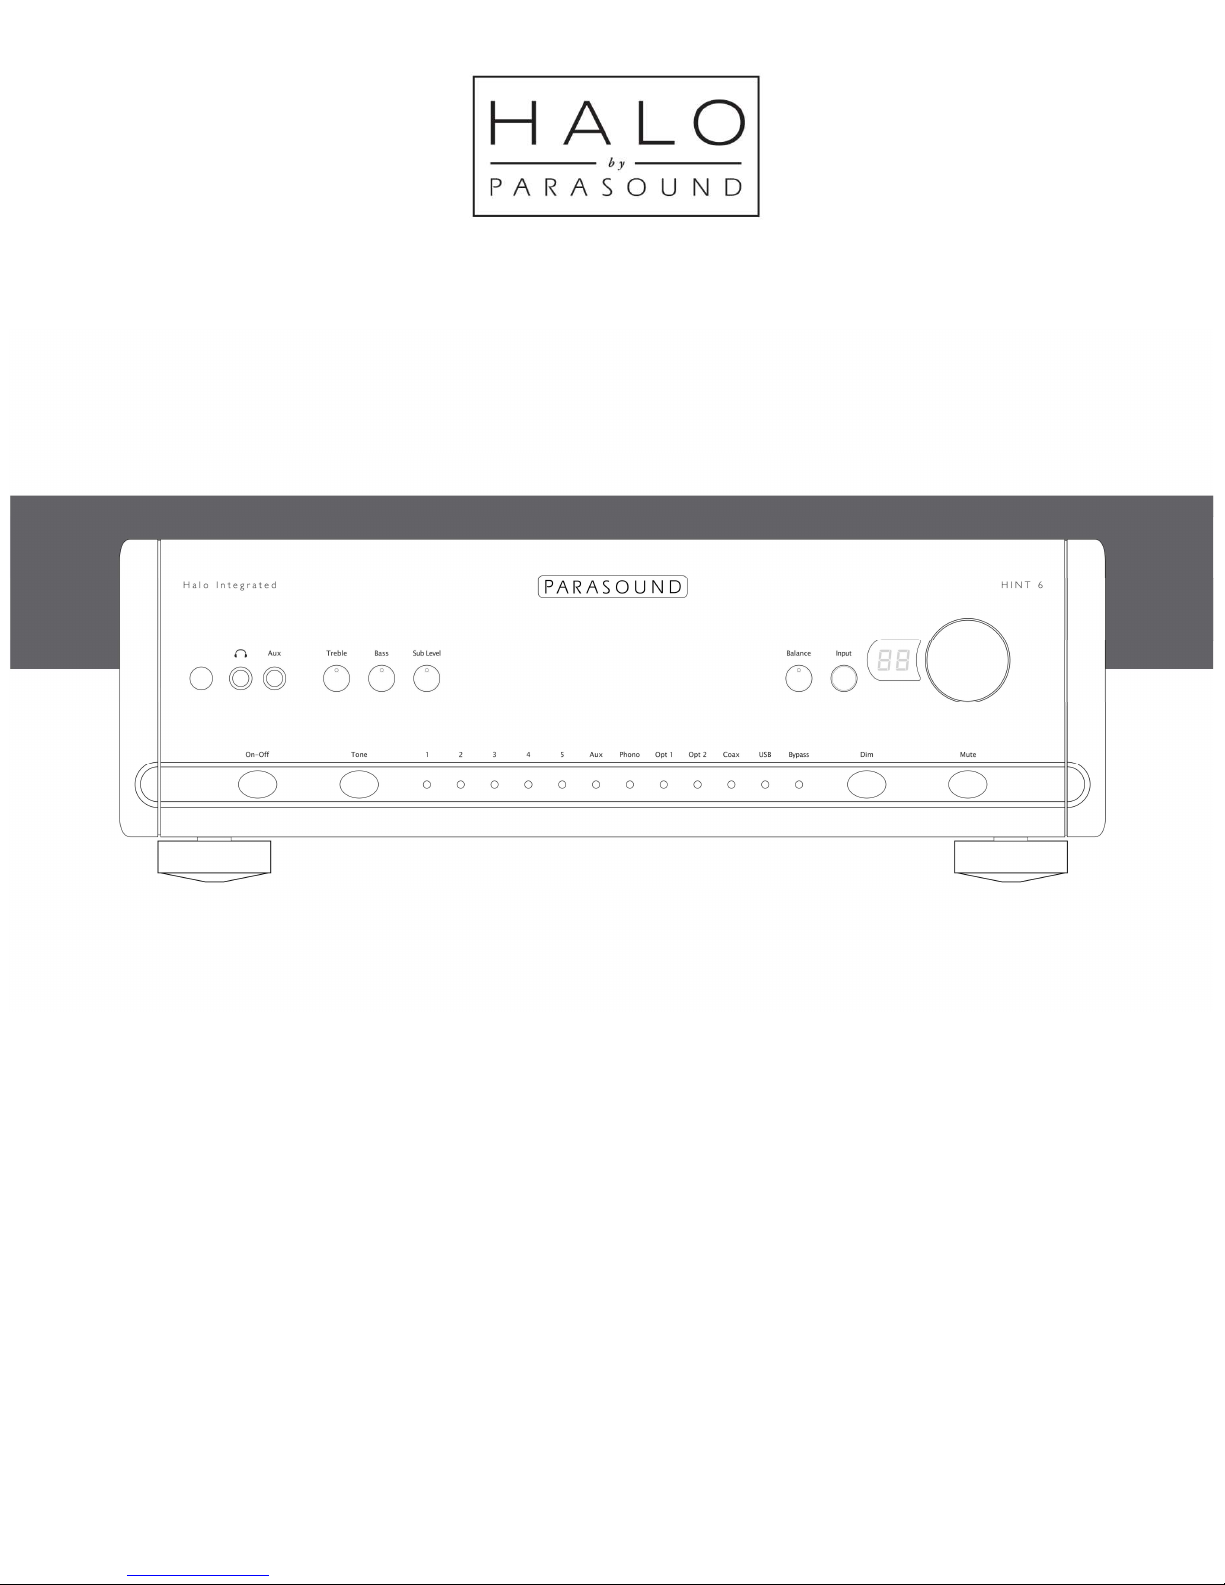
HINT 6
2.1 Channel Halo Integrated Amplifier & DAC
OWNER’S GUIDE

Important Safety Instructions
The lightning flash with the arrowhead symbol within an equilateral triangle is intended to alert the user to the
presence of “dangerous voltage” inside the product that may constitute a risk of electric shock.
The exclamation point within an equilateral triangle is intended to alert the user to the presence of important
operating and maintenance instructions in the literature accompanying the product.
TO REDUCE THE RISK OF ELECTRIC SHOCK, DO NOT REMOVE COVER. NO USER-SERVICEABLE PARTS INSIDE.
REFER SERVICING TO QUALIFIED SERVICE PERSONNEL
1. Read Instructions — Read all the safety and operating instructions before operating this product.
2. Retain Instructions — Retain safety and operating instructions for future reference.
3. Heed Warnings — Adhere to all warnings on the product and in the operating instructions.
4. Follow Instructions — Follow all operating and use instructions.
5. Cleaning — Unplug this product from the wall outlet before cleaning. Use a damp cloth for cleaning. Clean
the outside of the product only.
6. Attachments — Do not use attachments that are not recommended by the product manufacturer; they may
be hazardous.
7. Water and Moisture — Do not use this product near water.
8. Accessories — Do not place this product on an unstable cart or stand. The product may fall, causing bodily
injury and damage to the product. A product and cart combination should be moved with care. Quick stops,
excessive force, and uneven surfaces may cause the product and cart to overturn.
9. Ventilation — Slots and openings in the cabinet are provided for ventilation to ensure reliable operation of
the product and to protect it from overheating. These openings must not be blocked or covered. This product
should not be placed in a built-in installation such as a bookcase or rack unless proper ventilation is provided.
10. Power Sources — Operate this product only from the type of power source indicated on the label. If you are
not sure of the type of power supply to your home, consult your dealer or local power company. This product is
equipped with a three-prong grounding plug. This plug will only fit into a grounding power outlet. If you are
unable to insert the plug into the outlet, contact your electrician to replace your obsolete outlet. Do not defeat the
safety purpose of the grounding plug.
11. Power Cord Protection — Power supply cords should be routed so that they are not likely to be walked on or
pinched by items placed upon or against them.
12. Lightning — Unplug the unit from the wall outlet for added protection during a lightning storm and when it
is left unattended and unused for long periods of time. This will prevent damage to the product due to lightning
and power line surges.
13. Overloading — Do not overload wall outlets or extension cords. This can result in a fire or electric shock.
14. Inserting Objects into Unit — Never push objects of any kind into this product through any openings; they
may touch dangerous voltage points or short out parts that could result in fire or electric shock.
15. Servicing — Do not attempt to repair or service this product yourself. Opening or removing covers may expose
you to dangerous voltage and other hazards. Refer all servicing to qualified service personnel.
16. Damage Requiring Service — Unplug this product from the wall outlet and refer servicing to qualified
service personnel under the following conditions: a) If the power-supply cord or plug is damaged.
b) If liquid has been spilled into the product. c) If the product has been exposed to rain or water. d) If the product
does not operate normally by following the operating instructions. e) If the product has been dropped or
damaged in any way. f) If the product exhibits a distinct change in performance.
17. Replacement Parts — When replacement parts are required, be sure the service technician has used
replacement parts specified by the manufacturer. Unauthorized substitutions may result in fire, electric shock, and
other hazards.
18. Safety Check — Upon completion of any service or repairs to this product, ask the service technician to
perform safety checks to determine that the product is in proper operating condition.
19. Wall or Ceiling Mounting — Mount the product to a wall or ceiling only as recommended.
20. Heat — The product should be situated away from heat sources such as radiators, heat registers, stoves,
and other products (including amplifiers) that produce heat.
2

Table of Contents
Introduction . . . . . . . . . . . . . . . . . . . . . . . . . . . . . . . . . . . . . . . . . . . . . . . . . 4
Placement and Ventilation Guidelines . . . . . . . . . . . . . . . . . . . . . . . . . . . . . 5
Rack Mounting . . . . . . . . . . . . . . . . . . . . . . . . . . . . . . . . . . . . . . . . . . . . . . . 5
AC Mains Voltage . . . . . . . . . . . . . . . . . . . . . . . . . . . . . . . . . . . . . . . . . . . . . 6
Analog Audio Input Connections . . . . . . . . . . . . . . . . . . . . . . . . . . . . . . . . . 7
Theater Bypass / Amp Input . . . . . . . . . . . . . . . . . . . . . . . . . . . . . . . . . . . . 9
Digital Audio Inputs . . . . . . . . . . . . . . . . . . . . . . . . . . . . . . . . . . . . . . . . . . 11
USB Computer Setup . . . . . . . . . . . . . . . . . . . . . . . . . . . . . . . . . . . . . . . . . 12
Audio Output Connections . . . . . . . . . . . . . . . . . . . . . . . . . . . . . . . . . . . . . 13
Other Rear Panel Connections . . . . . . . . . . . . . . . . . . . . . . . . . . . . . . . . . . 14
Subwoofer Setup . . . . . . . . . . . . . . . . . . . . . . . . . . . . . . . . . . . . . . . . . . . . 15
Crossover Setup . . . . . . . . . . . . . . . . . . . . . . . . . . . . . . . . . . . . . . . . . . . . . 15
Front Panel Controls . . . . . . . . . . . . . . . . . . . . . . . . . . . . . . . . . . . . . . . . . . 17
Remote Control Functions . . . . . . . . . . . . . . . . . . . . . . . . . . . . . . . . . . . . . 19
Turn On Volume & Favorite Volume Settings . . . . . . . . . . . . . . . . . . . . . . . 20
Amplifier Protection & On-Off Button Red Glow . . . . . . . . . . . . . . . . . . . . 21
Problem & Remedies . . . . . . . . . . . . . . . . . . . . . . . . . . . . . . . . . . . . . . . . . 22
If You Require Assistance or Warranty Repair . . . . . . . . . . . . . . . . . . . . . . 24
Specifications . . . . . . . . . . . . . . . . . . . . . . . . . . . . . . . . . . . . . . . . . . . . . . . 25
3

Introduction
Thank You for Choosing Parasound
Your new Parasound® HINT 6 is an advanced 2.1 channel integrated amplifier that has been
designed for the highest performance for serious two channel music listening and ease of
integration with a surround sound system. The HINT 6 is built to the extremely strict quality and
performance standards for which Parasound is renowned. We’re proud to offer you this
exceptional audio component that will bring you many years of enjoyment and dependability.
Because your new HINT 6 amplifier performs at a higher level of sonic performance than you may
have expected we encourage you to read this entire manual to maximize your enjoyment. We wish
you many years of listening enjoyment.
-The Parasound Staff
Keeping Records for Future Reference
Record the serial number located on the back panel or bottom of your HINT 6 in the space below.
Also note your Parasound Dealer’s name and telephone number. Your purchase receipt/bill of sale
is required to determine if your HINT 6 is eligible for Parasound warranty service. We recommend
that you make an extra copy of your original purchase receipt/bill of sale and store it inside the
HINT 6’s carton.
HINT 6 Amplifier Serial #: _______ (5 digit number below the bar code on the chassis bottom)
Parasound Dealer: ___________________________________________________
Parasound Dealer Phone Number: ___________________
Date of Purchase: ______________________
Important Warranty information
There is no Parasound warranty for this unit if it was not purchased from an Authorized
Parasound Dealer. Investigate warranty coverage statements made by an unauthorized dealer
very carefully, as you will need to depend entirely upon your dealer, and NOT upon Parasound.
Unauthorized dealers lack the capability to make repairs or arrange for repairs of Parasound
equipment. A list of Authorized Parasound Dealers and detailed warranty information is available
at www.parasound.com or you can call 415-397-7100 between 9:00 am and 4 pm Pacific time.
A missing or altered serial number could indicate that this unit was re-sold by an unauthorized
dealer or is stolen merchandise. If this unit is missing its serial number or the serial number has
been altered, you should return it to your dealer immediately for a full refund.
4

Unpacking Your HINT 6 & Placement
Guidelines
Unpacking Your HINT 6
Carefully remove your HINT 6 from its shipping carton and locate the enclosed accessories:
• AC power cord
• A 12 V trigger wire with mono 3.5 mm mini plugs on each end
• Remote Control with two AA batteries
• USB A to USB B cable for music playback from a computer
While you are unpacking your HINT 6, inspect it thoroughly for possible shipping damage and tell
your Parasound dealer immediately if you find any evidence of shipping damage. This would be a
good time to make a copy of your sales receipt to store with the HINT 6’s original packing.
Note: The HINT 6 should be shipped only in its original carton set and foam packing inserts.
Please save and store both the inner and outer cartons and, most especially, the foam packing
inserts to protect the HINT 6 if you have to move it or ship it. You may wish to flatten the cardboard
cartons to save room in storage after cutting the taped seams on the bottom flaps.
Placement Guidelines
The HINT 6 will be easier to use and will last longer if you follow these simple guidelines:
• Use input and output cables that are long enough to leave some slack; that will enable you to
pull the HINT 6 out of a cabinet to check or to change connections without inadvertently
disconnecting cables.
• Place your HINT 6 where you can route input and output signal cables as far as possible from
AC cords.
• Where signal cables must cross AC cords they should do so only at a 90° right angle.
Ventilation Requirements
• Always position the HINT 6 horizontally.
• The HINT 6 should not be stacked on top of a power amplifier.
• The HINT 6 should not be placed in a completely enclosed cabinet.
• The HINT 6 requires at least 4” inches (10cm) empty space above it to avoid overheating
Rack Mounting your HINT 6
With its four feet removed, the HINT 6’s front panel height occupies three rack spaces: 5.25” or
133 mm. (A single standard rack space occupies 1.75” or 44.5 mm vertical height.) For mounting in
a standard 19” equipment rack, you must use the Parasound HRA 3 rack mount kit (sold
separately). The HRA 3 kit includes four bolts and eight plastic washers with raised “shoulders.”
Slide one washer onto each mounting bolt with its raised shoulder pointing toward the panel hole.
Insert the bolt through the hole and slide the other washer on the bolt with its raised shoulder
facing the rear side of the panel. The washers will sandwich the HINT 6 panel and the four
mounting bolts to prevent metal-to-metal contact between the HINT 6 chassis, the equipment rack,
and the other components mounted in the rack.
Note: Because of its high bias Class A/AB design the HINT 6 can get very warm, even when no
music is playing. At least 4” (or 10cm) of free space must be left above the unit. Other
heat-producing components should not be positioned directly beneath the HINT 6.
Warning: Do not put the screws for the feet back into the bottom of the HINT 6 without the feet.
If you insert the screws without the feet they could touch internal electrical circuitry
and cause a short circuit, damage to the amp and electric shock.
5
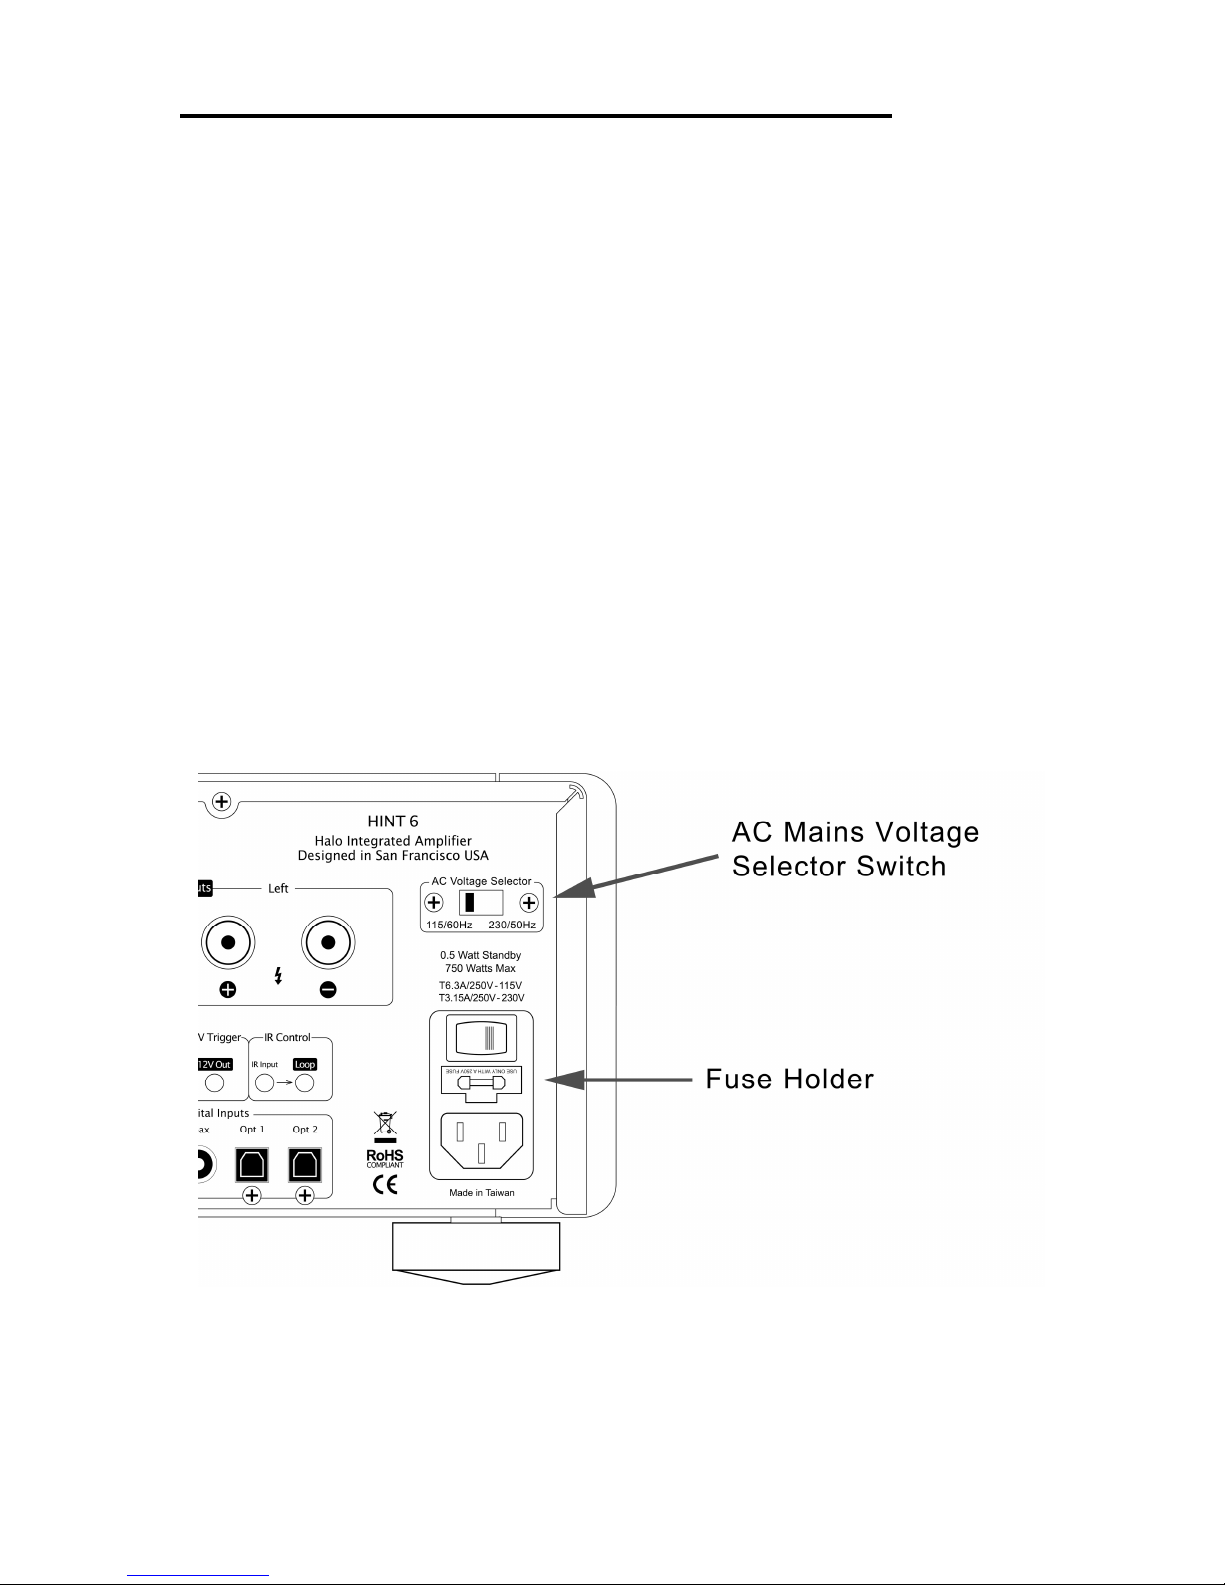
AC Mains Voltage Selection and Fuse
Check the 115 V/230 V Voltage switch before plugging in the HINT 6’s
AC mains power cord!
Make sure the 115 V/230 V Voltage Selector switch on the HINT 6’s back panel is set for the
correct AC line (mains) voltage before you plug in the power cord. It can be seriously
damaged if this switch is set for the wrong AC mains voltage.
In the 115 V position the HINT 6 can safely operate with AC Line voltages between 110-125 V
which is correct for North America, Mexico, and Taiwan. In some countries, such as Brazil, AC
voltages differ by region. Most other countries require setting it to 230 V. With the 230 V setting
the HINT 6 can operate safely with AC line voltages between 220-250 V. If the AC Voltage
Selector is changed the rear panel fuse value must also be changed. The HINT 6 operates on
50Hz or 60Hz AC.
Note: A HINT 6 that has been damaged by connection to the incorrect AC mains
voltage is not covered by the Parasound warranty.
6
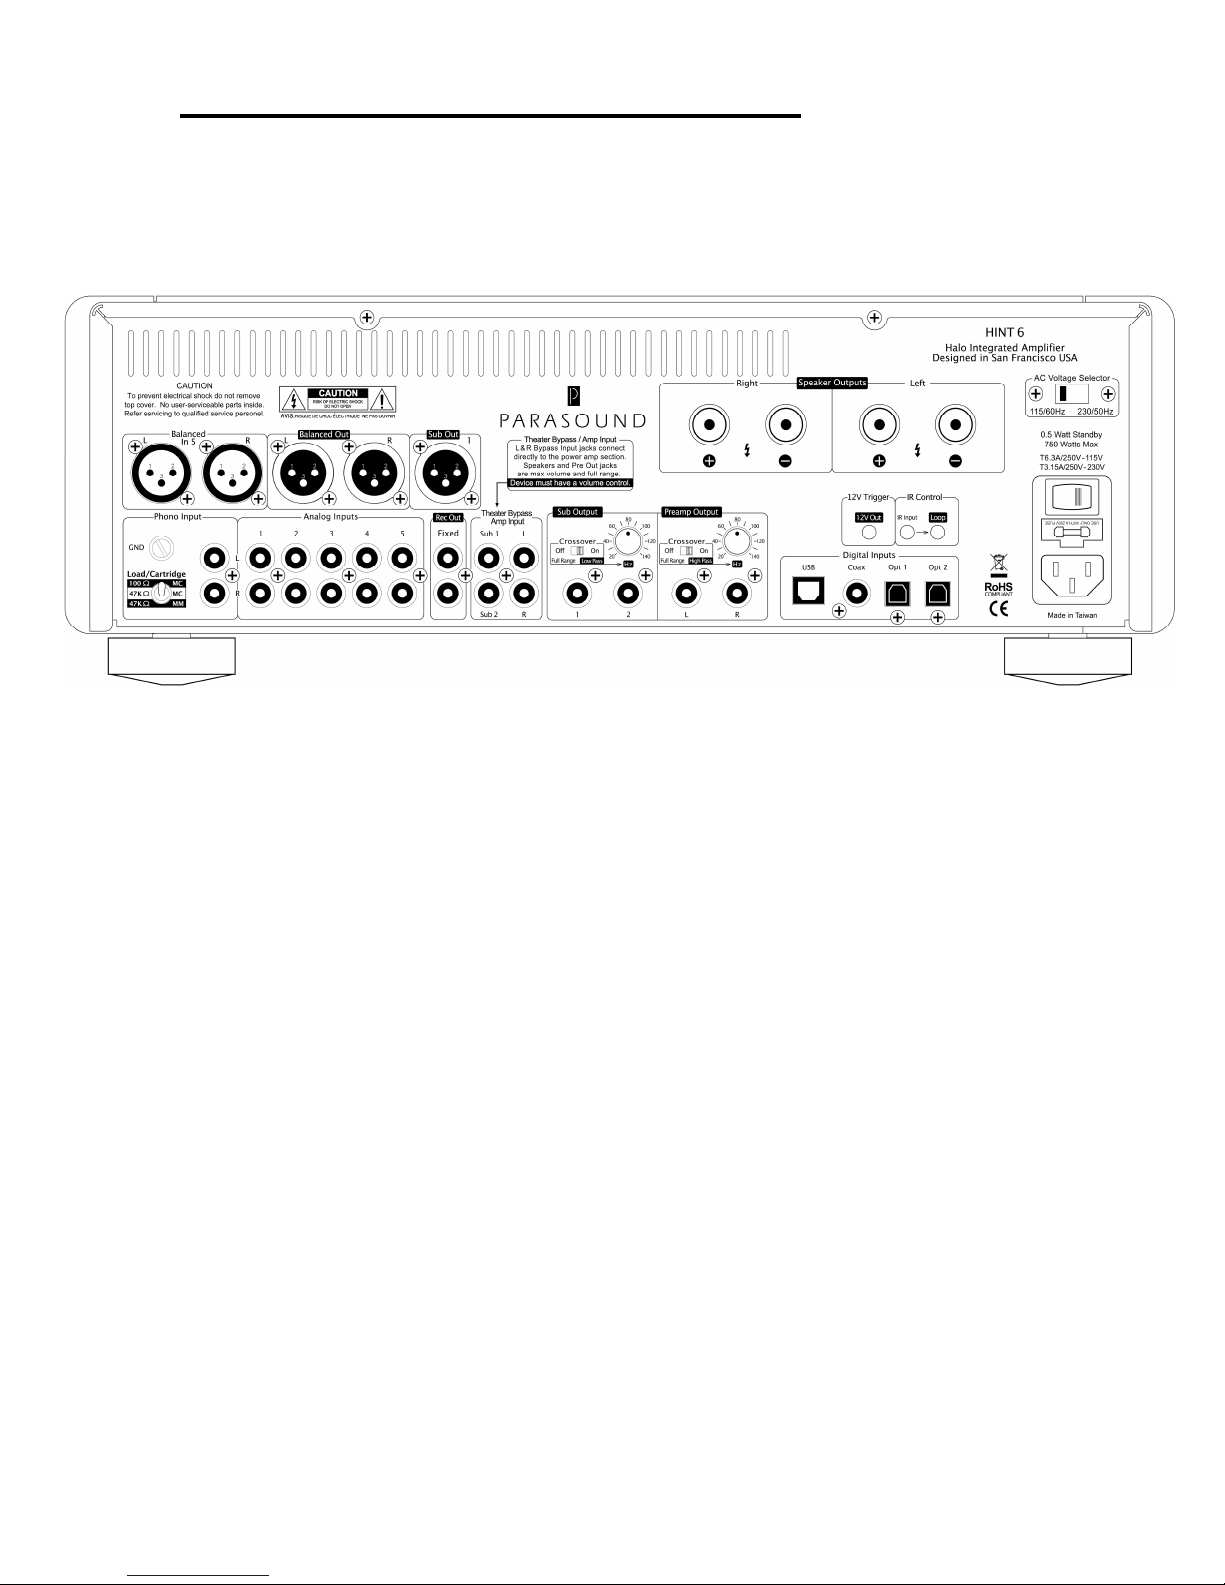
Analog Audio Input Connections
Always unplug your HINT 6's AC Mains power cord before making or changing any input, output or
trigger wire connections. Inserting or removing an input or output cable while the HINT 6 is turned
on can result in a blast of sound that could damage your loudspeakers. Make sure there is no
strain or tension on any cables that could cause them to pull loose.
Phono Input
The HINT 6 is equipped with a high-quality phono stage. If you wish to connect a turntable,
set the Load/Cartridge switch to MM (moving magnet) or MC (100 Ω or 47k Ω moving coil),
depending on your cartridge type. Select MM if you are not sure which type of cartridge you
have. If you use the MC setting with an MM cartridge the volume level will be very high and
distorted.
Note: Only a turntable can be connected to the Phono input.
Phono Load/Cartridge Switch
The Phono input has a three-position Load/Cartridge selector switch. Select the switch
position that matches your turntable cartridge type. We recommend that you contact the
cartridge manufacturer if you are unsure which setting to use. You can also try all three
settings and use the setting which sounds the best in your system and listening room.
.
MM is for moving magnet cartridges. It provides a 47 k ohm load and the appropriate
gain for all MM cartridges. This is the most common cartridge type.
MC 100 Ω is for most moving coil cartridges. It provides the higher gain required for even
very low output MC cartridges and a 100 ohm load that is ideal for most MC cartridges.
MC 47 k Ω provides the appropriate gain for MC cartridges with an alternative 47 k ohm
load. You can try both the 100 Ω and 47 k Ω settings to see which sounds best in your
system. The MC 47 k Ω setting is also the load which Grado™ recommends for their MI
(moving iron) cartridges.
Note: If your turntable won’t reach adequate volume, or if it plays too loud, you have
selected the incorrect cartridge type. Don’t forget to connect the ground wire from your
turntable to the Phono GND (ground) terminal on the HINT 6.
7

Analog Audio Input Connections (Continued)…
RCA Line Level Input Jacks (Inputs 1-5)
Source inputs 1–5 all have the same input sensitivity and input impedance and are compatible
with any typical analog line level source.
Note: Input 5 is shared with the XLR balanced input connectors, therefore the
RCA and XLR jacks for input 5 cannot be connected at the same time.
XLR Balanced Input (Input 5)
Input 5 also uses balanced XLR type jacks. Use this input to connect an analog source which
has balanced XLR outputs. A balanced line provides superior hum and noise cancellation,
especially for long cable runs.
Note: Input 5 is shared with the XLR balanced input, therefore the RCA and
XLR jacks for Input 5 cannot be connected at the same time.
Front Panel Aux Input
For your convenience there is an input jack on the front panel for a portable MP3 player,
tablet, or mobile phone. Connect a cable with 3.5 mm stereo mini plugs between your portable
player, tablet or phone’s headphone jack and the HINT 6’s Aux input jack. The Aux input has
an additional gain stage that boosts the input signal by 12 dB so that the volume level is
comparable with your other audio sources. For the best result set your portable player or
phone’s volume to at least 75% of its maximum level.
Note: If you connect a component other than a portable MP3 player or phone to the Aux
Input jack, the volume level will probably be too high and likely distorted.
8
 Loading...