

Page 1

Parallels Desktop® 14 for
Mac
User's Guide
Page 2

Parallels International GmbH
Vordergasse 59
8200 Schaffhausen
Switzerland
Tel: + 41 52 672 20 30
www.parallels.com
Copyright © 1999-2018 Parallels International GmbH. All rights reserved.
This product is protected by United States and international copyright laws. The product’s underlying technology,
patents, and trademarks are listed at http://www.parallels.com/about/legal/.
Microsoft, Windows, Windows Server, Windows Vista are registered trademarks of Microsoft Corporation.
Apple, Mac, the Mac logo, OS X, macOS, iPad, iPhone, iPod touch are trademarks of Apple Inc., registered in the US
and other countries.
Linux is a registered trademark of Linus Torvalds.
All other marks and names mentioned herein may be trademarks of their respective owners.
Page 3

Contents
Welcome to Parallels Desktop .................................................................................... 9
What You Can Do .......................................................................................................... 9
Set Up Your Mac to Use Windows Applications ........................................................... 10
Other Operating Systems ............................................................................................. 10
Install or Upgrade Parallels Desktop ........................................................................ 11
What You Need ............................................................................................................ 11
Install Parallels Desktop ............................................................................................... 12
Activate and Register Parallels Desktop ....................................................................... 12
Purchase Parallels Desktop ......................................................................................... 14
Upgrade Parallels Desktop ........................................................................................... 14
Install Software Updates ...................................................................................................... 15
Set the Language ......................................................................................................... 16
Install or Import Windows ......................................................................................... 17
Install Windows ............................................................................................................ 17
Import Your Data from a PC ......................................................................................... 19
Overview of Methods for Importing ...................................................................................... 19
Requirements for Importing Your Data ................................................................................ 19
Step 1: Install Parallels Transporter Agent on Your Windows PC ....................................... 19
Step 2: Import Your Data ...................................................................................................... 20
Solving Problems ................................................................................................................. 25
Use Boot Camp with Parallels Desktop ........................................................................ 27
Import from an Earlier Parallels Desktop or Other Virtualization Application ................. 29
Download and Install Windows From Microsoft ............................................................ 29
Use Windows on Your Mac ...................................................................................... 30
Get Started ................................................................................................................... 30
Start Windows ...................................................................................................................... 30
Open a Windows Application ............................................................................................... 31
Install Windows Applications ................................................................................................ 34
Shut Down or Suspend Windows ......................................................................................... 35
Set How Windows Works with macOS ......................................................................... 38
Merge Windows and macOS................................................................................................ 39
Page 4

Contents
Set Windows to Appear in a Single Window ........................................................................ 41
Set Windows to Take Up the Whole Screen ........................................................................ 42
Set an Application to Open When You Insert a CD or DVD ................................................ 46
Share Items Between macOS and Windows ....................................................................... 46
Apply macOS Parental Controls to Windows ....................................................................... 62
Mouse, Trackpad, and Keyboard ................................................................................. 62
Set Your Mouse or Trackpad to Right-Click and Middle-Click ............................................. 63
Control Applications with Trackpad Gestures ...................................................................... 64
Use Keyboard Shortcuts ...................................................................................................... 66
Customize Keyboard Shortcuts ............................................................................................ 66
Create New Keyboard Shortcuts .......................................................................................... 69
See and Change Windows Input Language In macOS ....................................................... 70
Mouse & Keyboard Settings ................................................................................................. 71
Connect External Devices ............................................................................................ 73
Adjust Devices Settings ........................................................................................................ 75
Connect Bluetooth Devices .......................................................................................... 77
Print from Windows ...................................................................................................... 78
Share a Printer Connected to Your Mac .............................................................................. 78
Set Up a Printer Using Bonjour ............................................................................................ 80
Set Up a Network Printer ...................................................................................................... 81
Set Up a USB Printer ........................................................................................................... 84
Create a PDF File ................................................................................................................. 85
Use the Built-in iSight Camera or Another Webcam ..................................................... 85
Show a Presentation on an External Monitor or Projector ............................................ 86
Protect Your Data ......................................................................................................... 87
Isolate Windows from Mac ................................................................................................... 87
Work in Windows Without Saving Changes ......................................................................... 87
Set Password Requirements ................................................................................................ 88
Encrypt Windows to Protect It from Unauthorized Use ........................................................ 88
Connect to the Internet or a Network ............................................................................ 89
Share Network Access Between macOS and Windows ...................................................... 89
Apply Separate Network Settings to Windows ..................................................................... 90
Use Host-Only Network Settings .......................................................................................... 92
Use Wi-Fi with Windows ....................................................................................................... 92
Connect Windows to a VLAN ............................................................................................... 93
Page 5

Contents
Optimize Performance .................................................................................................. 93
Set How Much Memory is Allocated to Windows ................................................................. 93
Optimization Settings ........................................................................................................... 94
Speed Up Games and Graphics Applications ...................................................................... 95
Pause Windows When No Applications Are Open............................................................... 96
Optimize Virtual Machine for Games, Graphics, Productivity, or Development ................... 96
Work with Windows in Travel Mode ..................................................................................... 97
Schedule Windows Maintenance ......................................................................................... 98
Use Windows on Your iPad, iPhone, or Android Device ............................................... 99
Save Time With Parallels Toolbox .............................................................................. 100
Save a Picture of the Screen ...................................................................................... 100
Set the Appearance of Virtual Machine Dock Icons .................................................... 101
Allow Windows Updates While Your Mac is Sleeping ................................................. 101
Translate Words in Windows ...................................................................................... 102
Use the Touch Bar with Windows ............................................................................... 102
Advanced Topics .................................................................................................... 104
Work with Virtual Machines ........................................................................................ 104
Supported Guest Operating Systems ................................................................................ 104
About Virtual Machines ...................................................................................................... 106
Arrange Virtual Machines ................................................................................................... 107
Make Virtual Machines Distinctive ..................................................................................... 107
Change the Virtual Machine Icon ....................................................................................... 108
Change the Virtual Machine Name .................................................................................... 108
Clone a Virtual Machine ..................................................................................................... 109
Back Up a Virtual Machine ................................................................................................. 109
Browse Virtual Hard Disks in macOS ................................................................................. 111
Create and Use Virtual Machine Templates ...................................................................... 112
Save Snapshots of a Virtual Machine ................................................................................ 114
Change Virtual Machine Configuration at Runtime ............................................................ 116
Use Mouse Wheel Horizontal Scrolling .............................................................................. 118
Remove a Virtual Machine ................................................................................................. 118
Download Pre-configured Virtual Appliances ..................................................................... 118
Set the Guest OS Type and Version .................................................................................. 119
Set How Many Processors are Allocated to a Virtual Machine .......................................... 120
Check Your Virtual Machine CPU and Memory Usage ..................................................... 120
Page 6

Contents
Enable Spoken Commands................................................................................................ 121
Get Acronis True Image ..................................................................................................... 121
Use AppleScript with the Guest OS ................................................................................... 122
Quickly Free Up Disk Space .............................................................................................. 122
Archive and Unarchive Virtual Machines ........................................................................... 123
Use Other Operating Systems on Your Mac ............................................................... 123
Use Linux in Coherence Mode ........................................................................................... 123
Customize the Keyboard for the Guest OS ........................................................................ 124
Use macOS as a Guest OS ............................................................................................... 126
Install or Update Parallels Tools ................................................................................. 128
Parallels Tools Overview .................................................................................................... 128
Parallels Tools for Windows ............................................................................................... 130
Parallels Tools for Linux ..................................................................................................... 131
Parallels Tools for Mac ....................................................................................................... 135
For Software Developers ............................................................................................ 136
Optimize Remote Debugging ............................................................................................. 136
Generate a Core Dump ...................................................................................................... 137
Start a Debugging Session ................................................................................................. 138
Integration With Chef/Ohai ................................................................................................. 138
Integration With Docker ...................................................................................................... 139
Use Virtual Machine Names as DNS Names ..................................................................... 139
Resolve Guest OS DNS Requests Using etc/hosts ........................................................... 139
Quickly Change the Screen Resolution ............................................................................. 140
Other Actions ...................................................................................................................... 140
Set File Type Associations ......................................................................................... 140
Picture in Picture Mode .............................................................................................. 141
Hide and Show Parallels Desktop .............................................................................. 143
Remove Parallels Desktop ......................................................................................... 144
Advanced Preferences ............................................................................................... 144
Shared Networking Settings ....................................................................................... 146
Host-Only Networking Settings ................................................................................... 148
Create a Custom Host-Only Network ......................................................................... 149
Parallels Desktop Preferences and Virtual Machine Settings ................................. 151
Parallels Desktop Preferences ................................................................................... 152
General Preferences .......................................................................................................... 152
Page 7

Contents
Shortcuts Preferences ........................................................................................................ 154
Devices Preferences .......................................................................................................... 159
Security Preferences .......................................................................................................... 161
Network Preferences .......................................................................................................... 162
Advanced Preferences ....................................................................................................... 166
Parallels Toolbox ................................................................................................................ 167
Parallels Access ................................................................................................................. 168
Virtual Machine Settings ............................................................................................. 169
General Settings ................................................................................................................. 169
Options ............................................................................................................................... 170
Hardware Settings .............................................................................................................. 191
Security Settings ................................................................................................................ 209
Backup Settings ................................................................................................................. 211
Adding and Removing Devices .................................................................................. 212
Support for Virtual and Real Disks ..................................................................................... 214
Initialize a Newly Added Disk ............................................................................................. 216
Page 8

Contents
Tips and Troubleshooting ....................................................................................... 219
Install Parallels Tools for Seamless Operation Between Windows and macOS .......... 219
Find Settings .............................................................................................................. 220
Restore Virtual Machine Default Settings ................................................................... 220
Memory Usage Problems ........................................................................................... 221
Windows Seems Slow ................................................................................................ 221
Pressing Ctrl+Alt+Del ................................................................................................. 222
My Password Isn't Working ........................................................................................ 222
Boot Windows Securely ............................................................................................. 223
My Virtual Machine Doesn't Boot ................................................................................ 223
I'm Having Problems Connecting to the Internet ......................................................... 223
I'm Having Problems with Antivirus Software .............................................................. 224
The F8 Key Isn't Working Correctly ............................................................................ 224
A Password is Required to Open the Virtual Machine Configuration .......................... 224
Windows or Windows Applications Ask for Reactivation ............................................. 224
Manage Virtual Machines via Command Line Interface .............................................. 225
Change Password in Windows via Command Line Interface ...................................... 226
Checking the Build Number ........................................................................................ 226
Send Technical Data to Parallels ............................................................................... 226
More Resources ..................................................................................................... 228
Visit the Parallels Desktop Twitter and Facebook Pages ............................................ 228
Glossary ................................................................................................................. 229
Index ....................................................................................................................... 233
Page 9

You no longer have to choose between the Mac and the PC. Parallels Desktop lets you use
Windows side-by-side with macOS on your Mac.
Use this guide to quickly set up and start using Parallels Desktop 14 for Mac.
In This Chapter
What You Can Do ................................................................................................. 9
Set Up Your Mac to Use Windows Applications .................................................... 10
Other Operating Systems ...................................................................................... 10
What You Can Do
With Parallels Desktop, you can:
C HAPTER 1
Welcome to Parallels Desktop
Page 10

10
Welcome to Parallels Desktop
• Open Windows applications side-by-side with your macOS applications, without having to
restart
• Copy and paste text and drag and drop files between Mac and Windows applications
• Run Windows games and other 3D applications
• Transfer all your data from a PC and use it on your Mac
• Easily share files, devices, and other resources between Windows and the Mac
• Install different operating systems, such as Windows, Linux, macOS, free virtual appliances
and use them together
• And much more
Set Up Your Mac to Use Windows Applications
After just a few steps, you can begin using Windows applications on your Mac. Setting up your
Mac to run Windows applications involves the following steps:
Step 1: Install Parallels Desktop on your Mac (p. 11).
Step 2: Install Windows in a virtual machine (p. 17).
Step 3: Install your Windows applications in Windows (p. 34).
You only need to follow these steps once. Then you can open and use your Windows
applications on your Mac anytime you like, just as you do with your Mac applications.
Other Operating Systems
Important: This guide is focused on using Parallels Desktop with Windows.
Using Parallels Desktop for Mac you can run several other kinds of operating systems (p. 104)
on your Mac, such as several flavors of Linux and Unix, macOS Server, Windows 10 and earlier
versions of Windows, and more.
Finding Information On Running Other Operating Systems
You can find much more information and details on using Parallels Desktop to run other
operating systems on your Mac by checking the resources listed in More Resources (p. 228).
Additionally, though not explicitly stated, many of the instructions presented in this guide also
apply to supported operating systems other than Windows. And some important instructions
relating to other operating systems are in the Advanced Topics (p. 104) section.
Page 11

Follow the instructions in this chapter to install or upgrade Parallels Desktop.
Note: You can either purchase a boxed version of Parallels Desktop or purchase and download it from
the Parallels website.
In This Chapter
What You Need ..................................................................................................... 11
Install Parallels Desktop ......................................................................................... 12
Activate and Register Parallels Desktop ................................................................ 12
Purchase Parallels Desktop ................................................................................... 14
Upgrade Parallels Desktop .................................................................................... 14
Set the Language .................................................................................................. 16
What You Need
To install and set up Parallels Desktop 14 for Mac, you need:
• A Mac computer with:
• A Mac computer with an Intel Core 2 Duo, Core i3, Core i5, Core i7, Intel Core M or Xeon
processor.
• At least 4GB of RAM (8GB recommended)
• At least 850 MB of space available on the boot volume (the volume that has macOS) for
Parallels Desktop installation
• Enough free disk space for each virtual machine and its applications (at least 15 GB for
each installation of Windows)
• macOS High Sierra 10.13 (when available), macOS Sierra 10.12 or later, OS X El
Capitan 10.11.5 or later.
To identify your computer's processor, memory, and macOS version, choose Apple menu
> About This Mac.
• Internet connection required for product activation, select features, and online updates
• One of the following:
• Windows installation media.
Note: If you don't have Windows, Parallels Desktop can help you download and install Windows 10.
C HAPTER 2
Install or Upgrade Parallels Desktop
Page 12

12
Install or Upgrade Parallels Desktop
• An Internet connection to download and install freely available operating systems such as
Ubuntu, Fedora or other Linux systems supported by Parallels Desktop.
• A macOS recovery partition that can be used to create a virtual machine with the guest
version of macOS.
• A Windows computer to transfer to a virtual machine and use it on your Mac alongside
macOS.
• The Boot Camp partition with Windows to create a Boot Camp-based virtual machine.
For a list of operating systems that Parallels Desktop supports for use with your Mac, see
Supported Guest Operating Systems (p. 104) or go to
http://www.parallels.com/products/desktop/system-requirements/.
Install Parallels Desktop
You can be up and running with Parallels Desktop in a few easy steps:
1 Make sure you have the latest version of macOS.
2 Do one of the following:
• If you downloaded Parallels Desktop from the Parallels website, double-click the disk
image file, most likely in your Downloads folder.
• If you purchased a boxed copy of Parallels Desktop with a USB thumb drive, connect the
drive to your Mac, open it and double-click the disk image file.
• If you purchased a boxed copy with a link to the installation file, open the link in your web
browser, download Parallels Desktop and double-click the disk image file.
• If you purchased a boxed copy with an installation disc, insert the disc.
Note: If your Mac doesn't have a DVD-ROM, you can use the download link, available in the retail
box, to download Parallels Desktop over the Internet.
3 Double-click the Install icon and follow the onscreen instructions to install Parallels Desktop.
Activate and Register Parallels Desktop
After the installation, activate and register Parallels Desktop. Do the following:
Page 13
13
Install or Upgrade Parallels Desktop
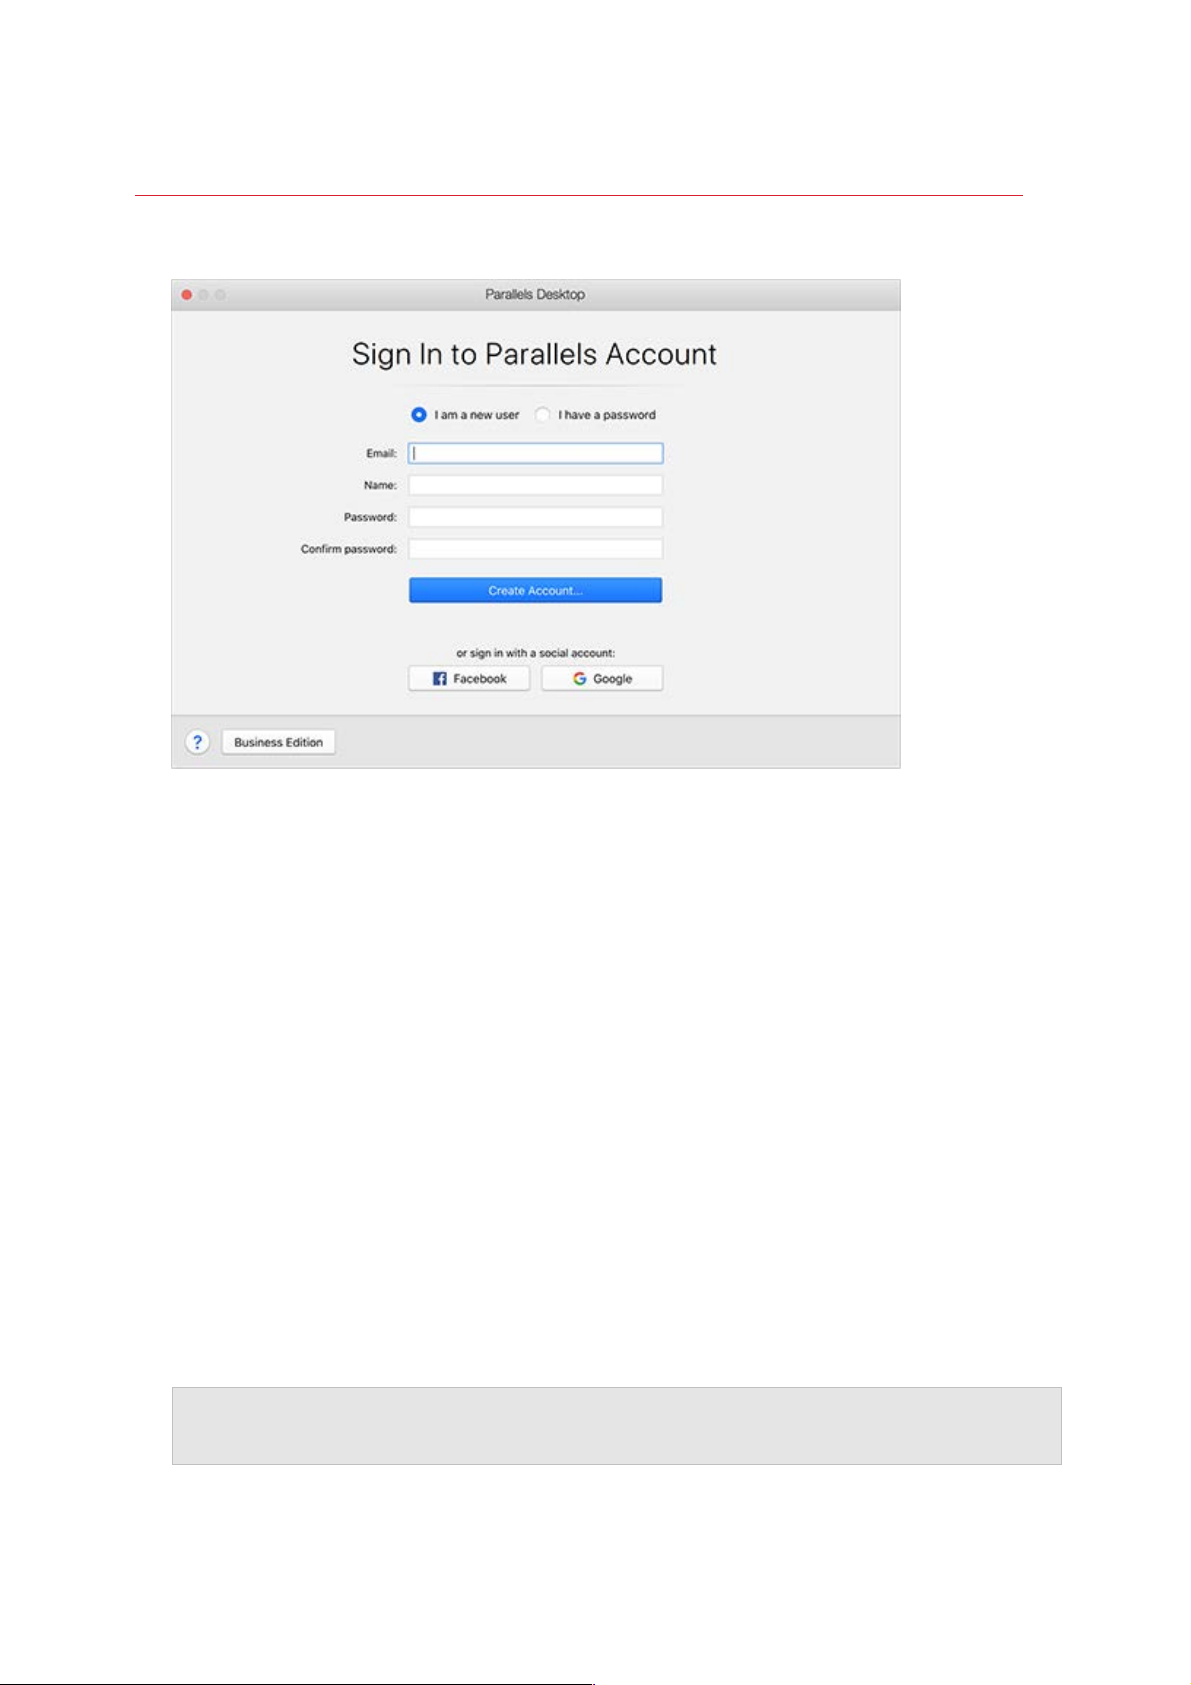
1 Sign in to your Parallels account:
Parallels account allows you to:
• store your product activation keys - you will never forget or lose them;
• prevent anyone but you from using your license keys;
• manage your subscriptions to Parallels products;
• contact the Parallels Support and track your support requests;
• download the latest versions of Parallels products and accompanying documentation;
• get info about the latest updates to your products and beta versions of new products;
• work with remote computers via a web browser (as a Parallels Desktop user, you will get
Parallels Access for free);
• manage Parallels Desktop licenses on the Macs belonging to your company (if you use
Parallels Desktop for Mac Business Edition).
To sign in, do one of the following:
• If you have an account, select I have a password, enter your email and password and
click Sign In.
• If you don't have a Parallels account, select I am a new user, enter an email address that
will be used to create the account, your name, password and click Create Account.
2 In the next step, enter your Product Activation Key to activate Parallels Desktop.
Note: If you purchased Parallels Desktop from the Parallels Online Store, a key was sent to the
email address you provided. If you bought a boxed copy, you can find your key printed on the
installation disc sleeve.
Page 14

14
Install or Upgrade Parallels Desktop
If you already have a license available and associated with your account, just select the
license and click Activate.
If You Don't Have A Product Activation Key
If you don't have a key already, you can get a free trial Product Activation Key so you can try out
Parallels Desktop for a limited time, click Try Free for 14 days. Or to purchase a key that lets you
use Parallels Desktop permanently, click Buy.
Purchase Parallels Desktop
If you're using a trial version of Parallels Desktop 14, you can easily purchase the full version
right from the application interface. To do so:
1 Click Buy in the About Parallels Desktop window or when you see the promo.
2 Choose one of the following:
• Upgrade: Select this option to upgrade your current version of Parallels Desktop. Please
keep in mind that you will need the activation key for your previous version. If the
Upgrade option is selected by default, Parallels Desktop has already automatically
detected the key for the previous version. If not, please make sure you have it.
Note: Only Parallels Desktop 12 and 13 can be upgraded to Parallels Desktop 14.
• Buy Full Version: Select this option to purchase Parallels Desktop if you have never used
it before or your version cannot be upgraded.
3 Follow the onscreen instructions.You may need to scroll down to see all the information.
Upgrade Parallels Desktop
If you already have Parallels Desktop 12 or 13 follow these steps to upgrade to Parallels
Desktop 14.
1 If you haven't already done so, purchase and download a "Parallels Desktop 14 for Mac
Upgrade," available from the Parallels Online Store at www.parallels.com/buyonline.
A Product Activation Key is sent to the email address you provide.
2 If Parallels Desktop is open, quit Parallels Desktop.
3 Follow the instructions to install Parallels Desktop 14. See Install Parallels Desktop.
During installation, the previous version of Parallels Desktop is automatically removed from
your computer.
4 Open Parallels Desktop and enter your upgrade Product Activation Key.
Page 15
15
Install or Upgrade Parallels Desktop
If you were using a trial version of Parallels Desktop or you purchased a previous version but
haven't installed it on your computer, you will also be prompted to enter a full or upgrade key
for that version.
Note: To upgrade from Parallels Desktop 2, 3, 4, 5, 6, 7, 8, 9, 10 or 11 you must purchase Parallels
Desktop 14 at full retail price.
Troubleshooting
If you have any problems upgrading Parallels Desktop, you can find troubleshooting information
at http://www.parallels.com/products/desktop/support/.
Install Software Updates
Periodically, Parallels provides free software updates to improve Parallels Desktop.
By default, Parallels Desktop is configured to automatically check for and download available
software updates once a week. When an update is available, Parallels Desktop prompts you to
install it. Simply follow the onscreen instructions.
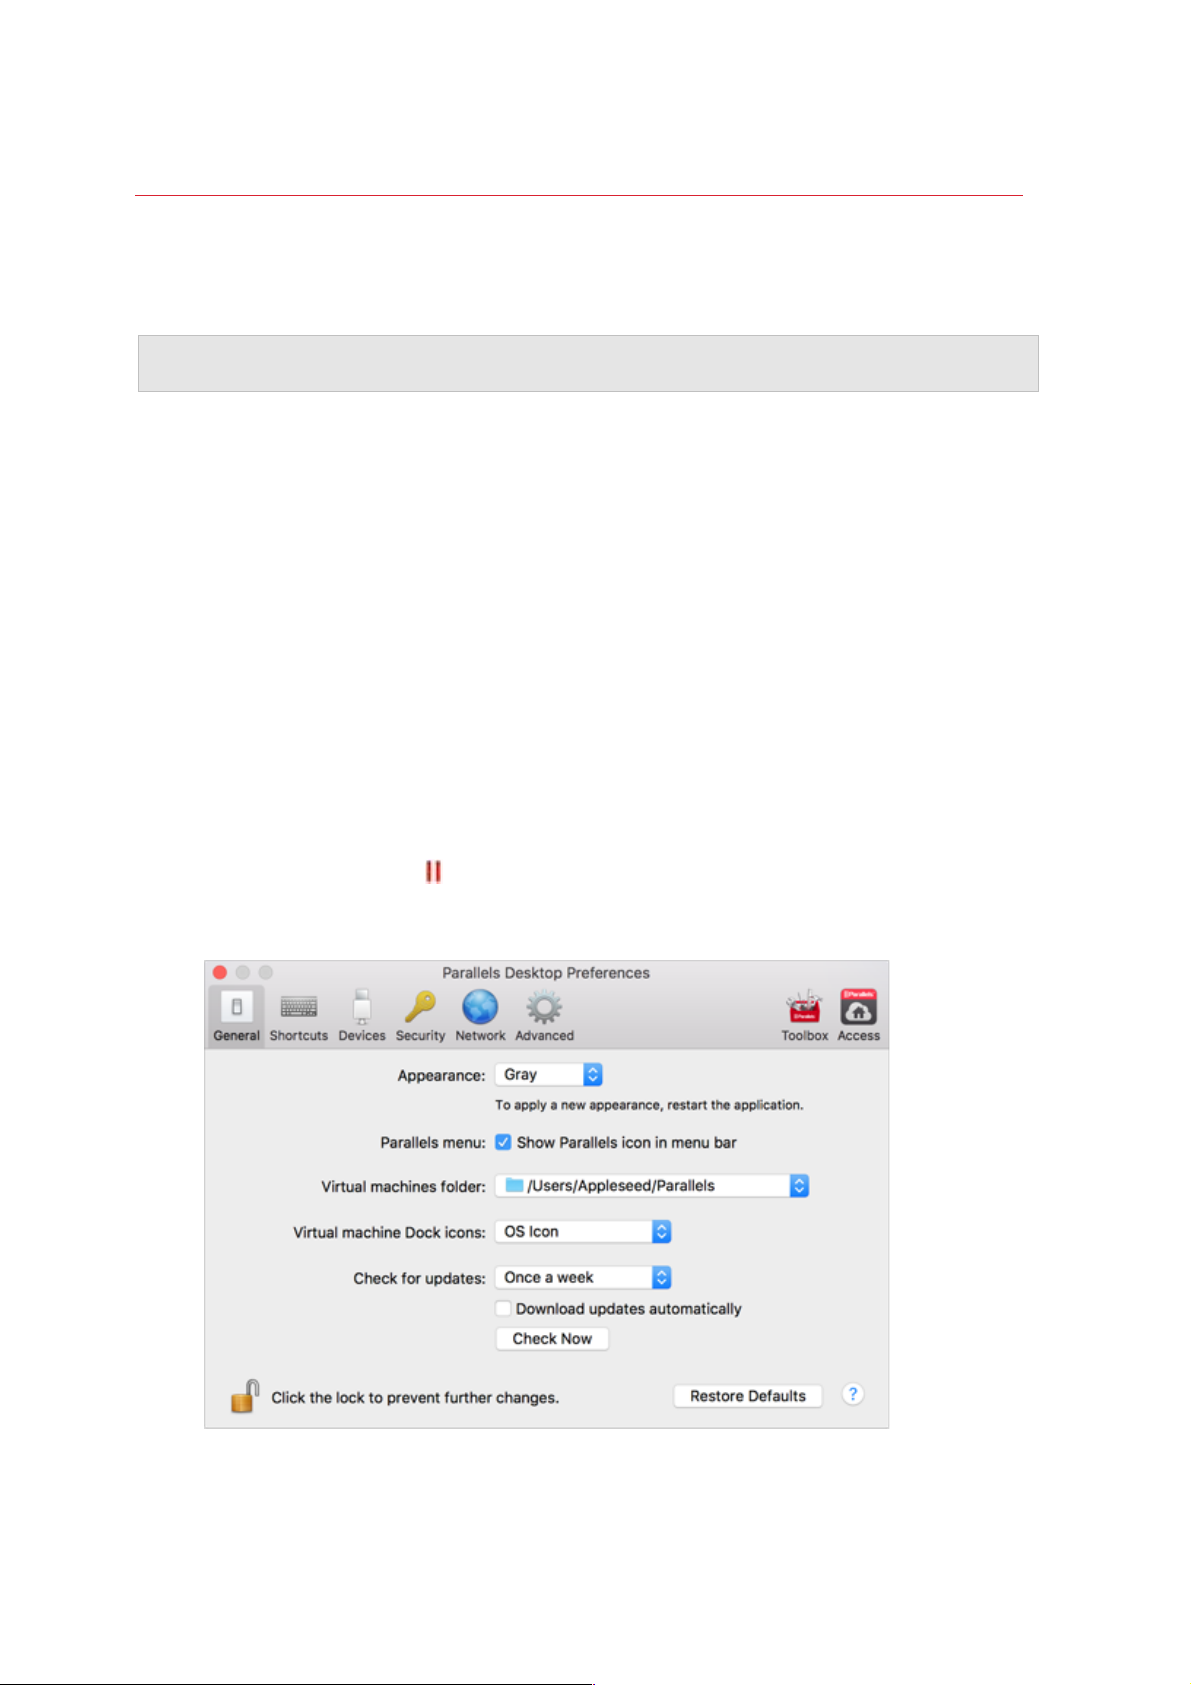
Adjust Software Update Settings
1 Do one of the following:
• Click the Parallels icon
in the menu bar and choose Preferences. Then click General.
• Right-click the Parallels Desktop icon in the Dock and choose Preferences. Then click
General.
•
2 Do one of the following:
16
Page 16

Install or Upgrade Parallels Desktop
• To adjust the frequency that Parallels checks for software updates, choose Never, Once
a Day, Once a Week, or Once a Month from the Check for Updates menu.
• To choose whether you want Parallels Desktop to download updates automatically, select
or deselect Download updates automatically.
If you choose not to download updates automatically, Parallels Desktop notifies you when
an update is available and asks whether you want to download it.
Check for an Update Manually
• Follow the instructions in step 1 above and then click Check Now. You can also choose
Check for Updates from the Parallels Desktop application menu.
Note: To check for updates and download them, your Mac must be connected to the Internet.
Set the Language
You can set which language the Parallels Desktop interface uses by doing the following:
1 Quit Parallels Desktop.
2 Choose Apple menu > System Preferences > Language & Region.
3 Drag the language you want to the top of the list. If you don't see the language you want to
use in the list, click the Add button
.
4 Open Parallels Desktop.
If the primary language you chose is supported by Parallels Desktop, the menus and
interface text appear in that language. If the primary language you selected isn't supported,
menus appear in the first language listed that Parallels Desktop supports.
Page 17

There are a few ways to get Windows up and running on your Mac:
• Install Windows (p. 17)
• Import your data from a Windows PC (p. 19)
• Use Windows that you already have installed from a Boot Camp partition (p. 27)
• Import Windows from a previous version of Parallels Desktop or other virtualization software
(p. 29)
In This Chapter
Install Windows ...................................................................................................... 17
Import Your Data from a PC ................................................................................... 19
Use Boot Camp with Parallels Desktop .................................................................. 27
Import from an Earlier Parallels Desktop or Other Virtualization Application ........... 29
Download and Install Windows From Microsoft ...................................................... 29
Install Windows
If you have a Windows installation source (a DVD disc, an image file, or a USB storage) and a
valid Windows product key, you can install Windows on your Mac and use it with Parallels
Desktop.
To install Windows:
1 Open Parallels Desktop (in the Applications folder) and choose File > New.
2 If you have a Windows installation disc, insert it into the DVD drive. If you have a USB
storage with Windows, connect the storage to the Mac.
3 Click Install Windows or another OS from a DVD or image file.
4 Parallels Desktop scans for and lists installable operating systems. If you see the version of
Windows you want to install, select it, click Continue and go to step 6.
5 If the Windows installation source didn't show up automatically in Step 4, click Choose
Manually to browse for it manually. You can browse from the following sources:
• DVD: If you have a Windows DVD, insert it into the DVD drive. Once Windows is
detected, click Continue. If your Mac doesn't have a DVD drive, you can use an Apple
SuperDrive, another Mac's DVD drive via Remote Disc, or make an image from the disc.
C HAPTER 3
Install or Import Windows
Page 18
18
Install or Import Windows
• Image File: If you have a Windows image file, click Image File and drag the image to the
Parallels Wizard window. Once Windows is detected, click Continue.
• USB Drive: If you have a bootable USB installer with Windows, click USB Drive and
connect the drive to the Mac. Once Windows is detected, click Continue.
Note: Parallels Desktop may fail to detect some operating systems (for example, the latest Linux
distributions). If this happens but you're sure that the operating system can be installed, click
Continue, specify the OS type manually (if it's not listed, choose Other), and follow the onscreen
instructions.
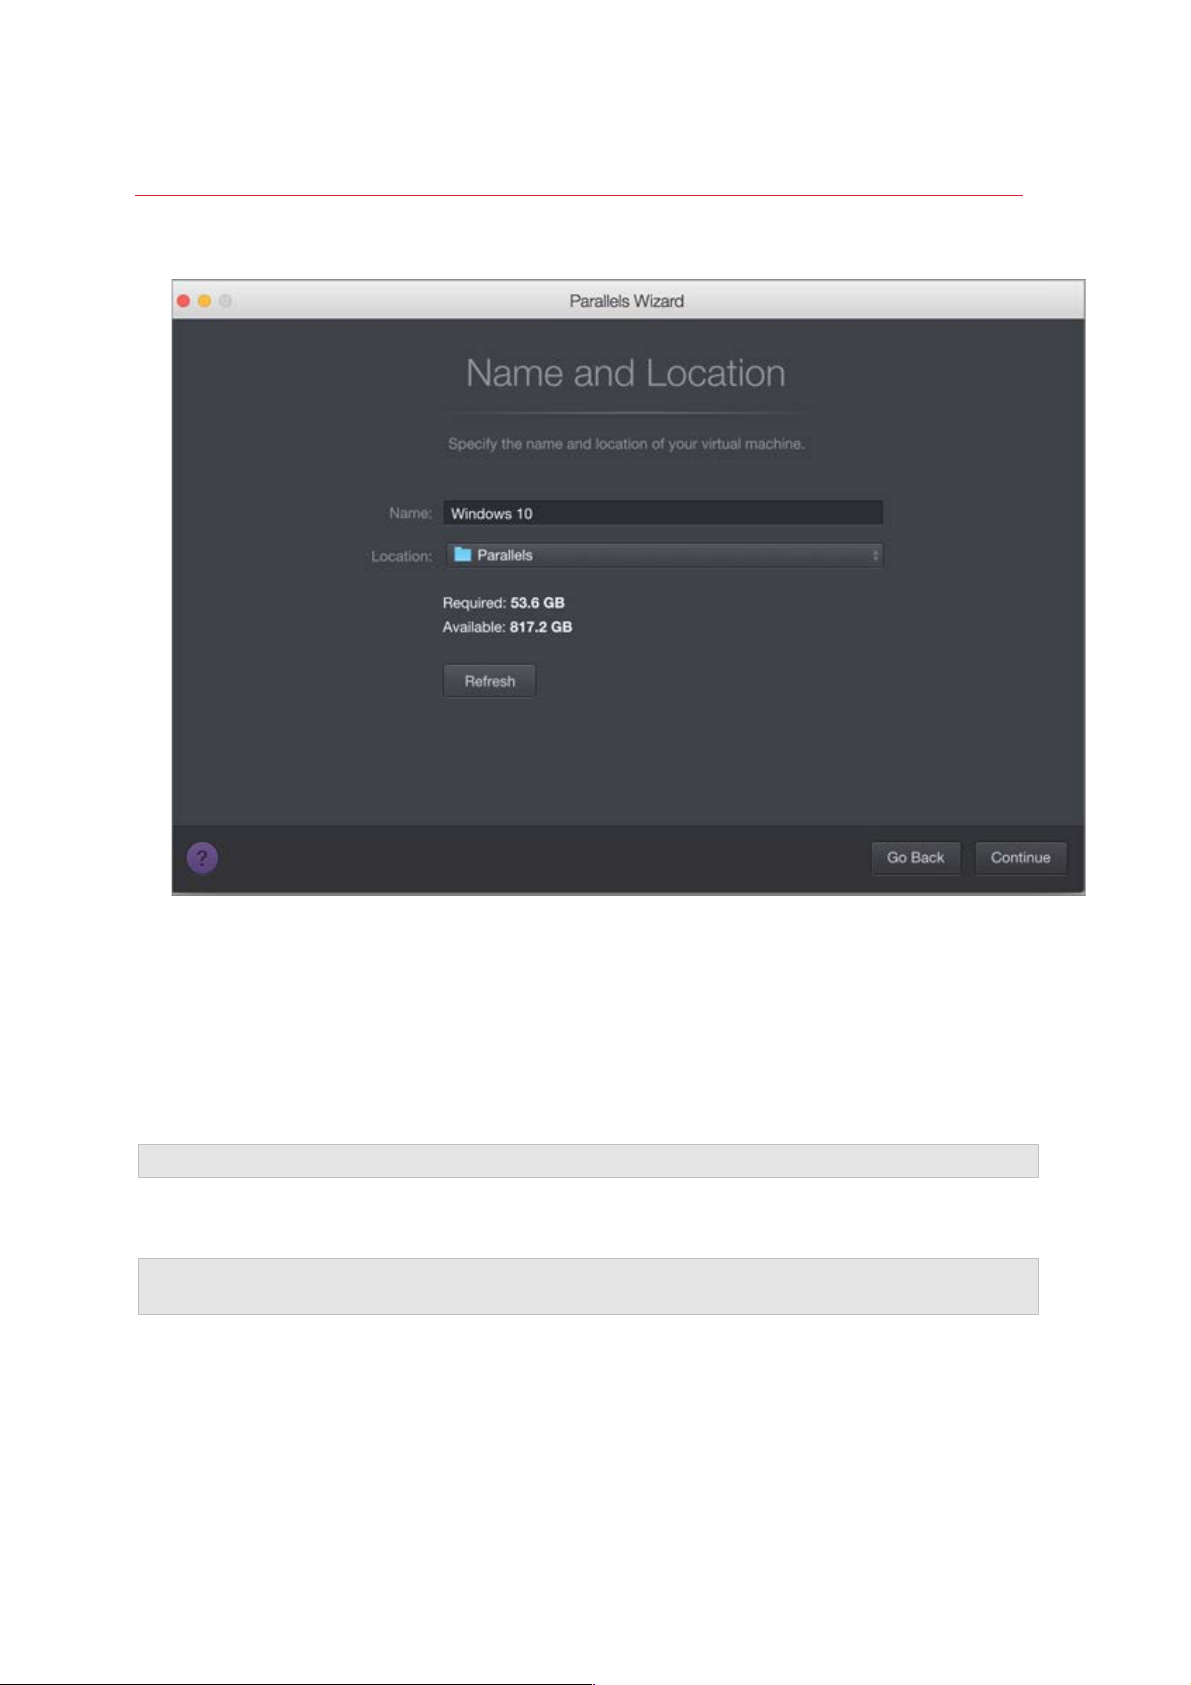
6 Choose what for you're going to primarily use Windows. Its settings will be tuned to best fit
your needs.
7 Choose where you want to store Windows from the Location menu.
By default, Parallels Desktop stores Windows in the /Users/<username>/Parallels
folder.
8 If you want to pre-set things like how much memory Windows uses or whether it starts
automatically when you open Parallels Desktop, select Customize settings before
installation. You can also adjust these settings after the operating system is installed.
9 Click Continue.
The assistant installs Windows.
Once Windows is installed, you can start it up by opening a Windows application (p. 31) or by
clicking the power button in Control Center.
Important: The first time you start Windows, Parallels Tools are installed to allow seamless operation
between Windows and macOS. Once Parallels Tools are installed, you're prompted to restart
Windows.
When you install Windows, Parallels Desktop creates an administrator account with a blank
password. Once the installation is complete, it is recommended that you change this password.
Note: You can also install Windows from a disk image file (p. 214) of an installation disc. Simply
choose the disk image file in step 4 above. Parallels Desktop supports ISO, DMG, CUE, and CCD disk
images.
Page 19

19
Install or Import Windows
Import Your Data from a PC
You can import all your data from a Windows PC to Parallels Desktop on your Mac. Then you
can continue to work with all your Windows applications, files, and data, side-by-side with
macOS.
Overview of Methods for Importing
You can import your data using one of the following:
• Network (p. 20): If both the Windows PC and your Mac are connected to a network, you can
import your data over the network.
• External storage device (p. 23): You can transfer the data from a Windows PC to an external
storage device, such as an external hard drive. Then, you can connect the device to your
Mac and import your data into Parallels Desktop.
Requirements for Importing Your Data
To import your data to your Mac, you need a Windows computer with:
• Windows 10, Windows 8.1, Windows 8, Windows 7, Windows Vista, or Windows XP with
Service Pack 2 or later.
Note: You can also use a computer running Windows Server 2008 R2 (64-bit only), Windows Server
2008, or Windows 2000 Professional (32-bit only).
• An Intel or AMD (700 MHz or higher) x86 or x64 processor
• At least 256 MB of RAM
• At least 70 MB of hard disk space for installing Parallels Transporter Agent
• One of the following:
• An Ethernet port for transferring your data over network
• An external storage device, such as a USB hard disk
Note: Parallels Desktop does not support migrating Windows dynamic volumes. These are volumes
which size is not fixed as in basic volumes. They are migrated as data disks only. You can later add
them (p. 212) to an already existing virtual machine.
Step 1: Install Parallels Transporter Agent on Your Windows PC
To import your data you must first install the Parallels Transporter Agent software on the
Windows PC.
To install Parallels Transporter Agent:
Page 20

20
Install or Import Windows
1 Do one of the following:
• If you purchased a physical copy of Parallels Desktop, insert the Parallels Desktop
installation DVD into your Windows PC. If the installation doesn't start automatically,
locate and double-click the Parallels Transporter Agent.exe file on the disc.
• Download Parallels Transporter Agent for Windows from the Parallels website at
http://www.parallels.com/download/desktop/ and double-click the installation file.
If your computer is connected to the Internet, Parallels Transporter Agent checks for
available updates. If an update is available, click Download and Install New Version.
2 Follow the onscreen instructions to install Parallels Transporter Agent.
Step 2: Import Your Data
Follow one of the methods below to import your data from your PC to your Mac.
Over a Network
Important: After importing your data, you may need to reactivate some of your Windows applications
using the activation keys you received when you purchased the applications.
To import your data from a PC over a network:
1 Turn on your Mac and your Windows PC and log in.
2 Make sure that Windows Firewall (p. 26) is turned off. You can turn it on again after the
import is finished.
Page 21

21
Install or Import Windows
3 On the Windows PC, open Parallels Transporter Agent by clicking the Start menu and
choosing All Applications > Parallels > Parallels Transporter Agent.
In Parallels Transporter Agent, select Network and click Continue.
4 On your Mac, open Parallels Desktop and choose File > New.
5 Select Transfer Windows from a PC and click Continue.
6 Select Network and click Continue.
7 Find the passcode displayed in Parallels Wizard on your Mac and enter it in Parallels
Transporter Agent on your Windows PC.
Page 22

22
Install or Import Windows
If the remote PC and Mac are not connected to the same network, you can transfer the
remote PC using its name or IP address. To do so, click Connect using IP address, select
the Windows PC name from the list or type the IP address, and click Continue.
8 If you have chosen to use the computer name or IP address, provide the Windows
administrator credentials. Parallels Desktop connects to Parallels Transporter Agent and
starts collecting information about the source computer.
9 If you want to log in to Windows automatically whenever you start up Windows, select
Enable Automatic Logon. When ready, click Continue.
10 Choose what you want to transfer;
• System only: this option allows you to transfer the operating system and applications
only.
• System and documents: this option allows you to transfer the operating system,
applications, and user's files like pictures, documents, downloads, music, videos, etc.
11 If you choose System only in step 10, you will have to use Apple Migration Assistant to
transfer the user's files.
Page 23
23
Install or Import Windows
12 Choose where you want to install your data.
When ready, click Continue.
13 In the next step there's a warning about Windows activation that might be required when you
start using it. To proceed, read this message, select I want to continue and click Continue.
14 Once the transfer is complete, click Done.
15 Start Windows (p. 30).
16 When Windows boots up, choose Actions > Install Parallels Tools and follow the onscreen
instructions.
Note: To be able to install Parallels Tools, you must be logged in to Windows as an administrator.
Using an External Storage Device
Important: After importing your data, you may need to reactivate some of your Windows applications
using the activation keys you received when you purchased the applications.
To import your data from a PC using an external storage device:
1 Connect an external storage device to your Windows PC.
Page 24

24
Install or Import Windows
2 On the Windows PC, open Parallels Transporter Agent by clicking the Start menu and
choosing All Applications > Parallels > Parallels Transporter Agent.
3 Select External storage and click Continue. Parallels Transporter Agent collects information
about the Windows PC.
4 If you want to log in to Windows automatically whenever you start up Windows, select
Enable Automatic Logon and specify the Administrator's password. When ready, click
Continue.
5 Choose what you want to transfer;
• System only: this option allows you to transfer the operating system and applications
only.
• System and documents: this option allows you to transfer the operating system,
applications, and user's files like pictures, documents, downloads, music, videos, etc.
6 If you choose System only in step 5, you will have to use Apple Migration Assistant to
transfer the user's files.
7 Choose where you want to store your data. You can also click Customize and select which
Windows volumes to migrate.
When ready, click Continue.
8 In the next step there's a warning about Windows activation that might be required when you
start using it. To proceed, read this message, select I want to continue and click Continue.
Page 25

25
Install or Import Windows
9 Once the migration is complete, click Done to quit Parallels Transporter Agent.
10 Disconnect the storage device from the Windows PC and connect it to your Mac.
11 On your Mac, open Parallels Desktop and choose File > New.
12 Select Transfer Windows from a PC and click Continue.
13 Select External storage and click Continue.
14 Parallels Desktop scans the connected storages for the newly created virtual machine. If
Parallels Desktop cannot find it, select the virtual machine manually. Then click Continue.
15 Choose where you want to install Windows and your data, and then click Continue.
16 Once the transfer is complete, click Done.
17 Start Windows (p. 30).
18 When Windows boots up, choose Actions > Install Parallels Tools and follow the onscreen
instructions.
Note: To be able to install Parallels Tools, you must be logged in to Windows as an administrator.
Solving Problems
Read this section if you have problems importing your data from a Windows PC.
General Tips
This section provides solutions to some errors that may occur during the import process.
Parallels Transporter Agent Doesn't Work Correctly
If you experience any problems while importing, make sure that the snapman.sys driver is
installed in C:\WINDOWS\system32\drivers\.
If the snapman.sys driver is not installed, follow these steps:
1 Uninstall Parallels Transporter Agent.
2 Restart your Windows PC.
3 Reinstall Parallels Transporter Agent.
4 Restart your Windows PC again.
5 Try to import Windows and your data again.
Import is Interrupted by an Error
If the import process is interrupted by an error, do the following:
1 From the Start menu, choose My Computer.
Page 26

26
Install or Import Windows
2 In the Hard Disk Drives pane, right-click the volume you want to import, and choose
Properties.
3 In the Properties pane, click the Tools tab, and in the Error Checking section, click the Check
Now button.
4 In the Check Disk window, select Automatically fix file system errors and Scan for and
attempt recovery of bad sectors, and then click Start.
5 Wait till the disk is scanned and errors are fixed.
Dynamic Volumes are not Imported
Only basic volumes can be imported. You can't import dynamic volumes using Parallels
Desktop.
The only way to import the data stored on a dynamic disk is to copy the data to a basic disk on
your Mac and then import the basic disk.
If Your Mac Fails to Connect with Parallels Transporter Agent
Firewall applications may block connections between your Mac and Parallels Transporter Agent
on the Windows PC.
Firewall problems in macOS
If your Mac fails to connect with Parallels Transporter Agent on your Windows PC, the reason
may be that the built-in Mac firewall blocks the connection to Parallels Transporter Agent.
To enable connections between your Mac and Parallels Transporter Agent and prevent further
blocking, you can configure the firewall settings in macOS by doing the following:
1 From the Apple menu, choose System Preferences, and then click Security.
2 Click the Firewall tab.
3 Configure the necessary settings.
If you try to search for Parallels Transporter Agent by typing the Windows PC IP address
manually, you may receive a message saying that Parallels Transporter Agent is blocked. Click
the Unblock button.
Firewall problems in Windows
Microsoft Windows operating system has a built-in firewall that blocks connections to and from
other computers. When starting Parallels Transporter Agent for the fist time, you may see a
message saying that Windows Firewall has blocked some features of the application.
To enable the connection between your Mac and Parallels Transporter Agent, click Unblock.
Page 27

27
Install or Import Windows
To prevent this problem from happening again, add Parallels Desktop and/or Parallels
Transporter Agent to the firewall exceptions (the list of applications allowed to communicate
through the firewall):
1 From the Start menu, choose Control Panel > Network Connections.
2 In the Network Tasks pane, click Change Windows Firewall Settings.
3 Add Parallels Desktop and/or Transporter Agent to the firewall exceptions list.
If Parallels Doesn't Detect Windows Correctly
If Parallels Desktop detects the source operating system (Microsoft Windows XP or Windows
Vista computer) incorrectly, make sure that neither of your Windows applications are running in
compatibility mode - a special mode of Windows allowing you to run applications that are
incompatible with your version of Windows.
See Windows Help for more information.
Problems Using a Application After an Import
Applications that depend on specific hardware may not work in Parallels Desktop.
If you import from several source volumes, the disk drive letters are changed. Make sure that the
application paths are set correctly. See Windows Help for more information.
Use Boot Camp with Parallels Desktop
Boot Camp is a feature of macOS that lets you start up your Mac in Windows. If you have
already installed Windows 10, Windows 8.1, Windows 8, Windows 7, Windows Vista, or
Windows XP on your Mac using Boot Camp, you can set Parallels Desktop to work with Boot
Camp using either of these two options:
• Set Parallels Desktop to run Windows from the Boot Camp partition: Changes you make in
Windows applications either while working in macOS or when you start up your Mac in
Windows using Boot Camp will be reflected in both places.
Note: Parallels Desktop supports Boot Camp created using Boot Camp Assistant on the same disk
where macOS is installed.
Windows running from Boot Camp has the following limitations:
• It can't be paused
• It can't be saved as a snapshot (p. 114)
• It can't run in Rollback Mode (p. 87)
• It can't be compressed
Page 28

28
Install or Import Windows
• Import Windows and your data from Boot Camp into Parallels Desktop: Windows running
from Parallels Desktop doesn't have the above listed limitations. Boot Camp and Parallels
Desktop are separate. Changes you make in Windows applications while working in macOS
are not reflected when you start up your Mac in Windows using Boot Camp.
When you import Windows from Boot Camp, Parallels Desktop creates an expanding .hdd
file and copies all the contents from Boot Camp to it. During this operation, initial Windows
on Boot Camp doesn't get changed. All you need is just enough free disk space on the Mac's
hard disk.
Set Parallels Desktop to run Windows from the Boot Camp Partition
1 Open Parallels Desktop (in the Applications folder) and choose File > New.
2 Click Boot Camp, and then follow the onscreen instructions.
Note: If you plan to start up in Windows using Boot Camp, it is recommended that you shut down
Windows in Parallels Desktop rather than suspending Windows.
Import Windows and Your Data from Boot Camp into Parallels Desktop
1 Set Parallels Desktop to use Boot Camp, as described in the steps above.
2 Right-click (Control-click) the Boot Camp version of Windows in Control Center and choose
Import Boot Camp.
Note: Windows must be shut down.
3 Click Import.
4 Locate where you want to store Windows and your data, and then click Choose.
Windows and all your data are imported from Boot Camp. You can still use the original Boot
Camp Windows installation, separately from Parallels Desktop.
Important: The first time you start Windows after setting Parallels Desktop to work with Boot Camp,
Parallels Tools are installed to allow seamless operation between Windows and macOS. Once
Parallels Tools are installed, you're prompted to restart Windows.
Save Disk Space with Parallels Desktop
You can save disk space on your Mac by importing Windows from Boot Camp into Parallels
Desktop and then deleting the Boot Camp partition. Here is how it works:
1 For example, you have a 40 GB Boot Camp partition and only 20 GB are taken by Windows
and its files. Other 20 GB are not used.
2 You choose to import Boot Camp. Parallels Desktop copies Windows and all its files from
Boot Camp into a new virtual machine. This virtual machine will occupy only20 GB of disk
space.
3 Once the import is complete, delete the Boot Camp partition and save 20 GB of disk space.
Page 29

29
Install or Import Windows
Note: The hard disk of the resulting virtual machine is not limited to 20 GB. It is expanding which
means that you can continue installing applications, downloading movies, music, etc. The disk will
grow in size proportionally. For example, if you download a 5 GB movie to this virtual machine, it will
occupy 25 GB of disk space.
Import from an Earlier Parallels Desktop or
Other Virtualization Application
With Parallels Desktop for Mac you can use Windows that you set up using earlier versions of
Parallels Desktop, as well as VMware Fusion, Microsoft Virtual PC, and VirtualBox:
1 Open Parallels Desktop (in the Applications folder) and choose File > Open.
2 Select the Windows data file you want to import, then click Open and follow the onscreen
instructions.
• Parallels Desktop data files end with .pvm.
• VMware files end with .vmx.
• Virtual PC files end with .vmc.
• VirtualBox files end with .xml or .vbox.
You can also simply drag a Parallels .pvm file to Control Center to add it to Parallels
Desktop.
3 Start Windows (p. 30).
4 Choose Actions > Install Parallels Tools and follow the onscreen instructions.
Download and Install Windows From Microsoft
If you don't have Windows, you can download and install it from Microsoft. To do so, please
follow the onscreen instructions.
Page 30

Read this chapter to find out all about using Windows applications on your Mac. Learn how to
get started using Windows applications, set how Windows applications work with macOS, share
applications, files, and folders between macOS and Windows, connect devices, print, customize
your keyboard, and more.
In This Chapter
Get Started ............................................................................................................ 30
Set How Windows Works with macOS .................................................................. 38
Mouse, Trackpad, and Keyboard ........................................................................... 62
Connect External Devices ..................................................................................... 73
Connect Bluetooth Devices ................................................................................... 77
Print from Windows ............................................................................................... 78
Use the Built-in iSight Camera or Another Webcam .............................................. 85
Show a Presentation on an External Monitor or Projector ...................................... 86
Protect Your Data .................................................................................................. 87
Connect to the Internet or a Network ..................................................................... 89
Optimize Performance ........................................................................................... 93
Use Windows on Your iPad, iPhone, or Android Device ........................................ 99
Save Time With Parallels Toolbox ......................................................................... 100
Save a Picture of the Screen ................................................................................. 100
Set the Appearance of Virtual Machine Dock Icons ............................................... 101
Allow Windows Updates While Your Mac is Sleeping ............................................ 101
Translate Words in Windows ................................................................................. 102
Use the Touch Bar with Windows .......................................................................... 102
Get Started
In this section, learn how to start Windows, open a Windows application, install more Windows
applications, and shut down or suspend Windows.
Start Windows
To use Windows applications on your Mac, Windows must be running.
The simplest way to start Windows is to open a Windows application (p. 31). If Windows isn't
already running when you open a Windows application, it starts automatically in Coherence
mode (p. 39).
C HAPTER 4
Use Windows on Your Mac
Page 31

31
Use Windows on Your Mac
Important: If Windows was previously shut down, you may need to enter your Windows password.
You can also start Windows by doing the following:
1 Open Parallels Desktop.
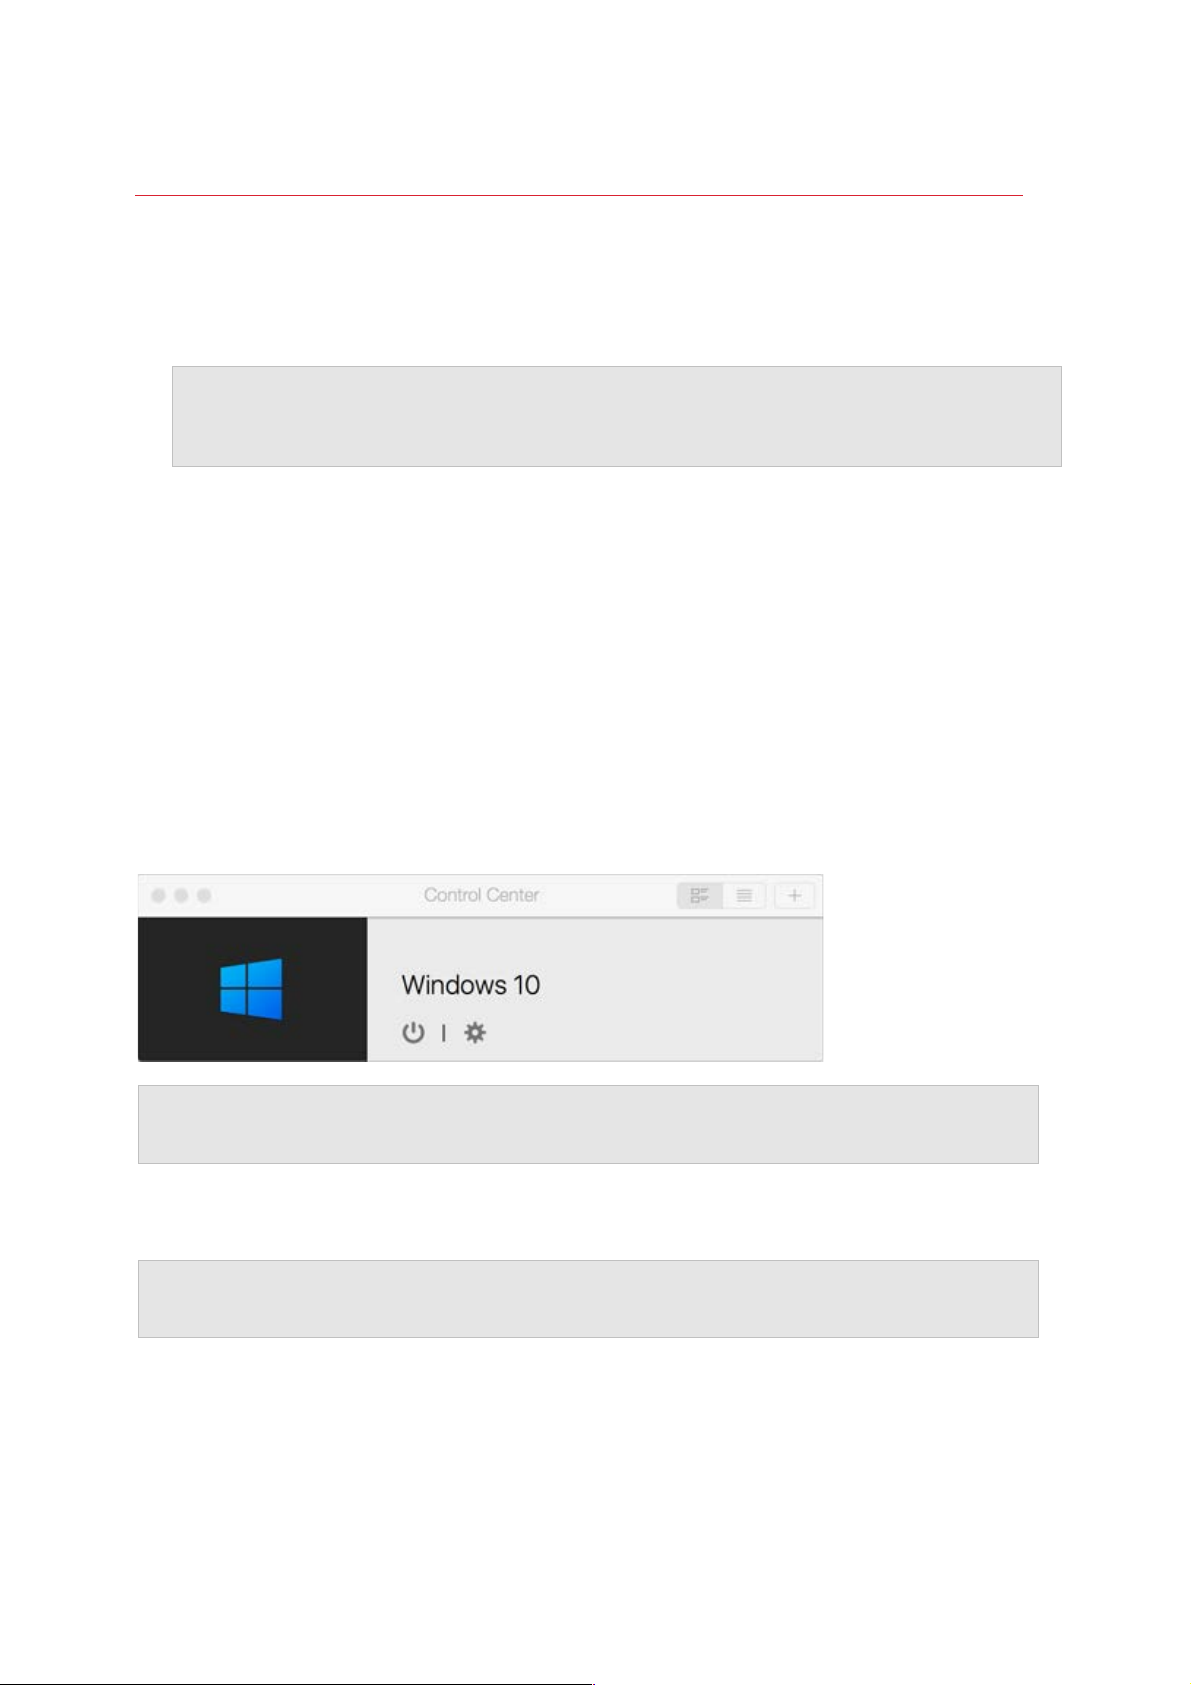
2 In Control Center, click the Power Button below Windows.
3 Click anywhere in the Windows window that appears.
Windows starts and you can begin using Windows applications alongside macOS.
Open a Windows Application
Opening a Windows application is as easy as opening a Mac application. Here are several ways
to open Windows applications:
• From the Windows Applications folder in the Dock
• From the Windows Start menu
• From the macOS Finder
• From the Dock
• Using Spotlight searching
• Using Launchpad
Note: All Windows application icons can be easily identified by the Parallels Desktop symbol in the
lower-right corner of the icon.
Page 32

32
Use Windows on Your Mac
Windows Applications Folder
This folder is available in the macOS Dock and contains all your Windows applications. As you
install more applications, they are automatically added.
To open a Windows application using the Windows Applications folder:
• Click the folder, and then choose a application.
To add the Windows applications folder to the Dock:
1 Do one of the following:
• Click the Parallels icon
in the menu bar and choose Configure.
• If the Parallels Desktop menu bar is visible at the top of the screen, choose Actions >
Configure.
2 Click Options and then click Applications.
3 Be sure Share Windows applications with Mac is selected, and then select Show Windows
applications folder in Dock.
Windows Start Menu
To open a Windows application from the Start menu:
1 Do one of the following:
Page 33

33
Use Windows on Your Mac
• Click the Parallels icon in the menu bar and choose Windows Start Menu.
• If Windows is in Full Screen or Window mode, open the Start Menu as you normally
would.
Note: You can also Control-click or Right-click the Parallels icon.
2 Click the application you want.
Application Icon in the Dock
When you open a Windows application, its icon appears in the macOS Dock at the bottom of the
screen. By default when you close the application, the icon disappears from the Dock. Keeping a
application's icon in the Dock provides a quick way to open the application anytime.
To keep a Windows application's icon in the Dock, do one of the following:
• Right-click or Control-click the Windows application icon in the Dock and choose Keep in
Dock from the shortcut menu.
• Drag the application's icon from the Finder to the Dock.
Now you can open the application again anytime by clicking the icon in the Dock.
Spotlight
You can search for and open Windows applications using Spotlight:
Page 34

34
Use Windows on Your Mac
• Click the Spotlight icon in the upper-right corner of your screen, or press Command-Space
bar on your keyboard. Then type the name of the application and select it from the list.
Launchpad
You can see a full screen display of all your Windows applications and Mac applications using
Launchpad. Just click the Launchpad icon (looks like a rocket) in the Dock. You can then click
any macOS application to open it. To open a Windows application, click the Windows folder and
then click the application you want.
Note: The Windows folder is available in Launchpad only if sharing Windows applications (p. 53) is
enabled.
To move a Windows application from the Windows folder to a main Launchpad page, do one of
the following:
• From Launchpad, click the folder containing your Windows applications and drag a
application to the Launchpad icon in the Dock.
• Start the Windows application you want, right-click its icon in the Dock, and choose Add to
Launchpad.
To remove a Windows application from Launchpad, start the application, right-click its icon in the
Dock, and choose Remove from Launchpad.
Install Windows Applications
You install Windows applications on your Mac just as you would on a Windows PC. The two
most common ways of installing applications are:
• Using a CD or DVD installation disc
• Downloading the application or installation file from the Internet or a network
Install a Application from a CD or DVD Installation Disc
1 Start Windows (p. 30).
2 Insert the installation disc.
3 In most cases, an AutoPlay dialog opens. Click the option to run a setup or install file, then
follow the onscreen instructions.
For more information about using CD and DVD discs with Parallels Desktop, see CD/DVD-ROM.
Install a Application from the Internet or a Network
• Download the application or installation file and follow the instructions from the application's
source.
Page 35

35
Use Windows on Your Mac
In most cases, you can either run the installation file and follow the onscreen instructions, or
simply open the downloaded application.
For more information about connecting to the Internet and networks, see Connect to the Internet
or a Network (p. 89).
Shut Down or Suspend Windows
When you're finished using Windows applications, you can leave Windows running in the
background as you work with your Mac applications. Or you may want to stop Windows from
running so more of your computer's resources are available for your Mac applications. There are
a few ways to stop Windows. You can:
• Suspend Windows
• Pause Windows
• Shut down Windows
• Stop Windows
Suspend Windows
Suspending Windows conveniently freezes all running Windows applications and settings in
their current state.
Do one of the following:
• Quit Parallels Desktop.
• Click the Parallels icon
in the menu bar and choose Actions > Suspend.
• If the Parallels Desktop menu bar is visible at the top of the screen, choose Actions >
Suspend.
The next time you start Windows or open a Windows application, you resume your progress
from exactly where you left off.
When Windows is suspended, you can safely quit Parallels Desktop and resume your progress
later.
Note: If you are using macOS Lion or later and you shut down or restart your computer, or quit
Parallels Desktop, Windows is automatically suspended. The next time you start up Parallels Desktop,
you can resume working with Windows from where you left off. If your W indows is encrypted (p. 88),
you will have to resume it manually.
Pause Windows
You can temporarily pause from using Windows and free your computer's resources, such as
RAM and processor cycles, to be used by your Mac applications by doing one of the following:
Page 36

36
Use Windows on Your Mac
• Click the Parallels icon in the menu bar and choose Actions > Pause.
• If the Parallels Desktop menu bar is visible at the top of the screen, choose Actions > Pause.
To resume using Windows after pausing it, do one of the following:
• Click the Parallels icon
in the menu bar and choose Actions > Resume.
• If the Parallels Desktop menu bar is visible at the top of the screen, choose Actions >
Resume.
If you quit Parallels Desktop while Windows is paused, you're prompted to either Suspend or
Stop Windows first.
Shut Down Windows
Shutting down Windows in Parallels Desktop is just like shutting down Windows on a PC. All
Windows applications close, giving you the opportunity to save your progress if necessary, and
Windows stops running.
To shut down Windows, do one of the following.
• Click the Parallels icon
in the menu bar and choose Actions > Shut Down.
• If the Parallels Desktop menu bar is visible at the top of the screen, choose Actions > Shut
Down.
Stop Windows
To stop Windows and all open Windows applications immediately, do one of the following:
• Click the Parallels icon
in the menu bar and choose Actions > Stop.
• If the Parallels Desktop menu bar is visible at the top of the screen, choose Actions > Stop.
Important: When you stop Windows this way, none of your data or progress is saved.
Startup and Shutdown Settings
Using Startup and Shutdown settings, you can choose how to start and shut down the virtual
machine.
To access Startup and Shutdown settings:
1 Do one of the following:
• Click the Parallels icon
in the menu bar and choose Configure.
• If the Parallels Desktop menu bar is visible at the top of the screen, choose Actions >
Configure.
2 Click Options and select Startup and Shutdown.
Page 37

37
Use Windows on Your Mac
Set to Start and Shut Down the Virtual Machine Manually
If you want to always start and shut down the virtual machine manually, select Start up and shut
down manually.
Configure the Virtual Machine to Start Automatically
If you want to make the virtual machine start automatically when the Mac starts, select Always
ready in background.
Specify More Details How to Start and Shut Down the Virtual Machine Automatically
If you want to specify not only how the virtual machine starts or shuts down but also the view
mode and what happens on closing the virtual machine window, select Custom and do the
following:
Set Whether Windows Starts Automatically
Choose one of the following from the Start Automatically menu:
Note: Windows starts when you open a Windows application (p. 31) regardless of this setting.
• Never: Windows never starts automatically.
• When window opens: Windows starts automatically when you open it from Control Center.
• When Parallels Desktop starts: Windows starts automatically when you start Parallels
Desktop.
• When Mac starts: Windows starts automatically when you start the Mac. If you select this
option, you can also configure the virtual machine to delay the startup.
Note: This feature is available in Parallels Desktop for Mac Pro Edition only.
• When user logs in: Windows starts automatically when the macOS user logs in to macOS on
the Mac startup.
Set the Startup View
This setting affects in which view mode Windows starts when you start the virtual machine or
guest OS application.
• From the Startup View menu, choose Coherence, Window, Full Screen, Picture in Picture,
Headless or Same as last time.
Note: Headless mode is available in Parallels Desktop for Mac Pro Edition only.
Page 38

38
Use Windows on Your Mac
Set What Happens When You Shut Down Windows
Choose one of the following from the On VM Shutdown menu:
• Keep window open: If Windows is set to appear in a separate window (p. 41), the window
stays open when you stop or shut down Windows.
• Close window: If Windows is set to appear in a separate window, the window closes when
you stop or shut down Windows.
• Quit Parallels Desktop: Parallels Desktop quits when you stop or shut down Windows.
Set What Happens When You Shut Down Your Mac
These settings affect what happens when you shut down the Mac.
From the On Mac Shutdown menu, choose Stop, Shut Down, or Suspend.
Set What Happens When You Close the Parallels Desktop Window
These settings affect what happens only when Windows is set to appear in a separate window
(p. 41).
From the On Window Close menu, choose Suspend, Shut Down, Force to stop, Keep running in
background or Ask me what to do.
Pause Windows When Possible
Select Pause Windows when possible to save your Mac's resources (p. 96).
Set How Windows Works with macOS
Parallels Desktop for Mac allows you to work seamlessly between Windows and macOS. For
example, you can cut and paste text, and share files, between the two.
There are a number of ways that you can set the level of integration between Windows and
macOS. For example, you may want your Windows applications to behave just like Mac
applications, appearing side-by-side with them on the Mac desktop. Or you may wish to keep the
Windows desktop and applications in a separate window.
Read on to learn more about setting how Windows works together with macOS.
Page 39

39
Use Windows on Your Mac
Merge Windows and macOS
You can set Windows and macOS to work seamlessly together, as if they were part of a single
operating system. In this mode, called Coherence mode, Windows applications appear on the
Mac desktop next to your Mac applications, and documents from Windows applications and Mac
applications are stored in the same folders.
Switch to Coherence Mode
To switch from Window mode to Coherence mode, do one of the following:
• Click the Coherence icon
in the top left corner of the virtual machine window.
• Choose View > Enter Coherence.
• Press Control-Command-C.
To switch from Full Screen mode to Coherence mode, do one of the following:
• Press Control-Command-F to exit Full Screen. Then click View > Enter Coherence.
Page 40

40
Use Windows on Your Mac
• Move the pointer to the top of the screen until the macOS menu bar appears and click View
> Exit Full Screen. Then open the View menu once again and click Enter Coherence. If
you're using Full Screen optimized for games, press Control-Option (Alt) to display the Mac
menu bar.
Note: To enable the Coherence view mode, Parallels Tools must be installed (p. 219). In most cases,
Parallels Tools are installed by default.
Parallels Menu
When in Coherence mode, the Parallels menu appears in the menu bar at the top of the
screen.
Use the menu for these common functions:
• Click the Parallels icon
to open a basic menu that provides the following items:
• Windows Start Menu: Access the Windows Start menu.
• View: Change the virtual machine view mode.
• Actions: Use this menu to perform various actions.
• Devices: Manage hardware devices like printers and DVD drives.
• Configure: Open the virtual machine configuration dialog.
• Control Center: Open the Parallels Desktop Control Center.
• New: Create a new virtual machine.
• Open: Open an already existing virtual machine.
• Preferences: Open the Parallels Desktop preferences.
Page 41

41
Use Windows on Your Mac
• and more...
• Right-click the icon to open the Windows start menu.
Important: When in Coherence mode, to quit Parallels Desktop, click the Parallels icon in the menu
bar and choose Quit Parallels Desktop.
Windows System Tray
When Parallels Desktop is in Coherence mode, the Windows system tray icons are in the
macOS menu bar at the top of the screen.
You can use the system tray icons just as you would from the Windows Desktop.
Move Windows Applications Between Desktops (Spaces)
When Windows is working in Coherence, you can easily move windows of guest OS applications
between macOS desktops (spaces).
Set Windows to Appear in a Single Window
You can set the Windows and applications to appear together in their own window.
To switch to Window mode from Coherence mode, do one of the following:
• Click the Parallels icon
in the menu bar, then choose View > Exit Coherence.
Page 42

42
Use Windows on Your Mac
• If the Parallels Desktop menus are available in the Mac menu bar, click View > Exit
Coherence.
To switch to Window mode from Full Screen mode, do one of the following:
• Press Command-Control-F.
• Move the pointer to the top of the screen until the macOS menu bar appears and click View
> Exit Full Screen. If you're using Full Screen optimized for games, press Control-Option (Alt)
to display the Mac menu bar.
Adjust Window Mode Settings
You can customize how Parallels Desktop appears and behaves when in Window mode.
Set Whether Windows Applications Show in the Dock:
You can choose whether or not to show icons for Windows applications in the macOS Dock
when in Window mode. If you prefer to work with applications by manipulating them on the
Windows desktop, you may not want to be distracted by seeing them in the Dock alongside your
macOS application icons.
1 Do one of the following:
• Click the Parallels icon
in the menu bar and choose Configure.
• If the Parallels Desktop menu bar is visible at the top of the screen, choose Actions >
Configure.
2 Click Options and then click Applications.
3 To show Windows application icons in the Dock when in Window mode, deselect Show Dock
icons in Coherence only.
Monitoring Windows in a Scalable Window
You can set Windows to appear in a window that can be resized to any size so that the content
scales in size with the window. This is called Picture in Picture mode. This mode can be useful if
you want to monitor applications and other tasks running in Windows as you work in macOS.
To switch to Picture in Picture mode:
• From Window mode, choose View > Enter Picture in Picture.
For more information on Picture in Picture mode, see the Picture in Picture mode settings topic
(p. 141).
Set Windows to Take Up the Whole Screen
You can set Windows to occupy your entire screen, so it looks just like it would if you were using
a Windows PC. In Full Screen mode, macOS and all of the Parallels Desktop controls are
hidden.
Page 43

43
Use Windows on Your Mac
To switch to Full Screen mode, do one of the following:
• From Coherence mode, click the Parallels icon
in the menu bar, then choose View > Exit
Coherence. Then click the View menu and select Enter Full Screen.
• From Window mode, choose View > Enter Full Screen or click the Full Screen icon
in the
top left corner of the virtual machine window.
To exit Full Screen mode, do one of the following:
• Press Command-Control-F.
• Move the pointer to the top of the screen until the macOS menu bar appears and click View
> Exit Full Screen. If you're using Full Screen optimized for games, press Control-Option (Alt)
to display the Mac menu bar.
Adjust Full Screen Settings
You can customize how Windows appears and behaves when in Full Screen mode.
To access Full Screen settings:
1 Do one of the following:
• Click the Parallels icon
in the menu bar and choose Configure > Options.
• If the Parallels Desktop menu bar is visible at the top of the screen, choose Actions >
Configure, and then click Options.
Page 44

44
Use Windows on Your Mac
2 Click Full Screen.
3
4 In this Full Screen pane, you can adjust any of the settings listed below.
Set What Shows on Displays Connected to Your Mac
If you have a second display connected to your Mac, by default when you switch to Full Screen
mode, Windows is displayed on the primary display and macOS on the secondary.
You can choose which display Windows is shown on by dragging its window to that display and
then clicking the Full Screen icon
.
Page 45

45
Use Windows on Your Mac
To extend Windows across all your displays, select Use all displays in full screen.
When Use all displays in full screen is selected, you can also choose Activating virtual machine
shows all its spaces. With this option selected, click the virtual machine on any of your displays
and it will appear on all displays. It's useful when you switched some of your displays to a space
that doesn't belong to the virtual machine and then decide to return to the virtual machine and
make it displayed on all connected monitors again.
Optimize Full Screen for Games
If you use a virtual machine to play video games in Full Screen view mode, select Optimize full
screen for games. With this option selected, macOS Dock, menu bar and notifications will not be
displayed when you move the mouse pointer to the top and bottom of the screen.
Allow Windows to set display gamma
If you're using Windows to play video games, Windows may need to temporarily change your
Mac's display gamma setting to properly display different visual effects. To allow Windows to
change gamma settings, select Use Windows gamma settings.
Scale to fit screen
Using the Scale to fit screen menu, you can configure how Windows is displayed when working
in Full Screen:
• Off. If Parallels Tools (p. 128) are installed, Windows resolution matches that of the Mac. If
Parallels Tools (p. 128) aren't installed, Windows resolution remains unchanged. If it is lower
than that of the Mac, Windows is displayed on the black background. If higher, Windows has
scroll bars.
• Auto. If Parallels Tools (p. 128) are installed, Windows resolution matches that of the Mac. If
Parallels Tools (p. 128) aren't installed, Windows resolution remains unchanged. If it is lower
than that of the Mac, Windows is displayed on the black background. If higher, Windows is
entirely displayed on the screen without any scroll bars.
• Keep ratio: No matter whether Parallels Tools (p. 128) are installed or not, Windows
resolution remains unchanged. If it is lower than that of the Mac, Windows is displayed on
the black background. If higher, Windows is entirely displayed on the screen without any
scroll bars.
Page 46

46
Use Windows on Your Mac
• Stretch: No matter whether Parallels Tools (p. 128) are installed or not, Windows resolution
remains unchanged but Windows is stretched to occupy the whole screen.
Note: To prevent unauthorized changes to Full Screen settings, click the Lock icon at the
bottom of the window. Once locked, an administrator's password is required to make further changes.
Set an Application to Open When You Insert a CD or DVD
You can set the Windows application of your choice to open when you insert a music CD, picture
CD, video DVD, or a blank CD or DVD.
1 From the macOS Finder, choose Apple menu > System Preferences.
2 Click CDs & DVDs.
3 From the disc type menu of your choice, choose Open other application.
4 Choose a Windows application from /username/Applications
(Parallels)/Windows Applications.
When you insert a disc of the type you selected, the Windows application you chose
automatically opens.
Note: 1.If you're unable to set a Windows application to open when you insert a CD or DVD, be sure
that sharing macOS applications (p. 53) is enabled and that macOS CD/DVD-ROM is not selected in
CD/DVD Preferences.
2. To enable a Windows application to open when you insert a CD or DVD, Parallels Tools must be
installed (p. 219). In most cases, Parallels Tools are installed by default.
Share Items Between macOS and Windows
Parallels Desktop allows you to easily access your macOS files using Windows applications, and
also to access Windows files using macOS applications.
Read on to learn about all the ways you can share folders, files, and applications between
macOS and Windows.
Copy and Paste Between macOS and Windows
Parallels Desktop allows you to copy and paste images and formatted text (italic, bold,
underlined, and of various colors, fonts, and sizes) between macOS and Windows applications.
To enable copying and pasting between macOS and Windows:
1 Do one of the following:
• Click the Parallels icon
in the menu bar and choose Configure.
Page 47

47
Use Windows on Your Mac
• If the Parallels Desktop menu bar is visible at the top of the screen, choose Actions >
Configure.
2 Click Options > More Options.
3 Select Share Mac clipboard.
4 To preserve text formatting when copying and pasting text, select Preserve text formatting.
Note: To enable copying and pasting between macOS and Windows, Parallels Tools (p. 219) must be
installed. In most cases, Parallels Tools are installed by default. Copying and pasting between macOS
and Windows is unavailable if you isolate macOS from Windows.
Copy and Paste Files
You can easily copy and paste files between Windows and macOS by doing the following:
1 Select a file (or multiple files) and press Command+C on your keyboard to copy it.
2 Open a folder or click the desktop in the other operating system and press Command-V to
paste the file.
Notes:
1. To enable copying and pasting files between macOS and Windows, in Sharing settings (p. 47) All
disks or Home folder only must be chosen from the Share Folders menu, and Access Windows folders
from Mac must be selected. In most cases all of these options selected by default.
2. If Home folder only is selected in the Share Folders menu (p. 47), you will be able to copy and paste
files from the Mac to Windows only from the Mac home folder.
Share Files and Folders
Parallels Desktop allows you to share folders between the macOS and Windows file systems, so
you can easily open macOS files from Windows applications and Windows files from macOS
applications.
Note: These instructions apply to sharing folders between macOS and Linux as well.
Access a macOS Folder or File from a Windows Application
With folder sharing enabled, you can navigate to any shared macOS folder from within a
Windows application. When you open a file (for example, by choosing File > Open in many
applications), your shared macOS folders appear as network shared directories labeled "psf."
To enable macOS folders for sharing with Windows applications:
1 Start Windows. (p. 30)
2 Do one of the following:
• Click the Parallels icon
in the menu bar and choose Configure.
Page 48

48
Use Windows on Your Mac
• If the Parallels Desktop menu bar is visible at the top of the screen, choose Actions >
Configure.
3 Click Options and select Sharing > Share Mac.
4
5 Do one of the following:
• To share just the folders in your Home folder, choose Home folder only from the Shared
Folders menu.
• To share all your macOS folders, choose All disks from the Shared Folders menu.
Page 49

49
Use Windows on Your Mac
• To share any folder you want, click Custom Folders and click the add (+) button, then
choose the folder you want to share. You can add more folders by clicking the add (+)
button again.
Once you share a macOS folder with Windows you can:
• Disable the folder sharing by deselecting On.
• Change the folder name that will be displayed in Windows by double-clicking the folder
name in the Name column and typing another name.
• Restrict writing to this folder by clicking Read & Write in the Permissions folder and
choosing Read only. You will not be able to add items to the folder.
Note: 1. To enable folder sharing, the Isolate Windows from Mac option must be disabled on the
Security tab of the Configuration dialog.
2. If you're running Linux, shared folders are mounted to the /media/psf or /mnt/psf directory.
Set macOS and Windows to Use the Same Folders
You can set macOS and Windows to use the same folders for things like music, documents,
pictures, your desktop, and deleted files. So for example, if you save a file to the Documents
folder, it will be in the Documents folder whether you're using a macOS application or a
Windows application.
1 Start Windows. (p. 30)
2 Do one of the following:
• Click the Parallels icon
in the menu bar and choose Configure.
• If the Parallels Desktop menu bar is visible at the top of the screen, choose Actions >
Configure.
3 Click Options and select Sharing.
4 Click the Share Mac tab and select Share Mac user folders with Windows.
Page 50

50
Use Windows on Your Mac
Your macOS Desktop, Documents, Pictures, Music, Movies, and Downloads folders
are merged with the corresponding Windows folders, and the macOS Trash is merged with
the Windows Recycle Bin.
5 If you only want to map some of the folders, click Configure and select the folders you want.
To map the macOS Trash to the Windows Recycle Bin, select Merge Recycle Bin with
Trash.
Show an Item from Windows in the Finder
You can show an item from Windows in the macOS Finder.
• In Windows, right-click (or Control-click) a file or folder and choose Show in Finder from the
shortcut menu.
From the Finder you could, for example, apply a color label to an item, or easily drag it to
another location in the Finder.
Note: You can only perform these actions with files stored in shared folders (p. 47).
Share a file from Windows via Mac services
You can share files from Windows via Mac services like AirDrop, Mail, Twitter, Facebook.
In Windows, right-click (or Control-click) a file or folder and choose Share on from the shortcut
menu.
Note: You can only perform these actions with files stored in shared folders.
Use Quicklook in Windows File Explorer
You can quickly preview a file or set of files using the macOS Quick Look functionality.
• In Windows, select a file or set of files to preview and press the Space key.
• If you're using a touchpad, select a file and use the three-finger tap gesture (or force-press
gesture on newer Macbooks).
Note: You can only perform these actions with files stored in shared folders.
Access Windows Disks from the Finder or Desktop
If you need to have a quick access to Windows disks, you can add them to the Finder or
desktop. Do the following:
Note: To add Windows disks to the Finder or desktop, the virtual machine must be running and the
Connected servers option selected on the General tab of Finder Preferences.
1 Open the Finder and select All in the Shared section.
Page 51

51
Use Windows on Your Mac
2 Find and expand your virtual machine.
3 Double-click the disk you want to add to the Finder or desktop. The disk gets mounted and
shown on the desktop. Then you can do the following:
• To add the disk to the Finder, drag it from the desktop to the Favorites section in the
Finder.
• To make the disk display on the desktop, create an alias for it. Right-click the disk and
select Make Alias.
Share iCloud, Dropbox, or Google Drive Folders with Windows
If you're using iCloud, Dropbox, or Google Drive cloud storage in macOS, you can easily share
their macOS folders with Windows. Once sharing is enabled, you can upload, download, and
sync files from any of these services from within Windows without duplicating any of their files on
your hard disk.
Notes:
1. This functionality is also available for Linux virtual machines.
2. To be able to use this functionality, Parallels Tools (p. 128) must be installed.
To share macOS iCloud, Dropbox, or Google Drive folders with Windows, do the following:
Note: In Parallels Desktop for Mac Pro Edition, you can also share your Dropbox for Business, Box
and OneDrive for Business folders with Windows.
1 If you haven't already, set up iCloud, Dropbox, or Google Drive in macOS.
2 Start Windows (p. 30).
3 Do one of the following:
• Click the Parallels icon
in the menu bar and choose Configure.
• If the Parallels Desktop menu bar is visible at the top of the screen, choose Actions >
Configure.
4 Click Options and select Sharing > Share Mac.
5 Select Share cloud folders with Windows.
Page 52

52
Use Windows on Your Mac
6 Log in to Windows and open Computer. Folders for iCloud, Dropbox, or Google Drive are
available in the Favorites section (or Quick Access section in Windows 10). You can use
them to upload and download files to and from the cloud.
Share Windows OneDrive Folders with macOS
If you're using Microsoft OneDrive to store files in the cloud, you can easily share your OneDrive
folders with macOS. Then you can upload or download OneDrive files in macOS without
duplicating any of the files on your hard disk.
Notes:
1. To share OneDrive folders with macOS, the OneDrive desktop app must be installed in Windows. If
you're using the preinstalled OneDrive app, OneDrive folders are not shared because this app doesn't
create any local folders and works directly with the cloud storage.
2. This feature is available only when Parallels Tools are installed (p. 130) in Windows.
To share your Windows OneDrive folders with macOS, do the following:
1 If OneDrive isn't already set up in Windows, set it up. For more information, go to
http://windows.microsoft.com/en-us/skydrive/download.
2 Do one of the following:
• Click the Parallels icon
in the menu bar and choose Configure.
• If the Parallels Desktop menu bar is visible at the top of the screen, choose Actions >
Configure.
3 Click Options and select Sharing > Share Windows.
4 Select Access Windows folders from Mac and Share OneDrive with Mac.
5 In the macOS Finder, choose Finder > Preferences and select Connected servers.
6 Open the Finder and click your virtual machine in the Shared section. The virtual machine
must be running.
Page 53

53
Use Windows on Your Mac
Note: In macOS 10.14 Mojave (when it is officially released), you can find your virtual machine in the
Network section.
7 Double-click the OneDrive disk. The disk gets mounted and shown on the desktop.
8 Drag the OneDrive disk from the desktop to the Favorites section in the Finder.
Now OneDrive from Windows is always available in the Finder. You can use it to download
or upload files to OneDrive from macOS.
Note: To use OneDrive, Windows must be running.
Share Applications
You can access macOS applications from within Windows and you can access Windows
applications from macOS. For example, if you locate a file using the Open menu in a Windows
application and decide you would rather open the file using a macOS application, you can.
Page 54

54
Use Windows on Your Mac
Note: Provided that Parallels Tools are installed in Linux (p. 131), you can also open macOS files
using Linux applications.
Enable Sharing macOS Applications
When sharing macOS applications is enabled, you can open macOS Applications from within
Windows or Windows applications.
If not, you can enable it at any time by doing the following:
1 Do one of the following:
• Click the Parallels icon
in the menu bar and choose Configure.
• If the Parallels Desktop menu bar is visible at the top of the screen, choose Actions >
Configure.
2 Click Options and click Applications.
3 Select Share Mac applications with Windows.
Once sharing macOS applications is enabled, you can do the tasks below.
Open a File from Windows in a macOS Application
You can open a file in a macOS application from Windows Explorer, from the Open dialog in
most Windows applications, or from Windows Desktop if Windows is set to appear in a separate
Window (p. 41) or at full screen (p. 42). You may want to do this if you don't have a Windows
application that can open the file.
• In Windows, right-click (or Control-click) a file and do one of the following:
• Choose Open on Mac from the shortcut menu. The file opens in the default macOS
application for that file type.
• Choose Open With from the shortcut menu, and then choose an application.
Note: You can only perform these actions with files stored in shared folders (p. 47).
Open a Mac Application from the Windows Start Menu
From the Windows Start menu, do one of the following:
• Choose All Applications > Parallels Shared Applications, and then choose an application.
• Type the name of the application you're looking for in the search field, then choose the
application from the list.
Page 55

55
Use Windows on Your Mac
Enable Sharing Windows Applications
When sharing Windows applications is enabled, you can open Windows applications from the
macOS Finder. You can also choose to add a folder to the Dock containing all your Windows
applications for easy access.
1 Do one of the following:
• Click the Parallels icon
in the menu bar and choose Configure.
• If the Parallels Desktop menu bar is visible at the top of the screen, choose Actions >
Configure.
2 Click Options and click Applications.
3 Select Share Windows applications with Mac.
Add a Windows Applications Folder to the Dock
1 Do one of the following:
• Click the Parallels icon
in the menu bar and choose Configure.
• If the Parallels Desktop menu bar is visible at the top of the screen, choose Actions >
Configure.
2 Click Options and then click Applications.
3 Be sure Share Windows applications with Mac is selected, and then select Show Windows
applications folder in Dock.
Configure Whether Dock Icons Bounce to Alert
When a Windows application icon in the taskbar would normally flash to alert you to something,
such as a new message in Skype or a notification in Microsoft Outlook, by default its icon also
bounces repeatedly in the macOS Dock.
To enable or disable Windows application icons bouncing to alert:
1 Do one of the following:
Click the Parallels icon
in the menu bar and choose Configure.
If the Parallels Desktop menu bar is visible at the top of the screen, choose Actions >
Configure.
2 Click Options and click Applications.
3 Select or deselect Dock icons bounce to alert.
Note: Icon bouncing is available for Windows with Parallels Tools installed (p. 219) provided that
Share Windows applications with Mac is selected in the Applications pane.
Page 56

56
Use Windows on Your Mac
Force Quit Windows Applications
If your running Windows guest OS application doesn't respond and freezes, you can easily force
quit it as you can do with any macOS application. To force quit a Windows application, do one of
the following:
• Right-click the icon of the Windows application available in the Dock, press Option (Alt), and
choose Force Quit.
• Press Option + Command + Esc (Alt + Command + Esc), select the name of the Windows
application you want to quit, and click Force Quit.
Note: To be able to force quit Windows guest OS applications, Parallels Tools must be installed (p.
219).
Add Applications to Launchpad
When you install any applications in Windows (except temporary apps), you can choose to
automatically add their icons to Launchpad.
1 Do one of the following:
• Click the Parallels icon
in the menu bar and choose Configure.
• If the Parallels Desktop menu bar is visible at the top of the screen, choose Actions >
Configure.
2 Click Options and click Applications.
3 Select Add new applications to Launchpad.
Set Files to Open in the Application or Application of Your Choice
You can set files of a particular type that you open from the macOS Finder to open in the
Windows application of your choice. For example, you could set files ending in .txt to always
open in Windows Notepad.
You can also set files opened from Windows to always open in the macOS application of your
choice.
Set macOS Files of a Particular Type to Open in a Windows Application
To open a macOS file once with a Windows application:
1 Right-click (or Control-click) the file in the Finder and choose Open With from the shortcut
menu.
2 Select a Windows application.
If you don't see the application you want, click Other and choose a Windows application from
/username/Applications (Parallels)/Windows Applications.
Page 57

57
Use Windows on Your Mac
You can also open a macOS file in a Windows application by dragging it to the application's icon
in the Dock.
To set files of a particular type to always open in a Windows application:
1 Right-click (or Control-click) a file and choose Get Info from the shortcut menu.
2 Click the triangle next to "Open with" to expand the section.
3 Choose a Windows application from the pop-up menu.
If you don't see the application you want, choose Other and choose a Windows application
from /username/Applications (Parallels)/Windows Applications.
4 Click Change All.
From this point on, double-clicking a file of this type (.txt in the example above) in the macOS
Finder opens the file in the Windows application. If Windows is shut down, suspended, or
paused, double-clicking the file starts or resumes Windows in Coherence mode. When Windows
starts up, the file opens in the Windows application.
Set Windows Files of a Particular Type to Open in a macOS Application
To open a Windows file with a macOS application only this time:
• Right-click (or Control-click) the file in Windows, choose Open With from the shortcut menu,
and choose an application.
To set all files of a particular file type to open in a macOS application:
1. Right-click (or Control-click) a file in Windows, choose Open With from the shortcut menu,
and click Choose default application.
2. Select an application, choose Always use the selected application to open this kind of file,
and click OK.
Note: To set files to open in the application or application of your choice, Parallels Tools must be
installed (p. 219). In most cases, Parallels Tools are installed by default. Also, the Isolate Mac from
Windows (p. 87) option must be disabled, and Windows application sharing (p. 53) must be enabled.
Set Internet Links to Always Open in macOS or Windows
By default, clicking a link (such as a web page URL) in Windows opens the default Windows
application for that link type, and clicking a link in macOS opens the default macOS application.
You can set links of a particular type to always open in macOS or in Windows. For example, you
could set web pages to always open in Windows Internet Explorer, even if the link is clicked in a
macOS application.
Note: To set Internet links to open in macOS or Windows, Parallels Tools must be installed (p. 219).
In most cases, Parallels Tools are installed by default.
Page 58

58
Use Windows on Your Mac
To set Internet links to open in macOS or Windows:
1 Do one of the following:
• Click the Parallels icon
in the menu bar and choose Configure.
• If the Parallels Desktop menu bar is visible at the top of the screen, choose Actions >
Configure.
2 Click Options and select Web & Email.
3 Click the menu for the type of link you want to set. If you don't see the link type you want,
click More Applications. The following types of links can be set:
• Web Pages: Web pages accessible through the HTTP and HTTPS protocols.
• Email: Links in the mailto format that open a pre-addressed email.
• Newsgroups: Links in the news. format that typically open a newsreader application.
• FTP: File upload and download locations accessible through the FTP protocol.
• RSS: Episodic content, such as blogs and podcasts.
• Remote Access: Locations accessible through the Telnet and Secure Shell (SSH)
protocols.
4 Choose one of the following:
• Default: The link opens in the application or application set as default in the operating
system (macOS or Windows) where you click the link.
• Open in Windows: Links clicked in macOS or Windows open in the default Windows
application for that link type.
• Open in Mac: Links clicked in macOS or Windows open in the default macOS application
for that link type.
Open the Current Safari Page in Internet Explorer
Some webpages work best when viewed in Windows Internet Explorer. If you are browsing in
macOS using Safari, you can quickly open the current page in Internet Explorer by doing the
following:
1 First you need to install the "Open in Internet Explorer" plugin. Do one of the following:
• Click the Parallels icon
in the menu bar and choose Configure.
• If the Parallels Desktop menu bar is visible at the top of the screen, choose Actions >
Configure.
2 Click Options and select Web & Email.
3 Click Install Plugin.
4 Once the plugin is installed, click the Open in IE button
in the toolbar.
If Windows isn't already open, it starts up and the page opens in Internet Explorer.
Page 59

59
Use Windows on Your Mac
Share External Storage Devices and Volumes
When you connect an external storage device, such as a USB drive, to your Mac, you can
access the contents from macOS applications.
You can set Parallels Desktop to automatically mount storage devices and volumes to Windows.
That way, you can access the contents from both macOS and Windows.
The following items can be mounted to Windows:
• Removable drives: External storage devices, such as USB hard disks and USB flash drives.
• CD/DVD drives: CD and DVD drives or CD/DVD images (files most commonly ending in
.dmg, .iso, and .img.).
• Network folders: Folders shared over the network.
To make these items mount to Windows automatically, do the following:
1 Start Windows. (p. 30)
2 Do one of the following:
• Click the Parallels icon
in the menu bar and choose Configure.
• If the Parallels Desktop menu bar is visible at the top of the screen, choose Actions >
Configure.
3 Click Options and select Sharing > Share Mac.
4 Select Map Mac volumes to Windows.
When you connect a storage device or volume, it is mounted as a network drive. For example, a
USB flash drive plugged in to your Mac will be accessible from both the /Volumes folder in
macOS and My Computer in Windows.
Note: Permissions for accessing the mounted device from Windows are the same as permission
settings for the device in macOS. For example, if you can read from and write to a USB flash drive in
macOS, you can also read from and write to it in Windows. One exception: macOS can't write to NTFS
volumes, regardless of permissions.
Share Windows External and Network Drives with Mac
When you connect an external NTFS drive to Windows or connect to a network drive in
Windows, you can make these drives available in macOS as well.
Do the following:
1 Start Windows. (p. 30)
2 Do one of the following:
• Click the Parallels icon
in the menu bar and choose Configure.
Page 60

60
Use Windows on Your Mac
• If the Parallels Desktop menu bar is visible at the top of the screen, choose Actions >
Configure.
3 Click Options and select Sharing > Share Windows.
4 Select Share Windows network drives with Mac and Share Windows-connected drives with
Mac.
When you connect to a network drive in Windows or connect an NTFS drive to Windows, these
drives become available in macOS. To access them, go to the Finder sidebar > Shared section
and click the virtual machine name.
Use a Disk Image with the Virtual DVD Drive
While working in Windows, you can select a disk image file to be used with the virtual Windows
DVD drive, as if it was a DVD inside a real drive. To do so:
1 In Windows Explorer, open Computer or This PC, right-click the DVD drive icon, and choose
Select disk image.
2 Locate the disk image you want to use and click Open.
Note: This functionality is available only for Windows with Parallels Tools installed (p. 219).
Save Internet Passwords in Mac Keychain
Nowadays, users don't have to remember numerous passwords to various social media
accounts and websites. Your Mac can store and automatically fill them in when necessary.
If you browse the Internet in Windows using Internet Explorer or Microsoft Edge, you can set to
store your passwords in Mac keychain. If you do so, the passwords you enter in Internet
Explorer or Microsoft Edge will be saved to Mac keychain and you will be able to auto fill them
from these browsers. These passwords won't be accessible to any other applications and won't
be lost if Windows gets corrupted or reinstalled.
To store Internet passwords in Mac keychain:
1 Do one of the following:
• Click the Parallels icon
in the menu bar and choose Configure.
• Click Actions in the Parallels Desktop menu bar at the top of the screen and choose
Configure.
2 Click Options and select Web & Email.
3 Select Store Internet passwords in Mac keychain.
Add Windows Disks to the Finder
If you often work with Windows, you can add Windows disks to the Finder to keep Windows files
always at hand.
Page 61

61
Use Windows on Your Mac
Do the following:
1 First of all, make sure that Windows disks are shared with macOS. Do one of the following:
• Click the Parallels icon
in the menu bar and choose Configure.
• If the menu bar is visible at the top of the screen, choose Actions > Configure.
Then click Options and select Sharing > Share Windows.
Make sure that Access Windows folders from Mac is selected. If you want to share Windows
OneDrive too, select Share OneDrive with Mac.
2 In the next step, you need to allow Windows disks to be mounted to the macOS desktop.
Open the Finder, choose Finder > Preferences and select Connected servers.
3 Now you need to mount Windows disks to the macOS desktop. In the Finder, click your
virtual machine - it should be available in the Shared section. The virtual machine must be
running.
Note: In macOS 10.14 Mojave (when it is officially released), you can find your virtual machine in the
Network section.
Then double-click any of Windows disks. The disk gets mounted and shown on the desktop.
Page 62

62
Use Windows on Your Mac
4 Drag the disk from the desktop to the Favorites section in the Finder.
Now this Windows disk is always available in the Finder. You can use it to access Windows
files.
Note: To use the disk, Windows must be running.
Apply macOS Parental Controls to Windows
If you have administrator rights in macOS, you can use parental controls to prevent others with
accounts on your Mac from using certain Windows applications or accessing certain web sites.
To apply parental control settings:
1 In macOS, choose Apple menu > System Preferences and click Parental Controls.
2 Click the lock if it's not unlocked, and then enter an administrator name and password.
3 Select the account that you want to restrict, click Enable Parental Controls, and set up the
controls. If you want the user to be able to use some Windows applications, be sure to select
Parallels Desktop in the list of allowed applications.
For more information on using parental controls, see Mac Help.
Mouse, Trackpad, and Keyboard
Parallels Desktop lets you configure your mouse or trackpad and your keyboard to work just the
way you want them to.
You can also use trackpad gestures to control Windows applications just as you can with
macOS applications.
Page 63

63
Use Windows on Your Mac
Read on to learn how to customize how your mouse, trackpad, and keyboard work with
Windows applications.
Set Your Mouse or Trackpad to Right-Click and Middle-Click
Many tasks in Windows, such as bringing up shortcut menus, are accomplished by right-clicking.
By default, Parallels Desktop is set to mimic a right-click when you press Shift+Control and click
the mouse. You can change which key combination triggers a right-click.
You can also set your trackpad to allow right-clicking, and if you have an Apple Mighty Mouse
(included with Apple desktop computers from 2005-2009) or Magic Mouse (included with current
Apple desktop computers), you can set the mouse to allow right-clicking.
Most other mice are pre-configured for right-clicking.
Set the Trackpad for Right-Clicking.
1 Choose Apple menu > System Preferences and click Trackpad.
2 Select Secondary Tap.
Now you can tap the trackpad with two fingers to imitate a right-click.
Set an Apple Mighty Mouse for Right-Clicking
1 Choose Apple menu > System Preferences and click Mouse or Keyboard & Mouse.
2 Choose Secondary Button from the menu to the right of the mouse.
Now you can press the right side of the mouse to right-click.
Set an Apple Magic Mouse for Right-Clicking
1 Choose Apple menu > System Preferences and click Mouse or Keyboard & Mouse.
2 Select Secondary click.
Now you can press the right side of the mouse to right-click.
Set Which Key Combination Triggers a Right-Click or a Middle-Click
1 Do one of the following:
• Click the Parallels icon
in the menu bar and choose Preferences.
• Right-click the Parallels Desktop icon in the Dock and choose Preferences.
2 Click Shortcuts.
3 If necessary, click the lock icon and enter an administrator password.
Page 64

64
Use Windows on Your Mac
4 Select Mouse Shortcuts in the sidebar.
5
6 Select Secondary click (for right-click) or Middle click.
7 Click in the corresponding text field and press the key or combination of keys that you want
to use with a mouse click to trigger a right-click or middle-click.
You can use any combination of the Control, Option (Alt), Shift, and Command keys.
Control Applications with Trackpad Gestures
If you have an Apple portable computer, such as a Macbook, or if you have an Apple Magic
Trackpad, you can use gestures, such as swiping left or right across the trackpad, to control
some Windows applications.
Note: You can control some W indows applications using three-finger swipes only if you're using
Parallels Desktop with macOS Snow Leopard. In macOS Lion and later, three-finger swipes are used
by default to move between full-screen apps and spaces.
The following table provides commands to control some of the more popular Windows
applications.
Action
Keyboard and Mouse
Combination
Touchpad Gesture
General
Page 65

65
Use Windows on Your Mac
Scroll Up, down, left, or right arrow
Swipe up, down, left, or
right with two fingers
Microsoft Power Point
Start slide show F5 n/a
End slide show Esc n/a
Perform the next
animation or advance to
the next slide
N, Enter, Page Down, Right
Arrow, Down Arrow, Space (or
click the mouse)
Swipe right with three
fingers
Perform the previous
animation or return to the
previous slide
P, Page Up, Left Arrow, Up
Arrow, Backspace
Swipe left with three fingers
Zoom in/zoom out Ctrl+wheel up /Ctrl+wheel down Pinch open/pinch close
Microsoft Word/Excel
Zoom in/zoom out Ctrl+wheel up /Ctrl+wheel down Pinch open/pinch close
Windows Media Player
Start/pause playback Space n/a
Skip to the next song Ctrl+F
Swipe right with three
fingers
Play the previous song Ctrl+B Swipe left with three fingers
Volume up F8, Up Arrow, wheel up n/a
Volume down F9, Down Arrow, wheel down n/a
Media Player Classic (k-lite)
Start playback/pause Space n/a
Volume up F8, Up Arrow, wheel up n/a
Volume down F9, Down Arrow, wheel down n/a
Winamp
Start playback/pause X to start, C to pause n/a
Volume up Up Arrow, wheel up n/a
Volume down Down Arrow, wheel down n/a
Microsoft Internet Explorer
Page back
Backspace, Option+Left Arrow
(Alt+Left Arrow)
Swipe right with three
fingers
Page forward
Option+Right Arrow (Alt+Right
Arrow)
Swipe left with three fingers
Zoom in/zoom out Ctrl+wheel up/Ctrl+wheel down Pinch open/pinch close
Mozilla Firefox
Page back
Backspace, Option+Left Arrow
(Alt+Left Arow)
Swipe right with three
fingers
Page 66

66
Use Windows on Your Mac
Page forward
Option+Right Arrow (Alt+Right
Arrow)
Swipe left with three fingers
Zoom in/zoom out
Ctrl-wheel up/Ctrl-wheel down
or Ctrl-"+"/Ctrl-"-"
Pinch open/pinch close
Windows Picture and Fax Viewer
Next image Right Arrow
Swipe right with three
fingers
Previous image Left Arrow Swipe left with three fingers
Zoom in/zoom out "+"/"-" Pinch open/pinch close
Rotate clockwise Ctrl+K
Rotate right with two
fingers
Rotate counterclockwise Ctrl+L Rotate left with two fingers
Use Keyboard Shortcuts
Both macOS and Windows provide extensive keyboard shortcuts. For example, in macOS you
can hold down the Command key and press Q (Command-Q) to quit the current application.
To enter a keyboard shortcut, simply press a key combination on your keyboard.
You can also enter keyboard shortcuts by doing one of the following:
• Click the Parallels icon
in the menu bar, then choose Devices > Keyboard and choose a
key combination.
• Choose Devices > Keyboard and choose a key combination.
These methods are most useful for using keyboard shortcuts that include keys not included on a
Mac keyboard, such as Alt + PrintScreen.
Note: To use the F1-F12 keys on a MacBook, press and hold the Fn key and then press an F key.
Customize Keyboard Shortcuts
By default, Parallels Desktop maps common macOS keyboard shortcut key combinations to the
equivalent Windows key combinations. That way if you're used to, for example, pressing
Command-C to copy text in macOS, you don't have to switch to the Windows equivalent,
Control-C.
You can also use and customize keyboard shortcuts for switching between Coherence, Full
Screen, and Window view modes, and for showing and hiding Parallels Desktop.
Page 67

67
Use Windows on Your Mac
Customize Keyboard Shortcuts
1 Do one of the following:
• Click the Parallels icon
in the menu bar and choose Preferences.
• Right-click the Parallels Desktop icon in the Dock and choose Preferences.
2 Click Shortcuts
3 Select Windows from the Virtual Machines list in the sidebar.
Or if you're using another operating system with Parallels Desktop and you want to
customize keyboard shortcuts for it, select it in the sidebar.
When you're using a Windows application, pressing a key combination in the From column
above triggers the key combination in the To column.
4 If the lock icon is locked, click it and enter an administrator password.
5 Do one of the following:
Page 68

68
Use Windows on Your Mac
• To edit an existing key combination, double-click the key combination or select it and click
the Edit button
. Click modifier keys to select or deselect them. If you wish, change the
character in the text field.
• To delete a key combination, select it and click the Remove button
.
• To add a new key combination, click the Add button
.
If you're using multiple operating systems with Parallels Desktop, you can create keyboard
profiles for each OS (p. 124).
Note: 1. Some key combinations can't be edited or deleted.
2. There are Mac shortcuts that do not have similar shortcuts in Windows For example, you can use
the F11 key or Fn+F11 combination to see your macOS desktop with Expose, but in Windows there
are no keys or key combinations that enable you to perform the same action, because there is no
Expose in Windows.
Enable or Disable macOS System Shortcuts
In macOS the function keys on your keyboard (F1, F2, F3 and so on) control functions like
activating Dashboard and Mission Control, adjusting screen brightness, and controlling the
volume. By default, when a Windows application is active the function keys and other Mac
system shortcut key combinations (such as pressing Cmd + Tab to switch between open
applications) continue to activate macOS functions.
To set whether function keys and macOS system shortcut key combinations activate functions in
macOS or Windows:
1 Click macOS system shortcuts in the sidebar.
2 Select one of the following from the Send macOS system shortcuts menu:
• Always: When Windows or Windows applications are active, function keys and other
system shortcuts always trigger functions in Windows.
• Never: Function keys and other system shortcuts always trigger functions in macOS.
• Auto: If you're working with Windows, system shortcuts that don't function in Windows (for
example, Control-Up Arrow button to display Mission Control) trigger functions in macOS.
If you're using macOS as a guest OS and a guest OS or its application is active, system
shortcuts that are typical only to macOS trigger functions in the guest version of macOS.
Page 69

69
Use Windows on Your Mac
Customize Keyboard Menu
In Window mode you can enter key combinations by choosing Devices > Keyboard and then
choosing a key combination. To customize available key combinations, do the following:
1 Do one of the following:
• Click the Parallels icon
in the menu bar and choose Preferences.
• If the Parallels Desktop menu bar is visible at the top of the screen, choose Parallels
Desktop > Preferences.
2 Click Shortcuts > Keyboard Menu.
3 If the lock icon is locked, click it and enter an administrator password.
4 Do one of the following:
• To add a new key combination, click the Add button
.
• To remove a key combination from the Keyboard menu, select it and click the Remove
button
.
• To edit an existing key combination, double-click the key combination or select it and click
the Edit button
. Click modifier keys to select or deselect them. If you wish, change the
character in the text field.
Create New Keyboard Shortcuts
You can press certain key combinations, called keyboard shortcuts, to quickly trigger various
actions in Parallels Desktop. For example, you can press Command-Control-F to switch
Windows to Full Screen mode. You can use existing keyboard shortcuts (you can see them in
the Parallels Desktop > Preferences > Shortcuts > Application Shortcuts pane), and you can
also create your own.
To create a new keyboard shortcut:
Page 70

70
Use Windows on Your Mac
1 Make a note of the name for the command you want a shortcut for as it appears in a menu in
Parallels Desktop. For example, if you want to create a new shortcut for switching to Full
Screen mode, you can see by opening the View menu in Parallels Desktop that the name of
the menu item is Enter Full Screen:
2 In macOS, choose Apple Menu > System Preferences.
3 In System Preferences, click Keyboard and click Shortcuts.
4 Select App Shortcuts in the sidebar and click the Add button
.
5 If you want a new shortcut to work only for Parallels Desktop, choose Parallels Desktop from
the Application menu. If you leave All Applications selected, the shortcut will work for any
application that has the same command name and is currently active.
6 Enter the menu item name from Step 1.
Important: You must enter the command name exactly as it appears in the Parallels Desktop menu
or your new shortcut won't work.
7 In the Keyboard Shortcut field, press the key combination that you want to trigger the action.
Note: You must create separate shortcuts for commands that change in the menu depending on the
state of Parallels Desktop, such as Enter Full Screen and Exit Full Screen.
See and Change Windows Input Language In macOS
While you're working with Windows or any Windows applications, Parallels Desktop shows the
input language set in Windows in macOS menu bar. You may find it useful while working with
Windows in Coherence (p. 39) when the guest OS desktop is hidden.
As soon as you switch to Mac, the input language in macOS menu bar changes back to the
language that was set before you started working with Windows.
To make this feature work properly, Parallels Tools (p. 130) must be installed and the same
input languages must be available in Windows and macOS. To learn how to add input
languages, please refer to the help resources for these operating systems.
Page 71

71
Use Windows on Your Mac
Change Windows Input Language From macOS Menu Bar
To change the Windows input language from the macOS menu bar:
1 Click Windows or your Windows application to make it active.
2 Choose the language you need from the Input menu available in the macOS menu bar.
Note: The language you're selecting from the Input menu must be also available in Windows. To learn
how to add a language to the list of input sources in Windows, please refer to the Windows help
resources.
If the Input menu isn't available in macOS menu bar, you can set it to show by doing the
following:
1 In macOS, choose Apple menu > System Preferences and click Language & Text.
2 Click Input Sources.
3 Select the language or languages you want to use from the sidebar.
4 Select Show input menu in menu bar.
Mouse & Keyboard Settings
Use Mouse & Keyboard settings, you can:
• Set whether the mouse pointer behavior is optimized for games.
• Set whether the mouse pointer sticks at the edges of the window in Window mode (p. 41).
• Set whether modifier keys are optimized for games.
• Set whether edge swipe gestures are enabled.
To access Mouse & Keyboard settings:
1 Do one of the following:
• Click the Parallels icon
in the menu bar and choose Configure.
• If the Parallels Desktop menu bar is visible at the top of the screen, choose Actions >
Configure.
Page 72

72
Use Windows on Your Mac
2 Click Hardware and select Mouse & Keyboard in the sidebar.
Mouse
If you play games in a virtual machine, the Mouse menu allows you to set how to use a mouse:
• Auto-detect for games. This is a recommended default setting. If you're working with a guest
OS application, the mouse moves freely between the guest operating system and macOS.
However, when you start a game, SmartMouse automatically captures the mouse input in
the virtual machine so that you couldn't move the mouse to macOS by mistake and
automatically releases the mouse when you quit the game.
• Optimize for games. If your mouse accidentally moves to macOS when you're playing a
game, select this option to make the mouse work in the virtual machine only.
• Don't optimize for games. In some rare cases, SmartMouse may detect an application as a
game and the mouse starts working incorrectly with the application. If you have this problem,
choose Don't optimize for games.
Modifier Keys Optimization
Choose Optimize for games from the Keyboard menu if you actively use the modifier keys
Option (Alt), Ctrl, and Shift in action games. If you choose this option, signals from these keys
will be processed faster.
Note: You're not recommended to optimize keyboard for games when not playing games.
Page 73

73
Use Windows on Your Mac
Mouse Pointer Sticks at Edges
When working with a virtual machine in Window view mode (p. 41), you may often need to move
the mouse pointer to the edges of the virtual machine window to display various guest OS items:
for example, to display the Start menu in Windows 8, hidden taskbar in Windows XP, or macOS
menu bar when any of the guest macOS applications is running in full screen.
The Mouse pointer sticks at window edges option makes the mouse pointer pause for a while at
the edges of the virtual machine window and you won't move the mouse outside of the virtual
machine window by mistake. To move past the edge, just move the mouse quickly.
Windows Touchpad Gestures
Select Enable swipe from edges to enable edge swipe gestures, for example, swiping from the
right edge of the touchpad to show the Charm Bar, when working with Windows.
Note: This option is available for Windows 8 and later.
If you often accidentally swipe from the edges of the touchpad and activate features, you may
want to disable edge swipe gestures by deselecting this option.
Connect External Devices
Parallels Desktop allows you to use USB, Thunderbolt, and FireWire devices with Windows.
Many external devices, such as mice and printers, are available by default to both Windows and
macOS when you connect them to your Mac.
Some external devices, such as an Apple iPhone, can only be used with either macOS
applications or Windows applications, but not both at the same time. When you connect such a
device, you can choose whether you want to use it with macOS or Windows.
To connect an external device:
1 Connect the device to your Mac.
Page 74

74
Use Windows on Your Mac
2 If Windows is running and the device can't be used with both Windows and macOS at the
same time, you're prompted to choose which one you want to use it with. If you want
Parallels Desktop to remember your choice, select the corresponding checkbox. To use the
device with macOS applications, click the Mac icon. To use it with Windows applications,
click the Windows screen.
Important: To be able to use a USB device with Windows applications, you may need to install
Windows drivers for the device. Typically you can download drivers from the manufacturer's website.
You can also set what happens when any new external device is connected and set particular
external devices to always be used with either macOS or Windows (p. 75).
If you have a USB device that is already connected to the Mac, you can do the following to
connect it to Windows:
Page 75

75
Use Windows on Your Mac
• If Windows is running in the Full Screen or Window mode, move the mouse pointer to the top
of the screen, click Devices > USB & Bluetooth > and select the device you want to connect.
• If Windows is running in Coherence, click the Parallels icon
in the menu bar > Devices >
USB & Bluetooth > and select the device you want to connect.
Note: If the device you're trying to connect is being used by some macOS application, you will see a
warning. In this case, first you need to quit this application and then try to connect the device again.
Connect a Common Access Card reader
A Common Access Card (CAC) reader can work simultaneously in macOS and Windows.
1 Connect the CAC reader to your Mac.
2 When you're prompted to choose Windows or the Mac, click the Windows screen. The CAC
reader becomes available to both Windows and macOS.
Adjust Devices Settings
In the Devices pane of Parallels Desktop Preferences, you can:
• Set what happens when you connect any new USB, Thunderbolt, or FireWire device to your
Mac.
• Set a particular external device to always be used with either macOS or Windows.
Page 76

76
Use Windows on Your Mac
• Choose to mount Windows-connected external NTFS drives to Mac.
To access Devices Settings:
1 Do one of the following:
• Click the Parallels icon
in the menu bar and choose Preferences.
• Right-click the Parallels Desktop icon in the Dock and choose Preferences.
2 Click Devices.
Set What Happens When You Connect a New External Device to Your Mac
Choose one of the following:
• Connect it to my Mac. New external devices are automatically available for use with macOS
applications.
• Connect it to the active virtual machine. New external devices are automatically available for
use with Windows applications. If Windows isn't running, the external device is connected to
macOS.
• Ask me what to do. Each time you connect an external device, you're prompted to choose
whether you want to connect the device to Windows or the Mac.
Page 77

77
Use Windows on Your Mac
Set a Particular External Device to Always Be Used With macOS or Windows
If you know you always want a particular external device to be available to either macOS or
Windows, you can set it to do so by following the instructions below. The device must already
have been connected to your Mac at least once.
1 Click the Add (+) button towards the bottom of the window.
2 Select the device from the list.
3 Double-click the word (either Computer or some form of Windows) in the Connect To
column. The word becomes a pop-up menu.
4 Do one of the following:
• To set the device to always be available to macOS applications, choose Computer from
the menu.
• To set the device to always be available to Windows applications, choose Windows from
the menu.
To remove an existing assignment, so that the device no longer automatically connects to
macOS or Windows, select the device in the External Device column and click the Remove (-)
button.
Important: To be able to use an external device with Windows applications, you may need to install
Windows drivers for the device. Typically you can download drivers from the manufacturer's website.
Connect Bluetooth Devices
Parallels Desktop lets you connect Bluetooth devices directly to Windows.
Before connecting a Bluetooth device, Bluetooth must be enabled.
To enable Bluetooth:
1 If Bluetooth is turned off in macOS, turn it on. Choose Apple menu > System Preferences
and click Bluetooth. Then select On.
2 In Parallels Desktop, start Windows (p. 30) if it isn't already started.
3 Do one of the following:
• Click the Parallels icon
in the menu bar and choose Configure.
• If the Parallels Desktop menu bar is visible at the top of the screen, choose Actions >
Configure.
4 Click Hardware and click USB & Bluetooth in the sidebar.
5 Select Bluetooth devices.
Page 78

78
Use Windows on Your Mac
Once you've enabled Bluetooth, you can pair Bluetooth devices with your computer and they'll
work with both Windows and macOS. For instructions on pairing a Bluetooth device with your
computer, see the documentation that came with the device.
In Windows 7, you can send a file to a paired Bluetooth device that's capable of receiving files
by right-clicking the file and choosing Send to > Bluetooth.
Besides Windows, you can connect Bluetooth devices to any guest operating systems (Linux or
macOS) that support USB Bluetooth adapters.
Print from Windows
By default, Windows is set to use the same printer that you use with macOS. Simply print from a
Windows application the way you normally would.
You can also set Windows to use a different printer. There are a few ways to set up printing in
Windows:
• Share any of the printers connected to your Mac.
• Connect to a network printer.
• Connect a USB printer directly to Windows.
Share a Printer Connected to Your Mac
You can use any printer connected to your Mac with Windows applications.
Note: This functionality is also available for Linux with Parallels Tools installed (p. 131).
To print a document from a Windows application:
• Open the document and simply print it the way you normally would (for example, choose File
> Print).
In the print window, you can choose any printer that's connected to your Mac.
Share Printers Connected to Your Mac
1 Do one of the following:
• Click the Parallels icon
in the menu bar and choose Configure.
• If the Parallels Desktop menu bar is visible at the top of the screen, choose Actions >
Configure.
2 Click Hardware and select Shared Printers.
Note: The Shared Printers pane is available for Windows 2000 and newer versions of Windows.
Page 79

79
Use Windows on Your Mac
3 Select Share Mac printers with Windows.
Set a New Default Printer
By default, Windows is set to use the same default printer as your Mac. To use a different
default printer for Windows.
1 Do one of the following:
• Click the Parallels icon
in the menu bar and choose Configure.
• If the Parallels Desktop menu bar is visible at the top of the screen, choose Actions >
Configure.
2 Click Hardware and select Shared Printers.
3 Deselect Synchronize default printer.
Now you can set a new default printer in Windows the way you normally would.
Show Page Setup Before Printing
When you choose to print a document from Windows, first you need to set how the document
will be printed. You usually have to specify various printing settings, such as orientation, page
size, whether to print the document on one or both sides, etc. Once everything is ready and you
click Print in Windows, the macOS window with printing settings appears as well. It's done by
default for you just to ensure that the document will be printed exactly the way you want.
To make the documents print without showing this macOS page setup window:
1 Do one of the following:
• Click the Parallels icon
in the menu bar and choose Configure.
• If the Parallels Desktop menu bar is visible at the top of the screen, choose Actions >
Configure.
2 Click Hardware and select Shared Printers.
3 Deselect Show page setup options before printing.
Add a Printer in Linux
The procedure of adding a printer in a Linux guest operating system depends on the Linux
distribution. In this example, we describe how to add a printer to a virtual machine running RHEL
5.4 Server. However, you can use these guidelines as general instructions on how to add a
printer to a Linux virtual machine:
1 Start the Linux virtual machine and log in when the guest operating system boots up.
Note: You must log in as root or acquire root privileges after successful login. If you don't do that,
you will be required to enter the root password when starting the system-config-printer
administration tool in the next step.
Page 80

80
Use Windows on Your Mac
2 Start the system-config-printer administration tool by doing one of the following:
• Click System > Administration > Printing; or
• Start the Terminal and enter the following command:
system-config-printer
3 In the displayed window, click New Printer.
4 In the next window, you must type a printer name. Under this name the printer will be
displayed in your Linux guest operating system. You can also enter the printer description
and location. When ready, click Forward.
5 Now you have to specify how your Mac printer will be shared with the virtual machine. As the
printer is connected to the virtual machine printer port, select LPT #1 (or another port to
which the printer is connected) and click Forward.
6 Then specify the printer manufacturer and model. No matter what printer you have, choose
either HP Color LaserJet 8500 PS or Apple Color LW 12/660 PS. When ready, click Forward.
7 Click Apply to finish setting up the printer.
Now the printer is properly configured and you can use it to print documents from your Linux
virtual machine.
Set Up a Printer Using Bonjour
If you have more than one Mac connected to your home network, you can use Apple Bonjour for
Windows to share any printer connected to any of them.
To see the list of all Windows operating systems supported by Bonjour, please refer to
http://support.apple.com/kb/dl999.
Important: To share a Mac printer with Windows via Apple Bonjour, Windows must be configured to
work in the Bridged networking mode (p. 90).
To set up a printer via Bonjour:
1 Be sure the printer you want to use is set to be shared on your Mac. To share a printer, in
macOS choose Apple menu > System Preferences and click Print & Fax. Then select the
printer and select Share this printer.
2 Open Parallels Desktop and start Windows.
3 When Windows starts, go to http://support.apple.com/kb/dl999 and download the Bonjour
for Windows installation package.
4 In Windows, start the Bonjour installation by launching the BonjourPSSetup.exe file from
the folder in which it was downloaded.
5 Follow the onscreen instructions to install Bonjour for Windows.
6 Start the Bonjour Printer wizard either by double-clicking its icon on the desktop or by
selecting Start -> All Applications -> Bonjour Print Services -> Bonjour Printer Wizard.
Page 81

81
Use Windows on Your Mac
7 In the Browse for Bonjour Printers window, select the printer that you want to use and click
Next.
8 If the next window you see is Completing the Bonjour Printer Wizard, then the driver required
by this printer is available in the Windows driver library and the printer has been successfully
configured. Click Finish and you can start using the newly added printer to print documents
from Windows applications.
However, if the next window you see is Install Bonjour Printer, you must choose the printer
manufacturer and model.
If the required printer model is not listed, you can do one of the following:
• Install the printer drivers in Windows. Then click Have Disk button in the Install Bonjour
Printer window and specify the path to the .inf file located in the folder where you
installed the printer drivers.
• In the Install Bonjour Printer window, select Generic in the Manufacturer list and
Generic/Postscript in the Model list.
Click Next.
9 In the Completing the Bonjour Printer Wizard window, click Finish. You can start using the
newly added printer to print documents from Windows applications.
Set Up a Network Printer
You can install a network printer directly into Windows.
Before installing a network printer in Windows, make sure that:
Page 82

82
Use Windows on Your Mac
• Your Mac can access the Internet.
• Windows is configured to work in either the Shared networking mode (p. 89) or Bridged
networking mode (p. 90) and can access the Internet too.
• The user account in Windows has permission to access the network printer.
• You know the printer IP address.
After that, you can log in to Windows and install a network printer.
In Windows
Before adding a network printer in Windows, download and install an appropriate printer driver.
For detailed information on installing the printer driver, refer to the printer manufacturer
documentation.
To add a network printer in Windows 7 or Windows Vista:
1 Open the Windows Start menu and select Control Panel.
2 In the Control Panel window, select Hardware and Sound and click Add a printer in the
Devices and Printers section (Printers in Windows Vista). The Add Printer wizard opens.
3 In the first window, click Add a network, wireless or Bluetooth printer.
4 In the next window, click The printer that I want isn't listed.
5 In the Find a printer by name or TCP/IP address window, select Add a printer using a TCP/IP
address or hostname and click Next.
6 In the Type a printer hostname or IP address window, do the following:
1. Select TCP/IP Device from the Device type menu.
2. Specify the printer IP address in the Hostname or IP address field.
3. Clear the Query the printer and automatically select the driver to use option if it is
selected.
4. When ready, click Next.
7 If prompted to specify additional port information, choose Standard, select Generic Network
Card from the list, and click Next.
8 In the Install Printer Software window, specify the manufacturer and model of the network
printer.
If the required printer model is not listed, click Have Disk button and specify the path to the
.inf file located in the folder where you installed the printer driver.
When ready, click Next.
9 Continue with the printer configuration procedure. When the printer is added to Windows,
you can use it to print documents from Windows XP.
To add a network printer in Windows XP:
1 Open the Windows Start menu and select Control Panel.
Page 83

83
Use Windows on Your Mac
2 In the Control Panel window, double-click the Printers and Faxes item.
3 Click the Add a printer link to open the Add Printer wizard.
4 In the Welcome to the Add Printer Wizard window, click Next.
5 In the Local or Network Printer window, select Local printer attached to this computer and
clear the Automatically detect and install my Plug and Play printer option if it is also selected.
When ready, click Next.
6 In the Select a Printer Port window, select Create a new port and specify Standard TCP/IP
Port as the port type. When ready, click Next.
7 In the Welcome to the Add Standard TCP/IP Printer Port Wizard window, click Next.
8 In the Add Port window, specify the network printer IP address and click Next.
9 If prompted to specify additional port information, choose Standard, select Generic Network
Card from the list, and click Next.
10 In the Completing the Add Standard TCP/IP Printer Port Wizard window, click Finish.
11 In the Install Printer Software window, specify the manufacturer and model of the network
printer.
If the required printer model is not listed, click Have Disk button and specify the path to the
.inf file located in the folder where you installed the printer driver.
When ready, click Next.
12 Continue with the printer configuration procedure. When the printer is added to Windows,
you can use it to print documents from Windows XP.
In Linux
The procedure of setting up a network printer in a Linux or FreeBSD guest operating system
depends on the Linux or FreeBSD distribution and printer. In this example, we describe how to
set up a network printer in a virtual machine running RHEL 5.4 Server. However, you can use
these guidelines as general instructions on how to set up a network printer in a Linux or
FreeBSD virtual machine.
Note: For more detailed information, refer to the CUPS documentation.
To set up a network printer:
1 Start the virtual machine.
2 Make sure the following components are installed in the guest operating system:
• Common UNIX Printing System (CUPS). Installation instructions can be found at CUPS
site;
• Samba service. Installation instructions can be found at Samba site; and
• A Web browser, since we consider controlling CUPS via web interface.
Page 84

84
Use Windows on Your Mac
Note: To set up a network printer, you should have root privileges.
3 Download and install an appropriate printer driver. For detailed information on installing the
printer driver, refer to the printer manufacturer's documentation.
4 Start Common UNIX Printing System. In the Terminal, type the command:
/etc/init.d/cups start
5 Start a web browser and type either the IP address of your virtual machine or
http://127.0.0.1:631.
6 Click the Add Printer button.
7 In the Add New Printer window, specify a printer name. Under this name the printer will be
displayed in the guest operating system. You can also enter the printer description and
location. When ready, click Forward.
8 In the Device for <Printer Name> window, select AppSocket/HP JetDirect and click
Continue.
9 In the Device URI for <Printer Name> window, specify the printer IP address in the following
format:
socket://<printer IP address>
When ready, click Continue.
10 In the Make/Manufacturer for <Printer Name> window, select the manufacturer of your
printer and click Continue.
11 In the Model/Driver for <Printer Name> window, select the model of your printer and click
Add Printer.
12 Enter the root password when prompted.
CUPS performs the installation. If the installation is successful, the "Printer <name> has
been configured successfully" message is displayed. Now you can use this printer to
print documents from the virtual machine.
Set Up a USB Printer
You can connect a USB printer directly to Windows. In this case, the printer isn't available to
macOS. If you want to use the printer to print both from macOS and from Windows, see Share a
Mac Printer (p. 78).
To connect a USB printer directly to Windows:
1 In Parallels Desktop, start Windows.
2 When Windows starts, install the printer driver. For detailed information on how to do that,
refer to the printer manufacturer's documentation. Typically you can find drivers on the
manufacture's website.
3 Do one of the following:
• If the USB printer is already connected to your Mac:
Page 85

85
Use Windows on Your Mac
If Windows is in Coherence, click the Parallels icon in the menu bar, choose Devices >
USB and select this printer from the list.
If Windows is working in a separate window, in the Mac menu bar click Devices > Printer
> Printer and select this printer from the list.
• If the USB printer is not connected to your Mac, connect it. In the New USB device
detected window, connect the printer to Windows.
4 In Windows, follow the Add New Hardware wizard instructions.
Create a PDF File
When working with a text document, web page, or other file, you may wish to create a Portable
Document Format (PDF) file out of it. A PDF file preserves the format and layout of a document,
so others can see it as if it were printed on the page.
To create a PDF file, select Print to PDF (Mac Desktop) when choosing a printer. A PDF file is
saved on the Mac desktop.
Note: This functionality is available for Windows guest operating systems provided that Parallels Tools
are installed (p. 128) and all Mac printers are shared (p. 78) with Windows.
Use the Built-in iSight Camera or Another
Webcam
If your Mac or display has a built-in iSight camera, or if you connect a compatible external
webcam, by default you can use it with Windows.
To use a built-in iSight or external camera with Windows:
• Simply open a Windows application that uses a camera, you should be able to select the
iSight or external camera for use with the application.
Note: If you are running a guest OS other than Windows XP Service Pack 2 or later, Windows Vista,
or Windows 7, be sure you have USB video device class (UVC) drivers installed.
Disable Camera Sharing
If you don't want Windows applications to be able use connected webcams or the built-in iSight
camera, you can disable camera sharing by doing the following:
1 Do one of the following:
• Click the Parallels icon
in the menu bar and choose Configure.
• If the Parallels Desktop menu bar is visible at the top of the screen, choose Actions >
Configure.
Page 86

86
Use Windows on Your Mac
2 Click Hardware and click USB & Bluetooth.
3 Deselect Web cameras.
Show a Presentation on an External Monitor or
Projector
You can easily connect your Mac to an external monitor or projector and show a presentation
from a Windows application, with little configuration needed.
To do so:
1 Start Windows (p. 30) if it isn't already running.
2 Connect your Mac to the external monitor or projector as you normally would. A message
appears asking if you're going to show a presentation.
3 If you want to show the exact contents of your computer's display on the external display or
projector, select Mirror display.
If you don't select Mirror display, certain applications, such as Microsoft Powerpoint, may
show a presenter view on your computer while showing only the presentation on the external
display or projector.
Page 87

87
Use Windows on Your Mac
4 Click Yes. Windows switches to Presentation mode, displayed at full screen on both your
computer's display and external display or projector. After that, you can start showing your
presentation.
Note: To learn how to choose on which display the presentation is shown, please refer to Help of the
application you're using for presentations.
Important! While you're working in Presentation mode, changing display settings in Windows may
cause the presentation to malfunction.
Protect Your Data
You probably have important documents, photos, and more on your Mac. When running
Windows on your Mac, it's especially important to protect your data from viruses and
unauthorized use. Read this section to learn how.
Isolate Windows from Mac
You can isolate Windows from macOS, so that they no longer share folders, profiles, and
applications, connected external devices are no longer automatically accessible by Windows,
Windows and Mac no longer synchronize volume, and you can no longer copy or move objects
between Windows and macOS. Isolating Windows from macOS may provide a higher level of
security by not allowing compromised items from one OS to come into contact with the other.
To isolate Windows from macOS
1 Do one of the following:
• Click the Parallels icon
in the menu bar and choose Configure.
• If the Parallels Desktop menu bar is visible at the top of the screen, choose Actions >
Configure.
2 Click Security.
3 Select Isolate Windows from Mac.
Work in Windows Without Saving Changes
If you don't want Windows to store the changes you make to it during the working session (for
example, when testing some Windows applications that may damage Windows), you can start
Windows in Rollback Mode:
Note: This feature is available in Parallels Desktop for Mac Pro Edition only.
1 Open Parallels Desktop.
2 From Control Center select Windows that you want to start in Rollback Mode and click
Actions > Start in Rollback Mode.
Page 88

88
Use Windows on Your Mac
Set Windows to Always Start in Rollback Mode
If you want Windows to always start in Rollback Mode:
1 Open Parallels Desktop.
2 From Control Center select Windows and click Actions > Configure > Security.
3 Choose Ask me what to do from the Rollback Mode menu.
Note: If you have the automatic compression of virtual disks (p. 94) enabled, it will become disabled
after you enable Rollback Mode.
Set Password Requirements
For added security, you can set Parallels Desktop to require an administrator password to
perform certain functions.
1 Do one of the following:
• Click the Parallels icon
in the menu bar and choose Configure.
• If the Parallels Desktop menu bar is visible at the top of the screen, choose Actions >
Configure.
2 Click Security.
3 Select one or more of the following to require a macOS administrator password to perform
the selected action:
• Change virtual machine state: A password is required to start, stop, suspend, pause, or
shut down (p. 35) Windows.
• Exit full screen mode: A password is required to exit full screen mode (p. 42).
• Manage snapshots: A password is required to create or delete a snapshot (p. 114), or
revert to a snapshot.
• Change virtual machine configuration: A password is required to change the virtual
machine configuration.
Encrypt Windows to Protect It from Unauthorized Use
If you store any important data using Windows applications, it is highly recommended that you
encrypt Windows to protect your data from any unauthorized use.
Encrypt Windows
To encrypt Windows (it must be shut down):
1 Select Windows and click Actions > Configure > Security.
2 On the Security tab, click Turn On, specify a password, and click OK.
Page 89

89
Use Windows on Your Mac
Warning: The specified password is very important. You must record it. Without this password, you
can't start Windows.
Change Your Password
To change the password for an encrypted Windows (it must be shut down):
1 Select Windows and click Actions > Configure > Security.
2 On the Security tab, click Change Password, specify a new password, and click OK.
Remove Encryption from Windows
To remove encryption from Windows (it must be shut down):
1 Select Windows and click Actions > Configure > Security.
2 On the Security tab, click Turn Off.
Connect to the Internet or a Network
Parallels Desktop allows you to use three types of networking with Windows:
• Shared Networking: Windows applications share a network connection with macOS. This is
the default setting.
• Bridged Ethernet: Windows can use one of your Mac's network adapters. This makes
Windows appear as a separate computer on the network.
• Host-only networking: Windows can access only your Mac.
In most cases, you don't need to adjust network settings. If your Mac is set to connect to a
network or to the Internet, Windows applications have access to the same network and the
Internet.
The Bridged Ethernet networking mode is more complex and you may need to contact your
system administrator to set it up properly.
Read on for detailed information on these types of networking and how to configure them.
Share Network Access Between macOS and Windows
By default, Windows is set to access the network via macOS. Windows applications can access
other computers on your local network and the Internet by using the IP address of your Mac.
Windows does not have its own IP address on the network.
Page 90

90
Use Windows on Your Mac
In most cases, you don't need to adjust network settings. If your Mac is set to connect to a
network or to the Internet, Windows applications have access to the same networks and the
Internet.
You may wish to use Shared Network mode in the following cases:
• Your Mac accesses the Internet via a modem or another non-Ethernet device.
• You need to access the Internet from inside Windows but are concerned about security.
• You have problems with working in the Bridged Ethernet mode.
To configure Windows to use Shared Networking:
1 Do one of the following:
• Click the Parallels icon
in the menu bar and choose Configure.
• If the Parallels Desktop menu bar is visible at the top of the screen, choose Actions >
Configure.
2 Click Hardware and then click Network.
3 In the Network pane, make sure that the Shared Network option is selected.
For the information about troubleshooting networking problems, refer to the Parallels knowledge
base http://kb.parallels.com/ available at the Parallels website.
Apply Separate Network Settings to Windows
When operating in the Bridged Ethernet mode, Windows appears on the network as a standalone computer with its own IP address and network name.
Page 91

91
Use Windows on Your Mac
Note: The Bridged Ethernet networking mode is more complex than the Shared Networking mode and
you may need to contact your system administrator to configure it properly.
To configure Windows to work in the Bridged Ethernet mode:
1 Do one of the following:
• Click the Parallels icon
in the menu bar and choose Configure.
• If the Parallels Desktop menu bar is visible at the top of the screen, choose Actions >
Configure.
2 Click Hardware and then click Network.
3 In the Network pane, select the appropriate network adapter from the list. To connect the
virtual machine's adapter to the active network adapter of your Mac, choose Default Adapter.
Note: In the MAC address field, you can change the MAC address currently assigned to Windows.
MAC addresses are automatically generated when you first set up Windows. However, you can
modify the default MAC address by typing another value in the MAC address field or clicking the
Generate button. When entering a new MAC address, make sure that it is unique within your
network.
If you can't configure Windows to function in the Bridged Ethernet mode, consider using Shared
Networking (p. 89).
For the information about troubleshooting networking problems, refer to the Parallels knowledge
base http://kb.parallels.com/ available at the Parallels website.
Page 92

92
Use Windows on Your Mac
Use Host-Only Network Settings
Parallels Desktop provides a closed network that is accessible only to macOS and Windows.
macOS is connected to this network via the Parallels Host-Only Networking adapter
automatically created on your Mac during the Parallels Desktop installation. The addresses for
Windows are provided by the Parallels DHCP server.
To configure Windows to use Host-Only Networking:
1 Do one of the following:
• Click the Parallels icon
in the menu bar and choose Configure.
• If the Parallels Desktop menu bar is visible at the top of the screen, choose Actions >
Configure.
2 Click Hardware and then click Network.
3 In the Network pane, make sure that the Host-Only option is selected.
For the information about troubleshooting networking problems, refer to the Parallels knowledge
base http://kb.parallels.com/ available at the Parallels website.
Use Wi-Fi with Windows
If your Mac is already connected to the Internet wirelessly, by default Windows is also set to
access the Internet wirelessly, with no setup required.
You can also bridge your virtual machine to Wi-Fi. When operating in this mode, Windows
appears on the network as a stand-alone computer with its own IP address and network name.
To bridge the virtual machine to Wi-Fi:
1 Do one of the following:
• Click the Parallels icon
in the menu bar and choose Configure.
Page 93

93
Use Windows on Your Mac
• If the Parallels Desktop menu bar is visible at the top of the screen, choose Actions >
Configure.
2 Click Hardware and then click Network.
3 In the Network pane, choose Wi-Fi from the list.
After you perform these steps, Windows is able to connect to the Internet through the Wi-Fi
adapter of your Mac.
If you can't configure your virtual machine to function in the Bridged Ethernet mode, consider
using Shared Networking (p. 89).
For the information about troubleshooting networking problems, refer to the Parallels knowledge
base http://kb.parallels.com/ available at the Parallels website.
Connect Windows to a VLAN
If your Mac is a VLAN (virtual local area network) member, Parallels Desktop allows you to
bridge Windows to this VLAN.
To bridge Windows to the VLAN, do one of the following:
• Click the Parallels icon
in the menu bar and choose Configure.
• If the Parallels Desktop menu bar is visible at the top of the screen, choose Actions >
Configure.
1 Click Hardware and then click Network.
2 Select Bridged Network > VLAN from the Source list.
Windows is bridged to the selected VLAN.
Optimize Performance
If Windows isn't working as speedily as you'd like, there are several simple ways you can
optimize its performance. This section contains many helpful instructions for doing just that.
Set How Much Memory is Allocated to Windows
Parallels Desktop is set to allocate a certain amount of your Mac's available RAM memory to
Windows and the rest to macOS. If too much memory is allocated to Windows, macOS may
slow down, which in turn can cause Windows applications to slow down because they're running
on top of macOS. If, on the other hand, too much memory is allocated to macOS, then macOS
applications may run well but Windows applications might slow down.
To optimize the performance of both Windows and macOS, set the memory allocated to
Windows to be somewhere within the recommended range.
Page 94

94
Use Windows on Your Mac
To set how much memory is allocated to Windows:
1 Shut down Windows (p. 35).
2 Choose Actions > Configure > Hardware > CPU & Memory.
3 Move the memory slider to somewhere within the recommended range, indicated by the
graphic under the slider (see above).
If you use Windows applications that require lots of memory, like 3D or video production
applications, it's best to set the memory allocation towards the high end of the range (move
the slider to the right). If not, it's usually best to set it closer to the middle.
Note: No matter how much memory (RAM) your Mac has, the maximum amount of memory that can
be assigned to Windows is 8 GB. However, if you're using Parallels Desktop for Mac Pro Edition, the
maximum amount of memory that can be assigned to Windows is 64 GB.
If you change this setting and then you don't like how Windows is performing, then try a different
setting.
Note: If you want to prevent Virtual Machine Configuration from unauthorized changes, click the Lock
icon at the bottom of the window. The next time someone wants to change the settings in any
pane of Virtual Machine Configuration, an administrator's password will be required.
Optimization Settings
Using Optimization settings, you can limit the virtual machine resource usage.
Note: The Optimization pane is available in Parallels Desktop for Mac Pro and Business Editions only.
To access Optimization settings:
1 Do one of the following:
• Click the Parallels icon
in the menu bar and choose Configure.
• If the Parallels Desktop menu bar is visible at the top of the screen, choose Actions >
Configure.
Page 95

95
Use Windows on Your Mac
2 Click Options and select Optimization.
If your Mac lacks resources for running two or more virtual machines at a time, you can limit the
virtual machine resource usage for the virtual machine doing more important work to have more
resources. Drag the slider between Low, Medium, and No limit points. If you change this setting
and then don't like how Windows is performing, then try a different setting.
Speed Up Games and Graphics Applications
With Parallels Desktop, you can run games and applications that require video cards with
DirectX or OpenGL support. To do so, you must enable 3D acceleration.
For information on whether a application requires DirectX or OpenGL support, see the materials
that came with the game or application.
To enable 3D acceleration:
1 Shut down the virtual machine. (p. 35)
2 Choose Actions > Configure > Hardware.
3 In the Graphics pane, select a version of DirectX from the 3D acceleration menu.
Note: Parallels Tools must be installed (p. 219) before you can enable 3D acceleration. Parallels
Tools are installed by default when you set up Windows.
Page 96

96
Use Windows on Your Mac
Pause Windows When No Applications Are Open
You can conserve your computer's resources by setting Windows to pause automatically when
no Windows applications are open. That way, more resources such as RAM and CPU can be
used for macOS applications.
To set Windows to pause when no applications are open:
1 Do one of the following:
• Click the Parallels icon
in the menu bar and choose Configure.
• If the Parallels Desktop menu bar is visible at the top of the screen, choose Actions >
Configure.
2 Click Options and select Startup and Shutdown.
3 Select Pause Windows when possible.
Optimize Virtual Machine for Games, Graphics, Productivity, or
Development
When creating a virtual machine, you can optimize it according to your needs. You can choose
to configure the virtual machine for:
• Productivity. Choose this profile if you're using the virtual machine for your everyday work
with text editors, email, web browsers, etc.
• Games only. Choose this profile if you're using the virtual machine to play PC games on your
Mac.
If you're using Parallels Desktop for Mac Pro Edition, you can configure your virtual machine
also for:
• Design. Choose this profile if you're using the virtual machine to work with graphics
applications.
• Software development. Choose this profile if you're using the virtual machine to develop and
test software.
• Software testing. Choose this profile if you're using the virtual machine to test software in an
isolated environment.
You can change this setting after the virtual machine is created:
1 Start Parallels Desktop.
2 In Control Center, right-click the virtual machine (it must be shut down) and choose
Configure.
3 On the General tab, click Change.
4 Select the profile that best fits your need.
Page 97

97
Use Windows on Your Mac
Note: If you made any changes to the virtual machine configuration and then select a new profile, your
changes may be reset to this profile default values.
Work with Windows in Travel Mode
If you often travel with your MacBook, you must have come across the situations when you had
no power adapter at hand to charge the Mac's batteries or experienced some problems when
connecting to public networks.
Travel Mode makes Windows use less energy to extend the Mac's battery life and adjusts
settings to connect to public networks.
Enter Travel Mode
To switch Windows to Travel Mode, do one of the following:
• If Windows is running in the Full Screen or Window mode, move the mouse pointer to the top
of the screen and click Actions > Enter Travel Mode.
• If Windows is running in Coherence, click the Parallels icon
in the menu bar and choose
Actions > Enter Travel Mode.
Quit Travel Mode
To quit Travel Mode, do one of the following:
• If Windows is running in the Full Screen or Window mode, move the mouse pointer to the top
of the screen and click Actions > Quit Travel Mode.
• If Windows is running in Coherence, click the Parallels icon
in the menu bar and choose
Actions > Quit Travel Mode.
Page 98

98
Use Windows on Your Mac
Enter and Quit Travel Mode Automatically
You can also configure your virtual machine to enter and quit Travel Mode automatically:
1 Do one of the following:
• Click the Parallels icon
in the menu bar and choose Configure.
• Click Actions in the Parallels Desktop menu bar at the top of the screen and choose
Configure.
2 Click Options and select Travel Mode.
3 To enter Travel Mode automatically, choose one of the following:
• Always when on battery power: The virtual machine enters Travel Mode when the Mac
starts working on battery power.
• When battery power is: Choose from the menu when you want your virtual machine to
enter Travel Mode.
• Never: The virtual machine never enters Travel Mode automatically.
4 To quit Travel Mode automatically, choose one of the following:
• When connected to power: The virtual machine quits Travel Mode when you connect
your Mac to power.
• Never: The virtual machine never quits Travel Mode automatically.
Schedule Windows Maintenance
From time to time, Windows needs to do various maintenance tasks like installing updates,
cleaning and defragmenting the disk(s), etc. When Windows is doing these tasks, performance
may slow down.
To avoid low performance when you're busy with important tasks, schedule Windows to run
maintenance when you're away or at any time you like:
1 Do one of the following:
• Click the Parallels icon
in the menu bar and choose Configure.
• Click Actions in the Parallels Desktop menu bar at the top of the screen and choose
Configure.
2 Click Options and select Maintenance.
3 Select Start maintenance and choose the day and time from the corresponding menus.
Once ready, Windows will do maintenance at the specified time.
Page 99

99
Use Windows on Your Mac
Use Windows on Your iPad, iPhone, or Android
Device
Parallels Access is a product created by Parallels that allows you to work with your Mac or
Windows PC and their applications remotely from your iPad, iPhone or Android device. It also
allows you to work with a remote computer via a web browser.
If you have Parallels Desktop installed on your Mac, you can use the Parallels Access app to
access and control Windows.
Parallels Access lets you:
• Use any of your Windows applications on your mobile device
• Remotely start, stop, and reset Windows
• Connect over Wi-Fi or 3G
• Access Windows from anywhere over the Internet
Get Started
Before you can use Parallels Access, you must do the following:
1 On your iPad, iPhone or Android device, download and install Parallels Access from the App
Store or Google play.
2 Be sure you have installed Windows on your Mac (p. 17).
3 In Parallels Desktop, do one of the following:
• Click the Parallels icon
in the menu bar and choose Preferences.
• Right-click the Parallels Desktop icon in the Dock and choose Preferences.
4 Click Access.
5 Install the Parallels Access agent on your Mac by clicking Install.
You only have to do these steps once.
Access Windows from your iPad, iPhone or Android device
1 Turn on your Mac.
Your Mac must be on for Parallels Access to access and use Windows.
2 Open Parallels Access on your iPad, iPhone or Android device and log in to your account
using the same email and password you used to register Parallels Desktop.
3 Tap your Mac in the list of available Macs.
Page 100

100
Use Windows on Your Mac
When you access Windows for the first time, you see tips about gestures you can use to control
Windows. Tap Close to go to the Windows desktop.
For more information about using Parallels Access, please see here.
Save Time With Parallels Toolbox
Parallels Toolbox is a set of handy tools that may help you to save time during your daily routine.
With Parallels Toolbox, you can:
• take screenshots;
• record audio;
• archive and unarchive files;
• block the Mac's camera and mute the microphone to prevent them from unauthorized
access;
• set a countdown to count down days to a specific event;
• lock the Mac's screen to ensure that other users cannot access your desktop while you're
away;
• prevent your Mac from going to sleep;
• and much more.
Please refer to the Parallels Toolbox User's Guide available online for the detailed information
on what and how you can do with Parallels Toolbox.
Install Parallels Toolbox on your Mac
To install Parallels Toolbox:
1 Do one of the following:
• Click the Parallels icon
in the menu bar and choose Preferences. Then click Toolbox.
• Right-click the Parallels Desktop icon in the Dock and choose Preferences. Then click
Toolbox.
2 Click Install and follow the onscreen instructions.
Save a Picture of the Screen
To save a picture of Windows in Window Mode:
• Choose View > Take Screenshot.
A file named Parallels Picture.png is saved on the macOS desktop.
 Loading...