

Page 1

Parallels Cloud Server 6.0
Getting Started Guide
Copyright © 1999-2012 Parallels IP Holdings GmbH and its affiliates. All rights reserved.
Page 2

Parallels IP Holdings GmbH.
Vordergasse 59
CH8200 Schaffhausen
Switzerland
Tel: + 41 526320 411
Fax: + 41 52672 2010
www.parallels.com
Copyright © 1999-2012 Parallels IP Holdings GmbH and its affiliates. All rights reserved.
This product is protected by United States and international copyright laws. The product’s underlying technology,
patents, and trademarks are listed at http://www.parallels.com/trademarks.
Microsoft, Windows, Windows Server, Windows NT, Windows Vista, and MS-DOS are registered trademarks of Microsoft
Corporation.
Apple, Mac, the Mac logo, Mac OS, iPad, iPhone, iPod touch, FaceTime HD camera and iSight are trademarks of Apple
Inc., registered in the US and other countries.
Linux is a registered trademark of Linus Torvalds.
All other marks and names mentioned herein may be trademarks of their respective owners.
Page 3

Contents
Introduction ............................................................................................................... 5
About Parallels Cloud Server 6.0 ..................................................................................... 6
About This Guide ............................................................................................................ 7
Organization of This Guide .......................................................................................................7
Documentation Conventions ....................................................................................................7
Getting Help .................................................................................................................... 8
Feedback ........................................................................................................................ 9
Key Terms ...................................................................................................................... 9
Installing Parallels Cloud Server 6.0 ....................................................................... 10
Hardware Compatibility ................................................................................................. 10
Requirements for Standalone Installations ............................................................................. 11
Requirements for Servers in a Parallels Cloud Storage Cluster .............................................. 12
Software Compatibility ................................................................................................... 13
Network Requirements .................................................................................................. 13
Obtaining Parallels Cloud Server 6.0 Distribution Set ...................................................... 13
Starting Installation ........................................................................................................ 14
Choosing the Installation Type ....................................................................................... 15
Installing in Graphical Mode ........................................................................................... 15
Reading and Accepting the License Agreement .................................................................... 15
Defining Network Settings ..................................................................................................... 16
Choosing the Installation Device ............................................................................................ 18
Entering the License .............................................................................................................. 20
Installing on Parallels Cloud Storage ...................................................................................... 21
Defining Time Zone Settings .................................................................................................. 27
Setting a Password ............................................................................................................... 28
Partitioning the Hardware Drive ............................................................................................. 29
Installing Parallels Virtual Automation ..................................................................................... 33
Finishing the Installation ......................................................................................................... 34
Page 4

Contents
Starting to Work in Parallels Cloud Server 6.0 ....................................................... 35
Using CLI ...................................................................................................................... 36
Using Parallels Virtual Automation .................................................................................. 37
Setting Up Parallels Virtual Automation .................................................................................. 39
Installing Parallels Virtual Automation Manually ...................................................................... 40
Connecting to a Server .......................................................................................................... 41
Performing Basic Operations in Parallels Cloud Server 6.0 .................................. 42
Creating Virtual Machines and Containers ...................................................................... 43
Supported Guest Operating Systems .................................................................................... 45
Performing Initial Configuration ...................................................................................... 46
Configuring Network Settings ................................................................................................ 46
Setting Passwords for Virtual Machines and Containers ........................................................ 47
Starting, Stopping, and Querying Status of Virtual Machines and Containers .................. 48
Listing Virtual Machines and Containers ......................................................................... 49
Deleting Virtual Machines and Containers ...................................................................... 49
Running Commands in Virtual Machines and Containers ................................................ 50
Monitoring Resources ................................................................................................... 51
Migrating Virtual Machines and Containers ..................................................................... 53
Managing Virtual Machine and Container Backups ......................................................... 55
Index ........................................................................................................................ 56
Page 5

Key Terms .............................................................................................................. 9
C
HAPTER
1
Introduction
Parallels Cloud Server 6.0 is a virtualization solution that allows you to run multiple virtual machines
and Containers on a single physical server.
This chapter provides general information about Parallels Cloud Server and this guide. You will learn
• Parallels Cloud Server basics (p. 6)
• goals and target audience of the guide (p. 7)
• guide organization (p. 7)
• documentation conventions used in the guide (p. 7)
• resources to consult to get more information on Parallels Cloud Server (p. 8)
• ways to submit feedback to the Parallels documentation team (p. 9)
In This Chapter
About Parallels Cloud Server 6.0 ............................................................................. 6
About This Guide .................................................................................................... 7
Getting Help ........................................................................................................... 8
Feedback ............................................................................................................... 9
Page 6

Introduction
About Parallels Cloud Server 6.0
Parallels Cloud Server 6.0 is a virtualization solution that allows you to simultaneously run multiple
Parallels virtual machines and Containers on a single physical server. With Parallels Cloud Server,
you can efficiently share your server's hardware resources among virtual machines and Containers.
Parallels Cloud Server is installed directly on the server hardware and does not need any operating
system to function. Once it is installed, Parallels Cloud Server allows you to create virtual machines
and Containers and manage them using the following tools:
• Parallels command-line interface (CLI). The command-line interface comprises a set of
Parallels command-line utilities that you can use to manage virtual machines and Containers,
both locally and remotely.
• Parallels Virtual Automation (PVA). Parallels Virtual Automation is a remote management tool
that allows you to manage physical servers and their virtual machines and Containers with the
help of a standard Web browser on any platform.
Graphically, a server with the Parallels Cloud Server software installed can be represented as
follows:
6
Page 7

Introduction
About This Guide
The Getting Started With Parallels Cloud Server 6.0 guide provides information on installing and
deploying Parallels Cloud Server on your server, including the pre-requisites and the stages you
shall pass.
The guide is intended for anyone interested in deploying Parallels Cloud Server 6.0 on their servers.
Organization of This Guide
This guide is organized in the following way:
Chapter 1, Introduction (p. 5), gives an overview of the Parallels Cloud Server product and this
guide.
Chapter 2, Installing Parallels Cloud Server 6.0 (p. 10), describes the hardware and software
requirements your server must meet to successfully install Parallels Cloud Server. It also provides
detailed information on how to install Parallels Cloud Server.
Chapter 3, Installation in a Nutshell, gives an overview of the steps to take to install Parallels
Cloud Server on a physical server.
Chapter 4, Starting to Work in Parallels Cloud Server 6.0 (p. 35), provides instructions on
setting up Parallels Virtual Automation, a web-based tool for managing virtual machines and
Containers.
Chapter 5, Performing Basic Operations in Parallels Cloud Server 6.0 (p. 42), familiarizes you
with the way to perform the main operations on your virtual machines and Containers: create new
virtual machines and Containers, start and stop them, adjust their configuration, and so on.
Documentation Conventions
Before you start using this guide, it is important to understand the documentation conventions used
in it.
The table below presents the existing formatting conventions.
Formatting convention Type of Information Example
Special Bold
Items you must select, such as
menu options, command buttons,
or items in a list.
Titles of chapters, sections, and
subsections.
Go to the Resources tab.
Read the Basic Administration chapter.
7
Page 8

Introduction
Italics
Preformatted
Saved parameters for Container
Monospace Bold
C:\vzlist -a
Monospace
Key+Key Key combinations for which the
Used to emphasize the
importance of a point, to
introduce a term or to designate a
command-line placeholder, which
is to be replaced with a real name
or value.
The names of commands, files,
and directories.
On-screen computer output in
your command-line sessions;
source code in XML, C++, or
other programming languages.
What you type, as contrasted with
on-screen computer output.
user must press and hold down
one key and then press another.
These are the so-called OS templates.
To remove a Container, type prlctl
delete ctid.
Use prlctl start to start a Container.
101
Ctrl+P, Alt+F4
Besides the formatting conventions, you should also know about the document organization
convention applied to Parallels documents: chapters in all guides are divided into sections, which,
in their turn, are subdivided into subsections. For example, About This Guide is a section, and
Documentation Conventions is a subsection.
Getting Help
In addition to this guide, there are a number of other resources available for Parallels Cloud Server
which can help you use the product more effectively. These resources include:
• Parallels Cloud Server 6.0 Installation Guide. This guide provides detailed information on
installing Parallels Cloud Server on your server, including the pre-requisites and the stages you
shall pass.
• Parallels Cloud Server 6.0 User's Guide. This guide provides comprehensive information on
Parallels Cloud Server covering the necessary theoretical conceptions as well as all practical
aspects of working with the product. However, it does not deal with the process of installing
and configuring your system.
• Parallels Cloud Server 6.0 Templates Management Guide. This guide is meant to provide
complete information on Parallels templates - an exclusive Parallels technology allowing you to
efficiently deploy standard Linux applications inside your Containers and to greatly save the
server resources (physical memory, disk space, etc.).
• Parallels Cloud Server 6.0 Command Line Reference Guide. This guide is a complete reference
on all Parallels Cloud Server configuration files and command line utilities.
8
Page 9

Introduction
Feedback
If you spot a typo in this guide, or if you have an opinion about how to make this guide more
helpful, you can share your comments and suggestions with us by completing the Documentation
Feedback form on our website (http://www.parallels.com/en/support/usersdoc/).
Key Terms
To avoid any misunderstandings while following the instructions in the guide, please become
acquainted with the main Parallels Cloud Server definitions:
Container. A virtual private server, which is functionally identical to an isolated standalone
computer, with its own IP addresses, processes, files, users database, configuration files,
applications, system libraries, and so on. Containers share one physical server and one operating
system (OS) kernel. However, they are isolated from each other. Container is a kind of ‘sandbox’ for
processes and users.
Guest operating system (Guest OS). An operating system installed in a virtual machine and
Container. It can be any of the supported Windows or Linux operating systems.
Hardware virtualization. A technology allowing you to efficiently use your physical server's
hardware resources by sharing them between multiple virtual machines created on the server.
Parallels Cloud Server license (or product key). A special license that you must install on the
physical server to be able to start using Parallels Cloud Server. Every physical server must have its
own license installed.
OS virtualization. A technology allowing you to create multiple isolated Containers on a single
physical server to share hardware, licenses, and management effort with maximum efficiency.
Parallels server. A server where the Parallels Cloud Server software is installed for hosting Parallels
virtual machines and Containers.
Virtual machine (VM). A computer emulated by Parallels Cloud Server. Like a Container, a virtual
machine is functionally identical to an isolated standalone computer, with its own IP addresses,
processes, files, users database, configuration files, applications, system libraries, and so on.
However, virtual machines run their own operating systems rather than share one operating system
kernel.
9
Page 10

Installing in Graphical Mode .................................................................................... 15
C
HAPTER
2
Installing Parallels Cloud Server 6.0
The current chapter provides comprehensive information on the process of installing Parallels Cloud
Server 6.0 on your server, including the pre-requisites and the stages you shall pass.
Note: This guide describes how to install Parallels Cloud Server 6.0 in the default graphical mode. For
information on other installation modes, consult the Parallels Cloud Server 6.0 Installation Guide.
In This Chapter
Hardware Compatibility ........................................................................................... 10
Software Compatibility ............................................................................................ 13
Network Requirements ........................................................................................... 13
Obtaining Parallels Cloud Server 6.0 Distribution Set................................................ 13
Starting Installation .................................................................................................. 14
Choosing the Installation Type ................................................................................. 15
Hardware Compatibility
The system requirements slightly change depending on whether you are deploying Parallels Cloud
Server 6.0
• as a stand-alone installation (p. 11)
or
• as part of a Parallels Cloud Storage cluster (p. 12)
Page 11
Installing Parallels Cloud Server 6.0
Requirements for Standalone Installations
The hardware requirements for running Parallels Cloud Server 6.0 as a standalone installation are
as follows:
• X86 or x86-64 platform with Intel VT-x or AMD-V hardware virtualization support.
• 1.5 GHz or faster processor (a 64-bit processor is required for running x64 versions of guest
operating systems).
• At least 2 GB of RAM.
• Ethernet network adapter and a valid IP address.
• DVD-ROM drive.
The actual number of virtual machines and Containers you can run on a physical server and
their performance depend on the resources they require. In general, the more resources your
physical server has, the more virtual machines and Containers you can run and the higher is
their performance.
You will need the following partitions:
Partition Description Size
/boot
/
/vz
swap
Boot partition containing boot files for Parallels Cloud
Server.
Root partition containing all Parallels Cloud Server
program files.
Partition for storing all virtual machines and Containers
data.
Paging partition for Parallels Cloud Server.
500 MB
12 GB or more
30 GB or more
RAM swap
up to 4 GB 2 GB
4-16 GB 4 GB
16-64 GB 8 GB
64-256 GB 16 GB
256-512 GB 32 GB
11
Page 12
Installing Parallels Cloud Server 6.0
Requirements for Servers in a Parallels Cloud Storage Cluster
If you plan to deploy a Parallels Cloud Storage cluster, make sure your servers meet the
requirements below.
Metadata Servers
A metadata server must meet the following requirements:
• Software: Parallels Cloud Server 6.0
• RAM: 2 GB or more
• Disk space: 10 GB or more
• Network:
• 1 or more Ethernet adapters (1 Gb or faster)
• a static IP address for each Ethernet adapter
Chunk Servers
A chunk server must run Parallels Cloud Server 6.0 and have at least one Ethernet adapter (1 Gb or
faster) installed. Chunk servers can export any amount of available local disk space to a Parallels
Cloud Storage cluster and do not require more than 1 GB of RAM.
Clients
A client computer must run Parallels Cloud Server 6.0 and have at least one Ethernet adapter (1 Gb
or faster) installed. There are no special requirements to the amount of RAM and disk space that
must be available on a client, except for the general recommendations for running the Parallels
Cloud Storage software.
Hard Disk Requirements
If you are installing Parallels Cloud Server with Parallels Cloud Storage, create these partitions:
Partition Description Size
/boot
/
/vz
Boot partition containing boot files for Parallels Cloud Server. 500 MB
Root partition containing all Parallels Cloud Server files. 10-20 GB (without the
/pstorage directory)
20-30 GB (with the /pstorage
directory)
Partition for storing OS and application template files. 30-40 GB
12
Page 13
Installing Parallels Cloud Server 6.0
/pstorage
Partition for storing Parallels Cloud Storage data.
Create a separate /pstorage partition if you plan to configure the
server as a chunk server. Otherwise, create the /pstorage
directory on the root (/) partition and additionally allocate 10 GB to
this partition.
all the remaining disk space on
the server
swap
Paging partition for Parallels Cloud Server.
RAM swap
up to 4 GB 2 GB
4-16 GB 4 GB
16-64 GB 8 GB
64-256 GB 16 GB
256-512 GB 32 GB
Software Compatibility
Parallels Cloud Server is installed on a bare-metal server and does not need any operating system
to function.
Network Requirements
To connect to a physical server with Parallels Cloud Server, you need to establish a wireless or
wired network connection between this server and the remote computer. So, you must have a valid
IP address for the physical server as well as know the default gateway, network mask, and DNS
configuration.
Obtaining Parallels Cloud Server 6.0 Distribution Set
You can use one of the following ways to obtain the Parallels Cloud Server 6.0 distribution set:
• Download the ISO image of Parallels Cloud Server 6.0 from the Parallels web site to your
computer. In this case, you need to burn the downloaded ISO image to a DVD or to create a
bootable USB drive before starting the installation.
• Contact a Parallels sales representative and get a DVD with Parallels Cloud Server 6.0.
13
Page 14
Installing Parallels Cloud Server 6.0
Starting Installation
Parallels Cloud Server can be installed from three types of media:
• DVD discs
• USB drives (see Preparing for Installation from USB Storage Drives to prepare for
installation from USB drives)
• PXE servers (see the Installation via PXE Server guide for information on installing Parallels
Cloud Server over the network)
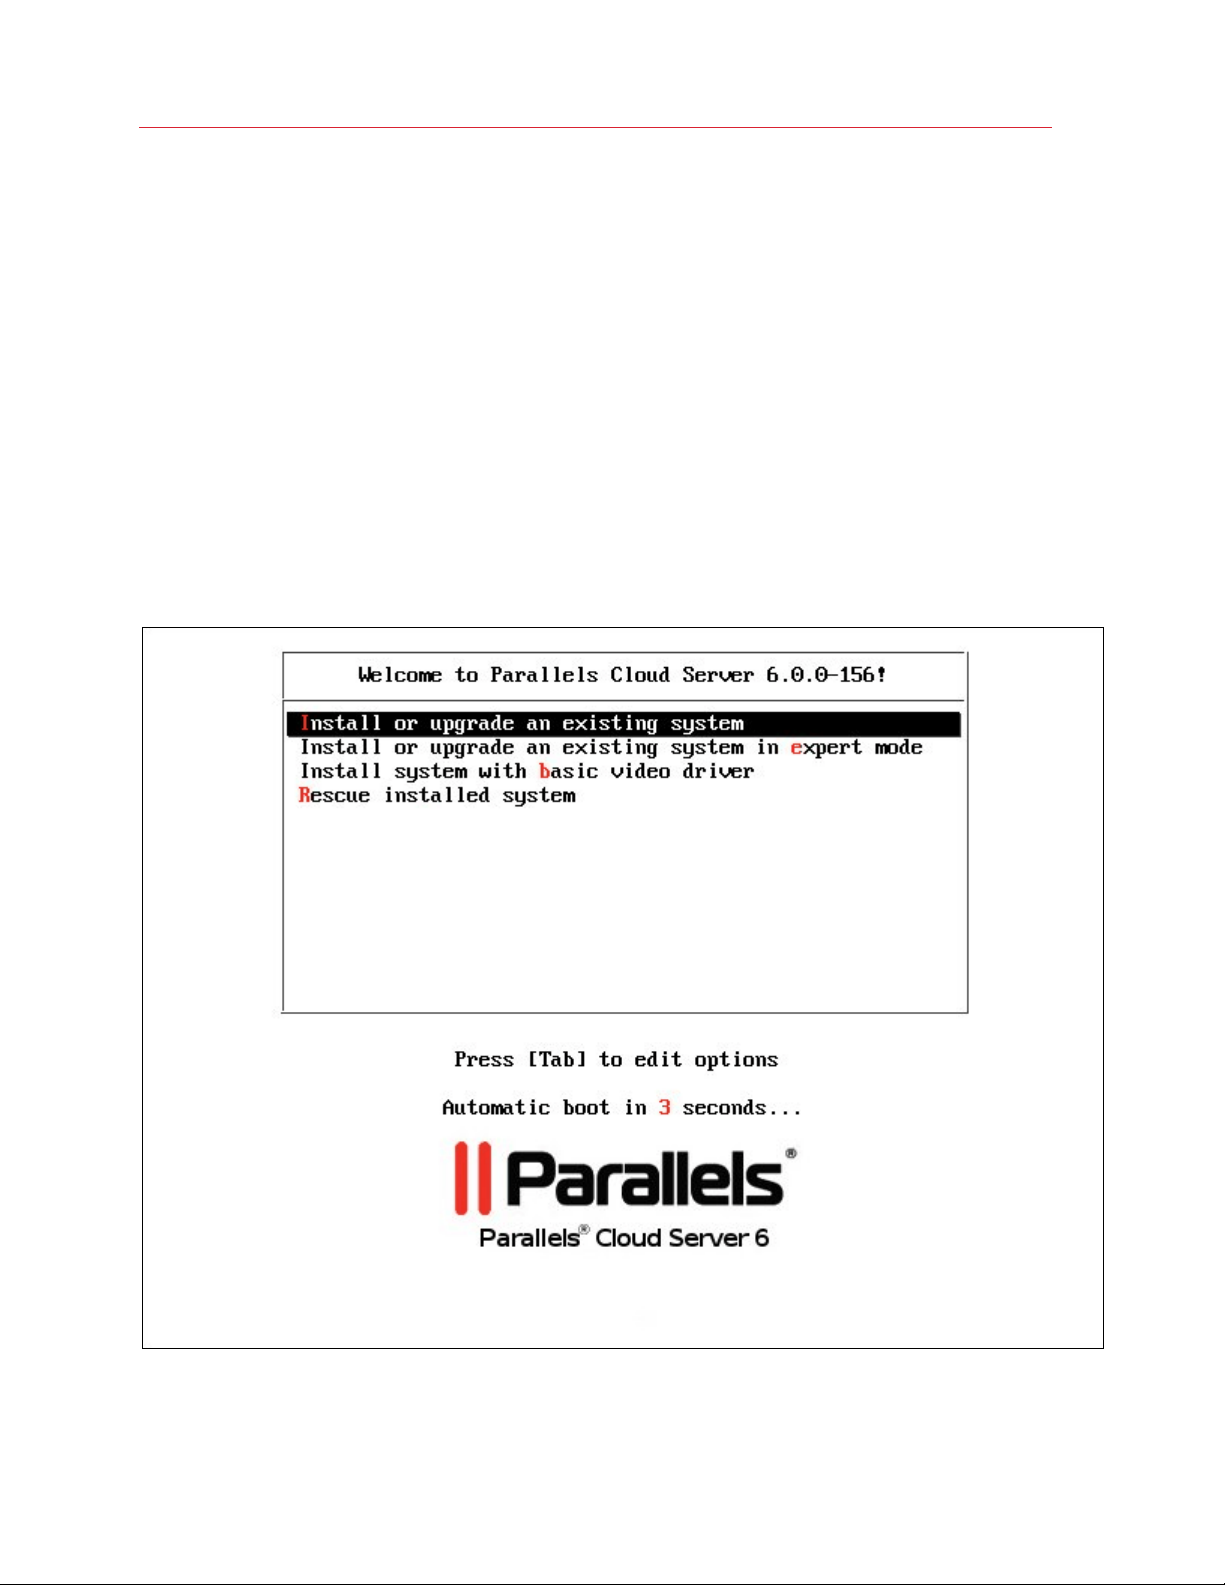
To start the installation, do the following:
1 Configure the server to boot from the chosen media (either a DVD disc or a USB drive).
2 Boot the server from the chosen media and wait for the Welcome screen:
14
Page 15

Installing Parallels Cloud Server 6.0
Choosing the Installation Type
You can install Parallels Cloud Server 6.0 in one of the following modes:
• graphical mode (default): install Parallels Cloud Server using the graphical installer. This is the
recommended mode of installing the product.
• graphical mode with basic video driver: install Parallels Cloud Server in a special graphical
mode. Use this mode if the installer cannot load the correct driver for your video card.
• expert mode: install Parallels Cloud Server using the graphical installer in extended mode. As
compared to the default graphical mode, this mode gives you more options to configure your
system and is recommended for advanced users.
• vnc mode: install Parallels Cloud Server by running the installer in graphical mode locally and
displaying it on a system connected to the local server over the network.
Your further installation steps will differ depending on which mode you choose.
Note: This guide describes only the procedure of installing Parallels Cloud Server in graphical mode. For
information on other modes, consult the Parallels Cloud Server 6.0 Installation Guide.
Installing in Graphical Mode
To install in the graphical mode, choose the Install or upgrade an existing system option in the
Welcome window and press Enter. In this mode, you use the graphical installer and specify only
basic parameters to install Parallels Cloud Server.
Reading and Accepting the License Agreement
Read and accept the Parallels end-user license agreement. To accept the license agreement, click
Next, and in the displayed window, click Agree.
15
Page 16
Installing Parallels Cloud Server 6.0
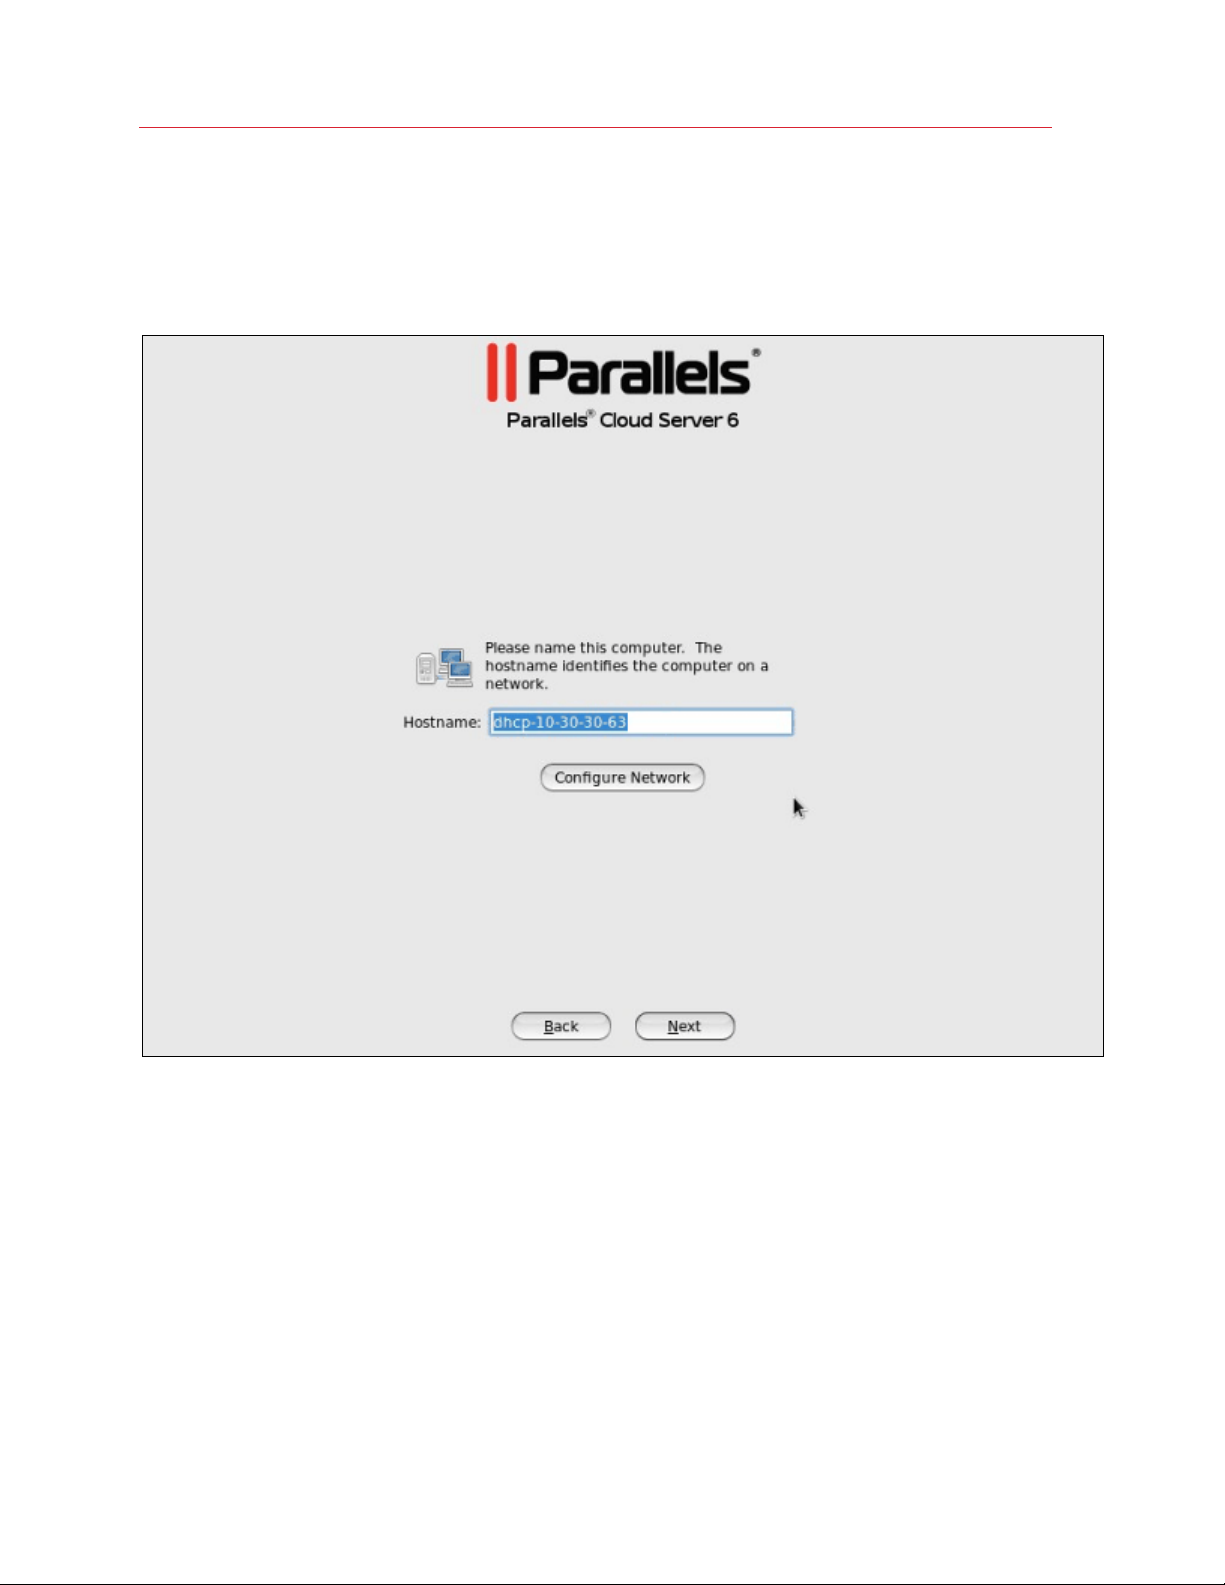
Defining Network Settings
Choose a hostname for your server. You can specify a hostname as a fully qualified domain name
(hostname.domainname) or as a short name (hostname).
On this screen, you also need to configure your network settings for at least one network card. To
do this:
1 Click the Configure Network button.
2 Select one of the network cards installed on the server.
3 Click Edit.
16
Page 17
Installing Parallels Cloud Server 6.0
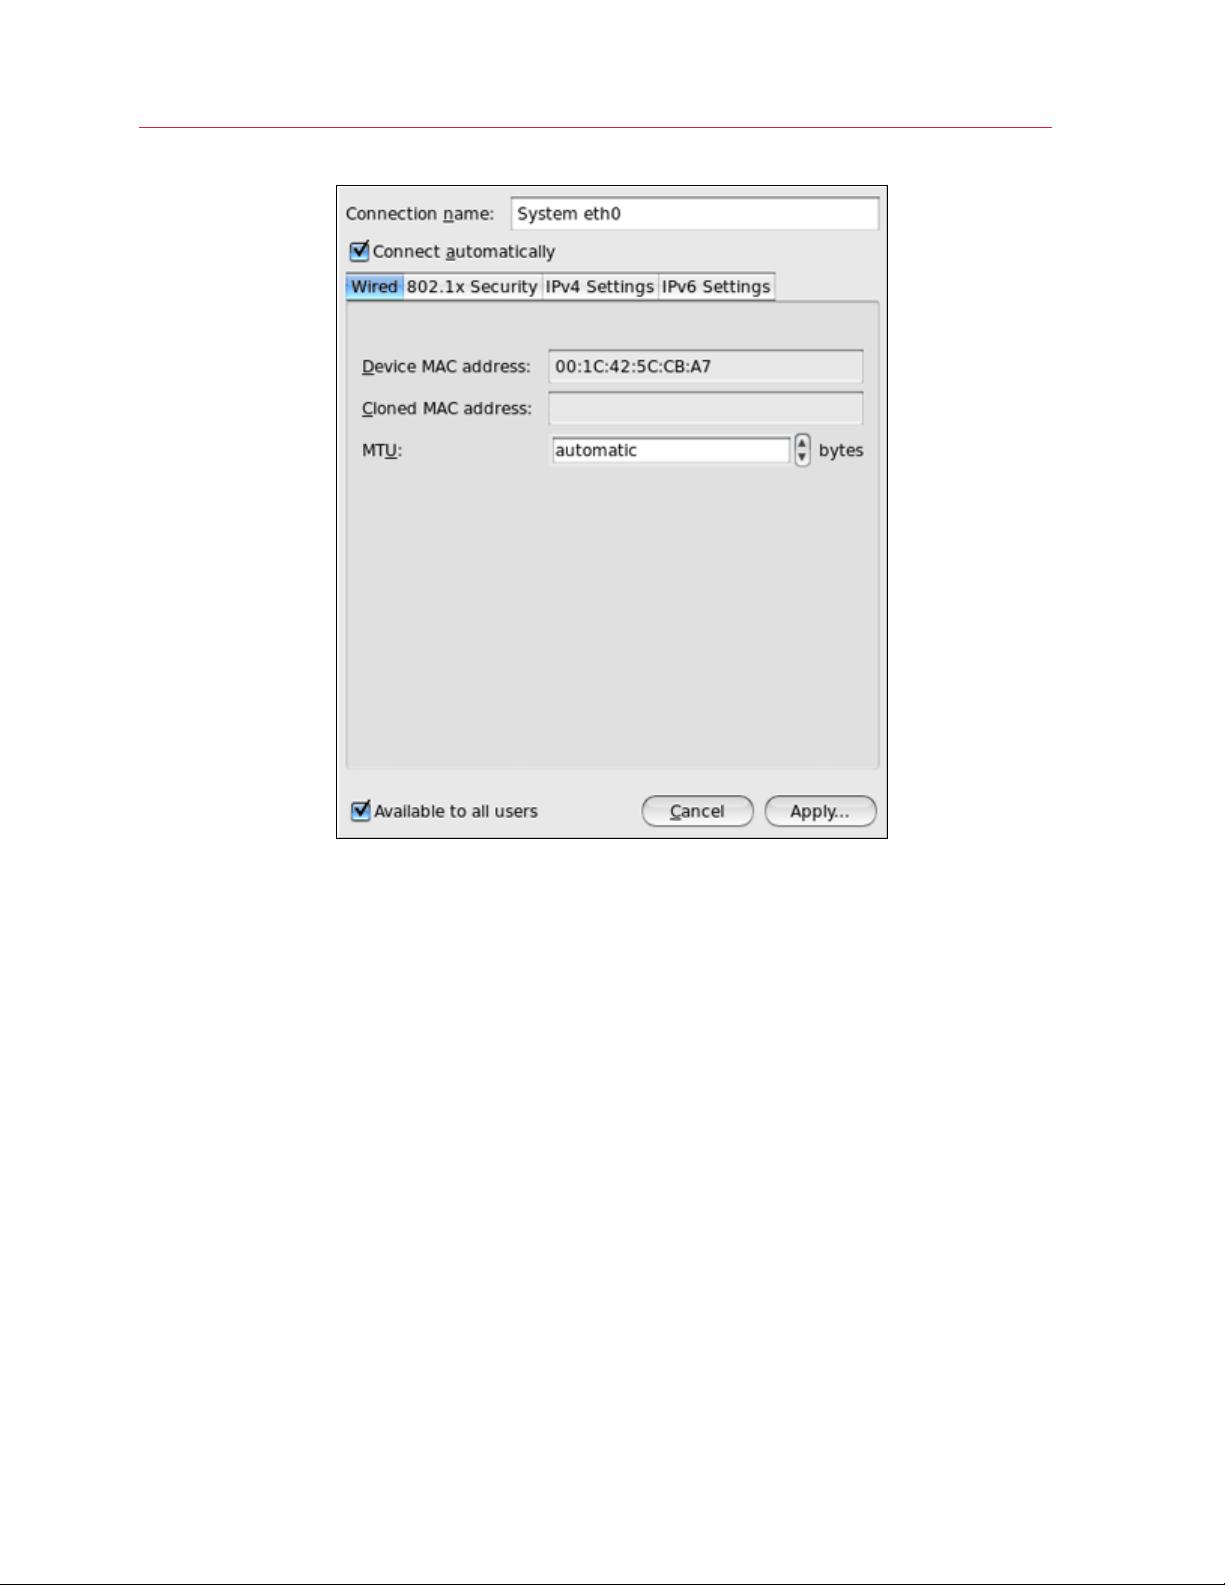
4 Do one of the following:
• Accept the network settings offered by the installer. View the default settings in the editing
network card window, and if you are satisfied with them, click Apply; then click Close.
• Configure the network card settings. Click the necessary tabs in the editing network card
window, and configure the settings to meet your demands. When you are done, click
Apply; then click Close.
Click Next to continue with the installation.
17
Page 18
Installing Parallels Cloud Server 6.0
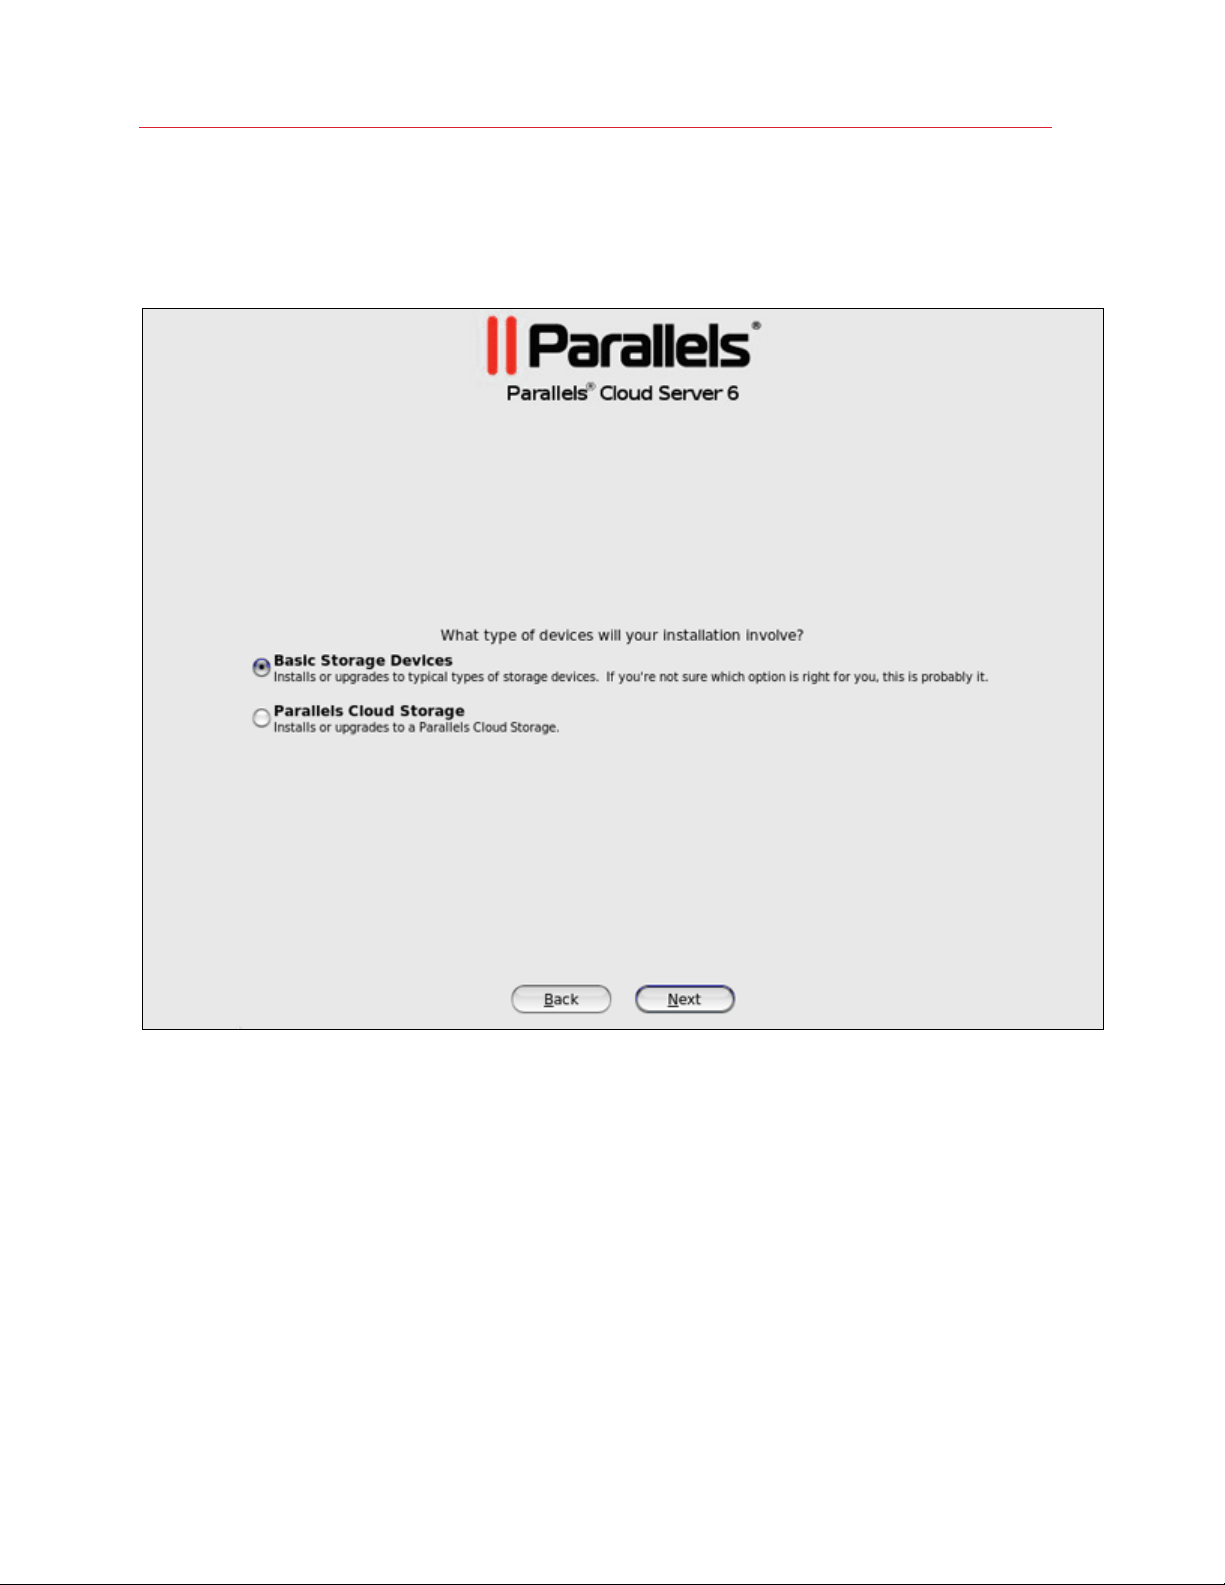
Choosing the Installation Device
First, you need to select the storage device to install Parallels Cloud Server on.
You can choose between two options:
• Basic Storage Devices: Install Parallels Cloud Server on a hard drive that is connected directly
to your local system.
• Parallels Cloud Storage: Install Parallels Cloud Server on a special storage device — Parallels
Cloud Storage. If you choose this option, you will need to specify a number of additional
settings in the step Installing on Parallels Cloud Storage (p. 21).
18
Page 19

Installing Parallels Cloud Server 6.0
Notes:
1. Parallels Cloud Storage is a solution that transforms local hard drives into a highly protected
enterprise-level storage (like SAN or NAS) with data replication, high-availability, and self-healing
features. Using Parallels Cloud Storage, you can safely store and run Parallels virtual machines and
Containers, migrate them with zero downtime, provide high availability for your Parallels Cloud Server
installations, and much more. For more information on Parallels Cloud Storage, see the Parallels Cloud
Storage Administrator's Guide.
2. In a Parallels Cloud Storage cluster, all servers must have unique hostnames. So if you did not set a
hostname for the server, click Back and specify one on the screen of defining network settings.
19
Page 20

Installing Parallels Cloud Server 6.0
Entering the License
Enter the Parallels Cloud Server and Parallels Cloud Storage licenses:
• Parallels Cloud Server license. Every physical server must have its own license installed.
Licenses are issued by Parallels and needed to start using Parallels Cloud Server on your
server.
• Parallels Cloud Storage license. You need to install a separate license for Parallels Cloud
Storage to start using its functionality.
Type the product keys for Parallels Cloud Server in the field provided, and click Next. You can skip
this step and install the licenses later. However, if you do not install the Parallels Cloud Server
license, you will not be able to install Parallels Virtual Automation and its components along with
Parallels Cloud Server. For more information on Parallels Virtual Automation, see Installing
Parallels Virtual Automation (p. 33).
20
Page 21

Installing Parallels Cloud Server 6.0
Installing on Parallels Cloud Storage
If you choose to install on Parallels Cloud Storage, you see the following window:
In this window, you can choose one of these options:
• Join an existing Parallels Cloud Storage. Choose this option to join the server to an existing
Parallels Cloud Storage cluster. You can use this option if you already have set up at least one
cluster in your network and want to make the server part of this cluster.
• Create a new Parallels Cloud Storage. Choose this option to create a Parallels Cloud Storage
cluster from scratch. You can use this option if you do not have any clusters in your network or
want to set up a separate cluster for this installation.
Depending on which option you choose, your further steps will slightly differ.
Note: For detailed information on working with Parallels Cloud Storage clusters, consult the Parallels
Cloud Storage Administrator's Guide.
21
Page 22

Installing Parallels Cloud Server 6.0
Creating a New Parallels Cloud Storage Cluster
If you choose to create a new Parallels Cloud Storage cluster, you will see this window:
Specify the parameters for your new Parallels Cloud Storage cluster:
1 Cluster name. Specify a name for the cluster that will uniquely identify it among other clusters
in your network. A name may contain the characters a-z, A-Z, 0-9, minus (-), and underscore (_)
signs.
2 Security settings. Click this button and specify a password to use for password-based
authentication in your cluster.
22
Page 23

Installing Parallels Cloud Server 6.0
Password-based authentication enhances security, requiring each server to be authenticated
before it can be included in the cluster. The password you specify is encrypted and saved into
the /etc/pstorage/clusters/pcs1/auth_digest.key file on the server.
Note: You need to authenticate a server only once. After that, you can configure it as an MDS server,
chunk server, or a client. So if you later decide to configure the server where you are setting the first
MDS server as a chunk server, no additional authentication will be required.
3 Metadata Server Role. Specify whether the installer should configure your server to act as a
metadata (MDS) server in the cluster. MDS servers are an essential part of any Parallels Cloud
Storage cluster. They store metadata about chunk servers and control how files keeping the
contents of virtual machines and Containers are split into chunks and where these chunks are
located.
When you create a new Parallels Cloud Storage cluster, the Metadata Server Role option is
selected by default. To set up an MDS server, you need to specify an IP address to use for
connecting to this server. You can type it manually in the IP address field or click the arrow at
the end of the field and choose one from the list of IP addresses that were detected by the
installer (it shows all IP addresses it could find for the server). \
Note: MDS servers must have static IP addresses assigned. If you are using DHCP, map an IP address
to the MAC address of the MDS server.
4 Chunk Server Role. Specify whether the installer should configure your server to act as a
chunk server in the cluster. Chunk servers store the contents of virtual machines and
Containers in the form of fixed-size chunks and provide access to these chunks. All data
chunks are replicated and the replicas are kept on different chunk servers to achieve high
availability. If one of the chunk servers goes down, the other chunk servers will continue
providing the data chunks that were stored on the failed server.
23
Page 24

Installing Parallels Cloud Server 6.0
5 Client Server Role: Specify whether the installer should configure your server to act as a client
in the cluster. Clients are computers with Parallels Cloud Server 6.0 from where you run virtual
machines and Containers stored in your Parallels Cloud Storage cluster.
When you are done, click Next.
24
Page 25

Installing Parallels Cloud Server 6.0
Joining an Existing Parallels Cloud Storage Cluster
If you select the Join an existing Parallels Cloud Storage option and click Next, you will see this
window:
Specify the parameters to join your new server to the cluster:
1 Cluster name: Specify the name of the Parallels Cloud Storage you want to join your server to.
In most cases, the installer automatically detects all Parallels Cloud Storage clusters in your
network and displays their names as a list box to the right of the Cluster name field. If the
installer cannot find any cluster, it shows a warning, and you need to manually type the cluster
name in the provided field.
2 Security settings. Click the button and specify the password to authenticate your new server
in the cluster. Type the password you specified when creating cluster and press Enter.
25
Page 26

Installing Parallels Cloud Server 6.0
3 Metadata Server Role. Specify whether the installer should configure your server to act as a
metadata (MDS) server in the cluster. MDS servers are an essential part of any Parallels Cloud
Storage cluster. They store metadata about chunk servers and control how files keeping the
contents of virtual machines and Containers are split into chunks and where these chunks are
located.
When you create a new Parallels Cloud Storage cluster, the Metadata Server Role option is
selected by default. To set up an MDS server, you need to specify an IP address to use for
connecting to this server. You can type it manually in the IP address field or click the arrow at
the end of the field and choose one from the list of IP addresses that were detected by the
installer (it shows all IP addresses it could find for the server).
Note: MDS servers must have static IP addresses assigned. If you are using DHCP, map an IP address
to the MAC address of the MDS server.
4 Chunk Server Role. Specify whether the installer should configure your server to act as a
chunk server in the cluster. Chunk servers store the contents of virtual machines and
Containers in the form of fixed-size chunks and provide access to these chunks. All data
chunks are replicated and the replicas are kept on different chunk servers to achieve high
availability. If one of the chunk servers goes down, the other chunk servers will continue
providing the data chunks that were stored on the failed server.
5 Client Server Role: Specify whether the installer should configure your server to act as a client
in the cluster. Clients are computers with Parallels Cloud Server 6.0 from where you run virtual
machines and Containers stored in your Parallels Cloud Storage cluster.
When you are done, click Next.
26
Page 27

Installing Parallels Cloud Server 6.0
Defining Time Zone Settings
Specify your time zone settings.
To set your time zone, either select the city nearest to your physical location on the drop-down
menu or click a spot on the interactive map to zoom in to it. You can also select the System clock
uses UTC check box to set your system to UTC (Universal Time Coordinated), which makes it
automatically switch between normal and daylight savings time.
27
Page 28

Installing Parallels Cloud Server 6.0
Setting a Password
Specify a password for the root account.
You will need to log in to the physical server as root to manage Parallels virtual machines and
Containers.
28
Page 29

Installing Parallels Cloud Server 6.0
Partitioning the Hardware Drive
The Partitioning window allows you to choose the way of partitioning your server.
Do one of the following:
• Select the Use All Space radio button to create the default layout on the server. If you do not
feel comfortable with partitioning servers, you are recommended to select this option and let the
installer automatically partition your system. For details, see Creating the Default Layout (p.
30).
• Select the Create custom layout radio button to manually partition your disk drive. Detailed
information on how you can do it is given in Creating Custom Layout (p. 31).
29
Page 30

Installing Parallels Cloud Server 6.0
Creating the Default Layout
The default partitioning scheme differs depending on whether you are installing Parallels Cloud
Server on a local storage or on a Parallels Cloud Storage.
Installing on a Local Storage
If you are installing Parallels Cloud Server on a local storage, the installer creates the following
partitions on your system:
Partition Description
/boot
/
/vz
swap
Boot partition containing boot files for Parallels Cloud Server.
Root partition containing all Parallels Cloud Server files.
Partition where all virtual machines and Containers will be located.
Paging partition for Parallels Cloud Server.
Installing on a Parallels Cloud Storage
If you are installing Parallels Cloud Server on a Parallels Cloud Storage, the installer creates these
partitions:
Partition Description
/boot
/
/vz
swap
/pstorage
Boot partition containing boot files for Parallels Cloud Server.
Root partition containing all Parallels Cloud Server files.
Partition for storing OS and application template files.
Paging partition for Parallels Cloud Server.
Partition for all Parallels Cloud Storage data. A separate /pstorage partition
is created if you choose to configure the server as a chunk server. Otherwise,
the /pstorage directory is created on the root (/) partition.
The installer makes the following directories on the /pstorage or root
partition, depending on the options you choose:
• If you choose to configure your server as a chunk server, the
• If you choose to configure your server as a metadata server, the
• If you choose to configure your server as a client, the
30
CLUSTER_NAME-cs directory is created. This directory stores
virtual machines and Containers in the form of fixed-size data
chunks.
CLUSTER_NAME-mds directory is created. This directory stores
metadata about Parallels Cloud Storage data.
CLUSTER_NAME directory is created. This is the directory where
the Parallels Cloud Storage is mounted.
Page 31

Installing Parallels Cloud Server 6.0
Creating a Custom Layout
If you choose to create a custom layout (that is, select the Create custom layout radio button
while specifying partition settings and click Next), the following window appears:
The process of partitioning your system is similar to that used to partition servers with the Disk
Druid partitioning tool which comes with most Linux distributions. You can use the provided
buttons (Create, Edit, and so on) to create and configure your partitions. The partitions you need
to create differ depending on whether you are installing Parallels Cloud Server on a local storage or
on a Parallels Cloud Storage.
Installing on a Local Storage
If you are installing Parallels Cloud Server on a local storage, create the following partitions on your
system:
Partition Description
/boot
Boot partition containing boot files for Parallels Cloud Server. Allocate 500 MB
31
Page 32

Installing Parallels Cloud Server 6.0
to this partition.
/
Root partition containing Parallels Cloud Server system files. Allocate 10-20
GB to this partition.
swap
/vz
Paging partition for Parallels Cloud Server. For details on how much disk
space to allocate to swap, see Creating the Paging Partition below.
Partition where all Containers and virtual machines will be stored. Allocate all
the remaining disk space to this partition (no less than 30 GB).
Installing on a Parallels Cloud Storage
If you are installing Parallels Cloud Server on a Parallels Cloud Storage, create these partitions:
Partition Description
/boot
/
/vz
swap
Boot partition containing boot files for Parallels Cloud Server. Allocate 500 MB
to this partition.
Root partition containing all Parallels Cloud Server files. Allocate:
• 10-20 GB if /pstorage will be a separate partition.
• 20-30 GB if /pstorage will be a directory and stored on the root
partition.
For details, see the /pstorage description below.
Partition for storing OS and application template files. Allocate 30-40 GB to
this partition.
Paging partition for Parallels Cloud Server. For details on how much disk
space to allocate to swap, see Creating the Paging Partition below.
/pstorage
Partition where all Parallels Cloud Storage data will be stored. Allocate all the
remaining space to this partition.
Create a separate /pstorage partition if you plan to configure the server to
act as a chunk server. Otherwise, create the /pstorage directory on the root
(/) partition and additionally allocate 10 GB to this partition.
Creating the Paging Partition
Use the following guidelines when deciding on how much disk space to allocate to swap:
RAM swap
up to 4 GB 2 GB
4-16 GB 4 GB
16-64 GB 8 GB
64-256 GB 16 GB
256-512 GB 32 GB
32
Page 33

Installing Parallels Cloud Server 6.0
Installing Parallels Virtual Automation
Choose the Parallels Virtual Automation components to install on your server. This screen is
displayed only if you entered the license in one of the previous steps and your license provides
support for the Parallels Virtual Automation.
Do the following:
• Clear the Install PVA Agent for Parallels Server and Install PVA Management Node check
boxes, and click Next if you do not want to use Parallels Virtual Automation for managing your
server and virtual machines and Containers.
• Leave the Install PVA Agent for Parallels Server and Install PVA Management Node check
boxes selected to set up the Parallels Virtual Automation application and its components on the
server. Using Parallels Virtual Automation, you can connect to the Parallels server and manage
virtual machines and Containers with your favorite browser.
33
Page 34

Installing Parallels Cloud Server 6.0
If you select the check boxes, you need to specify a valid IP address in the IP Address field for
a special Management Node and can also set its hostname in the Hostname field. Once the
installation is complete, you can log in to Parallels Virtual Automation by opening
http://IP_address_or_hostname in the browser and using the root user name and the
password you specified in the previous step.
When the check boxes are selected, the Parallels Cloud Server installer performs the following
operations after restarting the server:
1. Downloads the installation packages for Parallels Virtual Automation from the Parallels web
site to the server. Notice that the download process may take some time, depending on the
speed of your Internet connection.
2. Installs Parallels Virtual Automation and its components on the server and inside a specially
created Container. The installation is automatically initiated once the installation packages
are downloaded to the server and runs without your interaction.
When you are done, click Next to start installing Parallels Cloud Server.
Notes:
1. Your server must be connected to the Internet to download the Parallels Virtual Automation installation
packages from the Parallels remote repository. Local repositories are only supported in kickstart
installations. For more information, see the Installation via PXE document.
2. You can use Parallels Virtual Automation to manage Parallels servers only if your license allows you to
do so. If the license does not support using Parallels Virtual Automation, the PVA components screen is
not displayed. In this case, you must first upgrade your license and then install the Parallels Virtual
Automation application manually. For more information, see Installing Parallels Virtual Automation
Manually (p. 40).
3. For more information on setting up and logging in to Parallels Virtual Automation, refer to Using
Parallels Virtual Automation (p. 37).
Finishing the Installation
Once the installation is complete, the Congratulations window appears. Click Reboot to restart
the server and boot into Parallels Cloud Server.
The Eject the installation DVD option, when selected, automatically removes the Parallels Cloud
Server installation disc from your DVD-ROM drive before booting the system.
34
Page 35

Using Parallels Virtual Automation ........................................................................... 37
C
HAPTER
3
Starting to Work in Parallels Cloud Server
6.0
After you restart the Parallels server, you will see a screen providing instructions on how to start
working in Parallels Cloud Server 6.0.
You can manage Parallels Cloud Server using these tools:
• Parallels command-line utilities (p. 36)
• Parallels Virtual Automation (p. 37)
Detailed information on both tools is given in the following sections.
In This Chapter
Using CLI ............................................................................................................... 36
Page 36

Starting to Work in Parallels Cloud Server 6.0
Using CLI
Parallels Cloud Server provides a set of utilities that allow you to manage Parallels virtual machines
and Containers both locally and remotely.
Connecting to Parallels Cloud Server Locally
To manage your virtual machines and Containers locally, i.e. from the same server where Parallels
Cloud Server is installed, log in to the server by typing the root username and the password you
provided when installing Parallels Cloud Server at the bottom of the welcome screen.
After you have successfully logged in to the server, you will see a command prompt and can start
creating and managing your Parallels virtual machines and Containers using Parallels command line
utilities.
Connecting to Parallels Cloud Server Remotely
To connect to Parallels Cloud Server remotely, use the IP address or hostname indicated on the
server's screen. For example, you can use a Secure Shell client to connect to your Parallels server.
When logging in to the server, use the root user name and the password you provided when
installing Parallels Cloud Server.
36
Page 37

Starting to Work in Parallels Cloud Server 6.0
Using Parallels Virtual Automation
Parallels Virtual Automation is a flexible and easy-to-use administration tool for managing servers
with Parallels Cloud Server and virtual machines and Containers residing on these servers. Once
you set up Parallels Virtual Automation, you can use it to connect to your Parallel servers with a
standard web browser on any platform. Parallels Virtual Automation includes the following
components:
• PVA Management Server (or Master Server or Management Node). This is a physical server
that ensures the communication between the server running Parallels Cloud Server (known as
Slave Server) and the Parallels Virtual Automation application. The Master Server keeps a
database with the information about all registered Slave Servers.
• Control Center. This is a front-end to the Parallels Virtual Automation application. You see
Control Center in the browser window when you log it to the Slave Server using Parallels Virtual
Automation.
• PVA Agent. This is a special agent installed on a Slave Server and ensuring the interaction
between the Slave Server, the Master Server, and your client computer (i.e. the computer you
use to connect to the Slave Server). Without this component, a server cannot be registered in
the Management Server.
• Slave Server. This is a physical server running the Parallels Cloud Server software and hosting a
number of virtual machines and Containers. You use Control Center to log in to the Slave Server
and manage your virtual machines and Containers.
• Parallels Power Panel. This is a tool installed on the Slave Server and used for managing
particular virtual machines and Containers.
Graphically, a typical system with Parallels Virtual Automation can be represented as follows.
37
Page 38

Starting to Work in Parallels Cloud Server 6.0
38
Page 39

Starting to Work in Parallels Cloud Server 6.0
Setting Up Parallels Virtual Automation
Parallels Virtual Automation is automatically set up on your server during the Parallels Cloud Server
installation if you select the Install PVA Agent for Parallels Server and Install PVA Management
Node options in the Parallels Cloud Server installer. During the setup procedure, the installer
performs the following operations:
• Installs the PVA Agent component, including Parallels Power Panel, on the server. After that,
the server starts acting as the Slave Server.
• Creates a special Container on the server and installs the PVA Management Server and Control
Center components inside the Container. Once the Container is created and the components
are installed, the Container starts acting as the Master Server.
The last point needs further explanation. The PVA Management Server and Control Center
components cannot be installed directly on a server with Parallels Cloud Server. Instead, a special
Container is automatically created during the Parallels Cloud Server installation where these
components are installed. The Container is created with the following configuration:
• The Container is running the CentOS operating system.
• The amount of disk space inside the Container is set to 10 GB.
• The root account is automatically created inside the Container. The root password is
automatically set to that you specify during the Parallels Cloud Server installation for logging in
to the server.
• The Container can be accessed by the IP address and hostname you provide in the
Congratulations window of the Parallels Cloud Server installer.
• The Container uses the same DNS server you specify for the Parallels server during the Parallels
Cloud Server installation.
39
Page 40

Starting to Work in Parallels Cloud Server 6.0
Installing Parallels Virtual Automation Manually
During the Parallels Cloud Server installation, the Parallels Virtual Automation application is not
installed on the server in the following cases:
• You did not enter the product key.
• Your license does not allow you to use Parallels Virtual Automation.
• You had no Internet connection when installing Parallels Cloud Server.
Later on, if you make up your mind to use Parallels Virtual Automation for managing Parallels
servers and their virtual machines and Containers, you can install this application manually by doing
the following:
1 Obtain the appropriate license from Parallels. This step is required only if your license does not
support using Parallels Virtual Automation.
2 Install the license on the server using the vzlicload utility. For information on installing
licenses using this tool, see the Parallels Cloud Server 6.0 User's Guide, respectively.
3 Once the license is installed, create the pva_opt.cfg file, open it for editing, and specify the
following options:
• PVA_AGENT=1 if you want to install the PVA Agent components or PVA_AGENT=0 if you do
not want to.
• PVA_MN=1 if you want to install the PVA Management Server and Control Center
components or PVA_MN=0 if you do not want to.
• PASSWD="XXXXXX" where XXXXXX is the root password on the Parallels server (set during
the Parallels Cloud Server installation). This option is mandatory if you choose to install PVA
Management Server and Control Center components.
• PVA_IP="X.X.X.X" where X.X.X.X is the IP address to be assigned to the Management
Node. You will then use this IP address to log in to the Management Node. This option is
mandatory if you choose to install PVA Management Server and Control Center
components.
Note: The Management Node must be assigned a public IP address to download the installation files
from the Parallels remote repository. Local repositories are only supported via kickstart files. For more
information, consult the Installation via PXE document.
• PVA_HOSTNAME="hostname" where hostname is the hostname to be assigned to the
Management Node. This option is mandatory if you choose to install PVA Management
Server and Control Center components
4 Make sure the Parallels server is connected to the Internet.
5 In a terminal, change to the directory where the pva_opt.cfg file is located, and run this
command:
# /usr/libexec/pva-setup.sh --install pva_opt.cfg
40
Page 41

Starting to Work in Parallels Cloud Server 6.0
Connecting to a Server
To connect to a server using Parallels Virtual Automation, do the following:
1 On any computer, open your favorite web browser.
2 Make sure that the computer can access the server with Parallels Cloud Server over the
network.
3 Type the IP address or hostname of the Container acting as the Master Server in the browser
window).
4 Log in to the Container with root credentials (that is, the root user name and the password you
entered during the Parallels Cloud Server installation).
Note: For more information on using Parallels Virtual Automation for managing servers with Parallels
Cloud Server, consult the Parallels Virtual Automation User's Guide available on the Parallels web site.
41
Page 42

Managing Virtual Machine and Container Backups .................................................. 55
C
HAPTER
4
Performing Basic Operations in Parallels Cloud Server 6.0
This chapter outlines the basic day-to-day operations that you are likely to perform with Parallels
virtual machines and Containers in Parallels Cloud Server.
In This Chapter
Creating Virtual Machines and Containers ............................................................... 43
Performing Initial Configuration ............................................................................... 46
Starting, Stopping, and Querying Status of Virtual Machines and Containers ............ 48
Listing Virtual Machines and Containers .................................................................. 49
Deleting Virtual Machines and Containers ................................................................ 49
Running Commands in Virtual Machines and Containers ......................................... 50
Monitoring Resources ............................................................................................. 51
Migrating Virtual Machines and Containers .............................................................. 53
Page 43

Performing Basic Operations in Parallels Cloud Server 6.0
Creating Virtual Machines and Containers
prlctl create
This section explains how to create new Parallels virtual machines and Containers. The options you
should pass to this command differ depending on whether you want to create a virtual machine or
Container.
Creating a Container
To create a Container, use the prlctl create command. The following parameters are
required:
Argument Description
Container ID
OS template name
Type of virtual server
A numeric ID associated with a Container (101, 403, and so on). The
Container ID should be an integer greater than 100 and unique for a
given Parallels server.
The name of the OS template to base your Container on. Parallels Cloud
Server is shipped with a number of ready-to-use OS templates. To find
out the names of the available templates, use the vzpkg list -O
command.
For the list of operating systems you can run in your Virtual Machines
and Containers, see Supported Guest Operating Systems (p. 45).
Tells the
command to create a Container.
Thus, for example, you can create a new Container by executing the following command:
# prlctl create 101 --ostemplate centos-6-x86 -–config basic --vmtype ct
In this case Parallels Cloud Server will create a Container with ID 101, the CentOS operating
system installed inside, and the configuration parameters taken from the ve-basic.conf-
sample sample configuration file.
Notes:
1. For more information on options you can pass to prlctl create when creating Containers, see the
Parallels Cloud Server 6.0 Command Line Reference Guide.
2. For information on creating Containers with preinstalled applications, see Using OS Template Caches
with Preinstalled Applications.
Creating a Virtual Machine
The process of creating a new virtual machine includes the following steps:
1 Creating a virtual machine configuration.
2 Installing an operating system in the virtual machine.
43
Page 44

Performing Basic Operations in Parallels Cloud Server 6.0
3 Installing Parallels Tools in the virtual machine, a set of special utilities that facilitate your work
with virtual machines.
The example below shows you how to make a new virtual machine configuration using the prlctl
create command:
# prlctl create MyVM --distribution win-2008 --vmtype vm
This creates a virtual machine with the name of MyVM, adjusts its configuration for installing the
Windows Server 2008 operating system in it, and places all virtual machine-related files in the
/var/parallels directory.
Once the virtual machine configuration is ready, you can install Windows Server 2008 and Parallels
Tools in it. To do this, you can
• Use the Parallels Virtual Automation application. For details on using this application, consult
the Parallels Virtual Automation Administrator's Guide.
• Enable VNC support in the virtual machine configuration and install the operating system and
Parallels Tools using your favorite VNC client. For information, on configuring VNC support in
virtual machines, see Enabling VNC Access to Virtual Machines and Containers.
Note: For more information on options you can pass to prlctl create when creating virtual
machines, see the Parallels Cloud Server 6.0 Command Line Reference Guide.
44
Page 45

Performing Basic Operations in Parallels Cloud Server 6.0
Supported Guest Operating Systems
Listed below are the operating systems that have been tested in virtual machines and Containers
and are officially supported in Parallels Cloud Server 6.0.
Virtual Machines
Windows
Windows 8 (x64)
Windows 7 with Service Pack 1 (x86, x64)
Windows Server 2012
Windows Server 2008 R2 with Service Pack 1 (x64)
Windows Server 2003 R2 with Service Pack 2 (x86, x64)
Windows XP Professional with Service Pack 2 (x64) and Service Pack 3 (x86)
Linux
Red Hat Enterprise Linux 6.x (x86, x64)
Red Hat Enterprise Linux 5.x (x86, x64)
Fedora 17 (x86, x64)
Fedora 16 (x86, x64)
CentOS 6.x (x86, x64)
CentOS 5.x (x86, x64)
SUSE Linux Enterprise Server 11 with Service Pack 2 (x86, x64)
SUSE Linux Enterprise Server 10 (x86, x64)
openSUSE 12.x (x86, x64)
Debian GNU/Linux 6.0 (x86, x64)
Ubuntu 12.10 (x86, x64)
Ubuntu 11.10 (x86, x64)
Ubuntu Server 12.04 (x86, x64)
Ubuntu Server 10.04 (x86, x64)
FreeBSD
FreeBSD 9 (x86, x64)
Containers
Red Hat Enterprise Linux 6.x (x86, x64)
Red Hat Enterprise Linux 5.x (x86, x64)
Fedora 17 (x86, x64)
Fedora 16 (x86, x64)
CentOS 6.x (x86, x64)
45
Page 46

Performing Basic Operations in Parallels Cloud Server 6.0
CentOS 5.x (x86, x64)
SUSE Linux Enterprise Server 11 with Service Pack 2 (x86, x64)
openSUSE 12.1 (x86, x64)
openSUSE 11.4 (x86, x64)
Debian GNU/Linux 6.0 (x86, x64)
Ubuntu 12.10 (x86, x64)
Ubuntu 12.04 (x86, x64)
Ubuntu 11.10 (x86, x64)
Ubuntu 10.04 (x86, x64)
Performing Initial Configuration
Before starting your newly created virtual machine and Container, you first need to configure it. This
section describes the main configuration steps for virtual machines and Containers.
Configuring Network Settings
To make virtual machines and Containers accessible from the network, you need to assign valid IP
addresses to them and configure DNS servers. The session below illustrates setting these
parameters for the MyVM virtual machine and Container 101:
• Assigning IPv4 and IPv6 addresses:
# prlctl set MyVM --device-set net0 --ipadd 10.0.186.100/24
# prlctl set MyVM --device-set net0 --ipadd 1fe80::20c:29ff:fe01:fb07
# prlctl set 101 --ipadd 10.0.186.101/24
# prlctl set 101 --ipadd fe80::20c:29ff:fe01:fb08
net0 in the commands above denotes the network card in the VM virtual machine to assign the
IP address to. You can view all network cards of a virtual machine using the prlctl list
VM_name -i command.
• Setting DNS server addresses:
# prlctl set MyVM --nameserver 192.168.1.165
# prlctl set 101 --nameserver 192.168.1.165
Notes:
1. You can configure the network settings only for virtual machines that have Parallels Tools installed.
2. To assign network masks to Containers operating in the venet0 network mode, you must set the
USE_VENET_MASK parameter in the /etc/vz/vz.conf configuration file to yes.
46
Page 47

Performing Basic Operations in Parallels Cloud Server 6.0
Setting Passwords for Virtual Machines and Containers
In Parallels Cloud Server, you can use the --userpasswd option of the prlctl set command
to create new accounts in your virtual machines and Containers directly from the Parallels server.
The created account can then be used to log in to the virtual machine and Container. The easiest
way of doing it is to run this command:
# prlctl set MyVM --userpasswd user1:2wsx123qwe
This command creates the user1 account in the MyVM virtual machine and sets the 2wsx123qwe
password for it. Now you can log in to the MyVM virtual machine as user1 and administer it in the
same way you would administer a standalone server: install additional software, add users, set up
services, and so on.
The prlctl set command can also be used to change passwords for existing accounts in your
virtual machines and Containers. For example, to change the password for user1 in the MyVM
virtual machine to 0pi65jh9, run this command:
# prlctl set MyVM --userpasswd user1:0pi65jh9
When setting passwords for virtual machines and Containers, keep in mind the following:
• You can use manage user accounts only inside virtual machines that have Parallels Tools
installed.
• You should use passwords that meet the minimum length and complexity requirements of the
respective operating system. For example, for Windows Server 2008, a password must be
more than six characters in length and contain characters from three of the following categories:
uppercase characters, lowercase characters, digits, and non-alphabetic characters.
• You should not create accounts with empty passwords for virtual machines and Containers
running Linux operating systems.
47
Page 48

Performing Basic Operations in Parallels Cloud Server 6.0
Starting, Stopping, and Querying Status of Virtual Machines and Containers
After a virtual machine and Container has been created, it can be managed like an ordinary
computer.
Starting Virtual Machines and Containers
You can use the prlctl start command to start your virtual machines and Containers:
• To start Container 101:
# prlctl start 101
Starting the Container ...
• To start a virtual machine with the name of MyVM:
# prlctl start MyVM
Starting the VM ...
Stopping Virtual Machines and Containers
The prlctl stop command is used to stop your virtual machines and Containers:
• To stop Container 101:
# prlctl stop 101
Stopping the Container ...
• To stop a virtual machine with the name of MyVM:
# prlctl stop MyVM
Stopping the VM ...
Checking Status of Virtual Machines and Containers
To check the status of a Container or a virtual machine, you can use the prlctl status
command:
• To get to know the status of Container 101:
# prlctl status 101
VEID 101 exists mounted running
• To get to know the status of the MyVM virtual machine:
# prlctl status MyVM
Vm MyVM exists stopped
Restarting Virtual Machines and Containers
Sometimes, you may need to restart a virtual machine and Container. To do this, use the prlctl
restart command:
• To restart a Container:
48
Page 49

Performing Basic Operations in Parallels Cloud Server 6.0
# prlctl restart 101
101 12 started 10.10.1.101 CT101
• To restart a virtual machine:
# prlctl restart MyVM
Listing Virtual Machines and Containers
To get an overview of the virtual machines and Containers existing on the physical server and to get
additional information about them - their IP addresses, hostnames, current resource consumption,
and so on - use the prlctl list command. In the most general case, you may get a list of all
virtual machines and Containers by issuing the following command:
# prlctl list -a
ID NPROC STATUS IP_ADDR HOSTNAME
{b8cb6d99-1af1-453d-a302-2fddd8f86769} - stopped 10.10.100.1 VM_1
The -a option tells the prlctl list command to output both running and stopped Containers
and virtual machines. By default, only running Containers and virtual machines are shown. The
default columns inform you of the Container and virtual machine IDs, the number of running
processes inside Containers and virtual machines, their status, IP addresses, and hostnames. This
output may be customized as desired by using prlctl list command line options. For
example:
# prlctl list -a -o name,ctid
NAME ID
- 101
My_Vm {b8cb6d99-1af1-453d-a302-2fddd8f86769}
This command displays only the names and IDs of the virtual machines and Containers existing on
the physical server. The full list of the prlctl list command options for Containers and virtual
machines is available in the Parallels Cloud Server 6.0 Command Line Reference Guide.
Deleting Virtual Machines and Containers
You can delete a virtual machine and Container that is not needed anymore using the prlctl
delete command. Note that you cannot delete a running or mounted virtual machine and
Container. The example below illustrates deleting the running Container 101:
# prlctl delete 101
Deleting Container private area: /vz/private/101
Container is currently running (stop first)
# prlctl stop 101
Stopping Container...
Container was stopped
Container is unmounted
# prlctl delete 101
Deleting Container private area: /vz/private/101
Container private area was deleted
49
Page 50

Performing Basic Operations in Parallels Cloud Server 6.0
Running Commands in Virtual Machines and Containers
Parallels Cloud Server allows you to execute arbitrary commands inside virtual machines and
Containers by running them on the physical server, i.e. without the need to log in to the respective
virtual machine and Container. For example, this can be useful in these cases:
• If you do not know the virtual machine and Container login information, but need to run some
diagnosis commands to verify that it is operational.
• If network access is absent for a virtual machine and Container.
In both these cases, you can use the prlctl exec command to run a command inside the
respective virtual machine and Container. The session below illustrates the situation when you run
the stopped SSH daemon inside a Linux virtual machine with the name of My_Linux:
# prlctl exec My_Linux /etc/init.d/sshd status
sshd is stopped
# prlctl exec My_Linux /etc/init.d/sshd start
Starting sshd:[OK]
# prlctl exec My_Linux /etc/init.d/sshd status
sshd (pid 26187) is running...
Notes:
1. You can use the prlctl exec command only inside virtual machines that have Parallels Tools
installed.
2. The prlctl exec command is executed inside a virtual machine and Container from the / directory
rather than from the /root one.
50
Page 51

Performing Basic Operations in Parallels Cloud Server 6.0
Monitoring Resources
In Parallels Cloud Server, you can use the pstat utility to monitor system resources in real time.
When executed, the utility displays the status and load of the system: its disk, network, CPU,
memory, and other parameters. It also provides the list of running virtual machines and Containers
together with their resources consumption statistics. For example, you can run the following
command on the server to view your current system resources:
# pstat -d 5
5:39pm, up 4 days, 5:33, 2 users, load average: 1.08, 1.11, 1.05
CTNum 2, procs 268: R 1, S 265, D 1, Z 0, T 1, X 0
CPU [ OK ]: CTs 0%, CT0 0%, user 0%, sys 1%, idle 99%, lat(ms) 1/0
Mem [ OK ]: total 7831MB, free 4147MB/0MB (low/high), lat(ms) 1/0
ZONE0 (DMA): size 9MB, act 0MB, inact 0MB, free 10MB (0/0/0)
ZONE1 (DMA32): size 3238MB, act 42MB, inact 39MB, free 3118MB (4/5/6)
ZONE2 (Normal): size 4661MB, act 2730MB, inact 606MB, free 1019MB (6/8/9)
Mem lat (ms): A0 0, K0 1, U0 0, K1 1, U1 0
Slab pages: 181MB/181MB (ino 39MB, de 13MB, bh 21MB, pb 40MB)
Swap [ OK ]: tot 2000MB, free 2000MB, in 0.000MB/s, out 0.000MB/s
Net [ OK ]: tot: in 0.027MB/s 233pkt/s, out 0.040MB/s 37pkt/s
lo: in 0.000MB/s 0pkt/s, out 0.000MB/s 0pkt/s
eth0: in 0.014MB/s 116pkt/s, out 0.020MB/s 19pkt/s
sit0: in 0.000MB/s 0pkt/s, out 0.000MB/s 0pkt/s
br0: in 0.000MB/s 0pkt/s, out 0.000MB/s 0pkt/s
br1: in 0.013MB/s 116pkt/s, out 0.020MB/s 19pkt/s
Disks [ OK ]: in 0.000MB/s, out 0.000MB/s
ST %VM %KM CPU FCNT MLAT NAME
OK 0.0/27 0.0/- 0.00/33 0 0 1
OK 0.2/685 0.0/- 0.00/33 0 0 101
OK 0.4/685 0.0/- 0.00/33 0 0 102
OK 27/6.7 0.1/- 0.00/33 0 0 Windows7
The command output is updated with the time interval equal to the value specified after the –d
(delay) option measured in seconds. In the session above, the statistics displayed is renewed every
five seconds. If the –d option is not specified, the default interval equals 1 second.
As you can see, the utility provides real-time information on all main resources subsystems
pertaining both to the physical server and to its virtual machines and Containers: the disk, network,
CPU, and memory subsystems. You may want to shrink the output of the utility by specifying the –
b (brief) option instead of the –v (verbose) one, or to do without any options to use the “normal”
mode of displaying.
The following information is displayed by default per each virtual machine or Container:
Column Description
ST
%VM
virtual machine or Container status. If there are no failed counters and the latency
values are normal, the status is “OK”. Otherwise, it is displayed in red as “!!”. You can
sort virtual machines and Containers by their status to see the problem virtual
machines and Containers first.
Virtual memory usage, in per cent to the total memory. The first number is how much
virtual memory is being used, and the second one is the virtual memory barrier.
51
Page 52

Performing Basic Operations in Parallels Cloud Server 6.0
%KM
of displaying, this number represents the increase of failed counters since the previous
Kernel memory usage, in per cent to the normal zone size. The first number is how
much kernel memory is being used, and the second one is the kernel memory barrier.
CPU
FCNT
MLAT
NAME
CPU usage in per cent to all available CPUs. The first number is how much of the CPU
power is being used by the virtual machine or Container, and the second one is its
guaranteed share judging by the cpuunits parameter. Note that the actual CPU
usage may be higher than the guaranteed one.
The number of failed counters for all the resource parameters. In the standard mode
screen update, whereas in the average mode of displaying, it represents an absolute
failed counters sum for the given virtual machine or Container.
Maximal scheduling latency for the virtual machine or Container, in ms. This parameter
shows the maximal scheduling latency inside the given virtual machine or Container,
i.e. for how long (at the utmost) a process inside the virtual machine or Container
awaits for the CPU.
Virtual machine or Container name.
The %VM, %KM, and CPU columns provide two values per column separated by a slash for each
virtual machine and Container. The first value indicates the real usage of the corresponding
parameter by the virtual machine and Container, and the second one – the maximal value allowed
for the virtual machine and Container.
For detailed information on options that you can use with the pstat utility, consult the Parallels
Cloud Server Command Line Guide.
52
Page 53

Performing Basic Operations in Parallels Cloud Server 6.0
Migrating Virtual Machines and Containers
Parallels Cloud Server provides a special utility - pmigrate - allowing you to perform different
types of migration.
Migrating a physical server to a virtual machine/Container
The pmigrate utility allows you to migrate physical servers to virtual machines and Containers on
the physical server running Parallels Cloud Server. For example, to move a physical server to the
MyVM virtual machine, you can execute the following command:
# pmigrate h 192.168.1.130 v localhost/MyVM
where
• h denotes that you are migrating a physical server.
• 192.168.1.130 is the IP address of the physical server to be migrated.
• v indicates that the physical server is to be moved to a virtual machine.
• localhost/MyVM denotes that the physical server must be migrated to the MyVM virtual
machine on the local server.
If you want to migrate the same physical server to a Container, just specify c instead of v and the
ID of the resulting Container (e.g. 101) instead of MyVM.
Migrating virtual machines and Containers between physical servers
The pmigrate utility supports migrating virtual machines and Containers between physical servers
running Parallels Cloud Server. For example, to migrate a virtual machine with the name of MyVM
from the server having the IP address of 192.168.1.130 to the local server, run this command:
# pmigrate v 192.168.1.130/MyVM v localhost/MyVM
Specifying c instead of v and the Container ID instead of MyVM allows you to migrate Containers
between physical servers with Parallels Cloud Server:
# pmigrate c 192.168.1.130/101 c localhost/101
Migrating Containers to virtual machines
You can also migrate Containers to virtual machines. The Containers to be migrated can reside on
both local and remote physical servers. For example, you can migrate Container 101 residing on
the physical server with the IP address of 192.168.1.130 to the MyVM virtual machine on the
local server as follows:
# pmigrate c 192.168.1.130/101 v MyVM
In its turn, you can migrate Container 101 from the local server to the MyVM virtual machine on the
physical server with the IP address of 192.168.1.130 by executing this command:
53
Page 54

Performing Basic Operations in Parallels Cloud Server 6.0
# pmigrate c 101 v 192.168.1.130/MyVM
Note: If you are migrating from/to a remote physical server, you will be asked for the root credentials to
log in to this server.
54
Page 55

Performing Basic Operations in Parallels Cloud Server 6.0
Managing Virtual Machine and Container Backups
A regular backing up of the existing virtual machines and Containers is essential for any physical
server reliability. In Parallels Cloud Server, you can use the prlctl backup and prlctl
restore commands to back up and restore your virtual machines and Containers.
Note: You can also use the pbackup and prestore utilities to back up and restore your virtual
machines and Containers.
Creating a backup
The prlctl backup command allows you to create virtual machine and Container backups on
both local and remote physical servers. You can back up to any server running the Parallels Cloud
Server software and having sufficient space for storing virtual machine and Container backups. For
example, to make a full backup of the MyVM virtual machine residing on the local server and save it
on the destination physical server with the IP address of 10.10.100.1, run the following
command:
# prlctl backup MyVM -s root:1qaz2wsx@10.10.100.1
root:1qaz2wsx before the destination server IP address denotes the root credentials used to log
in to this server. If you do not specify these credentials, you will be asked to do so during the
command execution.
Restoring a backup
To restore a backup of a virtual machine and Container, you can use the prlctl restore
command. This command supports restoring backups to a local Parallels server only. For example,
to restore a backup of the MyVM virtual machine stored on the remote server with the IP address of
10.10.100.1, you can run this command on the local server:
# prlctl restore MyVM -s root:1qaz2wsx@10.10.100.1
If you have two or more backups of the MyVM virtual machine, you can use the prlctl backuplist command to find out the ID assigned to a specific backup:
# prlctl backup-list -s 10.10.100.1
ID Backup_ID Node Date Type
{e3c8be4a-...} {7a5e7605-...} server.com 2012-08-21 10:10:32 f
{e3c8be4a-...} {24a3011c-...} server.com 2012-08-21 11:12:35 f
You can now indicate the found ID after the -t option to tell prlctl backup to restore a
particular backup. For example, to restore the backup that was created first, execute this
command:
# prlctl restore -t {7a5e7605-a467-4e04-9f5f-6f0078b5f9f5} -s root:1qaz2wsx@10.10.100.1
55
Page 56

Index
Index
A
About Parallels Cloud Server 6.0 - 6
About This Guide - 7
C
Choosing the Installation Device - 18
Choosing the Installation Type - 15
Configuring Network Settings - 46
Connecting to a Server - 41
Creating a Custom Layout - 31
Creating a New Parallels Cloud Storage
Cluster - 22
Creating the Default Layout - 30
Creating Virtual Machines and Containers -
43
D
Defining Network Settings - 16
Defining Time Zone Settings - 27
Deleting Virtual Machines and Containers - 49
Documentation Conventions - 7
E
Entering the License - 20
F
Feedback - 9
Finishing the Installation - 34
G
Getting Help - 8
H
Hardware Compatibility - 10
I
Installing in Graphical Mode - 15
Installing on Parallels Cloud Storage - 21
Installing Parallels Cloud Server 6.0 - 10
Installing Parallels Virtual Automation - 33
Installing Parallels Virtual Automation Manually
- 40
Introduction - 5
J
Joining an Existing Parallels Cloud Storage
Cluster - 25
K
Key Terms - 9
L
Listing Virtual Machines and Containers - 49
M
Managing Virtual Machine and Container
Backups - 55
Migrating Virtual Machines and Containers -
53
Monitoring Resources - 51
N
Network Requirements - 13
O
Obtaining Parallels Cloud Server 6.0
Distribution Set - 13
Organization of This Guide - 7
P
Partitioning the Hardware Drive - 29
Performing Basic Operations in Parallels
Cloud Server 6.0 - 42
Performing Initial Configuration - 46
R
Reading and Accepting the License
Agreement - 15
Requirements for Servers in a Parallels Cloud
Storage Cluster - 12
Page 57

Index
Requirements for Standalone Installations -
11
Running Commands in Virtual Machines and
Containers - 50
S
Setting a Password - 28
Setting Passwords for Virtual Machines and
Containers - 47
Setting Up Parallels Virtual Automation - 39
Software Compatibility - 13
Starting Installation - 14
Starting to Work in Parallels Cloud Server 6.0
- 35
Starting, Stopping, and Querying Status of
Virtual Machines and Containers - 48
Supported Guest Operating Systems - 45
U
Using CLI - 36
Using Parallels Virtual Automation - 37
 Loading...