

Page 1

OpenLane® SLM 5.5
Administrator’s Guide
Document No. 7800-A2-GB32-00
January 2002
Page 2

Copyright © 2002 Paradyne Corporation.
Al l rig h t s res erve d.
Printed in U.S.A.
Notice
This publi cation is protected by federal copyright law. No part of this publication ma y be copied or distributed,
transmitt ed, tr anscri bed, stor ed in a retrie v al syst em, or tr anslat ed into an y human or comput er langu age in any form or
by any mea ns, electronic, mechan ical, magnetic, manual or ot herwise, or disclosed to third parties without the express
written permission of Paradyne Corporation, 8545 126th Ave. N., Largo, FL 33773.
Par adyne Corporation makes no representa tion or warranties with respect to the contents hereof and specifically
disclaims any implied warranties of merc hantability or fitness for a particular purpose. Further, Paradyne Corporat ion
reserves the right to revise this publication and to make changes from time to time in the contents hereof without
obligation of Paradyne Corporation to notify any person of such revision or changes.
Changes and enhancements to the product and to the information herein will be documented and issued as a new
release to this manual.
W arranty, Sal es, Service, and Training Information
Contact yo ur loc al sales r eprese ntati v e, service r epresent ativ e , or dist ribut or di rec tly f or an y hel p need ed. F or addit ional
informati on concerning warranty, sales, service, repair, instal lation, documentation, training, distributor locations, or
Paradyne worldwide office locations, use one of the following methods:
Internet: Visit the Paradyne World Wide Web site at www.paradyne.com. (Be sure to register your warranty at
www.paradyne.com/warranty.)
Telephone: Call our automated system to re ceive current info rmatio n by fax or to speak with a company
representative.
— Within the U.S.A., call 1-800-870-2221
— Outside the U.S.A., call 1-727-530- 2340
Document Feedback
We welcome your comments and suggestions about this document. Please mail them to Technical Publications,
Par adyne Corporation, 8545 126th Av e. N., Largo, FL 33773, or send e-mail to [email protected]. Incl ude the
number and title of this document in your correspondence. Please include your name and phone number if you are
willing to pro vide additional clarificati on.
Trademarks
ACCULINK, COMSPHERE, F rameSaver, Hotwire, MVL, NextEDGE, OpenLane, and Performance Wizard are
registere d tr adem arks of Paradyne Corporation. ReachDSL and TruePut are trademarks of Parad yne Corpor ation. All
other product s and services mentioned herein ar e the trademarks, service marks , registered trademarks , or registered
service marks of their respective owners.
A
January 2002 7800-A2-GB32-00
Page 3

Contents
About This Guide
Document Purpose and Intended Audience . . . . . . . . . . . . . . . . . . . . v
Document Summary . . . . . . . . . . . . . . . . . . . . . . . . . . . . . . . . . . . . . . v
Product-Related Documents . . . . . . . . . . . . . . . . . . . . . . . . . . . . . . . . vi
1 Introduction to OpenLane SLM
OpenLane SLM . . . . . . . . . . . . . . . . . . . . . . . . . . . . . . . . . . . . . . . . . . 1-1
Network Monitoring . . . . . . . . . . . . . . . . . . . . . . . . . . . . . . . . . . . . 1-1
Easy Installation. . . . . . . . . . . . . . . . . . . . . . . . . . . . . . . . . . . . . . . 1-1
OpenLane Features . . . . . . . . . . . . . . . . . . . . . . . . . . . . . . . . . . . . . . . 1-2
2 Insta lling OpenLane on S ol aris
About These Instructions . . . . . . . . . . . . . . . . . . . . . . . . . . . . . . . . . . . 2-1
Planning the Installation. . . . . . . . . . . . . . . . . . . . . . . . . . . . . . . . . 2-1
Insta l lation Require ments. . . . . . . . . . . . . . . . . . . . . . . . . . . . . . . . . . . 2- 2
Minimum Hardware Requirements . . . . . . . . . . . . . . . . . . . . . . . . 2-2
Software Requirements . . . . . . . . . . . . . . . . . . . . . . . . . . . . . . . . . 2-2
Checking the Java Runtime Environment Version. . . . . . . . . . . . . . . . 2-3
Upgrading from Earlier Software . . . . . . . . . . . . . . . . . . . . . . . . . . . . . 2-4
Uninstalling DCE Manager . . . . . . . . . . . . . . . . . . . . . . . . . . . . . . 2-4
Uninstalling Performance Wizard . . . . . . . . . . . . . . . . . . . . . . . . . 2-4
The OpenLane Installation Program . . . . . . . . . . . . . . . . . . . . . . . . . . 2-5
Obtaining a License Key . . . . . . . . . . . . . . . . . . . . . . . . . . . . . . . . 2-6
Installing from Paradyne’s Web Site . . . . . . . . . . . . . . . . . . . . . . . 2-6
Installing from CD-ROM. . . . . . . . . . . . . . . . . . . . . . . . . . . . . . . . . 2-7
Installing from FTP Files . . . . . . . . . . . . . . . . . . . . . . . . . . . . . . . . 2-7
Insta l ling Re motely Us i n g X. . . . . . . . . . . . . . . . . . . . . . . . . . . . . . 2-8
Installing the Permanent License Key . . . . . . . . . . . . . . . . . . . . . . 2-8
Locating the License Key On an Installed System . . . . . . . . . . . . 2-9
Displaying the License Key Expiration Date . . . . . . . . . . . . . . . . . 2-9
Migration to Current Release for Oracle . . . . . . . . . . . . . . . . . . . . . . . 2-9
Starting OpenLane Web and Database Services . . . . . . . . . . . . . . . . 2-10
Stopping OpenLane Web and Database Services. . . . . . . . . . . . . . . . 2-10
Configuring Apache to Use a Different Port. . . . . . . . . . . . . . . . . . . . . 2-11
7800-A2-GB32-00 January 2002
i
Page 4

Contents
3 Installing OpenLane on Windows
About These Instructions . . . . . . . . . . . . . . . . . . . . . . . . . . . . . . . . . . . 3-1
Planning the Installation. . . . . . . . . . . . . . . . . . . . . . . . . . . . . . . . . 3-1
Insta l lation Require ments. . . . . . . . . . . . . . . . . . . . . . . . . . . . . . . . . . . 3- 2
Minimum Hardware Requirements . . . . . . . . . . . . . . . . . . . . . . . . 3-2
Software Requirements . . . . . . . . . . . . . . . . . . . . . . . . . . . . . . . . . 3-2
Web Client Software Requirements. . . . . . . . . . . . . . . . . . . . . . . . 3-3
Checking the Java Runtime Environment Version. . . . . . . . . . . . . . . . 3-3
Upgrading from Earlier Software . . . . . . . . . . . . . . . . . . . . . . . . . . . . . 3-4
Uninstalling DCE Manager . . . . . . . . . . . . . . . . . . . . . . . . . . . . . . 3-4
Uninstalling Performance Wizard . . . . . . . . . . . . . . . . . . . . . . . . . 3-4
The OpenLane Installation Program . . . . . . . . . . . . . . . . . . . . . . . . . . 3-5
Obtaining the License Key. . . . . . . . . . . . . . . . . . . . . . . . . . . . . . . 3-6
Installing from Paradyne’s Web Site . . . . . . . . . . . . . . . . . . . . . . . 3-6
Installing from CD-ROM. . . . . . . . . . . . . . . . . . . . . . . . . . . . . . . . . 3-7
Installing from FTP Files . . . . . . . . . . . . . . . . . . . . . . . . . . . . . . . . 3-7
Installing the Permanent License Key . . . . . . . . . . . . . . . . . . . . . . 3-7
Locating the License Key On an Installed System . . . . . . . . . . . . 3-7
Displaying the License Key Expiration Date . . . . . . . . . . . . . . . . . 3-8
Migration to Current Release for Oracle . . . . . . . . . . . . . . . . . . . . . . . 3-8
Starting OpenLane Web and Database Services . . . . . . . . . . . . . . . . 3-9
Stopping OpenLane Web and Database Services. . . . . . . . . . . . . . . . 3-10
Configuring Apache to Use a Different Port. . . . . . . . . . . . . . . . . . . . . 3-11
4 Configuring Distributed Components
OpenLane Distributed Components. . . . . . . . . . . . . . . . . . . . . . . . . . . 4-1
Setting Up Web Server Distribution . . . . . . . . . . . . . . . . . . . . . . . . . . . 4-2
Operational Notes . . . . . . . . . . . . . . . . . . . . . . . . . . . . . . . . . . . . . 4-4
Setting Up the Distributed Poller and Reader . . . . . . . . . . . . . . . . . . . 4-5
Distributed Poller/Reader — Managem ent Server Setup . . . . . . . 4-5
Distributed Poller/Reader — Poller/Reader Setup . . . . . . . . . . . . . 4-7
5 Apache User Access Authentication
User Access Authentication . . . . . . . . . . . . . . . . . . . . . . . . . . . . . . . . . 5-1
Configuring HTTP Challenge/Response . . . . . . . . . . . . . . . . . . . . . . . 5-2
Removing a User’s Access . . . . . . . . . . . . . . . . . . . . . . . . . . . . . . . . . 5-3
ii
January 2002 7800-A2-GB32-00
Page 5

6 Adding Devices and Customer Profiles
Accessing the OpenLane Web Applications . . . . . . . . . . . . . . . . . . . . 6-1
Adding a Device. . . . . . . . . . . . . . . . . . . . . . . . . . . . . . . . . . . . . . . . . . 6-2
Adding a Customer Profile. . . . . . . . . . . . . . . . . . . . . . . . . . . . . . . . . . 6-4
7 OpenLane Maintenance
Backing Up OpenLane Files . . . . . . . . . . . . . . . . . . . . . . . . . . . . . . . . 7-2
Oracle Database . . . . . . . . . . . . . . . . . . . . . . . . . . . . . . . . . . . . . . 7-2
Backing Up OpenLane Under Solaris . . . . . . . . . . . . . . . . . . . . . . . . . 7-3
Restoring OpenLane Under Solaris . . . . . . . . . . . . . . . . . . . . . . . . . . . 7-3
Backing Up OpenLane Under Windows . . . . . . . . . . . . . . . . . . . . . . . . 7-4
Restoring OpenLane Under Windows . . . . . . . . . . . . . . . . . . . . . . . . . 7-4
Deleting Older Records from the Database. . . . . . . . . . . . . . . . . . . . . 7-5
Frequency . . . . . . . . . . . . . . . . . . . . . . . . . . . . . . . . . . . . . . . . . . . 7-5
Generating Scheduled Reports . . . . . . . . . . . . . . . . . . . . . . . . . . . . . . 7-6
Automating the Generation of Scheduled Reports . . . . . . . . . . . . 7-6
Using Cron Under Solaris to Automate Reports . . . . . . . . . . . . . . 7-6
Using AT under Windows to Automate Reports . . . . . . . . . . . . . . 7-7
Rebuilding Oracle Database Indexes . . . . . . . . . . . . . . . . . . . . . . . . . . 7-8
Monitoring Log Files. . . . . . . . . . . . . . . . . . . . . . . . . . . . . . . . . . . . . . . 7-9
Apache Log Files. . . . . . . . . . . . . . . . . . . . . . . . . . . . . . . . . . . . . . 7-9
SQL Database Log File . . . . . . . . . . . . . . . . . . . . . . . . . . . . . . . . . 7-9
Legacy Logger Log Files . . . . . . . . . . . . . . . . . . . . . . . . . . . . . . . . 7-10
Archiving and Deleting Log Files . . . . . . . . . . . . . . . . . . . . . . . . . . . . . 7-10
Uploading Configurations. . . . . . . . . . . . . . . . . . . . . . . . . . . . . . . . . . . 7-11
Contents
8 Building and Usin g a Fi rmware Library
Building a Firmware Library . . . . . . . . . . . . . . . . . . . . . . . . . . . . . . . . . 8-1
New Device Models Not Supported by OpenLane . . . . . . . . . . . . 8-2
Downloading and Activating Firmware. . . . . . . . . . . . . . . . . . . . . . . . . 8-4
7800-A2-GB32-00 January 2002
iii
Page 6

Contents
AOLCmd Reference
OLCmd Helps. . . . . . . . . . . . . . . . . . . . . . . . . . . . . . . . . . . . . . . . . . . . A-2
OLCmd addcust . . . . . . . . . . . . . . . . . . . . . . . . . . . . . . . . . . . . . . . . . . A-3
OLCmd assigndev . . . . . . . . . . . . . . . . . . . . . . . . . . . . . . . . . . . . . . . . A-5
OLCmd chgrawfileext. . . . . . . . . . . . . . . . . . . . . . . . . . . . . . . . . . . . . . A-6
OLCmd clean. . . . . . . . . . . . . . . . . . . . . . . . . . . . . . . . . . . . . . . . . . . . A-7
OLCmd confauth . . . . . . . . . . . . . . . . . . . . . . . . . . . . . . . . . . . . . . . . . A-8
OLCmd dbage . . . . . . . . . . . . . . . . . . . . . . . . . . . . . . . . . . . . . . . . . . . A-9
OLCmd dbconfig . . . . . . . . . . . . . . . . . . . . . . . . . . . . . . . . . . . . . . . . . A-10
OLCmd dbcopy . . . . . . . . . . . . . . . . . . . . . . . . . . . . . . . . . . . . . . . . . . A-12
OLCmd dbip. . . . . . . . . . . . . . . . . . . . . . . . . . . . . . . . . . . . . . . . . . . . . A-13
OLCmd dbroll. . . . . . . . . . . . . . . . . . . . . . . . . . . . . . . . . . . . . . . . . . . . A-14
OLCmd delcust . . . . . . . . . . . . . . . . . . . . . . . . . . . . . . . . . . . . . . . . . . A-15
OLCmd deldev. . . . . . . . . . . . . . . . . . . . . . . . . . . . . . . . . . . . . . . . . . . A-16
OLCmd dumpldap . . . . . . . . . . . . . . . . . . . . . . . . . . . . . . . . . . . . . . . . A-17
OLCmd importldif . . . . . . . . . . . . . . . . . . . . . . . . . . . . . . . . . . . . . . . . . A-18
OLCmd key . . . . . . . . . . . . . . . . . . . . . . . . . . . . . . . . . . . . . . . . . . . . . A-19
OLCmd ldapmodify . . . . . . . . . . . . . . . . . . . . . . . . . . . . . . . . . . . . . . . A-20
OLCmd ldapsearch . . . . . . . . . . . . . . . . . . . . . . . . . . . . . . . . . . . . . . . A-21
OLCmd logsvc . . . . . . . . . . . . . . . . . . . . . . . . . . . . . . . . . . . . . . . . . . . A-23
OLCmd processreports . . . . . . . . . . . . . . . . . . . . . . . . . . . . . . . . . . . . A-24
OLCmd snmpget . . . . . . . . . . . . . . . . . . . . . . . . . . . . . . . . . . . . . . . . . A-25
OLCmd snmptest . . . . . . . . . . . . . . . . . . . . . . . . . . . . . . . . . . . . . . . . . A-26
OLCmd sync . . . . . . . . . . . . . . . . . . . . . . . . . . . . . . . . . . . . . . . . . . . . A-27
OLCmd uhread. . . . . . . . . . . . . . . . . . . . . . . . . . . . . . . . . . . . . . . . . . . A-29
OLCmd unassigndev . . . . . . . . . . . . . . . . . . . . . . . . . . . . . . . . . . . . . . A-30
OLCmd viewlog . . . . . . . . . . . . . . . . . . . . . . . . . . . . . . . . . . . . . . . . . . A-31
OLCmd xmlreport. . . . . . . . . . . . . . . . . . . . . . . . . . . . . . . . . . . . . . . . . A-33
B Using XML to Produce Reports
XML Reports . . . . . . . . . . . . . . . . . . . . . . . . . . . . . . . . . . . . . . . . . . . . B-1
Command Line Interface (OLCmd xmlreport) . . . . . . . . . . . . . . . . . . . B-1
Servlet Interface (SlvXmlServlet). . . . . . . . . . . . . . . . . . . . . . . . . . . . . B-2
Writing an Interface to the Servlet. . . . . . . . . . . . . . . . . . . . . . . . . B-2
XML and XSL Examples . . . . . . . . . . . . . . . . . . . . . . . . . . . . . . . . . . . B-3
Additional Resources . . . . . . . . . . . . . . . . . . . . . . . . . . . . . . . . . . . . . . B-3
Index
iv
January 2002 7800-A2-GB32-00
Page 7

About This Guide
Document Purpose and Intended Audience
This guide contains information about the OpenLane Service Level Management
(SLM) system, Version 5.5. It is designed both as an introduction for novice users
and a reference for experienced users of OpenLan e.
Document Summary
Section Description
Chapter 1,
OpenLane SLM
Chapter 2,
Solaris
Chapter 3,
Windows
Chapter 4,
Components
Chapter 5,
Authentication
Chapter 6,
Customer Profiles
Chapter 7,
Chapter 8,
Firmware Library
Appendix A,
Introdu c ti o n to
Installing OpenLane on
Installing OpenLane on
Configuring Distributed
Apache User Access
Adding Devices and
OpenLane Mainte nance
Building and Using a
OLCmd Reference
Describes the general purpose and features of
OpenLane.
Contains procedur es for installing OpenLane on a
Solar i s pla tform.
Contains procedur es for installing OpenLane on a
Windows platf orm.
Explains how to run a Web server and a
poller/reader serv er separate from the OpenLane
management server.
To configure a di stributed Oracle database, see the
OpenLane SLM 5.5 Oracle Database
Administration Instructions
Explains how to set up use r access authentication
through Apache.
Presents the basic tasks necessary to set up a
customer on OpenLane.
Lists and d escri bes t he tasks nec essa ry to mai ntai n
the OpenLane system.
Explains how to admini ster a library of device
firmware.
Describes the functions of the command line
program OLCmd.
.
Index
7800-A2-GB32-00 January 2002
Lists key terms, concepts, and sections in
alphabetical order.
v
Page 8

About This Guide
A master glossary of terms and abbreviations used in Paradyne documents is
available online at
Technical Glossary
Product-Related Documents
Document Number Document Title
www.paradyne.com
.
. Select
Library → Technical Manuals →
7800-A2-GB30
7800-A2-GZ46
Contact your sales or service representative to order additional product
documentation.
Paradyne documents are also available online at
Library → Technical Manuals
OpenLane’s Online Help is available in the Technical Manuals area, as well as on
Paradyne’s documenta tion CD-ROM. The Online Help is the user’s guide for
OpenLane.
OpenLane SLM Reports Reference Guide
OpenLane SLM 5.5 Oracle Database Administration
Instructions
www.paradyne.com
.
. Select
vi
January 2002 7800-A2-GB32-00
Page 9

Introduction to OpenLane SLM
OpenLane SLM
Paradyne’s OpenLane® Service Level Management (SLM) is an open,
standards-based, highly distributable system offering robust scalability and
flexibility. A Web browser-enabled user interface provides accessibility anytime,
anywhere.
Paradyne’s network manage men t solution features support for diagn ostics,
real-time performance monitoring, historical reporting, and detailed health and
status indicators for Paradyne’s wide array of SNMP-managed narrow and
broadband network access device families. Support is provided for Paradyne’s
FrameSaver
7xxx, and 9xxx T1 and subrate access products.
®
and Hotwire® products. OpenLane also supports Paradyne’s 31xx,
1
Network Monitoring
Easy In stallation
OpenLane lets you proactively and reactively monitor, analyze, and troubleshoot
your network with easy-to-use management tools, letting you discover and
eliminate trouble spots before they affect service. With Open Lane you can verify
line quality and the level of serv ice provided, as well as monitor bandwidth
utilization.
OpenLane comprises several features that provide extensive element, network,
and service level management capabilities for network service pr ovid ers, network
managers, and their end customers.
OpenLane is installed through an easy-to-use graphical interface. OpenLane’s
highly scalable architecture offers flexibility to grow your system as management
scope increases. OpenLane can span customer network sizes from small
customers with a few dozen devices and a few users to carrier-class installations
with thousands of devices and many users.
7800-A2-GB32-00 January 2002
1-1
Page 10

1. Introduction to OpenLane SLM
OpenLane Features
Easy-to-use Web browser-based user interface
Support for the full array of Paradyne SNMP-manageable devices
Support for several different levels of user access
Easy-to-use graphical interface installs and configures each module
E-commerce-class distributed architecture suppor ts small-scale end-user
networks up to carrier-class deployments
Distributed architecture supports:
— Optional customer-supplied Oracle 8i database
— Distributed Web server
— Distributed Poller/Reader (on Solaris platform)
— LDAP (Lightweight Directory Access Protocol) directory service
Integrates with HP OpenView
Online Help system with full text search capability
Device configuration through the Web interface
Scheduled and on-demand firmware maintenance downloads
Service level reporting, enabling quality of service (QoS) verification
Historical data collection and reporting (FrameSaver only)
On-demand polling
Real-time device health and status, diagnostics, and perform ance m onitoring
Extensive Web-based diagnostics, including non-disruptive PVC loopback and
end-to-end connectivity testing
1-2
January 2002 7800-A2-GB32-00
Page 11

Installing OpenLane on Solaris
About These Instructions
These instructions provide you with the necessary information to get your
OpenLane Serv ice Level Management software installed and running as quickly
as possible. Installers should be familiar with Solaris and Solaris administration.
Planning the Installation
Before installing OpenLane:
2
Review the
Verify the JRE version on your syste m. Refer to
Environment Version
Installation Requirements
on page 2-3.
on page 2-2.
Checking the Java Runtime
7800-A2-GB32-00 January 2002
2-1
Page 12

2. Installing OpenLane on Solaris
Installation Requirements
Review th e following
Requirements
to verify that you meet the prerequ isites.
Minimum Hard wa re Requirements
Networks with
Less Than 500 Devices*
Sun Ultra 10
256 MB RAM
100 MB free disk space
Additional disk space for storage of performance data:
– Cloudscape: 120 KB of disk space per PVC per day (60 KB per DLCI per day )
– Oracle: 62 KB of disk space per PVC per day (31 KB per DLCI per day)
* A device is an SNMP-manageable CSU, DSU, or DSL port.
Software Requirements
Sun Solaris 2.6 or 2.8 operating system (Solaris 2.7 is not supported)
Java Runtime Environment (JRE) Version 1.1.8_10
Minimum Hardware Requirements
Networks with
500–2000 Devices
Sun Ultra 10
512 MB RAM
Networks with
2000–5000 Devices
and
Software
Sun Enterprise 450 Server
512 MB RAM
The JRE is included on the OpenLane CD.
Internet Explorer 5.5 (for Windows-based clients) or Netscape Communicator
Version 4.76 or 4.78 (for Solaris-based clients)
The following default TCP ports are used by the OpenLane server:
— Port 80: Apache Web server 1.3.12 (for HTTP Requests. The port can be
changed; see
Configuring Apache to Use a Different Por t
on page 2-11)
— Port 1521: Oracle Database (if used)
— Port 2099: Remote Method Invocation (RMI for Application
Communications)
— Port 3890: LDAP (Lightweight D irector y A ccess Protocol) Directory
Services
— Port 8007: Apache JServ (for Java Servlet Communications)
Optional:
Distributed architecture with customer-supplied Oracle 8i (Standard
or E nterprise)
OpenLane’s internal Cloudscape database accommodates up to 80 PVCs
(160 DLCIs). For larger networks, an Oracle database must be installed.
Optional:
HP OpenView Network Node Manager 6.1 or 6.2
To install OpenLane on a UNIX system (not Solaris), a graphical interface such as
the X Window System is required. This is inherent in Solaris.
2-2
January 2002 7800-A2-GB32-00
Page 13
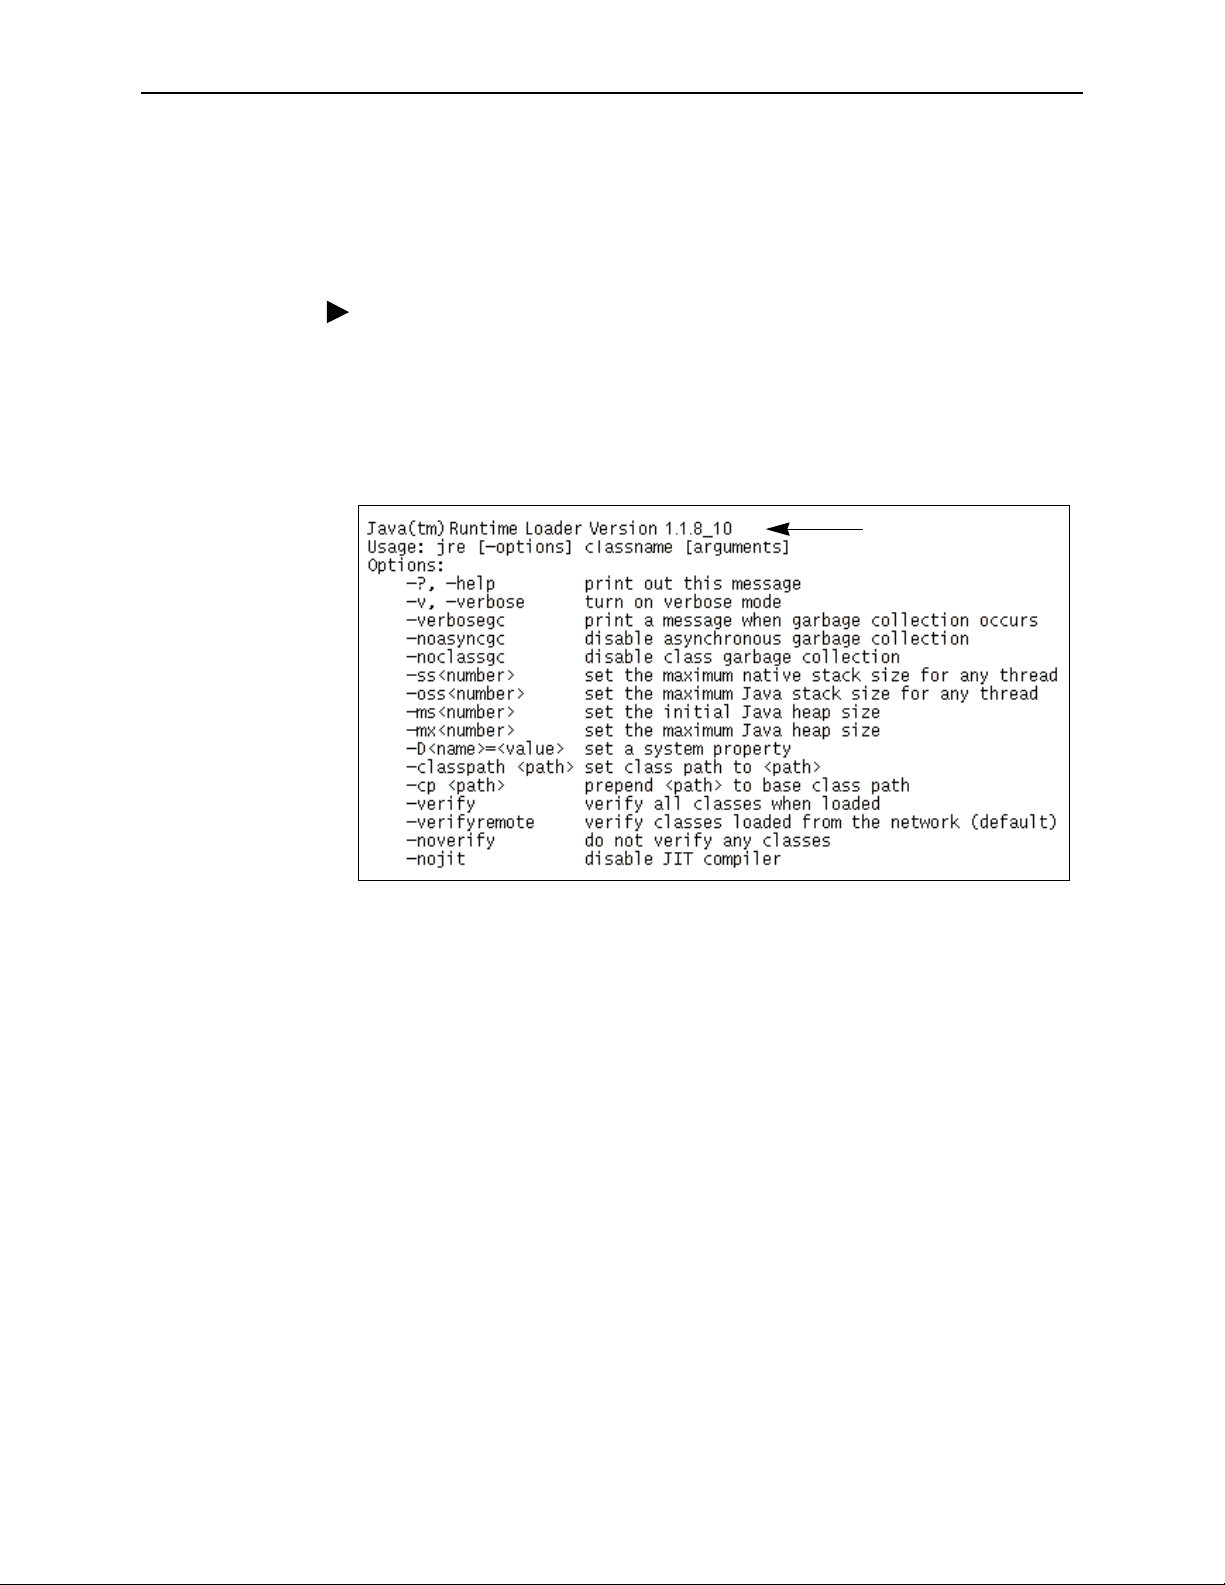
Checking the Java Runtime Environment Version
Before installing the OpenLane Service Level Management software, you need to
verify that the Java Runtime Environment (JRE) has been installed correctly.
Procedure
To verify the JRE installation:
2. Installing OpenLane on Solaris
1. Open a terminal window. Type
The window should display the Java Runtime Environment Version number
and a list of options. Verify that you have
jre
and press Enter.
Version 1.1.8_10
.
Version Number
2. If you receive a message that the JR E canno t be found or another version is
found, verify that the path to the correct JRE is in your PATH environment
variable. To displ ay the PATH environment variable:
Type
echo $PATH
7800-A2-GB32-00 January 2002
and press Enter.
2-3
Page 14

2. Installing OpenLane on Solaris
Upgrading from Earlier Softwa re
If you are installing OpenLane on a syste m that is currently running:
DCE Manager
Performance Wizard 4.2
An earlier ve rsio n of OpenLane 5
during the OpenLane installation.
If you use an Oracle database, you must execute a migration script to update
the schema. See the
Instructions
Uninstalling DCE Manager
To uninstall DCE Manager, follow this procedure before installing OpenLane:
Procedure
1. Start the DCEinstall program.
— If you downloaded the software from the World Wide Web, change to the
, see
Uninstalling DCE Manager
, see
Uninstalling Perfor ma nce Wizard
Do not uninstall the earlier version.
, the upgrade is handled automatically
, below.
, below.
OpenLane SLM 5.5 Oracle Database Administration
.
directory where you expanded the file and run the installation program:
<directory>
cd
./DCEinstall
— If you mounted the CD-ROM for Sun systems:
cd /tmp/cdrom/DCE/Solaris2
./DCEinstall
2. The script detects the existing version and prompts you to uninstall it.
Select OK.
3. When the software is uninstalled, the installation script prompts you to install
DCE Manager. Select No.
Uninstalling Perf or m anc e W izar d
Procedure
1. Run UnInstallToOV:
cd /opt/OV/pdn/PerfWiz
./UnInstallToOV
2. Delete the /opt/OV/pdn/ directory and all subordinate directories and files:
rm -rf /opt/OV/pdn
2-4
January 2002 7800-A2-GB32-00
Page 15

The OpenLane Instal l ati on Program
2. Installing OpenLane on Solaris
To install OpenLane and the Apache Web server , ex ecute the OpenLane
setup.sh
program. Follow the instructions and respond to the queries it presents. The
OpenLane installation program:
Optionally installs and configures the Apache 1.3.12 Web server and the
Apache JServ. (This is not req uired for upgrades from earlier versions of
OpenLane 5.)
By default, the Apache software is installed with the follo wing parameters:
Apache Parameter Setting
Installation directory /opt/apache
TCP Port for HTTP requests 80
User nobody
Group nobody
These options can be changed during the installation process. To modify the
Apache Web server to use a port other than port 80 after installation, see
Configuring Apache to Use a Different Por t
The default installation path for Apache software is:
on page 2-11.
/opt/apache
Installs the OpenLane components, including the Cloudscape Java SQL
Database.
The default installation path for OpenLane software is:
/opt/pdn/OpenLane
Provides a startup command to control all Apache and OpenLane processes.
Includes Management Platform Integration Adapters for HP OpenView
Network Node Manager for Sun Solaris.
The software-based platform adapters provide integration points for:
— Paradyne device -specific map icon creation
— Trap definition files
In addition, OpenLane is added to OpenView’s menu structure.
7800-A2-GB32-00 January 2002
2-5
Page 16

2. Installing OpenLane on Solaris
Obtaining a License Key
An OpenLane license key is required to install OpenLane. You can request a
temporary license key from the Paradyne Web site at
www.paradyne.com/pdn/key
e-mail.
NOTES:
— You do not have to install the Apache Web server in /opt/apache and
OpenLane in /opt/pdn/OpenLane. Howe v er, it is
you install Apache and OpenLane on the same mount point.
If you do not use the standard directory names, substitute the names you
use for the directory references in this document.
— If you will be distributing the Web ser ver, you must install OpenLane and
Apache in the same directory path on the Web server and the OpenLane
Management system.
. A 30-day temporary license key is provided by
highly recommended
that
Installing from P ar adyne ’s Web Site
Procedure
1. Log on to the system as
2. Obtain a temporary license key and the OpenLane software from
www.paradyne.com/pdn/key
3. Save the setup.sh file in
4. Exit
5. Change the file permissions:
6. Run the setup.sh file:
7. Follow the instructions on each screen with these except ions:
your Web browser if it is running. Change to the directory chosen in
Step 3.
chmod 777 setup.sh
./setup.sh
— If you are upgrading a version of OpenLane 5, do not remove the old
version when prompted. Select
— When prompted for the Apache User and Group information, use the
default User and Group:
root
/tmp
.
.
or any directory you choose.
Continue
.
User = nobody
Group = nobody
2-6
January 2002 7800-A2-GB32-00
Page 17

Installing from CD-ROM
Procedure
2. Installing OpenLane on Solaris
1. Log on to the system as
2. Exit your Web b rowser if it is running. Insert the OpenL ane CD-ROM into the
3. Change to the CD-ROM drive.
4. Change to the OpenLane directory and run t he
5. Follow the instructions on each screen with these except ions:
Installing from FTP Files
Contact Technical Suppor t to arrange this type of installation:
root
CD-ROM drive and mount it.
— If you are upgrading a version of OpenLane 5, do not remove the old
version when prompted. Select
— When prompted for the Apache User and Group information, use:
User = nobody
Group = nobody
1-800-795-8004
.
Continue
setup.sh
.
file.
7800-A2-GB32-00 January 2002
2-7
Page 18

2. Installing OpenLane on Solaris
Installing Remotely Using X
You can install OpenLane from a remote host using the X Window System.
Procedure
1. On the local host, execute the following commands:
xhost +
rlogin
username
2. On the remote host, execute the following command or commands:
— If using the Bourne shell (sh):
— If using the Korn shell (ksh):
— If using the C shell (csh):
3. On the remote host, change the directory to the path where setup.sh resides:
cd /tmp
4. Run setup.sh:
./setup.sh
remote_host_name
remote_host_name
must have root pr ivilege.
DISPLAY=
export DISPLAY
export DISPLAY=
setenv DISPLAY
local_host_name
-l
username
:0.0
local_host_name
local_host_name
:0.0
:0.0
Installing the Permanent License Key
Procedure
1. Change the directory to /opt/pdn/OpenLane:
cd /opt/pdn/OpenLane
2. Enter the command to install the permanent key:
OLCmd key
Where
example:
OLCmd key ALUKB-KAC9Y-H987N-CX5GK
2-8
January 2002 7800-A2-GB32-00
permanent_key
permanen t_key
is the key e-mailed or faxed to you by Paradyne. For
Page 19

Locating the License Key On an Installed System
To locate the license key on the system once OpenLane is installed, use one of
these methods:
2. Installing OpenLane on Solaris
Display the OpenLane About screen by clicking the
Service Level Management
Display the
Issue the command
/opt/pdn/OpenLane/pdnKey.txt
OLCmd key
License Key Expiration Date
Displaying the License Key Expiration Date
You can view your license key’s expiration date at any time using the
of OLCmd.
Procedure
1. Open a terminal window and change to the OpenLane directory.
2. Enter the command:
OLCmd key
The expiration date is displayed in day-month-year format. For example:
License expires on: 02-Jan-03
This license expires on January 2, 2003.
About OpenLane
link on the OpenLane Administration screen
file using a text editor
from a command line (see
)
Displaying the
function
key
Migra ti on to Current Rel ea s e for Oracle
If you use an Oracle database for an earlier release of OpenLane, you must run a
migration script to update the schema after OpenLane is installed. See the
OpenLane SLM 5.5 Oracle Database Administration Instructions
.
7800-A2-GB32-00 January 2002
2-9
Page 20

2. Installing OpenLane on Solaris
Starting OpenLane Web and Database Services
Procedure
1. From a terminal window, change the directory to /opt/pdn/OpenLane:
cd /opt/pdn/OpenLane
2. Type
OLControl start
started:
— Apache Web Server
— Cloudscape JDBMS (if used)
— OpenLane Serv ices
— RMI Application Server
— SCM Poller
— OpenLDAP Directory Services
— User History Poller
— User History Reader
and press Enter. The following services are
Stopping OpenLane Web and Database Services
Procedure
1. From a terminal window, change the directory to /opt/pdn/OpenLane:
cd /opt/pdn/OpenLane
2. Type
2-10
January 2002 7800-A2-GB32-00
OLControl stop
and press Enter.
Page 21

Configuri n g Apach e to Use a Differen t Port
By default, the Apache Web server is installed and configured to use TCP port 80
(unless you changed it at installation time). You can configure the Apache Web
server to use another port after installation, as long as that port is not in use by
another service.
Procedure
To change the TCP port:
1. From a terminal window, change the directory to /opt/pdn/OpenLane:
cd /opt/pdn/OpenLane
2. Installing OpenLane on Solaris
2. To stop OpenLane, type
3. Change to the Apache configuration directory:
cd /opt/apache/conf
4. Edit the file httpd.conf using a text editor, such as vi:
vi httpd.conf
5. Find the entry for
6. Save the file after makin g changes.
7. Change to the OpenLane directory:
cd /opt/pdn/OpenLane
8. To start OpenLane, type
OLControl stop
PORT.
Change the value from 80 to the new port number.
OLControl start
and press Enter.
and press Enter.
7800-A2-GB32-00 January 2002
2-11
Page 22

2. Installing OpenLane on Solaris
2-12
January 2002 7800-A2-GB32-00
Page 23

Installing OpenLane on Windows
About These Instructions
These instructions provide you with the necessary information to get your
OpenLane Serv ice Level Management software installed and running as quickly
as possible. Installers should be familiar with Windows administration.
Planning the Installation
Before installing OpenLane:
3
Review the
Verify the JRE version on your syste m. Refer to
Environment Version
Installation Requirements
on page 3-3.
on page 3-2
.
Checking the Java Runtime
7800-A2-GB32-00 January 2002
3-1
Page 24

3. Installing OpenLane on Windows
Installation Requirements
Review the
Minimum Hardware Requirements
prerequisites.
Minimum Hard wa re Requirements
Networks with Less Than 500 Devices* Network with 500–1000 Devices*
500 MHz Processor**
256 MB RAM
100 MB free disk space
Additional disk space for storage of performance data:
– Cloudscape: 120 KB of disk space per PVC per day (60 KB per DLCI per day )
– Oracle: 62 KB of disk space per PVC per day (31 KB per DLCI per day)
* A device is an SNMP-manageable CSU, DSU, or DSL port. The Solaris version of
OpenLane is recommended for networks with more than 1000 devices.
** Dual processors are not supported.
Software Requirements
Windows NT 4.0 with Service Pack 5 or higher
– or –
Windows 2000 Server with Service Pack 2 or higher
and to verify that you meet the
700 MHz Processor**
512 MB RAM
Java Runtime Environment (JRE) Version 1.1.8_006
The JRE is included on the OpenLane CD. It is also available at:
http://www.paradyne.com/products/ol_support.html
The following default TCP ports are used by the OpenLane server:
— Port 80: Apache Web server 1.3.12 (for HTTP Requests. The port can be
changed; it must be changed if you use Internet Information Server (IIS).
See
Configuring Apache to Use a Different Port
on page 3-11)
— Port 1521: Oracle Database (if used)
— Port 2099: Remote Method Invocation (RMI for Application
Communications)
— Port 3890: LDAP (Lightweight D irector y A ccess Protocol) Directory
Services
— Port 8007: Apache JServ (for Java Servlet Communications)
Optional:
Distributed architecture with customer-supplied Oracle 8i (Standard
or E nterprise)
OpenLane’s internal Cloudscape database accommodates up to 80 PVCs
(160 DLCIs). For larger networks, an Oracle database must be installed.
Optional:
HP OpenView Network Node Manager 6.1 or 6.2
3-2
January 2002 7800-A2-GB32-00
Page 25
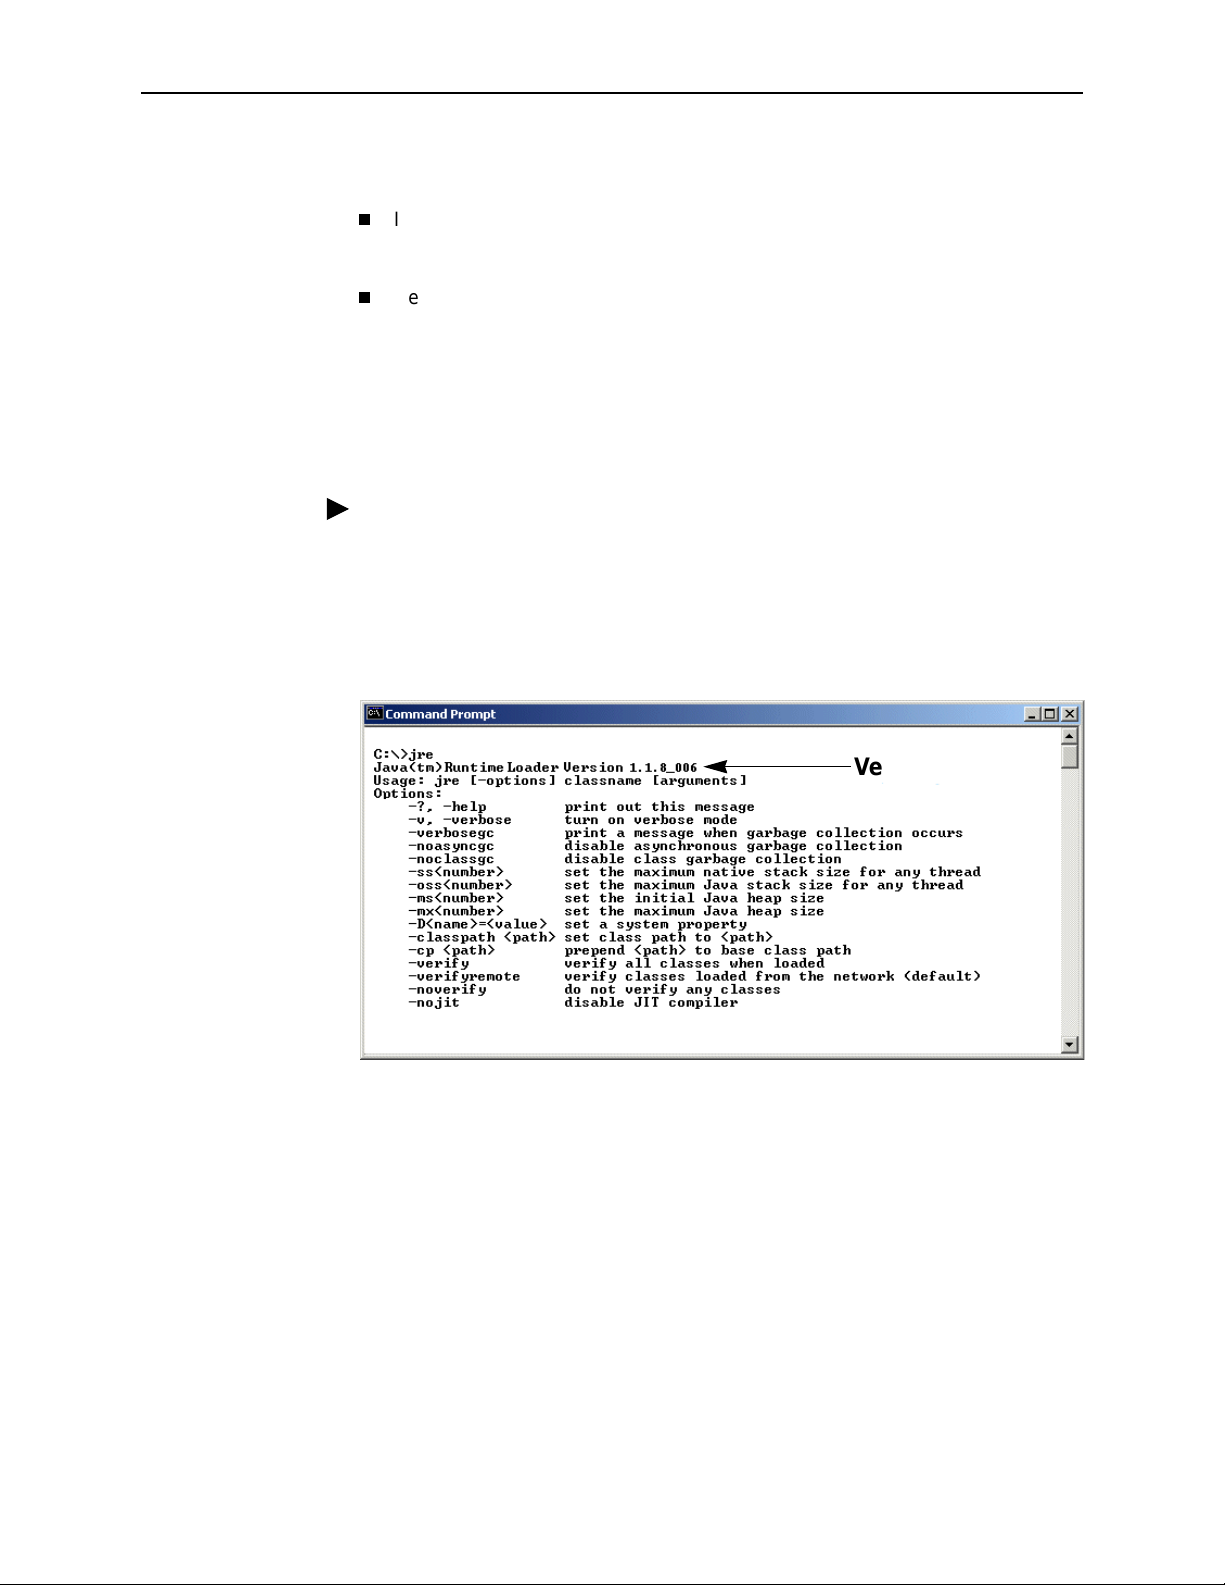
3. Installing OpenLane on Windows
Web Client Software Requirements
Internet Explorer Version 5.5 (for Windows-based clients)
– or –
Netscape Communicator Version 4.76 or 4.78 (for Solaris-based clients)
Checking the Java Runtime Environment Version
Before installing the OpenLane Service Level Management software, you need to
verify that the Java Runtime Environment (JRE) has been installed correctly.
Procedure
To verify the JRE installation:
1. Open an MS-DOS command prompt window. Type
The window should display the Java Runtime Environment Version number
and a list of options. Verify that you have
2. If you receive a message that the JR E canno t be found or another version is
found, completely uninstall and reinstall the JRE software.
Version 1.1.8_006
jre
and press Enter.
.
Version Number
Version Number
7800-A2-GB32-00 January 2002
3-3
Page 26

3. Installing OpenLane on Windows
Upgrading from Earlier Softwa re
If you are installing OpenLane on a syste m that is currently running:
DCE Manager
Performance Wizard 4.2
An earlier ve rsio n of OpenLane 5
during the OpenLane installation.
use an Oracle database, use the supplied migration script to update the
schema. See the
Instructions
Uninstalling DCE Manager
Procedure
1. Double-click on Control Panel, then double-click on Add/Remove Programs.
2. Select DCE Manager and click on Add/Remove.
Uninstalling Perf or m anc e W izar d
Procedure
1. Open an MS-DOS command prom pt window and run
\opt\OV\pdn\PerfWiz\UnInstallToOV.bat:
, see
Uninstalling DCE Manager
, see
Uninstalling Perfor ma nce Wizard
, the upgrade is handled automatically
Do not uninstall the earli er ver sion.
OpenLane SLM 5.5 Oracle Database Administration
.
, below.
, below.
If you
cd \opt\OV\pdn\PerfWiz
uninstalltoov
2. Delete the \opt\OV\pdn directory and all subordinate directories and files.
3-4
January 2002 7800-A2-GB32-00
Page 27

The OpenLane Instal l ati on Program
To install OpenLane and the Apache Web server, ex ecut e the OpenLane
setup.exe
When installation of OpenLane is complete,
The OpenLane installation program:
program. Follow the instructions and respond to the queries it presents.
Optionally installs and configures the Apache 1.3.12 Web server and the
Apache JServ. (This is not req uired for upgrades from earlier versions of
OpenLane 5.)
Defau lt i n s talla tion path for Apache softwar e :
C:\Program Files\Apache Group\Apache
Recommended installation path for Apache software:
C:\opt\apache
The Apache software is configured to use TCP port 80 for http requests. To
modify the Apache Web server to use a port other than port 80, see
Configuring Apache to Use a Different Por t
3. Installing OpenLane on Windows
restart Windows.
on page 3-11.
Installs the OpenLane components, including the Cloudscape Java SQL
Database.
Default installation path for OpenLane software:
C:\opt\pdn\OpenLane
Establishes OpenLane as a Windows service that starts automatically when
Windows does.
Includes Management Platform Integration Adapters for:
— HP OpenView Network Node Manager for Microsoft Windows NT
— HP OpenView for Windows Workgroup Node Manage r
The software-based platform adapters provide integration points for:
— Paradyne device -specific map icon creation
— Trap definition files
In addition, OpenLane is added to the menu structure of HP OpenView
Network Node Manager.
NOTES:
— You do not have to install the Apache Web server at C:\opt\apache and
OpenLane at C:\opt\pdn\OpenLane. However, it is
that you install Apache and OpenLane on the same drive.
highly recommended
If you do not use the standard directory names, substitute the names you
use for the directory references in this document.
— If you will be distributing the Web ser ver, you must install OpenLane and
Apache in the same directory path on the Web server and the OpenLane
Management system. The path cannot exceed 18 characters.
7800-A2-GB32-00 January 2002
3-5
Page 28

3. Installing OpenLane on Windows
Obtaining the License Key
An OpenLane license key is required to install OpenLane. You can request a
temporary license key from the Paradyne Web site at
www.paradyne.com/pdn/key
Installing from P ar adyne ’s Web Site
Procedure
1. Log on to the Windows system as an administrator.
2. Obtain a license key and the OpenLane software from
www.paradyne.com/pdn/key
.
.
3. Save the setup.exe file in
4. Exit your Web br owser if it is running.
5. Run the
6. Follow the instructions on each screen, with these exceptions:
— If you are upgrading a version of OpenLane 5:
— If you are installing OpenLane 5 for the first time:
setup.exe
Do not remove the old version of OpenLane when prom pted . Select
Continue
Do not use the default Apache installation directory. Specify instead:
C:\opt\apache
Do not restart the computer if prompted to do so during the Apache
portion of the installation.
.
C:\temp
file.
or any directory you choose.
3-6
January 2002 7800-A2-GB32-00
Page 29

Installing from CD-ROM
Procedure
1. Log on to the Windows system as an administrator.
2. Exit your Web br owser if it is running.
3. Insert the OpenLane CD-ROM into the CD-ROM drive.
3. Installing OpenLane on Windows
4. Change to the OpenLane directory on the CD-ROM drive and run the
setup.exe
5. Follow the instructions on each screen, with these exceptions:
— Do not use the default Apache installation directory. Specify instead:
C:\opt\apache
— Do not restart the computer when prompted duri ng the Apache portion of
the installation.
Installing from FTP Files
Contact Technical Suppor t to arrange this type of installation:
1-800-795-8004
Installing the Permanent License Key
Procedure
1. Open an MS-DOS command prom pt window and change to the OpenLane
directory:
file.
cd \opt\pdn\OpenLane
2. Enter the command to install the permanent key:
OLCmd key
Where
example:
OLCmd key ALUKB-KAC9Y-H987N-CX5GK
permanent_key
permanen t_key
is the key e-mailed or faxed to you by Paradyne. For
Locating the License Key On an Installed System
To locate the license key on the system once OpenLane is installed:
Display the OpenLane About screen by clicking the
Service Level Management
Display the
Issue the command
C:\opt\pdn\OpenLane\pdnKey.txt
OLCmd key
License Key Expiration Date
7800-A2-GB32-00 January 2002
link on the OpenLane Administration screen
on page 3-8)
About OpenLane
file using a text editor
from a command line (see
Displaying the
3-7
Page 30

3. Installing OpenLane on Windows
Displaying the License Key Expiration Date
You can view your license key’s expiration date at any time using the
of OLCmd.
Procedure
1. Open an MS-DOS Prompt and change to the OpenLane directory.
2. Enter the command:
OLCmd key
The expiration date is displayed in day-month-year format. For example:
License expires on: 02-Jan-03
This license expires on January 2, 2003.
Migra ti on to Current Rel ea s e for Oracle
If you use an Oracle database for an earlier release of OpenLane, you must run a
migration script to update the schema after OpenLane is installed. See the
OpenLane SLM 5.5 Oracle Database Administration Instructions
function
key
.
3-8
January 2002 7800-A2-GB32-00
Page 31
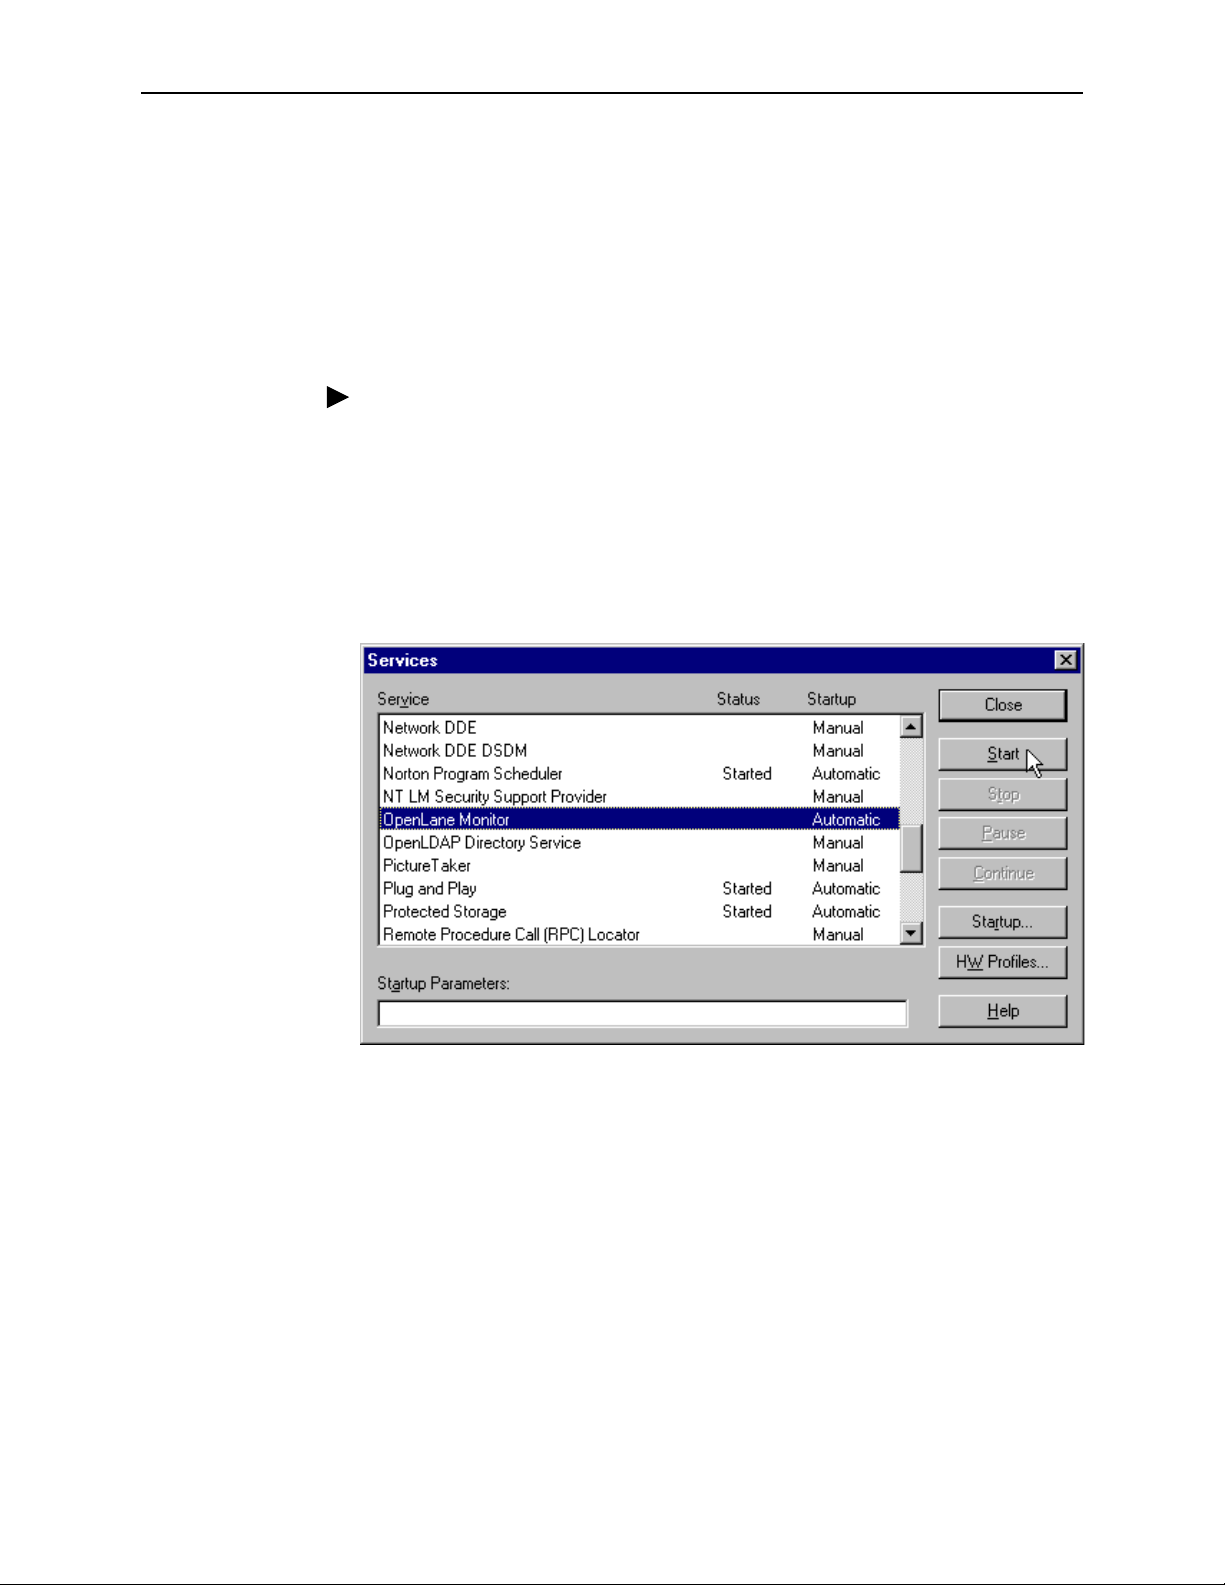
Starting OpenLane Web and Database Services
OpenLane runs as a Windows service. It star ts automa tically when Windows
does, whether or not a user has logged in to Windows.
3. Installing OpenLane on Windows
If you have shut down the OpenLane Monitor ser vice m anually (see
OpenLane Web and Database Services
restarting Windows or by following this procedure.
on page 3-10), you can restart it by
Procedure
To restart OpenLane:
1. Invoke the Services management screen. It can be found:
— In the Control Panel folder under Windows NT
— In the Administrative Tools start menu under Windows 2000
2. Issue a
command for the OpenLane Monitor service.
Start
Stopping
The example shown is from Windows NT.
7800-A2-GB32-00 January 2002
3-9
Page 32
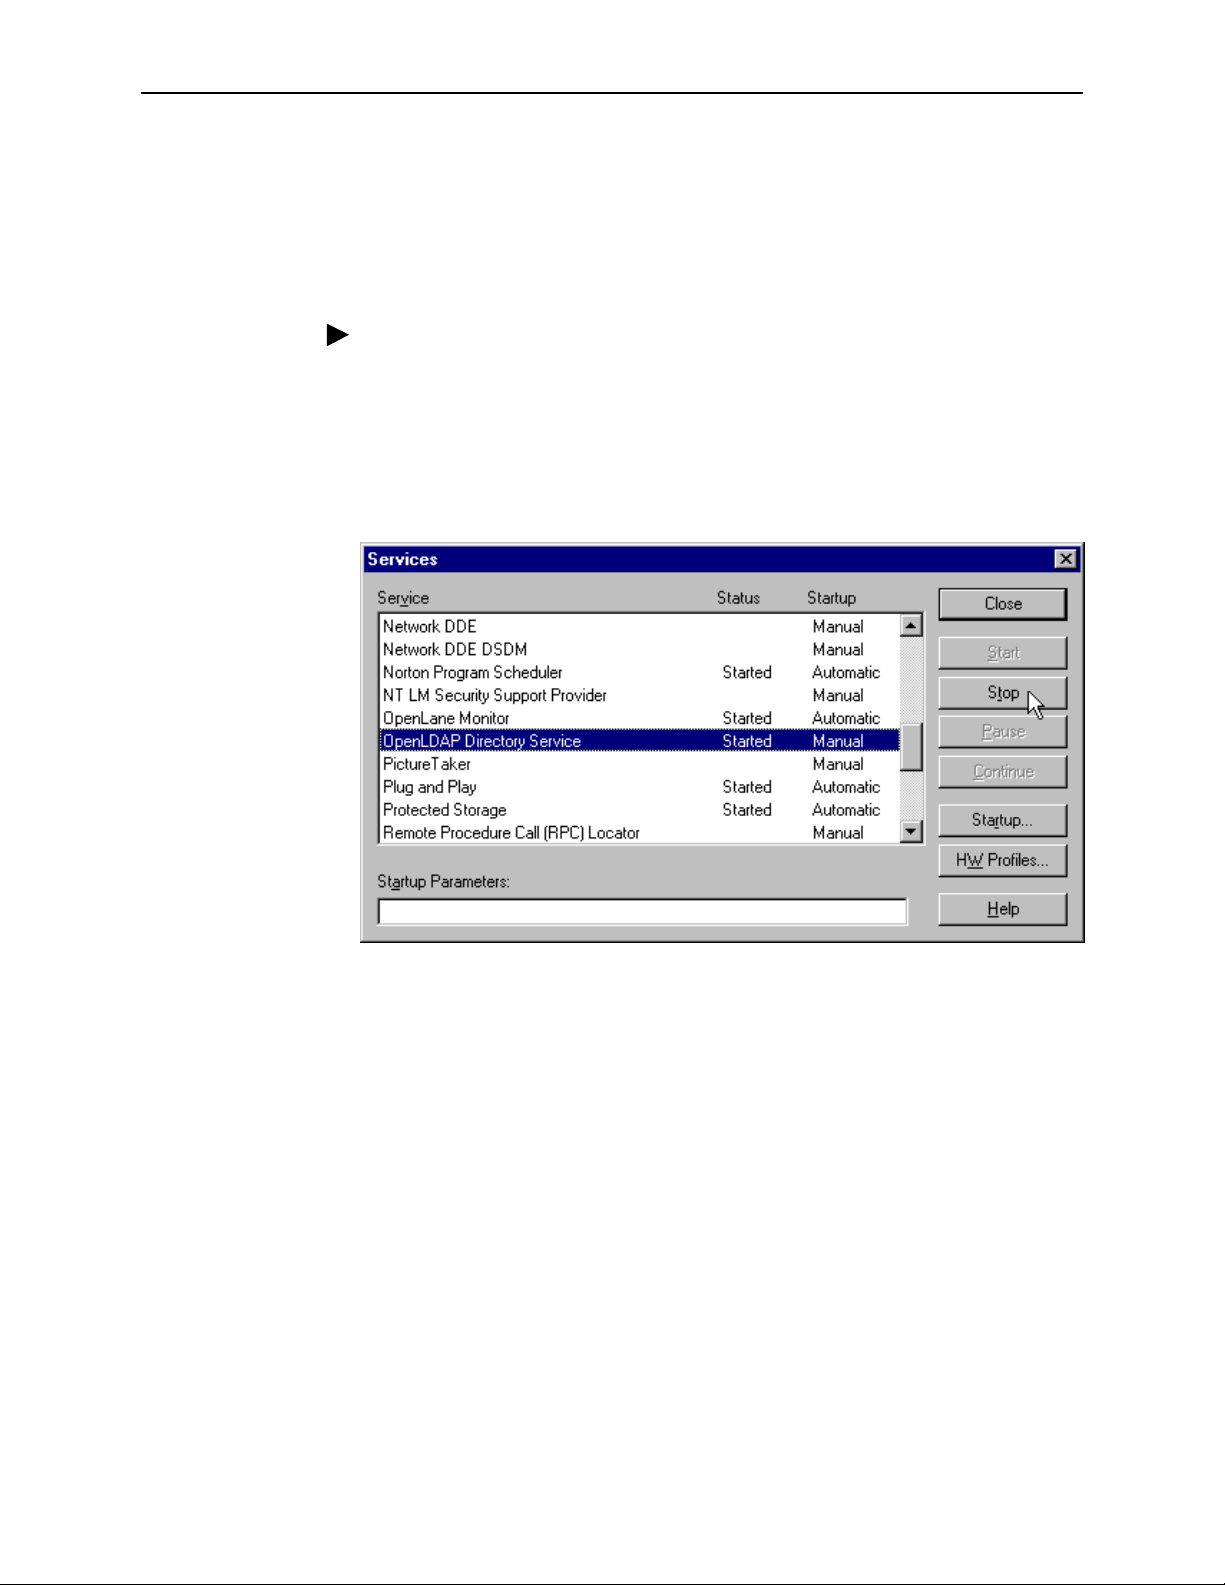
3. Installing OpenLane on Windows
Stopping OpenLane Web and Database Services
Use the Services managem ent screen to shut down OpenLane. Since the
OpenLDAP Directory Service is dependent on the OpenLane Monitor Service,
OpenLDAP should be shut down rather than OpenLane Monitor.
Procedure
1. Invoke the Services management screen. It can be found:
— In the Control Panel folder under Windows NT
— In the Administrative Tools start menu under Windows 2000
2. Issue a
The example shown is from Windows NT.
command for the OpenLDAP Directory Service.
Stop
3-10
January 2002 7800-A2-GB32-00
Page 33

Configuri n g Apach e to Use a Differen t Port
By default the Apache Web server is installed and configured to use TCP port 80.
You can choose to configure the Apache Web server to use any port you wish as
long as that port is not in use by another service.
Internet Information Server (IIS), the Web server installed with Windows 2000
Server, also uses Port 80. To use OpenLane on a system with IIS, you must either
disable IIS or change the port used by Apache.
When you use a port other than 80, the port must be specified in URLs directed to
the Apache server. For example, if you use Port 8080 on the host olserver.com,
the URL for OpenLane is:
http://olserver.com:8080/openlane/
Procedure
To change the TCP port for Apache:
3. Installing OpenLane on Windows
1. If OpenLane is running, stop it. (See
Services
2. Change the directory to C:\opt\apache\conf:
cd \opt\apache\conf
3. Edit the file httpd.conf:
edit httpd.conf
4. Find the entry for
5. Save the file after makin g changes.
6. Change the directory to C:\opt\pdn\OpenLane:
cd \opt\pdn\OpenLane
7. Start OpenLane. See
page 3-9.
on page 3-10.)
PORT.
Starting OpenLane Web and Database Services
Change the value from 80 to the new port number.
Stopping OpenLane Web and Database
on
7800-A2-GB32-00 January 2002
3-11
Page 34

3. Installing OpenLane on Windows
3-12
January 2002 7800-A2-GB32-00
Page 35

Configuring Distributed Components
OpenLane Distributed Components
OpenLane provides a highly distributable framework. Distribution of OpenLane
functions can be used to share workload over several servers, and to provide a
more secure configuration. This chapter describes:
Distributing the Web server
Distributing the Poller/Reader
4
To configure a distributed Oracle database, see the
Database Administration Instructions
.
OpenLane SLM 5.5 Oracle
7800-A2-GB32-00 January 2002
4-1
Page 36
4. Configuring Distributed Components
Setting Up Web Server Distribution
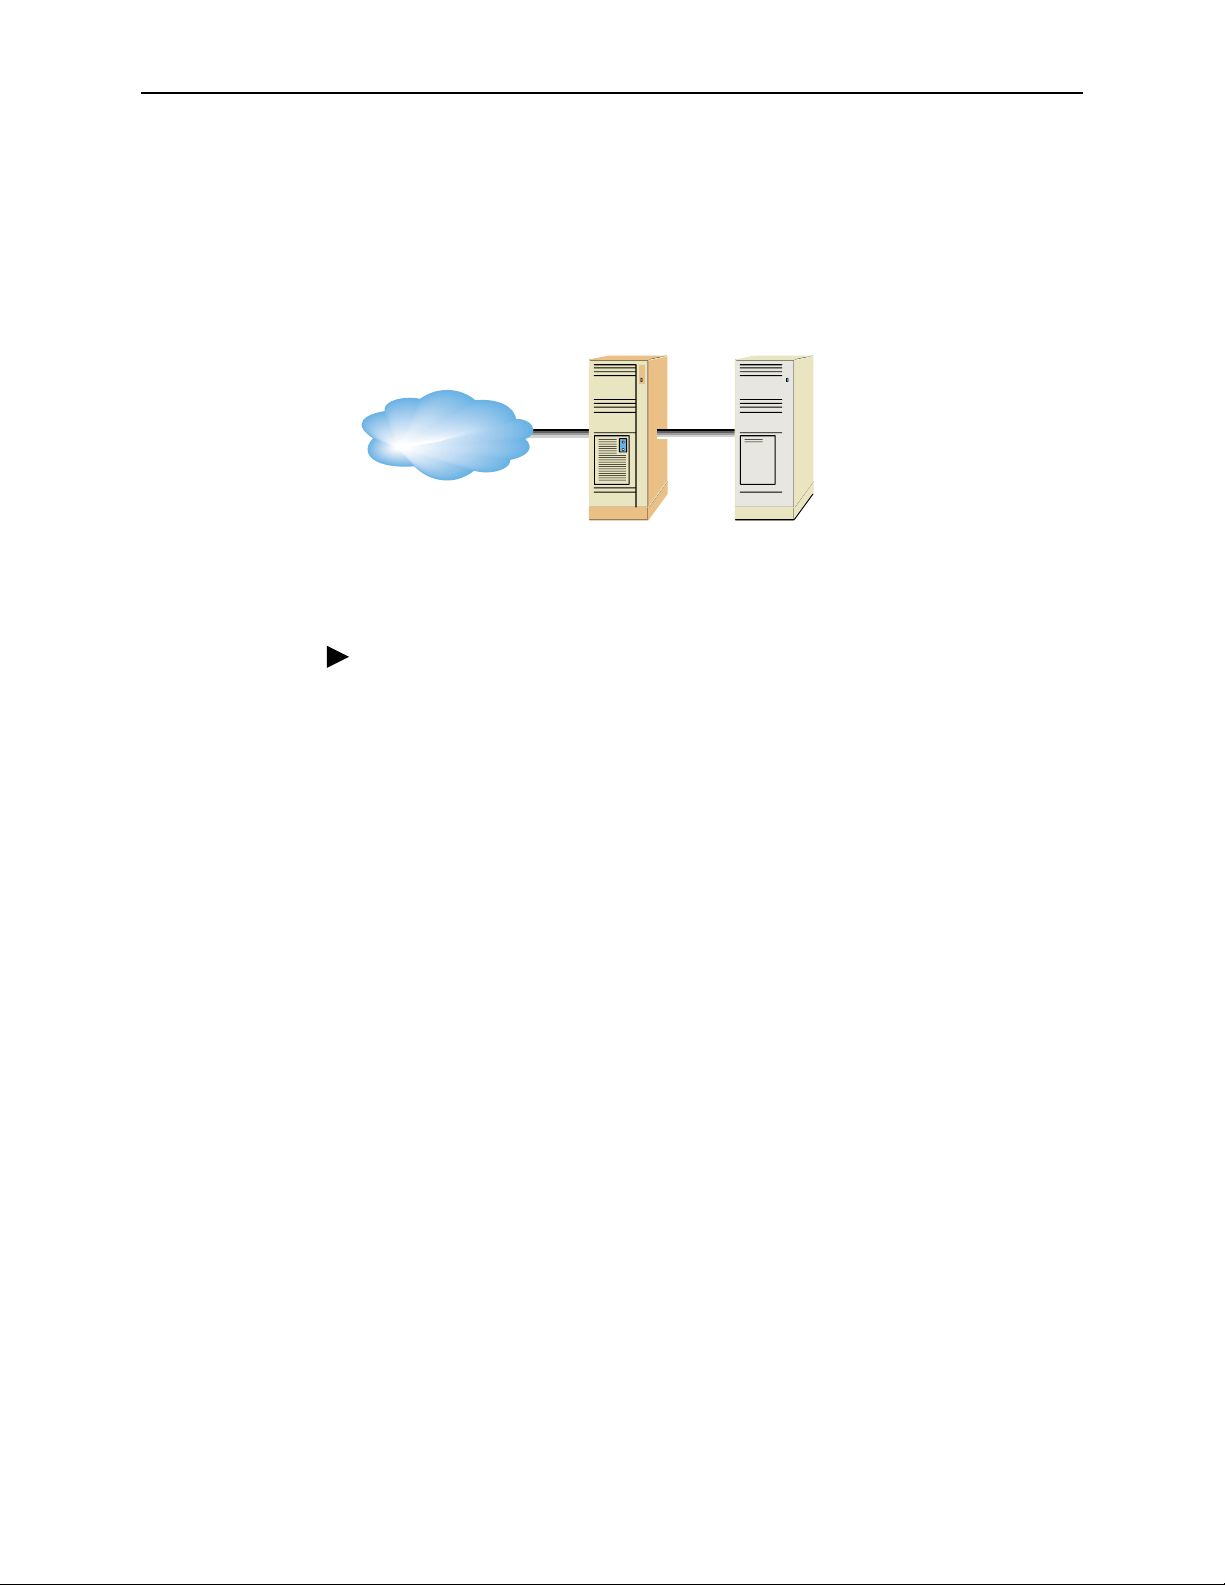
With OpenLane, Web Server functionality can be distributed to another server to
offload the task of serving Web pages or provide a more secure configuration. The
Web Server and the OpenLane Management Server can be Solaris or Windows.
The following procedure uses this diagram to illustrate distributing the Web server.
Internet
Web Server
172.20.1.10
OpenLane Server
172.20.1.20
00-16651a
Procedure
1. Install OpenLane on the OpenLane Management server and the Web server.
Install OpenLane using the same directory names on both servers. The
directory path cannot exceed 18 characters.
Installation Path examples:
—
Solaris:
ser ve r, then insta ll:
OpenLane in
Apache in
document show the directory as /opt/apache and must be modified for the
path you use.)
—
Windows:
OpenLane in
Apache in
this document show the directory as c:\opt\apache and must be modified
for the path you use.)
If the OpenLane server and/or the Web server use a Solaris
/opt/pdn/OpenLane
/opt/apache
(or your choice of directory. Procedures in this
If the Web server uses a Windows server , then install:
C:\opt\pdn\OpenLane
C:\opt\apache
(or your choice of directory. Procedures in
2. If it is running, stop the OpenLane server on both machines.
4-2
January 2002 7800-A2-GB32-00
Page 37

4. Configuring Distributed Components
3. On the OpenLane server (172.20.1.20), edit the jserv.properties file:
—
Solaris:
Edit the
address of the Web server to the
/opt/apache/conf/jserv.properties
security.allowedAddresses
file and add the
directive:
security.allowedAddresses=127.0.0.1,172.20.1.20,172.20.1.10
Set the bind address to the IP address of the OpenLane server:
bindaddress=172.20.1.20
Edit the
comment symbol (#) from
ApJServDefaultHost
ApJSer vD efa ultHost 17 2. 20 .1. 20
—
Windows:
Edit the
/opt/apache/conf/jserv.conf
ApJServDefaultHost
to the IP address of the OpenLane server:
c:\opt\apache\conf\mod_jserv.properties
file and remove the
. Set th e
add the address of the Web server to the
security.allowedAddresses
directive and set the bind address to
the IP address of the OpenLane server:
security.allowedAddresses=127.0.0.1,172.20.1.20,172.20.1.10
bindaddress=172.20.1.20
Edit the
c:\opt\apache\conf\mod_jserv.conf
the comment symbol (#) from
ApJServDefaultHost
to the address of the OpenLane server:
ApJServDefaultHost
file and remove
. Set the
file and
ApJSer vD efa ultHost 17 2. 20 .1. 20
4. Restart the OpenLane s erver.
5. On the Web server (172.20.1.10):
—
Solaris:
Edit
OLControlConfig
(disable by changing the value to 0).
—
Windows:
Edit
OLControlConfig.bat
Web server (by changing the value for other functions from 1 to 0). For
example:
•
•
•
set DATABASE=0
set WEBSERVER=1
set MGMTSVCS=0
set UHPOLLER=0
set UHREADER=0
set SNMPPOLLER=0
set SCHEDRPTS=0
set SCMPOLLER=0
set DIRSVCS=0
•
•
•
. Disable everything but the Web server
. Disab l e a ll functions but the
7800-A2-GB32-00 January 2002
4-3
Page 38

4. Configuring Distributed Components
6. On the Web server (172.20.1.10):
—
Solaris:
Edit the
/opt/apache/conf/jserv.conf
file. Modify these
directives:
ApJServManual On
ApJSer vD efa ultHost 17 2. 20 .1. 20
ApJSer vM oun t /OLServl et s ajp v1 2://172. 20 .1 .20/OLSer vl et s
ApJSer vM oun t /OLServl et s2 ajpv 12://172 .2 0. 1.20/OLSe rv le ts2
—
Windows:
Edit the
c:\opt\apache\conf\mod_jserv.conf
file.
Modify these directives:
ApJServManual On
ApJSer vD efa ultHost 17 2. 20 .1. 20
ApJSer vM oun t /OLServl et s ajp v1 2://172. 20 .1 .20/OLSer vl et s
ApJSer vM oun t /OLServl et s2 ajpv 12://172 .2 0. 1.20/OLSe rv le ts2
7. Start the Web server.
In this example, you can now access the OpenLane Ma nagem ent Syste m by
entering:
http://172.20.1.10/OpenLane
Operational Notes
An httpd server will be running on both the Web server and the OpenLane
Management ser ver. This will allow you to access the OpenLane Ma nagement
server if the Web server should fail.
If Apache authentication is enabled, it must be enabled on both systems. Apache
authentication is specific to individual machines. To have the same set of users
access both machines, you need an identical
.htpasswd
file on both systems. You
may choose to allow different sets of users to access each machine by keeping a
different .htpasswd file on each machine.
4-4
January 2002 7800-A2-GB32-00
Page 39
Setting Up the Distributed Poller and Reader
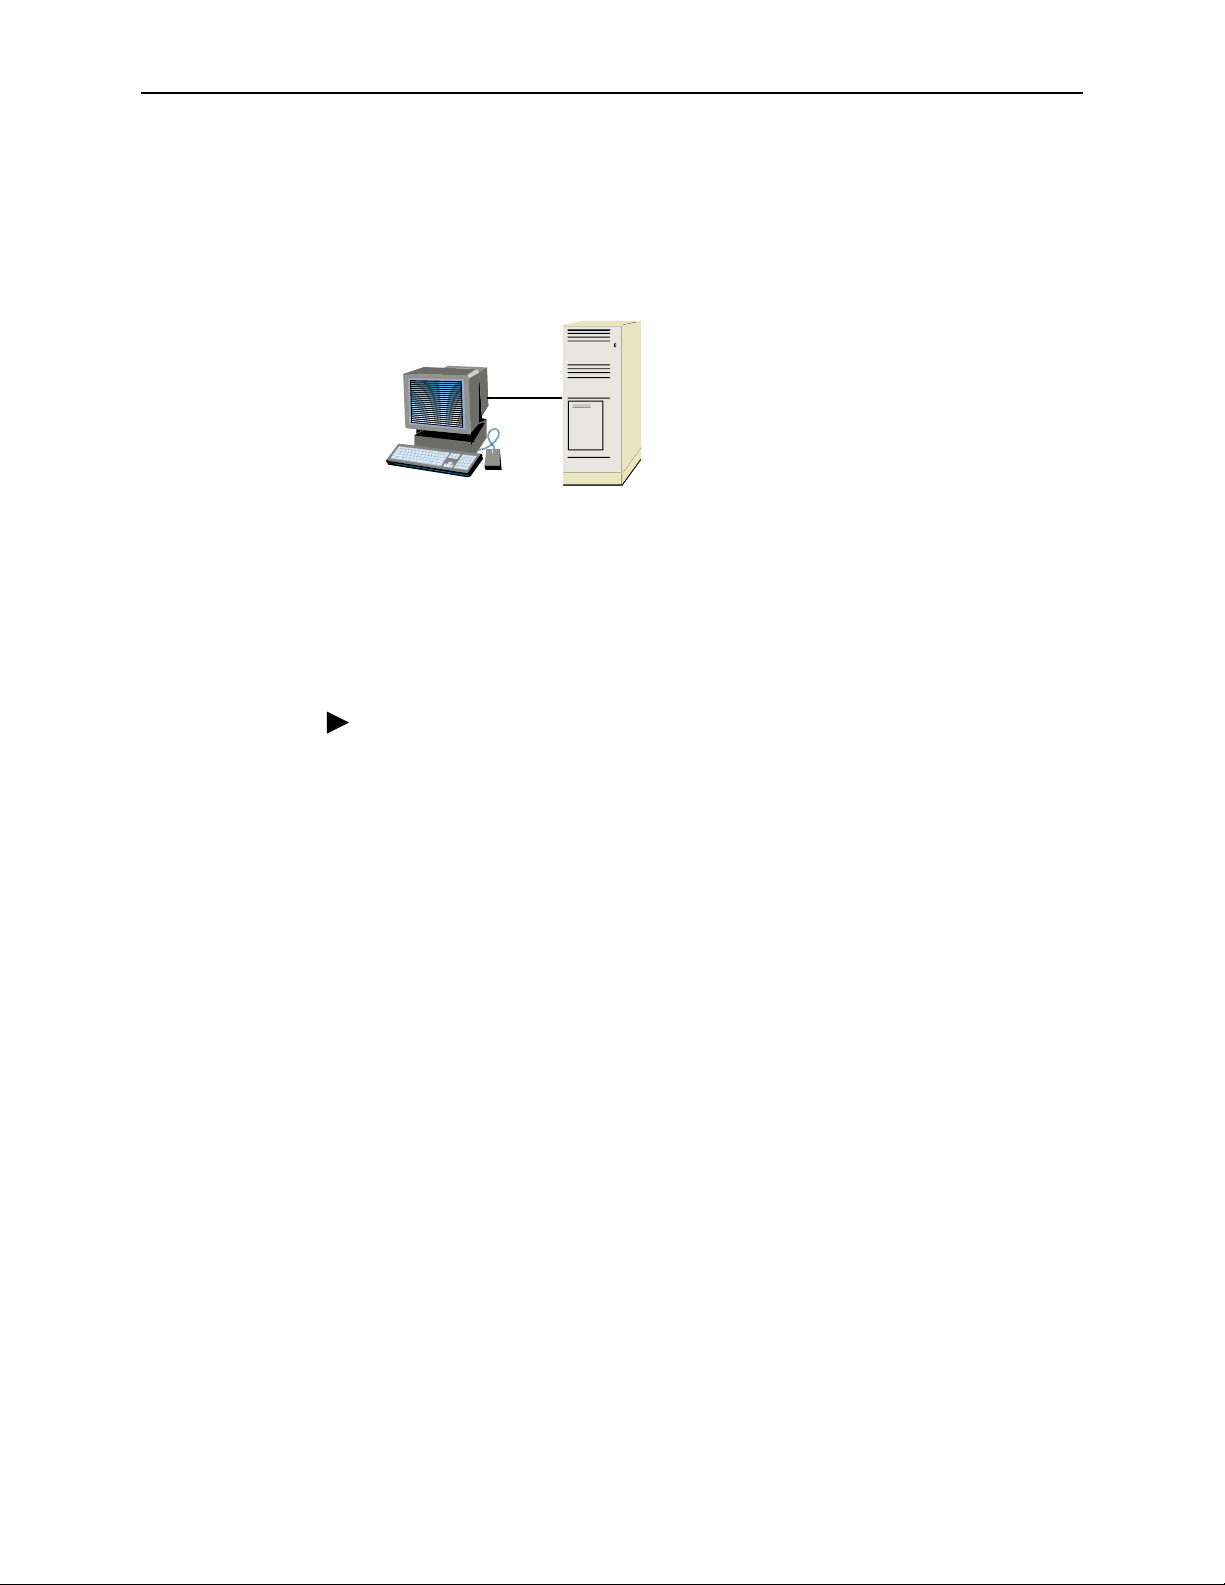
OpenLane allows you to offload the Poller and Reader functions from the main
Solaris OpenLane server to another Solaris hardware platform. The follo wing
procedures use this diagram to illustrate the distributed poller and reader.
4. Configuring Distributed Components
OpenLane
Distributed Poller &
Reader
172.20.1.20
(poller1)
OpenLane
Server
172.20.1.10
00-16757-01
Distributed Poller/Reader — Management Server Setup
Procedure
Perform the following steps on the OpenLane Management Server (172.20.1.10 in
the example diagram).
1. Stop OpenLane:
cd /opt/pdn/OpenLane
OLControl stop
2. Edit
/etc/dfs/dfstab
share -F nfs -o rw /opt/pdn/OpenLane/uhpoller
3. Stop and start the NFS ser ver to put the sharing into effect:
/etc/init.d/nfs.server stop
/etc/init.d/nfs.server start
and add the following line at the end:
4. Verify that the directory is being shared:
showmount -e
5. Create a directory to mirror the one that will be created automatically on the
distributed poller/reader (named poller1 in this example):
cd /opt/pdn/OpenLane/uhpoller
mkdir poller_poller1
6. Set up the permissions:
chmod -R 777 /opt/pdn/OpenLane/uhpoller
7800-A2-GB32-00 January 2002
4-5
Page 40

4. Configuring Distributed Components
7. Restart OpenLane:
cd /opt/pdn/OpenLane
OLControl start
8. Define the location of the database. Use the appropriate command for your
database type:
OLCmd dbconfig ‘-m 172.20.1.10’
OLCmd dbconfig ‘-m 172.20.1.10:1521’
9. Define the location of the log server:
OLCmd logsvc 172.20.1.10
(Cloudscape)
(Oracle)
4-6
January 2002 7800-A2-GB32-00
Page 41

Distributed Poller/Reader — Poller/Reader Setup
Procedure
Perf orm the following steps on the prospective Distributed Poller/Reader platform
(172.20.1.20 in the example diagram).
4. Configuring Distributed Components
1. Install OpenLane on the Distributed Poller platform.
Do not install the
Apache Web server or traps for HP OpenView.
2. Edit
/opt/pdn/OpenLane/OLControlConfig
to turn off all services
except Management Services, User History Poller, and User History Reader
(1 = on; 0 = off). Change
DOMAIN
the new domain name (poller1 in this example)
and
READER_DOMAIN
.
from
default
Example of the OLControlConfig file:
•
•
•
Change to
DOMAIN=default
READER_DOMAIN=default
←
Change to
←
poller1
poller1
PARAMS=
RMI=2099
LDAP=3890
DATABASE=1
WEBSERVER=1
Change to
←
Change to
←
0
0
MGMTSVCS=1
UHPOLLER=1
UHREADER=1
SNMPPOLLER=0
SCMPOLLER=1
Change to
←
0
SCHEDRPTS=0
DIRSVCS=1
•
•
•
Change to
←
0
to
3. Edit
/opt/pdn/OpenLane/database/config/Preferences.dat
to define the OpenLane Management Ser ver as the Java naming provider.
Change:
java.naming.provider.url=ldap://localhost:3890
to:
java.naming.provider.url=ldap://172.20.1.10:3890
4. Start OpenLane:
cd /opt/pdn/OpenLane
OLControl start
Ignore any Java errors.
7800-A2-GB32-00 January 2002
file
4-7
Page 42
4. Configuring Distributed Components
5. Stop OpenLane:
OLControl stop
If OpenLane does not shut down within two minutes, proceed with the next
step regardlessly.
6. Reboot the server.
7. Mount the directory:
mount -F nfs -o rw
172.20.1.10:/opt/pdn/OpenLane/uhpoller/poller_poller1
/opt/pdn/OpenLane/uhpoller/poller_poller1
This is a temporary mount and w ill not be reestablis hed after a reb oot. To set
up a permanent mount, add the following line to the
172.20.1.10:/opt/pdn/OpenLane/uhpoller/poller_poller1 -
/opt/pdn/OpenLane/uhpoller/poller_poller1 nfs - yes rw,bg
8. Verify the mount:
mount
/etc/vfstab
file:
9. Start OpenLane:
cd /opt/pdn/OpenLane
OLControl start
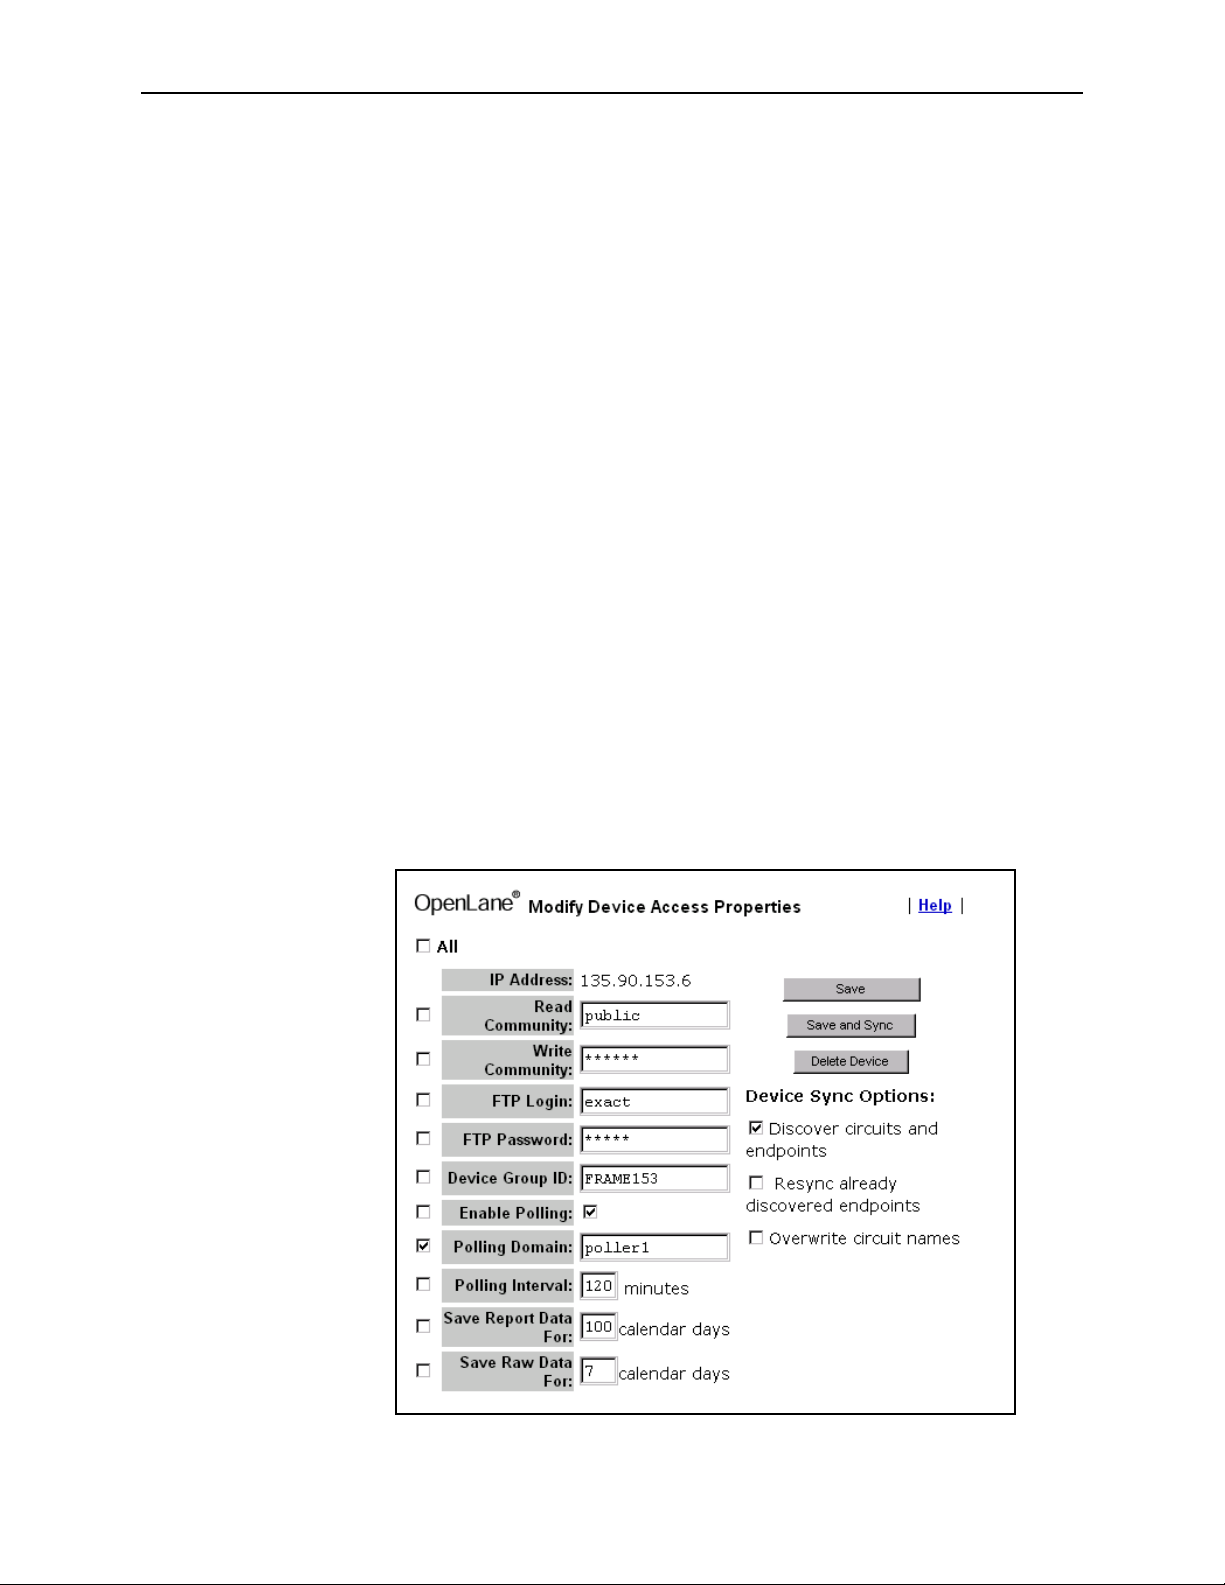
10. When you add devices to OpenLane’s database, specify the new location of
the poller/reader. Modify existing de vices to use the new poller/reader (poller1
in this example):
4-8
January 2002 7800-A2-GB32-00
Page 43

Apache User Access Authentication
User Access Authentication
User access authentication is used to specify who has access to the Web server.
When authentication is enabled on the Web server, it affects all users of the
system.
There are many mechanisms that can be used to set user access. HyperText
Transfer P rotocol (HTTP) Challenge/Response is presented here. You can choose
another authentication mechanism or a combination of methods, as long as the
authentication mechanism provides the REMOTE_USER environment variable to
CGI programs. Methods and protocols include:
5
HTTP Challenge/Response
SSL (Secure Sockets Layer)
Secure HTTP with a well-configured firewall
VPN (Virtual Private Network)
A router
The following are re quirement s of Apache user access authenticat ion under
OpenLane:
The C ustomer ID and username must match.
Authentication is either enabled or disabled for all customer IDs. If
authentication is enabled, eve ry customer ID must have an a ssoci ated user
with a username.
There can only be one username per Customer ID for authentication.
When authentication is enabled, the first OpenLane Login page displays a
button instead of an
invok es a window for entering User Name and Password.
Enter your Customer ID
prompt. Clicking on the button
Log In
7800-A2-GB32-00 January 2002
5-1
Page 44

5. Apache User Access Auth entication
Configuring HTTP Challenge/Response
Follow this procedure to configure HTTP Challenge/Response for OpenLane
access authentication with the Apache Web server.
Procedure
1. If OpenLane is running, stop it.
2. Find the directory where Apache is installed. This is the directory where the
file named apache (on Solaris) or apache.exe (on Win dows) resides.
3. In a command line window, change to the Apache directory with the cd
command. For example:
cd /opt/apache
cd \opt\apache
4. Under the /opt/apache/conf (or C:\opt\apache\conf) directory, open the file
called
httpd.conf
OpenLane, then the text referred to below is commented out in the httpd.conf
file.
Uncomment the text and make sure the
(ordinarily /opt/pdn/OpenLane/dat abase/ conf ig/ in Solaris and
C:\opt\pdn\OpenLane\databas e\con fig\ in Windows) is correct. If the Apache
configuration files were installed during an OpenLane installation,
AuthUserFile is already set.
<Location "/OLServlets/*">
order allow,deny
allow from all
AuthType Basic
AuthName "OpenLane"
AuthUserFile /opt/pdn/OpenLane/database/config/.htpasswd
require valid-user
</Location>
In this case, forward slashes should be used in the directory name for both
Solaris and Windows.
If the commented text is not found , add the text as shown to the bottom of the
file, specifying the location of the
passwords are stored. The directory name must be an absolute path (full
directory path and filename).
(Solaris)
(Windows)
. If the Apache configuration files were installed with
AuthUserFile
.htpasswd
file where usernames and
parameter
5. Change to the
(Windows) directory.
6. Run
5-2
January 2002 7800-A2-GB32-00
htpasswd
parameter to create the password file:
Solaris:
/opt/pdn/OpenLane/database/config/.htpasswd
Windows:
c:\opt\pdn\OpenLane\database\config\.htpasswd
/opt/apache/bin
. The first time you use the htpasswd command, use the
htpasswd -c
htpasswd.exe -c
(Solaris) or
c:\opt\apache\bin
username
username
-c
Page 45

5. Apache User Access Authentication
Where
Add additional usernames by running the htpasswd program without the
option.
If additional help is needed, run the .htpasswd program without specifying any
command line parameters to display additional help.
7. Change the directory to
C:\opt\pdn\OpenLane
8. Run the
MS-DOS prompt (Windows). The confauth function configures OpenLane to
run with an authenticated system. For help and a list of command line
parameters, run confauth without any parameters.
To c onf igure Ope nLane to run with an authenticated system , type:
To c onf igure Ope nLane to r un without an authenticat ed system, type:
username
htpasswd -c
/opt/pdn/OpenLane/database/config/.htpasswd Admin
confauth
OLCmd confauth on
OLCmd confauth off
is the name of the user being added. For example:
/opt/pdn/OpenLane
(Windows).
function of OLCmd from a Console window (Solaris) or
(Solaris) or
NOTE:
-c
If any problems are encountered, refer to the file
/opt/apache/logs/error.log
c:\opt\apache\logs\error.log
related to the authentication configuration.
Removing a User’s Access
To prevent a user’s access to the OpenLane system, edit the htpasswd file. Delete
the line containing the name of the user to be deleted.
(Solaris) or
(Windows) for error information
7800-A2-GB32-00 January 2002
5-3
Page 46

5. Apache User Access Auth entication
5-4
January 2002 7800-A2-GB32-00
Page 47
Adding De vi ces and Custom er Profiles
Accessing the OpenLane Web Applications
Procedure
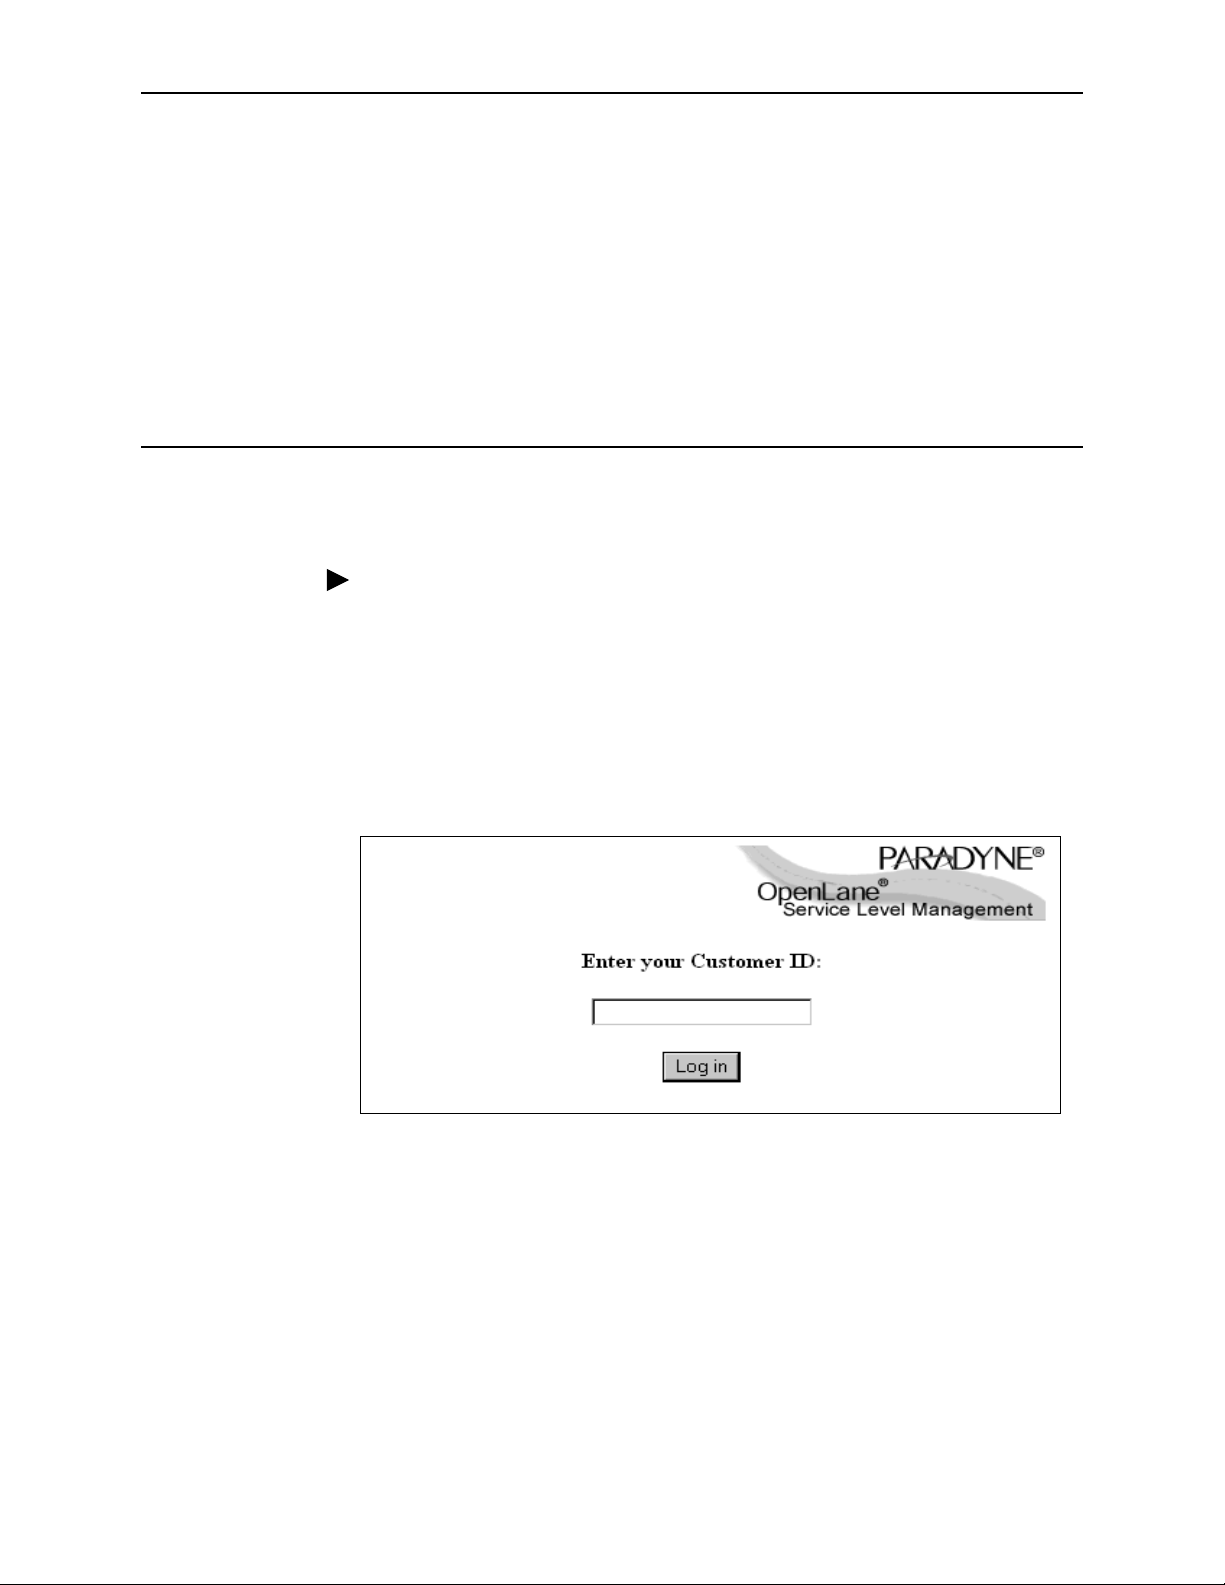
1. Using your Web browser, enter the URL of the OpenLane system.
6
Example:
2. When the OpenLane login screen appears, enter
field to access the system as an administrator.
http://172.24.9.1/OpenLane/
NOTE:
You can use the IP address or the host machine name in the URL to
access the OpenLane system. OpenLane must be running on the host
machine.
Admin
in the Customer Id
You are now ready to create additional Customer Profiles and add manageable
devices. See the OpenLane online Help for more information.
7800-A2-GB32-00 January 2002
6-1
Page 48
6. Adding Devices and Customer Profiles
Adding a Device
Procedure
To add a device to the OpenLane System :
1. If you have not already done so, log in to the OpenLane system with the
customer ID of:
Admin
2. On the OpenLane Administration screen, select
3. Select the
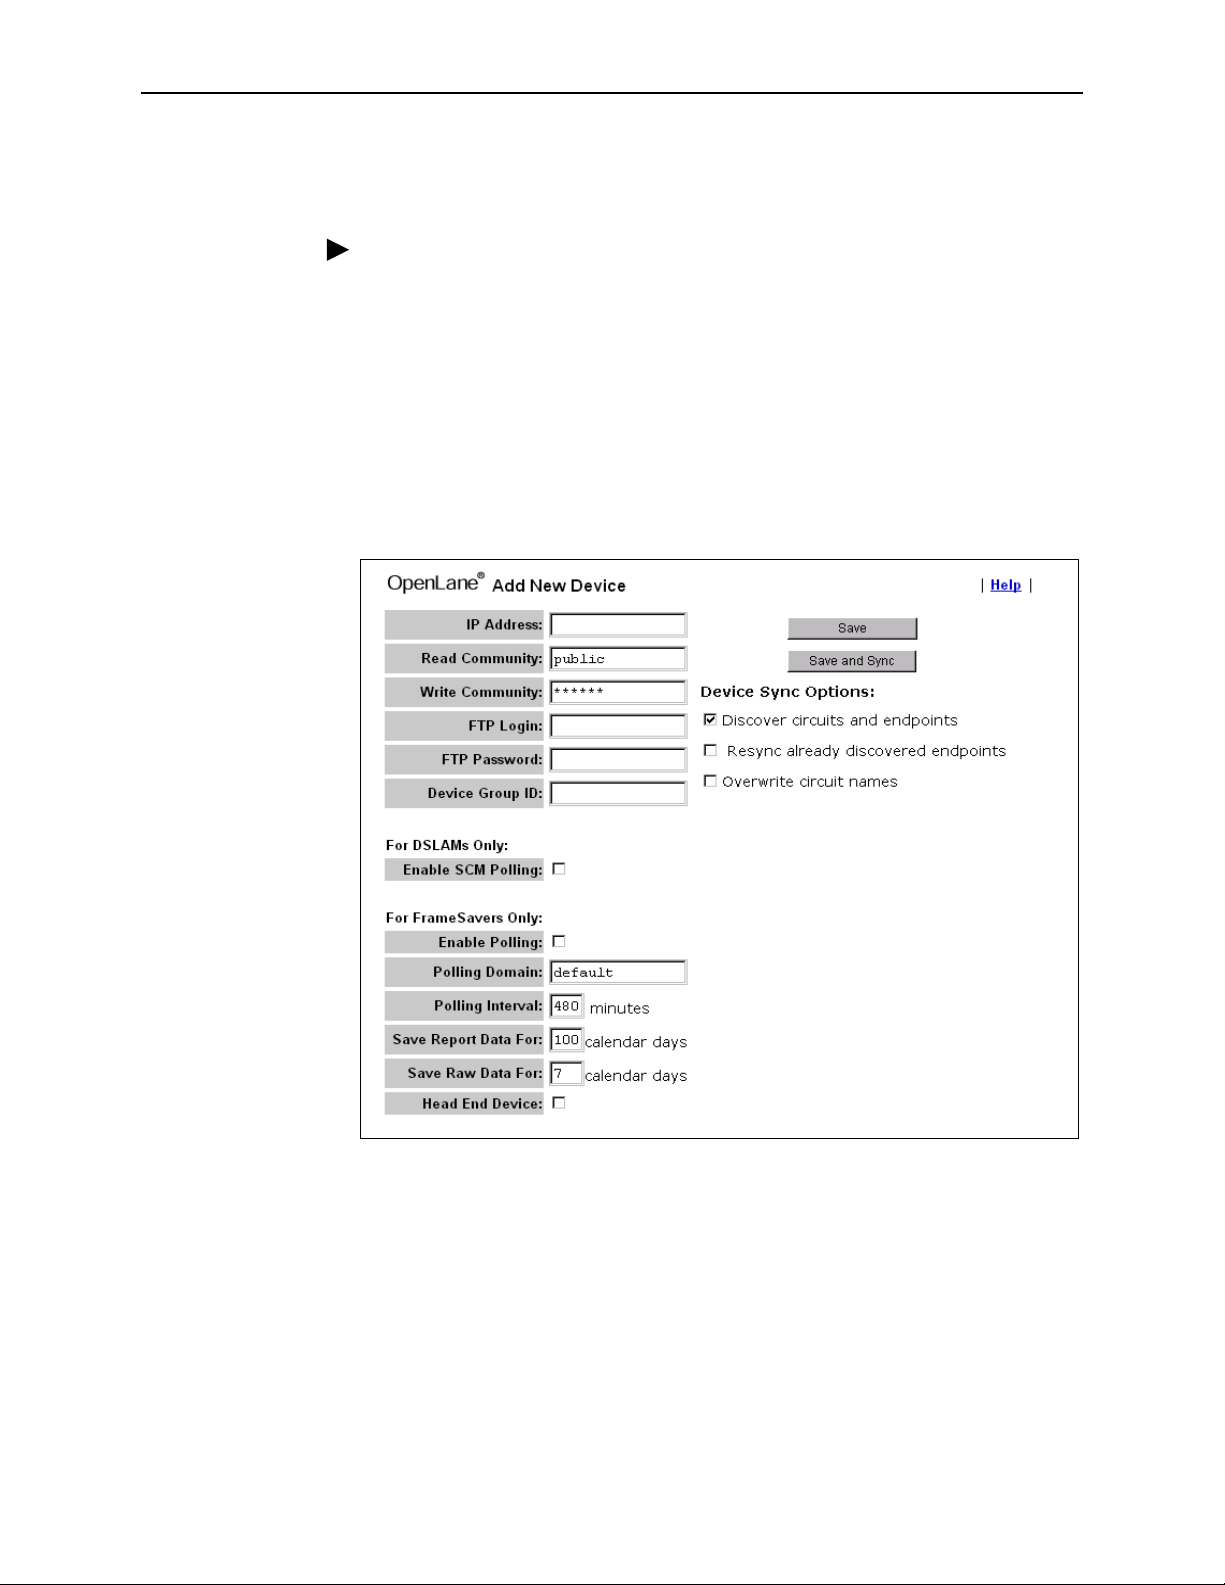
4. The following New Device screen appears:
New Device
button from the bottom frame on the screen.
Network Diagnostics
.
6-2
January 2002 7800-A2-GB32-00
Page 49

6. Adding Devices and Customer Profiles
New Device
Field Names Field Description*
IP Address IP Address of the dev ice being added.
Read Community Read Community Name mus t matc h the Read Comm unity Name
set in the device. Default = public .
Write Community Write Community Name must match the Write Community Name
set in the device. Default = public .
FTP Login FTP Login must match FTP Login in this device. Used by RMON
Data Collection and Firmware Download.
FTP Password FTP Password must match FTP Password in this device. Used by
RMON Data Collection and Firmware Download.
Device Group ID Device Gr oup ID i s an adm ini stra tiv e n ame use d only i n OpenLane
to group together certain de vices. For exam ple, devices could be
grouped by a region name. The OpenLane Network Navigator
allows you to then search for devices by ID.
Enable SCM
Polling
Enable Polling Enables RMON Data Collectio n. Default = Disabled.
Polling Domain User history polling domain. Should be left as “default.”
Polling Interval Number of minutes between each RMON Data Collection.
Save Report Data
For
Save Raw Data For Number of calendar days to keep quarterly-hourly RMON data for
Head End Device Specifies that this is the head end FrameSaver device in a link.
Save Adds the new device to the OpenLane Directory Services
Save and Sync Adds the new device to the OpenLane Directory Services
Enables polling for Hotwire GranDSLAM devices. Used to speed
the display of cross-connect information. Default = Disabled.
Default = 480 minutes.
Number of calendar days to keep hourly RMON data for this
device in the SQL dat abase. Used by the dbage utility.
Default = 100 calendar days.
this device in th e SQL database. Used by the dbage utility.
Default = 7 calendar days.
database.
database and perf orms a device synchr onizatio n to ensure that the
OpenLane directory matches the current configuration of the
device. The behavior of the device synchronization can be
changed using the following options:
Device Sync Options:
❑
Discover circuits and endpoints
❑
Resync already discovered endpoints
❑
Overwrite circuit names
* Default values for fields can altered by modifying the file Preferences.dat. See the
OpenLane online Help for information.
7800-A2-GB32-00 January 2002
6-3
Page 50
6. Adding Devices and Customer Profiles
5. Modify fields as desired. Make sure
checked and click on
6. Use the Device Browser or DSLAM Device Display to verify that the device is
added properly and endpoints and circuits are discovered. See the OpenLane
online Help for more infor m ation.
Adding a Customer Profile
Procedure
To c reat e a new Customer Profile for Web-based report access:
1. Log in to the OpenLane system with the Customer ID of:
Admin
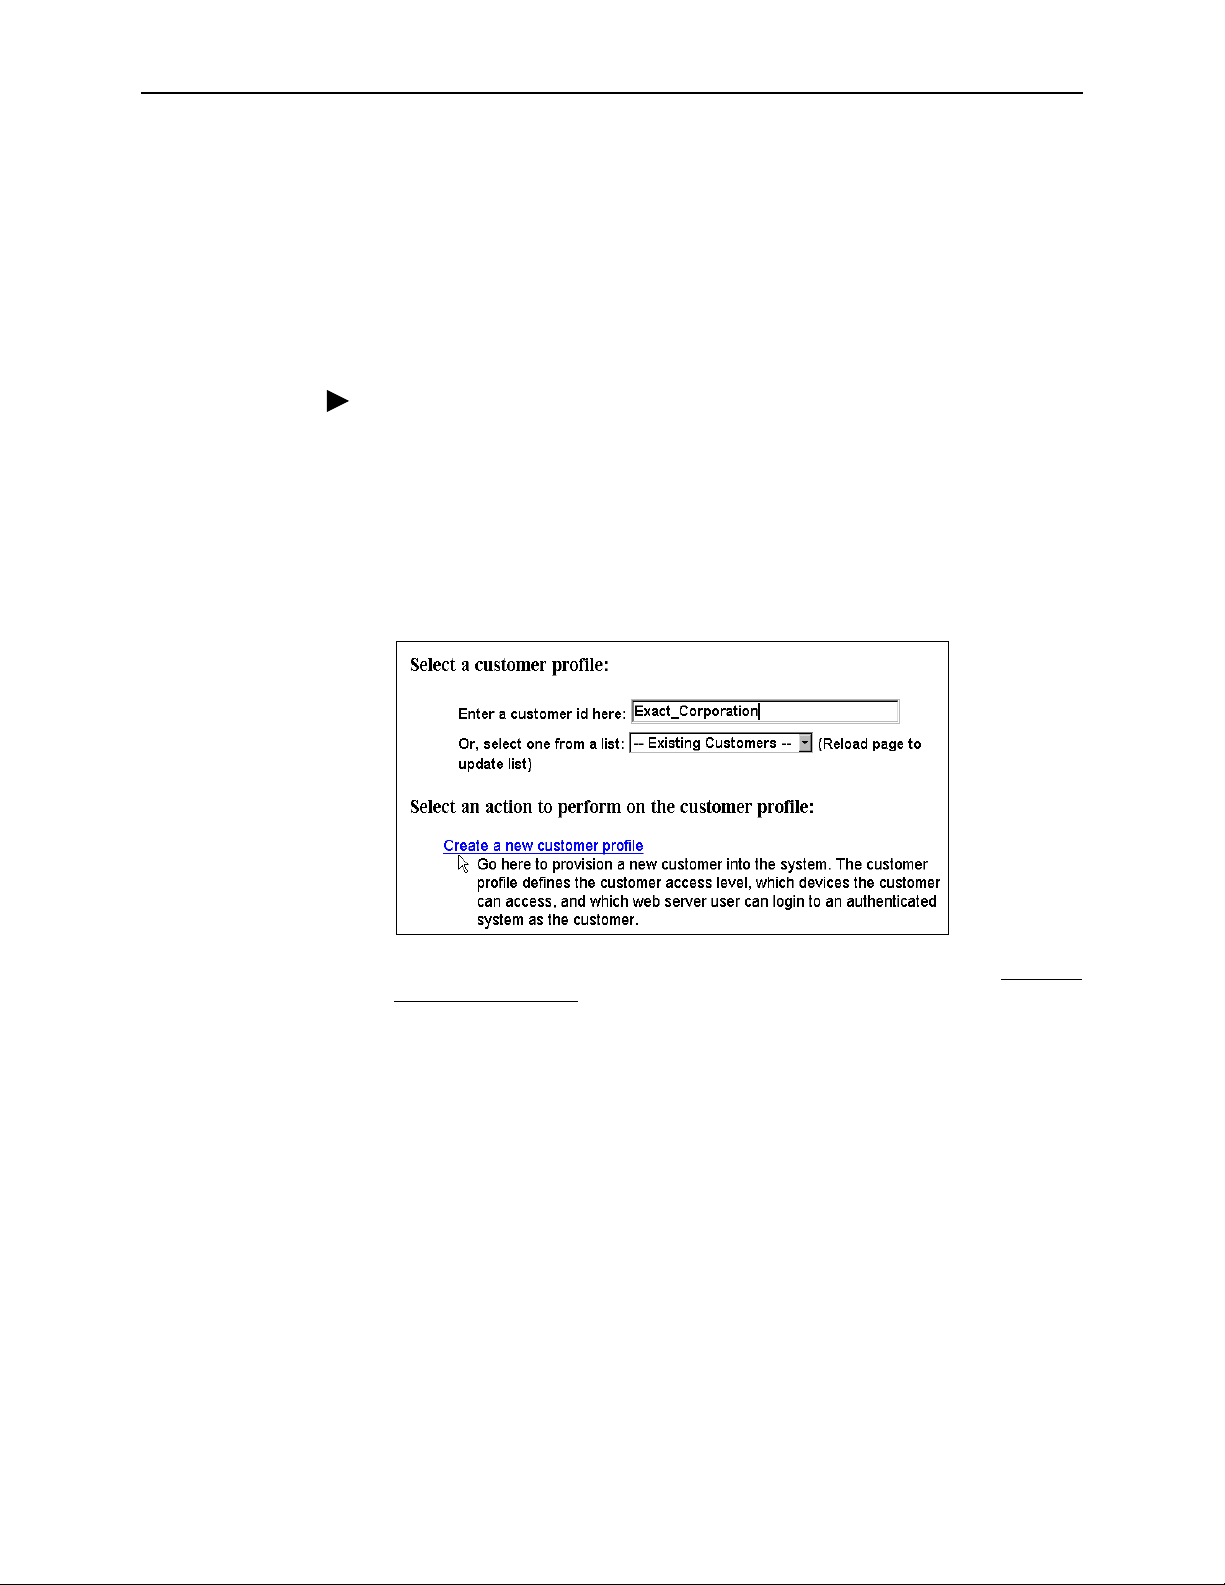
2. On the OpenLane Administration screen, select
3. Under
Select a customer profile
Save and Sync
, enter a new Customer ID .
Discovered circuits and endpoints
.
Customer Profiles
.
is
4. Under
6-4
January 2002 7800-A2-GB32-00
Select an action to perform on the customer profile
new customer profile.
, select Create a
Page 51
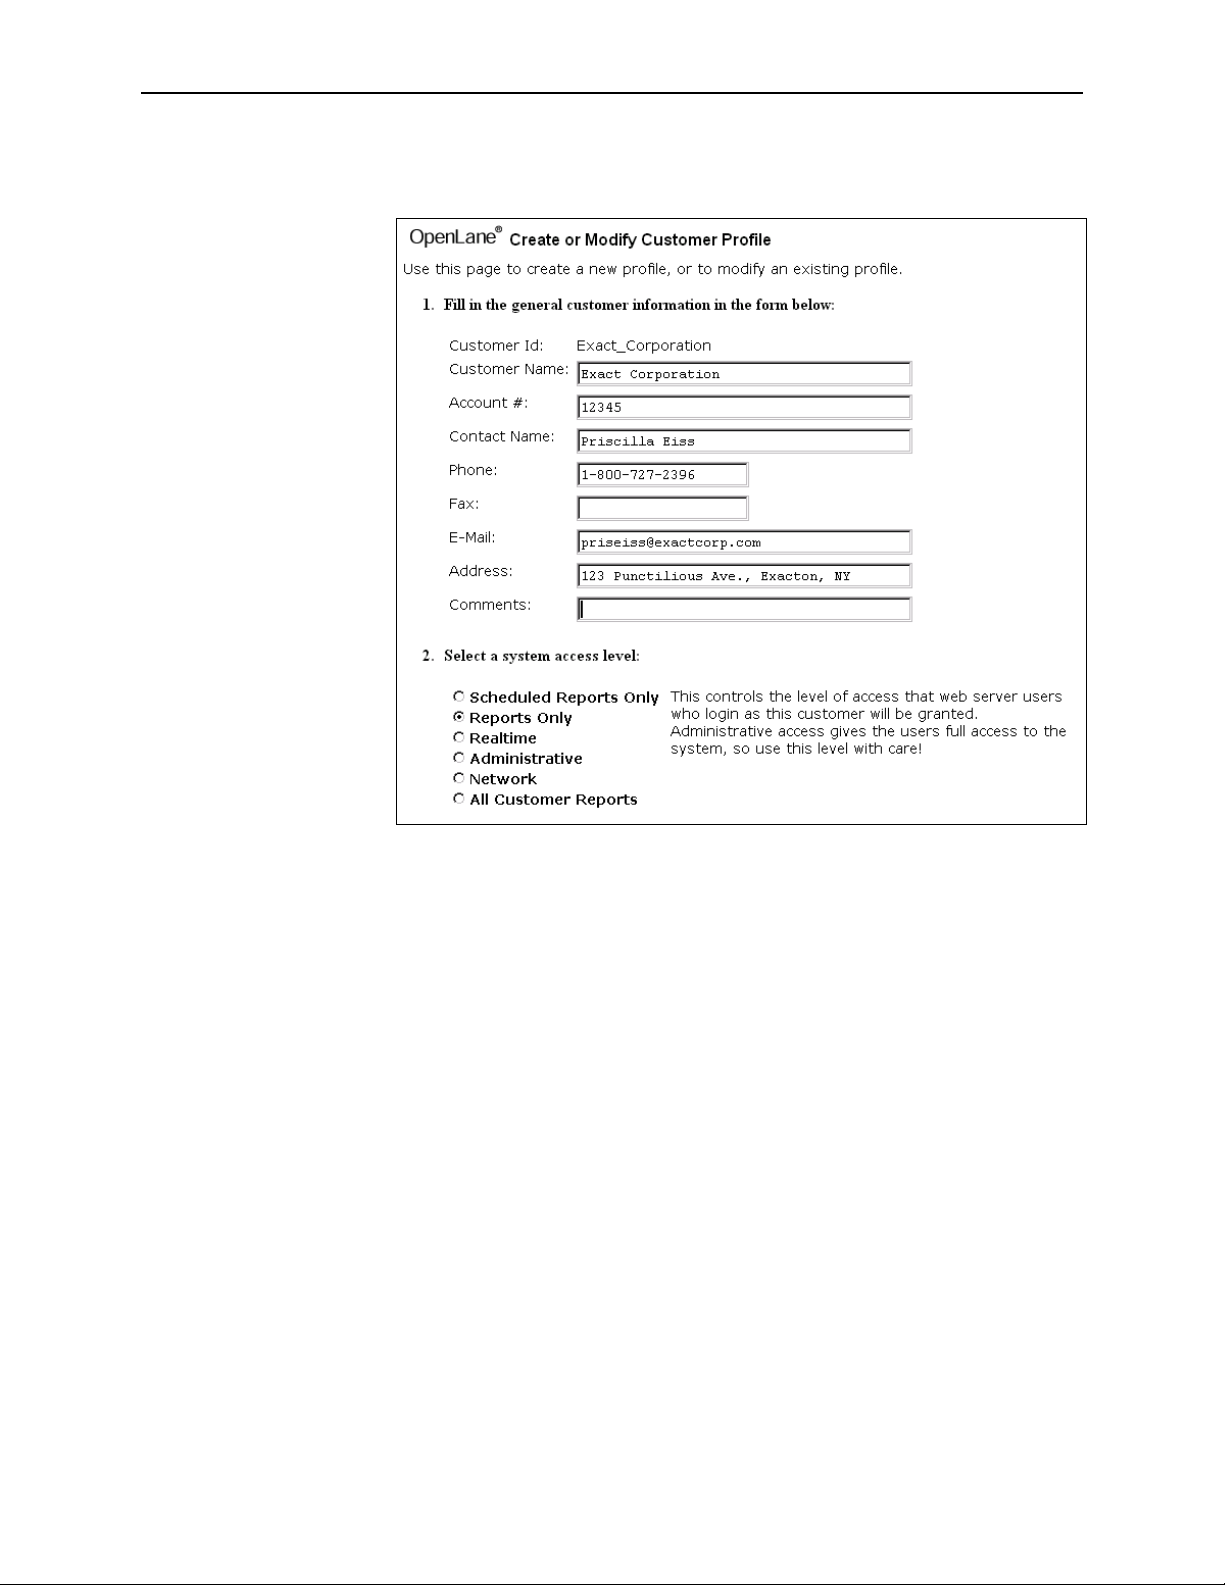
5. The following form appears:
6. Adding Devices and Customer Profiles
6. Fill in the customer information in the fields provided. No fields are required,
but Customer Name and Account # will not appear on reports if they are left
blank here.
7. Under
—
Schedule d R eports Only
2. Select a system access level
– The customer can view the customer’s own
, specify one of the following:
scheduled FrameSaver SLV reports.
—
Reports Only
– The customer can view the customer’s own scheduled
FrameSav er SLV reports and DSL inventory reports, and run on-demand
reports.
—
Realtime
– The customer can can generate Performance graphs
(real-time and historical), generate on-demand repor ts, view scheduled
reports, view Health and Status, view configurations, run nondisruptive
tests, and use the Device Browser in read-only mode. Apache use r
access authentication must be active for read-only restrictions to be
enforced on a user with Realtime access. See Chapter 5,
Access Authentication
—
Administrative
.
– The customer is a system administrator. The
Apache User
Administra ti ve access level gives the user read/write access to all
features, including scheduling reports and running disruptive tests, so is
not ordinarily suitable for a customer .
7800-A2-GB32-00 January 2002
6-5
Page 52
6. Adding Devices and Customer Profiles
—
Network
– The customer can access the Network Navigator and view log
files.
—
All Customer Reports
– The customer can view on-demand and
scheduled reports for all customer IDs.
8. Click on the
button to save the customer profile.
Save
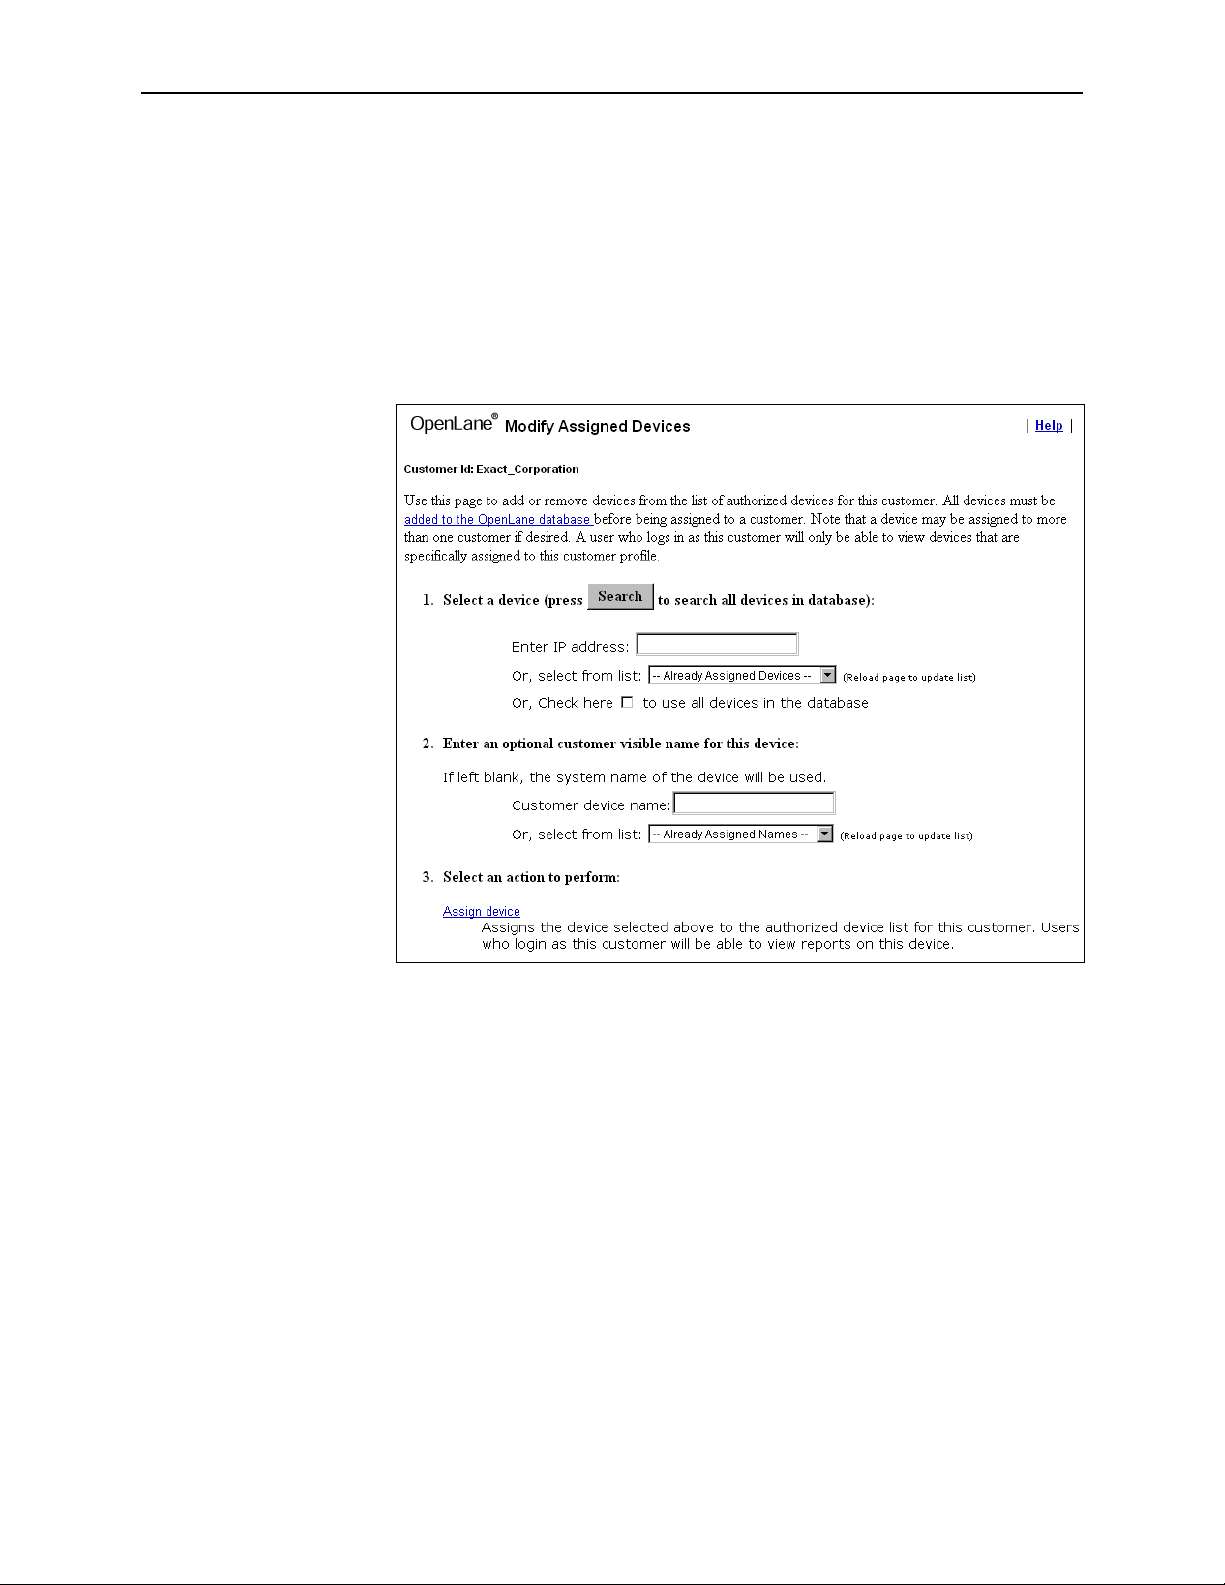
9. Assign devices to the customer using the
the Customer Profile Administration screen.
Modify Assigned Devices
link of
6-6
January 2002 7800-A2-GB32-00
Page 53

OpenLane Maintenance
The following tasks are the responsibility of the Ope nLane adm ini strator:
Task Importance Ideal Frequency
7
Back up user-modif ied files. See
Backing Up OpenLane Files
page 7-2.
Back up the SQL database. See
Backing Up OpenLane Files
page 7-2.
Run the dbage function of OLCmd.
See
Deleting Older Records from
the Database
Run the processreports function
of OLCmd. See
Scheduled Reports
Monitor log files (s ee
Log Files
them periodically (se e
and Deleting Log Files
page 7-10):
OpenLane
Apache
Oracle (if used)
on page 7-5.
Generating
on page 7-6.
on page 7-9) and clean
on
on
Monitoring
Archiving
on
Recommended When you add or modify:
Customer profiles or devices
Passwords
Firmware
Report filters and ex ceptions
Web pages
Recommended Daily
Critical Daily
Required for
scheduled
reports users
Recommended Ongoing
Daily
Monitor disk space usage. Critical Ongoing
Upload device configurations as
they are changed. See
Configurations
Maintain current firmware for all
devices. See Chapter 8,
and Using a Firmware Library
7800-A2-GB32-00 January 2002
on page 7-11.
Uploading
Building
.
Recommended Ongoing
Recommended Ongoing
7-1
Page 54

7. OpenLane Maintenance
Backing Up OpenLane Files
Directories that cannot be restored by reinstalling OpenLane should be backed up
periodically for safekeeping. These may include directories listed in Table 7-1.
Table 7-1. Direc t ories That May Contain User-Modif ied Files
Directory Contents
/opt/pdn/OpenLane/data (Solaris)
C:\opt\pdn\OpenLane\data (Windows)
/opt/pdn/OpenLane/database (Solaris)
C:\opt\pdn\OpenLane\database (Windows)
/opt/apache/.htpasswd (Solaris)
C:\opt\apache\.htpasswd (Windows)
/opt/pdn/OpenLa ne/web/cgi-bin (Solaris)
C:\opt\pdn\OpenLane\web\cgi-bin (Windows)
/opt/pdn/OpenLane/web/htdocs (Solaris)
C:\opt\pdn\OpenLane\web\htdocs (Windows)
/opt/pdn/OpenLane/web/templates (Solaris )
C:\opt\pdn\OpenLane\web\templates (Windows)
/opt/apache/conf (Solaris)
C:\opt\apache\conf (Windows)
/opt/apache/h tdocs (Solaris)
C:\opt\apache\htdocs (Windows)
Customized default template files ,
customized default prefere nces
Directory services (LDAP) database
(includes device information, report
schedules, report filters), Cloudscape
SQL database, fi rmware l ibrary,
configurations
Password file
Customer profiles, reports, repor t
schedules, filters
Customized Web pages, files
changed for user authentication
Files changed for user authentication
Files changed f or user authent ication
and Web server customization
Customized Web pages
Directories shown here are the recommended installation directories for
OpenLane and Apache. Replace them with the actual directory names if you have
not used the recommended names.
Oracle Database
If you are using Oracle for the performance statistics database, see the vendor’s
documentation for information about backup and recove ry of the database.
7-2
January 2002 7800-A2-GB32-00
Page 55

Backing Up OpenLane Under Solaris
Procedure
To back up files under Solaris:
1. Create a text file (called back up.txt in this example) listing the directories to be
backed up. For example:
/opt/pdn/OpenLane/data
/opt/pdn/OpenLane/database
/opt/pdn/OpenLane/web/cgi-bin
/opt/pdn/OpenLane/web/htdocs
2. Verify that you have sufficient space in the backup directory (called
/backup_dir in this exampl e) to accommodat e a copy of the files.
3. From a command prompt, execute the tar (tape archive) command:
tar cvf /backup_dir/backup.tar -l backup.txt
7. OpenLane Maintenance
4. From a command prompt, execute the gzip comman d:
gzip /backup_dir/backup.tar
The file
backup.tar.gz
contains a compressed copy of the OpenLane directories.
Restoring OpenLane Under Solaris
Procedure
To restore OpenLane under Solaris:
1. Reinstall OpenLane.
2. Execute the commands:
gzip -d /backup_dir/backup.tar.gz
tar xvf backup.tar
7800-A2-GB32-00 January 2002
7-3
Page 56
7. OpenLane Maintenance
Backing Up OpenLane Under Windows
Windows provides no tool for compressing files, but add-on archiving software is
readily available. Use it to create a backup of the directories listed in Table 7-1,
Directories That May Contain User-Modified Files, that contain altered files.
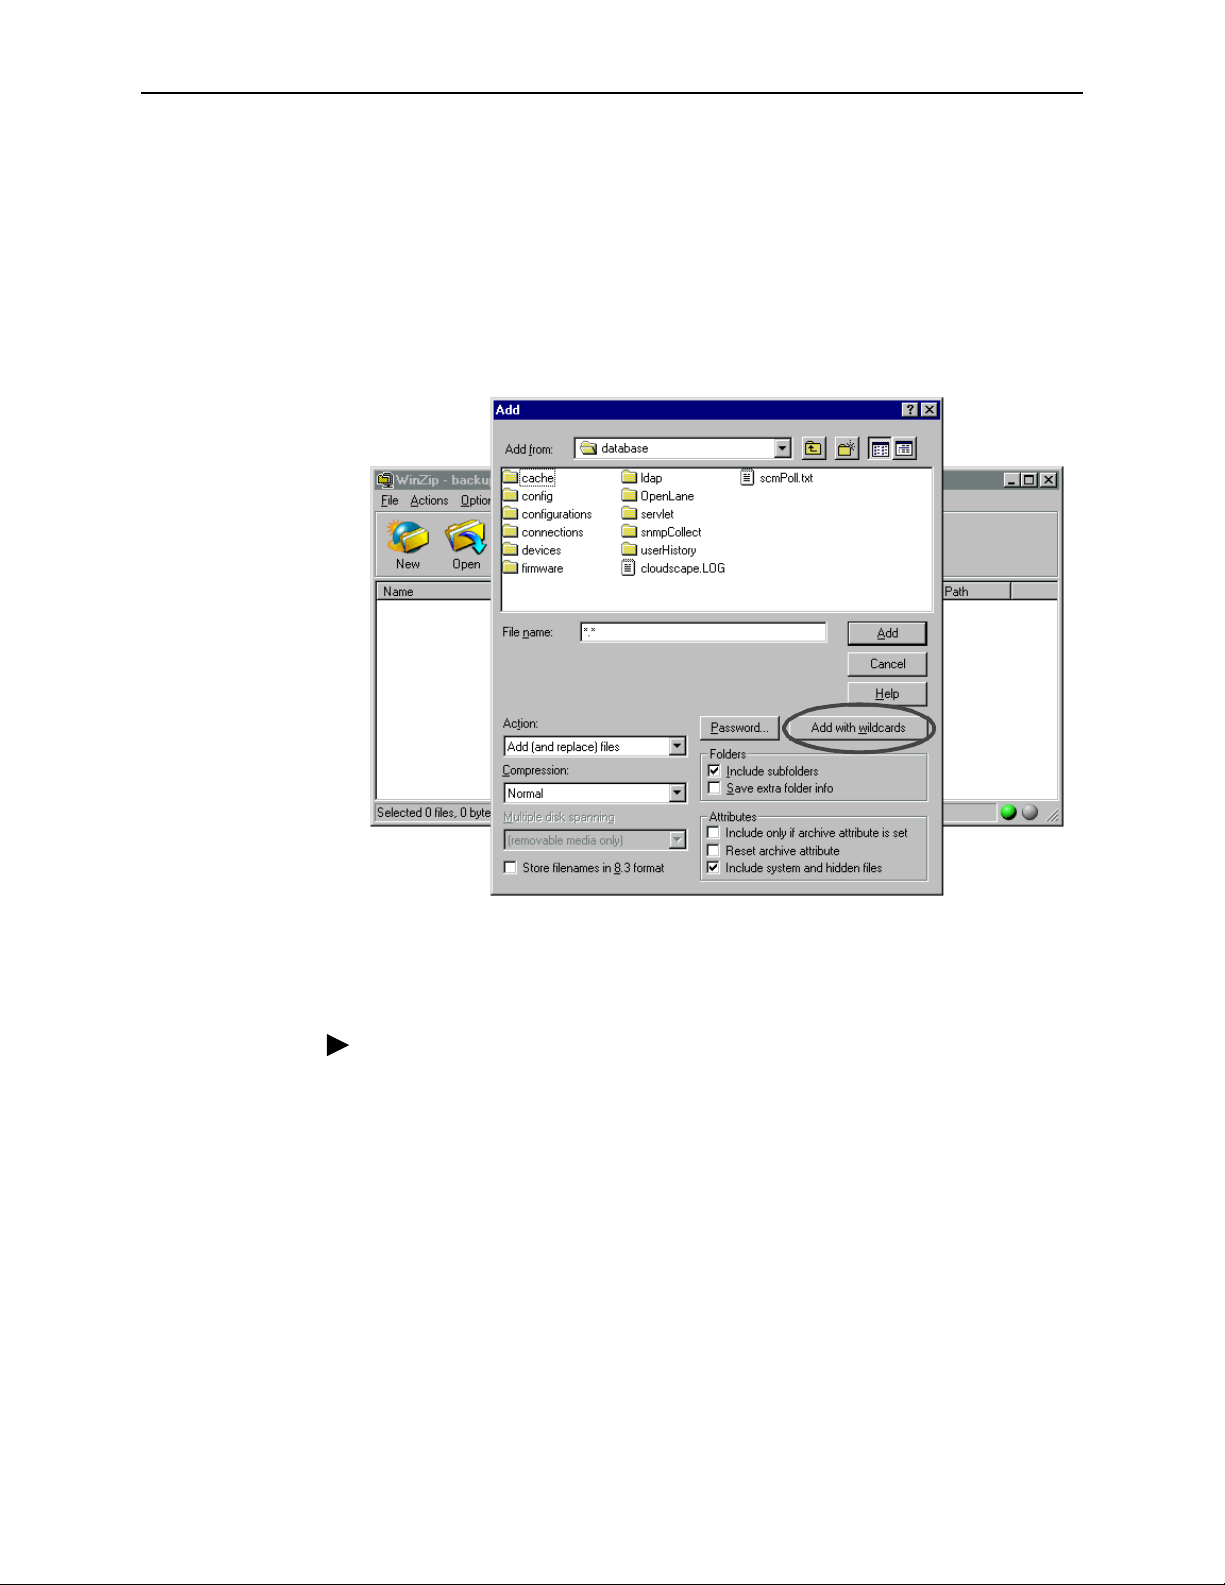
Using WinZip, for ex ample, you might begin an archive file by selecting all files and
subfolders in
\opt\pdn\OpenLane\database
:
Restoring OpenLane Under Windows
Procedure
To restore OpenLane under Windows:
1. Reinstall OpenLane.
2. Restore the files backed up with the archiving utility .
7-4
January 2002 7800-A2-GB32-00
Page 57

Deleting Older Records from the Database
7. OpenLane Maintenance
Frequency
The
The -dparameter causes records to be deleted according to individual device
definitions (the Save Report Data For and Sav e Ra w Data For v alues set when
each device was added)
The -aparameter causes records to be deleted according to the system-wide
preferences set in the preferences.dat file
The
deleted according to values specified when the dbage function is executed
The
When the dbage function is run periodically, it should be run twice: once to delete
records for nonexistent connections with the -dd (dead data) option, and once to
force the deletion of outdated records.
For a complete description of the dbage command, see Appendix A,
Reference
How often dbage needs to be run depends in part on the disk space allotted to the
database. In a system collecting data for 15-minute and 24-hour intervals, the
database grows per day for each PVC approximately:
function of OLCmd has four modes:
dbage
and
-rpt
parameter deletes data for connections which no longer exist
-dd
.
parameters cause report and raw data records to be
-raw
OLCmd
Tiny Database
(Up to 25 devices
and 75 PVCs)
76 KB 62 KB 62 KB 61 KB
However, regardless of available space, the database will run more efficiently the
more its size is limite d .
The running of dbage can be automated using
Windows). See
examples.
Example
To delete all dead data records and then delete report and raw data records
according to device definitions, enter the commands:
OLCmd dbage -n OracleStatsDB -dd
OLCmd dbage -n OraclStatsDB -d
Small Database
(Up to 250 devices
and 750 PVCs)
Automating the Generation of Scheduled Reports
Medium Database
(Up to 750 devices
and 2250 PVCs)
(under Solaris) or at (under
cron
Large Database
(Up to 5000 devices
and 15 ,000 PVCs)
on page 7-6 for
7800-A2-GB32-00 January 2002
7-5
Page 58

7. OpenLane Maintenance
Generating Scheduled Reports
To generate scheduled reports, run the
The processreports application can generate reports based on a date range. This
allows, for e xample, several days’ worth of repor ts to be generated at once.
processreports also allows one customer, a list of customers, or all customers to
be specified for report generation. For more information, see Appendix A,
Reference
.
A utomating the Generation of Scheduled Reports
To aut om ate runnin g schedu led reports (and other periodic processes), use the
scheduler for the platform where OpenLane was installed. This is typically
Solaris platforms and at for Windows NT. The scheduler runs the ProcessReports
command line program at the times or intervals specified by the scheduler.
Using Cron U nde r So la r is to Automate R ep ort s
Procedure
1. Using a text editor, create a shell script in the /opt/pdn/OpenLane directory
that contains the commands you would ordinarily use to generate reports. For
example, to create reports for all customers, add the following commands:
processreports
function of OLCmd.
OLCmd
cron
for
cd /opt/pdn/OpenLane
.OLCmd processreports
2. Save the script. In this example, the script is called MyReports.sh.
3. Make the file executable:
chmod 777 MyReports.sh
4. Open the crontab for edit:
crontab -e
5. Add a line to the end of the crontab file for the shell script. Each line of the
crontab consists of six fields:
—
Minute
—
Hour
—
Day of Month
—
Month
—
Day of Week
— Command to be executed
Lists, ranges, and asterisks (meaning all legal values) are allowed.
For exampl e, to execute MyReports.sh every weekday (1-5) at midnight and
noon (0,12), a correct crontab entry is:
(0–59)
(0–23)
(1–31)
(1–12)
(0–6, where 0 is Sunday and 6 is Saturday)
0 0,12 * * 1-5 /opt/pdn/OpenLane/MyReports.sh
7-6
January 2002 7800-A2-GB32-00
Page 59

Using AT under Windows to Automate Reports
Procedure
1. Using a text editor, create a batch script in the c:\opt\pdn\OpenLane director y
that contains the commands you would ordinarily use to generate reports. For
example, to create reports for all customers, add the following commands:
c:
cd \opt\pdn\OpenLane
.OLCmd processreports
2. Save the script. In this example, the script is called Myreports.bat.
3. Open an MS-DOS prompt window. Type the at command required to schedule
your batch script. The at command has the following fields:
7. OpenLane Maintenance
—
\\computername
executed (optional).
—ID – An identification number for the scheduled command (optional).
—
/delete
scheduled commands on the computer are canceled.
—
/yes
desired.
—
time
—
/interactive
logged on at the time the job runs.
—
/every:date[,...]
week or month. If date is omitted, the current day of the month is
assumed.
—
/next:date[,...]
the day (for example, next Thursday). If date is omitted, the current day of
the month is assumed.
—
Command
For exampl e, to execute MyReports.sh every weekday at midnight and noon
on the same computer as the AT comm and is executed, the correct
commands are:
at 00:00 /every:Monday,Tuesday,Wednesday,Thursday,Friday
c:\opt\pdn\OpenLane\Myreports.bat
– Cancels a scheduled command. If id is omitted, all the
– Used with cancel all jobs command when no further confirmation is
– Specifies the time when command is to run.
– A remote host on which the command will be
– Allows the job to interact with the desktop of the user who is
– Runs the command on each specified day(s) of the
– Runs the specified command on the next occurrence of
– Is the Windows NT command, or batch program to be run.
at 12:00 /every:Monday,Tuesday,Wednesday,Thursday,Friday
c:\opt\pdn\OpenLane\Myreports.bat
7800-A2-GB32-00 January 2002
7-7
Page 60

7. OpenLane Maintenance
Rebuilding Oracle Database Indexes
As records are added to and deleted from the database, indexes may become
fragmented and index trees may increase in height, slowing access to the
database.
The
ol_rbldidx.sql
Indexes should be rebuilt weekly, or, if less frequently, as often as practicable.
scri pt rebuil d s indexes to ma i n t a i n performanc e.
Procedure
To rebuild the indexes of the database named OpenLane every Sunday morning
starting at 12:15 am on a Solaris system:
1. Move
2. Create a shell script:
3. Create or a modify a crontab file with the entry:
/opt/pdn/OpenLane/data/sql/scripts/Oracle/
Maintenance/ol_rbldidx.sql
ORACLE_HOME=/opt/oracle;
export ORACLE_HOME;
ORACLE_SID=OLDB;
export ORACLE_SID;
/opt/oracle/product/8.1.6/bin/sqlplus
my_username/my_password @ol_rbldidx
For this example, presume the script is saved as:
/OL_Scripts/rebuild_ix
15 0 * * sunday “/OL_Scripts/rebuild_ix“
to the $ORACLE_HOME directory.
For this example, presume the script is saved as:
/OL_Scripts/my_cronfile
4. Submit the crontab file to cron:
crontab /OL_Scripts/my_cronfile
7-8
January 2002 7800-A2-GB32-00
Page 61

Monitoring Log Files
The following log files can be viewed from the View Log Files screen, or by running
the
viewlog
Default Polling Domain
Additional Polling Domains (if any exist)
Firmware/Configuration/Feature Maintenance
Database Reader
Poller Contr o ller
On-Demand SLV Reports
Scheduled SLV Reports
Database Aging (dbage)
Database Roll-up (dbroll)
Ala rm Configuration
Device Sync
7. OpenLane Maintenance
function of OLCmd.
Other OpenLane log files may be created in
(Solaris) or
any text editor.
Apache Log Files
Apache log files can be found at:
SQL Database Log File
Configuration/Health and Status
Device Tests
Exception Periods
Customer Profile Administration
System Access (logins and logouts)
PVC Maintenance Periods
\opt\pdn\OpenLane\logs
Solaris:
/opt/apache/logs/access.log
/opt/apache/logs/error.log
Windows:
c:\opt\apache\logs\access.log
c:\opt\apache\logs\error.log
/opt/pdn/OpenLane/logs
(Windows), and can be displayed using
If you use a Cloudscape database, the following log file is created:
Solaris:
Windows:
/opt/pdn/OpenLane/database/cloudscape.LOG
c:\opt\pdn\OpenLane\database\cloudscape.LOG
For inform at ion abou t log files created for an Oracle database, see the
SLM 5.5 Oracle Database Administration Instructions
7800-A2-GB32-00 January 2002
OpenLane
.
7-9
Page 62

7. OpenLane Maintenance
Legacy Logger Log Files
These files are created if
preferences.da t
Solaris:
Windows:
:
/opt/pdn/OpenLane/logs/UHReader.log
/opt/pdn/OpenLane/logs/UHPoller_default.log
c:\opt\pdn\OpenLane\logs\UHReader.log
c:\opt\pdn\OpenLane\logs\UHPoller_default.log
Archiving and Deleting Log Files
The
specified number of days. Periodic use of the command keeps your log files at a
manageable size.
For exampl e, the command:
OLCmd clean logs .log 14
(executed in the OpenLane home directory) performs two functions. It:
function of OLCmd renames log files and deletes log files older than a
clean
Renames any file in the OpenLane logs directory that has a file extension of
to a file extension of .log_
.log
current date)
Deletes any file in the OpenLane logs directory that has a file extension of
and was created more than 14 days ago
pdn.uhpoller.legacyLogger
yyyy_mm_dd
.arc (where
is enabled (set to true) in
yyyy_mm_dd
is the
.arc
For more information about the clean function, see Appendix A,
Reference
Solaris) or at (under Windows). See
Reports
. The running of the clean function can be automated using
Automating the Generation of Scheduled
on page 7-6 for examples.
OLCmd
cron
(under
7-10
January 2002 7800-A2-GB32-00
Page 63

Uploading Configuration s
You can main tain a library of configuration files so that in the event a device must
be replaced, its configuration can be loaded into the new hardware quickly and
without discrepancy. Use the Schedule Configuration Upload screen to schedule
or immediately perform configuration uploads from devices in the network to
OpenLane’s configuration database.
After you log in as an administrator, the OpenLane Admin istration Main Menu
appears. Select Firmware/Configuration/Feature Maintenance. The
Firmware/Configuration/Feature Maintenance screen appears. Click on
configuration uploads
Procedure
To s chedule or perform configuration uploads:
1. Select a device or group of devices by model, name, or IP address.
7. OpenLane Maintenance
Schedule
.
2. Click on
selected according to your criterion are listed in the lower frame.
3. If there are devices listed in the lower frame that you do not want to be part of
the upload operation, click once in the Upload check box f or that de vice to omit
it.
4. Specify when the upload should occur. Optionally, specify that the upload will
be repeated periodically.
5. Optionally, specify whether the upload operation is to be stopped if it does not
finish within a certain time period.
6. Click on
See the online Help for detailed infor m ation.
Configuration files are stored in the configurations directory:
Solaris:
Windows:
Under the configurations directory, subdirectories are named for the IP addresses
of the devices whose configurations you have saved.
Like all OpenLane files, configurations should periodically be backed up for
safekeeping. See
Click here to search devices and refresh the lower frame
Click here to schedule the tasks
/opt/pdn/OpenLane/database/configurations
\opt\pdn\openlane\database\configurations
Backing Up OpenLane Files
.
on page 7-2.
. Device s
7800-A2-GB32-00 January 2002
7-11
Page 64

7. OpenLane Maintenance
7-12
January 2002 7800-A2-GB32-00
Page 65

Building and Using a Firmware Library
Building a Firmware Library
OpenLane allows you to maintain a firmware library from which you can download
firmware to devices in your network.
Before the Download Feature can schedule or activate firmware download to a
device, you must retrieve the firmware files from the Paradyne Web site.
Procedure
1. Go to Paradyne’s Technical Support site to obtain access to firmware files:
www.paradyne.com/tech_support
.
8
2. Download the appropriate firmware file or files.
If the firmware file is a .exe file, it is a self-extracting zip file. Unarchive it on a
Windows platform and, if it will reside on a Solaris platform, use FTP to move
it.
3. Move the files to the subdirectory under
/opt/pdn/OpenLane/database/firmware
C:\opt\pdn\OpenLane\database\firmware
appropriate model.
—
—
4. Map the firmware version to the firmware filename by editing the firmware.dat
file in the selected model’s directory. The syntax is:
FrameSav er Map Example:
DSL Map Example:
files are for FrameSaver products
.OCD
and
.IMG
version=filename
01.02.01=R010201.ocd
04.00.30=pc8314.3001.img
.FPI
files are for DSL products
(Solaris) or
(Windows) for the
7800-A2-GB32-00 January 2002
8-1
Page 66

8. Building and Using a Fi rmware Library
New Device Models Not Supported by OpenLane
You can create your own subdirectory and definition files for Paradyne devices not
yet supported by OpenLane. The device model number will appear in the
drop-down Device Model selection list for scheduling downloads.
Procedure
1. Create a directory under
(Sol a r is) or
the device model. Start the directory name with fw and follow with the device
model number. For example:
2. Retrieve the firmware as described in
page 8-1.
3. Copy any firmware.dat file into the directory you just created in Step 1 and
modify the file. The syntax is:
FrameSav er Map Example:
DSL Map Example:
4. Edit the
(Solaris) or
(Windows) file to map the device model number to the new directory name.
The syntax is:
c:\opt\pdn\OpenLane\database\firmware
mkdir fw9880
version=filename
01.02.01=R010201.ocd
04.00.30=pc8314.3001.img
/opt/pdn/OpenLane/database/firmware/models.dat
c:\opt\pdn\OpenLane\database\firmware\models.dat
model=directory
/opt/pdn/OpenLane/database/firmware
(Windows) fo r
Building a Firmware Library
on
Example:
9880=fw9880
You can determine the correct device model number from the OpenLane
Network Navigator screen.
8-2
January 2002 7800-A2-GB32-00
Page 67

8. Building and Using a Firm ware Library
5. Edit the
(Solaris) or
/opt/pdn/OpenLane/database/firmware/mtypes.dat
c:\opt\pdn\OpenLane\database\firmware\mtypes.dat
(Windows) file to map the device model number to the device type. The syntax
is:
model=devicetype
where devicetype is one of:
dbm
dslaan
dslasn
dsldsn
dslman
dslmcc
dslmsn
dslscm
dslssn
fs
fsflex
– Dial Backup Module
– GranDSLAM Access Node (also used for older DSL)
– Service Node
– 5620/6310
– TDM Access Node
– Management Communications Controller (MCC)
– TDM Service Node
– Shelf Concentration Module (SCM)
– SNMP-Managed Ser vice Node
– FrameSaver
– FrameSaver FLEX
Example:
9880=fs
7800-A2-GB32-00 January 2002
8-3
Page 68
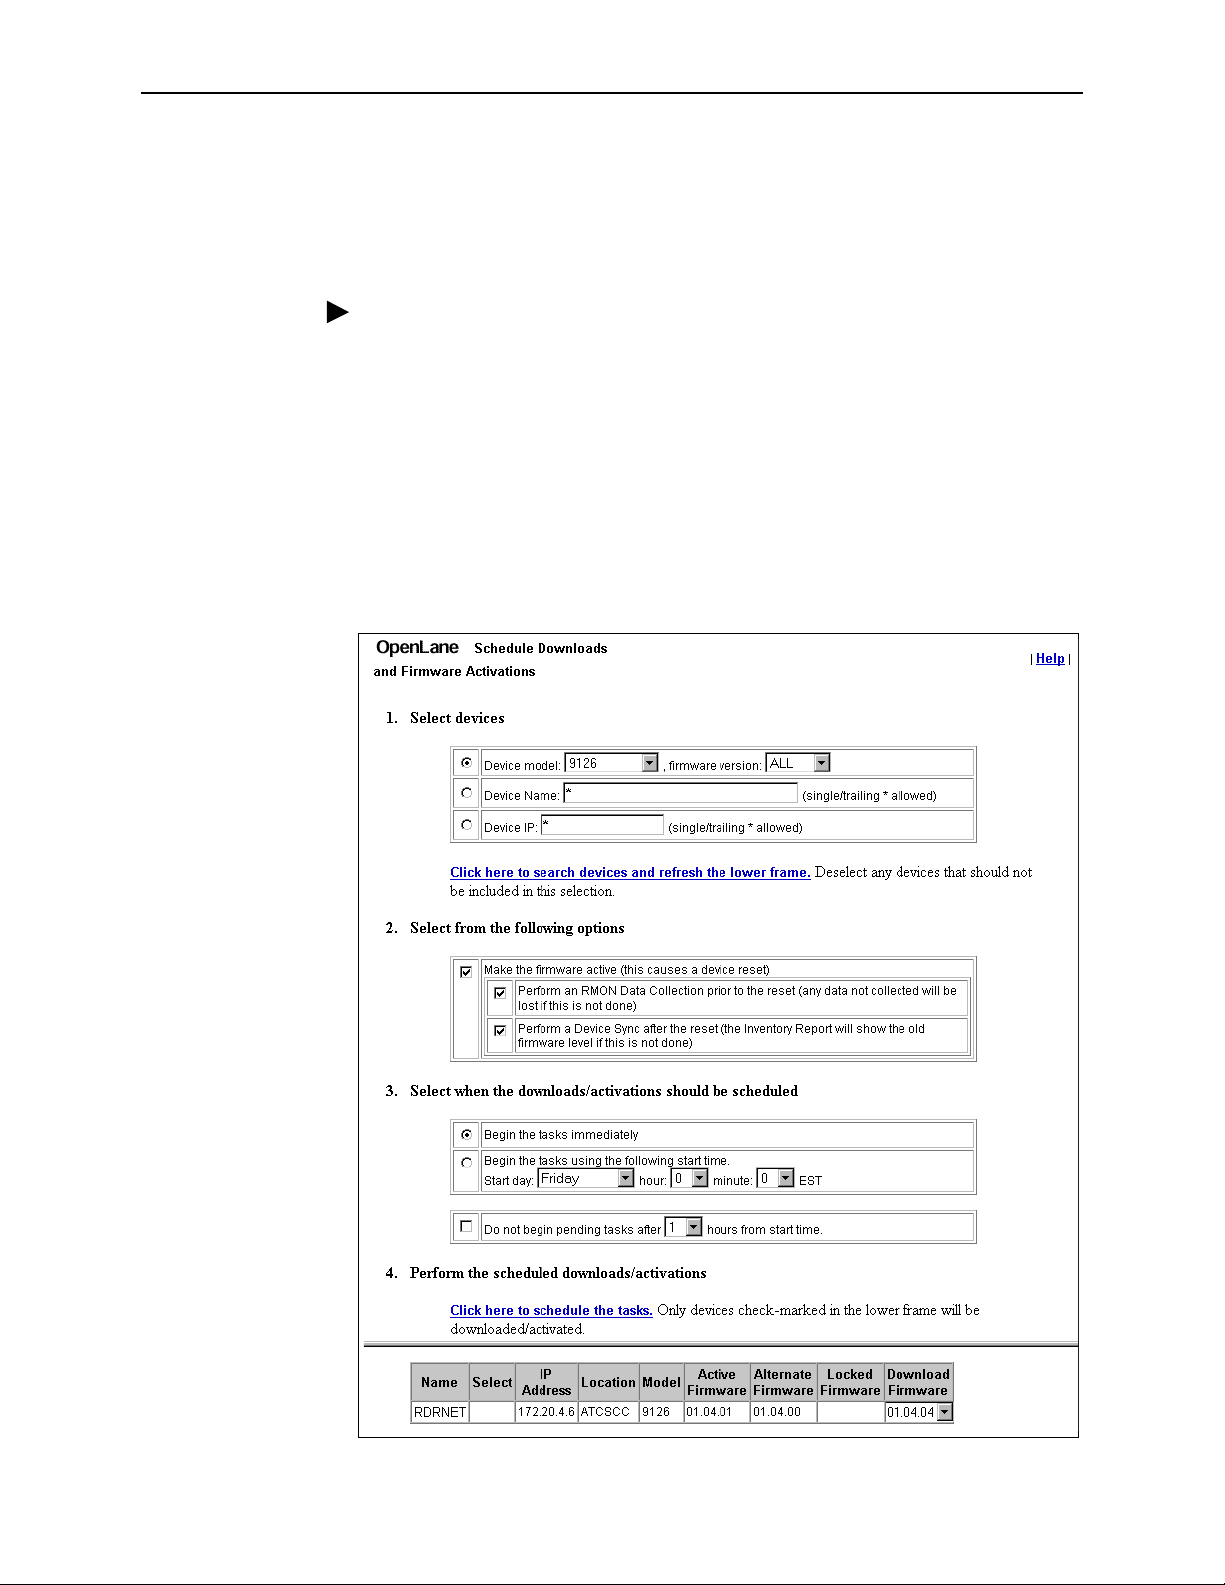
8. Building and Using a Fi rmware Library
Downloading and Activating Firmware
Use the Schedule Downloads and Firmware Activations screen to administer
firmware for selected de vices.
Procedure
1. Select
Home Page. The Firmware/Configuration/Feature Maintenance screen
appears. Select
Downloads and Firmware Activations screen appears.
2. Select one or more devices of the same model or enter a device’s IP address.
3. Click on
lower frame displays the selected devices. Ver ify that the first column titled
Selected includes a checkmark for each device requiring a firmware update. If
desired, select a
device.
Firmware/Configuration/Feature Maintenance
Schedule fir mware downloads/activations
Click here to search devices and refresh the lower fram e
Download Firmware
version from the drop-down list for the
from the OpenLane
. The Schedule
. The
8-4
January 2002 7800-A2-GB32-00
Page 69

8. Building and Using a Firm ware Library
4. Select
Make the firmware active (this causes a device reset)
if you would
like to activate the firmware immediately. The Alternate Firmware becomes the
Active Firmware, followed by a device reset. If do not want to activate the new
firmware yet, uncheck this option.
Prior to activating firmware, decide which options should be performed:
— RMON data collection (for SLV Reports)
— Device Sync
Both options are recommended.
5. Select when the downloads/activations should be scheduled.
—
Begin the tasks immediately
. The Alternate Firmware becomes the
Active Firmware, followed by a Device Reset.
—
Begin the tasks using the following start time
. This schedules firmware
activation anytime in the ne xt sev en days .
For either option (Begin the tasks immediately or Scheduling tasks), an
amount of time can be specified for the maintenance window. If the firmware
download process has not started within the specified time set in the
maintenance window, the firmware down loads/ac tivations must be
rescheduled.
The download server will initiate up to ten FTPs to process ten tasks
concurrently . Any task in process will continue until complete, regardless of the
maintenance window scheduled start time (the end time is not specified).
6. Click on
Click here to schedule the tasks
. A verification page displays all
choices from the previous screen fo r review and confirmation. All devices
selected for firmware download will have a checkmark in the first column of the
lower frame.
Do not use the browser’s Back button. Instead, use the Back button at the
bottom of the activation page or the
option to modify any values. To approve the displayed data, select
Click here to go back and reselect
Apply
are returned to the OpenLane main menu.
. You
7800-A2-GB32-00 January 2002
8-5
Page 70

8. Building and Using a Fi rmware Library
8-6
January 2002 7800-A2-GB32-00
Page 71

OLCmd Reference
OLCmd (OLCmd.bat in Windows) is the command line interface for OpenLane.
OLCmd commands include:
A
OLCmd addcust
database.
OLCmd assigndev
OLCmd chgrawfileext
OLCmd clean
OLCmd confauth
OLCmd db age
OLCmd db con f ig
description of the user history database.
OLCmd db copy
another.
OLCmd db ip
integer and vice versa.
OLCmd db roll
OLCmd delc u s t
from the database.
OLCmd delde v
on page A-3 – Adds customers to the OpenLane LDAP
on page A-5 – Assigns devices to customers.
on page A-6 – Renames raw data files.
on page A-7 – Creates and deletes archived log files.
on page A-8 – Turns user access authentication on and off.
on page A-9 – Deletes outdated user history.
on page A-10 – Configures the naming/directory service
on page A-12 – Copies data from one database instance to
on page A-13 – Translates IP addresses from a string to an
on page A-14 – Rolls up raw history data into hourly data.
on page A-15 – Deletes a customer or a list of customers
on page A-16 – Deletes a device from the LDAP database.
OLCmd du m plda p
database.
OLCmd importldif
LDIF file.
OLCmd key
OLCmd ldapm odify
database.
OLCmd ldapsearch
OLCmd logsvc
7800-A2-GB32-00 January 2002
on page A-19 – Sets or tests the OpenLane licens e key.
on page A-17 – Creates an LDIF file from the LDAP
on page A-18 – Adds data to the LDAP database from an
on page A-20 – A dds or modifies entries in the LDAP
on page A-21 – Searches the LDAP database.
on page A-23 – Configures the logger for distributed logging.
A-1
Page 72

A. OLCmd Reference
OLCmd processreports
OLCmd snmpget
OLCmd snmptest
OLCmd sync
OLCmd uh read
OLCmd unassigndev
on page A-27 – Synchronizes a device.
on page A-25 – Gets an SNMP object.
on page A-29 – Starts and stops UHReader.
on page A-24 – Generates sched uled reports.
on page A-26 – Tests SNMP connection.
on page A-30 – Removes a device from a customer
record.
OLCmd viewlog
OLCmd xmlreport
on page A-31 – Displays OpenLane log files.
on page A-33 – Generates OpenLane reports in XML
format.
OLCmd must be execut ed in the OpenLane home directory . For example (in
Windows):
cd \opt\pdn\openlane
olcmd confauth on
In Windows, OLCmd can be invoked by typing
olcmd.bat
. In Sola ris, only
OLCmd
is valid.
OLCmd, olcmd, OLCmd.bat
, or
OLCmd Helps
All OLCmd commands accept the
parameter in lieu of other parameters. This
-h
causes usage notes for the command to be displayed . For example, the following
command causes the available parameters of the viewlog function to be displayed:
olcmd viewlog -h
A-2
January 2002 7800-A2-GB32-00
Page 73

OLCmd addcust
A. OLCmd Reference
The
addcust
command adds customers to the LDAP database.
Format:
OLCmd addcust -a
[-o
customer_details
Where:
-a
access_le vel
access_level
] [-t
template
Is the a ccess l e v el of t he cust omer o r cu stomer s to
be added. It may be one of:
[ [-c
customer_id
] | [-l
customer_list
]]
]
– The customer has full administrator
admin
rights.
realtime
– The customer may view on-demand
and scheduled reports, generate performance
graphs, view device configuration, run
nondisruptive tests, and use the Device
Browser in read-only mode.
reports
– The customer may view on-demand
and scheduled reports.
schedreports
– The customer may view
scheduled reports on devices.
network
– The customer may use the Network
Navigator and view log files.
allcustreports
– The customer may view all
on-demand and scheduled reports for all
customers.
customer_id
-c
-l
customer_list
-o
customer_details
template
-t
Is the identifier of a customer to be added to the
LDAP database. Customer ID can contain no
spaces.
Is a text file conta ining a list of customer names
separated by carriage returns.
Is a text file conta ining customer informa tion. The
file must consist of eight lines, which are taken to
be:
— Customer Name
— Account Number
— Contact Name
— Phone
— Fax
— E-Mail Address
— Street Address
— Comments
Any line may be blank.
Is the name of an existing customer record to be
used as a template for the customer being added.
7800-A2-GB32-00 January 2002
A-3
Page 74

A. OLCmd Reference
Examples:
The following command adds a single customer to the LDAP database with a
Realtime a ccess l eve l:
OLCmd addcust -a realtime -c Exact_Corporation
The file customer_list.txt contains several customer ID s on separate lines:
Rent-a-Phone.com
Rent-a-Phone_GmbH
Rent-a-Phone_USA
The following command adds the list of customers to the database with the same
characteristics as those of the customer Exact_Corporation:
OLCmd addcust -a realtime -l customer_list.txt
-t Exact_Corporation
The file customer_data.txt contains details about the customer Exact_Corp:
Exact Corporation
261800-1023-9
Priscilla Eiss
800-727-2396
727-530-2000
[email protected]
123 Punctilious Rd., Exacton, NY
Office closed Tuesdays
The following command adds the customer Exact_Corporation to the database
using the details in customer_data.txt:
OLCmd addcust -a realtime -c Exact_Corporation
-o customer_data.txt
A-4
January 2002 7800-A2-GB32-00
Page 75

OLCmd assigndev
A. OLCmd Reference
The
assigndev
Format:
OLCmd assigndev -c
Where:
-c
customer_name
-a
device_address
-l
device_li st
Example:
The following command adds a single device to customer Exact_Corporation:
OLCmd assigndev -c Exact_Corporation -a 137.16.255.5
The following command assigns a group of devices, which are listed in the file
exact_devices.txt:
OLCmd assigndev -c Exact_Corporation -l exact_devices.txt
command assigns device s to a customer ID.
customer_name
Is the customer name to be acted upon.
Is the IP address of a device to be assigned.
Is a text file conta ining a list of device IP
addresses separated by carriage returns. The
group of devices is assigned to the customer ID.
[-a
device_address
] | [-l
device_list
]
7800-A2-GB32-00 January 2002
A-5
Page 76

A. OLCmd Reference
OLCmd chgrawfileext
The
chgrawfileext
seleted polling domains.
Format:
OLCmd chgrawfileext [-d
[-e
new_extension
Where:
-d
polling_domain
-o
current_extension
-e
new_extension
Example:
The following command renames all .raw files on all polling domains to .ftp.
OLCmd chgrawfileext -o raw -e ftp
The following command renames .bad files on the polling domain named dallas to
.raw.
command changes the file extensions of raw data files on
polling_domain
]
Is the polling domain where file extensions are to
be changed. If -d is not specified, all polling
domains are affected.
Is the current file extension of files to be renamed.
Valid extensions are bad, ftp, and raw.
Is the new file extension of files to be renamed.
Valid extensions are bad, ftp, and raw.
] [-o
current_extension
]
OLCmd chgrawfileext -d dallas -o bad -e raw
A-6
January 2002 7800-A2-GB32-00
Page 77

OLCmd clean
A. OLCmd Reference
The
archived files older than a specified age.
Format:
OLCmd clean
Where:
Example:
The following command moves files in the \opt\pdn\openlane\logs directory named
*.log to *.log_<date>.arc (for example, database.log_2001_05_13.arc) and deletes
any *.arc files older than 7 days.
command creates archive copies of specified log files and deletes
clean
directory extension days [new-exten sion
directory
extension
days
new-extension
Is the directory where the log files reside.
Is the suffix of the log files to be archived.
Is the number of days old existing archive files must be for
the clean command to delete them.
Is an optional name to be added to the suffix of archived
files. It is also used to identify files to be deleted. If
new-extension is not specified, an exten sion of .arc is
presumed.
]
OLCmd clean logs .log 7
The following command moves files in the \opt\apache\log s director y nam ed *.log
to *.log_<date>admin (for example, jserv.log_2001_05_13admin) and deletes any
*.log_<date>admin files older than 21 days.
OLCmd clean \opt\apache\logs .log 21 admin
7800-A2-GB32-00 January 2002
A-7
Page 78

A. OLCmd Reference
OLCmd confauth
The
confauth
user access authentication.
Format:
OLCmd confauth
Where:
on Specifies that Apache user access authentication is in use.
off Specifies that Apache user access authentication is not in
Example:
To conf igure OpenLane for use in a system with Apache user access
authentication:
OLCmd confauth on
command configures OpenLane for use in a system with Apache
on | off
use.
A-8
January 2002 7800-A2-GB32-00
Page 79

OLCmd dbage
A. OLCmd Reference
The
database.
Format:
OLCmd dbage [-n
Where:
-n
-d
-a
-raw
-rpt
command removes older records from the performance statistics
dbage
instance
days
days
instance
Specifies the database name. If -n is omitted, the default
database is used.
Removes records from the database by device according to
the parameters selected when each device was added.
Removes records from the database using the number of
days in the system-wide preferences (preferences.dat).
Optionally specifies the age in days of the oldest Raw
(quarter-hourly user history) data record to be retained. This
overrides the Save Raw Data For value entered when each
device was added to the database. If 0 is specified, all Raw
data records in the database are deleted.
Optionally specifies the age in days of the oldest Report
(hourly user history) data record to be retained. This
overrides the Save Repo r t Data For value entered when
each device was added to the database. If 0 is specified, all
Report data records in the database are deleted.
] [[ -d |
-a
] | [[
-raw
days
] [
-rpt
days
]] |
-dd
]
-dd
Example:
To delete Report data records older than 90 days and Raw data records older than
7 days, enter the command:
OLCmd dbage -n OracleStatsDB -raw 7 -rpt 90
To del ete all records for nonexistent connections, then delete Report and Raw
data records according to individual device definitions, enter the commands:
OLCmd dbage -n OracleStatsDB -dd
OLCmd dbage -n OracleStatsDB -d
Optionally deletes data for connections which no longer
exist. The -dd parameter may not be specified with the -d,
-a, -raw, or -rpt parameters.
A connection is determined to be nonexistent when an
interface appears in the user history database but not in the
LDAP database. If the -dd option is never used, user history
records for nonexistent connections are eventually deleted
like other records, according to age.
7800-A2-GB32-00 January 2002
A-9
Page 80

A. OLCmd Reference
OLCmd dbconfig
Information that OpenLane uses to connect to a database is stored in a
naming/directory service. The
naming/directory service database entry that points to the performance statistics
database.
Format:
Solaris:
OLCmd dbconfig '
[[ -c
[Advanced Parameters]
Windows:
OLCmd dbconfig "
[[ -c
[Advanced Parameters]
new_instance
new_instance
[[
-d c
] ] [ -m
'
[[
] ] [ -m
"
host
-d c
host
dbconfig
| o ] | [ -a
] [ -n
dbname
| o ] | [ -a
] [
-n
dbname
command creates or modifies the
instance
] [ -u
instance
] [ -u
]] | [
] ] | [ -l ] | [ -h ] |
-l
user
user
] | [ -h ] |
] [ -p
password
] [ -p
password
]
]
Parameters may be set to null by specifying null. Example:
Where:
| o Sets the default database to Cloudscape (c) or Oracle
-d c
(o).
-a
instance
-c
new-instance
-m
host
-n
dbname
-u
user
-p
password
Alters the options specified on a specific database
instance. If -a is omitted, the default database is
assumed.
Creates a new database instance. If the -c parameter is
not followed by a -d parameter, the database type is
derived from the default instance.
Sets the host machine name or IP address (and port if
needed) where the database is located. The default is
localhost:1521.
Specifies the database name (SID in Oracle). The
default is OpenLane for Cloud scape or OLDB for
Oracle.
Specifies the database user. The default is empty for
Cloudscape or pdyn for Oracle.
Specifies the database user password. The default is
empty for Cloudscape or pdyn for Oracle.
-u null
.
Lists all the database instances in the naming/directory
-l
service.
Prints usage notes similar to those shown here.
-h
A-10
January 2002 7800-A2-GB32-00
Page 81

Advanced Parameters:
A. OLCmd Reference
-url
-dr
-err
-sm
-rs
-cm
-om
-fc
driver
number
statmap
rawsql
calcmap
oidmap
feedclass
Specifies the database connection URL in raw form. It
may contain $host$, which gets replaced by the host, and
$dbname$, which gets replaced by the database name
when the connection is made.
Specifies the name of the JDBC driver from the database
vendor. It must be in the classpath for connections to
work.
Specifies the vendor-specific JDBC error number to ignore
for duplicate keys. If not set or correct, duplicate key
warnings are logged.
Specifies the filename of file that maps internal statistic
names to the database schema.
Specifies the filename of file that contains raw SQL for the
database schema/vendor.
Specifies the filename of file that defines and maps
calculations to the database schema.
Specifies the filename of file that maps MIB OIDs to the
database schema.
Specifies the feed class name fo r feeding user history
statistics to a database.
-ac
ageclass
Example:
To change the default database to Oracle and set the database parameters, enter
the command:
OLCmd dbconfig '-d o -m mycomputer.mycompany.com:1521 -n mydb
-u myself -p mypassword'
Specifies the age class name for aging user history
statistics in a database.
7800-A2-GB32-00 January 2002
A-11
Page 82

A. OLCmd Reference
OLCmd dbcopy
The
dbcopy
naming/directory service to another database instance. It can be used, for
example, to convert an outgrown Cloudscape database to an Oracle database.
Format:
OLCmd dbcopy
Where:
from_instance
to_instance
Specifies the default database instance. It can be placed
d
start_time
end_time
command copies all the data in one database instance defined in the
[
from_instance
Specifies the database instance in the naming/directory
service to copy data from.
Specifies the database instance in the naming/directory
service to copy data to.
in the source or target position.
Optionally specifies the start time of statistics to be copied
in the form YYYYMMDDhhmmss.
Example: 20011101235959 denotes one second before
midnight (23:59:59) on November 30, 2001.
Optionally specifies the end time of statistics to be copied
in the form YYYYMMDDhhmmss.
Example: 20020101000000 denot es mid night (00:00:00)
on January 1, 2002.
| d ] [
to_in stanc e
| d ] [
start_time end_time
]
Example:
To c opy the default database instance to an Oracle database (created with the
name OracleStatsDB using the dbconfig command), ente r the command:
OLCmd dbcopy d OracleStatsDB
A-12
January 2002 7800-A2-GB32-00
Page 83

OLCmd dbip
A. OLCmd Reference
IP addresses are maintained in the statistics database as single decimal integers.
For exampl e, the IP address 135.26.10.37 is maintained in the database as
–2028336603. The
address (four decimal integers separated by periods), or a dotted decimal address
into a single integer.
Format:
command converts a single integer into a dotted decimal
dbip
OLCmd dbip
Where:
address
Example:
The following are valid uses of the dbip command (shown with responses):
OLCmd dbip -2023301243
-2023301243 = 135.102.223.133
OLCmd dbip 174195980
174195980 = 10.98.5.12
OLCmd dbip 200.23.132.10
200.23.132.10 = 937982966
address
May be a positive or negative decimal integer, or four
decimal integers from 0–255 separated by periods. A
negative number is denoted by a leading hyphen.
7800-A2-GB32-00 January 2002
A-13
Page 84

A. OLCmd Reference
OLCmd dbroll
User history statistics are stored by 15-minute intervals. To speed up the
processing of SLV reports, and to reduce the size of the database, you can roll up
statistics into hourly intervals by using the
Format:
function of OLCmd.
dbroll
OLCmd dbroll [-d
[-i
ip_address
Where:
-d
] [-r] [-h]
database_instance
-s
start_time
-e
end_time
-i
ip_address
database_instance
Optionally specifies the user history database to roll
up. If no database is specified, the default database is
used.
Optionally specifies the start time of statistics to be
rolled up, in the form YYYYM M DDhhm mss.
Example: 20011012235959 denotes one second
before midnight (23:59:59) on October 12, 2001. If
not specified, roll-up begins at the beginning of the
user history database.
Optionally specifies the end time of statistics to be
rolled up, in the form YYYYM M DDhhm mss.
Example: 20020101000000 denotes midnight
(00:00:00) on January 1, 2002. If not specified, roll-up
ends at the end of the user history database.
Optionally specifies the IP address of a device whose
statistics are to be rolled up. If not specified, statistics
for all devices are rolled up.
] [-s
start_time
] [-e
end_time
]
-r
-h
Example:
To roll up and delete 15-minut e buckets created before January 2001 for all
devices, enter the command:
OLCmd dbroll '-e 20010101000000 -r'
If specified, statistics that are successfully rolled up
are deleted from the database.
Prints usage notes similar to those shown here.
A-14
January 2002 7800-A2-GB32-00
Page 85

OLCmd delcust
A. OLCmd Reference
The
delcust
the database.
Format:
OLCmd delcust [-c
Where:
-c
-l
Example:
The file ex-customers.txt contains customer IDs on separate line s:
Rent-a-Phone.com
Rent-a-Phone_GmbH
Rent-a-Phone_USA
The following command deletes from the database all the customer IDs in the
ex-customer.txt file:
command allows you to delete a customer or a list of customers from
customer
customer-list
] | [
customer
Is the customer ID of a single customer to be deleted
from the database.
Is the pathname of a file containing customer IDs
separated by carriage returns. All the customer IDs in the
file are deleted from the database.
-l
customer-list
]
OLCmd delcust -l ex-customers.txt
7800-A2-GB32-00 January 2002
A-15
Page 86

A. OLCmd Reference
OLCmd deldev
The
deldev
from the database.
Format:
OLCmd deldev
Where:
ip_address
Example:
The following command deletes the device whose IP address is 135.26.10.37 and
all its circuit s.
OLCmd deldev 135.26.10.37
command allows you to delete a device and all associated circuits
ip_address
Is the IP address of the device to be deleted from the
database.
A-16
January 2002 7800-A2-GB32-00
Page 87

OLCmd dumpldap
A. OLCmd Reference
The
dumpldap
from the LDAP database. The file may be used for export to a different directory
server system.
The file created is written to standard output.
The dumpldap command also uses the environmental variable
the file OLControlConfig (Solaris) or OLControlConfig.bat (Windows), to identify
the socket used to connect to the LDAP database.
Format:
OLCmd dumpldap
Where:
host
Example:
The following command dumps the LDAP database on olhost.exactcorp.com to an
LDIF file.
OLCmd dumpldap olhost.exactcorp.com > backups/060501.ldif
command creates an LDAP Data Interchange Format (LDIF) file
, located in
LDAP
host
Is the name or IP address of the OpenLane management
server.
7800-A2-GB32-00 January 2002
A-17
Page 88

A. OLCmd Reference
OLCmd importldif
The
importldif
Data Interchange Format (LDIF) file.
The importldif command also uses the environmental variable
file OLControlConfig (Solaris) or OLControlConfig.bat (Windows), to identify the
socket used to connect to the LDAP database.
Format:
OLCmd importldif [-h
Where:
host
ldif_file
Example:
The following command imports data from an LDIF file to the LDAP database on
olhost.exactcorp.com.
OLCmd importldif -h olhost.exactcorp.com openldap/new.ldif
command adds entries to an LDAP database based on an LDAP
, located in the
LDAP
host] ldif_file
Is the name or IP address of the OpenLane management
server. This parameter is optional.
Is the pathname of the LDIF file to be imported. This
parameter is required.
A-18
January 2002 7800-A2-GB32-00
Page 89

OLCmd key
A. OLCmd Reference
The
determine its expiration date.
Format:
OLCmd key
Where:
Example:
The following command displays the expiration date of the OpenLane license key:
OLCmd key
The following command sets the OpenLane license key to
WZBCK-AAM6E-U898Q-MX5HK:
OLCmd key WZBCK-AAM6E-U898Q-MX5HK
command sets the OpenLane license key, or tests the current key to
key
[
license_key
license_key
]
Is the new license key to be applied to OpenLane. If the key
is omitted, the current key is tested and its expiration date is
displayed.
7800-A2-GB32-00 January 2002
A-19
Page 90

A. OLCmd Reference
OLCmd ldapmodify
The
ldapmodify
accepts input from the STDIN stream.
Format:
OLCmd ldapmodify [-D
[-a | -r] [-b] [-c] [-v]
Where:
-D
bindDN
-w
password
-h
host
-p
port
-F
-a
-r
command adds or modifes entries in the LDAP database. It
bindDN
] [-w
Is the Distinguished Name (DN) used to bind to
the directory.
Is the database password.
Is the name or IP address of the OpenLane
management server .
Is the port used to connect to the LDAP database.
Specifies that all changes will be forced, even
when input lines begin with
Specifies that data is to be added. If neither -a nor
is specified, -r is presumed.
-r
Specifies data is to be replaced. If neither -a nor
is specified, -r is presumed.
-r
password
] [
-h
] [-p
host
replica:
port
] [-F]
.
-b
-c
-v
Example:
The file new.ldi f contains data for new database entries, in LDAP Data Interchange
Format (LDIF). The following command adds the entries to the LDAP databas e:
OLCmd ldapmodify -D c=US -w admin -a -c < data/new.ldif
Specifies that any value starting with a forward
slash (/) is the pathname of a binary file.
Specifies that the command should continue
execution even after an error.
Specifies that debugging information should be
returned.
A-20
January 2002 7800-A2-GB32-00
Page 91

OLCmd ldapsearch
A. OLCmd Reference
The
ldapsearch
search criteria.
Format:
OLCmd ldapsearch [-n
[-b
searchbase
[-t] [-B] [-A] [-L] [-v] [-d
Where:
-n
-D
bindDN
-w
password
-h
host
-p
port
-b
searchbase
command retrieves data from the LDAP database based on
] [-F
separator
Specifies that the command will return information on
what would be changed if executed, but does not
modify entries.
Is the Distinguished Name (DN) used to bind to the
directory.
Is the database password.
Is the name or IP address of the OpenLane
management ser ver.
Is the port used to connect to the LDAP database.
Is an attribute value denoting the starting point of the
search.
] [-D
bindDN
] [-S
debug_level
] [-w
password
sort_attrib
]
] [
-l
] [
-h
time_limit
host
] [
] [-p
-z
size_lim it
port
]
] [-u]
-F
separator
-S
sort_attrib
-l
time_limit
-z
size_limit
-u
-t
-B
-A
-L
Is the character used as a separator between attribute
names and values. The default is an equal sign (=).
This parameter is ignored if -L is specified.
Is the attribute used to sort the entries return ed.
Is the amount of time which may elapse before the
search is abandoned.
Is the size of the output (in bytes) which may be
produced before the search is abandoned.
Specifies that the output should include the
human-readable form of the Distinguished Name.
Specifies that retrieved values should be written to
temporary files.
Specifies that non-ASCII values should not be
suppressed.
Specifies that only attribute names (not values) should
be retrieved.
Specifies that search results should be displayed in
LDAP Data Interchange Format (LDIF).
7800-A2-GB32-00 January 2002
A-21
Page 92

A. OLCmd Reference
-v
Specifies that debugging information should be
returned.
-d
debug_level
Specifies the level of detail of debugging information
that should be returned in the event of an error.
Possible values are 1, 2, 3, and 4, with 1 returning the
least information and 4 the most.
Example:
The following command exports the entire database to an LDIF file:
OLCmd ldapsearch -D c=US -w admin -b c=US -L objectclass=* >
data/alldata.ldif
A-22
January 2002 7800-A2-GB32-00
Page 93

OLCmd logsvc
A. OLCmd Reference
The
logsvc
used.
Format:
OLCmd logsvc
Where:
ip_address
Example:
The following command sets the IP address of the logger:
OLCmd logsvc 135.26.10.37
command sets the IP address of the logger when distributed logging is
ip_address
Is the address of the host that will service logging requests.
7800-A2-GB32-00 January 2002
A-23
Page 94

A. OLCmd Reference
OLCmd processreports
The
processreports
customers and dates.
Format:
OLCmd processreports [-date
[
-customer
Where:
-date
-enddate
-customer
-customerlist
customer_id
date
command generates scheduled reports for specified
] [
-customerlist
Is the optional starting date of the report s. If
-date is not specified, the current date is used.
enddate
customer_id
list_file
Is the optional end date of the reports, creating
a date range between -date and -enddate. If
-enddate is not specified, there is no date
range.
Is the optional customer for whom reports are
to be generated. If neither -customer nor
-customerlist is specified, scheduled reports for
all customers are generated.
Is the optional list of customers for whom
reports are to be generated.
pathname of a text file with one customer ID
per line. Both -customer and -customerlist may
be specified. If neither -customer nor
-customerlist is specified, scheduled reports for
all customers are generated.
date
] [
-enddate
list_file
enddate
]
]
list_file
is the
Example:
The following command generates scheduled reports for all customers:
OLCmd processreports
The following command generates scheduled reports for customer Exact_Corp
using 13 May 2001 as a start date:
OLCmd processreports -date 05/13/2001 -customer Exact_Corp
The following command generates scheduled reports for a list of customers in a
file called la_west.txt:
OLCmd processreports -customerlist la_west.txt
A-24
January 2002 7800-A2-GB32-00
Page 95

OLCmd snmpget
A. OLCmd Reference
The
snmpget
Format:
OLCmd snmpget
Where:
community_name
ip_address
object_id
Example:
The follo wi n g command per forms an SNMP get and displa ys the sysDescr MIB
object:
OLCmd snmpget 135.26.10.37 1.3.6.1.2.1.1.1.0
command performs an SNMP get on a specified MIB object.
[
community_name] ip_address object_id
Is the community name for read access. If omitted,
is used.
public
Is the address of the device to be accessed.
Is the object to be displayed.
7800-A2-GB32-00 January 2002
A-25
Page 96

A. OLCmd Reference
OLCmd snmptest
The
snmptest
name. If successful, snmptest displays sysDescr, sysName, sysContact, and
sysLocation.
Format:
OLCmd snmptest
Where:
ip_address
community_name
Example:
The following command tests SNMP connectivity using a community name of
nmswrite:
OLCmd snmptest 135.26.10.37 nmswrite
command tests SNMP connectivity using a specified commu nity
ip_address [community_name
Is the address of the device to be accessed.
Is the community name to be used. If omitted,
is used.
]
public
A-26
January 2002 7800-A2-GB32-00
Page 97

OLCmd sync
A. OLCmd Reference
The
device is not in the database, it is added.
Format:
OLCmd sync
[ [ -i
[ -I
[
ip_address
Where:
command synchronizes a specified device and the database. If the
sync
[ [ -v ] [ -c
ftp_user
minutes
] [ -p
] [ -k
|
hostname
ip_address
hostname
-v
-c
community-string
-w
community-string
-i
ftp_user
days
community-string
ftp_passwd
] [ -r
] ]
Is the address of the device to be synchronized.
Is the host name of the device to be synchronized.
Specifies that debugging information should be
returned.
Sets the name of the read community string for the
device.
Sets the name of the write community string for the
device.
Specifies the user ID for the FTP session used to
collect performance statistics.
] ] [ -g
] [ -h ] [ -A ] [ -S ] [ -E ] [ -O ]
days
] [ -w
groupid
community-string
] [ -s ] [ -f ] [ -d
]
domain
]
-p
ftp_passwd
-g
groupid
-s
-f
-d
domain
-I
minutes
-k
days
-r
days
-h
-A
-S
Specifies the password for an FTP session initiated by
ftp_user.
Specifies the group ID for the device.
Enables SCM polling (for DSLAM devices only).
Enables user history polling (for FrameSaver devices
only).
Specifies the domain where the poller/reader resides.
Specifies the number of minutes between polls. This
should be less than 1440 (24 hours) to ensure that no
data is los t.
Specifies the number of days’ worth of hourly repor t
data that should be maintained for the device.
Specifies the number of days’ worth of quarter-hour ly
report data that should be maintained for the device.
Specifies that the device is a head-end FrameS aver.
Causes the parameters to be saved without
synchronizing the device.
Requests that circuits and endpoints be discovered in
the course of synchronizing the device.
7800-A2-GB32-00 January 2002
A-27
Page 98

A. OLCmd Reference
-E
Requests that endpoints already discovered be
resynchronized.
-O
Specifies that circuit names may be overwr itten.
Example:
The following command synchronizes device 172.20.4.7:
OLCmd sync 172.20.4.7
A-28
January 2002 7800-A2-GB32-00
Page 99

OLCmd uhread
A. OLCmd Reference
The
uhread
a command line. It can be used to process user history records automatically
during periods of low network activity.
Format:
OLCmd uhread -c
Where:
-c
-n
command starts and stops the User History Reader (UHReader) from
command
poller-name
command
[-n
poller-name
Specifies the action to be taken.
one of:
singleRead
poll files, the n ha lts
– Runs UHReader until the shutdown
run
command is issued
shutdown
running
– Shows the status of UHReader
status
Optionally specifies the poller domain to read from
when the singleRead or run command is issued. If
no poller domain is specified, all poller domains
are read.
]
command
– Reads all collected user history
– Shuts down UHReader if it is
may be
Example:
The following command causes UHReader to read all collected user history poll
files, then stop:
OLCmd uhread -c singleRead
7800-A2-GB32-00 January 2002
A-29
Page 100

A. OLCmd Reference
OLCmd unassigndev
The
unassigndev
Format:
OLCmd unassigndev -c
Where:
-c
customer_name
-a
device_address
-l
device_li st
Example:
The following command removes a single device from customer
Exact_Corporation:
OLCmd unassigndev -c Exact_Corporation -a 137.16.255.5
The following command assigns a group of devices, which are listed in the file
exact_devices.txt:
OLCmd unassigndev -c Exact_Corporation -l exact_devices.txt
command removes devices from a customer record.
customer_name
Is the customer name to be acted upon.
Is the IP address of a device to be unassigned.
Is a text file conta ining a list of device IP
addresses separated by carriage returns. The
group of devices is unassigned.
[-a
device_address
] | [-l
device_list
]
A-30
January 2002 7800-A2-GB32-00
 Loading...