

Page 1
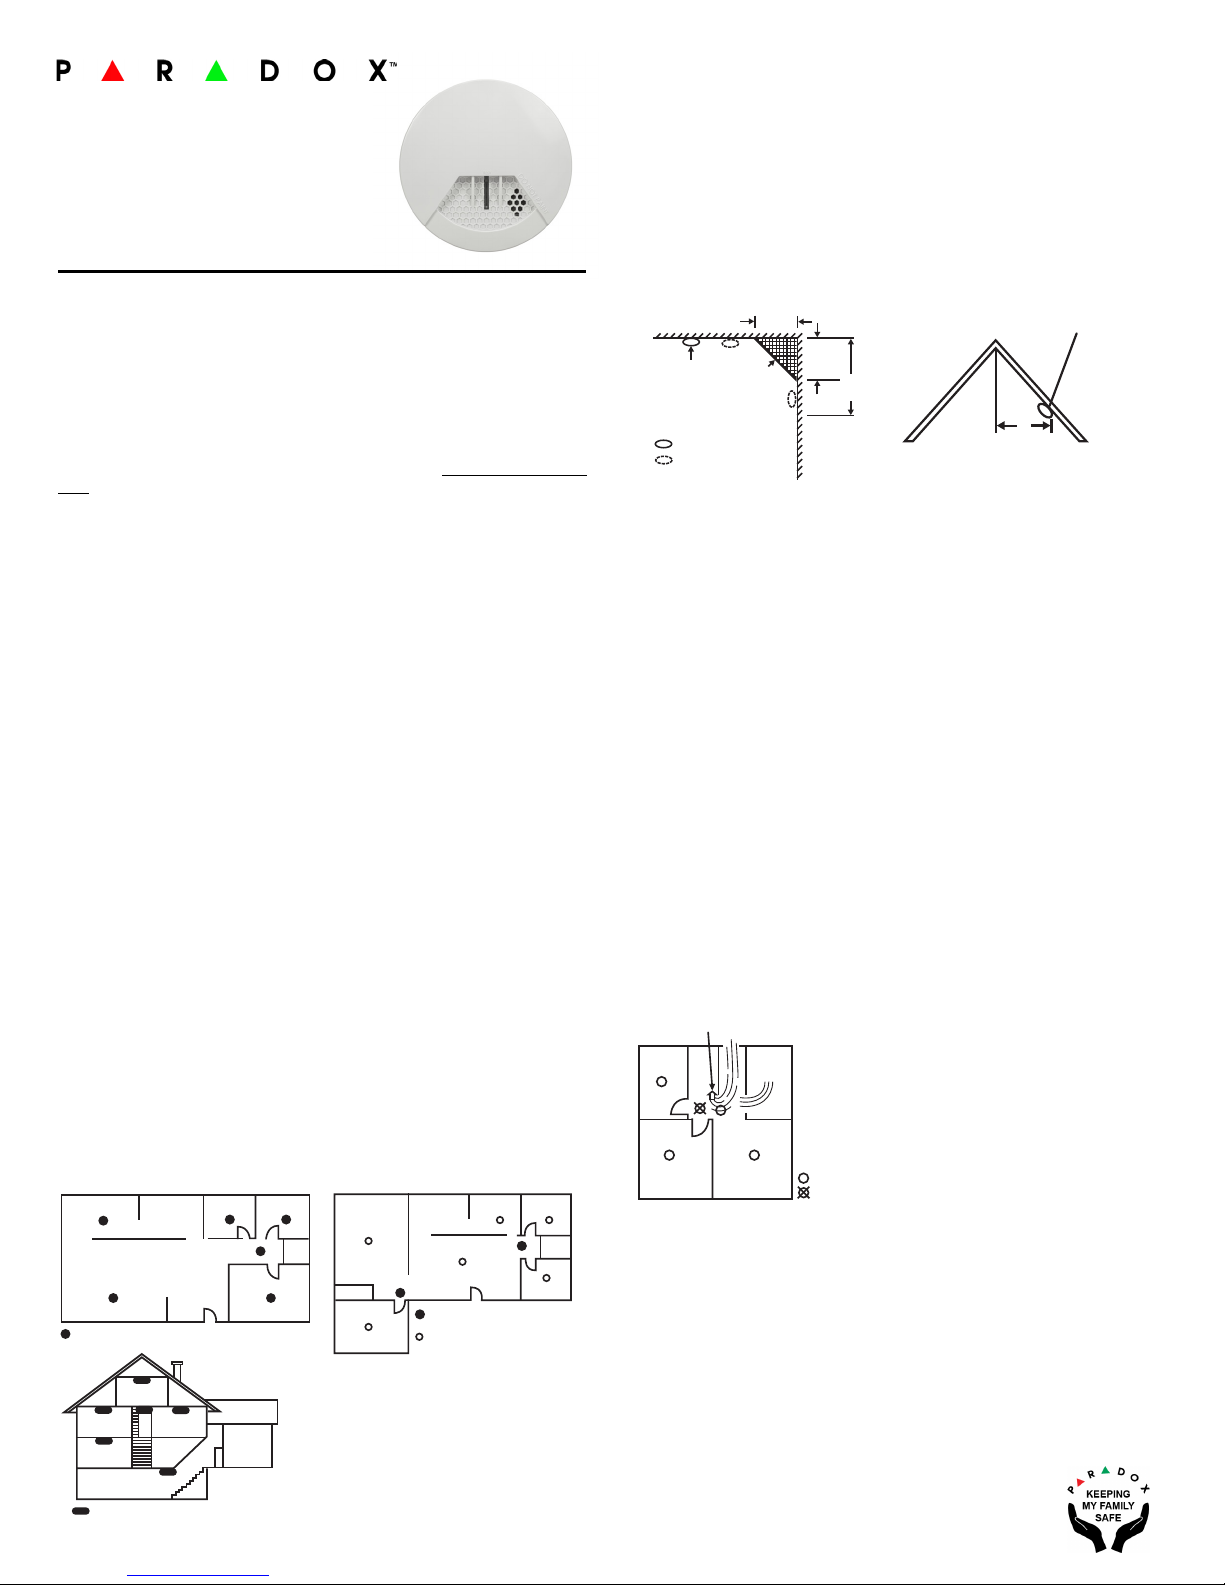
Figure 1:
One separate smoke detector in every
bedroom and one on the floor for more
security
FAMILY ROOM KITCHEN
LIVING ROOM
BEDROOM BEDROOM
BEDROOM
Smoke detectors for minimum
security
Smoke detectors for more security
Smoke detectors for more security
DINING ROOM KITCHEN BEDROOM
LIVING ROOM BEDROOM
BEDROOM
Figure 2:
One separate smoke detector in every room,
except kitchen and bathroom as minimum
security
BEDROOM
BEDROOM
BEDROOM
GARAGE
KITCHEN
GROUND
FLOOR
BASEMENT
Smoke detectors for minimum security
Figure 3:
Location for placing smoke detectors for a multifloor residence
Figure 4:
If it is not practical to mount the
detector on the center of the ceiling,
put the detector on the ceiling no
clo ser tha n 50 cm t o any wa ll or co rner
as shown in Figure 4
Figure 5:
The distance between the peak and the
mounting of the smoke detector on
peaked ceilings (>20°) is minimum 0.5M
to maximum 1M, measured along the
peaked ceiling
CEILING
CENTER
OF CEILING
BEST LOCATION
ACCEPTABLE
LOCATION
NEVER
HERE
4in.
(10cm)
4in.
(10cm)
Minimum
6in.(15cm)
Maximum
Smoke Detector
3
Feet
Horizontal Distance from Peak
Figure 4:
If it is not practical to mount the
detector on the center of the ceiling,
put the detector on the ceiling no
clo ser tha n 50 cm t o any wa ll or co rner
as shown in Figure 4
AIR RETURN
AIR ENTRY
Bedroom
Stove
Kitchen
Living RoomBedroom
Correct Location
Incorrect Location
Figure 6:
Recommended smoke detector’s locations to
avoid air streams with combustion particles
SD360
Installation / User Manual
Long Battery Life Single Station
Battery Powered Photoelectric
Smoke Detector
Introduction
Paradox’s SD360 single station photoelectric smoke detector is designed to
sense smoke that comes into the alarm chamber. It does not sense gas, or
flame. This smoke detector is designed to give early warning of developing
fires by giving off the alarm sounds from its built-in alarm horn. It can provide
precious time for you and your family to escape before a fire spreads.
However, the smoke detector makes such pre-warning of fire accident
possible, only if the smoke detector is located, installed, and maintained
properly as described in this User Manual.
WAR NI NG: This smoke detector is designed for use in a single residential unit
only, which means that it should be used inside a single family home or
apartment. It is not meant to be used in lobbies, hallways, basements, or another
apartment in multi-family buildings, unless there are already working alarms in
each family unit. Smoke detectors, placed in common areas outside of the
individual living unit, such as on porches or in hallways, may not provide early
warning to residents. In multi-family buildings, each family living unit should set
up its own smoke detectors.
WAR NI NG: This detector is not meant to be used in non-residential buildings.
Warehouses, industrial or commercial buildings, and special purpose nonresidential buildings require special fire detection and alarm systems. This
detector alone is not a suitable substitute for complete fire detection systems for
places where many people live or work, such as hotels or motels. The same is true
of dormitories, hospitals, nursing homes or group homes of any kind, even if they
were once single family homes.
WAR NI NG: This detector will not alert people who are hard of hearing. It is
strongly recommended that the special-purpose smoke detectors using lights or
vibrating devices, should be installed to alert occupants who are hard of hearing.
Location to Install Your Smoke Detectors
For complete coverage in residential units, smoke detectors should be
installed in all rooms, halls, storage areas, basements, and attics in each family
living unit. Minimum coverage is one detector on each floor and one in each
sleeping area.
Here, we have useful tips for you:
• Install a smoke detector in each separate room and exit way except
kitchen, as shown in Figure 1 and Figure 2.
• Install a smoke detector on every floor of a multi-floor home or
apartment, as shown in Figure 3
• Install a minimum of two detectors in any household
• Install a smoke detector inside every bedroom
• Install smoke detectors at both ends of a bedroom hallway if the
hallway is more than 40 feet (12 meters) long
• Install basement detectors at the bottom of the basement stairwell
• Install second-floor detectors at the top of the first-to-second floor
stairwell
Be sure no door or other obstruction blocks the path of smoke to the
detector.
• Install additional detectors in your living room, dining room, family
room, attic, utility and storage rooms
• Install smoke detectors as close to the center of the ceiling as possible. If this is not practical, put the detector on the ceiling, no closer
than 20 inches (50 cm) from any wall or corner, as shown in Figure 4
• If ceiling mounting is not possible and wall mounting is permitted by
your local and state regulations, put wall-mounted detectors
between 4 and 6 inches (10 ~ 15 cm) from the ceiling as shown in
Figure 4
• If some of your rooms have sloped, peaked, or gabled ceilings, try to
mount detectors 3 feet (0.9 meter) measured horizontally from the
highest point of the ceiling as shown in Figure 5
Locations NOT to Install Your Smoke Detectors
Nuisance alarms take place when smoke detectors are installed where they
will not work properly. To avoid nuisance alarms, do not install smoke
detectors in the following situations:
• Combustion particles are the by-products of something that is burning. Thus in or near areas where combustion particles are present you
do not install the smoke detector to avoid nuisance alarms, such as
kitchens with few windows or poor ventilation, garages where there
may be vehicle exhaust, near furnaces, hot water heaters, and space
heaters
• Do not install smoke detectors less than 20 feet (6 meters) away from
places where combustion particles are normally present, like kitchens. If a 20-foot distance is not possible, e.g. in a mobile home, try to
install the detector as far away from the combustion particles as possible, preferably on the wall. To prevent nuisance alarms, provide
good ventilation in such places
IMPORTANT: For any reason, do not disable the
alarms.
• When air streams passing by kitchens, the way how a detector can
sense combustion particles in normal air-flow paths is graphically
shown in Figure 6, which indicates the correct and incorrect smoke
detector locations concerning this problem
detector to avoid nuisance
SD360EN-EI00 01/2016
• In damp or very humid areas, or near bathrooms with showers.
Moisture in humid air can enter the sensing chamber, then turns into
droplets upon cooling, which can cause nuisance alarms. Install
smoke detector at least 10 feet (3 meters) away from bathrooms
• In very cold or very hot areas, including unheated buildings or outdoor rooms. If the temperature goes above or below the operating
range of smoke detector, it will not work properly. The temperature
range for your smoke detector is 0~49ºC
• In very dusty or dirty areas, dirt and dust can build up on the detector’s sensing chamber, to make it overly sensitive. Additionally, dust
or dirt can block openings to the sensing chamber and keep the
detector from sensing smoke
Page 2

• Near fresh air vents or very drafty areas like air conditioners, heaters
Mounting
bracket
Test / Silence &
Power / Smoke Detectors
LED indicator
Figure 7 :
or fans, fresh air vents and drafts can drive smoke away from smoke
detectors
• Dead air spaces are often at the top of a peaked roof, or in the corners
between ceilings and walls. Dead air may prevent smoke from reaching a detector. See Figures 4 and 5 for recommended mounting locations
• In insect-infested areas. If insects enter a detector’s sensing chamber,
they may cause a nuisance alarm. Where bugs are a problem, get rid
of them before putting up a detector
• Near fluorescent lights, electrical “noise” from fluorescent lights may
cause nuisance alarms. Install smoke detectors at least 5 feet (1.5
meters) from such lights
WAR NI NG: Never remove battery from a DC-power operated detector to stop a
nuisance alarm. Open a window or fan the air around the detector to get rid of
the smoke. The detector will turn itself off when the smoke is gone. If nuisance
alarms persist, attempt to clean the detector as described in this Installation
Manual.
WAR NI NG: Do not stand close to the detector when the alarm is sounding. The
alarm is loud in order to wake you in an emergency. Too much exposure to the
horn at close range may be harmful to your hearing.
Installing Your Smoke Detector
The SD360 smoke detector is made to be mounted on the ceiling or on the
wall if necessary. Since this smoke detector is a single-station type, it cannot
be linked to other detectors.
WAR NI NG: Do not connect the SD360 smoke detector to any other detector or
auxiliary device. Connecting anything else to this detector will keep it from
working properly.
LOCATIONS TO INSTALL YOUR SMOKE DETECTORS” and “LOCATIONS NOT TO
Read “
INSTALL YOUR SMOKE DETECTORS
to install your smoke detector.
Please follow these steps to install your smoke detector:
1) At the place where you are going to install the detector, draw a horizontal
line six inches long.
2) Remove the mounting bracket from your unit by rotating it
counterclockwise.
3) Place the bracket so that the two longest hold slots are aligned on the line.
In each of keyhole slots, drawing a mark to locate a mounting. plug and
screw.
4) Remove the bracket.
5) Using a 3/16-inch(5mm) drill bit, drills two holes at the marks and insert
plastic wall plugs. Put the detector away from plastic dust on it when you
drill holds for mounting.
6) Using the two screws and plastic wall plugs (all supplied), attach the
bracket to the wall.
7) Line up the slot of the bracket and the detector. Push the detector onto
the mounting bracket on turn it clockwise to fix it into the place. Pull
onward on the smoke detector to make sure it is securely attached to the
mounting bracket.
CAUTION: This smoke detector comes with cover latches that will prevent the
smoke detector cover from closing if battery is not installed. This tells you that
the detector will not work until a new battery is properly installed.
NOTE: The detector horn will beep once after the detector is installed with
battery and mounted with bracket 2~4 seconds. This means the smoke
detector is working normally and also indicates that the battery is positioned
properly. Close cover, and then press the test button, holding it down for
about 3 seconds until the horn sounds. The horn should sound a loud,
pulsating alarm. This means the unit is working properly.
SD360EN-EI00 01/2016
” section in this Manual first, then decide where
Standby Mode
The red LED, as the ALARM indicator, is featured with the smoke detector. It
can be seen through the clear test button on the cover of the unit. When a red
LED flashes once every 334 seconds, it indicates the smoke detector is under
normal operation. When the smoke detector senses smoke and
simultaneously sounds an audible alarm with 3 beeps, pause and 3 beeps.
The red LED will flash continuously and rapidly.
Silence Feature
The silence feature can temporarily quiet an alarm for up to 10 minutes. To
use this feature, press test/silence button on the cover when it alarms.
However, if the smoke concentration around the smoke detector unit is still at
alarming level after 10 minutes of silence, the unit will re-alarm immediately.
LOW BATTERY WARNING SIGNAL
If the detector horn begins to chirp once in 43 seconds with yellow LED
flashing, it indicates that the smoke detector’s battery is weak. Replace with
new battery immediately. Keep fresh batteries on hand for this purpose.
The Low Battery warning signal should last for up to 30 days, but you should
replace the battery immediately to secure your protection.
Also upon initial low battery condition, the detector will send a low battery
indicator to the receiver after 5 minutes. The smoke detector will continue to
transmit a low battery signal every 12 hours until the battery is replaced.
Warning: Use only the types of battery stated in this manual’s
Specifications. Do not use any other kind of battery. This smoke detector may
not operate properly with other types of battery. For battery installation see
below.
TAMPER SWITCH FEATURE:
If the smoke detector’s tamper remains open (not mounted into the bracket)
within two and a half minutes after the battery is installed, three sequential
chirps will sound at regular continuous intervals and the Yellow LED will turn
on (steady) until smoke detector is mounted into the bracket properly.
MALFUNCTION (ERROR) SIGNAL:
If you hear 3 “beep” with yellow LED flashing 3 times in 43 seconds, it
indicates that the smoke detector does not work properly, please have it
repaired or serviced.
TESTING YOUR SMOKE DETECTOR
If you suspect that your smoke detector does not go into alarm, test it as
described below. When the Test button is pressed, the smoke detector sends
an alarm signal to the wireless receiver.
Notes
• If the smoke detector zone is defined as an Instant 24hr Fire Zone,
the alarm signal is immediately sent to the Central Monitoring Station; contact the Central Monitoring Station to advise them of the
test and to avoid a false alarm.
• If the smoke detector zone is defined as a Delayed 24hr Fire Zone,
the alarm signal is not sent to the Central Monitoring Station.
To test the detector:
Test the detector weekly by pushing firmly on the test
button for around 4 seconds until the horn sounds, the sound pattern is 3
beeps, pause, and then 3 beeps with red LED flashing continuously and
rapidly. If the smoke detector beeps three beeps with yellow LED flashing
three times in 43 seconds, it indicates the smoke detector is not working
properly, it requires to be repaired or serviced.
WAR NI NG: This is the only way to test the smoke detector! If the test fails, repair or
replace the detector immediately. If you suspect that your smoke detector does
not go into alarm, test it by pressing the test button with your finger to ensure if it
works properly.
To cease the alarm:
• If the zone is defined as Delayed Fire Zone, the alarm will stop automatically.
• If the zone is defined as an Instant Fire Zone, enter a valid code #
(PIN).
WAR NI NG: Never use an open flame of any kind to test your detector. You may set
fire to damage the detector, as well as your home. The built-in test switch
accurately tests all functions. This is the only correct way to test the unit.
WAR NI NG: When you are not testing the unit and the detector’s alarm horn
sounds this means the smoke detector has sensed smoke or combustion particles
in the air. Be sure that the detector alarm horn is a warning of a possible serious
situation, which requires your immediate attention.
• The alarm could be caused by a nuisance situation. Cooking smoke or
a dusty furnace, sometimes called “friendly fires” can cause the alarm
to sound. If this happens, open a window or fan the air to remove the
smoke or dust. The alarm will turn off as soon as the air is completely
clear.
Page 3

NOTE: Do not disconnect the power or remove the battery from the smoke
Removable cover
of smoke chamber
Battery
compartment
Tamper Switch
Figure 8:
detector. This will remove your protection from fires.
Battery Installation
1) Open battery compartment (see Figure 8).
2) Install battery into compartment and make sure the “+” and “-“ends of
each battery are aligned properly.
3) After battery is installed in compartment and mounted with the bracket,
you will hear a chirp which indicates the unit is receiving battery power.
4) After battery is replaced, please press test button immediately to check if it
alarms properly.
TAKING CARE OF YOUR SMOKE DETECTOR
Your smoke detector is designed to be maintenance-free as possible. To keep
your smoke detector in good working condition, you must test the unit
weekly, as referring to section “TESTING YOUR SMOKE DETECTOR”.
Regular Maintenance:
• Open the cover and vacuum the dust off the detector’s sensing
chamber at least once a month.
Remove battery before cleaning. To clean the smoke detector, use soft brush
attachment to your vacuum. Carefully remove any dust on the smoke
detector components, especially on the openings of the sensing chamber.
Replace battery after cleaning. Test the smoke detector to make sure battery
is working correctly. Never use water, cleaners as they may damage the unit.
• Decide on a meeting place which has a safe distance from your
house. Make sure that all your children understand that they should
go and wait for you there if there is a fire
• Hold fire drills at least every 6 months to make sure that everyone,
even small children, knows what to do to escape safely
• Know where to go to call the Fire Department from outside your
home
• Provide emergency equipment, such as fire extinguishers, and teach
your family to use this equipment properly
MORE TIPS TO FACE A FIRE IN YOUR HOME
If you have made a family escape plan and practiced it with your family, you
have increased their chances of escaping safely. Go over the following rules
with your children each time you have fire drills. This will help everyone
remember them in case of a real fire emergency.
• Don’t panic and stay calm. Your safe escape may depend on thinking
clearly and remembering what you have practiced
• Get out of the house as quickly as possible. Follow a planned escape
route. Do not stop to collect anything or to get dressed
• Feel the doors to see if they are hot. If they are not, open them carefully. Do not open a door if it is hot. Use an alternate escape route
• Stay close to the floor. Smoke and hot gases rise
• Cover your nose and mouth with a wet or damp cloth. Take short,
shallow breaths
• Keep doors and windows closed. Open them only if you have to in
order to escape
• Meet at your planned meeting place after leaving the house
• Call the Fire Department as soon as possible from outside your
house. Give the address and your name
• Never go back inside a burning building. Contact your local Fire
Department. They will give you more ideas about how to make your
home safer from fires and how to plan your family’s escape
NOTE: If nuisance alarms keep coming from the unit, you should check
whether the smoke
“WHERE TO INSTALL SMOKE DETECTORS”. Move your smoke detector if it is not
located properly. Clean the unit as described above.
detector unit’s location is adequate. Refer to section
TIPS TO ENHANCE YOUR PROTECTION FROM FIRES
Putting up smoke detectors is only one step in protecting your family from
fires. You must also reduce the chances that fires will start in your home. And
you must increase your chances of escaping safely if one does start.
To have a good fire safety program you must apply the following tips to
enhance your family’s protection from fires:
1) Install smoke detectors properly. Carefully follow all the instructions in this
manual. Keep your smoke detectors clean, and test them every week.
2) Remember that smoke
your smoke
3) Follow fire safety rules, and prevents hazardous situations:
• Use smoking materials properly. Never smoke in bed
• Keep matches and cigarette lighters away from children
• Store flammable materials in proper containers. Never use them near
open flame or sparks
• Keep electrical appliances in good condition. Do not overload electrical circuits
• Keep stoves, fireplaces, chimneys, and barbecue grills grease free.
Make sure they are properly installed and away from any combustible materials
• Keep portable heaters and open flames such as candles away from
combustible materials
• Do not allow rubbish to accumulate
• Keep a supply of extra batteries on hand for your battery powered
smoke detectors
4) Develop a family escape plan and practice it with your entire family. Be
sure to include small children in your practice.
• Draw a floor plan of your home, and find two ways to exit from each
room. There should be one way to get out of each bedroom without
opening the door
• Explain to children what the smoke detector signal means. Teach
them that they must be prepared to leave the home by themselves if
necessary. Show them how to check to see if doors are hot before
opening them. Show them how to stay close to the floor and crawl if
necessary. Show them how to use the alternate exit if the door is hot
and should not be opened
detectors immediately if they are not working properly.
detector that do not work will not alert you. Replace
Wireless Transmitter Information
Wireless Installation Location
The location of the wireless smoke detector affects the overall performance of
the wireless system. In order to ensure the best possible signal reception, the
following criteria should be respected whenever possible:
• Select an installation site that is free of obstacles that reflect and
absorb radio frequency (RF) signals, as well as interference that may
distort signals. Avoid installation near or in the path of strong RF
fields (i.e. neon lights, computers), and on or near metal objects, circuit breaker boxes, air conditioners, and heater ducts since they may
cause interference and reduce the module’s
sensitivity
• Select a site that is not susceptible to drastic temperature changes
• Respect the maximum allowable distance between the smoke detector and the wireless receiver
NOTE: To configure the detector to communicate with control panels refer to:
EVOHD, EVO192 and MGSP programming manuals.
Smoke Detector Zone Assignment
To assign the smoke detector to a wireless receiver, press the smoke
detector’s Test button.
Check-In Supervision
The SD360 transmits a check-in supervision signal to the receiver at regular
intervals. This value is pre-determined and cannot be programmed.
Alarm Transmission
Upon detection of an alarm condition (smoke) the detector will transmit an
alarm signal every 30 seconds to the wireless receiver until the condition
stops. Once the alarm condition has stopped, the detector will wait 5 seconds
then transmit a restore signal to the wireless receiver. The restore signal is
transmitted only once to the receiver after an alarm condition has stopped.
Replacing the Battery
After replacing the battery, test the detector to ensure proper functioning
(refer to Testing the Smoke Detector above).
Product Compatibility:
Smoke detectors are not to be used with detector guards unless the
combination has been evaluated and found suitable for that purpose.
WARNING: This device is not intended as life-saving device and should not
be connected with any life-saving device or fire system. This device is only
intended to be used in residences.
SD360EN-EI00 01/2016
Page 4

WARNING: LIMITATIONS OF SMOKE DETECTORS/TRANSMITTERS
Although smoke detectors play a key role in reducing damage resulting from
home fires, they can only work if they are properly installed, located and
maintained.
Smoke alarm may not be heard if residents are hearing impaired. Special
designed units such as those with visual and audible alarms should be
installed for hearing impaired residents.
Smoke alarm may not waken all individuals if they are sound sleepers. If
children or other family members do not waken readily to the sound of the
smoke alarm, or if there are infants or members with mobility limitations,
make sure someone is assigned to assist them in fire drill and in the event of
emergency.
Smoke detectors will not work without power. AC or DC powered smoke
detectors will not work if, for any reason, the power supply is cut off. An alarm
signal sent by the wireless transmitter in this detector may be blocked or
reflected by metal before reaching the detector’s receiver. Even if the signal
path has been recently checked, blockage may occur if a metal object is
moved into the path.
Smoke detectors will not sense fires when smoke does not reach the
detectors. Smoldering fires typically do not generate a large amount of heat,
which is needed to drive smoke up to the ceiling where the smoke detector is
usually located. For this reason, there may be large delays in detecting a
smoldering fire with either an ionization-type detector or a photoelectrictype detector. Either one of them may only generate an alarm after flaming
has initiated, which will generate the heat needed to drive the smoke to the
ceiling.
Smoke from fires in chimneys, in walks, on roofs, or on the other side of a
closed door may not reach the smoke detector and generate an alarm. A
detector may not quickly detect or sense at all, a fire developing on another
level of a building. Alarm warning devices, such as bells or horns, may not
alert people or wake up sleepers if they are located on the other side of closed
or partly open doors, or on another level. Persons may not hear a warning
device over the noise levels of a radio, air conditioner or appliances or traffic.
For this reaso n, detectors are strongly recommended to be located on
every level and in every bedroom within a building. Alarm warning
devices, however loud, may not warn hearing-impaired people or waken
deep sleepers.
Smoke detectors shall be located in any room where an alarm control is
located, or in any room where alarm control connections to an AC source
or phone lines are made. If detectors are not so located, a fire within any of
these rooms could prevent the QED control from reporting a fire.
Sensing limitations of smoke detectors. Ionization detectors and
photoelectronic detectors are required to pass fire tests of the flaming and
smoldering types. This is to ensure that both can detect a wide range of fires.
Ionization detectors offer a broad range of fire-sensing capability, but not
always provide early warning of a specific type of fire.
In general, detectors cannot be expected to provide warning for fires
resulting from inadequate fire protection practices, violent explosions,
escaping gases that ignite, improper storage of flammable liquids like
cleaning solvents that ignite, other similar safety hazards, arson, smoking in
bed, children playing with matches or lighters, etc. Smoke detectors used in
high air velocity conditions may have a delay in alarm due to dilution of
smoke densities created by frequent and rapid air exchanges. Additionally,
high air velocity environments may create increased dust contamination,
demanding more frequent detector maintenance.
Maintenance of smoke detectors must be done. To keep your equipment in
excellent working order, ongoing monthly maintenance is required as
outlined above and as per EU standards. A preventative maintenance
agreement should be arranged through the local manufacturer’s
representative. Though smoke detectors are designed for long life, they may
fail at any time. Any smoke detector, fire alarm equipment, or any component
of that system which fails must be repaired or replaced as soon as possible.
Changes and modifications on equipment not expressly approved by Paradox
Security Systems Ltd could void the user's authority to operate the
equipment.
The users manual or instruction manual for an intentional or unintentional
radiator shall caution the user that changes or modifications not expressly
approved by the party responsible for compliance could void the user's
authority to operate the equipment.
Product Specifications
Model: SD360
Sensitivity: 0.091 – 0.149dB/m, 1.31-2.28%/ft
Battery Power: 3V lithium battery, Duracell DL 123A or Panasonic CR123A
Warning Sound Pattern: Three Pulse temporal pattern
Detector Audibility: 85dBA@3m
Operation Temperature Range: 0~49ºC (32ºF~120ºF)
Battery Life:
Radio Frequency: 433 MHz/868 MHz
Wireless Range: 35m (115ft) with MG6250
70m (230ft) with MG5000, MG5050, and RTX3
Relative Humidity: 10~85%
Size: 120mm diameter x 5.3mm depth
One year
Information to the User
This equipment generates and can radiate radio frequency energy and, if not
installed and used in accordance with the instructions, may cause harmful
interference to radio communications. However, there is no guarantee that
interference will not occur in a particular installation. If this equipment does
cause harmful interference to radio or television reception, which can be
determined by turning the equipment off and on, the user is encouraged to
try to correct the interference by one or more of the following measures:
• Reorient or relocate the receiving antenna
• Increase the separation between the equipment and receiver
• Connect the equipment into an outlet on a circuit different from that
to which the receiver is connected
• Consult the dealer or an experienced radio/TV technician for help
SD360EN-EI00 01/2016
Warranty
For complete warranty information on this product, please refer to the Limited
Warranty Statement found on the website www.paradox.com/terms or contact
your local distributor. Your use of the Paradox product signifies your acceptance
of all warranty terms and conditions.
© 2016 Paradox Security Systems (Bahamas) Ltd. All rights reserved.
Specifications may change without prior notice.
Address
Paradox Security Systems Ltd.
780 INDUSTRIAL BLVD
ST-EUSTACHE, QC, CANADA J7R 5V3
Phone: 450-491-7444
Fax: 450-491-1095
 Loading...