

Page 1
Voice Dialer Module V2.2
VD710
Reference and Installation Manual
We hope this product performs to your complete satisfaction. Should you have any questions or comments,
please visit our website at paradox.com
Page 2

Page 3

Table of Contents
Introduction ....................................... ............. ............. ............. ............. ....1
System Features ................................................................................................. 1
Technical Specifications ................................ ... ... ...............................................2
Glossary of Terms ....................................................... ... .................................... 2
Installation .................................................................................................3
Power Connections .............................................................................................3
Telephone Line Connections .................................................. ... ... ...................... 3
Zone Input Terminals .......................................................................................... 5
Programmable Outputs (PGMs) ......................................................................... 5
System Reset .....................................................................................................6
Basic Operation ......... .... ... ... ... ... .... ... ... .................................................... .6
LED Indicators .................................................................................................... 6
Green OK LED .............................................................................................................6
Red PULSE LED ..........................................................................................................6
Standby Mode ..................................................................................................... 7
Dialer Mode ........................................................................................................7
Installer’s Programming Mode ................................................................8
Dialing Options ............................................................ ... .................................. 10
Dialing Method ..........................................................................................................10
Redials ......................................................................................................................10
Pulse Options ............................................................................................................11
Post Pager Message Delay .......................................................................................11
Post Dial Delay ....................................................................................... ...................11
Voice Message Options .................................................................................... 1 1
Voice Message Length ..............................................................................................12
Voice Message Repeats ...........................................................................................12
Kiss Off Options ........................................................................................................12
Zone Options .................................................................................................... 13
Zone Type .................................................................................................................13
Idle State ...................................................................................................................13
Zone Speed ...............................................................................................................14
Zone 4 Mode .............................................................................................................14
Page 4

PIN Options ...................................................................................................... 15
Change Installer PIN (Default: 777444) ....................................................................15
Set User PIN Length .................................................................................................15
Set Installer PIN Length ............................................................................................15
Answering Options ............................................................................................ 16
Rings Before Answering ............................................................................................16
Answering Machine Override ....................................................................................16
Telephone Line Monitoring (TLM) .............................................................................17
Local Connection Options .........................................................................................17
Local Connection Code .............................................................................................17
Call Progress Options ....................................................................................... 18
No Dial Tone Action ..................................................................................................18
User’s Opening Menu .............................................................................18
User’s Programming Mode ....................................................................19
Store Telephone Numbers ................................................................................ 21
Record Voice or Pager Messages ..................................................... ............... 23
Voice Messages ........................................................................................................24
Program Output Labels (messages) .........................................................................24
Pager Messages .......................................................................................................24
Change User PIN (Default: 1234) ..................................................................... 25
Installer Instructions for Changing a PIN ...................................................................26
User Instructions for Changing a PIN ........................................................................26
Telephone Number Assignment ........................................ ............................... 27
Test Message Sending ..................................................................................... 28
Programming Data Sheet .......................................................................29
Index ........................................................................................................31
Page 5

1.0 Introduction
The ParaVoxTM Voice Dialer provides remote voice and pager messaging
capabilities for almost any security alarm panel. The ParaVox can advise users
of almost any security situation such as burglary, fire, or flood by calling the
user and playing a pre-recorded message or by paging and leaving a
numerical message.
Fully programmable over the telephone (locally or from an external line), the
ParaVox guides the end user through all system functions with a full set of
voice prompts (no external keypad required). All the user needs to remember
is their P.I.N. (Personal Identification Number).
The ParaVox Voice Dialer has four input zones, programmable to accept a
variety of input configurations and devices. These zone inputs can be linked to
four different 32-digit telephone or pager numbers delivering up to eight
different messages (4 voice and 4 pager). Programmable dial-out priority
allows the dialer to contact the most important number first. Based on the
installation requirements, the ParaVox can use two 30 second messages or
four 15 second messages.
The ParaVox's two programmable outputs can be used for remote activation of
almost any device by telephone, such as turning on air conditioning or heat,
extinguishing lights, activating a sprinkler system, or opening a garage door.
1.1 System Features
• Voice and Pager Dial-out Capable
• Remote programming from any DTMF capable telephone
• The dialer can be configured to provide four 15 second messages or two
30 second messages
• Automatic Gain Control (AGC) provides excellent recorded speech quality
• Both DTMF and Pulse Dialing
• Each zone can dial-out a maximum of four 32-digit telephone numbers
individually allocated for either voice or pager
• Dial-out priority can be set for each zone, enabling the most important
number to be dialed first
• All system information, messages, telephone, pager and PIN numbers are
stored in secure NV (non-volatile) RAM
ParaVox 1
Page 6

• Kiss off Options: Users can terminate received alarm activation message
of current call (press [#] twice) or of all pending calls (press [∗] twice)
• No Dial Tone Option: Wait 8 seconds for dial tone and continue to dial or
wait 16 seconds for dial tone and hang up
• Post Pager Message Delay: After dialing the pager number, ParaVox will
wait the programmed delay period before sending the message
• Local Reset Feature: Zone 4 can be used as a local reset switch, which
when activated will cancel all calls from a currently triggered zone
• Communicate with ParaVox through a local phone (a phone on the same
phone line as ParaVox) by pressing the [#] or [∗] key twice or by
generating a 4-digit code.
1.2 Technical Specifications
Input Voltage: 12 to 16Vdc (12.5Vdc typical)
Current Consumption: Typical: 100mA
Maximum: 200mA (with 2 PGMs enabled)
Power Consumption: 1 Watt
Zone Inputs: 4 (N.C., N.O., 1K/2K EOL, 12Vdc input)
PGM Outputs: 2
PGM Output Current: 50mA
Operating Temperature: 0°C to 50°C (32°F to 122°F)
Dialing Modes: Pulse, DTMF
Message Storage Length: 4 x 15s or 2 x 30s
Voice Quality: 44.1KHz sample rate with AGC
Dimensions (w/case): 16.5cm x 15.2cm x 2.8cm (6.5in x 6in x 1.1in)
1.3 Glossary of Terms
PSTN Public Switched Telephone Network
PABX Private Access Branch Exchange
PIN Personal Identification Number
DTMF Dual Tone Multiple Frequency
EOL End of Line
PPS Pulses Per Second
Kiss off User acknowledges receipt of voice messages by pressing the [#] or
[∗] key twice within 2 seconds. Kiss off can also be pe rformed local ly
if Zone 4 is programmed as a Local Reset switch.
2 Reference and Installation Manual
Page 7

2.0 Installation
2.1 Location and Mounting
Mount the ParaVox Voice Dialer on a wall, leaving at least 5cm (2in) around
the panel box to permit adequate ventilation/heat dissipation. Verify that the
selected site is even and free of bumps which may damage the product casing.
Select a dry installation site that isn't susceptible to drastic changes in
temperature and is close to a 12Vdc-power source, a ground, and a telephone
line connection. Using a drill or screwdriver, punch out the four mounting holes
on the back of the plastic case. Align the six holes of the printed circuit board
(PCB) with the six pins on the back plastic mounting case and snap into place.
After completing required wiring, run the wires through the entry hole on the
back of the plastic case and screw the back of the plastic case onto the
selected installation site and affix the plastic cover.
2.2 Power Connections
The auxiliary terminals (12Vdc) of any Paradox series control panel can be
used to power the ParaVox by connecting the AUX+ and AUX- of the control
panel to the +12VDC and GND terminals of the voice dialer. If desired, a Paradox
12Vdc PS-817 Power Supply and a 12Vdc backup battery can be used to
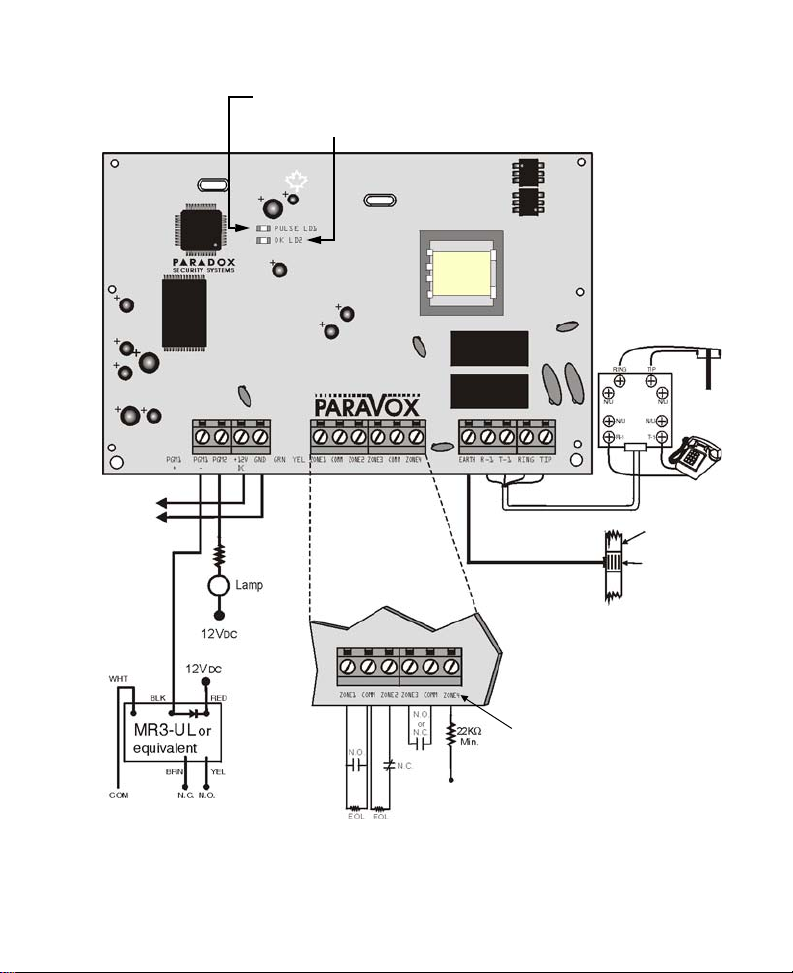
power the ParaVox. Refer to Figure 1 on page 4.
2.3 Telephone Line Connections
The ParaVox Voice Dialer has been designed to be connected to a PSTN or a
PABX telephone system. It places outgoing calls in response to zone input
changes and seizes incoming calls when entering programming mode. The
telephone line terminals are connected as shown in Figure 1 on page 4.
In addition to dialing the number of the telephone line that the ParaVox is
connected to, you may now use a local phone (a phone on the telephone line)
to program the ParaVox. Simply pick up the handset and dial either [#][#] or
[∗][∗], depending on how the kiss off is programmed. Please see Kiss Off
Options on page 12 for more information.
ParaVox 3
Page 8
To c ontrol
panel’s
auxiliary
output or
Paradox PS817 power
supply.
Use a relay if current
consumption exceeds 50mA.
Figure 1: ParaVox Installation Diag r am
The PULSE LED indicates the TLM and dialing
state (see Red
OK LED pulses during normal
operation.
PULSE
LED on page 6).
Configure each input to use any of these
setups:
- N.O. / N.C. with EOL (1K9 / 2K9)
- N.O. / N.C. with no EOL
- 0 to 12Vdc input termination
Zone 4 can also be used as a Local
Reset input. Refer to Zone 4 Mode on
page 14.
0 to 12Vdc
input termination.
The contacts shown in the above drawing can be control panel PGMs,
detection devices, switches or relays.
Cold water pipe
grounding
Ground clamp
4 Reference and Installation Manual
Page 9

2.4 Zone Input Terminals
Up to four zone inputs can be used to initiate a dial-out to pre-programmed
telephone or pager numbers. When the ParaVox recognizes a change at the
zone input, it will proceed with the programmed dial-out. Each zone input can
be configured to use normally open or normally closed triggering with or
without an EOL resistor (1kΩ/2kΩ). Each zone input must be in its triggered or
active state for longer than the programmed Zone Speed (see Zone Speed on
page 14) before the ParaVox will dial-out. Please refer to Zone Options on
page 13 for more information on how to program these termination methods.
Refer to Figure 1 on page 4 for more information.
Example:
Connect the output of a control panel’s PGM to zone input 1 as shown
in Figure 1 on page 4. Program the PGM to activate when there is an
alarm. When an alarm occurs in the control panel, the PGM output will
activate (close). The ParaVox will recognize this change and proceed
to dial-out as defined by the Telephone Number Assignment for zone
input 1 (see Telephone Number Assignment on page 27).
A 12Vdc input termination method is also available. Using this method, the
ParaVox will verify the voltage levels of a device connected to its input and
responds accordingly depending on the programmed Idle State (see Idle State
on page 13). To ensure reliable triggering when using the 0-12Vdc-termination
method, connect a 22kΩ resistor in series.
2.5 Programmable Outputs (PGMs)
Two outputs (PGM1 and PGM2) are available on the ParaVox for remote
switching of other devices. A user can remotely activate (close) or deactivate
(open) the output by calling the ParaVox and pressing the appropriate key (see
User’s Opening Menu on page 18). For example, a PGM can be used to turn
on air conditioning or heat, extinguish lights, activate a sprinkler system, or
open a garage door. When activated, a PGM provides a maximum 50mA
current sink to 0Vdc. If the load on the PGM will exceed 50mA, we recommend
using a relay as shown in Figure 1 on page 4.
ParaVox 5
Page 10

2.6 System Reset
Performing a system reset will set all options and settings to factory default. To
execute a system reset perform the following:
1. Remove the power connections (
2. Remove all connected wires and devices
from the
3. Short the
placing a wire between PGM1 and ZONE1 of the
ParaVox (see Figure 2).
4. Reconnect the power connections to the
ParaVox.
5. Wait 10 seconds and remove the wire.
PGM1- and ZONE1 terminals.
PGM1- and ZONE1 terminals by
+12VDC and GND) from the ParaVox.
Figure 2
3.0 Basic Operation
3.1 LED Indicators
3.1.1 Green OK LED
• When the ParaVox is powered and is operating normally, the OK LED will
flash.
3.1.2 Red PULSE LED
• With the ParaVox in its idle state and with TLM disabled (see T elephone
Line Monitoring (TLM) on page 17), the PULSE LED is off.
• With the ParaVox in its idle state and with TLM enabled, the LED will
flash briefly every second indicating that it is verifying the telephone line .
If the telephone line is not present, the LED will flash (1 second ON and 1
second OFF) to indicate TLM failure.
• When the ParaVox is pulse dialing, the LED will pulse in sync with the
dialing sequence. When the ParaVox is tone dialing, the LED will remain
on for the duration of the dialing sequence.
6 Reference and Installation Manual
Page 11

3.2 Standby Mode
In this mode, the voice dialer is idle (OK LED flashes), waiting for one of two
events to occur:
1. When one of the four zone inputs on the ParaVox has triggered, the voice
dialer immediately enters Dialer Mode (see Dialer Mode on page 7).
2. When receiving an incoming call, the ParaVox waits a pre-determined
number of rings (see Answering Options on page 16), seizes the line and
enters Programming Mode. If the ParaVox is sharing a line with an
answering machine, see Answering Machine Override on page 16.
3.3 Dialer Mode
When a zone input has triggered, the ParaVox:
1. Seizes the telephone line and disconnects all other telephones.
2. Waits for a dial tone (see No Dial Tone Action on page 18).
3. Dials the first telephone/pager number assigned to the triggered zone
input (see Telephone Number Assignment on page 27). If it is a Voice
Message Number go to step 4. If it is a Pager Number go to step 7.
Voice Message Number:
4. After dialing the number and after the Post Dial Delay has elapsed (see
Store Telephone Numbers on page 21), the ParaVox will begin
transmitting the recorded message linked to the triggered zone (see
Record Voice or Pager Messages on page 23). It will transmit the
message the number of times defined by the Voice Message Repeats
(see Voice Message Repeats on page 12).
5. The user must acknowledge receipt (kiss off) of the message (see Kiss
Off Options on page 12). If the ParaVox does not receive a kiss off, it will
hang up, queue the number for redial and dial the next number in the dialout list.
6. If, after dialing the number, there is a busy signal, the ParaVox will hang
up, queue the number for redial, wait for 4 seconds and dial the next
number in the dial-out list.
Pager Number:
7. After dialing the number and after the Post Pager Message Delay has
elapsed, the ParaVox will begin transmitting the recorded numerical
message linked to the triggered zone (see Record Voice or Pager
ParaVox 7
Page 12

Messages on page 23).
8. After transmitting the message it will hang up and dial the next number in
the dial-out list. Since the ParaVox assumes that the pager service has
received and relayed the message, user acknowledgment (kiss off) is not
required and the ParaVox no longer attempts to dial this number again
regardless of the number of Redials programmed (see Redials on page
10).
9. If, after dialing the number, there is a busy signal, the voice dialer will
hang up, queue the number for redial, wait for 4 seconds and dial the next
number in the dial-out list.
Dial-Out List:
For example, if zone input 1 has been assigned to dial telephone number
locations 1 and 2 and the Redials are set to 2, then the Voice Dialer will dial out
as follows:
1st attempt: Call TEL1 and then call TEL2
1st redial: Call TEL1 and then call TEL2
2nd redial: Call TEL1 and then call TEL2
Please note that pager numbers are dialed only once (regardless of the
Redials setting) unless the number is busy. Also note that telephone
numbers are not redialed once kiss off is received.
4.0 Installer’s Programming Mode
The Installer's Programming Mode allows you to set certain parameters that
are not available in the User's Programming Mode. In the Installer's
Programming Mode there aren't any voice prompts to guide you. However,
when a programmable setting has been programmed, you will hear a
confirmation beep (3 beeps) and the ParaVox will save and exit. When
choosing a selection that isn't available, the telephone will emit a rejection
beep (1 long beep).
8 Reference and Installation Manual
Page 13

Programming Example: Change number of Redials to 2.
1. Dial the ParaVox telephone number (“Hello, please enter your PIN”). If
your telephone is connected directly to the unit, press the [#] or [∗] key
twice. Please see Kiss Off Options on page 12 for more information.
2. Enter a valid Installer PIN.
3. Press [1] to program Dialing Options.
4. Press [2] to program Redials.
5. Press [2] to set Redials to 2.
6. Automatically saves and exits.
Pressing the [∗] key at any time reverts to the previous section without saving.
In most situations, users and installers can type over voice prompts rather than
waiting for the prompt to end. The ParaVox will hang up if no actions are made
after approximately 60 seconds.
To enter Installer's Programming Mode:
1. Dial the telephone number to which the ParaVox Voice Dialer is
connected. When the Voice Dialer answers (see Rings Before
Answering on page 16), you will hear “Hello, please enter your PIN.”
2. On your telephone keypad, key in the Installer PIN (default: 777444)
A confirmation beep (beep, beep, beep) indicates that the PIN was
accepted.
3. Select an action from the Installer’s Main Menu:
ParaVox 9
Page 14

4.1 Dialing Options
4.1.1 Dialing Method
The ParaVox can use Pulse or Tone (DTMF) dialing. The ParaVox
automatically switches to tone dialing when transmitting pager
messages.
Please note that pulse dialing is not recommended and if used,
proper operation is not guaranteed.
4.1.2 Redials
This parameter defines how many times (excluding the first attempt) the
ParaVox will redial the same telephone number if a busy signal is
detected or if it hasn't received a kiss off from the user. Since the
ParaVox assumes the pager service has received and relayed the
message, the ParaVox does not redial pager numbers unless the
number was busy. Please note that the ParaVox does not immediately
redial the same number. It will dial any other numbers in the Dial-Out
List (see Dialer Mode on page 7) before returning to the same number
(i.e. #1, #2, #1, #2 NOT #1, #1, #2, #2).
10 Reference and Installation Manual
Page 15

4.1.3 Pulse Options
When using Pulse Dialing, the ParaVox can use North American (1:1.5
ratio, 10PPS) or European (1:2 ratio, 10PPS) dialing characteristics.
4.1.4 Post Pager Message Delay
After dialing the pager number, ParaVox will wait the programmed delay
period before sending the message. After sending the message,
ParaVox will hang up. The Post Pager Message Delay can be set to
zero, two, four, or six seconds.
4.1.5 Post Dial Delay
After dialing the phone number, ParaVox will wait the programmed delay
period before sending the voice message. After sending the message,
ParaVox will hang up. The Post Dial Delay can be set to 1, 3, 5, 7, 10,
12, 15, 18, or 20 seconds.
4.2 Voice Message Options
ParaVox 11
Page 16

4.2.1 Voice Message Length
The ParaVox can be configured to provide either two 30 second
messages or four 15 second messages. Refer to Record Voice or Pager
Messages on page 23 for information on how to record these
messages.
Please note that every time the Voice Message Length is
programmed, the ParaVox will erase any existing messages and will
use the default messages until a new message is recorded.
4.2.2 Voice Message Repeats
This sets the number of times that the ParaVox will repeat the recorded
voice message once the called party has answered or the Post Dial
Delay period (see Store Telephone Numbers on page 21) has expired.
4.2.3 Kiss Off Options
The kiss off options can be set as shown in the figure in section 4.2 on
page 11.
To acknowledge receipt (kiss off) of a message and to cancel any
further dialing attempts to this number, the user must press the [#] key
twice within 2 seconds. After kiss off, the ParaVox will dial the next
number in the dial-out list and it will no longer attempt to dial this number
again regardless of the number of Redials programmed (see Redials on
page 10).
To acknowledge receipt (kiss off) of a message and to cancel any
further dialing attempts to all numbers assigned to the triggered zone,
the user must press the [∗] key twice within 2 seconds. After kiss off, the
ParaVox will say “Goodbye” and hang up. If the ParaVox does not
receive a kiss off, it will hang up, queue the number for redial and dial
the next number in the dial-out list.
12 Reference and Installation Manual
Page 17

4.3 Zone Options
4.3.1 Zone Type
The following zone input terminations can be selected for each zone
input: 1K, 2K, or no EOL or 0-12Vdc input termination (see Zone Input
Terminals on page 5).
4.3.2 Idle State
This parameter defines the idle state (N.O. or N.C.) of the device
connected to each zone input. If using the 0-12Vdc input termination
method (see Zone Input Terminals on page 5), the Idle State functions
as indicated in the table below.
[1] N.C.: 0V to 4.33V = Alarm (initiates dial-out)
4.33 to 12V = O.K (normal)
[2] N.O.:0V to 4.33V = O.K (normal)
4.33 to 12V = Alarm (initiates dial-out)
ParaVox 13
Page 18

4.3.3 Zone Speed
The Zone Speed parameter defines how long a zone input must remain
in its opposite state (triggered) before the ParaVox responds to the
triggering of the zone input. This feature prevents any momentary
glitches in the system from causing unnecessary dial-outs. Each zone
input can be set with a Zone Speed of 0.1 seconds to 80 seconds.
4.3.4 Zone 4 Mode
If you select option [1], the ParaVox will process zone 4 like any other
zone in the voice dialer. Zone 4 will be considered normal.
If you select option [2], zone 4 can be used as a local reset (kiss off).
Program the appropriate Zone Options and when zone 4 has met the
trigger requirements (Zone Options), the ParaVox will cancel all pending
calls assigned to the currently triggered zone (zones 1 to 3).
Special Defaults for Zone 4:
- Local Reset (kiss off) enabled
- No EOL resistor
- Normally Open
- Zone Speed is one second
14 Reference and Installation Manual
Page 19

4.4 PIN Options
4.4.1 Change Installer PIN (Default: 777444)
To change the installer PIN, enter the new 4-digit or 6-digit number
twice. Voice prompts will be played in this section indicating when to
enter the PINs. This will be verified by 3 short beeps. Press the [∗] at
any time to cancel the change.
4.4.2 Set User PIN Length
The User PIN length can be set to four or six digits (default: 4 digits).
4.4.3 Set Installer PIN Length
The Installer PIN length can be set to four or six digits (default: 6 digits).
We recommend using the default User & Installer PIN Lengths.
Otherwise, a user can accidentally enter the Installer's Programming
Mode or accidentally change the Installer's PIN. When you change
the PIN Length from 4 digits to 6 digits, the ParaVox will
automatically add the last 2 digits by using the first 2 digits. For
example, if the PIN is 1234 it will become 123412. When you change
the PIN Length from 6 digits to 4 digits, the ParaVox will
automatically remove the last 2 digits.
ParaVox 15
Page 20

4.5 Answering Options
4.5.1 Rings Before Answering
This parameter determines how many rings the ParaVox will wait before
answering the telephone call. This parameter can be set from 1 to 8
rings. If an answering machine is on the same line as the ParaVox,
please refer to the Answering Machine Override option (see section
4.5.2). Set this parameter to a minimum of two rings in order for
this feature to function correctly.
4.5.2 Answering Machine Override
If there is an answering machine on the same line as the ParaV ox, you must set
the Rings Before Answering (see section 4.5.1) to more than the number of
rings required for the answering machine to answer. The user then calls the
ParaVox and hangs up before the programmed number of rings. If the user
redials (waiting at least 10s) within the period defined by the Answering Machine
Override option (24-60s), the ParaVox will immediately pick up the line.
16 Reference and Installation Manual
Page 21

4.5.3 Telephone Line Monitoring (TLM)
Telephone Line Monitoring checks the telephone line every second to
see if it is still connected. In the TLM Options Menu, two different items
must be programmed.
1. If the line is disconnected for longer than the period defined by
options [6] to [#] (see Figure in Rings Before Answering on page
16), the ParaVox will activate PGM2.
2. When PGM2 is activated, PGM2 will remain activated for the period
defined by options [1] to [5] (see Answering Options on page 16).
PGM2 will continue to re-trigger for as long as the line is disconnected.
To completely disable TLM, set the TLM option to [0].
4.5.4 Local Connection Options
Numerous options are offered to access the ParaVox voice dialer from a
local phone connection.
1. Choose options [1] to [3] from the Local Connection Options to use
different [*][*] and [#][#] combinations.
2. Choose option [4] from the Local Connection Options menu, to access
the system using a 4-digit code. To change the code, go to the Local
Connection Code menu.
3. Choose option [5] from the Local Connection Option menu, to disable
access to the voice dialer through the local line connection. An outside
line must be used.
4.5.5 Local Connection Code
The local connection code can be changed. It is strongly suggested that
the codes include the symbols [*] and/or [#] to prevent the sequence
from being accidentally activated.The default local code is [*][#][*][#].
ParaVox 17
Page 22

4.6 Call Progress Options
4.6.1 No Dial Tone Action
With option [1] selected, the ParaVox will continue to dial if no dial tone
is present after 8 seconds. With option [2] selected, the ParaVox will
hang-up if no dial tone is present after 16 seconds.
5.0 User’s Opening Menu
The User's Opening Menu allows a user to activate or deactivate the
programmable outputs and enter the User's Programming Mode (see User’s
Programming Mode on page 19). Please note that while in any of the user
menus, detailed voice prompts will guide the user through the available
selections. Also note that pressing the [∗] key at any time will revert to the
preceding section without saving. In most situations users and installers can
type over voice prompts rather than waiting for the prompt to end. The ParaVox
will repeat the voice prompts four times. If no actions are made in this time, the
ParaVox will hang up. To enter the User's Opening Menu:
18 Reference and Installation Manual
Page 23

Call the ParaVox Voice Dialer.
*If there is an answering machine sharing the same line, refer to Answering Machine
Override on page 16. If you are cal ling from a local phone ( on the same phone line as the
ParaVox), press [#][#] or [*][*] or a 4-digit code (see the ‘Answering Options’ graphic on
page 17).
“Hello, please enter your PIN.”
Key in the User PIN (default: 1234).
“Output one is <on/off>. Output two is <on/off>.”
This message can be programmed see section 6.3
Select the desired action as shown below.
6.0 User’s Programming Mode
By entering the User's Programming Mode, you can set most of the ParaVox’s
parameters. Please note that while you are in any of the user menus, detailed
voice prompts will guide you through the available selection s . Also, note that
pressing the [∗] key at any time will revert to the previous section without
saving. In most situations you can type over voice prompts rather than waiting
for the prompt to end. The ParaVox will repeat the voice prompts four times. If
no actions are made during this time, the ParaVox will hang up.
ParaVox 19
Page 24

User Installer
To enter the User’s Programming
Mode, press the [3] key from the
User’s Opening Menu (page 18).
To enter the User’s Programming
Mode, press the [8] key from the
Installer’s Main Menu (page 8).
20 Reference and Installation Manual
Page 25

6.1 Store Telephone Numbers
The ParaVox unit can store up to four telephone numbers in locations [1] to [4]
and up to four pager numbers in locations [5] to [8]. When a telephone number
is assigned to a zone input (see Telephone Number Assignment on page 27),
the ParaVox will dial the programmed number whenever the zone input is
triggered.
When programming numbers, do not wait more than 4 seconds between key
presses. After entering a number, make sure to press the [#] key.
ParaVox 21
Page 26

Delete Telephone and Pager Numbers
Previously stored voice message telephone numbers and pager telephone
numbers can be deleted by entering option [1] or [2] from the Delete Telephone
Numbers Menu. Select the desired voice message telephone or pager number
location. Deletion is confirmed by entering [1] for yes or [2] for no.
When you delete a telephone number , the ParaV ox will automati cally remove
the number from all zone assignments.
22 Reference and Installation Manual
Page 27

6.2 Record Voice or Pager Messages
ParaVox 23
Page 28

6.2.1 Voice Messages
If key [1] is selected from the Store Messages Menu, you will be able to
record voice messages. Depending on the selected Voice Message
Length (see Voice Message Length on page 12) you will be able to
record two 30 second messages or four 15 second messages. Each
recorded message is linked to a specific zone input as shown in the
Record Voice or Pager Messages on page 23. When a triggered zone
has been programmed to dial-out a voice message telephone number
(see Telephone Number Assignment on page 27) and when the number
is reached, the voice dialer will play the recorded message linked to the
triggered zone.
Default Messages:
"Trigger of zone x detected. Key pound twice or star twice to accept."
Sample Voice Messages:
"Liquid level above normal"
"Smoke detected in the archive room"
We recommend adding the following to your voice messages:
"...press the [#] or [∗] key twice to acknowledge message"
6.2.2 Program Output Labels (messages)
Selecting the [2] key from the Store Messages Menu allows the user to
record voice prompts linked to the progra mma b le ou tp u ts (3 seconds
maximum) as shown in the diagram on page 23. These messages are
played when entering the User's Opening Menu and when changing the
state of the PGMs (see User’s Opening Menu on page 18).
Default Labels (messages):
"Output 1 is <on/off>"
"Output 2 is <on/off>"
6.2.3 Pager Messages
If key [3] is selected from the Store Messages Menu, you will be able to
record numerical pager messages. Up to four 32-digit pager messages
can be programmed, each of which is linked to a specific zone input as
shown in Record Voice or Pager Messages on page 23. When a
24 Reference and Installation Manual
Sample Program Output Labels:
"Garage door is open"
"Air conditioning is off"
Page 29

triggered zone has been programmed to dial-out a pager number (see
Telephone Number Assignment on page 27) and when the number is
reached, the voice dialer will transmit the recorded numerical message
linked to the triggered zone.
Example:
In the following example notice how the messages are linked to the
triggered zone and not the telephone numbers.
Zone 4 is programmed to dial telephone numbers 1 and 2. When zone 4
has triggered, the ParaVox will dial the telephone number stored in
telephone number location 1. After the Post Dial Delay, the ParaVox will
play the message recorded in Voice Message Location 4. The ParaVox
will proceed by dialing the number recorded in telephone number location
2. After the Post Dial Delay , the ParaV ox will play the message recorded in
Voice Message Location 4.
6.3 Change User PIN (Default: 1234)
The ParaVox system supports up to four user PINs, which can be 4 or 6 digits
in length as defined in Set User PIN Length on page 15.
ParaVox 25
Page 30

6.3.1 Installer Instructions for Changing a PIN
After entering the User's Programming Mode, press the [4] key to enter
the Change User PIN Menu. Select which user PIN from [1] to [4] that
you wish to change and enter the new PIN twice. The [∗] key can be
pressed at any time to exit without saving.
6.3.2 User Instructions for Changing a PIN
After entering the User's Programming Mode, press the [4] key to enter
the Change User PIN Menu. Enters the new PIN twice (please note that
the user does not have to select a user PIN location). After entering the
PIN twice, the ParaVox automatically saves the PIN in a user PIN
location. Users can only change their own PINs (the PIN used to enter
the User's Main Menu). The [∗] key can be pressed at any time to exit
without saving.
When programming a user PIN for the first time , the user must ente r the
User's Main Menu using the default user PIN (1234). Then change the
PIN to the desired number. To program subsequent user PINs, the user
must exit and re-enter the User's Main Menu using the default PIN.
Please note that the default user PIN (1234) is only erased after
programming all 4 user PINs. Therefor e, if only one user is going to
use the system, we recommend programming the same user PIN in
all four locations in order to erase the default PIN.
26 Reference and Installation Manual
Page 31

6.4 Telephone Number Assignment
The ParaVox can assign up to four telephone or pager numbers to each of the
four zone inputs. This means each zone has a prioritized sequence of dial-outs
customized to suit the input. Since voice and pager messages are linked to
specific zones, telephone numbers assigned to a zone will play the same voice
messages and pager numbers will send the same numerical message.
The user selects the desired zone input and enters up to four telephone and/or
pager number locations (one through eight) in the order of dial-out preference.
If a location that corresponds to an empty voice or pager number is selected,
an error message is played and the user can enter another location. To disable
a zone input, enter zero in all four number locations for that zone, or wire the
zone input to never trigger. Press the [∗] star key after the last entry to enter
less than four entries and access the Review Menu.
ParaVox 27
Page 32

6.5 Test Message Sending
The User may test the dialer functionality by entering the Test Message
Sending Menu and entering a digit between one and eight corresponding to
the desired telephone number location (see Store Telephone Numbers on
page 21). If an empty location is selected (no number is stored there), the error
prompt will be played. Another selection can then be entered.
After selecting the desired telephone number location, the ParaVox will dial the
selected telephone number and after the Post Dial Delay it will play the
message recorded in Message Location 1.
Telephone numbers 1 to 4 will always play the voice message stored in
Voice Message Location 1. Pager numbers 5 to 8 will always play the pager
message stored in Pager Message Location 5.
Example:
To test the message transmission of telephone number 4, press the [6] key from
the User’s Main Menu, then press the [4] key to select Telephone Number
Location 4. The ParaVox will dial the number stored in Telephone Number
Location 4. When the Post Dial Delay has elapsed, the ParaVox will transmit the
message programmed in Voice Message Location 1.
28 Reference and Installation Manual
Page 33

7.0 Programming Data Sheet
The following pages have been provided to record the ParaVox's settings.
Personal Identification Numbers (PINs)
User PIN Length (section 4.4.2): _____
Installer PIN Length (section 4.4.3):_____
User PIN 1 (section 6.3):__________Default: 1234
User PIN 2 (section 6.3):__________Default: 1234
User PIN 3 (section 6.3):__________Default: 1234
User PIN 4 (section 6.3):__________Default: 1234
Installer PIN (section 4.4.1):__________Default: 777444
Telephone and Dialing Parameters
Dialing Method (section 4.1.1):__________(Pulse/Tone)
Redials (section 4.1.2):_____(0 to 3)
Pulse Options (section 4.1.3)__________(N. America/Europe)
Post Pager Delay (section 4.1.4):_____(0, 2, 4, or 6 sec.)
Post Dial Delay(section 4.1.5):________ (1, 3, 5, 7, 10, 12, 15, 18, or 20 sec.)
Rings for Answering (section 4.5.1):_____(1 to 8)
Ans. Override (section 4.5.2):_____(24 to 60 sec.)
TLM (section 4.5.3):_____ [0] to [5]_____ [6] to [#]
Call Progress Options
No Dial Tone Action (section 4.6.1):_________
Voice Message & Pager Telephone Numbers (section 6.1)
Location 1 #:______________________________
Location 2 #:______________________________
Location 3 #:______________________________
Location 4 #:______________________________
Location 5 #:______________________________
Location 6 #:______________________________
Location 7 #:______________________________
Location 8 #:______________________________
ParaVox 29
Page 34

Recorded Voice Messages (section 6.2.1)
Message Length (section 4.2.1):_____(2 x 30s or 4 x 15s)
Message Repeats (section 4.2.2):_____(1 to 8)
Kiss off Options (section 4.2.3)_____(∗∗, ##, or both)
Location 1 / Zone 1:______________________________________________
Location 2 / Zone 2:______________________________________________
Location 3 / Zone________________________________________________
Location 4 / Zone 4:______________________________________________
Recorded Pager Messages (section 6.2.3)
Location 5 / Zone 1:______________________________________________
Location 6 / Zone 2:______________________________________________
Location 7 / Zone 3:______________________________________________
Location 8 / Zone 4:______________________________________________
Recorded Output Labels (section 6.2.2)
Location 1 / Output 1 off:__________________________________________
Location 2 / Output 1 on:__________________________________________
Location 3 / Output 2 off:__________________________________________
Location 4 / Output 2 on:__________________________________________
Assign Numbers to Zones (section 6.4)
1st Location 2nd Location 3rd Location 4th Location
Zone 1: ____ ____ ____ ____
Zone 2: ____ ____ ____ ____
Zone 3: ____ ____ ____ ____
Zone 4: ____ ____ ____ ____
Zone Options (section 4.3)
Zone Type Idle State Zone Speed Notes
Zone 1: ________ ________ ____ _________________
Zone 2: ________ ________ ____ _________________
Zone 3: ________ ________ ____ _________________
Zone 4: ________ ________ ____ _________________
Zone 4: Local Reset Option (section 4.3.4): _________ (enabled/disabled)
30 Reference and Installation Manual
Page 35

8.0 Index
A
Answering Machine Override 16
Answering Options 16
Answering Machine Override 16
Rings Before Answering 16
Telephone Line Monitoring 17
Assign Telephone Numbers 27
Assigning Telephone Numbers 27
B
Basic Operation 6
C
Cadence Options See Call Progress Options
Call Progress Options 18
No Dial Tone Action 18
Change Installer PIN 15
Change User PIN 25
Changing User PIN if Installer 26
Changing User PIN if User 26
connecting power 3
connecting telephone lines 3
Connecting the Telephone Line 3
D
Data Sheet 29
Debounce Time. See Zone Speed
Delay after pager message 11
Delete Telephone and Pager Numbers 22
Deleting Telephone & Pager Numbers 22
Diagram, Installation 4
Dialer Mode 7
Dialing Method 10
Dialing Options 10
Dialing Method 10
Post Pager Message Delay 11
Pulse Options 11
Redials 10
Dial-out List 8
F
Features 1
G
Glossary 2
Glossary of Terms 2
I
Idle State 13
Indicators, LED 6
input terminals 5
Input, Zone Terminals 5
Installation 3
Installer PIN 15
Installer Programming Mode 8
Answering Options 16
Call Progress Options 18
Dialing Options 10
PIN Options 15
Voice Message Options 11
Zone Options 13
Introduction 1
K
Kiss Off Options 12
Kiss-Off Options 12
L
LED Indicators 6
OK LED 6
Pulse LED 6
Length of voice messages 12
Local Connection Code 17
Local Connection Options 17
ParaVox 31
Page 36

Local Reset. See Zone 4 Mode
Location & Mounting 3
M
Message Length, Voice 12
Message Options, Voice 11
Message Repeats, Voice 12
Messages, Record 23
Mounting Location 3
N
No Dial Tone Action 18
O
Opening Menu, User’s 18
Operation, Basic 6
Override Answering Machine 16
P
Pager Messages 24
Pager Messages Recording 23
Pager Number 7
Pager Numbers, Deleting 22
ParaVox Installation Diagram 4
PGMs 5
PIN Options 15
Change Installer PIN 15
Installer PIN Length 15
User PIN Length 15
PIN, Change 25
Post Pager Message Delay 11
Power Connections 3
Program Output Labels 24
Program User PIN 25
Programmable Outputs 5
Programmable Outputs (PGM) 5
Programming Data Sheet 29
Programming Mode
Installer 8
User 19
Pulse Options 11
R
Record Messages 23
Record Telephone Numbers 21
Record Voice or Page Messages 23
Recording Messages
Pager Messages 24
Program Output Labels 24
Voice Messages 24
Recording Voice/Pager Messages 23
Redials 10
Repeat voice messages 12
reset 6
Reset System 6
Rings Before Answering 16
S
Sending Test Messages 28
Set Installer PIN Length 15
Set User PIN Length 15
Specifications 2
specifications 2
Standby Mode 7
Store Telephone Numbers 21
System Features 1
System Reset 6
T
Technical Specifications 2
Telephone & Pager Numbers, Delete 22
Telephone Line Connections 3
Telephone Line Monitoring 17
Telephone Line Monitoring (TLM) 17
Telephone Number Assignment 27
Telephone Numbers, Deleting 22
Telephone Numbers, Store 21
Telephone Numbers, Storing 21
Terminals, Zone Input 5
Test Message Sending 28
TLM 17
32 Reference and Installation Manual
Page 37

U
User PIN, Change 25
User PIN, Changing 25
User Programming Mode 19
User’s Opening Menu 18
User’s Programming Mode
Change User PIN 25
Deleting Pager Numbers 22
Deleting Telephone Numbers 22
Recording Messages 23
Store Telephone Numbers 21
Telephone Number Assignment 27
Test Message Sending 28
V
Voice Message Length 12
Voice Message Number 7
Voice Message Options 11
Kiss Off Options 12
Message Length 12
Message Repeats 12
Voice Message Recording 23
Voice Message Repeats 12
Voice Messages 24
Z
Zone 4 Mode 14
Zone 4 Special Defaults 14
Zone Input Terminals 5
Zone Options 13
Idle State 13
Zone 4 Mode 14
Zone Speed 14
Zone Type 13
Zone Speed 14
Zone Type 13
ParaVox 33
Page 38

WARRANTY
Paradox Security Systems Ltd. (“Seller”) warrants its products to be free from defects in materials and
workmanship under normal use for a period of one year. Except as specifically stated herein, all express or
implied warranties whatsoever, statutory or otherwise, including without limitation, any implied warranty of
merchantability and fitness for a particular purpose, are expressly excluded. Because Seller does not install
or connect the products and because the products may be used in conjunction with products not
manufactured by Seller, Seller cannot guarantee the performance of the security system and shall not be
responsible for circumstances resulting from the product’s inability to operate. Seller obligation and liability
under this warranty is expressly limited to repairing or replacing, at Seller's option , any product not meeting
the specifications. Returns must include proof of purchase and be within the warrant y period. In no event
shall the Seller be liable to the buyer or any other person for any loss or damages whether direct or indirect
or consequential or incidental, including without limitation, any damages for lost profits stolen goods, or
claims by any other party, caused by defective goods or otherwise arising from the improper, incorrect or
otherwise faulty installation or use of the merchandise sold.
Notwithstanding the preceding paragraph, the Seller’s maximum liability will be strictly limited to the
purchase price of the defective product. Your use of this product signifies your acceptance of this warranty.
BEWARE: Dealers, installers and/or others sellin g the product are not authorized to modify this warranty or
make additional warranties that are binding on the Seller.
© 1998-2006 Paradox Security Systems Ltd. All rights reserved. Specifications may change without prior
notice. One or more of the following US patents may apply: 6215399, 6111256, 5751803, 5721542, 5287111,
5119069, 5077549, 5920259 and 5886632. Canadian and international patents may also apply.
Limitations of Alarm Systems
It must be understood that while your Paradox alarm system is highly advanced and secure, it
does not offer any guaranteed p ro te cti on against burglary, fire or other emergency (fire and
emergency options are only available on certain Paradox models). This is due to a number of
reasons, including by not limited to inadequate or improper in st allation/positioning, sensor
limitations, battery performance, wire less signal interruption, inadequate maintenance or the
potential for the system or telephon e lin es to b e c omp ro mised or circumvented. As a result,
Paradox does not represent that the alarm system will prevent personal injury or proper t y
damage, or in all cases provide ad eq uat e w a rn ing o r p ro tection.Your security system sh ou ld
therefore be considered as one of many tools av ailable to reduce ri sk and/or damage of burgl ary ,
fire or other emergencies, such other tools include but are not limited to insurance coverage, fire
prevention and extinguish devices, and sprinkler systems.We also strongly recommend that you
regularly maintain your security system s and stay aware of new and improved Par adox prod ucts
and developments.
ParaVox is a trademark or registered tr adema rk of Paradox Secur ity S ystems Lt d. or its affiliates in Canada,
the United States and/or other countries.
34 Reference and Installation Manual
Page 39

Page 40

For technical support in Canada or the U.S., call 1-800-791-1919 Monday to Friday
from 8:00 a.m. to 8:00 p.m. EST. For technical support outside Canada and the
U.S., call 00-1-450-491-7444, Monday to Friday from 8:00 a.m. to 8:00 p.m. EST.
Please feel free to visit our website at paradox.com.
paradox.com
Printed in Canada- 03/2007 VD710-EI09
 Loading...