

Page 1
616, 636 and 646 Keypads
User’s Manual
Page 2

Page 3

TABLE OF CONTENTS
1.0 BASIC OPERATION .................... 2
2.0 ACCESS CODES .........................4
3.0 ARMING & DISARMING ..............6
4.0 PANIC ZONES ..........................13
5.0 KEY ACCESS PROGRAMMING . 14
6.0 ADDITIONAL FEATURES ..........15
7.0 TROUBLE DISPLAY .................. 16
8.0 FIRE ALARM OPERATION ........18
9.0 SYSTEM MAINTENANCE .......... 20
10.0 SYSTEM CHECKLIST ............. 21
Esprit Keypads 1
Page 4
1.0 BASIC OPERATION
The Esprit 616, 636 and 646 keypads all f unct ion in
the same way, but display the visual feedback
differently.
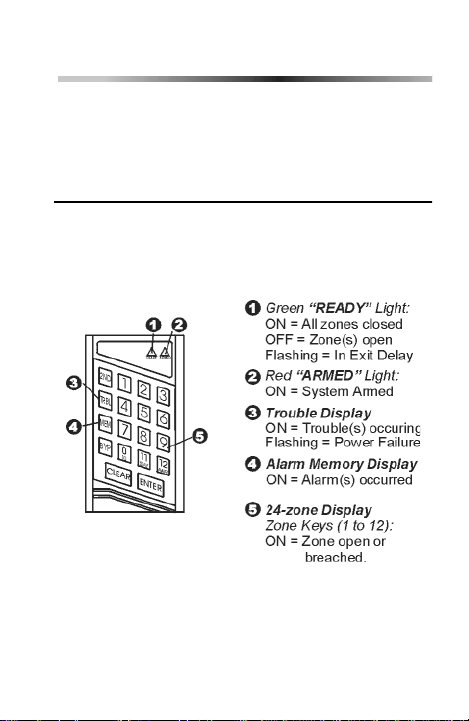
1.1 VISUAL FEEDBACK
The numbers, symbols, lights and keys on th e keypad
communicate the status of your system as described
below.
Figure 1: Overview of the 616 Keypad
2 User’s Manual
Page 5
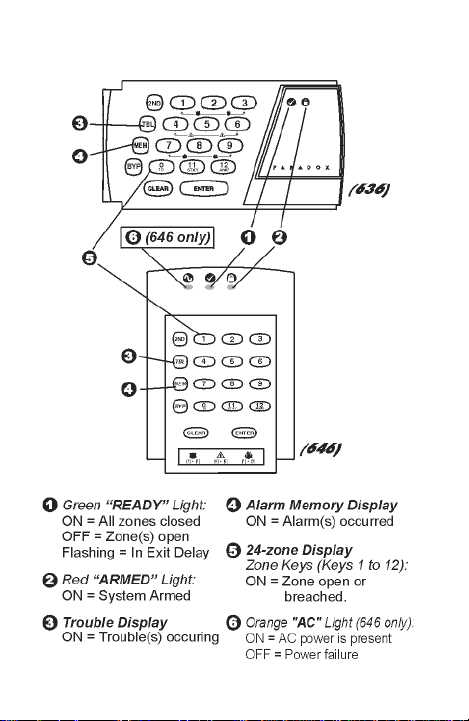
Figure 2: Overview of the 636 & 646 Keypads
Esprit Keypads 3
Page 6

1.2 ZONES
The Esprit control panel can support up to 24 zones.
When a zone is opened or breached its
corresponding key will light up on the keypad. For
example, if zone 5 were to open,the 5 key willlight up
on the keypad. The Esprit’s keypads will show the
status of the zones through keys 1 to 12. By default,
keys 1 to 12 will display the status of zones 1 to 12.
Press the [2
display the status of zones 13 to 24 respectively.
ND] button and keys 1 to 12 will now
1.3 PARTITIONING
Your Esprit system is equipped with a partitioning
feature that can divide your alarm system into two
distinct areas (System A and System B). User access
codes can arm or disarm one sy stemor both systems
simultaneously. In partitioning mode, when System A
is armed, the [
armed, the [
armed, both of these keys will be flashing.
STAY] keyflashes.IfSystemBis
AWAY] key flashes. If both systems are
2.0 ACCESS CODES
2.1 PROGRAMMING USER CODES
In addition to the m aste r code, the Esprit control
panel can be program med to accept up to 48 user
codes.
4 User’s Manual
Page 7

Note: Avoid programming simple or
obvious access codes, such as your
telephone number, address or codes such
as 1234.
To create or modify access codes, follow the steps
indicated in section 2.2. T he master code and user
codes are identified by a 2 digit “code number”.
2.2 CREATING USER CODES
1) Press [ENTER] and then enter your master code
(default 474747) or user 1 code. You will hear
the “confirmation” beep and the [
flash.
2) Enter the two digit “code number” (01-48) for the
user code you wish to program (or 00 to change
the master code). You will hear the
“confirmation” beep and the [
on.
3) Key in 4 or 6-digit user access c ode and press
[
ENTER]. The “confirmation” beep will be heard
again. The [
ENTER] key will flash. You may
continue programming other user codes, or
press [
CLEAR] to exit programming mode.
Note: [2
ND] key flashes if location is empty
(no code programmed).
ENTER] key will
ENTER] key will stay
Esprit Keypads 5
Page 8

2.3 DURESS CODES
The last user code (user 48) can be programmed to
report a “duress code”. If you are forced to arm or
disarm your system under threat, a duress code can
be entered to produce a silent alarm at the monitoring
station. Check with your installer to see if this option
is active on your system.
2.4 DELETING A USER CODE
How do I deletea usercode?
1) Press the [
2) Enter your [
3) Enter the 2-digit [
4) Press the [2
5) Press the [
6) If you wish to delete another user code, repeat steps 1
to 5. If you wish to exit, press the [
ENTER] key.
MASTER CODE] (default 474747).
CODE NUMBER] (01-48) to be deleted.
ND] key.
ENTER] key.
CLEAR] key.
3.0 ARMING & DISARMING
3.1 EXIT DELAY
After entering a valid arming sequence, an exit delay
timer will provide you with time to exit the protected
area before the system arms. The keypad m ay beep
during the exit delay.
6 User’s Manual
Page 9

3.2 REGULAR SYSTEM ARMING
How do I Regular Arm the system?
1) The green “
the system.
2) Enter your User Code.
After the Confirmation beep, the “ready” light and the
STAY] and [AWAY] buttons will begin to flash. The exit
[
delay timer will begin the countdown to arming.
READY’ light must be ON in order to arm
3.3 STAY ARMING
Stay arming allows you to remain in the protected
area while “partially” arming the sys tem (perimeter
zones only,such as doors and windows).
How do I Stay Arm the system?
1) Press the [
2) Enter your User Code.
After the Confirmation beep, the “ready” light and the
STAY] and [AWAY] buttons will begin to flash. The exit
[
delay timer will begin the countdown to arming.
STAY] button.
3.4 ONE TOUCH ARMING
One touch system arming - no code required. Chec k
with your installer if these features are enabled.
3.4.1 Key [10] - Regular Arming:
When the “ready” light is on, pressing key [10]
steadily for 2 seconds automatically arms the system.
Esprit Keypads 7
Page 10

3.4.2 Key [STAY/11] - Stay arming:
Please refer to section 3.3 on page 7 for an
explanation of stay arming. Press the [
steadily for 2 seconds. This will automatically “Stay”
arm the system.
STAY/11] key
3.5 DOUBLE STAY ARMING:
After Stay Arming and during the exit delay, press
and hold the [
zones to “instant” zones. Regular arming cancels
“double stay” arming.
STAY/11] key to switch any delayed
3.6 FAST EXIT WHILE IN STAY MODE:
3.6.1 Fast Exit and Stay Arm
To exit the already Stay arm ed premises and remain
Stay armed, press key [
The system will switch to exit delay mode (“ready”
LED flashes). At the end of the exit delay period, the
system will return to “Stay” arming mode.
STAY/11] for two seconds.
3.6.2 Fast Exit and Regular Arm
To exit the already Stay armed premises and switch
to regular arm ing , press key [10] for two seconds.
The system will switch to regular arming (keys [11]
and [12] flash) with an exit delay. At the end of the
exit delay period, the system is regular armed.
8 User’s Manual
Page 11

3.7 KEYSWITCH ARMING
A keyswitch can be used to arm your system. If an
alarm is generated in your system, or a zone that has
not been defined as a Stay zone is opened after
panel arming, the system can only be disarmed from
a keypad (if keyswitch is defined as “Stay” arming).
3.8 MANUAL BYPASS ARMING
This feature arms the sy stem while bypassing zones
you wish to leave unarmed.
How do I Manually Bypass Arm the system?
1) Press the [
The [
have already been bypassed.
2) Enter thenumber of the zone(s) you wish to bypass.
To “unbypass” a bypassed zone, enter the zone number of the bypassed zone.
3) Press [
The [
there are bypassed zones.
BYP] button and then enter your User Code.
BYP] key will illuminate as well as any zones that
ENTER]. Arm the system using desired method.
BYP] key will remain illuminated to indicate that
By using the “bypass recall” feature, you can reinstate
the latest zone bypass instructions saved in memory.
Press [
BYP] in Step 2 (see above) and the previous
bypass status will be re-established.
3.9 FORCE (AWAY)ARMING
To arm the system rapidly without waiting for the
Esprit Keypads 9
Page 12

READY” light (for all zones to cl ose), use Force
“
“Away” arming. Open zones will not be protected, but
will be armed as soon as they are closed.
How do I Force Arm the system?
1) Press the [
Code.
The [
AWAY] button and then enter your User
AWAY] key will flash.
3.10 ARMING BOTH SYSTEMS SIMULTANEOUSLY
If your code has access to both systems:
How do I Arm Systems A and B simultaneously?
1) Enter your Access Code.
The [
STAY] AND [AWAY] key will flash. The “ready” light
will also begin to flash and the exit timer will begin to
countdown.
3.11 ARMING SYSTEM A AND BSEPARATELY
If your Access Code has access to System A:
HowdoIarmSystemA?
1) Press the [
2) Enter your Access Code.
The [
begin to flash and the exit timer will begin to countdown.
If your Access Code has access to System B:
STAY] key.
STAY] key will flash. The “ready” light will also
10 User’s Manual
Page 13

HowdoIarmSystemB?
1) Press the [
2) Enter your Access Code.
The [AWAY] key will flash. The “ready” light will also
begin to flash and the exit timer will begin to countdown.
AWAY] key.
3.12 STAY ARMING SYSTEM A
Please refer to section 3.3 on page 7 for an
explanation of stay arming. Press the [
steadily for 2 seconds. With y our system partitioned,
only System A will be Stay armed when the [
keyispressed.
STAY/11] key
STAY/11]
3.13 “NO MOVEMENT” SUPERVISION FEATURE
Your panel can be programmed to send a report and/
or arm the system if it is not armed and there is no
zone activity for a preprogrammed amount of time.
3.14 AUTOMATICALLY ARM ON TIME
Your installer can program your system to arm at a
specific time each day. In this mode, all protect ed
zones and detection devices must be in the “normal”
state before arming can occur.
Esprit Keypads 11
Page 14

3.15 DISARMING
How do I Disarm the Security System?
1) Enter through the designated entry/exit door.
The keypad will beep and begin the entry delaytimer.
2) Enter your Access Code.
The “armed” light will go off and the keypad will stop
beeping.
3.16 DISARMING SYSTEM A AND BSEPARATELY
If your Access Code has access to System A:
How do I Disarm System A?
1) Enter through the designated entry/exit door.
The keypad will beep and begin the entry delaytimer.
2) Press the [
code.
The “armed” light will go off and the keypad will stop
beeping.
If your Access Code has access to System B:
How do I Disarm System B?
1) Enter the designated entry-exit door.
The keypad will beep and begin the entry delaytimer.
2) Press the [
code.
The “armed” light will go off and the keypad will stop
beeping.
STAY] button and then enter a valid access
AWAY] button and then enter a valid access
12 User’s Manual
Page 15

3.17 VIEWING ALARM MEMORY
The memory light [MEM] on your keypad will illuminate
if any alarm situations take place while your system is
armed. After disarming the system, pressing once on
MEM] key brings up the zones that were open
the [
during the last alarm period.
4.0 PANIC ZONES
The Esprit provides t h ree “panic” zones on your
keypad. These panic zones can generate audible or
silent alarms, both of which also can be sent directly
to your central security station. The 3 different panic
zones can also communicate specific messages to
your monitoring station, i.e. pressing “panic 1” means
“call the police”. Ask your installer for the exact
definition of your panel's panic alarms.
4.1 “PANIC 1” - PANIC ALARM
Pressing keys [1] and [3] simultaneously for 2 sec.
will generate a “panic 1” or a “panic alarm”.
4.2 “PANIC 2” - AUXILIARY ALARM
Pressing keys [4] and [6] simultaneously for 2 sec.
will generate a “panic 2” or an “auxiliary alarm”.
Esprit Keypads 13
Page 16

4.3 “PANIC 3” - FIRE ALARM
Pressing keys [7] and [9] simultaneously for 2 sec.
will generate a “panic 3" or a “fire alarm”.
5.0 KEY ACCESS PROGRAMMING
Several control panel features can be programmed
quickly on the keypad. The Security Company or
installer may ask you to perform some of these
functions. To enter the One-key Access programm i ng
mode:
How do I enter One-key Access programming mode?
1) Press the [
2) Enter the[
3) Then pressthe key thatcorrespondsto the feature you
wishtoactivate(seebelow).
4) Press [
Key Feature Description
[9] “Auto-arming” Time Programming:
[
MEM] Control Panel Time Programming:
ENTER] key.
MASTER CODE] or [USER CODE 1].
ENTER] or [CLEAR] to exit.
When the [9] key flashes, enter the time
using the 24-hour clock (ex: 6PM would
be entered as 18:00).
When the [
MEM] key flashes, enter the
time using the 24-hour clock (ex: 6PM
would be entered as 18:00).
14 User’s Manual
Page 17

Key Feature Description
BYP] Test Report:
[
If programmed by your installer, this feature will send a test report code to the
Security Company.
[
TRBL] Call Espload via telephone:
This initiates communication to the central monitoring station computer using the
Espload software.
[
AWAY] Answer Espload Software:
This feature will force the control panel to
answer a call made by your security
Company that is using the E spload software.
[
STAY] Cancel Communication
Cancels all communication wit h the Espload software if it has been initiated.
6.0 ADDITIONAL FEATURES
6.1 KEYPAD NIGHT ILLUMINATION
Pressing on the [MEM] key for 2 seconds changes it to
the keypad illumination key. Keep pressing the [
key until you reach the level you require, then press
[
ENTER] or [CLEAR] to save the setting in system
memory.
MEM]
Esprit Keypads 15
Page 18

6.2 CHIME ZONES
A chime zone will emit a rapid intermittent beep tone
when it is opened. To turn on the “chime zone”
feature, press on the selected zone key for three
seconds until the intermittent chime beep is heard.
If you have more than one keypad in your system,
“chime” program each keypad separately.
6.2.1 Chime Keys
Keys [1] to [6]:Turns chime “on” or “off” in zones
Key [8]: Turns the chime “on” and “off” for the
numbered 1-6.
zone connected to this keypad.
6.2.2 Panel Buzzer Mute
Key [9]:Turns keypad sounder “on” & “off”
(intermittent beep means mute is activated,
and keypad sounder is “off”. Depress for 2
seconds to disable).
7.0 TROUBLE DISPLAY
When a trouble condition occurs, the [TRBL] key on
your keypad illuminates and if programmed by your
installer, the keypad sounder will beep. Pressing the
TRBL] key will cause it to flash, indicating that your
[
panel is in “trouble display” m ode. Keys that
illuminate in “trouble display” mode tell you which
trouble conditions are taking place and/or are in
16 User’s Manual
Page 19

memory. Only the troubles that are relevant to you
are listed below. If a trouble appears and it is not
listed below, call your Security Company to come
service your system.
Trouble conditions will remain in memory. Pressing
on the [2
Pressing [
ND] key displays current trouble conditions.
CLEAR] will erase trouble conditions in
memory.
Key [1] - No battery/low battery
If battery is not connected to the control panel, or if it
is at low capacity, key [1]illuminates. This means that
the battery connec ted to the panel shouldbe replaced
because it can no longer provide adequate back-up
current in the event of a power failure.
Key [3] - AC power failure
If AC power is not being supplied to the control panel,
key [3] will illuminate. AC trouble can be excluded
from keypad “trouble display” by your alarm installer.
Key [4] - Bell disconnect
If a bell or siren is not connected to the bell/siren
output, this is indicated by the illumination of key [4]
in trouble display mode.
Key [8] - Timer loss
Your alarm system’s clock must be r eprogrammed.
This is the only trouble we recommend that you
correct.
Esprit Keypads 17
Page 20

How do I reprogramthe Timer?
1) Press the [
2) Enter the[
3) Press the [
4) Enter the new time using the 24-hour clock (ex:
8:30PM = 20:30).
5) Press [
ENTER] key.
MASTER CODE] or [USER CODE 01].
MEM] key.
ENTER].
Key [9] - Tamper/zone wiring failure
Key [9], if illuminated, means that there is a wiring
problem in one of your protected zones.
Key [11] - Fire/trouble
If the fire zone is cut, the fire zone key and trouble key
[11] will illuminate.
Most of these“trouble” conditions will be programmed
by your installer to be reported directly to your
security company. Please make sure to contact your
alarm company, h owever, to ensure that repairs are
immediately made to your security system.
8.0 FIRE ALARM OPERATION
Upon a Fire Alarm, the bell/siren will operate in “pulse
mode”. To silence or reset a fire alarm, enter a valid
user code.
18 User’s Manual
Page 21

Note: IF A FIRE CONDITION EXISTS,
FOLLOW YOUR EVACUATION PLAN
IMMEDIATELY! If there is no fire condition,
contact your monitoring company without
delay to avoid an unnecessary response.
Fire Safety in the Home
Reasonable fire safety can be achieved byfollowing a
three point program:
1.Minimizing fire hazards (i.e. smoking in bed, etc.)
2.Providing a fire warning system
3.Having and practicing an escape plan
Providing a Fire Warning System
Household fires are especially dangerous at night.
Fires produce smoke and deadly gases that can
overcome occupants while they sleep. To warn
against fire, smoke detectors should be installed
outside of each separate sleeping area in the
immediate vicinity of the bedroom s and on each
additional story of the family living unit, including
basements.
Having and Practicing an Escape Plan
There often may be very little time between detection
of a fire and the time that it becomes deadly. Advance
warning of a fire may be wasted unless the family has
planned for a rapid exit from their residence. The
following should be considered:
• Plan and practice for fire conditions with the focus
on rapid exit from the residence.
Esprit Keypads 19
Page 22

• Drills should be held so that all family members
know what to do.
Each person should plan for the possibility that an
•
exit out of the bedroom window may be necessary.
An exit out of the residence that does not require
the opening of a bedroom door is essential.
Provision for the Disabled
For special circumstances where life-safety of some
occupant(s) depends upon prompt rescue by others,
the fire warning system includes a means of prompt,
automatic notification to those who are to be
depended upon for the rescue.
9.0 SYSTEM MAINTENANCE
Under normal use, your system requires virtually no
maintenance other than regular testing.
9.1 TESTING YOUR SYSTEM
It is recommend that your system be tested once a
week. Contact your monitoring station BEFORE and
AFTER testing.
9.1.1 Burglar Alarm Testing
With the system disarm ed and the “ready” light on,
activate motion detectors (walk in protected area).
Open and close protected doors. Observe the zone
light. It should come on following each activation.
20 User’s Manual
Page 23

Your installer can advise you of the best way to test
your particular system.
9.1.2 Fire Alarm Testing
CAUTION: Do not use open flame or burning
materials to test your fire detection devices. Contact
your alarm installer to discuss safe methods to test
your system.
10.0 SYSTEM CHECKLIST
10.1 PANIC BUTTONS
Keys Panic Alarm Type
[1] and [3] Police or ______________________
[4] and [6] Auxiliary or____________________
[7] and [9] Fire or ________________________
!"Silent !"Audible"""""!"Not Used
!"Silent !"Audible"""""!"Not Used
!"Silent !"Audible"""""!"Not Used
10.2 ZONE CHECKLIST
Is this a partitioned system? Yes ! No !
System A =___________System B =____________
Esprit Keypads 21
Page 24

Zone # and
Description
01:
02:
03:
04:
05:
06:
07:
08:
09:
10:
11:
12:
System
AB
"!""!
"!""!
"!""!
"!""!
"!""!
"!""!
"!""!
"!""!
"!""!
"!""!
"!""!
"!""!
Zone # and
Description
13:
14:
15:
16:
17:
18:
19:
20:
21:
22:
23:
24:
Entry Delay 1 is __________ seconds.
Entry Delay 2 is __________ seconds.
Exit Delay is __________ seconds.
System
AB
"!""!
"!""!
"!""!
"!""!
"!""!
"!""!
"!""!
"!""!
"!""!
"!""!
"!""!
"!""!
22 User’s Manual
Page 25

10.3 USER ACCESS CODE LIST
User Name System User Name System
01: 17:
02: 18:
03: 19:
04: 20:
05: 21:
06: 22:
07: 23:
08: 24:
09: 25:
10: 26:
11: 27:
12: 28:
13: 29:
14: 30:
15: 31:
16: 32:
Esprit Keypads 23
Page 26

User Name System User Name System
33: 41:
34: 42:
35: 43:
36: 44:
37: 45:
38: 46:
39: 47:
40: 48:
Warranty
The Seller warrants its productsto be free from defects in materialsand
workmanship under normal use for a period of one year (except as
indicated otherwise). Except as specifically stated herein,all express or
implied warranties whatsoever, statutory or otherwise, including without
limitation, any implied warranty of merchantability and fitness for a
particular purpose, are e xpressly excluded. Because Seller does not
install or connect the products and because the products may be used
in conjunction with products not manufactured by Seller, Seller cannot
guarantee the performance ofthe security system. Seller obligation and
liability under this warranty is expressly limited to repairing or replacing,
at Seller's option, any product not meeting the specifications. In no
event shall the Seller be liable to the buyer or any other person for any
loss or damages whether direct or indirect or consequential or
incidental, including without limitation, any damages for lost profits,
stolen goods, or claimsby any other party causedby defective goods or
otherwise arising from the improper, incorrect or otherwise faulty
installation or use of the merchandisesold.
24 User’s Manual
Page 27

Page 28

 Loading...