

Paradigm SE, SE 1, SE Center, SE 3, SE SUB Owner's Manual

OWNERS MANUAL
© PARADIGM ELECTRONICS INC.
MAN0001004 111109
www.paradigm.com

RECYCLING AND REUSE GUIDELINES FOR EUROPE
In accordance with the European Union WEEE (Waste Electrical and Electronic Equipment) directive effective
August 13, 2005, we would like to notify you that this product may contain regulated materials which, upon
disposal, according to the WEEE directive, require special reuse and recycling processing. For this reason
Paradigm Electronics Inc. (manufacturers of Paradigm
®
speakers and Anthem® electronics) has arranged
with our distributors in European Union member nations to collect and recycle this product at no cost to you. To find your local
distributor please contact the dealer from whom you purchased this product or go to our website at www.paradigm.com.
Please note that the product only falls under the WEEE directive. When disposing of packaging and other shipping material we
encourage you to recycle through the normal channels.
TABLE OF CONTENTS
SAFETY PRECAUTIONS
READ THIS SECTION CAREFULLY BEFORE PROCEEDING!
WARNING: TO REDUCE THE RISK OF ELECTRIC SHOCK, DO
NOT REMOVE COVER (OR BACK). NO USER-SERVICEABLE
PARTS INSIDE. REFER SERVICING TO QUALIFIED SERVICE
PERSONNEL.
The lightning flash with arrowpoint within an equilateral
triangle warns of the presence of uninsulated “dangerous
voltage” within the product’s enclosure that may be of
sufficient magnitude to constitute a risk of electric shock
to persons.
The exclamation point within an equilateral triangle
warns users of the presence of important operating and
maintenance (servicing) instructions in the literature
accompanying the appliance.
WARNING: TO REDUCE THE RISK OF FIRE OR ELECTRIC SHOCK,
DO NOT EXPOSE THIS APPARATUS TO RAIN OR MOISTURE, AND
OBJECTS FILLED WITH LIQUIDS, SUCH AS VASES, SHOULD NOT
BE PLACED ON THIS APPARATUS.
CAUTION: TO PREVENT ELECTRIC SHOCK, MATCH WIDE BLADE
OF PLUG TO WIDE SLOT, FULLY INSERT.
CAUTION: FOR CONTINUED PROTECTION AGAINST RISK OF FIRE,
REPLACE THE FUSE ONLY WITH THE SAME AMPERAGE AND
VOLTAGE TYPE. REFER REPLACEMENT TO QUALIFIED SERVICE
PERSONNEL.
WARNING: UNIT MAY BECOME HOT. ALWAYS PROVIDE ADEQUATE
VENTILATION TO ALLOW FOR COOLING. DO NOT PLACE NEAR A
HEAT SOURCE, OR IN SPACES THAT CAN RESTRICT VENTILATION.
WARNING
RISK OF ELECTRIC SHOCK
DO NOT OPEN
Safety Precautions . . . . . . . . . . . . . . . . 1
Important Safety Instructions . . . . . . 2
Introduction. . . . . . . . . . . . . . . . . . . . . . 3
The Design and Technology
Behind Your New Paradigm
®
Special Edition Speakers
and Subwoofer . . . . . . . . . . . . . . . . . . . 4
Unpacking Instructions for
Floorstanding SE 3 (Pictorial) . . . . . . 5
Attaching Bumper Pads –
Bookshelf SE 1 (Pictorial). . . . . . . . . . . 6
Speaker Placement (Pictorial) . . . . . . 6
Speaker Connection (Pictorial) . . . . . 7
Converting Subwoofer Driver
Configuration (Pictorial) . . . . . . . . . . . 8
Subwoofer Placement . . . . . . . . . . . . 9
Subwoofer Connection . . . . . . . . . . . . 9
Your New Speakers. . . . . . . . . . . . . . 10
Power Requirements . . . . . . . . . . . . 10
Preventing Speaker Damage. . . . . . 11
Room Acoustics . . . . . . . . . . . . . . . . . 12
Speaker Placement . . . . . . . . . . . . . . 12
Speaker Connection . . . . . . . . . . . . . 13
Subwoofer Placement . . . . . . . . . . . 14
Subwoofer Connection. . . . . . . . . . . 16
Fine Tuning . . . . . . . . . . . . . . . . . . . . . 17
Troubleshooting Guide. . . . . . . . . . . 18
Limited Warranty . . . . . . . . . . . . . . . . 18
Technical Specifications . . . . . . . . . . 19
1

1. Read Instructions – All the safety and operating instructions should be
read before the product is operated.
2. Retain Instructions – The safety and operating instructions should be
retained for future reference.
3. Heed Warnings – All warnings on the product and in the operating
instructions should be adhered to.
4. Follow Instructions – All operating and use instructions should be
followed.
5. Cleaning – Unplug this product from the wall outlet before cleaning. Do
not use liquid cleaners or aerosol cleaners. Use a damp, soft cloth for
cleaning.
6. Water and Moisture – Do not use this product near water—for
example, near a bath tub, wash bowl, kitchen sink, or laundry tub; in a
wet basement; or near a swimming pool; and the like.
7. Accessories – Do not place this product on an unstable cart, stand,
tripod, bracket or table. The product may fall, causing serious injury to
a child or adult, and serious damage to the product. Use only with a
cart, stand, tripod, bracket or table recommended by the manufacturer,
or sold with the product. Any mounting of the product should follow
manufacturer’s instructions and should use a mounting accessory recommended by the manufacturer.
8. Ventilation – Slots and openings in the cabinet are provided for
ventilation and to ensure reliable operation of the product and to protect
it from overheating, and these openings must not be blocked or covered.
The openings should never be blocked by placing the product on a bed,
sofa, rug, or other similar surface. This product should not be placed in a
built-in installation such as a bookcase or rack unless proper ventilation
is provided or the manufacturer’s instructions have been adhered to.
9. Power Sources – This product should be operated only from the type
of power source indicated on the marking label. If you are not sure of the
type of power supply to your home, consult your product dealer or local
power company. For products intended to operate from battery power, or
other sources, refer to the operating instructions.
10. Grounding and Polarization – This product may be equipped with a
polarized alternating-current line plug (a plug having one blade wider than
the other). This plug will fit into the power outlet only one way. This is a
safety feature. If you are unable to insert the plug fully into the outlet, try
reversing the plug. If the plug should still fail to fit, contact your electrician
to replace your obsolete outlet. Do not defeat the safety purpose of the
polarized plug.
11. Power-Cord Protection – Power supply cords should be routed so that
they are not likely to be walked on or pinched by items placed upon or
against them, paying particular attention to cords at plugs, convenience
receptacles, and the point where they exit from the product.
12. Lightning – For added protection for this product during a lightning
storm, or when it is left unattended and unused for long periods of time,
unplug it from the wall outlet and disconnect the antenna or cable systems.
This will prevent damage to the product due to lightning and powerline surges.
13. Overloading – Do not overload wall outlets, extension cords, or integral
convenience receptacles as this can result in a risk of fire or electric shock.
14. Object and Liquid Entry – Never push objects of any kind into this
product through openings as they may touch dangerous voltage points
or short-out parts that could result in a fire or electric shock. Do not expose
this apparatus to dripping or splashing, and ensure that no objects filled
with water, such as vases, are placed on the apparatus.
15. Servicing – Do not attempt to service this product yourself as opening
or removing covers may expose you to dangerous voltage or other hazards.
Refer all servicing to qualified service personnel.
16. Damage Requiring Service – Unplug this product from wall outlet
and refer servicing to qualified personnel under the following conditions:
• When power supply cord or plug is damaged;
• If liquid has been spilled, or objects have fallen into product;
• If the product has been exposed to rain or water;
• If the product does not operate normally by following the operating
instructions. Adjust only those controls that are covered by the operating instructions as an improper adjustment of other controls may
result in damage and will require extensive work by a qualified
technician to restore the product to its normal operation;
• If the product has been dropped or damaged in any way;
• If the product exhibits a distinct change in performance—this
indicates a need for service.
17. Replacement Parts – When replacement parts are required, be sure
the technician has used replacement parts specified by the manufacturer
or have the same characteristics as the original part. Unauthorized
substitutions may result in fire, electric shock, or other hazards.
18. Safety Check – Upon completion of any service or repairs to this
product, ask the service technician to perform safety checks to determine
that the product is in proper operating condition.
19. Wall or Ceiling Mounting – The product should be mounted to a
wall or ceiling only as recommended by the manufacturer.
20. Heat – The product should be situated away from heat sources such
as radiators, heat registers, stoves, or other products (including amplifiers)
that produce heat.
IMPORTANT SAFETY INSTRUCTIONS
2

INTRODUCTION
Thank you for purchasing Paradigm's Special Edition (SE) Series speakers
and congratulations! You are about to hear the difference that sonically
accurate speakers make in your music and home theater system!
Paradigm's Special Edition Series is a limited and very unique addition to
our collection. Combining elements from our affordable audiophile-quality
Paradigm
®
line and higher-end Paradigm®Reference line, Paradigm®Special
Edition speakers, with their soft edges, clean lines, state-of-the-art
technology, compact dimensions and real wood veneer cabinets are a
stepping stone to the world of high-end audio.
Paradigm speakers are internationally recognized for their exceptional sound.
In fact, Paradigm is the only speaker company to be rated #1* year after
year. Quite simply, our speakers are the best sounding speakers in the world.
Extensive listener preference tests conducted by the National Research
Council (NRC) gave our design engineers a firm understanding of how we
hear speakers and clearly established which design parameters were most
critical to good sound. Using the NRC findings along with measurement-based
analysis done in our anechoic chamber and double-blind testing carried out
in our controlled listening rooms, our engineers work to constantly improve our
speakers in three critical areas:
• Flat Midrange: Smooth and even with coloration reduced to the lowest
level possible.
• Smooth Total Energy Response: On and off axis, sound must be funda-
mentally similar. Dispersion must be wide and uniform ensuring superior
imaging and a wide listening area.
• Low Distortion: Lowest levels possible.
In addition, we concentrate on two other very significant performance areas:
• Better Bass Response: Tight, extended and well defined.
• Higher Power Handling: To improve dynamic contrasts and by extension,
sonic realism, power compression must be minimized.
Unyielding attention to these areas results in speakers that are measurably
and audibly superior. When it comes to state-of-the-art sound, Paradigm gets
it right and Paradigm
®
Special Edition speakers are a perfect example …
Comprehensive R&D, leading-edge design, use of the finest materials and
sophisticated manufacturing and quality control techniques provide vastly
superior performance for each component part at every stage of design.
Paradigm
®
Special Edition speakers boast G-PAL™gold-plated pure-aluminum
domes; S-PAL
™
satin-anodized pure-aluminum bass/midrange cones; and
Reference quality crossover networks with ideal response characteristics.
Rest assured, in this price range no other speakers feature the stunning
Reference quality of your new Paradigm
®
Special Edition speakers.
Your Paradigm
®
Special Edition subwoofer boasts a 10-inch driver powered
by an advanced Class-D amplifier capable of delivering 900 watts of Dynamic
Peak power and 300 watts RMS Sustained power. Proprietary digital signal
processing (DSP) algorithms shape frequency response ensuring accurate,
consistent, musical bass, without distortion.
However, even when the finest subwoofer is perfectly positioned in a room,
dimensions, dead spots, archways, even furniture can turn the room into
an additional instrument playing alongside musicians or movie scores with
unwanted coloration and resonance. Bass can sound boomy with poor
definition. You have the ideal subwoofer, but in a less than ideal room!
You can pad the walls, trap the corners, remove the furniture, or you can
let Paradigm's critically acclaimed Perfect Bass Kit
™
(PBK)
(sold separately)
tackle the problem. Based on research conducted by the National Research
Council, PBK analyzes the sub's response in your room situation then sets
about perfecting that response through scientific calculation! Real digital
room correction for real life situations.
(See dealer for more information.)
Your Paradigm®Special Edition system will provide you with stunning highend sound and unparalleled listening pleasure for years to come. However,
to achieve all of the exceptional sound the system is capable of providing
requires care in installation and operation. Please take the time to read this
manual and follow all instructions.
Visit our website at www.paradigm.com for more information on the
technology behind your new Paradigm
®
Special Edition system. If you have
additional questions, contact your Authorized Paradigm®dealer or visit the
Q&A page in the Tech Support section of our website.
* Rated #1 Best Price/Value. Inside Track Annual Dealer Survey. An annual independent
nationwide survey of consumer electronics specialist retailers and custom installers.
3
THE DESIGN AND TECHNOLOGY BEHIND YOUR NEW
PARADIGM®SPECIAL EDITION SPEAKERS AND SUBWOOFER
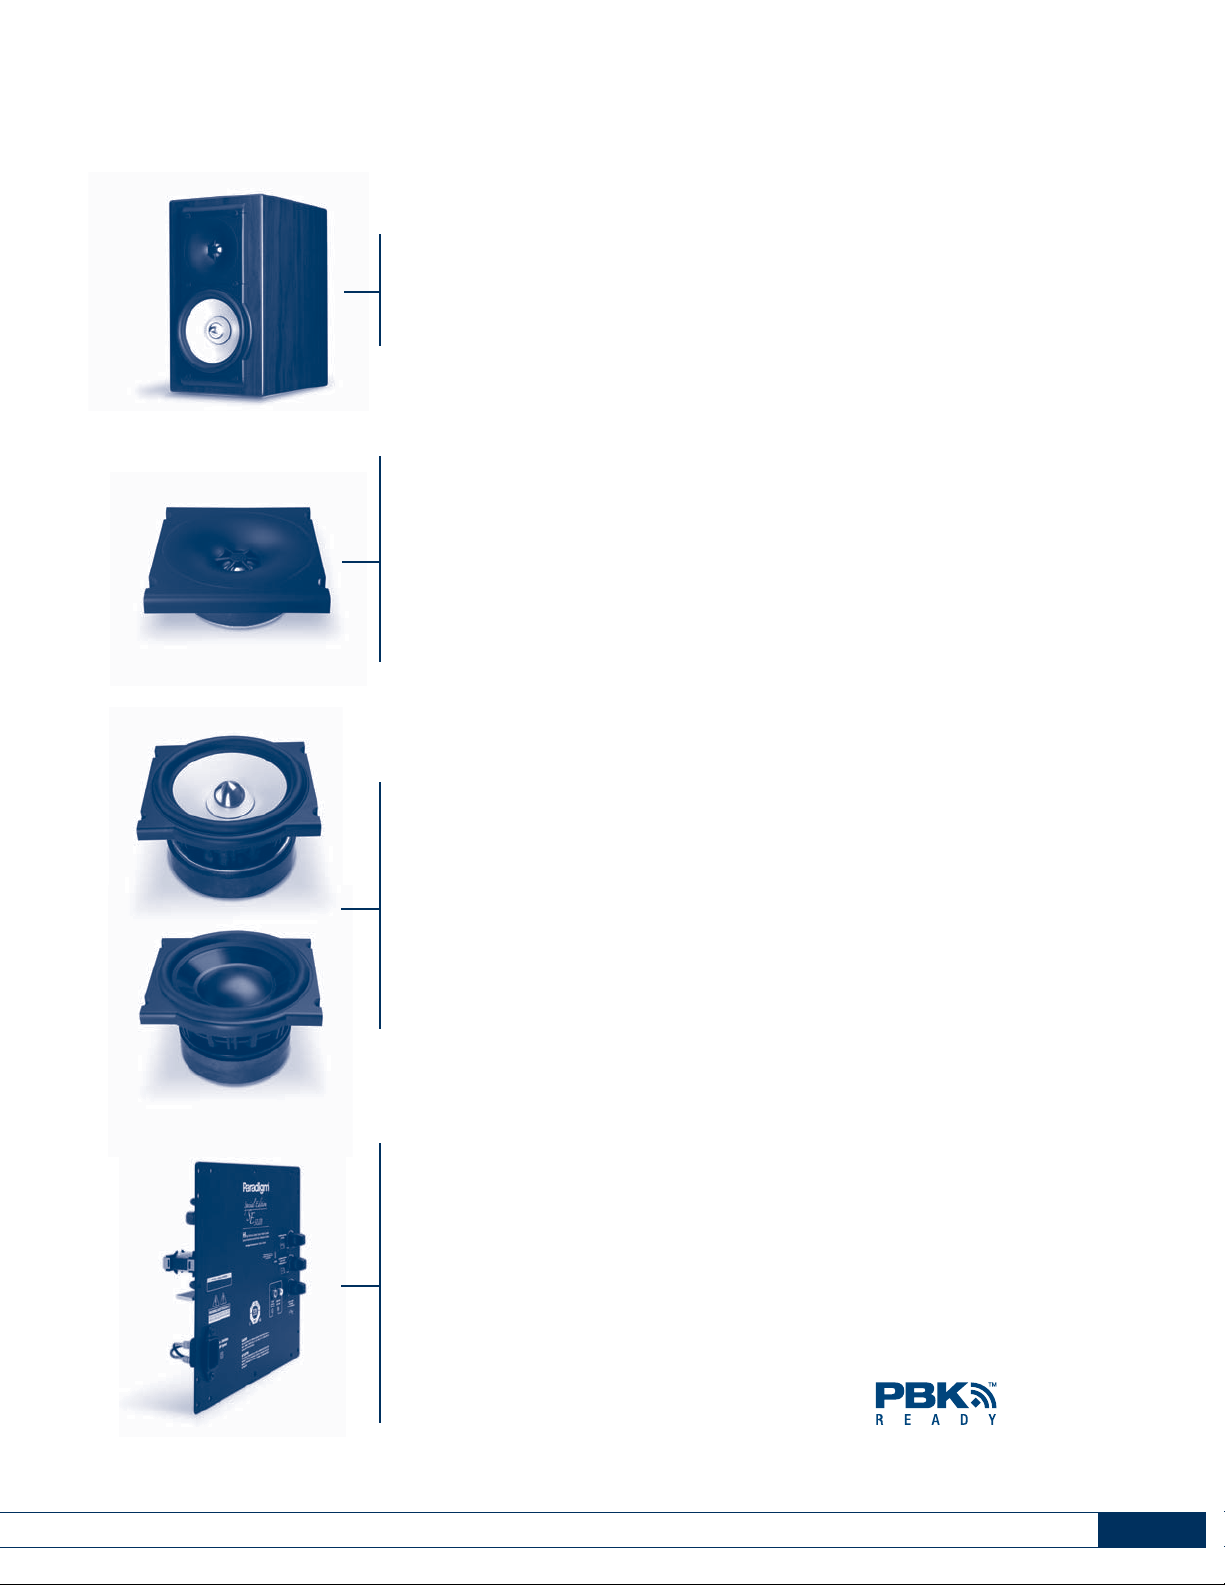
Paradigm®Special Edition High-Frequency Drive Units
•G-PAL™Gold-Plated Pure-Aluminum Domes with ferro-fluid cooling
• Elevated Tweeter and Advanced WaveGuide™Chassis
• Dual Magnets and Advanced Motor Structures
• High-Power Apical
™
Formers
• High-Pressure Die-Cast Aluminum Chassis
• 'Reference' quality crossovers
Paradigm
®
Special Edition Bass / Midrange
and Bass Drive Units
•S-PAL™Satin-Anodized Pure-Aluminum Bass / Midrange Cones
• Mineral-Filled Polypropylene Bass Cones
• Satin-Anodized Solid-Aluminum Phase Plugs (bass / midrange)
• Die-Cast Aluminum or GRIP
™
Glass-Reinforced Injection-Molded
Polymer chassis
• Advanced Santoprene®Rubber Surrounds
• Oversize Magnet / Motor Structures
Paradigm
®
Special Edition Subwoofer
• Bass-Reflex Single-Driver Design
• Converts to Down- or Forward-Firing Driver Orientation
• 10˝ Driver with CAP™Carbon / Aramid Fiber Polypropylene Cone
• Advanced High-Power Class-D Amplifier:
900 watts Dynamic Peak / 300 watts RMS Sustained
• Paradigm's Proprietary Digital Signal Processing (DSP) Design
• Comprehensive Range of Input and Control Facilities
• USB Port for use with the Critically Acclaimed Paradigm Perfect Bass
Kit™(PBK) Room Correction System
(sold separately, see dealer)
Paradigm®Special Edition Finishes
• Paradigm
®
Reference quality:
– Rosenut
– Black Gloss
4

Special Edition
ROSENUT
ACAJOU
HIGH-GLOSS BLACK
NOIR TRÈS BRILLANT
HIGH-GLOSS WHITE
BLANC TRÈS BRILLANT
1 PIECE
Special Edition
ROSENUT
ACAJOU
HIGH-GLOSS BLACK
NOIR TRÈS BRILLANT
HIGH-GLOSS WHITE
BLANC TRÈS BRILLANT
1 PIECE
Special Edition
ROSENUT
ACAJOU
HIGH-GLOSS BLACK
NOIR TRÈS BRILLANT
HIGH-GLOSS WHITE
BLANC TRÈS BRILLANT
1 PIECE
Special Edition
ROSENUT
ACAJOU
HIGH-GLOSS BLACK
NOIR TRÈS BRILLANT
HIGH-GLOSS WHITE
BLANC TRÈS BRILLANT
1 PIECE
INSTALLING OPTIONAL SPIKES FOR FLOORSTANDING SE 3
Special Edition
R
O
S
E
N
U
T
A
C
A
J
O
U
H
I
G
H
-
G
L
O
S
S
B
L
A
C
K
N
O
I
R
T
R
È
S
B
R
I
L
L
A
N
T
H
I
G
H
-
G
L
O
S
S
W
H
I
T
E
B
L
A
N
C
T
R
È
S
B
R
I
L
L
A
N
T
1
P
I
E
C
E
S
pecial Edition
RO
S
EN
U
T
A
C
A
J
O
U
H
IG
H
-
G
L
OS
S
B
L
A
C
K
N
O
IR
T
RÈS
BRI
L
L
A
N
T
H
IG
H
-
G
L
OS
S
WH
IT
E
BL
A
N
C
T
RÈS
B
RIL
L
A
N
T
1
PIEC
E
Special Edition
R
O
SE
N
U
T
A
CA
JOU
H
I
GH-GLOSS
B
L
A
CK
N
OI
R
TRÈS
BR
I
L
L
A
NT
H
I
GH-GLOSS
WHI
T
E
B
L
ANC
TR
È
S
BR
I
L
L
A
N
T
1
PIEC
E
UNPACKING INSTRUCTIONS: FLOORSTANDING SE 3
Fig. 1
5
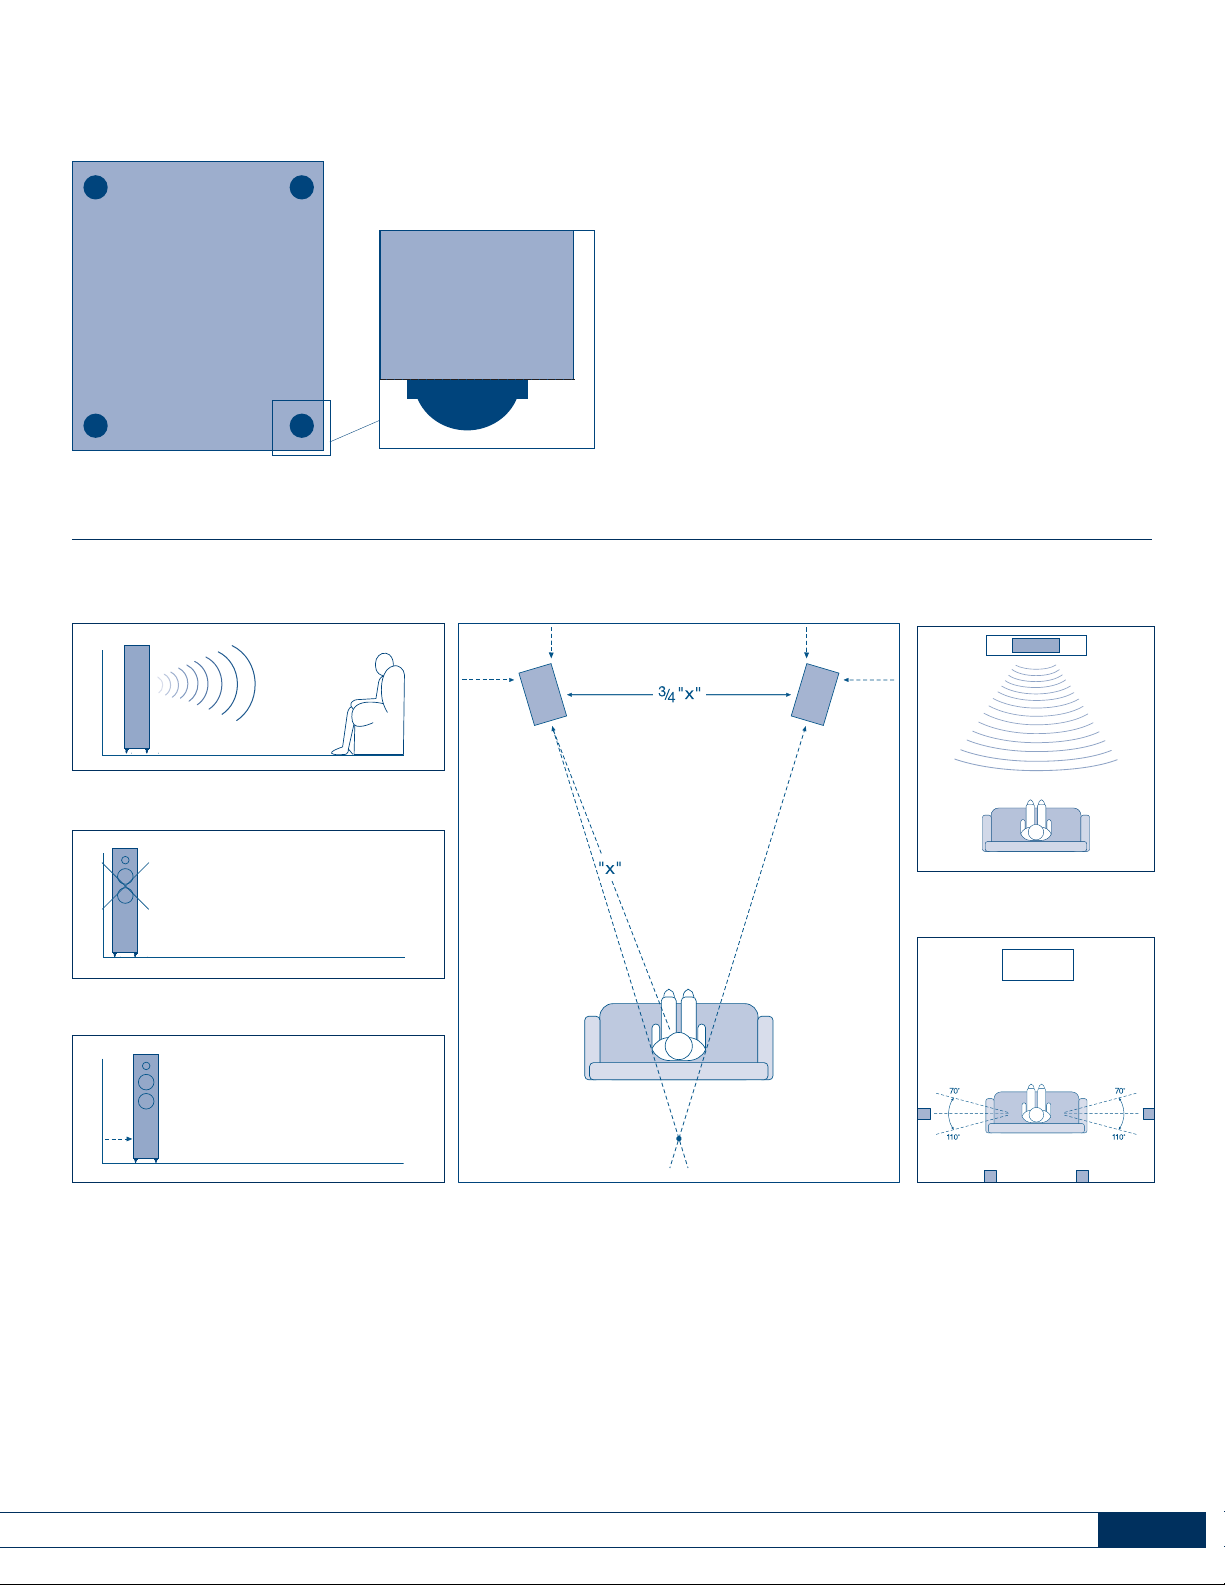
Fig. 6
Fig. 7
Fig. 5
SPEAKER PLACEMENT
Fig. 4b
Fig. 4a
Fig. 3
ATTACHING BUMPER PADS: BOOKSHELF/STAND-MOUNTED SE 1
(included)
Side View
Fig. 2 Bottom View
6
NOTE: If speakers are used on Paradigm
®
high-performance speaker stands, bumper
pads should be applied directly to the top
plate of the stand.

Fig. 8 SE 1 and SE Center
Fig. 9 SE 3 only
Fig. 10 Bi-wiring: SE 3 only
Fig. 11 Bi-amping: SE 3 only
SPEAKER CONNECTION
Leave jumper bars
attached for standard
connection
7
STANDARD CONNECTION
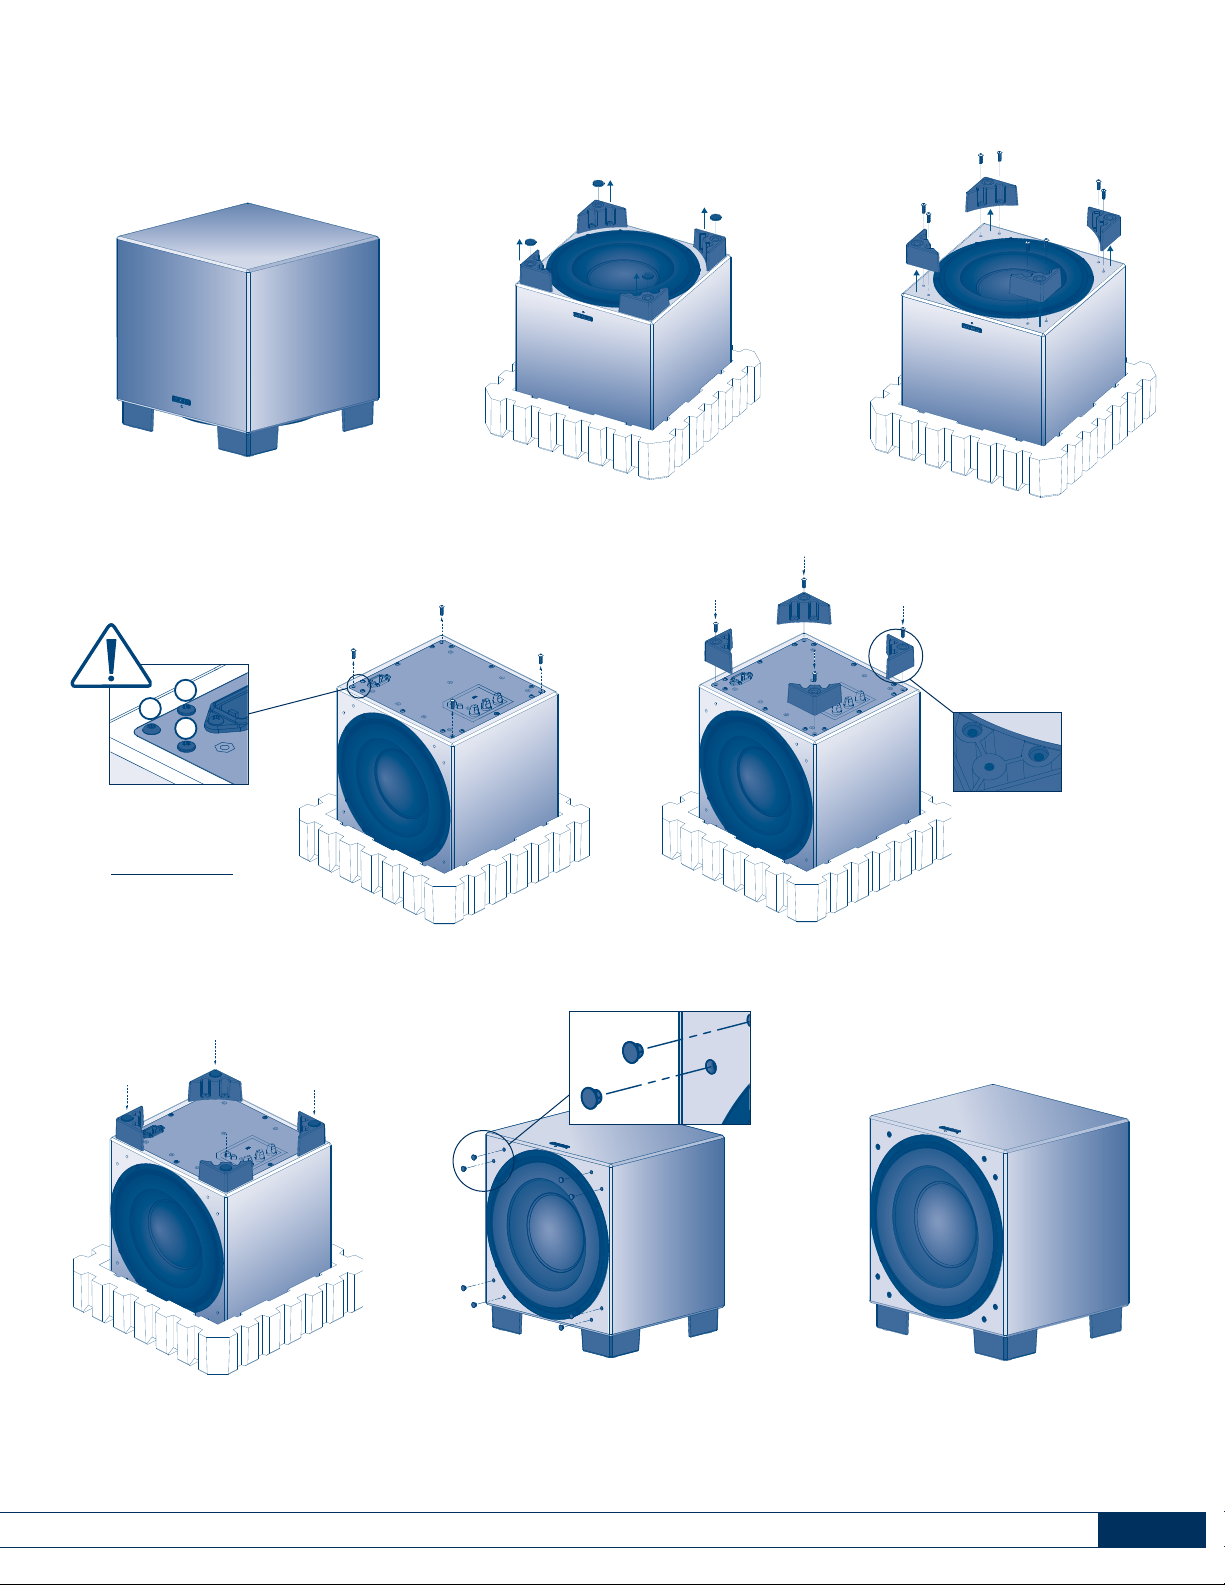
CONVERTING SUBWOOFER DRIVER CONFIGURATION:
DOWN-FIRING TO FRONT-FIRING
✔
✗
✗
CAUTION!
The only screws to
be removed are the
hexagonal screws
in each corner
(as
shown )
.
Fig. 12
Step 1
Out-of-the-box:
Down-firing configuration
Final front-firing configuration
Step 2
Step 3
Step 4
Step 5
Step 6
8
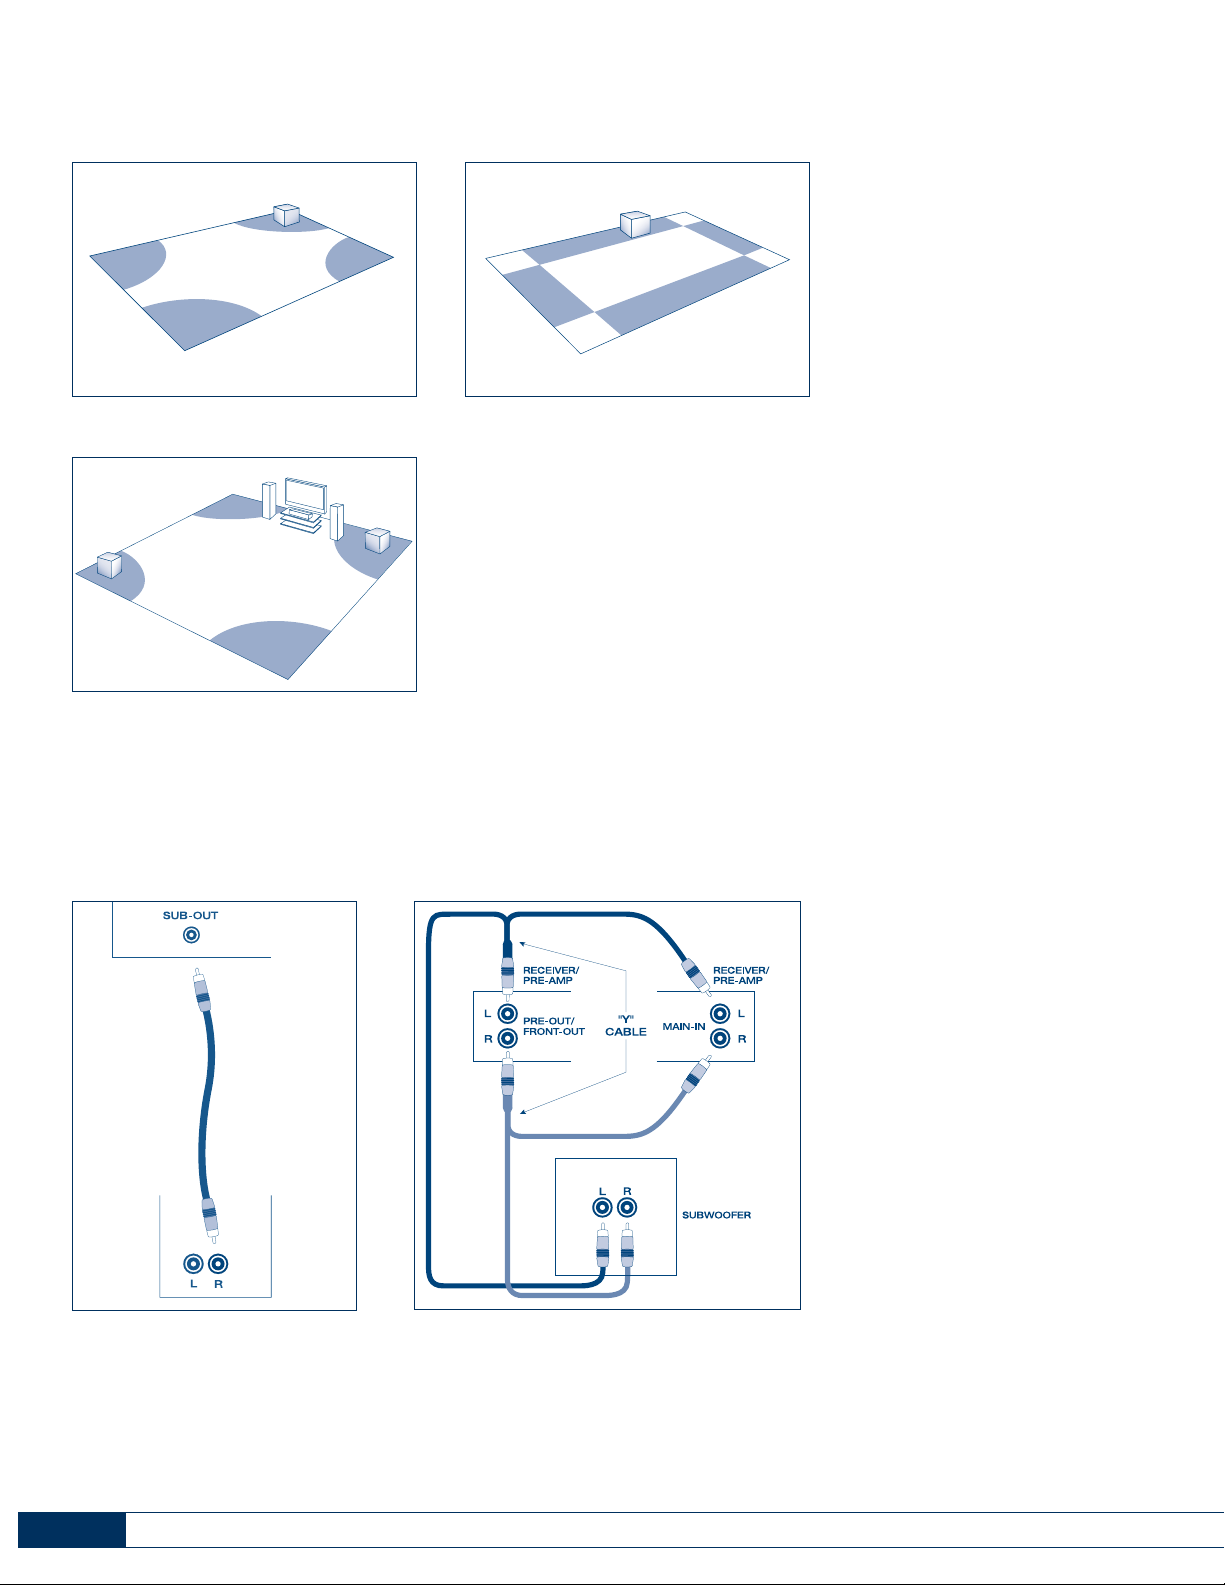
SUB-IN
LFE-IN
Fig. 15
SUBWOOFER CONNECTION
SUBWOOFER PLACEMENT
Fig. 14
9
Fig. 13a Fig. 13b
Fig. 13c

Break-In
Although Paradigm
®
Special Edition speakers sound great “out of the carton”
they will sound even better when broken in. Allow them to operate for several
hours before you listen critically.
High-frequency drivers use ferro-fluid that can thicken at temperatures below
10° C (50° F). If your speakers have been transported or stored in the cold
let them warm to room temperature before use.
Cleaning
Do not use a strong or abrasive cleaner on your speakers. Clean them with a
damp soft cloth but do not get them wet. Do not place wet objects such as
drinking glasses or potted plants on top of the speakers. If allowed to soak in,
even a small amount of water may permanently damage the speaker enclosure.
Speaker Grilles
Paradigm®Special Edition speakers are meant to be played with their grilles
on. The grilles are designed to minimize edge diffraction—the sound
reflections that occur at the outer edges of the front of the enclosure which
interfere with the drivers’ primary sound output.
Isolation Spikes and Rubber Feet (Fig. 1)
Isolation spikes and protective rubber feet are included with your Paradigm
®
Special Edition (SE 3) floorstanding speakers. We highly recommend installing
the spikes as they will improve the sound of your speakers by isolating them
from the floor. The most convenient time to install the spikes is during the
unpacking process. Rubber feet can be used, if desired, to cap the spikes to
prevent damaging hardwood floors. To install spikes and caps, refer to
the Unpacking Instructions at the beginning of this manual.
Optional Paradigm
®
Speaker Stands
We recommend placing your Paradigm
®
Special Edition (SE 1) bookshelf
speakers on Paradigm®high-performance speaker stands
(sold separately,
see dealer)
or bookshelves to raise the high-frequency drivers to ear level
thereby ensuring the best performance possible.
Bumper Pads (Fig. 2)
Paradigm
®
Special Edition (SE 1) bookshelf speakers come with four rubber
bumper pads. To lend added stability and prevent vibrations from coloring
sound output, these pads must be used if you are placing your speakers on
Paradigm®speaker stands. The pads may also be used for additional stability
when placing speakers on a bookshelf or table.
Wall Mounting
(not shown)
Threaded inserts were pre-drilled into the back of Paradigm®Special Edition
(SE 1) bookshelf models to facilitate wall mounting, if desired. When wall
mounting you must
use only Paradigm®MB-60 wall-mounting brackets
(sold
separately, see dealer)
. See the Caution Note below:
YOUR NEW SPEAKERS
The ‘Watts’ (W) rating indicated on the rear panel of your Paradigm®Special
Edition subwoofer is the typical AC power the subwoofer will draw.
However, the actual wattage draw will vary with the bass content of the
program material.
POWER REQUIREMENTS
10
The wood screws included with Paradigm®MB-60
brackets MUST NOT be used to mount your Paradigm
Special Edition (SE 1) speakers on the wall. Use the
two screws and two washers included in the box
with the speaker. Failure to follow this instruction
could result in damage to property or personal injury.
You must also use the safety straps included with
MB-60 brackets as secondary restraints. Follow the
instructions included with the brackets to correctly
attach straps to speaker and wall.

Paradigm®Special Edition speakers are efficient and can be driven to loud
listening levels with moderate amplifier power. They are also able to handle
the output of very powerful amplifiers. To prevent damage to your speakers,
please read the following guidelines before hooking them up.
Amplifier Distortion—The #1 Culprit!
Amplifier distortion is the principal cause of speaker damage. When listening
at loud levels your amplifier may run out of clean power. It will then begin to
produce distorted power several times greater than its rated output power.
This will damage any brand of speaker very quickly!
(See dealer for amplifier
recommendations.)
More Powerful Amplifiers are Safer
A 40 watt/channel amplifier will have substantial distortion above 40 watts.
If driven to 50 watts, this amplifier will deliver distorted power—which
will damage the speaker! A 100 watt/channel amplifier will have substantial
distortion above 100 watts, but very low distortion below 100 watts. Therefore,
when the speaker requires 50 watts, this more powerful amplifier will deliver
clean power and speaker damage is less likely to occur.
Volume Control
Do not be fooled by the Volume Control of your receiver/preamplifier. It only
adjusts listening level—it is not a “power-output” dial. The amount of
amplifier power actually used at a given Volume Control setting depends
solely on the nature of the music you are listening to. At a given Volume
Control setting a quiet section of music will use less amplifier power than a
loud section. With typical pop-rock, jazz or large scale classical music, the rated
output power of many receivers/amplifiers is often reached when the
Volume Control is between the “11” and “1 o’clock” settings (with bass/ treble
and loudness controls not used—otherwise rated power may be reached at
even lower Volume Control settings).
Remember, all amplifiers produce distortion when operated beyond their rated
output power. The resulting distortion will damage all speakers! Exercise
caution! If you listen at loud levels, be careful to listen for the point of audible
distortion—if the speakers begin to sound distressed, turn the Volume Control
down or your speakers and/or amplifier(s) will be damaged! This type of
damage constitutes abuse and is not covered by the warranty. If
louder volumes are desired, obtain a more powerful amplifier.
There is a Limit!
Although more powerful amplifiers are safer, there is a point at which you
could have more power than the speaker can handle. At that point you will
overpower the speaker and damage it. Exercise caution! At loud levels do
not increase bass/treble controls from zero and ensure that all loudness/
contour/bass EQ buttons are off (otherwise rated output power will be
reached at lower volume control settings). If you listen at loud levels,
watch for excessive visible cone excursion (grille movement) from the
woofer—then turn the Volume Control down.
The Right Amount of Power
A power-range rating is given as a guide to indicate the approximate
minimum and maximum power input of your Paradigm® Special Edition
speakers. Amplifiers that exceed your speaker’s power-range rating are
recommended. Their greater power reserves provide better sound. However,
exercise caution! Use the speakers within their power-range rating to prevent
damage (keep listening levels below the point of excessive woofer cone
excursion).
PREVENTING SPEAKER DAMAGE
11

Paradigm®Special Edition speakers are designed to provide exceptional sound
in a wide variety of domestic settings. However, it is important to note that
listening room construction, dimensions and furnishings all play a part in
the quality of sound you will ultimately achieve. Your listening room will
impose its own character on the performance capabilities of any speaker
system. The extra care you take in correctly positioning the speakers will
result in greater listening enjoyment. Keep the following guidelines in mind
when deciding on the best speaker placement:
• Mid and high frequencies are affected by the amount of soft furnishings
in your room—curtains, carpets, sofas, wall coverings, etc. An excess of
such items can result in a somewhat dull sound. The same room without
any soft furnishings can produce an overall bright sound. The typical
quantity of soft furnishings found in most living environments provides the
right acoustic characteristics to allow the speakers to sound balanced;
• Concrete floors and walls tend to aggravate low-frequency standing wave
problems and are less preferred;
• Rooms where height, width and length are similar should be avoided as
they can exhibit significant low-frequency standing wave problems. This
may result in reduced clarity. If no other room is possible, experiment with
speaker placement to minimize acoustic problems.
Even when your subwoofer is perfectly positioned, the room can still have
a dramatic impact on performance. The critically acclaimed Paradigm
Perfect Bass Kit
™
(PBK) room correction system
(sold separately, see
dealer)
is a wonderful tool to help you achieve optimal bass in your room.
Additional details on the PBK can be found on page 14.
ROOM ACOUSTICS
SPEAKER PLACEMENT
Paradigm®Special Edition front speakers are designed to allow flexible
placement while providing a very large window of sound throughout your
listening room. To ensure the best performance possible, we strongly recommend you observe the following placement guidelines:
Accurate Timbre (Fig. 3)
For the most accurate and natural timbre, place front speakers so that their
high-frequency drivers are approximately at ear level.
As mentioned earlier, placing Paradigm
®
Special Edition (SE 1) bookshelf
models on Paradigm
®
speaker stands
(sold separately)
or bookshelves raises
their high-frequency drivers to approximately ear level, ensuring the best
performance possible.
Balanced Bass Performance (Figs. 4a, 4b)
Placing front speakers in corners will over-emphasize bass and reduce overall
clarity. Avoid corner placement (Fig. 4a). Position front speakers 8 in (20 cm)
or more from the wall behind the speaker and as much as possible from either
side wall, as shown in Fig. 4b. This will ensure better bass performance and
optimal midrange clarity.
Optimal Imaging (Fig. 5)
Measure the distance from your main listening area to the front speakers
(“X”). For optimal imaging, place speakers from three-quarters of that
distance up to that same distance from each other (3/4 of “X” to “X”). To
further optimize imaging, turn speakers slightly inward so they point
toward the listening position with their axes crossing just behind it.
On-Wall Mounting
(not shown)
Follow the directions for placement given under “Optimal Imaging” above, and
use the mounting instructions provided with your Paradigm
®
MB-60 on-wall
mounting brackets
(sold separately, see dealer)
to safely and securely mount
your speakers on the wall.
REMINDER: Before wall-mounting, read the Caution Note provided on
page 10 of this manual.
FRONT SPEAKERS
The Paradigm®Special Edition (SE Center) center channel is designed to cover
a large, wide listening area, allowing listeners throughout the room to hear
center-channel information with unprecedented clarity and intelligibility.
Placing your center-channel speaker above the TV will ensure the best
possible clarity and intelligibility. Position the speaker flush with the front
of the TV or speaker shelf to minimize unwanted sound reflections. Make
sure the center-channel speaker is approximately the same distance away
from the primary listening position as your front speakers. (Some A/V receivers
and processors can electronically adjust for differences in distance.)
Surround/rear speakers reproduce the ambience and sound effects critical
to the full dimension of multichannel music and movies. The Special Edition
(S1) bookshelf model is ideal for use as a surround/rear speaker.
Refer to Fig. 7 in the pictorial guide to placement at the front of this manual
for correct positioning of surround/rear speakers.
NOTE: The S1's are direct-radiating speakers, for optimal surround-sound
performance keep them well away from the listening area.
12
CENTER-CHANNEL (Fig. 6)
SURROUND/REAR SPEAKERS (Fig. 7)
For optimum sound, the use of high-quality speaker cable is essential. The chart
to the right identifies the minimum gauge requirements for various lengths.
(See dealer for more information.)
Your Paradigm®Special Edition speakers’ binding posts can be used with
banana, pin or spade connectors, as well as with bare wire. Tighten the posts
firmly by hand—do not over tighten!
Correct polarity (or phase) is critical for proper soundstage imaging and bass
performance. Connect one speaker at a time to ensure proper connection of
every channel. The red (+) amplifier terminal must be connected to the red (+)
speaker terminal. The same applies to the black (–) terminals. Make sure
all wires are firmly fastened. Repeat this connection procedure for each
speaker in your system.
NOTE: If you hear a distinct lack of bass and a dislocated stereo image then
one or more of your speakers may have been connected out of phase (their
polarity is reversed). Re-check to ensure that each speakers’ cable is connected with correct polarity: red (+) to red (+) and black (–) to black (–).
SPEAKER CONNECTION
CONNECTION FOR PARADIGM®SPECIAL EDITION (SE 1)
BOOKSHELF MODEL AND CENTER CHANNEL (Fig. 8)
Your Paradigm® Special Edition (SE 3) floorstanding speakers have two sets
of input terminals connected externally with jumper bars. The speaker can
be bi-wired or bi-amplified to achieve even better performance.
Standard Connection (Fig. 9)
For standard connection, leave the jumper bars attached
and connect using
either set of input terminals.
Bi-wire Connection (Fig. 10)
Bi-wiring can improve clarity and openness, with less grain and more solidity
to the bass. Two cables are required for each speaker that you bi-wire.
Bi-amp Connection
IMPORTANT! When bi-amping, always use amplifiers with identical gain.
If uniform amplifier gain is not maintained the speaker-to-speaker balance
will be incorrect when vertically bi-amped, or the speaker system’s frequency
balance will be incorrect when horizontally bi-amped. To prevent problems,
use identical amplifiers (Brand and Model). Make sure they are operating
in the same non-bridged or bridged mode.
Passive bi-amping offers a dramatic improvement in clarity, openness and
detail, with much better bass solidity and definition. The presentation of music
and movie soundtracks is simply more intelligible and transparent.
With passive bi-amping, the speaker’s internal passive crossovers remain
connected. An external electronic crossover is not required and cannot be
used (there is no direct electrical access to individual drive units). This saves
expense and setup difficulties. Passive bi-amping optimizes your speaker
to achieve the best possible high-end performance.
To bi-amplify, two power amplifiers are required. Connection can be either
vertical or horizontal.
Horizontal Bi-amplification (Fig. 11) dedicates one amplifier to
your speakers' mid/low-frequency inputs and another to their high-frequency
inputs. This configuration can maintain better clarity when listening at
loud levels—if low-frequency demands cause amplifier clipping, distortion
will still be kept away from high-frequency drivers. Connect your speakers
to one amplifier at a time.
Vertical Bi-amplification
(not shown)
dedicates one amplifier to
each speaker. This configuration provides complete channel separation which
optimizes your system’s imaging ability. Connect your speakers to one
amplifier at a time.
LENGTH DIAMETER GAUGE
Under 4.5 m (15 feet) 1.3 mm (0.05 in) 16 awg
Under 9 m (30 feet) 1.6 mm (0.06 in) 14 awg
Over 9 m (30 feet) 2.0 mm (0.08 in) 12 awg
MINIMUM GAUGE REQUIREMENTS
13
CONNECTION OPTIONS FOR THE PARADIGM®SPECIAL
EDITION (SE 3) FLOORSTANDING MODEL
Turn your amplifier(s) OFF before connecting your
speakers. This will avoid damage which could result
from accidental shorting of speaker cables.
DO NOT attempt to bi-wire or bi-amplify unless you
have removed the jumper bars.
 Loading...