

Page 1
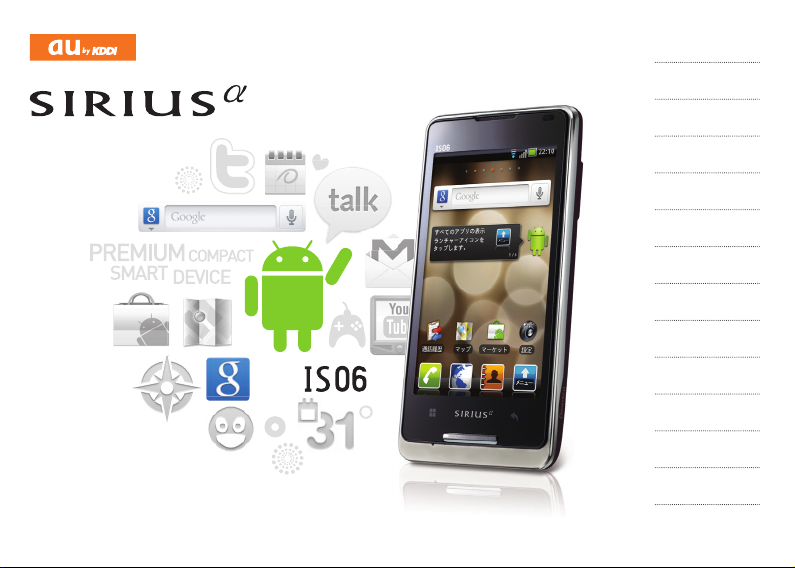
Basic Manu a l
Introdu ction
Table of Conte nts
Before Us ing Your
New Cell Phone
Basic F unctions
Phone F unctions
Mail Fu nctions
Google Function s
Intern et Functions
Multime dia Func tions
Useful Function s
In Case of
Loss of Your IS06
Appendi x/Index
Page 2

Introduction
Thank you for purchasing the IS06. Before using your
IS06, be sure to read the IS06 Basic Manual (this
PDF manual) to ensure correct usage. After you have
finished reading this manual, store this PDF manual
and the printed manuals in safe places so you can
retrieve them whenever you need them.
Manuals for the IS06
The IS06 comes with the Basic Manual and
Instruction Manual.
For learning the basics:
●
Read the IS06 Basic Manual (this manual).
For learning details on using each function:
●
Read the supplied IS06 Instruction Manual
(Japanese). Be sure to read the Safety Precautions
“安全上のご注意”
IS06.
to ensure proper usage of the
The keyword searchable au Online Manual is also
available on the au homepage:
http://www.au.kddi.com/manual/index.html
ii
Notes on Cell Phone Use
Cell Phone Etiquette
The cell phone always emits weak radio waves when
power is on.
Use the cell phone in an enjoyable and safe manner
without forgetting to be considerate of others around
you.
Use of cell phones is not allowed in some
●
places.
• Do not use the cell phone while you are driving.
Doing so is both dangerous and prohibited by law.
• Using a cell phone in an aircraft is prohibited by
law. Be sure to turn the cell phone off.
Radio waves from cell phones may interfere with
●
medical electrical equipment.
• Some people close to you in crowded places
such as packed trains may be using a cardiac
pacemaker. Turn the cell phone off in such places.
• Abide by the rules of hospitals and other medical
institutions where it is forbidden to use or carry cell
phones.
Be considerate of where you use the cell phone
●
and how loudly you talk.
• Do not make calls in theaters, museums, libraries,
and other similar places. Turn power off or turn on
Page 3

manner mode not to disturb others around you by
ringtones.
• Do not use the cell phone on a street where you
might interrupt the flow of pedestrians.
• Move to areas where you will not inconvenience
others on trains or in hotel lobbies.
• Refrain from talking in a loud voice.
• Obtain the permission of other people before you
take their photos with the cell phone’s camera.
• Do not record information with the cell phone’s
camera in bookstores and other locations where
taking photos is not permitted.
Do not use the cell phone while driving!
Turn off your cell phone or put it in Drive mode while
driving.
Do not use the cell phone while driving a car/
motorcycle or riding a bicycle. It may result in a
traffic accident. Using a cell phone while driving is
prohibited by law. Using a cell phone while riding a
bicycle may also be punishable by law.
Prohibited!
• Looking at a cell phone display
• Talking on a cell phone while holding it
Illustrations and Screenshots in This Manual
The illustrations in this manual may look different from
the actual cell phone in shape, color and typeface.
The screenshots in this manual are simplified and
may look different from the actual cell phone screens.
Notation of Tapping Instructions in This Manual
This instruction manual omits the phrase “tap” when
listing instructions that involve tapping menu items,
icons, keys, or other user interface elements.
Ex.: Registering a new contact in your Contacts from
the Dialer
[Phone]▶Enter phone number
[Create new contact]
▶
This means, Tap
→
number▶Tap
[Phone]▶Enter phone
▶Tap [Create new contact].
▶
Introduction
1
Page 4

Table of Contents
Introduction ........................ ii
Notes on Cell Phone Use ... ii
Illustrations and
Screenshots in This
Manual .............................. 1
Notation of Tapping
Instructions in This
Manual .............................. 1
Table of Contents ·············· 2
Before Using Your
New Cell Phone
List of Icons ······················· 5
List of Included Items ········ 6
Names and Functions of
Parts ·································· 7
Included Items ··················· 9
Battery Pack ...................... 9
au IC-Card ...................... 11
microSD Memory Card ... 12
Tur ning On/Off the
Power ······························ 13
Turning On the Power ..... 13
Turning Off the Power ..... 13
Switching the Display
Language ························ 13
2
Using the System
Settings ........................... 13
Using the Initial Settings
Screen ............................. 13
Setting Manner Mode/
Airplane Mode ················· 14
Setting Manner Mode...... 14
Setting Airplane Mode .... 14
Touch Panel····················· 14
Operating the Touch
Panel ............................... 14
Displaying the Home
Preview Screen ............... 17
Executing Widgets .......... 18
Locking the Screen ......... 20
Unlocking the Screen ...... 20
How to Input Character ··· 21
Showing the Keyboard .... 21
Using the Android
Keyboard ........................ 21
Using the iWnn IME
Keyboard ........................ 22
Basic Functions
Using Android·················· 25
Home Screen ·················· 26
Using the Home Screen
Viewing the Status Bar .... 27
Showing the Notification
Panel/Using Easy
Setting ............................. 27
Using Applications/
Widgets/Folders .............. 28
Menu Screen ··················· 31
Using Applications and
Other Functions............... 31
Search ·······················32
Quick
Using Quick Search ........ 32
... 26
Phone Functions
Making a Phone Call ······· 34
Entering a Phone
Number to Call ................ 34
Making International
Calls ................................ 34
Searching and Calling
From Your Contacts......... 35
Making a Call Using the
Call Log ........................... 35
Receiving a Call ·············· 36
In Call Functions ············· 37
Adjusting the Receiver
Volume ............................ 37
Call Log ··························· 37
Viewing Your Call Log ..... 37
Making a Call From Your
Call Log ........................... 37
Sending E-mail/C-mail
From Your Call Log.......... 37
Contacts ·························· 38
Adding a New Contact.... 38
Viewing Your Contacts .... 39
Quick Contact ................. 39
Deleting a Contact .......... 39
Editing a Contact ............ 39
Mail Functions
E-mail ······························ 41
Configuring E-mail Initial
Settings ........................... 41
E-mail Contacts ............... 41
Sending E-mail ................ 45
Viewing Received
E-mails ............................ 46
Check the E-mails in
Each Folder ..................... 46
Setting Mail Filters ........... 47
C-mail ······························ 50
Sending C-mail ............... 50
Viewing Received
C-mails ............................ 51
Using the Earthquake
Early Warning .................. 52
Page 5

Viewing Received
Earthquake Early
Warning ........................... 53
Setting Up the
Earthquake Early
Warning ........................... 54
C-mail Safety Block ......... 55
Setting Up a C-mail
Receiving Filter ............... 56
PC-mail ··························· 57
Setting Up PC-mail .......... 57
Managing Received
PC-mail............................ 58
Sending PC-mail ............. 59
Google Functions
Using Google Services ··· 61
Registering an Existing
Google Account .............. 61
Creating a New Google
Account .......................... 62
Gmail ······························· 63
Viewing Your Inbox.......... 63
Sending Mails ................. 64
Showing Labels............... 64
Android Market ················ 65
Using the Android
Market ............................. 65
Google Voice Search ······· 67
Using Voice Search ......... 67
Using Other Google
Services ·························· 68
Using Google Talk ........... 68
Using Google Maps ........ 68
Using Google Maps
Navigation ....................... 68
Using Google Places ...... 69
Using Google Latitude .... 69
Using Google News and
Weather ........................... 69
Using Google Calendar
... 69
Internet Functions
Connecting to the
Internet ···························· 71
Using Wi-Fi ...................... 71
Using Data
Communication
Services .......................... 72
Browser ··························· 73
Displaying a Web Page
Possible Actions While
Displaying a Web Page
au one Market ················· 75
Downloading
Applications .................... 75
Deleting Downloaded
Applications .................... 76
... 73
... 73
Multimedia Functions
Camera ··························· 78
Before Taking a Photo ..... 78
Taking a Photo................. 78
After Taking a Photo ........ 79
Before Recording a
Movie............................... 80
Record a Movie ............... 80
After Recording a
Movie............................... 81
Gallery ····························· 82
Viewing Photos ................ 82
Viewing Movies ............... 82
Useful Functions
Alarm/Wakeup Call ········· 84
Setting an Alarm ............. 84
Setting a Wakeup Call ..... 84
PocketBook ····················· 85
Voice Recorder ............... 85
Playing Back Your
Recordings ...................... 85
Using the Calculator ....... 86
Setting Up the World
Clock ............................... 86
Using the Stopwatch ....... 87
SmartNote ······················· 88
Creating a New Note ....... 88
Editing an Existing Note
Deleting a Note ............... 89
... 89
In Case of
Loss of Your IS06
Remote Control Lock ······ 91
Activating the Device
Administrator ................... 91
Setting Up the Remote
Control Lock .................... 91
Activating the Remote
Control Lock From a
Registered Phone ........... 92
Unlocking the Remote
Control Lock .................... 92
Security Lock Service ····· 93
Activating the Remote
Control Lock Using the
Security Lock Service ..... 93
Appendix/Index
Troubleshooting ··············· 95
Index ······························· 97
Table of Contents
3
Page 6

Before Using Your
New Cell Phone
List of Icons
List of Included Items
Names and Functions of Parts
Included Items
Turning On/Off the Power
Switching the Display Language
Setting Manner Mode/Airplane Mode
Touch Panel
How to Input Character
Page 7
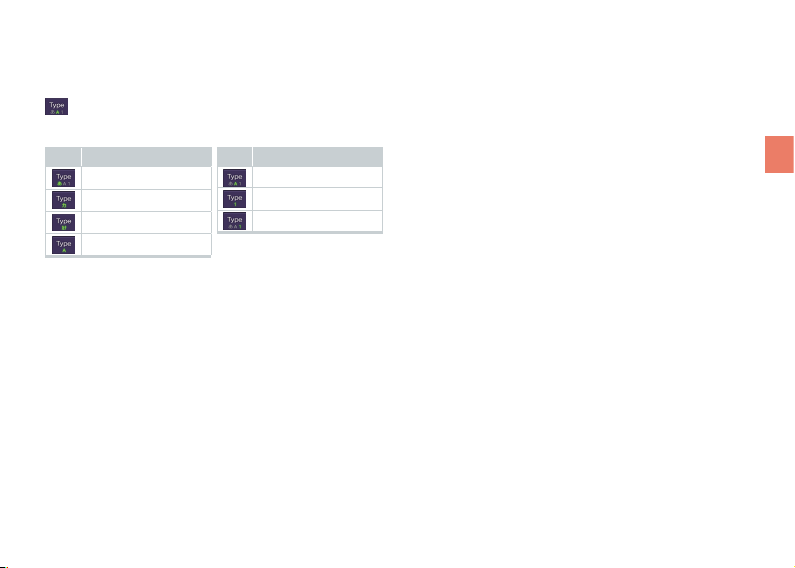
List of Icons
You can check the current settings and status of your
IS06 by looking at the icons on the status bar at the
top of the display.
: Calling or currently in a call
: Missed call
: Putting a call on hold
: In a call using a Bluetooth® headset
: Information available
: An error occurred/Warning display
Character input mode display
Hiragana-
Full-width
Half-width
Full-width
Half-width
Full-width
Kanji
Katakana
Katakana
Alphabet
: New E-mail
: New C-mail
: New Earthquake Early Warning
: New PC-mail
: Syncing data
: Data sync failed
: Alarm/Wakeup call set
: Call volume muted
Alphabet
Numeric
Half-width
Numeric
: Silent manner mode
: Manner mode
: Bluetooth® standby
: Bluetooth® connecting
: Connected to Wi-Fi (display signal strength)
: Open network available
: Using GPS
: Insufficient disk space
: Preparing microSD memory card
: Connected by USB
: USB debugging
/ : Packet transmission available
/ : During packet transmission
: Receiving packets
: Sending packets
– : Battery power level
– : Battery power level (when charging)
: Signal strength
: Out of area
: Airplane mode
: Playing music
: Displays the current time
: Software update available
Before Using Your New Cell Phone
5
Page 8
List of
基本操作
●基本設定
Step1 Googleアカウントの設定
初めてIS06を使用するときに、Googleアカウントを登録する方法
を説明します。
Googleアカウント を登録すると、Gmail、Androidマーケット、
GoogleマップなどのGoogle社が提供するサービスを利用すること
ができます。
Step2 PCメール設定
IS06では、POP3/IMAP/Exchangeに対応したPCメールを受
信/送信できます。
本書では、例として、auoneメールをIMAPで設定する方法を説明
します。
●Wi-Fi設定
無線LAN(Wi-Fi)機能を利用 してインターネットに接続する方法を
説明します。
■キーの基本操作 ■タッチパネルの
基本操作
タップ
メニューや項目に 軽く触れ
て、すぐに指を離します。
ロングタッチ
メニューや項目に指を触れた
状態を保ちます。
フリック
画面を指ですばやく上下左右
にはらうように操作します。
■電源を入れる
(電源)を長押し
ロゴが表示され、しばらくするとロック画面が表示されます。
■画面ロックを解除する
を右側にスライド
※電源を入れた直後や、電源を入れた後一定時間操作を行わなかった場合、
自動的に画面ロック状態になります。
■電源を切る
携帯電話オプション 画面が表示されるまで (電源)を 長押し
▶[電源を切る]▶[OK]
■文字入力の基本操作
IS06では、文字入力時に画面下部にソフトウェアキーボードが表示さ
れます。画面のキーをタップして文字を入力します。
記号を入力
文字種を切替
iWnnIMEキーボード
日本語入力可能なキーボードです。
ケータイ入力とフリック入力に対応して
います。
フリック入力について
テンキーを上下左右にフリックすること
で文字を入力できます。
例:「も」を入力する場合は、「ま」を下方
向にフリックします。
(ケータイ入力で「も」を入力する場
合は、「ま」を5回タップします。)
電源キー (電源)
本製品の電源がOFFの状 態で
長押しして電源ONにします。
メニューキー (メニュー)
操作の途中で使用できるメニュー
を表示します。
ホームキー (ホーム)
ホーム画面を表示するときなどに
使用します。
戻るキー (戻る)
前の画面に戻ります。
※文字入力欄をロングタッチ▶「入力方法]▶[Androidキーボード]
をタップすると、英語入力専用のAndroidキーボードに切り替えるこ
とができます。
Included
Items
6
●IS06 ●Battery pack ●microSD memory card
(2 GB) (Sample)
●PANTECH
microUSB-18 pin
(charger) conversion
cable
安全上のご注意
取扱説明書
目次
ご利用になる前に
基本機能
通話機能
メール機能
Google機能
インターネット機能
マルチメディア機能
便利な機能
auのネットワークサービス
設定
付録/索引
●Instruction Manual
(Japanese)
●USB-microUSB
conversion cable
(Sample)
はじめにお読みください
設定ガイド
このたびは、IS06をお買い上げいただき、誠にありがとうございました。
この『設定ガイド』では、主な基本操作・初期設定について説明しています。
さまざまな機能の説明については、同梱の『取扱説明書』をご参照ください。
ご使用の前に必ず『取扱説明書』の「免責事項」および「安全上のご注意」を
お読みいただき、正しく安全にお使いください。
●Setting Guide
(Japanese)
●PANTECH earphone jack
conversion adapter 03
●Warranty (Japanese)
●Safety Precautions
(Japanese)
●Software Update Guide
(Japanese)
●au International Call
Guide (Japanese)
Page 9

Names and Functions of Parts
①
②
③
④
⑤
⑥
⑦
⑧
⑨
NOTE
Be careful not to place any stickers over the
built-in antenna or cover the built-in antenna with
your hand when transmitting data or talking. Call
and network connection quality will be adversely
affected.
⑩
⑪
⑫
⑬
⑭
⑮
⑯
Built-in antenna
Before Using Your New Cell Phone
7
Page 10
①Proximity sensor
②Receiver
Allows you to hear ringtones, incoming call voice,
and multimedia playback audio, etc.
③microUSB connection jack
④Display (touch panel)
⑤Back key
Return to the previous screen.
⑥Home key
Displays the Home screen.
Hold down to display a list of recently used
applications and functions.
⑦Menu key
Displays a menu for the application or function
currently used.
⑧Microphone
Transmits your voice during a call.
Also used to record sounds.
⑨LED lamp
Lights up red while charging.
Flashes when receiving a call or when an alarm
rings depending on your settings.
⑩Power key
Turns on the IS06 by holding down this key while
the power is turned off.
8
Used to turn the power on and off, turn the screen
on or off, or end a call. Hold down to display a
menu of phone options (manner/airplane mode).
⑪Strap eyelet
⑫Camera light
⑬Camera (lens)
⑭Volume key
⑮Search key
Press for application-specific search features or to
search your IS06 information or the web via Quick
Search.
⑯Battery pack cover
This manual represents each key as shown below.
Menu key ▶
Home key ▶
Back key ▶
Search key ▶
Power key ▶
Volume key ▶
(Menu)
(Home)
(Back)
(Search)
(Power)
(Volume)
Page 11
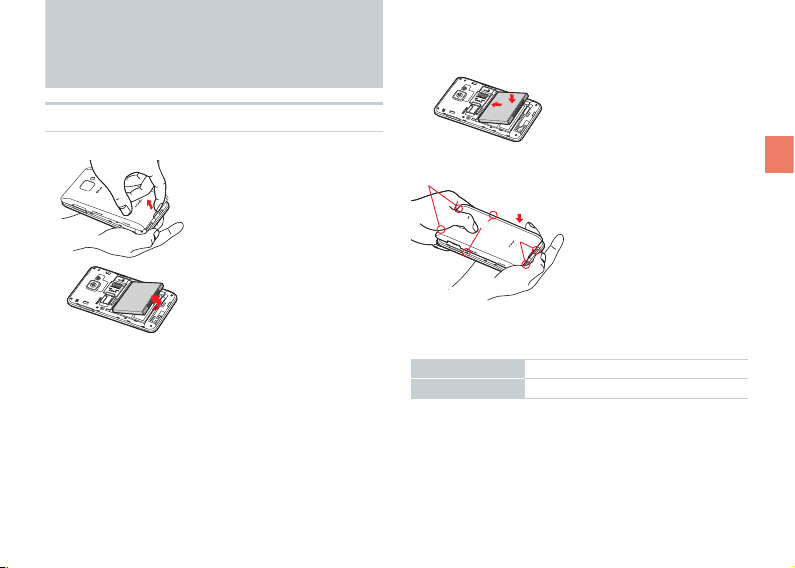
Included Items
③
Battery Pack
Removing the Battery Pack
①
Inserting the Battery Pack
①
① Confirm the location
of the connectors
in the IS06 and
insert the battery
pack in the proper
① Insert the tip of your
finger (fingernail) into
the slot at the bottom
of the battery pack
cover and lift up.
②
② Use the groove to lift
the battery pack out.
-1
②
③-2
③-3
orientation.
② Place the battery
pack cover back on
the IS06.
③ Push down on the
two locations at ③-1,
the two locations at
③-2, and the two
locations at ③-3, in
Before Using Your New Cell Phone
that order.
Battery Life
Standby time Approximately 200 hours
Talk time Approximately 300 minutes
■
Battery life may be shorter than the list depending
on the applications and functions used.
9
Page 12
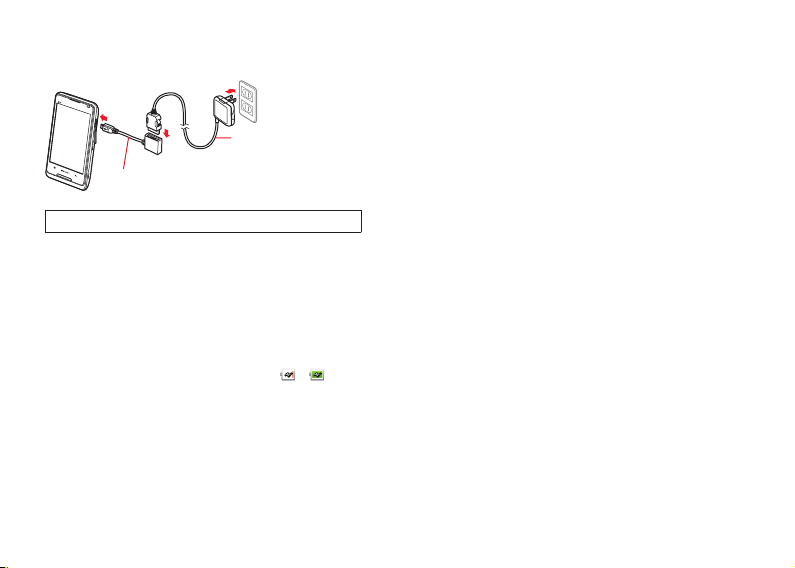
Charging the Battery Pack
③
②
①
PANTECH microUSB-18 pin (charger)
conversion cable
Common AC adapter
01/02 (sold separately)
Charging time takes approximately 190 minutes.
① Connect the PANTECH microUSB-18 pin (charger)
conversion cable to the common AC adapter
01/02 (sold separately).
② Open the microUSB connection jack cover on the
IS06 and connect the PANTECH microUSB-18 pin
(charger) conversion cable.
③ Plug the common AC adapter 01/02 (sold
separately) into an 100 V AC power outlet.
The LED lamp lights up red, and
displayed.
– will be
The LED lamp will go out when charging is
complete.
④ Unplug the PANTECH microUSB-18 pin (charger)
conversion cable from the IS06 in a straight line
once charging is complete.
⑤ Close the microUSB connection jack cover.
⑥ Unplug the common AC adapter 01/02 (sold
separately) from the power outlet.
10
■
To remove the PANTECH microUSB-18 pin
(charger) conversion cable from the common AC
adapter 01/02 (sold separately), pull the cable out
in a straight line while holding down the release
buttons on both sides of the connector.
■
If you charge the IS06 when the battery pack has
no power left, it may take a few moments for the
charging notice to display on the screen.
Page 13
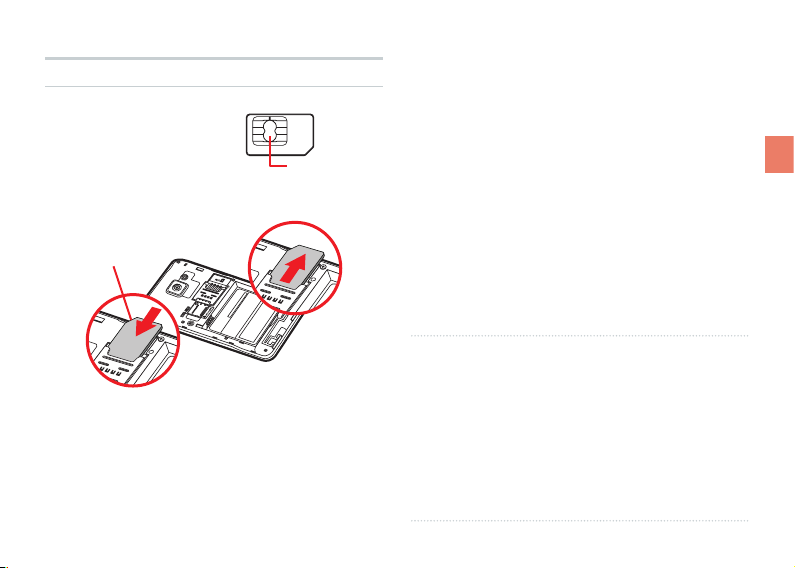
au IC-Card
②
③
Cutout
The au IC-Card contains
your phone number and
other personal details.
au IC-Card
Inserting/Removing the au IC-Card
① Turn off the IS06 and remove the battery pack
cover.
② Slightly raise the au IC-Card and pull it out in the
direction of the arrow.
③ To insert the au IC-Card, insert it in the direction
of the arrow. Make sure the IC (metal) portion is
facing down and the cutout on the au IC-Card
matches that shown in the figure.
IC (metal) portion
NOTE
■
Pay attention to the followings not to damage the
au IC-Card.
• Do not touch the IC (metal) portion of the au
IC-Card or the IC card terminal on the IS06.
• Check to ensure that the au IC-Card is inserted in
the correct direction.
• Do not apply excessive force when inserting or
removing the au IC-Card.
■
Be careful not to lose your au IC-Card after
removing it.
Before Using Your New Cell Phone
11
Page 14

microSD Memory Card
②
③
Notes on Handling of microSD Memory Card
■
Do not remove the microSD memory card, the
battery pack, or turn off the power when loading,
writing, saving, playing, moving, or copying data
to and from the microSD memory card. Doing so
could result in the loss of some or all data stored on
the microSD memory card or the IS06.
■
Do not drop or apply excessive force to the IS06
when there is a microSD memory card inside.
Doing so could result in the loss of some or all data
stored on the microSD memory card.
■
Do not insert any liquid, metallic, flammable, or
other foreign objects in the microSD memory card
slot on the IS06. Doing so could result in a fire,
electrical shock, or damage to the IS06.
■
microSD memory card may become warm after
long periods of use. This is not a malfunction.
12
Inserting/Removing a microSD Memory Card
① Turn off the IS06. Remove the battery pack cover
and the battery pack.
② Insert the microSD memory card in the direction of
the arrow. Make sure that the metallic terminal is
facing down and the side with the microSD logo is
facing up.
③ Remove the microSD memory card by pulling it out
in the direction of the arrow.
■
You can save photos, movies, documents, music,
and other files to a microSD memory card.
■
Some applications may not function without a
microSD memory card.
■
To safely remove a microSD memory
card, unmount it by tapping
[Settings]▶ [System]▶ [microSD & phone
storage]▶[Unmount microSD], or turn off your IS06
before removing.
[menu]▶
Page 15

Turning On/Off the Power
Switching the Display Language
Turning On the Power
Hold down (Power)
■
■
Turning Off the Power
Hold down (Power)
until the Phone
options screen
appears
▶
▶[OK]
The logo will be displayed
and after a few moments the
lock screen will appear. See
“Unlocking the Screen” (
to unlock the screen.
After unlocking the screen,
the display will turn off
and the screen will lock
automatically after a period
of inactivity.
▶
P.20)
[Power off]
You can switch the display language for function
names and other items to Japanese/Korean/Chinese/
English.
A part or all the contents may not be displayed in
Korean/Chinese/English depending on the application.
Using the System Settings
[メニュー] (menu)▶ [設定] (Settings)
▶
[システム] (System)▶ [言語とキー
ボード] (Language & keyboard)▶[言語
を選択] (Select language)▶[日本語]/
[
한국어]/[中文]/[English]
Using the Initial Settings Screen
When you first turn on the IS06▶
[言語変更] (change language) on the
screen with the Android robot▶[日本語]/
[
한국어]/[中文]/[English]
13
Before Using Your New Cell Phone
Page 16
Setting Manner Mode/Airplane Mode
Touch Panel
Setting Manner Mode
Hold down (Power) until the Phone
options screen appears▶
■
When manner mode is on, appears in the status
bar and all sounds, including ringtones and other
sound effects, are turned off. (Excludes multimedia
playback audio and alarms.)
■
To turn off manner mode, hold down (Power)
again until the Phone options screen appears▶
[Manner mode].
Setting Airplane Mode
[Manner mode]
Hold down (Power) until the Phone
options screen appears
▶
[Airplane
mode]
■
When airplane mode is on, appears in the status
bar and all communications/networking functions
such as Wi-Fi and Bluetooth
■
To turn off airplane mode, hold down (Power)
again until the Phone options screen appears▶
[Airplane mode].
14
®
are turned off.
Operating the Touch Panel
■
The IS06 is equipped with a touch panel screen.
You can perform actions by tapping items and keys
on the screen with your finger.
Page 17
❶ Tap Touch a menu or item and quickly remove
your finger from the screen.
❸ Flick Up/Down
Touch and quickly slide your finger
up or down across the screen.
▶
❷ Long Touch Keep touching a menu or item.
▶
❹
Flick Left/Right
▶
Touch and quickly slide your finger
left or right across the screen.
▶
Before Using Your New Cell Phone
15
Page 18
❺ Drag Keep touching the item and slide your finger
to the desired location with the item.
❼
Pinch Out (Zoom in)
Place two fingers on the
screen and slide them apart.
▶
❻ Slide Keep touching and slide your finger across
the screen in the target direction.
16
❽
Pinch In (Zoom out)
▶
Place two fingers on the
screen and slide them closer.
▶
Page 19
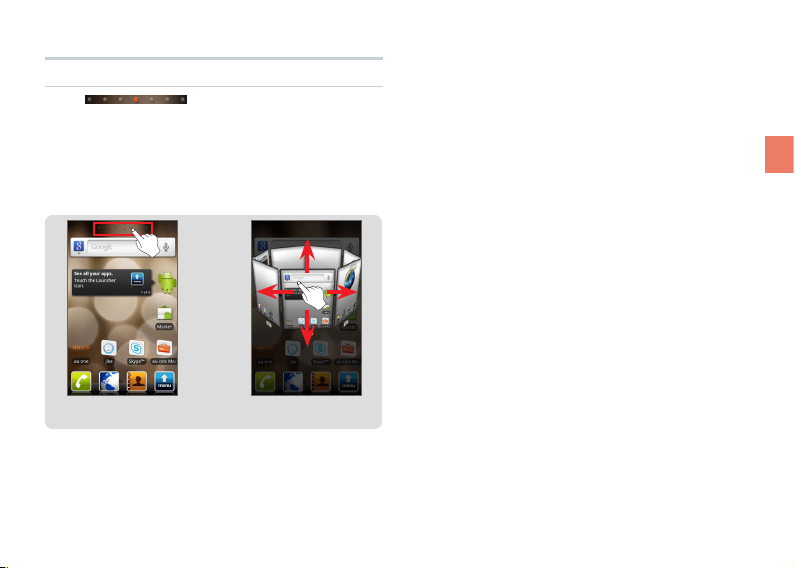
Displaying the Home Preview Screen
■
Tap at the top of the Home screen
to display the Home Preview screen in 3D.
■
You can flick the Home Preview screen to rotate it
left and right, or to tilt it up and down. Tap a Home
screen in the 3D display to move to that Home
screen.
▶
Before Using Your New Cell Phone
<Home screen>
<Home Preview screen>
17
Page 20
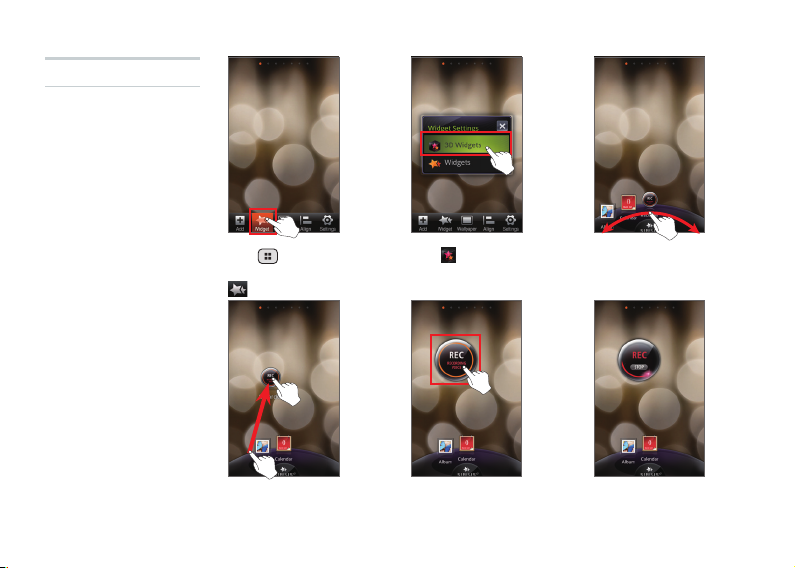
Executing Widgets
❶ Executing 3D
Widgets
▶ ▶ ▶
Tap (Menu) on the
Home screen▶Tap
[Widget]
Tap
[3D Widgets]
Slide to the left and
right
▶ ▶
Long-touch the widget
to select it and drag it
18
to the desired location
Tap the widget on the
Home screen
The 3D widget will be
executed
Page 21
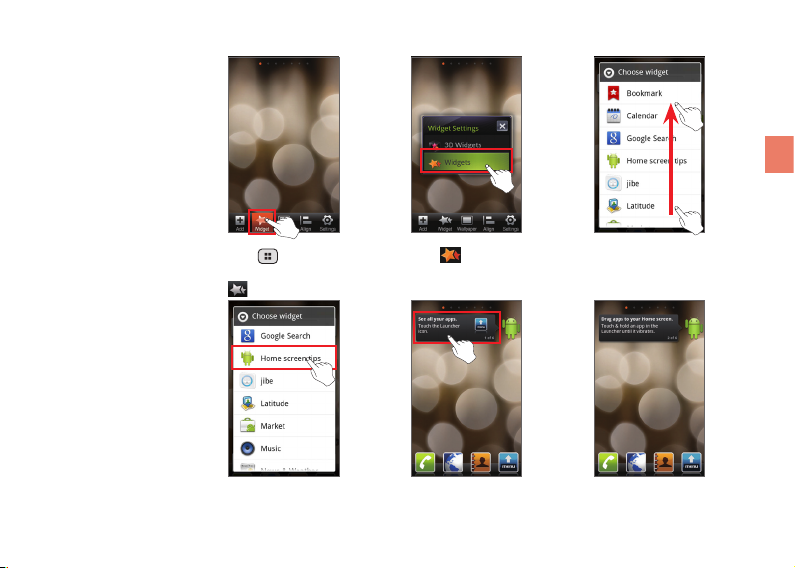
❷ Executing Widgets
▶ ▶ ▶
Before Using Your New Cell Phone
Tap (Menu) on the
Home screen▶Tap
[Widget]
Tap the widget
Tap
[Widgets]
▶ ▶
Tap the widget on the
Home screen
Flick up or down
The widget will be
executed
19
Page 22
Locking the Screen
Lock the Screen
■
Press (Power) while using the IS06 to turn off the
display and lock the screen.
■
After a period of inactivity, the display will turn off
and the screen will lock automatically.
Unlocking the Screen
■
Press (Power) or (Home) to turn on the
display.
20
Slide Unlock
Unlock Pattern
■
If a slide unlock has been set,
slide your finger across the
screen in the direction noted to
unlock the screen.
■
You can set a password or
PIN number to input after
slide unlock from
[Settings]▶ [System]▶
[menu]▶
[Location & security]▶[Set
up screen lock].
■
To further increase security,
you can set an unlock pattern
[menu]▶ [Settings]▶
from
[System]▶ [Location &
security]▶[Set up screen lock].
■
Draw the unlock pattern to
unlock the screen.
■
If you fail to unlock the screen
five times in succession you
cannot try again for 30 seconds.
■
You can make an emergency call
by tapping
[Emergency
call]▶[110] (Police)/[118] (Regional
Coast Guard Headquarters)/[119]
(Fire institution).
Page 23
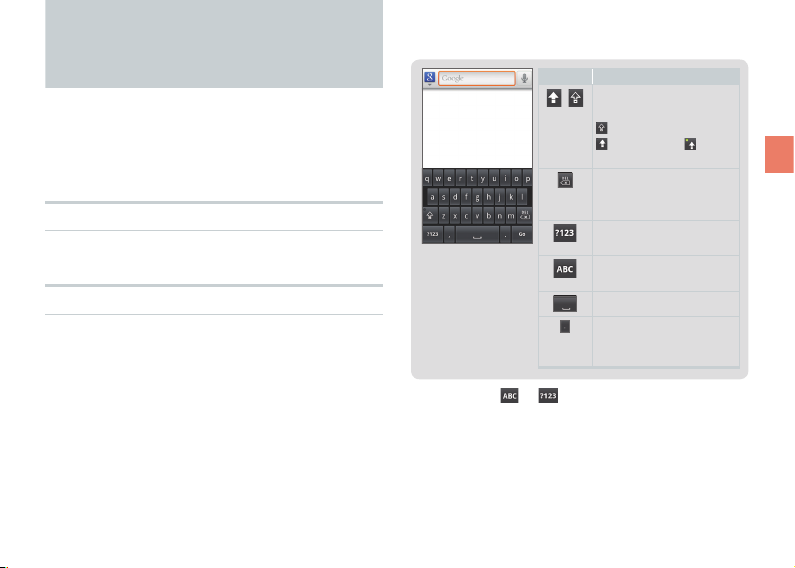
How to Input Character
Input characters by tapping keys on the on-screen
keyboard (soft keyboard).
The IS06 comes with two types of soft keyboards:
the Android keyboard for English and the iWnn IME
keyboard for Japanese.
Showing the Keyboard
Tap the character input field
Using the Android Keyboard
Long-touch the character input field
▶[Input method]▶[Android keyboard]
Icon Explanation
Switch between
/
uppercase/lowercase
Lowercase/
Uppercase/ Caps
lock
Delete one character
to the left of the
cursor
Switch to number/
symbol input
Switch to alphabet
input
Space
Long-touch for
symbol selection
(
period
)
input
■
Long-touch or to show the Android
keyboard settings/Input method selection screen.
■
You can input European characters by longtouching the letters such as a, e, i, o, u, y, c, s, n.
■
You cannot enter Japanese characters when using
the Android keyboard.
Before Using Your New Cell Phone
21
Page 24
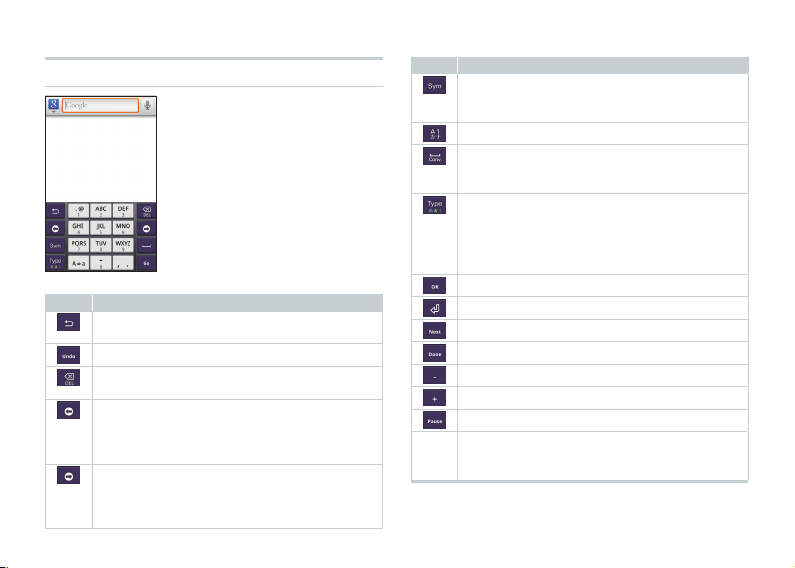
Using the iWnn IME Keyboard
Long-touch the
character input field
▶[Input method]
▶[iWnn IME]
Icons and Their Functions
Icon
Return to the previous character assigned
to the key
Return to the state before character conversion
Delete one character to the left of the cursor
Long-touch to delete continuously
Move cursor left
Shorten the segment for conversion by one
character
Delete one character of wildcard prediction
Move cursor right
Lengthen the segment for conversion by one
character
Add one character of wildcard prediction
22
Explanation
Icon
Display Emoji/Symbol/Emoticon
* Emoji can only be used with “E-mail”,
“C-mail”, and “SmartNote”.
Convert to alphanumeric kana
Insert space
Convert (group paragraph conversion also
possible)
Change Input mode (Hiragana →Half-width
Alphabet →Half-width Numeric)
Long-touch to display menu (Change
Settings, 10-key ⇔QWERTY, Input Mode,
Input Method)
Finalize segment conversion during input
Input carriage return
Move to next input field
Finish input
Input half-width “-”
Input half-width “+”
Input “P” (pause)
10-key
Input the character displayed on the key
(available characters depend on the input
mode)
■
The icons and menus that actually appear may vary
depending on the application or function in use.
Explanation
Page 25
Changing Input Modes
While entering character▶Long-touch
▶[Input Mode]▶Select an input
mode
Icon Explanation
Hiragana-Kanji
Full-width Katakana
Half-width Katakana
Full-width Alphabet
■
The input mode icon is also displayed on the status
bar.
■
The input mode may not be changed depending
on the applications or functions in use.
Icon Explanation
Half-width Alphabet
Full-width Numeric
Half-width Numeric
Before Using Your New Cell Phone
23
Page 26

Basic Functions
Using Android
Home Screen
Menu Screen
Quick Search
Page 27
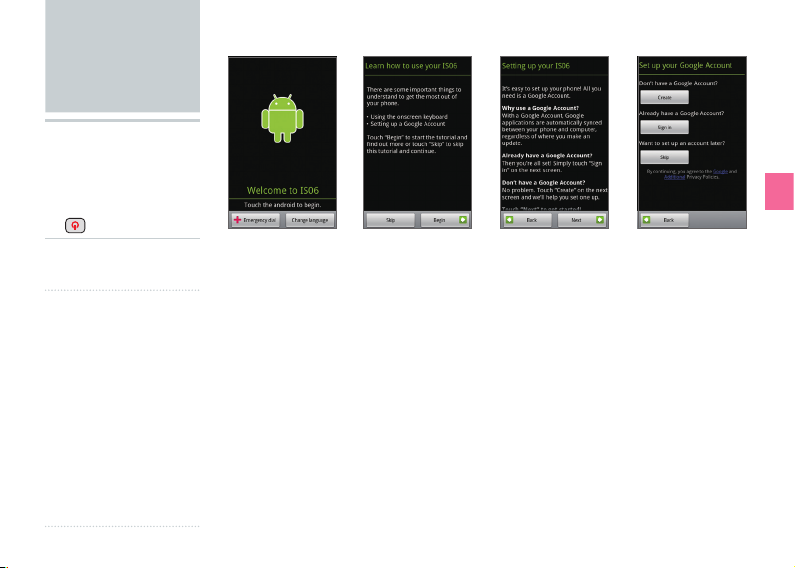
Using Android
▶ Using your IS06
for the first
time
▶ Hold down
(Power)▶
NOTE
■
If you register multiple
accounts you can
synchronize contacts
and other information
for each registered
account.
■
If you do not register a
Google account, you
may not be able to
recover your contacts
if they are lost. Be
sure to register a
Google account
before using Android.
▶ ▶ ▶
Tap the
Android robot
■
When you turn on the IS06 for the first time and unlock the screen using slide
unlock, you will see an illustration of the Android robot. Tap the robot to begin
using your IS06.
■
If you already have a Google account, tap [Sign in] to register your Google
account to your IS06. Or you can create a new Google account by tapping
[Create]. You must register a Google account in order to use Google online
services such as Gmail, Google Talk, or Google Calendar or to download
applications and other items from the Android Market.
■
Follow the on-screen instructions to set up your Google account, configure your
Google location settings and data backup settings, then tap [Next]. Tap [Finish
setup] to return to the Home screen and begin using your IS06.
Read usage
instructions
Read setup
instructions
Google account
setup
Basic Functions
25
Page 28

Home Screen
▶While using
a function/
application
▶
(Home)▶
What is the Home screen?
The Home screen is
displayed first when you
turn on the IS06, and is the
screen from which you start
all your applications, other
functions, and menus.
You can arrange the icons
for your applications and
other functions, menu
icons, widgets, and set any
wallpaper as you like.
26
Using the Home Screen
Status bar
❶
Widget
❷
Wallpaper
❸
Folder icon
❹
Shortcut icon
❺
Dialer
❻
Browser
❼
Contacts
❽
Menu
❾
❶ Displays notification icons, status
icons, and the current time.
❷ An application that you can use by
adding it to the Home screen.
❸ Allows you to change the wallpaper
on your Home screen.
❹ Tap to open the folder.
■
Press (Home) when using an application or other function to display the
Home screen at any time.
■
You can flick the Home screen to the left or right to change Home screens. There
are a total of seven Home screens: three to the left, and three to the right. You
can put icons and widgets on these Home screens as you like.
❺ Execute the application or function.
❻ Opens the Dialer.
❼ Opens the browser.
❽ Opens your Contacts.
❾ Displays a list of applications and
other functions.
Page 29
▶While using
a function/
application
▶
(Home)▶
Viewing the Status Bar
■
A notification icon will appear if you have a missed
call or received a new mail. Status icons that inform
you about signal strength, remaining battery life,
and other essential status updates for your phone
are also displayed.
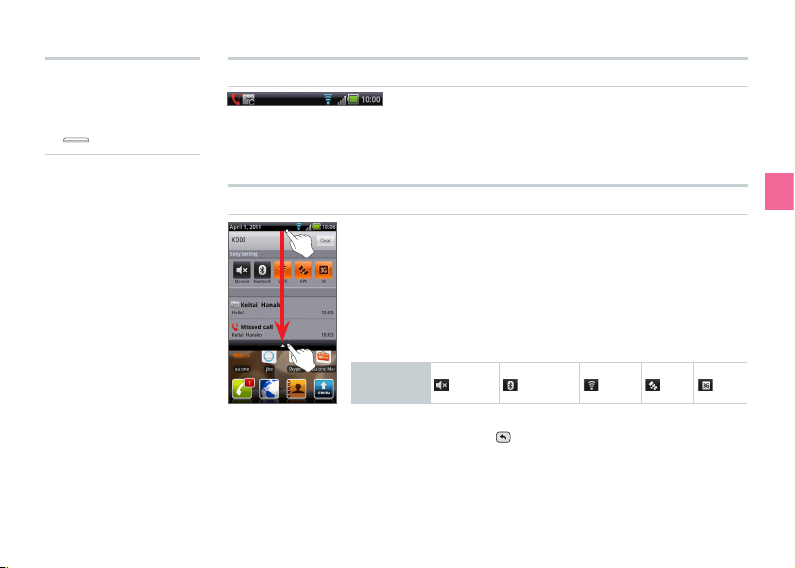
Showing the Notification Panel/Using Easy Setting
Drag the Status Bar down
■
The notification panel will open, and you will see detailed
information about the status icons and easy setting icons.
■
You can tap on these details to either use that function or
change settings for that function.
■
Simply tapping the easy setting icons turns on or off
functions such as manner mode, Bluetooth
3G.
Easy Setting
Icons
■
To close the notification panel, drag the △ at the bottom of
the screen up or tap
Manner Bluetooth Wi-Fi GPS 3G
(Back).
®
, Wi-Fi, GPS, and
Basic Functions
27
Page 30
▶While using
a function/
application
▶
(Home)▶
28
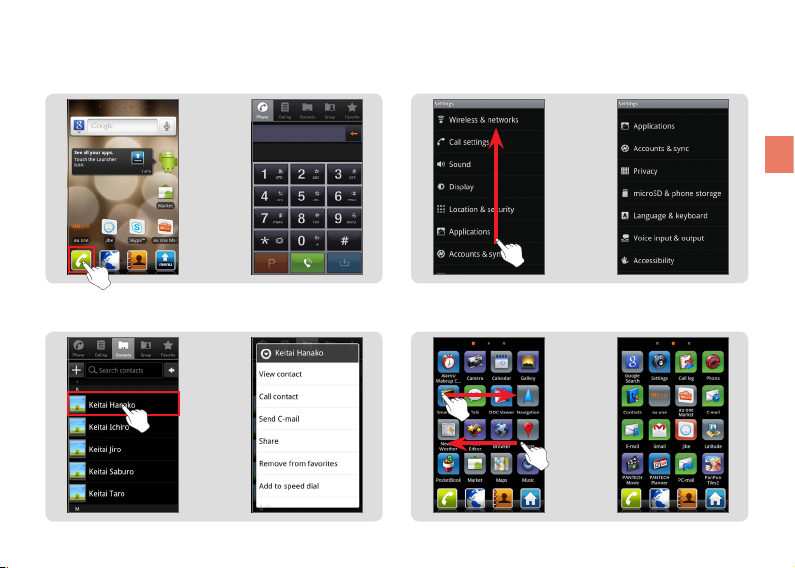
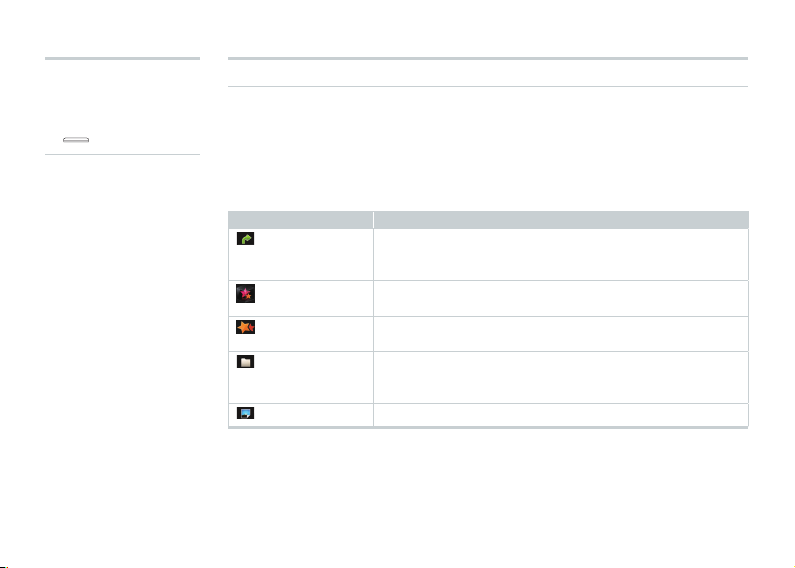
Using Applications/Widgets/Folders
Executing Applications and Widgets/Opening Folders
Tap the application/widget/folder
Adding a New Widget or Icon
Long-touch the wallpaper on the Home screen
Icon Explanation
[Shortcuts] Add applications to the Home screen in the form of a
[3D Widgets] Add 3D widgets for photo albums, calendars, and other
[Widgets] Add widgets such as the RSS reader, YouTube, Google
[Folders] Add shortcuts to folders such as the Contacts to the
[Wallpaper]
shortcut. You can also add shortcuts for bookmarks,
music playlists, contacts, settings, and other functions.
functions to the Home screen.
Search to the Home screen.
Home screen. Folders can also be used as containers to
organize the icons on the Home screen.
Change the wallpaper on the Home screen.
Page 31

▶While using
a function/
application
▶
(Home)▶
Moving Applications/Widgets/Folders
Long-touch the application/widget/folder to
move
▶Drag to the desired location
Basic Functions
Deleting Applications/Widgets/Folders
Long-touch the application/widget/folder to
delete
▶Drag to
29
Page 32

▶While using
a function/
application
▶
(Home)▶
30
Managing Folders
Tap the Folder
■
The folder will open, and you will see the contents of that
folder. Tap any of the icons in that folder to execute that
application or function.
■
You cannot put other folders or widgets inside a folder.
Page 33

Menu Screen
Using Applications and Other Functions
▶ [menu]▶
Executing an Item on the Menu Screen
Tap the Icon
■
When you open the Menu screen you will see icons for all the
applications and functions you can use on your IS06.
■
If you execute any other application or function or press
(Home) to return to the Home screen while you are
already using an application or function, the application or
function currently used will not close so that you can return
to it later.
■
When you are using an application or function, you can
access additional functions by tapping
can use search functions unique to that application or
function by pressing
Some applications and functions may not support the use of
(Menu) and (Search).
Basic Functions
(Menu), or you
(Search) on the side of the IS06.
31
Page 34

Quick
Search
Using Quick Search
▶ (Search)▶
32
Text Search
Enter a keyword into the Quick Search input field
■
Press (Search) on the side of the IS06 to display the Quick Search screen.
■
When you are already using another application (Dialer, Gmail, browser, etc.),
pressing
application.
(Search) may allow you to use search functions unique to that
Voice Search
▶Say the keyword into the microphone while [Speak now]
is displayed
■
The browser will load and Google search results will be displayed.
■
You can also hold down (Search) to display the Google Voice Search screen.
Page 35

Phone Functions
Making a Phone Call
Receiving a Call
In Call Functions
Call Log
Contacts
Page 36

Making a Phone Call
▶ ▶
34
Entering a Phone Number to Call
Enter the phone number starting with the area
code▶
■
If you make a mistake entering the phone number, tap to
delete the last digit you entered. Long-touch
digits.
■
After you enter four digits or more, the Dialer will automatically
search through the Contacts and display search results. Tap
to view all search results. Select a phone number from the
search results to call it.
■
Tap with no phone number entered to open your call log.
Long-touch
to re-dial the last number you called.
to delete all
Making International Calls
Calling Internationally From Your IS06 (au International Call Service)
Enter international access code “001010” or “010”▶Enter
country code▶Enter area code▶Enter the phone number
you want to dial▶
For more information on au International Call Service, dial either of the
following numbers:
■
From au cell phones (toll-free): 157 (area code not required)
■
From fixed-line phones (toll-free): 0077-7-111 (Open 9:00 to 20:00 everyday)
Page 37

▶ ▶
Searching and Calling From Your Contacts
Press (Search)▶Enter all or a portion of a
name▶Select a contact▶
■
You can use the search Contacts function by pressing
(Search) even while using the Phone, Call log, Group, or
Favorite.
Making a Call Using the Call Log
[Call log]▶ to the right of the phone number
Phone Functions
35
Page 38

Receiving a Call
36
Drag to the right when receiving an
incoming call
■
When receiving a call, the following information will appear.
• If the caller allows showing their phone number, their phone
number will appear on the display.
• If that phone number and name are registered in your
Contacts, the caller’s name and other information will be
shown. If an image for that contact is registered, the image
will also be displayed.
• If the caller does not allow showing their phone number, the
reason for blocking will be displayed.
“ID Unsent” “Payphone” “Not Support”
■
Tap [End] to end the phone call.
When You Missed a Call
■
will appear on the status bar.
■
Open the notification panel to see what time the call was received and the phone
number of the caller. You can also tap any relevant information to view your call
log.
Page 39

In Call Functions
▶In a call ▶
Adjusting the Receiver Volume
Press (Volume) to adjust the receiver volume to six
different levels
Call Log
▶
▶ [Call log]▶
Viewing Your Call Log
Select a call log
Key
Descriptions
■
You can view all logs, incoming/outgoing/missed, and C-mail logs.
Making a Call From Your Call Log
All logs Incoming Outgoing Missed C-mail
Select the call log to call▶ [Call]
Sending E-mail/C-mail From Your Call Log
Long-touch a phone number▶[Send E-mail]/[Send C-mail]
Phone Functions
37
Page 40

Contacts
Adding a New Contact
▶ ▶
38
Add a New Contact from the Dialer
[Phone]▶Enter phone number▶ ▶[Create new
contact]
Add a New Contact from the Call Log
[Call Log]▶Long-touch a relevant phone number▶[Add
to contacts]▶[Create new contact]
Add a New Contact from the Contacts
[Contacts]▶ (Menu)▶ [New contact]▶Enter each
item▶[Done]
Page 41

▶
▶ [Contacts]▶
Viewing Your Contacts
Viewing Individual Contacts
Quick Contact
Select contact’s photo▶Select icon
Icon
Examples
Deleting a Contact
Make phone call Send C-mail
Send E-mail
Send PC-mail
Send Gmail
View position using
Google Maps
Chat
Long-touch contacts▶[Delete contact]
■
By tapping (Menu)▶ [More]▶[Delete], you can delete multiple, or all,
contacts at once.
■
After synchronizing your Contacts, deleting a contact on your IS06 will also
delete that contact from your Google Account Contacts.
Editing a Contact
Long-touch contacts▶[Edit contact]
Phone Functions
39
Page 42

Mail Functions
E-mail
C-mail
PC-mail
Page 43

▶ [menu]
▶
[E-mail]
▶
Configuring E-mail Initial Settings
The initial settings screen is displayed the first time you use the E-mail application
after purchase. During initialization, an E-mail address is automatically set. You can
change this E-mail address.
[OK]
■
You need to sign up for IS NET to use E-mails (XXX@ezweb.ne.jp). If you do not
have signed up at the time of the purchase, contact an au shop or the Customer
Service Center.
■
Initial settings are not necessary if you change your phone model from an au cell
phone with which you were already using E-mails.
■
E-mail can be exchanged with cell phones supporting E-mails and computers.
Besides text, data like photo and video can be sent as well.
■
The packet communication charge for sending and receiving E-mails applies to
the amount of data sent and received.
■
E-mail transmission may require some time depending on the signal strength of
the area for E-mails with attachment.
E-mail Contacts
With the IS06 software V06.1X.XX released in November 2011, contact information is
no longer stored in E-mail Contacts but is registered in IS06 Contacts. This manual
provides explanation for the IS06 updated to the software V06.1X.XX Note that
procedures and settings differ if your IS06 is not updated to this software version.
Each contact stored in E-mail Contacts must be registered individually to the IS06
Contacts.
E-mail ringtone “Individual setting” and “receive all” used in E-mail Contacts can
be kept after the update.
Mail Functions
41
Page 44

▶ [menu]
▶
[E-mail]
▶
42
■
The software version of your phone can be checked from “V” in [MENU] ▶
[Settings] ▶
■
With the software V06.1X.XX, the contents stored in E-mail Contacts before the
[System] ▶ [About phone] ▶ [Boad and Software version].
update can be seen and deleted, but cannot be edited anymore.
Transferring E-mail ringtone “Individual setting” and “receive all” from
E-mail Contacts
After the software V06.1X.XX update, the “Version up notice” screen is displayed
when using the E-mail application. You can choose to transfer the E-mail ringtone
“Individual setting” and “receive all” used in E-mail Contacts to “Inform settings”
and “E-Mail receive mode individual settings” after the update.
[Yes]▶[Yes]▶[OK]
■
These settings can also be transferred from backup data stored in a microSD
memory card.
■
When backup data is available from both the IS06 and a microSD memory card,
a data selection screen is displayed.
■
When several Contacts lists are registered, a Contacts list selection screen is
displayed.
■
When there is no E-mail Contacts data neither in the IS06 nor the microSD
memory card, like when data was deleted or when you did not use this function,
the “Version up notice” screen is not displayed.
■
Put (check) in “Don’t show this dialog again.” and tap [Yes]/[No] in the
“Version up notice” screen to prevent this screen from appearing again in the
future when using the E-mail application.
■
Tap (Menu) ▶ [E-mail Contacts view] ▶ (Menu) ▶“Transfer Ringtone/
Receive mode data” to transfer the settings.
Page 45

▶ [menu]
▶
[E-mail]
▶
Registering E-mail Contacts contents to IS06 Contacts
(Menu) ▶ [E-mail Contacts view] ▶Select a group
▶Select a contact ▶
(Menu) ▶[Add to Contacts]
▶[Create new contact] ▶[Done]
■
Tap an existing contact after taping [Create new contact] to add information to a
contact already registered.
■
When backup data is available from both the IS06 and a microSD memory card,
a data selection screen is displayed.
■
When several Contacts lists are registered, a Contacts list selection screen is
displayed.
■
When several Google accounts are registered in the IS06, a registered account
selection screen is displayed.
Mail Functions
43
Page 46

▶ [menu]
▶
[E-mail]
▶
44
Viewing E-mail Contacts
(Menu) ▶ [E-mail Contacts view] ▶Select a group
▶Select a contact
■
When backup data is available from both the IS06 and a microSD memory card,
a data selection screen is displayed.
■
When several Contacts lists are registered, a Contacts list selection screen is
displayed.
Deleting E-mail Contacts
(Menu) ▶ [E-mail Contacts view] ▶ (Menu)
▶[Delete E-mail contacts] ▶[Yes]
■
When backup data is available from both the IS06 and a microSD memory card,
a data selection screen is displayed.
■
When several Contacts lists are registered, a Contacts list selection screen is
displayed.
Page 47

▶ [menu]
▶
[E-mail]
▶
Sending E-mail
[New]▶[Recipient]▶[Direct input]
▶Enter recipient▶[Done]▶[Subject]
▶Enter subject▶[Return to edit body]
▶Enter message▶
[Send]▶[OK]
<E-mail composition screen>
■
The recipient can be selected from Contacts, E-mail incoming and outgoing
logs, etc.
■
Tap [Save] to save the E-mail in the [Draft] folder.
■
Tap [Edit] to edit the message content.
■
Tap [Discard] to discard the E-mail.
Mail Functions
45
Page 48

▶ [menu]
▶
[E-mail]
▶
46
Attaching Data
On the E-mail composition screen, tap [Attachment]▶[Add
attachments]
■
A maximum of 5 files (no more than 2 MB in total) can be attached.
Decorating a Message
On the E-mail composition screen, tap [Deco.]
■
You can create decorated mails by changing the text and background colors or
adding Decoration emoticon.
Viewing Received E-mails
[Inbox]▶Select an E-mail
Opening/Saving Attachments
[Inbox]▶Tap / on E-mails with files attached ▶[Open] /
[Save]
Checking and Receiving New E-mails
[Check]
■
You can check the new mails and receive them when the [Auto Receive] function
is disabled or when the reception failed.
Check the E-mails in Each Folder
Select a folder▶Select an E-mail
Page 49

▶ [menu]
▶
[E-mail]
▶
Setting Mail Filters
Mail filters have functions to receive and reject specific mail messages and to
reject mail messages spoofing cell phones or PHSs.
Setting the Mail Filter as Recommended
(Menu)▶ [Setting]▶[E-mail settings]▶[Other settings]
▶[OK]▶[オススメの設定はこちら] (See Recommended
Settings)▶[登録] (Register)
■
Set the mail filter that enables to reject spoofing or auto-forwarded mail
messages, and to receive mail messages from cell phones, PHSs or PCs.
Setting Details of the Mail Filter
(Menu)▶ [Setting]▶[E-mail settings] ▶[Other settings]
▶[OK]▶[迷惑メールフィルター] (Mail Filter)▶Select
(Entry
field)▶Enter your security code▶[送信] (Send)
Mail Functions
カンタン設
定 (Simple
Settings)
「携帯」「PHS」「PC」
1.
メールを受信(1. Receive
Mail Messages from Cell
Phone, PHS or PC)
「携帯」「PHS」メール
2.
のみを受信 (2. Receive
only Mail Messages
from Cell Phone or PHS)
Rejects spoofing or auto-forwarded mail
messages, and receives mail messages
from cell phones, PHSs or PCs.
Rejects PC addresses, mail newsletters,
spoofing mail messages or autoforwarded mail messages, and receives
mail messages from cell phones or PHSs.
47
Page 50

▶ [menu]
▶
[E-mail]
▶
48
詳細設定
(Advanced
Settings)
一括指定受信 (Collective
Receive Setting)
なりすまし規制 (Spoof
Restriction)
指定拒否リスト設定 (Reject
Mail Address List Setting)
指定受信リスト設定
(Allowed Address List
Setting)
指定受信リスト設定(なりす
まし・転送メール許可)
(Allowed Address List
Setting (Spoofing or
Forwarded Mail Messages))
HTMLメール規制 (HTML
Mail Restriction)
Receives or rejects all mail messages
from the Internet or cell phones.
Rejects mail messages sent with an
alleged sender address. You can
set the following levels; 高 (High), 中
(Medium), 低 (Low).
Rejects mail messages from certain
mail addresses, domains or parts of
addresses to the left of “@” that are
contained in the specified address list.
Prioritizes reception of mail messages
from certain mail addresses, domains or
parts of addresses to the left of “@” that
are contained in the specified address list.
•
To block mail messages from
addresses other than the specified
ones, unmark all items in 一括指定受信
(Collective Receive Setting) to set to off
(to reject receiving).
Avoids the mail block due to なりす
まし規制 (Spoof Restriction) setting,
and receives auto-forwarded mail
messages.
Rejects mail messages in HTML format.
Page 51

▶ [menu]
▶
[E-mail]
▶
詳細設定
(Advanced
Settings)
設定確認/設定解除 (Check Settings/
Release Settings)
URLリンク規制 (URL Link
Restriction)
拒否通知メール返信設定
(Block Mail Notification
Setting)
Rejects mail messages that include a
URL.
Sets whether to send a receiver error
(address unknown) mail message to the
sender of the rejected mail message.
Checks the setting status of the mail
filters and releases all the settings at
one time.
PC設定用ワンタイムパスワード発行
(Issue One Time Password for PC
Setting)
Issues a one time password to set the
mail filter on your PC. The password
is available within 15 minutes after
issuance.
設定にあたって (Notes on Setting Mail
Filter)
■
Security code is the four-digit number you wrote on your subscription form.
■
If the security code is incorrectly entered three times consecutively during a
single day, the mail filter setting operation will be disabled until the next day.
■
Note that you cannot receive mail messages once rejected by mail filters. Be
Displays the explanation for setting mail
filters.
careful when you set mail filters.
Mail Functions
49
Page 52

C-mail
Sending C-mail
▶ [menu]
▶
[C-mail]
▶
50
Recipient
input field
[Create new]▶Tap the recipient
input field▶Enter recipient phone
number▶Tap message input
field▶Enter message▶[Send]
Message
input field
<C-mail Composition screen>
■
C-mail is a service that uses phone numbers as addresses to exchange
messages between cell phones. C-mail messages can be sent and received
also between cell phones from other companies.
■
A maximum of 70 full-width/140 half-width characters can be entered per
message.
■
C-mail messages of more than 51 full-width/101 half-width characters may be
divided and received in 2 C-mail messages depending on the destination.
■
Some Emoji may not be displayed properly when sending C-mails to a different
model of cell phone.
■
Even if the C-mail has been sent successfully, a transmission error message may
sometimes be displayed if the signal is weak.
■
C-mail cannot be sent if you are in a location with no signal or if your IS06 is set
to airplane mode.
Page 53

▶ [menu]
▶
[C-mail]
▶
Viewing Received C-mails
<Thread list screen>
Message
input field
<Thread details screen>
Select a contact on the thread list
screen▶Check the contents on the
thread details screen
■
On the thread details screen, C-mails received
from the contact and those sent to him/her are
displayed as a dialog.
■
You can send a C-mail reply by entering a
message in the input field on the bottom of the
thread details screen, and tapping [Send].
■
Receiving C-mails is free of charge.
■
C-mail messages of more than 51 fullwidth/101 half-width characters are divided
and received in 2 C-mail messages.
■
Received mails may not be displayed properly
depending on the content.
■
C-mail cannot be received if you are in a
location with no signal or if your IS06 is set to
airplane mode.
Mail Functions
51
Page 54

▶ [menu]
▶
[C-mail]
▶
52
Using the Earthquake Early Warning
The Earthquake Early Warning is a service that delivers Earthquake Early Warning
distributed by the Japan Meteorological Agency to au cell phones in the vicinity
of the earthquake center. The IS06 is set to receive Earthquake Early Warning by
default.
When you receive an Earthquake Early Warning, secure a safe location depending
on your surroundings and remain calm.
■
When an earthquake above level 5.0 on the Japanese scale is anticipated, the
Earthquake Early Warning will immediately provide information on where any
earthquake with a seismic intensity of 4.0 or more is expected to occur.
■
Immediately after an earthquake occurs, the earthquake (P waves or initial
tremors) are captured and the location, scale, and expected seismic intensity
are automatically calculated. The system then notifies affected regions as
quickly as possible some seconds in advance before strong tremors (S waves or
main tremor) begin.
■
Regions near the epicenter may not receive the Earthquake Early Warning
before strong tremors begin.
■
This service is available within Japan only.
■
The Earthquake Early Warning is available completely free of charge.
■
KDDI (au) cannot be held responsible for any losses or damages incurred due
to interrupted communications or system outages resulting in non-received or
delayed information, the content of that information, or any other issues related
to this service.
■
For more details about the Japan Meteorological Agency Earthquake Early
Warning, refer to the Japan Meteorological Agency homepage.
http://www.jma.go.jp/ (for PC)
Page 55

▶ [menu]
▶
[C-mail]
▶
Viewing Received Earthquake Early Warning
When an Earthquake Early Warning is received, a special warning tone will sound
and the phone will vibrate along with a notice on the screen.
Slide the status bar to the bottom▶Select the Earthquake
Early Warning information
■
When an Earthquake Early Warning is received, a warning tone (cannot be
changed) sounds and
■
Earthquake Early Warning cannot be received when in a call, and in some cases
when receiving or sending a C-mail/e-mail or when using the browser or other
applications.
■
Earthquake Early Warning cannot be received in some cases when the power
to the mobile phone is turned off, or when in an area with poor signal quality
(such as in tunnels or below ground). In these cases, missed Earthquake Early
Warning cannot be received again.
■
This system is not the same as those that distribute Earthquake Early Warning to
TV, radio, or other forms of media and therefore the time when such notifications
are received may vary from those other media sources.
■
In some cases you may receive information regarding a region different from that
of your current location.
■
You cannot change the Earthquake Early Warning tone or adjust its volume.
is displayed in the status bar.
Mail Functions
53
Page 56

▶ [menu]
▶
[C-mail]
▶
54
Setting Up the Earthquake Early Warning
(Menu)▶[Settings]
Receive Setting Set whether or not you want to receive Earthquake Early
Check Ring/Vib This option allows you to hear the warning tone that is played
Sound in
manner mode
Warning.
[Receive] [Not Receive]
when an Earthquake Early Warning is received and feel the
vibration that occurs.
Set the warning tone when in manner mode. The phone
vibrates regardless of the current [Vibrate] setting.
[Noti. with ringtone & vibration] [Noti. with only vibration]
• When set to [Noti. with ringtone & vibration], the warning
tone will play and the phone will vibrate, even when the
phone is set to manner mode or silent mode.
• When set to [Noti. with only vibration], the phone will only
vibrate without a warning tone when set to manner mode or
silent mode.
Page 57

▶ [menu]
▶
[C-mail]
▶
C-mail Safety Block
C-mail safety block is a function that allows you to reject C-mails that include URLs
(http://△△△, https://△△△) or phone numbers in the C-mail message text.
■
C-mail safety block is valid by default. Cancel the setting if you want to receive
C-mails that include URLs and phone numbers in the message text.
Setting the C-mail Safety Block
You can set the C-mail safety block by sending C-mail to a specified phone
number.
Canceling the setting Input “Cancel” in the C-mail message and send to
09044440010.
Enabling the setting Input “Enable” in the C-mail message and send to
09044440011.
Confirming the setting Input “Confirm” in the C-mail message and send to
09044440012.
■
Sending the C-mail for this setting is free of charge.
■
A C-mail reporting that settings are complete arrives from “09044440012”.
When a C-mail is Blocked by the C-mail Safety Block
When a C-mail is blocked by the C-mail safety block, “Unable to send to selected
person.” is displayed and the C-mail is not sent.
Mail Functions
55
Page 58

▶ [menu]
▶
[C-mail]
▶
56
Setting Up a C-mail Receiving Filter
(Menu)▶[Settings]▶[Receiving filter settings]
Specified
No. setup
Specified
No. list
Unregistered
Contacts
Specify a particular phone number to block incoming C-mails
Select a phone number to block incoming C-mails by tapping
(Menu)▶[Quote Contacts], [Quote Outgoing call log], [Quote
Incoming call log], [Quote C-mail log], or [Direct input]
• You can register up to 20 phone numbers.
• Long-touch an already registered phone number to edit or delete
that number.
Block C-mails from all phone numbers that are not registered in
your Contacts
Page 59

PC-mail
▶ [menu]
▶
[PC-mail]
▶
Setting Up PC-mail
You can send and receive PC-mail compatible with POP3, IMAP, or Exchange on
your IS06.
In order to use PC-mail, you need to configure your user name, password,
incoming server, and outgoing server settings. Please refer to your PC-mail
provider for questions about these settings.
The “type of account”, “incoming server settings”, and “outgoing server settings”
will automatically be detected for some mail addresses.
Adding a PC-mail Account (First-time Registration)
Enter mail address and password▶[Next]▶Select account
type▶Incoming server settings▶[Next]▶Outgoing server
settings▶[Next]▶Account options▶[Next]▶Enter account
name and name to display for outgoing mail▶[Done]
Adding a PC-mail Account
(Menu)▶ [Accounts]▶ (Menu)▶ [Add account]
▶Enter mail address and password▶[Next]▶Select account
type▶Incoming server settings▶[Next]▶Outgoing server
settings▶[Next]▶Account options▶[Next]▶Enter account
name and name to display for outgoing mail▶[Done]
■
You can add multiple PC-mail accounts and manage the incoming/outgoing mail
separately for each account.
Mail Functions
57
Page 60

▶ [menu]
▶
[PC-mail]
▶
58
Managing Received PC-mail
Viewing Received PC-mail
Select account▶Select mail in Inbox
■
Tap / to view the previous/next mail.
■
Tap [Reply], [Reply all], or [Delete] to perform the respective action while the
contents of a mail are displayed.
■
You can star important mails so that they are easy to find later. Tap to the right
of the subject while the contents of a mail are displayed to star that mail. Or tap
to the right of a mail in your Inbox to star that mail.
Viewing Incoming PC-mail From All Registered Accounts
[Combined Inbox]
■
Register multiple PC-mail accounts to display [Combined Inbox].
■
You can also display [Combined Inbox] with only one mail account registered
by tapping
(Menu)▶ [Account].
Viewing Starred Mails
[Starred]
■
Star important mails or mails you want to read again later and you can view
them from your Starred Inbox.
Page 61

▶ [menu]
▶
[PC-mail]
▶
Viewing Your Inbox/Drafts/Outbox/Sent/Trash Mails
Select account▶ (Menu)▶ [Folders]▶Select Inbox/
Drafts/Outbox/Sent/Trash
Sending PC-mail
Select account▶ (Menu)▶ [Compose]▶Enter recipient,
subject, and message body▶[Send]
■
You can send a mail to multiple contacts by separating their mail addresses with
a comma (,) or semi-colon (;).
■
You can save a mail you have written as a draft instead of sending it immediately.
■
You can also include photos, movies, documents, and other data as an
attachment to your mails.
Mail Functions
59
Page 62

Google Functions
Using Google Services
Gmail
Android Market
Google Voice Search
Using Other Google Services
Page 63

Using Google Services
▶Using your IS06
for the first
time
▶Hold down
(Power)▶
Registering an Existing Google Account
Registering an Existing Google Account for the First Time
Tap the Android robot▶[Begin]▶[Next]▶[Sign in]▶Enter
your username and password▶[Sign in]▶Follow the
on-screen instructions
■
After the Google account registration screen, the Google Location Setup screen
and Backup Data Setup screen will be displayed. You must perform the Google
location setup so that applications such as Google Maps can check your
current physical location. If you want to back up some of your IS06 settings and
application data to Google’s servers, configure your data backup settings.
■
You can register an existing Google account to your IS06 or create a completely
new Google account from your IS06 directly.
■
After registering your Google account to your IS06, you will be able to use
Google services such as Gmail, Google Calendar, and Google Talk as well as
download applications from the Android Market.
■
You can only use the Google account you registered to your IS06 initially for
Google Talk and some other functions and menus. Be aware of this when
registering Google accounts to your IS06.
■
To delete the Google account you registered first, select [menu]▶
[Settings]▶ [System]▶ [Privacy]▶[Factory data reset] to reset your IS06
to its factory default settings.
■
Some Android Market applications may not be compatible with the IS06.
■
Google applications and services are subject to change without any prior notice.
Google Functions
61
Page 64

▶Using Google
services for the
first time▶
Registering an Existing Google Account to Use Google Services for the
First Time
[Next]▶[Sign in]▶Enter your username and
password▶[Sign in]▶Follow the on-screen instructions
■
If you did not set up your Google account the first time you used your IS06, the
Google Account Registration screen will appear the first time you use some
Google services that need Google account.
■
You can only use the Google account you registered to your IS06 initially for
Google Talk and some other functions and menus. Be aware of this when
registering Google accounts to your IS06.
■
To delete the Google account you registered first, select [menu]▶
[Settings]▶ [System]▶ [Privacy]▶[Factory data reset] to reset your IS06
to its factory default settings.
▶
When registering
a Google account
▶
62
Creating a New Google Account
[Create]▶Enter your first name, last name and
username▶[Next]▶Follow the on-screen instructions
■
If you do not have a Google account, or if you want to create a new Google
account, you can create one directly from your IS06.
Page 65

Gmail
Viewing Your Inbox
▶ [menu]
▶
[Gmail]▶
What is Gmail?
Gmail is a mail service
provided by Google.
You can view and send
Gmail from your IS06.
Refer to the Google
homepage for more detailed
instructions on how to use
Gmail.
View mails
■
If you have registered multiple Google accounts, the Inbox for the last account
you checked will be displayed.
■
Mails will appear in the order they were received. The number of unread mail
messages in your Inbox and the mail account currently viewed are shown at the
top of the screen.
■
Add a (Check) beside any mail to use the Archive, Delete, and Labels
functions.
■
Archived mails will not be shown in the Inbox. To view archived mails, tap
(Menu)▶ [Go to labels]▶[All Mail] in that order.
■
Tap to the right of a mail to star that mail. To view starred mails, tap
(Menu)▶ [Go to labels]▶[Starred] in that order.
Switching Gmail Accounts
(Menu) ▶ [Accounts]▶Select an account
■
You can switch accounts and add new accounts.
■
The number to the right of an account shows the number of unread mails for that
account.
Google Functions
63
Page 66

▶ [menu]
▶
[Gmail]▶
64
Viewing the Contents of a Received Mail
Select a mail
■
Tap to the right of the sender’s name to star the mail.
■
Tap [Reply] to the right of the sender’s name to compose a reply to the mail.
to use [Reply all] and [Forward].
Tap
■
Read mails will appear with a gray background in the Inbox to differentiate them
from unread mail.
■
Tap [Archive] below the mail body to save the mail in your Archive. To view
archived mails, tap
■
Tap [Delete] below the mail body to delete the mail.
■
Tap / below the mail body to view the previous/next mail.
(Menu)▶ [Go to labels]▶[All Mail] in that order.
Sending Mails
(Menu)▶ [Compose]▶Enter recipient, subject, message
body▶
■
You can save a mail you have written as a draft instead of sending it immediately.
■
You can also include photos as an attachment to your mails.
Showing Labels
(Menu)▶ [Go to labels]
■
Select a label to view all mails set with that label.
■
mails can be viewed and managed together in the Starred Inbox.
Page 67

Android Market
▶ [menu]
▶
[
Market]
▶
What is the Android
Market?
Android Market is an
application distribution
service run by Google. You
can download many free
and fee-based applications
for your IS06 using the
Android Market.
Refer to the Google
homepage for more detailed
instructions on how to use
the Android Market.
Using the Android Market
Downloading Applications
Select an application to download▶View application
information▶[Download]/Select the price▶[Accept &
download]/[Accept & buy]
■
You must register a Google account to your IS06 in order to use the Android
Market.
■
Application downloads and install completion notifications will appear in the
status bar. When installation finishes, the icon for the installed application will
appear on the Menu screen.
■
To download fee-based applications, you must use the au kantan payment
method or the Google Checkout service. Follow the on-screen instructions to
perform the necessary steps.
Searching for Applications
(Search)
■
Enter some characters to search for an application on the Search screen.
Google Functions
65
Page 68

▶ [menu]
▶
[Market]▶
66
Deleting Downloaded Applications
(Menu)▶ [My Apps]
▶Select an application▶[Uninstall]▶[OK]
NOTE
■
You take full responsibility for any applications you download. Check to make
sure an application is safe before installing it. Some applications may contain
viruses, cause data corruption, or transmit your current location, usage logs,
and/or personal information stored on your cell phone to the Internet.
■
au takes no responsibility for any damages or problems caused by applications
you install on your cell phone. Repairing any such problem may not be covered
under the warranty and only be performed for a fee.
■
au takes no responsibility for any losses to you or any other third party caused
by applications you install on your cell phone.
■
Some applications may not function without a microSD memory card.
■
Some applications may prevent your phone from entering sleep mode, or will run
in the background severely wasting the battery.
■
You can uninstall any applications you no longer need.
■
If you believe an application is causing a problem with your IS06, uninstall
the relevant application immediately. However, note that this will not solve all
problems in all cases.
Page 69

Google Voice Search
▶ [menu]
▶
[Voice
Search]▶
Using Voice Search
Say the keyword into the microphone while [Speak now] is
displayed
■
The browser will load and your Google search results will be displayed.
Google Functions
67
Page 70

Using Other Google Services
▶ [menu]
▶
[Talk]▶
Using Google Talk
Google Talk is a chat service provided by Google.
Refer to the Google homepage for more detailed instructions on how to use Google
Talk.
▶ [menu]
▶
[Maps]▶
▶ [menu]
▶
[Navigation]
68
Using Google Maps
Google Maps is an online map service provided by Google. You can use Google
Maps to view your current location on the map and find directions to your
destination. You can superimpose aerial photographs and traffic information (only
in areas where such data is provided) directly on the map.
Refer to the Google homepage for more detailed instructions on how to use Google
Maps.
Using Google Maps Navigation
▶
Google Maps Navigation is a navigation service provided by Google. This service
provides you with navigation information to your destination.
Refer to the Google homepage for more detailed instructions on how to use Google
Maps Navigation.
Page 71

▶ [menu]
▶
[Places]▶
Using Google Places
Google Places is an online information service provided by Google. You can use
Google Places to search for information related to shops, services, and places.
Refer to the Google homepage for more detailed instructions on how to use Google
Places.
▶ [menu]
▶
[
Latitude
▶ [menu]
▶
[News &
Weather]▶
▶ [menu]
▶
[
Calendar]
]▶
▶
Using Google Latitude
Google Latitude is a location information sharing service provided by Google. You
can use Google Latitude to see where your friends are on the map, send them mail
messages, and more.
Refer to the Google homepage for more detailed instructions on how to use Google
Latitude.
Using Google News and Weather
Google News and Weather is a news and weather service provided by Google.
Refer to the Google homepage for more detailed instructions on how to use Google
News and Weather.
Using Google Calendar
Google Calendar is an online calendar service provided by Google. You can use
Google Calendar to sync all calendars saved online to your Google account to
your IS06 for easy schedule management.
Refer to the Google homepage for more detailed instructions on how to use Google
Calendar.
69
Google Functions
Page 72

Internet Functions
Connecting to the Internet
Browser
au one Market
Page 73

Connecting to the Internet
■
You can connect to the Internet on your IS06 by either of the following methods.
• Packet communications (IS NET, au.NET)
• Wi-Fi
Using Wi-Fi
■
You can connect to the Internet using the wireless LAN setup in your home or
through public wireless LANs when you are out on the go.
■
To connect from your home, you will need an Internet connection and an access
point (wireless router) so that you can connect wirelessly. You will also need to
know the network SSID (network name, SSID, ESS-ID) and password (WEP key,
WPA key, shared key, encrypted key) for your wireless access point.
■
To connect to a public wireless LAN, check the homepage of the public wireless
LAN provider to confirm the current status of the access point beforehand. In
some cases you may need an account with the service provider and an ID and
password for authentication.
Enabling Wi-Fi
[menu]▶ [Settings]▶ [System]▶ [Wireless &
networks]▶Add a
(Check) beside [Wi-Fi]
Internet Functions
71
Page 74

Registering and Connecting to an Access Point
[menu]▶ [Settings]▶ [System]▶ [Wireless &
networks]▶[Wi-Fi settings]▶Select network SSID▶Enter
password▶[Connect]
■
Enter the WEP key or shared key for the wireless access point in the password
field. If the access point does not require a password, the password entry screen
will not appear.
■
(Check) [Show password] to view the password as you enter it.
■
To connect to an open network, add a (Check) beside [Network notification].
Using Data Communication Services
[menu]▶ [Settings]▶ [System]▶ [Wireless &
networks]▶[Mobile networks]▶Add a
(Check) beside
[Data enabled]
■
You can connect to the Internet and transmit packets through IS NET or au.NET.
■
IS NET is an Internet connection service for smartphones. If you have signed
up for EZ WIN before using any IS-series phone, you do not need to sign up
for IS NET. The monthly fee for IS NET is 315 yen (tax included) plus additional
transmission fees.
■
If you are not registered for IS NET, use au.NET instead. The monthly fee for
au.NET is 525 yen (tax included, only for months you use au.NET) plus additional
transmission fees.
72
Page 75

Browser
▶ [menu]
▶
[
Browser
]▶
Displaying a Web Page
■
The au one homepage will be displayed when you launch the browser (by
factory default settings).
Using the Search Box (URL Input Field)
Enter keyword or URL into the search box▶ (Go)
■
If you enter a URL into the search box, the web page for that URL will be
displayed.
■
If you enter a search keyword in the search box, the search results will be
displayed. Tap any relevant item in the list.
■
Tap to view your bookmarks.
■
To use the search box on your Home screen, press (Search) on the side of
your IS06.
Possible Actions While Displaying a Web Page
■
Pinch out to zoom in, and pinch in to zoom out. You can also lightly tap twice to
zoom in and zoom out.
■
You can also tap / that appear while dragging the screen to zoom in and
zoom out.
Internet Functions
73
Page 76

▶ [menu]
▶
[
Browser
74
]▶
Opening a New Window
(Menu)▶ [New window]
■
The au website (http://auone.jp/ by default) is displayed in a new window. Enter
the URL of the website you want to visit or a keyword in the Search Box (URL
Input Field).
Switching Between Windows (When Multiple Windows Are Open)
(Menu)▶ [Windows]
■
A list of all currently open websites will appear. Tap the web page you want to
view and that page will be displayed.
■
Tap to close the window.
Bookmarking the Currently Displayed Web Page
(Menu)▶ [Bookmarks]▶[★Add]▶Enter/view name and
location▶[OK]
■
A list of web pages that you have bookmarked will appear by tapping
(Menu)▶ [Bookmarks]. Tap any web page you like from your bookmarks to
quickly connect to it.
Downloading Files
Long-touch the specified item (character, icon, etc.)▶[Save
link]/[Save image]
■
Downloaded files are stored on your microSD memory card. (Menu)▶
[More]▶[Downloads] allows you to find all of your previously downloaded
files.
Page 77

au one Market
▶ [menu]
▶
[au one
Market]▶
■
au one Market is an application distribution site for au Android smartphones
running au Android by KDDI (au).
■
You can download many free and fee-based applications and widgets for your
IS06.
■
Terms of Service are displayed for the first time you activate au one Market.
Check the content and tap [同意] (Agree) to use au one Market.
■
An au one ID is required to use some of the au one Market functions. Refer to the
Instruction Manual (Japanese) for more information about au one ID registration.
Downloading Applications
Select an application to download ▶[ダウンロード] (Download)
■
Download procedures may differ depending on the distributor. Follow the
on-screen instructions.
■
A security password is required to buy fee-based applications using au kantan
payment method. The security password is your security code by default. The
security code is the four-digit number you wrote on the subscription form.
■
Application download and installation completion notifications will appear in the
status bar. When installation finishes, the icon for the installed application will
appear on the Menu screen. Installed widgets can be set and executed from the
Home screen.
Internet Functions
75
Page 78

▶ [menu]
▶
[au one
Market]▶
76
Deleting Downloaded Applications
[マイアプリ] (My apps)▶Select an application▶[アンインス
トール] (Uninstall)▶[はい] (Yes)
NOTE
■
You take full responsibility for any applications you download. Check to make
sure an application is safe before installing it. Some applications may contain
viruses, cause data corruption, or transmit your current location, usage logs,
and/or personal information stored on your cell phone to the Internet.
■
au takes no responsibility for any damages or problems caused by applications
you install on your cell phone. Repairing any such problem may not be covered
under the warranty and only be performed for a fee.
■
au takes no responsibility for any losses to you or any other third party caused
by applications you install on your cell phone. Use au one Market in accordance
with the Terms of Service. Download procedures and fee-based applications
payment methods may differ depending on the au one Market distributor. Some
applications may not function without a microSD memory card.
■
Some applications may prevent your phone from entering sleep mode, or will run
in the background severely wasting the battery.
■
If you believe an application is causing a problem with your IS06, uninstall
the relevant application immediately. However, note that this will not solve all
problems in all cases.
Page 79

Multimedia Functions
Camera
Gallery
Page 80

Camera
▶ [menu]
▶
[Camera]▶
78
Before Taking a Photo
Icon Explanation
■
Tap the screen to display the icons.
Zoom adjustment
(9 levels)
Brightness
adjustment
(9 levels)
Function
Camera mode
setting
Icon Explanation
[VIEW]
Show Gallery
Take photo
(Shutter)
[SET]
Photography
mode
Movie mode
(◦denotes the
current mode)
Taking a Photo
(Take photo)
■
Photos taken using your IS06 will be saved under “Camera” on your microSD
memory card automatically.
Page 81

▶ [menu]
▶
[Camera]
▶
(Take photo)
▶
After Taking a Photo
When [View after Saving] is ON (Default)
Icon Explanation
Zoom (10 levels)
Show Gallery
Send (Bluetooth®, E-mail, Gmail, PC-mail,
PhotoEditor, Picasa)
Delete automatically saved photos from the
microSD memory card
■
The icons will disappear automatically after a few moments. To display the icons
again, or to remove the icons when they are displayed, simply tap the screen.
■
When you want to take another photo, tap (Back) to return to Photography
mode.
Multimedia Functions
79
Page 82

▶ [menu]
▶
[Camera]
▶
(Record
movie)▶
80
Before Recording a Movie
Icon Explanation
■
Tap the screen to display the icons.
Zoom adjustment
(9 levels)
Brightness
adjustment
(9 levels)
Function
[VIEW]
Show Gallery
Icon Explanation
Record movie/
/
stop recording
[SET]
Photography
mode
Movie mode
(◦denotes the
current mode)
Record a Movie
(Record)▶ (Stop)
■
Movies recorded using your IS06 will be saved under “Camera” on your microSD
memory card automatically.
■
If you receive a phone call while recording a movie, the screen will change to the
incoming call screen after automatically saving your recording. After you finish
talking, the screen will return to the Movie Preview screen (the screen visible
after saving a recorded movie).
Page 83

▶ [menu]
▶
[Camera]
▶
(Record
movie)
▶
(Record)
▶
(Stop)▶
After Recording a Movie
When [View after Saving] is ON (Default)
Icon Explanation
Show Gallery
Send (Bluetooth®, E-mail, Gmail, PC-mail,
YouTube)
Delete
■
The icons will disappear automatically after a few moments. To display the icons
again, or to remove the icons when they are displayed, simply tap the screen.
■
When you want to record another movie, tap (Back) to return to Movie mode.
Play
Multimedia Functions
81
Page 84

Gallery
Viewing Photos
▶ [menu]
▶
[
Gallery
82
]▶
Select a folder▶Select a photo
■
After selecting the folder, slide in the upper-right corner of the screen
to switch between viewing by sub-folder and viewing all files.
Slideshow Display
Select a folder▶Select a photo▶ [Slideshow]
■
Photos will be shown one-by-one from the photo you selected.
■
If a movie is displayed during the slideshow, tap to play the movie.
Viewing Movies
Select a folder▶Select a movie▶ [Movies]
Icon Explanation
Rewind
Play/stop
/
■
When the movie finishes playing the screen will return to the list of files.
Icon Explanation
Fast forward
Playback time slide bar
Page 85

Useful Functions
Alarm/Wakeup Call
PocketBook
SmartNote
Page 86

Alarm/ Wakeup Call
▶ [menu]
▶
[Alarm/
Wakeup Call]▶
84
Setting an Alarm
[Alarm]▶ [Easy]/ [Timely]/ [Daily]/ [Weekly]
▶Select/enter each item▶
■
You can set up to ten different alarms at once. After you have set one alarm,
[Alarm]▶ (Menu) or (Open)▶ [Add] to add more alarms. To
select
delete an alarm, select
(Check) beside each one you want to delete▶ [Delete].
add a
■
The alarm will automatically stop if left ringing for approximately one minute.
■
If your IS06 is turned off at the time set for an alarm, the alarm will not ring.
Setting a Wakeup Call
[Alarm]▶ (Menu) or (Open)▶ [Select all] or
(Save) except for [Easy]
[Wakeup Call]▶[+Add]▶Select/enter each item▶ (Save)
■
You can set up to ten different wakeup calls at once. After you have set one
wakeup call, select
To delete a wakeup call, select
(Check) beside each one you want to delete▶ [Delete].
■
The wakeup call will automatically stop if left ringing for approximately
one minute. Even if snooze is set, the wakeup call will stop ringing after
approximately one minute.
(Menu) or (Open)▶ [Add] to add more wakeup calls.
(Menu) or (Open)▶ [Select all] or add a
Page 87

PocketBook
Voice Recorder
▶ [menu]
▶
[
PocketBook]
[Voice Recorder]▶ ▶ ▶
▶
■
You can record for a maximum of 60 minutes, and save up to 20 separate
recordings. (You may not be able to save 20 recordings depending on the
amount of free space on your microSD memory card.)
■
If you want to stop recording without saving, press (Back).
Playing Back Your Recordings
Select a File
Icon Explanation
[Volume]
/
[List] Switch to the recordings list screen
[One Time]*
[Continuous]*
[Sequential]*
■
Items denoted with a * will appear in order with each tap on the icon.
A slider bar for adjusting the volume will appear.
Pause/Play
Previous File
Next File
Play the selected file once
Play only the selected file on repeat
Play the files in order from the selected file
Useful Functions
85
Page 88

▶ [menu]
▶
[
PocketBook]
Using the Calculator
▶
Calculating 7 × 9
[Calculator]▶ ▶ ▶ ▶
Icon Explanation
(Save) Name and save the
Setting Up the World Clock
[World Clock]▶ [IntCity]▶ (Menu) or (Open)▶
[Add]▶Add (Check) beside city▶ (Save)
calculation results
Switch to Scientific mode
Icon Explanation
(List)
Display a list of all saved
calculation results
Icon Explanation
[DST]
■
When you have set six cities to your [IntCity], the [Add] menu will not be
shown.
This icon will appear again if you delete one of the six cities.
■
The +/– time represents the time difference with JST (Japan Standard Time).
■
Set DST (Daylight Saving Time) for cities that go on daylight saving time.
86
Set for daylight saving
time
Icon Explanation
[IntCity]
Set for up to six different
cities shown in the World
Clock
Page 89

▶ [menu]
▶
[
PocketBook]
Using the Stopwatch
▶
[Stopwatch]▶ ▶
Icon Explanation
Start measurement again from
the stopped time
Icon Explanation
Clear the stopwatch value and
return to the initial screen
Useful Functions
87
Page 90

SmartNote
Creating a New Note
▶ [menu]
▶
[
SmartNote]
88
If There Are No Previously Saved Notes
Enter note contents▶ (Save)
▶
If There Are Previously Saved Notes
(New Note)▶Enter note contents▶ (Save)
Icon Explanation
(Add Photo)
(Text Input)
(Pen)
(Pen Option)
(BackGround
Set)
(Clear)
Paste in a photo from your Gallery or start the Camera to
add a new photo
Enter characters (font size, color, and position will not
change)
Select a pen
:Pen :Eraser :Highlighter
Set the thickness, stroke (except for the Eraser), and
color (except for the Eraser) of the selected pen
:Thickness :Stroke :Color
Set the background for your note
Clear all/Clear drawing
Page 91

▶ [menu]
▶
[
SmartNote]
Editing an Existing Note
▶
Select a note▶ (Edit)▶Edit contents▶ (Save)
Deleting a Note
(Menu) or (Open)▶ [Select All] or add a (Check)
beside each note to delete▶
[Delete]▶[Yes]
Useful Functions
89
Page 92

In Case of
Loss of Your IS06
Remote Control Lock
Security Lock Service
Page 93

Remote Control Lock
In case of loss of your IS06, you can activate the Remote control lock by calling
your IS06 a set number of times from a registered phone number in order to
prevent others from using your IS06.
▶ [menu]
▶
[Settings]
▶
[System]▶
Activating the Device Administrator
[Location & security]▶[Select device administrators]
▶[Remote control lock]▶[Activate]
■
Activate this item to remotely lock your IS06 using either the [Remote control
lock] or “Security Lock Service.”
Setting Up the Remote Control Lock
[Location & Security]▶[Remote control lock]▶Select items
Remote control
lock
Valid Caller ID You can register up to three phone numbers.
Specified
period
Incoming call
count
■
If [Remote control lock] is not checked under [Select device administrators]
(▶see above), tapping [Remote control lock] will display the “Activate device
administrator?” screen. Tap [Activate] if you want to configure the Remote control
lock.
Enable/disable Remote control lock (Check this option to set
[Valid Caller ID], [Specified period] and [Incoming call count].)
Set the time limit until the number of calls set in the [Incoming
call count] should be received. Set from 1 to 10 minutes.
Set the number of incoming calls until the Remote control lock is
activated. Accepts values between 3 and 10.
In Case of Loss of Your IS06
91
Page 94

■
In case of loss of your IS06, you can configure your IS06 so that the screen will
lock and become unusable after receiving a specified number of calls from a
registered phone number. We recommend that you set a lock pattern, password,
or PIN number beforehand from
[Location & security]▶[Set up screen lock] screen.
■
If [Location & security]▶[Set up screen lock] is set to [None], the PIN “1234”
[menu]▶ [Settings]▶ [System]▶
will be used to lock your screen when you use the Remote control lock function.
Activating the Remote Control Lock From a Registered Phone
Call your IS06 from a phone registered in your [Valid Caller
ID] list as many times as you set for [Incoming call count]
within the [specified period]
■
Be sure not to block your phone number when calling.
■
The Remote control lock cannot be activated if your IS06 is turned off, is outside
the service area, or if airplane mode is turned on. The Remote control lock may
also fail if your IS06 is in an area with poor signal quality.
Unlocking the Remote Control Lock
■
Unlock the screen lock. If [menu]▶ [Settings]▶ [System]▶ [Location &
security]▶[Set up screen lock] is set to [None], you can enter “1234” and tap
[OK] after sliding to unlock in order to unlock the Remote control lock.
■
You must also unlock the screen lock from your IS06 when you retrieve it even if
you applied the Remote control lock using the Security Lock Service.
92
Page 95

Security Lock Service
Activating the Remote Control Lock Using the Security Lock Service
■
You can activate the Remote control lock on your IS06 even if you did not set up
the Remote control lock beforehand by calling the Customer Service Center or
by submitting the necessary information from your computer. However, [Remote
control lock] under [Select device administrators] (▶P.91) must be activated to
use this feature (it is disabled under the factory default settings).
■
The Security Lock Service is available free of charge.
■
You must submit an application if using the Security Lock Service for the first
time. (This can be submitted even after losing your phone.)
■
To unlock the Remote control lock, unlock the screen lock of your IS06 when you
retrieve it. You cannot unlock the Remote control lock through the Security Lock
Service itself.
Activate the Remote control lock by calling the Customer
Service Center
From au cell phones (toll-free): 113 (area code not required)
From any other cell phone or fixed-line phone (toll-free):
■
Available 24 hours a day.
■
Follow the automated voice prompts to complete the process.
0077-7-111
Activate the Remote control lock through au Customer
Support (https://cs.kddi.com/)
In Case of Loss of Your IS06
93
Page 96

Appendix/Index
Troubleshooting
Index
Page 97

Troubleshooting
▶ Cannot turn on by pressing (Power)
• Do you hold down
• Is the battery pack charged? (▶P.10)
• Is the battery pack properly inserted? (▶P.9)
• Are the contacts on the battery pack dirty?
▶ The power is turned off automatically
• Has the battery run out? (▶P.10)
▶ The power is turned off at the startup screen
• Has the battery run out? (▶P.10)
▶ Cannot make any phone calls
• Is your IS06 turned on? (▶P.13)
• Is the au IC-Card inserted? (▶P.11)
• Is the phone number you entered correct? (Did
you start with the area code first?) (▶P.34)
• Did you tap
(▶P.34)
• Is your IS06 in airplane mode? (▶P.14)
▶ Cannot receive any phone calls
• Do you have sufficient signal strength? (▶P.5)
• Are you outside the service area? (▶P.5)
• Is your IS06 turned on? (▶P.13)
• Is the au IC-Card inserted? (▶P.11)
(Power)? (▶P.13)
after entering the phone number?
• Is your IS06 in airplane mode? (▶P.14)
(Out of Area) appears
▶
• Are you outside the service area or in a location
with poor signal strength? (▶P.5)
• Are you covering the built-in antenna with your
fingers or hand? (▶P.7)
▶ Cannot connect to Wi-Fi
• Is your IS06 receiving a signal from the wireless
access point?
• Did you configure your Wi-Fi settings? (▶P.71)
▶ The LED lamp flashes but I cannot hear any
ringtone
• Is your IS06 in manner mode? (▶P.14)
▶ Cannot charge the battery pack
• Is the charger connected properly? (▶P.10)
• Is the battery pack properly inserted? (▶P.9)
▶ Cannot perform any key/touch panel operations
• Is your IS06 turned on? (▶P.13)
• Did you unlock the screen? (▶P.20)
▶ “au IC-Card (UIM) error” is displayed
• Is the au IC-Card inserted? (▶P.11)
• Is a card different from the au IC-Card used?
Appendix/Index
95
Page 98

▶ I hear a beeping sound and cannot make any
phone calls
• Are you outside the service area or in a location
with poor signal strength? (▶P.5)
• Either the network is very busy, or the person you
are trying to call is already on the phone.
▶ Cannot hear the other person on the line
• Is your receiver volume turned all the way down?
(▶P.37)
• Are you covering up the receiver with your ear?
Place the receiver to your ear.
▶ The microSD memory card is not recognized
• Is the microSD memory card inserted properly?
(▶P.12)
• Is the microSD memory card unmounted?
■
For more detailed information, see au Customer
Support on the au homepage at the following URL.
http://www.kddi.com/customer/service/au/
trouble/kosho/index.html
96
Page 99

Index
Number
3D Widget ····················18
A
Add Access Point ········72
Adding Widgets/
Icons ·························28
Airplane mode ··············14
Alarm/Wakeup Call ······84
Android keyboard ········21
Android Market ············65
au IC-Card ···················11
au one Market ··············75
B
Back key ························8
Battery pack
Charge ......................... 10
Insertion/Removal .......... 9
Battery pack cover ·········8
Before You Begin ········· 25
Bookmark ····················· 74
Browser ························ 73
C
Calculator ·····················86
Calendar ······················69
Call Log ··················35, 37
Camera ························78
Camera (lens) ················8
Cell phone etiquette ······· ii
Charge ·························10
C-mail ···························50
C-mail Receiving Filter
Settings ····················· 56
C-mail Safety Block ······55
Contacts ·················35, 38
D
Daily Alarm ···················84
Data Communications
Deleting Applications/
Widgets/Folders ········29
Device Administrator ····91
Display (touch panel) ·····8
Drag ·····························16
···72
E
Earthquake Early
Warning ·····················52
Easy Alarm ··················· 84
Easy Setting ·················27
E-mail ···························41
F
Flick ······························15
Folder ····················· 28, 30
G
Gallery ··························82
Gmail ····························63
Google Account ··········· 61
Google Services ···········61
Google Voice Search ··· 67
H
Home key ······················· 8
Home Preview screen
Home Screen ···············26
···17
I
Icon list ···························5
Included items ···············6
Input mode ···················23
International Call ··········34
Internet Connection······71
iWnn IME keyboard ······22
K
Key name ······················· 7
L
Language ·····················13
Latitude ························69
LED lamp ·······················8
Light (camera) ················8
Long touch ··················· 15
M
Mail Filter ······················47
Make a Call ··················34
Manner mode ···············14
Maps ····························68
Market ··························65
Menu key ························8
Microphone ···················· 8
microSD memory
card ···························12
microUSB connection
jack ·····························8
Appendix/Index
97
Page 100

Moving Applications/
Widgets/Folders ········29
N
Navigation ···················· 68
News ····························69
Notification Panel ·········27
P
Pattern unlock ··············20
PC-mail ·························57
Pinch out/in ··················16
Places ··························69
PocketBook ·················· 85
Power key ·······················8
Power ON/OFF ············· 13
Proximity sensor ·············8
Q
Quick Contact ··············39
Quick Search ···············32
R
Receive a Call ·············· 36
Receiver ························· 8
Receiver Volume ·········· 37
Record ·························85
Record Movie ···············80
98
Remote Control Lock ···91
S
Screen lock ··················20
Search Box ···················73
Search key ·····················8
Security Lock Service
Shortcut ························28
Slide ·····························16
Slideshow ·····················82
Slide unlock ··················20
SmartNote ····················88
Standby time ·················· 9
Starred mail ··················58
Status Bar ·····················27
Stopwatch ····················87
Strap eyelet ···················· 8
Switch Windows ··········· 74
···93
T
Take Photo ···················· 78
Talk ·······························68
Talk time ·························9
Tap ······························· 15
Text input method ········· 21
Timely Alarm ················84
Touch panel
operation ···················14
Troubleshooting ············ 95
V
View Movie ··················· 82
View Photo ···················82
Voice Search ··········32, 67
Volume key ·····················8
W
Wakeup Call ·················84
Wallpaper ·····················28
Weather Forecast ·········69
Weekly Alarm ···············84
Widget ··························18
Wi-Fi ·····························71
World Clock ··················86
 Loading...