


TXT8040
User Guide

CHAPTER 1. BEFORE USING
BEFORE USING..................................... 4
INSIDE THE P ACKA GE..................................................5
HANDSET DESCRI PTIONS.........................................6
KEY DESCRIPTION S.....................................................7
DISPLA Y INDIC A TORS..................................................9
INST ALL BA TTER Y.......................................................11
REMOVE BA TTERY.....................................................12
BATT ERY HANDLIN G INFORMATION....................13
SWIVELING THE KEY P AD.........................................14
REMOVING T HE microSD CARD..............................14
BASIC OPERATION.............................15
TURNING THE PHONE ON/OFF...............................16
ACCESSING THE ME NU............................................16
USING THE T A SK BAR................................................17
MENU SUMMAR Y........................................................18
MAKING A CALL............................................................20
ANSWERING CALLS...................................................20
MISSED CALL N OTIFICATION...................................21
WAIT/PAUSE FEA TURE..............................................21
ANSWERING A CALL...................................................22
MAKING AN INTERNA TIONAL CALL .......................22
3-WA Y CALLING............................................................22
CALL W AITING FU NCTION........................................22
CALLING A NUMBER FROM CONTACTS..............23
ADJUSTING VOLUM E.................................................23
CALLER ID FUNCTION................................................23
VIBRAT E ON/OFF M ODE............................................23
SPEAKERPHONE MODE...........................................24
USING AUTO KEYPAD LOCK FUNCTION .............24
AV AIL ABLE OPTIONS DU RING A CALL..................24
MAKING AN EMERGENCY CA LL.............................25
DIALING LETTERS.......................................................25
MEMORY FUNCTION...........................27
STORING A PHONE NUMBER..................................28
ENTERING LETTERS, NUMBERS & SYMBOLS..33
ONE, TWO, THREETOUCH DIA LING..................34
MENU FUNCTION................................35
NEW CONT ACT............................................................36
LIST Entries.....................................................................36
GROUPS.........................................................................37
SPEED DIALS................................................................39
MY NAME C ARD...........................................................40
CALLS..............................................................................42
MISSED...........................................................................42
Table of Contents 1

RECEIVED......................................................................43
DIALED............................................................................43
ALL....................................................................................44
BLUETOOTH..................................................................45
SOUNDS SETTINGS....................................................48
DISPLAY SETTING S.....................................................51
PHONE SETTINGS.......................................................54
CALL SET TINGS...........................................................59
MEMORY........................................................................61
USB MODE.....................................................................63
PHONE INFO.................................................................64
SET - UP WIZ ARD.........................................................65
VOICE COMMANDS....................................................66
CALCULA TOR................................................................70
TIP CALCULA T OR........................................................71
CALENDAR....................................................................71
E-DIARY...........................................................................73
ALARM CLOCK.............................................................74
STOP W A TCH................................................................76
WORLD CLOCK............................................................77
NOTEP AD.......................................................................77
USB MASS STORAGE................................................78
MEDIA CENTER................................... 79
USING THE micro SD CARD.......................................80
2
MUSIC & T ONES...........................................................80
PICTURES......................................................................84
GAMES............................................................................86
MOBILE WEB.................................................................87
BROWSE & DOWNLOAD...........................................88
EXTRAS..........................................................................88
MEDIA CENTER INFO.................................................89
MESSAGING MENU.............................90
WHEN A NEW MESSAGE ARRIVES........................91
NEW MESSAGE...........................................................91
INBOX..............................................................................93
SENT................................................................................94
MESSAGES....................................................................94
DRAFTS..........................................................................95
VOICEMAIL.....................................................................96
ERASE ALL.....................................................................96
SETTINGS......................................................................97
SAFETY AND WARRANTY .................99
SAFETY INFORMATION FOR WIRELESS
HANDHELD PHONES..............................................100
SAFETY INFORMATION FOR FCC RF EXPOSURE
........................................................................................103
SAR INFORMA TION..................................................104

HEARING AID COMPATIBILITY (HAC) FOR
WIRELESS TELECOMMUNICATIONS DEVICES
........................................................................................105
FDA C ONSUMER U PDA TE.....................................107
AVO ID POTENT IAL H EARING L OSS.....................113
FCC COMPLIANC E INFORM A TION......................1 15
12 MONTH LIMIT ED W ARRANTY..........................116
Table of Contents 3

CHAPTER 1
BEFORE USING
This chapter provides important information about using the
TXT8040 including:
Inside the package
Handset descriptions
Key descriptions
Display indicators
Install battery
Remove battery
Charging your battery
Battery handling information
Swiveling the keypad
Removing the microSD card
4
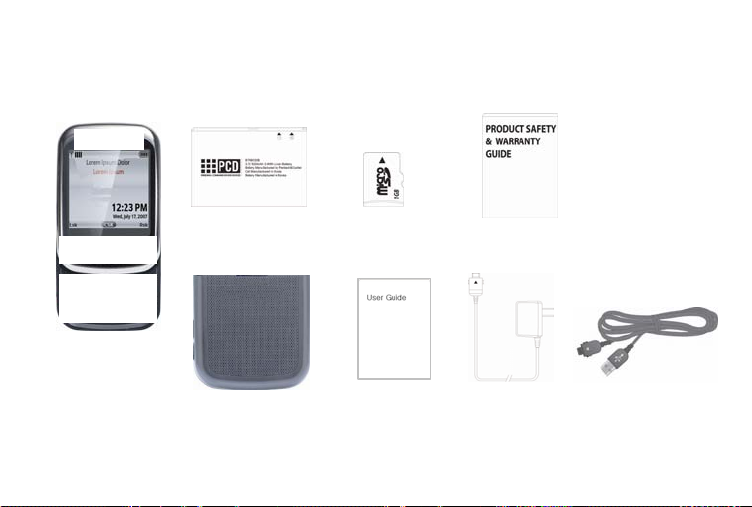
INSIDE THE PACKAGE
This package should include all items pictured below. If any are missing or different, immediately conta ct the
retailer where you purchased the phone.
Handset
Standard Battery
Battery Co ver
1GB pre-installed
microSD Card
User Guide
Product Safety &
Warranty Guide
Wall Charger
USB Cable
Chapter 1 Before Using 5
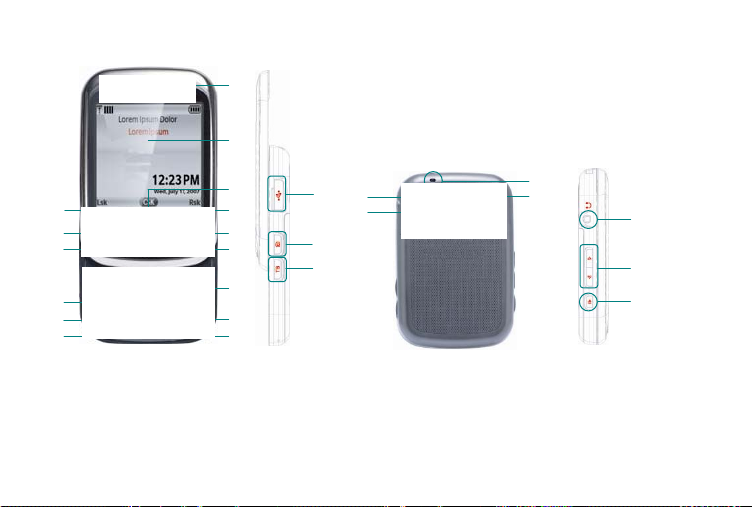
HANDSET DESCRIPTIONS
15
14
1
2
3
4
5
6
13
12
11
10
9
8
7
18 22
17
16
1. Left Soft Key 7. Quick Note Key
2. SEND Key 8. TXT Composer
3. Speakerphone Key 9. Delete Key
4. Function Key 10. CLR/AVC Key
5. International Dial Key 11. END Key
6. Vibration Key 12. Right Soft Key
6
21
23
24
25
13. Scroll Navigation 19. Self-Portrait Mirror
14. Display Screen 20. External Speaker
15. Earpiece 21. Wrist Strap Eyelet
16. Task Bar/Lock Key 22. Camera lens
17. Camera Key 23. Headset Jack
18. Charging Jack 24. Volume Keys

KEY DESCRIPTIONS
The following list correlates to the previous page’s
phone illustration.
] Left Soft Ke y: From idle mode, press to
1. [
display the Message menu or access the function
listed above the key .
] SEND Key: Press to make or receive a call.
2. [
From idle mode, press to access the AL L CALLS list.
3. [
] Music Key: Press to access Music Play er .
4. [] Function Key: In text entry mode, press to
change the character input type.
5. International Dial Key: Press to enter an asterisk
(*) character for calling features. Press and hold to
display the plus sign (+) for international dia ling.
5. External Speaker: Music, Ringtones and Sounds
are played through the speaker .
6. Vibration Key: Press and hold to place your
device in Vibrate Mode.
7. Quick Note Key: Press to access the Quick Note
menu or to add a space betw een character s.
8. TXT Composer Key: Press to access the New
TXT Message menu.
9. [] Delete Key: In text entry mode, press to delete
the character.
10. [
] CLR/AVC Key: Press to clear a character
from the display. Press and hold to clear all
characters. Within a menu, press to return to the
previous menu. From idle mode, press and hold to
access the VOICE COMMANDS menu.
11. [
] END Key: Press and hold to turn the
phone on/off or press to end a call or browser
session, and/or return to idle mode .
12. [
] Right Soft Key: From idle mode, press to
display Contacts or to access the function listed
above the key .
13. Scroll Navigation: Allows you to scroll through
phone menu options and provides a shortcut to
phone functions from idle mode.
14. Display Screen: Displays incoming calls,
messages, signal, battery strength, time and date.
15. Earpiece: The earpiece allows you to hear the
other caller.
16. Task Bar: Press to access the Task Bar menu.
17. Camera Key: Press to access the built-in
camera.
] Charging/ Jack: Allows you to plug in an
18. [
optional headset for convenient, hands-free
conversations.
Chapter 1 Before Using 7

19. Self-Portrait Mirror: Displays your reflection
when taking pictures.
20. External Speaker: Music, Ringtones and
Sounds are played through the speaker .
21. Wrist Strap Eyelet: Accessory eyelet (optional
straps and lanyards - purchased sep arately).
22. Camera Lens: The lens of your built-in camera.
23. Headset Jack: Allows you to plug in an optional
headset for convenient, hands-free conversations.
24. [
/ ] Volume Keys: Press to adjust the
master volume in idle mode, adjust the voice volume
during a call or adjust music volume when playing
music.
8
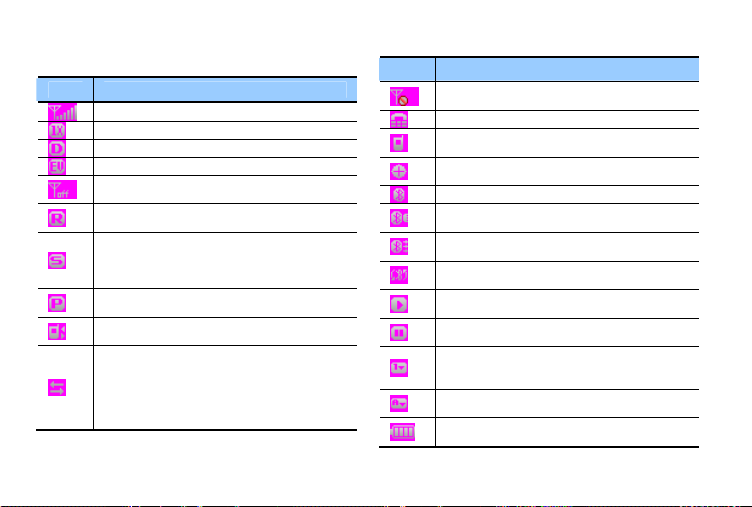
DISPLAY INDICATORS
Icon Icon Descriptions
Signal Strength: Indicates Signal Strength.
1X: 1X service is available.
D: CDMA IS 95 service is available.
EVDO: EVDO service is available.
Airplane Mode: Transmitting and receiving
information is restricted.
Roaming: The phone is outside of the home
service area.
SSL (Secured Socket Layer): Indicates that
secure communication between client and
server has been established during data
communication using encryption.
Voice Privacy: Indicates Voice Privacy mode
is active.
Data Call: Indicates Data Session in
progress.
Dormant: Indicates phone is in a dormant
state during a data call. Phone reverts to
Dormant mode when there hasn't been
activity on a page for some time — the
connection is still active and you can make
and receive calls.
Icon Icon Descriptions
No Service: Phone cannot receive signal
from the system.
TTY: TTY mode is active.
Voice Call: A call is in progress. * No icon
indicates the phone is in idle mode.
Location On: Global Positioning Service is
set to On for Location Service and 911 calls.
Bluetooth: Indicates Bluetooth mode.
Bluetooth Active: Indicates Bluetooth Active
mode.
Bluetooth Connected: Indicates Bluetooth
Device is connected.
Bluetooth Discovery: Indicates Bluetooth
Discovery mode is On.
Playing Music: Indicates that music is
playing.
Pause Music: Indicates that music playback
has been paused.
Numeric Entry Mode: Enter numbers by
pressing the corresponding key on the
keypad.
Alphabetical Entry Mode: Enter characters
by pressing the key w it h the d esir ed c harac ters.
Battery Level: Battery charging level-the
more blocks, the stronger the charge.
Chapter 1 Before Using 9
Icon Icon Descriptions
AVR Active: AVR mode is active.
AVR Listening: Indicates AVR listening.
Silent: Indicates the Ringer Volume is set to
Silent.
Vibrate Only: Indicates the Ringer Volume is
set to Vibrate On.
Speakerphone: Speakerphone mode is
active.
Message: Indicates you have new message.
Voice Message: Indicates you have voice
message.
Voicemail: Indicates you have voicemail
message.
Alarm On: Appears when an alarm is set.
Recent Calls Icons
Dialed Call
Received Call
10
Missed Call
Contact Icons
Mobile1
Mobile2
Home
Work
E-mail1
E-mail2
Message Icons
NEW/Unread
Message
Opened/Read
Message
Message
Delivered
Incomplete
Delivery
Sent
Message,
Delivery
Failed
Group
Picture
Ringtone
Fax
Speed Dial
Message
Locked
Text Message
Draft
Multimedia
Message Draft
Message
Priority level
Unread
Multimedia
Message
Message Icons
Read
Multimedia
Message
Pending
Message
Send
Sent Message
Unread WAP
Read WAP
Multiple
Message
Delivered
Multiple
Message
Failed
Multiple
Message
Incomplete
Multiple
Message
Pending
Multiple
Message Sent
INSTALL BATTERY
1. Push down (1) the battery door release latch w ith
your finger tip and pull off (2) the ba ttery cov er .
2. Slide (1) the battery into the slot by aligning the
contacts and press (2) until you hear the "click".
3. Align the cover tab s with the slot s on the back of
the device and press the battery cover onto the unit
until it snaps into place.
If the battery is not correctly placed in t he compartm ent,
the handset will not turn on and/or the battery may detach
during use.
Chapter 1 Before Using 11
REMOVE BA TTERY
1. T o remove the ba ttery cover, push down (1) battery
door release latch with your finger tip and p ull off (2)
the battery cover.
2. Push the bottom of the battery upw ards while
inserting your finger into the slot (1) and remov e (2)
the battery.
3. Align the cover tab s with the slot s on the back of
the device and press the battery cover onto the unit
until it snaps into place.
12
CHARGING YOUR BATTER Y
1. T o charge, open th e Charging/Data Ja ck cover
and connect the Wall Charger . Make sure you align
the connector as it appears in the image.
If the battery connector is not properl y aligned, damag e
could occur to the charging connector and t he phone
may not charge.

2. Plug the other end into a standard outlet.
3. T o remove the Wall Charger , squee ze the
adapter’s side buttons (1) and pull the charger from
the device (2).
y When you charge the battery with the handset
powered off you will see a charging status
screen. After the charging has compl eted, the Charge
Complete message appears. You cannot operate the
phone until it is powered on.
y The battery is not fully charged at the time of purchase.
Fully charge the battery before use.
y It is more efficient to charge the battery with the
handset powered off.
y Battery operating time gradually decreases over time.
y If the battery fails to perform normally, you may need
to replace the battery .
BA TTERY HANDLING INFORMATION
DO’S
y Only use the battery and charger approved fo r
use with the TXT8040.
y Only use the battery for its original purp ose.
y Try to keep batteries in a tempera ture between
41°F (5°C) and 95°F (35°C). If the battery is
stored in temperatures above or below the
recommended range, give it time to warm up or
cool down before using.
y Store the discharged battery in a cool, dar k, and
dry place.
y Purchase a new battery when its operating time
gradually decreases after fully charging.
y Properly dispose of the battery according to local
laws.
DON’TS
y Don’t attempt to disassemble the battery – it is a
sealed unit with no serviceable pa rts.
y Don’t accidentally short circuit the battery by
carrying it in your pocket or purse with other
metallic objects such as coins, clips and pens.
This may critically damage the battery.
y Don’t leave the battery in extremely hot or cold
temperatures. Otherwise, it could significantly
reduce the capacity and lifetime o f the battery.
y Don’t dispose of the battery by placing in to a fire.
Chapter 1 Before Using 13

SWIVELING THE KEYPAD
T o avoid breakag e, turn the device in the direction
indicated.
1. Rotate the swivel bottom of the phone to the righ t,
as shown above.
2. The swivel bottom must be rot ated to the lef t in
order to bring it back to the original position.
Important: T o prevent br eakage, do not rotate the sw ivel
bottom 360 degrees.
14
REMOVING THE microSD CARD
This device comes with a 1GB pre-installed micro SD
Card.
1. Open the microSD Card cover , and use y our
thumb to press and release the microSD Card.
2. Press the memory card inward, ge ntly, until it pops
out. Remove the microSD Card.
3. Close the microSD Card cov er .
To prevent possible damages, pleas e keep the micr oSD
Card cover closed at all times regardless of whet her the
microSD Card is inserted or not.

CHAPTER 2
BASIC OPERA TIO N
This chapter addresses and explains the basic features for
TXT8040 including:
Turning the phone on/off 3-way calling
Accessing the menu Call waiting function
Using the task bar Calling a number from contacts
Quick switching between the main menus Adjusting volume
Menu summary Caller ID function
Making a call Vibrate on/off mode
Answering calls Speakerphone mode
Missed call notification Using auto keypad lock function Available
Wait/Pause feature options during a call
Answering a call Making an emergency call
Making an international call Dialing Letters
Chapter 2 Basic Operation 15

TURNING THE PHONE ON/OFF
TURNING THE PHONE ON
1. Press and hold the END Key [ ] until your display
turns on.
y If “Enter Lock Code” appears on the display, press the
OK Key to unlock the keypad and ent er your 4-digi t
lock code and press the OK Key .
y The default lock code is “1234”.
TURNING THE PHONE OFF
1. Press the OK Key to unlock the keypad, then
press and hold the END Key [ ] until your display
turns off.
y Immediately change or recharge the battery when
“BA TTERY LOW” appear s on the display.
y Memory may possibly be damaged if the phone turns
off due to the battery completely draining.
y Turn the phone off before removing or replacing the
battery. I f the phone is on, unsaved data may be los t.
16
ACCESSING THE MENU
Y our phone can be customi zed via the me nu. Each
function can be accessed by scrolling w ith the
Directional Key [ ] or by pressing the number that
corresponds with the menu item.
1. T o access the main menu from idle mode, press
the OK Key to unlock the keypad, then press the Left
Soft Key [ ] [MENU].
2. T o scroll through the menu, press the Directional
Key [ ] up or down or press the number tha t
corresponds to the desired menu item.
3. T o return to the p revious p age, press the CLR Key
[ ]. T o exit the curren t menu and return to id le mode,
press the END Key [ ].
4. From idle mode, press the OK Key to unlock the
keypad, then press the Right Sof t Key [Cont acts] to
open your Contact List.
This manual assumes that Menu Type of Display
Settings is set to Grid which is the default settings.

USING THE TA SK BAR
The T ask Bar is an alternativ e way to cy cle through
menus, requiring fewer key presses. Toggle between
the following menus:
Dialing, Recent Calls, Messages, MP3 Box, My
Pictures, Contacts, Tools
1. From idle mode, press the OK Key to unlock the
keypad, then press the Task Bar Key [ ].
2. Press the Directional Key lef t or right to scroll
through Task Bar menus.
3. Select the desired task and press the OK Key.
y Task Bar is not available for certain circ umstances
such as receiving an incoming call or message,
displaying a notification message or dis playing the
main menu.
y Once a menu is selected, it is dimmed and not
selectable from the T ask Bar .
Chapter 2 Basic Operation 17
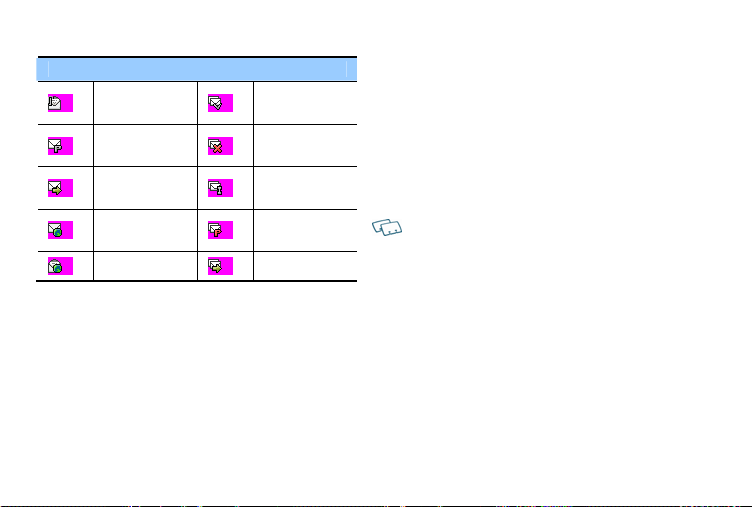
MENU SUMMARY
Main Menu 2ND DEPTH 3RD DEPTH
1. Calls
2. Contacts
3. Multimedia
4. Messages 1. New
18
1. Missed
2. Received
3. Dialed
4. All
5. View T i mers
1. New Entry
2. List Entries
3. Message
Groups
4. Speed Dials
5. My Name
Card
1. Sound Box
2. MP3 Box
3. Picture Box
Messages
1. All Songs
2. Playlists
3. Artists
4. Genres
5. Albums
6. Manage My
Music
7. Music Settings
1. Text Message
Main Menu 2ND DEPTH 3RD DEPTH
4. Messages
.
5. Neo
Applications
6. Neo
Navigation
7. Configuration 1. Sounds
1. New
Message
2. Voicemail
3. Inbox
4. Sent
5. Drafts
6. Settings
7. Erase
1. Neo
Applications
1. Connect
WAP
Settings
2. Picture
Message
1. Entry Mode
2. Auto Save
3. Auto Erase
4. Auto Receive
5. Quick Text
6. Callback #
7. Signature
1. Erase Inbox
2. Erase Sent
3. Erase Drafts
4. Erase All
1. Ringer
Volume
2. Dial Sounds
Main Menu 2ND DEPTH 3RD DEPTH
7. Configuration
1. Sounds
Settings
2. Display
Settings
3. Phone
Settings
3. Call Sounds
4. Msg Sounds
5. Service
Alerts
6. Device
Connect
7. Power
On/Off
8. Key Tone
9. Swivel
Sounds
1. My Banner
2. Backlight
3. Wallpaper
4. Menu Type
5. Clock Format
1. Airplane
Mode
2. Language
3. Menu
Readout
4. Message
Readout
5. Location
6. Security
Main Menu 2ND DEPTH 3RD DEPTH
7. Configuration
9. Tools
4. Call Settings
5. Memory
6. Bluetooth 1. Add New
7. USB Mode
8. Phone Info
1. Take Picture 8. Camera
2. Picture Gallery
1. Voice
Commands
2. Calculator
3. Calendar
Chapter 2 Basic Operation 19
7. System Select 3. Phone Settings
8. NAM Selection
1. Answer
Options
2. Auto Retry
3. TTY Mode
4. One T ouch
Dial
5. Voice Privacy
1. Save Options
2. Internal
Memory
3. External
Memory
Device
1. My Number
2. SW / HW
Version

Main Menu 2ND DEPTH 3RD DEPTH
9. T ools
4. Alarm Clock
5. Stop Watch
6. World Clock
7. Notepad
8. Voice M emo
9. USB Mass
Storage
1. Alarm 1
2. Alarm 2
3. Alarm 3
20
MAKING A CALL
1. From idle mode, press the OK Key to unlock the
keypad, swivel to the QWERTY keyp ad and enter
the phone number (include the area code if needed).
y To erase one digit at a time, pr ess the CLR Key [ ].
y To erase the entire number, press and hold the CLR
Key [ ].
y When you place or receive a call from phone numbers
stored in your Contact List with a con tact name, t he
name will be displayed.
2. Press the SEND Key [ ].
3. To end a call, press the END Key [ ].
y If you activate the AUTO RETRY functio n, the phone
will automatically re-dial the numb er
(Refer to page 63).
y You can also place calls using V oic e-Activated Dialing .
Please refer to page 70 for more details.
ANSWERING CALLS
1. When your phone rings or vibrates, press the
SEND Key [ ] to answer the incomi ng call.
(Depending on your phone’s settings, you may also
answer incoming calls by pressing any key.)
2. T o ignore incoming cal ls, press the Right Sof t Key
[ ] [Ignore].

3. To end a call, press the END Key [ ].
In “Auto with Handsfree” a call is automatically answered
after a preset number of ringtones ( Refer to p age 63).
MISSED CALL NOTIFICATION
When an incoming call is not answered, the Missed
Call logo appears on the display .
TO DISPLAY THE MISSED CALL ENTRY FRO M
THE NOTIFICATION SCREEN:
1. Highlight View Now and press the OK Key.
2. Press the OK Key [OPEN] to view the call det ails.
TO DISPLAY A MISSED CA LL ENTR Y FROM
IDLE MODE:
1. From idle mode, press the OK Key to unlock the
keypad, swivel to the QWERTY keyp ad and press
the Left Soft Key [ ] [MENU], select Calls, then press
the OK Key.
2. Press 1. Missed.
3. Highlight the entry you wish to view, then press the
OK Key [OPEN].
4. T o dial the phone n umber , press the SEND Key [ ].
WAIT/P AUSE FEATURE
Pauses are used for automated systems (i.e., voice
mail or calling cards). Insert a pause after a phone
number and then enter another group of numbers.
The second set of numbers is dialed automatically
after the pause. This feature is u seful for dialing in to
systems that require a code.
Hard Pause (P)
The phone stops dialing until you press the SEND
Key [ ] to advance to the next number.
2 Sec Pause
The phone waits 2 seconds before sending the nex t
string of digits automatically.
1. From idle mode, press the OK Key to unlock the
keypad, swivel to the QWERTY keyp ad and enter
the phone number.
2. Press the Right Soft Key [ ] [Op tions].
3. Select 2 Sec Pause, then press the OK Key .
4. Enter additional number(s) (pin number or credi t
card number).
5. Press the SEND Key [ ] to dial or the Lef t Sof t Key
[ ] [Save].
Chapter 2 Basic Operation 21

ANSWERING A CALL
1. If your phone is set to Any Key for Answer Options,
simply press any key to answer a call . If your phone
is set to Auto w ith Handsfree for Answer O ptions,
calls are answered automatically with a 5 second
delay. (Auto with Han dsfree is available only w hen
connected to a headset or hands-free device.) For
information on how to set your Answ er Options, see
page 67.
2. To end the call, press the END Key [ ].
Any Key is the default setting for this device.
MAKING AN INTERNATIONAL CALL
1. Press the OK Key to unlock the keyp ad, swivel to
the QWERTY keypad and then press and hold the *
Key [ ]. The + required for international call s will be
displayed.
2. Enter the country code, area code, and phone
number then press the SEND Key [ ].
3. To end the call, press the END Key [ ].
3-WAY CALLING
With 3-Way Calling, you can talk to two people at the
same time. When using this feature, the normal
airtime rates will be applied for each of the tw o calls.
22
1. Press the OK Key to unlock the keyp ad, swivel to
the QWERTY keypad, e nter the phone number you
wish to call and then press the SEND Key [ ].
2. Once you have established the connection, ente r
the second phone number you wish to call and then
press the SEND Key [ ] again.
3. When you’re connected to the second party, press
the SEND Key [ ] again to begin your 3-W ay call.
If one of the people you called hangs up during your call,
you and the remaining caller stay con nected. If you
initiated the call and are the first to hang up, all thr ee
calls are disconnected.
CALL WAITING FUNCTION
If you are on a call and you receive another incoming
call, you will hear a beep and the caller’s phone
number will appear on the display. With Call Waiting,
you may put the active call on hold while y ou answer
the other incoming call.
T o use Call Wai ting:
1. T o answer anothe r call while on the phone, press
the SEND Key [ ].

This places the first call on hold. To switch back to the
first caller, press the SEND Key [ ] again.
CALLING A NUMBER FROM
CONTACTS
1. From idle mode, press the OK Key to unlock the
keypad, then press the Right So ft Key [ ] [C ontacts].
2. Select the Contact entry and press the OK Key
[VIEW], then select the desired phone num ber .
3. Press the SEND Key [ ] to place the call.
Selecting the Contact entry and then pressing the Send
Key [ ] will dial the Default Number of the Contact entry
automatically . If multiple numbers are s aved in the
Contact List, select the Contact entry , th en select the
phone number you want to dial. Then press the Send
Key [ ].
ADJUSTING VOLUME
T o adjust the master volume:
1. From idle mode, press the OK Key to unlock the
keypad, then press the Volume Keys [ ]/[ ] up or down.
2. Select one of the following options and press the
OK Key [SET] to save it.
y Silent
y Vibrate On
y Level 1 ~ Level 5
y Press the Volume Keys [ ]/[ ] up or down to adjust
Earpiece volume during a call.
y To play a ringtone, press the Lef t Soft Key [ ] [Play].
CALLER ID FUNCTION
Caller ID displays the number of the person cal ling
when your phone rings. If the caller’s identity is stored
in Contacts, the name appears on the screen. The
caller ID is stored in the Recent Calls Menu.
VIBRATE ON/OFF MODE
Vibrate Mode mutes key tones and alert s for an
incoming call or message. To activate Vibrate Mode:
1. From idle mode, press the OK Key to unlock the
keypad, swivel to the QWERTY keyp ad, then pres s
and hold the # Key [ ]. "VIBRA TE MODE ENABLED"
appears on the display .
2. T o disable V ibrate, press and ho ld the # Key [ ]
again. "VIBRATE MO DE DISABLED" appears on
the display .
Chapter 2 Basic Operation 23

SPEAKERPHONE MODE
The Speakerphone feature let s you hear au dio
through the speaker and talk without holdi ng the
phone.
1. T o activ ate press the OK Key to unlo ck the keyp ad,
then press the Speakerphone Key [ ]. To deactivate,
press the Speakerphone Key [ ] again.
USING AUTO K EYPAD LOCK
FUNCTION
When the backlight of the display is turned off, the
Side Keys and the Directional Key are locked. To
unlock them, press any key, “PRESS OK TO
UNLOCK KEYPAD” display s, th en press the OK Key.
You can pr ess and hold the Task Bar/Lock Key [ ] to lock
or unlock the keypad.
AVAILABLE OPTIONS DURING A
CALL
During a phone call, you can access the following
features by pressing the Right Soft Key [Option s]:
24
NEW MESSAGE
T o access the Messa ging Menu during a call:
1. Press the Right Soft Key [Options ], with New
Message highlighted, press the OK Key.
CONTACTS
T o view your Contact s during a call :
1. Press the Right Soft Key [Options ], select Contact s
and press the OK Key.
CALLS
T o view y our recent Calls list during a cal l:
1. Press the Right Soft Key [Options ], select Calls
and press the OK Key.
BLUETOOTH
T o acce ss the Blueto oth Menu during a call:
1. Press the Right Soft Key [Options ], select
Bluetooth and press the OK Key .
If an Audio device is connected, Audi o To Phone / Audio
To Device is displayed in the options menu instead of
Bluetooth.
MAIN MENU
T o access the Main Menu during a call:

1. Press the Right Soft Key [ ] [Op tions], select Main
Menu and press the OK Key .
NOTEPAD
T o compose notes du ring a call:
1. Press the Right Soft Key [ ] [Op tions], select
Notepad and press the OK Key.
VOICE PRIVA CY
T o turn the voice privacy feature On or Of f:
1. Press the Right Soft Key [ ] [Op tions], select Voice
Privacy and press the OK Key.
MAKING AN EMERGENCY CALL
The 911 fea ture automatically places the phone in
Emergency Call Mode when you dial the
preprogrammed emergency number, 911. It also
operates in Lock Mode and out of the service area.
911 IN LOCK MODE
T o make an emergency call in Lock Mod e:
1. Press the OK Key to unlock the keyp ad, swivel to
the QWERTY keypad, e nter “911”, and then press
the SEND Key [ ].
2. The call connects.
3. The phone maintains Emergency Mode for 5
minutes. When the call ends, the phone returns to
Lock Mode.
911 USING ANY AVAILABLE SYSTEM
T o make an Emergency Call using any available
system:
1. Press the OK Key to unlock the keyp ad, swivel to
the QWERTY keyp ad, enter “911”, and then press
the SEND Key [ ].
2. The call connects.
3. The phone will stay in Emergency Mode for 5
minutes. While the phone is in the Emergency Mode
for 5 minutes, the phone can receive an incoming call
from any available system or you can make outgoing
calls even in the Emergency Callback Mode.
DIALING LETTERS
Allows you to dial the number associated with a
specific word.
For example, to call “1-800-FLOWERS”:
1. Press the OK Key to unlock the keyp ad, swivel to
the QWERTY keyp ad, enter “1- 800”, then press the
Mode Change Key [ ].
Chapter 2 Basic Operation 25

2. Enter “FLOWERS” with the QWERTY Key pad
and press the SEND Key [ ] to connect.
y If Alphabetical Entry Mode icon is turned on, only
capital letters will be appeared.
y Pressing the Mode Change Key change between the
Numeric Entry Mode and Alphabetical Entry Mode.
26

CHAPTER 3
MEMORY FUNCTION
This chapter addresses memory functions including:
Storing a phone number
Entering letters, numbers & symbols
One, Two, Three-touch dialing
Chapter 3 Memory Function 27

STORING A PHONE NUMBER
The Contact List stores up to 1000 entries.
ADDING A NEW CONTACT
1. From idle mode, press the OK Key to unlock the
keypad, swivel to the QWERTY keyp ad, then enter
the phone number you want to save.
2. Press the Left Soft Key [ ] [Sav e].
3. Select New Entry , and press the OK Key.
4. Press the Directional Key [ ] up or down to select
the type of phone number you want to save, then
press the OK Key .
Mobile 1/Mobile 2/Home/Work/Fax
Use Update Existing to add another pho ne number to a
contact already stored in memory.
5. Enter a name for the phone number (up to 32
characters), then press the OK Key [SAVE].
6. “CONTACT SAVED” displays, then the phone
number reappears on the screen. Press th e End Key
[ ] to exit, or press the Send Key [ ] to call the num ber .
OPTIONS TO CUSTOMIZE YOUR CONT A CTS
Once the basic phone number and name informa tion
is stored in your Contacts, you can edi t and/or
customize the entries.
1. From idle mode, press the OK Key to unlock the
28
keypad, press the Right Soft Key [ ] [Contacts], then
highlight the Contact entry you want to edit.
2. Press the Left Soft Key [ ] [Edit ] to acces s the Edit
Contact screen.
3. Select the information field you want to customi ze.
Additional fields include: Name / Mobile 1 / Home /
Work / E-mail 1 / Group / Picture / Ringtone / Mobile
2 / IM Screen Name / Fax / E-mail 2 / S treet / City /
State / Zip Code / Country
4. Swivel to the QWERTY keyp ad, change the dat a
as necessary , then press the OK Key [SAVE] to
update the contact entry.
ADDING OR CHANGING GROUPS
T o organize y our Contact s into gro ups:
1. From idle mode, press the OK Key to unlock the
keypad, press the Right Soft Key [ ] [Contacts], then
highlight the desired Contact entry .

2. Press the Left Soft Key [ ] [Edit ].
3. Highlight Group and press the Left Sof t Key [ ]
[Set].
4. Select Family or Work, then press the OK Key
[MARK]. To create a new group, press the Right Soft
Key [ ] [New], swivel to the QWER TY keyp ad and
enter the new group name, then press the OK Key
[SA VE].
5. Press the Left Soft Key [ ] [Done] to set the group.
6. Press the OK Key [SA VE] to update the contact
entry.
CHANGING THE CALL RINGTONE
T o identify who is calling by setting dif ferent ringtone s
for different phone numbers in your Contac ts:
1. From idle mode, press the OK Key to unlock the
keypad, press the Right Soft Key [ ] [Contacts], then
highlight the desired entry .
2. Press the Left Soft Key [ ] [Edit ].
3. Highlight Ringtone, then press the Lef t Sof t Key [ ]
[Set].
4. Select the new ringtone, then press the OK Key.
Press the Left Soft Key [ ] [Play ] to listen to a hi ghlighted
ringtone before you press the OK Key.
5. Press the OK Key [SA VE] to update the contact
entry.
ADDING OR CHANGING THE PICTURE ID
T o select a picture or graphic to assign to a Caller ID:
1. From idle mode, press the OK Key to unlock the
keypad, press the Right Soft Key [ ] [Contacts], then
highlight the desired entry .
2. Press the Left Soft Key [ ] [Edit ].
3. Highlight Picture, and press the Left Sof t Key [ ]
[Set].
4. Press the Directional Key [ ] up, down, lef t or right
to select a picture, then press the OK Key.
5. When completed, press the OK Key [SAVE] to
update the contact entry.
ADDING OR CHANGING AN EMAIL A DDRESS
T o enter or add an Email addre ss to a Co ntact entry :
1. From idle mode, press the OK Key to unlock the
keypad, press the Right Soft Key [ ] [Contacts], then
press highlight the desired entry.
2. Press the Left Soft Key [ ] [Edit ].
Chapter 3 Memory Function 29

3. Highlight E-mail 1 or E-mail 2.
4. Swivel to the QWERTY keyp ad, enter an Email
address, then press the OK Key [SA VE] to update
the contact entry .
ADDING A SPEED DIAL ENTR Y
T o add an en try to Speed Dial:
1. From idle mode, press the OK Key to unlock the
keypad, press the Right Soft Key [ ] [Contacts], then
highlight a desired entry .
2. Press the Left Soft Key [ ] [Edit ].
3. Highlight the phone number you want to add to
Speed Dial, then press the Right Soft Key [ ]
[Options].
4. Select 1. Set Speed Dial, then press the OK Key .
5. Select a Speed Dial location, th en press the OK
Key [SET].
6. Select Y es and press the OK key.
7. Press the OK Key [SA VE] to update the contact
entry.
EDITING CONTACT ENTRIES
ADDING A PHONE NUMBER FROM IDLE MODE
1. From idle mode, press the OK Key to unlock the
keypad, swivel to the QWERTY keyp ad, and then
30
enter the phone number you want to sav e (up to 32
digits).
2. Press the Left Soft Key [ ] [Sav e].
3. Highlight Update Existing, then press the OK Key.
4. Highlight the existing Contact entry, then press the
OK Key.
5. Highlight the following phone number type, then
press the OK Key .
Mobile 1/Mobile 2/Home/Work/Fax
6. If a phone number is already assigned to the i tem
you selected, select Yes or No to overwrite the
existing entry , then press the OK Key.
7. “CONTACT UPDATED” displays, then the phone
number reappears on the screen. Press th e End Key
[ ] to exit, or press the Send Key [ ] to call the num ber .
ADDING A PHONE NUMBER FROM THE
CONTACT LIST SCREEN
1. From idle mode, press the OK Key to unlock the
keypad, then press the Right So ft Key [ ] [C ontacts].
Y our Contact s are displayed alphabetically.

2. Highlight the Contact entry you want to e dit, then
press the Left Soft Key [ ] [Edit].
3. Highlight the phone number field you want to add,
swivel to the QWERT Y key pad, enter the number,
then press the OK Key [SA VE] to update the contact
entry. A confirmation message appears.
DEFAUL T NUMBERS
The phone number saved when a Contact is created
is the Default Number. If more than one number i s
saved in a Contact entry, another number can be set
as the Default Number .
The Default Number cannot be deleted. The entire
Contact entry can be deleted or an other number
can be assigned as the Default Number al lowing you to
delete the original number and keep the Contac t entry.
CHANGING THE DEFAUL T NUMBER
1. From idle mode, press the OK Key to unlock the
keypad, then press the Right So ft Key [ ] [C ontacts].
Y our Contact s are displayed alphabetically.
2. Highlight the Contact entry you want to e dit, then
press the Left Soft Key [ ] [Edit].
3. Highlight the phone number you want to assign a s
the Default Number, then pre ss the Right Sof t Key [ ]
[Options].
4. Select 2. Set As Defaul t, then press the OK Key.
5. Select Yes and press the OK Key. A confirmation
message appears.
6. Press the OK Key [SA VE] to update the contact
entry.
EDITING STORED PHONE NUMBERS
1. From idle mode, press the OK Key to unlock the
keypad, then press the Right So ft Key [ ] [C ontacts].
Y our Contact s are displayed alphabetically.
2. Highlight the Contact entry you want to e dit, then
press the Left Soft Key [ ] [Edit].
3. Select the phone number you want to edit.
4. Swivel to the QWERTY keyp ad, edit the phone
number as necessary, then press the OK Key
[SA VE] to update the contact entry.
EDITING STORED NAMES
1. From idle mode, press the OK Key to unlock the
keypad, then press the Right So ft Key [ ] [C ontacts].
Y our Contact s are displayed alphabetically.
Chapter 3 Memory Function 31

2. Highlight the Contact entry you want to e dit, then
press the Left Soft Key [ ] [Edit].
3. Swivel to the QWERTY keyp ad, edit the name as
necessary , then pre ss the OK Key [SAVE] to update
the contact entry .
DELETING
DELETING A PHONE NUMBER FROM A
CONTACT
1. From idle mode, press the OK Key to unlock the
keypad, then press the Right So ft Key [ ] [C ontacts].
2. Highlight the Contact entry, then press the Left Soft
Key [ ] [Edit].
3. Select the desired phone number to be deleted.
4. Press and hold the Clear Key [ ] to dele te the
number.
5. Press the OK Key [SA VE] to update the contact
entry. A confirmation message appears.
DELETING A CONTACT ENTRY
1. From idle mode, press the OK Key to unlock the
keypad, then press the Right So ft Key [ ] [C ontacts].
2. Select the desired Contact en try to be deleted.
3. Press the Right Soft Key [ ] [Op tions], select 2.
Erase and press the OK Key.
32
4. Select Yes and press the OK Key. A confirmation
message appears.
DELETING A SPEED DIA L
1. From idle mode, press the OK Key to unlock the
keypad, then press the Right So ft Key [ ] [C ontacts].
2. Highlight the entry that has a speed dial to be
deleted.
3. Press the Left Soft Key [ ] [Edit ].
4. Highlight the phone number that has a speed dial
to be deleted.
5. Press the Right Soft Key [ ] [Op tions], select 1.
Remove Speed Dial and press the OK Key. Select
Y es and press the OK Key. A confirmation message
appears.
6. Press the OK Key [SA VE] to update the contact
entry.

ENTERING LETTERS, NUMBERS &
SYMBOLS
Y our device has a Q WERTY keypad tha t provides a
superior typing experience on a small handheld
device for easy and comfortable input.
1
2 3 4 5
1. [
] Mode Change Key:
y When in Numeric entry mode
- Press to change between entering nu mbers and letter s
that appear on the same key or to lock in numeric or
text entry mode.
y When in Text entry mode
- Press to change between entering nu mbers and letter s
that appear on the same key .
- Press and hold to lock in numeric or tex t entry mode.
8
7
6
2. [ ] Word Change Key: When in text entry
mode, press to select the next matching wo rd.
3. [
] Space Key: Press to accept a w ord and add
a space while entering letters. From idle mode, pre ss
to access the Quick Note menu .
4. [
] Symbols Key: Press to open the symbols
list.
5. [
] Caps Key: Press to select a letter case for
the standard text [Abc] input mode. [Abc], [ABC] and
[abc] indicate the standard text input.
] Enter Key: Press to insert a carri age return.
6. [
] Del Key: When in a Text entry field and in
7. [
entry mode, press to delete the character to the lef t of
the cursor. Press and hold to delete the entire word
or character string that was just entered.
Chapter 3 Memory Function 33

8. [ ] CLR/AVR Key: When in a Text entry field
and in entry mode, press to delete the character to
the left of the cursor . Press and hold to del ete the
entire word or character string that was j ust entered.
For best performance in low-light env ironments, y our
handset includes a backlight feature that can
illuminate both the display and the keypad so you can
keep reading and typing. (Please refer to page 55 for
more details on Backlight.)
ONE, TWO, THREE TOUCH
DIALING
Ideal for frequently dialed numbers, this fe ature
allows contact entries to be dialed via the key pad
with only one, two, or three key pre sses.
ONE - TOUCH DIALING:
1-9: Press the OK Key to unlock keyp ad, swivel to
the QWERTY keypad, a nd then press an d hold the
number you wish to connect to for more than 1
second.
TWO - TOUCH DIALING:
10-21 : Press the OK Key to unlock keypad, swivel to
the QWERTY keypad, and then press the first digit
34
and press and hold the second digit of the number to
dial.
THREE - TOUCH DIALING:
Press the OK Key to unlock key pad, sw ivel to t he
QWERTY keypad, press the first and second digit s,
then press and hold the third digit of the number to
dial.

CHAPTER 4
MENU FUNCTION
This chapter addresses accessing the menu and using its functions
and features to customize your TXT8040.
CONTACTS RECENT CALLS SETTINGS TOOLS
New contact Recent calls Bluetooth Voice Commands
Contact list Missed Sounds settings Calculator
Groups Received Display settings Tip Calculator
Speed dials Dialed Phone settings Calendar
In Case of Emergency All Call settings E-Diary
My Name Card Blocked Memory Alarm Clock
View timers USB Mode Stop Watch
Phone Info World Clock
Set-up Wizard Notepad
USB Mass Storage
Chapter 4 Menu Function 35

NEW CONTACT
T o add a new number to your Cont act List:
Using this submenu, the number is sav ed as a new
Contact. To save the number into an existing Contact,
edit the Contact entry .
1. From idle mode, press the OK Key to unlock the
keypad, press the Left Soft Key [ ] [MENU], sw ivel to
the QWERTY keypad, then press 2. Contacts, 1.
New Entry.
To change the input mo de, press the L eft Soft Key [ ]
[Abc], select the desired o ption, and press th e OK Key.
2. Press the Directional Key [ ] down to enter
information in other fields for the contact. Fields
include:
Mobile 1 / Home / Work / E-mail 1 / Group / Picture /
Ringtone / Mobile 2 / IM Screen Name / Fax / E-mail
2 / Str eet / City / State / Zip Code / Country
3. Press the OK Key [SA VE] to crea te the contact
entry.
LIST Entries
Y ou can review all the entries stored in y our Contact
List or quickly find an entry by entering a na me or its
character string.
1. From idle mode, press the OK Key to unlock the
keypad, press the Left Soft Key [ ] [MENU], sw ivel to
36
the QWERTY keypad, then press 2. Contacts, 2. List
Entries.
Press the Right Soft Key [ ] [Contacts]. The list of names
in your contacts is displayed al phabetically.
2. Enter a name or part of a name in the Go To Field
at the bottom of the screen or press the Dir ectional
Key [ ] up or down to scroll through y our Contact List.
3. T o edit the en try, press the Left Soft Key [ ] [Edit].
T o view contact detail s, press the OK Key [VIEW].
y By pressing the Right Soft Key [ ] [Options], you can
choose from the following:
1. New Contact: To add a new contact.
2. Erase: T o delete a cont act.
3. New TXT Message: To create a TXT message.
4. New Picture Message: To create a Picture message.
5. New Voice Message: To create a Voice message.
6. Set As ICE Contact:: To set as an in case of emergency
number.
7. Call: Dial the contact.
8. Manage Contacts: To erase, lock, unlock or cop y to card.
9. Send Name Card: To send a name card.
4. T o dial the sele cted number , pre ss the Right Sof t
Key [ ] [Options] and then press 7. Call or press the
SEND Key [ ].

GROUPS
Groups allow you to classify phone entries into
groups with up to 10 members in each gro up. The
default groups include Family and Work a nd they
cannot be erased or renamed.
TO ADD NEW GROUP
1. From idle mode, press the OK Key to unlock the
keypad, press the Left Soft Key [ ] [MENU], sw ivel to
the QWERTY keypad, p ress 2. Contacts then pres s
3. Message Groups.
2. Press the Left Soft Key [ ] [New ].
3. Enter a new group name and press the OK Key
[SA VE].
TO ASSIGN PHONE NUMBER T O GROUP
1. From idle mode, press the OK Key to unlock the
keypad, press the Left Soft Key [ ] [MENU], sw ivel to
the QWERTY keypad, p ress 2. Contacts then pres s
3. Message Groups.
2. Select the group where you want to add the
contact, and then press the R ight Sof t Key [ ]
[Options].
3. Select Add and press the OK Key.
4. Y our cont act entrie s will be display ed in
alphabetical order. Select the cont act you want to
add then press the OK Key [MARK].
5. Press the Left Soft Key [ ] [Done]. “MEMBER LIST
UPDATED” will be di splayed.
TO CHANGE GROUP NA ME
1. From idle mode, press the OK Key to unlock the
keypad, press the Left Soft Key [ ] [MENU], sw ivel to
the QWERTY keypad, p ress 2. Contacts then pres s
3. Message Groups.
2. Select the group you want to rename then pre ss
the Right Soft Key [ ] [Options].
3. Select Rename and press the OK Key.
4. Enter the new group name, then press the OK Key
[SA VE].
ERASE GROUP
1. From idle mode, press the OK Key to unlock the
keypad, press the Left Soft Key [ ] [MENU], sw ivel to
the QWERTY keypad, p ress 2. Contacts then pres s
3. Message Groups.
2. Select the existing group name that you w ant to
erase, and then press the Right Soft Key [ ] [Options].
Chapter 4 Menu Function 37

3. Select Erase Group and press the OK Key .
“ERASE GROUP?” will appear on th e screen.
4. Select Yes and press the OK Key. A confirmation
message appears.
TO SEND A TXT MESSAGE T O A GROUP
1. From idle mode, press the OK Key to unlock the
keypad, press the Left Soft Key [ ] [MENU], sw ivel to
the QWERTY keypad, p ress 2. Contacts then pres s
3. Message Groups.
2. Select the group you want to send a me ssage to
then press the Right Soft Key [ ] [Options].
3. Press 1. New TXT Message.
4. Input your message in the Text Field and then
press the Right Soft Key [ ] [Options] to sele ct Insert
Quick T ext, Save As Draft, Add, Format T ext, Priority
Level or Cancel Message.
5. T o send the TXT m essage, press the OK Key
[SEND] or press the SEND Key [ ].
TO SEND A PICTURE MESSA GE TO A GROUP
1. From idle mode, press the OK Key to unlock the
keypad, press the Left Soft Key [ ] [MENU], sw ivel to
the QWERTY keypad, p ress 2. Contacts then pres s
3. Message Groups.
38
2. Select the group you want to send a me ssage to
then press the Right Soft Key [ ] [Options].
3. Press 2. New Picture Message.
4. Under Text, input your message and then press
the Directional Key [ ] down.
5. Under Picture, press the Left Soft Key [ ] [My Pics],
select the picture you would like to send the n press
the OK Key . Press the Directional Key dow n.
6. Under Sound, press the Left Sof t Key [ ] [Sounds],
select the sound you would like to send the n press
the OK Key . Press the Directional Key dow n.
7. Under Subject, input a subject and then press the
Directional Key down.
8. Under Name Card, press the Left Soft Key [ ] [Add],
select 1. My Name Card or 2. Contacts then press
the OK Key . Select the de sired card then press the
OK Key.

9. Press the Right Soft Key [ ] [Op tions] to select
Preview, Save As Draft, Add Quick Text, Add Slide,
Priority Level, Remove Picture, Remove Slide,
Remove Sound, Remove Name Card or Cancel
Message.
These options will vary depending on the message
contents chosen.
10. T o send the Picture Message , press the OK Key
[SEND] or press the SEND Key [ ].
TO SEND A VOICE MESSA GE TO A GROUP
1. From idle mode, press the OK Key to unlock the
keypad, press the Left Soft Key [ ] [MENU], sw ivel to
the QWERTY keypad, p ress 2. Contacts then pres s
3. Message Groups.
2. Select the group you want to send a v oice
message to then press the Ri ght Soft Key [ ]
[Options].
3. Press 3. New Voice Message.
4. T o record a new V oice Memo , press the OK Key to
start recording, then press the OK Key [ STOP] to
finish recording and save the voice memo.
5. Under Voice, your recorded file name will appear.
Press the Directional Key [ ] down.
6. Under Text, input your message then press the
Directional Key [ ] down.
7. Under Subject, input a subject then press the
Directional Key [ ] down.
8. Under Name Card, press the Left Soft Key [ ] [Add],
select 1. My Name Card or 2. Contacts then press
the OK Key . Select the card y ou’d like to send then
press the OK Key .
9. Press the Right Soft Key [ ] [Op tions] to select
Review, Save As Draft, Add Q uick Text, Priority Level,
Remove Recording, Remove Name Card or Cancel
Message.
These options will vary depending on the message
contents chosen.
10. T o send the V oice Message, press the OK Key
[SEND] or press the SEND Key [ ].
SPEED DIALS
From idle mode, calls can be placed to numbers
stored in speed dial by swiveling to the QWERTY
keypad, and pressing & holding the locatio n number
on the keypad.
1. From idle mode, press the OK Key to unlock the
keypad, press the Left Soft Key [ ] [MENU], sw ivel to
the QWERTY keypad, p ress 2. Contacts then pres s
4. Speed Dials.
Chapter 4 Menu Function 39

2. Highlight the desired S peed Dial position, or enter
the Speed Dial digit, then pre ss the OK Ke y [SET].
3. Select the desired Contact entry, then press the
OK Key.
4. Highlight the number you wish to set to speed dial
then press the OK Key .
5. "ASSIGN SPEED DIAL T O CONTACT?" appears
on the screen. Select Yes and press the OK Key . A
confirmation message appears.
“Unassigned” appears if t he location is av ailable.
TO ERASE A SAVED SPEED DIAL
1. From idle mode, press the OK Key to unlock the
keypad, press the Left Soft Key [ ] [MENU], sw ivel to
the QWERTY keypad, p ress 2. Contacts then pres s
4. Speed Dials.
2. Select the Speed Dial entry you want to era se.
3. Press the Right Soft Key [ ] [Remov e].
4. "REMOVE SPEED DIALS" appears on the screen.
Select Yes and press the OK Key. A confi rmation
message appears.
40
MY NAME CARD
A Name Card with the hand set’s mobile number
automatically appears.
EDIT MY NAME CA RD
1. From idle mode, press the OK Key to unlock the
keypad, press the Left Soft Key [ ] [MENU], sw ivel to
the QWERTY keypad, p ress 2. Contacts then pres s
5. My Name Card.
2. Press the Left Soft Key [ ] [Edit ].
3. Edit My Name Card options and then press the
OK Key [SAV E] to sav e your changes.
SEND MY NAME CA RD
1. From idle mode, press the OK Key to unlock the
keypad, press the Left Soft Key [ ] [MENU], sw ivel to
the QWERTY keypad, p ress 2. Contacts then pres s
5. My Name Card.
2. Press the Right Soft Key [ ] [Send ].
3. Press 1. TXT Message, 2. Picture Message, 3.
Voice Message or 4. Via Bluetooth.
y TXT Message: Allow s you to send TXT messages w ith the
Name Card as an attachment.

1. Enter the recipient’s contact i nformation an d press the
OK Key.
2. Enter your message in the Text field and then press the
OK Key [SEND].
y Picture Message: Allows you to se nd picture messag es
with the Name Card as an attachment .
1. Enter the recipient’s contact i nformation an d press the
OK Key.
2. Compose your Picture Message and then press the OK
Key [SEND]. Please refer to page 97 for more details
on Picture Message.
y Voice Message: Allows you to se nd voice messag es with
the Name Card as an attachment.
1. Press the OK Key to start recording a v oice memo and
press the OK Key [STOP] to finish recording and sav e
the voice memo.
2. Compose your Voi ce Message and then press the OK
Key [SEND]. Please refer to page 97 for more details
on Voice Message.
y Via Bluetooth: Allows you to se nd Name Card t o another
Bluetooth device.
1. Press 1. Add New Dev ice. If the Bluetooth® pow er is
switched off, the following message will appear on t he
screen: "TURN BLUETOOTH POWER ON?". Press
the OK Key to select Yes.
2. When "PLACE DEVICE YOU ARE CONNECTING T O
IN DISCOVERABLE MODE" appears, press the O K
Key to start searching Bluetooth devi ces.
3. Press the Directional Key [ ] up or dow n to select a
desired device and press the OK Key [PAIR]. Please
refer to page 47 for more details on Bluetooth.
4. The handset may prompt you for the passkey. Consult
the Bluetooth® accessory (sold separatel y) instructions
for the appropriate passkey (ty pically “0000” - 4 zeroes).
Enter the passkey , then press the OK Key .
5. "Before Connecting To [Device Name]" will appear on
the screen. Select Alw ays Ask or Always C onnect and
press the OK Key.
Chapter 4 Menu Function 41

CALLS
The Calls menu is a list of the last phone numbers or
Contact entries for calls you placed, a ccepted, or
missed. It is continually updated as new numbers are
added to the beginning of the list and the oldest
entries are removed from the bottom of the list.
ACCESS AND OPTIONS
1. From idle mode, press the OK Key to unlock the
keypad, press the Left Soft Key [ ] [MENU], sw ivel to
the QWERTY keypad, select 1. Recent Calls, then
press the OK Key .
2. Select a submenu.
1. Missed
2. Received
3. Dialed
4. All
5. View Timers
MISSED
Displays information about the 90 most recently
missed calls. Place a call to a missed cal l by sim ply
pressing the SEND Key [ ].
1. From idle mode, press the OK Key to unlock the
keypad, press the Left Soft Key [ ] [MENU], sw ivel to
42
the QWERTY keypad, then press 7. R ecent Call s, 1.
Missed.
2. Highlight an entry and do one of the following
options:
y Press the OK Key [OPEN] to view the entry.
y Press the Send Key [ ] to place a call to the number .
y Press the Right Soft Key [ ] [Options] to select:
Save to Contacts: To store the phone number in your
Contacts.
Erase: T o eras e a call lis ting.
Lock/Unlock: T o lock or unlock a call listing.
Erase All: T o erase all Missed Call entries.
View Timers: To display usage time.
y Press the Left Soft Key [ ] [Message] to select:
TXT Message: To send a TXT message to the cont act.
Picture Message: T o s end a Picture mess age to the
contact.
Voice Message: To send a Voice messag e to the cont act.
After 90 missed calls, the oldest call will automatically be
erased from the history .

RECEIVED
Displays information about the 90 most recently
received calls. Place a call to a received call by
simply pressing the SEND Key [ ].
1. From idle mode, press the OK Key to unlock the
keypad, press the Left Soft Key [ ] [MENU], sw ivel to
the QWERTY keypad, then press 7. R ecent Call s, 2.
Received.
2. Highlight an entry and do one of the following
options:
y Press the OK Key [OPEN] to view the entry.
y Press the Send Key [ ] to place a call to the number .
y Press the Right Soft Key [Options] to select:
Save to Contacts: To store the phone number in your
Contacts.
Erase: T o eras e a call lis ting.
Lock/Unlock: T o lock or unlock a call listing.
Erase All: T o erase all Receiv ed Call entries.
View Timers: To display usage time
y Press the Left Soft Key [Message] to select:
TXT Message: To send a TXT message to the cont act.
Picture Message: T o s end a Picture mess age to the
contact.
Voice Message: To send a Voice messag e to the cont act.
After 90 received calls, the oldest call will automatically
be erased from the history.
DIALED
Displays information about the 90 most recently
dialed numbers. Place a call to a dialed call by simply
pressing the SEND Key [ ].
1. From idle mode, press the OK Key to unlock the
keypad, press the Left Soft Key [ ] [MENU], sw ivel to
the QWERTY keypad, then press 7. R ecent Call s, 3.
Dialed.
2. Highlight an entry and do one of the following
options:
y Press the OK Key [OPEN] to view the entry.
y Press the Send Key [ ] to place a call to the number .
y Press the Right Soft Key [ ] [Options] to select:
Save to Contacts: To store the phone number in your
Contacts.
Erase: T o eras e a call lis ting.
Lock/Unlock: T o lock or unlock a call listing.
Erase All: T o erase all Dialed Call entries.
View Timers: To display usage time.
y Press the Left Soft Key [ ] [Message] to select:
TXT Message: To send a TXT message to the cont act.
Picture Message: T o s end a Picture mess age to the
contact.
Voice Message: To send a Voice messag e to the cont act.
After 90 dialed calls, the oldest call will automatically be
erased from the history .
Chapter 4 Menu Function 43

ALL
Displays information about the most recently
received, dialed and missed calls.
1. From idle mode, press the OK Key to unlock the
keypad, press the Left Soft Key [ ] [MENU], sw ivel to
the QWERTY keypad, then press 7. R ecent Call s, 4.
All.
2. Highlight an entry and do one of the following
options:
y Press the OK Key [OPEN] to view the entry.
y Press the Send Key [ ] to place a call to the number .
y Press the Right Soft Key [ ] [Options] to select:
Save to Contacts: To store the phone number in your
Contacts.
Erase: T o eras e a call lis ting.
Lock/Unlock: T o lock or unlock a call listing.
Erase All: T o erase all Call entries.
View Timers: To display usage time
y Press the Left Soft Key [ ] [Message] to select:
TXT Message: To send a TXT message to the cont act.
Picture Message: T o s end a Picture mess age to the
contact.
Voice Message: To send a Voice messag e to the cont act.
After the 270 received, dialed or missed calls, the oldest
call will automatically be erased from the history.
Shortcut: T o v iew a quick list o f all your calls, pr ess the
Send Key from idle mode.
44
VIEW TIMERS
Checks the usage time and manages your calls
within the limit you set. The 11 timers include (Last
Call, All Calls, Received Calls, Dialed Calls, Roaming
Calls, Transmit Data, Received Data, Total Data, Last
Reset, Lifetime Calls, Lifetime Da ta Coun ter):
1. From idle mode, press the OK Key to unlock the
keypad, press the Left Soft Key [ ] [MENU], sw ivel to
the QWERTY keypad, then press 7. R ecent Call s,
then 5. View Timers.
2. Highlight a call list. Call timers include:
Last Call/All Calls/Re ceived Calls/Dialed
Calls/Roaming Calls/T ransmi t Data/Received
Data/Total Data/Last Reset/Lifetime Calls/Lifetime
Data Counter
y Press the Left Soft Key [Reset] to reset highlighted timer .
y Press the Right Soft Key [Reset All] to reset all timers.

BLUETOOTH
Bluetooth technology connectivity enables wireless
connections between electronic devices. If connected
with a Bluetooth Handsfree device, you can use your
phone more freely . Since dev ices with Bluetooth
connectivity communicate using radio w aves, your
phone and the other device do not need to be in
direct line-of-sight. The two devices only need to be
within 10 meters (30 feet) of each other. The
connection can be subject to interference from
obstructions such as walls or other electronic devices.
This device is compliant with Bluetooth specifica tion
2.0, supporting the following profiles: Headset,
Handsfree, Stereo, Phonebook Access, an d Object
Push for vCard. To ensure interoperability between
other devices supporting Bluetooth technology, use
approved enhancements for this model. Check with
the manufacturers of other devices to de termine their
compatibility with this phone. There may be
restrictions on using Bluetooth technology in some
locations. Check with your local autho rities or service
provider. If you want more info rmation on this fun ction,
visit the Bluetooth Technology organization Web site:
https://www .bluetooth .org/.
Important: Features using Bluetooth technology , or allow ing
such features to run in the background
while using other features, increase the d emand on
battery power and reduce the battery life.
BLUETOOTH ON/OFF
T o toggle Blu etooth® pow er On/Off:
1. From idle mode, press the OK Key to unlock the
keypad, press the Left Soft Key [ ] [MENU], sw ivel to
the QWERTY keypad and press 9. Settings & Tools,
3. Bluetooth.
2. Press the Left Soft Key [ ] [T urn On/T urn Off]. A
confirmation window appears.
ADD NEW DEVICE
Pairing is the process that allows the handset to
locate, establish and register a 1-to-1 connection with
the target device.
1. From idle mode, press the OK Key to unlock the
keypad, press the Left Soft Key [ ] [MENU], sw ivel to
the QWERTY keypad and press 9. Settings & Tools,
3. Bluetooth, 1. Add New Device.
2. If the Bluetooth® power is switched off, the
following message will appear on the LCD screen:
“TURN BLUETOOTH POWER ON?” Select Yes and
press the OK Key .
Chapter 4 Menu Function 45

3. The handset will prompt you with the following
message on the LCD screen: “PLACE DEVICE YOU
ARE CONNECTING TO IN DISCOVERABLE
MODE.” Press the OK Key .
4. The device will appear in the ADD NEW DEVICE
menu. Select the device you wish to pair to, then
press the OK Key [PAIR].
5. The handset may prompt you for the passkey.
Consult the Bluetooth® accessory (sold separately)
instructions for the appropriate pa sskey (typically
“0000”—4 zeroes). Enter the passkey, then press the
OK Key.
You do not need to input the passk ey for pair ing when
the passkey of the Bluetooth® Heads et or hands-fr ee kit
is 0000.
6. The handset will prompt you with the following
message on the LCD screen: BEFORE
CONNECTING [Device Name]. If you w ould like to
always confirm before connecting to the Bl uetooth®
device, select Alw ays Ask, then press the OK Key .
Then the handset will prompt you with the message
Connect to [Device Name]? Select Yes and press the
OK Key. If you do not wish to confirm every tim e
before connecting to the Bluetooth® device, select
Always Connect, then press the OK Key.
7. Once connected, you will see the device listed in
46
the Bluetooth menu and the Bluetooth® dev ice
connected icon will appear at the top of the screen
when connected to the Bluetooth® dev ice.
y In the Bluetooth menu, you can disconnect the
connected device with an icon by pressing th e OK
Key [Drop]. Conversely , you can reconnect by
pressing the OK Key again.
y When an audio device is connected, you can select
another device and the connection is au tomatically
transferred from that audio device to the other one.
y If multiple devices are displayed, select the device you
want to connect to.
OPTIONS
1. From idle mode, press the OK Key to unlock the
keypad, press the Left Soft Key [ ] [MENU], sw ivel to
the QWERTY keypad and press 9. Settings & Tools,
3. Bluetooth.
2. Select the paired dev ice.
3. Press the Right Soft Key [ ] [Op tions].
4. Select one of the following options, then press the
OK Key.
y Remove Device: Removes a device from the pairing l ist.
y Rename Device: Renames a paired device.
y Incoming Security: Sets permissions for co nnecting an
incoming device.
y Service Discovery: To se arch for the serv ices that the
selected device supports.

y Device Info: Displays device information.
5. Or, press the OK Key to access 1 . Send Name
Card, 2. Get Name Card or 3. Se nd Picture. Selec t
the desired option and press the OK Key to acce ss
the following:
y Send Name Card: Send name cards stored in Contacts to
a selected device.
1. Press the Directional Key [ ] up or dow n to highlight a
desired contact or contacts, the n press the OK Key
[MARK]. If you want to change y our selections, pre ss the
OK Key [UNMARK] to deselect your selections.
2. Press the Left Soft Key [ ] [Done]. If y ou want to send al l
the name cards, press the Right Soft K ey [ ] [Send All].
y Get Name Card: Get name cards from the selected dev ice.
y Send Picture: Send photos to a selected dev ice.
1. Press the Directional Key [ ] up, down, l eft or rig ht to
highlight a desired photo or photos, th en press the OK Key
[MARK]. If you want to change y our selections, pre ss the
OK Key [UNMARK] to deselect your selections.
2. Press the Left Soft Key [ ] [Done]. If y ou want to send al l
the photos, press the Right Soft Key [ ] [Send All].
SETTINGS
MY PHONE NAME
T o edit the Bluetooth® name of your phone:
1. From idle mode, press the OK Key to unlock the
keypad, press the Left Soft Key [ ] [MENU], sw ivel to
the QWERTY keypad and press 9. Settings & Tools,
3. Bluetooth.
2. Press the Right Soft Key [ ] [Op tions].
3. Press 1. My Phone Name.
4. Use the numeric keypad to enter a new custom
name.
5. Press the OK Key [SET] to save and exit.
DISCOVERY MODE
T o set w hether your d evice is able to be searched for
by other Bluetooth® devices in the area:
1. From idle mode, press the OK Key to unlock the
keypad, press the Left Soft Key [ ] [MENU], sw ivel to
the QWERTY keypad and press 9. Settings & Tools,
3. Bluetooth.
2. Press the Right Soft Key [ ] [Op tions].
3. Press 2. Discovery Mode.
If Bluetooth power is not on, it will be turned on
automatically.
4. Select On or Off, then pres s the OK Key [SET].
Chapter 4 Menu Function 47

SUPPORTED PROFILES
T o view brief descriptions of th e profiles supported by
the phone:
1. From idle mode, press the OK Key to unlock the
keypad, press the Left Soft Key [ ] [MENU], sw ivel to
the QWERTY keypad and press 9. Settings & Tools,
3. Bluetooth.
2. Press the Right Soft Key [ ] [Op tions].
3. Press 3. Supported Profiles.
4. Select one of the following profiles, and then press
the OK Key [VIEW].
Headset / Handsfree / Stereo / Phonebook Access /
Object Push
AUTO P AIR HANDSFR EE
T o set Auto Pair Handsfree O n/Of f:
1. From idle mode, press the OK Key to unlock the
keypad, press the Left Soft Key [ ] [MENU], sw ivel to
the QWERTY keypad and press 9. Settings & Tools,
3. Bluetooth.
2. Press the Right Soft Key [ ] [Op tions].
3. Press 4. Auto Pair Handsfree.
4. Select On or Off, then pres s the OK Key [SET].
SOUNDS SETTINGS
48
CALL SOUNDS
T o set r ingtones for types of incoming calls:
CALL RINGTONE
1. From idle mode, press the OK Key to unlock the
keypad, press the Left Soft Key [ ] [MENU], sw ivel to
the QWERTY keypad and press 9. Settings & Tools,
4. Sound Settings, 2. Call Sounds, 1. Call Ringtone.
2. Select a ringtone, then press the OK Key [SET ]. To
play the ringtone, press the Left Soft Key [Play].
CALL VIBRATE
1. From idle mode, press the OK Key to unlock the
keypad, press the Left Soft Key [ ] [MENU], sw ivel to
the QWERTY keypad and press 9. Settings & Tools,
4. Sound Settings, 2. Call Sounds, 2. Call Vibrate .
2. Select On or Off, then pre ss the OK Key [SET].
CALLER ID READOU T
1. From idle mode, press the OK Key to unlock the
keypad, press the Left Soft Key [ ] [MENU], sw ivel to
the QWERTY keypad and press 9. Settings & Tools,
4. Sound Settings, 2. Call Sounds, 3. Caller ID
Readout.
2. Select Ring Only , Caller ID + Ring or Name
Repeat, then press the OK Key [SET].

ALERT SOUNDS
T o select the alert ty pe for a new message :
1. From idle mode, press the OK Key to unlock the
keypad, press the Left Soft Key [ ] [MENU], sw ivel to
the QWERTY keypad and press 9. Settings & Tools,
4. Sounds Settings, 3. Alert Sounds.
2. Select 1. TXT Message, 2. Pic- Voice Message or
3. Voicemail then press the OK Key.
3. Select Tone, Vibrate or Reminder, then p ress the
OK Key.
y To ne: Press the Dir ectional Key [ ] up or down to se lect a
ringer, then press th e OK Key [SE T]. To play the alert tone,
press the Left Soft Key [ ] [Play ].
y Vibrate: Press the Directional Key [ ] up or down to select
On or Off, then press the OK Key [SET].
y Reminder: Press the Directional Key [ ] up or down to
select Once, Every 2 Minutes, Every 15 Minutes or Off,
then press the OK Key [SET].
EMERGENCY TONE
1. From idle mode, press the OK Key to unlock the
keypad, press the Left Soft Key [ ] [MENU], sw ivel to
the QWERTY keypad and press 9. Settings & Tools,
4. Sounds Settings, 3. Alert Sounds, 4. Emergency
T one.
2. Select Alert, Vibrate or Off then press the OK Key
[SET].
MISSED CALL
T o selec t alert type for missed ca lls:
1. From idle mode, press the OK Key to unlock the
keypad, press the Left Soft Key [ ] [MENU], sw ivel to
the QWERTY keypad and press 9. Settings & Tools,
4. Sounds Settings, 3. Alert Sounds, 5. Missed Call.
2. Select Tone, Vibrate or Reminder, then p ress the
OK Key.
y Tone: Press the Directi onal Key [ ] up or down to se lect a
ringer, then press th e OK Key [SE T]. To play the alert tone,
press the Left Soft Key [ ] [Play ].
y Vibrate: Press the Directional Key [ ] up or down to sel ect
On or Off, then press the OK Key [SET].
y Reminder: Press the Directional key [ ] up or down to
select Once, Every 2 Minutes, Every 15 Minutes or Off,
then press the OK Key [SET].
KEYPAD SOUNDS
T o selec t keyp ad sounds for pre ssing keyp ad:
1. From idle mode, press the OK Key to unlock the
keypad, press the Left Soft Key [ ] [MENU], sw ivel to
the QWERTY keypad and press 9. Settings & Tools,
4. Sounds Settings, 4. Keypad Sounds.
2. Select DTMF , Cloud or Simple, then press the OK
Key [SET].
DTMF is the default setting for this device.
Chapter 4 Menu Function 49

KEYPAD VOLUME
T o set the key pad volum e:
1. From idle mode, press the OK Key to unlock the
keypad, press the Left Soft Key [ ] [MENU], sw ivel to
the QWERTY keypad and press 9. Settings & Tools,
4. Sounds Settings, 5. Keypad V olume.
2. Adjust the volume by pressing the Directional Key
[ ] up or down, then press the OK Key [SET] to save
the setting.
DIGIT DIAL READOUT
The Digit Dial Readout setting controls if di gits are
read out when you enter a phone number with the
keypad.
1. From idle mode, press the OK Key to unlock the
keypad, press the Left Soft Key [ ] [MENU], sw ivel to
the QWERTY keypad and press 9. Settings & Tools,
4. Sounds Settings, 6. Digital Dial Readout.
2. Select On or Off, then pres s the OK Key [SET].
SERVICE ALERTS
T o set a ny of the three Alert options to either On or
Off:
1. From idle mode, press the OK Key to unlock the
keypad, press the Left Soft Key [ ] [MENU], sw ivel to
the QWERTY keypad and press 9. Settings &
50
T ools, 4. Sounds Settings, 7. Serv ice Alerts.
2. Select one of the following options, then press the
OK Key.
y ERI: The Enhanced Roaming Indic ator (ERI) feat ure
displays a text banner on the display scr een informing the
handset user of which systems the wireless device is
using as compared to the service plan th ey purchased.
The ERI Banner text changes to tell a custo mer if they ar e
using the Verizon Wireles s Network, Extended Netw ork or
Roaming.
y Minute Beep: Alert s you ev ery minute dur ing a call.
y Call Connect: Alert s you w hen the call is con nected.
3. Select On or Off, then pres s the OK Key [SET].
DEVICE CONNECT
Allows you to turn the Device Connect On or Of f:
1. From idle mode, press the OK Key to unlock the
keypad, press the Left Soft Key [ ] [MENU], sw ivel to
the QWERTY keypad and press 9. Settings & Tools,
4. Sounds Settings, 8. Device Connect.
2. Select On or Off, then pres s the OK Key [SET].
POWER ON/OFF
T o set the phone to sound a tone when the phone is
powered on or off:
1. From idle mode, press the OK Key to unlock the
keypad, press the Left Soft Key [ ] [MENU], sw ivel to

the QWERTY keypad and press 9. Settings & Tools,
4. Sounds Settings, 9. Power On/Of f.
2. Press 1. Power On or 2. Power Off.
3. Select On or Off, then pres s the OK Key [SET].
SWIVEL SOUNDS
T o set the phone to sound a tone when swiveling to
Music/QWERTY keypad:
1. From idle mode, press the OK Key to unlock the
keypad, press the Left Soft Key [ ] [MENU], sw ivel to
the QWERTY keypad and press 9. Settings & Tools,
4. Sounds Settings, 0. Swivel Sounds.
2. Select On or Off, then pres s the OK Key [SET].
DISPLAY SETTINGS
Allows you to customize the display.
BANNER
T o set y our Personal or ERI bann er:
PERSONAL BANNER
The Personal Banner can be up to 16 char acters and
is displayed on your phone’s screen from idle mode.
1. From idle mode, press the OK Key to unlock the
keypad, press the Left Soft Key [ ] [MENU], sw ivel to
the QWERTY keypad and press 9. Settings & Tools,
5. Display Settings, 2. Banner, 1. P ersonal Banner .
2. Enter the banner text (up to 16 characte rs), select
a desired font color , then press the OK Key [SET].
ERI BANNER
If you use ERI Service, ERI Text is shown on the sub
banner.
1. From idle mode, press the OK Key to unlock the
keypad, press the Left Soft Key [ ] [MENU], sw ivel to
the QWERTY keypad and press 9. Settings & Tools,
5. Display Settings, 2. Banner, 2 . ERI Banner.
2. Select On or Off, then pres s the OK Key [SET].
BACKLIGHT
T o set the duration for backlight illumination of the
Main Screen and Keypad:
1. From idle mode, press the OK Key to unlock the
keypad, press the Left Soft Key [ ] [MENU], sw ivel to
the QWERTY keypad and press 9. Settings & Tools,
5. Display Settings, 3. Backlight.
2. Press 1. Display or 2. Keypad.
3. Select 7 Seconds, 15 Seconds, 30 Seconds or
Always On, then press the OK Key [SET].
Chapter 4 Menu Function 51

Even if Always On is selected for the Backlight
setting, the backlight will turn off when the phone is
powered off.
WALLP A PER
T o choose the kind of backgr ound to be display ed on
the phone:
1. From idle mode, press the OK Key to unlock the
keypad, press the Left Soft Key [ ] [MENU], sw ivel to
the QWERTY keypad and press 9. Settings & Tools,
5. Display Settings, 4. Wallpaper .
2. Select a desired screen then press the OK Key
[SET]. To view the image, press the Left Soft Key [ ]
[View].
3. T o download other available selections, press the
Right Soft Key [ ] [Get New], then 1. Get New
Applications. Follow the on-screen prompts.
DISPLA Y THEMES
T o choose the background screen:
1. From idle mode, press the OK Key to unlock the
keypad, press the Left Soft Key [ ] [MENU], sw ivel to
the QWERTY keypad and press 9. Settings & Tools,
5. Display Settings, 5. Display Themes.
2. Select Foliate, Transp arent, Urban, or White, then
press the OK Key [SET]. To preview the display
52
theme, press the Left Soft Key [ ] [ Preview].
3. T o view the Help for the Display Theme, press the
Right Soft Key [ ] [Help].
Foliate is the default setting for this device.
MAIN MENU SETTINGS
T o change Main Menu layout and type:
1. From idle mode, press the OK Key to unlock the
keypad, press the Left Soft Key [ ] [MENU], sw ivel to
the QWERTY keypad and press 9. Settings & Tools,
5. Display Settings, 6. Main Menu Settings.
y Menu Layout: Select Tab, List or Grid, then press the OK
Key [SET]. To preview the Main Menu layout, press the
Left Soft Key [ ] [Preview ]. If you selected List or Grid, the
Menu Type selection screen appears. S elect Messaging
or Personalizing, then press the OK Key [SET].
This guide gives navigation instructions according
to the defaults, Main Menu Settings are set to List
and Messaging, and Display Themes is set to
Foliate. If other settings are set, navigating the
phone's menus may be different.
y Replace Menu Items: Al lows you to repl ace the Mai n
Menu with desired menus.
1. Select the menu you want to replace then press the O K
Key [EDIT].
2. Select a menu in the list to replace it a nd then press the
OK Key [SET].

3. T o return t o Menu Settings, pr ess the Left S oft Key [ ]
[Done] or to view the Help for Replace Me nu Items, press
the Right Soft Key [ ] [Help].
y Position Menu Items: All ows you to mov e the position of
Main Menu to a desired position.
1. Select the menu you want to move th en press the OK
Key [MOVE].
2. Press the Directional Key up or dow n to place the menu
in a desired position and then press the OK K ey [SET].
3. T o return t o Menu Settings, pr ess the Left S oft Key [ ]
[Done] or to view the Help for Position Menu Ite ms, press
the Right Soft Key [ ] [Help].
y Reset Menu Settings: Allows you to reset Main M enu Settings.
1. Select Menu Layout, Menu Items, Item P ositions, or All
and then press the OK Key .
2. T o return t o Menu Settings, pr ess the Left S oft Key [ ]
[Done] or to view the Help for Reset Menu Settings, pr ess
the Right Soft Key [ ] [Help].
- Menu Layout: Reset Menu Layout to the initial Menu Layout.
- Menu Items: Reset Menu Items to the initial content of the Main
Menu.
- Item Positions: Reset Menu Items to the initial order of Main Menu.
- All: Reset all Main Menu Settings to the initial Main Menu Settings.
DIAL FONTS
T o se t the font size:
1. From idle mode, press the OK Key to unlock the
keypad, press the Left Soft Key [ ] [MENU], sw ivel to
the QWERTY keypad and press 9. Settings & Tools,
5. Display Settings, 7. Dial Fonts.
2. Select Normal or Large, then press the OK Key [SET].
MENU FONT SIZE
T o set the menu fon t size:
1. From idle mode, press the OK Key to unlock the
keypad, press the Left Soft Key [ ] [MENU], sw ivel to
the QWERTY keypad and press 9. Settings & Tools,
5. Display Settings, 8. Menu Font Size.
2. Select Normal or Large, then press the OK Key [SET].
CLOCK FORMAT
T o choose the kind of clock to be display ed on the
LCD screen:
1. From idle mode, press the OK Key to unlock the
keypad, press the OK Key [MENU], sw ivel to the
QWERTY keypad and press 9. Settings & T ools, 5.
Display Settings, 9. Clock Format.
2. Press the Directional Key [ ] left or ri ght to select
Analog, Large Analog, Digital 12, Large Digital 12,
Digital 24, Large Digital 24 or Of f, select a
desired font color, the n pre ss the OK Key [SET].
Large Digital 12 is the default setting for this d evice.
Chapter 4 Menu Function 53

PHONE SETTINGS
AIRPLANE MODE
In Airplane Mode, all menu functions can b e
accessed except making calls, receiving calls, dat a
connection and Bluetooth®. Activating Airpl ane Mode
will disable all wireless communications. Services
that support Location On functions like Chaperone
are temporarily disabled.
1. From idle mode, press the OK Key to unlock the
keypad, press the OK Key [MENU], sw ivel to the
QWERTY keypad and press 9. Settings & T ools, 6.
Phone Settings, 1. Airplane Mode.
2. Select On or Off, then pres s the OK Key [SET].
SET SHORTCUTS
Y our phone offers y ou the option o f assigning a
shortcut key (Directional Key lef t, right, up, and down)
to a favorite or often-used func tion.
From idle mode, press the Directional Key [ ] r ight to
access the MY SHORTCUTS menu and press the Lef t
Soft Key [ ] [Settings].
1. From idle mode, press the OK Key to unlock the
keypad, press the Left Soft Key [ ] [MENU], swivel to
the QWERTY keypad and press 9. Settings & Tools, 6.
Phone Settings, 2. Set Shortcuts, 1. Set My Shortcuts.
2. Select Shortcut 1, Shortcut 2, Shortcut 3 or
54
Shortcut 4, then press the OK Key [SET].
3. Select the desired option, then press the OK Key [SET].
From idle mode, pressing the Directional Key [ ] right will
display the MY SHORTCUTS screen. On the MY
SHORTCUTS screen, you can select a function an d
then press the OK Key to access the function. On the
MY SHORTCUTS screen, you can reloca te a function
by pressing the Right Soft Key [ ] [Move], pressing the
Directional Key [ ] up or down, and then pressi ng the OK
Key [SAVE]. Or y ou can press the Le ft Soft K ey [ ]
[Settings] to access Set My Shortcuts or Set Directional Keys.
RESETTING MY SHORTCUTS
T o reset My Shortcuts to their original default s:
1. From idle mode, press the OK Key to unlock the
keypad, press the Left Soft Key [ ] [MENU], swivel to
the QWERTY keypad and press 9. Settings & Tools, 6.
Phone Settings, 2. Set Shortcuts, 1. Set My Shortcuts.
2. Select Shortcut 1, Shortcut 2, Shortcut 3 or
Shortcut 4, and then press the Right Sof t Key [ ]
[Options].
3. Press 1. Reset Shortcut (1, 2, 3 or 4) or 2. Reset
My Shortcuts.
4. Select Yes and press the OK Key.

SET DIRECTIONAL KEYS
From idle mode, you can specify the function that is
accessed when you press the Directional Key [ ] up ,
down or left.
1. From idle mode, press the OK Key to unlock the
keypad, press the Left Soft Key [ ] [MENU], sw ivel to
the QWERTY keypad and press 9. Settings & Tools,
6. Phone Settings, 2. Set Shortcuts, 2. Set Directional
Keys.
2. Select UP Directional Key , LEFT Dire ctional Key or
DOWN Directional Key , and then press the OK Key [SET].
3. Select the desired option, and then pres s the OK
Key [SET].
RESETTING THE DIRECTIONAL KEY SETTINGS
Use the following procedure to specify the default
Directional Key settings.
1. From idle mode, press the OK Key to unlock the
keypad, press the Left Soft Key [ ] [MENU], sw ivel to
the QWERTY keypad and press 9. Settings & Tools,
6. Phone Settings, 2. Set Shortcuts, 2. Set Directional
Keys.
2. Select UP Directional Key , LEFT Dire ctional Key or
DOWN Directional Key , and then press the R ight
Soft Key [ ] [Options].
3. Press 1. Reset (UP, LEFT or DOWN) Key or 2.
Reset Directional Keys.
4. Select Yes and press the OK Key.
LANGUA GE
T o set the bilingual fe ature to either English or
Español:
1. From idle mode, press the OK Key to unlock the
keypad, press the Left Soft Key [ ] [MENU], sw ivel to
the QWERTY keypad and press 9. Settings & Tools,
6. Phone Settings, 4. Language.
2. Select either English or Español, then pr ess the
OK Key [SET].
LOCATION
1. From idle mode, press the OK Key to unlock the
keypad, press the Left Soft Key [ ] [MENU], sw ivel to
the QWERTY keypad and press 9. Settings & Tools,
6. Phone Settings, 5. Location.
2. Select one of the following settings, then press the
OK Key [SET
y Location On: Y our loc ation is now av ailable to th e network.
y E911 Only: Your location will be hidden from the network
].
and applications, except for 91 1.
When Lock Setting is selected for Location Setting
under Restrictions on the Security Menu, you will need
to enter a lock code. The default Lock Code i s “1234”.
Chapter 4 Menu Function 55

CURRENT COUNTRY
Allows you to set the country of your current lo cation
so that your phone works properly while y ou travel.
1. From idle mode, press the OK Key to unlock the
keypad, press the Left Soft Key [ ] [MENU], sw ivel to
the QWERTY keypad and press 9. Settings & Tools,
6. Phone Settings, 6. Current Country .
2. Press the Directional Key [ ] up or down or input
the country name in the Go To field to select the
desired country , then press the OK Key [SET]. To
view help for Current Country , press the Right Soft
Key [ ] [Help].
SECURITY
The Security menu allows you to electronically
secure the phone.
The default lock code is “1234”.
EDIT CODES
T o set a new lock code:
1. From idle mode, press the OK Key to unlock the
keypad, press the Left Soft Key [ ] [MENU], sw ivel to
the QWERTY keypad and press 9. Settings & Tools,
6. Phone Settings, 7. Security.
2. Enter the four-digit lock code, then press the OK Key .
3. Press 1. Edit Codes.
56
4. Select one of the following settings, then press the
OK Key.
y Phone Only: All ows you to edit the l ock code for Secur ity .
(The default lock code is ”1234”.)
y Calls & Services: Allows you to edit the lock code for
Restrictions. (The default lock code is “1234”.)
5. If Phone Only is selected, enter the new four-digi t
code in the Enter New Code field. Enter the new
four-digit code again in the Re-enter New Code field
to confirm your input.
6. If Calls & Services is selected, enter the current
lock code in the Enter Current Code field. E nter the
new four-digit code in the Enter New Code field.
Enter the new four-digit code again in the Re-enter
New Code field.
7. Press the OK Key [SET].
RESTRICTIONS
Use the following procedure to configure Location
Setting, Calls and Messages restric tions.
1. From idle mode, press the OK Key to unlock the
keypad, press the Left Soft Key [ ] [MENU], sw ivel to
the QWERTY keypad and press 9. Settings & Tools,
6. Phone Settings, 7. Security.
2. Enter the four-digit lock code, then press the OK
Key. The default lock code is “1234”.

3. Press 2. Restrictions.
4. Enter the four-digit lock code again, then press the
OK Key.
5. Select one of the following settings:
y Location Setting: Unlock Setting/Lock Setting.
y Calls: Incoming Calls/Outgoing Calls.
For Incoming Calls, set Allow All, Contact s Only or
Block All.
For Outgoing Calls, set Allow All, Contacts Only or
Block All.
y Messages: Incoming Messages/Outgoing Messages.
6. Press the OK Key [SET].
For Incoming Messages, set Allow All or Block
All.
For Outgoing Messages, set Allow All or Block
All.
PHONE LOCK SETTING
This setting specifies whether the phone should be
locked whenever it is turned on. Lock Mode prev ents
the unauthorized use of your phone. Once the phone
is locked, it is in restricted m ode until the lock code is
entered. Y ou can still make eme rgency calls.
1. From idle mode, press the OK Key to unlock the
keypad, press the Left Soft Key [ ] [MENU], sw ivel to
the QWERTY keypad and press 9. Settings & Tools,
6. Phone Settings, 7. Security.
2. Enter the four-digit lock code, then press the OK
Key. The default lock code is “1234”.
3. Press 3. Phone Lock Setting.
4. Select one of the following settings, then press the
OK Key [SET].
y Unlocked: Phone is unlocked.
y On Power Up: Phone will lock when it is turned on.
LOCK PHONE NOW
Lock the phone now.
1. From idle mode, press the OK Key to unlock the
keypad, press the Left Soft Key [ ] [MENU], sw ivel to
the QWERTY keypad and press 9. Settings & Tools,
6. Phone Settings, 7. Security.
2. Enter the four-digit lock code, then press the OK
Key. The default lock code is ”1234”.
3. Press 4. Lock Phone Now .
4. T o unlock the phone from idle mode , press the OK
Key to unlock the keypad, then press the Right Sof t
Key [ ] [Unlock] and enter the four-digit lo ck code,
then press the OK Key .
Chapter 4 Menu Function 57

RESTORE PHONE
T o delete all User Dat a and restor e all settings to their
initial defaults:
1. From idle mode, press the OK Key to unlock the
keypad, press the Left Soft Key [ ] [MENU], sw ivel to
the QWERTY keypad and press 9. Settings & Tools,
6. Phone Settings, 7. Security.
2. Enter the four-digit lock code, then press the OK Key .
3. Press 5. Restore Phone.
4. A confirmation me ssage appears in the d isplay,
select Yes, and then press the OK Key .
5. After reading the message that appears, press the
OK Key.
6. Enter the four-digit lock code, then press the OK Key .
The phone will turn off and then ba ck on again
automatically .
SYSTEM SELECT
Y ou can set y our phone to search or roam on
another network when you are not in your home area .
Leave this setting as default unless you want to alter
the system selection as instru cted by y our service
provider.
1. From idle mode, press the OK Key to unlock the
keypad, press the Left Soft Key [ ] [MENU], sw ivel to
the QWERTY keypad and press 9. Settings &
58
T ools, 6. Phone Settings, 8. System Select.
2. Select one of the following settings, then press the
OK Key [SET].
y Automatic: Scan radio channels based on the Automatic setting.
y Home Only: Only within your home area or home affiliated
area.
Automatic setting can be displayed as Automati c B and
Automatic A dependi ng on PRL.
NAM SELECTION
Enables Auto NAM (Number Assignment Modules)
or manually selects a NAM.
AUTO NAM
Automatically switches the phone to proper NAM
when you have multiple NAM registrations.
1. From idle mode, press the OK Key to unlock the
keypad, press the Left Soft Key [ ] [MENU], sw ivel to
the QWERTY keypad and press 9. Settings & Tools,
6. Phone Settings, 9. NAM Selection.
2. Select 1. Auto NAM, then press the OK Key .
3. Select On or Off, then pres s the OK Key [SET].

CHANGE NAM
1. From idle mode, press the OK Key to unlock the
keypad, press the Left Soft Key [ ] [MENU], sw ivel to
the QWERTY keypad and press 9. Settings & Tools,
6. Phone Settings, 9. NAM Selection.
2. Select 2. Change NAM, then press the OK Key .
3. Select NAM 1 or NAM 2, then press the OK Key
[SET].
CALL SETTINGS
ANSWER OPTIONS
T o determine how to handle an answered call :
1. From idle mode, press the OK Key to unlock the
keypad, press the Left Soft Key [ ] [MENU], sw ivel to
the QWERTY keypad and press 9. Settings & Tools,
7. Call Settings, 1. Answer Options.
2. Select Any Key or Auto w ith Handsfree , then press
the OK Key [MARK].
Any Key is the default setting for this device.
3. Press the Left Soft Key [ ] [Done].
y When the phone is closed, the Auto with Handsfree
Mode will not function, except when a headset is
connected.
y The Auto with Handsfree will function after about five
seconds.
y Auto with Handsfree is available only when a head set
or hands-free device is connected.
y The two functions can be used at the same time.
y To answer all incoming calls, press the SEND Key [ ].
AUTO RETRY
T o set the length of time the phone waits before automatically
redialing a number when the attempted call fails:
1. From idle mode, press the OK Key to unlock the
keypad, press the Left Soft Key [ ] [MENU],sw ivel to
the QWERTY keypad and press 9. Settings & Tools,
7. Call Settings, 2. Auto Retry .
2. Select one of the following settings, then press the
OK Key [SET].
10 Seconds/30 Seconds/60 Seconds/Off.
TTY MODE
Y ou can attach a TTY device to y our phone enabling
you to communicate with p arties also using a TTY
device. A phone with TTY support is able to translate
typed characters to voice. Voice can also be translated
into characters and then displayed on the TTY .
1. From idle mode, press the OK Key to unlock the
keypad, press the Left So ft Key [ ] [MENU], swivel to
the QWERTY keypad and press 9. Settings & Tools,
7. Call Settings, 3. TTY Mode.
Chapter 4 Menu Function 59

2. Select one of the following settings, then press the
OK Key [SET].
TTY Full/TTY + Talk/TTY + Hear/TTY Off.
ONE TOUCH DIAL
T o initiate a speed dia l call by holding dow n the
speed dial digit:
1. From idle mode, press the OK Key to unlock the
keypad, press the Left Soft Key [ ] [MENU], sw ivel to
the QWERTY keypad and press 9. Settings & Tools,
7. Call Settings, 4. One Touch Dial.
2. Select On or Off, then pres s the OK Key [SET].
If One T ouch D ial is disabl ed, S peed Dial n umbers
designated in your Contacts will not function.
VOICE PRIVA CY
T o turn the voice privacy feature On or Of f:
1. From idle mode, press the OK Key to unlock the
keypad, press the Left Soft Key [ ] [MENU], sw ivel to
the QWERTY keypad and press 9. Settings & Tools,
7. Call Settings, 5. V oice Privacy.
2. Select On or Off, then pres s the OK Key [SET].
DTMF TONES
T o set the Key T one length and touch tone playback speed:
1. From idle mode, press the OK Key to unlock the
60
keypad, press the Left Soft Key [ ] [MENU], sw ivel to
the QWERTY keypad and press 9. Settings & Tools,
7. Call Settings, 6. DTMF Tones.
2. Select one of the following settings, then press the
OK Key [SET].
y Normal: Sends out a tone for a fixed period of time even if you
continue to press the key .
y Long: Sends out a continuous tone for the duration the key is
pressed and held.
ASSISTED DIALING
T o set Assisted Dialing feature On or Off:
1. From idle mode, press the OK Key to unlock the
keypad, press the Left Soft Key [ ] [MENU], sw ivel to
the QWERTY keypad and press 9. Settings & Tools,
7. Call Settings, 7. Assisted Dialing.
2. Press the Directional Key [ ] left or ri ght to select
On or Off. To view help for Assisted Dialing, press the
Right Soft Key [ ] [Help].
3. When you set A ssisted Dialing to On, press the
Directional Key [ ] down and then pre ss the Lef t Soft
Key [ ] [Set] to edit Reference Country .
4. Select the desired Country and press th e OK key.
5. Press the OK Key to set Assisted Dialing.

MEMORY
SAVE OPTIONS
T o select w hether to sav e to Phone Memory or to
Card Memory when saving files:
1. From idle mode, press the OK Key to unlock the
keypad, press the Left Soft Key [ ] [MENU], sw ivel to
the QWERTY keypad and press 9. Settings & Tools,
8. Memory, 1 . Save Options.
2. Select 1. Pictures or 2. Sounds, and then press the OK
Key.
3. Select Phone Memory or Card Memory, and then
press the OK Key [SET].
PHONE MEMORY
Select Phone Memory option to display Phone
Memory information or to delete or move files sav ed
in Phone Memory .
PHONE MEMORY USAGE
T o check the available Phone Memory cap acity, used
capacity and total cap acity:
1. From idle mode, press the OK Key to unlock the
keypad, press the Left Soft Key [ ] [MENU], sw ivel to
the QWERTY keypad and press 9. Settings & Tools,
8. Memory, 2. Ph one Memory.
2. Press 1. Phone Memory Usage.
3. Press the OK Key to return to the prev ious screen.
DELETING AND MOVING FILES
T o delete file s stored in Phone Memory or to move
files from Phone Memory to Card Memory:
1. From idle mode, press the OK Key to unlock the
keypad, press the Left Soft Key [ ] [MENU], sw ivel to
the QWERTY keypad and press 9. Settings & Tools,
8. Memory, 2. Ph one Memory.
2. Select My Pictures, My Ringtones, My Sounds or
My Contacts and then press the OK Key.
3. Press the Right Soft Key [ ] [Op tions].
4. Select 1. Erase if you want to delete a file or 2.
Move if you want to move a file to Card Memory, and
then press the OK Key .
If you have selected My Contacts, you can select 1.
View, 2. Copy or 3. Erase after pressing the Right So ft
Key [ ] [Options]. Once you have selected 2. Copy or 3.
Erase, press the OK Key . If you w ant to move the
contacts, press the Left So ft Key [ ] [Move].
5. Select a file, press the OK Key [MARK] or th e
Right Soft Key [ ] [Mark All], and then press the Left
Soft Key [ ] [Done].
6. Select Yes and press the OK Key.
Chapter 4 Menu Function 61

MOVING ALL FILES
T o move all file s saved in Phone Memory to Card
Memory:
1. From idle mode, press the OK Key to unlock the
keypad, press the Left Soft Key [ ] [MENU], sw ivel to
the QWERTY keypad and press 9. Settings & Tools,
8. Memory, 2. Ph one Memory.
2. Select Move All to Card and then press the OK Key .
3. Select Yes and press the OK Key.
Do not remove the memory card from the phone while a
file or files are being moved to the Card Memory.
CARD MEMORY
Select this option to display Card Memory
information or to delete or move files saved in Car d
Memory . The m emory card must be ins erted into the
phone to perform these functions. A 1GB microSD
Card is pre-installed in the device.
CARD MEMORY US AGE
T o chec k the available C ard Memory c apacity, used
capacity and total cap acity:
1. From idle mode, press the OK Key to unlock the
keypad, press the Left Soft Key [ ] [MENU], sw ivel to
the QWERTY keypad and press 9. Settings & Tools,
8. Memory, 3 . Card Memory.
62
2. Press 1. Card Memory Usage.
3. Press the OK Key to return to the prev ious screen.
FORMAT CARD
T o forma t the card in serted:
1. From idle mode, press the OK Key to unlock the
keypad, press the Left Soft Key [ ] [MENU], sw ivel to
the QWERTY keypad and press 9. Settings & Tools,
8. Memory, 3 . Card Memory.
2. Press 1. Card Memory Usage and the Right Sof t
Key [ ] [Options].
3. Press 1. Format Card, enter your 4-digit lock code
and then press the OK Key .
4. Select Yes and press the OK Key.
DELETING AND MOVING FILES
T o delete files stored i n Card Memory or to move files
from Card Memory to Phone Memory:
1. From idle mode, press the OK Key to unlock the
keypad, press the Left Soft Key [ ] [MENU], sw ivel to
the QWERTY keypad and press 9. Settings & Tools,
8. Memory, 3 . Card Memory.
2. Press the Directional Key [ ] up or down to select
My Pictures, My Ringtones, My Music, My Sounds or
My Contacts and then press the OK Key.
3. Press the Right Soft Key [ ] [Op tions].

4. Select 1. Erase if you want to d elete a fil e or 2.
Move if you want to move a file to Phone Memory,
and then press the OK Key .
If you have selected My Contacts, you can select 1.
Copy or 2. Erase after pressing the Ri ght Soft Key [ ]
[Options]. Once you have sel ected 1. Copy or 2. Erase,
press the OK Key. I f you want to move the cont acts,
press the Left Soft Key [ ] [Move].
5. Select a file, press the OK Key [MARK] or th e
Right Soft Key [ ] [Mark All], and then press the Left
Soft Key [ ] [Done].
6. Select Yes and press the OK Key.
MOVING ALL FILES
T o move all file s saved in Card Memory to Phone
Memory:
1. From idle mode, press the OK Key to unlock the
keypad, press the Left Soft Key [ ] [MENU], sw ivel to
the QWERTY keypad and press 9. Settings & Tools,
8. Memory, 3 . Card Memory.
2. Select Move All to Phone and then press the OK
Key.
3. Select Yes and press the OK Key.
Do not remove the memory card from the phone while a
file or files are being moved to Card Memory.
USB MODE
Y ou can use the USB data cable to transfer data
between the device and a compatible PC.
Important: T o ac tivate your dev ice for dat a transfer ,
select USB Mode before connecting the USB dat a cabl e.
1. From idle mode, press the OK Key to unlock the
keypad, press the Left Soft Key [ ] [MENU], sw ivel to
the QWERTY keypad and press 9. Settings & Tools,
9. USB Mode.
2. Select Media Sync Mode or Modem Mode and
then press the OK Key [SET].
y Media Sync Mode: Allow s you to sync y our device music
files with PC's Windows Media Player vi a USB data cabl e.
y Modem Mode: All ows you to use y our phone as a mod em
for your computer when connecting with a USB dat a cable.
To use End User Upg rade Tool, select Modem Mode for
USB Mode.
Chapter 4 Menu Function 63

PHONE INFO
MY NUMBER
T o view your phone number:
1. From idle mode, press the OK Key to unlock the
keypad, press the Left Soft Key [ ] [MENU], sw ivel to
the QWERTY keypad and press 9. Settings & Tools,
0. Phone Info, 1. My Number .
2. The following information appears:
Mobile Device Number (MDN)/Mobile Identifications
Number (MIN)/Other device information
SW/HW VERSION
T o view your device H W/SW information:
1. From idle mode, press the OK Key to unlock the
keypad, press the Left Soft Key [ ] [MENU], sw ivel to
the QWERTY keypad and press 9. Settings & Tools,
0. Phone Info, 2. SW/HW Version.
2. Software Version / PRL Version / ERI Version /
Browser Version / Me dia Center V ersion / MSUI
Version / HW V ersion / MEID are display ed.
3. Press the OK Key to return to the prev ious screen.
ICON GLOSSARY
T o view all the icons and their me anings:
1. From idle mode, press the OK Key to unlock the
64
keypad, press the Left Soft Key [ ] [MENU], sw ivel to
the QWERTY keypad and press 9. Settings & Tools,
0. Phone Info, 3. Icon Glossary.
2. Press the OK Key to return to the prev ious screen.
Please refer to page 9 Display Indicators for more details
about the icons.
SOFTWARE UPDATE
The update phone firmware (software) op tion allows
you to download and update the softw are in your
phone automatically . Only the interna l sof tware is
updated; no Contacts entries or other infor mation
saved to your phone will be deleted.
STATUS
Check the latest Software Download/Update st atus.
1. From idle mode, press the OK Key to unlock the
keypad, press the Left Soft Key [ ] [MENU], sw ivel to
the QWERTY keypad and press 9. Settings & Tools,
0. Phone Info, 4. Software Update.
2. Press 1. Status.

CHECK NEW
T o check Dow nload Server for new Softw are
updates:
1. From idle mode, press the OK Key to unlock the
keypad, press the Left Soft Key [ ] [MENU], sw ivel to
the QWERTY keypad and press 9. Settings & Tools,
0. Phone Info, 4. Software Update.
2. Press 2. Check New.
SET - UP WIZARD
Set-up Wizard menu allows you to set following five
menus for Settings & Tools with simple operation.
1. From idle mode, press the OK Key to unlock the
keypad, press the Left Soft Key [ ] [MENU], sw ivel to
the QWERTY keypad and press 9. Settings & Tools,
*. Set-up Wizard.
y CALL SOUNDS: Select Ring Only, Vibrate Only,
Ring&Vibrate or Be Silent then press the OK Key [ SET]. If
you select Ring Only or Ring&Vibrate, the ringtone
selection screen will be displayed. Select a desired
ringtone and then press the OK Key [SE T]. T o play the
selected ringtone, press the Left Soft Key [ ] [Play ].
y DISPLAY THEMES: Select Foliate, T ranspar ent, Urban or
White , then press the OK Key [SET]. To preview the
selected display theme, press the Left So ft Key [ ]
[Preview].
y MENU LAYOUT : Sel ect Tab, List and Grid, then press the
OK Key [SET]. To preview the Main Menu layout, press
the Left Soft Key [ ] [Preview ].
y MENU TYPE: Select Messaging or Personalizing, then
press OK Key [SET]. To view the Help for each type,
select the type then press the Left Soft Key [ ] [Help].
y CLOCK FORMAT: Select Analog, Large Analog, Digital 12,
Large Digital 12, Digital 24, Large Digital 24 or Off, and
then press the OK Key [SET]. To preview the format of the
main clock, press the Left Soft Key [ ] [Preview].
To skip setting each menu, press the Ri ght Soft Ke y
[Skip].
Chapter 4 Menu Function 65

VOICE COMMANDS
Y our phone is equipped w ith an Adv anced V oice
Command (AVC) feat ure. This feature allo ws you to
make calls or use the phone’s functions by simply
using your voice. All you have to do is t alk into the
phone and then the phone will recognize your v oice
and complete tasks by itself.
1. T o access Voice Commands from idle mode,
press the OK Key to unlock the keyp ad, press the
Left Soft Key [ ] [MENU], swivel to the QW ERTY
keypad and press 9. Settings & Tools, 2. T ools, 1.
Voice Commands.
Shortcut: From idle mode, press and hold the CLR Key
[ ] to access the Voice Comman ds menu.
2. The phone displays the V oice Comman ds menu
and prompts you to say the name of the command
you want to use. To complete your task, si mply follow
the voice prompts. You can speak the name of the
command after you hear a beep.
3. Select one of the following options, then press the
OK Key.
Call <Name or #> / Send <MSG Ty pe> / Go To
<Shortcut> / Check <Item> / Contact <Name> /
Redial / Play <Playlist> / Help
To view information about each opti on, press the Le ft
Soft Key [ ] [Info]. Press the Right Soft K ey [ ] [Options] to
66
access Voice Commands Setti ngs. Please refer to page
73 for more details on Voice Commands Settings.
4. When it recognizes one of these commands, the
phone launches the associated application. If the
phone does not hear a command within
approximately eight seconds, AVC mode will turn
itself off.
CALL <NAME OR #>
Use the Call command to voice dial a name fr om
your Contact List or a phone number . Whe n dialing a
number, pronounce each digit, but do not pause
noticeably between the digits.
1. Y ou will hear Please say a command and the
Voice Commands menu will be displ ayed.
2. If calling a contact from your Contact List, say Call
<Name>. Y our phone w ill ask you to confirm the
name you said. Say “Yes“ if it was repeated correctly.
That phone number will be dialed. If there is more
than one number saved for that contact, you w ill be
asked to confirm which number to dial.
Examples: - Call Tom Smith, - Call 617 555-1212,
- Call Bob Carson’s mobile, - Call Dee
Harper at Home.

SEND <MSG TYPE>
Use the Send command to send a text or other type
of message to a specified name or number.
1. Y ou will hear Please say a command and the
Voice Commands menu will be displ ayed.
2. Say “Send“ followed immediately by Text, Picture
or Voice.
Examples: - Send Picture to Dee Harper’s Mobile,
- Send T ext Tom Smith.
GO TO <SHORTCUT>
Use the Go To command to open an application on
your phone. Y ou can say “Go To” by itself and be
prompted to say the application name, or you can
skip the prompt by saying ”Go To” followed by the
application name.
1. Y ou will hear Please say a command and the
Voice Commands menu will be displ ayed.
2. Say “Go T o” followed immediately by one of the
following items:
Airplane Mode / Alarm / Alert So unds / All Calls / Answ er
Options / Auto Retry / Backlight / Banner / Blue tooth /
Calculator / Calendar / Call Connect / Call Ringtone / Call
Settings / Call Sounds / Call Vibrate / Card Memory / Clock
Format / Contact List / Contacts / Dial Fonts / Dialed Calls /
Display Settings / Display Themes / Draft s / ERI / ERI
Banner / Groups / Icon Glossary / In Case of Emergency /
Inbox / Keypad Backlight / Keypad Volume / Language /
Location / Master Volume / Media Center / Memory /
Message Settings / Messaging / Minute Beep / Missed Calls
/ Music & T ones / My Name Card / My Number / My
Pictures / My Ringtones / My Sounds / New Contact / New
Message / New Picture Message / New TXT Message /
Notepad / One Touch Dial / Perso nal Banner / Phon e Info /
Phone Memory / Phone Settings / Power On/Off / Received
Calls / Recent Calls / Save Options / Sent / Service Alerts /
Set Shortcut Keys / Settings & Tools / Sounds Settings /
Speed Dials / Stop Watch / SW/HW Version / Take Picture /
Tip Calculator / Tools / TTY mode / View Timers / Voice
Privacy / Voicemai l / Wal lpaper / World Clock
CHECK <ITEM>
The Check command lets you check status
information for your phone. You can say “Check” or
“Check Status” to see and hear all statu s information.
1. Y ou will hear Please say a command and the
Voice Commands menu will be displ ayed.
2. Say “Check” followed immediately by one of the
following items:
Status / V oic email / Messages / Missed Calls / Time / Signal
Strength / Battery Lev el / Volume / Balance / Minutes /
Payment / My Number
Chapter 4 Menu Function 67

CONTACTS <NAME>
Use the Contact command to retrieve and display
information for any name stored in your Cont act List.
1. Y ou will hear Please say a command and the
Voice Commands menu will be displ ayed.
2. Say “Contact <Name>”.
Examples: - Contact Tom Jones.
3. The Say a Command menu will be displayed for
that contact name.
Follow the voice prompts.
REDIAL
Use the Redial command to make a call to the last
number you dialed.
1. Y ou will hear Please say a command and the
Voice Commands menu will be displ ayed.
2. Say “Redial”.
3. Y our phone w ill make a call to the last n umber you
dialed.
PLA Y <PLAYLIST>
Use the Play command to play back one of the
playlists. Say “PLA Y” follow ed by a playlist and then
your phone will play back the recognized playlist for
you.
1. Y ou will hear Please say a command and the
68
Voice Commands menu will be displ ayed.
2. Say “Play <Playlist>” to play back indiv idual playlist
or say “Play All Songs” to play back all songs saved
in your phone.
HELP
Use the Help command to view how to use the V oice
Commands.
1. Y ou will hear Please say a command and the
Voice Commands menu will be displ ayed.
2. Say “Help”.
3. The Help guide will be displayed on y our phone.
VOICE COMMANDS SETTINGS
CONFIRM CHOICES
When the phone does not recognize your voice
command, it will ask you to repeat your voice
command. If it does not recognize the name or number,
it will display a list of up to three choices and speak
each one in turn. Y ou can control how often the phone
asks you to confirm the recognized name or number.
1. From idle mode, press the OK Key to unlock the
keypad, press the Left Soft Key [ ] [MENU], sw ivel to
the QWERTY keypad and press 9. Settings & Tools,
2. T ools, 1. Voice Commands.

2. Press the Right Soft Key [ ] [Se ttings] and 1.
Confirm Choices.
You can also access V oic e Commands Set tings fro m
idle mode, by pressing the OK Key to u nlock the k eyp ad,
press the Left Soft Key [ ] [MENU], swivel to the
QWERTY keypad and press 9. Set tings & Tools, 6.
Phone Settings, 3. Voi ce Commands Setti ngs, 1.
Confirm Choices.
3. Select Automatic, Always Confirm or Never
Confirm, then press the OK Key [SET].
SENSITIVITY
The Sensitivity setting allows you to adjust the
sensitivity monitoring of voice tones. If you frequently
experience the messages “Please try again” or
“COMMAND NOT RECOGNIZED Try again?”, adjust
the sensitivity toward Less Sensitive. If you frequently
experience false activations (when the phone
recognizes a name you didn’t say), adjust the
sensitivity toward More Sensitive.
1. From idle mode, press the OK Key to unlock the
keypad, press the Left Soft Key [ ] [MENU], swivel to
the QWERTY keypad and press 9. Settings & Tools, 2.
T ools, 1. V oice Commands.
2. Press the Right Soft Key [ ] [Settings], 2. Sensitivity .
3. Select More Sensitive, Automatic or Less Sensitive,
then press the OK Key [SET].
ADAPT VOICE
Voice Command is speaker independent, which
means that no training or adaptation is required. Some
users with heavy accents or unusual voice
characteristics may find difficulty in achieving high
accuracy with speaker independent Voice Command,
so the Adapt V oice feature allows users to dramatically
improve the recognition accuracy after adapting their
voices. Users who get acceptable recognition accuracy
will find no additional benefit to performing the Adapt
Voice.
1. From idle mode, press the OK Key to unlock the
keypad, press the Left Soft Key [ ] [MENU], swivel to
the QWERTY keypad and press 9. Settings & Tools, 2.
T ools, 1. V oice Commands.
2. Press the Right Soft Key [ ] [Settings], 3. Adapt Voice.
3. Select 1. Train Voice or 2. Reset V o ice, then press
the OK Key.
y Train V oice: Requires that you make recordings of your voice to
customize the voice recognitions system. It will take a few
minutes.
y Reset Voice: Once you finish the adaptation process, you can
reset the adaptation to factory default. Reset Voice option only
appears after you finish the Train V oice process.
Chapter 4 Menu Function 69

4. "Adaptation will take a couple of minutes to
complete. Adapt in a quiet room. Pre ss OK to begin ."
will appear on the screen. Press the OK Key . Wait for
the beep, and then repeat the sentences using a
normal tone of voice.
5. When you are finished with a full session, y ou will
reach a screen that reads “Adaptation Co mplete”.
PROMPTS
Allows you to select the voice command system
characteristics.
1. From idle mode, press the OK Key to unlock the
keypad, press the Left Soft Key [ ] [MENU], sw ivel to
the QWERTY keypad and press 9. Settings & Tools,
2. T ools, 1. Voice Commands.
2. Press the Right Soft Key [ ] [Se ttings], 4. Prompts.
3. Select 1. Mode or 2. Audio playback, then press
the OK Key.
y Mode: Select the voice command system mode from the
following:
- Prompts: For handset to prompt for required information.
- Readout+Alerts: For handset to prompt for required information and
readout the contents of the screen and phone alerts.
- Readout: For handset to prompt for required information and
readout the contents of the screen.
- Tones Only: For handset to provide beeps only for audio guidance.
y Audio playback: Allows audio playback to play through the
speakerphone or earpiece. Select Automatic, Speakerphone or
70
Earpiece.
4. Press the OK Key [SET].
ABOUT
1. From idle mode, press the OK Key to unlock the
keypad, press the Left Soft Key [ ] [MENU], sw ivel to
the QWERTY keypad and press 9. Settings & Tools,
2. T ools, 1. Voice Commands.
2. Press the Right Soft Key [ ] [Se ttings], 5. About.
3. The Nuance VSuite 3.2 version appears.
4. T o return to the previous screen, then pres s the OK Key .
CALCULAT OR
The Calculator allows you to perform simple
mathematical calculations. To access the calculator:
1. From idle mode, press the OK Key to unlock the
keypad, press the Left Soft Key [ ] [MENU], sw ivel to
the QWERTY keypad and press 9. Settings & Tools,
2. T ools, 2. Calculator.

2. Follow the instructions below to calcula te 8×6÷4-
2.5=9.5
y Input 8 and then press the Directional Key [ ] rig ht.
y Input 6 and then press the Directional Key [ ] lef t.
y Input 4 and then press the Directional Key [ ] dow n.
y Input 2 and then press the [ ] to input (.).
y Press 5.
y Then press the OK Key and then you will see the answer (9.5).
3. T o reset, press the Left Sof t Key [ ] [Clear].
y Directional Key right : X, Directional Key down : -,
Directional Key left : ÷, Directional Key up : +, * Key : .,
Left Soft Key : Clear , OK Key : = .
y To change the displayed number from positive (+) to
negative (-) and vice versa, press # Key [ ].
y Press the Right Soft Key [ ] [Operator] to use parenthesis
1. (, 2. ) and 3. Exponent.
TIP CALCULA TOR
Allows you to calculate the tip and determine how
much each person should pay for the bill.
1. From idle mode, press the OK Key to unlock the
keypad, press the Left Soft Key [ ] [MENU], sw ivel to
the QWERTY keypad and press 9. Settings & Tools,
2. T ools, 3. T ip Calculator .
2. Input the amount in the Total Bill field and press the
Directional Key [ ] down.
3. Select the percentage of tip in the Tip(%) field by
pressing the Directional Key [ ] left or right. The
amount of a tip will be displayed in the Tip($) field.
Press the Directional Key [ ] down.
4. Input the number of persons by pressing the
Directional Key [ ] left or right. The tip amount a nd
cost per person is shown.
5. Press the Left Soft Key [ ] [Reset] to clear the fields .
Press the Right Soft Key [ ] [Close] to re turn to the
previous menu.
CALENDAR
The Calendar tool provides easy and convenient
access to your schedule. Simply store your
appointments and then your phone will alert y ou to
them.
1. From idle mode, press the OK Key to unlock the
keypad, press the Left Soft Key [ ] [MENU], sw ivel to
the QWERTY keypad and press 9. Settings & Tools,
2. T ools, 4. Calendar.
Shortcut: From idle mode, press the Directional Key [ ]
down to access the Calendar .
2. Highlight the scheduled day.
Chapter 4 Menu Function 71

3. Press the Left Soft Key [ ] [Add ].
4. The Appointment field is highlighted. En ter the
name of the event.
Press the Directional Key [ ] down to set th e other
fields for the event:
APPOINTMENT
Use the keypad to enter an appointment in your
schedule.
START TIME
Use the keypad to set a st art time and press the
Left Soft Key [ ] for am/pm.
END TIME
Use the keypad to set a end time and p ress the
Left Soft Key [ ] for am/pm.
START DATE
Use the keypad to change or en ter the st art date .
RECURRENCE
Press the Directional Key [ ] left or right to set the
recurrence of the event (Once, Daily, Weekly,
Monthly, Yearly).
72
END DATE
Use the keypad to change or en ter the end date.
ALERT
Press the Left Soft Key [ ] [Set] to select a new
ringtone. Highlight a desired ringtone then press
the OK Key . Press the Left Soft Key [ ] [Play] to
play a ringtone.
VIBRA TE
Press the Directional Key [ ] lef t or right to set On or
Off.
REMINDER
Press the Directional Key [ ] lef t or right to select a
reminder before the event from the following:
Once / Every 2 Minutes / Every 15 Minutes / Off
ALERT TIME
Press the Directional Key [ ] lef t or right to select
the alert time before the event takes place from the
following:
On time / 5 minutes before / 10 minutes before / 15
minutes before / 30 minutes before / 1 hour before
/ 3 hours before / 5 hours before / 1 Day Before

1. Press the OK Key [SA VE] to save it. The date of
the event will be marked on your calendar.
VIEW SAVED EVENT
1. From idle mode, press the OK Key to unlock the
keypad, press the Left Soft Key [ ] [MENU], sw ivel to
the QWERTY keypad and press 9. Settings & Tools,
2. T ools, 4. Calendar.
2. Choose the event then press the OK Ke y [VIEW].
ERASE SA VED EVENT
1. From idle mode, press the OK Key to unlock the
keypad, press the Left Soft Key [ ] [MENU], sw ivel to
the QWERTY keypad and press 9. Settings & Tools,
2. T ools, 4. Calendar.
2. Choose the event then press the OK Ke y [VIEW].
3. Press the Left Soft Key [ ] [Era se], select Yes, then
press the OK Key .
ERASE ALL PASSED EVENTS
1. From idle mode, press the OK Key to unlock the
keypad, press the Left Soft Key [ ] [MENU], sw ivel to
the QWERTY keypad and press 9. Settings & Tools,
2. T ools, 4. Calendar.
2. Choose the event then press the OK Ke y [VIEW].
3. Press the Right Soft Key [ ] [Op tions], press 7.
Erase Passed, select Yes, then press the OK Key .
E-DIARY
E-Diary is a simple diary application designed to be
easy to understand and
convenient for everyday use.
1. From idle mode, press the OK Key to unlock the
keypad, press the Left Soft Key [ ] [MENU], sw ivel to
the QWERTY keypad and press 9. Settings & Tools,
2. T ools, 5. E-Diary .
2. Press the Left Soft Key [ ] [New ].
3. In the Weather & Feeling field, press the Left Soft
Key [ ] [Set], then select an icon and press the OK Key .
4. Press the Directional Key [ ] down to set the other
fields for the E-diary:
Title
Enter the title of the diary.
Picture
Press the Left Soft Key [ ] [Set] to s elect an image st ored in
My Pictures. Please refer to page 90 for more details on
PICTURES.
Text
Enter the message for the diary.
Background
Press the Directional Key [ ] left or right to select o ne of the
following backgrounds:
Blackboard / Essay / Sky / Letter
Chapter 4 Menu Function 73

5. In each field, press the Right Soft Key [ ] [Options]
then press 1. Preview to preview the setting you
selected or 2. Cancel E-Diary to discard your new Ediary.
6. Press the OK Key [Save] to save y our E-diary.
SEND AN E-DIARY
1. From idle mode, press the OK Key to unlock the
keypad, press the Left Soft Key [ ] [MENU], sw ivel to
the QWERTY keypad and press 9. Settings & Tools,
2. T ools, 5. E-Diary .
2. Press the Directional Key [ ] up or down to highlight
an entry , then press the Right So ft Key [ ] [ Options].
3. Select Send and press the OK Key , then compose
a Picture Message and press the OK Key [SEND].
Please refer to page 97 for more de tails on Picture
Message.
EDIT AN E-DIARY
1. From idle mode, press the OK Key to unlock the
keypad, press the Left Soft Key [ ] [MENU], sw ivel to
the QWERTY keypad and press 9. Settings & Tools,
2. T ools, 5. E-Diary .
2. Highlight an E-diary , then pre ss the Right So ft Key
[ ] [Options].
3. Select Edit and press the OK Key , then modify
74
the E-diary.
4. Press the OK Key [SA VE] to save y our
modifications.
ERASE E-DIARY
1. From idle mode, press the OK Key to unlock the
keypad, press the Left Soft Key [ ] [MENU], sw ivel to
the QWERTY keypad and press 9. Settings & Tools,
2. T ools, 5. E-Diary .
2. Highlight an E-diary , then pre ss the Right So ft Key
[ ] [Options].
3. Select Erase to erase an E-diary or Erase all to
erase all the E-diary entries, then press the OK Key.
4. Select Yes and press the OK Key.
ALARM CLOCK
The Alarm Clock tool allows you to set up to th ree
alarms. When you set an alarm, the current time is
displayed at the top of the screen. When the alarm
goes off, Alarm 1 (2 o r 3, as applicable) w ill be
displayed on the LCD screen and the alarm w ill
sound.

1. From idle mode, press the OK Key to unlock the
keypad, press the Left Soft Key [ ] [MENU], sw ivel to
the QWERTY keypad and press 9. Settings & Tools,
2. T ools, 6. Alarm Clock.
2. Highlight an Alarm (1, 2 or 3), then press the OK
Key.
3. Press the Directional Key [ ] down to set the fields
for the alarm:
ALARM
Press the Directional Key [ ] lef t or right to select
On or Off.
TIME
Use the keypad to set a time for the alarm and
press the Left Soft Key [ ] to set am or pm.
FREQUENCY
Press the Directional Key [ ] lef t or right to select a
setting for the alarm (Once, Daily, Mon - Fri,
Weekends).
RINGTONE
Press the Left Soft Key [ ] [Set] then press 1. Get
New Ringtones or select the alert tone you wish to
set. Press the Left Soft Key [ ] [Play ] to play a
ringtone. Press the OK Key [SET] to make y our
selection.
4. Press the OK Key [SA VE] to set the alarm.
TURN ON/OFF THE ALARM SETTING
1. From idle mode, press the OK Key to unlock the
keypad, press the Left Sof t Key [] [MENU], sw ivel to
the QWERTY keypad and press 9. Settings & Tools,
2. T ools, 6. Alarm Clock.
2. Highlight an Alarm (1, 2 or 3), then press the Right
Soft Key [ ] [Options].
3. Select Turn On or Turn Off then press the OK Key .
RESET THE ALARM SETTING
1. From idle mode, press the OK Key to unlock the
keypad, press the Left Soft Key [ ] [MENU], sw ivel to
the QWERTY keypad and press 9. Settings & Tools,
2. T ools, 6. Alarm Clock.
2. Highlight an Alarm (1, 2 or 3), then press the Right
Soft Key [ ] [Options].
3. Select Reset Alarm, then press the OK Key .
4. "RESET ALARM?" will appear on the screen.
Select Yes and press the OK Key.
Chapter 4 Menu Function 75

RESET ALL ALARM SETTINGS
1. From idle mode, press the OK Key to unlock the
keypad, press the Left Soft Key [ ] [MENU], sw ivel to
the QWERTY keypad and press 9. Settings & Tools,
2. T ools, 6. Alarm Clock.
2. Highlight an Alarm (1, 2 or 3), then press the Right
Soft Key [ ] [Options].
3. Select Reset All, then press the OK Key.
4. "RESET ALL ALARMS? " will appear on the screen.
Select Yes and press the OK Key.
STOP WATCH
Simultaneously times up to eight dif ferent ev ents. To
operate the stop watch:
1. From idle mode, press the OK Key to unlock the
keypad, press the Left Soft Key [ ] [MENU], sw ivel to
the QWERTY keypad and press 9. Settings & Tools,
2. T ools, 7. Stop Watch.
TO MEASURE A TIME PERIOD
1. T o star t the stop watch, pr ess the OK Key [START].
2. T o pause it, pre ss the OK Key [ STOP].
3. To resume it, press the OK Key [START].
4. To reset it, press the Right Soft Key [ ] [Reset].
76
TO TIME UP TO EIGHT EVENTS AT ONCE
1. T o star t the stop watch, pr ess the OK Key [START].
2. T o stop a time peri od and continue measuring
another one, press the Left Soft Key [ ] [Lap].
3. T o stop the second and continue mea suring a third
one, press the Left Soft Key [ ] [ Lap].
4. T o measure up to eight time period s, repeat the
above steps.
5. T o stop the stop watch , press the OK Key [STOP].
6. To review the results, press the Lef t Soft Key [ ]
[View].
7. To return to the stop watch, press the OK Key.
8. To reset it, press the Right Soft Key [ ] [Reset].

WORLD CLOCK
T o display the time and da te in pre-programmed
cities:
1. From idle mode, press the OK Key to unlock the
keypad, press the Left Soft Key [ ] [MENU], sw ivel to
the QWERTY keypad and press 9. Settings & Tools,
2. T ools, 8. World Clock.
2. Press the Left Soft Key [ ] [Cities] to access the
CITIES LIST . Select the desired city, then press the
OK Key. Or, press the Directional Key [ ] up, down,
left, or right to select y our city using the world m ap.
3. The world map appears with the city, its date and
time.
DA YLIGHT SAVING TIME (DST) SETTING
1. From idle mode, press the OK Key to unlock the
keypad, press the Left Soft Key [ ] [MENU], sw ivel to
the QWERTY keypad and press 9. Settings & Tools,
2. T ools, 8. World Clock.
2. Press the Right Soft Key [ ] [DST].
3. Press the Directional Key [ ] lef t or ri ght to select a
city. Pre ss the Directional Key [ ] down.
4. Under DST , pre ss the Directio nal Key [ ] l eft or right
to turn Daylight Savings T ime (DST ) On or Off. Press
the Directional Key [ ] down.
5. Under Start Date, use the keypad to change or
enter the start date and then press the Directional
Key [ ] down.
6. Under Start Time, use the keypad to set a start
time and press the Left Sof t Key [ ] to select am or
pm and then press the Directional Key [ ] dow n.
7. Under End Date, use the keypad to cha nge or
enter the end date and then press the Dire ctional
Key [ ] down.
8. Under End Time, use the key pad to set an end
time and press the Left Sof t Key [ ] to select am or
pm.
9. T o save a DST setting, press the OK Ke y [SAVE].
NOTEPAD
Y our phone includes an in ternal notep ad that can be
used to compose and store reminders and notes. To
create a note:
1. From idle mode, press the OK Key to unlock the
keypad, press the Left Soft Key [ ] [MENU], sw ivel to
the QWERTY keypad and press 9. Settings & Tools,
2. T ools, 9. N otepad .
Chapter 4 Menu Function 77

2. Press the Left Soft Key [ ] [New ] to write a new
note. When you are done, press the OK Key [SAVE].
VIEW SAVED MEMO
T o v iew a saved m emo:
1. From idle mode, press the OK Key to unlock the
keypad, press the Left Soft Key [ ] [MENU], sw ivel to
the QWERTY keypad and press 9. Settings & Tools,
2. T ools, 9. N otepad .
2. Select a note, then press the OK Key [VIEW].
ERASE SA VED MEMO
T o erase a sav ed memo:
1. From idle mode, press the OK Key to unlock the
keypad, press the Left Soft Key [ ] [MENU], sw ivel to
the QWERTY keypad and press 9. Settings & Tools,
2. T ools, 9. N otepad .
2. Select a note, press the Right Sof t Key [ ] [Options]
then select Erase and press the OK Key.
3. Select Yes and press the OK Key.
ERASE ALL SA VED MEMOS
T o erase all sav ed memos:
1. From idle mode, press the OK Key to unlock the
keypad, press the Left Soft Key [ ] [MENU], sw ivel to
the QWERTY keypad and press 9. Settings &
78
T ools, 2. Tools, 9. Notepad.
2. Press the Right Soft Key [ ] [Op tions], then select
Erase All and press the OK Key.
3. Select Yes and press the OK Key.
USB MASS STORAGE
The USB Mass Storage allows you to transfer file s to
or from your PC. In order to use this option, you must
insert a microSD memory card and connect to PC
with the USB cable. The TXT8040 come s with a
1GB pre-installed microSD Card.
1. From idle mode, press the OK Key to unlock the
keypad, press the Left Soft Key [ ] [MENU], sw ivel to
the QWERTY keypad and press 9. Settings & Tools,
2. T ools, 0. USB Mass Storage.

CHAPTER 5
MEDIA CENTER
Your phone provides a unique feature - Media Center - that enables
you to download ringtones, wallpapers, games and more from your
network to your phone. Please contact your service provider for the
availability of these services.
Using the microSD Card
Music & Tones
Pictures
Games
Mobile Web
Browse & Download
Extras
Media Center Info
Chapter 4 Menu Function 79

USING THE microSD CARD
The microSD Card stores sounds, images, photos,
music and other files.
The TXT8040 comes with a 1GB pre-instal led
microSD Card.
INSTALLING THE microSD CARD
T o inst all your microS D Card:
1. Open the microSD Card cover , and insert the
microSD Card into the slot w ith the gold co ntact s
facing down.
2. Press the microSD Card until you hear the 'click'
and close the microSD Card cover. Then, “CARD
INSERTED. PICTURE & SOUND WILL BE SAVED
TO CARD MEMORY. CONTINUE?” will appear on
the display .
3. Select Yes and press the OK Key.
To prevent possible damages, pleas e keep the micr oSD
Card slot closed at all times regardless of whether the
microSD Card is inserted or not.
REMOVING THE microSD CARD
T o remov e the microS D Card:
1. Open the microSD Card cover , and use y our
thumb to press and release the microSD Card. Press
the memory card inward, gently , until it pops ou t.
80
2. Remove the microSD Card and close the microSD
Card cover.
y Do not remove the microSD Card while reading or
writing files. Otherwise it could be damag ed.
y To ensure the proper function of removable memory,
please use a microSD Card.
MUSIC & TONES
T o acce ss the Musi c & Tones menu:
GET NEW RINGTONES
T o connec t to Media Center and download various
ringtones:
1. From idle mode, press the OK Key to unlock the
keypad. Press the Left Sof t Key [ ] [MENU], sel ect
Media Center and press the OK Key, then sw ivel to
the QWERTY keypad and press 1. Musi c & Tones, 1.
Get New Ringtones.
2. If you have not downloaded any ringtones or
ringtone applications previously , pre ss 1. Get New
Applications and follow the prompts.

MY RINGTONES
TO PLAY DOWNLOADED TUNES OR TONES:
1. From idle mode, press the OK Key to unlock the
keypad. Press the Left Sof t Key [ ] [MENU], sel ect
Media Center and press the OK Key, then sw ivel to
the QWERTY keypad and press 1. Musi c & Tones, 2.
My Ringtones.
2. Select the tune or tone you want to play then press
the OK Key [PLAY].
3. T o stop, press th e OK Key [ST OP].
TO ERASE DOWNLOADED TUNES OR T ONES:
1. From idle mode, press the OK Key to unlock the
keypad. Press the Left Sof t Key [ ] [MENU], sel ect
Media Center and press the OK Key , sw ivel to the
QWERTY keypad, then pre ss 1. Music & Tones, 2.
My Ringtones.
2. Select the tune or tone you want to eras e then
press the Right Soft Key [ ] [Options].
3. Press 1. Erase, then select Yes and press the OK
Key.
y If a Downloaded Ringtone is selected, press the Right Sof t
Key [ ] [Options] to choose from the followi ng:
1. Erase: Erase the current ringtone from your pho ne.
2. Rename: T o edi t the ring tone’s title.
3. Lock/Unlock: Lock/Unlock the ringtone.
4. Erase All: To erase all the ringtones in y our phone.
5. File Info: Displays information on the selected ring tone.
TO ASSIGN DOWNLOADED TUNES OR T ONES:
T o select a desired ringtone , or download a new
ringtone:
1. From idle mode, press the OK Key to unlock the
keypad. Press the Left Sof t Key [ ] [MENU], sel ect
Media Center and press the OK Key , sw ivel to the
QWERTY keypad, then pre ss 1. Music & Tones, 2.
My Ringtones.
2. Highlight the desired ringtone, press the Lef t Soft
Key [ ] [Set As], then select one of the following and
press the OK Key .
y 1. Ringtone: A confirmation message appears.
y 2. Contact ID: The Set As Cont act ID screen appear s.
Select the Contact you want to assign the r ingtone to, then
press the OK Key.
y 3. Alert Sounds: Press the corresponding number key to
set the ringtone for one of the following:
- All Messages / TXT Message / Pic-Voice Messa ge / V oicemail
3. Press the Right Soft Key [ ] [Op tions] to acce ss the
following options:
y Erase: Erase the current ringtone from y our phone.
y Rename: To edit the ringtone’s title.
y Lock/Unlock: Lock or unlock the current ringtone in your
phone.
y Erase All: T o erase all the r ingtones in your p hone.
Chapter 5 Media Center 81

y File Info: Displays information on the selected ringto ne.
MY MUSIC
T o playback and ma nage music stored in your
phone’s memory and on a memory card:
NATIVE MUSIC PLAYER
Volume indicator
Shuffle / Repeat
Visual Guide
Icon Name Descriptions
Volume Indicates current music volume
Previous / Next Short Press: Previous, Nex t
Pause / Play Indicates Player’s status
82
Long Press: Rewind, Fast Forward
Playing Icon
Skin & File info
Elapsed time / Total time
Repeat Repeat All
Shuffle On
Repeat One
Off
Off
1. From idle mode, press the OK Key to unlock the
keypad, press the Music Key [ ] or the Lef t Soft Key
[ ] [MENU], select Media Center and press the OK
Key, sw ivel to the QWERT Y key pad, the n press 1.
Music & Tones, 3. My Music.
2. The Music Library screen appears.
3. Select All Songs, p ress the OK Key, then select
the desired song and press the OK Key [PLA Y].
4. Press the Left Soft Key [ ] [Mute] to mute . Press
the Right Soft Key [Options] to select from the
following options:
Exit Player/Music Only Mode/Song Info/Home
Screen/Repeat/Shuffle/Sound Effect s
5. Press the Directional Key [ ] left to start th e song
over again. Press the Directional Key [ ] right to skip
to the next song if there are other songs to be play ed.
Press the OK Key to pause or pl ay the song. If you
press and hold the Directional Key [ ] lef t, the song
rewinds or press and hold the Directional Key [ ] righ t,
the song will fast forward.

MY SOUNDS
T o select a desired so und or record a new sound:
1. From idle mode, press the OK Key to unlock the
keypad, press the Left Soft Key [ ] [MENU], sele ct
Media Center and press the OK Key , sw ivel to the
QWERTY keypad, then pre ss 1. Music & Tones, 4.
My Sounds.
2. Highlight the desired sound, then press the OK
Key [PLAY] to hear the so und. Press the OK Key
[STOP] to stop playing the sound .
3. Press the Right Soft Key [ ] [Op tions] to acce ss the
following options:
y DOWNLOADED or RECORDED SOUND:
Send: T o send the sound.
To Online Albu m: Upload the s elected tone to the online
server.
Rename: To edit the sound’s title.
Move: To move the select ed sound to the memory card.
This option only appears if a memor y card is
inserted.
Lock/Unlock: Lock or unlock the selected sound in your
phone.
Erase: T o eras e the sound.
Erase All: T o erase all the soun ds in your phon e.
The preloaded sounds cannot be erased.
File Info: Displays information on the selected sound.
y PRELOADED SOUND:
Send: T o send a sound.
To Online Albu m: To upload selected sound to picture
server.
File Info: Displays information on the selected sound.
RECORDING NEW SOUNDS
T o record a new soun d:
1. From idle mode, press the OK Key to unlock the
keypad, press the Left Soft Key [ ] [MENU], sele ct
Media Center and press the OK Key , sw ivel to the
QWERTY keypad and press 1. Mu sic & Tones, 4. My
Sounds.
2. Press 1. Record New .
3. Press the OK Key to begin recording. When done,
press the OK Key [STOP] to finish re cording. T he
recording is automatically saved to your My Sounds
list.
4. Y our recor ding is saved with a number . To rename
your recording, scroll to it with the D irectional Key [ ]
in the My Sounds menu, then press the Ri ght Soft
Key [Options].
5. Press 3. Rename.
6. Enter the new name for your recording, then press
the OK Key.
Chapter 5 Media Center 83

TO SET A SOUND:
1. From idle mode, press the OK Key to unlock the
keypad, press the Left Soft Key [ ] [MENU], sele ct
Media Center and press the OK Key , sw ivel to the
QWERTY keypad and press 1. Mu sic & Tones, 4. My
Sounds.
2. Select the sound you want to set, press the Left
Soft Key [ ] [Set As], then select one of the following
and press the OK Key.
y 1. Ringtone: A confirmation message appears.
y 2. Contact ID: The Set As Cont act ID screen appear s.
Select the Contact you want to assign the r ingtone to, then
press the OK Key.
y 3. Alert Sounds: Press the corresponding number key to
set the ringtone for one of the following:
- All Messages / TXT M essa ge / Pic-V oice Messag e /
Voicemail
SYNC MUSIC
1. Plug in the USB cable (included inbox) to y our
phone and connect it to a USB port on your PC.
2. Press the Right Soft Key [] Sync.
3. Drag and drop the song(s) you want to sync from
PC to your external memory where placed in
TXT8040.
4. Once synchronization is complete, press the
END/CLR key and disconnect the USB cable
84
(included inbox).
5. Under the Music & Tones menu, open My Music to
view and play your music.
y A compatible USB cable is required for synchroni zing.
PICTURES
GET NEW PICTURES
T o connect to Media Center and d ownload a variety
of Pictures (images):
1. From idle mode, press the OK Key to unlock the
keypad, press the Left Soft Key [ ] [MENU], sele ct
Media Center and press the OK Key , swivel to the
QWERTY keypad, then press 2. Pictures, 1. Get New
Pictures.
2. Press 1. Get New Applications . Follow the onscreen prompts.
The downloaded application will be included in the list
displayed when you access:
Get New Pictures > 1. Get New Applications.

MY PICTURES
In My Pictures you can view all the picture s you have
taken, store selected images in your phone , send
pictures to the Online Album, delete images and
access additional picture options.
1. From idle mode, press the OK Key to unlock the
keypad, press the Left Soft Key [ ] [MENU], sele ct
Media Center and press the OK Key , swivel to the
QWERTY keypad, then press 2. Pictures, 2. My
Pictures.
2. Select the desired picture, then press the Right
Soft Key [Options].
3. Select one of the following options:
y Send: T o send a picture messag e.
y Set As: Assigns the selected pict ure to display for specific
tasks. (Wallpaper/Picture ID)
y Tak e Picture: Take a new picture.
y Get New Picture: Download various pictures.
y Manage Pictures: Erase, Lock, Unlock, Move to Ph one or
Move to Card.
y Rename: Rename the selected picture.
y File Info: Displays information about the selected pictur e.
(File Name/Date/Time/Resolution/Size)
TO ERASE A PICTURE:
1. From idle mode, press the OK Key to unlock the
keypad, press the Left Soft Key [ ] [MENU], sele ct
Media Center and press the OK Key, swivel to the
QWERTY keypad, then press 2. Pictur es, 2. My
Pictures.
2. Select the picture you want to erase, the n press
the Left Soft Key [ ] [Erase]. “ERASE PICTURE?” will
appear on your display.
3. Select Yes and press the OK Key. A confirmation
message appears.
TAKE PICTURE
1. To access the camera, press the Camera Key [ ].
If the keypad is locked, unlock the keypa d by pressing
the OK Key. Press t he Camera Key [ ] to access th e
camera viewfinder .
2. Point the camera lens at your subject. You can
check the picture framing through the disp lay screen.
y Press the Directional Key [ ] left/right: Zoom Down/Up.
(Except 1280X960, 960X1280 mode).
y Pressing the Right Soft Key [ ] [Options], you can choose
from the following:
1. Resolution: T o select a resolution for a picture.
- Landscape: 1280x960 / 640x480 / 320x240 / 160x120
- Portrait: 960x1280 / 480x640 / 240x320 / 120x160
2. Self Timer: To activate the camera’s timer function.
(Off/3 Seconds/5 Seconds/10 Seconds)
3. Brightness: T o brightness up/down( -2, -1, 0, +1, +2).
Chapter 5 Media Center 85

4. White Balance: T o select w hite balance.
(Auto / Sunny / Cloudy / T ungsten / Fluorescent /
Darkness)
5. Shutter Sound: To select a shutter sound.
(Shutter/Silent/Say “Cheez”/Ready! 123)
6. Color Effects: T o select color effect.
(Normal/Antique/Black and White/Negative)
7. Capture Mode: To select Capture mode. (Landscape /
Portrait)
To view captured im ages, press the Left Sof t Key [ ] [My
Pics].
3. Press the Camera Key [ ] or press the OK Key
[T AKE] to t ake th e picture.
4. After ta king the picture, it will be display ed. To save
the picture, press the Left Soft Key [ ] [Save]. To take
another picture without saving the pi cture you just
took, press the Right Soft Key [ ] [Erase]. To send the
picture to someone, press the OK Key [SEND].
ONLINE ALBUM
T o acce ss Online Album:
1. From idle mode, press the OK Key to unlock the
keypad, press the Left Soft Key [ ] [MENU], sele ct
Media Center and press the OK Key , sw ivel to the
QWERTY keypad, then pre ss 2. Pictures, 4. Online
Album. The browser launches and the Online A lbum
sign-on screen appears.
86
2. Follow the on-screen prompts.
GAMES
DOWNLOADING NEW GAMES
T o download games and applications from the Media
Center server:
1. From idle mode, press the OK Key to unlock the
keypad, press the Left Soft Key [ ] [MENU], sele ct
Media Center and press the OK Key , sw ivel to the
QWERTY keypad, then pre ss 3. Games.
2. Press the OK Key to select 1. Get New
Applications.
3. Follow the on-screen prompts.
PLA YING DOWNLOADED GAMES
1. T o play the game you dow nloaded, from the
Games menu, select the game then press the OK
Key [PLAY] to run the appli cation.

MOBILE WEB
Now you can access news, sports, weathe r and
Email from your phone. Mobile Web keeps y ou
updated by providing access to up-to-date information
such as news, sports, weather and stock quotes when
you subscribe to Internet service with your service
provider. Please contact your service provider for a list
of available websites and service details.
1. T o start y our Internet b rowser and acce ss websites
through your wireless handset, press the Directional
Key [ ] up.
BROWSER MENU
The browser menu lists the actio ns necess ary to
operate the browser. To access, press the Directional
Key [ ] up to launch Mobile Web and then press the
Right Soft Key [ ] [Menu].
VZW HOME
Returns the user to the home page.
ADD FAVORITE
T akes u ser to the VZ W Add F avorite p age.
For favorites, page name and URL need to a utopopulate.
SEARCH
T akes u ser to the VZ W Search p age.
GO TO URL
T akes user to the VZW Sear ch > Go to Site p age.
SHOW URL
Displays the current URL.
BACK
Returns to the previously viewed p age.
MANAGE MEMORY
Displays the following list of options:
y Clear Cache: Clears the cache.
y Clear History: Clears the list of recently visited URLs.
y Clear Cookies: Clears saved cookies.
y Autofill: Automatically fills in character for browser
recognized words.
SETTINGS
y Downloads: Selecting the Downloads item allows the
user to enable/disable downloading images,
background sounds and object downloads when a
URL is accessed.
y Restart Browser: Selecting Restart Browser causes the
history and cache to be cleared and ret urns the user to
the homepage.
Chapter 5 Media Center 87

y Scroll Mode: Selecting Scroll Mode from the Settings
menu allows the user to select the way text scrolls and
the scroll speed.
y Send Referrer: When the Send Referrer item is
selected from the Settings menu, the brow ser allow s
the user to turn on or off sending the referrer URL.
y Key Press Time Out: When the Key Press Ti me Out
item is selected from the Settings menu, the browser
allows the user to set the key press timeout as fast,
medium, slow or OFF. Medium is 1.5 seconds, slow 2
seconds and fast is 1 second. The key pr ess timeout is
the period of time after which the cursor auto-adv ances
to the next entry position. In most cases, a si ngle key
can be used to enter more than one charac ter . Each
time the key is pressed the last character o f the line is
replaced by the next choice for that key. As long as the
same key is repressed within key press timeout , the last
character cycles between all the choices for the key.
y Connection Time Out: When the Connection Timeout is
selected from the Settings menu, the brow ser allow s
the user to set the connection timeout. The connecti on
timeout determines how long the br owser will wait for a
response from the network for a network request: 30
Seconds or 60 Seconds.
ADVANCED
y About: Displays the name of the supplier of the Bro wser
and the Browser SW version.
y Refresh: Allows the user to reload the cur rent URL.
y History: Displays the previous 20 visited URLs.
88
y Encryption: Displays the following list of options:
1. Authentication: Gives the option to turn Authenti cation
Caching ON or OFF .
2. Root Certificate: Shows the root security keys for TLS.
3. Current Certificate: Shows the current site security key
for TLS (if applicable).
2. Press the END Key [ ] to exit out o f the brow ser
and return to idle mode.
BROWSE & DOWNLOAD
DOWNLOADING NEW APPLICATIONS
T o download Tools that can help you navigate to
entertainment spots, restaurant s, and provide y ou
with up-to-date weather information:
1. From idle mode, press the OK Key to unlock the
keypad, press the Left Soft Key [ ] [MENU], sele ct
Media Center and press the OK Key, swivel to the
QWERTY keypad, then press 5. Browse & Download.
2. Select Backup Assistant, Mobile Email or VZ
Navigator, then press the OK Key. Follow the on-
screen prompts.
EXTRAS
DOWNLOADING NEW APPLICATIONS
T o download Applications:
1. From standby mode, press the OK Key to unlock

the keypad, press the Lef t Soft Key [ ] [MENU], select
Media Center and press the OK Key , sw ivel to the
QWERTY keypad, then pre ss 6. Extras.
2. Press 1. Get New Applications and follow the onscreen prompts.
MEDIA CENTER INFO
T o view Application M emory, Phone Memory, View
Log and Help information:
1. From idle mode, press the OK Key to unlock the
keypad, then press the Lef t Soft Key [ ] [ MENU].
2. Select Media Center and press the OK Key.
3. Press the Right Soft Key [ ] [In fo].
4. Select one of the following settings and then press
the OK Key.
App. Memory / Phone Memory / View Log / Help
Chapter 5 Media Center 89

CHAPTER 6
MESSAGING MENU
This chapter addresses Voicemail, TXT, Picture, Voice Messaging
functions including:
When a new message arrives
New Message
Messages
Voicemail
Mobile IM
Erase All
90
Inbox
Sent
Drafts
Email
Chat
Settings

WHEN A NEW MESSAGE ARRIVES
1. The following display appears
when a new message arrives.
2. To display the message, select
View Now and then press the OK Key.
NEW MESSAGE
TXT MESSAGE
1. From idle mode, press the OK Key to unlock the
keypad, press the Left Soft Key [ ] [Message], swivel
to the QWERTY keypad, then press 1. New
Message.
2. Press 1. TXT Message.
Shortcut: From idle mode, press the TXT Composer Key
[ ].
3. Under To, input the phone number and then press
the OK Key.
y By pressing the Right Soft Key [ ] [Add], you can ch oose
from the following:
1. From Contacts: Search for a phone number which is
stored in the Contact List.
2. Recent Calls: Search for a phone number which is
stored in the Add Rece nt Calls menu.
3. Groups: Search the groups stored in the Add Groups
menu.
4. To Contact s: Save the number or email you’v e entered
to the Contact List, when you enter the number.
4. Under Text, input your message. When completed,
press the OK Key [SEND].
y By pressing the Right Soft Key [ ] [Add], you can choose
from the following:
1. Insert Quick T ex t: Inserts w ritten sentences in the TXT
message.
2. Save As Draft: To save the TXT message to Draft s.
3. Add: T o at tach Graphic, Sound, Name Card.
y Graphic: Inserts simple graphic images.
y Sound: Inserts a selected Sound.
y Name Card: Inserts a selected Name Card.
4. Format T ex t: Allows you to edit the Align ment, Font Size,
Font Style, Font Color and Backg round Color.
y Alignment: Select Left, Center or Right by pressing the
Directional Key [ ] left or right.
y Font Size: Select Normal, Large or Small by pressing
the Directional Key [ ] left or right.
y Font Style: Select Regular, Bold, Italic, Underline or
Strikethrough by pressing the Directional Key [ ] left or
right.
y Font Color: Select a font color.
y Background Color: Select a background color .
5. Priority Level: Select High or Normal and then press the
OK Key.
6. Cancel Message: T o cancel message.
5. To send the TXT Message, press the OK Key
[SEND].
Chapter 6 Messaging Menu 91

PICTURE MESSAGE
1. From idle mode, press the OK Key to unlock the
keypad, press the Left Soft Key [ ] [Message], swivel
to the QWERTY keypad, then press 1. New Message.
2. Press 2. Picture Message.
3. Under To, input the phone number and then press
the OK Key.
y By pressing the Right Soft Key [Add], you can choose
from the following:
1. From Contacts: Search for a phone number which is
stored in the Contact List.
2. Recent Calls: Search for a phone number which is
stored in the Add Rece nt Calls menu.
3. Groups: Search the groups stored in the Add Groups menu.
4. To Online Album: Send the picture message to your
Online Album.
5. To Contact s: Save the number or email you’v e entered
to the Contact List, when you enter the number.
4. Under Text, input your message and then press
the Directional Key [ ] down.
5. Under Picture, press the Left Soft Key [My Pics] to
select the picture you would like to send then press
the OK Key . Press the Direc tional Key [ ] down.
6. Under Sound, press the Left Soft Key [ ] [Sounds]
to select the sound you would like to send then press
the OK Key . Press the Direc tional Key [ ] down.
7. Under Subject, input the message subject and
92
then press the Directional Key [ ] down.
8. Under Name Card, press the Left Soft Key [ ] [Add]
select 1. My Name Card or 2. Contacts then press the
OK Key. Select the desired card then press the OK Key .
9. Press the Right Soft Key [ ] [Options] to access the
following:
y Preview: T o preview a written Picture Message.
y Save As Draft: To sav e the Picture Message to Dra fts.
y Add Quick T ext: Inserts w ritten sentences in the Picture
Message.
y Add Slide: T o a dd another messag e.
y Priority Level: Select High or Normal and then press the
OK Key.
y Remove Picture: To remove an inserted picture in Picture field.
y Remove Slide: To remove an inserted Slide Message.
y Remove Sound: To remove an inserted sound in Sound field.
y Remove Name Card: To r emove an inserted name card in
Name Card field.
y Cancel Message: T o cancel the picture message.
10. To send the Picture Message, press the OK Key
[SEND].
VOICE MESSAGE
1. From idle mode, press the OK Key to unlock the
keypad, press the Left Soft Key [ ] [Message], swivel
to the QWERTY keypad, then press 1. New
Message.

2. Press 3. Voice Message.
3. T o record a new Voice Memo, press the OK Key to
start recording a voice memo. Press the OK Key
[STOP] to finish reco rd ing and i nse rt the v oice m emo
into the voice message.
4. Under To, input the phone number and then press
the OK Key.
y By pressing the Right Soft Key [ ] [Add], you can ch oose
from the following:
1. From Contacts: Search for a phone number which is
stored in the Contact List
2. Recent Calls: Search for a phone number which is
stored in the Add Rece nt Calls menu.
3. Groups: Search the groups stored in the Add Groups
menu.
4. To Contact s: Save the number or email you’v e entered
to the Contact List, when you enter the number.
5. Using the Directional Key [ ], scroll dow n to the Text field.
6. Under Text, input your message and then press
the Directional Key [ ] down.
7. Under Subject, input the voice message subject
and then press the Directional Key [ ] down.
8. Under Name Card, press the Left Soft Key [ ] [Add],
select 1. My Name Card or 2. Contacts then press
the OK Key. Select the desired card then press the
OK Key.
9. Press the Right Soft Key [ ] [Options] to access the
following:
y Review: T o preview a w ritten V oice Messag e.
y Save As Draft: T o save the V oic e Message to Dra fts.
y Add Quick T ext: Inserts w ritten sentences in the Voice
Message.
y Priority Level: Select High or Normal an d then press the
OK Key.
y Remove Recording: To remove an inserted recorded
voice memo in Voice field.
y Remove Name Card: To r emove an inserted name card in
Name Card field.
y Cancel Message: To cancel the voice message.
10. To send the Voice Message, press the OK Key
[SEND].
INBOX
The Inbox manages received TXT, Picture, Voice,
Web Alert messages. T o access:
1. From idle mode, press the OK Key to unlock the
keypad, press the Left Soft Key [ ] [Message], swivel
to the QWERTY key pad, then press 2. Inbox.
2. Select a message and then press the OK Key
[OPEN]. The message is displayed. To delete a
message, press the Left Soft Key [ ] [Erase], then
select Y es and press the OK Key.
3. Press the Right Soft Key [ ] [Options] to access the
following:
Chapter 6 Messaging Menu 93

y Play Again: T o play a receiv ed Picture/V oice message.
y Forward: Select to forward the message.
y Erase: T o delete a message.
y Replay w. Copy: Select to reply with the original messag e
included.
y Save Graphic: Select to save the graphic to the My
Pictures folder.
y Save Sound: Select to save the sound to the My Sounds folder.
y Save Picture: Select to save the picture to th e My Pictures
folder.
y Save As Ringtone: Select to save the tone to the My
Ringtones folder.
y Save Name Card: Select to save the name card to the
Contact List.
y Save Quick Text: Select to save the received text to Quick
Text.
y Add To Contacts: Select to save the n umber to the
Contact List.
y Extract Addresses: To extract all phone numbers, email
addresses and URLs from the received mess age.
y Message Info: Select to view received message information.
y Manage Inbox: Manage messages with follow ing options:
y Sort By Sender: To view messages sorted by sender.
y Sort By Size: T o view messages sorted by size.
y View By Contacts: To view messages sorted by contacts.
This feature is displayed when the Messages View is set
to By Time.
94
Erase: T o delete a message.
Lock: T o lock a message.
Unlock: To unl ock a message.
SENT
Manage messages already sent or waiting to be sen t.
1. From idle mode, press the OK Key to unlock the
keypad, press the Left Soft Key [ ] [Message], swivel
to the QWERTY key pad, then press 3. Sent.
2. Select a message and then press the OK Key
[OPEN]. The message is displayed. To delete a
message, press the Left Soft Key [ ] [Erase], then
select Yes and press the OK Key.
3. With the message open, press the Right Soft Key
[ ] [Options] to access the follow ing:
y Forward: Select to forward the message.
y Resend: Select to resend the message.
y Erase: T o del ete a sent message.
y Lock/Unlock: Select to lock or unlock the message.
y Save Quick Text: Select to save sent text to Quick Text.
y Add To Contacts: Select to save the n umber to the
Contact List
y View Name Card: T o view the included Name C ard.
y Message Info: Select to view sent message information.
This feature is displayed when the Messages View is set
to By Time.
MESSAGES
This feature can be seen when the Messages View
setting value is set to By Contacts. With Message
View By Contacts, all receiv ed and sent me ssages

are stored under Messages by contact na me.
1. From idle mode, press the OK Key to unlock the
keypad, press the Left Soft Key [ ] [Message], swivel
to the QWERTY key pad, then press 2. Message s.
2. Select the desired contact name to view and press
the OK Key. Press the Right Soft Key [ ] [Options] to
access following options:
y Erase: T o delete a message.
y Sort Alphabetically: To view messages sorted
alphabetically .
y Add To Contacts: Save number to contact s.
y Manage Inbox: Manage messages with follow ing options:
3. Select a message then press the OK Key [OPEN]
Erase: To delete a message.
Lock: To lock a message.
Unlock: To unlock a m essag e.
to view the message.
4. Press the Directional Key [ ] right / left to view the
next / previous message.
5. Press the Right Soft Key [ ] [Options] to access the
following options.
y Forward: Forward the message.
y Reply w. Copy: Select to r eply with the or iginal messag e
included.
y Save Quick Text: Save the text to Quick Text.
y Lock / Unlock: Lock or unlock the message.
y Add To Contacts: Save the number to the Contac t List.
y Extract Addresses: To extract all phone numbers, email
addresses and URLs from the received mess age.
y Message Info: Select to view received or sent mess age
information.
DRAFTS
The Drafts Folder contains any draft messages or
saved messages. If message composition is
interrupted by a voice call or other interrupting event,
the message being composed is automatically sav ed
in the Drafts Folder .
1. From idle mode, press the OK Key to unlock the
keypad, press the Left Soft Key [ ] [Message], swivel
to the QWERTY key pad, then press 3. Drafts.
2. Select a message and then press the OK Key
[EDIT]. The message is display ed.
3. To delete a message, press the Left Soft Key [ ]
[Erase], then select Yes and press the OK Key.
4. Press the Right Soft Key [ ] [Options] to access the
following:
y Send: Select to send the selected message.
y Lock/Unlock: Select to lock or unlock the message.
y Add To Contacts: Select to save the n umber to the
Contact List.
y Erase Drafts: To erase all drafts messages.
Chapter 6 Messaging Menu 95

VOICEMAIL
WHEN A NEW VOICE MAIL ARRIVES
When you receive a new voicemail message you’ll
hear a sound and a Voicemail appears in the display.
1. To listen to the message, select Listen Now or
Listen Later.
2. Press the OK Key .
TO ACCESS YOUR VOICE MAILBOX
1. To dial your voice mailbox directly, press the OK
Key to unlock the keypad then swivel to the
QWERTY keypad, dial *86 and then press the SEND
Key [ ]. Or, from idle mode, press the Left Soft Key [ ]
[Message], select V oicemail and press the OK Key
then press the OK Key [CALL].
2. Follow the prompts to enter your password and
retrieve your messages.
Shortcut: From idle mode, press and hold 1 to access
your Voicemail. O ne T ouch Dial must be enabled,
please refer to page 63 for more details.
ERASE ALL
To erase all messages stored in your Inbox, Drafts or
Sent folders:
1. From idle mode, press the OK Key to unlock the
96
keypad, press the Left S oft Key [ ] [Message], then
press the Right Soft Key [ ] [Options] and select from
the following:
y Press “1. Erase Inbox” to erase all messages or o nly read
messages stored in the Inbox.
y Press “2. Erase Sent” to erase all messages stored in
Sent Folder.
y Press “3. Erase Drafts” to erase all mess ages stored in t he
Drafts folder.
y Press “4. Erase All” to era se all messages or al l except
unread messages stored in the Inbox, Se nt, and Draf ts
folders.
Locked messages cannot be erased.
2. Select Yes to erase the selected messages, then
press the OK Key . A confirmation message appears.

SETTINGS
T o configure messag e setting s:
1. From idle mode, press the OK Key to unlock the
keypad, then press the Left Soft Key [ ] [Message],
then press the Left Soft Key [ ] again for [ Settings ].
2. Highlight one of the settings below, then press the
OK Key to select it:
MESSAGES VIEW
1. Select By Time or By Contacts and press the OK
Key.
y By Time: Sort received an d sent messages in to inbox and
sent folders by time.
y By Contact: Group all received and sen t messages by
contact.
ENTRY MODE
Allows you to set a default Entry Mode. Fo r ex ample,
if Abc Mode is the de fault, its icon w ill appear .
1. Select Abc, ABC or 123, then press the OK Key.
AUTO SA VE SENT
1. Select On, Off or Prompt, then press the OK Key.
y On: All sent messages are saved in the Sent box.
y Off: All sent messag es are not saved in the Sent box .
y Prompt: The Yes or No dialogue box will be displayed a fter
sending a message.
AUTO ERASE INBOX
Automatically erase inbox messages when new
messages arrive.
1. Select On or Off, then pres s the OK Key.
y On: The oldest message will be erased from the I nbox
automatically once full.
y Off: The oldest message will not be erased automatically
from the Inbox once full.
MESSAGING FONT SIZE
T o set the mes sage font size:
1. Select Normal or Large, then press the OK Key.
TXT AUTO VIEW
1. Select On or Off, then pres s the OK Key.
y On: TXT messages are displayed automatically.
y Off: TXT messages are di splayed by goi ng into the Inbox,
or by responding to the message prompt.
MULTIMEDIA A UTO RECEIVE
1. Select On or Off, then pres s the OK Key.
y On: Picture/Voice messa ges are downloaded
automatically.
y Off: Picture/Voice messages must be r etrieved from the
Inbox or by responding to the message pro mpt.
Chapter 6 Messaging Menu 97

QUICK TEXT
T o crea te a new Qui ck Text or edit the Quick Text you
have saved:
1. Select a Quick Text from the list and press the OK
Key [EDIT].
2. To add a new Quick Text, press the Right Soft key
[ ] [Options] and press 1. New. Enter the new text and
press the OK Key [SA VE].
3. To move the saved Quick Text, press the Right
Soft Key [ ] [Options] and press 2. Move . Scroll to
desired location and press the OK Key [SAVE].
4. To erase a saved Quick Text, press the Left Soft
Key [ ] [Erase]. Select Yes and press the OK Key .
VOICEMAIL#
1. Swivel to the QWERTY keypad, input a new
voicemail number or edit the voicemail number then
press the OK Key .
2. Press the Left Soft Key [ ] [Add] and then press 1.
Add Wait or 2. Add 2-Sec Pause. Please refer to
page 21 for more details on WAIT/ PAUSE
FEATURE.
CALLBACK #
Edit a default callback number so that the recipient
can callback or reply.
98
1. Select On or Off, then pres s the OK Key.
2. If On is selected, input a new callback number
then press the OK Key .
SIGNA TURE
Create a signature that can be automatically inserted
at the end of all TXT, Picture
and Voice messages.
1. To deactivate Signature function, select None and
press the OK Key .
2. To input a Signature, select Custom. Enter your
signature in the text
box then press the OK Key.
DELIVERY RECEIPT
T o set d elivery receipts for sent message s:
1. Select On or Off, then pres s the OK Key.
y On: Request to receive the delivery acknowledgement.
y Off: No delivery acknowledgement will be sent.

CHAPTER 7
SAFETY AND WARRANTY
This chapter addresses the safety guidelines and precautions to
follow when operating your phone. Before operating your phone,
please be aware of all the safety details. This chapter contains the
terms and conditions of services and the warranty for your phone.
Please review them thoroughly.
Safety Information for Wireless Handheld Phones
Safety Information for FCC RF Exposure
SAR Information
Hearing Aid Compatibility (HAC) for Wireless Telecommunications Devices
FDA Consumer Update
Avoid Potential Hearing Loss
FCC Compliance Information
12 month Limited Warranty
Chapter 7 Safety and Warranty 99
 Loading...