

Page 1
6320013600 REV00
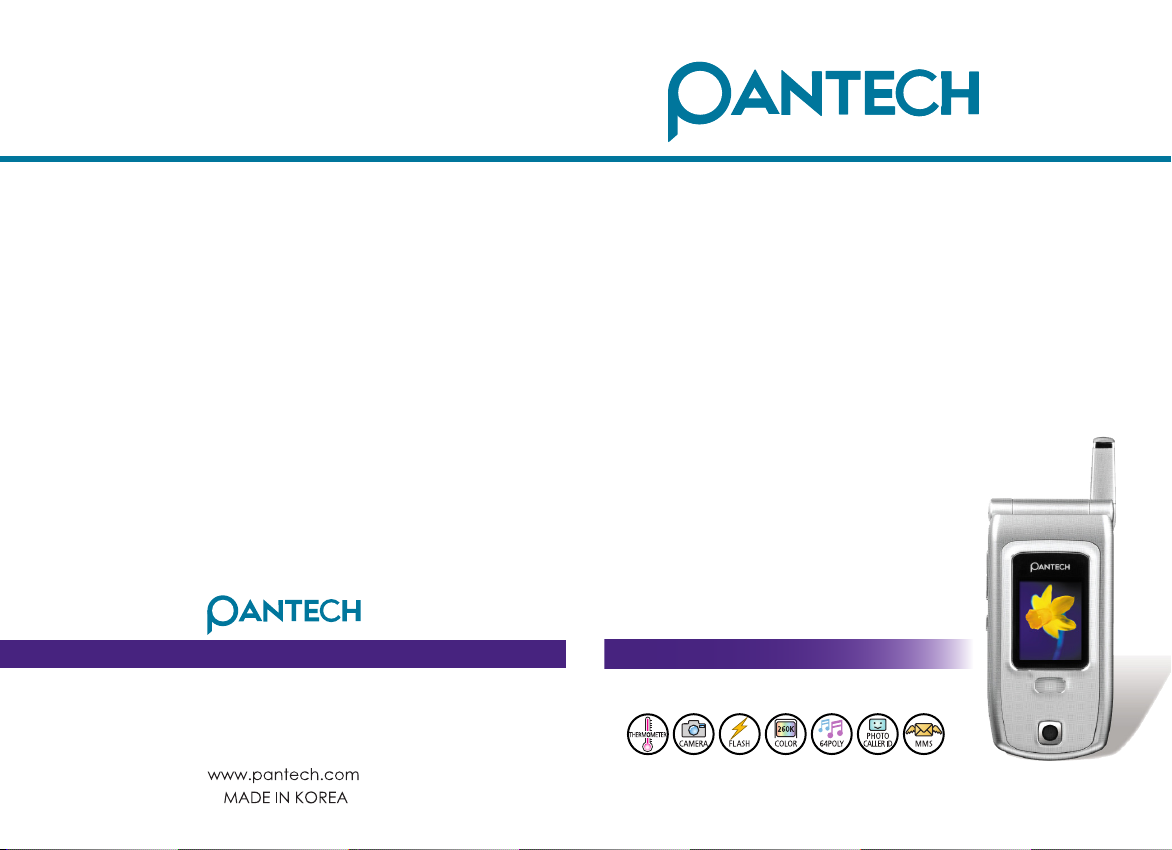
G670
User’s Manual
6320013600
6
3
2
0
0
1
3
6
0
0
Page 2

SPECIFICATION
SPECIFICATION
Display
Dual clamshell TFT LCD both Main & Sub.
Main LCD : 260,000 TFT Color Display (128 X 160)
Sub LCD : 260,000 TFT Color Display (128 X 160)
Animation Message, Variable Icon
Melody
64 Poly Orchestra Music Bell Sound
Camera
High Sensitive Digital Camera with Flash
Dimension & Weight
80X40X21 mm with Standard Battery
85g with Standard Battery
Performance
Talk Time: up to 210 minutes (with 780 mAh Battery)
Standby Time: up to 200 hours (with 780 mAh Battery)
Operating Frequency
GSM 900MHz / 1800MHz Dual Band
1
Page 3

SAFETY PRECAUTIONS
SAFETY PRECAUTIONS
For your safety and proper operation of the cell phone, please read
the following information carefully and observe the simple
guidelines provided. For detailed information, please refer to the
Appendix.
Antenna
Do not use any antenna not authorized by Pantech. Using such
antenna may cause malfunction or serious damage to the phone.
Traffic Safety
You should check and observe your local traffic regulations before
using your cell phone. Do not use your phone while driving.
If unavoidable, use a hands-free device in a safe area.
Effects on Electronic Devices Inside the Car
RF (Radio Frequency) signals may adversely affect the electronic
devices or systems in your car.
Hands-free Device
Installing an in-vehicle hands-free device on the area of deployment
of an airbag or within the coverage of airbag inflation may cause
serious injury.
Effects on Electronic Devices
RF signals emitted from your cell phone may adversely affect the
electronic devices that are inadequately shielded against such
signals.
2
Page 4

SAFETY PRECAUTIONS
SAFETY PRECAUTIONS
Medical Devices
Turn off your cell phone in healthcare facilities and make sure to
observe facility rules and regulations.
As external RF signals may interfere with a pacemaker(s) or another
medical device(s), turn off your cell phone when near such devices.
Consult a physician or the manufacturer of the medical device if
you have any questions about using your phone in a healthcare
facility.
Public Place
Turn off your cell phone in public areas where the use of cell
phones is prohibited.
Boarding an Aircraft
Turn off your cell phone before boarding an aircraft.
Using a cell phone inside the aircraft may seriously affect aircraft
operation.
Potentially Explosive Atmosphere
Turn off your cell phone in any area with a potentially explosive
atmosphere, and obey all posted signs and instructions in the area.
Do not separate the battery from your phone in an area with a
potentially explosive atmosphere.
3
Page 5

SAFETY PRECAUTIONS
SAFETY PRECAUTIONS
User Guide
Do not allow another person to use your phone without your
permission.
If the phone is lost or stolen, contact your service provider
immediately.
If the phone does not function properly, take it to the nearest
service center.
Use only approved accessories and batteries. Do not attempt to
connect incompatible devices.
Avoid prolonged exposure to RF (radio frequency) signals emitted
from the phone as it may adversely affect the human body.
Remember to make a backup copy of important data such as
telephone numbers.
Exposure to Radio Waves
Your phone is comprised of a radio transmitter and receiver. It was
designed and manufactured not to exceed the radio wave energy
limit or exposure recommended by an independent scientific
organization after extensive scientific studies.
Use only the batteries, chargers and accessories approved by
authorized manufacturers so as to not exceed the recommended
exposure guidelines. Use of unauthorized items may result in a
failure to comply with the guidelines. In such a case, the safety of
all users, regardless of their age and health condition, cannot be
guaranteed.
4
Page 6

SAFETY PRECAUTIONS
SAFETY PRECAUTIONS
Using Your Phone Properly
Use your cell phone in normal operating position (as a hand-held
telephone is normally held).
Do not touch or bend the antenna while using the phone, as it may
degrade the call quality or even affect battery performance.
Do not attempt to disassemble the phone. Non-expert handling may
damage the phone.
Use only the batteries, chargers and accessories which are
authorized or supplied with the phone.
Use of any unauthorized item may result in the invalidation of the
warranty.
5
Page 7

PRECAUTION USING THERMOMETER
PRECAUTION USING THERMOMETER
This is non-critical and non-medical device and just you can take a
temperature for your body as interesting function.
Thermometer measures the infrared heat generated by the forehead
and surrounding tissues. The technical accuracy requirement for the
system is defined by a ±1.0˚C maximum measurement deviation.
Important
• The operating ambient temperature range for this thermometer is
18˚C~35˚C.
• Do not expose the thermometer to temperature extremes (Below
-20˚C or over 50˚C) nor excessive humidity (over 95%)
• Available measurement range is 34˚C ~ 40˚C
• Keep the distance from thermometer to forehead as 2cm.
• The use of thermometer is not intended as a substitute for
consultation with your physician.
• This thermometer is intended for household use only.
• Start measuring 10 minutes after power of the phone is initially
turned on.
• When the place for taking a measurement is moved, the
thermometer needs about 30 minutes of stabilization.
• Avoid taking measurement immediately after a call or charging.
Take measurement after getting stabilized more than 30 minutes.
• Do not heat the exposed part of the sensor on the back of the
phone, or avoid any physical contact.
• If body temperature is taken near the air conditioner or heater, the
measurement might not be correct. Please avoid taking a
measurement around those places.
• Body temperature might not be correct if taken immediately after
exercising or bath or coming home. Please take a measurement
after you rest for more than 30 minutes within the house.
• For the correct measurement, wash away the sweat or makeup
from the surface of your forehead when you take a measurement.
6
Page 8
PRECAUTION USING THERMOMETER
PRECAUTION USING THERMOMETER
• Body temperature taken at the right side or left side of your
forehead might be different. Please take a measurement at the
same side all the time.
• It is important to keep an eyebrow, eye, or hair out of the part
where the temperature is being taken.
Lens Washing
Since the lens is very delicate, it is very important not to touch it
with a hand or any other thing.
When you need to clean the lens to remove the dust or dirt, use a
cotton swab soaked with water or a little bit of alcohol. Be sure not
to press the lens. Do not use the thermometer for at least 30
minutes after cleansing the lens.
Body temperature guide
Normal body temperature is a range. The below table shows that
this normal range also varies by site. Therefore, readings from
different sites should not be directly compared.
Normal body temperature of each body part
Measured part Body temperature
Auxiliary 34.7˚C~37.3˚C
Oral 35.5˚C~37.5˚C
Inner Ear 35.8˚C~38.0˚C
Rectal 36.6˚C~38.0˚C
1. Chamberlain, J.M., MD, and Terndrup, T.E., “New Light on Ear
Thermometer Readings”, Contemporary Pediatrics; March 1994.
7
Page 9

PRECAUTION USING THERMOMETER
PRECAUTION USING THERMOMETER
Normal body temperature by age
Ages Body temperature
1~2 36.1˚C~37.7˚C
3~10 35.8˚C~37.5˚C
11~65 35.6˚C~37.6˚C
Older than 65 35.5˚C~37.2˚C
2. Chamberlain, J.M., MD, and Terndrup, T.E., “Determination of
Normal Ear Temperature with an Infrared Emission Detection
Thermometer”, Annals of Emergency Medicine; January 1995.
The thermometer is initially calibrated at the time of manufacture.
If this thermometer is used according to the use instructions,
periodic re-calibration is not required.
8
Page 10

MEMO
MEMO
9
Page 11

TABLE OF CONTENTS
TABLE OF CONTENTS
COMPONENTS ..................................................................... 14
HANDSET DESCRIPTION .................................................... 15
INTERNAL LCD (MAIN LCD) ................................................ 16
• Main LCD Screen .............................................................. 16
SUB-LCD MENU OPTIONS
FUNCTION KEYS FUNCTION KEYS
QUICK START
• Installing the Battery ........................................................ 22
• Charging the Battery ........................................................ 22
.......................................................................
..................................................
....................................
18
19
21
Getting started
TURNING YOUR PHONE ON
TURNING YOUR PHONE OFF
MAKING A CALL
ENDING A CALL
ANSWERING A CALL
ADJUSTING THE EARPIECE VOLUME
BROWSING THE MAIN MENU
INPUTTING CHARACTERS AND NUMBERS
..................................................................
...................................................................
..............................................
.............................................
...........................................................
............................................
Basic Functions
SPEED DIALING
MAKING AN INTERNATIONAL CALL
MAKING AN EMERGENCY CALL
MISSED CALLS
PHONE BOOK SHORTCUT
LAST NUMBER DIALLED/RECEIVED/MISSED
CALL WAITING
DURING A CALL (OPTIONS DURING A CALL)
T9 GUIDELINE
10
...................................................................
.................................
........................................
....................................................................
..................................................
.....................................................................
......................................................................
...............................
......................
...................
..................
24
24
25
26
26
27
27
28
30
31
31
31
32
32
33
34
35
Page 12

TABLE OF CONTENTS
TABLE OF CONTENTS
Menu functions
MESSAGES
• SMS/EMS
• MMS
• Voicemail
• Cell broadcasts
CALL LOGS
• Received Calls
• Dialled Calls
• Missed Calls
• Clear Logs
• Call Info
• GPRS Info
SOUND
• Ringing Settings
• Message Alert
• Key Tone
• Flip Open Tone
• Sound Effect
SETTINGS
• Display
• Date & Time
• Language
• Reset Settings
• Information
• Auto Power Alarm
• Answering machine
• Voice LED
NET SERVICES
• Divert Calls
• Call Settings
..........................................................................
..........................................................................
..................................................................................
...........................................................................
..................................................................
...........................................................................
...................................................................
.......................................................................
......................................................................
..........................................................................
..............................................................................
..........................................................................
.................................................................................
...................................................................
............................................................................
..................................................................
......................................................................
.............................................................................
...............................................................................
......................................................................
...........................................................................
...................................................................
........................................................................
..........................................................................
.....................................................................
........................................................................
......................................................................
...............................................................
............................................................
..........................................................
38
38
46
52
53
55
55
55
56
57
58
60
61
61
62
62
63
63
66
66
70
72
72
73
74
74
77
78
78
80
11
Page 13

TABLE OF CONTENTS
TABLE OF CONTENTS
• Network Settings
• Security Settings
ORGANIZER ORGANIZER
• Alarm
• Scheduler
• Memo
• Calculator
• Converter
• Stop Watch
FUN & TOOLS
• Game
• Downloaded
• Voice record
• Thermometer
• Wap
• JAVA
• Camera
• Memory info
STK
PHONEBOOK
• Group search
• Name Search
• Photo search
• Add New Name
• Speed Dial List
• Settings
MY MENU
• Register in My Menu
• Using a registered menu
• Deleting registered menus.
• Reference
.................................................................................
.................................................................................
.................................................................................
..................................................................................
................................................................................
............................................................................
......................................................................................
............................................................................
...........................................................................
..............................................................
...............................................................
...................................................
..........................................................................
..........................................................................
...........................................................................
........................................................................
......................................................................
......................................................................
....................................................................
..................................................................
.....................................................................
......................................................................
...................................................................
...................................................................
...................................................................
...............................................................
................................................................
......................................................
................................................
............................................
.........................................................................
82
84
90
90
92
95
96
96
97
98
98
99
103
104
105
111
114
120
121
122
122
123
124
125
125
126
128
128
128
128
128
12
Page 14

TABLE OF CONTENTS
TABLE OF CONTENTS
Appendix
ALL ABOUT PERFORMANCE AND SAFETY
TROUBLESHOOTING TROUBLESHOOTING
• When the “Insert SIM Card” message appears:
• When the “Handset locked enter password”
message appears:
• When the “Enter PIN1” message appears:
• When the “No service” or “Network failure”
message appears:
• When audio quality is poor:
• When the other party cannot hear you speaking:
• When battery lifetime is shorter than usual:
• When your cell phone does not turn on:
• When you are unable to send a message:
• When you are unable to make a call:
• When you are unable to charge the battery:
When you are unable to input data into the Phone Book:
•
• When you are unable to select a certain function:
BATTERY USE
SAFETY INFORMATION
• Road Safety
OPERATING ENVIRONMENT
Malfunction of Nearby Electronic Devices
Emergency Calls
...........................................................
...........................................................
...........................................
....................................................................
....................................................
.....................................................................
............................................
................................................................
....................
...................
..................
................
......................
...................
............................
................
.......................
..........
........
....
......
130
131
131
131
131
131
132
132
132
132
132
132
133
133
133
134
135
135
135
136
136
13
Page 15
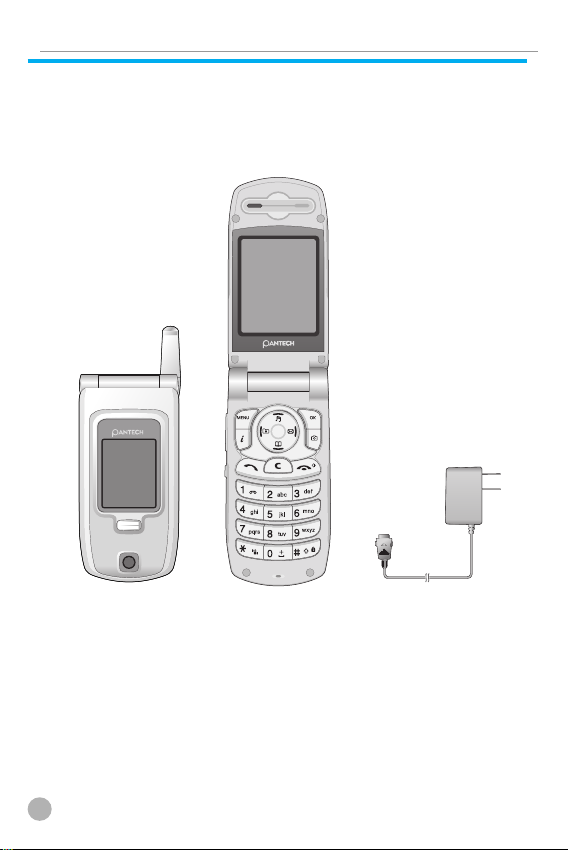
COMPONENTS
COMPONENTS
The pictures shown below are for general user reference only.
Individual items of the cell phone package may vary depending on
the policy of your service provider.
The Cell Phone
14
AC Adapter
Page 16
* For detail usage of key
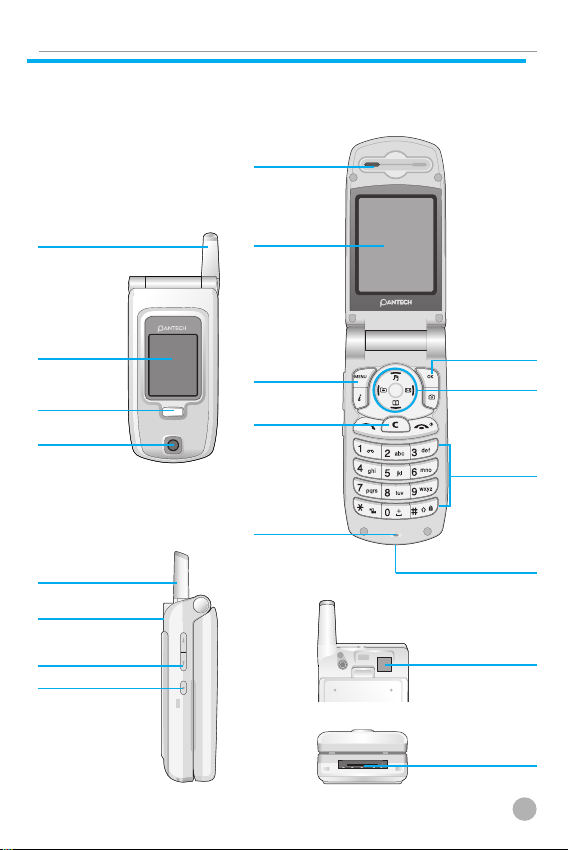
HANDSET DESCRIPTION
HANDSET DESCRIPTION
Earpiece
Antenna
Sub display
Flash
Camera
Antenna
Thermo sensor
(lens)
Side Key
Camera
LCD display
MENU key
Clear key
Microphone
OK key
Navigation
keys
Alphanumeric
keys
Power Adaptor
Connectors
Thermo sensor
(lens)
Power Adaptor
Connectors
15
Page 17
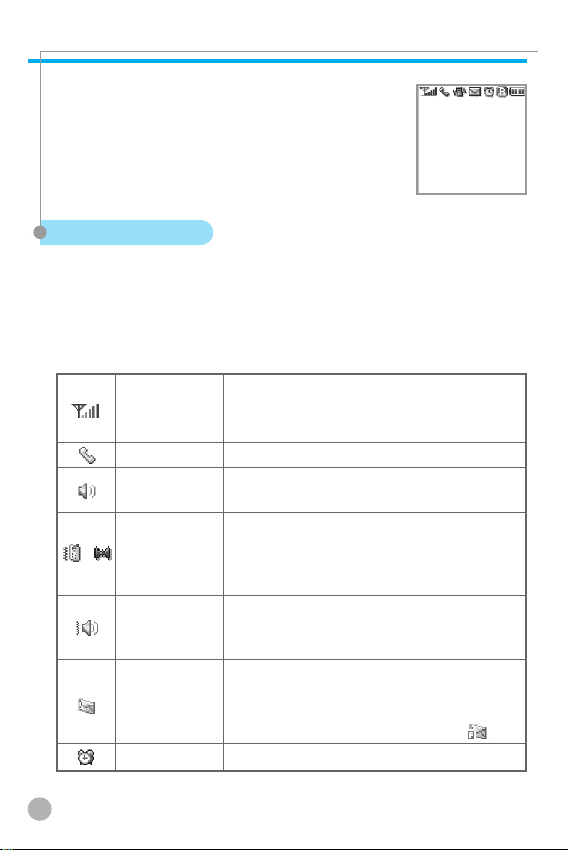
INTERNAL LCD (MAIN LCD)
INTERNAL LCD (MAIN LCD)
There are two LCD displays: main-LCD and subLCD. One displays only icons to show the status of
the phone while the other shows messages,
telephone numbers, icons, or other information.
Main LCD Screen
An icon(s) is displayed when a certain function is activated, a
message has been received or idle mode.
The figure above displays a list of all the possible icons that may be
positioned at the top of the screen.
The function of each icon is described below.
Signal strength
Call-active
Melody
/
Vibration
Vib then Ring/
Vib and Ring
SMS Message
Alarm
16
Shows the strength of the RF signal. The
greater the number of bars, the stronger
the signal.
Indicates that a call is in progress.
Indicates that your ring type is in melody
mode.
Indicates that your ring type is in either
vibration mode or etiquette mode
(Vibration mode: yellow / Etiquette mode:
blue).
Indicates that your ring type begins with
either vibration-melody mode or
vibration followed by melody mode.
Indicates that there is an unread
message(s). When messages are stored in
the SIM to the maximum storage
capacity, this icon will change to .
Indicates that an alarm has been set.
Page 18
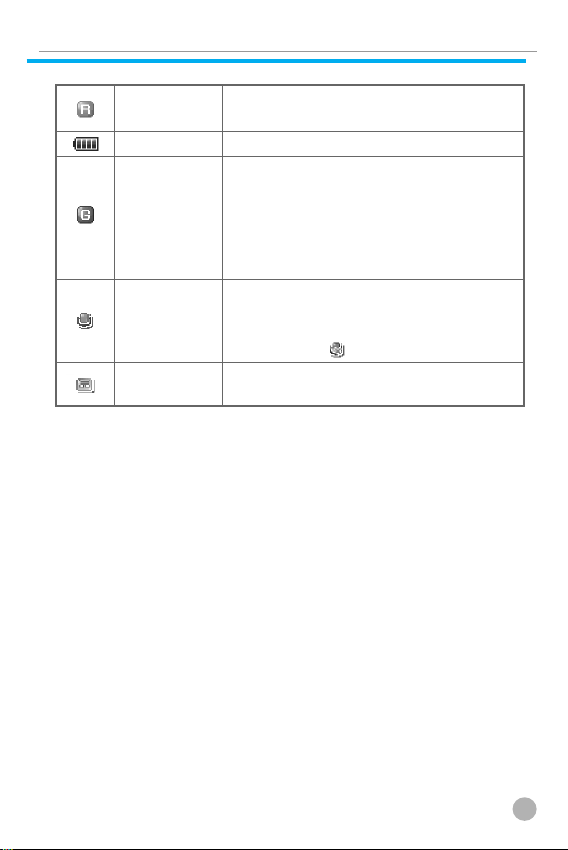
INTERNAL LCD (MAIN LCD)
INTERNAL LCD (MAIN LCD)
Roaming
Battery
GPRS
Auto-
Answering
Recorded
Indicates that roaming service is
available.
Shows remaining battery power.
This icon will appear when you insert
the SIM card that supports the GPRS
function and when your phone is in
GPRS service area (This means that your
phone is camped to the GPRS service
area.)
Indicates that the auto-answering
functionality has been activated. If the
recorded messages are full (10 messages),
it changes to .
Indicates that there are recorded
messages that are unchecked.
17
Page 19

SUB-LCD MENU OPTIONS
SUB-LCD MENU OPTIONS
You can select several options with Sub-LCD Menu. The Sub-LCD
options are shown below.
Camera
1. While the flip is closed, press and hold the key to enter the
camera mode.
2. If the key is pressed after focusing the screen you want by
referring to the sub-LCD screen, the current image on the screen
will be photographed. To save it, press the key again in this
condition. To cancel and enter the camera mode again, press the
key, and to return to the standby screen, press the key.
3. If you press the key in the camera mode, the brightness will be
changed.
Flash ON
While the flip is closed, the camera flash can be used as an
emergency light.
1. On standby mode, press and hold the key to turn on the flash.
2. Release the key to turn off the flash.
Sublcd Menu
You can use the SMS Inbox, All calls, and Check Temperature
menus while the flip is closed.
1. To enter the menu, press and hold the key in standby mode.
Then, a list of menu will appear.
2. After the menu you want is placed using either or key, you
can press the key to enter the menu.
18
Page 20
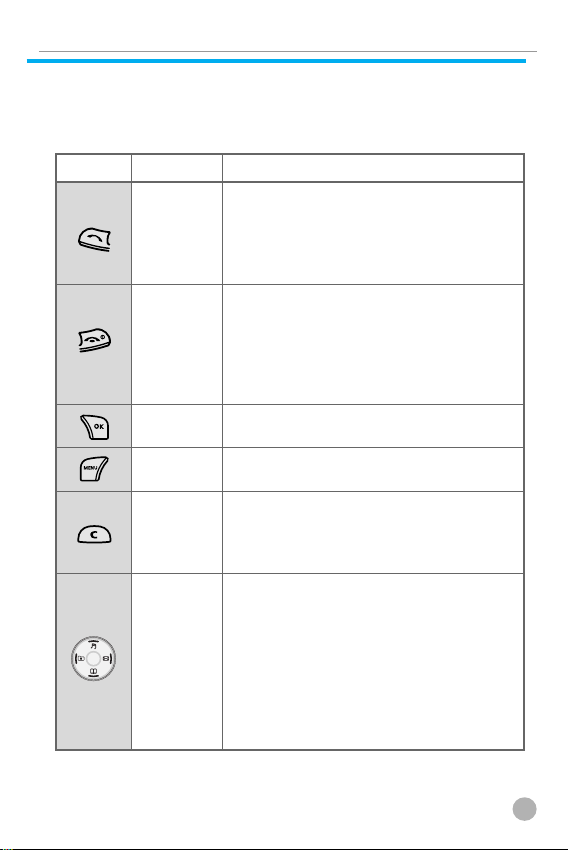
FUNCTION KEYS
FUNCTION KEYS
Function keys
The following table shows a list of function keys, each of which has
one or more functions.
Key Icon Name Key Function
Press this key to make a call or answer
SEND KEY
END KEY
OK KEY
MEMU KEY
CLEAR KEY
NAVIGATION
KEYS with
shortcut keys
to Hot Folder,
Sound setting,
Message and
Phonebook
an incoming call when the answer type
is ANY KEY & SEND KEY. If you wish to
see the list of all recent calls, press this
key once.
Press this key to end a call or to convert
to standby mode from menu mode.
Press and hold this key to turn your
phone on or off. Press the END key
when call is incoming, then incoming
call will be rejected.
Press this key to select or activate the
menu displayed on the screen.
Press this key to enter into the main
menu & pop up menu.
Press this key to delete a single character,
or press and hold this key to delete all
characters. Press this key to return to the
previous screen.
Press one of the four keys (left, right, up,
and down) to move the cursor in the
menu list or editor. During a call, press
the [Up] key to see the list of recent calls
made or the [Down] key to see the list of
calls received. If you press this key on
the idle screen, you can easily access
the Phonebook, Sound Setting, SMS, or
My Menu (Hot Folder).
19
Page 21
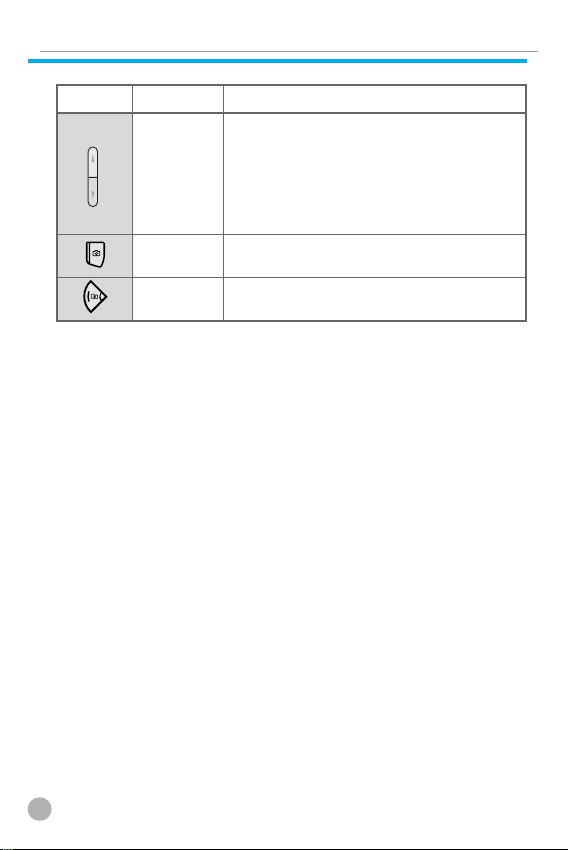
FUNCTION KEYS
FUNCTION KEYS
Key Icon Name Key Function
Press this key if you wish to adjust the
SIDE UP and
DOWN KEYS
CAMERA KEY
WAP KEY
call volume during a call. From standby
mode, press the [Vol Down] key to see
the calendar. If you press the [Vol Up]
key, you can enter the answering
machine menu.
From the idle screen, press this key to
directly access the [Camera] menu.
From the idle screen, press this key to
directly access the [WAP] menu.
20
Page 22

QUICK START
QUICK START
In order for you to use the phone the first time, you must follow the
steps shown below.
Install the SIM card inside the handset.
When you subscribe to a cellular network, you are provided with a
plug-in SIM card loaded with your subscription information.
(such as PIN number, available optional services, etc.)
If necessary, turn off your phone by pressing and holding the
key until a closing message appears.
1. Remove the battery from the phone.
2. Clear the SIM slot and install the SIM card into the slot.
3. If you wish to remove the SIM card, push it in the arrow direction
shown in the picture below.
21
Page 23
QUICK START
QUICK START
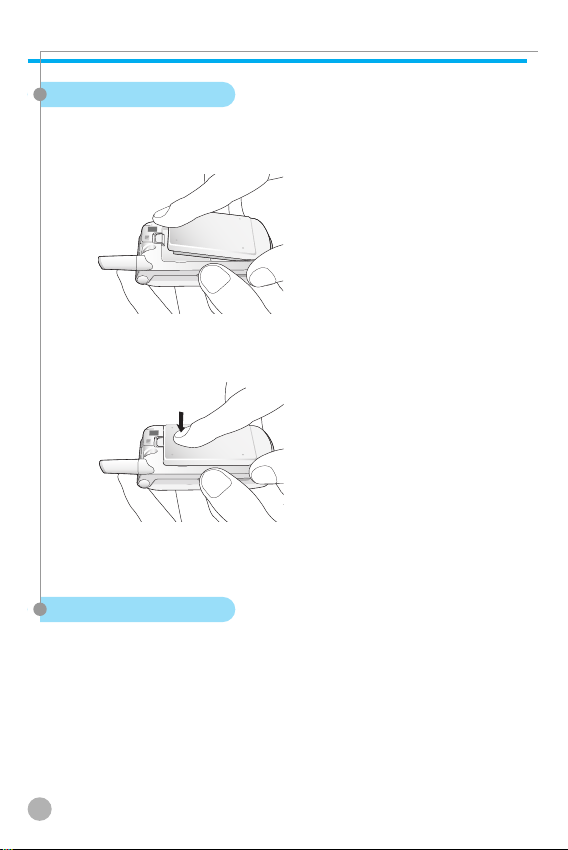
Installing the Battery
As shown in the picture below, fix the part (where the metal groove
of the battery is located) into the groove at the bottom of the
handset.
1. Insert the part (where the metal groove of the battery is located)
unto the groove at the bottom of the handset.
2. Then press the top of the battery until it snaps.
Charging the Battery
Your phone is powered by a charged Li-ion battery. Use only
authorized batteries and chargers. Ask your Pantech dealer for
further details. You may use the phone while the battery is charging.
In case a battery has been installed in the phone, open the cover to
the power adapter connector at the bottom of the phone and
connect the adapter to the connector. The adapter is supplied
together with the phone.
When the battery is fully charged, disconnect the adapter from the
connector.
22
Page 24

Getting started
Turning your phone on
Turning your phone off
Making a call
Ending a call
Answering a call
Adjusting the earpiece volume
Browsing the main menu
Inputting characters and numbers
23
Page 25
TURNING YOUR PHONE ON
TURNING YOUR PHONE ON
Press and hold the key for approximately 3 seconds to turn your
phone on.
TURNING YOUR PHONE OFF
TURNING YOUR PHONE OFF
Press and hold the
24
key to turn your phone off.
Page 26
MAKING A CALL
MAKING A CALL
Press and hold the key to turn your phone on.
Insert the SIM card into the SIM slot when the “Insert SIM card”
message appears on the screen.
Enter your PIN number (up to 8 characters) to unlock the handset
(if applicable). If the correct PIN number has been entered, the
search for the subscribed network will start automatically.
In idle mode, enter the phone number with the area code. Press the
key to make a call. If you wish to make an international call,
press twice or press and hold until the ‘+’ symbol appears
on the screen. Then dial the country code, area code and telephone
number. If you press and hold the key, you can insert the ‘P’
pause symbol between each code and telephone number for a
delay of 2 seconds.
You can also make an emergency call without the SIM. To make an
emergency call, enter the emergency number and press .
25
Page 27

ENDING A CALL
ENDING A CALL
Press the key to cancel or disconnect a call or just simply close
the flip
ANSWERING A CALL
ANSWERING A CALL
When the phone rings a melody or vibrates, if the service is
available to you, the screen will display the name or telephone
number of the caller. The caller’s name will be displayed only
when his/her telephone number and name are archived in the
Phone Book. If you wish to answer a call in normal mode, simply
press the
key(when the Answer type is set to or [Any Key]) and you can
answer a call by pressing any key except the key in [Any key]
mode.
key. If you wish to answer a call, simply press the
26
Page 28
ADJUSTING THE EARPIECE VOLUME
ADJUSTING THE EARPIECE VOLUME
If you wish to adjust the earpiece volume while speaking on your
phone, adjust the volume key on the side of the phone to select the
desired level from the 8 different volume levels.
BROWSING THE MAIN MENU
BROWSING THE MAIN MENU
If you wish to enter the main menu from the idle screen, press the
key. Press the or key to exit the menu and return to the
idle screen. With the navigation keys, and , you can
select one item from the item menu. You can answer questions by
pressing the key for ‘Yes’ and the key for ‘No’.
27
Page 29

INPUTTING CHARACTERS AND NUMBERS
INPUTTING CHARACTERS AND NUMBERS
Select the keypad of the number you wish to input. If you wish to
input characters, you must be in the ‘T9’ mode (e.g. Phone Book,
Message). For detailed information, see the ‘T9’ section in the
Appendix. Press the key to delete a character, If you hold the
key for an extended period of time, all characters on the screen
will be deleted.
28
Page 30

Basic Functions
Speed Dialing
Making an international call
Making an emergency call
Missed calls
Phone Book shortcut
Last number dialled/received/missed
Call waiting
During a call (Options during a call)
T9 GUIDELINE
29
Page 31

SPEED DIALING
SPEED DIALING
There are two ways to make a call from the idle screen. The general
method is to dial the destination number and press the key; the
other is to use the Speed Dial function. The Speed Dial allows you
to make a call quickly without dialing the actual phone number. If
the index number which is allocated to each phone number saved
in the Phone Book is within the range of 2~9, simply press and hold
the index associated with the phone number that you wish to call.
Or you can enter key and then the number key that
corresponds with the index number, and then press to call the
number. If the index number is within the range of 10~99, enter th
two numbers of the index with the number key and then press the
key. Then the phone will attempt to call the phone number
associated with the two-digit index number.
For example, if the index number is
index shown in the Phone Book. Or you can enter and keys
and then press to call the number. If the index number is 34,
press the number keys and , and then press the key.
The range of index numbers available for Speed Dial is 2 to 99.
key is the hot key for Voice mail.
, simply press and hold that
30
Page 32

MAKING AN INTERNATIONAL CALL
MAKING AN INTERNATIONAL CALL
To make an international call, press twice or press and hold
until you see a ‘+’ sign on the screen. Once you see the ‘+’ sign,
dial the destination country number.
MAKING AN EMERGENCY CALL
MAKING AN EMERGENCY CALL
You can make an emergency call by entering the emergency
number and then pressing the
network range, you may make emergency phone calls in any
country regardless of whether you are using an SIM card.
If you miss an incoming call for any reason, a missed call message
will appear on the screen as reminder. To return a missed call,
select ➞ [Call logs] ➞ [Missed calls]. Use the / key to
locate the number you wish to call and press the key to dial.
key. If you are within the GSM
MISSED CALLS
MISSED CALLS
31
Page 33

PHONE BOOK SHORTCUT
PHONE BOOK SHORTCUT
You may move directly to the Phone Book menu from the idle
screen by pressing the key of navigation. You can also store a
phone number(s) in the Phone Book by dialing the number on the
idle screen, pressing and holding the key.
LAST NUMBER DIALLED/RECEIVED/MISSED
LAST NUMBER DIALLED/RECEIVED/MISSED
In order to view the list of recently made or received calls, press the
key. If you wish to make a call to one of the numbers on the
list, use the / key to select the number. Press the key to
make the call. If you press the key, information on the selected
number will be displayed.
32
Page 34

CALL WAITING
CALL WAITING
(A subscription with your Network Service Provider is needed to
use this service. Please check with your Network Service Provider
before using this function.)
On an incoming call, press the
following call options.
[MENU]
1. Answer: Accepts an incoming call.
2. Reject: Ends an incoming call without accepting it.
3. I am busy: Makes the message “I am busy” be heard to the caller
without accepting an incoming call.
If another call comes in while you are on the phone, you may
choose from the three options.
Press the key to reject an incoming call.
Press the
incoming call.
key to hold an active call and connect to the
key to select one of the
33
Page 35

DURING A CALL (OPTIONS DURING A CALL)
DURING A CALL (OPTIONS DURING A CALL)
You may use different call options while engaging in a phone call
by pressing the key.
[MENU]
1. Phonebook
2. Messages
3. Volume
4. Hold
5. End current
6. Mute on
7. DTMF on/off
Each function is described below.
Phonebook: Allows you to access the Phonebook menu during a
•
call.
• Messages: Allows you to access the Messages menu during a call.
• Volume: Allows you to adjust the volume during a call.
• Hold: You may take another call while holding a currently active
phone call.
End current: This function ends the currently active call.
•
• Mute: When activating this function while using your phone, the
recipient will not hear any sounds.
• DTMF on/off: Allows you to set the DTMF tone for On or Off.
34
Page 36

T9 GUIDELINE
T9 GUIDELINE
T9 English
In the T9 English editor, basic usage is the same as
using a computer keypad. For example, to write
‘hello’, type
number represents an alphabet. If you cannot find
the desired word, you can get a list of candidate
words by pressing . To shift between lower case
and upper case letters, press . Press to insert
a period and to insert a space. Use the /
key to navigate through different insert modes. To change to the T9
symbol mode, press and hold . To change to T9 symbol mode,
press and hold key.
where each
Multi-tap English
You can enter special English words such as names,
nicknames, abbreviations, etc. T9 English has a
dictionary function with which you can look up
desired words. As with any other cell phone,
candidate words will automatically show up after
you input the first few characters. You may use the
key to switch between lower case and upper
case letters, and also to move to the T9 mode.
T9 Number and T9 Symbol
This is the mode for entering
numbers and symbols. You can
select symbols from the Select
window.
35
Page 37

MEMO
MEMO
36
Page 38

Menu functions
Menu Type
There are two types of menus: the basic menu and
‘My Menu’. If you wish to use the main menu, press the
key. If you wish to use the My Menu option, press the
left NAVI key.
Messages
Call Logs
Sound
Settings
Net Services
Organizer
Fun & Tools
STK
37
Page 39

MESSAGES
MESSAGES
SMS/EMS
EMS (Enhanced Messaging Service) is built upon SMS (Short
Message Service) technology. You can add pictures, animations,
melodies and emoticons to a text message and designate text
properties through EMS.
➨ ➨
Before getting started
First, check whether the service center number is set up. This
number is usually provided by your service provider and stored in
the SIM card.
MENU]
[
1. Create
2. Inbox
3. Outbox
4. Archive
5. Settings
6. Used space
• Create: Write new messages.
•
Inbox: Displays the list of received messages.
• Outbox: Displays the list of messages waiting to be sent.
Archive: Displays the list of messages stored in the phone
•
memory.
• Settings: See ‘Detailed Functions of Settings.’
•
Used space: Displays the current status of SIM.
(Total capacity of SIM memory, number of messages stored,
number of messages unread)
38
Page 40

MESSAGES
MESSAGES
Detailed functions of settings
[MENU]
1.Message center
2.Message lifetime
3.Message format
• Message center: Allows the URL of proxy relay or allows MMSC
to be set.
• Message lifetime: Adjust the lifetime of messages
(1 hour ~ 6 months).
Message format: Determine the message format (Normal, Fax,
•
Voicemail, ERMES, National paging, X.400, Internet)
Detailed functions of Used Space
1. Capacity
2. Used records
3. Unread records
•
Capacity: Displays the amount of storage space in SIM memory
• Used records: Displays the number of messages stored in SIM
memory.
Unread records: Displays the number of unread messages.
•
39
Page 41

MESSAGES
MESSAGES
Inbox, Outbox, Archive messages
Inbox
1
Choose the “Inbox” menu and press the key to display
the list of messages in the Inbox. Messages are shown with
the caller number and the corresponding name in the Phone
Book, if available.
2
To select a message, choose an item from the list and press
the key.
3
The chosen message appears on the screen. If the message
contains an item, put the cursor behind the item. If the item
is an animation, it will start to move. If it is a melody, you
will hear sound.
4
Press the key for menu options. You may choose from
“Edit”, “Delete”, “Forward”, “Text Reply” and “Voice call”.
Outbox
1
Choose the “Outbox” menu and press the key to display
the list of messages in the Outbox.
2
Choose an item from the list and press the key.
3
When the chosen message is displayed on the screen, press
key.
the
4
Choose from “Edit”, “Delete” and “Forward” menu options.
40
Page 42

Archive
1
Select the “Archive” menu and press the key to display
the archive list.
2
Select the stored message, the data size will be displayed
under the message. And press menu key.
You may choose from the “Info”, “Delete” and “Rename”
3
menu options that appear.
MESSAGES
MESSAGES
If you press the
4
the contents of the message.
key from the “Archive” list, you will see
Inbox and Outbox menu
[MENU]
1. Edit
2. Delete
3. Forward
4. Text Replay
5. Voice call
Edit: Edit received and sent messages.
•
Delete: Delete a message.
•
• Forward: Forward a received or sent message to another person.
Text Reply: Write and send a new message with the sender’s
•
number set as the default.
Voice call: Make a call to the sender’s number.
•
41
Page 43

MESSAGES
MESSAGES
Archive menu
[MENU]
1. Info
2. Delete
3. Rename
Info: Displays the type of message (SMS/EMS), saved date and
•
time, and data size.
•
Delete: Delete messages stored in the Archive.
• Rename: Rename a message.
Creating/Sending/Storing a message
Creating a message
1. Choose the “Create” option and press the
key.
2. While creating a message, you can choose
“Insert Items” by pressing the key.
3. From “Insert Items,” you may choose from
Picture/ Animation/ Melody/ Message/
Emoticon.
4. “Predefined” and “Load” will be displayed on the screen.
5. Use the key to choose an item and press the key. The
chosen item will be loaded.
Predefined: Loads items stored in your phone memory. (This
•
does not appear on Picture/Message.)
• Load: Loads the items that you stored in the file system.
File size limit for EMS files
• Picture: 16*16(pixel), 32*32(pixel)
• Animation: 8*8(pixel), 16*16(pixel)
•
Melody: 128 byte
42
Page 44

MESSAGES
MESSAGES
File extension names available for EMS items (for Load)
• Picture: *.wbmp
Animation: *.awb
•
• Melody: *.imy
Text style
You may change the properties of text messages.
1. Press the key while creating a message.
2. Choose “Text style” and press the key.
3. You can choose from Underline/Bold/Strikeout.
(Note: This feature is not applicable to Chinese languages.)
T9 options
See the Appendix on how to use the Editor.
Sending the message
1
After writing the message, press the key.
2
Choose “Send” and press the key.
3
You may input the recipient’s phone number or retrieve the
number from the “Phone Book” via the option.
4
After inputting the destination phone number, press the
key to send the message. You will see a sending animation
and the transmission progress (e.g. 1/3) on the screen.
43
Page 45

MESSAGES
MESSAGES
Storing messages
Storing messages in the SIM card
Press the key after writing a message.
1
Once “Saving message ➞ Message saved” appears on the
2
screen, the message will be saved to the SIM card.
Storing messages in the handset
1. Press the key after writing a message.
2. Select “Archive” and press the key.
3. Select “Save” and press «Save here» to input a filename for your
message.
4. The message will be stored in the handset once you press the
key.
Receiving a message
When you receive a message, you will be alerted by a bell sound,
and a “received message” animation will run on the screen.
The number of messages received will then be displayed on the idle
screen. (If you receive messages with multiple pages, the alert will
sound when the last page is received.)
Messages stored in the SIM card
Received messages are stored in the SIM card. If the memory is full,
you can no longer receive messages. In such a case, an icon
indicating that SIM memory is full will be displayed on the idle
screen. You can receive more messages by deleting stored
messages.
44
Page 46

MESSAGES
MESSAGES
Storing messages with attached files
You may store Picture/Animation/Melody/Message/Emoticon in the
phone memory if the received message contains them. (Only userdefined items are possible.)
1. Place the cursor behind the item while you check the message.
2. Press the key to set the file name and directory.
3. The message is stored in phone memory.
4. Stored items may be sent by going through the following steps
under the ‘Create’ option: [Insert item] ➞ [Picture/Animation/
Melody/Message] ➞ [Load].
Page limit in “Create”
The maximum number of pages allowed for each message under
the “Create” option is 7 pages.
Every time a page is completed, a popup (e.g. SMS1) appears.
- Maximum words allowed per text-only message
English
153 characters * 6 pages + 1(input of the 7th page) = 919 characters
Chinese
67 characters * 6 pages + 1(input of the 7th page) = 403 characters
45
Page 47

MESSAGES
MESSAGES
MMS
MMS stands for multimedia messaging system that can send files
taken from the digital camera, downloaded image files and sound
files. The file limit for each object is 32KB, and the total message
limit is 64KB.
➨ ➨
Menu structure
MMS
Create : Creates and sends new messages.
Inbox : Displays received messages.
Outbox : Displays a list of messages to be sent.
Drafts : Displays a list of incomplete messages.
Sent : Displays a list of messages sent.
Archive : Shows stored messages.
Templates : Shows a list of templates that can be applied when
writing new messages.
MMS Settings
- Save messages : You can decide whether or not
you will store all messages in the Sent mailbox.
- Delivery receipts : Use this function to check if a
sent message has been delivered to the recipient,
or to determine if you will send a Delivery Report
demanded by an incoming message.
-
MMS center : Sets the address of the MMS center.
- WAP Profile : Sets the configuration of the WAP
profile used when receiving or sending MMS
messages.
MMS life time : Determines the lifetime of MMS
messages.
46
Page 48

MESSAGES
MESSAGES
- MMS download :
Automatic : New messages are downloaded onto the background
as soon as they are received, and you receive notification when
the download is complete.
On read: New messages are downloaded when you open the
file.
-
Spam filter: Sets a spam filter for MMS messages
that are set as “Advertisement”.
Off: Receives all MMS messages.
Prompt if spam: Asks your permission before
downloading spam messages.
Reject spam: Rejects all spam messages.
Writing and sending multimedia messages
A new message may be written by selecting the “Create” option.
Once you select this option, the screen displays the first page of an
MMS message.
Along the top of the message screen is a status bar that shows the
information and status of the message. This bar also shows whether
the current page of the message contains sound, and the message
size and page number of the message you are reading.
1. Select MMS from the Message menu, scroll to “Create” and press
the key.
2. Write your message. For example, you may write “Hello world”.
47
Page 49

MESSAGES
MESSAGES
3. You may attach, change, or delete image or sound objects to the
message. Using the key enables you to use the following
menu options.:
Add picture: To insert an image, press the key and select
“Add picture”. Select a picture file (*.bmp, *.jpg, *.gif, *.png)
from the list, and press the key.
- Add photo: To insert an image file stored by the camera, press
the key and select “Add photo”. Select a picture file (*.jpg)
and press the key.
- Add sound: To insert a sound file, press the key and select
“Add sound”. Choose the desired sound file (*.imy, *.mid,
*.mmf) by pressing the key.
Change picture/photo/sound: To change an object already
inserted, press the key and select “Change picture”,
“Change photo” or “Change sound.” Select and change the
desired file.
- Apply template: You may reorganize your current message by
using stored templates.
Add page: To add a new page, press the key, and select
“More” and then select “Add page.”
- Delete objet: To delete an inserted object, press the key and
select “Delete object”. Select the object you wish to delete and
press the key.
48
Page 50

MESSAGES
MESSAGES
4. Adjust the object properties of inserted images
and sounds.
Object properties: press the key and go
-
through the following steps Select “More” ➞
“Object properties” ➞ desired object (image,
sound). Then press the key. This function
allows you to set the time for displaying a sound
or image once the text message appears on the
screen, or the extent of time the sound or image will be
displayed
5. Adjust page properties.
Page property ➞ Page layout : Press the key
and select “More” ➞ “Page properties” ➞ “Page
layout”. You can choose whether you will
position the image or text on top of a message.
Page property ➞ Displayed for: Press the
key and select “More” ➞ “Page properties” ➞
“Displayed for”. You can set the length of time
each page will be displayed before going on to the next page.
6. To check if a written message will be correctly
displayed, press the key and select “Preview”.
If the contents of the message are displayed
correctly, press the key ➞ “Done”.
7. When the address option menu appears, scroll to
“TO” and press ‘ok’ key in order to select the
phone number of a recipient. Press the key
to select the number from the Phone Book or
directly enter the number. When the number is entered, moved
to “Add address” and press the key to exit.
49
Page 51

MESSAGES
MESSAGES
8. Move to “Subject” and enter the message title.
9. For additional configuration of message
properties, select “More” and set the priority level
to “Normal”, “High”, or “Low”.
10. If a message has been written, you can either
send it right away or send it later by saving it.
To send it immediately, select the “Send” option.
To save it so that you can send it later, select the
“Send later” option.
Receiving Messages
When a new MMS message has been received, the message alert
function is activated, displaying a new message icon on the idle
screen.
1. Select “MMS” from the message menu, move to “Inbox” and
select the message by pressing the key.
2. The message will begin downloading with the display of a
receiving screen.
3. Once the download is complete, the message will be displayed
on the screen.
Read Message and its functions
1. Choose a message box (Outbox,Inbox).
2. Choose the message you wish to read and press the key or
press the key and select “Read”.
3. Press the key and choose “Select.” This option has the
following functions.
50
Page 52

MESSAGES
MESSAGES
- Play: Displays an image or plays a sound file attached to the
current page. (This function is activated only if there are 2 or
more pages.)
Play from start: Displays an image or plays a sound file starting
from the first page. (This function is activated only if there are 2
or more pages.)
- Step forward a page, Step back a page: Moves to the previous
or next page depending on the option you choose. On your
handset keypad, you may perform this function by using the
/ keys.
Edit: Edits the current message.
Delete: Deletes the current message.
-
- Reply: Writes a reply message.
-
Move to: Moves a message to a desired message box.
- Forward: Sends received mail to a third party.
Archive: Moves a message to the Archive.
-
- Save as template: Saves the current message as a template. You
may apply the saved template when writing a new message.
Object: Saves all objects included in a message.
-
- Details: Shows detailed information of a message.
Storing message objects
1. Select a message box.
2. Select the message you wish to read and press the key, or
press the key and select “Read.”.
3. Press the key and select “Object”.
4. Select an object you wish to store and press the key.
5. Edit the file name to be stored and press the key to save.
51
Page 53

MESSAGES
MESSAGES
Deleting a message
1. Choose a message box.
2. Choose the message to be deleted and press the key.
3. Select “Delete.”.
Moving a message
1. Choose a message box.
2. Choose the message to be moved and press the key.
3. Select “Move to” to move the mail to the desired message box.
Editing a message
1. Choose a message box.
2. Choose the message to be edited, press the key and select
“Edit.”
3. Follow the steps for writing a message.
Voicemail
➨ ➨
[MENU]
1. Call
2. On
3. Off
4. Settings
You can connect to the voice mailbox provided by your network
service provider and listen to your voicemail messages. If you select
the “Call” option, the phone will automatically dial the designated
number for your voice mailbox.
52
Page 54

MESSAGES
MESSAGES
Each option is described below.
Call: Makes a call to the pre-defined voice mailbox system to
•
receive voicemail.
• On: Makes a call to your voice mailbox to activate voicemail
service.
Off: Makes a call to your voice mailbox to disactivate voicemail
•
service.
• Settings: See the “Settings” section below.
Settings
1. Box numbers
Sets Home Mbox / Roam Mbox / Voice no./
Message no./ Disable no. / Enable no.
respectively
2. Sets the voicemail alert by call to inform you of
voicemail arrival
3. Sets the voicemail alert by SMS to inform you of
voice mail arrival
4. Alert match-Sets the message to be displayed when a voice mail
arrives.
Cell broadcasts
➨ ➨
Read info
You can read cell broadcast messages sent by your
network service provider.
53
Page 55

MESSAGES
MESSAGES
Settings
Enables you to select preferred topics and
languages.
Language
You can specify the language of the message.
You may also add new languages or delete existing
ones.
1. Insert: This function is used when you add a new language.
Newly added languages are displayed at the top of the language
list.
2. Add to End: Same as “Insert,” except newly added languages are
displayed at the bottom of the language list.
3. Delete: Deletes a language from the language list.
Set Info
You can set message topics.
1. Create subject: Use this function to add a new subject to the
current subject list. You may add, edit or delete a subject by
pressing the key from the listed subjects.
2. Current list: Shows the currently stored subject list. You may add
or delete a topic by pressing the key from the listed subjects.
You may choose up to a maximum of 2 subjects from the current
list.
For more information, contact your network service provider.
54
Page 56

CALL LOGS
CALL LOGS
With this function, you can maintain received calls, dialled calls,
missed calls, clear logs, call info, GPRS info.
Received Calls
Displays the list of received calls and has the
following sub-functions: edit, view call logs, add to
P-Book, send SMS and delete.
➨ ➨
Dialled Calls
Displays the list of outgoing calls and has the following subfunctions: edit, view Call logs, add to Phone Book, send SMS, and
delete.
➨ ➨
55
Page 57

CALL LOGS
CALL LOGS
Missed Calls
Displays the list of calls you’ve missed and has the following subfunctions: edit, view call logs, add to Phone Book, send SMS, and
delete.
➨ ➨
From the Call Logs screen, scroll to the desired list and press the
key. If there is nothing saved in the list, the phrase “List Empty” will
appear on a guidance window for approximately two seconds
before returning to the previous window state. The sub-menu (popup menu) of the above list will appear when you press the key.
If you wish to delete the contents of the list, select the “Clear logs”
function.
• SEND OPTION: If you wish to make a call to a number in the
phone number list, scroll to the desired phone number and press
the key.
•
MENU OPTION: You may use the following sub-options under
the phone number selected by using the scroll bar.
• EDIT:
You may use the “SEND OPTION” after editing the
selected phone number by using the / keys. (This function
is used only for received calls/ dialled calls/missed calls’)
• VIEW CALL LOGS: If you wish to see detailed information on
the selected phone number, press the key after scrolling to
the desired phone number. Otherwise, press the key after
pressing the key to display the pop-up menu and scrolling to
“View call logs.” To close the log window, press the key
and you will return to the previous phone number list.
• ADD TO P-BOOK: To save a phone number to the Phone Book
by using the "Add to P-Book" function, scroll to the phone
number to be saved and press the key to display the pop-up
menu. Select the "Add to P-Book" option, and press the key.
The number after selecting the type, it pressing the key or
number key {1 is home, 2 is mobile, and 3 is office} press. This
will enable you to use related functions. The phone numbers
already saved will not appear in the pop-up menu.
56
Page 58

CALL LOGS
CALL LOGS
• SEND SMS: To send an SMS message using the number in the
phone number list, scroll to the desired phone number, and
press the key, scroll to "Send SMS” and press the key.
This will enable you to perform related functions.
- While or prior to performing a function, pressing the
will take you to the idle screen, and pressing the key will
take you to the previous screen. After display of the “pop-up
menu upon pressing the key,” the menu will disappear if
no key is pressed for ten seconds.
key
Clear Logs
Deletes received, dialled, or missed calls data, or the entire call list
(select “All calls”).
➨ ➨
57
Page 59

CALL LOGS
CALL LOGS
Call Info
➨ ➨
Call costs
Records call costs. The maximum cost of a call can be set to avoid
overcharge.
➨ ➨ ➨
Last call
Displays the cost of the last call.
All calls
Displays the costs of all calls. You can clear logs with PIN2
authorization.
Clear logs
Clears all logs of call costs after you enter PIN2.
Cost units
Read the defined unit or set the unit of cost in the service area. You
may select from the following two options:
Read units: Read cost units.
•
• Set units: Set the current cost unit and cost per unit.
Max cost
Set the maximum value of a defined call cost via PIN2
authorization.
This function has the following two sub-options:
•
Read limit: Read the maximum limit of a unit.
• Set limit : Set maximum units.
58
Page 60

Call timers
Records calling airtime.
➨ ➨ ➨
Last call
Displays the airtime of the last call.
Dialled calls
Displays the airtime of the Dialled calls.
Received calls
Displays the airtime of the Received calls.
All calls
Displays the airtime of all calls.
Reset call time
Resets the time recorded for Last Call or All Calls.
CALL LOGS
CALL LOGS
59
Page 61

CALL LOGS
CALL LOGS
GPRS Info
➨ ➨
Current connection
Shows, in kilobytes, the current volume of data sent
and received via GPRS.
All connections
Shows, in kilobytes, all data sent and received via GPRS.
Last connection
Shows, in kilobytes, the volume of the most recent data sent or
received via GPRS.
Clear logs
Clears the logs related to GPRS.
60
Page 62

SOUND
SOUND
You may set tones for ringing, messages, keys, flip opening, etc.
Ringing Settings
➨ ➨
Ring type
• Ringing tone: Operates the sound selected from
Melody, Bell Sound, Voice Sound, Natural Sound,
and My Melody.
•
Vibration: Operates only in vibration mode.
• Vib then Ring: Vibrates and then rings.
Vib and Ring: Vibrates and rings simultaneously.
•
• Ascending: The ringing volume keeps rising.
None (Quiet): Only the lamp flashes without any sound or vibration.
•
Melody type
There are five types of ringing tones: Melody, Bell Sound, Voice
Sound, Natural Sound, and My Melody. Each of them has several
different melodies.
You can insert up to 5 different melodies in My Melody. You can
set these melodies as follows: [7. Fun & Tools ➞ 2. Downloaded ➞
3. Melody ➞ ➞ “Set as ringtone”]. Please note that you can
delete the melodies only through the [3.1 Ringing Settings]. When
the melody type is My Melody, if you scroll to the melody name
below My Melody, a hidden menu will appear. At this time, select
and then “Delete” to delete the melody.
Ringing Volume
There are 8 different volume levels (0~7) available for volume
adjustment.
61
Page 63

SOUND
SOUND
Message Alert
➨ ➨
• Select mode: Once/Every 2 mins/Every 5 mins/
Off. If you select Every 2 mins/Every 5 mins, the
message tone will ring every 2 mins/5 mins if a
message has not been checked.
• Tones: You can choose a message alert tone
among three tones: Bell 1/Bell 2/Bell 3.
•
Volume: There are 8 different volume levels (0~7) available for
volume adjustment.
Key Tone
➨ ➨
• Settings: On and Off functions of the Key Tone.
• Tones: DTMF/Voice/Bell 1/Bell 2 /Bell 3 /Bell 4
/Bell 5/Beep.
The Key Tone is applied to number keys ‘ ’ key
and ‘ ’ key.
The ‘Voice’ and ‘Bell 1’ options work only on the idle screen.
•
Volume: There are 8 different volume levels (0~7) available for
volume adjustment.
62
Page 64

SOUND
SOUND
Flip Open Tone
➨ ➨
• Settings: On and Off functions of the Flip open
tone.
• Tones: Bell 1/Bell 2/Bell 3 This is the melody that
rings when you open your phone flip. (There is no
melody when you close the phone flip.)
•
Volume: There are 8 different volume levels (0~7) available for
volume adjustment.
Sound Effect
➨ ➨
Connection/Minute minder/Disconnection/Area
alerting /On & Off melody/Menu moving This
function provides a melody option for the selected
item(s). (one melody)
63
Page 65

SOUND
SOUND
[Operating Method]
- Bell/Vibration/Volume
From the Sound Menu, select Sound Setting.
Select Bell/Vibration/Volume by using the / / / key.
Press the key to save the selected item.
If you do not wish to save, press the
menu.
( : exits to the previous stage. : exits to the idle screen.)
or key to exit the
- Message Tone Setting
Select the Message Alert menu.
Select Mode/Tone/Volume by using the
Press the key to save the selected item.
Once: operates only once Every 2 mins: operates every two
minutes Every 5 mins: operates every five minutes. If you do not
wish to save, press the or key to exit the menu.
(
: exits to the previous stage. : exits to the idle screen)
/ / / key.
- Key Tone Setting
Select the Key Tone menu.
Select Setting/Tone/Volume by using the
Press the key to save the selected item. If you do not wish to
save, press or key to exit the menu.
( : exits to the previous stage. : exits to the idle screen)
For the Key Tone function, the changed tone applies only to
number keys.
/ / / key.
64
Page 66

SOUND
SOUND
- Flip Open Tone
Select the Flip Open Tone menu.
Select Setting/Tone/Volume by using the
Press the key to save the selected item. If you do not wish to
save, press the or key to exit the menu.
( : exits to the previous stage. : exits to the idle screen.)
Flip Open Tone: the tone that rings when you open the phone
flip.
/ / / key.
- Sound Effect
‘Connection’ is the tone that is connected to making an
outgoing call. ‘Minute minder’ is a one-minute alert tone.
‘Disconnection’ is the tone that rings when an outgoing call is
disconnected. ‘Area alerting’ is the tone that rings when you are
out of the service area. ‘On & Off melody’ is the tone that rings
when you turn your phone on or off. ‘Menu moving’ is the tone
that rings when moving among the menus. The / key
allows you to select each item within the menu. Use the /
key to select Set/ Unset. Use the key to save changed
contents. If you do not wish to save, press the or key to
exit the menu.
( : exits to the previous stage. : exits to the idle screen.)
65
Page 67

SETTINGS
SETTINGS
This menu allows you to check or edit functions related to the
screen, date, time, etc.
Display
➨ ➨
Visual Setting
➨ ➨ ➨
Screen Setting
➨ ➨ ➨ ➨
You may set any image shown below.
Idle screen
image
66
Power On
screen image
Power Off
screen image
Page 68

SETTINGS
SETTINGS
MTcall screen
image
You can change the image to fit a specific situation by moving to
the desired situation, using the key to move the Select bar
downward, and using the / key again to select the desired
image. If you do not wish to change the image setting, press the
or key to exit the menu.
MOcall
screen image
Dialing
screen image
Screen Option
➨ ➨ ➨ ➨
You can select three different screen options in this menu.
Screen option: Select the display options for the idle screen.
Display string: Change the text string displayed on the idle screen.
Font color: Change the font color.
Move to each item using the
/ key.
- Screen option
Use the / key to select one of the four idle
screens.
Normal image: Displays the image set in the
Screen Setting menu.
Analog clock: Displays the analog clock screen.
Calendar: Displays the calendar as the
background.
67
Page 69

SETTINGS
SETTINGS
User define image: Sets an image taken from your cell phone
camera or downloaded from the Internet as the background. This
option can be set in the [Camera], [Album], [Fun&Tools], and
[Download] menus.
- Display string
Use the / key to choose one of the three text string types for
the idle screen.
Time & Date: Shows the current date and time. To change the
display setting, follow these steps: [setting]-[Date & Time][Display].
Greeting: Shows a greeting message input by the user. To set the
greeting message, follow these steps: [setting]-[display][greeting].
D-day: Displays the D-day schedule. To enter the D-day
schedule, follow these steps: [organizer]-[scheduler]-[menu key][View all event]-[menu key]-[On D-day]
- Font color
You can change the colors of all texts used in your handset.
The colors available are: default color, red, blue, green, and dark
gray.
PW OnOff Screen
➨ ➨ ➨ ➨
In the album, you can set the animation of pictures
taken by a camera as a Power On or Power Off.
This setting will be automatically set as a User
Defined img. If you choose a normal image from the
current menu, the built-in animation will be displayed.
68
Page 70

SETTINGS
SETTINGS
Greeting
➨ ➨ ➨
Once the Greeting function is set, the greeting message is displayed
instead of an animation every time the handset is turned on. This
message can be used in the idle screen as well. To set the message,
follow these steps: [setting]-[display]-[visual setting]-[screen
option]-[display string]-[greeting].
Backlight
➨ ➨ ➨
Sets the backlight level for the Main and Sub-LCD.
Use the / key to scroll to a particular item
and the / key to adjust the level.
• Light Level: Indicates the level of brightness of the
backlight when it is turned on. There are
four levels that can be set. (Off, Low, High, Maximum)
Minimal Brightness: Set the brightness of the backlight when the
•
Light Duration expires. This cannot be higher than the current
light level and, like the Light Level, there are four different levels.
(Off, Low, High, Maximum)
• Light Duration: The backlight light level of the handset is
automatically changed to the set level in Minimal Brightness
when no entry is made within the set time. (Always off, 5 sec,
10 sec, 20 sec, Always on)
69
Page 71

SETTINGS
SETTINGS
Date & Time
➨ ➨
Set Time
➨ ➨ ➨
Input the desired time and press the [ key to set the current time.
If the time is set to a 12-hour format, press the ‘*’ key in your
handset to convert between am and pm modes.
Set Date
➨ ➨ ➨
To set the current date, using Navigation key move
the select box to the desired date and press the
key. Press or to switch to a different month.
70
Page 72

SETTINGS
SETTINGS
Set Time Zone
➨ ➨ ➨
Select the desired time zone and press the key to
edit the current time and save it as the current time.
Display
➨ ➨ ➨
You can set the time display format for your handset.
• Time format: Press the / key to change
between the 12-hour format and 24-hour format.
Date format: You can change the date display
•
format to D:M:Y, M:D:Y, or Y:M:D.
• Display: You can set the time-related display.
Choose between Time Only, Date Only, and Date & Time.
71
Page 73

SETTINGS
SETTINGS
Language
Sets the language to be used in your handset. Scroll to the desired
language in the language list and press the key to be being
using the language.
➨ ➨
<Information> If you choose ‘Automatic’, the settings will change
to the setting fixed in your SIM.
Reset Settings
➨ ➨
You can use this function to set all of your saved data as default
values. From ‘Reset settings,’ enter the handset password and press
the key when ‘Restore factory settings’ appears on a separate
screen. This will make save all values saved in the handset as
default values, and the handset will be rebooted automatically.
72
Page 74

SETTINGS
SETTINGS
Information
➨ ➨
Own Number
➨ ➨ ➨
This function allows you to input, save, and edit
your own phone number. If no phone number has
been saved, the ‘List Empty’ screen will appear.
If you press the key at this stage, the Edit screen
will appear to allow you to edit phone numbers.
Once the numbers are entered and saved, they will
be available from your handset.
If you already have a phone number saved, press the key and
select one of the following functions.
[You can save only two numbers]
• Edit: Edits saved numbers.
Add: Adds new numbers.
•
• Delete: Deletes saved numbers.
<Information> You can save up to two Own Numbers.
Software Version
➨ ➨ ➨
Allows you to check the software version of your handset.
73
Page 75

SETTINGS
SETTINGS
Auto Power Alarm
➨ ➨
If an alarm is set on the auto power alarm on/off
function and your phone is turned off, the alarm will
ring automatically at the moment your phone is
turned on at the time designated by the alarm. After
the alarm, the handset power will be automatically
turned off.
Answering machine
➨ ➨
A unique feature of Pantech mobiles is the
Answering Machine function, by which a user can
record up to 10 messages. The user can also
overhear the recording and can choose to accept or
reject the call.
To access answering machine press
➞ ➞
Settings
➨ ➨ ➨
Settings:
You can turn on or off the answering machine by
selecting this button. Press the right or left key to
change between the On and Off. When the
answering machine is activated, a “mike” icon
appears on the idle screen.
74
Page 76

SETTINGS
SETTINGS
Response Time:
You can set the response time before which the answering machine
becomes activated. One can choose a response time of 3 secs. 5
secs. or 10 secs.
Response Message:
You can choose between a set of 3 predefined messages and one
user defined message as their choice of response message, when an
incoming call is received.
• Absent: “I am not available right now, please leave a message
after the tone.”
•
Meeting: “I am in a meeting right now, please leave a message
after the tone.”
• Driving: “I am driving right now, please leave a message after the
tone” User message is a message that the user can record by
themselves. The next menu explains this.
Recording
➨ ➨ ➨
By selecting this key, one can record messages of their choice to be
played on the answering machine. Press button to start
recording, by speaking clearly into the mouth piece/ microphone.
Maximum recordable time is 15 secs. Once a message is recorded,
User Defined Message is automatically selected as the Response
Message.
75
Page 77

SETTINGS
SETTINGS
User message
➨ ➨ ➨
Select this key to hear the recorded message. Press
button to hear the recorded message. In case the
user wishes to delete the recording, press key
and select “Delete”. Message can be re-recorded by
selecting the “Recording” key again. If message is
deleted, the answering machine is reset to “absent” mode.
(“I am not available right now, please leave a message after the tone”)
Recorded message
➨ ➨ ➨
This key is selected to hear all recorded messages.
To listen to the recorded messages, select the
recorded message by moving the down/up arrow
key and press button on the selected message.
To delete the recorded message, press button
and select “Delete”. A maximum of 10 messages
can be recorded in the answering machine. The answering machine
will not work when full capacity is reached
(10 messages). Users can listen to the message being recorded by
hearing into the ear-piece and can connect to the call any time
during the recording by pressing the button.
Whenever a message is recorded, a “Recorded Message” sign giving
the number of recorded messages is displayed on the sub-LCD. When
flipped open, the main LCD gives the same display. To view the
Recorded message, press
A “Audio-cassette” type icon appears on the idle screen, in case there
any unread/unheard messages among the recorded messages.
key.
76
Page 78

SETTINGS
SETTINGS
Pantech phones have also developed a unique feature by which a
voice call or a SMS message can be made to the person who has
left a message. To access this function, select the recorded message
to which the voice call/SMS needs to be made, then press
button and select “Call” or “Send message”.
Shortcut
In idle screen, press the side volume key (short press) to access
the answering machine function.
When the answering machine is activated, users can connect to an
incoming call any time while ringing or while recording by pressing
the
button.
Voice LED
➨ ➨
The outside LED glitters according to the level of human voice
during a call.
•
On: Uses the Voice LED function.
• Off: Clears the Voice LED function
77
Page 79

NET SERVICES
NET SERVICES
Divert Calls
➨ ➨
Divert calls: You can forward your incoming calls to
a preset number.
All Calls
➨ ➨ ➨
Divert all calls: You can forward all voice calls, data received, fax,
and message services to another number.
On
This sets the “Divert Calls’s” option for all incoming calls.
If you select ‘On’, a screen will appear asking you for the number to
forward to. After entering the number and pressing the key.
Off
Cancels the setting for the “Divert all calls” function.
Status
Displays the status of the current setting.
By Service
You can divert all services , make an individual setting for each
service , or choose all services except messages .
78
Page 80

NET SERVICES
NET SERVICES
When Busy
➨ ➨ ➨
Diverting calls when busy: This forwards incoming
calls to another number set by you when you are on
the phone. You can set this function in the same
manner shown in “Divert all calls”.
On No Answer
➨ ➨ ➨
Diverting calls when there is no answer: This
forwards incoming calls to a different number
designated by you if you do not answer your phone
within a designated time (between 5 and
30 seconds).
When Not Found
➨ ➨ ➨
Diverting calls when out of range: This forwards
calls to a number designated by you if you are out
of the network service area.
You can set this function in the same manner
shown in “Divert all calls”.
79
Page 81

NET SERVICES
NET SERVICES
Cancel All
➨ ➨ ➨
Cancels all current settings for diverting calls.
Call Settings
➨ ➨
Call settings: Sets all additional options available for use when
making or receiving calls.
Answer Type
➨ ➨ ➨
Answer type: Sets the method for answering
incoming phone calls.
Flip open
Answer the phone by opening your phone flip.
Send key
Answer the phone only by pressing the key.
80
Page 82

NET SERVICES
NET SERVICES
Any key
Answers the phone by pressing any key except the and keys.
Auto answer
Automatically answer an incoming phone call after 10 seconds.
Call Waiting
➨ ➨ ➨
Call waiting: This function lets you know if you
receive an incoming call while you are on the line.
Caller Number
➨ ➨ ➨
Caller number: Displays the phone number or
name of the calling or called party. This function
is dependent on whether or not you are subscribed
to Caller ID service and also the settings of the
caller.
•
Show caller no.: It shows my number in the counterpart.
• Hide your no.: It hides my number in the counterpart.
(Network dependent)
•
Show called no.: It shows the number calling to me.
(Network dependent)
• Hide if called: It hides the number calling to me.
(Network dependent)
81
Page 83

NET SERVICES
NET SERVICES
Automatic Redial
➨ ➨ ➨
Automatic redial: In the case of call drop when you attempt to
make a call, the number will be automatically redialled 2 to 4
times. You cannot set the number of attempts to be made.
Network Settings
➨ ➨
Preferred N/W
➨ ➨ ➨
Setting to the preferred network: You can view the list of networks
available to you. Press the key and you will see the following
sub-options.
• Insert: Inserts your preferred network to the top of the list.
•
Added to end: Adds the network to the end of the list.
• Delete: Deletes the selected network item.
Your phone provides the profiles of several different service
providers in many different countries. This menu allows you to
select and register service providers of your choice (preferred
network).
82
Page 84

NET SERVICES
NET SERVICES
Add new N/W
➨ ➨ ➨
You can register a new network by the following steps.
• Country code: Enter the country code (3 digits) on the given
screen.
•
Network code: Enter the code (2 digits) of the network you wish
to use.
• Enter name: You must enter the name of the network manually.
This menu also has the following sub-menus.
•
Add: Adds a new N/W.
• Change: Allows you to edit the contents of a network item.
Delete: Deletes the selected network item.
•
In the “(1) Preferred N/W” items, use this menu to add a service
provider other than those already stored.
N/W selection
➨ ➨ ➨
This function allows you to prepare a list of network
providers and select the preferred network provider.
Automatic
Automatically selects the network.
Manual
Allows you to select a network of your choice.
83
Page 85

NET SERVICES
NET SERVICES
Change password
➨ ➨ ➨
The network password is available from your network service
provider. It is also used for setting Network Call Barring options and
is not the same
as your SIM card PIN1.
Security Settings
➨ ➨
To continue with this menu, you must first enter
your password (PIN1). If you fail to enter the
correct password three consecutive times, the PIN1
will become blocked and you will return
to the idle mode. Security settings allow you to
block unauthorized personnel from using the phone.
As such, you can bar services if your phone gets lost
or stolen. You can change the passwords (PIN1 or
PIN2) and set or cancel security settings. Such
services include: Call Barring (baring
sending/receiving) and FDN (Fixed Dialing Number).
To change the settings of those services, you must
first enter your PIN2 password.
84
Page 86

NET SERVICES
NET SERVICES
SIM lock
➨ ➨ ➨
• Lock: Allows you to set the function so that PIN1
must be entered before proceeding to the idle
screen once your cell phone is turned on.
• Unlock: Allows you to set the function so that you
can proceed to the idle screen without entering
PIN1.
•
Change PIN: This is a menu displayed when the SIM lock setting
is set to Lock. It allows you to change the PIN1 number at your
discretion.
• Change PIN2: It allows you to change the PIN2 number at your
discretion.
Handset lock
➨ ➨ ➨
You can completely lock the phone by disallowing
any calls when the password is incorrectly entered
at the time the phone is turned on. Once your
phone becomes locked, it cannot be unlocked even
if the SIM card is replaced with another one. You
can, however, use the emergency calls function even
when the phone is locked.
This function has the following sub-menus.
Unlock: Allows you to set the function not to limit calls or access
•
to menus.
Call only: Regular calls are freely allowed, but the handset
•
password must be entered to access menus.
Lock: Only emergency calls are allowed. To access menus or for
•
regular calls, you need to enter the handset password.
•
Change code: Allows you to change the handset password at your
discretion.
85
Page 87

NET SERVICES
NET SERVICES
H/S barring
➨ ➨ ➨
This function offers multiple methods to limit
incoming or outgoing calls. In general, the barring
service is activated while interoperating with the
network, but H/S barring is made by the phone
itself. Major functions are as follows.
Incoming
Rejects all incoming calls. You can set this function by selecting
ON/OFF in the menu.
Outgoing
This function bars outgoing calls. You have three options for this
function. (1) Bar all outgoing calls, (2) Bar outgoing calls for
specified numbers (e.g. with a designated prefix), and (3) Do not
bar. If you select option (2), the bar list is displayed. You can either
set the function here by selecting the entire list or use the pop-up
menus such as ‘add’, ‘edit‘, ‘delete’, and ‘Clear all’ If you attempt to
make a call after setting the barring function, the message “Call
failed/Call barred” will appear on the screen.
86
Page 88

NET SERVICES
NET SERVICES
N/W barring
➨ ➨ ➨
This function is available only if the service provider
provides such a function and you have subscribed
to it. Like the “Divert Calls” service, you can set this
function to the entire basic service group or make
individual settings for each service. You can set
each of the following services to On/Off: (1) All
services, (2) Voice calls, (3) Data, (4) Fax, (5) Messages, and (6) All
except messages. Any attempt to change the settings will require
inputting the handset password.
Foreign calls
Barring of Outgoing International Calls (BOIC): Bars all outgoing
international calls.
Only Local/Home
Barring of Outgoing Calls except those directed to the HPLMN
Country (BOIC-exHC): Only calls to the Home PLMN country are
allowed. Calls to all other countries are barred.
Bar incoming
Barring of All Incoming Calls (BAIC): Bars all incoming calls.
Incoming abroad
Barring of Incoming Calls when Roaming Outside the Home PLMN
Country (BIC-Roam): If you are using the roaming service in a
country other than the Home PLMN, this bars all incoming calls.
Outgoing calls
Barring of All Outgoing Calls (BAOC): Bars all outgoing calls.
87
Page 89

NET SERVICES
NET SERVICES
The call list where the barring will be set is displayed.
Select one item from the call list.
Press the key.
On: Sets barring on a specific call.
•
• Off: Releases the call subject to barring.
•
Status: Shows whether or not the current call has been barred.
Clear all
Deactivates the barring items set through the [1-5] menu. You will
be asked to enter a network password.
Fixed dialing
➨ ➨ ➨
Fixed dial
Fixed Dialing Numbers (FDN) is a service function that allows calls
only to specific numbers of the phone numbers saved in your SIM.
To set/release this function, you are asked to enter the PIN2
password.
Fixed dial list
Displays the phone numbers saved on the FDN list.
88
Page 90

NET SERVICES
NET SERVICES
CUG settings
➨ ➨ ➨
List CUGs
Displays the CUG name list entered by you. Select the CUG name.
Press the
• Add: The newly created CUG name positions itself at the bottom
of the CUG name list.
Edit: Edits the CUG name and index.
•
• Delete: Deletes the CUG name and index.
•
Clear all: Deletes listed CUG names and indexes.
key.
Select
1. Displays the CUG name list entered by you.
2. If you select the CUG name, the CUG is set as your selection.
89
Page 91

ORGANIZER
ORGANIZER
In organizer you can set alarms, record important events, make
notes, use a calculator, use a stop watch function and convert
measures.
Alarm
➨ ➨
You can set alarms to ring for once, or on a daily or weekly basis.
Adding and deleting alarms
Press key ➞ then press key.
Set the alarm time and move down once with the On/Off toggle
bar, and select ON or OFF. In the next scroll bar, you can choose
whether the alarm will ring once, daily or weekly at the alarm time
set in the above.
90
Page 92

ORGANIZER
ORGANIZER
Repetition type: once, daily, weekly
If you choose [once], then it will ring just once on the given Alert
Date and Time. If you choose [daily], then it will ring everyday at the
given time. If you choose [weekly], then it will ring at the given time
on the specific weekends you choose by pressing the direction key
[
].
Selecting the alarm melody
When you press the key from this screen, a popup window will
appear. In this window, select the [Melody] to choose an alarm
melody that you like. If you check the [On Morning Call] option, the
alarm will ring even if your handset is in the <Etiquette Mode>.
You may register up to five alarms.
91
Page 93

ORGANIZER
ORGANIZER
Scheduler
➨ ➨
You may record an important event by setting a short
note and alarms on the calendar. You can move the
<red square> cursor by using the direction keys.
[The above figure shows that an event has been
registered.]
Erasing and adding events
➨ ➨ ➨
Move the <blue square> cursor to the date you wish
to insert an event. Press , and then select [Add
Event]. Or you may press the key, and then
and select [Add Event]
Then you will see the screen shown below. You can
move up or down by using / direction keys.
You can select the options by using the / direction keys.
1. Event: You can choose the type of the event.
(options: meeting, call, restaurant, entertainment,
birthday, travel and others.)
2. Memo: You can access this feature by pressing
any key except: , , , keys.
This allows you write a short note.
3. Time: Records the event time.
92
Page 94

ORGANIZER
ORGANIZER
4. Alarm alert: You can set when the alarm will ring.
(Option: you can choose ‘on time‘, ‘1 hour
before‘, ‘2 hours before‘, ‘1 day before‘ ‘2 days
before‘ or ‘no alerting‘
5. Repeat: You can set how often the event happens,
(Option: once, daily, weekly, monthly, or yearly.)
ex) For a birthday, you may choose ‘yearly’.
6. Press key to set an event alarm melody.
7. Now that everything is set up, press to save
the event.
When a new event is set on a date, it is marked on
the calendar. You can see the event registered on
that date at the bottom of the calendar. Press
see the detail of the events.
➨ ➨
to
93
Page 95

ORGANIZER
ORGANIZER
You can see the pop up menu by pressing key.
Add event: Adds a new event to the selected date.
•
• On d-day: Shows you how many days are left until the event.
Delete and delete all: Deletes one or all of the events registered
•
on the selected day.
• Memory info: Shows the number of events registered.
Seeing all the events registered on the calendar
Press key and select [view all event]
Moving to a specific date
Press key and select [Go to date]
94
Page 96

ORGANIZER
ORGANIZER
Memo
➨ ➨
Allows you to keep short notes on your cell phone.
Press , then you will see the following sub menus.
1. Add: You can create a short note.
2. Delete: Delete the selected note.
3. Delete all: Deletes all notes.
After you are done with the writing, press key to save the note.
From the memo list screen, press key to see the contents of the
selected note. You can keep up to 20 notes.
95
Page 97

ORGANIZER
ORGANIZER
Calculator
➨ ➨
Adding, subtracting, multiplying, and dividing of
decimal numbers are supported. Use the to
select a calculation type, and press to get the
result. Use the key to input a decimal point, and
the key to change a symbol
Example: 6 X 5 / 2 + 2 =
[Keypad ], [Scroll Left], , , [Scroll Right], , , [Scroll
Up], ,
Converter
➨ ➨
In converter, you can convert measures such as length, area,
volume and weight from one unit to another. Basically ‘length’
includes cm, m, inch, feet, yard and mile. ‘Area’ includes sq. m, a,
sq. feet, sq. yard and acre. ‘Volume’ includes cu. cm, cu. m, Liter,
cu. inch, cu. feet, cu. yard, gallon. And ‘weight’ includes g, kg, t,
grain, oz, pound.
Select the measure among length, area, volume and
weight pressing
by using the key, select a calculation unit by
using the key or key. Enter the target value
by using the keypad. Use the key to input a
decimal point.
or . After moving downward
96
Page 98

ORGANIZER
ORGANIZER
Press to go to the bottom. Then press the or key to select
a calculation unit of the measure coverted. When a calculation
value is entered, or every time the calculation unit of measure
changes, the converter generates the corresponding results.
Some units cannot be converted to another units. In such case, the
resulting value becomes “0.” If the values are beyond the
calculation capacity available with the phone, the resulting value
also becomes “0.”
Stop Watch
➨ ➨
You can time an event using the stopwatch
function. Use the [navigation] key to use the
stopwatch function. Press ‘start’ to time an
event, press ‘pause’ to pause timing. Press
‘reset’ to clear the time and ‘wait’.
97
Page 99

FUN & TOOLS
FUN & TOOLS
Game
➨ ➨
Photo Puzzle
➨ ➨ ➨
• How to Play
This game a kind of Jigsaw puzzle. User can select game type. In
terms of Game Type, there are two types of game Swapping and
Sliding type in Photo Puzzle. Swapping Type is a game that the
player select the piece by moving direction key and after the
player move the selected piece to wanted place, the player
implement the place selected then, the place of two pieces will
be exchanged each other. Sliding Type is a game that have the
empty spaces and the player push the pieces into the empty
space with direction key and the completed image is matched up
to the original image correctly and the, the game stage will be
cleared.
Controls
•
Key In Menu Screen / In Game Execution
2/Up Moving Upward
8/Down Moving Downward
4/Left Change the Game Stage / Move to Left
6/Right Change the Game Stage / Move to Right
5/OK(select) Confirm / select or cancel
98
Page 100

FUN & TOOLS
FUN & TOOLS
Downloaded
➨ ➨
You can see the list of image and melody files downloaded through
EMS/MMS or mobile services. You can also delete, change file
names and see the file information, as well as change the
background and view image files.
Image
➨ ➨ ➨
View a list of image files.
Use the / navigation keys to select images.
These are the downloaded image files. You can see the information
of the size of the selected file on the bottom. Use the key to
choose a file.
99
 Loading...