


User Guide
Thank you for choosing the Pantech EASE, our latest 3G mobile phone.
The Pantech EASE has many features designed to enhance your mobile experience. From its unique, stylish design and QWERTY keypad, we know you will enjoy the entire EASE experience.
This User Guide contains important and useful information that will maximize your familiarity with all that the Pantech EASE has to offer.

Specifications
Design
Touch QWERTY Slider
Displays
•260k ColorsTFT LCD with 3.2” display
•240X400 resolution
Melodies
MP3, MIDI, iMelody,WAV, QCP, M4A, AAC, 3GP
Camera
Integrated 2M CMOS Camera
•Resolution up to 1600 x 1200 (1,920,000 pixels)
•Mpeg4Video recording/playing up to 15f/s(QVGA size)
•Self-timer function (5 seconds or 10 seconds)
•Photo album and video album
Dimensions & Weight
Weight: 137g/4.86oz (with standard battery) Dimensions: 114 mm x 58mm x 14.25 mm 4.48“ x 2.28“ x 0.56“
Power Management (Performance)
Battery Type |
Capacity |
Standby Time |
Talk Time |
|
|
|
|
|
|
Standard |
|
Minimum |
Minimum |
|
Lithium-Ion |
1000 mAh |
|||
10days (250hrs) |
3hours |
|||
(Li-ion) |
|
|||
|
|
|
Operating Frequency
•GSM 850Mhz, GSM 900Mhz, GSM 1800Mhz, GSM 1900Mhz, UMTS 850Mhz and UMTS 1900Mhz networks in North America, South America, Europe, Africa, and Asia-Pacific where these networks are supported.
•Automatic band switching.
2 |
|
3 |
|

Specifications............................................. |
2 |
Memo......................................................... |
7 |
Phone overview......................................... |
8 |
Quick & Easy............................................... |
9 |
Menu overview....................................... |
13 |
SIM card and battery .............................. |
22 |
Memory card........................................... |
25 |
Turning the phone on/off ...................... |
29 |
Screen unlock.......................................... |
29 |
Essential display indications................... |
29 |
Language................................................ |
33 |
Missed events ......................................... |
34 |
Setting the phone mode ........................ |
34 |
Dynamic Noise Suppression from |
|
Audience................................................. |
35 |
Screen navigation................................... |
36 |
Using the multitask menu...................... |
40 |
PC Suite .................................................. |
41 |
Updating software.................................. |
42 |
Easy Mode |
|
1. Calls and address book |
|
Making, receiving and ending calls........ |
46 |
UsingVideo Share................................... |
48 |
Options during a call............................... |
50 |
Checking all calls..................................... |
54 |
Speed dialing.......................................... |
55 |
Using the address book .......................... |
55 |
Address book settings............................. |
58 |
Using your headset................................. |
58 |
Fixed dialing............................................ |
59 |
2. Messaging |
|
Entering text ........................................... |
62 |
Messaging............................................... |
64 |
Receiving messages................................ |
65 |
Creating and sending text messages ..... |
66 |
Creating multimedia messages.............. |
67 |
3. Multimedia |
|
Camera.................................................... |
72 |
Photo album........................................... |
78 |
Video album............................................ |
79 |
4. Useful Features |
|
Alarm ...................................................... |
84 |
Calendar.................................................. |
85 |
Calculator and Tip Calculator.................. |
86 |
Pill Reminder .......................................... |
86 |
Pedometer .............................................. |
88 |
5. Connectivity |
|
Bluetooth................................................ |
92 |
Accessing AT&T Services......................... |
94 |
6. Settings |
|
Sound Profile .......................................... |
98 |
Display..................................................... |
98 |
Readout mode...................................... |
100 |
Advanced Mode |
|
1. Calls and address book |
|
Call settings........................................... |
102 |
Contents |
|
Settings for Video Share ....................... |
102 |
Checking all calls................................... |
104 |
Using the address book ........................ |
106 |
Address book settings........................... |
108 |
Caller identification............................... |
109 |
Using your headset............................... |
109 |
Service numbers and fixed dialing....... |
109 |
2. Messaging |
|
Entering text ......................................... |
112 |
Messaging............................................. |
114 |
Receiving messages.............................. |
116 |
Creating and sending text messages ... |
117 |
Message templates............................... |
118 |
Message settings.................................. |
119 |
Email ..................................................... |
121 |
Using instant messenger...................... |
121 |
3. Multimedia |
|
Camera.................................................. |
124 |
Photo album......................................... |
129 |
Video album.......................................... |
131 |
4 |
|
5 |
|

Audio album......................................... |
132 |
Music player.......................................... |
133 |
Music player settings............................ |
136 |
Audio player.......................................... |
138 |
Media player ......................................... |
139 |
Other files.............................................. |
141 |
Managing memory .............................. |
142 |
Playing games ...................................... |
142 |
4. Useful Features |
|
Notepad and voice memo .................... |
144 |
World time............................................ |
145 |
Converter .............................................. |
146 |
Stop watch and timer........................... |
146 |
Sketch pad............................................. |
147 |
Memory information............................ |
148 |
5. Connectivity |
|
Bluetooth.............................................. |
152 |
AppCenter............................................. |
154 |
Accessing the AT&T Services................. |
155 |
Accessing and Using MobileWeb......... |
157 |
Profile settings...................................... |
160 |
6. Settings |
|
Phone.................................................... |
164 |
Setting sound profile............................ |
164 |
Display................................................... |
164 |
Touch Settings....................................... |
166 |
LockingYour Phone .............................. |
166 |
Reset ..................................................... |
168 |
TTY ........................................................ |
169 |
8. Appendix |
|
Alert message....................................... |
172 |
Troubleshooting checklist..................... |
173 |
Safety information................................ |
174 |
Safety precautions................................ |
175 |
About the battery usage....................... |
177 |
FCC Hearing-Aid Compatibility (HAC) |
|
regulations for wireless devices............ |
179 |
FCC Regulatory Compliance.................. |
181 |
Warranty............................................... |
184 |
 Contents
Memo
6 |
|
7 |
|

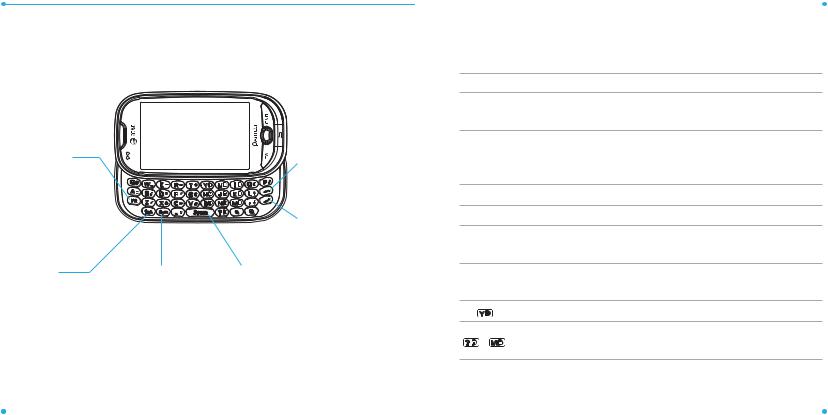
Phone overview
Touch mode view
Quick Contact Key
Access contact list.
Call key
Press to make and answer calls.
Earpiece
Volume Up/Down key 

Adjusts volume. Press and hold the Up key
for Multitasking.
Charger/Headset port 


End key
End calls, exit menus.
Back / Clear key
Return to previous screen.
2nd MIC
Camera
Speaker

 Sliding Screen
Lock/Unlock key


 Say A command key


 Camera key
Internal antenna |
|
area |
|
1st MIC |
|
Note: Holding the device by the internal antenna |
Note:The phone has integrated advanced noise |
area might affect the quality of all calls. |
suppression technology.To ensure voice quality, |
|
please do not cover microphone entries as indicated. |
8 
Quick & Easy
Keys Functions
Slide down to lock. Slide down and hold to unlock.
Delete characters from the display, or return to previous menu.
Access Quick Contacts.
Place a call after dialed. Access Recent Calls or dial the last number if pressed and held.
Complete the current call.Turn on/off the phone if pressed and held.
Cancel user input and return to main screen.
Adjust the earpiece volume while making a call.
Control the Ringtone volume, vibrate mode and silent all mode in standby.
Mute the ringtone of an incoming call.
Access the Say a Command feature.
Turn camera on.
Take picture when camera is on.
 9
9
QWERTY mode view
Function key |
|
Delete key |
To enter a number |
|
|
|
Press to delete a |
|
or symbol, and press |
|
|
|
number or letter. |
|
this key and then the |
|
|
corresponding key |
|
|
Fn + any key : Insert a |
|
Enter key |
number or symbol. |
|
|
Fn + Fn : Fn Lock mode. |
|
Press to move to the |
|
|
next row. |
CAPS key |
Symbol key |
Space key |
To type a single uppercase |
Press to open symbol |
Press to enter a space. |
letter, press this key then |
menu. |
|
enter a letter. |
|
|
Your phone has a QWERTY keypad which provides a superior typing experience on a small handheld for easy and comfortable texting.You can use all of the phone functions with the QWERTY keypad.
Keys Functions
!Press to change entry mode at the text editing screen. (Abc / ABC / abc /T9Ab /T9AB / T9ab)
Press to enter a special character or number.To
"enter symbols and numbers continually, press twice until
.displays in top right of screen.
# Enter the space character in text input mode.
% Insert a hard return in text input mode.
Delete a character to the left of the text cursor in text editing $ screen.
Press to view to type a special character that is not placed onthe keypad.
Access voice mail if pressed in standby mode.
~ |
Enter numbers, letters or special characters. |
|
Opens dialer if numbers are pressed standby mode. |
||
|
10 |
|
11 |
|
Keys Functions
Enter an international dialing prefix if pressed in standby mode.
Zooms in when in text entry or viewer mode.
Zooms out when in text entry or viewer mode.
Scrolls up in text viewer mode only.
Scrolls down in text viewer mode only.
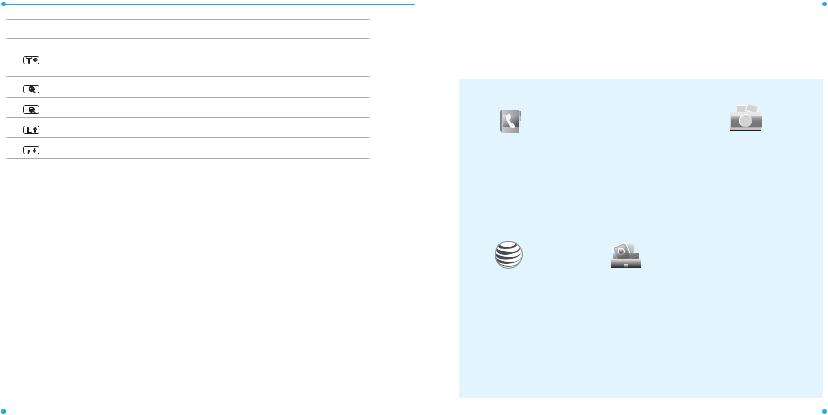
Menu overview
The steps may vary by mode and this manual provides instructions for both Easy Mode and Advanced Mode respectively.
Easy mode menu
Address Book |
Messaging |
Camera |
All Contacts |
Inbox |
Take Photo |
Favorites |
Create Message |
TakeVideo |
Groups |
Drafts |
My Pictures |
My Settings |
Sent Messages |
MyVideos |
|
Voice Mail |
Downloaded Picture |
|
Mobile Email |
Downloaded Audio |
AT&T Services |
Tools |
Settings |
Say a Command |
Calendar |
Phone Status |
AT&T Navigator |
Alarm Clock |
Sounds & Alerts |
My CastWeather |
Pill Reminder |
Bluetooth |
MobileWeb |
Calculator |
Display |
Games & Apps |
Tip Calculator |
Readout Mode |
My Account |
Pedometer |
Phone Mode |
6SIM dependent 1Network dependent |
|
|
12 |
|
13 |
|

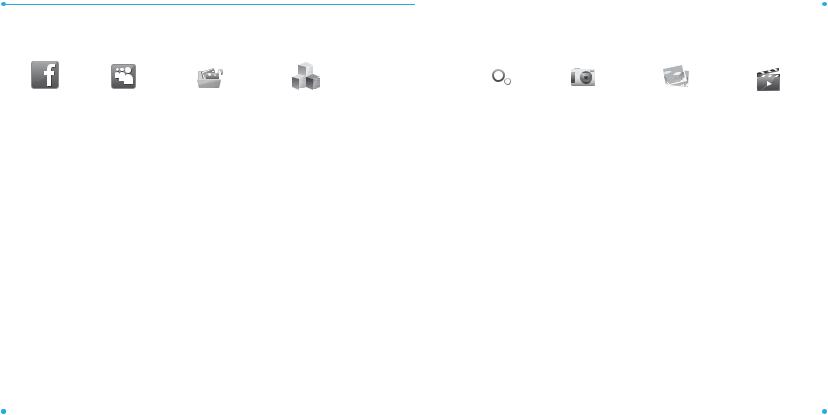
Advanced mode menu
|
|
|
|
|
|
|
|
|
|
|
|
|
|
|
|
|
|
|
|
|
|
|
|
|
|
|
|
|
|
|
|
|
|
|
|
|
|
|
AT&T Navigator |
YPmobile |
Mobile Web |
Messaging |
Mobile Email |
AT&T Social Net |
Address Book |
AppCenter |
|||||
|
|
|
Inbox |
|
|
|
|
|
|
|
All Contacts |
|
|
|
|
Create Message |
|
|
|
|
|
|
|
Favorites |
|
|
|
|
Mobile Email |
|
|
|
|
|
|
|
Groups |
|
|
|
|
IM |
|
|
|
|
|
|
|
My Settings |
|
|
|
|
Outbox |
|
|
|
|
|
|
|
|
|
|
|
|
Drafts |
|
|
|
|
|
|
|
|
|
|
|
|
Voice Mail |
|
|
|
|
|
|
|
|
|
|
|
|
Settings |
|
|
|
|
|
|
|
|
|
|
|
|
Templates |
|
|
|
|
|
|
|
|
|
|
|
|
Used Space |
|
|
|
|
|
|
|
|
|
14 |
|
15 |
|

IM |
Games |
Apps |
AT&T Music |
|
Loopt |
Where |
AT&T FamilyMap |
Mobile Video |
|
Shop Games |
Shop Applications |
Music Player |
|
|
|
|
|
|
Bejeweled |
Shop GPS |
Shop Music |
|
|
|
|
|
|
Midnight Bowling 2 |
AllSport GPS |
AT&T Radio |
|
|
|
|
|
|
Ms. PAC-MAN by Namco |
AT&T Social Net |
Shazam |
|
|
|
|
|
|
The Sims 3 |
Maps |
MusicVideos |
|
|
|
|
|
|
World Series of Poker HL |
Mobile Banking |
Community |
|
|
|
|
|
|
|
MobileWeb |
Music Apps |
|
|
|
|
|
|
|
MobiTV |
|
|
|
|
|
|
|
|
My-CastWeather |
|
|
|
|
|
|
|
|
Pocket Express |
|
|
|
|
|
|
|
|
WikiMobile |
|
|
|
|
|
|
|
|
Browser |
|
|
|
|
|
|
|
|
|
|
|
|
|
|
|
16 |
|
17 |
|
|
|
|
|
|
|
|
|
|
|
|
|
|
|
|
|
|
|
|
|
|
|
|
|
|
|
MySpace |
My Stuff |
Tools |
|
Settings |
Camera |
Picture |
Video |
|||||
|
|
Applications |
Recent Calls |
|
Phone Mode |
|
ShopWallpapers |
ShopVideos |
||||
|
|
Audio |
Camera |
|
Profiles |
|
Images |
|
|
|
||
|
|
Games |
Video Camera |
|
Display |
|
Camera |
|
|
|
||
|
|
Picture |
Media Player |
|
Call |
|
Sketch Pad |
|
|
|
||
|
|
Video |
Alarm Clock |
|
Phone |
|
FaceTagging |
|
|
|
||
|
|
Tools |
Calendar |
|
Touch |
|
|
|
|
|
||
|
|
Other Files |
Notepad |
|
Connectivity |
|
|
|
|
|
||
|
|
Used Space |
Sketch Pad |
|
Security |
|
|
|
|
|
||
|
|
|
|
|
Voice Memo |
|
AT&T Software Update |
|
|
|
|
|
|
|
|
|
|
WorldTime |
|
Reset |
|
|
|
|
|
|
|
|
|
|
Calculator |
|
TTY |
|
|
|
|
|
|
|
|
|
|
Tip Calculator |
|
Readout Mode |
|
|
|
|
|
|
|
|
|
|
Converter |
|
Phone Information |
|
|
|
|
|
|
|
|
|
|
StopWatch |
|
|
|
|
|
|
|
|
|
|
|
|
Timer |
|
|
|
|
|
|
|
|
|
|
|
|
Say a Command |
|
|
|
|
|
|
|
|
|
|
|
|
|
|
|
|
|
|
|
|
18 |
|
19 |
|
Memo
Bluetooth |
Alarm |
My Account |
Settings |
Simple Alarm |
|
Search |
|
|
My Info |
|
|
20 |
|
21 |
|

SIM card and battery
About your SIM card
When you subscribe to your network operator, you receive a SIM (Subscriber Identity Module) card containing your registration information, PIN code, etc.
Like a credit card, it should be kept secure and handled carefully. Do not bend, scratch or expose it to moisture. Avoid static electricity.
To avoid corrupting your SIM card’s memory, always switch off your phone before removing or inserting your SIM card.
About your battery
Your phone uses a Li-Ion battery. Make sure to use an authorized battery and charger only.
For more details, please inquire at your nearest dealer.
Note:Your phone is powered by a Lithium Ion (Li-Ion) battery. Unlike other forms of battery technology, you can recharge your battery while some charge remains without reducing your phone’s autonomy due to the“battery memory effect” inherent in those technologies.
22 
Getting Started
Installing/removing SIM card and battery
1. Remove the battery cover from the unit.
2. Insert the SIM card into the slot.The gold contacts of the SIM card should go against the metal contacts of the phone. Put the connector of the battery into the hole located at the top of the unit and then insert and press the lower side of the battery until you hear the light click. Make sure you align the gold contacts at the battery end with contacts on the phone. If the contacts at the battery are not properly aligned, damage could occur to the phone and the battery.
Correct |
Incorrect |
 23
23

3.To remove the battery push the bottom of the battery to upwards (1) and remove (2) the battery. Push the SIM card in the direction of the arrow as shown.
4.To fit the battery cover, put it on the guide rail and push up.
Instructions for Optimal Performance
Put the cover align with the phone(1) and push up(2) as the arrow until you hear the light‘click’.
Make sure you align the battery cover as shown below. If not, the battery cover will be damaged.
Correct |
Incorrect |
24 
Getting Started
To charge your battery
1.To charge, connect the charger adapter. Make sure you align the connector as the image(1).
If not, it will damage the charging connector on the phone and will not charge.
Correct |
Incorrect |
Correct |
Incorrect |
2.To remove pull the adapter away (2).
Memory card
You can use a microSD card as a memory card. It gives you more space to save pictures, videos, music, etc.
Inserting and removing a memory card
1. Open the memory card slot.
 25
25

2.Insert the card.The  icon will be displayed.
3.Press the card to remove.
Using a memory card
You can save, move and delete the files between your phone and external memory card.You can also move and copy the files to computer from your phone.
To copy or move a file to the card
,Q HDV\ PRGH
1.Tap Menu > Camera > My Pictures, My Videos, Downloaded Picture or Downloaded Audio.
2.Tap to select the folder or file.
3.Tap Cof selected file > Copy.
4.Tap D> Memory Card.
5.Tap to select the folder or Options > Create New Folder.
6.Tap Copy Here.
,Q DGYDQFHG PRGH
1.Tap Menu Menu > My Stuff > Audio, Picture, Video or Other Files.
2.Tap to select the folder or file.
3.Tap Cof selected file > Copy.
4.Tap D> Memory Card.
26 
Getting Started
5.Tap to select the folder or Options > Create New Folder.
6.Tap Copy Here.
To copy or move a file back to phone
,Q HDV\ PRGH
1.Tap Menu > Camera > My Pictures, My Videos, Downloaded Picture or Downloaded Audio.
2.Tap to select the folder or file.
3.Tap D> Memory Card.
4.Tap to select the folder or file.
5.Tap Cof selected file > Copy.
6.Tap D> Phone.
7.Tap to select the folder or Options > Create New Folder.
8.Tap Copy Here.
,Q DGYDQFHG PRGH
1.Tap Menu Menu > My Stuff.
2.Tap D> Memory Card.
3.Tap to select the folder or file.
4.Tap Cof selected file > Copy.
5.Tap D> Phone.
6.Tap to select the folder or Options > Create New Folder.
 27
27

7.Tap Copy Here.
To delete a file from the memory card
,Q HDV\ PRGH
1. Select the file from the card > Options > Delete.
,Q DGYDQFHG PRGH
1. Select the file from the card > Options > Delete.
To move the file from the card to the computer
Connect the data cable with mobile and the computer.
,Q HDV\ PRGH
1.Select Music Player or Mass Storage .
2.Follow the instructions on your computer screen.
,Q DGYDQFHG PRGH
1.Tap Menu Menu > Settings > Connectivity.
2.Tap Select USB Mode.
3.Select Music Player, Mass Storage or Ask on Connection.
4.Follow the instructions on your computer screen.
Note: Select Music Player when you want to add music to the playlist in your device. When you select Ask on Connection, it will ask you to select either the Music Player or Mass Storage every time you connect your device with your computer.
28 
Getting Started
Resetting a memory card
1.Tap Menu Menu > Settings > Reset.
2.Enter the password > External Memory Reset.
Note: The default password is‘1234’.
Turning the phone on/off
To turn on
1. Press and hold .
.
To turn off
1. Press and hold .
.
Screen unlock
Unlocking the screen
1.Press any hard keys to turn on the display.
2.Tap and hold 8to unlock the screen.
Or
1. Slide down the sliding lock/unlock key to unlock the screen.
Essential display indications (Easy Mode only)

 A 3G signal is available. It is displayed when there is an active 3G session.1
 29
29

An EDGE signal is available. It is displayed when there is an active EDGE session.
A GPRS signal is available. It is displayed when there is an active GPRS session.
Signal strength.The greater the number of bars, the stronger the signal. When network is in searching mode  is displayed.
Flight Mode is active.
Bluetooth hands-free headset is connected.
Bluetooth A2DP headset is connected.
Bluetooth hands-free + A2DP headset is connected.
Bluetooth is active.
Data transfer via Bluetooth.
A call is being made.When you are in no service area  is displayed.
Call forwarding1 is active.
An alarm is set.
Schedule Alarm is set.
Pill Reminder is set.
Received one or more text messages.
Received one or more multimedia messages.
Received one or more voice messages.
30 
Getting Started
Received one or moreWAP push messages.
A message is being sent.
A message is being received.
A message is full.
Received one or more configuration messages.
Battery strength.When the battery charge is low,  is displayed.
1Network dependent
Essential display indications
A 3G signal is available. It is displayed when there is an active 3G session.1
An EDGE signal is available. It is displayed when there is an active EDGE session.
A GPRS signal is available. It is displayed when there is an active GPRS session.
Signal strength.The greater the number of bars, the stronger the signal. When network is in searching mode  is displayed.
Flight Mode is active.
Headset is connected.
Bluetooth hands-free headset is connected.
 31
31

Bluetooth A2DP headset is connected.
Bluetooth hands-free + A2DP headset is connected.
Browser is Active, Secured and being downloaded.
Bluetooth is active.
Data transfer via Bluetooth.
USB is connected.
A call is being made.When you are in no service area  is displayed.
Call forwarding1 is active.
An alarm is set.
Schedule Alarm is set.
Available, Away, Invisible Status of AIM.
Online, Away, Busy, Offline Status of MSN.
Available, Busy, Invisible Status ofYAHOO
You have receivedYAHOO, AIM andYAHOO new messages
Received one or more text messages.
Received one or more multimedia messages.
Received one or more voice messages.
32 
Getting Started
Received one or moreWAP push messages.
A message is being sent.
A message is being received.
A message is full.
Received one or more configuration messages.
Java
Incoming calls set to ring only (Normal).
Incoming calls set to Vibrate and Ring.
Incoming calls set to Vibrate only.
Incoming calls set to Silent.
Battery strength.When the battery charge is low,  is displayed.
TTY is active.
microSD card is inserted.
BGM is play, pause and being stopped.
1Network dependent
Language
Setting up easy mode
1.Tap Menu > Settings > Display.
2.Tap Language.
3.Tap /
/ to set the language type of Screen Text and Predictive text > Save.
 33
33

Setting up advanced mode
1.Tap Menu Menu >Settings > Phone > Language.
2.Select Screen Text or Predictive.
3.Select the language > Save.
Missed events
Easy Mode / Advanced Mode
When you miss calls, messages, email, instant messages, JAVA or voice messages, the icons will pop up and let you know you have missed events.The icon will show at the Missed Events Area, tap the each icon to check the details.To make it disappear even you didn’t check the events, simply press .
.
Setting the phone mode
Your phone has two customized modes, Easy and Advanced.The default is set to Easy mode which provides easy access to the functions used most frequently. In the Easy mode, you can view an easy to read, easy to access, abbreviated menu: Address Book, Messaging, Camera, AT&T Services,
Tools and Settings.The Advanced Mode allows access to all menu items.
34 
|
|
Getting Started |
|
Easy Mode |
Advanced Mode |
||
|
|
|
|
|
|
|
|
To change the mode from Easy Mode to Advanced Mode
1.Press Menu > Settings > Phone Mode.
2.Select Advanced Mode.
Dynamic Noise Suppression from Audience
Your phone is equipped with an advanced voice processing chip that delivers clear mobile calls by suppressing background noise, intermittent sounds (like a siren or nearby conversation), and echoes, allowing you to hear and be heard nearly anywhere.
How Does It Work?
Based on the intelligence of the human hearing system, the technology:
•Captures, evaluates and distinguishes all the sound signals surrounding your phone, and the person you’re speaking with.
 35
35

•Then isolates the primary voice in conversation and filters out the background noise – so the person you’re calling hears only your voice, without disturbing background noise.
•Dynamically equalizes and adjusts voice volume to optimize your calling experience, so you can hear clearly and don’t need to speak louder to overcome surrounding noise.
The noise suppression technology is built-in and already enabled in your new mobile phone. So it’s ready to provide unsurpassed voice clarity with every call. For information on how to turn off and on noise suppression, see Making, receiving and ending calls or Sound Profile.
Screen navigation (Advanced Mode only)
The home screen is your starting point for using the applications on your phone.You can customize the home screen to display application icons, shortcuts, folders, and widgets according to your preference.
About your home screen
•Main screen:The phone’s main home screen.
•Apps screen: Provide operators and users Shortcuts menu that you want to register. Max 24 icons can be added.
•FAVs screen:Widget content is stored on the screen as items. Max 15 icons can be added.
36 
Getting Started
Apps Screen : Left |
Main Screen : Center |
FAVs Screen : Right |
® |
® |
Position indicators
Note:You can access 3 different types of home screen by flicking one way. However, the position indicators are always displayed for the corresponding home screen (i.e. Left – Apps, Center – Main, Right – FAVs).
Adding a home screen item
Shortcuts and floor screens allow you to assign items to the screen. 1.Tap Add  Add .
Add .
2.Tap a desired menu.
3. Once you have added one or more items to the screen, or
or is displayed to customize the home screen.
37

Getting Started
3. Position the item, then release it.
Navigating through menus
EASE has 3 different menu screens to provide quick access to menus.
1.Tap Menu Menu .
2.Flick the screen from left to right or right to left to navigate.
Position indicators
Deleting a home screen item
1.Tap the or
or .
.
2.Select and hold until

 appears.
3.Drag to the trash can @.
Note: This action is only applied to the home screen.To delete all the items on the screen, tap or
or > Delete All
  .
.
Repositioning a home screen item
Once the items are assigned to the home screen, you |
|
||||
can reposition the items for your convenience. |
|
||||
1. Select and hold until |
|
|
|
appears. |
Mini Map |
|
|||||
|
|
|
|||
2. Drag to the desired position. |
|||||
® |
|
® |
Extended Menu: Left |
Extended Menu: Center |
Extended Menu: Right |
Note: The position indicators are always displayed for the corresponding menu screen.
38 |
|
39 |
|
Using the multitask menu
Easy Mode Advanced Mode
Press and hold 

 to launch the Multitask menu that can be accessed from any active window or page on the phone.This function allows you to temporarily exit your current location to access a group of common functions such as: Call, Messaging, Mobile Web, App Manager or
Music.With the multitask key, you can quickly navigate to other menus without quitting current task or active window such as creating a message, making a call, or browsing a web page.
Multitask functions
To use multitask function, tap and hold 

 .You can choose from one of the following functions:
40 
Getting Started
•Call: Make a voice call while using the handset for other tasks. If Music Player is active, it is muted during the call.
•Messaging: Send a text or multimedia message while using the handset for other tasks.
•MobileWeb: Launch the browser while using the handset for other tasks.
•App Manager: Access other applications while using the handset for other tasks.
•Music: Launch the Music Player while using the handset for other tasks. If an incoming call is received or you try to make a call, the Music Player is muted.
PC Suite
PC suite is aWindows-based PC program that allows you to easily manage personal data and multimedia files by connecting your Phone to a PC.The PC suite application can be downloaded at http://www. pantechusa.com/.
System requirements
•MicrosoftWindows 2000 or XP family,Windows7 andVista 32 bit
•At least 300MB of free disk space
 41
41

•Interface devices such as USB or Bluetooth for the connection with the phone
PC Suite features
•PC Suite launcher
•Contact Manager
•PC Sync
•Message Manager
•File Manager
•MMS PC Composer
•Internet Access
Updating software (Advanced Mode only)
You can update your software without visiting your nearest dealer.
To update the software
1.Tap Menu Menu > Settings > AT&T Software Update.
2.Tap Check for Update > Yes to check whether or not you need to
update the software.
Note: After downloading the software, the device will ask you whether to update the software now or later. If you choose to update the software now, it will restart the handset. If you postpone updating the software, you can select between 30 mins, 1 hour or 4 hours in the Options. After selecting
42 
Getting Started
the updating time, you will be sent back to standby mode. If you go to Software Update while you are in postponing, tap Continue Update.
To view the version of software
1.Tap Menu Menu > Settings > Phone Information.
2.Scroll down to SoftwareVersion.
 43
43

Memo
1
Calls and address book
Making, receiving and ending calls
Using Video Share
Options during a call
Checking all calls
Speed dialing
Using the address book
Address book settings
Using your headset
Fixed dialing
44

Making, receiving and ending calls
Making a call
1.Enter the area code and phone number.
2.Press .
.
Answering a call
1. Press .
.
Ending a call
1. Press .
.
Once the call is complete, a call summary is displayed.
Rejecting a call
1. Press or Ignore.
Making a call using the call list
1.Your phone logs up to 20 dialed, received and missed call numbers.
2.Press to display the Recent Calls list.
3.Select a number.
4.Press to dial the selected number.
Note:To redial the last number in the Recent Calls list, press .
.
Making a call during a call
1. Enter the phone number or look it up in Address Book.
46 
Easy Mode - Calls and address book
2. Press |
to dial the second call.The first call is automatically put on |
01 |
hold. |
02 |
|
Switching between two calls |
03 |
|||||
1.Tap Swap. |
|
|
|
04 |
||
|
|
|
|
|
|
|
Making an international call |
05 |
|||||
|
||||||
06 |
||||||
1. [ ]Tap Dial and press and hold Ekey for the international |
||||||
|
||||||
01 |
||||||
prefix until the‘+’ character appears. |
||||||
|
||||||
02 |
||||||
[ ] Press |
|
|
key for the international prefix until the‘+’ character |
|||
|
|
|
||||
03 |
||||||
|
|
|||||
appears. |
|
|
|
|||
|
|
|
|
|||
|
|
|
04 |
|||
2.Type the country code, area code, and phone number. |
||||||
|
||||||
05 |
||||||
3.Tap |
. |
|
|
|
||
|
|
|
|
|||
|
|
|
06 |
|||
Making an emergency call |
||||||
07 |
||||||
1.You can make emergency calls even if your phone does not have a SIM card.
2.Tap Emergency Number, or tap SOS if your phone does not have a SIM card.
3.Tap .
.
Replying to a missed call
1.TapView in the Missed Call notification to display the list of missed calls.
 47
47

2.Select a number to call by scrolling the screen.
3.Press .
.
Answering a second call1
1.Press .The first call is automatically put on hold.
2.Tap to end the second call.The call on hold is automatically reconnected.
Using Video Share
You can share live or recorded video while on a call.
Note:Video Share is not available in all markets. Both parties must be in a 3G service area–a 3G icon must appear by the signal bars prior to a call being placed, and both parties must remain in the 3G coverage area for the duration of theVideo Share.
<Call mode> <Video Share Mode>
48 
Easy Mode - Calls and address book
Making video share call |
|
01 |
1. Enter the area code and phone number > |
. |
|
02 |
||
2.Tap Options > Video Share. |
|
|
|
03 |
|
3. Select Live or Recorded. |
|
|
|
04 |
|
Note:To use video share in the Recent Calls, tap Options >Video Share. |
|
|
05 |
||
Turning off the speakerphone |
|
|
|
06 |
|
1.Tap Speaker Speaker during video share mode. |
|
01 |
2.Tap Mute Mute to mute the sound. |
|
02 |
Increasing or decreasing the brightness |
|
03 |
|
|
|
|
04 |
|
1.Tap Set Set . |
|
|
|
|
|
|
05 |
|
2. Adjust the brightness by scrolling left or right. |
|
|
|
|
|
|
06 |
|
Zoom in and out |
|
|
|
07 |
|
1.Tap Set Set . It ranges from 1x to 3x.
2. Adjust the zoom by scrolling up or down.
Stopping the recording
1.Tap Record Record .
Stopping or ending video share
1.Tap Stop to end the video share.
2.It will ask you whether you will stop video share > Yes to stop.
Note: Even you end video share or close the slider, the call will not be ended.
 49
49

Press to end the call.The recorded video will be saved in My Stuff >Video.
Receiving video share
1.After receiving video share, it will ask you whether to accept or reject the video share > Yes to accept and No for reject.
2.Tap Full or Landscape to enlarge the video to fill the entire screen.
Options during a call
Microphone off and on
Switching your phone’s microphone off
1.Tap Mute Mute .
Switching your phone’s microphone back on
1.Tap Mute Mute .
Turning on speakerphone
1.Tap Speaker Speaker .
Turning off speakerphone
1.Tap Speaker Speaker .
Putting a call on hold and returning1
Putting a call on hold
1.Tap Hold Hold or press |
. |
50 
Easy Mode - Calls and address book
Returning to a held call |
|
01 |
1.Tap Unhold Hold or press |
again. |
|
02 |
||
Multi-party calls1 |
|
|
|
03 |
|
You can talk with more than one person or have conference call. |
04 |
|
|
|
|
Making a multi-party call |
|
05 |
|
06 |
|
|
|
|
1. Call the first participant. |
|
|
01 |
||
2. Call the second participant.The first call is automatically put on hold. |
||
|
||
02 |
||
3.Tap the second participant phone number > Join. |
||
|
||
03 |
||
|
||
|
|
|
|
04 |
|
|
|
|
|
05 |
|
|
|
|
|
06 |
|
|
07 |
Having a private conversation with one participant
1.Tap the participant to hold.
2.Tap Members.
3.Tap y.
 51
51

Note: All of the multi-party call participants can now hear each other.
Removing one participant from a multi-party call
1.Tap the participant to end.
2.Tap Members.
3.Tap I.
The call ends with that participant, but you can continue to talk to the other participants.
Searching for a number in the address book during a call
1.Tap Contacts.
2.Select a contact by scrolling up or down the alphabet bar until you see the first letter of the contact.
3.Scroll to the contact and tap the name.
4.Tap Info to see phone numbers or Call to call a number.
52 
Easy Mode - Calls and address book
Searching for a name or group in the address book |
01 |
|
Enter the first letters of the name for Name Search.The entries are |
|
|
02 |
||
displayed starting with the first entry matching your input. |
|
|
03 |
||
Finding a name manually in the address book |
|
|
04 |
||
|
|
|
1. Scroll up or down the alphabet bar until you see the first letter of the |
05 |
|
contact. |
06 |
|
2. Scroll to the contact and tap the name. |
01 |
|
Viewing the details of the highlighted entry in the address |
02 |
|
|
||
03 |
||
book |
||
|
||
04 |
||
1.Tap Info. |
||
|
||
05 |
||
For details on address book, see page 55. |
||
|
||
06 |
||
Reading a message during a call |
||
07 |
1. Press and hold  and tap Messaging. 2.Tap Inbox then select a message.
Sending a message during a call
1. Press and hold  and tap Messaging.
For details on creating a text message, see page 66.
Saving contacts during a Call
1.Tap Options > Save > New Contact or Update Existing.
 53
53

For details on address book, see page 55.
Noise suppression
1.Tap Options > Noise Suppression.
2.Tab On or Off.
Checking all calls
You can check all call history by press .
.
Viewing call history
1.Press .
.
2.You can view all Recent Calls.
Viewing call time
1.Press > Call Time.
2.You can view Last Call, Received Calls, Dialed Calls and Total Calls.
Resetting all call times
1.Press > Call Time.
2.Tap Reset > Yes.
3.Enter password > OK.
Note:The default password is‘1234’.
54 
Easy Mode - Calls and address book
Speed dialing |
01 |
|
You can dial quickly using speed dialing. Up to 8 phone numbers can be |
02 |
|
programmed using numbers 2 to 9. |
|
|
03 |
||
Setting speed dial |
04 |
|
|
||
05 |
||
1.Tap Dial > Speed Dial. |
||
|
||
06 |
||
2.Tap an empty entry. |
||
|
||
01 |
||
3. Select a person in your address book and tap to add. |
||
|
||
02 |
||
Changing speed dial contact |
||
|
||
03 |
||
1.Tap Dial > Speed Dial. |
|
|
04 |
||
2. Select a number > Change. |
|
|
05 |
||
3. Select a person and tap. |
|
|
06 |
||
Removing from speed dial |
07 |
|
1.Tap Dial > Speed Dial. |
|
|
2. Select a number > Remove > Yes. |
|
Using the address book
You can save names, phone numbers, and information on the SIM or phone. Number of entries can depend on the capacity of the SIM card.
Viewing the contact list
1.Tap Menu > Address Book.
 55
55

Searching for a phone number
1.Tap Menu > Address Book.
2.Scroll up or down the alphabet bar until you see the contact or tap Search and enter the name to find the contact.
3.Tap the contact > Info to view the detailed information.
4.To update information, tap Edit.
Calling from the contact list
1.Tap Menu > Address Book.
2.Scroll up or down the alphabet bar until you see the contact or tap Search and enter the name to find the contact.
3.Press .
.
Forwarding contact details
1.Tap Menu > Address Book.
2.Scroll up or down the alphabet bar until you see the contact or tap Search and enter the name to find the contact.
3.Tap the contact > Info > Options > Send Contact.
4.You can send the information using Multimedia Message or
Bluetooth.
Deleting a contact
1.Tap Menu > Address Book.
56 
Easy Mode - Calls and address book
2. Scroll up or down the alphabet bar until you see the contact or tap |
|
|
01 |
||
Search and enter the name to find the contact. |
||
02 |
||
3.Tap the contact > Info > Delete > Yes. |
||
|
||
03 |
Adding a contact |
04 |
1.Tap Menu > Address Book > Add. |
|
05 |
|
2. Input contact information by tapping the desired field and sliding |
06 |
open the keyboard to type. |
01 |
3.Tap Save. |
02 |
Note:You can enter phone numbers, email addresses, company name and |
03 |
|
|
more. To change phone number type, touch Cand select from the Number |
04 |
Type list.To add an address, birthday, or anniversary to a contact or assign |
05 |
a specific ringtone, touch the More button to open additional information tabs. |
|
06 |
|
Making groups |
07 |
1.Tap Menu > Address Book > Groups R. |
|
2.To add new group, tap Add. |
|
3. Input the group name > OK. |
|
4.To add members to group, tap Yes. |
|
5. Select the members > Add. |
|
Editing groups
1.Tap Menu > Address Book > Groups R.
 57
57
 Loading...