

Page 1

USER MANUAL
Page 2

Characteristic Specification
Display
Dual clamshell TFT LCD both Main & Sub.
Main LCD : 65,000 TFT Color Display (128 X 160)
Sub LCD : 65,000 TFT Color Display (128 X 128)
animation message, variable Icon
Melody
40 Poly Orchestra Music Bell Sound
Camera
High sensitive Digital Camera with flash
Dimension & Weight
85*41*22mm with Slim Battery
under 85g target with Slim Battery
Performance
Talk time: up to 180 minutes (with 760 mAh Battery)
Standby time: up to 200 hours (with 760 mAh Battery)
AOL Tegic Solution T9
Chinese (Simplified), English
Operating Frequency
GSM 900MHz / PCS 1900MHz Dual Band
2
Page 3

Caution
Please check and f oll ow si mpl e g uide lin es bel ow fo r yo ur sa fe ty, and for the proper operation
of the phone. Further detailed information is given in the Appendix.
ANTENNA
Use of the antenna not proved by the phone manufacturer can cause severe damage or
malfunction to the mobile.
TRAFFIC SAFETY
First check and make sure the traffic regulations related to the wireless phone use. Don’t use
a hand-held phone while driving a vehicle. Even though using a phone, use it with handsfree kits, and in safety area.
ELECTRONIC DEVICES IN VEHICLE
RF signals may affect improperly installed or inadequately shielded electronic systems in
motor vehicles.
HANDS-FREE KITS
Do not install the hands-free kits in the area over the air bag, in the air bag depl oyme nt are a,
or in the area where serious injury could result.
ELECTRONIC DEVICES
RF from wireless phone on operation can interfere the functionality of electronic devices not
properly shielded against.
MEDICAL DEVICES
Switch the phone off in hospitals.
Follow any regulations or rules of the hospital.
Switch the phone off to avoid interference with pacemaker, or even other medical devices.
3
Page 4

Consult a physician or the manufacturer of the medical device if you have any questions
about using the phone in hospital.
PUBLIC PLACE
Do not switch on the phone in the area where wireless phone use is prohibited.
BOARDING AN AIRCRAFT
Switch off your phone before boarding an aircraft.
The use of wireless telephones in an aircraft may be dangerous to the operation of the
aircraft.
EXPLOSIVE ATMOSPHERES
Switch off your phone in any area with a potentially explosive atmosphere and obey all signs
and instructions.
Do not separate battery from the phone in the potentially explosive atmosphere.
USER GUIDE
Do not allow other person to use your phone without your permission.
When lost the phone or stolen, immediately report to the service provider.
If the phone is not working properly, take it to your nearest qualified service facility.
Use only approved accessories and batteries. Do not connect incompatible products.
RF from the phone can affect to the human body, so avoid longtime exposure to RF as
possible.
Remember to make backup copies of important data, such as phoneb ook, etc.
EXPOSURE TO RADIO WAVES
Your mobile phone is a radio transmitter and receiver. It is designed and manufactured n ot to
exceed the limits or exposure to RF energy recommended by independent scientific
organizations through evaluation of scientific studies.
Use only batteries, chargers and accessories approved by the aut h orized m anuf acturer n ot to
exceed the recommended exposure guidelines. The use of unauthorized types can not
4
Page 5

guarantee the permitted guidelines, and also can not assure the safety of all persons,
regardless of age and health.
PROPER USAGE
Use the phone only in its normal operating positions.
Don’t touch or bend the antenna unnecessarily while you are calling. It may degrade the call
quality and eventually limit the battery’s performance.
Do not attempt to open the phone. Non-expert handling may damage it.
Use only the supplied or approved batteries, chargers and accessories with this phone model.
The use of any unauthorized types may invalidate any approval or warranty applying the
phone.
5
Page 6

Table of contents
Caution
Components
Handset description
Internal LCD(Main LCD)
Sub-LCD Menu options
Function keys
Quick start
Getting started
Basic call functions
Menu functions
i. Message
ii. Call logs
iii. Sound
iv. Settings
v. Net service
vi. Organizer
vii. Fun & Tools
viii. STK
ix. Phonebook
x. Hot folder
Appendix
-
How to use T9 & etc.
6
Page 7
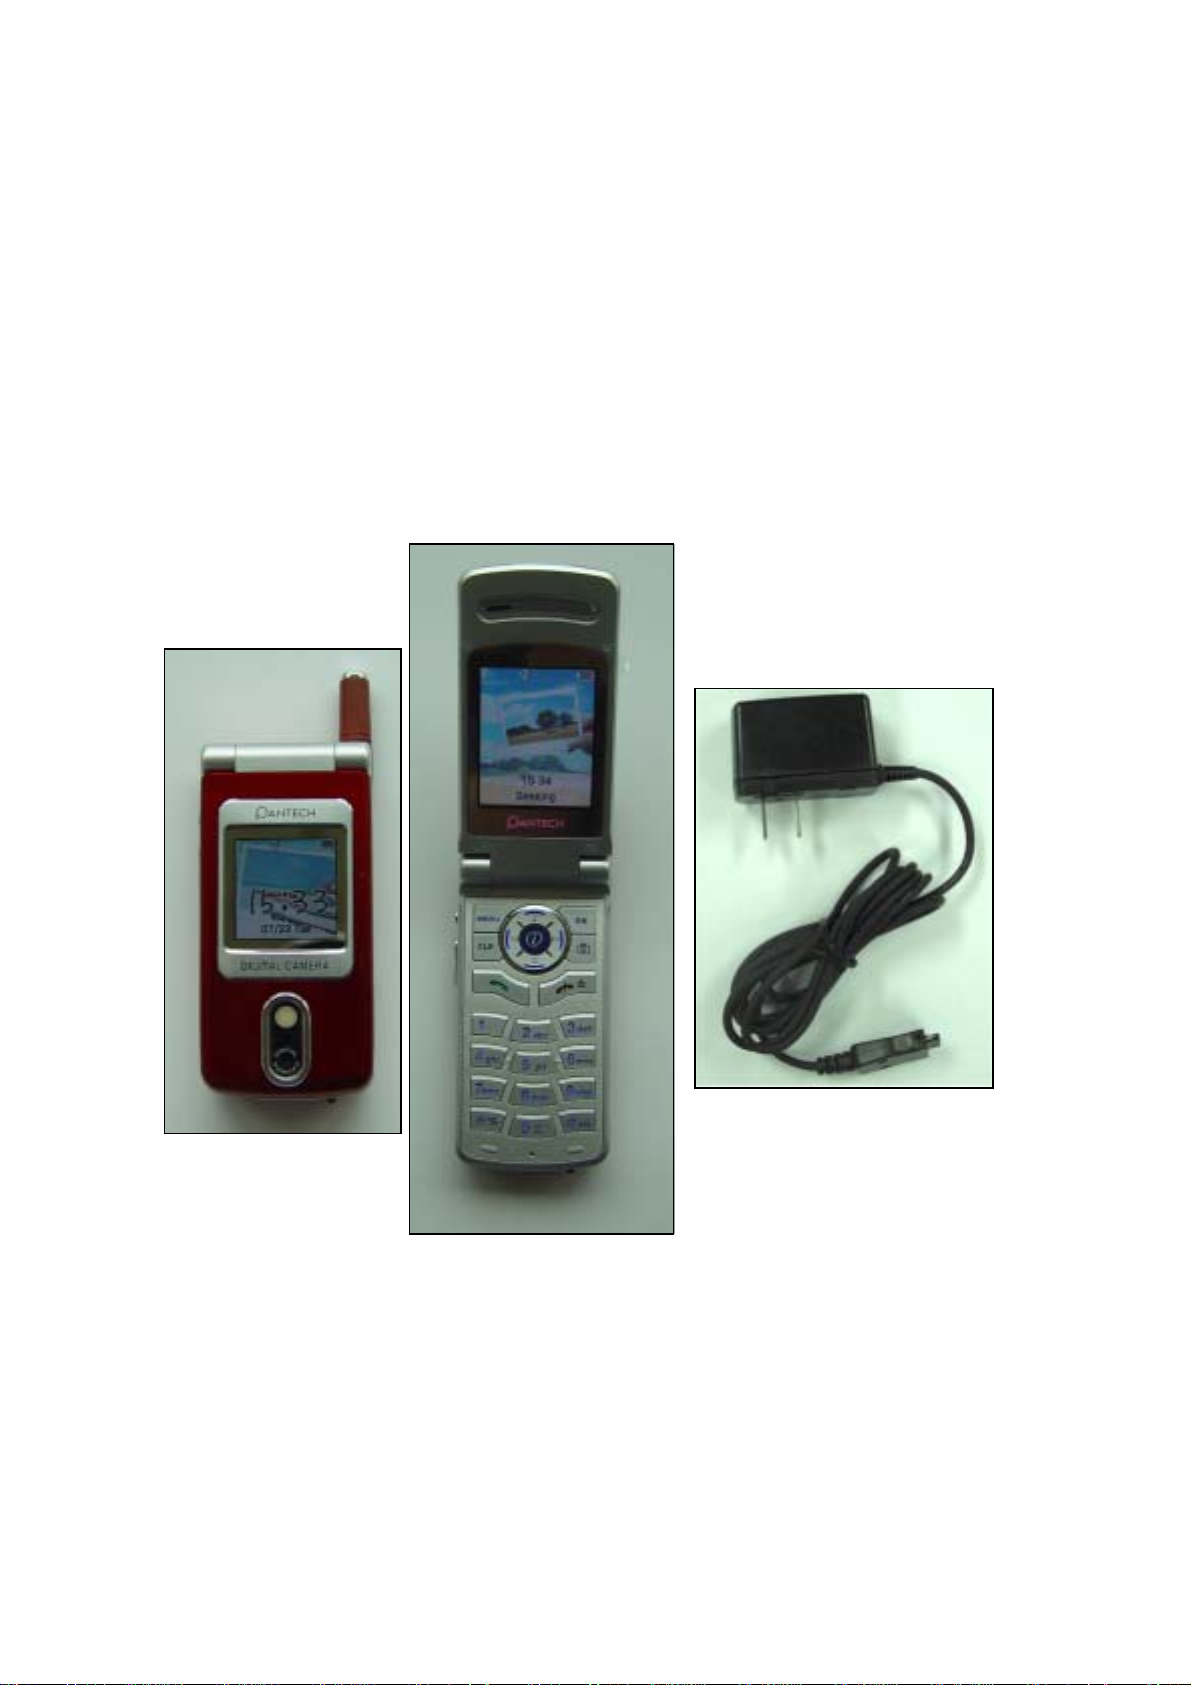
Components
The package items may differ from the ones shown below. The items depend on the service
provider’s specification, and the picture below is for user reference only.
The mobile phone AC adapter
7
Page 8
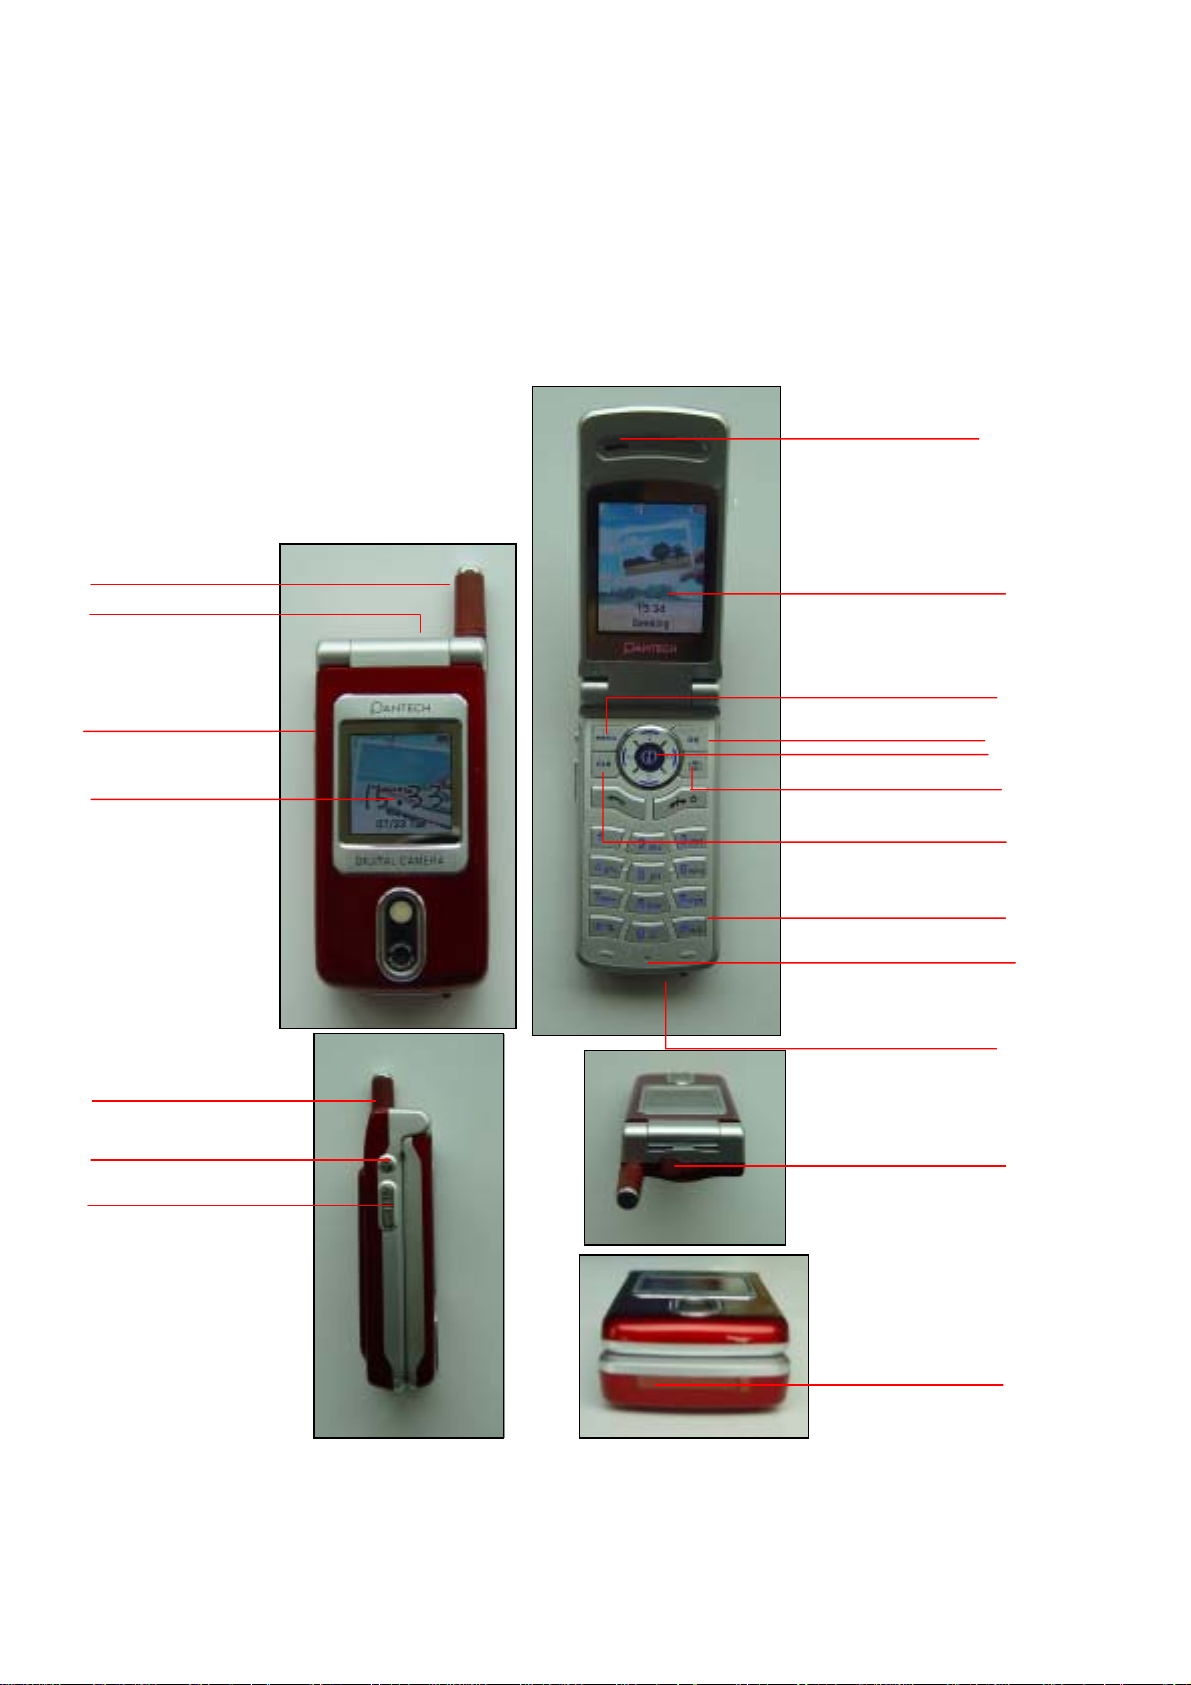
Handset Description
y
E
P
Ad
P
Ad
E
* For detail usage of key
Earpiece
Antenna
ar-microphone
Side keys
Sub display
Antenna
Camera
LCD display
Menu key
OK key
Navigation keys
Camera key
Clear key
Alphanumeric
s
ke
Microphone
ower
Connectors
ar-microphone
aptor
Side keys
ower
Connectors
8
aptor
Page 9
Internal LCD(Main LCD)
There are two areas in both LCD displays (Main and Sub). One is for icons to show the
status of the mobile phone. The other is to show message, phone number, icons and etc.
<Main LCD Display>
Icons are displayed when specific functions are active or when you have received a message.
The figure above shows an overview all possible icons and where they appear.
The table below shows every icons separately and describes the meaning of each icons
Signal strength
Keys
There are function keys, which have one and more features. Following table shows list of
In use This icon indicates in-call state.
Ringing tone This icon will appear when ring type is ‘Ringing tone’.
Vibration
Vib+Melody This icon will appear when ring type is ‘Vib+Melody’.
Short message
Alarm This icon will indicate alarm set
Roaming This icon will appear when roaming service is applied.
Battery This shows the strength of the battery.
This icon shows radio signal strength. The more bars
displayed, the better the signal strength received.
This icon will appear when ring type is ‘Vibration’ and in
Etiquette mode.
This icon will blink if SIM message box is full, or appear if
unread message exits.
function keys.
9
Page 10

Sub-LCD Menu options
Your mobile phone provides extra options for you to select with
sub—LCD menu. The following sections describe options in the
sub-LCD menu and their functions respectively. There is the ways
to access the menu options:
[ Normal access ]
In standby mode with flip close, press [Vol Down] key to enter the
list menu screen. Press [Vol Up]/[Vol Down] keys to browse
between the functions in the main screen, then press [Camera] key
to select and enter. Select the desired function with [Vol Up][Vol
Down] keys and press [Camera] key to confirm.
Press [Vol Down] key for long to return to standby mode.
Recent Call
With this function, you can check recent received call numbers and
you can call to the number as well.
(1). Scroll to “Recent Call” and press [Volume] key.
(2). Scroll to the recent call number which you want to check and
Press [Volume] key to make a phone call. (Calling is possible only
with using ear jack)
(3). Press [Vol Down] key for long to return to standby mode.
SMS InBox
With this function, you can check the received SMS messages.
(1). Scroll to “SMS InBox” and press [Volume] key.
(2). Scroll to the message which you want to check and Press
[Volume] key.
(3). Press [Vol Down] key for long to return to standby mode.
10
Page 11

Flash ON
You can turn on the camera flash for emergency light .
(1). On standby mode, keep pressing [Vol Up] key to turn on the
flash
(2). Release the key to turn off the flash.
11
Page 12
Function keys
There are function keys, which have one and more features. Following table shows list of function
keys.
Function keys
Key Icon Name Key Function
Press this key to make a call, or answer incoming call (except
SEND KEY
END KEY
OK KEY
ANY KEY ANSWER).
Press this key long to redial a last call number.
Press this key once to retrieve the list of last dialed.
Press this key to end a call, to return to standby state in menu
(Cancel, Exit).
Long press this key to turn the phone on or off.
Press this key to enter main menu basically. At each state,
special function/menu will be displayed on the screen above
this key.
Press this key to execute the menu which selected by arrow in
the display.(OK)
MEMU KEY
CLEAR KEY
NAVIGATION
KEYS with
shortcut
keys to WAP,
Sound
setting,
Message
and
Phonebook
SIDE UP and
DOWN KEYS
CAMERA
KEY
Press this key to enter menu. At each state, menu will be
displayed on the screen above this key.
Press this key to clear a single letter and long press this key to
clear a line.
Press this key to return to the previous screen.
Press these keys to move the cursor up and left or down and
right in menu or in list.
In call state, press ‘up’ key to show recent received call list and
press ‘down’ key to show missed call list.
With shortcut keys, you can easily access phonebook, Sound
setting, SMS and WAP browser.
Press these keys to adjust volume of earpiece up and down in
call state.
Press the key to take pictures of people or events while on the
move.
12
Page 13
Quick start
Follow steps below for the first time use;
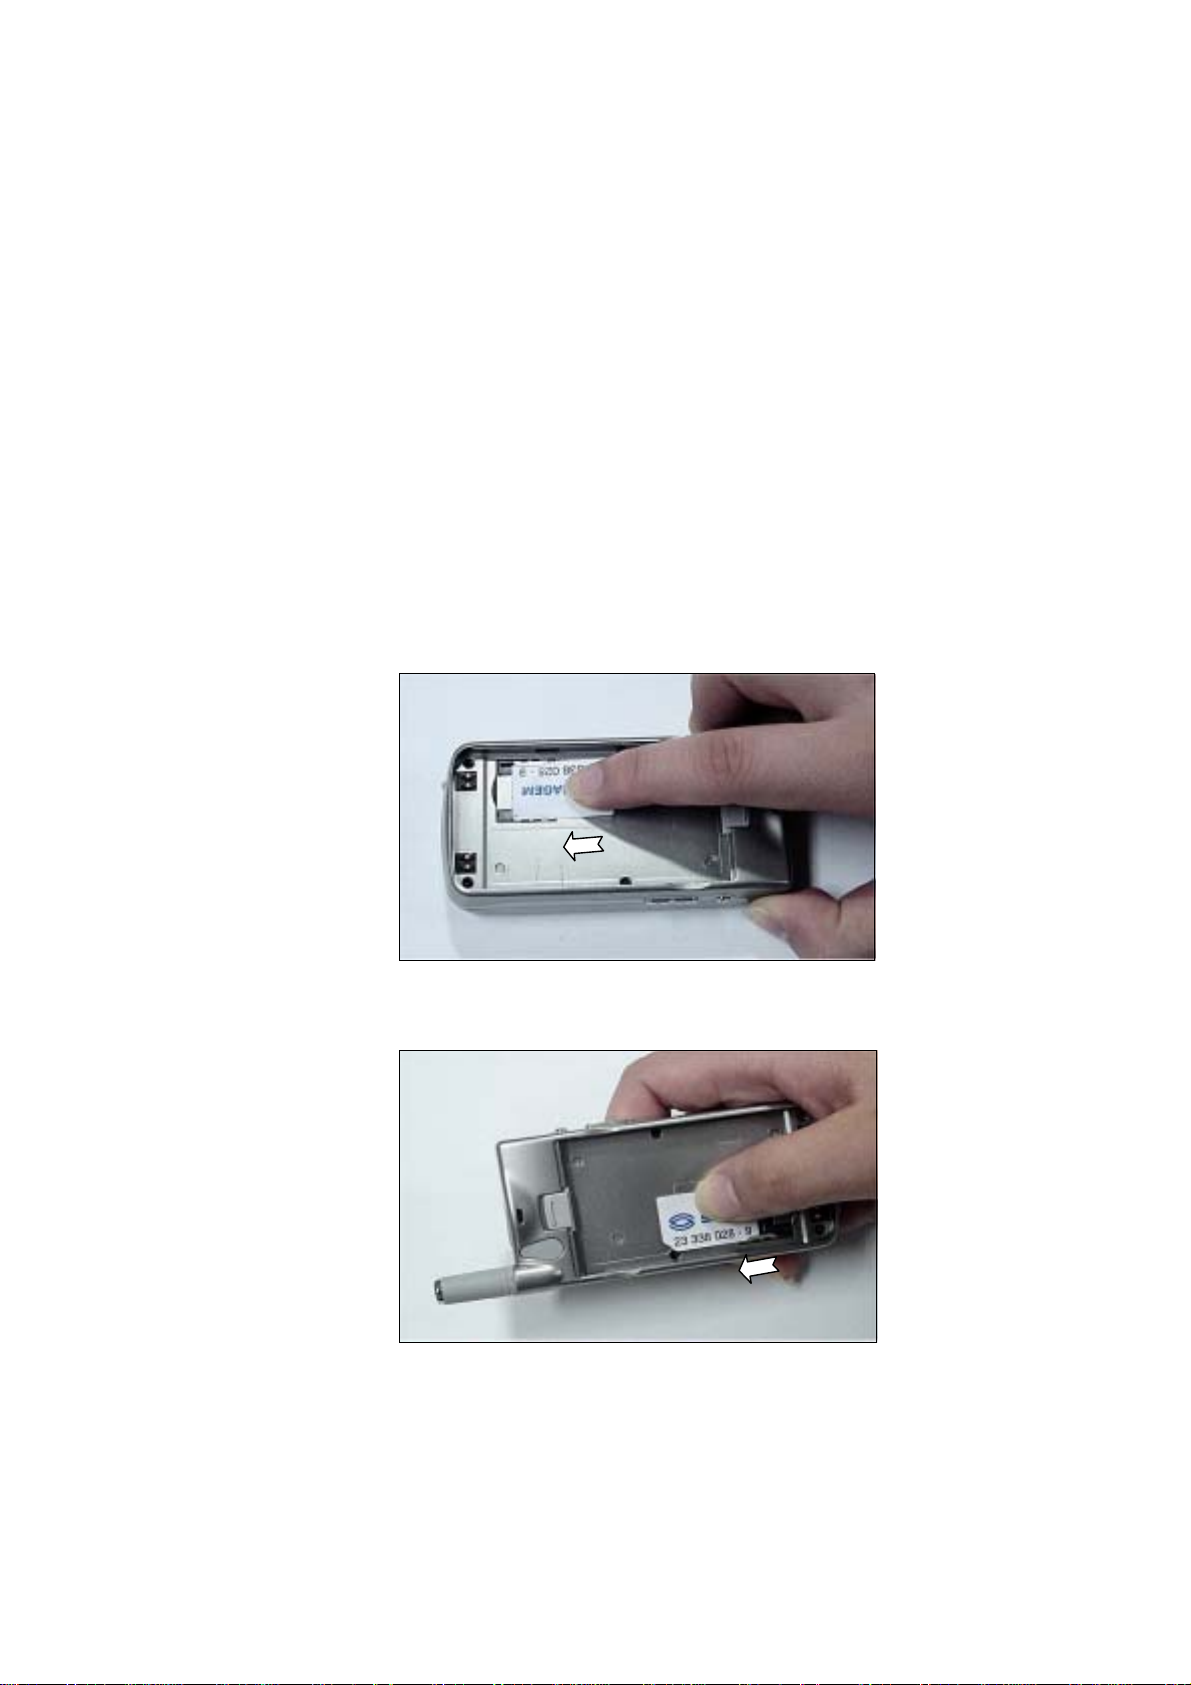
Install the SIM card
When you subscribe to a cellular network, you are provided with a
plug-in SIM card loaded with your subscription details (PIN, optional
services available and so on).
If necessary, switch off the phone by holding down [END] key until
the powering down message is displayed.
1. Remove the battery
2. Check the SIM slot clear, and place the SIM card into slot
3. If you want to remove the SIM card, push it in the direction
of the arrow
13
Page 14
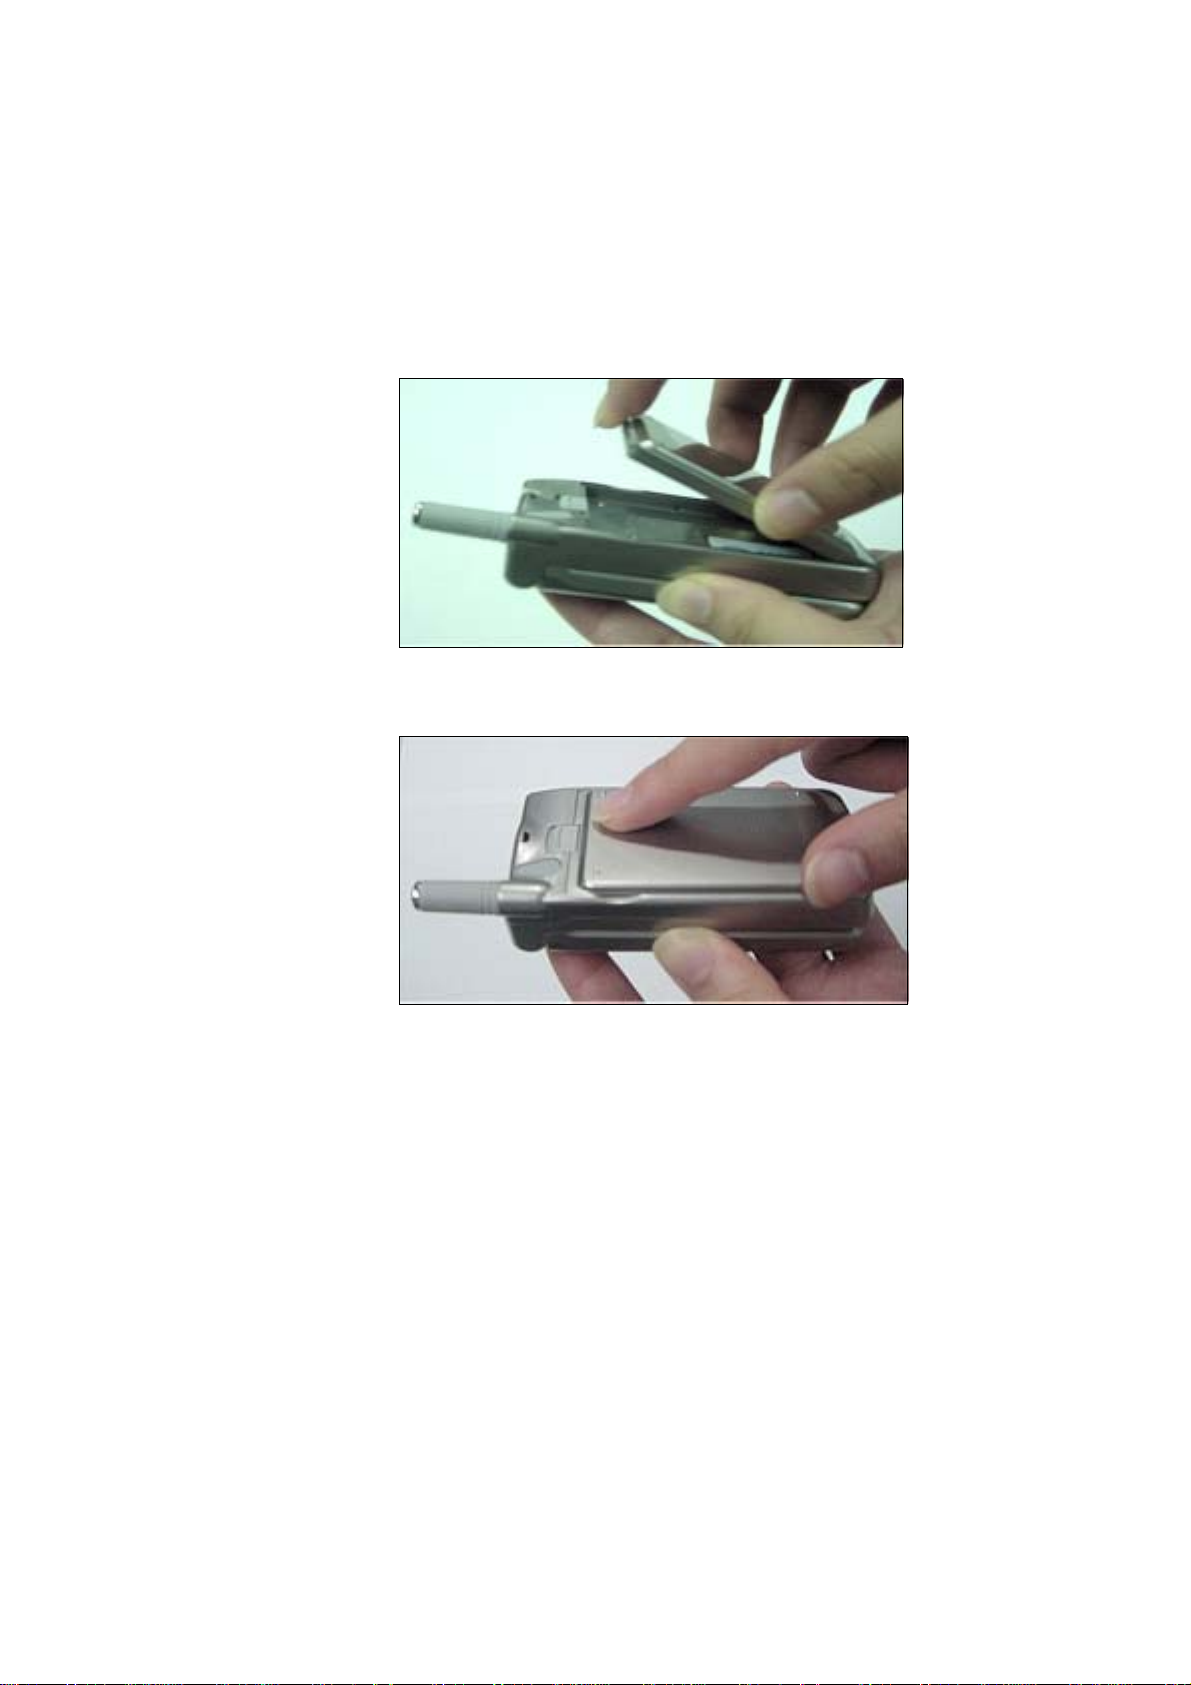
Install the battery
Insert tabs on the base of the battery into the notches on the base
of the phone, as shown bellows:
1. Insert the bottom of battery into the groove at the bottom of the
handset.
2. Press in the top of the battery until you hear a click.
Charge the battery
Your phone is powered by a rechargeable Li-ion battery. A travel
adapter is provided with your phone. Use only approved batteries
and chargers. Ask your local PANTECH dealer for further details.
The phone can be used while the battery is charging
With the battery in position on the phone, connect the lead from the
travel adapter to a standard AC wall outlet located in the bottom
side of the phone, after opening the cover.
When charging is finished, disconnect the adapter from the power
outlet and from the phone.
14
Page 15

Getting started
1. Turn on the phone power
Long key press (3 seconds) [END] key to turn the phone power on.
2. Turn off the phone power
Long key press [END] key to turn the phone power off.
3. Make a call
Phone power on by long key press [END] key.
Insert SIM card into SIM slot if “Insert SIM card” message showed.
Enter your PIN1(Maximum up to 8 digits) and to unlock handset(if applicable.)
After the PIN is accepted, network searching is started automatically.
In this idle mode, dial the phone number with area code. Then press [Send] key to make a
call. When you’d l ike to make an interna tional call, press [0] key long until ‘+’ sign appears
(alternate ly pr es s ‘00 ’). Th en d ial na tion al c ode , are a code and tele phon e number s those you
like. With long press [#] key, you can add ‘P’ pause symbol for around 2 seconds waiting.
!! Emergency call is available even without available SIM. Dial 112 and press [Send] to make
an emergency call.
4. End a call
Press [END] key to end or cancel a call
5. Answer a call
When the phone rings or vibrates, the screen will display the name or the number of the caller
(If network supports and you subscribe to it). Display of name is de pen dent on the data in the
Phone book. Press [SEND] key to answer a call in normal answering mode option. With
special option [Any key], you could answer a call by pressing any key even side up and
down keys except [END] key.
15
Page 16

6. Adjust the earpiece volume
When you are speaking with your phone, press the volume adjustment keys on the side of the
phone to adjust volume of the earpiece. Seven levels of volume are available for your
selection.
7. Browse main menu
Press [Menu] key to enter main menu in standby mode.
Press [End] key to exit menu to standby screen
With navigation keys, [up][left] and [down][right], you can browse among menu items.
To make a decision or answer the question, press [OK] key as YES, or [Clear] key as NO.
8. Type numbers and letters on handset
To enter number, press the number keypad, as you want. To enter letters into handset, you
should be into ‘T9’ mode (e.g. Phone book, Message). Please refer to ‘T9’ on appendix page
Wrong letter can be erased by pressing [Clear] key. You can erase all characters in a line by
long pressing [Clear]. And when continuously pressing, you can erase all character in screen.
16
Page 17

Basic call functions
1. Speed Dialing
There are two ways for you to do one-touch dialing while in standby mode :
You can use the 100 records[00-99] saved in the Phone book by long pressing the d esired
number. For instance, if the number is saved in the Phone book at the location of 5, long
press [5] key to initiate the call.
2. Make an international call
Enter the outgoing national code, or press [0] key for about 2 seconds until “+” shows up on
the display or double tapping [0] key (00) acts as the same as international call symbol “+”.
3. Make an emergency call
Enter 112 (the emergency number) and press [SEND] key. The call will be sent out. (This 112
number can be used in any country whether a SIM card is available or not, as long as you are
included in a GSM network.)
4. Missed call message
If for any reason, an incoming call cannot be answered, a missed call message will appear on
the screen to r em ind you o f t he cal l you miss ed (N etw or k a nd su b scrip tion dependent fea ture,
not available in all areas). To reply to the missed call, first press [MENU] key, then press
[Up/Down] key to select the number you want to reply to and press [SEND] key to dial it.
5. Phonebook shortcut
Under standby mode, you can press the [Shortcut to Phonebook ‘
key to enter the Phone book and browse the sub menu entries.
6. Last number dialed(received,missed)
Press [SEND] key to access the list of lastest dialed(received,missed) numbers. Press
[Up/Down] Key to scroll through the last dialed numbers. Press [SEND] key to send the call
if the number shown is correct.
’(NAVIGATION DOWN)]
17
Page 18

7. Incoming call waiting
(This is the Network and subscription dependent feature. Not available in all areas.)
When a call comes in, you can press [MENU] keys to enter the call options.
[MENU]
1. Answer
2. Reject
3. I am busy
If another call comes in while you are on the phone, you can:
Press [End] key to reject the waiting call.
Press [Send] key to hold on the active call and connect to the waiting call.
8. During call options
When you are on a telephone call, you can press [MENU] keys to enter the call options.
[Menu]
1. Hold
2. End current
3. Mute
4. DTMF on/off
5. Main menu
6. Multiparty
7. End all calls
Each function is described as follows in detail.
Hold
- This function allows you to put a currently active call on hold, so that you c an initiate
a new call.
End current
Mute
choose the Mute function to do so by selecting this function.
DTMF on/off –
Main menu –
- You can end a current call on one of them by selecting this function.
- When want no sound to be heard by your caller when you are on a call. You can
This function allows you to turn DTMF tone on/off.
You can select the main menus by selecting this functions.
Multiparty
18
Page 19

End all calls
by selecting this function.
- Under a circumstance of multi-party call, you can end all calls on one of them
19
Page 20

Menu functions
MENU TYPE
There are two types of Menu in this phone. One is basic menu, and the other is hot folder
menu.
To enter the main menu, press one of
, , and Keys.
20
Page 21
1. Messages
You can send new messages, and check received messages
1.SMS/EMS
EMS(Enhanced Messaging Service) is sent via SMS (Short Message Service). You can add
picture, animation, melody, message and emoticon to a text message, a nd format the text,
using EMS(Enhanced Messaging Service).
Before you start
You must make sure that the number of your service center is set. Usually, The number is
supplied by service provider and is saved on the SIM card.
Each function is described as follows in detail.
Create –
Inbox–
Outbox
Settings
Used space
Used to create a new EMS message to be sent
Displays a list of received EMS messages
– Displays a list of any messages waiting to be sent
– see next ”
– State of SIM records (Capacity, Used records, Unread records)
1.1 Create
1.2 Inbox
1.3 Outbox
1.4 Settings
1.5 Used space
2. SMS/EMS Sub menu
”
21
Page 22

1.4.1 Message center
1.4.2 Message lifetime
1.4.3 Message format
Each function is described as follows in detail.
Message center - Message lifetime Message format –
3. Popup menu
When you read the message, received or sent, in the “Inbox” or “Outbox” in Text message
menu, you can do the same work such as following popup menu shown:
[MENU]
1. Edit
2. Delete
3. Forward
4. Text Replay
5. Voice call
Each function is described as follows in detail.
Edit
- you can edit incoming/outgoing messages.
Allows the address (URL) of the proxy relay or MMSC to be set.
Controls the lifetime of created messages (1 hour – 6 months)
(normal, fax, voicemail, ermes, nation’l paging, x.400, internet)
Delete Forward
you can delete the message.
- you can forward the message with the message.
Text Reply Voice call
- you can call with the originated number.
you can reply the message with the originated number.
22
Page 23
Reading Inbox and Outbox messages
1. Inbox
1. Scroll to “Inbox” and press [OK] key.
2. Press [OK] key from the Inbox messages.
3. Press [Menu] key.
4. Now, You can select “Edit”, “Delete”, “Forward”, ”Text Reply”
or “Voice call” as you want.
2. Outbox
1. Scroll to “Outbox” and press [OK] key.
2. Press [OK] key from the Outbox messages.
3. Press [Menu] key.
4. Now, You can select “Edit”, “Delete”, or “Forward” as you want.
Creating and sending a message
1. Create
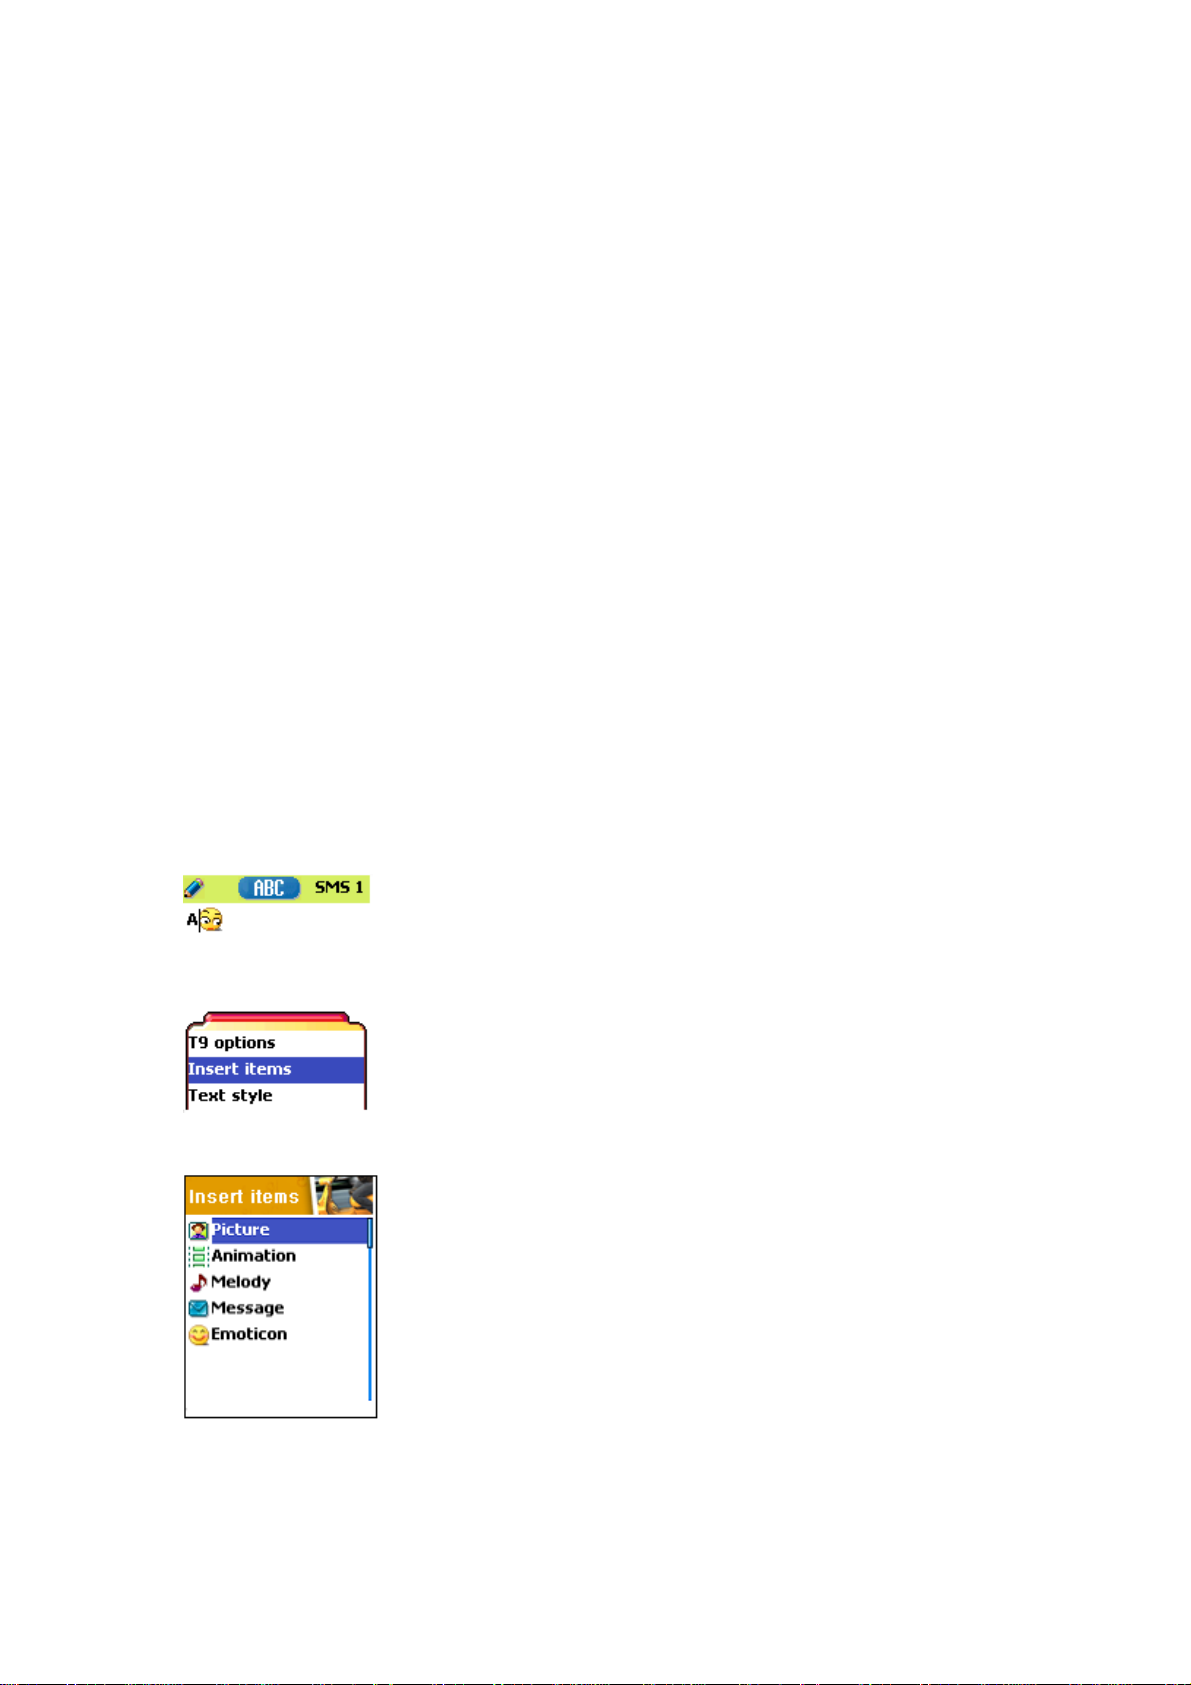
Inserting an item in a text message
1. Scroll to “Create” and press [OK] key.
2. While writing your message press [MENU] key.
3. Select “Insert items” and press [OK] key.
4. Now, You can select “Picture”, “Animation”, “Melody”,
“Message” or Emoticon” as you want.
5. And then select “Predefined” or sometimes “Load”
6. Select an item by using [Navigation] key and then press[OK]
There are two options to insert an item.
Predefined
displayed if Picture or Message is not being selected)
Load –
load form File view or Media box (File system access)
– you can load predefined items in the phone. (only
23
Page 24
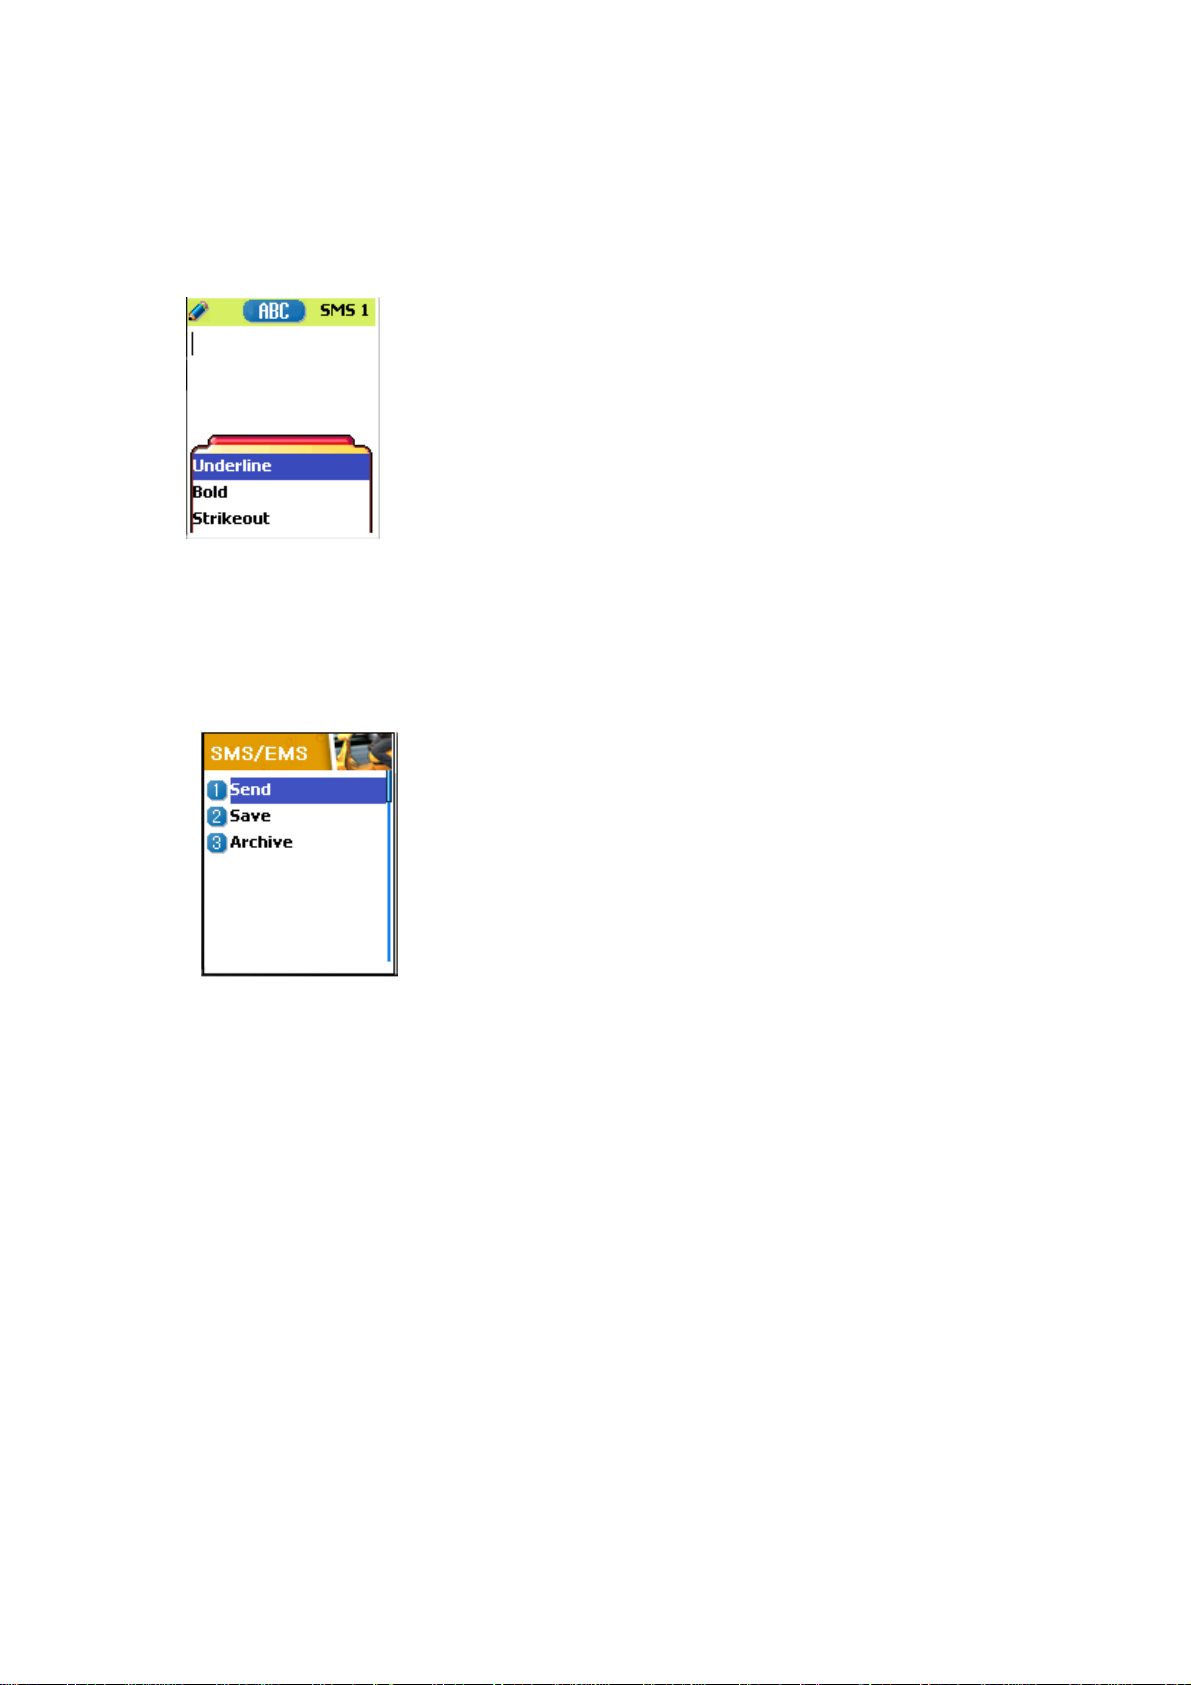
Text style
You can change the text format in a text message.
1. While writing your message press [MENU] key.
2. Select “Text style” and press [OK] key.
3. Select format “Underline”, “Bold” or “Strikeout.
T9 options
You can find how to edit with this options in appendix
page, which explains how to use T9 editor.
2. Sending a text message
1. Scroll to “Create” and press [OK] key.
2. Write your message and press [OK] key.
3. Scroll to “Send” and Press [OK] key.
4. Enter numbers the user, You can also search them from the
“phonebook list” through pressing [MENU] key.
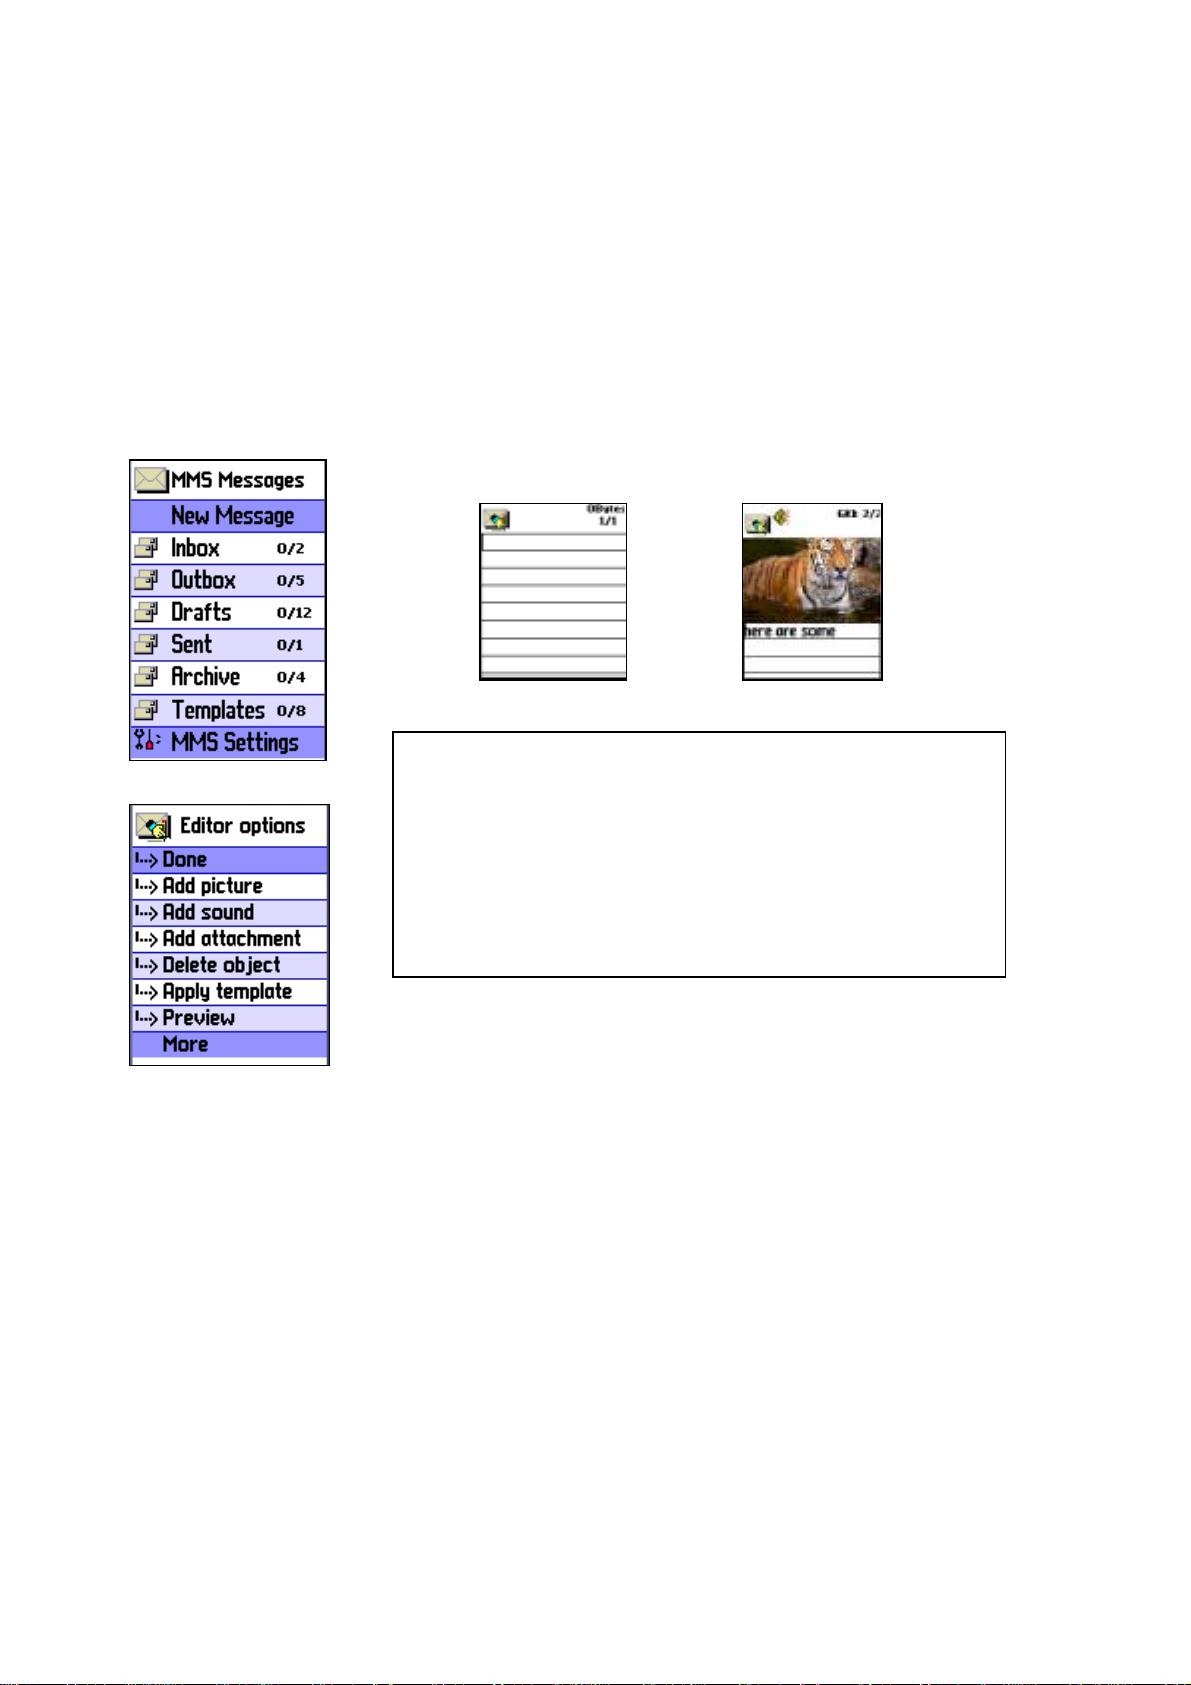
3. Saving message
To save a text message (in SIM)
1. After writing your message press [OK] key.
2. Select “Save” and press [Ok] key.
To save a text Archive (in File system)
1. After writing your message press [OK] key.
2. Select “Archive” and press [Ok] key.
3. Select “Save” and press [OK] key.
4.You can save the message in file system.
24
Page 25

Receiving a message
When you received a text message, the user will be alerted to the arrival of a message in the
convention manner. When the user reads an incoming message the contents are analyzed
and displayed on the screen.
To read the text message
Message is saved in “Inbox” in text message menu. Press [OK] to read the text message.
Saving incoming text message
Incoming text messages are saved in the SIM card. When the SIM card is full, you cannot
receive messages any more.
In this time, you can see the special icon, which alerts that SIM card is full, in your handset.
When you delete one of your saved messages from your SIM card,
then you can receive the message you missed.
To save objects from a text message
If the message text contains embedded components (the picture, animation, melody,
message or Emoticon), you can fetch and save them to your phone memory.
While you are reading a message, if a cursor has been moved at
the object, then you can select it with [MENU] key and save to
the phone (file system).
In this case, if what you have selected is a predefined object,
then you can not save it, but if it is real data (user defined object),
you can do it.
The objects which you saved through the process above can be
loaded from the menu, which is <Load>menu from “insert item//
Picture/Animation/melody/Message/Emoticon//Predefined/Load”.
25
Page 26
2.MMS
Creating and Sending a message
A new message is created by accessing the “New message”. The user is presented with a
screen showing the first page in a blank MMS message.
Notice!
The screen displays the page with an informational/status bar
above the message showing:
The presence of any sounds or attachments on the current page.
The size of the whole MMS in bytes or kilobytes.
The current page number/total number of pages.
Creating multimedia message
1. In Messages menu, select multimedia
select item.
Enter text of message what you wants. For example, “Hello world”.
You can add some objects of multimedia message in any order. – To add an image, press
[MENU] key and select
– To add a sound, press [MENU] key and select
– To add a new page, press [MENU] key and select
If you select
Add image, sound, or attachment
Add picture -> Load
message -> New Message
. Select a picture file(*.jpg) with the cursor keys
Add sound -> Load
Add page.
, a list of items opens. Scroll to the item you
and press [OK] key to
.
Then new page will be shown.
26
Page 27

wish to add and press [ok] key. Then, the icon is shown in the top of the
screen.
To add a text, Press [MENU] key and select
> select
Then, you can see Object Property menu. Now, let’s control for how long
the current page is shown when read. Select “
[OK] key. And scroll
To add a new text press [MENU] key and select
In this example, “The end”.
4
text files(*.txt)
seconds
to add and press [OK] key.
Add page
More -> Object properties
Displayed after
then enter text you want to write.
” and press
-
27
Page 28

Receiving messages
7. Press [MENU] key and select
correction, press [CANCEL] -> [MENU] key and select
8. In the shown Address option menu, move down to the “To:” line
and press [OK] key with the “Add address” line selected.
9. When done entering phone number Press [OK] key.
10. Select “Subject” line with [OK] key and write your subject.
11. And select the
When the user receives a notification of new message’s arrival the
following actions will take place:.
1. In Messages menu, select multimedia
[OK] key to select item.
Send
or
Send later
Preview
for correction. At the end of
Done.
line and press [OK] key.
message -> Inbox
and press
Deleting a message
2. Select received mail and press [OK] key.
Here a user deletes a message from the mailbox.
1. In Messages menu, select multimedia
2. Scroll to the mail you want to delete and press [MENU] key and select
“Delete”
message ->any mailbox
28
Page 29

3.Voicemail
[MENU]
1. Call
2. On
3. Off
4. Settings
With this function, you can call the voice mailbox provided by
your network service provider to listen to the voice mail. You can
enter this item by selecting Call and the phone dial the designated
voice mailbox number for you automatically.
Each function is described as follows in detail.
Call
- The Phone makes a call to pre-defined voice mailbox system to get voicemail.
On
- The Phone makes a call to set voice mail on
Off -
The Phone makes a call to set voice mail off
Voicemail settings –
see next “Settings”
Settings
Box numbers
no/Message no/Disable no/Enable no
- setting the Home Mbox/Roam Mbox/Voice
Alert by call
Alert by SMS
Alert match -
specific icon
When the voicemail comes, it alerts with a
29
Page 30

4.Cell broadcasts
[MENU]
1. Read new
2. Read info
3. Settings
You can receive cell broadcast offered by your network service.
This function is to set and to read info message(Cell
Broadcast)provider, and choose preferring topics and languages.
Each function is described as follows in detail.
Read new
Read info -
network service.
You can receive the message that Newsflashes and District from offered by
Settings
Language/ Set info subjects
You can choose preferring topics and languages where you are
in.
This function is to set Language and information.
-
Language
: You can specify the language of info message. The addition of
new language and elimination of existing language are possible.
-
Set info
: You can specify the topic number of info msg.
Contract network service provider for further information.
- Create subject
list'.
: It will be able to add a new list other than 'Current
- Current list
You can select a ‘Current list’(maximum two) to receive info
message.
: It shows the list, which is stored. It co nt ai ns new l ist s.
30
Page 31

2. Call logs
With this function, you can set Received calls, Dialed numbers,
Missed calls, Clear logs, Call timers and Call costs.
1) Received calls
This function displays the phone number of the received call. Phone
number of received call can operate received time view, phone
number store, delete.
2) Dialed calls
This function displays the list of phone number dialed. With menu
key, “Call time” and “Add to Pbook” features can be displayed.
3) Missed calls
This function displays the phone number or stored name in SIM of
the missed calls. Phone number of missed calls can operate dialed
time and date view.
In the case of ‘Received calls’/’Dialed calls’/’Missed calls’
To move to the list you want, you use scroll up/down key, and then
press OK key. If there is no information in the list, it pops up the
“list empty” message, and return to the previous window in 2
seconds. When you press MENU key, popup-menu shows the list of
view call log, add to P-Book, SMS, and delete.
To make a call with the number in the list, move to the list by using
scroll up/down key, and then press SEND Key.
To view the log information of a certain number, move to the
number by using scroll up/down key, and press OK key. You will
31
Page 32

return to the previous list window by pressing one of OK key, CLR
key, and END Key.
To store a number in the log into the P-Book, select the number by
using scroll up/down key, and press MENU key. Then, POP window
shows “add to P-Book” and press OK key.
To send SMS to the number in the list, move to the number by using
scroll up/down key, and press MENU key. Then scroll to the “SMS”
popup menu, and press OK key. If the number is “withheld”, “no
number” pops up for 2 seconds, and then return to the previous list.
To delete a number in the list, scroll to the number and press MENU
key. It shows “delete” popup menu, and press OK key.
-> During operation, END key selection goes to the idle screen, and
CLE key selection goes to the previous stage. Also MENU key
selection pops up some menu lists, however then, if there is no key
selection for 10 seconds, the popup menu will disappear.
4) Clear logs
This function is to clear Last received, Last dialed, Missed call, Last
received logs of call related.
This function has following sub-options to select.
-Last received/Last dialed/Missed call/Last received
5) Call Info
(1) Call costs
This function records the information of the call cost. You can also
set the maximum value of cost to avoid overcharge.
[1] Last call
32
Page 33

This function displays the cost of the last call with units.
[2] All calls
This function displays the cost of all calls with units. /****You can
also clear logs with PIN2 authorization. ****/
[3] Clear logs
This function is to clear all logs of call cost related after you enter
PIN1.
[4] Cost units
You can read defined unit or set the unit of cost in service area.
This function has following sub-options to select.
-Read units : You can read of Cost unit.
-Set units : You can set price/Unit and currency of Cost unit.
[5] Max cost
You can set the maximum value of call cost in specified unit
/*****with PIN2 authorization.****/
This function has following sub-options to select.
-Read limit : You can read limit of Max units.
-Set limit : You can set limit of Max units.
(2) Call timers
This function records the information of the call duration.
[1] Last call
This function displays the time of the last call.
[2] All calls
This function displays the total time of all calls.
[3] Reset call time
6) GPRS Info
(1) GPRS current
(2) GPRS last
This function display the kbyte sent and received for using GPRS at
33
Page 34

last time.
(3) GPRS all
This function display the total kbyte sent and received.
(4) Clear logs
This function is to clear all logs of GPRS related.
34
Page 35

3. Sound
You can set a sound for ringing, message, key, flip, and etc.
3.1 Ringing setting
3.2 Message alert
3.3 Key tone
3.4 Flip Open tone
3.5 Sound effect
3.1 Ringing Settings
Ring Type
Ring; ring with one of melody, bell, voice sound, natural sound,
or my melody.
Vibration; no sound, just vibration.
Vib then Ring; ring after vibration.
Vib and Ring; ring and vibration come together.
Ascending; ring gets louder and louder.
None(Quit); no ring, no vibration. Only lamp.
Melody Type
There are Melody/Bell Sound/Voice Sound/Natural Sound/My
melody type.
Each type has its own items. There could be minimum 40 items in
the phone.
Ringing volume
You can turn up/down the ringing in 8 steps of volume (0~7).
35
Page 36

3.2 Message alert
-Select mode
Once/Every 2 mins/Every 5 mins/off
tone alerts that there is no message arrived in every 2 minutes/5
minutes.
-Tones
Bell 1/Bell 2/Bell 3 (the number of Tone will change in the near
future) Message Tone selection
-volume
Ringing volume has total 8 steps (0~7).
3.3 Key Tone
Setting: On/Off
Tones
DTMF/Beep/Voice (the number of Tone will change in the near
future).
Key Tone selection (only applicable to the alphanumeric key)
Volume
There are 8 steps in volume (0~7).
3.4 Flip open tone
Setting: On/Off
Tones
DTMF/Beep/Voice (the number of Tone will be changed in the near
future)
Key Tone을 선택(only applicable to the alphanumeric key)
Volume
8 steps in volume (0~7).
36
Page 37

3.5 Sound effect
Connection/Minute minder/Disconnection/Area alerting
/On&Off melody/menu moving
Melody plays when one of the checked conditions is satisfied.
[detail description of sound setting]
Setting the bell/vibration/volume
select the Sounding Setting in the Sound Menu, and scroll to the bell/vibration/volume by
using Up/Down/Left/Right key. Press OK key to save the setting. If you do not want to store
the setting, press CLR or END key.
SMS Tone Setting
choose Message alert, and move to the Mode/Tone/Volume by using navigation key. Press
OK key to store your selection. If you do not want your selection, press CLR or END key.
Key Tone Setting
choose Key Tone, and move to the Setting/Tone/Volume by using navigation key. Press OK
key to store your choice. If you do not want your selection, press CLR or END key. Key tone
only applies to the alphanumeric key.
Flip Open Tone
choose Flip Open Tone, and move to the Setting/Tone/Volume by using navigation key. Press
OK key to store your choice. If you do not want your selection, press CLR or END key. The
37
Page 38

Flip Open Tone sounds when the Flip opens.
Sound effect
Connection tone sounds when the Outgoing Call is alerting.
Minute minder sounds in every 1 minute while talking on a call.
Disconnection alerts the release of the current Call.
Area alerting sounds when the phone goes out of service area.
On & Off melody sounds when the Phone is On/Off.
Menu moving tone sounds when moving to another menu.
Select a tone item by using Up/Down key, and set/reset with th e Right/Left ke y. Press OK key
to save the setting. If you don’t want to store the setting, press CLR or END key.
38
Page 39

4. Settings
You can change items below.
1. Display
1.1 Visual setting
1.1.1 Screen Option
You can change each screen image as shown below.
Idle screen image Power On screen image Power Off screen image
Mocall screen image Mtcall screen image Dialing screen image
To change the screen image, move to the screen you want by using left/right navigation key,
move the cursor to the image change line by using up/down key, and choose an image by
using again left/right key for the screen.
If you do not want the image change for the screen, press CLR or END key.
39
Page 40

1.1.2 Screen Option
You can choose display options for the handset idle screen.
There are three option and shown below.
Screen option : you can change the display image of idle screen.
Display string : you can change the string of the idle screen.
Font color : you can change the font color in handset.
To move to each option, use the up/down key.
Screen option
you can one of 4 images to be displayed by using left/right key.
Normal image : display the image set in Screen setting.
Analog clock : display the analog clock screen.
Calendar : display the calendar screen.
User define image : display the picture taken by camera, or the
image downloaded from internet. You can se t the user defin e imag e
in Fun&Tool\download\set as wallpaper.
Display strin g
You can change the string displayed on the idle screen by using
left/right key.
Time&Date : display Time & Date, and you can change the time
format in setting\time&date\displayformat.
Greeting : disp lay the greeting message yo u input. Yo u can cha nge
the Greeting msg in setting\display\greeting.
40
Page 41

D-day : display the D-day message. You can input the D-day
message in organizer\ scheduler.
Font color
You can change the all text color in the handset.
There are Red, Blue, Green, and Dark grey including default color.
1.2 Greeting
You can insert greeting message.
1.3 Contrast
You can set Main LCD Brightness, Main LCD contrast, Sub LCD
contrast.
Use Navigation [UP/DOWN] Keys to move up and down to the
mode you want to change and then use Navigation [RIGHT/LEFT]
keys to change the value. Each has 8 levels.
41
Page 42

1.4 Backlight
You can set the Light Level of Ma in S ub LCD.
Use Navigation [UP/DOWN] Keys to move up and down to the mode you want to change and
then use Navigation [RIGHT/LEFT] keys to change the value.
1. Light level(off, low, medium, high, maximum)
A. You can set the brightness of LED Back light while it is on.
2. Minimal bright(off, low, medium, high, maximum)
A. You can set the brightness of the LED Back light while it is off after the Light
Duration is expired.(This value cannot be higher than the value of Light Level).
3. Light duration
A. The time until light goes off automatically for no input from you after Back light
was turned on. (always off, 5 sec, 10 sec 20 sec, always on)
2. Date & Time
2.1 Set time
Press OK key after you input the time you want.
42
Page 43

2.2 Set date
Press OK key and store when you move the cursor to the date you want.
2.3 Set time zone
Press OK key and store when you choose the time zone you want.
2.4 Display
Set the time format as 12 hour or 24 hour.
Set the date format as one of D:M:Y, M:D:Y, or Y:M:D.
Choose the display as one of Time only, Date only, or Date & Time.
43
Page 44

Press OK key and store when you choose proper options.
3. Language
Language
Select the language to be displayed.
choose one of lists, and press OK key.
<Information> when choosing Automatic, it shows the Language Preference stored in SIM.
4. Reset settings
Reset settings
Restore the saved setting values into the default values.
Input the handset password, and press OK key when the ‘Restore factory setting?’ pop up
shows, the values are restored into the default values, and then the phone reboots.
44
Page 45

5. Information
5.1 Own number
You can input, edit, store, and delete your phone number.
If there is no number stored, List empty shows. When press OK key
in this state, it goes to the own number edit window. Input the
numbers in the editor and press OK to store the number.
If there is any number stored, press MENU key and select a menu
you want.
1. Edit : modify and edit the number.
2. Add : add new number.
3. Delete : delete the number.
<Information> you can input Own number up to 2
5.2 Software version
You can check the software version
45
Page 46

6. Voice LED
You can set voice LED function.
When the voice LCD function sets on, the sub LCD is flickering with
different colors depending on the receiver’s voice in active call state.
46
Page 47

5. Net Services
1. Divert calls
Divert calls – With this options, you can redirect your incoming
calls to another number predefined by you. Also you choose a
forwarding rule to each service.
1. 1 All calls
Divert all calls – You can redirect all of voice calls, data, fax and
messages to another number.
1. 1. 1 On
Select ON to direct all of the services provided by network, voice
calls, data, fa x, an d mess ages . If y ou se lect “O n”, y ou sho uld e nter
a number to which you wish to direct. After entering the number,
you should enter a waiting time just before directing a call and press
OK to send the configuration to a network.
1. 1. 2 Off
Select OFF to cancel “Divert All Calls”.
1. 1. 3 Status
STATUS shows the configuration set previously, ON or OFF.
1. 1. 4 By service
You can use your handset to divert a specific type of call to another
number if your network supports this feature. You can redirect a call
by services. “All services”[1] enables all calls to divert and you can
choose one of the services, “Voice calls”[2], “Data”[3], “Fax”[4]
or “Messages”[5]. Also choose “All except msgs”[6] to all other
services to divert except the messaging service.
47
Page 48

1.2 When busy
calls diverted when handset is engaged on another call – When yo ur
handset is already connected to a call, you can choose this option
to be diverted to another number.
You can set this as shown in 1.1[Divert All Calls].
1.3 On no answer
calls diverted when handset does not answer – This option allows
you to divert the calls to a predefined number. When you cannot
answer the phone in 5 seconds to 30 seconds (you should enter
this timeout period), the call is diverted.
You can set this as shown in 1.1[Divert All Calls].
1. 4 When not found
calls diverted when handset is out of range – Divert a call (or all
call) when your handset is out of the service range.
You can set this as shown in 1.1[Divert All Calls].
48
Page 49

1. 5 Cancel all
Can cel all the diverts yo u set – You can cancel all the diver ts by
using this option.
2. Call Settings
Call settings – You can choose one of a nu mber of features for
controlling the way in which you make and receive calls.
2. 1 Answer type
Answer type – When a call is incoming to your handset, you can
choose the way you start to answer.
2. 1. 1 Flip open
Select “Flip open” to connect a call by opening the flip.
2. 1. 2 Send key
You can connect a call when you press [SEND] key.
2. 1. 3 Any key
You can answer a call if you press one of the handset keys.
2. 1. 4 Auto answer
After 10 seconds, a call is connected automatically.
49
Page 50

2. 2 Call waiting
Call waiting – Your handset can warn you when you’ve got a
second call while you are already in a call.
2. 3 Caller number
Show caller’s number or called number – You can see the
number of the caller or you can show your number to the caller
when some caller is making a call to you. And vice versa.
2. 3. 1 Show caller no
This option shows the number of the handset making the
incoming call
2. 3. 2 Hide your no
You can hide your handset number when you’re making a call
out.
2. 3. 3 Show called no
This option allows the number of the handset to be displayed on
your screen, to which you are connected, even if your call is
diverted to another number.
50
Page 51

2. 3. 4 Call settings -> Caller number -> Hide if called
You can hide your handset number from any callers. This
function overrides “Show caller no”
2. 3. 5 Call settings -> Caller number -> Caller name
You can see the name matched to caller’s handset number if the
number and its corresponding name is registered in your phone
book.
2. 4 Automatic redial
Try to redial automatically – If the call is dropped when you’re
making a call, your han dset tr ies to di al out r epeate dly 2 or 4 times.
You can choose the number of trials.
3.Network settings
(1) Preferred N/W
With this function, you can set preferred list of network.
This function has following sub-options to select.
- Insert : add the network to the top of the preferred network list
- Added to end : adds the network to the end of the preferred
network list
- Delete : delete the network name
(2) Add new N/W
You can make the list by entering network service provider code.
This function has following sub-options to select.
- Add : Enter the country code, network c ode, and network name
as they are requested, and this can include new networks whose
network codes are not known to the handset.
- Change: Choose a network name to change and then enter the
network code, country code, and network name newly to change
51
Page 52

the network.
- Delete: delete the network name
(3) N/W selection
You can select network with your flavor or make a list of network
that you like out of the available networks.
[1] Automatic
A network can be selected automatically.
[2] Manual
You can choose a specific network to subscribe.
(4)Change password
The network password is available from your network service
provider. It is also used for setting Network Call Barring options and
is not the same as your SIM card PIN1.
4.Security setting
This menu selecting needs to enter the password at first time.
You must pres s the [OK] key after entering the pass word for getting
the permission.
Three fail to enter password makes it to return to main menu.
The security functions can help to prevent your phone and SIM card
from being used by an unauthorized person. With this function, you
can set the password and settings relating to phone.
/**********This function customizes the call barring service, fixed
dialing mode.*****/ You’ll be prompted to enter handset lock
password.
(1) SIM password
52
Page 53

-Lock : When the handset is power-up, PIN1 password is required
to access the main menu.
-Unlock : When the handset is power-up, no PIN1 is required and
you can see the main menu.
-Change PIN : This menu is visible when “SIM lock setting” is set to
“Lock”. The user can change PIN1 immediately.
(2) Handset lock
Your handset can be locked to prevent calls being made unless the
correct handset lock code is entered when it is switched on. The
handset will remain locked even if the SIM card is removed and
replaced with another one. You can still make emergency calls while
the handset is locked.
This function has following sub-options to select.
-Unlock
-Call only
- Lock
-Change code
(3) H/S barring
You can control types of calls your handset makes and receives in a
number of ways. Some of the bars are set using the handset.
The handset itself can be set to bar certain types of calls. These
are:
[1] Incoming call
You can set this function Lock/Unlock using selecting Lock/Unlock
in the menu. Then your phone can bar all incoming calls.
[2] Outgoing call
You can set this function on by the case. You can bar outgoing call
that match a certain number prefixes specified by the user. As you
53
Page 54

select the List of bar outgoing menu. A List of prefixes is showed
then you can add, or edit, or delete one entry or the entire list.
After setting call barring, your phone will display the message “Call
fail Call barred”, when you make a call which restricted by you.
-Sub option : Bar all, Bar prefixed, Unlock
(4) N/W barring
This feature is dependent on network service provider and
subscription. Some of the bars are set by the network service
provider. You can set the call barring service all or each services. It
is possible to select a range of call barring options. At each range,
you can see the status and set it On/Off. You’ll be prompted to
enter network password when you change the setting. You can clear
all settings of call barring. These are:
[1] Foreign calls
to bar the outgoing international calls
[2] Only Local/Home
to bar all calls except those on local and home networks
[3] Incoming calls
to bar all incoming call
[4] Incoming abroad
to bar incoming calls if the handset is abroad
[5] Outgoing calls
to bar all outgoing call
When you select one of the above menu,
1.The call list to be barred is displayed
2.You choose one item in the call list
3.Press OK, and you can make the call
-On : to be barred
-Off : not to be barred.
54
Page 55

-Status : to see whether the call is barred or not
[6] Clear all
After selecting a call type, activate or deactivate service type of
information as following.
- All services
- Voice calls
- Data
- Fax
- Messages
- All except msgs
(5)Fixed dialing
[1] Fixed dial setting
-Enable : This option allows the user to only dial those numbers
which match a set of “filters” stored in a list on the SIM
-Disable : Select this option to disable the “Fixed Dialing”
[REF] The PIN2 password is required wh en you turn it on or turn it
off
[2] Fixed dial list
Display the Fixed dial list
(6)CUG settings
[1] List CUGs
1.CUG name list specified by the user is displayed
2.Select the CUG name
3.Press OK, and you can
-Add : add a new CUG name to the index list
-Edit : The user can associate their own text, rather than the default
text, with each of the 10 CUG identifiers
-Delete : The pre-set CUG identifier is deleted.
55
Page 56

-Clear all : The all the pre-set CUG identifiers and CUG names are
erased.
[2] Select
1.CUG name list specified by the user is displayed
2.When the user selects a CUG from the menu, the corresponding
CUG index will be sent when a call is set up
56
Page 57

6.Organizer
In Organizer, you can set alarms, keep track of events, make notes, use a simple calculator,
convert measures, and time events.
1. Alarm
Navigation [Left] Button Æ 1.Alarm
You can set alarms to ring for once, or on daily or weekly base.
[Default screen without any alarm registered]
Adding & Deleting alarms
Press [Menu] key -> [OK] button.
Fill in the alarm time and scroll down once to On/Off toggle bar.
Then, decide On or Off.
At the next scroll bar, you can set this alarm to ring just once, or daily or weekly base.
57
Page 58

[ repeat type : Once] [ repeat type : Daily] [ repeat type : Weekly]
If you choose [Once], then it will ring just once on the given Alert Date.
If you choose [Daily], then it will ring every day at the given time.
If you choose [Weekly], then it will ring on the weekdays you check by pressing Navigation
Right [->] key.
Selecting alarm melody,
Press [Menu] key then you will see a popup menu where if you select [Melody], you can
select alarm melody you like to hear.
[On MorningCall] option lets you hear alarm even when your phone is on silent mode.
58
Page 59

Up to 5 alarms can be added.
2. Scheduler
Navigation Left [<] key Æ 2.Scheduler
You can keep track of your events by putting short notes and alarms
on the calendar.
You will see a blue rectangular cursor on the calendar which you
can move around with navigation keys.
[Calendar without any event set]
Adding & deleting Events
Move the blue rectangular cursor onto the date on which you want
to put an event. Then press [Menu] key -> select [Add Event].
Or, just press [OK] key on a date and [Menu]key -> select [Add
Event]
59
Page 60

Then you will see following screens.
– Use navigation keys to scroll up and down.
1) Event : You can choose the type of the event
( Meeting, Call, restaurant, entertainment, birthday, Travel, and
Others).
2) Memo : Press [->] to put a short note about the event.
3) Time : Set the alarm time.
4) Alarm alert : You can set when the alarm to ring
(On time, 1Hour Before, 2Hour Before, 1Day Before, 2Day Before,
and No alerting )
5) repeat : You can set how often the event happens.
( Once, Daily, Weekly, Monthly, and Yearly )
ex) For birthday, you would make it Yearly.
6) Press [Menu] to choose the melody to hear on the event time.
7) Now, everything’s done. Just press [OK] to save the event.
When a new event is set on a date, it is marked on the calendar.
You can see the events registered on that day on the bottom of the
screen. Press [OK] to see the details of the events.
60
Page 61

OK Æ MenuÆ
Press [Menu] key and then you will see a popup menu.
1. Add Event : To add anther event on the selected day.
2. On D-day : Show you how many days are left until the event.
3, 4 Delete & Delete All : Deletes one or all of events registered on the selected day.
5. Memory Info : shows the number of events registered.
To see all events put on the calendar
Press [Menu] key Æ select [View All Event]
Jumping to specific date
Press [Menu] key Æ select [Goto Date]
61
Page 62

3. Memo
You can keep short notes on your phone.
Press [MENU] then you will see following sub menus.
1. Add : You can create a short note.
2. Delete : Delete the selected note.
3. Delete all : Deletes all notes.
After you are done with writing, press [OK] key to save the note.
You can edit notes by pressing [OK] key on the list view.
You can keep notes up to 20.
62
Page 63

4. Calculator
Addition, subtraction, multiplication, and division of decimal numbers are supported.
One of the four operators is selected with navigation keys. [Ok] key
gives you the result of calculation. Press [*] Key to set point and
[#] to toggle the sign of number.
Example : 6 X 5 / 2 + 2 =
[Keypad 6], [Scroll Left], [5], [Scroll Right], [2], [Scroll
Up],
[2], [Ok Key]
5. Converter
In Converter, you can convert measures such as Length, Area, Volume
and Weight from one unit to another.
Basically, ‘Length’ includes cm, m, inch, feet, yard and mile. ‘Area’
includes sq. m, a, sq. feet, sq. yard and acre. ‘Volume’ includes cu.
cm, cu. m, L, cu. inch, cu. fee t, c u. yar d and g allo n . ‘We ight’ includes
g, kg, t, grain, oz and pound.
Select the measure among Length, Area, Volume and Weight pressin g
navigation [Left] key or [Right] key.
Select the target unit pressing navigation [Left] key or [Right] key
after moving down using navigation [Down] key.
Enter the target value pressing keypad and dot(.) using key [*].
63
Page 64

Select the result unit pressing navigation [Left] key or [Right] key.
This converter displays the result value converted whenever entering
the target value or changing the target unit/result unit.
It is impossible some of units are converted. In that case, this
converter displays the result value as zero.
6. Stop Watch
You can time an event using this stopwatch function. The stopwatch
can be operated with the navigation key. Press
event, press
time and wait
Pause
to pause timing and press
Start
to time an
Reset
to clear the
64
Page 65

7. Fun & Tools
1.Games
- Smokey
In the middle age, at the peaceful forest Village, Dark monsters
(Smokey) haunt and make there very dirty. The duty of a sorcerer
boy is keeping the village clean and peaceful. He must catch and
cage them up. He can only push the monsters in the cages and one
cage is for just one monster. If all of the monsters are in the cages,
Stage will be cleared.
This game consists of over 200 game maps applied various
difficulty.
Basically, this game constructed with four menus [START, HELP].
You can select one of four menus using keypad and navigation key.
With key [LEFT/4] and [RIGHT/6], you can change menu options
and with Key [UP/2] and [DOWN/8] can move up and down from
the menu. The game-starting button is [OK/5].
The game player could make it to move by pressing each direction
key [LEFT/4], [RIGHT/6], [UP/2] and [DOWN/8]. View Option
Menu to select stage is [0] key. You can make PAUSE state with ‘∗’
key.
65
Page 66

2.Downloaded
You can view a list of downloaded images and melodies and execute the basic file operation
like browse, delete, rename, set as wallpaper, play, and view.
1. image file browser
View a list of image files
Browse image files using UP/DOWN key.
©
ª
If you want file operation, then press MENU key and browse file operation you want using
UP/DOWN key.
©
ª
66
Page 67

View the full screen image.
Set as wallpaper
Press OK key after saving to wallpaper image. If you want to display wallpaper image then
display visual option
goto
View file information.
.
Delete the image file..
67
Page 68

if the confirm window popuped, then press OK key.
Don’t press any key and wait a moment if you want to cancel deleting.
Rename the file
Press OK key after m o di fy i ng the file name.
68
Page 69

2. Animation file browser
View a list of animation image files
Send via SMS
refer the SMS
3. Melody file browser
View a list of melody files
69
Page 70

3. Voice record
You can record your voice or those of other people using this
functionality. This is composed of the voice recorder and the voice
player. So, you can record y our voice with the recorder and
then play it with the player.
Using the key [MENU] on the v oice memo view list, you can go int o
the voice recorder as the following picture.
Basically, the voice recorder have the functionalities as RECORD /
STOP / PLAY (PrePLAY) / SAVE.
If you press the key [SAVE] after completing the voice recording, you
can take a brief note with the te xt editor, and then see the recorded
voice memo on the view list.
If you want to play the recorded voice memo, you can play it using the
voice player that entered by pressing the key [OK] on the
corresponding list.
[ Notes ] Max recor d able time : 30 Seconds / 1 v o i c e m e m o
Max recordable memo : 3 Voice memos
Refresh : reloads the current page(not the cached version)
70
Page 71

4.Wap
You can surf on Internet with WAP browser. That means you can
connect to Internet anywhere, anytime.
Contact to nearest dealer for detail inform ation.
1) Home
2) Resume
You can reconnect the latest web site.
3) Bookmarks
You can store on Internet address with WAP browser.
4) Push messages
Mobile can receive Push Messages from Service Provider.
71
Page 72

(1) Connection settings
5) Settings
With this function, you can set Connection settings, Security
certification, Cache mode, Push security.
72
Page 73

A. Homepage : This is an address of homepage.
B. Image : You can select image display option.
C. Connection : You can select connection-orientation/connection-less or with-
security / without security
D. Gateway : This is an ID and password of Gateway
E. Bearer : You can select bear type( Data / SMS / GPRS )
F. Data options
① IP address : IP address of Gateway
② Dial : Dial number
③ DataCall Type : ISDN/ analogue
④ Data Call Speed : 2400/4800/9600/14400 bps
⑤ Userid
⑥ Password
⑦ Timeout : 30/60/90/120 msec
G. SMS options
① Server number
② Service number
H. GPRS options
① Ip Address : Gateway IP address
② Access point : Access point name
③ User id
④ Password
73
Page 74

(2) Security
These are lists of Security Certification.
(3) Cache mode
You can set mode in two options(Always check/Never check).
(4) Push security
-Accept all
-Trusted only
-Accept none
74
Page 75

3) Empty Temp File
-Empty cache
-Empty Cookies
-Empty Password
4) Version info
This function is to view the software version of WAP browser.
5) On-line menu
If you press a menu key when browsing, browser menu will be
available.
Stop : stops current page download
Go back : navigates back one page in the history list
Bookmarks : presents the list of bookmarks
Add bookmark : creates a new bookmark for the page you are
viewing.
Enter address : allows you to enter a URL to browse to
Home : takes you back to the top of curr e n t pa ge
Top : jumps you back to the top of the current page
75
Page 76

5.Camera
With the camera you can take pictures of people or events while on
the move. The pictures are manually saved in the images application,
where you can rename them and organize them in folders:
[ Snapshot ]
This menu allows you to take a picture. You can make it by pressing
numeric ‘1’ key or selecting ‘Sanpshot’ on the camera menu.
<preview> <captured>
A. Process
i)
Access snapshot then you can see the preview mode
ii) Press ‘OK’ or ‘Side camera’ key to take a picture.
iii) Press ‘OK’ key to save the photo.
Enter a name for your photo and press the ‘OK’ key.
Press ‘END’ or ‘MENU’ key to go back preview mode
without saving.
iv) In preview mode, if you press ‘Volume Up/Down’ key, you
can choose main LCD or sub LCD as a view screen.
v) In preview mode, yo u can change the setti ng values using
‘navigation’ key.
Use ‘left-right navigation’ key to change the target.
Use ‘up-down navigation’ key to chan ge the targe t’s val ue.
The target is displayed on the bottom left side of the
screen and it’s present set value is displayed on the
bottom right side.
[ Sticker shot ]
This menu allows you to take a sticker photo. You can make it by
pressing numeric ‘2’ key or selecting ‘Sticker shot’ on the camera
.
76
Page 77

menu.
A. Process
The process is same with the Snapshot process.
<preview> <captured>
[ Album ]
This menu allows you to manage the taken pictures. You can make
it by pressing numeric ‘3’ key or selecting ‘Album’ on the camera
menu.
<List mode> <Zoom mode>
A. Album’s new mode has list mode and zoom mode.
Press ‘OK’ key to move between the modes.
B. You can choose a picture in the view mode using navigation
key.
C. In view mode, use menu key to use the following options.
i) Set as wallpaper : Set the photo to be displayed on
the idle screen as a background image.
ii)
Info. : See the selected picture’s information
iii)
Rename : Change the selected picture’s name.
iv)
Delete : Delete the selected picture.
77
Page 78

v) Delete all : Delete the whole pictures saved at the
album.
[ Setting ]
This menu allows you to manage the taken pictures. You can make
it by pressing numeric ‘4’ key or selecting ‘Settings’ on the camera
menu.
A. You can adjust various setting value related with camera using
‘Navigation’ key.
Use ‘left-right navigation’ key to change the target.
Use ‘up-down navigation’ key to change the target’s value.
The present set value is displayed on the bottom side of the screen.
B. Press ‘OK’ key to save the changed set values and exit. Press
‘END’ key not to save and exit.
6.Memory info
It shows the memory in use, and the memory left.
View the memory info [MENU] – [4] – [6]
Press OK key
78
Page 79

8. STK
The feature allows you to use a set of commands and procedures during the network
operation of GSM.
It is available only when provided by service provider
Please contact your service provider for more details
79
Page 80

[HOT KEY]
Phonebook
Phone book menu allows you to set up your own phone book. You
can add or delete the records anytime you want. In addition, you are
able to choose to save the records either in SIM card memory or
phone memory. You can store up to 500 entries in the phone book.
※You can use the [Phonebook] menu by press navigation
key(down key) in idle mode.
(1) Group search
You can search a person’s number registered to each group.
ok ok
menu/select ‘Edit’
(2) Name Search
80
Page 81

Select each number with
left & right navigation key.
If press Ok key, Search a person in the PhoneBook list by typing
PINYIN or AlphaBet in the T9 Editor. If no input in the T9 Editor,
show the total list of Phone Book.
ok ok
menu/select ‘Edit’
If the size of a Name overflows, it scrolls. Move to each phone
number with navigation key. You can make a call with number listed
first by pressing Send Key in a list. A list can have 3 phone numbers
(handphone, home, office), and if you want to make a call with one
of the numbers, press the Send Key in the selected number list. The
last number in the list is the number in scrolling.
Window when Menu Key pressed in idle state
•Search (search a number in the list)
•Edit
•Delete (delete all numbers of the person)
Window when Menu Key pressed in the each number
•Delete(delete the number)
•Add to Speed (store the number to the S pee d Dial)
•Send Message (Menu to send SMS / EMS / MMS)
Change to the View Name by pressing Ok Key in the list. It shows all
81
Page 82

(3) Add New Name
(4) Speed Dial List
(5) Settings
of the information about the person, but can not modify the
information. To modify the information, press Menu Key and select
Edit.
Add new phone number in the Edit mode.
To edit the Name / PhoneNumber / Memo / Picture, move to the
item and press any key on the item. You can select group /
individual bell by pressing left or right navigation key.
You select Picture, then go into Album. By pressing OK Key, you
can store the picture.
scroll
You can store up to 100 of Speed Dials (00 ~ 99). Name &
PhoneNumber are toggling one another in turn. To select Speed Dial
#0 in idle state, press long 00, then you can make a call with the
number.
Icon, PhoneNumber, and Name are shown in the list. To store a
number into the Speed Dial list, select a number, and press Menu
Key and choose Add to Speed, then press OK key in the list you
want (00 ~ 99).
82
Page 83

5-1) Save nos.to
Select the memory for an item to be stored by pressing OK key.
Memory choice will be one of the SIM card / Phone memory /
Choice, etc. In the case of Choice, when you select Add New Name
in the menu #3, the window asking which memory (Sim / Phone)
you want will be shown.
5-2) Used space
Show the memory currently used.
Store total 500 entries to the phone book.
5-3) Group ring tones
Select a bell sound for each group with navigation key(up, down,
left, right)
83
Page 84

Hot folder
This menu is consist of lists that frequently used. Press left nav igation key in idle mode.
1. Game
2. Downloaded
3. Display
4. Alarm
5. Scheduler
84
Page 85

Statement according to FCC part 15.19
This device complies with Part 15 of the FCC Rules. Operation is subject to the following two
conditions: (1) this device may not cause harmful interference, and (2) this device must
accept any interference received, including interference that may cause undesired operation.
FCC ID: JYCG510
Statement according to FCC part 15.21
Modifications not expressly approved by this company could void the user's authority to
operate the equipment.
Statement according to FCC part 15.105
NOTE: This equipment has been tested and found to comply with the limits for a Class B
digital device, pursuant to Part 15 of the FCC Rules. These limits are designed to provide
reasonable protection against harmful interference in a residential installation. This equipment
generates, uses and can radiate radio frequency energy and, if not installed and used in
accordance with the instructions, may cause harmful interference to radio communications.
However, there is no guarantee that interf erence will not occur in a particular installation. If
this equipment does cause harmful interference to radio or television reception, which can be
determined by turning the equipment off and on, the user is encouraged to try to correct the
interference by one or more of the following measures:
. Reorient or relocate the receiving antenna.
. Increase the separation between the equipment and receiver.
. Connect the equipment into an outlet on a c ircuit differe nt fr om that to which the receiver is
connected.
. Consult the dealer or an experienced radio/TV technician for help.
RF exposure FCC
Tests for SAR are conducted using standard operating positions speci fied by the FCC with
the phone transmitting at its highest certified power level in all tested frequency bands.
Although the SAR is determined at the highest certified power level, the actual SAR level of
the phone while operation can be well below the maximum value. This is because the phone
is designed to operate at multiple power levels so as to use only the power required to reach
the network. In general, the closer you are to a wireless base station antenna, the lower the
power output.
Before a phone mode l is ava ila ble f or sal e to th e publ ic, it mus t be tested and certified to the
FCC that it does not exceed the limit established by the government-adopted requirement for
safe exposure. The tests are performed in positions and locations (e.g., at the e ar and worn
on the body) as required by the FCC for each model. (Body-worn measureme nts may differ
among phone models, depending upon available accessories and FCC requirements). While
there may be differences between the SAR levels of various phones and at various positions,
they all meet the government requirement for safe exposure.
For body worn operation, to maintain compliance with FCC RF exposure guideli nes, use only
accessories that contain no metallic components and provide a se paration distance of 15mm
85
Page 86

(0.6 inches) to the body. Use o f other accessories may violate FCC RF exposure guidelines
and should be avoided.
Health and Safety Information FCC
Exposure to Radio Frequency (RF) Signals
Your wireless phone is a radio transmitter and receiver. It is designed and manufactured not
to exceed the emission limits for exposure to radio frequency (RF) energy set by the Federal
Communications Commission of the U.S. Government. These limits are part of
comprehensive guidelines and establish permitted levels of RF energy for the general
population. The guidelines are based on the safety standards previously set by both U.S. and
international standards bodies:
This EUT has been shown to be capable of compliance for localized specific abso rption ra te
(SAR) for uncontrolled environment/general population exposure limits specified in ANSI/IEEE
Std. C95.1-1992 and had been tested in accordance with the measurement procedures
specified in FCC/OET Bulletin 65 Supplement C (2001) and IEEE Std. 1528-200X (Draft 6.5,
January 2002).
Ministry of Health (Canada), Safety Code 6. The standards include a substantial safety margin
designed to assure the safety of all persons, regardless of age and health. The exposure
standard for wireless mobile phones employs a unit of measurement known as the Specific
Absorption Rate, or SAR. The SAR limit set by the FCC is 1.6W/kg *.
* In the U.S. and Canada, the SAR limit for mobile phones used by the public is 1.6 watts/kg
(W/kg) averaged over one gram of tissue. The standard incorporates a substantial margin of
safety to give additional protection for the public and to account for any variations in.
86
 Loading...