

Page 1

CHARACTERISTIC SPECIFICATION
CHARACTERISTIC SPECIFICATION
Display
Dual clamshell TFT Main LCD .
Main LCD : 260,000 TFT Color Display (128 X 128)
Sub LCD : B&W Display ( 96x65)
Melody
40 Polyphonic Ringtone
Dimension &Weight
76*40*23.5mm with Slim Battery
90g with Slim Battery
Performance
Talk time: up to 180minutes (with 680 mAh Battery)
Standby time:up to 150hours (with 680 mAh Battery)
Operating Frequency
GSM 900MHz / DCS 1800MHz Dual Band
Some of the contents in this User Manual would differ from that in your
phone.
It may differ depending on the S/W version and the network provider you
subscribed to.
1
Page 2

CAUTION
CAUTION
Please check and follow simple guidelines below for your safety and proper operation of the
phone.
ANTENNA
Using unapproved antenna can cause severe damage or malfunction to
the phone.
TRAFFIC SAFETY
Firstly, check and make sure you are aware of the traffic regulations
related to the wireless phone use. Don’t use a hand-held phone while
driving a vehicle. If you want to use the phone while driving, please
install a car kit.
ELECTRONIC DEVICES IN VEHICLE
RF(Radio Frequency) signals may affect improperly installed or
inadequately shielded electronic devices.
CAUTION
CAUTION
PUBLIC PLACE
Do not turn on the phone in the area where wireless phone use is
prohibited.
BOARDING AN AIRCRAFT
Switch off your phone before boarding an aircraft.
The use of wireless telephones in an aircraft may be dangerous to the
operation of the aircraft.
EXPLOSIVE ATMOSPHERES
Switch off your phone in any area with a potentially explosive
atmosphere and obey all signs and instructions.
Do not separate battery from the phone in a potentially explosive
atmosphere.
HANDS-FREE KITS
Do not install the hands-free kits in the area over the air bag, in the air
bag deployment area, or in the area where serious injury could result.
MEDICAL DEVICES
Switch the phone off in hospitals.
Follow any regulations or rules of the hospital.
Switch the phone off to avoid interference with pacemaker, or even other
medical devices.
Consult a physician or the manufacturer of the medical device if you have
any questions about using the phone in hospital.
2
USER GUIDE
If the phone does not work properly, take it to the nearest qualified
service facility.
Always use only approved accessories and batteries.
Do not connect incompatible devices.
RF(Radio Frequency) from the phone can affect to the human body, so
avoid prolonged exposure to RF as possible.
Remember to make backup copies of important data, such as phonebook,
etc.
3
Page 3

CAUTION
CAUTION
EXPOSURE TO RADIO WAVES
Your mobile phone is a radio transmitter and receiver.
It is designed and manufactured not to exceed the limits of exposure to RF
energy recommended by independent scientific organizations through
evaluation of scientific studies.
Use only batteries, chargers and accessories approved by the authorized
manufacturer. The use of unauthorized items can not guarantee the
permitted guidelines, and also can not ensure the safety of all persons,
regardless of age and health.
PROPER USAGE
Use the phone only in its normal operating positions.
Don’t touch or bend the antenna unnecessarily while you are calling. It
may degrade the call quality and eventually limit the battery’s
performance.
Do not attempt to disassemble the phone. Non-expert handling may
cause damages
Use only the supplied or approved batteries, chargers and accessories
with this phone model. The use of any unauthorized items may invalidate
the warranty.
MEMO
MEMO
4
5
Page 4

TABLE OF CONTENTS
TABLE OF CONTENTS
TABLE OF CONTENTS
TABLE OF CONTENTS
PACKING ITEMS.........................................................................................................10
HANDSET DESCRIPTION...........................................................................................11
INTERNAL LCD(MAIN LCD).......................................................................................12
MAIN LCD DISPLAY...........................................................................................................12
SCREEN STATUS, DISPLAY AND FUNCTION.................................................................12
FUNCTION KEYS........................................................................................................13
FUNCTION KEYS................................................................................................................13
INSTALLING SIM CARD.............................................................................................14
USING THE BATTERY................................................................................................15
INSTALLING THE BATTERY ............................................................................................15
REMOVING THE BATTERY..............................................................................................15
CHARGE THE BATTERY.............................................................................................16
GETTING STARTED ................................................................................ 17
TURN ON/OFF THE PHONE POWER.........................................................................18
MAKE A CALL.............................................................................................................19
END A CALL................................................................................................................20
ANSWER A CALL........................................................................................................20
ADJUST THE EARPIECE VOLUME............................................................................21
BROWSE MAIN MENU ..............................................................................................21
TYPE NUMBERS AND LETTERS ON HANDSET ......................................................22
BASIC CALL FUNCTIONS....................................................................... 23
SPEED DIALING..........................................................................................................24
MAKE AN INTERNATIONAL CALL............................................................................24
MISSED CALL MESSAGE ..........................................................................................25
PHONEBOOK SHORTCUT .........................................................................................25
LAST NUMBER DIALED (RECEIVED, MISSED) ........................................................26
INCOMING CALL WAITING .......................................................................................27
DURING CALL OPTIONS............................................................................................28
HOW TO USE T9.........................................................................................................29
T9 ENGLISH........................................................................................................................30
MULTI-TAP ENGLISH.........................................................................................................30
MENU FUNCTIONS................................................................................. 31
MESSAGES.................................................................................................................32
SMS/EMS............................................................................................................................32
MMS....................................................................................................................................38
VOICEMAIL.........................................................................................................................42
CELL BROADCASTS...........................................................................................................43
CALL LOGS .................................................................................................................44
RECEIVED CALLS...............................................................................................................44
DIALED CALLS....................................................................................................................45
MISSED CALLS...................................................................................................................46
CLEAR LOGS ......................................................................................................................47
CALL INFO ..........................................................................................................................47
GPRS INFO..........................................................................................................................50
SOUND..........................................................................................................................51
RINGING SETTINGS ............................................................................................................51
MESSAGE ALERT ................................................................................................................53
KEY TONE.............................................................................................................................54
FLIP OPEN TONE..................................................................................................................55
SOUND EFFECT ...................................................................................................................56
SETTINGS.....................................................................................................................57
DISPLAY................................................................................................................................57
DATE&TIME..........................................................................................................................62
LANGUAGE ..........................................................................................................................64
RESET SETTING...................................................................................................................64
INFORMATION.....................................................................................................................65
VOICE LED ............................................................................................................................66
AUTO POWER ALARM ........................................................................................................66
NET SERVICES .............................................................................................................67
DIVERT CALLS......................................................................................................................67
CALL SETTINGS...................................................................................................................72
NETWORK SETTING............................................................................................................74
SECURITY SETTINGS..........................................................................................................76
ORGANIZER..................................................................................................................82
ALARM..................................................................................................................................82
SCHEDULER .........................................................................................................................84
MEMO...................................................................................................................................87
CALCULATOR.......................................................................................................................88
CONVERTER.........................................................................................................................89
STOP WATCH.......................................................................................................................90
FUN&TOOLS ................................................................................................................91
GAME....................................................................................................................................91
DOWNLOADED ....................................................................................................................98
VOICE RECORD ..................................................................................................................101
WAP ....................................................................................................................................102
MEMORY INFO...................................................................................................................108
STK..............................................................................................................................109
PHONEBOOK..............................................................................................................110
GROUP SEARCH ...............................................................................................................110
NAME SEARCH .................................................................................................................111
ADD NEW NAME ...............................................................................................................113
SPEED DIAL LIST ...............................................................................................................114
SETTINGS...........................................................................................................................115
APPENDIX ............................................................................................... 117
CARE AND MAINTENANCE ......................................................................................118
TROUBLESHOOTING.................................................................................................119
“INSERT SIM CARD” MESSAGE APPEARS ....................................................................119
“HANDSET LOCKED ENTER PASSWORD” MESSAGE APPEARS.................................119
“ENTER PIN1” APPEARS ..................................................................................................119
“NO SERVICE”, “NETWORK FAILURE” IS DISPLAYED .................................................119
6
7
Page 5

TABLE OF CONTENTS
TABLE OF CONTENTS
AUDIO QUALITY IS POOR. ECHO, OR NOISE MAKES IT HARD TO HEAR...................120
CORRESPONDENCE CANNOT HEAR YOU SPEAKING..................................................120
THE STANDBY TIME BECOMES SHORT.........................................................................120
THE PHONE IS NOT TURNED ON....................................................................................120
UN ABLE TO SEND MESSAGE.........................................................................................120
UN ABLE TO MAKE A CALL .............................................................................................120
UN ABLE TO CHARGE THE BATTERY.............................................................................121
UN ABLE TO INPUT DATA IN THE PHONEBOOK...........................................................121
UN ABLE TO CHOOSE CERTAIN FUNCTION..................................................................121
USING THE BATTERIES............................................................................................122
SAFETY INFORMATION............................................................................................123
ROAD SAFETY...................................................................................................................123
OPERATING ENVIRONMENT....................................................................................124
ELECTRONIC DEVICES..............................................................................................125
EMERGENCY CALLS .................................................................................................126
IMPORTANT! .....................................................................................................................126
MEMO
MEMO
8
9
Page 6
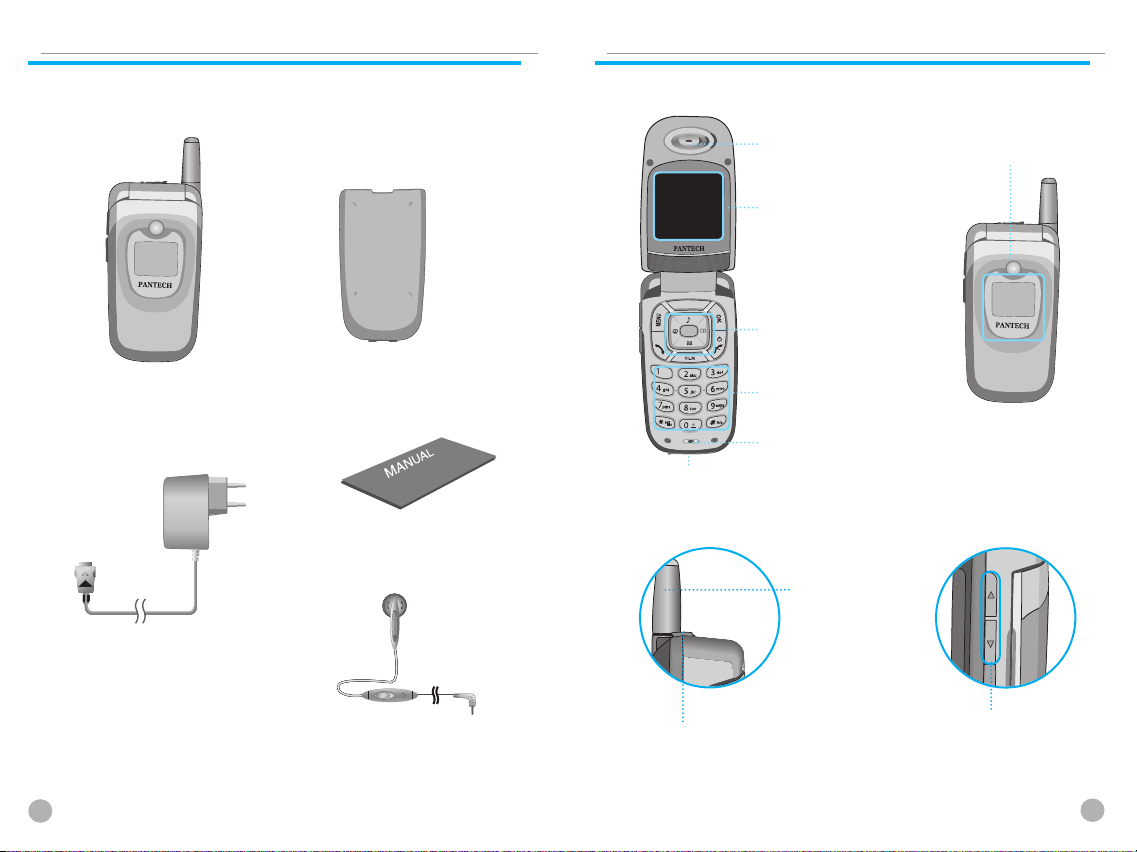
PACKING ITEMS
PACKING ITEMS
The package items may differ from the ones shown below.
The items depend on the service provider’s specification, and the picture below is for user
reference only.
HANDSET DESCRIPTION
HANDSET DESCRIPTION
Earpiece
LCD display
Navigation/Hot Keys
Sub display
Handset
Batteries(Standard x 2)
Alphanumeric keys
Microphone
Charging Connector / Cable Connecto
User manual
Antenna
Travel Adaptor
Ear-Microphon
10
Ear-Microphone
Side keys
11
Page 7

INTERNAL LCD(MAIN LCD)
INTERNAL LCD(MAIN LCD)
FUNCTION KEYS
FUNCTION KEYS
There are two LCD displays (Main and Sub).
The line at the top of the display is for icons showing the status of the mobile phone.
Main LCD Display
Icons are displayed when specific functions are
active or when you have received a message.
The figure above shows the list of all possible
icons and threir position.
<Main LCD Display>
Screen Status, display and function
For the description of each icons, please refer to the table below.
Signal strength
In use
Ringing tone
Vibration
Vib+Melody
Short message
Alarm
This icon shows the radio signal strength.
The more bars displayed, the stronger the signal.
This icon indicates call active state.
This icon will appear when ring type is “Ringing tone“.
This icon will appear when ring type is “Vibration” and in
Etiquette mode .
This icon will appear when ring type is “Vib+Melody“.
This icon will blink if SIM message box is full, or it will
appear if there are unread messages.
This icon will indicate alarm set.
There are function keys, which have one or more features.
Following table shows list of function keys.
Function keys
Key Icon Name Key Function
SEND KEY
END KEY
OK KEY
MENU KEY
CLEAR KEY
NAVIGATION KEYS
with shortcut keys to
WAP, Sound setting,
Message and
Phonebook
SIDE UP and DOWN
KEYS
Press this key to make a call,or answer incoming call.
Press this key once to retrieve the list of All
Calls(recently dialed, received, and missed call numbers)
Press this key to end a call.
Press this key to return to standby state. (Cancel, Exit).
Press and hold this key to turn the phone on or off.
Use this key to confirm the selected function or menu on
the display.
Press this key to enter menu. When pressed, the menu will
be displayed on the screen.
Press this key to delete a single letter and press and hold
this key to clear a line.
Press this key to return to the previous screen.
Press these keys to move the cursor up/down or left/right
in menu or in list.
During a call, press ‘up’ key to see recently received call
list and press ‘down’ key to see missed call list.
These keys may act as shortcut keys by which you can
easily access Phonebook, Sound Setting, Messages and
WAP browser.
Press these keys to adjust the phone speaker volume
during a call
With the phone closed, press [down] key to change the
type of display. When the phone is open, you can see the
calendar with the same key.
Roaming
Battery
12
This icon will appear when roaming service is applied.
This indicates the remaining power of the battery.
13
Page 8
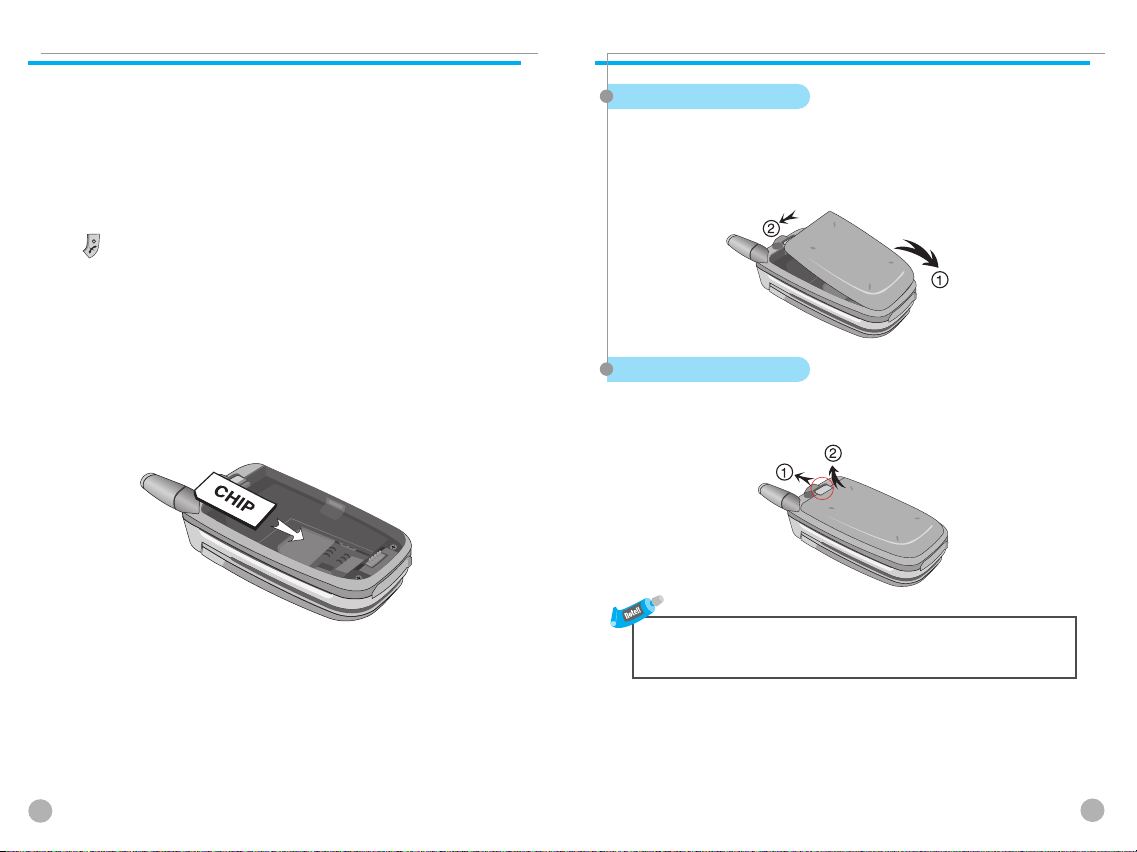
INSTALLING SIM CARD
INSTALLING SIM CARD
USING THE BATTERY
USING THE BATTERY
Follow the steps below for the first time use;
Install the SIM card
When you subscribe to a cellular network, you are provided
with a plug-in SIM card loaded with your subscription details
(PIN, optional services available and so on).
1) If necessary, switch off the phone by holding down
[ ]
key until the powering down message is displayed.
2) Make sure the battery is removed.
3) Clear the SIM slot, and place the SIM card into slot in the
direction of the arrow.
4) If you want to remove the SIM card, push it in the opposite
direction of the arrow.
Installing the battery
(1)Insert the bottom of battery into the groove at the bottom of
the handset.
Then (2)press in the top of the battery until it snaps.
Removing the battery
Push the tab (1)with one hand and lift the top of the battery (2)to
separate.
The battery must be correctly placed in the battery compartment.
If battery is incorrectly inserted, the handset will not turn on or the battery may slip
out during use.
14
15
Page 9
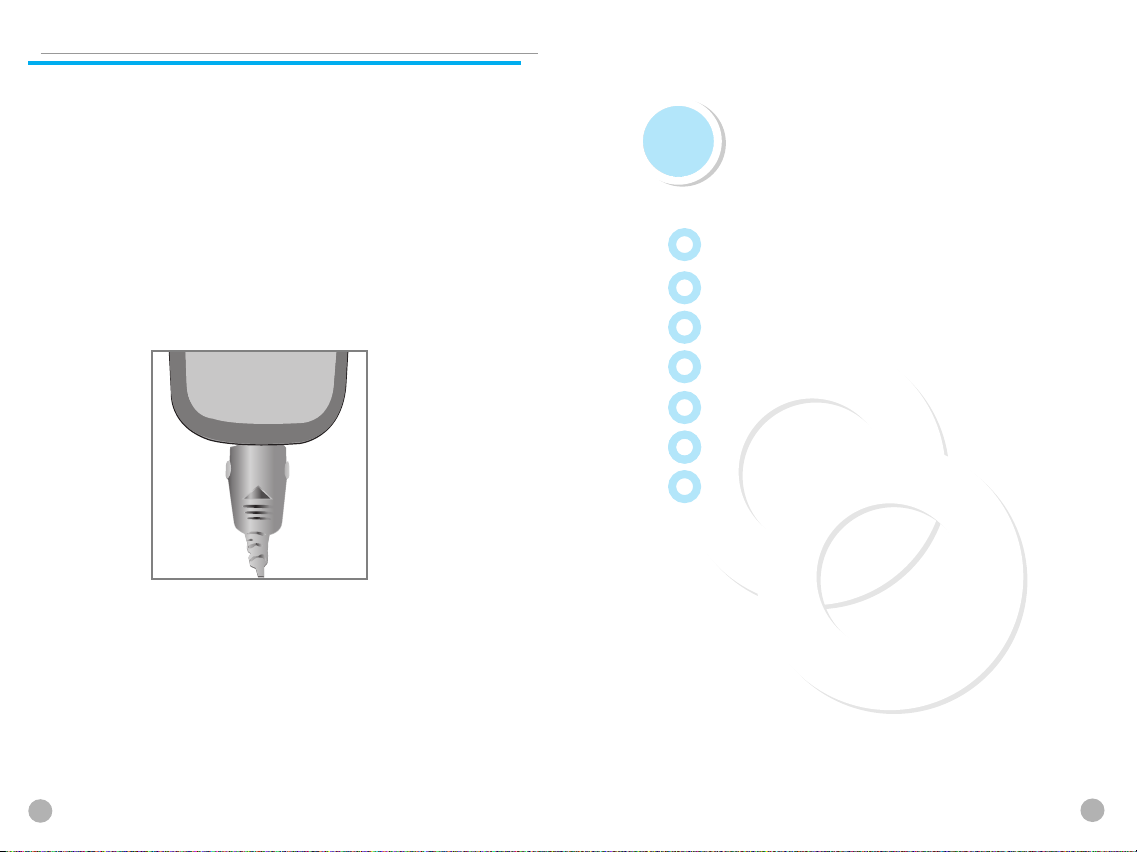
CHARGING THE BATTERY
CHARGING THE BATTERY
Your phone is powered by a rechargeable Li-ion battery.
A travel adapter is provided with your phone.
Use only approved batteries and chargers.
Ask your local PANTECH dealer for further details.
The phone can be used while the battery is charging
To Charge, make sure the battery is in position on the phone. Plug the
charging connector into the slot at the bottom side of the phone, and
plug the adaptor to a standard AC wall outlet.
When charging is finished, disconnect the adapter by pressing the gray
tabs at the side of the connector and pulling against the slot. Also,
disconnect the adaptor from the AC wall outlet.
GETTING ST
GETTING ST
Turn on/off the phone power
Make a call
End a call
Answer a call
Adjust the earpiece volume
Browse main menu
Type numbers and letters on handset
ARTED
ARTED
16
17
Page 10

TURN ON/OFF THE PHONE POWER
TURN ON/OFF THE PHONE POWER
MAKE A CALL
MAKE A CALL
Turn on the phone power
Press and hold the [ ]key for 3 seconds to turn the phone power on.
(Do the same to turn off the power)
If the handset is in the lock mode, enter your 4 digit secret number.
(Initially,"0000" for SIM lock code, "1234" for handset lock code.)
Make sure the phone power is on.
Insert SIM card into the SIM slot if “Insert SIM card” message is shown.
Enter your PIN1(Maximum up to 8 digits) to unlock handset (if applicable)
After the PIN is accepted, network search will start automatically.
When you press the wrong number, press [ ]key to delete.
(Press and hold to delete all)
In the idle mode, dial the phone number with area code.
Then press [ ]key to make a call. When you’d like to make an
international call, press and hold [ ]key until ‘+’ sign appears. Then
dial national code, area code and telephone number. With long press
[ ]key, you can add ‘P’ pause symbol. If the number you want to call
has an extension number, use this key between the main number and the
ext. number to call directly to the extension.
18
19
Page 11

END A CALL
END A CALL
ADJUST THE EARPIECE VOLUME
ADJUST THE EARPIECE VOLUME
Press [ ]key to end or cancel a call
ANSWER A CALL
ANSWER A CALL
When the phone rings or vibrates, the screen will display the name or the
number of the caller (If the network you subscribe to supports this). The
displayed name is dependent on the data in the Phone book.
Press [ ]key to answer a call in normal answering mode option.
With the Any Key option, you could answer a call by pressing any key
except [ ]key.
When you are speaking with your phone, press the volume adjustment
keys on the side of the phone to adjust earpiece volume. Seven levels of
volume are available for your selection.
BROWSE MAIN MENU
BROWSE MAIN MENU
Press [ ]key to enter main menu in standby mode.
Press [ ]key to exit menu to standby screen.
With navigation keys, [ ][ ]and[ ][ ], you can
browse among menu items.
To make a decision or answer the question, press [ ]key as YES,
or [ ]key as NO.
20
21
Page 12

TYPE NUMBERS AND LETTERS ON HANDSET
TYPE NUMBERS AND LETTERS ON HANDSET
To enter number, press the number keypad, as you want.
To enter letters into handset, you can either be in ‘T9’ mode or in
Multi-tab mode (e.g. Phone book, Message). Letters can be erased
by pressing [ ]key.
BASIC CALL FUNCTIONS
BASIC CALL FUNCTIONS
Speed Dialing
Make an international call
Missed call message
Phonebook shortcut
Last number dialed (received, missed)
Incoming call waiting
During call options
22
23
Page 13
SPEED DIALING
SPEED DIALING
MISSED CALL MESSAGE
MISSED CALL MESSAGE
You can retrieve and call the desired number by pressing and holding
the number of the phonebook in which you saved the number to call.
For instance, if the number is saved in the Phonebook number 5, press
and hold [ ]key to make a call.
(For more details, please refer to “HOT KEY/Phonebook”)
MAKE AN INTERNATIONAL CALL
MAKE AN INTERNATIONAL CALL
Firstly, press and hold [ ]key until “+” shows up on the display or
enter the outgoing national code. Then enter the number you want to call.
If for any reason, an incoming call cannot be answered, a missed call
message will appear on the screen to remind you of the call you missed
(Network and subscription dependent feature, not available in all areas).
To reply to the missed call, first press [ ]key, then press [ ]
[ ]key to select the number you want to reply to and press
[ ]key to dial it.
PHONEBOOK SHORTCUT
PHONEBOOK SHORTCUT
Under standby mode, you can press the [ ]key to enter the Phone
book and browse the sub menu entries.
24
25
Page 14

LAST NUMBER DIALED/RECEIVED/ MISSED
LAST NUMBER DIALED/RECEIVED/ MISSED
INCOMING CALL WAITING
INCOMING CALL WAITING
Press [ ]key to access the list of latest dialed/received/missed
numbers.
Press [ ][ ]Key to scroll through the last dialed numbers.
Press [ ]key to send the call if the number shown is correct.
This is Network and subscription dependent feature.
Please check with your Network provider before using this function.
When a call comes in, you can press [ ] keys to enter the call
options.
1. Answer
2. Reject
3. I am busy
If another call comes in while you are on the phone,
you can:
Press [ ]key to reject the incoming call.
Press [ ]key to hold on the active call and connect to the incoming
call.
26
27
Page 15
DURING CALL OPTIONS
DURING CALL OPTIONS
HOW TO USE T9
HOW TO USE T9
When you are on a telephone call, you can press [ ]keys to enter
the call options.
1. Phonebook
2. Messages
3. Volume
4. Hold
5. End current
6. Mute on
7. DTMF on/off
Each function is described as follows in detail.
Phonebook: You can look through the phonebook.
Message: You can read and write SMS/EMS and check Voicemail.
Volume: You can adjust the phone speaker volume.
Hold - This function allows you to put a currently active call on hold, so
that you can initiate a new call.
End current - You can end a current call by selecting this function.
Mute - When you want no sound to be heard by your caller during a
call, you can choose the Mute function to do so.
DTMF on/off - This function allows you to turn DTMF tone on/off.
If DTMF(Dual Tone Multi Frequency) is turned off, the recipient will not
hear the key sounds while you’re pressing the keys.
Key
LONG
press
LONG
press
LONG
press
T9 Number T9 English
1
2
3
4
5
6
7
8
9
*+-/ =
0
(SPACE)
#
Next candidate
ABC
DEF
GHI
JKL
MNO
PQRS
TUV
WXYZ
Smart period
T9Number
OPR
(SPACE)
Shift-
CapsLOCK
T9 Emoticon
Multitap
ABC
DEF
GHI
JKL
MNO
PQRS
TUV
WXYZ
Smart punctuation
T9Number
OPR
(SPACE)
Shift-Caps
LOCK
T9 Emoticon
28
29
Page 16
HOW TO USE T9
HOW TO USE T9
T9 English
The more types you enter,the more complete word you can get using T9 English
editor.
For example
If you like to make the word, “English”, then press the keys, [ ] for E,
[ ] for n, [ ] for g, [ ] for l, [ ] for i, [ ] for s,
and [ ] for h.
If you could not find the word what you want, just press [ ] key for next
possible candidates.
You can switch the lowercase to the capital letter or the capital letter to one
capital letter mode by pressing [ ]key.
Also you can insert period by pressing key [ ].
Blank space can be added by pressing [ ].
You can shift input mode by pressing [ ] or [ ]
arrow keys. Alternately, you can switch to T9 number mode
by long pressing [ ]key and to T9 Symbol mode by long
pressing [ ]key.
Multi-tap English
In this mode, you can insert special English word something like name,
nickname, abbreviations and so on. T9 English has special dictionary to find
and to list candidates up.
As like ordinary mobile phone, you can input alphabets
by pressing a key several times ‘til finding the character.
By pressing key [ ] you can easily shift to Capitalized
letter to lowercase to T9 number easily.
Menu functions
Menu functions
MENU TYPE
There are three ways to access the menu. One is the main
menu by pressing [ ]key, second is the shortcut menu
by pressing [ ]key.
Messages
Call logs
Sound
Settings
Net Services
Organizer
Fun &Tools
STK
Phonebook
Hot folder
30
31
Page 17

MESSAGES
MESSAGES
You can send new messages, and check received messages.
SMS/EMS
In EMS(Enhanced Messaging Service) messages you can add pictures, animation, melodies,
emoticons to a text message.
MESSAGES
MESSAGES
Popup menu
When you read the message, in the “Inbox” or “Outbox” you can
Edit, Delete, Forward, Reply or make a Voice Call by pressing
[ ]key.
to enter the SMS/ EMS menu and arrive at the following options.
Entering the SMS/EMS menu
Each option is described below;
Create - To create a new SMS/EMS message.
Inbox - Displays SMS/EMS messages
Outbox - Displays messages waiting to be sent
Archive - SMS/EMS messages stored in the phone
memory
Settings – There are 3 sub-options;
Each option is described as follows in detail.
Message center - Allows the address (URL) of the proxy
relay or MMSC to be set.
Message lifetime - Controls the lifetime of created messages
(1 hour – 6 months)
Message format - (normal, fax, voicemail, ermes, nation’l
paging, x.400, internet)
Used space – State of SIM records
(Capacity, Used records, Unread records)
Each option is described below;
Edit - To edit incoming/outgoing messages.
Delete - To delete the message.
Forward - To forward the message to the desired number.
Text Reply - To reply the message
Voice call - To make a call to the originated number.
32
33
Page 18
MESSAGES
MESSAGES
MESSAGES
MESSAGES
Create
1
Scroll to “Create” and press [ ]key.
2
While writing your message press [ ]key.
3
Select “Insert items” and press [ ]key.
Now, You can select “Picture”, “Animation”, “Melody”,
4
“Message” or “Emoticon” as you want.
And then select from “Predefined” or “Load”
5
Select an item by using [ ]key and then press [ ]
6
There are two options in inserting an item.
Predefined - you can load predefined items in the phone.
Load - load form File view or Media box
(Except Picture and Message)
(Access to File system)
Sending a text message
1
Scroll to “Create” and press [ ]key.
2
Write your message and press [ ]key.
Scroll to “Send” and Press [ ]key.
3
Enter the number of the recipient. You can also search for the
4
number from the “phonebook list” by pressing [ ]key.
34
35
Page 19
MESSAGES
MESSAGES
MESSAGES
MESSAGES
Saving message
To save a text message (in the SIM)
1. After writing the message press [ ]key.
2. Select “Save” and press [ ]key.
To save in Archive (in the file system in the memory)
1. After writing your message press [ ]key.
2. Select “Archive” and press [ ]key.
3. Select “Save” and press [ ]key.
Receiving a message
When you received a text message, the user will be alerted to the arrival
of a message by a bell sound as set by the user (no sound in case the user
has selected that option) and the message received icon would be visible
on the Idle screen.
To read the text message
Messages are saved in “Inbox” in the Message menu.
Press [ ] to read the text message.
To add the number of the message sender to the phonebook
Enter “Inbox” and scroll to the message whose phone number’s not
registered to the phonebook.
Press [ ]to select “Add to P-book”
Saving incoming text message
Incoming text messages are saved in the SIM card. When the SIM card is
full, you cannot receive messages any more. In this case, a special icon
is displayed alerting that alerts the SIM card is full.
Messages can be then received only by deleting one or more messages
in the Inbox or by moving one or more messages to Archives. To move
messages from Inbox to Archive:
- Enter Inbox and select the message that needs to be moved.
- Press OK to enter the message.
- Press MENU and select the EDIT function.
- Press OK and Select ARCHIVE.
- Press OK to Save message.
To save objects from a text message
If a message text contains embedded components (such as picture,
animation, melody, message or Emoticon), you can save them to your
phone memory.
While you are reading a message, and when you put the cursor on the
object, you can select it with [ ]key and save to the phone (File
system).
The objects, which you saved through the process above, can be loaded
from the menu, which is <Load>menu from “insert item//Picture/
Animation/melody/Message/Emoticon// Predefined/Load”.
36
37
Page 20
MESSAGES
MESSAGES
MESSAGES
MESSAGES
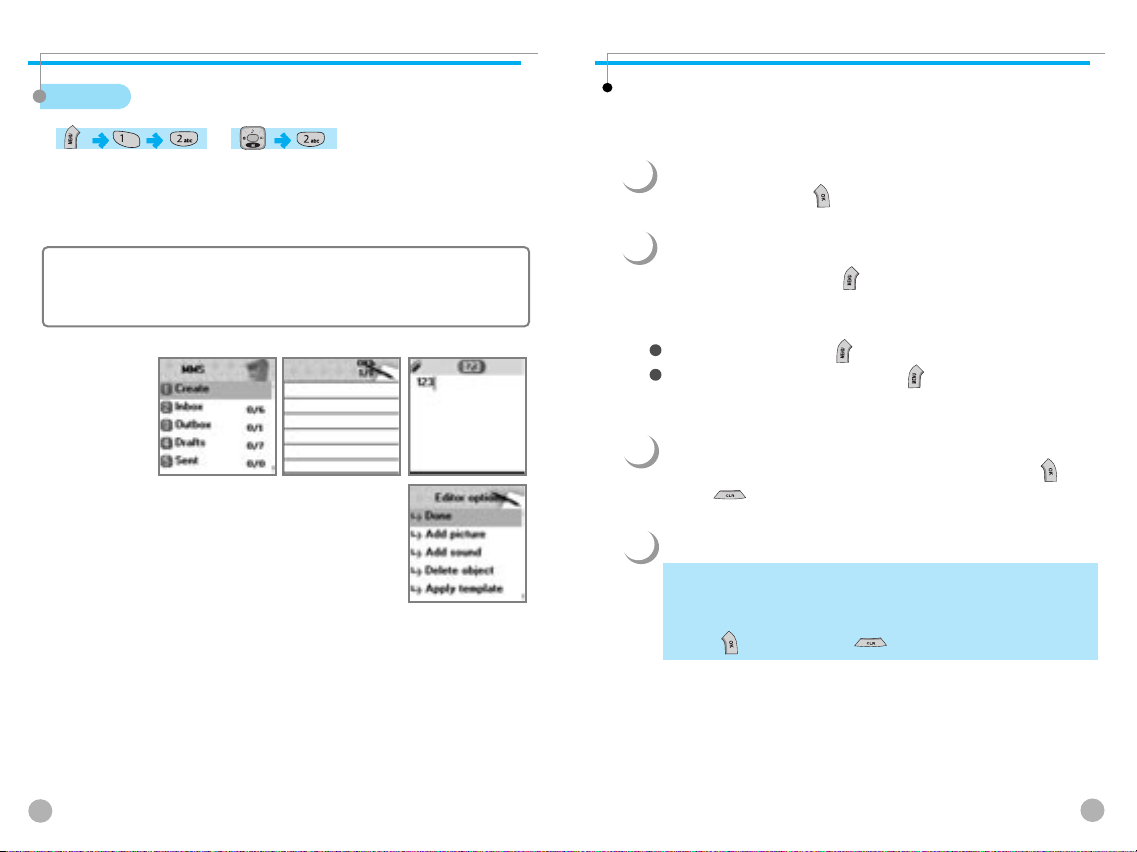
MMS
A new message is created by accessing the "Create" menu.
The user is presented with a screen showing the first page in a blank
MMS message.
The screen displays the page with an informational/status bar above the message showing:
The presence of any sounds or attachments on the current page.
The size of the whole MMS in bytes or kilobytes.
The current page number/total number of pages.
Creating multimedia message
An MMS message can be a constitution of several objects, which are text, picture, photo,
sound etc.
In Messages menu, select multimedia message
1
->Create and press [ ].
2
You can add some objects of multimedia message.
To add an image, press [ ]key and select Add
picture or Add photo ->Load. Select a picture file(*.jpg)with the
cursor keys.
To add a sound, press [ ]key and select Add sound ->Load.
To add a new page (a text), press [ ]key and select Add
page.
If you select Add image, sound, or attachment, a list of items
3
opens. Scroll to the item you wish to add and press [ ]key.
Press [ ] to view and edit your MMS message.
You can change the duration of showing each object;
4
Display after: To decide when the object will appear after
opening the page.
Display for: To decide how long the object will be shown for.
Press [ ] to select and [ ]key to confirm your choice.
38
39
Page 21

MESSAGES
MESSAGES
MESSAGES
MESSAGES
In the Editor option, select Preview to view the MMS message
5
you made so far.
If you’re done with creating the message, select Done in the
6
Editors option. Edit the address options and select Send or Send
later.
Receiving messages
When the user receives a notification of new message’s arrival the following actions will take
place:
1
In Messages menu, select multimedia message
->Inbox and press [ ]key to select item.
2
Select received mail and press [ ]key.
Deleting a message
Here a user deletes a message from the mailbox.
In Messages menu,select multimedia message
1
->any mailbox
2
Scroll to the mail you want to delete and press [ ]key and
select “Delete”.
40
41
Page 22

MESSAGES
MESSAGES
MESSAGES
MESSAGES
Voicemail
With this function, you can call the Voice mailbox provided by your network service provider
to listen to your Voice mail messages. You can use this function by selecting Call and then the
phone will automatically dial the designated number for your Voice mailbox.
This function is dependant on your Network provider, please ask them for detailed
information. You can receive information messages offered by your network provider. This
function is to set the topics of the info. messages you want to receive that are offered by the
Network.
Each option is described below;
Call - The Phone makes a call to the Voice mailbox. Whether to call to Home Mbox
or Roam Mbox will be decided according to the SIM card you°Øre using.
Home Mbox - To set the number for the Home Mailbox of your Network provider.
Roam Mbox - To set the number for the Roaming Mailbox of the Roaming Network
provider.
Each option is described below;
Read info - You can read the messages sent by the network
Settings - You can choose preferred topics and languages.
Cell broadcasts
you subscribed to.
Language : You can specify the language of info message.
Addition of new language and elimination of existing language
are possible.
Set info : You can specify the topic number of info message.
Contact network service provider for further information.
- Create subject :You can add a new list other than 'Current list'.
- Current list :It shows the list, which is stored. It contains new lists.
You can select a “Current list”(maximum two)to receive info
message.
42
43
Page 23

CALL LOGS
CALL LOGS
With this function, you can view call logs and set Call Info & GPRS info.
Received calls
This function displays the list of phone numbers received.
To make a call chose the number by scrolling the [ ]key, press
[ ]key to connect.
Press the [ ]Key to:
-Edit: Edits number before dialing
-View Call logs: Displays call information including time & date of when the
-Add to P-book: To store number in the phone book, select this key and enter
-Send SMS: To send an SMS to the caller, select this key.
call was made
caller details.
CALL LOGS
CALL LOGS
Dialed calls
This function displays the list of phone number dialed. To make a call
chose the number by scrolling the [ ]key, press [ ]key to
connect.
With [ ]key, you’ll see the same Pop-up menu as in
Received calls.
44
45
Page 24

CALL LOGS
CALL LOGS
CALL LOGS
CALL LOGS
Missed calls
This function displays the list of calls you’ve missed.
To make a call chose the number by scrolling the [ ]key, press
[ ]key to connect.
With [ ]key, you’ll see the same Pop-up menu.
Clear logs
This function is to delete the previously received, dialed, missed call
numbers. The following are the sub-options.
Call Info
This menu gives information on the duration and cost of a call.
46
47
Page 25

CALL LOGS
CALL LOGS
CALL LOGS
CALL LOGS
Call costs Call timers
This function records the information of the call cost.
The maximum cost of a call can be set to avoid overcharge.
This function records the call duration.
Last call
This function displays the cost of the last call with units.
All calls
This function displays the cost of all calls with units.
/****You can also clear logs with PIN2 authorization.****/
Clear logs
This function clears all logs of call cost related after you enter PIN1.
Cost units
You can read defined unit or set the unit cost of the call in your service area.
This function has following sub-options to select.
- Read units :Displays the unit Cost of a call.
- Set units :You can set price/Unit and currency of Cost unit.
Max cost
You can set the maximum value of call cost in specified unit
/*****with PIN2 authorization.****/
This function has following sub-options to select.
- Read limit :Displays the maximum call cost limit set.
- Set limit :Sets the maximum value of a call after specifying PIN2 authorization.
Last call
This function displays the duration of the last call.
All calls
This function displays the total duration for all calls.
Reset call time
Resets the call timer to “00:00”
48
49
Page 26

CALL LOGS
CALL LOGS
GPRS Info
This menu shows you the amount of the data you’ve sent/received by
using GPRS
SOUND
SOUND
Sets tones for ringing, message, keytone, flip opening, etc.
Ringing Settings
Current connections
This shows you the total kbyte spent and received in the current connection.
All connections
This function displays the total kbyte sent and received for all the
GPRS connections made.
Last connection
This function displays the kbyte sent and received in the last
connection.
Clear logs
This function is to clear the data related to GPRS.
1
Use [ ]keys to move across categories.
Press [ ] to save settings.
Ring Type
Ringing Tone: Select this to get a ringing tone on
Vibration : just vibration without sound.
Vib then Ring : ring after vibration.
Vib and Ring : ring and vibration come together.
Ascending : ring gets louder and louder.
None(Quit) : no ring, no vibration. Only backlight glows.
receipt of a call.
50
51
Page 27

SOUND
SOUND
SOUND
SOUND
Melody Type
The ringing tones are categorised into:
Melody, Bell Sounds, Voice Sounds, Natural Sounds and my melody
(download of personal ringtones)
Under each type, a variety of ringtones are available.
Ringing volume
You can adjust the volume with [ ][ ]keys in 8 different levels.
Message alert
You can choose and save the bell sound you like for alerting on
1
receipt of a message.
Select mode
You can choose the type of message alert from 4 options;
Once/Every 2 mins/ Every 5 mins/off.
Tones
You can select the alerting tone 3 options;
Bell 1/Bell 2/Bell 3.
Volume
8 different levels of volume can be set.
52
53
Page 28

SOUND
SOUND
SOUND
SOUND
Key Tone
1
You can choose and save the keypad tone you like.
Setting
On/Off
Tones
DTMF/Beep/Voice
Volume
You can set the volume in 8 different grades.
Flip open tone
You can set up the Flip open sound you like.
1
Setting
On/Off
Tones
DTMF/Beep/Voice
Volume
8 different levels of volume can be set.
54
55
Page 29

SOUND
SOUND
Sound effect
1
Helps set the sound for:
Connection/Minute minder/Disconnection/Area alerting/On&Off
melody/ menu moving
Use [ ][ ]keys to select the requirement.
SETTINGS
SETTINGS
In this menu, you can tune the phone settings such as Display, Date&Time, Language etc.
Display
Visual setting
Screen Setting
To change the screen image, move to the screen you want by using [ ]
[ ]key, move the cursor to the image change line by using [ ]
[ ]key, and choose an image by using again [ ][ ]key for the
screen.
You can change each screen image as shown below.
56
57
Page 30

SETTINGS
SETTINGS
SETTINGS
SETTINGS
Screen Option
You can choose display options for the handset idle
1
screen.
There are three option as shown below.
<Screen option>
you can one of 4 images to be displayed by using [ ][ ]key.
Normal image : display the image set in Screen setting.
Analog clock : display the analog clock screen.
Calendar : display the calendar screen.
User define image : display the picture taken by camera, or the image downloaded
You can set the user define image in Fun&Tool\ download\set as wallpaper.
<Display string>
You can change the type of text displayed on the idle screen by using
from the internet.
[ ][ ]key.
Time&Date : display Time &Date, and you can change the time format in setting\
Greeting : display the greeting message you make. You can write the Greeting message in
D-day : display the D-day message.
You can put the D-day message in organizer\ scheduler.
<Font color>
You can change the color of all the text in the handset.
There are Red, Blue, Green, and Dark gray including default color.
date&time\display.
setting\display\greeting.
Greeting
You can write a greeting message.
Contrast
You can set Main LCD Brightness, Main LCD contrast, Sub LCD contrast.
Use Navigation [ ][ ]Keys to move up and down to
1
the mode you want to change and then use Navigation [ ]
[ ]keys to change the value.
Each has 8 levels.
58
59
Page 31

SETTINGS
SETTINGS
SETTINGS
SETTINGS
Backlight
You can set the Light Level of Main LCD.
Use Navigation [ ][ ]Keys to move up and down to
1
the mode you want to change and then use Navigation [ ]
[ ]keys to change the value.
1. Light level(off, low, high, maximum)
A. You can set the brightness of LED Back light.
2. Minimal bright(off, low, high, maximum)
A. You can set the brightness of the LED Back light while it is off after the Light
Duration is expired.
(This value cannot be higher than the value of Light Level).
3. Light duration
A. The duration of the LED Backlight when the phone is left idle.
(always off, 5 sec, 10 sec 20 sec, always on)
Keypad color
Gives you three options for the keypad color
60
61
Page 32

SETTINGS
SETTINGS
SETTINGS
SETTINGS
Date&Time
Set time
Press [ ]key after you input the time you wish to set.
Set date
Setting up the present date
Press [ ]key when you move the cursor to the date you wish
to set.
Set time zone
Showing the world wide time differences with present time.
Press [ ]key when you choose the time zone you want.
Display
Set the time format as 12 hour or 24 hour.
Set the date format as D:M:Y,M:D:Y,or Y:M:D.
Choose the display as Time only, Date only, or Date & Time.
Press [ ]key to save preferred options.
62
63
Page 33

SETTINGS
SETTINGS
SETTINGS
SETTINGS
Language
Select the language to be displayed.
Choose one from the lists, and press [ ]key.
<Information>
when choosing Automatic,it chooses the
Language Preference stored in your SIM.
Reset setting
Restore the default values for the settings.
Input the handset password, and press [ ]key when the “Restore
factory setting?” pop up shows, the default values are restored into,
and then the phone reboots.
Information
Own number
You can input, edit, store, and delete your own phone number.
If there is no number stored, “List empty” message appears.
Press [ ]key to edit & add your own number.
With the number(s) listed, press [ ]key and select a menu you
want.
1.Edit :modify and edit the number.
2.Add :add new number.
3.Delete :delete the number.
<Information>
you can input up to 2 Own numbers
64
65
Page 34

SETTINGS
SETTINGS
Software version
To check the software version, press [ ] and
the software version is displayed.
NET SERVICES
NET SERVICES
Some of the functions in this section are network dependant. Therefore, please check with
your network provider whether they support these services.
Divert calls
With this option, you can forward your incoming calls to any
designated number.
Voice LED
The Cubic on top of sub-LCD blinks in several colors according to the voice of the
caller and you.
Auto power alarm
If the phone is off with this function on, it automatically turns on to ring at the saved
time.
66
All calls
You can all voice calls, data, fax and messages to another number.
On : Select ON to forward all the services provided by the network; voice calls, data,
fax, and messages. If you select “On”, you should enter a number to which you
wish to direct. After entering the number, you should enter a waiting time just
before directing a call and press [ ] to send the configuration to the network.
Off : Select OFF to cancel “Divert All Calls”.
Status : STATUS shows the current configuration, ON or OFF.
By service : You can use your handset to divert a specific type of call to another
number if your network supports this feature.
”All services” [ ] enables all calls to divert and you can choose one
of the services, “Voice calls”[ ], “Data” [ ], “Fax”[ ] or
“Messages”[ ].
Choose “All except msgs”[ ] to divert except the messages.
67
Page 35

NET SERVICES
NET SERVICES
NET SERVICES
NET SERVICES
When busy
Calls are diverted when your handset is already connected to another call.
On : Select ON to forward all the services provided by the network; voice calls, data,
fax, and messages. If you select “On”, you should enter a number to which you
wish to direct. After entering the number, you should enter a waiting time just
before directing a call and press [ ] to send the configuration to the network.
Off : Select OFF to cancel “Divert All Calls”.
Status : STATUS shows the current configuration, ON or OFF.
By service : You can use your handset to divert a specific type of call to another
number if your network supports this feature.
”All services” [ ] enables all calls to divert and you can choose one
of the services, “Voice calls”[ ], “Data” [ ], “Fax”[ ] or
“Messages”[ ].
Choose “All except msgs”[ ] to divert except the messages.
On no answer
This option allows you to divert the calls to a designated number when the phone is not
answered within a certain time; time can be set from 5 to 30 seconds.
On : Select ON to forward all the services provided by the network; voice calls, data,
fax, and messages. If you select “On”, you should enter a number to which you
wish to direct. After entering the number, you should enter a waiting time just
before directing a call and press [ ] to send the configuration to the network.
Off : Select OFF to cancel “Divert All Calls”.
Status : STATUS shows the current configuration, ON or OFF.
By service : You can use your handset to divert a specific type of call to another
number if your network supports this feature.
”All services” [ ] enables all calls to divert and you can choose one
of the services, “Voice calls”[ ], “Data” [ ], “Fax”[ ] or
“Messages”[ ].
Choose “All except msgs”[ ] to divert except the messages.
68
69
Page 36

NET SERVICES
NET SERVICES
NET SERVICES
NET SERVICES
When not found
Divert the calls when your handset is out side the network coverage area.
On : Select ON to forward all the services provided by the network; voice calls, data, fax,
and messages. If you select “On”, you should enter a number to which you wish to
direct. After entering the number, you should enter a waiting time just before
directing a call and press [ ] to send the configuration to the network.
Off : Select OFF to cancel “Divert All Calls”.
Status : STATUS shows the current configuration, ON or OFF.
By service : You can use your handset to divert a specific type of call to another
number if your network supports this feature.
”All services” [ ] enables all calls to divert and you can choose one
of the services, “Voice calls”[ ], “Data” [ ], “Fax”[ ] or
“Messages”[ ].
Choose “All except msgs”[ ] to divert except the messages.
Cancel all
You can cancel all the diverts by using this option.
70
71
Page 37

NET SERVICES
NET SERVICES
NET SERVICES
NET SERVICES
Call Settings
This function sets the way in which a call is received/ made.
Answer type
This key specifies the answering mode when a call is received.
Flip open : Select “Flip open” to connect the incoming call when the phone
is flipped open.
Send key : The incoming call is connected when the [ ]key is pressed.
Any key : The incoming call is connected when any key except [ ]key
is pressed.
Auto answer : The incoming call is automatically connected after 10 seconds
Call waiting
Your handset can alert you when you’ve got a second call while you are already engaged
in a call.
Caller number
You can see the number of the incoming call (You can see the name of the caller if it’s
saved in the phonebook) or you can show your number to the caller when making a call.
This service is network dependent so please ask your Network Provider.
Send my number (on, off, set by network) : Select this option if you want to show your
Show called number : Select this option if you want to show your number to the
Hide if called : Select this option if you do not want to show your number to the
recipient’s diverted phone.
recipient’s diverted phone.
number to the recipient.
72
73
Page 38

NET SERVICES
NET SERVICES
NET SERVICES
NET SERVICES
Network setting
Preferred N/W
With this function, you can set preferred list of network service providers.
Press [ ]key to see the following ub-options;
Insert : add the network to the top of the
preferred network list
Added to end : adds the network to the end of the preferred network list
Delete : delete the network name
Add new N/W
You can add to the list by entering network service provider code.
This function has following sub-options to select
when you press [ ]
Add : Enter the country code, network code, and network name as they are requested,
and this can include new networks whose network codes are not known to the
handset.
Change : Choose a network name to change and then enter the network code, country
code, and ne twork name newly to change the network.
Delete : Delete the network name
N/W selection
You can select the network you like or make a list of networks you like from the
available networks.
Automatic : A network can be selected automatically.
Manual : You can choose a specific network to subscribe.
Change password
The network password is available from your network service provider.
It is also used for setting Network Call Barring options and is not the same as your SIM
card PIN1.
74
75
Page 39

NET SERVICES
NET SERVICES
NET SERVICES
NET SERVICES
Security settings
First, you need to enter the password. The password is set “1234” when you buy the phone.
You must press the [ ]key after entering the password for getting the permission.
If you fail to enter the right password for more than three times, it will go back to the main
menu.
The security functions can help to prevent your phone and SIM card from being used by an
unauthorized person. With this function, you can set the password and settings relating to the
phone. This function customizes the call barring service, fixed dialing mode.
SIM lock
PASSWORD
Lock : When you turn on the handset, you need to enter the PIN1 password
to access the main menu.
Unlock : When you turn on the handset, you don’t need the PIN1 password
to access the main menu.
Handset lock
If you select this option, the phone will be locked until you enter the right password.
To enter the password, press [ ] key.
(The password is set “1234” when you buy the phone).
If you want to lock again, select “unlock°” and then select “lock”
PASSWORD
This function has following sub-options to select.
- Unlock
- Call only
- Lock
- Change code
76
77
Page 40

NET SERVICES
NET SERVICES
NET SERVICES
NET SERVICES
H/S barring (Handset barring)
You can ignore the incoming calls or restrict certain outgoing calls with this menu.
PASSWORD
Incoming call : If you select “on” in this option, all incoming calls will be barred.
Outgoing call : There are three sub-options in this menu.
1) Bar all: This will bar disable all outgoing calls
2) Bar prefixed: This will bar the outgoing numbers that includes the first
number(s) you previously designated. For example, if you
designate first two numbers as “82”, then all numbers that
starts with “82” will be barred.
You can add, edit, delete and clear all numbers in the Pop-up
menu by pressing [ ] key.
3) Off: This will make all outgoing calls available.
N/W barring (Network)
This feature is dependent on network service provider and subscription.
Some of the bars are set by the network service provider. You can set the call barring for all
or for each service. It is possible to select a range of call barring options. At each range, you
can see the status and set it On/Off. You need to enter network password when you change
the setting. You can clear all settings of call barring.
PASSWORD
Followings are the sub-options :
Foreign calls : to bar the outgoing international calls
Only Local/Home : to bar all calls except those on local and home networks
Bar incoming : to bar all incoming call
Incoming abroad : to bar incoming calls from abroad
Outgoing calls : to bar all outgoing call
When you select one of the above menu,
1. The call list to be barred is displayed
2. You choose one item in the call list
3. Press [ ], and you can make the call
-On : to be barred
-Off : not to be barred.
-Status : to see whether the call is barred or not
Clear all : After selecting a call type, activate or deactivate
service type of information as following.
- All services
- Voice calls
- Data
- Fax
- Messages
- All except msgs
78
79
Page 41

NET SERVICES
NET SERVICES
NET SERVICES
NET SERVICES
CUG settings (Closed User Group settings)
You can set a group of numbers that you can only call and receive within them.
PASSWORD
List CUGs
Fixed dialing
Fixed dial setting
Enable : This option allows the user to only dial those numbers which
Disable : Select this option to disable the “Fixed Dialing” [REF] The PIN2
Fixed dial list
Display the Fixed dial list
80
PASSWORD
match a set of “filters” stored in a list on the SIM
pa ssword is required when you turn it on or turn it
1. CUG name list specified by the user is displayed
2. Select the CUG name
3. Press [ ], and you can
- Add : add a new CUG name to the index list
- Edit : The user can associate their own text, rather than the default text,
with each of the 10 CUG identifiers
- Delete : The pre-set CUG identifier is deleted.
- Clear all : Erases all the pre-set CUG identifiers and CUG names.
Select
1. CUG name list specified by the user is displayed
2. When the user selects a CUG from the menu, the
corresponding
CUG index will be sent when a call is set up
81
Page 42

ORGANIZER
ORGANIZER
In Organizer, you can set alarms, keep track of events, make notes, use a simple calculator,
convert measures, and check time events.
Alarm
You can set alarms to ring for once, or on a daily or weekly basis.
Adding & Deleting alarms
Fill in the alarm time and scroll down once to decide
On or Off.
At the next scroll bar, you can set this alarm to ring
just once, or on a daily or weekly basis.
ORGANIZER
ORGANIZER
If you choose [Once], then it will ring just once on the given
Alert Date. If you choose [Daily], then it will ring every day at the
given time. If you choose [Weekly], then it will ring at the given
time on the days you select. To select press the [ ]key. You
can select more than one day.
Selecting alarm melody, Press [ ]key and select [Melody]
from the popup menu that appears select alarm melody. From the
options that appear. [On MorningCall] option lets you hear the
alarm even when your phone is in silent mode.
Up to 5 alarms can be
Add :
Add new alam.
Delete :
Delete selected alam.
Delete all :
Delete all alams.
added.
82
83
Page 43

ORGANIZER
ORGANIZER
ORGANIZER
ORGANIZER
Scheduler
You can keep track of your events by putting short notes and alarms on the calendar.
You will see a blue circle cursor on the calendar which you can move using the [ ]keys.
Adding & deleting Events
Move the blue circle cursor to the date you want to add an event.
Then press [ ]key ->select [Add Event].
Or, just press [ ]key on a date and [ ]key
->select [Add Event]
Add Event : Add a new event.
View All Event : View all the event that is saved
Goto Date : Going to the specific date.
Memory Info : Defining saved event’s number
The following screen appears.
When a new event is set on a date, it is marked on the calendar with a
green box. Press [ ] to see the details of the events.
Event : You can choose the type of the event
(Meeting,Call,restaurant,entertainment,birthday,Travel,and Others).
Memo : Press [ ] to put a short note about the event and press [ ]
Time : Set the alarm time.
Alarm alert : You can set when the alarm will ring
(On time, 1Hour Before, 2Hour Before, 1Day Before, 2Day
Before, and No alerting )
Repeat : You can set how often the event happens.
(Once, Daily, Weekly, Monthly, and Yearly )
Ex)For birthday, you would make it Yearly.
Press [ ] to choose the melody for the alerting.
Now, everything’s done. Just press [ ] to save the event.
84
85
Page 44

ORGANIZER
ORGANIZER
ORGANIZER
ORGANIZER
Press [ ]key while viewing the details to see the followings;
1. Add Event : To add another event on the selected day.
2, 3. Delete & Delete All : Deletes one or all of the events registered on the selected
day.
4. On D-day : Show you how many days are left until the event.
5. Memory Info : Shows the number of events registered.
To see all events put on the calendar
Press [ ]key a select [View All Event] Jumping to specific
date
Press [ ]key a select [Goto Date]
Memo
You can keep short notes on your phone.
Press [ ] then you will see the following sub menus.
1. Add memo : You can create a short note. After you are done with the writing, press
[ ] key to save the note.
2. Delete : Delete the selected note.
3. Delete all : Deletes all notes.
You can edit notes by pressing [ ] key on the list view.
You can keep up to 20 notes.
86
87
Page 45

ORGANIZER
ORGANIZER
ORGANIZER
ORGANIZER
Calculator
Adding, subtracting, multiplying, and dividing of decimal numbers are supported.
You can use [ ], [ ], [ ] and [ ]keys to
manipulate the calculation.
Example : 6 X 5 / 2 + 2 =
[ ] ,[ ], [ ], [ ], [ ],
[ ], [ ], [ ]
Converter
In Converter, you can convert measures such as Length, Area, Volume and Weight from one
unit to another.
Basically, ‘Length’ includes cm, m, inch, feet, yard and mile. ‘Area’ includes sq. m, a, sq.
feet, sq. yard and acre. ‘Volume’ includes cu. cm, cu. m, L, cu. inch, cu. feet, cu. yard and
gallon. ‘Weight’ includes g, kg, t, grain, oz and pound.
Select the measure among Length, Area, Volume and Weight
pressing navigation [ ]key or [ ]key.
Select the target unit pressing navigation [ ]key or [ ]key
after moving down using navigation [ ] key. Enter the target
value pressing keypad and dot(.)using key [ ].
Select the result unit by pressing navigation [ ]key or
[ ]key.
88
89
Page 46

ORGANIZER
ORGANIZER
FUN&TOOLS
FUN&TOOLS
Stopwatch
You can time an event using this stopwatch function. The stopwatch
can be operated with the navigation key. Press Start to time an event,
press Pause to pause timing and press Start to resume. Press Reset to
clear the time and wait
This section describes the game embedded in your phone.
Game
Mini Soccer 2003
Title
LCD
Sound
Release Date
Copyright
[Introduction]
This game is the mini soccer game supported single match mode and
tournament mode between 16 countries. Each team consists of 5
players included a goalkeeper. All field players can be controlled to
move (Up, Down, Left, Right, Left-Up, Left-Down, Right-Up, RightDown), pass and tackle. Each player has his own special ceremony
when he is earning and losing a point.
Team play helps to make a score very much.
miniSoccer
64K Color [128 x 160]
40 Poly [MA3]
2003.04.30
Diffon, Inc.
90
91
Page 47

FUN&TOOLS
FUN&TOOLS
FUN&TOOLS
FUN&TOOLS
Title Screen
Tela de Menu
Keys
Single Match Tournament
Help Screen Record Screen
Playing Game
/
/
/
/
/
Change Play Mode
Change Play Mode
Move up
Move down
Select
92
93
Page 48

FUN&TOOLS
FUN&TOOLS
FUN&TOOLS
FUN&TOOLS
Etc.
Keys
/
/
/
/
Move Left
Move Right
Move Up
Move Down
Move Left-Top
Move Right-Top
Move Left-Down
Move Right-Down
Attack : Pass,
Defense : Tackle
Shoot
My Puppy
Title
LCD
Sound
Release Date
Copyright
[Introduction]
Your cute pet is in your mobile phone.
Time in the game is identical with real time. So the player has to feed
up 3 times a day and play with the pet sometimes as like a real pet.
The pet is baby at first. If the player brings up the pet carefully, the pet
MyPuppy
64K Color [128 x 160]
40 Poly [MA3]
2003.04.30
Diffon, Inc.
Title
will be young and then attain full growth. Essential 5 activities are
ready for the pet. (feeding, exercising, the veterinary hospital, bath,
playing) The player can view the status of the pet and do something
appropriately for the pet.
If the player doesn’t take care of the pet carefully, the pet will go away
or go to Heaven.
94
95
Page 49

FUN&TOOLS
FUN&TOOLS
FUN&TOOLS
FUN&TOOLS
Move Left Menu
/
/
Keys
Playing With Player
Keys
Think and choose where the pet is about to jump.
Etc.
Keys
Move Right Menu
/
Select Action
Select Left
/
/
Select Right
Move Left Menu
/
/
Move Right Menu
/
Select
If the player doesn’t care the pet for about 5 days, It will go
away or go to Heaven
96
97
Page 50

FUN&TOOLS
FUN&TOOLS
FUN&TOOLS
FUN&TOOLS
Downloaded
You can view a list of downloaded images, animations and melodies and execute the basic
file operation like browse, delete, rename, set as wallpaper, play, and view.
Image
If you press [ ] then you’ll be given with several options to
select.
Select options you like with [ ] key.
Browse image files using [ ][ ] key.
1)View : View the full screen image.
2)Set as wallpaper: Press [ ] key after saving to wallpaper
image. If you want to display wallpaper image
then go to display visual option.
3)Info: View file information
4)Delete: Delete the image file.
5)Rename: Rename the file
98
99
Page 51

FUN&TOOLS
FUN&TOOLS
FUN&TOOLS
FUN&TOOLS
Animation
View a list of animation image files
Melody
View a list of melody files
Voice record
You can record and play your voice or those of other people using this function.
Press [ ] key to bring up the Pop-up menu, which has
following sub-options.
Record
Scroll the [ ] key to choose Record/Stop/Play/Save.
If you press the [SAVE] key after completing the voice recording,
you can make a brief note with the text editor, and then see the
recorded voice memo on the view list.
To play the memo, select the voice record by pressing [ ] key
and press play.
Max recordable time : 30 Seconds / 1 voice memo
Max recordable memo : 3 Voice memos
100
101
Page 52

FUN&TOOLS
FUN&TOOLS
FUN&TOOLS
FUN&TOOLS
Wap
You can surf the Internet using the WAP browser.
The descriptions below can vary according to your Network provider.
Therefore, ask your Network provider for detailed information.
Home
Resume
Reconnects to the lat web site entered.
Bookmarks
You can bookmark Internet address using the WAP browser.
Push messages
Mobile can receive Push Messages from Service Provider.
Settings
Using this function, Connection settings, Security certification, Cache mode, and Push
security can be set.
Connection settings
102
103
Page 53

FUN&TOOLS
FUN&TOOLS
A. Homepage : Sets the home page address
B. Image Settings : Image display option can be chosen using this.
C. Connection Type/ Options : Helps select connection-orientation/connection-less or with-
D. Gateway Settings : To set the ID and password of Gateway
E. Bearer : The bearer type( Data / SMS / GPRS ) can be selected.
F. Data settings
1. IP address : IP address of Gateway
2. Dial number: Dial number
3. DataCall Type : ISDN/ analogue
4. Data Call Speed : 2400/4800/9600/14400 bps
5. User ID
6. Password
7. Timeout : 30/60/90/120 msec
G. SMS settings
1. Server number
2. Service number
H. GPRS settings
1. IP Address : Gateway IP address
2. Access point :Access point name
3. User ID
4. Password
security / without security
FUN&TOOLS
FUN&TOOLS
Security
These are the lists of Security Certification.
Cache mode
Two options(Always check/Never check) of Cache mode can be selected.
Push security
- Accept all : To accept all the messages the Network provider
sends.
- Trusted only: To receive messages only from trusted sources.
- Accept none : To refuse all the pushed messages.
104
105
Page 54

FUN&TOOLS
FUN&TOOLS
FUN&TOOLS
FUN&TOOLS
Empty Temp File
- Empty Cache : To delete the information related to the web-pages
you previously visited.
- Empty Cookies : To delete the Cookies stored in the phone
memory.
- Empty Password : To delete the saved password in the phone
memory.
Version info
Provides information about view the software version of the WAP
browser.
Press the [ ] key while browsing to see the
following sub-options.
Stop : stops current page download
Go back : navigates one page back in the history list
Bookmarks : presents the list of bookmarks
Add bookmark : creates a new bookmark for the page you are viewing.
Enter address : allows you to enter a URL to browse to
Home : takes you to the homepage of the current website.
Top : jumps you back to the top of the current page
106
107
Page 55

FUN&TOOLS
FUN&TOOLS
Memory info
This option shows the memory status.
STK (SIM Tool Kit)
STK (SIM Tool Kit)
This function is dependant on your Network provider, please ask them
for more information.
108
109
Page 56

PHONEBOOK
PHONEBOOK
Phone book menu allows you to set up your own phone book. You can add or delete the
records anytime you want. In addition, you are able to save the records either in SIM card
memory or phone memory. You can store up to 800 entries in the phone book.
PHONEBOOK
PHONEBOOK
Name Search
Group search
You can search a person’s number registered in each
group.
Press [ ]
and select Edit
You can search a person’s number with the name saved in the phonebook.
Press [ ]
Select each number with
[ ][ ]key.
and select Edit
One person can have at most 3 numbers.
Press [ ][ ] key to select the correct number.
110
111
Page 57

PHONEBOOK
PHONEBOOK
PHONEBOOK
PHONEBOOK
When viewing the list of the phonebook, press [ ] to;
- Search (search a number in the list)
- Edit
- Delete (delete all numbers of the person)
Press [ ] key to view all the information about the
person. To modify the information, press [ ] Key and
select Edit.
Add New Name
Add new phone number in the Edit mode.
To edit the Name / PhoneNumber / Memo / Picture, move to the item
and press any key on the item. You can select group / individual bell
by pressing [ ] or [ ] navigation key.
You select Picture, then go into Album. By pressing [ ]Key, you
can store the picture.
112
113
Page 58

PHONEBOOK
PHONEBOOK
PHONEBOOK
PHONEBOOK
Speed Dial List
Here you can see the whole list of the phone numbers stored in the
phonebook with their names and given numbers.
If you want to speed dial a number in idle mode, press and hold the
number of the phonebook that matches the person you want to call.
For example;
1) Single digit number(1~9) : Press and hold the phonebook number.
2) Double digit number(including 00) : After pressing the tenths, press
and hold the units of the
phonebook number.
Settings
Save nos.to
You can choose between the SIM card and Phone memory for the
phone number to be saved. If you choose “Choice”, you’ll be asked
where to save when you Add New Name to the phonebook.
Used space
Shows the memory currently used.
You can store up to 500 entries.
114
115
Page 59

PHONEBOOK
PHONEBOOK
Group ring tones
You can set a bell sound for each group with navigation key
( , , , )
Appendix
Appendix
Care and Maintenance
Troubleshooting
Delete all
You can delete all the stored numbers. You need to enter the Lock code to access this menu.
Select one of the following options with the Navigation key.
Delete SIM – Select “O”, “X”
Delete phone –
To save, press [ ].
116
Select “O”, “X”
Using the batteries
Safety information
Operating environment
Electronic devices
Emergency calls
117
Page 60

CARE AND MAINTENANCE
CARE AND MAINTENANCE
Followings are to help ensure the proper use and the life of your mobile
phone.
Keep your mobile phone and its accessories out of small children’s reach.
Keep it dry. Use your phone at a normal temperature.
Temperature higher than 55 ° C or lower than 20°C (Higher than 131° For
lower than-4°F)may cause damage to your phone.
Do not use or store your mobile phone in dusty or dirty areas if possible.
Do not attempt to open your mobile phone.
Do not drop, knock or shake it.
Do not use harsh chemicals, cleaning solvents, or strong detergent to clean
mobile phone.
If your mobile phone or its accessory is not work properly, contact your
dealer immediately.
Use only approved batteries, battery chargers and accessories to help
ensure the proper function of your phone and battery life. Any malfunction
or damage caused by the use of any third-party accessories will void the
limited product warranty.
Keep battery contacts and battery charging socket at the bottom of your
phone from direct contact with conductive objects. Otherwise it could
cause a short-circuit and result in potential damage or harm.
TROUBLESHOOTING
TROUBLESHOOTING
If you have any problem while using your phone, please refer to following check lists to solve
problem.
If the problem persists, please contact your dealer immediately for services them.
“Insert SIM Card” message appears
Make sure that the SIM card is correctly installed.
Check SIM is working properly, it may be defected or out of order.
If so, send it to network service provider.
Or, clean the SIM card contact.
“Handset locked enter password” message appears
Enter the valid lock code.
If you don’t know the valid lock code, contact dealer near you.
“Enter PIN1” appears
Enter the valid PIN1 code with the SIM card.
If you don’t know the code, contact your dealer.
With handset locked with 3 invalid trials, incoming call could be
received.
“No service”, “Network failure” is displayed
Check the signal strength indicator. The network connection
was lost. You may be in the basement or building where signal is weak.
Move to other location to receive signal properly. In another case, you
may be too far from the base station of your network service provider.
Then, ask your network service provider service range map.
118
119
Page 61

TROUBLESHOOTING
TROUBLESHOOTING
TROUBLESHOOTING
TROUBLESHOOTING
Audio quality is poor. Echo, or noise makes it hard
to hear
Hang up the phone and then dial again.
You may be switched to a better quality network line.
Correspondence cannot hear you speaking
Your mobile phone is set to enable MUTE function.
Make mobile phone to UNUTE by pressing.
The standby time becomes short
You may be in weak signal area.
Turn it off temporarily while you are expecting no calls.
Or your mobile phone battery life may be over.
Then,get a new battery.
The phone is not turned on
Check the battery capacity or charge the battery.
You can turn your phone on to check during charging.
Unable to send message
You may have not subscribed to SMS service or network
service provider in your area couldn’t support service.
Unable to make a call
You mobile phone is set to fixed dial function.
Then, cancel fixed dial function.
Unable to charge the battery
It could be one of 3 possible situations:one is that your
mobile phone charger is out of order. Then contact dealer near you.
Another is that you attempt to use your mobile phone in
severe temperature. So,change the battery-charging environment.
The other is the poor connection. Then check the connector.
Unable to input data in the Phonebook
Your phonebook memory is full.
Delete some entries from phonebook list.
Unable to choose certain function
You are not subscribed in that service or in network service provider
where not support that service.
Contact your service provider.
120
121
Page 62

USING THE BATTERIES
USING THE BATTERIES
SAFETY INFORMATION
SAFETY INFORMATION
Your mobile phone is equipped with Li-on battery.
The following batteries are also available (Contact dealer near you):
-Standard battery
-Slim battery
Precautions when using batteries
Do not use any charger and battery that is damaged in anyway.
Use the battery only for its intended purpose.
If you use the phone near the near the network’s base station, it uses less
power; talk and standby time will increase as strong as signal strength.
Battery charging time depends on the remaining battery charge and type of
battery and charger used.
Battery lifetime is about hundreds times in charging and discharging, but it
will gradually wear out. Use only approved battery and recharges your
battery only with approved chargers.
When a charger is not in use, disconnect it from the power outlet.
Overcharging makes battery lifetime shortened.
Do not leave the battery in hot or cold places, such as in a car in summer
or winter. This reduces the capacity of battery.
Always try to keep the battery at room temperature.
Do not short-circuit the battery. Accidental short-circuiting can occur
when a conductive object contacts both contact directly.
Short-circuiting terminals may damage the battery.
Dispose of used batteries in accordance with local regulation.
Always recycle. Never dispose of batteries in fire.
Don’t use other than the specified battery charger.
To prevent injury or burns, don’t allow metal objects to contact or short
circuit the battery terminals.
Don’t discard the Battery Pack into to fire.
Road Safety
Remember, road safety always comes first.
Do not use a hand-held telephone while driving a vehicle.
If using a hand-held phone, park the vehicle before conversing.
Always secure the phone in its holder;do not place the phone on the
passenger seat or where it can break loose in a collision or sudden stop.
The use of an alert device to operate a vehicle’s lights or horn on public
road is not permitted.
122
123
Page 63

OPERATING ENVIRONMENT
OPERATING ENVIRONMENT
ELECTRONIC DEVICES
ELECTRONIC DEVICES
Remember to follow any special regulations in force in any
area and always switch off your phone whenever it is forbidden
to use it, or when it may cause interference or danger.
When connecting the phone or any accessory to another
device, read its user’s guide for detailed safety instructions.
With other mobile radio transmitting equipment, users are
advised use mobile phone in the normal operating position for
the satisfactory operation of the equipment and for the
personnel (Held to your ear with the antenna pointing over
your shoulder)
Most modern electronic equipment is shie lded from radio
frequency (RF)signals. However, certain electronic equipment
may not be shielded against the RF signals from your wireless
phone.
Operation of any radio-transmitting equipment may interfere
with inadequately protected medical devices.
Consult a doctor or the manufacturer of the medical device if
you have any questions. Other electronic equipment may also
be subject to interference.
Always switch off the phone when at a refueling point (service
station).
You are reminded of the need to observe restrictions on the
use of radio equipment in fuel depot (Fuel storage and
distribution areas), chemical plants or where blasting
operations are in progress.
Do not store or carry flammable liquids, gases or explosive
materials in the same compartment as the phone, its parts or
accessories.
Switch off your mobile phone when in an aircraft. The use of
mobile phones in an aircraft is illegal and may be dangerous to
the operation of the aircraft or disrupt the cellular network.
Failure to observe this instruction may lead to the suspension
or denial of cellular telephone services to the offender, legal
action or both.
124
125
Page 64

EMERGENCY CALLS
EMERGENCY CALLS
IMPORTANT!
This phone, like any wireless phone, operates using radio
signals, wireless and landline network as well as userprogrammed functions, which cannot guarantee connection
in all condition. Therefore, you should never rely solely upon
any wireless phone for essential communications
(e.g.medical emergencies).
Remember, to make or receive any calls the phone must be
switched on and in a service area with adequate cellular
signal strength. Emergency calls may not be possible on all
wireless phone networks or when certain network services
and/or phone features are in use.
Check with local cellular service providers:
To make an emergency call:
If your phone is not on, Switch it on.You should be in a
service area,so check the radio signal strength.
Emergency calls may not be possible on all cellular phone
networks or when certain network services and/or phone
features are in use.
Check local cellular service provider.
MEMO
MEMO
126
127
Page 65

MEMO
MEMO
128
 Loading...