

Page 1

Page 2

WHERE YOUR
WORLDS CONNECT
™
Thank you for selecting Disney Mobile's™ DM-P205.
Equipped with many of today’s most popular and
advanced wireless features, the simple-to-use, easily
customized DM-P205 will keep you and your family
better connected. Your new phone includes:
• A camera with embedded flash to make taking
pictures quick and easy, day or night
• Customized user interface menu that features the
Disney Mobile Family Applications
• A flip-phone design with dual LCD displays
• Increased memory for wireless Internet access,
messaging and image transmissions
• A two-way speakerphone and voice-activated dialing
• A large, 300-entry phone book with easy access to
all your contacts
• Ability to download and personalize your phone with
images, ringtones, themes, games and applications
• A web browser with a menu of selected web sites
that are specially designed to be viewed on wireless
phones
Your DM-P205 also supports text and picture
messaging, MIDI, MP3 or QCELP audio formats, plus
JPG image graphics for a rich multimedia experience.
Fun, easy-to-use and featuring the latest wireless
technology, the Disney Mobile DM-P205 is the smart
choice for today’s mobile family.
IMPORTANT INFORMATION
THIS DISNEY MOBILE DM-P205 USER GUIDE CONTAINS IMPORTANT INFORMATION
REGARDING PROPER USE AND HANDLING OF YOUR NEW PHONE.
NOTE: PLEASE BE AWARE OF THE WARRANTY'S EXCLUSIONS AND LIMITATIONS
WHICH ARE RELATED TO UNAUTHORIZED USE OF COMPONENTS.
REV.00 XXXXXXXXXXXXXXX
Page 3

TABLE OF CONTENTS
CHAPTER 1: GETTING STARTED 9
Inside the Package 10
Handset Description 11
Display Icons 13
Battery Usage 14
Installation 14
Removal 14
Charging 15
Power Connection 15
Talk Time 16
Standby Time 16
Battery Handling Information 17
Dos/Don’ts 17
CHAPTER 2: BASIC PHONE OPERATION 19
Turning the Phone On/Off 20
Powering On 20
Powering Off 20
Accessing the Menu 21
Menu Summary 22
Basic Functions 24
Making Calls 24
Speakerphone 25
Pause 25
Answering Calls 26
TABLE OF
CONTENTS
Page 4

Caller ID 26
Call Waiting 26
Volume 27
Silencer 27
During a Call 28
Mute/Unmute 28
Messaging 28
View My Phone # 28
Bluetooth 28
Making Emergency Calls 29
911 in Lock Mode 29
911 Using Any Available System 29
CHAPTER 3: DATA ENTRY 31
Entering Letters, Numbers & Symbols 32
Standard [Abc] Input Mode 33
T9 Input Mode [Word] 34
Numeric Mode 35
Symbols Mode 35
CHAPTER 4: MENU FUNCTION 37
Contacts
Contact List 38
Storing Phone Numbers 39
Groups 40
Adding a Number to a Group 40
Adding a New Group 40
TABLE OF
CONTENTS
Page 5

Changing a Group Name 41
Deleting a Group 41
Speed Dial 42
Voice Dial 43
Record New Voice Dial 43
Voice Dial List 44
Services 45
Guest Services 45
Directory Assistance 45
Roadside Assistance 45
Check Usage 45
Messaging 46
Call History 46
Recent 46
Missed 47
Receiv ed 48
Dialed 49
Voice Mail 49
Create Message 50
Tex t 50
Pix 51
Inbox 53
Outbox 55
Drafts 57
Family Center™ 58
Family Locator™ 61
Family Monitor™ 62
TABLE OF
CONTENTS
Page 6

Call Control 65
Family Alert!™ 67
Entertainment 72
Shopping 73
Previewing 74
Purchasing/Downloading 75
My Ringtones 77
My Themes 80
My Images 82
My Games 85
My Subscriptions 87
Disney Zone 88
Toolbox 90
My Profile 90
Camera 91
Take Pi x 91
Pix Gallery 95
Voice Recorder 9 6
Recording New Voice Memos 96
Voice Gallery 97
Too l s 98
Bluetooth 98
Calendar 99
Alarm Clock 101
Notepad 102
Calculator 104
Stopwatch 105
TABLE OF
CONTENTS
Page 7

World Clock 106
Settings 107
Display 107
Greeting 107
Menu Style 108
Contrast 108
Backlight 109
Clock Setting 109
Volume 110
Ringtone Volume 110
Earpiece Volume 110
Alert Volume 111
Game Volume 111
Roaming 112
Set Mode 112
Call Guard 112
Roam Ringer 113
Messaging 113
Auto Delete 113
Signature 113
Quicknote 114
Tex t Entry 114
Security 115
Lock Phone 115
Change Lock Code 115
Special Numbers 116
Deleting Contacts 116
TABLE OF
CONTENTS
Page 8

TABLE OF
CONTENTS
Setup/Others 117
Flip Activation 117
Language 117
TT Y 118
Lo cat ion 118
Phone Info 119
Device Info 119
Version 119
CHAPTER 5: SAFET Y AND WARRANTY 121
Safety Information for Wireless
Handheld Phones 122
Exposure to Radio Frequency Signals 122
Antenna Care 123
Driving Safety 124
Electronic Devices 125
Pacema kers 125
Other Medical Devices 126
Posted Facilities 126
Other Safety Guidelines 126
Aircraft 126
Blasting Areas 126
Potentially Explosive Atmospheres 127
Precautions 128
Safety Information for FCC RF Exposure 129
Cautions 129
Page 9

TABLE OF
CONTENTS
Body-Worn Operation 130
Vehicle Mounted External Antenna
(optional, if available) 130
SAR Information 131
FDA Consumer Update 133
12 Month Limited Warranty 144
Page 10

MEMO
Page 11

CHAPTER
ONE
GETTING STARTED
The first step in learning all about your
new DM-P205 camera phone...
•
Package Contents
•
Handset Description
•
Battery Usage & Handling
Page 12
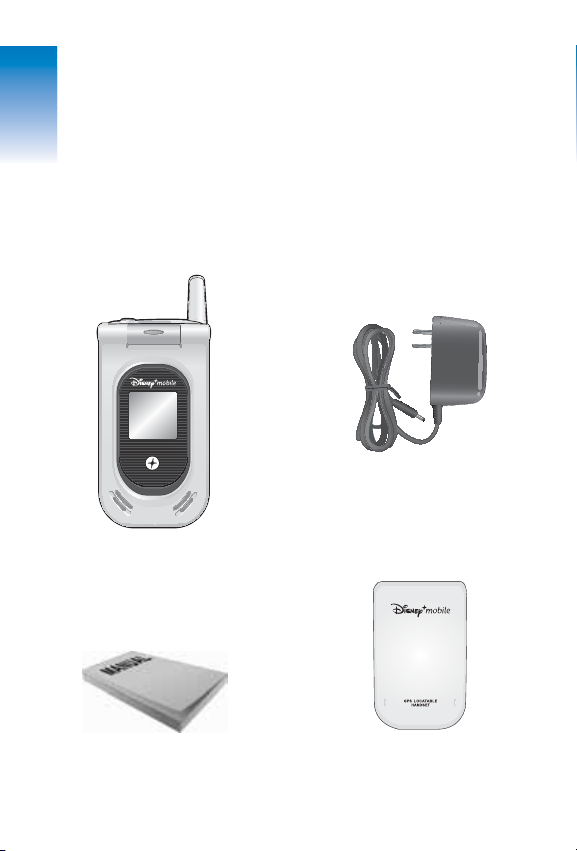
INSIDE THE PACKAGE
Important! This package should contain all the
items shown below. If anything is missing or different,
please contact the retailer where you purchased
the phone or call 1-866-DISNEY2 if you purchased
online or over the phone. Note:
Earbud not shown.
10
Handset
User Manual Standard Battery
AC Travel Charger
CH 1
Page 13
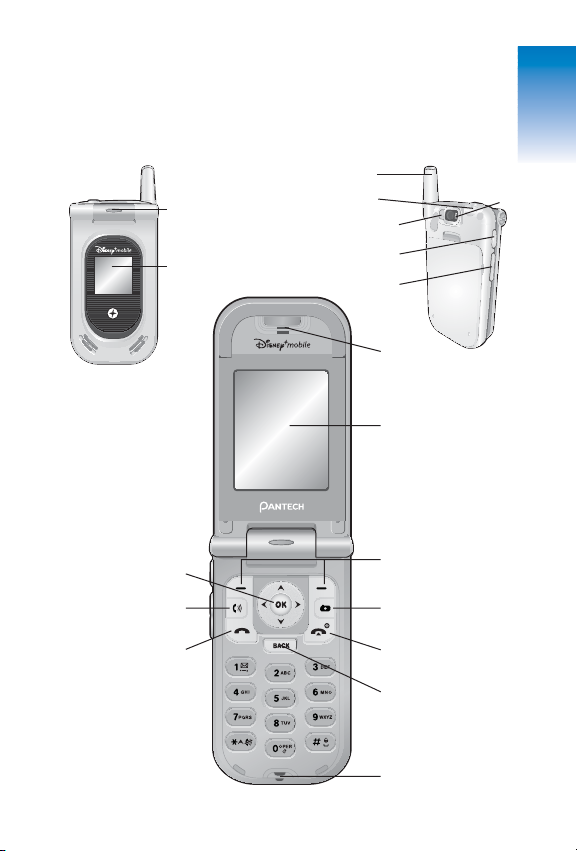
HANDSET DESCRIPTION
The compact Disney Mobile DM-P205 weighs only
3.7 ounces and measures 1.92" x 3.43" x .94".
11
State LED
Antenna
Earj ack
Camera F lash
Camera Key
Volume Key
Sub LCD
Earpi ece
1.9
"
260K Color
TFT LCD Display
Nav Bars (Softkeys)
Navigatio n NAV Key
Speakerphone Key
Send Key
Camera Key
END/Power Key
Back Key
Microphon e
Camera Len s
CH 1
Page 14
HANDSET DESCRIPTION HANDSET DESCRIPTION
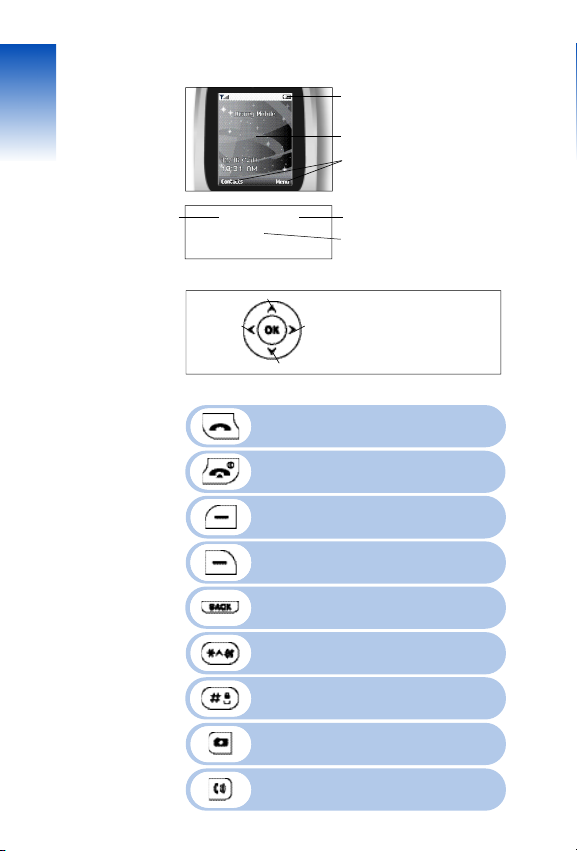
DISPLAY INDICATORS
See page 13 for a list of icons.
TEXT & GRAPHIC DISPLAY SCREEN
NAVIGATION BAR OPTIONS
(SOFTKEYS)
Displays softkeys functions.
CONTACTS
ENTERTAINMENT
FAMILY CENTER
Within a menu, use theNAV KEY to scroll up, down, left or right through
listed options to make a selection.
MENU
Press to make or receive calls.
Press and hold to access VR Mode
(Voice Activated Dialing)
Press and hold to turn the phone ON/OFF.
Pr ess to end calls or retu r n to the Id le Scr een.
(Left NAV Bar) Press to access Contacts or
softkey displayed.
(Right NAVBar) Press to access the Menu or
softkey displayed.
Press to delete characters or return to the
previous screen.
Press and hold to activate Silencer Mode.
MENU
NAV KEY
A ccesses Disney Mobi le Fa m i ly
A ppl ications and allows you to ma ke
selections within a speci f ic menu.
ON THE IDLE SCREEN
MESSAGING
UP = Entertainment
DOWN = Menu
RIGHT = Messaging
LEFT = Family Center
Press to accept a word and/or add a space.
Press and hold to enter lock mode.
Press to access the Camera Menu.
Press and hold to activate Camera Mode.
12 13
Press to enable Speakerphone Mode.
Page 15

DISPLAY ICONS
Signal Strength
More lines = a stronger signal.
Service
Indicates a call in progress.
Indicates the phone cannot receive
network signals.
CH 1CH 1
Messaging
Digital Mode
I nd icates the phone is operati ng in Dig ital Mo de and ready to ma ke
ca l l s. If not pr esent, phone will be in an out of service status.
Battery
More bars = a stronger charge.
Mute
Indicates the phone has been muted during a call.
Speakerphone
I nd icates the phone is operati ng in Spea kerphone Mo de.
Silencer
Indicates the phone will be muted for incoming calls.
Calendar
Appears when events or alarms are set.
Ringtone
Mode
GPS
Indicates the phone’s Location Service is enabled
or disabled.
TTY Mode
Indicates the phone’s TTY Mode is active.
Bluetooth
Power On Mode.
Bluetooth
Discovery On Mode.
New Message Voice Message
Ringtone Off Vibrate On Ringtone High Vibrate
Voice & Text Message
Page 16
14
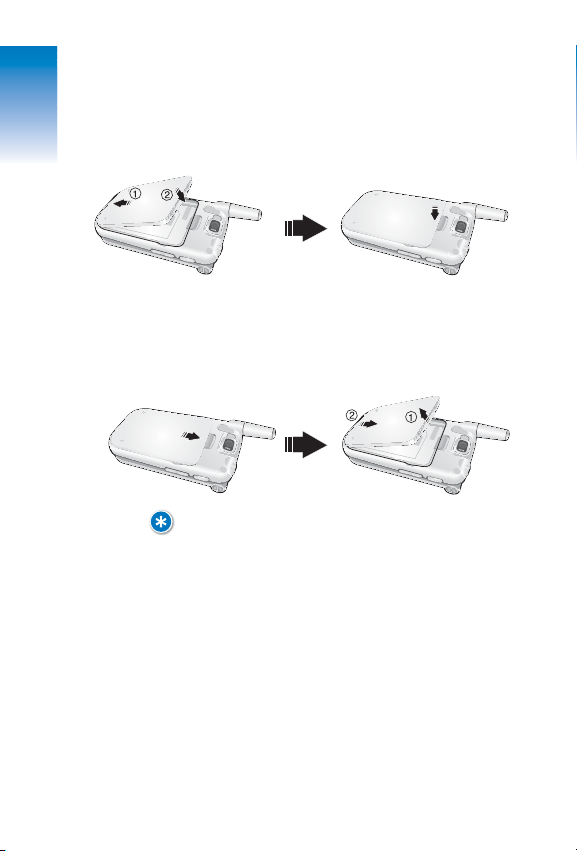
BATTERY USAGE
INSTALLATION
Place the battery on the back of the handset and slide
until it locks into place.
REMOVAL
On the back of the handset, push the release latch
down, lift the battery up and remove it from the handset.
NOTE:
IF THE BATTERY IS NOT INSTALLED CORRECTLY, THE PHONE WILL NOT POWER ON
AND/OR THE BATTERY MAY DETACH DURING USE.
CH 1
Page 17
15
BATTERY USAGE
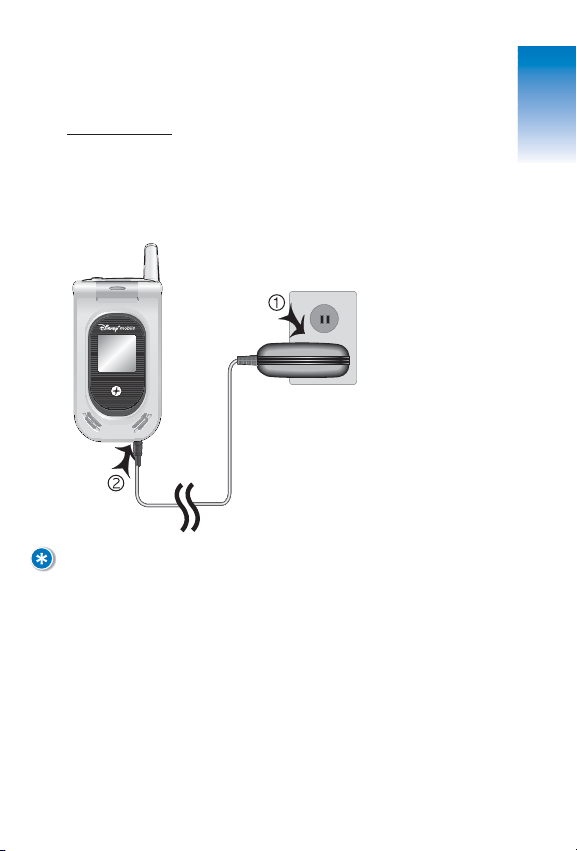
CHARGING
P
ower Connection
Plug one end of the AC charger into the bottom of
the phone and the other into a standard outlet. Your
phone's battery must be installed correctly to charge
at maximum capacity.
NOTE:
• UPON PURCHASE, BATTERIES MUST BE FULLY CHARGED FOR ABOUT TWO
HOURS BEFORE USING THE PHONE.
• WHEN CHARGING POWERED-OFF PHONES, A STATUS MESSAGE WILL APPEAR
ON THE INTERNAL DISPLAY SCREEN. YOUR PHONE WILL NOT OPERATE UNTIL
POWERED ON.
• IN ADDITION TO BEING CORRECTLY CONNECTED TO YOUR PHONE, BATTERIES
WILL CHARGE MORE EFFICIENTLY WITH THE PHONE POWER OFF.
• BATTERY OPERATING TIME WILL GRADUALLY DECREASE WITH USE.
• IF THE BATTERY FAILS TO PERFORM PROPERLY, IT MAY NEED TO BE
REPLACED.
CH 1
Page 18
16
BATTERY USAGE
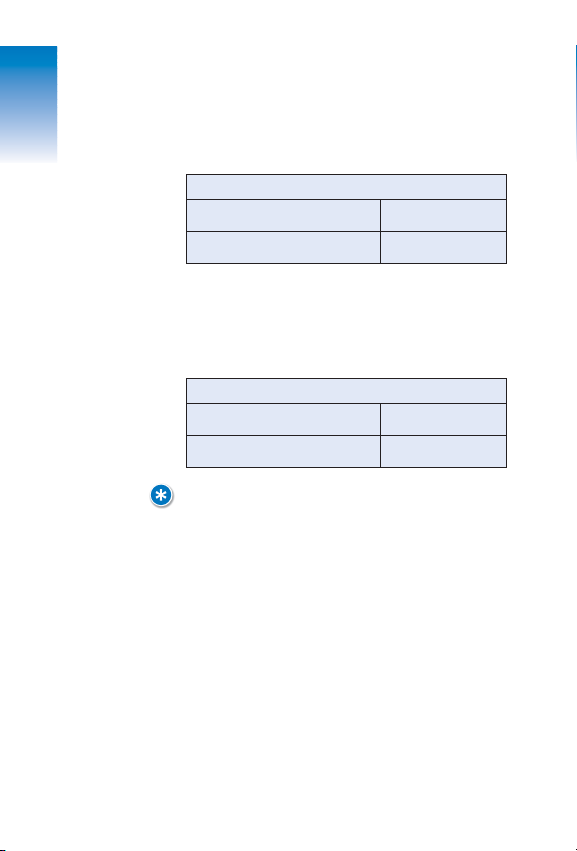
TALK TIME
The operating time is subject to handset usage and
configuration.
STANDBY TIME
Operating time is subject to handset usage and
configuration.
NOTE:
THESE TIMES ARE FOR A NEW BATTERY. TALK AND STANDBY TIME MAY
DECREASE OVER TIME.
BATTERY CAPACITY
Standard Battery (820mAh) Up to 190 minutes
Extended Battery (1430mAh) Up to 320 minutes
BATTERY CAPACITY
Standard Battery (820mAh) Up to 9.5 days
Extended Battery (1430mAh) Up to 13 days
CH 1
Page 19

17
BATTERY HANDLING INFORMATION
DOS
• Only use the battery and charger approved by the
manufacturer.
• Only use the battery for its original purpose.
• Try to keep batteries in a temperature between
41ºF (5ºC ) and 95ºF (35ºC).
• If battery is stored in temperatures above or
below the recommended range, give it time to
warm-up or cool-down before using.
• Completely drain the battery before recharging.
It may take one to four days to completely drain.
• Store discharged battery in a cool, dark, and dry place.
• Purchase a new battery when operating time
gradually decreases after fully charged.
• Properly dispose of the battery according to local laws.
DON’TS
• Do not attempt to disassemble the battery – it is a
sealed unit with no serviceable parts.
• Don’t accidentally short circuit the battery by
carrying it in your pocket or purse with other
metallic objects such as coins, clips and pens.
This may critically damage the battery.
• Don’t leave the battery in hot or cold temperatures.
It could significantly reduce the capacity and lifetime of the battery.
• Don’t dispose of the battery into a fire.
CH 1
Page 20

MEMO
CH 1
18
Page 21

BASIC PHONE OPERATION
Simple step-by-step instructions on
using the DM-P205 features, including...
•
Turning the Phone On/Off
•
Accessing the Main Menu
•
Main Menu Summary
•
Basic Functions
•
Making Emergency Calls
CHAPTER
TWO
Page 22
20
TURNING THE PHONE ON/OFF
POWERING ON
1. Press and hold until the Power On logo appears
and the tone sounds.
NOTE:
• IF A “PASSWORD” MESSAGE APPEARS ON YOUR PHONE'S LCD SCREEN, ENTER
YOUR 4-DIGIT PASSWORD TO UNLOCK FROM LOCK MODE.
• DEFAULT PASSWORD FROM LOCK IS THE LAST 4 DIGITS OF YOUR PHONE NUMBER.
POWERING OFF
1. Press and hold until the Power Off logo appears.
NOTE:
• IMMEDIATELY CHANGE OR RECHARGE YOUR PHONE'S BATTERY WHEN THE
LOW BATTERY WARNING: POWER OFF MESSAGE APPEARS. MEMORY DAMAGE
MAY OCCUR IF THE PHONE POWERS OFF BY ITSELF DUE TO A DRAINED BATTERY.
• TURN THE PHONE OFF BEFORE REMOVING OR REPLACING THE BATTERY. IF
LEFT ON, UNSAVED DATA MAY BE LOST.
CH 2
Page 23
21
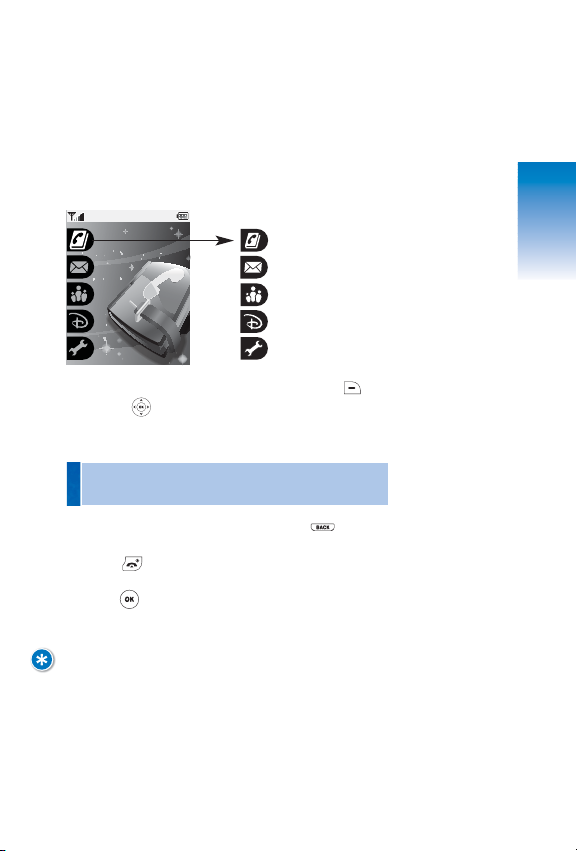
ACCESSING THE MENU
Your DM-P205 camera phone features a customized
Main Menu. Functions can be accessed by scrolling
up/down with the NAVIGATION (NAV) KEY or by
pressing the specific number that corresponds with
each menu item.
Contacts (1)
Messaging (2)
Family Center™ (3)
Entertainment (4)
Toolbox (5)
1. To access the Main Menu in Idle Mode, press
[MENU] or .
2. Use the NAV KEY to scroll through the menu options.
3. To return to the previous screen, press .
Exit the current screen and return to Idle Mode by
pressing .
4. Press to enter one of the functions displayed
or press its assigned number to have direct access to
that function.
NOTE:
HOTKEYS
VIA THE IDLE SCREEN, PRESS THE NAV KEY AS INDICATED BELOW TO ACCESS
THE FOLLOWING FUNCTIONS:
• UP: ENTERTAINMENT
• DOWN: MENU
• RIGHT: MESSAGING
• LEFT: FAMILY CENTER™
• Press the NAV KEY’s down arrow to search the menu
in numerical order.
CH 2
Contacts
Page 24

MENU SUMMARY
1. Contact List
2. New Contact
3. Groups
4. Speed Dial
5. Voice Dial 1. Record New
2. Voice Dial List
6. Services 1. Guest Services
2. Directory Assistance
3. Road Assistance
4. Check Usage
1. Call History 1. Recent
2. Missed
3. Received
4. Dialed
2. Voicemail
3. Create Message 1. Text
2. Pix
4. Inbox
5. Outbox
6. Drafts
1. My Profile
2. Camera 1. Take Pix
2. Pix Gallery
3. Voice Reco rder 1. Record Voice
2. Voice Gallery
4. Tools 1. BlueTooth 1. Power
2. Device List
3. Discovery Mode
4. Device Scan
5. Voice Dial
6. Device Name
2. Calendar 1. Add Event
2. View Event
3. Alarm Clock 1. Alarm 1
2. Alarm 2
3. Alarm 3
4. Notepad 1. A dd Notepad
2. View Notepad
3. Settings
5. Calculator
6. Stopwatch
7. World Clock
5. Settings 1. Display 1. Greeting
2. Menu Style
3. Contrast
4. Backlight
5. Clock Setting
2. Volume 1. Ringtone Volume
2. Ear piece Vol ume
3. Alert Volume
4. Game Volume
1. Family Locator
2. Family Monitor
3. Family Alert!
4. Call Control
5. Shop Family
1. Shop Entertainment
2. Disney Zone
3. My Ringtones
4. My Themes
5. My Images
6. My Games
7. My A p pl ic at io ns
8. My Subscriptions
9. Web
FAMILY CENTER
CONTACTS
LEVEL ONE
LEVEL TWO LEVEL THREE LEVEL FOUR
MESSAGING
ENTERTAINMENT
TOOLBOX
22
CH 2
Page 25

LEVEL ONE
LEVEL TWO LEVEL THREE LEVEL FOUR
23
MENU SUMMARY
3. Roaming 1. Set Mode
2. Call Guard
3. Roam Ringer
4. Messaging 1. Auto Delete
2. Signature
3. Quicknote
4. Text Entry
5. Security 1. Lock Phone
2. Change Lock Code
3. Special Numbers
4. Delete Contacts
5. Reset Phone
6. Setup/Others 1. Flip Activation
2. Language
3. TTY
4. Location
7. Phone Info 1. Device Info
2. Version
CH 2
Page 26
24
BASIC FUNCTIONS
MAKING CALLS
1. Enter a phone number and press [SEND] to dial.
NOTE:
TO MODIFY PHONE NUMBERS AFTER ENTERING:
• ERASE ONE CHARACTER AT A TIME BY PRESSING .
• TO ERASE THE ENTIRE NUMBER, PRESS AND HOLD .
2. will appear on the display screen as your call is
being connected.
NOTE:
• IF “CALL FAILED” MESSAGE APPEARS ON THE PHONE'S SCREEN OR THE
LINE IS BUSY, PRESS OR .
• WHEN MAKING OR RECEIVING CALLS FROM STORED NUMBERS, BOTH THE
CONTACT NAME AND NUMBER WILL BE DISPLAYED.
• YOU CAN MAKE CALLS THROUGH THE VR MODE, WHICH IS CALLED “VAD
(VOICE-ACTIVATED DIALING).” PLEASE REFER TO CHAPTER 4:VOICE DIAL
FOR MORE DETAILS.
3. End calls by pressing [END] to hang up.
CH 2
Page 27
25
BASIC FUNCTIONS
SPEAKERPHONE
This feature allows you to listen through the speaker
and talk hands-free.
1. To activate the speakerphone in Idle, Answering or
Calling Modes, press .
2. Speakerphone Mode will deactivate after ending
a call or when the phone is powered off and then on
again.
PAUS E
This feature allows you to dial or save phone
numbers that include additional extensions or groups
of numbers.
1. To insert a pause, enter a phone number then press
[OPTIONS]. Select either a Hard Pause (P) or a
Timed Pause (T) and continue entering any additional
numbers.
2. Press to dial [SEND] or [SAVE] to store.
Please refer to Chapter 4: Contacts for more details
about storing phone numbers.
NOTE:
THIS FEATURE IS USED FOR AUTOMATED SYSTEMS (I.E., VOICEMAIL, CALLING
CARDS) WHEN GROUPS OF NUMBERS OR SPECIAL CODES ARE REQUIRED.
AFTER THE PHONE NUMBER, INSERT A PAUSE TO ADD ADDITIONAL NUMBERS,
WHICH WILL THEN BE DIALED AUTOMATICALLY AFTER THE PAUSE.
CH 2
Page 28

26
BASIC FUNCTIONS
ANSWERING CALLS
1. To answer incoming calls, press .
2. End calls by pressing to hang up.
NOTE:
IGNORE INCOMING CALLS BY PRESSING [IGNORE].
INCOMING CALL RINGTONE CAN BE MUTED BY PRESSING .
CALLER ID
Identifies callers by displaying their phone number if
available. If the caller’s name and number are stored
in Contacts, both will appear.
NOTE:
CALLER ID DATA IS STORED IN RECENT CALLS.
CALL WAITING
A beep tone will indicate incoming calls when you’re
already on the phone, while the LCD screen will
display the caller’s phone number if available.
1. To answer a second call while on the phone, press
to place the first call on hold. Retrieve your first
call by pressing again.
CH 2
Page 29
27
BASIC FUNCTIONS
VOLUME
Adjust the Ringtone, Earpiece, Alerts and Game Volume
to satisfy your personal comfort level.
1. Press [MENU] then select one
of the following volume controls:
2. Adjust the selected volume, then press [OK]
to save.
NOTE:
TO ADJUST EARPIECE VOLUME DURING A CALL, PRESS THE NAV KEY
OR THE SIDE VOLUME KEY UP/DOWN.
SILENCER
Mutes key tones/ringtones while activating the
Ringtone Off Mode to indicate incoming calls or
messages.
1. To turn Silencer Mode on/off, press and hold .
2. indicates Silencer Mode is active.
• Ringtone Volume (Ringer, Key Tone, and Power ON
Volumes)
• Earpiece Volume (Earpiece and Speaker Volumes)
• Alert Volume
• Game Volume
CH 2
Page 30
28
DURING A CALL
You can view menu options during calls by pressing
[OPTIONS].
MUTE
This feature prevents callers from hearing sound
or conversation from your phone. When Mute is
activated, you will still be able to hear the caller.
1. Press [OPTIONS], then .
SEND MESSAGE
To send a message during a call.
1. Press [OPTIONS] . (When connected to a
Bluetooth device, press [OPTIONS] .)
VIEW MY PHONE #
View your own phone number during a call.
1. Press [OPTIONS] . (When connected to a
Bluetooth device, press [OPTIONS] .)
BLUETOOTH
This option appears only when you are connected to a
Bluetooth audio device.
1. Press [OPTIONS] .
To activate your Bluetooth device, select “To Bluetooth.”
To deactivate, select “To Phone.”
• To deactivate Mute, press [OPTIONS], then .
Your phone deactivates Mute when set in Emergency
Call or Callback Mode.
CH 2
Page 31

29
MAKING EMERGENCY CALLS
Activate the Emergency Call Mode by dialing 911.
This feature also operates in Lock Mode (instructions
later in manual) as well as out of the service area,
provided a compatible system is available. When a 911
call has been made, the phone moves to Emergency
Mode and displays relevant information on the screen,
and it exits Emergency Mode when you press .
911 IN LOCK MODE
This 911 call service is available even when your
phone is in Lock Mode.
1. Enter 911, then press to connect the call.
2. To exit emergency mode, press .
911 USING ANY AVAILABLE SYSTEM
1. Enter 911, then press to connect the call.
2. To exit emergency mode, press .
• If the call does not go through, your phone will
continuously attempt to receive or send calls from
any available system.
• When the emergency call ends, your phone will
automatically return to Lock Mode.
CH 2
Page 32

30
MEMO
CH 2
Page 33

CHAPTER
THREE
DATA ENTRY
Everything you need to know about
entering letters, number & symbols on
your DM-P205 phone.
Page 34

32
ENTERING LETTERS, NUMBERS & SYMBOLS
Input Mode (Alpha Editor) is automatically activated
when letters and/or numbers are entered. Modes
include: Standard (Abc), Word (Word), Numeric (123),
and Symbol (Symbols).
The Input Mode Indicator appears on the lower right
side of the Nav Bar Options. First, press [Abc] to
access the Input Modes. Scroll the menu with the
down NAV KEY to select the desired Input Mode, then
press [OK] to enter your input selection.
The following chart illustrates the function(s)
assigned to each key in the Alpha Editor.
INPUT MODE INDICATOR
Abc: Standard Mode
WORD: Word Mode
123: Numeric Mode
Symbols: Symbols Mode
KEY FUNCTION
Press to select a different Input Mode.
[Abc][Word][123][Symbols]
Press to view the next word if the highlighted text is not desired (WORD).
Press to accept a word as well as add
a space.
Press to select a letter case of the
Standard (Letter) Input or T9 (Text) Input
Mode. [Abc], [ABC], and [abc] indicate the
Standard Text Input. [Word], [WORD], and
[word] indicate the Predictive Text Input.
Press to delete a character to the left of
the cursor.
Abc
Next
Space
Caps Lock
Clear
c
CH 3
Message
0/160
Options
OK Ab
Page 35

33
ENTERING LETTERS, NUMBERS & SYMBOLS
STANDARD [Abc] INPUT MODE
Use the number keys on your phone’s keypad to enter
letters, numbers and characters.
1. Enter letters, numbers and characters using your
phone’s key pad as follows:
Change the Input Mode by pressing [Abc]. When
entering special characters such as . @ - ’ , / : ? ( ),
press [1] repeatedly.
2. To enter a space between characters, press .
The cursor will automatically add a space/move to
the next column.
3. Repeat until all letters/characters are entered.
Please note: Text messages have a 160-character limit.
4. Delete one character by pressing . To delete the
entire entry, press and hold .
5. Change from lowercase to uppercase by press ing .
FOR EXAMPLE:
SELECT ABC MODE BY PRESSING [ABC]; THE ABC ICON WILL APPEAR AS A
VISUAL CONFIRMATION.
• FIND THE KEY THAT CORRESPONDS TO THE LETTER YOU WISH TO ENTER AND
CONTINUE TO PRESS UNTIL THAT LETTER APPEARS ON THE SCREEN.
• TO ENTER THE NAME “JOHN”:
PRESS J
PRESS O
PRESS H
PRESS N
KEY PAD
2ABC A B C 2 A
3DEF D E F 3 D
4GHI G H I 4 G
: : : : : :
9WXYZ W X Y Z 9
1 Time
Repetitions
2 Times
Repetitions
3 Times
Repetitions
4 Times
Repetitions
5 Times
CH 3
Page 36

34
ENTERING LETTERS, NUMBERS & SYMBOLS
T9 INPUT MODE [WORD]
The T9 Input Mode utilizes a built-in dictionary to
determine words based on the characters you enter.
Words can be entered more quickly by pressing keys
once per character.
1. Select the T9 [Word] Input Mode by pressing
[Word].
2. Press the corresponding number key and continue
to press until the first character appears on the
screen, then enter subsequent characters until you’ve
input the desired word.
3. View the next matching word by pressing .
4. Select words and enter spaces by pressing .
NOTE:
TO ENTER COMPOUND WORDS:
• ENTER THE FIRST PART OF THE WORD, THEN PRESS
TO SELECT.
• ENTER THE LA ST PART OF THE WORD, THEN PRESS TO ENTER THE WORD.
FOR EXAMPLE:
TO ENTER “HILLTOP” IN THE T9 INPUT MODE:
• PRESS [ABC] TO SELECT THE T9 INPUT MODE AND TO CHOOSE
THE SMALL LETTER CASE (T9 WORD).
• PRESS AND YOU WILL SEE “HILL” HIGHLIGHTED. PRESS
TO
SELECT IT.
• PRESS AND YOU WILL SEE “TOP” HIGHLIGHTED. PRESS
TO SELECT IT. PRESS TO ENTER THE WORD.
CH 3
Page 37

35
ENTERING LETTERS, NUMBERS & SYMBOLS
NUMERIC MODE
Allows you to input numbers when storing entries in
Contacts and sending text messages.
1. Press [Abc], select Numeric Mode [123], and
press [OK].
2. Enter a number by pressing its corresponding
keypad digit key until the number appears on the
LCD screen.
SYMBOLS MODE
Allows you to input symbols when storing entries in
Contacts and sending text messages.
1. Press [Abc], select Symbol Mode [Symbols], and
press [OK].
2. Scroll up, down, left or right with the Nav Key to
select the symbol you want to enter.
• Use the NAV Key to view each row of symbols.
PRESS
[
]
OR
PRESS
[
]
CH 3
Page 38

36
CH 3
MEMO
Page 39

CHAPTER
FOUR
MENU FUNCTION
Includes detailed information on
your DM-P205 Main Menu features
and functions.
•
Contacts
•
Messaging
•
Family Center™
•
Entertainment
•
Too lb o x
Page 40

38
CONTACTS
Easily access your most frequently dialed numbers
for family, friends, schools, business and colleagues.
Contacts allows you to store up to 300 entries, either
individually or by group.
Here’s how to access the functions available in
Contacts:
CONTACT LIST
Quickly review or retrieve calls and entries by name,
or sort alphabetically by entering the first few letters
of a contact name.
1. Press [MENU] to view stored Contact
names alphabetically.
2. Enter a name (or the first few letters of a contact
name) or scroll through the list with the up/down
NAV KEY.
Please refer to Page 32 for more details on entering
letters, numbers & symbols.
3. Select an entry; press to place the call.
Options for Contacts displayed include:
1. Send Message
2. Add Speed Dial #
3. Add New Contact
4. Delete
Options for Contacts with an email address include:
1. Send Message
2. Add New Contact
3. Delete
Please refer to Page 32 for more details on
entering letters, numbers & symbols.
CH 4
Page 41

39
CONTACTS
STORING PHONE NUMBERS
You can store up to 300 individual entries (names and
numbers) in Contacts.
1. Enter a phone number, then press [OK] to save.
2. Select “New Contact” or “Existing Contact” and press
[OK]. (To add a new entry, you can also press
[MENU] .)
New Contact: Press the left/right NAV KEY to choose
the listing type indicated by the icon below the
number. Press [OK] to select.
Existing Contact: Enter the contact name being edited
when the “Find” screen appears, then press [OK].
Press the left/right NAV KEY to select the listing type,
then press [OK].
3. To enter or edit an existing Contact name, press the
down NAV KEY to enter information into additional
fields.
Please refer to Page 32 for more details on entering
letters, numbers & symbols. To change the Input
Mode, press [Abc].
4. Press [OK] to save your entry [Save]. “New
Contact Added” or “Contact Edited” will appear on your
phone screen.
• Entry Fields:
Name/Ringtone ID/Pix ID/Mobile/Home/Office/Group/
E-mail/Mobile2/E-mail2
CH 4
Page 42

40
CONTACTS
GROUP S
Classify Contact entries into one of the pre-set
groups, including Family, Friends, School, Business
and Colleagues.
A
dding a Number to a Group
1. Press [MENU] .
2. Use the up/down NAV KEY to select a contact and
press [OK].
3. With the NAV KEY, scroll down to “Group.”
4. Press the left/right NAV KEY to select a group.
5. Press [OK] under “Save” to save the contact to
the selected group.
A
d
ding a New Group
1. Add a new group by pressing [MENU] .
2. Press [OPTIONS], select “Add Group,” then press
[OK].
3. Enter a new group name, then press [OK]
to save.
NOTE:
A MAXIMUM OF TEN GROUPS CAN BE STORED.
CH 4
Page 43

41
CONTACTS
C
hanging a Group Name
1. Press [MENU] .
2. Scroll up/down with the NAV KEY to select an
existing group name.
3. Press [OPTIONS], select “Rename” and press
[OK].
4. Enter a new group name and press [OK] to save.
Deleting a Group
Delete a group that you’ve added.
1. Press [MENU] .
2. Use the up/down NAV KEY to select the group.
3. To delete, press [DELETE], then [OK].
NOTE:
DEFAULT GROUP NAMES INCLUDING FAMILY, FRIENDS, SCHOOL, BUSINESS
AND COLLEAGUES CANNOT BE RENAMED OR DELETED.
CH 4
Page 44

42
CONTACTS
SPEED DIAL
In Idle Mode, calls can be placed to numbers stored
in Speed Dial by pressing/holding the corresponding
number key. To create a two-digit speed dial number,
press the first number, then press and hold the second
number.
1. Press [MENU] .
2. To assign a phone number to a speed dial location,
select the number location and press [ASSIGN].
NOTE:
• “1” KEY IS USED FOR THE ONE-TOUCH VOICEMAIL DIALING FEATURE.
• “UNASSIGNED” APPEARS IF THE KEY IS AVAILABLE.
3. Use the NAV KEY to select an entry, then press .
4. When the message “Speed Dial for [Name] is now
set. To access, click the number and hold for 2 sec.” is
displayed, press [OK].
FOR EXAMPLE:
SETTING A SPEED DIAL NUMBER THROUGH YOUR CONTACT LIST.
1. FROM CONTACTS, ACCESS CONTACT LIST.
2. SCROLL THROUGH CONTACT ENTRIES WITH THE NAV KEY, THEN
PRESS [OPTIONS] TO SELECT “ADD SPEED DIAL #.”
3. SCROLL THROUGH SPEED DIAL ID #S WITH THE NAV KEY, MAKE A SELECTION
THEN PRESS [OK].
4. WHEN “SPEED DIAL FOR [NAME] IS NOW SET. TO ACCESS, CLICK THE
NUMBER AND HOLD FOR 2 SEC.” APPEARS, PRESS [OK].
• If a phone number is already assigned to the key, press
[DELETE] to delete.
CH 4
Page 45

43
CONTACTS
VOICE DIAL
Voice Dial (VR Mode) allows you to record voice tags
for entries saved in your Contact List. When a voice
tag has been recorded, you can call that contact
simply by pressing the send key and speaking the tag.
RECORD NEW VOICE DIAL
1. Press [MENU] .
2. When “Please say the name after pressing OK”
appears, press [OK]. You will then hear “Name
Please”.
Say the name of the voice tag and repeat the name
when prompted. When “Finished Recording” appears,
press [ASSIGN].
3. Your Contact List will be displayed.
Select a name, then press [OK].
When “Voice Dial for [Name] is now recorded.
To access, hold SEND key, wait for prompt and say the
name.” appears, press [OK].
You will then hear “Added.”
• To re-record a Voice Dial: Press [OPTIONS] and then
select “Re-Record.”
• To playback a Voice Dial: Press [OPTIONS] and then
select “Playback.”
CH 4
Page 46

44
CONTACTS
VOICE DIAL LIST
1. Press [MENU] to view the
Voice Dial List.
To Play a Voice Dial:
Highlight the voice tag you want to play and then
press [PLAY].
To Re-Record a Voice Dial:
Highlight the voice tag you want to re-record and
press [RE-REC].
To Delete One or all Voice Dials:
Highlight the voice tag you want to delete and press
[OPTIONS]. Next, select “Delete” or “Delete All” to
erase voice tags.
CH 4
Page 47

45
CONTACTS
SERVICES
Your Contact List is preprogrammed with contact
numbers for the services listed below. When you
select a service, the number is automatically dialed.
GUEST SERVICES
Contact Disney Mobile Guest Services.
1. Press [MENU] .
2. The number (866-347-6392) is automatically dialed.
DIRECTORY ASSISTANCE*
1. Press [MENU] .
2. The number (411) is automatically dialed.
*Subject to additional fees.
ROAD ASSISTANCE
For subscribers to Disney Mobile’s Roadside
Assistance service.
1. Press [MENU] .
2. The number (866-624-4260) is automatically dialed.
CHECK USAGE
Check your current usage.
1. Press [MENU] .
2. The number (*14) is automatically dialed.
NOTE:
ROAMING RATES APPLY WHEN SERVICES ARE DIALED WHILE YOUR PHONE
IS ROAMING OFF THE DISNEY MOBILE NETWORK.
CH 4
Page 48

MESSAGING
Messaging includes your Call History, Voicemail,
Inbox, Outbox, and Drafts; it’s also where you send
and save incoming and outgoing text, voice and pix
(photo) messages.
Here’s how to access the functions available in
Messaging:
1. [MENU] or .
CALL HISTORY
RECENT
Displays information on the 75 most recent received,
dialed or missed calls.
1. To see a list of the 75 most recent incoming,
outgoing or missed calls, press [MENU]
. If the number is already stored in
Contacts, only the name will appear. If not previously
stored, only the phone number will appear.
2. To view call details, press [OK].
NOTE:
CALL DETAILS INCLUDE DATE, TIME AND PHONE NUMBER.
3. Press [OPTIONS] to send a message to the
phone number or delete call history.
4. Press [SAVE] to save phone number to Contacts.
NOTE:
• AFTER 75 INCOMING, OUTGOING OR MISSED CALLS, THE OLDEST CALL
WILL AUTOMATICALLY BE DELETED FROM THE HISTORY.
• CALLS THAT ARE BLOCKED OR DON’T REGISTER IN THE CALLER ID WILL
DISPLAY “UNKNOWN OR RESTRICTED NUMBER.”
• SHORTCUT: IN IDLE MODE, PRESS TO ACCESS THE RECENT LIST.
• Send Message: Sends a message to the selected (recent)
phone number.
•
Delete: Erases the selected (recent) phone number.
• Delete All: Erases your entire Recent Calls list.
46
CH 4
Page 49

MESSAGING
MISSED
Displays information on the 25 most recent missed
calls. Dial a missed call simply by pressing .
1. To see a list of the 25 most recent missed calls,
press [MENU] . If the number is
already stored in Contacts, only the name appears.
If not previously stored, only the phone number
appears.
2. To view missed call details, select a specific missed
call and press [OK].
NOTE:
CALL DETAILS INCLUDE DATE, TIME, AND PHONE NUMBER.
3. Press [OPTIONS] to send a message to the
phone number or delete call history.
4. Press [SAVE] to save phone number to Contacts.
NOTE:
AFTER 25 MISSED CALLS, THE OLDEST CALL WILL AUTOMATICALLY BE ERASED
FROM THE HISTORY.
• Send Message: Sends a message to the selected (missed)
phone number.
• Delete: Erases the selected (missed) phone number.
• Delete All: Erases your entire Missed Calls list.
47
CH 4
Page 50

MESSAGING
RECEIVED
Displays information on the 25 most recent received
calls. Dial a received call simply by pressing .
1. To see a list of the 25 most recent received calls,
press [MENU] . If the number is
already stored in Contacts, only the name appears.
If not previously stored, only the phone number
appears.
2. To view received call details, press [OK].
NOTE:
CALL DETAILS INCLUDE DATE, TIME, AND PHONE NUMBER.
3. Press [OPTIONS] to send a message to the
phone number or delete call history.
4. Press [SAVE] to save phone number to Contacts.
NOTE:
AFTER 25 RECEIVED CALLS, THE OLDEST CALL WILL AUTOMATICALLY BE
ERASED FROM THE HISTORY.
• Send Message: Sends a message to the selected
(received) phone number.
• Delete: Erases the selected (received) phone number.
• Delete All: Erases your entire Received Calls list.
48
CH 4
Page 51

MESSAGING
DIALED
Displays information on the 25 most recent dialed
calls. Place calls to dialed numbers simply by
pressing .
1. To see a list of the 25 most recent dialed calls,
press [MENU] . If the number
is already stored in Contacts, only the name appears.
If not previously stored, only the phone number
appears.
2. To view dialed call details, press [OK].
NOTE:
CALL DETAILS INCLUDE DATE, TIME, AND PHONE NUMBER.
3. Press [OPTIONS] to send a message to the
phone number or delete call history.
4. Press [SAVE] to save phone number to Contacts.
NOTE:
AFTER 25 DIALED CALLS, THE OLDEST CALL WILL AUTOMATICALLY BE
ERASED FROM THE HISTORY
VOICEMAIL
1. To access Voicemail options, press [MENU]
or press and hold in idle mode.
• Send Message: Sends a message to the selected (dialed)
phone number.
• Delete: Erases the selected (dialed) phone number.
• Delete All: Erases your entire Dialed Calls list.
49
CH 4
Page 52

MESSAGING
CREATE MESSAGE
TEXT
"Text" messaging allows you to communicate without
calling. You can send either a newly written message
or one of the pre-loaded Quicknotes, ready-to-send
text messages.
Here's how to send a new text message:
1. Press [MENU] or .
2. Under “Add Recipients”, enter the phone numbers,
then press [OK].
3. Under “Message,” enter a new text message.
NOTE:
TEXT MESSAGES CAN BE UP TO 160 CHARACTERS LONG.
(Please refer to Page 32 for more details on entering
letters, word, numbers and symbols.)
4. Press [SEND] to send your text message.
• By pressing [OPTIONS], you can choose from the
following:
Add Family: Selects a phone number stored in Family.
Add Contacts: Selects a phone number stored in Contacts.
Recent: Selects an incoming, dialed or missed number
stored in your Recent Calls list.
Press [123] to select text entry mode.
(Abc/Word/123/Symbols)
• By pressing [OPTIONS], you can select one of the
following:
Add Quicknote: Inserts a text from Quicknote list.
Add Emoticon: Inserts an emoticon.
Delete Text: Clears edited text.
Save as Draft: Saves a message in Drafts folder.
Cancel: Returns to the “Add Recipient(s)” screen.
Press [123] to select text entry mode.
(Abc/Word/123/Symbols)
50
CH 4
Page 53

MESSAGING
PIX
You can share pictures with your family and friends
right from your phone by sending Pix messages to
their wireless phones or email addresses.
Here's how to send a new pix message:
1. Press [MENU] .
2. Under “Add Recipient(s),” enter the wireless phone
numbers or email addresses, then press [OK].
3. Under “Message,” enter a text message, then press
[OK].
• By pressing [OPTIONS], you can select one of the
following:
Add Family: Selects a phone number stored in Family.
Add Contacts: Selects a phone number stored in Contacts.
Recent: Selects a phone number or email address recently
used to send messages.
Press [123] to select text entry mode.
(Abc/Word/123/Symbols)
• By pressing [OPTIONS], you can select one of the
following:
Add Quicknote: Inserts a text from Quicknote list.
Delete Text: Clears edited text.
Preview: Previews the message being edited.
Save as Draft: Saves a message in Drafts folder.
Cancel: Returns to the “Add Recipient(s)” screen.
Press [123] to select text entry mode.
(Abc/Word/123/Symbols)
51
CH 4
Page 54

MESSAGING
4. Under “Add Pix,” select pix to insert and press [OK].
5. Under “Add Voice,” insert your voice message, then
press [OK].
6. Under “Subject,” enter a message subject, then press
[OK].
7. To send your completed pix message, press [SEND].
• By pressing [OPTIONS], you can select one of the
following:
Add Pix: Add a picture to the message.
Delete Pix: Delete previously added picture from the
message. This option appears only after an image file
has been added to the message.
Preview: Previews the message being edited.
Save as Draft: Saves the message in Drafts folder.
Cancel: Returns to the “Add Recipient(s)” screen.
Press [123] to select text entry mode.
(Abc/Word/123/Symbols)
• By pressing [OPTIONS], you can select one of the
following:
Add Voice: Adds a voice sound to the message.
Record Voice: Records your voice message.
Delete Voice: Deletes a previously added voice sound from
the message. This option appears only after a sound file
has been added to the message.
Preview: Previews the message being edited.
Save as Draft: Saves the message in Drafts folder.
Cancel: Returns to the “Add Recipient(s)” screen.
Press [123] to select text entry mode.
(Abc/Word/123/Symbols)
• By pressing [OPTIONS], you can select one of the
following:
Add Quicknote: Inserts a text from Quicknote list.
Delete Text: Deletes the subject text.
Preview: Previews the message being edited.
Save as Draft: Saves the message in Drafts folder.
Cancel: Returns to the “Add Recipient(s)” screen.
Press [123] to select text entry mode.
(Abc/Word/123/Symbols)
52
CH 4
Page 55

MESSAGING
INBOX
The Inbox manages your incoming (received) text and
pix messages.
Here’s how to access your Inbox:
1. Press [MENU] .
2. Select a message, then press [OK] to view.
3. To reply to the received message, press [REPLY].
4. Press [OPTIONS], and then you will have the
following choices :
Call
To dial a number in the message text or a call back
number, select “Call.”
Forward
1. To forward a message, select “Forward.”
2. Enter the recipients’ wireless phone numbers or
email addresses. Then, press [OK].
3. Edit the message.
4. Press [SEND] to send.
• : New Msg (unread new)
• : Old Msg (already read)
• : Pix Msg Notification
53
CH 4
Page 56

MESSAGING
Sa
ve Contact
1. To save a number to Contacts, select “Save Contact.”
Delete
1. To delete a message, select “Delete.”
2. When “The message will be deleted. Continue?”
appears, press [OK] to delete or [CANCEL] to
exit.
Delet
ed Read Msg
1. To delete read message, select “Delete Read Msg.”
2. When “All read messages will be deleted. Continue?”
appears, press [OK] to delete or [CANCEL] to
exit.
Delete All
1. To delete all messages in Inbox, select "Delete All."
2. When “All messages in Inbox will be deleted.
Continue?” appears, press [OK] to delete or
[CANCEL] to exit.
54
CH 4
Page 57

MESSAGING
OUTBOX
The Outbox manages sent text and pix messages.
Here’s how to access your Outbox:
1. Press [MENU] .
2. Select a message, then press [OK] to view.
3. Press [FORWARD] to forward the message to
new recipients.
4. Press [OPTIONS], and then you will have the
following choices :
Call
To dial a number in the message text or a call back
number, select “Call.”
Resend
Select “Resend” to send the message again.
• : Fail
• : Not Sent
• : Sent
• : Canceled
55
CH 4
Page 58

MESSAGING
Sa
ve as Quicknote
Select “Save As Quicknote” option to add the text in
the message to the Quicknote list.
Delete
1. To delete a selected message, select “Delete.”
2. When “The message will be deleted. Continue?”
appears, press [OK] to delete or [CANCEL] to
exit.
Info
Displays information such as the recipient, time and
date, priority, file size and the message status.
56
CH 4
Page 59

MESSAGING
DRAFTS
Stores messages that have not been sent yet. When
you receive a voice call while composing a message
and you accept the call, the message being edited will
be automatically saved in Drafts folder.
1. Press [MENU]
2. Select a message and press [OK] to edit the
message.
3. Press [SEND] to immediately send the selected
message without further editing.
57
CH 4
Page 60

FAMILY CENTER™
Disney Mobile’s unique Family Center features familycentric applications that help you stay connected to
and manage your family.
Listed below is an easy to read chart that clearly
defines the roles for adults and kids for each Disney
Mobile application.
NOTE:
A FAMILY MANAGER IS THE ONE PERSON WHO OVERSEES THE DAY-TO-DAY
ACTIVITY IN A DISNEY MOBILE FAMILY PLAN. THE FAMILY MANAGER CAN SET
USAGE ALLOWANCES FOR FAMILY MEMBERS UNDER THE AGE OF 18 VIA
FAMILY MONITOR; AND RESTRICT USAGE AND SET ALWAYS ON AND PROHIBITED
NUMBERS THROUGH CALL CONTROL (ONLY AT WWW.DISNEYMOBILE.COM).
NOTE:
FAMILY CENTER
™
SERVICES MAY NOT BE AVAILABLE UNDER CERTAIN CONDITIONS INCLUDING BUT NOT LIMITED TO PHONES BEING TURNED OFF, ONE OR
MORE PHONES ROAMING OFF THE DISNEY MOBILE NETWORK, POOR NETWORK
SIGNAL OR OTHER NETWORK SYSTEMS OR EQUIPMENT LIMITATIONS.
FAMILY CENTER™SERVICES
Family Locator™ Service
Can locate kids’ phones on the account Yes Yes No
Can locate adults’ phones on the account No No No
Phones can be located No No Yes
Family Monitor™ Service
Can set spending allowances for family members Yes No No
Can have spending allowances set for them No No Yes
Family Alert!™ Service
Can send Family Alerts! Yes Yes Yes
Can receive Family Alerts! Yes Yes Yes
Call Control Service
Can set phone usage restrictions by day & time Yes No No
Can set Always On and Prohibited Numbers Yes No No
Can have restrictions imposed on usage No No Yes
Family
Manager
Family
Members
(18 and over)
Family
Members
(under 18)
58
CH 4
Page 61

FAMILY CENTER
Here’s how to access the functions available in
Family Center:
1. Press [MENU] or º.
2. By pressing OPTIONS under Family Center, you can
choose from the following:
FAMILY LOCATOR™ SERVICE
Family Locator provides locations and maps of locations to locate your children’s phones right from your
wireless phone without calling. From within Family
Locator, select your child’s name, enter your PIN and
press “OK.”
Your Calling Plan may include a specific number of
free locates per billing cycle; additional searches are
available for a nominal fee per request. Please review
your Calling Plan details.
NOTE:
FAMILY MANAGER AND ADULTS ON THE ACCOUNT CAN LOCATE PHONES
ASSIGNED TO FAMILY MEMBERS ON THE ACCOUNT UNDER THE AGE OF 18;
FAMILY LOCATOR CANNOT BE ACCESSED FROM PHONES ASSIGNED TO
FAMILY MEMBERS UNDER THE AGE OF 18.
• Delete: Delete the selected purchased applications.
• Delete All: Delete all purchased applications.
• Info: Provides details about the selected purchased or
preloaded application.
• Permissions: Displays whether permission controls have
been set for applications.
• Check Upgrade: Check availability of an upgrade for the
selected purchased or preloaded application.
59
CH 4
Page 62

FAMILY CENTER
Here’s how to access and use Family Locator:
ACCESSING
1. Press MENU, select “Family Center” and press
[OK].
2. Select “Family Locator” and press [OK].
Family Managers and adults who have activated Family
Locator can access this feature from their computers by
going to the Family Center at www.disneymobile.com.
SETTING YOUR PIN
The first time you use the Family Locator feature, you
will be prompted to create your PIN. You will need to
enter your PIN each time you access the Family Locator
feature from your phone or online.
1. Under “OK to Locate,” select a name and press [OK].
2. Enter your temporary PIN (provided upon activation)
and press [OK].
3. If correct, review and then accept or decline the
Terms & Conditions.
NOTE:
IF YOU HAVE ALREADY SET YOUR FAMILY LOCATOR PIN FROM
WWW.DISNEYMOBILE.COM,YOU WILL NOT BE PROMPTED AGAIN.
IF YOU HAVE ALREADY ACCEPTED TERMS & CONDITIONS FROM
WWW.DISNEYMOBILE.COM,YOU WILL NOT BE PROMPTED AGAIN.
IF YOU DECLINE THE TERMS & CONDITIONS, YOU WILL NOT BE ABLE
TO USE FAMILY LOCATOR FUNCTIONALITY FROM YOUR PHONE OR FROM
WWW.DISNEYMOBILE.COM. YOU WILL CONTINUE TO BE PROMPTED EACH TIME
YOU ACCESS THE FEATURE UNTIL YOU ACCEPT THE TERMS & CONDITIONS.
4. Under “Create PIN,” enter a new PIN and press [OK].
5. Re-enter your new PIN to confirm and press [OK].
6. “New PIN Set” will appear to confirm the completed action.
NOTE:
IT IS VERY IMPORTANT TO CHANGE YOUR PIN TO SAFEGUARD THE FAMILY
LOCATOR FEATURE ON YOUR PHONE. YOUR NEW PIN MUST BE 4 DIGITS
AND MUST BE DIFFERENT FROM YOUR TEMPORARY PIN.
60
CH 4
Page 63

FAMILY CENTER
USING FAMILY LOCATOR
Here’s how to locate the phones of the children in your
Family Plan:
1. From “Family Locator,” under “OK to Locate,” select a
name and press [OK].
2. Enter your PIN and press [OK].
3. “Locating” will appear to confirm action in progress.
4. If you have already used the locates included in
your calling plan, you will be prompted to continue
this search for an additional fee. Select “Yes” and
press OK to continue. Select “No” and press OK to
return to the previous screen.
5. For a successful locate, under “Location,” the location,
accuracy range and the local time will be displayed.
6. For unsuccessful attempts, press [RETRY].
NOTE:
AFTER ENTERING AN INCORRECT PIN THREE TIMES IN A ROW, YOU WILL
BE LOCKED OUT. THE ACCOUNT OWNER MUST CONTACT GUEST SERVICES AT
1-866-DISNEY2 TO RESET YOUR PIN.
NOTE:
PRESSING BACK OR END WHILE CONDUCTING A SEARCH WILL COUNT
AGAINST ANY LOCATES INCLUDED IN YOUR CALLING PLAN. UNSUCCESSFUL
LOCATE ATTEMPTS WILL NOT BE DEDUCTED AGAINST ANY LOCATES INCLUDED
IN YOUR CALLING PLAN.
61
CH 4
Page 64

FAMILY CENTER
VIEWING MAPS
After receiving a location, you can access an area map
to get a better view of your child’s phone location.
1. Under “Location,” press [MAP].
2. An area map will appear with a shaded circle
indicating the reported location and accuracy range.
3. Use the up/down/left/right NAV KEY to view
surrounding area. Press (ZOOM) to zoom in/out
of map using the left/right NAV KEY.
4. Press [BACK] to return to the “Location” page.
NOTE:
LOCATION INFORMATION CAN ONLY BE PROVIDED IF THE PHONE BEING
LOCATED IS TURNED ON AND BOTH PHONES ARE WITHIN DISNEY MOBILE’S
COVERAGE AREA. LOCATION CAN NOT BE COMPLETED IF THE PHONE BEING
LOCATED IS MAKING A VOICE CALL.
FAMILY MONITOR™SERVICE
Stay in control of your family’s wireless spending. Check
total family usage, and set voice, text, pix and download
usage allowances for Family Members under the age of 18.
When allowances are reached for voice usage or
messaging, the Family Manager will receive an alert on
his or her phone that lets the Family Manager decide to
view usage, increase allowances or restrict service through
the Call Control feature on www.disneymobile.com.
When a download allowance is reached, a restriction on
further downloading will go into effect without the Family
Manager’s intervention, and an alert will not be sent.
62
CH 4
Page 65

FAMILY CENTER
Phones assigned to Family Members under the age of
18 on the account will be set up to be managed via
Family Monitor, but phones assigned to Family
Members over the age of 18 cannot be managed.
Here’s how to access and use Family Monitor:
ACCESSING
1. Press MENU, select “Family Center” and press [OK].
2. Select “Family Monitor” and press [OK].
SETTING ALLOWANCES
Only the Family Manager can “Set Allowances” for
children through the following steps:
1. From “Family Monitor,” select “Set Allowances” and
press [OK].
2. Select [NAME] and press [OK]. (This step is
omitted if there is only one member under the age of
18 on the acc ount .)
3. Press up/down NAV KEY to select voice, text, pix or
downloads and press [OK] to edit.
4. Under “Edit Allowance,” use left/right NAV KEY to
increase/decrease amount.
5. Press [OK] to save the new allowance. An
“Updating Allowance” message will appear briefly.
6. A message will display to confirm that you’ve saved
the new allowance.
NOTE:
SETTING ALLOWANCES FROM THE HANDSET IS ONLY AVAILABLE WITHIN
DISNEY MOBILE’S COVERAGE AREA.
63
CH 4
Page 66

FAMILY CENTER
VIEWING USAGE
Only the Family Manager can view everyone’s usage.
Other family members and children on the account
can view their own personal usage only.
F
amily Manager
For up-to-the-minute usage information:
1. From “Family Monitor,” select “View Usage” and
press [OK].
2. An “Updating Usage” message will appear briefly
while the phone gets up-to-the-minute usage
information for all members on your family plan.
3. Select [Name],“Myself,” or “Family Total” and
press [OK].
4. Press up/down NAV KEY to select voice, text, pix
or downloads.
5. Usage information appears at the bottom of each screen.
6. You can also set allowances from this screen for
family members under the age of 18.
NOTE:
VIEWING USAGE FROM THE HANDSET IS ONLY AVAILABLE WITHIN DISNEY
MOBILE’S COVERAGE AREA.
64
CH 4
Page 67

FAMILY CENTER
Other Family Members and Children
All other family members can only view, not edit, their
personal allowances and usage.
1. From “Family Monitor,” select “My Spending” and
press [OK].
2. Children use the up/down NAV KEY to view
allowances
& voice/text/pix/download usage. Adults view usage only.
NOTE:
YOU CAN ALSO CHECK USAGE AND SET USAGE ALLOWANCES FROM THE FAMILY
CENTER AT WWW.DISNEYMOBILE.COM.
RECEIVING SPENDING ALERTS
When a Family Member under the age of 18 reaches
an allowance for voice usage or messaging, a pop-up
message called a Spending Alert will appear on his or
her phone and on the Family Manager’s phone.
NOTE:
FAMILY MONITOR SERVICES ARE ONLY AVAILABLE WITHIN DISNEY MOBILE’S
COVERAGE AREA. THEY WILL NOT WORK WHEN ROAMING, NOR WILL ROAMING
USE BE TRACKED. AFTER RECEIVING ALERTS, VOICE, TEXT MESSAGING AND
PIX MESSAGING USAGE WILL CONTINUE UNLESS SERVICE IS SUSPENDED VIA
CALL CONTROL.
CALL CONTROL FEATURES
Available only at www.disneymobile.com, Call Control
enables the Family Manager to go online and restrict
when children can and cannot use their phones by day
of the week and time of day. For the greatest flexibility,
the Family Manager can also designate phone numbers
that can always be communicated with even when
65
CH 4
Page 68

Here’s how to access and use Call Control:
Accessing Call Control
Call Control is only accessible in the Family Center on
www.disneymobile.com.
Suspending Usage
When usage is restricted by the day or by time of day,
during those periods your child will not be able to:
• Send or receive voice calls, text messages and pix
messages.
• Purchase downloads.
NOTE:
ALWAYS ON NUMBERS AND 911 REMAIN FULLY ACCESSIBLE
Always On Numbers
Always On numbers are phone numbers that can always
be called, regardless of Call Control restrictions.
All mobile phone numbers included in your Disney
Mobile Family Plan and 911 are Always On numbers.
You may choose to set other Always On numbers for
your children, such as your home and work phone numbers.
The Family Manager can designate up to 20 Always On
numbers for each child.
Prohibited Numbers
Prohibited numbers are numbers which cannot be
called and which calls cannot be received from.
The Family Manager can set up to 20 Prohibited
numbers for each child.
NOTE:
CALL CONTROL FEATURES ARE ONLY AVAILABLE AND ACTIVE WHEN THE
RESTRICTED PHONE IS WITHIN DISNEY MOBILE’S COVERAGE AREA, SO OUTSIDE
OUR COVERAGE AREA PROHIBITED NUMBERS CAN BE COMMUNICATED WITH.
66
CH 4
Page 69

FAMILY CENTER
FAMILY ALERT!™SERVICE
Perfect for important intra-family communication. This
feature allows you to instantly send priority messages
that will pop up on the recipient’s phone’s screen as
soon as they are received. Create new messages or
choose any of the pre-loaded QuickAlerts, and then
press a button to “alert” one or multiple family
members simultaneously.
NOTE:
MESSAGES CAN BE SENT TO AND FROM DISNEY MOBILE FAMILY MEMBERS
REGARDLESS OF CALL CONTROL RESTRICTIONS.
Here’s how to access and use Family Alert!:
ACCESSING
1. Press MENU, select “Family Center” and
press [OK].
2. Select “Family Alert!” and press [OK].
NOTE:
SEE CHAPTER 4: MESSAGING, FOR MORE DETAILS ON ENTERING LETTERS,
NUMBERS AND SYMBOLS.
67
CH 4
Page 70

FAMILY CENTER
SENDING QUICKALERTS
QuickAlerts are ready-to-send text messages that
save time when communicating with your family.
Use as-is or edit to fit your needs. You can also create
a new alert. To send an alert:
1. From “Family Alert!,” select “Send Alert” and
press [OK].
2. Under “Add Recipients,” use the up/down NAV KEY
and [OK] to select family member(s) and press
NEXT.
3. Under “Add QuickAlert,” use the up/down NAV KEY to
choose a QuickAlert, or select (Create Your Own) to
type your own, press [OK].
4. Under “Send Alert,” edit a QuickAlert, leave it as-is or
enter the new alert.
5. Press [OK] to SEND. “Alert Sent!” will appear to
confirm the completed action.
Family Member Recipient Options
• Family
• Myself
• Family Member Name
68
CH 4
Page 71

FAMILY CENTER
EDITING QUICKALERTS
Personalize the QuickAlerts that are pre-loaded in your
phone and store them for repeat usage. Once saved,
an edited QuickAlert is available for repeat use on the
“Add QuickAlert” page.
1. From “Family Alert!,” select “Edit QuickAlerts” and
press [OK].
2. Under “Edit QuickAlerts,” use the up/down NAV KEY
to choose a QuickAlert to edit, or select “Enter New”
to type your own and press [OK].
3. Under “Edit Alert,” change or add text to the
QuickAlert and press [SAVE].
4. “Saved!” will appear to confirm the completed action.
“Added!” will appear if you selected “Enter New.”
5. To send the saved message, follow “Sending
QuickAlerts” directions above.
NOTE:
FAMILY ALERT! SERVICES ARE ONLY AVAILABLE WITHIN DISNEY MOBILE’S
COVERAGE AREA. THEY WILL NOT WORK WHEN ROAMING.
69
CH 4
Page 72

FAMILY CENTER
VIEWING ALERTS
A Family Alert! will pop up on your phone’s screen as
soon as it is received. Or, to see the last 10 alerts you
have received:
1. Press “Family Alert!”, select “Alerts Received” and
press [OK].
NOTE:
ALERTS THAT HAVE NOT BEEN READ DISPLAY A SPECIAL ICON WITH THE
LETTER N FOR “NEW.”
REPLYING TO ALERTS
You can view and reply directly to messages when
they are first received and appear on your phone’s
screen. You can also view the last 10 Family Alert!
messages you’ve received. It’s easy to read, reply
to or delete these alerts.
1. From “Family Alert!,” select “Alerts Received” and
press [OK].
2. Under “Alerts Received,” select an alert, press
[OK] (or press REPLY to display the “Add Recipient(s)”
screen immediately).
3. Use the left/right NAV KEY to view all alerts. Press
[DELETE] to delete an alert or [REPLY] to
display the “Add Recipient(s)” screen.
4. Under “Add Recipient(s),” use the up/down NAV KEY
and [OK] to select family members and press NEXT.
5. Under “Add QuickAlert,” use the up/down NAV KEY to
select a QuickAlert or (Create Your Own) to type your
own and press [OK].
6. Under “Send Alert,” edit the QuickAlert, leave as-is or
enter the new text message and press [OK] to SEND.
NOTE:
ALERTS THAT HAVE NOT BEEN READ DISPLAY A SPECIAL ICON WITH THE LETTER
N FOR “NEW.”
70
CH 4
Page 73

FAMILY CENTER
DELETING ALERTS
Family Alert! will delete messages saved in “Alerts
Received” as new messages arrive.
To delete alerts from the “Alerts Received” screen:
1. From “Family Alert!,” select “Alerts Received” and
press [OK].
2. Select an alert, press [OPTIONS], select “Delete”
or “Delete All” and press [OK].
3. “Deleted!” will appear to confirm the completed
action.
71
CH 4
Page 74

ENTERTAINMENT
Entertainment is where you’ll find a selection of
preprogrammed images, ringtones, themes, games
and applications in addition to being able to download
more of your personal favorites from the “Shop
Entertainment” area for the ultimate personalized
wireless experience. Be sure to check out fun, fresh
content packs and special subscription offers as well.
Entertainment also includes Disney Mobile’s
Disney Zone.
Here’s how to access the functions available in
Entertainment:
1. Press [MENU], or .
72
CH 4
º
Page 75

ENTERTAINMENT
SHOPPING
Here’s how to purchase subscriptions and to preview,
purchase and download content packs and individual
ringtones, images, themes, games and applications:
1. From “Entertainment,” use the NAV KEY to select
“Shop Entertainment” and press [OK].
2. Use the NAV KEY to select Ringtones, Themes,
Images, Games, Applications, Content Packs or
Subscriptions and press [OK].
3. Select a content category and press [OK].
4. Select an individual item in the category or pack and
press [OK].
5. Select one of the following options and press
[OK].
\
6. You can also select [SHOP MENU] to display
“Shop Entertainment” and navigate to another content.
NOTE:
THERE IS NO “PREVIEW” OPTION FOR SUBSCRIPTIONS. SELECT “INFO” TO
VIEW S UBSCRIPTION DETAILS.
• Preview: To view/listen before buying, scroll left/right
to preview all available content in the selected category
or pack.
• Buy: Initiates purchase transaction.
• Info: Displays content details.
• Close: Dismisses the Preview/Buy/Info menu.
73
CH 4
Page 76

ENTERTAINMENT
PREVIEWING
This feature allows you to “try before you buy.”
Here’s how:
1. After choosing your content, select “Preview” and
press [OK].
2. View/listen to your selection and press [OK].
3. You can also use the left/right NAV KEY to preview
other items in the category or pack.
4. Select one of the following options and press
[OK].
• Pause (ringtones only): Press up NAV KEY to pause and
press up NAV KEY again to preview ringtone.
• Buy: Initiates purchase/ transaction.
• Info: Displays content details and allows you to
preview/listen to your selection before buying.
• Close: Dismisses the Preview/Buy/Info menu.
74
CH 4
Page 77

ENTERTAINMENT
PURCHASING/DOWNLOADING
To buy with or without previewing:
1. After choosing your content, select “Buy” and press
[OK]. The purchase price will now be displayed.
2. Select the displayed price (e.g., $1.49) from the
But/View/Info options and press [OK].
3. Press [OK] to confirm purchase.
75
CH 4
Page 78

ENTERTAINMENT
F
or Images, Ringtones and Themes
After “Install Complete” appears, select “Continue
Shopping,” “Exit,” or an “Assign” option from the menu.
Downloaded images, ringtones or themes are saved
and accessible via the “Entertainment” menu. Please
refer to the IMAGES, RINGTONES and THEMES sections
for details on assigning images, ringtones and themes.
For Games and Applications
After “Install Complete” appears, select “Play,”
“Continue Shopping” or “Exit” from the menu.
Downloaded games and applications are saved and
accessible via the “Entertainment” menu.
F
or Content Packs
Content Packs consist of predefined selections of
content types (e.g., two ringtones and an image) or
a set of like-type content (e.g., three ringtones)
available for a set price.
After “Install Complete” appears, select “Continue
Shopping,” “Exit” or one of the following and press OK.
• Assign All (mixed content packs only):
Automatically assigns the single ringtone
(as default ringtone), image (as wallpaper) or
theme in a mixed pack. Will advance to “Assign”
screen if there are two items of the same content
type to select from.
• Assign [CONTENT]: Advances to “Assign” screen.
Select one of up to three items of the same content
type to assign.
76
CH 4
Page 79

ENTERTAINMENT
F
or Subscriptions
After “Successfully Purchased” appears, the “Shop
Entertainment” screen will be displayed. Items
purchased with your subscription credits are saved
and accessible, via the “Entertainment” menu, in their
appropriate content categories. You can manage your
subscriptions, via the “Entertainment” menu, in “My
Subscriptions.” Refer to the MY SUBSCRIPTIONS section
for details on managing your subscriptions.
NOTE:
ALTHOUGH YOU MAY DELETE PURCHASED CONTENT, SOME PRELOADED
IMAGES, RINGTONES, THEMES, GAMES AND APPLICATIONS CANNOT BE DELETED.
• CONTENT (RINGTONES, GRAPHICS, GAMES, THEMES, ETC.) IS NOT
REFUNDABLE.
MY RINGTONES
You can preview and assign preloaded/purchased
ringtones as a Ringtone ID to identify callers or as the
default ringtone for all incoming calls. All downloaded
ringtones may be deleted.
Accessing Ringtones
1. Press [MENU], select “Entertainment” and
press [OK].
2. Select “My Ringtones” and press [OK].
3. Your ringtones will be listed below “Voice Gallery.”
4. You can also access your voice recordings from “Voice
Gallery” and assign as Ringtone ID or the default ringtone.
77
CH 4
Page 80

ENTERTAINMENT
P
reviewing Ringtones
1. Once in “My Ringtones”, scroll through your
ringtone list with the NAV KEY, make a selection and
press [OK] to play.
2. Use the up/down NAV KEY to preview all ringtones.
ASSIGNING RINGTONES
Ringtones can be assigned via the main “My
Ringtones” screen or when previewing.
Assigning as a Ringtone ID
1. Select a ringtone (see above) and press
[ASSIGN].
2. Under “Assign,” select “Ringtone ID” and press
[OK].
3. Under “Find,” your list of Contacts will be displayed.
4. At the cursor, enter a name (or select a name using
the NAV KEY) and press [OK].
5. “Ringtone [NAME] assigned” will appear to confirm
the completed action.
NOTE:
SEE CHAPTER 4: MESSAGING FOR MORE DETAILS ON ENTERING LETTERS,
NUMBERS AND SYMBOLS.
78
CH 4
Page 81

ENTERTAINMENT
A
ssigning as a Default Ringtone
1. Select a ringtone (see above) and press
[ASSIGN].
2. Under “Assign,” select “Ringtone” and press
[OK].
3. “Ringtone [NAME] assigned” will appear to confirm
the completed action.
DELETING RINGTONES & VIEWING INFO
Ringtones can be deleted via the main “My Ringtones”
screen or when previewing.
1. Press [OPTIONS], select one of the following
and press [OK].
• Delete: Deletes the selected ringtone.
• Delete All: Deletes all your ringtones.
• Info: Provides details about the selected ringtone.
79
CH 4
Page 82

ENTERTAINMENT
MY THEMES
You can preview and assign preloaded/purchased
themes to completely transform your phone’s menu
display. Downloaded and preloaded themes are found
under “My Themes.”
Ac
cessing Themes
1. Press [MENU], select “Entertainment” and
press [OK].
2. Select “My Themes” and press [OK].
Previewing Themes
1. Once in “My Themes,” scroll through your theme list
with the NAV KEY, make a selection and press
[OK] to view the selected theme.
2. Use the up/down NAV KEY to preview all themes.
A
ssigning Themes
Themes are assigned via the main “My Themes”
screen or when previewing.
1. Select a theme and press
[ASSIGN].
2. “Theme [NAME] assigned” will appear to confirm the
completed action.
80
CH 4
Page 83

ENTERTAINMENT
DELETING THEMES & VIEWING INFO
Themes can be deleted via the main “My Themes”
screen or when previewing.
1. Press [OPTIONS], select one of the following
and press [OK].
• Delete: Deletes the selected theme.
• Delete All: Deletes all your themes.
• Info: Provides details about the selected theme.
81
CH 4
Page 84

ENTERTAINMENT
MY IMAGES
You can preview and assign your pix (photos) and
preloaded/purchased images as a Pix ID to identify
callers or as Wallpaper for your phone’s idle screen.
Your saved pix are stored in “Pix Gallery.” All downloaded images and saved pix may be deleted.
Ac
cessing Images and Pix Gallery
1. Press [MENU], select “Entertainment” and
press [OK].
2. Select “My Images” and press [OK].
3. Your images will be listed below “Pix Gallery.”
Previewing Images
1. Once in “My Images,” scroll through your image
list with the NAV KEY, make a selection and press
[OK] to view the selected image.
2. Use the up/down NAV KEY to preview all images.
Previewing Pix (Photos)
1. Once in “My Images,” select “Pix Gallery” and press
[OK].
2. Scroll through your pix list with the NAV KEY, make a
selection and press [OK] to view the selected pix.
3. Use the up/down NAV KEY to preview all pix.
82
CH 4
Page 85

ENTERTAINMENT
ASSIGNING IMAGES AND PIX (PHOTOS)
Images can be assigned via the main “My Images”
screen or when previewing. Pix can be assigned right
from the main “Pix Gallery” screen or when previewing
a specific selection.
A
ssigning as a Pix ID
1. Select an image or pix (see above) and press
[ASSIGN].
2. Under “Assign,” select “Pix ID” and press [OK].
3. Under “Find,” your list of Contacts will be displayed.
4. At the cursor, enter a name (or select a name using
the NAV KEY) and press [OK].
5. “Image [NAME] assigned” will appear to confirm the
completed action.
NOTE:
SEE CHAPTER 4: MESSAGING FOR MORE DETAILS ON ENTERING LETTERS,
NUMBERS AND SYMBOLS.
Assigning as Wallpaper
1. Select an image or pix (see above) and press
[ASSIGN].
2. Under “Assign,” select “Wallpaper” and press
[OK].
3. “Image [NAME] assigned” will appear to confirm
the completed action.
83
CH 4
Page 86

ENTERTAINMENT
DELETING IMAGES/PIX & VIEWING INFO
Images can be deleted via the main “My Images”
screen or when previewing. Pix can be deleted from
the main “Pix Gallery” screen or when previewing a
specific selection.
1. Press [OPTIONS], select one of the following,
and press [OK].
• Delete: Deletes the selected image or pix.
• Delete All: Deletes all your images or pix.
• Info: Provides details about the selected image or pix.
84
CH 4
Page 87

ENTERTAINMENT
MY GAMES
Play subscription and non-subscription games.
Ac
cessing Games
1. Press [MENU], select “Entertainment” and
press [OK].
2. Select “My Games” and press [OK].
Playing Non-Subscription Games
1. Under “Games,” select a game and press [OK]
or [PLAY].
M
anaging Non-Subscription Games
1. Under “My Games,” press [OPTIONS], select one
of the following and press [OK].
• Delete: Deletes the selected game.
• Info: Provides details about the selected game.
85
CH 4
Page 88

ENTERTAINMENT
Pl
aying Subscription Games
1. Under “My Games,” select a game and press
[OK] or [PLAY].
2. Your subscription will be validated and you will be
connected to your game automatically.
Managing Subscription Games
1. Under “My Games,” press [OPTIONS], select one
of the following and press [OK].
• End Subscription: Ends your subscription to the
selected game.
• End & Delete: Deletes the selected game and ends
your subscription.
• Info: Provides details about the selected game.
86
CH 4
Page 89

ENTERTAINMENT
MY SUBSCRIPTIONS
Go to the featured subscriptions area in “Shop
Entertainment” to purchase special content
subscriptions, which are redeemable for download of
Images, Ringtones, Themes and Games. Your
subscription purchases are saved and accessible in
their appropriate content categories in “Entertainment”
and are managed in the “My Subscriptions” section.
M
anaging Subscriptions
1. Under “Entertainment,” use the NAV KEY to select
“My Subscriptions.”
2. Under “My Subscriptions,” select a subscription.
3. Press [OPTIONS], select one of the following
and press [OK].
NOTE:
WHEN YOU SUBSCRIBE, YOU MUST AGREE TO THE TERMS AND CONDITIONS.
WHEN YOU END A SUBSCRIPTION, YOU WILL STILL BE BILLED FOR THE CURRENT
BILLING CYCLE, AND YOU WILL NOT RECEIVE ANY PRO-RATED REFUND.
• End Subscription: Ends your subscription to the
selected content.
• End & Delete: Deletes the selected content and ends
your subscription.
• Info: Provides details about the selected content.
87
CH 4
Page 90

ENTERTAINMENT
DISNEY ZONE
Be sure to visit Disney Zone on a regular basis to check
out the latest Disney entertainment applications plus
games, themes, ringtones and wallpapers designed
specifically for your Disney Mobile phone.
Here’s how to access everything available in Disney
Zone:
Ac
cessing Disney Zone
Press [MENU], select “Entertainment” and press
[OK]. Select “Disney Zone” and press [OK].
Sele
cting a Product in Disney Zone
Use up/down NAV KEY to choose a product area and
press [OK].
88
CH 4
Page 91

MEMO
89
CH 4
Page 92

TOOLBOX
The Toolbox includes My Profile, Camera (Take Pix, Pix
Gallery), Voice Recorder (Record Voice, Voice Gallery),
Bluetooth, Tools (Calendar, Alarm Clock, Notepad,
Calculator, Stopwatch and World Clock) and Settings
(Display, Volume, Roaming, Messaging, Security,
Setup/Others and Phone Info).
Here's how to access the functions available in Toolbox:
MY PROFILE
My Profile displays your phone number and available
memory space.
1. Press [MENU] .
2. To return to the previous screen, press [OK].
90
CH 4
Page 93

TOOLBOX
CAMERA
Taking photos with your phone’s built-in camera is as
simple as choosing a subject, pointing the lens and
then pressing a button.
T
AKING PHOTOS VIA THE MENU
1. Press [MENU] .
2. Point the camera lens at your subject and check the
photo framing through the main LCD screen.
3. To take the photo, press [OK] or the [SIDE
CAMERA KEY].
4. To send photos, press [SEND].
To save photos, press [SAVE].
• You can receive calls while in Camera Mode, but not when
sending a photo to someone. If this occurs, all incoming
calls will be forwarded to voicemail automatically.
91
CH 4
Page 94

TOOLBOX
T
AKING PHOTOS IN IDLE MODE
1. To activate Camera Mode, press and hold the
[SIDE CAMERA KEY] or [CAMERA KEY].
2. Point the camera lens at your subject and check the
photo framing through the main LCD screen.
3. To take the photo, press [OK], [SIDE CAMERA
KEY] or [CAMERA KEY].
4. To send photos, press [SEND].
To save photos, press [SAVE].
T
AKING PHOTOS WITH THE PHONE CLOSED
This feature is perfect for taking self-portraits.
1. To activate Camera Mode, press/hold the [SIDE
CAMERA KEY].
2. Point the camera lens at your subject and check the
photo framing through the sub-LCD screen.
3. To take the photo, press [OK] or
[SIDE CAMERA KEY].
92
CH 4
Page 95

TOOLBOX
C
AMERA MODE OPTIONS
When your phone is open while in Camera Mode, there
are several user options available.
RESOLUTION
Press the NAV KEY up/down to adjust the photo size
from High (480x640 pixels), Med High (240x320
pixels), Med Low (144x176 pixels), or Low (120x160
pixels). The current photo size appears at the top left
of the LCD screen.
ZOOM
Press the NAV KEY left/right to change the magnification.
(Zoom to 1x, 2x or 4x magnification) The Zoom
Magnification appears at the top center of the LCD screen.
UNDER [OPTIONS]
1. Self Portrait
Switch the viewfinder to the sub LCD. (Take photos of
yourself by checking the view on the sub-LCD.)
2. Add a Frame
Choose a fun photo frame to decorate your pix by
scrolling left/right with the NAV KEY, then pressing
[OK].
3. Flash
Activates the flash function. (Off/Auto Flash/Always
On/On This Shot).
4. Self Timer
Activates the camera’s timer function. (Off/5 Secs/10
Secs).
93
CH 4
Page 96

TOOLBOX
5. Pix Controls
Adjust your photos by selecting from the following
options:
Brightness: Select your brightness. (Auto, Manual: -2,
-1, 0, +1, +2)
Image Effect: Select your color effect. (Normal, Gray,
Sepia, Negative)
Quality: Select an image quality. (High, Medium, Low)
6. Shutter Sound
Select a shutter sound. (Classic/Say “Cheese”/Ready!
123/Silent)
94
CH 4
Page 97

TOOLBOX
PIX GALLERY
Review Mode lets you view stored photos, send photos
to an online album, delete photos and access additional
photo options.
1. Press [MENU] .
2. Your phone will now be in Review Mode, which
allows you to view all your stored photos.
3. Use the NAV KEY to select “Pix,” then press
[VIEW].
4. To send pix, press [SEND] to access “Pix
Messages.”
Please refer to Chapter 4: Messaging for more details
on Sending Pix Messages.
In Detail View, you can view photos in sequence by
pressing the up/down NAV KEY. Press [OPTIONS] to
select from the following options:
• Upload: Uploads selected photos to an online album.
• Assign Wallpaper: Assigns the selected pix (photo) as
wallpaper.
• Assign Pix ID: Assigns the selected pix (photo) as a Pix ID.
• Delete: Erases selected pix (photos).
• Delete All: Erases all pix (photos).
• Details/Edit: Displays photo information such
as date taken, resolution, size, and quality. Can Edit
photo titles.
• Take Pix: Returns to Camera Mode to take add itional
photos.
95
CH 4
Page 98

TOOLBOX
VOICE RECORDER
Voice Memo allows you to record a voice message up
to 60 seconds in length. You can listen to, add and
erase short verbal reminders.
Here's how to record a voice memo:
RECORDING NEW VOICE MEMOS
1.Press [MENU] .
2. After "Press OK to start recording" appears,
press [OK]. You will then hear “Please record after
the tone.” At the tone, start recording your voice memo.
3. To stop recording, press [OK] or [STOP]
to stop or [PAUSE/RESUME] to pause/ resume.
After recording a voice memo, press [OPTIONS] to
playback or rerecord.
4. Press [SAVE] to enter a voice memo title, enter
the title, then press [OK].
See Page 32 for more information on entering letters,
numbers and symbols.
To send voice memos, select the message, then press
[SEND] to access “Pix Messages.”
Please refer to Chapter 4: Messaging for more details
on Sending Pix Messages.
96
CH 4
Page 99

TOOLBOX
VOICE GALLERY
1. Press [MENU] to view your
Voice Memo list.
2. To play voice memos: Select a voice memo and
press [PLAY].
To send Voice Memos, select the message and press
[SEND] to access “Pix Messages.”
Please refer to Chapter 4: Messaging for more details
on Sending Pix Messages.
Press [OPTIONS] to select from the following options:
• Delete: Erases selected voice memos.
• Delete All: Erases all voice memos.
• Details/Edit: Displays voice memo information including
date recorded and time. Also allows you to edit a voice
memo title.
• Record Voice: Returns to Voice Recorder Mode for additional
recording.
97
CH 4
Page 100

TOOLBOX
TOOLS
BLUETOOTH
This feature supports the Bluetooth Specification 1.1;
Headset Profile 1.1; and Handsfree Profile 1.0.
Power
1. Press [MENU] .
2. Select “On” or “Off” then press [OK] to save.
D
evice List
1. Press [MENU] .
Dis
covery Mode
1. Press [MENU] .
2. Select “On (60 secs)” or “Off” then press [OK]
to save.
NOTE:
AFTER 60 SECONDS, THE PHONE RETURNS TO DISCOVERY MODE “OFF.” IN
DISCOVERY MODE “ON,” REMOTE BLUETOOTH DEVICES CAN SCAN YOUR PHONE.
Device Scan
Device Scan allows you to scan for remote Bluetooth
devices from your phone.
1. Press [MENU] .
V
oice Dial
1. Press [MENU] .
2. Select “On” or “Off” then press [OK] to save.
D
evice Name
1. Press [MENU] .
98
CH 4
 Loading...