

Page 1

Introduction
Contents
Getting Ready
Learning the Basics
Character Input
Phone
Contacts
Mail
Internet
Multimedia
Applications
Settings
Wi-Fi
Global Function
Appendix/Index
Page 2

Preface
Thank you for purchasing the PTL21. Before using your PTL21, be sure to
read the PTL21 Basic Manual (this PDF manual) to ensure correct usage.
After you have finished reading this manual, store this PDF manual and
the printed manuals in safe places so you can retrieve them whenever you
need them.
◎ The Basic Manual (this PDF manual) describes basic operations of the PTL21
major functions.
For detailed descriptions on various functions, refer to PTL21 full Instruction
Manual (Japanese), which is available from the au homepage.
http://www.au.kddi.com/torisetsu/index.html
◎ Downloading Manuals
You can download English version of the Basic Manual (this PDF manual),
Korean/Simplified Chinese/Traditional Chinese/Portuguese version of
the Basic Manual and the full Instruction Manual (Japanese) from the au
homepage.
http://www.au.kddi.com/torisetsu/index.html
◎ Online Manual
Online manuals are also provided on the au homepage. They consist of
parts of the full Instruction Manual (Japanese) reorganized in a searchable
format.
http://www.au.kddi.com/manual/index.html
Safety Precautions
Be sure to read the Safety Precautions “安全上のご注意” in the
Instruction Manual (Japanese) to ensure proper usage of the
PTL21.
For troubleshooting, check the symptom of your PTL21 in
au お客さまサポート (au Customer Support) on the au homepage.
http://www.kddi.com/customer/service/au/trouble/kosho/index.html
ii
Before Using PTL21
• You cannot receive or make calls in a location where the signal
cannot be received, even within the service area. Calling may not
be available in a location where the signal is weak. If you move to
a location where the signal is weak during a call, the call may be
interrupted.
• The au phone is a digital cell phone and can maintain a high call
quality until the signal weakness reaches its limit.
Therefore, once the limit has been reached, the call may be
disconnected suddenly.
• Note that the au phone uses signals which may be intercepted
by a third party. (However, the CDMA/GSM system enables highly
confidential call communications.)
• The au phone is a wireless station which is compliant with the Radio
Act, and may be subject to inspections regulated by the Radio Act.
• When you insert the au IC-Card, the product number information of
your au phone is sent to the au server for the security and operation
status notification of the au phone.
• Always be considerate of others around you when using your au
phone in public places.
• For a child’s use, read the Basic Manual and give your child
instructions on proper use.
• The PTL21 is a cell phone compatible with the international roaming
service. Each network service which is described in the Basic Manual
varies depending on the area or service. For details, refer to the supplied
Global Passport Owner’s Guide (Japanese).
Page 3
Illustrations and Screenshots in This Manual
■Note on illustrations
The illustrations in this manual may look different from the actual cell
phone in shape, color and typeface. The key illustrations are also
simplified as shown below.
■Note on screenshots
The screenshots in this manual are simplified and may look different
from the actual cell phone screens.
Notes on Cell Phone Use
Cell Phone Etiquette
The cell phone always emits weak radio waves when power is on.
Use the cell phone in an enjoyable and safe manner without forgetting
to be considerate of others around you.
■
Use of cell phones is not allowed in some places
•
Do not use the cell phone while you are driving. Doing so is both
dangerous and prohibited by law.
•
Using a cell phone in an aircraft is prohibited by law. Set “Airplane
mode” to on and turn the cell phone power off. However, the use of
cell phones is authorized by some airline companies. Contact your
airline company for more information.
■
Radio waves from cell phones may interfere with
medical electrical equipment
•
Some people close to you in crowded places such as packed trains
may be using a cardiac pacemaker. Turn the cell phone off in such
places.
•
Abide by the rules of hospitals and other medical institutions where it
is forbidden to use or carry cell phones.
■
Be considerate of where you use the cell phone and
how loudly you talk
•
Do not make calls in theaters, museums, libraries, and other similar
places. Turn power off or turn on manner mode not to disturb others
around you by ringtones.
•
Do not use the cell phone on a street where you might interrupt the
flow of pedestrians.
•
Move to areas where you will not inconvenience others on trains or in
hotel lobbies.
•
Refrain from talking in a loud voice.
Introduction
1
Page 4
•
Obtain the permission of other people before you take their photos
with the cell phone’s camera.
•
Do not record information with the cell phone’s camera in bookstores
Introduction
and other locations where taking photos is not permitted.
Do Not Use the Cell Phone While Driving!
Turn off your cell phone while driving.
Do not use the cell phone while driving a car/motorcycle or riding a
bicycle. It may result in a traffic accident. Using a cell phone while
driving is prohibited by law. Using a cell phone while riding a bicycle
may also be punishable by law.
■
Prohibited!
•
Looking at a cell phone display
•
Talking on a cell phone while holding it
Water Resistance/ Dust Resistance
PTL21 provides waterproofness of IPX5 equivalent*1 and IPX7 equivalent*2
and dustproofness of IP5X equivalent*
cover and external connection jack cover (by company testing method).
*1 IPX5 (former JIS protection code 5) equivalent:
A phone keeps functioning after applying a jet flow of 12.5 L/min. from every direction from
a distance of approximately 3 m for at least 3 minutes using water nozzle of 6.3 mm inner
diameter.
*2 IPX7 (former JIS protection code 7) equivalent:
A phone keeps functioning after being slowly submerged to depth of 1 m in static tap water
at room temperature, left there for approximately 30 minutes and then taken out.
*3 IP5X (JIS protection code 5) equivalent:
A phone is protected to keep functioning safely after being placed in a chamber containing
dust particles with a diameter of 75 μm or less and left for 8 hours while the contents of the
chamber are subjected to agitation.
2
3
by firmly closing the battery pack
Checking the Contents of the Box
Check that all the contents are included.
PTL21 Warranty (Japanese) Battery pack
Desktop holder microSD memory card
• Instruction Manual (Japanese)
• Safety Precautions (Japanese)
• Setting Guide (Japanese)
• Global Passport Owner’s Guide (Japanese)
• au International Call Guide (Japanese)
The following items are not included.
• AC adapter
• Stereo earphones
• USB-microUSB conversion cable
• microUSB-stereo earphones conversion
adapter
• Purchase a specified charger (sold separately).
• The cell phone illustrations in this manual may look different from
the actual product.
(2GB) (Sample)
Page 5
Security Code and Password
You have to use each security code to operate the PTL21.
You can use the security code and other passwords described below.
Take care not to forget your security code and passwords, because
they are required for performing various operations and using
subscription services.
● Security Code
Usage
Example
Initial
Setting
● Pattern/PIN/Password
Usage
Example
Initial
Setting
① Using the Answering Service (Voice Mail) and Call Transfer
remotely from a fixed-line phone
② Making inquiries, applications, and changes while using
Customer Service Center voice guidance, and au homepage
③ Configuring “Other settings” in E-mail settings
The four-digit number you wrote on your subscription form
● PIN code
Setting/Canceling Screen
lock, Remote control
lock, etc.
None
Usage
Example
Initial
Setting
Preventing unauthorized
use of the au IC-Card by
a third party
1234
PIN Code
If the PIN code is incorrectly entered three times consecutively, the
PIN code will be locked. Use the PUK code to unlock the PIN code.
■PIN code
You can set the PTL21 to require PIN code entry every time the power is
turned on, to prevent unauthorized use of the au IC-Card by a third party.
• At the time of purchase, the PIN code is not to be required to use
the phone. You can select “Lock UIM card” and set the PIN code to
be required. It is also required when setting “Lock UIM card”.
• The initial setting of the PIN code is “1234”. You can change the
PIN code to a four- to eight- digit number by selecting “Change UIM
PIN”.
■PUK code
Enter the PUK code when the PIN code is locked.
• PUK code is an eight-digit number given at the time of purchase,
and is printed on the back side of the plastic card where your au
IC-Card is attached.
• When you enter the PUK code, set a new PIN code by selecting
“Change UIM PIN”.
• If the PUK code is incorrectly entered ten times consecutively,
contact an au shop, PiPit or the Customer Service Center.
◎ The PIN code is not initialized even after executing “Factory data reset”.
Introduction
3
Page 6

Contents
Preface ............................................................................................. ii
Contents
Safety Precautions ....................................................................... ii
Before Using PTL21 ..................................................................... ii
Introduction .......................................................... 1
Illustrations and Screenshots in This Manual ....................1
Notes on Cell Phone Use ........................................................... 1
Cell Phone Etiquette .......................................................................1
Do Not Use the Cell Phone While Driving! .............................2
Water Resistance/ Dust Resistance ...........................................2
Checking the Contents of the Box ......................................... 2
Security Code and Password ...................................................3
PIN Code ......................................................................................... 3
Contents .................................................................4
Getting Ready ....................................................... 6
Names and Functions of Parts ................................................ 6
Charging the Battery Pack ........................................................ 8
Turning On/Off the Power ........................................................9
Turning On the Power ................................................................9
Turning Off the Power ................................................................9
Sleep Mode .................................................................................... 9
Initial Setup ..................................................................................10
Setting Google Account ..........................................................10
Switching the Display Language to English ....................... 10
Initial Setup of E-mail ...............................................................10
4
Setting au one-ID.......................................................................11
au IC-Card .....................................................................................11
Removing au IC-Card ...............................................................12
Inserting au IC-Card ..................................................................12
Using microSD Memory Card ................................................13
Handling Precautions ...............................................................13
Inserting microSD Memory Card .........................................14
Removing microSD Memory Card .......................................14
Learning the Basics .......................................... 15
Touch Panel ...................................................................... 15
Operating the Touch Panel .....................................................15
Operation While Using Functions ........................................16
Selecting an Item .......................................................................16
Displaying the Menu ................................................................16
Home Screen and Launcher
Viewing Home Screen ..............................................................17
Using Status Bar .........................................................................17
Using Notification/Status Panel............................................19
Using Home Screen ..................................................................19
Switching Home Screen ..........................................................20
Using Widgets .............................................................................20
Using Launcher Menu ..............................................................21
Displaying Launcher Menu ....................................................21
Reducing Power Consumption .................................23
Using Power Control Widget .................................................23
Closing the Applications .........................................................23
Using Simple Mode ....................................................... 23
Switching to Simple Mode .....................................................23
Switching to Normal Mode ....................................................23
Menu .............................. 17
Character Input ................................................. 24
How to Input the Characters .................................................24
Switching Character Entry Mode .........................................25
Switching Software Keyboards .............................................25
Entering Hiragana/Kanji/Katakana/
Alphanumeric .............................................................................25
Correcting Characters ..............................................................26
Entering Emoji/Symbol/Emoticon .......................................26
Using Voice Input .......................................................................26
Using Handwriting Input ........................................................27
Switching Input Software .......................................................27
Phone .................................................................... 28
Making a Call ...............................................................................28
Answering a Call.........................................................................29
Using International Call ...........................................................29
Making an International Call (001International
Call Service)..................................................................................29
Returning a Call (Incoming Log/Outgoing
Setting the Manner Mode ......................................................30
Log) ...................30
Contacts ............................................................... 31
Saving a Contact ........................................................................31
Editing Contacts .........................................................................31
Using Contacts ............................................................................31
Page 7

Mail ........................................................................ 32
Using E-mail......................................................................32
Sending E-mail ............................................................................32
Receiving E-mail .........................................................................32
Viewing Received E-mails .......................................................32
Changing Your E-mail Address ..............................................33
Setting Mail Filters .....................................................................33
Using C-mail .....................................................................35
Sending C-mail ...........................................................................35
Receiving C-mail ........................................................................35
Viewing Received C-mails .......................................................35
C-mail Safety Block ....................................................................36
Using the Earthquake Early Warning ..................................36
When an Earthquake Early Warning is
Received ........................................................................................37
Setting Up the Earthquake Early Warning ........................37
Setting Up C-mail ......................................................................38
Setting Receiving Filter ............................................................38
Using PC-mail...................................................................39
Setting Up PC-mail Account ..................................................39
Sending PC-mail .........................................................................39
Receiving PC-mail ......................................................................40
Viewing Received PC-mails ....................................................40
Using Gmail ......................................................................41
Sending Gmail ............................................................................41
Receiving Gmail..........................................................................41
Viewing Received Gmails ........................................................41
Internet................................................................. 42
Using Browser ..................................................................42
Viewing Sites ...............................................................................42
Using Address Bar ......................................................................42
Using Bookmarks/History .......................................................42
Bookmarking a Web Page.......................................................42
Using Bookmarks/History .......................................................42
Multimedia .......................................................... 43
Using Camera ...................................................................43
Cautions for Using Camera.....................................................43
Taking a Photo ............................................................................44
Recording a Movie ....................................................................44
Using Gallery .................................................................... 44
Viewing Photos/Movies ...........................................................44
Applications........................................................ 45
Using Android Market ..............................................................45
Using au one Market ................................................................45
Managing Applications ...........................................................46
Settings ................................................................ 47
Viewing the Setting Menu ......................................................47
Checking Your Profile ...............................................................47
Changing the Ring Tone ..........................................................47
Using the Remote Control Lock............................................47
Initializing PTL21 ........................................................................49
Wi-Fi ....................................................................... 50
Activating/Inactivating Wi-Fi .................................................50
Registering/Connecting to the Access Point ...................50
Global Function ................................................. 51
Using Global Passport ...................................................51
For Overseas Use without Anxiety ......................................51
Configuring the Overseas Settings .....................................52
Obtaining the PRL (Preferred Roaming List) ....................52
Setting the Area .........................................................................52
Setting the Data Roaming ......................................................52
Setting the Time .........................................................................53
Making a Call at Your Travel Destination ...........................53
Making a Call to Another Country (Including
Japan) from Your Travel Destination ...................................53
Making a Call within the Same Country While
Overseas ........................................................................................54
Receiving a Call at Your Travel Destination .......................54
Appendix/Index ................................................ 55
Troubleshooting.........................................................................55
Index ................................................................................... 57
User License......................................................................59
Aplix End-User License Agreement .....................................59
About Open Source Software ...............................................59
Safety Information
CE Declaration of Conformity ................................................61
FCC Notice ....................................................................................61
Contents
5
Page 8

Names and Functions of Parts
Getting Ready
6
Page 9

① External connection jack cover
② External connection jack
Use it to connect the PTL21 to the common AC adapter 03 (sold
separately), the microUSB cable 01 (sold separately), the 18pinmicroUSB conversion adapter 01 (sold separately), the microUSB stereo
earphones conversion adapter 01 (sold separately), etc.
③ Strap eyelet
④ pPower key
Turns on/off the power, and sets/disables sleep mode.
⑤ Built-in antenna
Do not cover the built-in antenna with your hand when you call,
transfer 3G data, use Wi-Fi, Bluetooth
®
or retrieve GPS information.
⑥ Charging indicator
Illuminates in red while charging.
⑦ Incoming indicator
Illuminates when receiving a call.
⑧ Earpiece
Emits the voice of the other party during a call.
⑨ Proximity sensor/optical sensor
The proximity sensor prevents operating the touch panel
incorrectly during a call. The light sensor detects the ambient
brightness and automatically adjusts the brightness of display.
⑩ Display
⑪ Microphone
Transmits your voice to the other party during a call. It is also used
for recording sounds.
Take care not to cover the microphone with your fingers when
making a call or recording sound.
⑫ mMENU key
Displays the option menu.
⑬ hHOME key
Use it to display the Home screen, etc.
⑭ bBACK key
Returns to the previous screen.
⑮ vVolume key
⑯ Speaker
Emits ring tones, alarm tones, music, movie sounds, etc.
⑰ Camera lens
⑱ Mobile light
⑲ Infrared port
⑳ Charging terminals
Used when charging the PTL21 with the desktop holder.
Battery pack/cover
microSD memory card slot
au IC-Card
Lock slider
Getting Ready
7
Page 10
Charging the Battery Pack
The battery pack is not fully charged at the time of purchase. Charge the
battery pack when you use the PTL21 for the first time or when the battery
level becomes low.
Getting Ready
◎ The PTL21 and the battery pack may become warm while charging. This is not
a malfunction.
◎ Read carefully the Safety Precautions “安全上のご注意” in the Instruction
Manual (Japanese) before using the battery pack.
◎ The charging time may become longer depending on the function used
while charging.
◎ When using the PTL21 with the specified charger (sold separately) connected
for charging, it may induce a repetition of small charging periods/electrical
discharges. Repeatedly charging the PTL21 may shorten the battery life.
◎ If the PTL21 charging indicator flashes in red, check that the battery is correctly
installed and that the cable is connected. If the indicator keeps flashing, stop
charging and contact an au shop or the Customer Service Center.
◎ The common AC adapter 01 (sold separately) is for use in Japan with
100V AC power supply. Do not use it with single-phase 200V power
supply or voltage transformers.
When charging with a specified AC adapter (sold separately), other than the
common AC adapter 01 (sold separately), outside Japan, use a plug adapter
according to your destination. Do not charge the PTL21 using a voltage
transformer.
◎ After charging, make sure to close the external connection jack cover
securely, and do not pull or twist it forcefully.
■Charging with the specified AC adapter (sold separately)
directly connected to the PTL21
The specified AC adapter (sold separately) is required. (The AC
adapter appearance in the figure may differ from the actual shape of
the adapter you are using).
The following is an explanation of how to charge your PTL21 using the
common AC adapter 03 (sold separately).
◎ When charging with the common AC adapter 01 (sold separately), the common
AC adapter 02 (sold separately) or an AC adapter with specifications similar
to the common AC adapter 02, use the 18pin-microUSB conversion adapter
01(sold separately) to make the connection to the PTL21.
◎ When starting charging with the PTL21 turned off, it automatically turns on and
the charging screen appears. Cell phone operation cannot be performed when
only the charging screen is displayed. When charging is finished, the PTL21
automatically turns off.
◎ When charging the PTL21 with the power turned off, if charging is stopped
while the battery is almost empty, a message prompting to charge the battery
may appear.
8
Page 11
Charging time: Approx. 160 min
Connect the microUSB plug
1
of the common AC adapter
03 (sold separately) to the
PTL21.
Open the external connection
jack cover, confirm the shape of
the connector and insert the plug
straight.
Insert the power plug of the common AC adapter 03
2
(sold separately) into a power outlet.
The PTL21 charging indicator illuminates in red and the battery level icon
changes to the charging icon on the display.
The charging indicator goes out when the charging is finished.
After the charging if finished, pull the microUSB plug of the
3
common AC adapter 03 (sold separately) straight out of the
PTL21.
Close the PTL21 external connection jack cover.
4
Pull the power plug of the common AC adapter 03
5
(sold separately) out of the outlet.
Turning On/Off the Power
Turning On the Power
Hold down p for at least 1
1
second.
The logo is displayed. Wait a little for the
unlock screen to appear.
to the circle in the center of the
Drag
screen to unlock.
If screen lock is set, the pattern/PIN/
password entry screen is displayed.
Drag a different icon to the circle in the
center of the screen to directly activate the
corresponding application.
◎ When you turn on the PTL21 for the first time, the initial setting screen is
displayed after you unlock the screen.
<Unlock screen>
Turning Off the Power
Hold down p for at least 0.5 second.
1
The phone options screen is displayed.
[Power off] → [OK]
2
Sleep Mode
If no operation is made for a while, the screen is turned off temporarily
and the sleep mode is set.
You can also press p at any time to set the sleep mode.
Getting Ready
9
Page 12

■Canceling the sleep mode
Press p while the sleep mode is set.
1
The unlock screen is displayed.
Initial Setup
Getting Ready
When you turn on the PTL21 for the first time, or after changing the IC-Card
or performing a factory data reset, the initial setting screen is displayed
after you unlock the screen.
Setting Google Account
Set up a Google account to use the online services provided by
Google.
[言語変更] (Change language)
1
Select a language.
2
Tap the Android robot icon.
3
■If you do not have a Google account
[Create]
4
Enter your first name, last name and a username →
5
[Next]
Follow the instructions displayed on the screen to complete the
account creation and setup.
■If you already have a Google account
[Sign in]
4
Enter your username and password → [Sign in]
5
Follow the instructions displayed on the screen to complete the
account setup.
10
◎ If you did not set up a Google account by tapping [Skip] on the initial
setting screen, you can still set up an account in “Accounts & sync” or when
activating for the first time applications requiring to have a Google account.
Switching the Display Language to English
You can switch the display language for function names and other items
to English.
A part or all the contents may not be displayed in English depending on
the application.
On the Home screen, [ ] → [設定] (Settings) → [言語
1
とキーボード] (Language & keyboard) → [言語を選択
(Select language)]
[English]
2
◎ The language can also be switched by tapping [言語変更] (Change
Language) on the initial setting screen.
Initial Setup of E-mail
When performing initial setup, an e-mail address is automatically set.
You can change this e-mail address.
On the Home screen, [ ]
1
The E-mail screen is displayed.
Page 13
[OK]
2
When the e-mail setup is completed, your e-mail address is displayed.
Setting au one-ID
You can register a new au one-ID or one you have obtained beforehand.
Set the au one-ID in common in your PTL21 and PCs, and save the ID and
password in your PTL21. By acquiring and saving an au one-ID, you can use
a variety of services provided by au, such as “au kantan payment method”.
On the Home screen, [ ] → [Settings] → [au one-ID
1
setting]
A screen about packet communication charges is displayed.
[OK] → [auone-IDの設定・保存] (au one-ID setting and
2
saving)
Tap “auone-IDとは?” (“What is au one-ID?”) to display an
explanation in the browser.
Enter the security code → [OK]
3
The security code is the four-digit number you wrote on your
subscription form. If the security code is incorrectly entered three
times consecutively during a single day, the setting operation will be
disabled until the next day.
■When registering your phone number as a new au one-ID
Enter the password → [利用規約に同意して登録]
4
(Iaccept the terms of service and register)
■When registering a new au one-ID different from you phone number
お好きなauone-IDを登
4
録したい方はこちら ( To
register an au one-ID of
your choice)
取得済みのauone-IDを
設定したい方はこちら ( To
set an au one-ID you
already obtained)
[設定画面へ] (Go to setting screen) → Follow the
5
Follow the instructions displayed on
the screen to perform a new
registration.
The newly registered au one-ID is set
in common in the PTL21 and the PCs.
Your au one-ID is set in common in the
PTL21 and the PCs. Follow the
instructions displayed on the screen
to complete the procedure.
instructions displayed on the screen.
Set the necessary information to reissue a password.
au IC-Card
An au IC-Card records your personal
information such as phone numbers.
◎ Follow the precautions below when handling the au IC-Card, otherwise it
may cause a malfunction or damage to the au IC-Card.
• Do not touch the IC (metal surface) par t of the au IC-Card, or the IC-Card
terminal on the PTL21.
• Confirm the orientation before inserting the au IC-Card.
• Do not forcibly insert or remove the au IC-Card.
◎ Be careful not to lose the au IC-Card after when removing it.
Getting Ready
Removing au IC-Card
Turn off the power and remove the battery pack before removing or
11
Page 14

inserting the au IC-Card.
Turn off the PTL21 and remove the battery pack.
1
Getting Ready
Pull the tab and move the tray straight out to remove
2
the au IC-Card.
Inserting au IC-Card
Pull the tab and move the tray straight out.
1
Place the au IC-Card on the tray with the IC (metal
2
surface) part side up and insert it securely.
Insert the au IC-Card in the tray according to the orientation of its
cutout.
12
Page 15
Using microSD Memory Card
You can set microSD memory cards (including microSDHC memory cards)
to the PTL21 to save data. You can also keep contacts and E-mail data in
microSD memory cards.
◎ Some applications may not be available if a microSD memory card is not
inserted.
◎ The PTL21 supports file size up to 2 GB.
◎ A microSD memory card initialized on other devices may not function properly
on the PTL21. Initialize your microSD memory cards with the PTL21.
Handling Precautions
• Do not remove the microSD memory card or the battery pack, and do
not turn off the PTL21 or any other device while reading, writing, playing
back, saving or moving/copying data. It may result to damage to the
data stored in the PTL21 or the microSD memory card, or data loss.
• Do not drop or subject the PTL21 to vibration or impact with a microSD
memory card inserted. It may result to damage to stored data or data
loss.
• Do not insert objects other than microSD memory cards, such as liquid,
metals or flammable items, into the microSD memory card slot of the
PTL21. It may result in a fire, electrical shock or malfunction.
• We recommend using the included 2 GB microSD memory card
(sample) only with cell phones. Using it with other devices, or in
high-voltage or high-temperature and humidity environments may
cause damage or a malfunction to the microSD memory card or the
other devices.
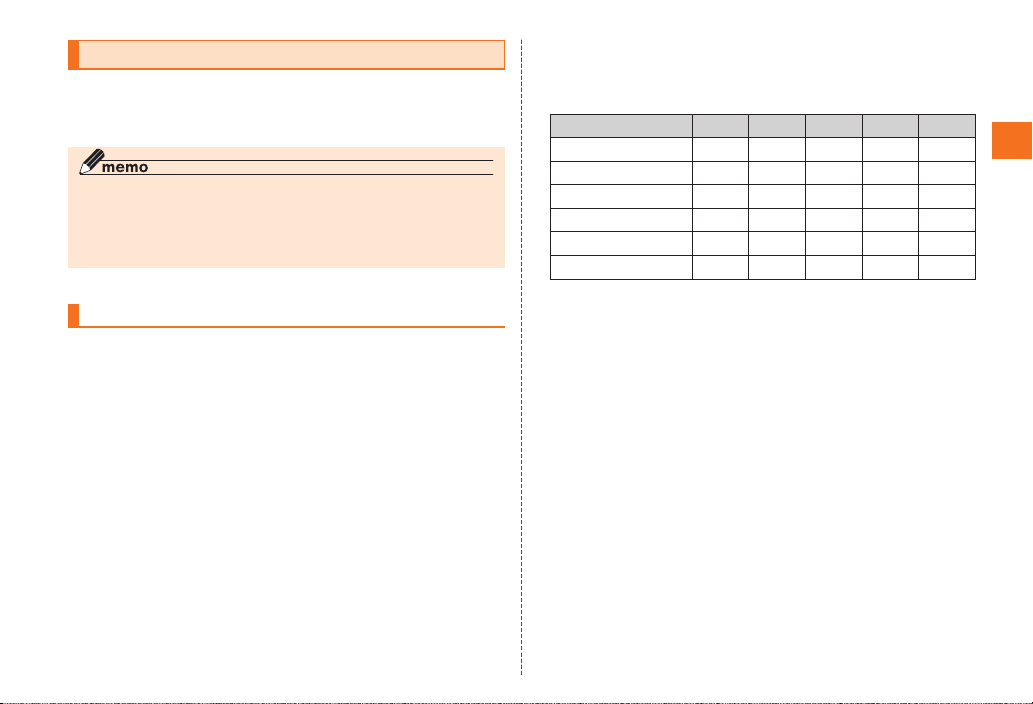
• The following microSD memory cards have been confirmed for
operation based on au criteria. For operation confirmation of other
microSD memory cards, contact each microSD memory card
manufacturer.
<microSD/microSDHC memory cards>
* 4 GB or more are for microSDHC memory cards.
Manufacturer 2 GB 4 GB 8 GB 16 GB 32 GB
Toshiba
Panasonic
SanDisk
○ ○ ○ ○
○ ○ ○
○ ○ ○ ○
– –
ADTEC – – – – –
Buffalo
Sony
○ ○
○
– – –
– – – –
• ○: Confirmed operation –: Unconfirmed operation or not available
for sale (as of July 2011)
* Operation with PTL21 is confirmed for microSD memory cards available for sale as of July 2011. For
the latest information on operation confirmation, visit the au homepage or contact the Customer
Service Center.
–
Getting Ready
–
13
Page 16
Inserting microSD Memory Card
Removing microSD Memory Card
Turn off the PTL21 and remove the battery pack.
1
Getting Ready
Confirm the microSD memory card orientation and
2
insert it straight until it clicks.
Be sure to hear the click indicating that the memory card is locked.
Also, be careful not to remove your finger from the microSD memory
card until it locks as it may be ejected.
Install the battery pack and close the battery pack
3
cover.
◎ Do not touch the terminal part of the microSD memory card.
◎ Insert the microSD memory card with the correct side up and in the
appropriate orientation.
Inserting a memory card forcefully into the slot could result in failure to
remove the microSD memory card or damage.
14
Turn off the PTL21 and remove the battery pack.
1
Push the microSD memory card slowly until it clicks.
2
Pull slowly the microSD memory card.
3
Install the battery pack and close the battery pack
4
When you hear the click,
keep your finger onto the
microSD memory card and
let it come toward you.
The microSD memory card
will come out by itself. Be
careful as the card may
be ejected violently if you
remove your finger too fast
after pushing strongly.
Pull slowly and straight.
Depending on the microSD
memory cards, the lock
may not be release and
the microSD memory may
not come out. In this case,
remove it by gently pulling
in out with your finger.
cover.
◎ Do not remove the microSD memory card forcefully. It may result to
damage or data loss.
◎ The microSD memory card may be warm after a long time use. It is
normal.
Page 17
Touch Panel
Operating the Touch Panel
The display of the PTL21 is a touch panel. You can operate the PTL21 by
directly touching the items and keys displayed on the screen with you
finger.
■Tap/Double-tap
Gently touch a menu or an item
and immediately remove your
finger.
Tap quickly twice on the same
position to double-tap.
■Long-touch
Keep touching a menu or an
item.
■Slide
While gently touching the screen
with your finger, slide it to the
desired direction.
■Pinch out/Pinch in
While touching the screen with
2 of your fingers, move your
fingers apart (pinch out) or
closer (pinch in) to enlarge or
reduce the screen.
■Flick
Move (flick) quickly your finger
up, down, right or left on the
screen.
Learning the Basics
■Drag and drop
Touch gently the item you want
to move with you finger and
slide it to the desired location.
Remove your finger to drop the
item.
15
Page 18
Operation While Using Functions
Selecting an Item
Select a displayed item or icon by tapping the screen directly.
Displaying the Menu
Learning the Basics
■Option menu
The option menu is displayed by pressing m on a screen where
the menu is available.
Example: Contacts screen option menu
■Context menu
The context menu is displayed by long-touching a screen or item
where the menu is available.
Example: Contacts screen context menu
16
Page 19
Home Screen and Launcher
Menu
Viewing Home Screen
On the Home screen you can confirm the status and current settings of the
PTL21.
① Status bar
② Locator
③ Widgets
④ Shortcuts
⑤ Folders
⑥ Quick menu
⑦ Menu icon
<Home Screen>
Using Status Bar
The status bar is displayed on the top of the PTL21 display. The notification
indicators for a new mail or a missed call are displayed on the left side of
the status bar, while the status indicators showing the signal strength,
remaining battery and other PTL21 statuses are on the right side.
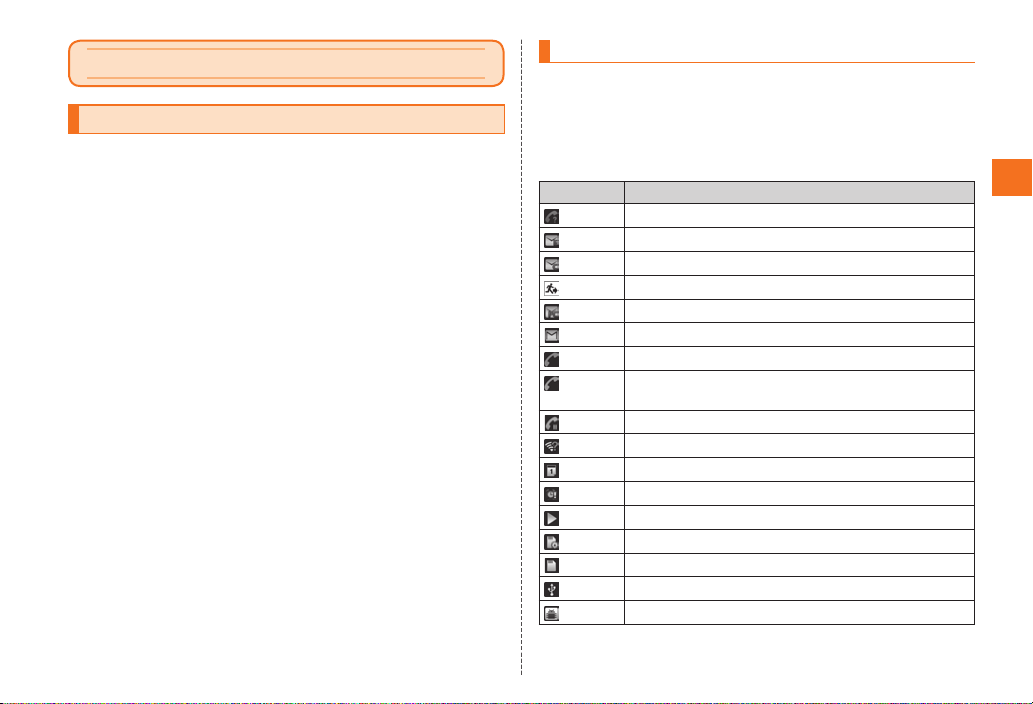
■Examples of notification indicators
Icon Description
Missed call
New e-mail message
New C-mail message
New Earthquake Early Warning
New PC-mail message
New Gmail message
(Green)
(Blue)
Dialing/Receiving call/Calling
Dialing/Receiving call/Calling with a Bluetooth
headset connected
Putting a call on hold
Open network available
Schedule notification of the calendar
Ringing alarm
Playing music
Loading microSD memory card
microSD memory card unmounted
USB connecting
USB debug connecting
®
Learning the Basics
15
Page 20
Icon Description
Downloading/Installing data or application
Downloading/Finished downloading/Installing
Finished installing
• Thedownloadingandinstallingiconsaredisplayed
as animations.
Uploading data/Finished uploading data
Learning the Basics
• Theuploadingdataiconisdisplayedasan
animation.
Application update available
PTL21 software update available
PTL21 memory full
Error/Warning notice
Indicators collected
■Examples of status indicators
Icon Description
Time
Timer set
Alarm set
( )
( )
( )
( )
( )
( )
( )
16
Battery level (while charging)
( ) Full/ ( ) Approx. 80% remaining/ ( )
Approx. 60% remaining/
remaining/
Approx. 10% remaining/
• Theiconwhilechargingisdisplayedasan
animation. (The animation is not displayed when the
battery level is below 15%)
( ) Approx. 20% remaining/ ( )
( ) Approx. 40%
( ) Battery level 0
Icon Description
Signal strength (receiving electric field)*
Level 4/ Level 3/ Level 2/ Level 1/ Level 0/
Out of service area
3G data communication status*
Sending and receiving/ Sending/ Receiving/
Waiting
CDMA 1X data communication status*
Sending and receiving/ Sending/ Receiving/
Waiting
Wi-Fi signal strength*
Level 4/ Level 3/ Level 2/ Level 1/ Level 0
In roaming
Airplane mode set
Manner mode status
Standard manner mode (Vibrator on)/ Silent
manner mode (Vibrator off )
Microphone set to off during a call
Bluetooth® connection status
Connecting/ Waiting
Data synchronizing status
Synchronizing/ Synchronization failed
GPS in use
• TheGPSpositioningindicatorisdisplayedasan
animation.
* Displayed in green or blue when logged in with a Google account.
Character type
Hiragana-Kanji/ Full-width Katakana/ Halfwidth Katakana/
Alphabet/
Numeric/
Full-width Alphabet/ Half-width
Full-width Numeric/ Half-width
Voice Input
Page 21

Using Notification/Status Panel
In the notification/status panel, you can check the details of
notification and status indicators and activate applications
corresponding to the indicators.
You can also easily set the manner mode, switch the Wi-Fi on/off or
perform other settings using Google Voice Search, voice commands
or the easy setting icons.
Slide the status bar to the
1
bottom.
The notification/status panel is
displayed.
① Clear
You can clear all the notifications by
tapping the key.
② Easy Setting
Tap the icons to switch each function
on/off.
Flick right or left to display the hidden
icons.
( ):
Turns the manner mode
(silent manner mode) on/off.
: Turns the Wi-Fi on/off.
: Turns the 3G data communication on/off.
: Turns the GPS on/off.
: Sets the simple mode.
: Turns the Bluetooth® on/off.
: Turns the display Auto Rotate on/off.
: Turns Auto Sync on/off.
③ Voice Search
④ Voice Command
⑤ Notifications
You can check the notification contents. Tap to activate the
corresponding applications depending on the notification content.
<Notification/
Status panel>
⑥ Close tab
Drag to the top to close the notification/status panel.
Using Home Screen
On the Home screen, m
1
Add Shortcuts Add shortcuts.
2
Manage apps Display the application settings.
Wallpaper Configure... Configure live wallpapers detail
Notifications Display the notification/status panel.
Settings Display the setting menu screen.
Widgets Add widgets.
Folders Add folders.
Wallpapers XSee “ Wallpaper” below.
settings.
Gallery Select and set data from the
Live
wallpapers
Wallpapers Select and set from wallpapers
microSD memory card.
Select and set from live
wallpapers registered beforehand
in your PTL21.
registered beforehand in your
PTL21.
Learning the Basics
15
Page 22

Switching Home Screen
Slide or flick the Home screen to the left or right to switch between
Home screens.
7 Home screens are available. Shortcuts, widgets and folders can be
added and used on each Home screen.
The current displayed position can be checked with the locator on
the top of the screen.
Learning the Basics
■Using blind home
Use the blind home function to hide all icons on the Home screen.
This function is convenient when you want to see the wallpaper you
have set.
Pinch out the Home screen.
1
All the icons on the Home screen disappear.
Pinch in the Home screen to make the icons appear again.
■Using home preview screen
Tap the locator on the Home screen.
1
The home preview screen is displayed. Flick to the top, bottom, right
or left to rotate or tilt the Home screens displayed in 3D.
Tap a Home screen displayed in 3D.
2
The tapped Home screen is displayed.
Using Widgets
Widgets are simple applications that can be activated on the Home
screen.
■Adding widgets
On the Home screen,m→ [Add] → [Widgets]
1
■When adding Android widgets
[Android Widgets]
2
Select a widget.
3
■When adding Pantech widgets
[Pantech Widgets]
2
Select a widget.
3
A style and detail items selection screen is displayed depending on
the widget. Follow the instructions displayed on the screen.
■Removing widgets
Long-touch the widget you want to remove on the
1
Home screen.
The PTL21 vibrates indicating that the widget can be moved.
Drag the widget to at the bottom of the screen and
2
then drop it.
16
Page 23

Using Launcher Menu
Installed applications are displayed as icons in the launcher menu.
Activate an application by tapping the corresponding icon.
Displaying Launcher Menu
On the Home screen, [ ]
1
The launcher menu is displayed.
Slide or flick the launcher menu screen to the
left or right to switch between launcher menu
screens.
<Launcher menu
screen>
Icon Application Page
Alarm/Clock –
Web P.42
Camera P.43
Calendar –
Gallery P.44
Compass –
Downloads –
Talk –
Document Viewer –
Navigation –
News & Weather –
Video Player –
Places –
Profile –
Market P.45
Maps –
Music Player –
Voice Command –
Voice Memo –
Voice Search –
Google Search –
Clock Tools –
Sketch Pad –
IrDA –
Settings P.47
Converter –
Call log P.30
Weather –
Calculator –
Phone P.28
Contacts P.31
Camcorder P.44
Handy Memo –
GREE* –
LISMO Book Store* –
Learning the Basics
15
Page 24

Learning the Basics
Run&Walk* –
ウェザーニュースタッチ (Weather News
Touch)*
かんたんメニュー (Kantan Menu)*
ショッピ ング (Shopping)*
ナビ ウォーク (Naviwalk)*
ニュースEX (News EX)*
健康記録 (Health Record)*
au one –
au one Market P.45
auWi-Fi接続ツール (au Wi-Fi
Connection Tool)
C-mail P.35
E-mail P.32
Facebook –
Gmail P.41
GREE_MARKET –
jibe Address Book –
Latitude –
NHK動画on! (NHK Movies on!)
PC-mail P.39
RSS Reader –
Skype –
YouTube –
* Shortcut applications that can be easily downloaded from the au one Market.
Download these applications to use them.
–
–
–
◎ When using applications, packet communication charges may apply
depending on the function.
If you have not subscribed to IS NET, au.NET charges (for the used month
only) and communication charges apply.
◎ Icon designs may be changed without prior notice.
–
–
–
–
–
16
Page 25

Reducing Power Consumption Using Simple Mode
Using Power Control Widget
By using the power control widget, you can easily turn on/off the WiFi, Bluetooth
brightness. The battery will last longer if unused functions are turned
off and the screen is set to a darker brightness.
1
2
3
4
®
, GPS and auto sync functions, and adjust the screen
On the Home screen, m → [Add] → [Widgets]
[Android Widgets]
[Power Control]
The power control widget is added to the Home screen.
Tap the function switching icon.
Closing the Applications
The amount of memory used and battery consumption can be
reduced by closing unused applications.
Hold down h for at least 0.5 second.
1
The running applications list screen is displayed.
[ ] on the top right corner of the application to close.
2
A simple mode is available with your PTL21 to operate easily the functions
you often use.
Switching to Simple Mode
Slide the status bar to the bottom.
1
[Simple Mode] in Easy Setting → [Yes]
2
◎ When switching to simple mode, some settings may be disabled, changed
or temporarily canceled.
Switching to Normal Mode
On the simple mode Home screen, [Menu]
1
[Settings] → [Normal mode] → [Yes]
2
◎ When switching to normal mode, some settings may be disabled,
changed or temporarily canceled.
Learning the Basics
15
Page 26

How to Input the Characters
Tap the character entry field on the PTL21 to display a keyboard (software
keyboard) on the screen, and enter characters by tapping the keys on the
screen.
The “Android keyboard”, “DioPen KOR/CHN/PO IME”, “iWnn IME” and “LaLa
Stroke” are available on the PTL21.
The following explains how to input characters using “iWnn IME”.
Character Input
<Character entry screen “10-key”> <Character entry screen “QWERTY”>
① Character entry mode icons
: Hiragana-Kanji
: Full-width Katakana
: Half-width Katakana
: Full-width Alphabet
: Half-width Alphabet
: Full-width Numeric
: Half-width Numeric
: Voice Input
24
② Character entry area
③ Normal conversion candidates list/Prediction candidates list/
Relational prediction candidates list
Enter characters and tap [
candidates list. If the word prediction function is enabled, the
prediction candidates list is displayed when characters are
entered. The relational prediction candidates list is displayed
when an entry is selected from the prediction candidates list.
You can enlarge the candidates list display area by tapping [
④ Back key/Undo key
⑤ Software keyboard
You can enter the characters assigned to each key.
⑥ Cursor key
Moves the cursor to the right or left and changes the range of
⑦ Emoji, Symbol, and Emoticon key/Alphanumeric, Kana key
⑧ Entry mode switch key
Switches the character entry mode.
When switching the entry mode, the display changes as follows.
] to return to the original display.
Tap [
: Displays the preceding character assign to the key (back
function).
: Returns the determined character to the undermined state.
characters when converting characters.
: Displays the list of Emoji, Symbols, and Emoticons.
: Switches conversion candidates of input characters to
alphabet and kana.
: Hiragana-Kanji
: Full-width Katakana
: Half-width Katakana
: Full-width Alphabet
: Half-width Alphabet
: Full-width Numeric
] to display the normal conversion
].
Page 27

: Half-width Numeric
: Voice Input
⑨ DEL key
Deletes the selected character or the character on the left of the
cursor. Long-touch to delete characters continuously.
⑩ Handwriting key/Conversion key
: Switches to handwriting entry.
: Displays the normal conversion candidates list.
⑪ OK key/Enter key
: Determines the entered characters.
: Inserts a line feed at the cursor position.
⑫ Uppercase/Lowercase characters switch key
: When entering hiragana or katakana, switches the entered
character between uppercase and lowercase, or adds
dakuten or handakuten.
: When entering alphabetic characters, switches the entered
character between uppercase and lowercase.
⑬ Shift key
: Lowercase character entry
: Uppercase character entry
: Uppercase character entry lock
◎ Displayed icons and functions that can be used may differ depending on
the application or the screen.
Switching Character Entry Mode
On the character entry screen, long-touch the entry
1
mode switch key → [Input Mode]
Select a character type.
2
◎ The character type is switched in order of “Hiragana-Kanji” → “Half-width
Alphabet” → “Half-width Numeric” → “Voice Input” each time you type the
input mode key.
◎ Some characters cannot be used depending on the application or the
screen.
Switching Software Keyboards
“10-key” and “QWERTY” software keyboards are available.
On the character entry screen, long-touch the entry
1
mode switch key → [10-key ⇔ QWERTY]
Entering Hiragana/Kanji/Katakana/Alphanumeric
■Entering hiragana/kanji/katakana
Switch the entry mode to “Hiragana-Kanji”. When the software
keyboard is set to “10-key”, tap the assigned keys to enter
characters. When the software keyboard is set to “QWERTY”, use
romaji to enter characters.
■Entering alphabet
Switch the entry mode to “Full-width Alphabet” or “Half-width
Alphabet”. When the software keyboard is set to “10-key”, tap the
assigned keys to enter characters. When the software keyboard is set
to “QWERTY”, tap the keys directly.
Character Input
25
Page 28

■Entering numeric
Switch the entry mode to “Full-width Numeric” or “Half-width
Numeric”. Tap the keys directly with either software keyboard. With
the software keyboard set to “QWERTY”, tap the shift key to switch
between available symbols.
■Flick input
When the software keyboard is “10-key”, you can enter a desired
character by flicking the key up, down, right or left without tapping
the key repeatedly.
Character Input
By long-touching a key, the candidates that can be entered by
flicking entry are displayed. Flick the key in the direction of a desired
character to enter that character.
Example: To enter “あ”, tap [
], and to enter “お”, flick [ ] down.
Correcting Characters
■Back function
When the software keyboard is “10-key”, tap [ ] when you tapped a
key too many times and went beyond the desired character to return
to the previous character.
Example: If “く” is displayed while you want to enter “き”, you can tap
] to return to “き”.
[
◎ The back function cannot be used with flick input.
■Undo function
When the software keyboard is “10-key”, tap [ ] after a character
has been determined to return it to the undetermined state.
Entering Emoji/Symbol/Emoticon
Display the Emoji/Symbol/Emoticon list and enter these characters on
the character entry screen.
] when there is no conversion target on the character entry
Tap [
screen.
Tap the “Emoji”, “Symbol” or “Emoticon” tab on the top of the list to
switch between the corresponding lists.
: Returns to the character entry screen.
/ : Displays the previous/next page.
: Deletes the selected character or the character on the left of the
cursor.
◎ Emoji can be used only with e-mail, C-mail and Handy Memo.
◎ D-Emoji can be used only with e-mail.
◎ Some Emoji/Symbol/Emoticon cannot be used depending on the
application or the screen.
Using Voice Input
On the character input screen, long-touch the entry
1
mode switch key → [Input Mode] → [Voice Input]
[Voice Input Start]
2
Voice input is activated.
Say any keyword in front of the microphone.
3
Characters are entered when the processing is finished.
24
Page 29

Using Handwriting Input
Handwriting input is possible by using the “LaLa Stroke” software
keyboard.
On the character input screen, [ ]
1
The handwriting entry screen is displayed.
① Cursor key
Moves the cursor to the right or left
and changes the range of characters
when converting characters.
② Keyboard key
Switches to the iWnn IME input.
③ Entr y mode switch key
Switches the entry mode.
When switching the entry mode, the
display changes as follows.
: Hiragana-Kanji (Kanji cannot
be entered directly. Enter
hiragana then convert them to
kanji)
: Katakana
: Symbol
: Numeric
: Alphabet
④ Conversion/Space key
Displays the normal conversion candidates list / Enters a space
⑤ DEL key
Deletes the selected character or the character on the left of the
cursor. Long-touch to delete characters continuously.
⑥ Charac ter entry field
⑦ OK key/Enter key
Determines the entered characters / Inserts a line feed at the
cursor position.
Write characters in the character entry field.
2
<Handwriting entry
screen>
Switching Input Software
On the character entry screen, long-touch the
1
character entry area → [Input Method]
Android
2
keyboard
DioPen KOR/
CHN/PO IME
iWnn IME Input software used mainly to enter hiragana,
LaLa Stroke Input software to handwrite in Japanese and
Input software used mainly to enter
alphanumeric characters. Can also be used
to write in Portuguese.
• CannotbeusedtowriteinJapanese.
Input software used to write in English,
Korean, Chinese (simplified and traditional),
and Portuguese.
• CannotbeusedtowriteinJapanese.
• Tap
/ / / to switch the input
language.
• SetChinesetoSimplifiedorTraditionalon
the Home screen [
[Language & keyboard] → [DioPen KOR/
CHN/PO IME] → [Language settings] →
[Chinese detail settings] → [Set Chinese
character]
kanji and katakana.
English.
] → [Settings] →
Character Input
25
Page 30

Making a Call
On the Home screen, [ ]
1
The phone number entry screen is displayed.
Enter a phone number.
2
When calling to a fixed-line phone, enter the phone number starting
with the area code even if you are in the same area.
[ ] → Talk → [End]
3
Press v during a call to adjust the sound level (other party’s
voice).
Phone
◎ If you cover the screen while dialing or calling, the display is turned off to
prevent erroneous operation.
◎ Dial services available from au phones
• Call with fixed-line phones all over Japan
• Call with cell phones, PHS, and car phones all over Japan
• 001 (001 international call service: Subscription is unnecessar y)
• 171 (Disaster Emergency Message Dial)
• 177 ( Weather forecast: The area code is necessary)
• 117 ( Time signal)
• 104 (Directory assistance)
• 115 (Sending telegram)
• 110 (Emergency call to Police)★
• 119 (Emergency call to Fire and Ambulance)★
• 118 (Emergency call to Regional Coast Guard Headquarters)★
• 157 (Customer Service Center)
• Maritime telephone
* The numbers with ★ are emergency call numbers. PTL21 notifies your present location to the
emergency call destination with a signal from a base station when you call the Police, Fire and
Ambulance, or Regional Coast Guard Headquarters.
* The following NTT services are unavailable. Collect call, message service, dial Q2, 116
(NTT business information)
■Using the special number key on the phone
number entry screen
On the phone number entry screen, [ ]
1
Add 184 Add “184 (Hide Caller ID Notification)”
2
Cancel 184 Cancel “184 (Hide Caller ID Notification)”
Add 186 Add “186 (Display Caller ID Notification)”
Cancel 186 Cancel “186 (Display Caller ID Notification)”
Add P Make a phone call with P (pause) dial.
Add + Add “+ (001 international access code)”
Cancel + Cancel “+ (001 international access code)”
International call Add “+ (001 international access code)” and
◎ “184” and “186” cannot be added at the same time.
◎ “Area Settings” is configure to something else than “Japan”, “184” and
“186” cannot be added.
the country code for each country.
28
Page 31

Answering a Call
Slide to the right during an incoming call.
1
Talk → [End]
2
■Display when receiving a call
The following content is displayed when receiving a call.
• If the other party’s phone number is sent, the number is displayed.
• If the other party’s phone number and name are registered in
Contacts, their name and other information are displayed. If a
picture is set for the other party, it is also displayed on the screen.
• If the other party’s phone number has not been sent, the reason is
displayed as follows.
“ID Unsent”, “Pay Phone” or “Not Support”*.
* The other party is calling from a phone that does not support ID sending.
When the call was not answered
◎
is displayed on the status bar. Open the notification/status panel to
check the calling time, the phone number, and the name if registered
with the phone number. Tap the notification content to display the call log
screen.
Using International Call
◎ The international access code differs depending on the country.
Making an International Call (001International
Call Service)
International call from the PTL21 can be made without any special
procedure.
Example: To call 212-123-XXXX in the USA
On the phone number entry screen, enter the
1
international access code, country code, area code
and phone number → [ ]
International
access code
*1
001010 1 212 123XXXX
*1 Long-touch “0” to enter “+”, and “001010” is entered automatically when calling.
*2 If the area code starts with “0”, dial it without including the “0”. ( There are some
exceptions such as fixed-line phones in Italy or Moscow.)
◎ International call charges are billed together with monthly charges.
◎ Application can be made to disable the 001 International Call Service for
those who do not want to use it.
For more information on 001 International Call Service, dial either of the
following numbers:
From au phones (toll free): 157 (area code not required)
From fixed-line phones:
Open from 9:00 to 20:00 everyday
Country
code (USA)
➡
0077-7-111(toll-free)
Area
2
code*
➡
➡
Phone
Phone
number
29
Page 32

Returning a Call (Incoming Log/Outgoing
Incoming Call/Outgoing Call log can be used to make phone calls.
On the Home screen, [ ] → [Call log]
1
Phone
2
3
: Incoming call
: Missed call
: Blocked call
: Outgoing call
: Incoming C-mail
: Outgoing C-mail
: If a log contains several consecutive calls with the same
number, tap it to display the details.
Tap the log you want to call.
The Incoming Call/Outgoing Call detail screen is displayed.
Tapping a C-mail log displays the thread detail screen.
[Call]
Log)
Setting the Manner Mode
Turn on the manner mode while driving or in public spaces to not
disturb others with phone and mail ringtones.
In manner mode, all sound levels are set to 0, except music, video
and other media sounds and alarm tones.
Hold down p for at least 0.5 second.
1
[Manner mode]
2
To turn off the manner mode, hold down p once more until the
option screen is displayed and tap “Manner mode”.
◎ The use of cell phone while driving is dangerous and prohibited by law.
Set the manner mode while driving.
◎ To set the vibrator, on the Home screen, [
[Vibrate].
] → [Settings] → [Sound] →
30
Page 33

Saving a Contact
◎ Using “Accounts & sync”, contacts information of a Google account saved in a
server can be synchronized with the Contacts in the PTL21.
On the Home screen, [ ] → [Contacts]
1
m → [New contact]
2
The contact edit screen is displayed.
When you register multiple accounts, the screen to select an account
is displayed. Select an account to save a contact in.
Select and fill each item.
3
[Done]
4
◎ If the phone number is a fixed-line phone, enter the phone number starting
with the area code.
◎ Tap [
]/[ ] to add/delete an item.
Editing Contacts
On the Home screen, [ ] → [Contacts]
1
Long-touch a contact → [Edit contact]
2
Select and edit an item.
3
[Done]
4
Using Contacts
You can use Contacts entries to easily make phone calls and send
mail messages.
On the Home screen, [ ] → [Contacts]
1
Select a contact.
2
: Makes a call
Special numbers can also be added.
: Creates a C-mail
: Sends e-mail, PC-mail or Gmail messages
: Uses a chat
: Displays Google map
* Displayed icons may differ depending on the items registered in the contact and the
PTL21 settings.
Contacts
31
Page 34

Using E-mail
Direct Input Enter a mail address directly.
My E-mail address Your e-mail address is input.
E-mail (XXX@ezweb.ne.jp) is a service to exchange e-mails with
other cell phones that support e-mail, and with PC. In addition to text
messages, you can also send photos and movies by e-mail.
◎ You must subscribe to IS NET to use e-mails. If you did not subscribe at
the time of purchase, contact an au shop or the Customer Service Center.
◎ E-mails can also be used overseas. For details, refer to the Global
Passport Owner’s Guide (Japanese)
◎ The packet communication charges for sending and receiving e-mails
vary depending on the amount of data sent and received. When using
e-mails overseas, high charges may be incurred. For details, refer to the
au comprehensive catalog or au homepage.
◎ Sending and receiving e-mails may take time depending on the attached
Mail
data and the area signal strength.
Sending E-mail
On the Home screen, [ ]
1
The E-mail screen is displayed.
[New]
2
Select the enter destination field.
3
Select/Enter a destination.
4
Contacts Selects from the mail addresses registered
Received Record Select a mail address from the received
Sent Record Select a mail address from the sent record.
32
in Contacts.
record.
Select the subject entry field → Enter a subject.
5
Select the message entry field → Enter a message.
6
[Send]
7
[Yes]
8
Receiving E-mail
An e-mail message is received.
1
When an e-mail message is received, is displayed on the status
bar, and the e-mail ring tone sounds.
Slide the status bar to the bottom.
2
Select e-mail information.
3
Select the received e-mail.
4
Viewing Received E-mails
Sent and received e-mails, as well as e-mail saved without being sent
are saved in each mail box.
On the Home screen, [ ]
1
Select a folder.
2
Select an e-mail.
3
Page 35

Changing Your E-mail Address
The e-mail address is automatically set when the E-mail is initialized,
but you can change the e-mail address after the initial settings.
On the e-mail screen/mail box screen/folder list
1
screen, [Setting] → [E-mail settings]
The e-mail settings screen is displayed.
[Other settings] → [OK]
2
[Eメールアドレスの変更] (Change e-mail address) →
3
Select (Entry field) → Enter your security code
→ [送信] (Send)
[承諾する] (Accept)
4
Select (Entry field) → Enter the part of the
5
address to the left of “@” (variable part).
[送信] (Send) → [OK]
6
◎ You can input up to 30-byte alphanumeric characters, including “-”, “.”,
and “_” for the part of the e-mail address that can be changed. However,
you can not use consecutive “.” or use them for the first or last character.
Also, you cannot use “0” as the first character.
◎ Note that immediately after changing your e-mail address, you may be not
be able to receive e-mails for a short time.
◎ If the e-mail address that you input is already being used, a message
appears requesting that you input a different e-mail address. Input a new
address.
◎ It is possible to change your e-mail address three times within a single
day.
◎ If the security code is incorrectly entered three times consecutively during
a single day, the changing operation will be disabled until the next day.
Setting Mail Filters
Mail filters have functions to receive and reject specific e-mail
messages and to reject messages spoofing cells phones or PHSs.
On the e-mail screen/mail box screen/folder list
1
screen, [Setting] → [E-mail settings]
The e-mail settings screen is displayed.
[Other settings] → [OK]
2
■Setting the mail filter as recommended
[オススメの設定はこちら] (See Recommended
3
Settings) → [登録] (Register)
Set the mail filter that enables to reject spoofing and auto-forwarded
mail messages, and to receive mail messages from cell phones, PHSs
or PCs.
■Setting details of the mail filter
[迷惑メールフィルター] (Mail Filter) → Select
3
(Entry field) → Enter your security code → [送信]
(Send)
4
カンタン設
定 (Simple
Settings)
1 . 「携帯」「PHS」
「PC」メールを受
信 (1. Receive
Mail Messages
from Cell Phone,
PHS or PC)
2.「携帯」「PHS」
メールのみを受信
(2. Receive only
Mail Messages
from Cell Phone
or PHS)
Reject spoofing or autoforwarded mail messages,
and receive mail messages
from cell phones, PHSs or
PCs.
Reject mail messages from
PCs, spoofing mail messages
or auto-forwarded mail
messages, and receive mail
messages from cell phones
or PHSs.
Mail
33
Page 36

詳細設定
(Advanced
Settings)
一括指定受信
(Collective
Receive Setting)
なりすまし規 制
(Spoof Restriction)
指定拒否リスト設定
(Reject Mail
Address List
Setting)
指定受信リスト設定
(Allowed Address
Mail
List Setting)
Receive or reject all mail
messages from the Internet
or cell phones.
Reject mail messages sent
with an alleged sender
address. You can set the
following levels; 高 (High), 中
(Medium), 低 (Low).
Reject mail messages from
certain e-mail addresses,
domains or parts of
addresses to the left of “@”
that are contained in the
specified address list.
Prioritize reception of mail
messages from certain e-mail
addresses, domains or parts
of addresses to the left of “@”
that are contained in the
specified address list.
• Toblocke-mailmessages
from addresses other than
the specified ones, unmark
all items in “一括指定受信”
(Collective Receive Setting)
詳細設定
(Advanced
Settings)
指定受信リスト設定
(なりす まし・転送
メール許可)
(Allowed Address
List Setting
(Spoofing or
Forwarded Mail
Messages))
HTMLメール規制
(HTML Mail
Restriction)
URLリンク規制
(URL Link
Restriction)
拒否通知メール返
信設定 (Block Mail
Notification
Setting)
設定確認/設定解除 (Check
Settings/Release Settings)
PC設定用ワンタイムパスワード
発行 (Issue One Time
Password for PC Setting)
to set to off (to reject
receiving).
設定にあたって (Notes on
Setting Mail Filter)
◎ If the security code is incorrectly entered three times consecutively during
a single day, the filter setting operation will be disabled until the next day.
◎ Note that you cannot receive e-mail messages once rejected by mail
34
filters. Be careful when you set mail filters.
Avoid the mail block due to
“なりすまし規 制 ”(Spoof
Restriction) setting, and
receive auto-forwarded mail
messages.
Reject e-mail messages in
HTML format.
Reject e-mail messages that
include a URL.
Sets whether to send a receiver
error (address unknown) mail
message to the sender of the
rejected e-mail message.
Check the setting status of
the mail filters and release all
settings at one time.
Issue a one time password to
set the mail filter on your PC.
The password is available
within 15 minutes after
issuance.
Display the explanation for
setting mail filters.
Page 37

Using C-mail
C-mail is a service that uses phone numbers as addresses to
exchange messages between cell phones. C-mail messages can be
sent and received also between cell phones from other companies.
◎ For using C-mails overseas, refer to the Global Passport Owner’s Guide
(Japanese).
Receiving C-mail
A C-mail message is received.
1
When a C-mail message is received from the C-mail center, is
displayed on the status bar, and the C-mail ring tone sounds.
Slide the status bar to the bottom.
2
Select C-mail information.
3
Sending C-mail
You can send a message consisting of kanji, hiragana, katakana,
alphanumeric, symbols, emoji and emoticon.
On the Home screen, [ ] → [C-mail]
1
[Create New]
2
Select the destination entry field → Enter a
3
destination.
Select the message entry field → Enter a message.
4
The maximum length of the message is 70 full-width/140 half-width
characters.
[Send]
5
◎ C-mail messages of more than 51 full-width/101 half-width characters
may be divided and received in 2 C-mail messages depending on the
destination.
◎ Charges do not apply when receiving C-mails.
◎ C-mail messages of more than 51 full-width/101 half-width characters are
divided and received in 2 C-mail messages.
◎ Messages may not be displayed properly depending on the content.
Viewing Received C-mails
C-mail messages received from the other party and C-mail messages
sent to them are displayed together in the same thread. A thread list
is displayed on the C-mail screen.
On the Home screen, [ ] → [C-mail]
1
Select a thread.
2
Mail
33
Page 38

C-mail Safety Block
C-mail safety block is a function that allows you to reject C-mails that
include URLs (http://△△△, https://△△△) or phone numbers in the
C-mail message text.
◎ C-mail safety block is valid by default.
◎ If you change your cell phone model, the settings are transferred from
your previous model.
◎ C-mail safety block rejects conventional C-mail messages (including
prepaid C-mail). This function does not apply to Answering Services, such
as message and call notices.
■Setting the C-mail safety block
You can set the C-mail safety block by sending a C-mail to a
Mail
specified phone number.
Canceling the setting Input “Cancel” in the C-mail message and
Enabling the setting Input “Enable” in the C-mail message and
Confirming the setting Input “Confirm” in the C-mail message and
* Sending the C-mail for this setting is free of charge.
* A C-mail reporting that settings are complete arrives from “09044440012”.
■ When a C-mail is blocked by the C-mail safety
block
When a C-mail is blocked by the C-mail safety block, “Unable to send
to selected person.” is displayed and the C-mail is not sent.
send to 09044440010.
send to 09044440011.
send to 09044440012.
Using the Earthquake Early Warning
The Earthquake Early Warning is a service that delivers Earthquake
Early Warning distributed by the Japan Meteorological Agency to
au cell phones in the vicinity of the earthquake center. When you
purchase your au cell phone, it is set to receive Earthquake Early
Warning by default.
When you receive an Earthquake Early Warning, secure a safe
location depending on your surroundings and remain calm.
◎When an earthquake above level 5.0 on the Japanese scale
is anticipated, the Earthquake Early Warning will immediately
provide information on where any earthquake with a seismic
intensity of 4.0 or more is expected to occur.
◎Immediately after an earthquake occurs, the earthquake (Pwaves
or initial tremors) are captured and the location, scale, and
expected seismic intensity are automatically calculated. The
system then notifies affected regions as quickly as possible some
seconds in advance before strong tremors (S waves or main
tremor) begin.
◎Regions near the epicenter may not receive the Earthquake
Early Warning before strong tremors begin.
◎This service is available within Japan only.
◎The Earthquake Early Warning is available completely free of
charge.
◎KDDI (au) cannot be held responsible for any losses or damages
incurred due to interrupted communications or system outages
resulting in non-received or delayed information, the content of
that information, or any other issues related to this service.
36
Page 39

◎For more details about the Japan Meteorological Agency
Earthquake Early Warning, refer to the Japan Meteorological
Agency homepage.
http://www.jma.go.jp/ (for PC)
◎In some cases you may receive information regarding a region
different from that of your current location.
◎You cannot change the Earthquake Early Warning tone or
adjust its volume.
When an Earthquake Early Warning is
Received
When an Earthquake Early Warning is received, a special warning tone will
sound and the phone will vibrate along with a notice on the screen.
An Earthquake Early Warning is received.
1
When an Earthquake Early Warning is received, a warning tone
(cannot be changed) sounds and
Slide the status bar to the bottom.
2
Select the Earthquake Early Warning information.
3
◎Earthquake Early Warning cannot be received when in a call,
and in some cases when receiving or sending a C-mail/e-mail
or when using the browser or other applications.
◎Earthquake Early Warning cannot be received in some cases
when the power to the mobile phone is turned off, or when in
an area with poor signal quality (such as in tunnels or below
ground). In these cases, missed Earthquake Early Warning
cannot be received again.
◎This system is not the same as those that distribute Earthquake
Early Warning to TV, radio, or other forms of media and
therefore the time when such notifications are received may
vary from those other media sources.
is displayed in the status bar.
Setting Up the Earthquake Early Warning
On the C-mail screen, m → [Settings]
1
The C-mail settings screen is displayed.
Receive Setting Set whether or not you want to receive
2
Check Ring/Vib This option allows you to hear the warning
Sound in
manner mode
Earthquake Early Warning.
[Receive] [Not Receive]
tone that is played when an Earthquake Early
Warning is received and feel the vibration
that occurs.
Set the warning tone when in manner mode.
The phone vibrates regardless of the current
[Vibrate] setting.
[Noti. with ringtone & vibration] [Noti. with
only vibration]
•
When set to [Noti. with ringtone & vibration],
the warning tone will play and the phone
will vibrate, even when the phone is set to
manner mode or silent mode.
• Whensetto[Noti.withonlyvibration],the
phone will only vibrate without a warning
tone when set to manner mode or silent
mode.
Mail
33
Page 40

Setting Up C-mail
On the C-mail screen, m → [Settings]
1
The C-mail settings screen is displayed.
Delete old
2
messages
Text message
limit
Edit signature Set the text that you can insert at the end of
Signature
Mail
auto-append
Store function Set whether to automatically store C-mail
Receiving filter
settings
Receive Setting Settings for the Earthquake Early Warning.
Check Ring/Vib
Sound in
manner mode
Notifications Set whether to display a notification icon in
38
Sets whether to delete C-mails in a thread,
starting from the oldest, when the maximum
number of text messages set via the [Text
message limit] setting is reached.
Set the maximum number of C-mails to
display in a thread.
your text messages.
Set whether to automatically insert the
signature you have set at the end of all your
text messages.
messages that failed to be sent in the C-mail
Message Center.
Select & Store: Select whether to store
messages individually.
Automatically: Automatically store in the
C-mail Message Center.
Set up filters for incoming mail.
the status bar when a C-mail is received.
Select ringtone Set the ring tone to play when a new C-mail
Vibrate Set the type of vibration when a new C-mail
is received.
is received.
Setting Receiving Filter
On the C-mail screen, m → [Settings] →
1
[Receiving filter settings]
2
Specified No.
setup
Specified No.
list
Unregistered
Contacts
Specify a particular phone number to block
incoming C-mails.
The specified number list is displayed.
• Registeraphonenumbertoblock
incoming C-mails by pressing m and
selecting the entry mode from “Quote
Contacts”, “Quote Outgoing call log”,
“Quote Incoming call log”, “Quote C-mail
log”, and “Direct input”.
• Taparegisteredphonenumber→ “Edit
No.” to edit a phone number.
• Taparegisteredphonenumber→ “Delete
No.” to delete a phone number.
• Youcanregisterupto20phonenumbers.
• If“184(HideCallerIDNotification)”or“186
(Display Caller ID Notification)” is added
before a phone number, delete “184” or
“186” before registering the phone number.
• Thesenderreceiveanormalconfirmation
even if the C-mail message is rejected by
the filter. Normal charges are applied.
Block C-mails from all phone numbers that
are not registered in your Contacts.
Page 41

Using PC-mail
PC-mail can be used from your PTL21 by setting your mail account used
with au one mail or on your PC.
• A PC-mail account must be set in advance to use PC-mail.
• To use au one mail in PC-mail, au one mail must be set in advance
by acquiring an au one mail account, enabling IMAP setting (initial
setting), and setting a mail password.
* Mail messages saved in the PTL21 may be lost if au one mail POP download setting is enabled and a
POP3 server is set for the PC-mail in the PTL21.
Setting Up PC-mail Account
A mail server can be set automatically for several mail addresses,
including au one mail addresses, and settings can be configured easily.
If the mail server is not set automatically, or if you want to configure
the settings manually, select “Manual setup” and specify a user name
and a mail server.
For details about mail server setting values, contact your service
provider or your mail account administrator beforehand.
On the Home screen, [ ] → [PC-mail]
1
If no mail account is registered in PC-mail, the mail account
registration screen is displayed.
Select the mail address field → Enter a mail address.
2
Select the password field → Enter a password.
3
[Next]
4
The mail server is set automatically.
Depending on the mail address, the mail server may not be set
automatically. If the mail server is not set automatically, or if you
selected “Manual setup”, specify a user name and a mail server.
Select the account name entry field → Enter a
5
account name.
Select the your name entry field → Enter your name.
6
[Done]
7
◎ When registering your second mail account, after step 1, press m →
[More] → [Accounts] → m → [Add account].
◎ From the third mail account, after step 1, press m → [Add account].
◎ When registering a Exchange account in PC-mail, a confirmation/setting
screen regarding security remote management is displayed during or after
the settings. Follow the instructions displayed on the screen.
◎ When setting the Exchange in “Accounts & sync”, the exchange account
is set automatically in PC-mail.
Sending PC-mail
On the Home screen, [ ] → [PC-mail]
1
If multiple mail accounts are registered, the PC-mail screen is
displayed. Select a mail account.
[Create new message]
2
Select the destination entry field → Enter a
3
destination.
Select the subject entry field → Enter a subject.
4
Select the message entry field → Enter a message.
5
[Send]
6
Mail
33
Page 42

Receiving PC-mail
A PC-mail message is received.
1
is displayed on the status bar, and the PC-mail ring tone sounds.
Slide the status bar to the bottom.
2
Select PC-mail information.
3
Select the received PC-mail.
4
Viewing Received PC-mails
Sent and received PC-mail messages, as well as PC-mail messages
saved without being sent are saved in each mail box.
Mail
On the Home screen, [ ] → [PC-mail]
1
If multiple mail accounts are registered, the PC-mail screen is
displayed. Select a mail account.
m→ [Mailbox]
2
Select a folder.
3
Select a PC-mail.
4
40
Page 43

Using Gmail
Gmail is a mail service provided by Google. You can send and receive Gmail
messages with your PTL21.
Mail data can be shared using Gmail between a PC and the PTL21
browsers.
• A Google account is required to use Gmail.
• For details about Gmail, refer to the Google homepage.
• The service content may change without prior notice.
Receiving Gmail
A Gmail message is received.
1
When a Gmail message is received, is displayed on the status bar,
and the Gmail ring tone sounds.
Slide the status bar to the bottom.
2
Select Gmail information.
3
Select the received mail.
4
Sending Gmail
On the Home screen, [ ] → [Gmail]
1
m → [Compose]
2
Select the destination entry field → Enter a
3
destination.
Select the subject entry field → Enter a subject.
4
Select the message entry field → Enter a message.
5
[ ]
6
Viewing Received Gmails
Sent and received Gmail messages, as well as Gmail messages
saved without being sent are saved and managed with labels.
On the Home screen, [ ] → [Gmail]
1
When multiple Google accounts are registered and synchronized
with Gmail, the inbox of the Google account used the last time is
displayed. To change the account, m → [Accounts] → Select an
account.
m → [Go to labels]
2
Select a label.
3
Select a mail.
4
Mail
33
Page 44

Using Browser
PC websites can be viewed with the browser. Depending on
websites, the screen size may be automatically adapted to smart
phones or the site may already be designed for smart phones.
Viewing Sites
On the Home screen, [ ] → [Web]
1
The browser basic operations are as follows
• Tap:Selects/executesalinkorakey.
• Slide:Scrollsthescreen.
• Pinchin/Pinchout:Reduce/Enlargethescreen.
Double-tap and [
when the screen is slid.)
Internet
* Some operations may not be available or may differ depending on the website.
Using Address Bar
You can enter keywords to make a search and enter URL to display
websites.
On the browser screen, select the address bar.
1
Enter a keyword/URL.
2
Select an item from the search candidate list / Tap
3
[ ] on the right of the address bar.
]/[ ] are also used. ([ ]/[ ] appears
Using Bookmarks/History
Bookmarking a Web Page
On the browser screen, m → [More] →[Add
1
bookmark]
The name and the URL can be edited.
[OK]
2
Using Bookmarks/History
On the browser screen, m → [Bookmarks]
1
[Bookmarks] / [Most visited] / [History]
2
Select a bookmark/history.
3
◎ Google Voice Search can be used by tapping [ ] after step 1.
42
Page 45

Using Camera
The PTL21 has a CMOS camera with approximately 5.0 effective megapixels
for shooting photos and movies.
Taken photos and movies are saved in the microSD memory card.
They can be viewed/played back in the gallery, sent via Bluetooth
as mail attachment, or uploaded on a sharing site.
◎ Insert a microSD memory card in the PTL21 when using the camera.
■Available photo sizes
Select a photo size matching your usage.
Resolution Memory (estimate)
5M (2560×1920) Approx. 2 MB
4M (2240×1680) Approx. 1.5 MB
3M (2048×1536) Approx. 1.2 MB
2M (1600×1200) Approx. 800 KB
1M (1280×960) Approx. 400 KB
WVGA (800×480) Approx. 300 KB
VGA (640×480) Approx. 240 KB
■Available movie sizes
Select a recording mode matching your usage.
Resolution Movie length
720P (1280×720) Approx. up to 60 min
WVGA (800×480) Approx. up to 60 min
VGA (640×480) Approx. up to 60 min
QVGA (320×240) Approx. up to 60 min
®
or
Cautions for Using Camera
• Do not position the mobile light close to your eyes. Do not look at
the mobile light directly while it is on. Do not point the mobile light
toward the eyes of others. It may harm eyesight.
• The PTL21 may be warm after displaying the photo monitor screen or
doing repeated movie recordings for a long time. In this case, touching
the PTL21 for a long time may result in a low temperature burn. The
camera may also not be used when the PTL21 temperature has risen.
• When the remaining battery is low, or when the PTL21 is used in
extremely low temperature environment, such as outside in winter, the
camera may not be used.
• If you use the PTL21 camera in a wrongful manner, you may be subject to
punishment according to laws of the national or local governments.
Multimedia
43
Page 46

Taking a Photo
On the Home screen, [ ] → [Camera]
1
[ ]
2
After the PTL21 has auto focused, the shutter sounds and the photo
preview is displayed on the screen.
The shot image data is automatically saved.
Recording a Movie
On the Home screen, [ ] → [Camcorder]
1
[ ]
2
[ ]/Elapsed recording time.
3
A video preview is displayed on the screen.
Recorded data is automatically saved.
Multimedia
Using Gallery
In the gallery, you can display, play back and share images and
movies saved in the microSD memory card and edit images.
Viewing Photos/Movies
On the Home screen, [ ] → [Gallery]
1
Select an album.
2
Select an image/movie.
3
When you select an image, the one image display screen is
displayed.
When you select a video, the video player is launched and the movie
is played back.
44
Page 47

Using Android Market
Android Market is an application distribution service managed by Google.
You can download free and fee-based applications to use them on your
PTL21.
• A Google account is required to use Android Market.
• For details, visit the Google homepage or see the Android Market
help section on the Android Market screen, m→ [Help].
• The service content may change without prior notice.
On the Home screen, [ ] → [Market]
1
When you activate Android Market for the first time, the terms of
service are displayed. Tap “Accept” after confirming the contents.
Using au one Market
au one Market is an application distribution site managed by KDDI (au)
for smart phones running Android. You can download free and fee-based
applications to use them on your PTL21.
You can search the desired applications by categories, keywords or
ranking.
• An au one-ID is required to use some functions.
On the Home screen, [ ] → [au one Market]
1
The au one Market screen is displayed.
When you activate au one Market for the first time, the terms of service
are displayed. Tap “同意” (Agree) after confirming the contents.
◎ Some applications may not be available when a microSD memory card is
not inserted.
◎ Some applications make the display keep turned on or run in the
background, weakening the battery.
◎ You can uninstall an application when you do not need it anymore.
◎ Follow the terms of service to use au one Market. Procedures for
downloading applications and making payment for fee-based applications
differ depending on the distributor.
◎ Some applications may not be available when a microSD memory card is
not inserted.
Applications
45
Page 48

Managing Applications
You can configure application general settings, delete downloaded
applications and display detailed information on each application.
On the Home screen, [ ] → [Settings] →
1
[Applications]
Applications
Unknown
2
sources
Manage
applications
Running
services
Storage use The application size, data size, cache size,
Battery use Displays the battery use percentage for each
Sets whether to authorize installation of
applications downloaded from unknown
sources.
Downloaded Select an application to display
All
On microSD
Running
A list of running services is displayed. You can
select a service to stop it.
default settings and access authorization can
be checked for each application. Data, cache
and settings can also be erased.
running component. Select a component to
display its detailed information, hints on
reducing power consumption and setting items
names.
detailed information and perform
operations such as uninstall,
erase data, send to microSD,
erase cache and stop forcefully
depending on the application.
Development USB
debugging
Stay awake
Allow mock
locations
Set debugging mode when a
USB cable is connected.
Prevents the PTL21 from entering
the sleep mode when recharging
with the AC or DC adapter or when
a USB cable is connected.
Sets whether to authorize the use
of mock locations information
data.
46
Page 49

Viewing the Setting Menu
On the Home screen, [ ] → [Settings]
1
The setting menu screen is displayed.
Checking Your Profile
You can check the phone number and e-mail address registered
automatically in your PTL21, and register additional information, such as a
phone number for your home, a Gmail address or a name.
On the setting menu screen, [Profile]
1
Edit Edits name, phone number or mail address.
2
Send via IrDA Sends the profile via IrDA.
Using the Remote Control Lock
In case of loss of your PTL21, you can activate the Remote control lock by
calling your PTL21 a set number of times from a specific phone number to
lock the screen of your PTL21 in order to prevent others from using it.
You can activate the Remote control lock on your PTL21 even if you did
not set up the Remote control lock beforehand by calling the Customer
Service Center or performing the necessary procedure on the au Customer
Support site (Security Lock Service).
◎ We recommend setting a pattern, PIN or password beforehand in “Set up
screen lock”.
◎ If “None” is set in “Set up screen lock”, the Remote control lock is
activated with “1234” as a PIN.
Changing the Ring Tone
On the setting menu screen, [Sound] → [Phone
1
ringtone]
Select a melody → [OK]
2
■Setting up the Remote control lock
On the setting menu screen, [Location & Security]
1
[Remote control lock]
2
When the screen has been locked, the unlock screen is displayed.
Enter the set pattern, PIN, or password to unlock the screen.
If “Remote control lock” is disabled in “Select device administrators”,
“Activate device administrator?” is displayed. Tap “Activate” if you
want to configure the Remote control lock.
Set [Remote control lock].
3
After the Remote control lock has been set, “Valid Caller ID”,
“Specified period” and “Incoming call count” can be configured.
Settings
47
Page 50

Valid Caller ID You can register up to three phone numbers.
4
Specified period Set the time limit in which the number of
Incoming call
count
◎ You can tap a set Valid Caller ID and select “Change phone number”,
“Remove this phone number”, or “Remove all”.
You can directly input a phone number or
select from Contacts or the call log. You can
also selec t “Payphone”.
calls set in “Incoming call count” should be
received. Set from 1 to 10 minutes.
Set the number of incoming calls until the
Remote control lock is activated. Set from 3
to 10.
■To activate the Remote control lock
Call your PTL21 from a phone registered in “Valid Caller ID”
1
as many times as set in “Incoming call count” within the
“Specified period”.
◎ Be sure to send your phone number when calling.
Settings
◎ The Remote control lock cannot be activated if your PTL21 is turned off, is
outside the service area, or if “Airplane mode” is turned on. The Remote control
lock may also fail if your PTL21 is in an area with poor signal quality.
◎ The Remote control lock cannot be activated if no au IC-Card, or if a IC-Card
which is not yours is inserted in your PTL21.
◎ If “Area Settings” is set to something else than “Japan”, the Remote
control lock activation is not guaranteed.
■Unlocking the Remote control lock
Unlock the screen lock with your PTL21.
◎ If “Set up screen lock” is set to “None”, you can enter “1234” and tap [OK]
after sliding to unlock in order to unlock the Remote control lock.
■Activating the Remote control lock using the
Security Lock Service
You can activate the Remote control lock on your PTL21 even if you did not
set the Remote control lock beforehand by calling the Customer Service
Center or by submitting the necessary information from a PC. However,
“Remote control lock” under “Select device administrators” must be
activated to use this feature (it is disabled at the time of purchase).
The Security Lock Service is available free of charge.
■Activate the Remote control lock by calling the Customer Service
Center
From au cell phones (toll-free): 113 (area code not required)
From any other cell phone or fixed-line phone (toll-free):
0077-7-113
• Available24hoursaday.
• Followtheautomatedvoicepromptstocompletetheprocedure.
■Activate the Remote control lock through au Customer Support
(https://cs.kddi.com/)
Log in au Customer Support (https://cs.kddi.com/) and follow the
instructions on the screen to complete the procedure.
48
Page 51

◎ You must submit an application if using the Security Lock Service for the
first time. (This can be submitted even after losing your phone.)
◎ The Remote control lock cannot be activated if your PTL21 is turned off, is
outside the service area, or if “Airplane mode” is turned on. The Remote control
lock may also fail if your PTL21 is in an area with poor signal quality.
◎ The Remote control lock cannot be activated if no au IC-Card, or if a IC-Card
which is not yours is inserted in your PTL21.
■Unlocking the Remote control lock activated
through au Customer Support
Even if you activated the Remote control lock using the Security Lock
Service, you can unlock your PTL21 screen after you retrieve it.
Initializing PTL21
You can reset the settings of all functions to their factory default. Note that
all data saved in the PTL21 internal memory is deleted.
On the setting menu screen, [Privacy]
1
[Factory data reset] → [Reset phone]
2
If the screen lock is set, the unlock screen is displayed. Enter the
pattern, PIN or password to unlock the screen.
[Erase everything]
3
Settings
47
Page 52

Activating/Inactivating Wi-Fi [ Caution ]
On the Home screen, [ ] → [Settings] → [Wireless & In the United States, 5180 ~ 5240MHz Band is restricted to indoor-
1
networks] use only. Outdoor operation on this band is a strict viloation of the
[Wi-Fi] FCC rules and can harmful interference to commercial radar
2
When the Wi-Fi function is turned on, the PTL21 starts scanning for communications. For outdoor operation, channel in 5180 ~ 5240MHz
networks. If a SSID of a network to which the PTL21 has been connected band must not be used. If using automatic channel assignment, add
before is found, the connection is made to that network. channels in this band to the automatic channel exclusion list.
is displayed in the status bar when connected.
Registering/Connecting to the Access
Point
On the Home screen, [ ] → [Settings] → [Wireless &
1
networks]
[Wi-Fi settings]
2
Turn on [Wi-Fi]
3
Select a network SSID.
4
■When connecting to an open wireless network
[Connect]
5
Wi-Fi
is displayed in the status bar when connected.
■When connecting to a secure wireless network
Enter the password.
5
[Connect]
6
is displayed in the status bar when connected.
50
Page 53

Using Global Passport
Global Passport is an international roaming service to use your PTL21
overseas without any additional application. The PTL21 can connect to
GSM networks, UMTS networks and CDMA networks depending on your
destination.
• You can use GSM networks, UMTS networks and CDMA networks
worldwide without changing your phone number.
• Calling charges are billed together with your monthly charges and
do not require any special application or separate daily payment.
For more information about countries using Global Passport GSM/
UMTS or Global Passport CDMA, charges, and other service
details, visit the au homepage or contact the Customer Service
Center.
For Overseas Use without Anxiety
The overseas network conditions are available on the au
homepage. Make sure to check the conditions before leaving
Japan.
http://www.au.kddi.com/service/kokusai/tokomae/
■When your PTL21 is stolen or lost
• If your PTL21 is lost or stolen while overseas, please contact the Customer
Service Center immediately to suspend phone service. Be aware that any
calling charges or packet communication charges incurred after theft or
loss of a phone are the responsibility of the customer.
• If the au IC-Card inserted into your PTL21 is stolen or lost, the card may
be inserted into another cell phone (including cell phones for overseas
use) by a third party. So, it is recommended to change the PIN code and
to use the lock function to protect from improper use by a third party.
■Using the PTL21 properly by knowing about calling and
communication services overseas
• Charges differ depending on the country and region.
• Discount services and packet communications flat rate do not apply
to calling charges and packet communications charges incurred
while overseas.
• Calling charges are also incurred when receiving calls overseas.
• Depending on the country and region, calling charges may be
incurred from the time you tap [
].
Global Function
51
Page 54

Configuring the Overseas Settings
To use your PTL21 overseas, you are required to change to the
telecommunications carrier's networks that you connect to at your travel
destination.
Obtain the latest PRL (Preferred Roaming List) before traveling.
Obtaining the PRL (Preferred Roaming List)
The PRL (Preferred Roaming List) contains information on roaming
areas of overseas partner providers who have signed an international
roaming contract with KDDI (au).
On the Home screen, [ ] → [Settings] → [Wireless &
1
networks] → [Mobile networks]
Set [Data enabled]
2
[Roaming Settings] → [PRL Settings] → [Update PRL
3
version]
[PRLダウンロード] (PRL Download) → [最新ファイルは
4
Global Function
こちら] (Latest file)
◎ Be sure to set the latest PRL before leaving Japan.
◎ You may not be able to communicate with your PTL21 overseas depending on
the area if you use old PRL data. Be sure to download the latest PRL data.
◎ When you download the PRL data, packet communication charges apply.
52
Setting the Area
You can set the area where you use your PTL21 when you arrive at
destination.
On the Home screen, [ ] → [Settings] → [Wireless &
1
networks] → [Mobile networks]
[Roaming Settings] → [Area Settings]
2
Japan Set for use in Japan.
3
Overseas
(CDMA)
Overseas Auto
(GSM/UMTS)
Overseas Manual
(GSM/UMTS)
◎ The country selection screen may be displayed when “Overseas (CDMA)”
is set. Select the travel country.
Set when using Global Passport CDMA
overseas (automatic setting according to
PRL).
Set when using Global Passport GSM/
UMTS overseas (automatic setting
according to PRL).
Set when using Global Passport GSM/
UMTS overseas while selecting the
overseas telecommunications carrier
manually.
Select a network name.
Setting the Data Roaming
Configure this setting to use packet communication at destination
(while roaming).
On the Home screen, [ ] → [Settings] → [Wireless &
1
networks] → [Mobile networks]
Page 55

Enable [Data roaming] → [OK]
2
Making a Call at Your Travel Destination
◎ “Area Settings” must be set to “Overseas (CDMA)”, “Overseas Auto (GSM/
UMTS)”, or “Overseas Manual (GSM/UMTS)” in advance to enable Data
roaming.
◎ If you have not subscribed to IS NET, au.NET charges (525 yen for the
used month only) and communication charges apply.
Setting the Time
When “Date & Time” is set to “Automatic” (factory default setting), the
PTL21 correct the time difference by acquiring time information from the
telecommunications carrier's network it is connected to.
With GSM/UMTS roaming, “Automatic” can be disabled and the time
can be set manually using “Set date”, “Select time zone” and “Set
time”.
With CDMA roaming, manual setting is not available.
◎ The time difference may not be corrected properly depending on the
telecommunications carrier's network.
◎ The time needed to correct the time differ depending on the
telecommunications carrier.
◎ In country using daylight saving time, check that the real time and the time
displayed on your PTL21 are the same. Daylight saving time may not be
supported depending on the telecommunications carrier.
Making a Call to Another Country (Including
Japan) from Your Travel Destination
You can make a call to Japan or another country from your travel
destination.
Example: To call 212-123-XXXX in the USA from Korea
On the Home screen, [ ]
1
Enter the international access code of your
2
destination, and the country code, area code and
phone number of the recipient → [ ]
International
access
code
1
(Korea)*
002 1 212 123XXXX
*1 Long-touch “0” to enter “+” and the international access code of your ravel
destination is automatically added when calling.
*2 If the person you are calling uses Global Passport, enter “81” (Japan) for the country
code regardless of their location.
*3 If the area code starts with “0”, dial it without including the “0”. There are some
exceptions such as fixed-line phones in Italy or Moscow.
Country
2
code*
➡
(USA)
Recipient
➡
area code
*3
➡
Recipient
phone
number
Global Function
51
Page 56

Making a Call within the Same Country While
Overseas
You can call to general fixed-line phones and cell phones with the
same method as when calling in Japan. There are some exceptions
such as when calling in the USA mainland, Hawaii, Saipan or Mexico
using Global Passport CDMA.
On the Home screen, [ ]
1
Enter the recipient area code and phone number →
2
[ ]
■For USA mainland, Hawaii, Saipan (when using CDMA)
“1” → Recipient area code and phone number →
2
[ ]
■For Mexico local calls (when using CDMA)
Enter the recipient phone number → [ ]
2
■For Mexico long distance calls (when using CDMA)
“01” → Recipient area code → Recipient phone
2
Global Function
number → [ ]
Receiving a Call at Your Travel Destination
You can receive calls with the same method as when receiving calls
in Japan.
Slide to the right during an incoming call.
1
◎ If you receive a call while overseas, the call is forwarded from Japan no matter
where the call is made from. Call charges to Japan are incurred by the caller and
receiving charges by the receiver (PTL21).
■Having calls made to your travel destination from
Japan
People calling you can use the same method as when you are in
Japan.
■Having call made to your travel destination from
countries other than Japan
The call is forwarded to Japan no matter the destination so the
country code is “81” (Japan).
Example: Someone calling your “090-1234-XXXX” PTL21 in Korea from the
USA
Enter the international access code of the caller's country,
1
Japan country code, your PTL21 phone number without the
first “0” → Call
International
access code
(USA)
011 81 901234XXXX
Japan
country
➡
code
PTL21 phone number
(without the first “0”)
➡
54
Page 57

Troubleshooting
Trouble Detail Page
Cannot turn on by
pressing p.
The power is turned
off automatically.
The power is turned
off while the wake-up
screen is displayed.
Cannot make any
phone calls.
Cannot receive any
phone calls.
Is the battery pack charged? P. 8
Is the battery pack properly installed? –
Are the contacts on the battery pack clean? –
Do you hold down p for at least 1 second?
Has the battery run out? P. 8
Is there enough power left in the battery pack?
* If the remaining power is low, the screen turns off soon
after wake-up screen is displayed.
Is your PTL21 turned on?
Is the au IC-Card inserted? P.11
Is the phone number you entered correct?
(Did you start with the area code first?)
Did you tap [
number?
Did you set correct setting in “Area Settings”? P.52
Is your PTL21 in “Airplane mode”?
Do you have sufficient signal strength? P.18
Are you outside the service area? P.18
Is your PTL21 turned on?
Is the au IC-Card inserted? P.11
Did you set correct setting in “Area Settings”? P.52
Did you set “Call Block”? –
Is your PTL21 in “Airplane mode”?
Is the call forwarding service set? –
] after entering the phone
P. 9
P. 8
P. 9
P.28
P.28
P. 9
Trouble Detail Page
The “out of service
area” indicator is
displayed.
Cannot connect with
Wi-Fi.
I cannot hear any
ring tone.
Cannot charge the
battery pack.
Cannot perform any
key/touch panel
–
–
operations.
“auIC Card(UIM)
error” is displayed.
A message
indicating “Please
connect charger”
appears and an
alarm sounds.
Are you outside the service area or in a location
with poor signal strength?
Are you covering the built-in antenna with your
fingers or hand?
Did you set correct setting in “Area Settings”? P.52
Is your PTL21 receiving a signal from the wireless
access point?
Did you configure your Wi-Fi settings? P.50
Is the volume set to “0”? –
Is your PTL21 in manner mode?
Is the charger connected properly? P. 8
Is the battery pack properly installed? –
Are the terminals of the desktop holder or PTL21
clean?
Cannot charge from a PC via a microUSB
cable.
Is your PTL21 turned on?
Did you unlock the screen? P. 9
Is your PTL21 in sleep mode?
Is the au IC-Card inserted? P.11
Is a card different from the au IC-Card used? P.11
The battery pack is almost empty. P. 8
P.18
P. 6
P.18
P.30
P. 9
P. 9
–
–
Appendix/Index
55
Page 58

Battery usage time
is short.
I hear a beeping
sound and cannot
make any phone
calls.
The light of the
display turns off
quickly
Cannot hear the
other person on
Appendix/Index
the line.
Cannot operate any
key and the screen is
frozen.
The microSD
memory card is not
recognized
Cannot operate the
camera.
56
Trouble Detail Page
Is the battery pack approaching the end of its
service life?
Do you often use your PTL21 in areas with low or
no signal strength?
Using functions such as Wi-Fi, 3G data
communication, GPS, Bluetooth
Sync shortens the battery life. The battery will
last longer if unused functions are turned off.
Each function can be turned on/off easily using
easy setting icons.
The battery consumption can be reduced by
closing unused applications.
The battery consumption can be reduced by
setting the screen to a darker brightness and
shortening “Screen timeout” setting.
Are you outside the service area or in a location
with poor signal strength?
Either the network is very busy, or the person
you are trying to call is already on the phone.
Try again later.
Is “Screen timeout” set to be long enough?
Is your earpiece volume turned all the way
down?
Are you covering up the earpiece with your ear?
Place the earpiece to your ear.
If you PTL21 does not turn off by holding down p,
remove the battery pack for several seconds, then
install it again. The data being edited are lost.
Is the microSD memory card inserted properly? P.14
Is the microSD memory card unmounted?
Is there enough power left in the battery pack? P.43
Is the PTL21 very warm or extremely cold?
®
, and Auto
P.18
P.19
P.18
P.28
P. 6
P.43
–
–
–
–
–
–
–
For more information, visit the au homepage or contact the Customer
Service Center.
http://www.kddi.com/customer/service/au/trouble/kosho/index.
html
Page 59

Number
001 International Call Service .................29
A
AC adapter .......................................................8
Address bar ....................................................42
Allow mock locations .................................46
Alphabet entry .............................................25
Alphanumeric, Kana key ...........................24
Android Market ............................................45
Android robot ...............................................10
Application settings ...................................46
Area Settings .................................................52
au IC-Card .................................................. 7, 11
Inserting ................................................12
Removing ..............................................12
au one-ID setting .........................................11
au one Market ...............................................45
B
Back function ................................................26
BACK key ...........................................................7
Battery pack..................................................... 7
Charging ..................................................8
Battery use .....................................................46
Bookmarks .....................................................42
Browser ...........................................................42
Built-in antenna .............................................7
Index
C
Call log .............................................................30
Camera ............................................................43
Record movie .......................................44
Take photo ............................................44
Camera lens .....................................................7
Cell phone-PC common setting .............11
Changing the ring tone .............................47
Character entry mode icons ....................24
Character input ............................................24
Charging ...........................................................8
Charging indicator ........................................7
Charging terminals .......................................7
C-mail ...............................................................35
C-mail safety block .............................36
Create new message .........................35
Receive ...................................................35
Receiving filter .....................................38
Send ........................................................35
Settings ..................................................38
Thread ....................................................35
Contacts ..........................................................31
Context menu ...............................................16
Conversion key .............................................25
Cursor key ......................................................24
D
Data roaming ................................................52
Development ................................................46
Display ...............................................................7
Displaying images .......................................44
Displaying the menu ..................................16
Double-tap ....................................................15
Drag and drop ..............................................15
Dust resistance ...............................................2
E
Earpiece ............................................................7
Earthquake Early Warning ........................36
Editing Contact ............................................31
E-mail ...............................................................32
Changing e-mail address.................33
Create new message .........................32
Initial setup ...........................................10
Mail filters ..............................................33
Receive ...................................................32
Recommended Settings ..................33
Send ........................................................32
Emoji ................................................................26
Emoticon ........................................................26
Enter key .........................................................25
Entry mode switch key ..............................24
External connection jack ............................ 7
F
Factory data reset ........................................49
Flick ...................................................................15
Flick input .......................................................26
G
Gallery .............................................................44
Global Passport ............................................51
Gmail ................................................................41
Create new message .........................41
Label........................................................41
Receive ...................................................41
Send ........................................................41
H
Handwriting input ......................................27
HOME key ......................................................... 7
Home screen .................................................17
I
Included items ................................................ 2
Incoming call log .........................................30
Incoming indicator .......................................7
Infrared port .................................................... 7
Initializing .......................................................49
Initial setup ....................................................10
International call ..........................................29
Item selection ...............................................16
L
Launcher menu ............................................21
Lock slider ........................................................7
Long-touch ....................................................15
M
Mail filters .......................................................33
Manner mode ...............................................30
Market .............................................................45
MENU key ......................................................... 7
Microphone ..................................................... 7
Appendix/Index
57
Page 60

microSD memory card...............................13
Inserting ................................................14
Removing ..............................................14
microSD memory card slot ........................ 7
Mobile light ..................................................... 7
Movie sizes .....................................................43
N
Name and functions of parts .................... 6
Network SSID ................................................50
Normal conversion......................................24
Normal mode ................................................23
Notification indicators ...............................17
Notification/status panel ..........................19
Numeric entry ...............................................26
O
Optical sensor ................................................. 7
Option menu .................................................16
Outgoing call log .........................................30
P
Appendix/Index
PC-mail ............................................................39
Create new message .........................39
Receive ...................................................40
Send ........................................................39
Setting up account ............................39
Phone
Answering a call ..................................29
Making a call ........................................28
Making/Receiving calls at your
travel location .................................53
58
Photo sizes .....................................................43
Pinch out/Pinch in .......................................15
PIN code ............................................................3
Power key .........................................................7
PRL ....................................................................52
Proximity sensor ............................................7
PUK code ..........................................................3
R
Receiver.............................................................7
Recording movies........................................44
Remote control lock ...................................47
Roaming settings ........................................52
Running services .........................................46
S
Search web ....................................................42
Security code .................................................. 3
Security Lock Service .................................48
Simple mode .................................................23
Sleep mode ...................................................... 9
Slide ..................................................................15
Speaker ............................................................. 7
Special number key ....................................28
Spoof Restriction .........................................34
Status bar .......................................................17
Status indicators ..........................................18
Stay awake .....................................................46
Storage use ....................................................46
Strap eyelet ......................................................7
Switching character entry mode ...........25
Switching Home screen ............................20
Switching input software .........................27
Switching software keyboards ...............25
Symbol ............................................................26
T
Taking photos ...............................................44
Tap ....................................................................15
Thread..............................................................35
Touch panel ...................................................15
Troubleshooting ..........................................55
Turning on/off the power ...........................9
U
Undo function ..............................................26
Unknown sources ........................................46
Uppercase/Lowercase characters
switch key ..................................................25
USB debugging ............................................46
V
Valid Caller ID ................................................48
Viewing photos/movies ............................44
Voice Input .....................................................26
Volume key ......................................................7
W
Wallpaper .......................................................19
Water resistance .............................................2
Web ..................................................................42
Widgets ...........................................................20
Page 61

User License
Aplix End-User License Agreement
About Software
This mobile telephone contains software of third parties other than the company.
Each customer using the telephone is granted a non-transferable and non-exclusive
license to use the installed software solely in conjunction with the use of this mobile
telephone. The consent in relation to use rights shall not be construed as the sale of
the software to the customer. The customer shall not reproduce, modify, distribute,
make available to the public, copy, alter or reverse engineer a part or the whole of
the software, and shall not decompile the source code. Each third party holding
rights of ownership in the software has exclusive ownership of the software, is the
holder of all rights, title and interest, and enjoys all benets in relation thereto.
User rights in the software installed in the mobile telephone are granted to the
customer on an “as is” basis. Notwithstanding any express or implied statements,
no warranty is given in relation to adaptation to a specic purpose, meeting the
demands of the customer, non infringement of the intellectual property rights of a
third party in relation to all software. Also, no warranty is given regarding proper
operation in case of continuous use of the software. Some jurisdictions do not allow
the exclusion of implied warranties, so the above exclusion may not apply or may
be limited.
About Open Source Software
This product includes the following open source software based on Android
software developed by Google Inc..
See detailed information in relation to this product on the following website.
http://opensource.pantech.com/
It is prohibited to perform or participate in the modication, translation,
adaptation, reverse engineering, decompiling, de-assembly of the software
installed in this product, or a part thereof.
This product shall not be taken out of Japan except when permitted by law or
regulation. (The U.S. Export Administration Regulations currently prohibit export
of this device to the following countries-Cuba, Iran, North Korea, Sudan and
Syria. (As of August 2011)).
microSD and microSDHC are trademarks of SD Association.
®
This product includes Flash
Adobe, Adobe Acrobat, Flash, FlashLite and Macromedia are trademarks or
registered trademarks of Adobe Systems Incorporated in the United States and
other countries.
The Bluetooth
Bluetooth SIG, Inc. Pantech has received a license to use these trademarks.
Wi-Fi
ABOUT DIVX VIDEO: DivX
subsidiary of Rovi Corporation. This is an ocial DivX Certied
DivX video. Visit divx.com for more information and software tools to convert your
les into DivX videos.
®
word trademark and the logo are registered trademarks of
®
is a registered trademark of Wi-Fi Alliance®.
ABOUT DIVX VIDEO-ON-DEMAND: This DivX Certied
registered in order to play purchased DivX Video-on-Demand ( VOD) movies.
To obtain your registration code, locate the DivX VOD section in your device
setup menu. Go to vod.divx.com for more information on how to complete your
registration.
Lite™ of Adobe Systems Incorporated.
®
is a digital video format created by DivX, LLC, a
®
device that plays
®
device must be
Appendix/Index
59
Page 62

Dolby and the double-D symbol are registered trademarks of Dolby Laboratories.
All other trademarks remain the property of their respective owners.
© 2011 Dolby Laboratories, Inc. All rights reserved.
iWnn of OMRON SOFTWARE Co, Ltd. is used for conversion methods for
Japanese language, and for phrase prediction methods for English.
iWnn© OMRON SOFTWARE Co, Ltd. 2008-2011 All Rights Reserved.
©
OMRON SOFTWARE Co, Ltd. 2009-2011 All Rights Reserved.
iWnnIME
InnoPath, the InnoPath Logo, and iMDM are registered trademarks of Innopath
Software, Inc.
All other trademarks are properties of their respective owners.
©
2011 Innopath Software, Inc All Rights Reserved.
Copyright
MAVEN is a trademark of Emersys, Inc.
Overwritten handwritten script recognition uses the LaLa Stroke of Toshiba Inc.
LaLa Stroke is a trademark of Toshiba Inc.
®
, Windows®, Windows Vista®, Microsoft® Excel®, Windows Media®,
Microsoft
®
Exchange
are trademarks or registered trademarks of Microsoft Corporation
America in the United States and other countries.
®
Microsoft
Word, Microsoft® Oce are trade names of Microsoft Corporation
America.
“Google”, “Google” logo, “Android”, “Android” logo, “Android market”, “Android
market” logo, “Gmail”, “Google Apps”, “Google calendar”, “Google Checkout”,
“Google Earth”, “Google Latitude”, “Google Maps”, “Google talk”, “Google
News”, “Picasa”, and “YouTube” are trademarks or registered trademarks of
Appendix/Index
Google Inc.
“Twitter” is a registered trademark of Twitter, Inc.
Skype, associated trademarks and logos and the “S” symbol are trademarks of
Skype Limited.
“jibe” is a social service related application produced by Jibe Mobile K.K.
“Jibe Mobile” is a registered trademark of Jibe Mobile K.K.
Powered by emblend™ Copyright 2009-2011 Aplix Corporation. All rights
reserved.
emblend is a trademark of Aplix Corporation in Japan and other countries.
60
This product is granted an AVC Portfolio License for the personal and noncommercial use of a consumer to (i) encode video in compliance with the AVC
Standard (“AVC Video”) and/or (ii) decode an AVC Video (limited to an AVC Video
that was encoded by a consumer engaged in a personal and non-commercial
activity and/or was obtained from a video provider licensed to provide AVC
Video). No license is granted or shall be implied for any other use. Additional
information may be obtained from MPEG LA, LLC. See http://www.mpegla.com
This product is granted a VC-1 Patent Portfolio License for the personal and noncommercial use of a consumer to (i) encode video in compliance with the VC-1
Standard (“VC-1 Video”) and/or (ii) decode a VC-1 Video (limited to a VC-1 Video
that was encoded by a consumer engaged in a personal and non-commercial
activity and/or was obtained from a video provider licensed to provide VC-1
Video). No license is granted or shall be implied for any other use. Additional
information may be obtained from MPEG LA, LLC. See http://www.mpegla.com
Other company and product names are the trademarks or trade names of the
respective companies.
Page 63

Safety Information
CE Declaration of Conformity
In some countries/regions, such as France, there are restrictions on
the use of Wi-Fi. If you intend to use Wi-Fi on the handset abroad,
check the local laws and regulations beforehand.
■Operation Temperature
0 - 45 °C (without adaptor), 0 - 45 °C (with adaptor)
■Battery
RISK OF EXPLOSION IF BATTERY IS REPLACED BY AN INCORRECT
TYPE.
DISPOSE OF USED BATTERY ACCORDING TO THE INSTRUCTIONS.
■Sound pressure- CAUTION
Excessive sound pressure from earphones can cause hearing loss.
■AC Adapter
The mains plug is used as the disconnect device, the disconnect device
shall remain readily operable.
Any AC adapter used with this handset must be suitably approved with
a 5Vdc SELV output which meets limited power source requirements as
specified in EN/IEC 60950-1 clause 2.5.
■USB
“The USB port has to be connected to USB interfaces USB 2.0 versions or
higher.”
FCC Notice
■SAFETY INFORMATION FOR FIXED WIRELESS
TERMINALS
POTENTIALLY EXPLOSIVE ATMOSPHERES
Turn your phone OFF when in any area with a potentially explosive
atmosphere and obey all signs and instructions. Sparks in such areas could
cauls e an explosion or fire resulting in bodily injury or even death.
INTERFERENCE TO MEDICAL DIVICES
Certain electronic equipment may be shielded against RF signal from you
wireless phone. (pacemakers, Hearing Aids, and so on) Turn your phone
OFF in health c are
facilities when any regulations posted in these areas instruct you to do
so. RF signals may affect improperly installed or inadequately shielded
electronic system in motor vehicles.
EXPOSURE TO RF ENERGY
Use only the supplied or an approved replacement antenna. Do not touch
the antenna unnecessarily when the phone is in use. Do not move the
antenna close to, or couching any exposed part of the body when making
a call.
SAFETY INFORMATION FOR RF EXPOSURE
■Body worm operation
This device was tested for typical body-worn operations with the back of
the phone kept 1 cm. from the body. To maintain compliance requirements,
use only belt-clips, holsters or similar accessories that maintain a 1
cm separation distance between the user’s Body and the back of the
phone, including the antenna. The use of belt-clips, holsters and similar
accessories should not contain metallic components in its assembly. The
use of accessories that do not satisfy these requirements may not comply
with FCC RF exposure requirements, and should be avoided.
For more information about RF exposure, please visit the FCC website at
www.fcc.gov.
61
Page 64

62
SAR INFORMATION
THIS MODEL PHONE MEETS THE GOVERNMENT’S
REQUIREMENTS FOR EXPOSURE TO RADIO WAVES.
Your wireless phone is a radio transmitter and receiver. It is designed
and manufactured not to exceed the emission limits for exposure
to radiofrequency (RF) energy set by the Federal Communications
Commission of the U.S. Government. These limits are part of
comprehensive guidelines and establish permitted levels of RF energy
for the general population. The guidelines are based on standards that
were developed by independent scientific organizations through periodic
and thorough evaluation of scientific studies. The standards include a
substantial safety margin designed to assure the safety of all persons,
regardless of age and health. The exposure standard for wireless mobile
phones employs a unit of measurement known as the Specific Absorption
Rate, or SAR. The SAR limit set by the FCC is 1.6 W/kg. *
Tests for SAR are conducted with the phone transmitting at its highest
certified power level in all tested frequency bands. Although the SAR is
determined at the highest certified power level, the actual SAR level of
the phone while operating can be well below the maximum value. This is
because the phone is designed to operate at multiple power levels so as
to use only the power required to reach the network. In general, the closer
you are to a wireless base station antenna, the lower the power output.
Before a phone model is available for sale to the public, it must be tested
and certified to the FCC that it does not exceed the limit established by
the government adopted requirement for safe exposure. The tests are
performed in positions and locations (e.g., at the ear and worn on the body)
as required by the FCC for each model. The highest SAR value for this
model phone when tested for use at the ear is 0.388 W/Kg and when worn
on the body , as described in this user guide, is 1.02 W/Kg . (Body-worn
measurements differ among phone models, depending upon available
accessories and FCC requirements). While there may be differences
between the SAR levels of various phones and at various positions, they all
meet the government requirement for safe exposure. The FCC has granted
an Equipment Authorization for this model phone with all reported SAR
levels evaluated as in compliance with the FCC RF exposure guidelines.
SAR information on this model phone is on file with the FCC and can be
found under the Display Grant section of http://www.fcc.gov/ oet/fccid after
searching on FCC ID: JYCCDMAPTL21
Additional information on Specific Absorption Rates (SAR) can be found on
the Cellular Telecommunications Industry Asso-ciation (CTIA) web-site at
http://www.wow-com.com. * In the United States and Canada, the SAR
limit for mobile phones used by the public is 1.6 watts/kg (W/kg) averaged
over one gram of tissue. The standard incorporates a sub-stantial margin
of safety to give additional protection for the public and to account for any
variations in measurements.
U.S.FEDERAL COMMUNICATIONS COMMISSION
RADIO FREQUENCY INTERFERENCE STATEMENT
■INFORMATION TO THE USER
NOTE : This equipment has been tested and found to comply with the
limits for a Class B digital device pursuant to Part 15 of the FCC Rules.
These limits are designed to provide reasonable protection against harmful
Interference in a residential installation This equipment generates, uses,
and can radiate radio frequency energy and, if Not installed and used in
accordance with the instructions, may cause harmful Interference to radio
communications. However, there is no guarantee that interference will
not occur in a particular Installation. If this equipment does cause harmful
interference to radio or television reception, which can be determined by
turning the equipment off and on, the user is encouraged to try to correct
the interference by one or more of the following measures:
* Reorient or relocate the receiving antenna.
Increase the separation between the equipment and receiver.
* Connect the equipment into an outlet of a circuit different from that to
which the receiver is connected.
* Consult the dealer or an experienced radio/TV technician for assistance.
Changes or modification not expressly approved by the party responsible
for Compliance could void the user’s authority to operate the equipment.
Connecting of peripherals requires the use of grounded shielded signal
cables.
Page 65

FCC Compliance Information
This device complies with Part 15 of FCC Rules.
Operation is subject to the following two conditions:
(1) This device may not cause harmful interference, and
(2) This device must accept any interference received.
Including interference that may cause undesired operation.
61
Page 66

For inquiries, call: Customer Service Center
For general information and charges (toll free)
From fixed-line phones:
0077-7-111
PRESSING ZERO WILL CONNECT YOU TO AN OPERATOR
AFTER CALLING 157 ON YOUR au CELLPHONE.
From au cell phones:
157 area code not required
For loss, theft or damage and operation
information (toll free)
From fixed-line phones:
0077-7-113
In case above numbers are not available,
From au cell phones:
113 area code not required
Cell phone and PHS operators collect and
recycle unused telephones, batteries and battery
chargers at stores bearing the logo
regardless of brand and manufacturer to protect
the environment and reuse valuable resources.
0120-977-033 (except Okinawa)
0120-977-699 (Okinawa)
August 2011 Edition
Sales: KDDI CORPORATION
Manufactured by: Pantech Co., Ltd.
·OKINAWA CELLULAR TELEPHONE COMPANY
 Loading...