


The Pantech C820 User Manual
The AT&T

WELCOME
Thank you for choosing the AT&T Smart Device Pantech C820, which has adopted the Microsoft Windows
Mobile™ 6.1 Standard in a dual slider design to give you the convenience of Windows and the comfort of a
familiar shape. Using ActiveSync®, you can keep your PC and Pantech C820 synchronized at all times. The
Pantech C820 offers the various features listed below which are designed to enhance your mobile
experience.
Key Features of the Pantech C820
• Microsoft Windows Mobile
• Full graphic TFT 262K Color LCD (240x320 pixel)
• Full QWERTY keyboard
• CMOS Camera (2.0 megapixels)
• Built-in Bluetooth Technology
• Advanced Voice Command Technology
• 2-Way Text Messaging
• Multimedia Messaging Service
• E-mail Messaging Service
• microSD Card for External Memory (SDIO Support)
• Voice Memo
• Easy text entry using the XT9 text input mode.
• Internet Access
IMPORTANT INFORMATION
This Pantech C820 user guide contains very important information about how to handle and use the product.
Please read this manual thoroughly, pay attention to the warranty on the back page and be warned of the
exclusions and limitations of your warranty, which is, for example, to prohibit using the unauthorized
accessories or components.
TM
6.1 for Smartphone OS
2/142

CONTENTS
WELCOME........................................................................................................................................................ 2
CHAPTER 1. BEFORE USING YOUR PHONE ............................................................................................. 13
Activating Your Phone.......................................................................................................... ........................ 16
Home Screen............................................................................................................................................... 16
Home screen Icons .................................................................................................................................... 16
CHAPTER 2. BASIC OPERATION................................................................................................................. 22
Turning the phone on.................................................................................................................................23
Turning the phone off................................................................................................................................... 23
Make a call by entering a contact name......................................................................................................23
Make a call by entering a phone number..................................................................................................... 23
Make a call from an open contact ................................................................................................................23
Make a call from the call history list............................................................................................................. 24
Make a call from a hyperlink phone number................................................................................................24
Answer a call by pressing any key............................................................................................................... 24
Answer or ignore a call ................................................................................................................................ 24
Insert a manual pause in a dialing sequence ..............................................................................................24
Insert a three-second pause in a dialing sequence.....................................................................................24
Setting Up Your Voicemail............................................................................................ ...... .......................... 25
Unlock the keypad........................................................................................................................................25
Auto-Lock the keypad..................................................................................................................................25
Set the date and time ........................................................................................................................... ........ 25
Set the idle timer..........................................................................................................................................26
Change the Home screen appearance.............................................................................................. .......... 26
View operating system information.............................................................................................................. 26
Enter owner information....................................................................... ........................................................ 26
Explore files and folders............................................................................................................................... 26
Silence the ring tone of an incoming call ..................................................................................................... 27
Change between uppercase, lowercase, and caps lock..............................................................................27
Change the Multipress timeout....................................................................................................................27
Delete characters................................................................................. ........................................................ 27
Enter a space............................................................................................................................................... 27
Enter a symbol.......................... ................................................................................................................... 27
Enter numbers in text boxes........................................................................................................................28
Enter punctuation in Multipress mode ......................................................................................................... 28
Enter punctuation in XT9 mode ................................................................................................................... 28
Enter text in XT9 mode ................................................................................................................................28
Start a new line............................................................................................................................................. 28
Turn on Caps Lock....................................................................................................................................... 28
Enter the plus sign for international calls.....................................................................................................29
Change the input mode................................................................................................................................ 29
CHAPTER 3. CALENDAR & CONTACTS & CALL HISTORY & MY STUFF ................................................ 30
Schedule an appointment............................................................................................................................31
Delete an appointment ................................................................................................................................. 31
3/142

Update an appointment.......................................................................................................... .. .................... 31
View an appointment ................................................................................................... ................................ 31
View appointments for the week.................................................................................................................. 31
View today's agenda.................................................................................................................................... 32
View your agenda for a specific date........................................................................................................... 32
View your schedule for the month................................................................................................................ 32
Make an appointment recurring.............................. .....................................................................................32
Show week numbers.................................................................................................................................... 32
Change the work week display....................................................................................................................32
Change the reminder time ........................................................................................................................... 33
Create a new contact................................................................................................................................... 33
Send via Bluetooth................................................................................................. ...... ................................ 33
Call a contact from contact information........................................................................................................ 34
Call a contact from the contact list............................................................................................................. ..34
Change the default number for a contact .................................................................................................... 34
Duplicate a contact.......................................................................................................................................34
Copy to Device / SIM...................................................................................................................................35
Copy All to Device / SIM..............................................................................................................................35
Delete a contact........................................................................................................................................... 35
Delete All Device / SIM................................................................................................................................35
Create a contact for a caller....................................................................... .................................................. 36
Filter the contact list....................................................................................................................... .............. 36
Find a contact...............................................................................................................................................36
Send an e-mail to a contact.................................... .....................................................................................36
Send a text message to a contact.......................................................................... ...................................... 37
View and edit contact information................................................................................................................ 37
Add a picture to a contact............................................. ...............................................................................37
Remove a picture from a contact................................................................................................................. 37
Assign a category to a contact..................................................................................................................... 37
Assign a ring tone to a contact........................................................................................... .......................... 38
Create a speed dial.................................................................................... .................................................. 38
Using speed dials......................................................................................................................................... 38
View and edit a speed dial........................................................................................................................... 38
Delete a speed dial .................................................................................... ...... ...... ...... ......
..........................38
View Call Timers................................... ...... ...... ............ ...... ...... ...... ...... ........... ...... ...... ................................ 39
Reset Call Timers.........................................................................................................................................39
View details about a call...............................................................................................................................39
Create a contact from Call History............................................................................................................... 39
Delete an item from Call History..................................................................................................................39
Dial the last number called........................................................................................................................... 40
Find a contact from Call History................................................................................................................... 40
Insert an international country code............................................................................................................. 40
Send an E-mail message from Call History.................................................................................................40
CHAPTER 4. VOICEMAIL & MESSAGING ................................................................................................... 41
Voicemail................................................................................... ...................................................................42
Call your voicemail box................................................................................................................................ 42
Text messaging............................................................................................................................................42
Create a text message................................................................................................................................. 42
Delete all messages..................................................................................................................................... 42
Multimedia Message.................................................................................................................................... 42
4/142

Create a multimedia message.....................................................................................................................42
Text box........................................................................................................................................................43
Multimedia message Menu options ............................................................................................................. 43
View Multimedia Message ............................................................. ...... ...... ...... ............ ...... ...... . ................... 44
Select Multimedia Message in the list of Message Type............................................................................. 44
Change messaging account options............................................................................................................44
Change how the message list displays........................................................................................................45
Create a message from a contact card........................................................................................................45
E-mail........................................................................................................................................................... 45
Synchronizing e-mail messages..................................................................................................................45
During synchronization: ............................................................................................... ................................ 45
Connecting Directly to an E-mail Server...................................................................................................... 45
Folder Behavior with a Direct Connection to an E-mail Server ...................................................................46
Creating an E-mail Account ......................................................................................................................... 46
Create an E-mail message .................................................................................... ...................................... 46
Overview of e-mail security.......................................................................................................................... 47
Download a complete e-mail message.......................................................................................... .............. 47
Download an attachment.............................................................................................................................47
Mark a folder for synchronization.................................................................................................................47
Add a picture to an e-mail message............................................................................................................47
Verify the digital signature on a signed message you receive..................................................................... 48
Send and receive Internet e-mail messages ............................................................................................... 48
Add a voice recording to an e-mail message............................................................................................... 48
Set up an Internet e-mail account manually ................................................................................................ 49
Delete a message........................................................................................................................................ 49
Delete an account........................................................................................................................................ 49
Edit predefined text...................................................................................................................................... 50
Empty the Deleted Items folder.................................................................................................................... 50
Forward a message..................................................... ................................................................................50
Insert predefined text into a message.......................................................................................................... 50
Mark a message as Read or Unread........................................................................................................... 50
Move a message to a different folder........................................................................................................... 50
Open a message.......................................................................................................................................... 51
Quickly move between accounts ..................................................................................................
............... 51
Send a message draft............................................................................................ ...... ...... ... ....................... 51
Reply to a message.....................................................................................................................................51
Save a draft of a message........................................................................................................................... 51
Specify the language for reading a message or composing................................................................ ........ 51
Stop adding a signature to messages.......................................................................................................... 52
View an attachment....................................................... ...............................................................................52
View message folder contents..................................................................................................................... 52
View the Inbox message list ........................................................................................................................ 52
View the list of accounts...............................................................................................................................52
What is SSL? ...............................................................................................................................................52
CHAPTER 5. ORGANIZER............................................................................................................................. 54
Alarm............................................................................................................................................................55
Using the alarm.......................................................................................... .................................................. 55
Voice Note....................................................................................................................................................55
Create a voice note...................................................................................................................................... 55
Listen to a voice note............................ ...... ............ ...... ...... ...... ...... ..... ............ ...... ...... ................................ 55
5/142

Delete a voice note......................................................................................................................................55
Rename a voice note...................... ...... ...... ...... ...... ............ ...... ...... ..... ...... ...... ............ ...... ... ....................... 56
Notepad........................................................................................................................................................56
To access Notepad:..................................................................................................................................... 56
Creating a memo ......................................................................................................................................... 56
Viewing a memo .......................................................................................................................................... 56
Sending a memo.......................................................................................................................................... 56
Deleting a memo.............................................................................................. ............................................ 56
Calculator..................................................................................................................................................... 56
Using the calculator ..................................................................................................................................... 56
World Time................................................................................ ................. .................. .. .............................. 57
Using the world time .................................................................................................................................... 57
Tasks.................................................................................................................................. .......................... 57
Create a task................................................................................................................................................ 57
Change a completed task to incomplete......................................................................................................57
Assign a category to a task.............................................................................. ............................................ 57
Delete a task................................................................................................................................................ 57
Mark a task as complete.............................................................................................................................. 58
Locate a task................................................................................................................................................ 58
CHAPTER 6. AT&T MUSIC ............................................................................................................................ 59
Windows Media Player®.............................................................................................................................. 60
Copying media files...................................................................................................................................... 60
Playing media files.................... ...................................................................................................................60
Setting up a playlist.................................................................................... .................................................. 61
Shop Music .............................................................................. ............ ...... ...... ...... ...... ... ............................. 62
Music ID.............................. ......................................................................................................................... 62
Using ID song!..............................................................................................................................................62
Using Manage ID’s....................................................................................................................................... 62
Getting Help with MusicID............................................................................................................................ 63
Exiting from the MusicID Application ..................................................................... ...................................... 63
XM RADIO MOBILE..................................................................................................................................... 63
Music Videos................................................................................................................................................ 63
The Buzz................................................................................................................ ...... ................................ 64
Community......................................................................................................................
.............................64
CHAPTER 7. AT&T MALL .............................................................................................................................. 65
Shop TONES ....................................................................................... .................. ............ ............ .............. 66
Shop Games................................... ...... ...... ............ ...... ...... ...... ...... ........... ...... ...... ...... ................................ 66
Shop Graphics .......................................................................... ........... ...... ...... ...... ...... ................................ 66
Shop Multimedia ............................................................................. ...... ........... ...... ...... ................................ 66
Shop Applications .............................................................................................................. ..........................67
MEdia Net Home.......................................................................................................................................... 67
CHAPTER 8. CELLULAR VIDEO .................................................................................................................. 68
Cellular Video............................................................................................................................................... 69
Media Clip Options....................................................................................................................................... 69
Library..........................................................................................................................................................69
Play/Pause................................................................................................................................................... 69
Stop..............................................................................................................................................................69
Shuffle/Repeat .......................................................................... ...................................................................69
6/142

Full Screen............................................................................................................. ...... ................................ 69
Options.........................................................................................................................................................70
Properties..................................................................................................................................................... 70
Settings........................................................................................................................................................ 70
Using the Video Categories.......................................... ...............................................................................70
Viewing a Video Clip.................................................................................................................................... 70
Customizing Cellular Video.......................................................................................................................... 70
Updating the Favorites List..........................................................................................................................70
Adding a Video Alert ....................................................................................................................................71
My Purchases..............................................................................................................................................71
Parental Controls ...................................................................... ...................................................................71
Setting up Parental Control.................................................................. ........................................................ 71
Configuring the Filters.................................................................................................. ................................ 72
CHAPTER 9. IM&E-MAIL, MOBITV, MEDIA NET, OFFICE MOBILE............................................................ 73
IM & E-mail...................................................................................................................................................74
Instant Messaging............................................................................................ ............................................ 74
Mobitv...........................................................................................................................................................74
Media net ................................................................................. .................................................................... 74
Office mobile................................................................................................................................................ 74
Data Analysis on the GO........................................ ......................................................................................74
Practice Microsoft PowerPoint Presentations..............................................................................................74
View Microsoft Word Documents.................................................................................................................74
CHAPTER 10. CAMERA ................................................................................................................................ 75
Camera / Camcorder mode ......................................................................................... ................................ 76
Select video quality...................................................................................................................................... 76
Copy an image to your phone...................................................................................................................... 76
Take pictures using a timer .......................................................................................................................... 76
Adjust pictures and video for lighting conditions..........................................................................................76
Select where pictures are saved.................................................................................................................. 77
Create a Pictures folder...............................................................................................................................77
Edit a picture................................................................................................................................................ 77
View pictures as a slide show...................................................................................................................... 77
Set a picture as the Home screen................................................................................................................ 77
Send a picture via Multimedia Message................................... ........... ...... ...... ...... ...... ............ ...... .. .... ........ 78
Save a copy of a picture..............................................................................................................................78
View pictures on your phone.................................................................................. ...................................... 78
Camera / Camcorder operations............................................................................ ...................................... 78
Camera ........................................................................................................................................................78
Video............................................................................................................................................................ 78
Record a Video .............................................................................. ...... ...... ...... ............ ................................ 78
Play recorded file .........................................................................................................................................78
Take a Picture .............................................................................................................................................. 79
Take a Picture (MultiShot)............................................................................................................................ 79
Snapshot...................................................................................................................................................... 79
Viewing saved file........................................................ ................................................................................79
Camera / Camcorder controls...................................................................................................................... 79
Camera Menu ..............................................................................................................................................79
Camcorder Menu ................................................................ .........................................................................80
General Settings ..........................................................................................................................................81
7/142

Camera Settings ..........................................................................................................................................82
Shutter Sound................................. ...... ...... ...... ............ ..... ...... ...... ...... ...... ............ ...... ................................ 82
Camcorder Settings.....................................................................................................................................82
Overview of the default hardware button assignments................................................................................83
CHAPTER 11. INTERNET EXPLORER ......................................................................................................... 84
USING INTERNET EXPLORER.................................................................................................................. 85
Add a Web page to the Favorites list................................................................................................... ........ 85
Change connection options ......................................................................................... ................................ 85
Change Web page display options..............................................................................................................85
Clear history , coo kies, or temporary files..................................................................................................... 85
Create a new folder in Favorites.................................................................................................................. 86
Delete a favorite........................................................................................................................................... 86
Disconnect from the Internet........................................................................................................................ 86
Edit a favorite............................................................................................................................................... 86
Go to a link................................................................................................................................................... 86
Go to a Web page........................................................................................................................................ 86
Go to a Web page in the History list ............................................................................................................ 86
Open Internet Explorer....................................................................................................... .......................... 87
Refresh a Web page.................................................................................................................................... 87
Return to a Web page you visited in the same session...............................................................................87
View a favorite.................................................................... ..........................................................................87
View a list of recently visited Web pages..................................................................................................... 87
Move a favorite to a folder ........................................................................................................................... 87
Change the size of text on Web pages...................................................................................................... ..87
Show or hide pictures on Web pages.......................................................................................................... 87
View a page in full screen mode.................................................................................................................. 88
Send a link via e-mail................................................................................................................................... 88
Adjust the scrolling speed............................................................................................................................ 88
CHAPTER 12. PC CONNECTIVITY, BLUETOOTH AND ACTIVESYNC ...................................................... 89
ActiveSync ...................................................................................................................................................90
Install and set up ActiveSync....................................................................................................................... 90
Set up an Exchange Server connection ...................................................................................................... 90
Change ActiveSync settings ...................................................................................................................... ..90
Schedule synchronization as items arrive ...................................................................................................91
Change the synchronization schedule......................................................................................................... 91
Start and stop synchronization..................................................................................................................... 91
View information about Sync status............................................................................................................. 91
Change settings for an information type......................................................................................................92
Connect the phone....................................................................................................................................... 92
Deactivate the USB modem......................................................................................................................... 92
Connect to a PC using chargeable USB cable............................................................................................ 92
Connect to a PC using Bluetooth................................................................................................................. 92
Change e-mail security options.................................................................................................................... 93
Exclude an e-mail address from Reply All ................................................................................................... 93
Bluetooth...................................................................................................................................................... 93
Turn Bluetooth on and off.............................................................................................................................93
Pair with a Bluetooth device......................................................................................................................... 94
Disconnect Bluetooth connection. ............................................................. .................................................. 94
Make your device discoverable....................................................................................................................94
8/142

Rename a Bluetooth partnership.................................................................................................................95
Turn wireless power on or off................................................................................. ...................................... 95
Connect to intranet URLs............................................................................................................................. 95
Use a specific connection to connect to the Internet................................................................................... 95
Edit a VPN Connection................................................. ...............................................................................96
Overview of Bluetooth virtual COM ports..................................................................................................... 96
Outgoing COM port...................................................................................................................................... 96
Set up an outgoing Bluetooth COM port......................................................................................................96
Create a dial-up connection......................................................................................................................... 96
Create a proxy connection........................................................................................................................... 97
Create a VPN connection ............................................................................................................................ 97
Delete a dial-up connection ............................................................................................... .......................... 97
Delete a proxy connection ........................................................................................................................... 98
Delete an intranet URL ................................................................................................................................ 98
Delete a VPN connection............................................................................................................................. 98
Edit a dial-up connection.............................................................................................................................. 98
Edit a proxy connection................................................................................................................................ 98
Edit an intranet URL..................................................................................................... ................................ 98
Connecting the GPS Intermediate Driver to GPS Hardware................................................... ...... ............ ..99
MY-CAST WEATHER.................................................................................................................................100
Camrea ......................................................................................................................................................101
Clearvue PDF.............................................................................................................................................101
File explorer ...............................................................................................................................................101
Get navigator..............................................................................................................................................101
JAVA........................................................................................................................................................... 101
Speed dial..................................................................................................................................................101
System info ................................................................................................................................................101
Task manager.............................................................................................................................................102
Voice Command........................................................... ..............................................................................102
1 - Adjust the Microphone.......................................................................................................................... 102
2 - Set the Voice Command Button ........................................................................................................... 102
3 - Try out Voice Command ....................................................................................................................... 102
Try Out More Commands.............................................. .............................................................................103
To Learn More............................................................................................................................................ 103
Using the Voice Command Button.............................................................................................................103
Making Phone Calls........................ ...... ...... ...... ...... ........... ...... ...... ...... ...... ...... ............ ...... ........................ 103
Showing Contacts...................................................................................................................................... 104
Reading Appointments............................................................................... ................................................ 105
Playing Music............................................................................................................................................. 106
Starting Programs........................... ...... ...... ...... ........... ...... ...... ...... ...... ............ ...... ...... .............................. 106
Aliases....................................................................................... .................................................................107
Getting Phone Status............................................................................................. ...... ...... ........................ 107
Getting Voice Command Help....................................................................................................................107
Personalization.............................................................. .............................................................................107
General Options......................................................................................................................................... 107
Calendar Options................ ........................................................................................................... ............ 108
Media Options............................................................................................................................................ 108
General Tips............................................................................................... .................. .............................. 108
Phone and Contact Tips............................................................................................................................. 109
Reading Appointments Tips.......................................... ..................................................... ........................109
Playing Music Tips..................................................................................................................................... 109
9/142

Starting Programs Tips................................................................... ............ ...... ...... ...... ...... .. .......................110
Troubleshooting ..........................................................................................................................................110
Reading Appointments Troubleshooter.......................................................................................................111
MY-CAST WEATHER..................................................................................................................................112
MYSPACE MOBILE ....................................................................................................................................112
Phone..........................................................................................................................................................114
Auto Answer..................................................................................................... ...........................................114
Auto Lock....................................................................................................................................................114
Call forwarding...................................... ...... ...... ............ ...... ...... ...... ..... ............ ...... ...... ... ............................114
Call Options.................................................................................... ...... ...... ...... ...... .....................................114
Turn call waiting notifications on and off.....................................................................................................115
Caller ID......................................................................................................................................................115
Channels.......................................................................................................... ...........................................115
Fixed Dialing ...............................................................................................................................................115
Select networks...........................................................................................................................................115
Add a network................................................................................................................................ .............115
Display your phone number........................................................................................................................116
Service Dialing Numbers (SDN.............................................................................. .....................................116
Select TTY Mode ................................................................................................... ............. ........................116
Sounds........................................................................................................................................................116
Change or turn sounds on or off................................... ..............................................................................116
Profiles............................................ ............................................................................................................117
Home Screen..............................................................................................................................................117
Set the date and time ........................................................................................................................... .......118
Connections................................................................................................................................................118
MAKE YOUR DEVICE VISIBLE ................................................................................................................. 120
Security...................................................................................................................................................... 121
Remove a program ....................................................................................................................................123
Power Management................................................................................................................................... 123
Video Share ...............................................................................................................................................123
Accessibility................................................................................................................................................124
Regional settings ....................................................................................................................................... 124
Error Reporting...........................................................................................................................................124
Turn Error Reporting On / Off.................................. ................................................................
...................125
Customer Feedback........................................................................................................... ........................ 125
Windows Update........................................................................................................................................125
Setup E-mail....................................................................... ........................................................................125
Managed Programs ................................................................................................................................... 125
Solitaire........................................... ...........................................................................................................127
Bubble Breaker .................................................................................... ...... ...... ...... .................................... 127
Midnight Pool - Demo ................................................................................................................................ 128
Brain Challenge - Demo..................................................................................................... ........................ 128
Scrabble Blast - Demo............................................................................................................................... 128
Tiger Woods PGA TOUR 07 - Demo ......................................................................................................... 129
Jewel Quest 2 - Demo ........................................................................................... .................................... 129
CHAPTER 16. SAFETY AND WARRANTY .................................................................................................130
SAFETY INFORMATION FOR WIRELESS HANDHELD PHONES............................................................ 131
10/142

EXPOSURE TO RADIO FREQUENCY SIGNALS ..................................................................................... 131
ANTENNA CARE ........................................................................................................................................ 131
DRIVING SAFETY....................................................................................................................................... 131
ELECTRONIC DEVICES............................................................................................................................. 132
Pacemakers.................. ............................................................................................................................. 132
Other medical devices ........................................................................................... .................................... 132
Posted facilities............................... ............ ...... ...... ...... ...... ........... ...... ...... ...... ...... .................................... 132
Aircraft........................................................................................................................................................ 132
Blasting areas ............................................................................................................................................132
Potentially explosive atmospheres ............................................................................................................133
PRECAUTIONS........................................................................................................................................... 133
BODY-WORN OPERATION ........................................................................................................................ 133
SAR INFORMATION................................................................................................................................... 134
SAFETY INFORMATION FOR BATTERY USAGE ..................................................................................... 135
• DO NOT DISASSEMBLE OR OPEN CRUSH, BEND OR DEFORM, PUNCTURE OR SHRED. .... 135
• DO NOT MODIFY OR REMANUFACTURE, ATTEMPT TO INSERT FOREIGN OBJECTS INTO THE
BATTERY, IMMERSE OR EXPOSE TO WATER OR OTHER LIQUIDS, EXPOSE TO FIRE, EXPLOSION
OR OTHER HAZARD. .................................................................................................................................. 135
• ONLY USE THE BATTERY FOR THE SYSTEM FOR WHICH IT IS SPECIFIED............................ 135
• ONLY USE THE BATTERY WITH A CHARGING SYSTEM THAT HAS BEEN QUALIFIED WITH
THE SYSTEM PER THIS STANDARD. USE OF AN UNQUALIFIED BATTERY OR CHARGER MAY
PRESENT A RISK OF FIRE, EXPLOSION, LEAKAGE, OR OTHER HAZARD......................................... 135
• DO NOT SHORT CIRCUIT A BATTERY OR ALLOW METALLIC CONDUCTIVE OBJECTS TO
CONTACT BATTERY TERMINALS............................................................................................................. 135
• REPLACE THE BATTERY ONLY WITH ANOTHER BATTERY THAT HAS BEEN QUALIFIED WITH
THE SYSTEM PER THIS STANDARD, IEEE-STD-1725-2006. USE OF AN UNQUALIFIED BATTERY MAY
PRESENT A RISK OF FIRE, EXPLOSION, LEAKAGE OR OTHER HAZARD.......................................... 135
• PROMPTLY DISPOSE OF USED BATTERIES IN ACCORDANCE WITH LOCAL REGULATIONS.
135
• BATTERY USAGE BY CHILDREN SHOULD BE SUPERVISED..................................................... 135
• AVOID DROPPING THE PHONE OR BATTERY. IF THE PHONE OR BATTERY HAS BEEN
DROPPED, SPECIFICALLY ON THE HARD SURFACE, AND ITS DAMAGE SUSPECTS, TAKE IT TO
THE CUSTOMER CARE CENTER FOR CORRECT INSPECTIONS.......................................................... 135
• IMPROPER BATTERY USE MAY RESULT IN A FIRE, EXPLOSION OR OTHER HAZARD. ....... 135
FCC & INDUSTRY COMPLIANCE............................................................................................................... 135
FCC HEARING-AID COMPATIBILITY REGULATIONS FOR WIRELESS DEVICES ................................. 136
11/142

FDA CONSUMER UPDATE ........................................................................................................................ 137
PROTECT YOUR WARRANTY.................................................................................................................... 141
MANUFACTURER'S WARRANTY ............................................................................................................... 141
12 MONTH LIMITED WARRANTY ............................................................................................................. 141
12/142
CHAPTER 1. BEFORE USING YOUR PHONE
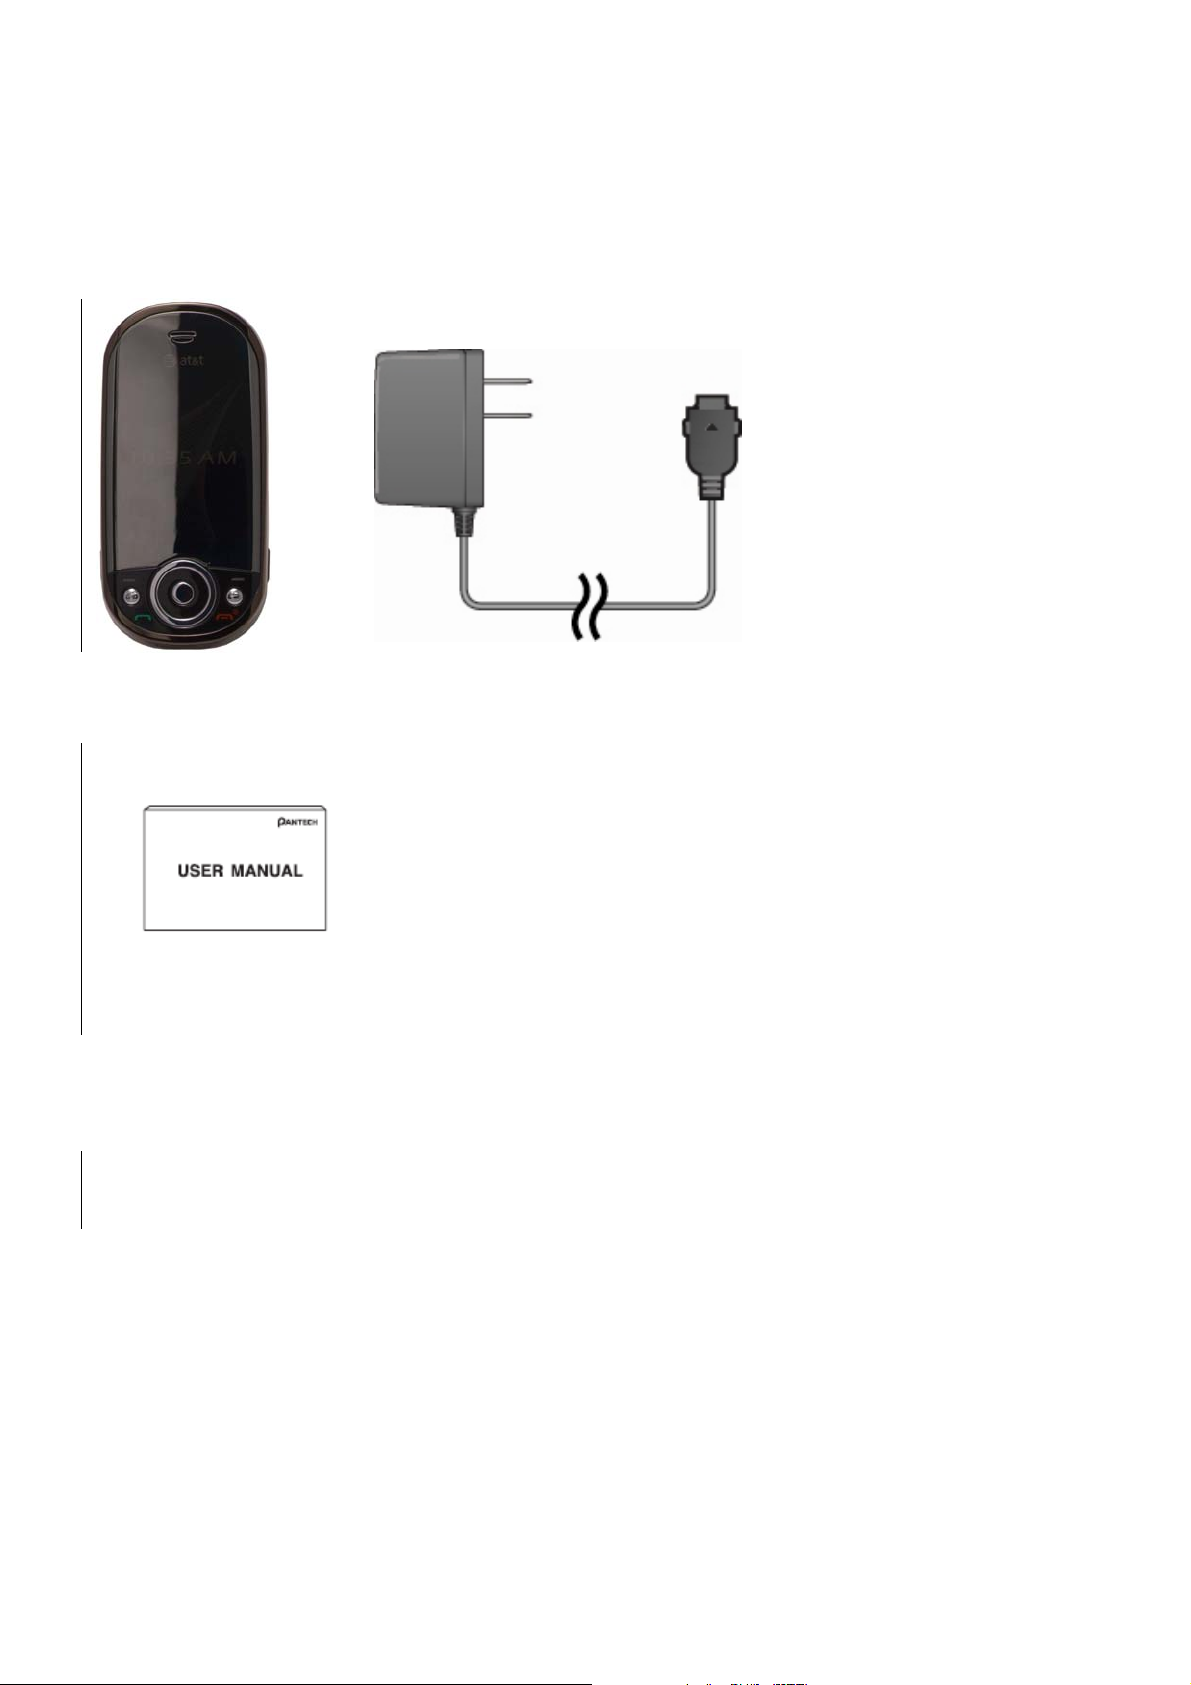
Inside the Package
This package should include all items pictured below.
If any are missing or different, you should immediately contact the retailer where you purchased the phone.
User Manual
Handset
AC Travel Charger
13/142

Handset Description
The Pantech C820 weight is about 110 g. The dimensions are 106 x 51 x 21.6 mm
Number pad view
Earpiece
Display
Navigation Key
Left/Right Soft Key
OK key
Home key
Send key
Voicemail
Side key
Clear key
End key
Camera
Speaker
REC key
microSD slot
Camera key
14/142
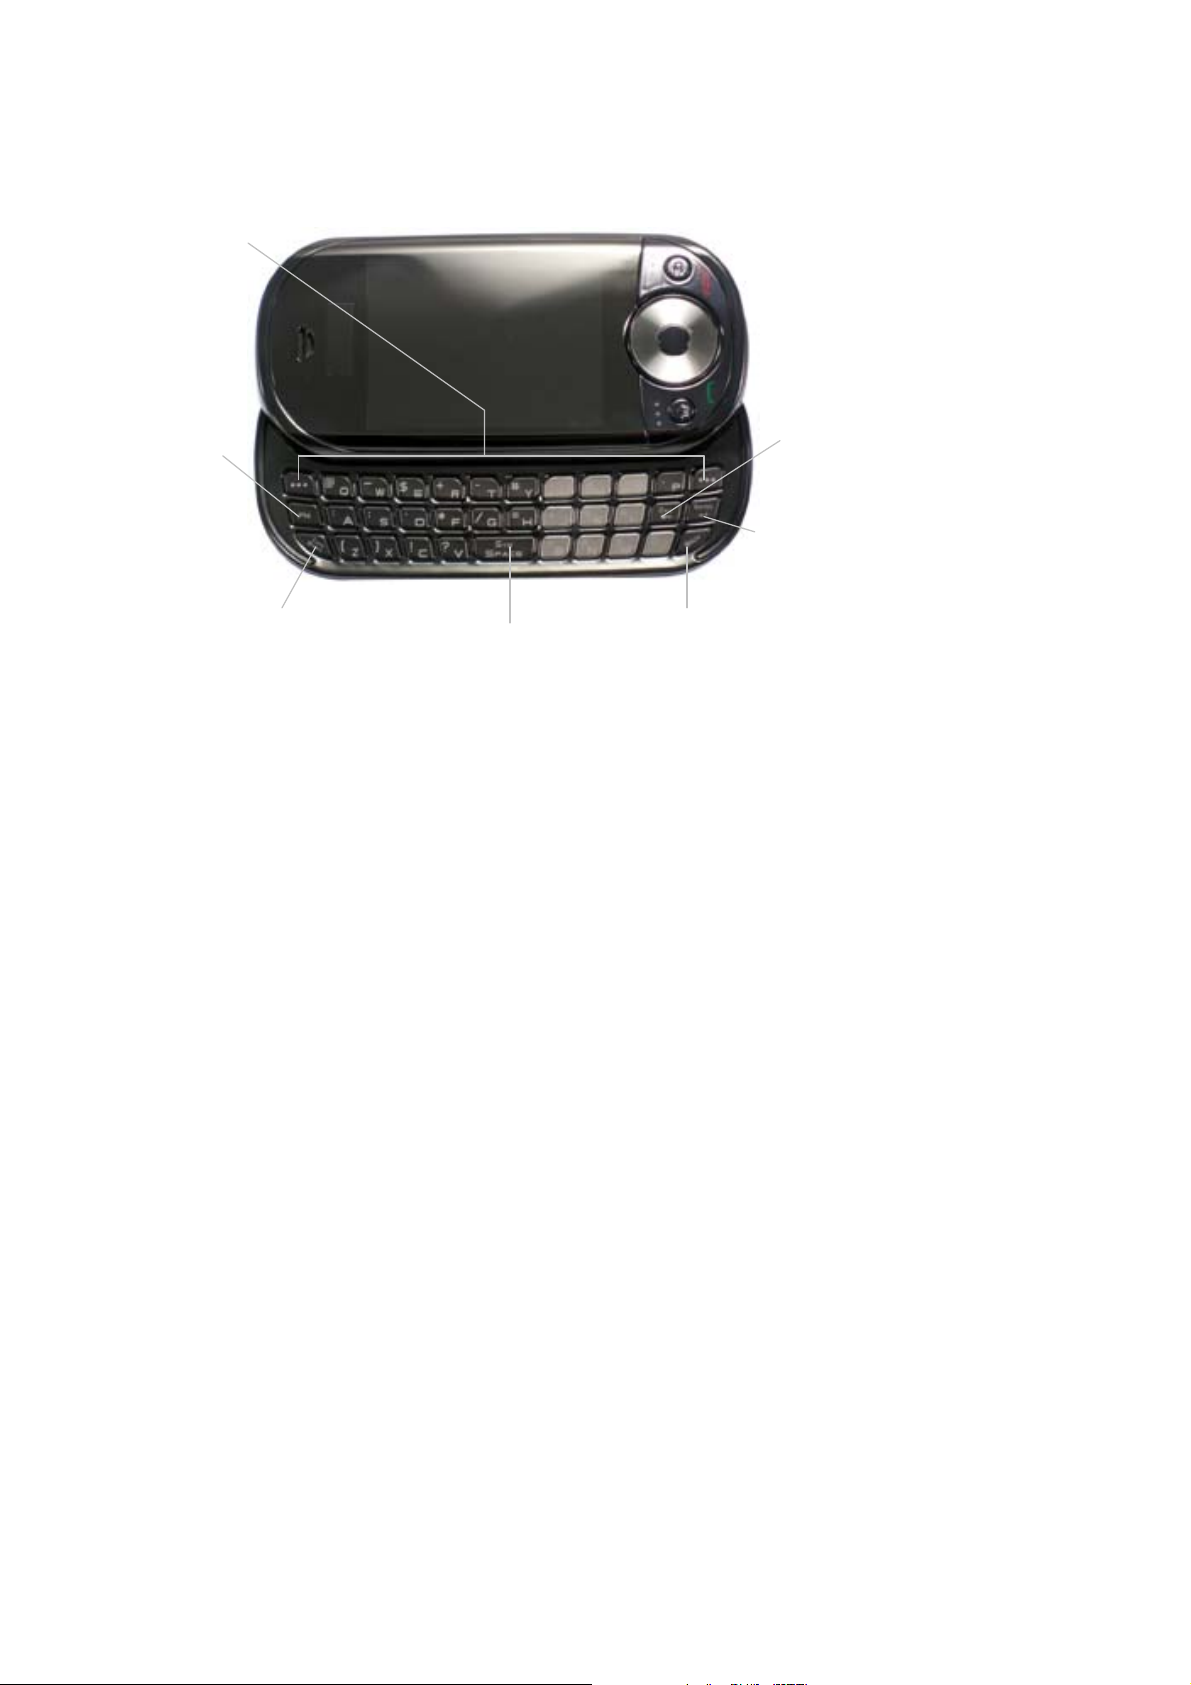
QWERTY keyboard view
s
w
m
Left/Right Soft key
Perform the functions
shown at the bottom
line of the display.
Function key
To enter a number
or a symbol, press
the function key,
and press the
corresponding key
CAPS/Shift key
To type a single
uppercase letter, press
this key then a letter
Note: To use the QWERTY keyboard, ensure that the Number pad is closed, then hold the phone
horizontally and slide the screen up.
Space key
Press to enter a space
Clear/Back key
Return to previous
screen or delete
characters in text
mode.
Delete key
Press to delete a number
or letter
Enter key
Press to create new
line while writing a
message
Delete key
Press to delete a nu
Enter key
Press to create ne
a message
Clear/Back key
Return to previou
delete characters in
15/142
Activating Your Phone
If you have purchased Pantech C820 from the AT&T Store, it has been activated already and is ready to use.
If you have upgraded your phone or received a new phone by mail, it probably needs to be activated before
you can use it.
To activate your phone, follow these steps:
1. Visit an AT&T Store and have your phone activated, and place your cursor on the MY ACCOUNT
tab available on the home page.
2. When the drop-down menu “HOW To” Wireless Guide displays, select ACTIVATE YOUR NEW
PHONE and click GO, to display instructions needed to activate your phone online.
3. After gathering the required materials, select the Activated New Phone link and follow the online
directions to complete the activation process.
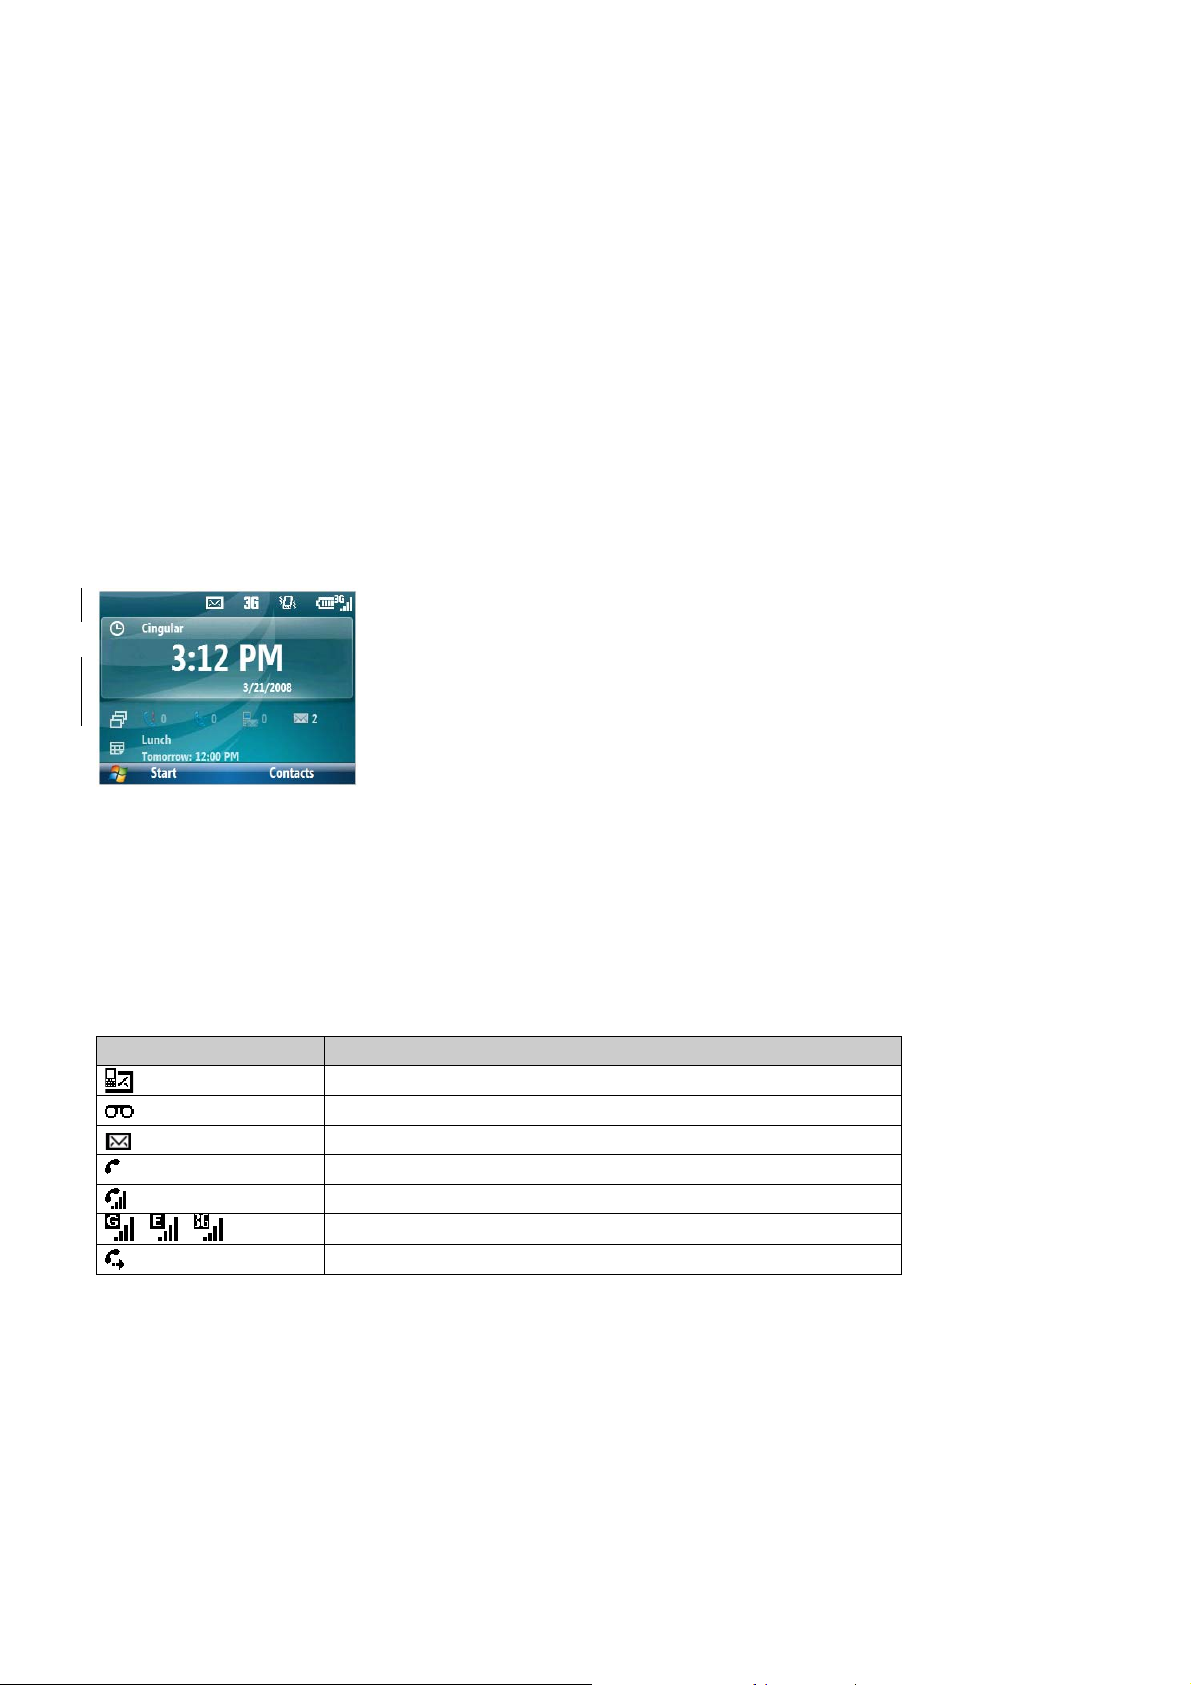
Home Screen
The Home Screen plays an integral part in the navigational mode of your Smart Device. It is the first screen
displayed every time the phone is turned on. You can easily return to the Home screen by pressing the
HOME key.
Å Select and press the OK key to access programs
Å AT&T Operator Name and date/time
Å Soft key commands
Home Screen customization
The Home Screen allows you to customize your start page. It can be used to display a variety of information,
such as phone-specific status, information from over-the-air services, and information from personal
information manager (PIM) applications. You can fully customize the Home Screen by installing new plug-ins
and schemes.
Home screen Icons
Status icons appear at the top of the screen and in the Home screen. The following table lists common status
icons and their meanings.
Indicator
H
Multimedia message (MMS) or Text message (SMS)
New Voicemail
New e-mail
Voice call
Voice call in progress
GPRS / EDGE / 3G Data call in progress / MEdia Net
Calls are forwarded
16/142
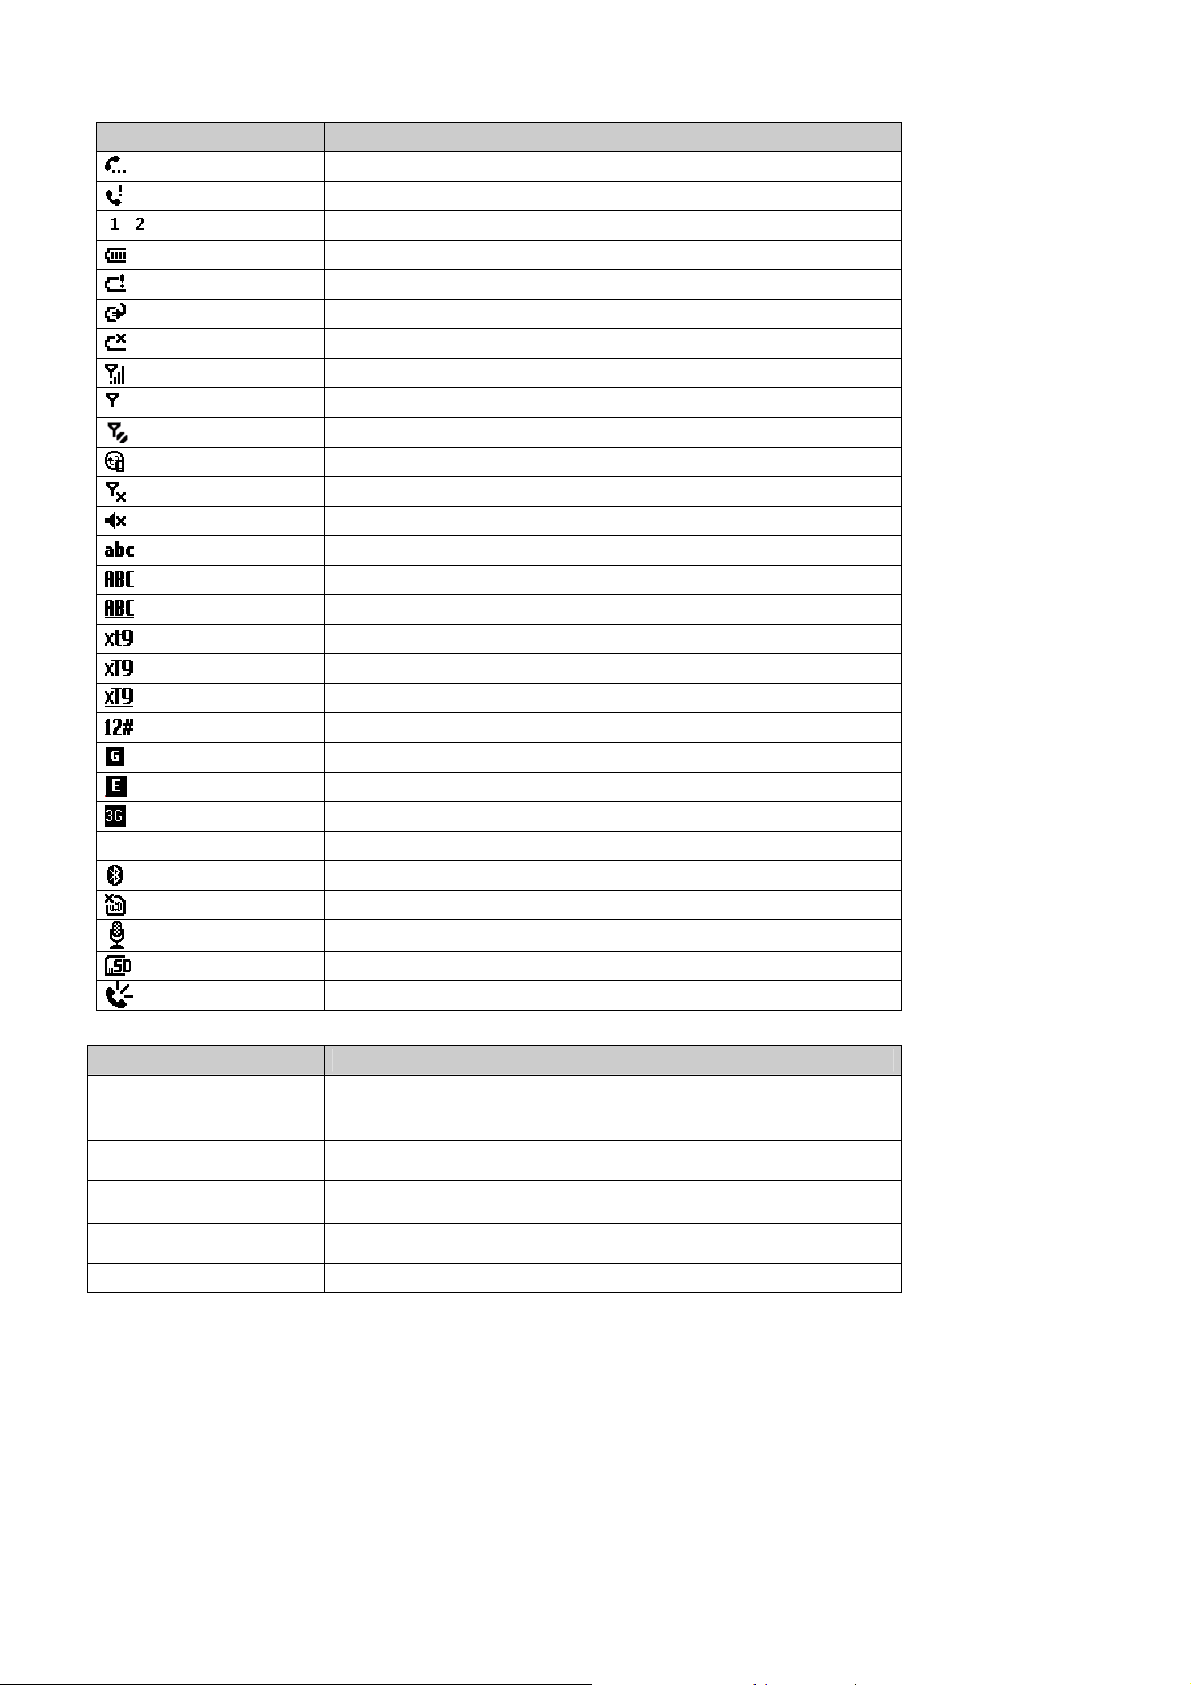
Indicator
/
Call on hold
Missed call
Line 1/Line 2
Battery level
Low battery
Battery charging
No battery
Signal strength
No signal
No wireless coverage
ActiveSync/ Synchronization error
Phone off
Silent
Multipress text input mode, lowercase
Multipress text input mode, uppercase first character only
Multipress text input mode, uppercase
XT9 text input mode, lowercase
XT9 text input mode, uppercase first character only
XT9 text input mode, uppercase
Numeric input mode
GPRS connection available
EDGE connection available
3G connection available
H Media Net
Bluetooth ON
Missing SIM card
Voice Command Enabled
microSD card inserted
Speaker phone on
Keys Functions
Press to make or receive a call.
[Send] key
Short press: View Recent Calls. Long press: Make a call to the last number
called.
[End] key
[Left] Soft key
[Right] Soft key
Press to turn the phone on/off, to terminate a call or to return to the Home
Screen.
(Left Soft Key) Press to access the main menu or the Menu functions
displayed on the bottom line.
(Right Soft Key) Press to access Contacts or Menu function displayed on
bottom line.
[C/Back] key (Clear) Press to clear a digit from the display or to return to the previous
17/142

page.
Numeric key pad [*] key
A short press changes to capital letters or symbols during text entry mode.
A long press shows menu for changing letters or symbols.
Numeric key pad 0 key Press and hold to insert a ‘+’ for international call
Numeric key pad [#] key
Press to insert a space and long press to enter choosing symbols during
text entry mode.
[Home] key Press to return to the Home screen.
[Volume] key
Press to adjust voice v olume during a call, and adjust audio volume in
standby mode.
Activates Voice Command or Voice Notes.
[Recording] key
Short press to launch the Quick List.
A long press enters Voice Note.
[Camera] key Press to launch the camera application.
Numeric key pad 1 ~ 9
Press from number 1 to number 9 on numeric key pad, it prints numeric
number of corresponding alphabet each situation.
: left / right soft key
A ~ Z: alphabet key.
FN: function key. Press and hold this key and press alphabet key at once,
Qwerty
it prints blue colored symbols or numbers.
Enter: enter key
Back: back key
Caps Shift: one time press for first word in capital, double press for holding
in capitals.
18/142
Battery Usage
The battery is not charged when the phone is first purchased – fully charge the battery before first use. The
battery will charge faster if the phone is powered off while charging. Battery operating time gradually
decreases over time. If the battery fails to perform normally, you may need to replace it.
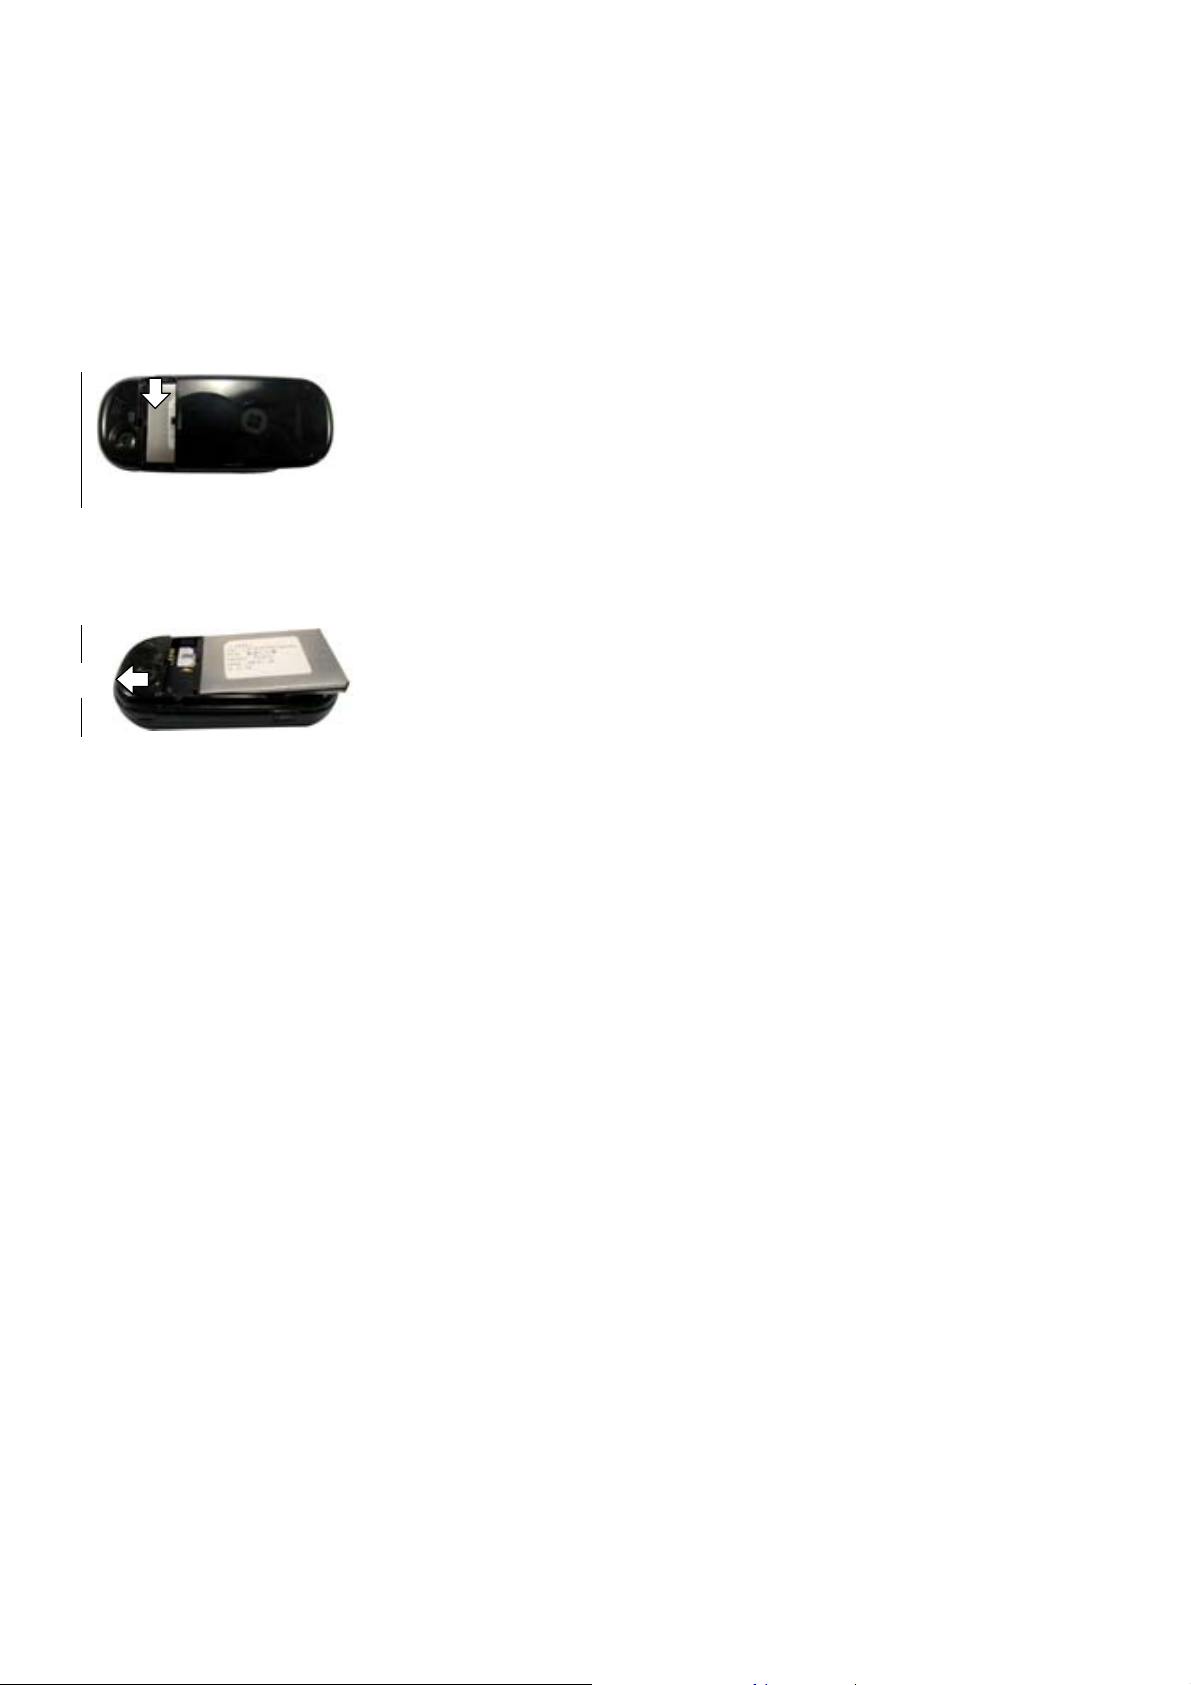
Battery Installation
Be sure to use only the batteries that have been provided with the phone. Installation is easier if you have
placed the phone on a flat surface.
1. Place the battery on the back of the handset and slide into place.
2. Push the battery down until it locks into place.
Battery Removal
Again, place the battery on a flat surface and use an even, steady pressure when removing the battery.
1. Pull the release latch upwards, lift up the battery.
2. Remove the battery from the handset.
1
NOTE: If the battery is not correctly placed in the compartment, the handset will not turn on and/or the
battery may detach during use.
19/142
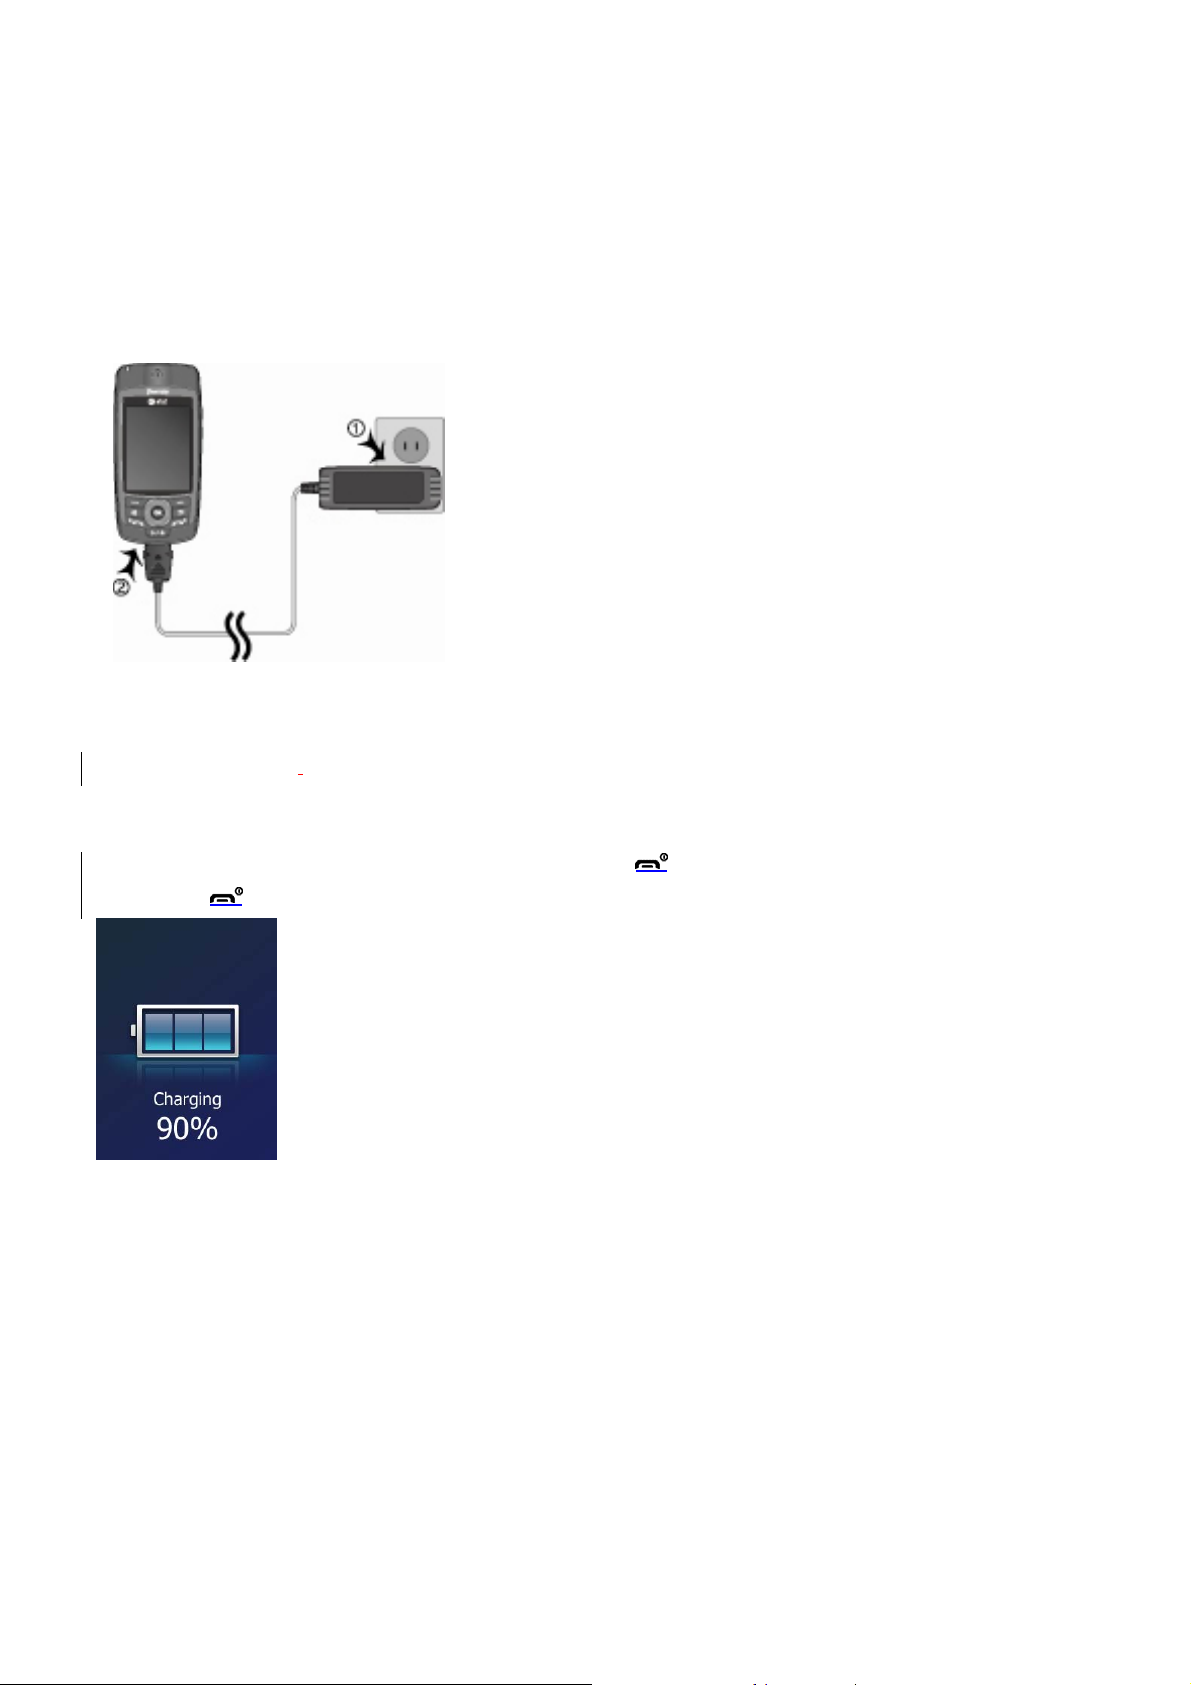
Battery Charging
Make sure the battery is properly installed in the handset. Use all normal cautions when working with a
standard wall outlet.
Power Connection
1. Plug the AC Charger into a standard outlet.
2. Plug the other end of the AC Charger into the bottom of your phone. The battery must be installed in the
phone.
Power-Off Charging
• The Pantech C820
will enter ‘power-off charging mode’ automatically if you try to charge it with the
device powered off.
• Charging state will be displayed according to the current state. ( complete, 0% ~ 90% and error )
• Backlight will turn on for 5 seconds if you press any key except [
] key.
• Press [ ] key if you want to exit ‘power-off charging mode’ and turn on.
NOTE:
• The battery may not be fully charged at the time of purchase.
• Fully charge the battery before use.
20/142

• The battery must be connected to the phone in order to charge it.
• Battery operating time gradually decreases over time.
• If the battery fails to perform normally, you may need to replace the battery.
B
attery Usage Times
The operating time is subject to your handset usage and configuration.
Battery Capacity Talk Time
STD 1320 mAh Up to 180 minutes
attery Standby Times
B
The operating time is subject to your handset usage and configuration.
Battery Capacity Standby Time
STD 1320 mAh Up to 250 hours
NOTE: These times are for a new battery. Usage and Standby times may decrease over time.
Battery Handling Information
The correct usage and handling of batteries can preserve the lifetime of your phone and ensure proper
operation. Operating times are subject to the usage and configuration of your handset; please see the label
on your battery for your battery’s capacity. Follow these suggestions carefully .
DOs
• Only use the battery and charger approved by the manufacturer.
• Only use the battery for its original purpose.
• Try to keep the battery in a temperature range of 41ºF (5ºC) to 95ºF (35ºC). Otherwise, it could
significantly reduce the capacity and lifetime of the battery.
• If the battery is stored in temperatures above or below the recommended range, give it time to warm
up or cool down before using it.
• Completely drain the battery before recharging. It may take one to four days to completely drain.
• Store the discharged battery in a cool, dark, and dry place.
• Purchase a new battery when its operating time gradually decreases after fully charging.
• Dispose of and recycle used batteries in accordance with local regulations.
DON’Ts
• Don’t use a damaged battery or charger.
• Don’t attempt to disassemble the battery – it is a sealed unit with no serviceable parts.
• Don’t accidentally short circuit the battery by carrying it in your pocket or purse with other metallic
objects such as coins, clips and pens. This may critically damage the battery.
To prevent injury or burns, ensure that no metal objects come into contact with the + and – terminals
of the battery.
• Don’t dispose of batteries by burning; they may explode.
21/142

CHAPTER 2. BASIC OPERATION
This chapter addresses and explains the basic features of your phone including:
TURNING THE PHONE ON / OFF
CALL FUNCTIONS
BASIC FUNCTIONS
MAKING AN EMERGENCY CALL
ENTERING TEXT AND NUMBER
USING QWERTY KEYBOARD
22/142

Turning the phone on / off
Turning the phone on
Press and hold the [ ] key until your “Power On” logo appears.
• If “Password” appears on the display, enter your 4-digit password to unlock your phone.
• If the battery does not have enough charge to turn on the phone, the keypad will not light up. You
should charge your phone before turning it on.
Turning the phone off
Press and hold the [ ] key until the “Power Off” logo appears.
Immediately change or recharge the battery when the battery low alert window appears on the display as
"Alert - Main Battery low. To prevent possible data loss, replace or recharge the battery according to the
owner's manual." The phone’s memory may possibly be damaged if the phone turns off due to the battery
completely draining.
If the phone turns off, unsaved data may be lost.
Call functions
Your Pantech C820 phone has many options. This section will show you how to use basic functions such as
making and receiving calls, locking and unlocking your phone, and managing the appearance and settings
on your phone.
Make a call by entering a contact name
Your phone allows you to call someone from your contact list or address book. The screen will auto-fill the
contact name as you begin to enter it.
1. On the Home screen, begin entering the contact name.
2. When you see the contact name you want to call, select it and press left soft key [Call].
Make a call by entering a phone number
On the Home screen, begin entering the phone number.
Do one of the following:
• If you see the number or contact name to call, select it and press left soft key [Call].
• If you do not see the number or contact name, finish entering the number and press OK or Send key.
Make a call from an open contact
You can open contacts from the main screen and make a call from that contact.
1. On the Home screen, press the Right Soft key [Contacts].
2. Select the contact to call and press OK.
3. Select the phone number to call and press OK or left soft key [Call] or Send key .
TIP: If you have a long list of contacts, you can use a shortcut to find the contact you want. Enter the first few
letters of the contact's name. When you do this, the phone searches through the contact list and displays the
name. To call the contact, select the phone number and press OK or Left Soft Key [Call].
23/142

Make a call from the call history list
Call History displays calls you have made, received, and missed.
1. On the Home screen, press [Start] and press [All Programs] , select Call History using the
Navigation Key.
2. Select the name or phone number to call.
3. Press
NOTE: To see Call History and more programs, press All Programs.
Your phone will maintain a list of recent calls you have made. These calls are always easily accessible for
redialing.
1. On the Home screen, press SEND to display a list of recent calls.
2. Select a name or phone number to make a call.
3. Press
.
.
Make a call from a hyperlink phone number
You can quickly dial a phone number from an e-mail or text message that contains a hyperlink phone number.
A hyperlink phone number is underlined in the same manner as a Web site address.
1. From a message containing a hyperlink phone number, select the phone number and press OK.
Answer a call by pressing any key
You can set your phone to answer by pressing any key.
1. On the Home screen, press [Start] [All Programs] [Settings] [Phone] [Call Options].
2. Use the Navigation key to select “Any Key answer” and press [OK] to check on the item and press
Left Sof t Key [Done] to finish.
Answer or ignore a call
To answer the call, press SEND or press Answer.
To reject the call, press END or press Ignore.
NOTE: Selecting Ignore will connect the caller to your voicemail if you subscribe to this service.
Answer a second call
To put the first call on hold and answer the second call, press SEND key or press [Answer].
To switch between calls, press [Swap].
To end the second call and go back to the first, press End key.
Insert a manual pause in a dialing sequence
1. On the Home screen, press the right function key [Contacts].
2. Press the contact in whose phone number you want to insert a pause.
3. Select the phone number and press [Menu] [Edit].
4. Place the cursor where you want to insert the pause.
5. Press [Menu] [Insert Wait]. The letter w appears where the manual pause will occur in the dialing
sequence.
6. Press [Done].
NOTE: To resume dialing after reaching a manual pause, press OK.
Insert a three-second pause in a dialing sequence
There may be occasions when you wish to pause dialing after you’ve selected a contact to call. You can
insert a three-second pause between selecting a contact to call and when the phone actually dials.
1. On the Home screen, press the right function key [Contacts].
24/142

2. Press the contact in whose phone number you want to insert a pause.
3. Select the phone number and Press [Menu] [Edit].
4. Place the cursor where you want to insert the pause.
5. Press [Menu] [Insert Pause]. The letter p appears where the three-second pause will occur in the
dialing sequence.
6. Press [Done].
Basic functions
Setting Up Your Voicemail
Set up Voicemail
All unanswered calls to your AT&T Pantech C820 are sent to voicemail, even if your phone is turned off.
You’ll want to set up your voicemail and personal greeting as soon as you activate your Pantech C820. Your
service provider has assigned your voicemail number to the 1 key.
Check Voicemail
When checking your voicemail, all unanswered calls will be played back in the order they were received.
After you have entered your voicemail, you will hear options, to save, delete, replay, or skip each message.
1. Press and hold 1 key to call your voicemail box.
2. Follow the instructions to retrieve it.
Unlock the keypad
On the Home screen, press Unlock and press the * key.
Auto-Lock the keypad
When deactivating the locked key, you have to enter * key additionally. However, with Auto-Lock, you can
deactivate the lock function automatically. Activate Auto-Lock as follows before using it.
1. Select [Start] [All Programs] [Settings] [Phone] [Auto Lock] in the Home screen.
2. Change the status of Auto-Lock to ‘On’.
3. Select [Done].
Once Auto-Lock is activated, the keypad will become locked when the slide is lowered and the screen is
turned off. You can unlock the setting in this condition by pressing the key for one second or simply open the
slide.
Set the date and time
Your phone is not preset with current date and time. You will need to select the time zone and the date and
time.
1. On the Home screen, press [Start] and press [All Programs], select Settings with the Navigation
Key, or select Settings from the menu bar on top of the Home screen.
2. Select Clock & Alarm, press OK, then Date and Time
3. In Time Zone, select your time zone using the left and right Navigation Keys.
4. In Date, edit the month, day, or year.
25/142

5. In Time, edit the hour, minute, and second.
6. Press [Done].
Set the idle timer
Your Pantech C820 will automatically return to the Home screen after a period of inactivity. You can adjust
the amount of time before the Pantech C820 defaults to the Home screen.
1. On the Home screen, press [Start] and press [All Programs], select Settings with the Navigation
Key, or select Settings from the menu bar on top of the Home screen and press OK.
2. Select Home Screen
3. Select Time out, use left and right Navigation Keys to set the amount of time for the phone to be idle
before the Home screen automatically appears.
4. Press [Done].
Change the Home screen appearance
The Pantech C820 allows you to choose from many color schemes and layouts and allows you to use a
background image for the main screen.
1. On the Home screen, press [Start] and press [All Programs], select Settings with the Navigation
Key, or select Settings from the menu bar on top of the Home screen and press OK.
2. Select Home Screen
3. Under the Home Screen Layout, select a Color scheme, and Background image.
4. Press [Done].
View operating system information
There may be instances when you wish to see the basic information about your phone’s operating system.
This option allows you to see summaries of all the settings on your phone.
1. On the Home screen, press [Start] and press [All Programs], select Settings with the Navigation
Key, or select Settings from the menu bar on top of the Home screen and press OK.
2. Press More, then select About.
NOTE: To see About and more settings, press More.
Enter owner information
Entering and displaying owner information allow someone to return the phone to you in case it is lost.
1. On the Home screen, press [Start] [All Programs] [More] [Settings] [More…] [Owner
Information].
2. Complete the following:
• In Name, enter your name.
• In Telephone number, enter a number where you can be reached.
• In E-mail address, enter your e-mail address.
• In Notes, enter any other information you want to include.
3. Press [Done].
NOTE: To see Owner Information and more settings, press More.
Explore files and folders
File Explorer lets you browse the contents of folders on your phone. The root folder on the phone is named
My Device. My Device is similar to My Computer on a PC and contains the My Documents, Program Files,
Temp, Storage Card, and Windows folders among others.
1. On the Home screen, press [Start], [All Programs] then select Applications and then select
03.File Explorer or select My Stuff. The My Documents folder and its subfolders are listed.
2. To find the folder you want, do the following.
3. Select one of the folders listed in the main window.
4. Press [Menu], and navigate through the folders listed there.
26/142

5. Select the item you want to open.
Silence the ring tone of an incoming call
Press Volume down button until the ring is silenced. You may still answer the call if you want to.
Making an emergency call
Emergency calls do not depend on the availability of the 911 (or 112) network in your area. The emergency
number will work independently of the network area you are in, with or without a SIM card inserted.
Dial 911 (or 112) and press OK.
NOTE: You can make calls to emergency service numbers under any circumstances, even if you have
locked the phone.
Entering text and numbers
You can enter text, numbers and symbols by using the keypad. The phone supports four input modes for
entering text, numbers and symbols: Multipress, XT9, Numeric and symbols. Multipress and XT9 modes are
used for entering text, Numeric mode is used for entering numbers, and Symbols mode is used for entering
symbols like “@”, “/”, “$” and punctuation marks.
When you select a field that requires text or numbers, the phone automatically selects the appropriate input
mode. The status indicator on the top right side of the display screen shows the input mode that you are
currently using.
Change between uppercase, lowercase, and caps lock
Press the * key to change between uppercase, lowercase, and caps lock within a text input mode.
TIP: In both Multipress and XT9 modes, the first letter of a sentence is automatically capitalized.
Change the Multipress timeout
The Multipress timeout setting controls the amount of time you have to press a single key to get to the next
letter on that key. If the time expires, the phone moves the cursor to the next letter in a word or sentence.
1. On the Home screen, press [Start].
2. Press [All Programs].
3. Select Settings, and then press More to select Accessibility.
4. In Multipress timeout, select the length of the pause between key presses using left and right
Navigation Keys.
Delete characters
You can only delete characters when you are in input mode, either for numbers, names, or text. The Clear
key operates similarly to a “backspace” key on a computer.
1. To backspace and delete a single character in any input mode, press Clear key
2. To backspace and delete an entire text or numeric field in any input mode, press and hold the Clear
key
.
.
Enter a space
Either with Multipress or XT9 mode, press the ‘# ‘ key.
Enter a symbol
There may be times when you need to use a symbol that is not displayed on the keypad. Additional symbols
are available by accessing a separate page.
1. Press and hold the * key.
27/142

2. In the menu that appears, press Symbols to display the Symbols page.
3. Select the symbol you want.
4. Press OK.
Enter numbers in text boxes
To enter numbers, use Numeric mode. If you need to enter a number within a line of text, change to Numeric
mode to enter the number, and then change back to Multipress or XT9 mode to finish entering the text.
1. Change to Numeric mode by pressing and holding the * key .
2. Enter the number or numbers using the keypad.
3. Change back to Multipress or XT9 input mode by briefly pressing the * key, then finish entering your
NOTE: If a field permits a numeric entry only, such as a phone number, the input mode automatically
defaults to Numeric mode.
text.
Enter punctuation in Multipress mode
Press ‘1’ until you see the punctuation mark.
TIP: To see all of the available symbols, press and hold the # key.
Enter punctuation in XT9 mode
In a text box when in XT9 text entry mode, do the following:
1. Press 1, and select from a list of common punctuation.
Enter text in XT9 mode
To form a word in XT9 mode, press the number keys that contain the letters you want. As you enter letters,
XT9 analyzes your key presses and attempts to complete the word. For example, to enter the word shoe,
press 7, 4, 6, 3.
1. Press and hold the * key.
2. On the popup menu, select XT9 and press
3. The XT9 indicator appears at the top of the screen.
4. Enter letters by pressing the keys on which the letters appear. Press a key only once for each letter.
If there is more than one choice in the XT9 dictionary for your entry, a list of available words is
displayed.
5. Press the # key to enter a space after the word is entered, or press one of the available words and
the space is added automatically.
6. If you do not see the desired word, press Add Word? from the list, and then enter the word using
Multipress.
OK key.
Start a new line
When you are entering information in a text box, if you want to add a line break, use the OK key.
1. In a multi-line text box such as the Notes area of a contact or a calendar appointment, do the
following:
2. In any input mode, press
OK key.
Turn on Caps Lock
You can toggle back and forth between having the cap lock on and off, the status indicator will tell you which
mode you are in.
1. In Multipress or XT9 mode, press the * key until the status indicator for the text input mode appears
in all capitals.
2. Press the * key to cycle back to lowercase.
28/142

Enter the plus sign for international calls
Before dialing an international call you must insert the plus sign in the number. The “0” functions as the plus
sign.
1. In a numeric entry field, press and hold 0.
Change the input mode
There are several input modes available on your phone depending on whether you are entering contact
information, phone numbers, symbols or text. Be sure you are in the input mode you desire.
1. In text input mode, press and hold the * key.
2. A popup menu appears; select the input mode you want and press OK.
3. The status indicator for the selected input mode appears at the top right of the screen.
Using QWERTY Keyboard
Your phone, with a specifically designed QWERTY keyboard, provides a superior typing experience on a small handheld
for easy and comfortable text writing. You can use all of the phone functions with the keyboard either closed or open.
When you open the keyboard you have the extra benefit of a full messaging keyboard. The handheld includes a fullyfunctional QWERTY keyboar d y ou can use t o co mpo se t ex t f or e- mail mess ag es, not es, a nd so on .
KEY FUNCTION
Left soft key
Right soft key
Shift
FN
Space Key
Enter Key
Del Key
Press to access the main menu or the Menu
functions displayed on the left at the bottom.
Press to access Contacts or Menu function
displayed on the right at the bottom.
To type upper-case letters, hold down the Shift key and
then press one or more letter keys.
To type upper-case letters con t i nuou sly, use the CAPS-
LOCK mode. To change to the CAPS-LOCK mode,
double-tap the Shift key. Once the CAPS-LOCK mode
is set, you can type upper-case letters only. To
deactivate, double-ta p the Shift key again.
To type an upper-case le tter for the first letter of a word
only, simply press t he Shift key once. Then, the first
letter you type will be upper case while the rest will be
lower-case.
To type a special chara cter or numbers, press the
applicable key while hol ding down the FN key.
To type special characters or numbers consecutively,
use the FN-LOCK mode. To change to the FN-LOCK
mode, double-tap the FN key. You can type special
characters or numbers only in this mode. To deactivate,
double-tap the FN key again.
To type a special character or number for t he f ir st letter
of a word only, simply press the FN key once. Then, the
first letter you type will be a special character or number
while the rest will be no rmal letters.
To type a special chara cter that is not placed on the
keyboard, press FN + Spa ce.
Press the Space key to type a blank space.
Press the Enter key to inser t a line break.
Press the Delete key to delete a character to the left of
the text cursor.
29/142

CHAPTER 3. CALENDAR & CONTACTS & CALL
HISTORY & MY STUFF
This chapter discusses using calendar and contacts menu on your phone.
CALENDAR
CONTACTS
CALL HISTORY
MY STUFF
30/142

Calendar
Schedule an appointment
Your calendar allows you to schedule appointments and reminders by day, by time, or by event.
1. From the Home screen, press the left soft key
2. Select Calendar and press OK.
3. Press [Menu] and select New Appointment.
4. Enter information about the appointment.
5. To schedule an all-day event, under End time, select All day event.
6. Press [Done].
NOTE: All-day events do not occupy blocks of time in the Calendar; instead, they appear in banners at the
top of the calendar.
See also ‘Change the remainder time’
Delete an appointment
To delete an existing appointment, you will have the option of deleting just one appointment or the entire
series if it is a recurring appointment.
1. From the Home screen, press the left soft key
2. Select Calendar and press OK.
3. In Agenda view, select the appointment to delete.
4. Press [Menu], then Delete Appointment.
NOTE: When you delete an appointment in Calendar on your phone, it is also deleted on your PC the next
time you synchronize. If the appointment has not been synchronized with a PC, it will be deleted only from
the phone.
Calendar items can be deleted only from Agenda view or from an open calendar appointment. To delete from
other views, open the appointment, and Press [Menu] [Delete].
TIP: To cancel a deletion, press Cancel key.
[Start] [All Programs].
[Start] [All Programs].
Update an appointment
When your schedule or appointment information changes, you can easily edit the appointment with new
information.
1. From the Home screen, press the left soft key
2. Select Calendar and press OK.
3. Select the appointment and press OK key and press right soft key [Menu] and select Edit and press
OK key.
4. Make your changes and press [Done].
[Start] [All Programs].
View an appointment
Your appointments should be easily viewable from the main calendar menu. The Calendar menu is
accessible with the Start soft key from the Home screen.
1. From the Home screen, press the left soft key
2. Select Calendar and press OK.
3. Select the appointment to view and press OK.
[Start] [All Programs].
View appointments for the week
Each week’s appointments are clearly displayed in the calendar, when you’ve selected Week view.
1. From the Home screen, press the left soft key
2. Select Calendar and press OK.
3. Press [Menu] and select Week View.
See also ‘Change the display of the workweek’.
[Start] [All Programs].
31/142

View today's agenda
For a single day’s schedule, select that day from one of the views in the calendar and select Agenda view.
1. From the Home screen, press the left soft key
2. Select Calendar and press OK.
3. Press [Menu] select Go to Today and press OK.
4. From Week or Month view in Calendar, press soft key [Menu] and select Agenda View.
TIP: To view previous or approaching dates, scroll left or right, or Press [Menu] [Go to Date].
To quickly view today's agenda, On the Home screen, press an upcoming appointment (if one is present).
[Start] [All Programs].
View your agenda for a specific date
You can also select a specific date to check that day’s schedule.
1. From the Home screen, press the left soft key
2. Select Calendar and press OK.
3. Press [Menu] select Go to Date and press OK.
4. Enter the date to view, and press [Done].
[Start] [All Programs].
View your schedule for the month
The calendar function has week views and month views, for a higher level view of a schedule.
1. From the Home screen, press the left soft key
2. Select Calendar and press OK.
3. Press [Menu] select Month View and press OK.
[Start] [All Programs].
Make an appointment recurring
If you’ve already entered a single appointment in your calendar and would like to change it to a recurring
appointment, use the Occurs selection after selecting the appointment.
1. From the Home screen, press the left soft key
2. Select Calendar and press OK.
3. Select an appointment and press soft key [Menu] [Edit].
4. Scroll to Occurs and use left/right navigation key to select one of the recurrence options.
5. Press [Done].
[Start] [All Programs].
Show week numbers
In many cases the weeks of the year are referred to by number – the calendar function allows you the option
of displaying the number of the week, between 1 and 52.
1. From the Home screen, press the left soft key
2. Select Calendar and press OK.
3. Press the right soft key [Menu] and select Tools , and press OK key or right navigation key, it shows
options menu, then press Ok key.
4. Scroll to Month view and click OK.
5. Select Show week numbers.
6. Press [Done].
NOTE: In Week view, the week number appears at the top of the screen. In Month view, the week numbers
appear along the left side of the screen.
[Start] [All Programs].
Change the work week display
Depending on your schedule, you may want to change the default work week displayed. You can choose any
day of the week to start and/or finish.
1. From the Home screen, press the left soft key
2. Select Calendar and press OK.
3. Press the right soft key [Menu] and select Tools , press OK key or right navigation key, and press
Do one of the following:
Options.
[Start] [All Programs].
32/142

• To specify the first day of the week, in First day of week, press Sunday or Monday.
• To specify the number of days you want to appear in a week, in Week view, press 5-day
week, 6-day week, or 7-day week.
4. Press [Done].
Change the reminder time
By default, the reminder time is set 15 minutes prior to an appointment.
1. In Calendar, press the right soft key [Menu] and select Tools, press OK key or right navigation key,
and press Options.
2. Scroll to Set reminders and press OK.
3. Change the time.
4. Press [Done].
Contacts
Using the Contacts feature of your Pantech C820, you can manage all the phone information you need.
There are many options for adding contacts, retrieving contacts, and managing the information for each
contact.
Create a new contact
To enter a new contact manually, without having the caller on the phone, you will use the Contacts selection
from the Home screen.
1. On the Home screen, press [Start] [All Programs].
2. Select Contacts using the Navigation Key and press OK.
3. Press the left soft key
4. Enter information for the new contact.
5. Press [Done].
TIP: If someone who isn't in your list of contacts calls you or sends you a message, you can create a contact
from Call History or from the message by pressing [Menu] [Save to Contacts].
[New].
Send via Bluetooth
It is possible to use your phone to send a contact to another device such as Bluetooth radio. A list of devices
will appear when you’ve selected Beam.
1. On the Home screen, press the left soft key
2. Select Contacts.
3. Select the contact to beam.
4. Press the right soft key
5. Select Send Contact then select Send via Bluetooth and press OK.
6. On the list that appears, scroll to the name of the device you want to send the contact.
7. To send using Bluetooth, ensure that both Bluetooth radios are turned on and that Bluetooth is
discoverable on the receiving device.
8. Press Select.
9. Status information displays, indicating the name of the device to which the phone is sending, and
whether the Send via Bluetooth process is pending, finished, or was unsuccessful.
If you want to receive a contact by Send via Bluetooth, you have to follow these steps.
1. On the Home screen, press left soft key
2. Select Settings and press OK.
3. Select Connections and press OK.
4. Select Wireless Manager and press OK.
[Menu]
[Start] [All Programs].
[Start] [All Programs].
33/142

5. Press the Menu and select the Bluetooth Settings.
6. Press the Settings and check ‘Allow other Bluetooth devices to see this phone’
NOTE: More information about Bluetooth, see Chapter 13 Bluetooth section.
Call a contact from contact information
You can call a contact directly by selecting them from the Contacts page off the Home screen.
1. On the Home screen, press left soft key
directly press right soft key [Contacts].
2. Select the contact to call and press OK.
3. Scroll to the phone number to dial.
4. Press OK or SEND.
[Start] [All Programs] and sele ct [contacts] or
Call a contact from the contact list
If you do not select one of the contacts phone numbers, but you press Send, your phone will dial the default
number for that contact.
1. On the Home screen, press left soft key
directly press right soft key [Contacts].
2. Select the contact to call.
3. Press SEND. The contact's default phone number is dialed.
TIP: To call a phone number other than the default, press the contact, press OK and scroll to the number you
want to dial, then press SEND.
[Start] [All Programs] and sele ct [contacts] or
Change the default number for a contact
The default number for the contact will be the first number displayed. If you need to change the default
number, you will use the Navigation key to set the default.
1. On the Home screen, press left soft key
2. Select Contacts and press OK.
3. Select the contact whose default number you want to change.
4. Press the Navigation Key left or right to select the number or other contact method that you want to
set as the default. For example, (m)obile, (h)ome or (w)ork.
[Start] [All Programs].
Duplicate a contact
This feature allows you to copy contacts in Device or SIM to the same area. (Device -> Device, SIM -> SIM)
1 On the Home screen, press the left soft key
2 Select Contacts and press OK.
3 Scroll to the contact to duplicate
4 Press the right soft key
5 Select Duplicate Contact from the popup menu and press OK.
[Menu].
[Start] [All Programs].
34/142

Copy to Device / SIM
This feature allows you to copy selected contacts in Device or SIM to other areas. (Device -> SIM , SIM ->
Device)
1 On the Home screen, press the left soft key
2 Select Contacts and press OK.
3 Scroll to the contact to duplicate
4 Press the right soft key
5 Select Copy to Device from the popup menu and press OK. – when selecting SIM Contact
5 Select Copy to SIM from the popup menu and press OK. – when selecting Device Contact
[Menu].
[Start] [All Programs].
Copy All to Device / SIM
This feature allows you to copy all contacts in Device or SIM to other areas. (Device -> SIM, SIM -> Device)
1 On the Home screen, press the left soft key
2 Select Contacts and press OK.
4 Press the right soft key
5 Select Copy All to Device from the popup menu and press OK. – when selecting SIM Contact
Select Copy All to SIM from the popup menu and press OK. – when selecting Device Contact
[Menu].
[Start] [All Programs].
Delete a contact
Deleting a contact is very simple, just use the Menu key once you have selected the contact.
1. On the Home screen, press the left soft key
2. Select Contacts and press OK.
3. Scroll to the contact to delete.
4. Press the right soft key [Menu]
5. Select Delete Contact from the popup menu and press OK.
.
[Start] [All Programs].
Delete All Device / SIM
This feature allows you to delete all contacts in Device or SIM.
1. On the Home screen, press the left soft key
2. Select Contacts and press OK.
3. Press the right soft key
[Menu].
[Start] [All Programs].
35/142

4. Select Copy All to Device from the popup menu and press OK. – when selecting SIM Contact
Select Copy All to SIM from the popup menu and press OK. – when selecting Device Contact
Create a contact for a caller
Creating a contact for a caller makes their information easier to retrieve when the call is done. The contact
can be added to the Contact list during the call.
1. During a call, press th e Right soft key [Menu].
2. Select Save to Contacts and press OK.
3. Select <New Contact >.
4. Enter information about the contact.
5. Press [Done]. The contact is added to your Contact list.
Filter the contact list
Contacts that have categories assigned are displayed in a list when filtered by category.
1. On the Home screen, press the left soft key
2. Select Contacts and press OK.
3. Press the right soft key
4. Select Filter from the popup menu and press OK.
5. Select a category to filter.
[Menu].
[Start] [All Programs].
Find a contact
The contact section of your phone has an auto-fill feature that will allow you to find contacts more quickly.
While entering the number or name of the contact, the phone will auto-fill the rest of the information as you
press the keys, until you find the right contact.
1. On the Home screen, press the left soft key
2. Select Contacts and press OK.
3. Begin entering the name or phone number of the contact you want to find until the contact is
displayed. For example, to find "Sandra," enter 7, 2, 6, 3, 7, 2 because these numbers correspond to
the letters for that name.
[Start] [All Programs].
Send an e-mail to a contact
If a contact’s e-mail address is entered into their information, you can send an e-mail from within the contact
list after selecting the contact.
1. On the Home screen, press the left soft key
2. Select Contacts and press OK.
3. Select a contact and press OK.
4. Scroll to the e-mail address and press OK.
5. Select the e-mail account to use.
6. Enter a subject, compose your message, and then press Send.
[Start] [All Programs].
36/142

Send a text message to a contact
You can send text mes sage from within the contact list after selecting the contact and pres sing the Menu ke y.
1. From the Home screen, press the left soft key [Start] [All Programs].
2. Select Contacts and press OK.
3. Select a contact, and press OK.
4. Press the right soft key [Menu] and select Send Text Message.
5. Compose your message, and press the left soft key [Send].
View and edit contact information
You may want to change or update contact information once it has already been entered. Do this from the
Contacts menu of the Home screen.
1. On the Home screen, press the left soft key [Start] [All Programs].
2. Select Contacts and press OK.
3. Select a contact, and press OK.
4. Press the right soft key [Menu] select [Edit] and press OK.
5. When finished making changes, press [Done].
Add a picture to a contact
You may wish to add a picture to a contact record. You can add an existing picture, or you can put the phone
in Camera mode to take the picture and add it to the contact.
1. On the Home screen, press the left soft key [Start] [All Programs].
2. Select Contacts and press OK.
3. Select a contact, and press OK.
4. Press the right soft key [Menu] select [Edit] and press OK.
5. Using the Navigation Key, scroll down to Picture.
Do one of the following:
• Select the picture you want to add.
• Press Camera and take a picture.
Remove a picture from a contact
Once a picture is attached to a contact, it can easily be removed or changed from the Contacts menu by
using the soft key and editing the field.
1. On the Home screen, press the left soft key [Start] [All Programs].
2. Select Contacts and press OK.
3. Select a contact, and press OK.
4. Press the right soft key [Menu] select [Edit] and press OK.
5. Press Remove Picture.
Assign a category to a contact
It may be helpful to group your contacts in categories you define for easier reference. If you know the
contact’s category you can easily retrieve the contact.
1. You can use categories to help you organize and group your contacts.
2. On the Home screen, press the left soft key
3. Select Contacts and press OK.
4. Select a contact, and press OK.
5. Press the right soft key [Menu]
6. Using the Navigation Key, scroll down to Categories.
7. Use the left and right Navigation Keys to select the category you want.
select [Edit] and press OK.
[Start] [All Programs].
37/142

8. Press [Done].
NOTE: Categories are shared between your contacts and tasks. A category will remain in the list of shar ed
categories as long as it is assigned to at least one contact or task.
Assign a ring tone to a contact
To easily identify who is calling you by the ring tone, you can assign a custom ring tone to each contact.
1. On the Home screen, press the left soft key [Start] [All Programs].
2. Select Contacts and press OK.
3. Select a contact, and press OK.
4. Press the right soft key [Menu] select [Edit] and press OK.
5. Using the Navigation Key, scroll down to Custom ring tone.
6. Select the ring tone you want.
7. Press [Done].
Create a speed dial
You can create a speed dial for a phone number, e-mail address, or Web page address that is stored in
Contacts.
1. On the Home screen, press the left soft key [Start] [All Programs].
2. Select Contacts and press OK.
3. Select the contact for whom to create a speed dial and press OK.
4. Select the phone number, e-mail address, or Web page address for which to create a speed dial.
5. Press [Menu] and select Add to Speed Dial, then press OK.
6. In Keypad assignment, select the speed dial number to use.
7. Press [Done].
NOTE: The number 1 is reserved for calling your voicemail box.
Using speed dials
Set up speed dial codes to allow you to call contacts by pressing only one (or two) buttons from the Home
screen.
1. On the Home screen, press and hold the number on the keypad that you have assigned as a speed
dial for the phone number, e-mail address, or Web page.
2. If the speed dial is in two digits, press the first digit, and press and hold the second digit.
3. The phone dials the phone number, opens a new e-mail message, or goes to the Web page.
View and edit a speed dial
You can view or edit all the contacts you’ve assigned to speed dial by entering the Speed Dial menu from the
Start soft key.
1. On the Home screen, press the left soft key [Start] [All Programs].
2. Select [Applications] [5.Speed Dial] and press OK.
3. Select a contact you want to change and press OK key.
4. Make any changes and press [Done].
Delete a speed dial
Deleting a Speed Dial can be done at any time by following these instructions.
1. On the Home screen, press the left soft key [Start] [All Programs].
2. Select [Applications] [Speed Dial] and press OK.
3. Select the speed dial to delete.
4. Press [Menu] and select Delete from the popup menu.
38/142

Call History
Call history provides details of all calls received, missed and dialed.
1. From the Home screen, press the left soft key [Start] [All Programs] [More].
2. Select Call History and press OK.
TIP: To view only missed calls, incoming calls, or outgoing calls, press [Menu] select Filter, and then press
the type of calls to view.
NOTE: Once you have accessed Call History from the main menu, the icon appears on the top of the Home
screen Shortcut bar. Select the icon and press OK to go directly to Call History.
View Call Timers
You can time each call that is received or made, and the time and length of each call can be reviewed.
1. From the Home screen, press the left soft key [Start] [All Programs] [More].
2. Select Call History and press OK.
3. Press [Menu] and select View Timers from the popup menu.
Reset Call Timers
When call information is no longer required, the call timers can be set to zero.
1. From the Home screen, press the left soft key [Start] [All Programs] [More].
2. Select Call History and press OK.
3. Press [Menu] and select View Timers from the popup menu and press OK.
4. Press [Menu] and select Reset Timers and press OK.
5. Press Yes. All of the call timers are set to zero (0), except for the Lifetime calls timer.
View details about a call
To review all the stored information on a call you will access the Call History function.
1. From the Home screen, press the left soft key [Start] [All Programs] [More].
2. Select Call History and press OK.
3. Select the call you want to view details for and press OK.
Create a contact from Call History
While you are in the Call History function, you can select any of the calls and automatically add that caller to
your contact list.
1. From the Home screen, press the left soft key [Start] [All Programs] [More].
2. Select Call History and press OK.
3. Select the phone number for which to create a contact and Press [Menu] and scroll to Save to
Contacts in the popup menu and press OK.
4. Select <New Contact> and press OK.
5. Enter the remainder of the contact information and press [Save]. The new contact appears in your
contact list.
Delete an item from Call History
Any entry in the Call History can be deleted by selecting an entry and then by accessing the menu.
1. From the Home screen, press the left soft key [Start] [All Programs] [More].
2. Select Call History and press OK.
3. Select the item to delete.
4. Press the right soft key [Menu], then select Delete from the popup menu.
TIP: To delete all items in Call History, press [Start] [All Programs] [More] [Call History] [Menu] [Delete
List].
39/142

Dial the last number called
If you need to quickly call the last number you have called, this shortcut allows you to do so without using
menus.
1. On the Home screen, press SEND twice.
Find a contact from Call History
There is an option in the Call History for finding contacts from your contact list. The auto-fill feature will help.
1. From the Home screen, press the left soft key [Start] [All Programs] [More].
2. Select Call History and press OK.
3. Press [Menu], than select Find Contact from the popup menu.
Insert an international country code
To make an international call you must include a country code at the beginning of the dialing sequence for
the phone number.
1. Press and hold 0 until a plus (+) sign appears, enter the country code, and then enter the rest of the
phone number.
NOTE: You can insert a plus (+) sign into a contact's phone number or dial it directly from the keypad.
Send an E-mail message from Call History
To use this function, the E-mail address of the person you are sending an E-mail to must be included in their
contact information card.
1. From the Home screen, press the left soft key [Start] [All Programs] [More].
2. Select Call History and press OK.
3. Select the contact you want to send an E-mail message to and press [Menu].
4. Scroll to E-mail and press OK.
5. Select an E-mail account.
6. Compose the message and press Send.
My Stuff
The My Stuff displays My Pictures, My Ringtones, My Videos, Notes, and Templates.
My Stuff’s menu is same as File Explorer
40/142

CHAPTER 4. VOICEMAIL & MESSAGING
This chapter addresses Voicemail, Text, Multimedia Message, Video and E-mail Messaging functions
including:
VOICEMAIL
TEXT MESSAGING
MULTIMEDIA MESSAGING
E- MAIL
41/142

Voicemail
Voicemail is available at all times. When you call your voicemail the messages will be played back in the
order they were received. You will have options to save, delete, replay, or skip each message.
Call your voicemail box
Retrieving your voicemail is simple and can be accessed directly from the Home screen.
1. On the Home screen, press and hold 1 to call your voicemail box.
2. Follow the instructions to retrieve it.
Text messaging
You can create a text message, delete a text message, or clear all text messages. Contacts from the contact
list can be used to send messages just as they can be used to make calls.
Create a text message
The Pantech C820 allows you to crea te text messages quickly. You create a text message by typing in a
phone number or by selecting a contact first.
1. On the Home screen, press the left soft key [Start] [All Programs] select Messaging and press OK.
2. Select Message and press OK.
3. Press the right soft key [Menu] [New] [Text Message].
4. In “To”, enter text message recipients’ phone numbers. Insert a semicolon (;) between multiple text
message recipients’ phone numbers.
5. Press Down navigation key, and compose message you want to send.
6. Press [Send]. Text messages are sent immediately.
TIP: You can quickly enter text message numbers from your contact cards. In T o, press [Menu] and select
‘Add Recipient’ from the list. Then, select the recipient’s phone number.
To cancel creating a message, just press [Menu] [Cancel Message].
Delete all messages
To clear all messages in a folder, you will need to show all the folders and select the folder you want.
1. On the Home screen, press the left soft key [Start] [All Programs] select Messaging and press OK.
2. Select Messages and press OK.
3. Press [Menu], and then select Folders.
4. Press [Menu], and then select Show all Folders.
5. Select the folder with the messages you want to delete.
6. Press [Menu] [Delete All].
Multimedia Message
Multimedia Messaging Service allows you to send multimedia messages to others, which can include text,
graphics and ring tones in a message.
Create a multimedia message
Creating a Multimedia message is simple and you can add images or attachments to the message.
1. On the Home screen, press the left soft key [Start] [All Programs], select Messaging and press
OK.
2. Select Message, press OK then press [Menu] [New] [Multimedia Message].
3. Enter an e-mail address or phone number.
4. Input a subject of this Multimedia message.
5. Input text message in text box.
42/142

6. To add an image, press [Menu] [Add Item] and press OK, then select Image.
7. Select an image from Picture file browser and the image is added to the Multimedia message.
8. Press the left soft key [Send] to send message.
If Multimedia message was sent successfully, a ‘Message sent successfully’ dialog will appear.
TIP: You can quickly enter Multimedia message numbers from your contact cards. In To, press [Menu]
and select ‘Add Recipient’ from the list. Then, select the recipient’s phone number.
To cancel creating a Multimedia message, just press [Menu] [Cancel Composer].
Text box
Enter the text that you wish to send. English and Spanish languages are supported.
Multimedia message Menu options
The Menu supports advanced MMS composer option.
Menu option Description
Preview Press [Menu] [Preview]
Add Recipient
Check Name Press [Menu] [Check Name], convert phone number to corresponding name, if that
Add Item
Create Item
Tem pla te You can add current components as a template, or replace with previous saved
Remove Item
My Text Press [Menu] [My Text]
Copy/Paste Press [Menu] [Copy/Paste]
Preview is displayed when Multimedia message has content (image, sound, text or
video). Preview is not displayed when message is empty.
You can add recipients in various ways to select the recipient address from Contact list
or Photo Album.
Press [Menu] [Add Recipient] to select the recipient’s address from Contact list or
Photo Album.
Press [Menu] [Add Recipient] [Contacts]: add a contact from Contact list.
Press [Menu] [Add Recipient] [Multi Contacts]: add multiple contacts from Contact
list at once.
Press [Menu] [Add Recipient] [Photo Album]: add Photo Album.
Press [Menu] [Add Recipient] [Bcc]: show Bcc field to add recipients in Bcc field.
Press [Menu] [Add Recipient] [Cc]: show Cc field to add recipients in Cc field.
number is registered in contact list.
You can add content such as text, image, sound, video, vCard, vCalendar, and
Attachments
Press [Menu] [Add Item] [Text]: enter a text message in the text box.
Press [Menu] [Add Item] [Image]: select image file from My Pictures.
Press [Menu] [Add Item] [Sound]: select sound file from My Documents.
Press [Menu] [Add Item] [Video]: select video file from My Videos.
Press [Menu] [Add Item] [vCard]: select a vCard.
Press [Menu] [Add Item] [vCalendar]: select a vCalendar.
Press [Menu] [Add Item] [Attachments]: select any file from all of memory.
You can add a picture, video or sound from Camera and Voice Note.
Press [Menu] [Create Item] [Picture]: Take a picture with Camera and add it to
Multimedia message.
Press [Menu] [Create Item] [Video]: Record a video with Camcorder and add it to
Multimedia message.
Press [Menu] [Create Item] [Sound]: Record a Voice Note and add to Multimedia
message.
templates.
Press [Menu] [Template] [Add Template]: Replace current components with previous
saved components.
Press [Menu] [Template] [Save as template]: Save current components as a new
template.
You can remove content such as image, sound, text and video
Press [Menu] [Remove Item]
You can add predefined text messages to text field.
You can cut, copy, paste text messages to text field.
43/142
Menu option Description
Priority Level
Page Layout You can set the layout of Multimedia Message in preview.
Options You can set the importance of Multimedia Message.
Save Press [Menu] [Save]: Save Multimedia Message in draft folder. Back to Inbox.
You can set the importance of Multimedia Message.
Press [Menu] [Priority Level] [High]: set Multimedia Message to be important.
Press [Menu] [Priority Level] [Normal]: set Multimedia Message to be normal.
Press [Menu] [Priority Level] [Low]: set Multimedia Message to be low.
Press [Menu] [Page Layout] [Image Top]: place image on top and text below in
preview.
Press [Menu] [Page Layout] [Text Top]: place text on top and image below in
preview.
Press [Menu] [Options] [Insert Page]: insert a new page at current page.
Press [Menu] [Options] [Delete Page]: delete current page.
Press [Menu] [Options] [Move Page]: change the order of current page.
Press [Menu] [Options] [Duration]: set durations between pages.
Press [Menu] [Options] [Multimedia Msg. Options]: set properties of Multimedia
Message such as profile, default edit mode, etc.
Press [Menu] [Options] [Per Msg. Setting]: set properties of per message such as
delivery report, read report, etc.
Press [Menu] [Options] [ About]: show information about Multimedia Message client.
Cancel
Composer
Press [Menu] [Cancel Composer]: Cancel Multimedia Message Back to Inbox.
View Multimedia Message
To view Multimedia Message, simply select Multimedia Message from the Messaging menu and you will see
a list of Inbox messages.
1. On the Home screen, press the left soft key [Start] [All Programs], select Messaging and press
OK.
2. Select Multimedia Message which you want to see for list of Inbox messages.
3. Press OK to play message.
Select Multimedia Message in the list of Message Type
After selecting Multimedia Message from the Messaging menu, you will use the Menu button to step through
each field that is available when composing a message.
1. On the Home screen, press the left soft key [Start] [All Programs], select Messaging and press
OK.
2. Press [Menu] [Reply] to send a reply Multimedia Message to new receiver and “CC”,”BCC”.
3. Press [Menu] [Reply all] to send a reply Multimedia Message to all senders. Open Multimedia
Message editor and display “To” field with “RE”: all sender addresses including “CC”, “BCC” sender.
4. Press [Menu] [Forward] to forward Multimedia Message, Open Multimedia Message editor.
5. Press [Menu] [Save] to save address to phonebook.
6. Press [Menu] [Details] to show detailed information about current Multimedia Message, such as
message size, sender.
7. [Menu] [Delete] to delete current message in the inbox list.
8. Press [Menu] [Back] to terminate Multimedia Message viewer and go back to the Inbox message
list.
Change messaging account options
Multimedia Message, E-mail and text messages can be displayed differently and you can select from many
options for each.
1. On the Home screen, press the left soft key [Start] [All Programs], select Messaging and press
44/142

OK.
2. Select Messages or E-mail account and press OK.
3. Press [Menu] [Tools] [Options].
4. Select the type of options to change.
5. Press [Done].
Change how the message list displays
You can change the order in which messages are displayed and show the date and time that messages
were received.
1. On the Home screen, press the left soft key [Start] [All Programs], select Messaging and press
OK.
2. Press [Menu] [Tools] [Options] [Display].
3. Change the display options and Press [Done].
Create a message from a contact card
Just as you can make phone calls from a contact card, you can select a contact and send a message from
the contact card.
1. On the Home screen, press [Start] [All Programs], select Contacts and press OK.
2. Select a contact.
3. Select the messaging address or phone number to use.
4. Select th e account to us e and press OK.
5. Use left soft key that displays corresponding action, or press right soft key [Menu] and select the
message you want to use. Ex) ‘Send Text Message’ ‘Send Multimedia Msg.’
6. A new message opens ready for you to complete and send.
TIP: To cancel a message, press [Menu] [Cancel Composer].
E-mail
The Pantech C820 allows you to send e-mails with several options. You can copy, blind copy, set priority,
and store e-mails just as you would from a computer. The Pantech C820 uses Outlook as the default mail
program.
You can send and receive e-mail messages in one of these ways:
• Synchronize e-mail messages with Microsoft Exchange or Microsoft Outlook on your PC.
• Send and receive e-mail messages by connecting directly to an e-mail server through an Internet
Service Provider (ISP) or a network.
Synchronizing e-mail messages
Use the Outlook E-mail account to send and receive e-mail messages by synchronizing e-mail messages
with Microsoft Exchange or Microsoft Outlook on your PC. E-mail messages can be synchronized as part of
the general synchronization process. You will need to enable Inbox synchronization in ActiveSync.
During synchronization:
• Messages are copied from the mail folders of Exchange or Outlook on your PC to the Outlook E-mail
folders on your phone.
• E-mail messages in Outlook E-mail on your phone are transferred to Exchange or Outlook, and then
sent from those programs.
Connecting Directly to an E-mail Server
You can send and receive e-mail messages by connecting to an e-mail server. You’ll need to set up a
remote connection to a network or an ISP, and a connection to your e-mail server. When you connect to the
e-mail server, new messages are downloaded to the phone’s Inbox folder. Also messages in the phone’s
45/142

Outbox folder are sent, and messages that have been deleted on the e-mail server are removed from the
phone’s message folders.
Folder Behavior with a Direct Connection to an E-mail Server
The behavior of the folders you create depends on whether you are using POP3 or IMAP4.
• If you use POP3 and you move e-mail messages to a folder you created, the link is broken between the
messages on the phone and their copies on the mail server. The next time you connect, the mail server
will see that the messages are missing from the phone and delete them. This prevents you from having
duplicate copies of a message, but it also means that you will no longer have access to messages that
you move to folders created from anywhere except the phone.
• If you use IMAP4, the folders you created and the e-mail messages you moved are mirrored on the
server. Therefore, messages are available to you anytime you connect to your mail server. This
synchronization of folders occurs whenever you connect to your mail server, create new folders or
rename/delete folders when connected.
Creating an E-mail Account
You need to create a new account to be used for retrieving and sending e-mail messages.
To make a new account:
1. From the main Messaging screen, select Setup E-mail.
2. Enter your E-mail address. If you want to save your password, enter your password and select Save
password. And press Next soft key.
3. If you want to set up your account automatically from the Internet, select Try to get e-mail settings
automatically from the Internet. And press Next soft key.
4. If it couldn’t find setting, press the Next soft key.
5. Select your e-mail provider, one or both of Internet e-mail or Exchange server.
6. Enter your display name and press the Next soft key.
7. Enter your Incoming mail server and select Account type and press the Next so ft key.
8. Enter your user information, such as user name, password, and press the Next soft key.
9. Enter the Outgoing (SMTP) mail server names and press the Next soft key.
10. Select how often your phone automatically connects to the server and checks for incoming e- mails
11. Press the Finish soft key.
To edit an account:
1. From the main Messaging screen, scroll to the account you want.
2. Press the Menu soft key and select Settings.
3. Change the account settings as you would when creating it.
Create an E-mail message
You can create an e-mail message from a contact card, or by typing in the address.
1. On the Home screen, press left soft key [Start] [All Programs], select Messaging and press OK.
2. Select the e-mail account with which you want to send.
3. Press right soft key [Menu] [New].
4. In To, Cc, and/or Bcc, enter the recipient’s e-mail addresses. Insert a semicolon (;) between the
multiple addresse s.
5. In Subject, enter a subject.
6. Enter a message.
7. Press Send. E-mail messages are stored in Outbox and are sent to recipients the next time you
TIP: You can quickly enter e-mail addresses from your contact cards. In To, press ENTER and select a
recipient from the list. Then, select the recipient’s e-mail address.
To set th e p riority, press [Menu] [Message Options].
To cancel creating an E-mail message, press [Menu] [Cancel Message].
synchronize or connect to your e-mail server and send and receive mail.
46/142

Overview of e-mail security
You can help prevent impersonation, tampering, and eavesdropping when sending e-mail messages from
your Outlook e-mail account by using Secure Multipurpose Internet Mail Extensions (S/MIME) digital
signatures and encryption.
A signature helps prevent impersonation and tampering. Impersonation occurs when a hacker sends e-mail
messages and pretends to be someone else. Tampering occurs when a hacker intercepts your e-mail
messages and changes the message without the recipient’s knowledge.
Signing a message applies the sender's certificate
recipient that the message is from the sender and not from an imposter.
Encryption helps prevent eavesdropping, which occurs when a hacker intercepts and reads your e-mail
messages. Using a cryptographic message format such as S/MIME for encryption helps improve e-mail
privacy because it converts plain, readable text of the message into cipher (scrambled) text. The sender's
messaging program uses the recipient’s public key to encrypt (lock) the e-mail message and attachments.
Only the recipient who has the private key
decipher (unscramble) the message.
A certificate is a digital means of proving your identity. When you send a digitally signed message, you are
sending your certificate and public key. Certificates can expire or be revoked.
NOTE: S/MIME encryption and digital signatures for Windows Mobile-based devices are available only with
Exchange Server 2003 Service Pack 2 or a later version that supports S/MIME. If you aren't using one of
these products, or have not yet synchronized, these options are unavailable.
that matches the public key you used to encrypt the message can
(and public key) to the message. This proves to the
Download a complete e-mail message
You can save e-mail messages and retrieve them at any time when you synchronize or connect to your mail
server.
1. On the Home screen, press the left soft key [Start] [All Programs], select Messaging and press
OK.
2. Select an e-mail account and the message to download.
3. Press [Menu] [Download Message]. The complete message is retrieved the next time you
synchronize or connect to your e-mail server and send and receive e-mail.
Download an attachment
In an open message with an attachment to download, press the attachment. The attachment is do wnloaded
the next time you synchronize or connect to your e-mail server and send and receive e-mail.
NOTE: If there are multiple attachments in the message, all attachments are downloaded.
Mark a folder for synchronization
When you synchronize your Outlook e-mail account with your PC, the same Inbox folders that are in Outlook
on your PC are created on your phone.
1. On the Home screen, press the left soft key [Start] [All Programs], select Messaging and press
OK.
2. Select Outlook E-Mail.
3. Press [Menu] [Folders].
4. Press [Menu] [Show All Folders].
5. Press [Menu] [Manage Folders].
6. Select a folder to synchronize and press Show Sync Folder.
7. Press [Done]. The next time you synchronize, the folder(s) that you marked on your phone are
synchronized with the corresponding folders in Outlook on your PC.
Add a picture to an e-mail message
You can retrieve pictures that have been downloaded to your phone and insert them into your e-mail
47/142

messages.
1. In the message area of an e-mail message, press [Menu] [Insert] [Picture].
2. Select the picture you want to add.
Verify the digital signature on a signed message you receive
For additional security, you can check digital signatures on messages before opening them. In some cases,
the signatures may not be available.
1. Open the message that has been digitally signed.
2. At the top of the message, press View Signature Status.
3. Press [Menu] [Check Certificate].
NOTE: There can be several reasons why a digital signature is not valid. For example, the sender's
certificate may have expired, it may have been revoked by the certificate authority, or the server that verifies
the certificate is unavailable. Contact the sender to report the problem.
S/MIME encryption and digital signatures for Windows Mobile-based devices are available only with
Exchange Server 2003 Service Pack 2 or a later version that supports S/MIME. If you aren't using one of
these products, or have not yet synchronized, these options are unavailable.
Send and receive Internet e-mail messages
Using the Pantech C820 you can connect to the Internet to send and receive e-mails.
1. On the Home screen, press [Start] [All Programs] [Messaging].
2. Select the Internet e-mail account for which you want to send and receive messages.
3. Press [Menu] [Send/Receive]. The phone connects to your Internet e-mail server and sends and
NOTE: To stop this process, press [Menu] [Stop Send/Receive].
receives your messages.
Add a voice recording to an e-mail message
Inserting a voice recording is useful when you want to verbally explain information that is contained in the
message.
1. In the message area of an e-mail message, press [Menu] [Insert] [Voice Note].
2. Press Record and Start speaking into the phone's microphone.
3. When finished speaking, press Stop.
4. Press [Done].
5.
Press [Send].
48/142

Set up an Internet e-mail account manually
Before you set up your Internet e-mail account, ensure that you have the necessary information.
Setting Description
User name Usually the first part of your e-mail address, which appears before the ‘at’ sign
Password Choose a strong password. You will have the option to save your pa ssword, so
Domain The domain name. This may be required.
Server type The type of e-mail server that hosts your mailbox (POP3 or IMAP4).
Account name A name for this account. You must use a different name for each account that
Network The type of network your e-mail server connects to.
Incoming mail server The name of your e-mail server (POP3 or IMAP4).
Require SSL connection Select this to ensure you always receive e-mail for this account using an SSL
Outgoing mail server The name of your outgoing e-mail server (SMTP).
Outgoing server requires
authentication
Outgoing server settings Your outgoing e-mail server may require different authentication settings than
Use different user name for
outgoing server
User name Your user name for the outgoing e-mail server.
Password Your password for the outgoing e-mail server.
Domain The domain name of the outgoing e-mail server.
Require SSL connection
(Outgoing mail server only)
(@).
that you do not need to enter it each time you connect to your e-mail server.
you set up.
connection. Th is enables you to receive personal information more securely.
Please note that if you select this and your ISP does not support an SSL
connection, you will not be able to connect to receive e-mail.
Your outgoing e-mail server (SMTP) may require authentication. NOTE: Your
user name and password from above will be used.
your incoming e-mail server.
Check box, where you enter a separate setting for your outgoing e-mail server.
A connection that enables you to send personal information more securely.
Note that if you select this and your ISP does not support an SSL connection,
you will not be able to send e-mail.
Delete a message
Messages from any account can be deleted. Select the Messaging function from the Home screen.
1. On the Home screen, press the left soft key [Start] [All Programs], select Messaging and press
OK.
2. Select an account.
3. Select the message to delete.
4. Press [Menu] [Delete].
NOTE: Messages deleted from the Outlook E-mail account will be deleted from Outlook on your PC or
Exchange Server the next time you synchronize.
Delete an account
You can delete accounts you have previously set up in the Messaging function.
1. On the Home screen, press the left soft key [Start] [All Programs], select Messaging and press
OK.
2. Select an account to delete.
3. Press [Menu] [Delete].
49/142

Edit predefined text
You can edit the predefined text included with the phone to create words or phrases that you frequently use
in messages.
1. On the Home screen, press the left soft key [Start] [All Programs], select Messaging and press
OK.
2. Select an account.
3. Press [Menu] [New] and scroll to the body of the message.
4.
Press [Menu] then select My Text.
Press [Menu] then select Edit My Text.
5.
6. Select the text to edit.
7. Edit the text and press [Done].
Empty the Deleted Items folder
If you don’t have a need to store deleted items, you can delete the Deleted Items folder itself.
1. On the Home screen, press the left soft key [Start] [All Programs], select Messaging and press
OK.
2. Select an account.
3. Press [Menu] [6 Tools] [Empty Deleted Items].
Forward a message
When you have received a message, it is possible to forward the message to another account or user.
1. Select message, press [Menu] [2 Reply] [Forward].
2. Enter a message in the message area.
3. Press Send.
NOTE: If you are forwarding e-mail from the Outlook e-mail account, you will send less data if you do not edit
the original message. This may reduce data transfer costs based on your rate plan.
Insert predefined text into a message
To save time when entering text, you can insert predefined text into messages.
1. On the Home screen, press the left soft key [Start] [All Programs], select Messaging and press
OK.
2. Select an account and press [Menu] [New].
3. Press [Menu] [My Text].
4. Press the text you want to insert.
TIP: Quickly insert text by entering its associated number.
Mark a message as Read or Unread
You have the option of marking messages you’ve received as Read or Unread for later retrieval.
1. On the Home screen, press the left soft key [Start] [All Programs], select Messaging and press
OK.
2. Select an account.
3. Select the message to mark.
4. Press [Menu].
5. Press Mark as Read or Mark as Unread. The message display is changed to reflect its new status:
normal text for read messages and bold text for unread messages. When you synchronize or send
and receive e-mail, the message is displayed as read or unread in all locations.
Move a message to a different folder
Whether a message is open or not, you can move it to another folder from any account.
1. On the Home screen, press the left soft key [Start] [All Programs], select Messaging and press
OK.
50/142

2. Select an account.
3. Scroll to the message to move.
4. Press [Menu] [Move].
5. Press the folder into which to move the message.
TIP: You can move an open message in the same manner, by pressing [Menu] [Move].
Open a message
To review or use a message you open it from its account in the Messaging function.
1. On the Home screen, press the left soft key [Start] [All Programs], select Messaging and press
OK.
2. Select an account.
3. Select the message to open and press OK.
4. To return to the message list, press Cancel key.
TIP: To open the next message in the list from within an open message, press right Navigation Key; to open
the previous message in the list, press left Navigation Key.
To create a contact card for the sender, press [Menu] [Save to Contacts].
Quickly move between accounts
Your messages are stored in accounts and it is convenient to be able to move from account to account
quickly.
Do one of the following:
• If you have an account open, you can quickly switch to another account by pressing right or left
Navigation Keys.
• Press [Menu] [Switch Accounts].
Send a message draft
If you wish to have a message draft reviewed, you can retrieve a stored draft or an open draft and send it to
someone else.
1. On the Home screen, press the left soft key [Start] [All Programs], select Messaging and press
OK.
2. Select an account.
3. Press [Menu] [Folders].
4. Press Drafts.
5. When you have finished composing the message, press Send.
Reply to a message
You can reply to a message you’ve received easily from within an open message.
1. From an open message, press [Menu] [Reply] or [Reply All].
2. Enter a message in the message area.
3. Press Send.
4. If you are replying to an e-mail in the Outlook E-mail account, you will send less data if you do not
edit the original message. This may reduce data transfer costs based on your rate plan.
Save a draft of a message
You can save a draft of a message that you are composing to finish and send later.
1. While in a message you are composing, press [Menu] [Save to Drafts]. A draft of the message is
stored in the Drafts folder of the account you are in.
Specify the language for reading a message or composing
The Pantech C820 has many languages and character sets from which to choose. Each message can be
composed in whatever language you require.
51/142

1. From an open message, press [Menu] [8 Message Options] [Languages].
2. In E-mail message language, scroll to the language.
3. Press [Done]. The message is displayed using the appropriate characters for the selected language.
Stop adding a signature to messages
If you have previously added a signature to an account and wish to stop using it, you can turn the signature
off for that account.
1. On the Home screen, press the left soft key [Start] [All Programs], select Messaging and press
OK.
2. Select an account.
3. Press [Menu] [Tools] [3 Option] [3 Signatures].
4. If necessary, scroll right or left to switch to the account that is using the signature.
5. Clear Use signature with this account and press [Done]. A signature is no longer inserted in
messages that you send from this account.
View an attachment
Many e-mail messages come with attachments. You can view attachments for file types that are supported
by the phone.
1. In an open message containing a downloaded attachment, select the attachment.
NOTE: You can view attachments only for file types that are supported by the phone.
third party software to view documents, spreadsheets, presentations and .pdf files.
You may need to add
View message folder contents
You can store messages in folders and create the types of folders you need.
1. On the Home screen, press the left soft key [Start] [All Programs], select Messaging and press
OK.
2. Select an account.
3. Press [Menu] [Folders].
4. Press the folder to view.
5. To return to the message list view of the Inbox folder, press [Menu] [Folders] [Inbox].
TIP: To view all Outlook E-mail folders, including those not marked for synchronization, press [Menu] [Show
All Folders].
View the Inbox message list
Your messages reside in an inbox. You can review the messages stored in the Inbox.
1. On the Home screen, press the left soft key [Start] [All Programs], select Messaging and press
OK.
2. Select an account.
3. The Inbox message list displays your received messages.
TIP: To quickly view new messages, press the message notification area in the Home screen.
View the list of accounts
If you have added accounts to your phone, you can see a list of all the accounts at one time.
1. On the Home screen, press the left soft key [Start] [All Programs], select Messaging and press
OK.
2. The list of accounts displays with the number of unread messages in the Inbox of each account
TIP: You can open an account by selecting it in the list.
shown in parentheses.
What is SSL?
Secure Sockets Layer (SSL) is a security protocol that enables you to send personal information in a more
52/142

secure manner over the Internet.
When you send a message from an account that you have with an Internet service provider (ISP) or from an
account that you access using a VPN server connection (typically a work account), Messaging always tries
to use an SSL connection. However, sometimes the e-mail server on the other end doesn't support SSL, so
in order to send the message, it is sent without an SSL connection.
To ensure that your e-mail is always sent using an SSL connection or not at all, select ‘Require SSL
connection’ when you set up your e-mail account.
53/142

CHAPTER 5. ORGANIZER
ALARM
VOICE NOTE
NOTEPAD
CALCULATOR
WORLD TIME
TASKS
54/142

Alarm
Using the alarm
You can use the alarm clock to set a wake-up alarm or set an alarm to remind you of an appointment.
1. On the Home screen, press the left soft key [Start], [All Programs] then left soft key [More] and
select Organizer and press OK.
2. Select Alarm1 or Alarm 2
• NEW Alarm registration
_ Press left soft key [New].
_ Set Time, Alarm1, Sound, Type, and Volume.
Time: the time for wake-up alarm.
Alarm1: alarm activation on/off..
Sound: choose an alarm melody.
Typ e : choose an alarm type.
Vol ume : adjust alarm volume.
• Delete registered alarm
_ In Alarm viewer, press right soft key [Menu] and press Delete on the pop-up menu.
and press OK.
Voice Note
In addition to making and receiving calls, scheduling and keeping contacts, the Pantech C820 allows you to
save your own reminders and messages in voice format.
Create a voice note
When you wish to create a voice note, after making the selections described here, you will speak into the
microphone just as you would speak on a call.
1. On the Home screen, press the left soft key [Start] [All Programs]
select Organizer and select Voice Note and press OK.
2. Briefly press the left soft key [Record] and speak into the microphone to record your voice note.
3. Press [Stop] to stop recording a voice note.
4. The voice note is recorded and appears in the All Notes list of Voice Note.
, then left soft key [More] and
Listen to a voice note
You can retrieve any voice notes you wish. When the voice notes were saved, they were recorded by time
and category.
1. On the Home screen, press the left soft key [Start] [All Programs]
select Organizer and select Voice Note and press OK.
2. Select the voice note to play and press the right soft key [Menu] and press [Play].
3. To stop listening to the voice note, press [Stop] while the voice note is playing.
NOTE: You can also play a voice note by selecting it in the All Notes list, then press
, then left soft key [More] and
.
Delete a voice note
After you have no further need for a voice note, you can delete the note completely from the phone.
1. On the Home screen, press the left soft key [Start] [All Programs]
select Organizer and select Voice Note and press OK.
2. Select the voice note to delete.
3. Press [Menu], select Delete and press OK.
NOTE: If you delete a voice note that has a default name, such as Recording001, this name becomes
available for a new voice note.
, then left soft key [More] and
55/142

Rename a voice note
You have the option of renaming a voice note, or assigning it to a different category.
1. On the Home screen, press the left soft key [Start] [All Programs]
select Organizer and select Voice Note and press OK.
2. Select the voice note to rename.
3. Press [Menu] then select Rename and press OK.
4. Enter a new name.
5. Press [Done].
, then left soft key [More] and
Notepad
Using Notepad, you can create memos for important things, and manage them.
To access Notepad:
On the Home screen, press the [Start] [All Programs] soft key and select [Organizer] [Notepad].
Creating a memo
1. Press the New soft key .
2. Enter the memo text and press the Done soft key.
Viewing a memo
To view memo details, select the memo you want from the list.
Sending a memo
You can send your notes as part of a SMS or e-mail message.
1. Scroll to the memo you want.
2. Press the Menu soft key and select Send via E-mail or Send via Text Message.
3. Compose and send a message.
Deleting a memo
1. Scroll to the memo you want.
2. Press the Menu soft key and select Delete.
3. Press the OK soft key to confirm the deletion.
Calculator
Using the calculator
Perform standard mathematical operations such as addition, subtraction, multiplication, and division.
1. On the Home screen, press the left soft key [Start] [All Programs]
select Organizer and press OK.
2. Select Calculator and press OK.
3. Enter a number using the keypad.
4. Press the right soft key Menu and choose the type of calculation to perform and Equals to perform
the operation, then click OK.
TIP: Press * to enter a decimal.
Use the Navigation Key to display the ava ilable mathematical symbols: up for plus (+), down for minus (-),
right for division (/), and left for multiplication (x).
You can also press the # key to cycle through the operators to perform a calculation.
Press the Cancel key briefly to clear the last digit entered.
Press the left soft key Clear to clear the display.
56/142
, then left soft key [More] and

World Time
Using the world time
You can set up the world clock with the time zones you want, and then check the current time of the city you
need at any time.
1. On the Home screen, press the left soft key [Start] [All Programs]
select Organizer and press OK.
2. Select World Time and press OK.
3. Select one of the three time zone, and press right soft key [Menu] [Edit].
4. Press the Left or Right Navigation key to move the time zone line. To apply daylight savings to the
currently selected time zone, press right soft key [DST Off/On].
5. Press the [Done] soft key to save the selected time zone.
6. Repeat from step 3 to select another time zone.
NOTE: In World Time Screen, press left soft key [Local time] to set this zone as local time.
, then left soft key [More] and
Tasks
Create a task
The Pantech C820 allows you to create a new task with reminders for your task list from your phone or from
your PC.
1. On the Home screen, press the left soft key [Start] [All Programs]
select Organizer and press OK.
2. Select Tasks and press OK.
3. In the Enter new task here box, enter the task name and press OK.
NOTE: You can synchronize information on your phone with your PC to keep your task list up to date in both
locations.
If you create a new task with a reminder on your PC and then synchronize tasks with your phone, the
reminder will play at the time it was set on your PC.
, then left soft key [More] and
Change a completed task to incomplete
If you have marked a task as complete on your list and the status changes, you can easily go back to the
task and change its status to incomplete by “activating” the task again.
1. On the Home screen, press the left soft key [Start] [All Programs]
select Organizer and press OK.
2. Select Tasks and press OK .
3. Select the task and press Activate.
, then left soft key [More] and
Assign a category to a task
The categories you can assign to a task are the same as those categories you’ve defined for appointments
and contacts. You can also add categories from the Task menu.
1. On the Home screen, press the left soft key [Start] [All Programs]
select Organizer and press OK.
2. Select Tasks and press OK.
3. Select Categories and check the category you want.
4. Press [Done].
NOTE: A category will remain in the list of shared categories as long as it is assigned to at least one
appointment, contact, or task.
, then left soft key [More] and
Delete a task
To remove a task from your list you will delete it. Marking a task as complete will not delete the task from
your list.
57/142

1. On the Home screen, press the left soft key [Start] [All Programs]
select Organizer and press OK.
2. Select Tasks and press OK.
3. Select the task, and press the right soft key [Menu].
4. Select Delete Task and press OK.
, then left soft key [More] and
Mark a task as complete
To designate a task as inactive o r complete you will mark it as complete through the Tasks menu.
1. On the Home screen, press the left soft key [Start] [All Programs]
select Organizer and press OK.
2. Select Tasks and press OK.
3. Select the task and press the left soft key [Complete].
, then left soft key [More] and
Locate a task
There are many options for finding a task on your list; you can view and sort the entire task list, or filter the
list by category.
1. On the Home screen, press the left soft key [Start] [All Programs]
select Organizer and press OK.
2. Select Tasks and press OK.
3. In the task list, do one of the following:
• To sort the list, press the right soft key [Menu], select Sort by and press OK. Choose a sort
option and press OK.
• To filter the list by category, to sort the list, press the right soft key [Menu], select Filter and press
OK. Choose the category you want displayed.
NOTE: Categories only appear in Tasks that are synchronized with your PC.
TIP: To filter your tasks further, press Active Tasks or Completed Tasks.
, then left soft key [More] and
58/142

CHAPTER 6. AT&T MUSIC
This chapter addresses AT&T Music applications to play, buy, identify and join music communities.
WINDOWS MEDIA PLAYER
SHOP MUSIC
MUSIC ID
XM RADIO Mobile
MUSIC VIDEOS
THE BUZZ
COMMUNITY
®
59/142

Windows Media Player®
This device comes with Microsoft® Windows Media Player® 10.3. You can play Windows® Media Audio,
Windows Media Video, and MP3 audio files that are stored on your phone, on a memory card, or on the Web.
You can open Windows Media Player like this:
1. On the Home screen, press the left soft key [Start] [All Programs] select AT& T M us i c and press
OK.
2. Select Windows Media Player and press OK.
NOTE: Content providers use a technology called Digital Rights Management (DRM), to encrypt the files.
That makes some options unable to operate. The reason some digital media files are encrypted is to prevent
these files from being unlawfully distributed or shared.
Copying media files
You can use ActiveSync® to copy media files from a computer to your phone.
1. Connect your phone to a computer.
2. Start synchronization.
3. Open the file directory on the phone using File Explorer.
4. Drag the media files and drop them into a folder.
Windows Media Player automatically retrieves. But, if the media files do not appear in Library, update the
library by pressing the Windows Media Player’s [Menu] and selecting Update Library.
You can also use the desktop Windows® Media Player® to copy media files. Licenses and protected files
are copied. And also make sure that you have Windows® Media Player® 10.3 or later versions on your
desktop computer. If you use different version of your Windows® Media Player®, the procedure to copy files
may vary.
1. Connect your phone to a computer.
2. Start synchronization.
3. Open Windows® Media Player® on the computer.
4. Press the [Sync].
5. Press [Edit Playlist].
6. Select the media files.
7. Press [OK].
8. Select the saving location.
9. Select the quality level and press [OK]
10. Press [Start Sync].
In order to access libraries, you should press the key of [Menu] from the player screen and then select
[Library]. The library screen contains categories, such as My Music, My Videos, My TV and My Playlists.
From the library screen, press [Menu] and you can see following options:
y Queue Up: adds the selected file to the end of the current playlist.
y Delete from Library: deletes the selected file or all files from the library.
y Now Playing: opens the current playlist.
y Library: Allows you to select the library that you want to view.
y Update Library: adds new files to the library by searching your phone or a memory card.
y Open File: allows you to find and play files that are stored on your phone or a memory card,
but those are not in the library.
y Open URL: allows you to specify a URL address for a streaming service.
y Properties: displays information about the selected file.
y Player: closes the Library screen and displays the player screen.
Playing media files
If you have copied media files to your phone’s memory or memory card, you can play them from Media
Player.
60/142

Playing media files from a library
1. On the library screen, if necessary, press the [Menu] soft key, select Library, and select the
memory from which you want to retrieve files.
2. Press the [Menu] soft key and select Update Library.
3. When libraries have been updated, press the [Done] soft key.
4. Select a category.
5. Scroll to the library you want to play and press the [Play] soft key.
If the file does not appear in a library, on the Library screen, press the [Menu] soft key and select Open File.
Then select the file you want to play. The player screen appears and the selected file plays. Use the
following options during playback:
• To adjust the Windows Media volume, press the Up or Down key. You can view the volume level
on the screen.
• To adjust the earpiece volume, press ▲ / ▼.
• To move backward in a file, press and hold the Left key.
• To move forward in a file, press and hold the Right key.
• To access the next file, press the Right key.
• To access the previous file, press the Left key.
• To pause or resume playback, press OK.
• To play the files in the playlist randomly or repeatedly, press the [Menu] soft key and select
[Shuffle/Repeat] [Shuffle] or [Repeat].
• To view the video on a full screen, press the [Menu] soft key and select Full Screen.
• To stop playback, press the [Menu] soft key and select Stop.
Playing media files on a network
1. On the Library screen, press the [Menu] soft key and sel ect Open URL.
2. Enter a URL address in the URL field, or scroll to one of the URL address that you have used from
the History field.
3. Press the OK sof t key.
NOTE: To play media streaming, you must be connected to a network.
Setting up a playlist
You can add media files on the Library screen to a temporary playlist. It lists the currently playing file, as well
as any files that have been queued up to play next.
Creating a playlist
1. On the library screen, select the category you want and scroll to the file you want to play. If the file
does not appear on the list, press the [Menu] soft key and select Update Library.
2. Press the [Menu] soft key and select Queue Up to add the file to the playlist.
3. Repeat steps 1 and 2 to add more files.
4. Press to return to the player screen or [Menu] [Player].
5. Press or to start playing the files.
6. To save the playlist, press the [Now Playing] soft key and then the [Menu] soft key, and select
Save Playlist.
7. Enter the list name and press the Done soft key. The list is saved in the My Playlists library.
Opening the playlist
On the player screen, press the [Now Playing] soft key. You can use various options by pressin g the
[Menu] soft key.
Editing the playlist
Changing the Windows Media Player Settings
You can customize the appearance and functionality of Windows Media Player. On the player screen, press
z To change the play order, press the [Menu] soft key and select Move Up or Move Down.
z To delete the selected files, press the [Menu] soft key and select Remove from Playlist.
z To clear the playlist, press the [Menu] soft key and select Clear Now Playing.
61/142

the [Menu] soft key and select Options. You can use the following options:
NOTE: If there is a problem while playing MP4 files, deselect the Scale to fit window option. The problem
occurs because the file has been resized.
z Playback: Select the options for playback. You can select the way time is displayed on the
player screen, or whether or not to pause playback when you launch another program, and
resume playback after a phone call.
z Video: Select the viewing options for playing videos on a full screen.
•
Network: Change the connections speed and protocol for playing music and streaming video.
• Library: Select whether the player screen or the Library screen is displayed when you open
Windows Media Player.
Skins: Change the appearance of the player screen by selecting a new skin.
•
• Buttons: Assign Windows Media Player functions to the keys on your phone to quickly control
playback without having to use the menus.
Shop Music
This menu connects to AT&T’s music download site.
1. On the Home screen, press the left soft key [Start] [All Programs]
OK.
2. Select Shop Music and press OK.
select AT&T M u si c and press
Music ID
This menu allows you to find out title, artist and other information about the song by just s ending the sound
of the song.
1. On the Home screen, press the left soft key [Start] [All Programs]
OK.
2. Select MusicID and press OK.
• ID song!: Allows you to find out information of unknown music by sending the sound of the
unknown music to the web. If the web identifies the song, it displays relevant information about
the song.
• manage IDs: Once a song has been identified through the Music ID, you can see the list of
songs in this folder.
• help me out: Information for how to use this application.
• exit: Ends the application and exits.
select AT&T M u si c and press
서식 있음: 글머리 기호 및
번호 매기기
Using ID song!
1. Highlight ID Song! And press the OK key.
2. Place the handset’s microphone up to the source of the song, which can be from either a radio,
stereo, or headset. The handset then begins to analyze the audio signal. If a song match is found,
the screen displays the Artist Name, Track Title, and Album cover art.
3. To purchase the song (with ringtone and wallpaper if available), highlight get, and press the OK key.
4. To share the song ID with another user, highlight Share ID press the OK key. Enter the recipient’s
phone number and press the Share ID! Soft ke y. Within a shor t time, he will receiv e a message
containing a MusicID link to the song.
5. If the song cannot be found, the handset displays a “Sorr y, No Match Try Again!” message. Press
the New ID! Soft key and try analyzing the song again.
Using Manage ID’s
1. Highlight Manage ID’s and press the OK key. The screen displays a list of the most recent
62/142

successful song ID’s which were made.
2. Highlight a song and press the Options soft key.
3. Highlight one of the following options and press the OK key.
a. ID Info: displays the Artist Name, Track Title, and Album cover art of the identified song.
b. Delete ID: deletes the selected song from the list of identified songs.
c. New ID!: begins the song analysis process again. Hold the microphone to the song source
and wait for analysis.
Getting Help with MusicID
1. Highlight help me out and press the OK key to select a topic. The screen displays a list of helpful
topics related to the MusicID application. These topics cover:
a. IDing a Song: provides information about the analysis process.
b. Recommendations and More!: describes the process following the successful identification
of a song. You can choose to purchase the song and wallpaper (if available) or send the
MusicID as a link to another phone number.
c. Subscription: provides details about the general usability and monthly term information.
d. About MusicID: provides information about the MusicID software version.
Exiting from the MusicID Application
There are two ways to exit from the MusicID application:
1. Highlight exit and press the OK key to select a topic.
2. Exit the application at any time by simply pressing the END key.
XM RADIO MOBILE
Selecting XM Radio Mobile from the AT&T Music sub menu launches an application which allows the user to
listen to streaming audio.
1. On the Home screen, press the left soft key [Start] [All Programs]
OK.
2. Select XM Radio Mobile and press OK.
select AT&T M u si c and press
Music Videos
Selecting Music Videos from the AT&T Music sub menu launches the bro wser t o provi de you with links to the
most popular multimedia contents.
1. On the Home screen, press the left soft key [Start] select AT& T M u s ic and press OK.
2. Select Music Videos and press OK.
You are then taken to your CV Music homepage. This homepage provides you with several sections
of accessible content:
• Music: allows you to choose from some recently uploaded video clips from the Music Choice
channel, which can include news, cuts, and ringtone reports.
• Music Channels: provides some general content categories from which to begin searching for
media: Sounds Live, Music Choice Premium, Music Videos, MTV, VH1, CMT, and Hip Hop
Official.
• Entertainment: exits from the Music Videos section of the homepage and launches an
entertainment page which provides further streaming multimedia content.
• Cellular Video: exists from the Music Video application and launches the Cellular Video
homepage.
• MEdia Net: exists from the Music Video application and launches the Media Net homepage.
• Help: provides basic on-line assistance which answers most of the common issues users come
3. Highlight the desired media clip or select from one of the available categories and press the OK key.
across while this feature.
63/142

The Buzz
Selecting The Buzz from the AT&T Music sub menu launches a preinstalled java application (e.g. Billboard).
The application allows the user to obtain relevant music industry news and information about your favorite
music artists, access to an artists main page (containing discographies, ringtones, concert dates, etc.),
concert information, games, and setup options for your own personal billboard notifications.
1. On the Home screen, press the left soft key [Start] [All Programs]
OK.
2. Select The Buzz and press OK.
3. Highlight The Buzz and press the OK key.
4. Press the Trial soft key to accept the terms of the trial period. You have only a few days to use the
service before the trial period expires. If at any time you wish to purchase a subscription to this
service, press the buy soft key and follow the on screen prompts.
5. Enter an area code, phone number (without dashes), and Zip code into the appropriate fields on the
Customize screen. Use UP or DOWN Navigation key to switch between fields.
6. Press the Confirm soft key to accept and save your information.
7. Once the phone number has been successfully registered, press the OK soft key to continue onto
the main Billboard mobile menu where you are given a list of categories to choose from:
• CHARTS: provides you with a top 20 list of popular Ringtones, and tunes such as R&B/Hip Hop,
Rock, Pop, Latin, Country, and Rap.
• NEWS & REVIEWS: provides you with links to some of the latest news about your favorite
artists.
• ARTISTS: features a personalized artist web page for an available artist that includes a bio,
discography info, ringtones, tour dates, etc.
• CONCERTS: allows you to search for a concert by using either the artist name, venue, type, or
city/state/zip information.
• GAMES: allows you to use your keypad to play an entertainment-based guessing game by
entering in names, dates, places.
• MY BILLBOARD: allows you to refine your Billboard mobile experience by configuring your text
message preferences, personal settings, and alerts.
8. Exit the application at any time by simply pressing the END key.
select AT&T M u si c and press
Community
Selecting Community from the AT&T Music sub menu launches the browser to either one or more of the hot
user communities. This menu allows you to interact with your friends and the community.
1. On the Home screen, press the left soft key [Start] [All Programs]
OK.
2. Select Community and press OK.
3. Use the UP or DOWN Navigation key to select a fan site and press the OK key.
• Wallpaper: provides you with color graphic files which can be uses as a wallpaper on your
handset. Highlight an entry and press OK key.
• Photos: allows you to view some artist-specific photos. Use the Next and Back buttons to
navigate through these pages.
• Bio: provides a biographical description of the artist/band.
• Artist Info: provides more specific group member information.
• Discography: provides a description of the artist’s albums and their corresponding release
dates.
• Tour Dates: provides a listing of the artist’s current tour dates.
64/142
select AT&T M u si c and press

CHAPTER 7. AT&T MALL
This chapter addresses AT&T Mall applications to shop for Tones, Games, Graphics, Multimedia, and
Accessing the Media Net Home site.
SHOP TONES
SHOP GAMES
SHOP GRAPHICS
SHOP MULTIMEDIA
SHOP APPLICATIONS
MEDIA NET HOME
65/142

Shop TONES
Selecting this menu launches the Web browser to AT&T’s Tones menu.
1. On the Home screen, press the left soft key [Start] [All Programs]
2. Select Shop tones and press OK.
3. Follow the on-screen options. The downloaded files can be stored into the Main Memory or
Storage Card found within the My Stuff (Phone) location. Music Tone categories include:
A. Featured Artists
B. Answer Tones
C. Search for a specific audio file by name
4. Select an audio file and press the OK key.
5. When you are ready to purchase the audio file, press the Buy Now button to charge your e-wallet
account and complete the transaction.
select AT& T M a l l and press OK.
Shop Games
Selecting this menu launches the Web browser to AT&T’s Game menu.
1. On the Home screen, press the left soft key [Start] [All Programs]
2. Select Shop Games and press OK.
3. Follow the on-screen options. The downloaded files can be stored in the Java folder found within
the Applications menu. Categories include:
A. New Arrivals
B. Retro
C. 3D Games
D. Game Clubs
E. Search for a specific game by name
4. Select a game entry and press the OK key.
5. When you are ready to purchase the game, press the Buy Now button to charge your e-wallet
account and complete the transaction.
select AT& T M a l l and press OK.
Shop Graphics
Selecting this menu launches the Web browser to AT&T’s Graphics.
1. On the Home screen, press the left soft key [Start] [All Programs]
2. Select Shop Graphics and press OK.
3. Follow the on-screen options. The downloaded files can be stored in the My Pictures folder found
within the My Stuff (Phone) location. These images can be used as wallpaper or included into
multimedia messages.
4. Select an image entry and press the OK key.
5. When you are ready to purchase the image, press the Buy Now button to charge your e-wallet
account and complete the transaction.
select AT& T M a l l and press OK.
Shop Multimedia
Selecting this menu launches the Web browser to AT&T’s Multimedia menu.
1. On the Home screen, press the left soft key [Start] [All Programs]
2. Select Shop Multimedia and press OK.
3. Follow the on-screen options. The downloaded files can be stored in the My Videos folder found
within the My Stuff (Phone) location. These files can be included in multimedia messages.
4. Select an video file entry and press the OK key.
5. When you are ready to purchase the file, press the Buy Now button to charge your e-wallet
account and complete the transaction.
66/142
select AT& T M a l l and press OK.

Shop Applications
Selecting this menu launches the Web browser to AT&T’s Applications menu.
1. On the Home screen, press the left soft key [Start] [All Programs]
2. Select Shop Applications and press OK.
3. Follow the on-screen options. The downloaded apps. can be stored in the My Stuff folder found
within the My Stuff (Phone) location. These files can be included in
4. multimedia messages.
5. When you are ready to purchase the application, press the Buy Now button to charge your e-wallet
account and complete the transaction.
select AT& T M a l l and press OK.
MEdia Net Home
The MEdia Net Home menu option allows you to quickly access your AT&T MEdia Net homepage using the
built-in browser. This page gives you quick access to information such as local weather, sports scores,
horoscope information and quick links to the previously mentioned shopping sites.
To access this menu option, use the following steps:
1. On the Home screen, press the [
2. Press OK key
3. The MEdia Net Home menu launches the built-in browser and launches this AT&T homepage.
Start] [All Programs] select AT&T Mall and MEdia Net Home.
67/142

CHAPTER 8. CELLULAR VIDEO
CELLULR VIDEO
MEDIA CLIP OPTIONS
USING THE VIDEO CATEGORIES
CUSTOMIZING CELLULAR VIDEO
MY PURCHASES
PARENTAL CONTROLS
68/142

Cellular Video
Your phone is equipped with a WAP (Wireless Application Protocol) browser which allows you to access
Internet and then upload media files directly to your phone. These media files are displayed using the built-in
Media Player. Cellular Video (CV) is a media service which allows you to not only navigate to your favorite
web sites but stream media content (Weather, News/Sports highlights, etc.) directly to your phone.
1. On the Home screen, press the [Start] [All Programs]
2. Press OK.
3. You are then taken to your default Cellular Video homepage. This homepage provides you with
several sections of accessible content:
•
Address Bar: allows you to enter a new address.
• Favorites: allow you to choose from some recently uploaded video clips from among the
following media providers: CNN, ESPN, HBO Mobile Preview, or Access Hollywood.
Add to Favorites: allow you to add media websites to the Favorites list.
•
• Video Categories: provides some general content categories from which to begin searching
for media: TV to Go, Entertainment, Sports, News & Weather, HBO Mobile, and Premium
Channel.
•
Customize Cellular Video: allow you to access the Cellular Video Settings menu where you
can configure most of the settings associated with Cellular Video.
Parental Control: provides you with settings which can be configured to restrict certain media
•
content from being displayed on the phone.
•
MEdia Net: exits from the Cellular Video application and launches the MEdia Net homepage.
• Help: provides basic on-line assistance which answers most of the common issues users come
4. Highlight the desired media clip or select from one of the available categories and press the select
across while using this feature.
soft key or the OK key.
[Cellular Video].
서식 있음: 글머리 기호 및
번호 매기기
Media Clip Options
With the media currently active on the phone (either playing or paused), press the [Menu] soft key to open a
list of the following streaming media options.
Library
This feature launches the Windows Media Library showing My Music, My Videos, My TV, My Playlists, and
Now Playing.
Play/Pause
This feature allows you to toggle the state of the current video between being Paused or Resuming playback.
Stop
The feature stops the current media, exits the media player and returns you to the main Cellular Video
homepage.
Shuffle/Repeat
This feature allows you to toggle between the shuffle or repeat options for your videos you have played and
saved to your device.
Full Screen
This feature changes the screen content to remove or include the information regarding the soft key menu
options or to display the video only. Press the key to switch between screen options.
69/142

Options
The following options are available
Playback
•
_ Show time as: set the show time elapsed or remaining.
_ Set the Pause playback while using another program to stop the video if you launch another
program.
_ Resume playback after a phone call to continue the video after your phone call is ended.
• Video
_ Play video in full screen: choose from Never, Only when oversized, or always.
_ Scale to fit window: allows you to fit the picture to the screen.
• Network
_ Internet connection speed: choose the internet connection speed to download the videos.
_ Detect connection speed: sets the default speed the data connection allows.
_ Protocol: select the UDP or TCP protocol, or the Port number.
• Library: allows you to start the player from the library screen.
• Skins: allows you to select the screen display (Skin) for your video clips. Use the Right or Left
Navigation key to make your selection. Press to make your selection.
• Buttons: displays the buttons and their options for the media clip application.
Properties
Displays a Media Player window which gives file specific information such as title, and duration.
Settings
This feature pauses the content and navigates you to the Player Settings menu where you can configure the
Media Player’s Volume setting.
1. Use the Up or Down Navigation key to increase/decrease the current volume setting for the player
while in Portrait mode. Use your Left or Right Navigation key to increase/decrease the current
volume setting for the player while in Landscape mode.
2. Press the Save soft key to save your changes.
•
This feature allows you to configure the current server profile being used by the on-board WAP.
서식 있음: 글머리 기호 및
번호 매기기
Using the Video Categories
This grouping of media categories provides access to an additional listing of streaming media. Where the
previous Favorites list of media stream can be user edited and updated, this list of categories is defined by
AT&T’s homepage and cannot be changed.
Viewing a Video Clip
1. From the Home screen, press the [Start] [All Programs] soft key. Highlight Cellular Video and
press the OK key.
2. Use the Up or Down Navigation key to highlight the video clip from within the Favorites section and
press the select soft key or the OK key.
3. After the stream has been buffered into memory, you can choose to either Pause or play the
content. Pressing the OK key toggles the Play and Pause functionality.
Customizing Cellular Video
Updating the Favorites List
The list of media providers which appears in the Favorites section of the Cellular Video homepage can be
edited and changed by the user.
1. From the Home screen, press the [
press the OK key.
Start] [All Programs] soft key. Highlight Cellular Video and
70/142

2. Use the Up or Down Navigation key to highlight the Edit button from the upper-right of the
homepage (adjacent to the My Favorites title) and press the OK key.
3. From the Customize Cellular Video - Options listing, highlight Edit My Favorites and press the
OK key.
4. Navigate to the Add to Favorites section of the page and highlight one the additional streaming
media channels which are not currently in your Favorites list (ex: Cartoon Network).
5. Press the Options soft key. Highlight Add to Favorites and press the select soft key or the OK key.
Adding a Video Alert
When new media is available for upload to your phone (such as breaking news), you can set your phone to
notify you of the new available content.
1. From the Home screen, press the [Start] [All Programs]
press the OK key.
2. Use the Up or Down Navigation key to highlight the Customize Cellular Video button from the
bottom of the homepage and press the select soft key or the OK key.
3. From the Customize Cellular Video - Options listing, highlight My Video Alerts and press the OK
key.
4. Navigate to the Add to My Alerts section of the page and highlight one the available services (ex:
Breaking News).
5. Press the Options soft key. Highlight Add to Favorites and press the OK key.
soft key. Highlight Cellular Video and
My Purchases
The Cellular Video homepage can be used to shop for streaming multimedia content. The My Purchases
can help keep track of your purchase history and view any new resale products.
1. From the Home screen, press the [Start] [All Programs]
press the OK key.
2. Use the Up or Down Navigation key to highlight the Customize Cellular Video button from the
bottom of the homepage and press the OK key.
3. From the Customize Cellular Video - Options listing, highlight My Purchases and press the OK
key.
4. Highlight Purchase History and press the OK key. This provides you with an on screen listing of
your “to date” purchase history for media content.
5. Highlight My Account and press the select soft key or the OK key. This provides you with an on
screen description of your account details.
soft key. Highlight Cellular Video and
Parental Controls
Your phone can be configured to block both purchased and streamed media content. Before filtering, you
must first establish a PIN/password and a contact e-mail address. Once those have been established, you
can choose one of the two available filter options: Content Filter and Purchase Blocker.
• Content Filters let you restrict access to inappropriate content both on and outside of MEdia Net.
• Purchase Blocker lets you restrict the ability to buy ringtones, downloads, games, etc., from this
phone.
Setting up Parental Control
1. From the Home screen, press the [Start] [All Programs] soft key. Highlight Cellular Video and
press the OK key.
2. Use the Up or Down Navigation key to highlight the Customize Cellular Video button from the
bottom of the homepage and press the OK key.
3. From the Customize Cellular Video - Options listing, highlight Parental Controls and press the
OK key.
71/142

4. Highlight the OK button and press the OK key to access the MEdia Net parental setup fields.
5. From the Parental Control Setup screen, use your keypad to enter information into the following
fields: PIN Code, Re-enter PIN code, contact e-mail address.
6. Use you Navigation keys to highlight the Save button and press the OK key. Allow a few minutes
for your information to be received and accepted by MEdia Net. You can then use this information
to activate the parental filters.
Configuring the Filters
1. From the Home screen, press the [Start] [All Programs] soft key. Highlight Cellular Video and
press the OK key.
2. Use the Up or Down Navigation key to highlight the Customize Cellular Video button from the
bottom of the homepage and press the OK key.
3. Highlight the OK button and press the OK key.
4. When prompted, enter the PIN and e-mail address which was registered with MEdia Net in the
previous section.
5. Highlight Content Filters and press the OK key.
6. Highlight the On button and press the select soft key or the key to toggle the On/Off state.
7. Highlight Purchase Blocker and press the select soft key or the OK key.
8. Highlight the On button and press the select soft key or the OK key to toggle the On/Off state.
9. Press the Back soft key or the key. This activates.
72/142

CHAPTER 9. IM&E-MAIL, MOBITV, MEDIA NET, OFFICE
MOBILE
IM & E-MAIL
MOBITV
MEDIA NET
OFFICE MOBILE
73/142

IM & E-mail
Instant Messaging
Your handset comes with the ability to sign onto Instant Messaging. You must first create an active account
using your PC, and then you can connect and chat using the following applications:
• AOL Instant Messenger
• Windows Live Messenger
• Y! Messenger
1. On the Home screen, press the [Start] [All Programs]
key.
[More] [IM & E-mail] [1.IM]. Press the OK
Mobitv
With MobiTV your phone becomes a portable TV. See channels you watch at home, made for mobile
programming, and the latest primetime shows from NBC, like Friday Night Lights. The Emmy® Award
winning service is available through your wireless carrier and offers over 100 TV channels worldwide, such
as MSNBC, ABC News Now, CNN International, FOX News Channel, Fox Sports, ESPN 3GTV, NBC Mobile,
Bravo To Go, Sci Fi Pulse Mobile, Telemundo Mobile, Discovery Channel, TLC, The Weather Channel and
others that deliver the latest music videos, cartoons, comedy, and more.
1. On the Home screen, press the [Start] [All Programs]
For more information, connect to the web site. www.mobitv.com
[More] [MobiTV]. Press the OK key.
Media net
See MEdia net home in Chapter 8. AT&T Mall.
Office mobile
Data Analysis on the GO
View spreadsheets, even when you’re out of the office. You can use the Chart Wizard to view Microsoft
Office Excel Mobile charts on the go.
Practice Microsoft PowerPoint Presentations
Practice and view your slides with Microsoft Office PowerPoint Mobile while you’re on the road.
View Microsoft Word Documents
View Word documents while away from your desk.
74/142

CHAPTER 10. CAMERA
This chapter addresses picture and video functions including:
CAMERA / CAMCORDER MODE
CAMERA / CAMCORDER OPERATIONS
CAMERA / CAMCORDER CONTROLS
75/142

Camera / Camcorder mode
Use the Camera program to take, view, and edit pictures as well as record and launch video clips stored on
your device or on a storage card. Y ou can also send pictures and video clips to others, or set a picture as the
background in the Home screen. You can see your pictures individually, as thumbnails, or as part of a slide
show. You can edit your pictures by cropping, rotating, and adjusting the brightness and contrast.
Select video quality
You can specify the quality (video resolution and sound fidelity) and size of the video clips you record.
1. On the Home screen, press [Start] [All Programs] [More]. Select [Applications] [Camera].
2. Press [Option] soft key and sele ct 1. Camcorder key to change the mode to Camcorder.
3. Press [Option] soft key and sele ct 3. Settings.
4. Use Right or Left Navigation key to select [Quality]. Then select the setting you want and select
OK.
5. Press [Close] soft key
NOTE: Video clips of higher quality require more memory.
Copy an image to your phone
You can upload standard image files from a PC to your phone. You should customize the size and resolution
of your images for display on the phone screen.
1. Connect the phone to your PC.
2. On your PC, copy the image file you want. The file format must be .gif, .jpg, or .bmp.
3. In ActiveSync on your PC, click Explorer and double-click My Windows Mobile-Based Device.
Do one of the following:
• Double-click My Documents, double-click My Pictures, and paste the image file into that folder.
• If you plan to use the image as your Home screen background, double-click Application Data,
double-click Home, and paste the image into that folder.
NOTE: For best results, use images with the same screen resolution as your phone's screen resolution,
either 240 x 320 pixels, or 176 x 200 pixels, depending on the phone. See also ‘Change the Home screen
appearance’.
Take pictures using a timer
Using the timer, you can be in the picture you take. Just place the phone on a stable support and press the
camera button, then get into position.
1. On the Home screen, press [Start] [All Programs] [More]. Select [Applications] [Camera].
2. Press [Option] soft key and sele ct 1. Camcorder key to change the mode to Camcorder.
3. Press [Option] soft key and sele ct 3. Settings.
4. Use Right or Left Navigation key to select [Timer]. The n select the setting you want and select OK.
5. Press [Close] soft key
6. After the timer interval, the picture is taken and automatically saved to the default storage location.
TIP: Take a test picture to find out how long the timer runs.
Adjust pictures and video for lighting conditions
White balance settings optimize pictures and video clips for the type of ambient light. If you are not sure what
to select, try the Automatic setting.
1. Select White Balance setting that matches the available light source.
76/142

Select where pictures are saved
You can set the default location where pictures are saved. If you select main memory, pictures are saved to
permanent storage on your device, which may require that you consider the storage needs of other
programs.
1. Press [Option] soft key and sele ct 3. Settings.
2. Use Right or Left Navigation key to select [Advanced Settings]
3. Press [1.Genral Settings] and select Storage, and then select the setting you want.
4. Press [Done] soft key
Create a Pictures folder
You can organize and store your pictures and images in separate folders you will create.
1. On the Home screen, press [Start] [All Programs] [More]. Select [Applications] [File Explorer]
[My Pictures].
2. Press [Menu] [Edit] [New Folder].
Edit a picture
You can actually edit pictures and videos on the Pantech C820 using the Menu key.
1. On the Home screen, press [Start] [All Programs] [More]. Select [Applications] [File Explorer]
[My Pictures].
2. Select the picture to edit, and press OK.
3. Press [Menu] [Edit] and press OK.
Do one of the following:
• To rotate a picture 90 degree rclockwise, press [Menu] [Rotate].
• To crop a picture, press [Menu] [Crop]. Then, position the selection cursor to mark the upper left
corner of th e p i cture, pres s [Next], and then position the cursor to mark the lower right corner of the
picture. Press [Finish] to see the cropped picture.
• To auto correct a picture, press [Menu] [Auto Correct].
• Press [Done].
TIP: To undo an edit, press [Menu] [Undo].
To cancel all unsaved edits made to the picture, press [Menu] [Cancel].
View pictures as a slide show
However you have stored the pictures and videos, you can review them consecutively in a slide show format.
1. On the Home screen, press [Start] [All Programs] [More]. Select [Applications] [File Explorer]
[My Pictures].
2. Select the picture.
3. Press [Menu] [Play Slide Show].
TIP: To stop the slide show, press the Cancel button. You can also rotate the view using up and down
navigation keys. To move forward or backward through the slides, press left and right Navigation Keys.
Set a picture as the Home screen
Any picture you have uploaded can be saved as the background for the Home screen.
1. On the Home screen, press [Start] [All Programs] [More]. Select [Applications] [File Explorer]
[My Pictures].
2. Select the picture to set as the background, and press OK.
3. Press [Menu] [Use as Home Screen].
4. Use Navigation Keys to select the portion of the picture you want to use, and press [Next].
5. Use Adjust the transparency to select a higher percentage for a more transparent picture or a lower
percentage for a more opaque picture.
6. Press [Finish].
77/142

Send a picture via Multimedia Message
You can attach pictures to messages and send them to someone else.
1. On the Home screen, press [Start] [All Programs] [More]. Select [Applications] [File Explorer]
[My Pictures].
2. Select the picture to send.
3. Press [Menu] [Send via Multimedia Msg.].
4. A new message is created with the picture attached.
5. Enter the recipient’s name and subject, and press [Send].
Save a copy of a picture
Store pictures in your phone by saving them to a pre-created folder.
1. On the Home screen, press [Start] [All Programs] [More]. Select [Applications] [File Explorer]
[My Pictures].
2. Select the picture to save and press OK.
3. Press [Menu] [Save] [Save As...].
4. Enter a name for the picture and press [Done].
TIP: To cancel all unsaved changes, press [Cancel] soft key.
View pictures on your phone
You can view pictures stored on your phone or on a plug-in storage card.
1. On the Home screen, press [Start] [All Programs] [More]. Select [Applications] [File Explorer]
[My Pictures].
2. Select the picture and press OK.
TIP: To view pictures located on a storage card, press [Start], [More], select Applications and select
03.File Explorer, select My Pictures. Press [Menu] [Storage Card]. (You may need to scroll to view this
option.)
Camera / Camcorder operations
Camera
• Supports JPEG File Format (jpg)
Video
• Supports QCIF (176 X 144), QVGA (320 X 240) size of video
• Supports 3gp File Format (3gp)
Record a Video
By using the camera function, you can take pictures or you can record video by selecting the Camcorder
option.
1. On the Home screen, press [Start] [All Programs] [More]. Select [Applications] [Camera].
2. Press [Option] soft key and select 1. Camcorder key to change the mode to Camcorder.
3. The left icon in upper changes to Camcorder icon
4. Aim your camera and press OK.
5. To stop recording, press OK again or [Stop] soft key.
6. You can see the first frame of recording file. Press OK or [View Finder] soft key to preview, select
[Option] [Delete] is delete the recording file just now, and [Option] [Send Via Multimedia Msg.]
that is attached to Multimedia Message.
Play recorded file
After you’ve recorded and stored a video file, you can retrieve it at any time and play it back on the phone.
1. Press [Option] soft key and select 1. Camcorder key to change the mode to Camcorder.
78/142

2. The left icon in upper changes to Camcorder icon
3. Press left soft key [My Video]
4. Choose the file that you want to play, and press OK
Take a Picture
• Supports 144 X 176, 240 X 320, 480 X 640, 800 X 600, 1024 X 1280, 1200 X 1600 size of video
• Stored JPEG file format (jpg)
• You can choose low, medium or high quality
Take a Picture (MultiShot)
• Supports maximize resolution of 176 X144, 320 X 240.
• Supports multi still shot. Maximum is 9 shots.
Snapshot
To take a quick picture, you will use the snapshot feature of the phone. After taking a picture, you can store it,
delete it, or forward it.
1. On the Home screen, press [Start] [All Programs] [More]. Select [Applications] [Camera].
2. Press [Option] soft key and select 1. Camera key to change the mode to picture icon
3. Aim your camera and press OK.
4. Change camera screen to review screen.
5. Press OK or [View Finder] soft key to return to preview, select [Menu] [Delete] to delete the
captured file, and [Menu] [Send Via Multimedia Msg.] to attach to Multimedia Message.
Viewing saved file
After a file has been saved, it is very simple to view the saved file from the My Photo feature.
1. On the Home screen, press [Start] [All Programs] [More]. Select [Applications] [Camera].
2. Press [Option] soft key and select 1. Camera key to change the mode to picture icon
3. Press left soft key [My Photo].
4. Choose the file that you want to view, and press OK.
Camera / Camcorder controls
Just as with an ordinary camera, your phone can be adjusted to control the brightness, color, resolution, etc.
From the Menu you have access to all the image parameters you will want to adjust.
Camera Menu
The menu is reached after selecting Camera from the Home screen and gives you access to these
parameters: white balance, Effect, Timer, Size, Quality, and Advanced Settings.
1. On the Home screen, press [Start] [All Programs] [More]. Select [Applications] [Camera].
2. Press right soft key [Option].
3. Change values using Navigation Keys.
4. Press OK to apply the chosen values.
Item Description
Take Mode Choose Take Mode in [Option] [3.Settings] [Advanced Settings]
Storage Choose storage in [Option] [3.Settings] [Advanced Settings] [1
[2.Camera Settings].
Change Multi Shot mode.
Resolution must be 176 X 144, 320 X 240 on Multi Shot mode.
General Settings].
79/142

Default value is ‘Phone’.
[Phone] Capture files stored in the Device of file box.
[External] capture files stored in the “SD Memory Card”
White Balance Choose white balance in [Option] [3.Settings] [W/B].
Effects Choose color effect in [Option] [3.Settings] [Size].
Timer Choose Self Timer in [Option] [3.Settings] [Timer].
Size Choose a Resolution in [Option] [3.Settings] [Size].
Quality
Default value is “Auto”.
[Daylight] Daylight control of the white value.
[Cloudy] Cloudy setting of the white value.
[Fluorescent] Fluorescent setting of the white value.
[Incandescent] Incandescent setting of the white value.
Default value is “Normal”.
[Normal] Color effect is normal.
[Gray] Color effect is gray
[Sepia] Color effect is sepia
[Negative] Color effect is negative
Default value is ‘Off’.
[Off] Push ‘OK’ to take a photograph instantly.
[3 Seconds] Push ‘OK’ to take a photograph after 3 sec.
[5 Seconds] Push ‘OK’ to take a photograph after 5 sec.
[10 Seconds] Push ‘OK key’ take a photograph after 10 sec.
Default value is ‘240 X 320’.
[144 X 176] Camera resolution is in 144 X 176.
[240 X 320] Camera resolution is in 240 X 320.
[480 X 640] Camera resolution is in 480 X 640.
[600 X 800] Camera resolution is in 600 X 800.
[1024 X 1280] Camera resolution is in 1200 X 1280.
[1200 X 1600] Camera resolution is in 1200 X 1600.
Choose Quality in li st.
Default value is “High”.
Low quality is a small file size and High quality is a large file size.
[Low] Low quality setting for still shot.
[Middle] Middle quality setting for still shot.
[High] High quality setting for still shot.
Camcorder Menu
The Camcorder Menu allows you to control video features such as resolution and quality, and allows you to
select the mode and turn the audio on and off.
1. On the Home screen, press [Start] [All Programs] [More]. Select [Applications] [Camera].
2. Press [Option] soft key and select 1. Camcorder key to change the mode to Camcorder.
3. Press right soft key [Option].
4. Change values using Navigation Keys.
5. Press OK to apply the chosen values.
Item Description
Storage Choose storage in list.
Profiles Choose Profiles in list.
Default value is ‘Phone’.
[Phone] Capture files stored in the Device of file box.
[External] capture files stored in the “SD Memory Card”
Default value is ‘176 X 144’.
[176 X 144] Recording resolution is in 176 X 144.
[320 X 240] Recording resolution is in 320 X 240.
80/142

White Balance
Effects Choose color effect in [Option] [3.Settings] [Size].
Timer Choose Self Timer in [Option] [3.Settings] [Timer].
Size Choose a Resolution in [Option] [3.Settings] [Size].
Choose white balance in [Option] [3.Settings] [W/B].
Default value is “Auto”.
[Daylight] Daylight control of the white value.
[Cloudy] Cloudy setting of the white value.
[Fluorescent] Fluorescent setting of the white value.
[Incandescent] Incandescent setting of the white value.
Default value is “Normal”.
[Normal] Color effect is normal.
[Gray] Color effect is gray
[Sepia] Color effect is sepia
[Negative] Color effect is negative
Default value is ‘Off’.
[Off] Push ‘OK’ to take a photograph instantly.
[3 Seconds] Push ‘OK’ to take a photograph after 3 sec.
[5 Seconds] Push ‘OK’ to take a photograph after 5 sec.
[10 Seconds] Push ‘OK key’ take a photograph after 10 sec.
[176 X 144] Camera resolution is in 176 X 144.
Quality Choose Quality in list.
Default value is “High”.
Low quality is a small file size and High quality is a large file size.
[Low] Low quality setting for still shot.
[Middle] Middle quality setting for still shot.
[High] High quality setting for still shot.
General Settings
Camera/Camcorder Settings allows you to control the backlight, auto hide, review, shutter sound and time
out.
1. On the Home screen, press [Start] [All Programs] [More]. Select [Applications] [Camera].
2. Press [Option] soft key and select 3. Settings.
3. Use Right or Left Navigation key to select [Advanced Settings]
4. Press [1.Genral Settings] and Change values using Navigation Keys and OK key.
5. Press [Done] soft key to apply the chosen values. The Camera screen is displayed.
6. If you do not wish to apply new values, press Cancel key.
Item Description
Keep backlight on
during previewing
and recording
Full Screen Check Full Screen in list.
Review file after
Capture
Time Out Choose Time Out in list
Check Keep backlight on during previewing and recording in list.
Default is checked.
Default is unchecked.
This item operates while in Landscape mode
If Full Screen is checked, preview is displayed in full screen.
Check Review file after Capture in list.
Default is checked.
If it checked Review file after Capture.
Default value is “1 Min”.
[1 Min] Time Out is 1 Min.
[2 Min] Time Out is 2 Min.
[3 Min] Time Out is 3 Min.
[Never] Time Out is off.
81/142

Storage
Choose storage in [Option] [3.Settings] [Advanced Settings] [1
General Settings].
Default value is ‘Phone’.
[Phone] Capture files stored in the Device of file box.
[External] capture files stored in the “SD Memory Card”
Camera Settings
Camera Settings allows you to control the multi shot count and image prefix.
1. On the Home screen, press [Start] [All Programs] [More]. Select [Applications] [01.Camera].
2. Press [Option] soft key and select 3. Settings.
3. Use Right or Left Navigation key to select [Advanced Settings]
4. Press [2.Camera Settings] and Change values using Navigation Keys and OK key.
5. Press [Done] soft key to apply the chosen values. The Camera screen is displayed.
6. If you do not wish to apply new values, press Cancel key.
7. On the Home screen, press [Start] [All Programs] [More]. elect Applications and select
01.Camera and press OK.
8. Press right soft key [Menu].
9. Select Settings, select Camera and press OK.
10. Change values using Navigation Keys.
11. Press left soft key [Done] to apply the chosen values. The Camera screen is displayed.
12. If you do not wish to apply new values, press Cancel key.
Item Description
Take Mode Choose T ake Mode in [Option] [3.Settings] [Advanced Settings] [2.Camera
Multi Shot Count Choose Multishot in list.
Image Prefix Change image prefix.
Shutter Sound
Settings].
Change Multi Shot mode.
Resolution must be 176 X 144, 320 X 240 on Multi Shot mode.
Default value is “4”.
[4] Make a photograph 4 times in a row.
[6] Make a photograph 6 times in a row.
[9] Make a photograph 9 times in a row.
Default image prefix is “Image”.
Choose Shutter Sound in list. It used only camera mode
Default value is “Shutter.wav”.
[Shutter.wav] Shutter sound is default sound.
[Cheese.wav] Shutter sound is Cheese sound.
[Smile.wav] Shutter sound is Smile sound.
서식 있음: 글머리 기호 및
번호 매기기
Camcorder Settings
Camcorder Settings allows you to control the Limit Recording, Sound Recording and File Extension.
1. On the Home screen, press [Start] [All Programs] [More]. Select [Applications] [Camera].
2. Press [Option] soft key and select 3. Settings.
3. Use Right or Left Navigation key to select [Advanced Settings]
4. Press [3.Camcorder Settings] and Change values using Navigation Keys and OK key.
5. Press [Done] soft key to apply the chosen values. The Camera screen is displayed.
6. If you do not wish to apply new values, press Cancel key.
Item Description
Limit Recording Choose Limit Recording in list.
Default value is “1 Min”.
[No Limit] Recording did not stop.
[1 Min] Recording stopped after 1 Min.
82/142

[3 Min] Recording stopped after 3 Min.
[5 Min] Recording stopped after 5 Min.
[10 Min] Recording stopped after 10 Min.
Sound Recording Choose Limit Recording in list.
Default value is “On”.
[On] Sound Recording is on.
[Off] Sound Recording is off.
Video Prefix Change video prefix.
Default video prefix is “video.”
Overview of the default hardware button assignments
By default, these hardware buttons are assigned to Camera functions.
Hardware Button Camera/Camcorder Function
OK Start Record Video/Stop Record Video, Take a picture
NAVIGATION left Brightness down
NAVIGATION right Brightness up
NAVIGATION up Zoom in
NAVIGATION down Zoom out
83/142

CHAPTER 11. INTERNET EXPLORER
This chapter addresses Internet services and web browsing.
For more detailed information contact your service provider.
USING INTERNET EXPLORER
84/142

USING INTERNET EXPLORER
Add a Web page to the Favorites list
Internet Explorer functions on your phone much the same as it does on your PC. You can maintain a list of
web sites in your favorites list. Add each site to the list through the Internet Explorer menus.
1. From the Home screen, press [Start] [All Programs]
2. Press [Menu] [Address Bar], enter the address of the page you want to add and press Go.
3. Press [Menu] [Add to Favorites].
4. Confirm or change the name and Web page address.
5. In Folder, select a location for this favorite.
6. Press Add.
TIP: A quick way to add favorites to your phone is to synchronize with your PC using ActiveSync. For more
information, see ActiveSync Help on your PC.
See also Go to a Web page.
Change connection options
Depending on your location and your access settings, you can connect to different networks through Internet
Explorer.
1. From the Home screen, press [Start] [All Programs]
2. Press [Menu] [Tools] [Options].
3. Press Connections.
4. Do one of the following:
z Default setting – Uncheck Automatically detect settings and WAP Network - make surfing
internet to any web site through service provider Proxy server. (recommended)
z Checking Automatically detect settings can surf Internet Using ActiveSync. In this setting,
you can’t access sites like Media Net.
5. Press [Done].
and select Internet Explorer.
and select Internet Explorer.
Change Web page display options
There are Web page display options to choose from: Text Size, one column, Fix To Screen, and desktop.
1. From the Home screen, press [Start] [All Programs]
2. Select one of the web sites.
3. Press [Menu] [View].
Select one of the following:
• Zoom Level
smaller.
• One Column. Arranges the content into one column that is as wide as the screen. This means
that you will rarely have to scroll horizontally.
• Fit To Screen. Maintains a layout similar to what you see on a desktop computer, but makes
items smaller and arranges the content so that you can see most of it without having to scroll
horizontally.
• Desktop. Keeps the same layout and size as on a desktop computer, which will require both
horizontal and vertical scrolling.
. The text on the Web pages displayed on your phone can be made larger or
and select Internet Explorer.
Clear history, cookies, or temporary files
Internet Explorer typica lly stores a list of the sites you’ve visited, cookies (files simplifying return to a site), or
temporary files. Clearing these files is simple.
1. From the Home screen, press [Start] [All Programs]
2. Press [Menu] [Tools] [Options].
3. Press Memory.
4. Select the type of memory to clear and press Clear.
5. Press Yes, and then press [Done].
85/142
and select Internet Explorer.

Create a new folder in Favorites
If you have more than a few web sites in your Favorites list, it may be convenient to arrange the sites in
folders on your favorites list.
1. From the Home screen, press [Start] [All Programs]
2. Press Favorites.
3. Press [Menu] [Add Folder].
4. In Name, enter a name for the folder.
5. Press Add.
and select Internet Explorer.
Delete a favorite
Any favorite can be deleted from your favorites list at any time.
1. From the Home screen, press [Start] [All Programs]
2. Press Favorites.
3. Select the favorite to delete.
4. Press [Menu] [Delete].
5. Press Yes to confirm the deletion.
and select Internet Explorer.
Disconnect from the Internet
Be sure to disconnect from the Internet when you are finished using it. Connections will time out
automatically if there is no activity, but it is a good idea to disconnect manually.
1. Press Recording
2. Press right soft key [Menu].
3. Press 1 Disconnect Cellular Data.
key, select 4 Wireless Manager and press OK.
Edit a favorite
You can change the name, URL, or description of a web site in your favorites list.
1. From the Home screen, press [Start] [All Programs]
2. Press [Favorites].
3. Select the favorite to edit.
4. Press [Menu] [Edit].
5. Make your changes and press [Done].
and select Internet Explorer.
Go to a link
If you have previously set up links, you can access them from the main page of Internet Explorer.
1. From the Home screen, press [Start] [All Programs]
2. Scroll vertically or horizontally to see all available links.
3. Press the link or press left soft key [GO] key.
and select Internet Explorer.
Go to a Web page
The Internet Explorer on your phone accesses web pages by letting you enter the address in the address bar
after pressing the menu key.
1. From the Home screen, press [Start] [All Programs]
2. Press [Menu] [Address Bar].
3. Enter the address, and press [Go].
and select Internet Explorer.
Go to a Web page in the History list
You also have access to web pages you’ve visited by using the History list in Internet Explorer.
1. From the Home screen, press [Start] [All Programs]
2. Press [Menu] [7 History].
3. Select the Web page, and press [Go].
NOTE: To return to the Web page you were viewing, press Cancel key.
86/142
and select Internet Explorer.

Open Internet Explorer
Internet Explorer is one of the easily accessible options from the Home Screen.
1. From the Home screen, press [Start] [All Programs]
and select Internet Explorer.
Refresh a Web page
To refresh a web page use the Menu soft key and select Refresh.
1. From the Home screen, press [Start] [All Programs]
2. If necessary, select the Web page in your Favorites or History list, and press [Go].
3. Press [Menu] [Refresh].
and select Internet Explorer.
Return to a Web page you visited in the same session
You can return to a web page or scroll back through pages you’ve visited in a session just as you would use
the “Back” button on a PC.
1. On a Web page, press Cancel key repeatedly until the page appears.
View a favorite
To view a favorite site at any time, just go into the Favorites list and select the site you wish to visit.
1. From the Home screen, press [Start] [All Programs]
2. Press Favorites.
3. Select a favorite and press [Go].
and select Internet Explorer.
View a list of recently visited Web pages
The History function of Internet Explorer allows you to select a site you’ve already visited and go to that site.
1. From the Home screen, press [Start] [All Programs]
2. Press [Menu] [History].
and select Internet Explorer.
Move a favorite to a folder
After you’ve created folders in your Favorites list, you can move any of the sites already on the list into one
of the folders.
1. From the Home screen, press [Start] [All Programs]
2. Press Favorites.
3. Select the favorite to move.
4. Press [Menu] [Edit].
5. Under Folder, scroll to the folder to which you want to move the favorite.
6. Press [Done].
and select Internet Explorer.
Change the size of text on Web pages
The text on the Web pages displayed on your phone can be made larger or smaller.
1. From the Home screen, press [Start] [All Programs]
2. Press [Menu] [View] [Text Size] and select the size you want.
and select Internet Explorer.
Show or hide pictures on Web pages
The images in the Web pages can be hidden or not on screen.
1. From the Home screen, press [Start] [All Programs]
2. Press [Menu] [View] [Show Pictures].
3. A check mark next to Show Pictures indicates that pictures will be displayed on Web pages.
87/142
and select Internet Explorer.

View a page in full screen mode
You can toggle back and forth between a full screen or a minimized screen on your phone’s display.
1. From the Home screen, press [Start] [All Programs]
2. Press [Menu] [View] [Full Screen].
TIP: To exit full screen mode, press either of the soft keys, and then Press [Menu] [View] [Full Screen] to
cancel the selection.
and select Internet Explorer.
Send a link via e-mail
One of the options your phone provides is sending a link through e-mail. You will use the Tools menu on the
Internet Explorer menu bar.
1. From the Home screen, press [Start] [All Programs]
2. Go to the Web page you want to send.
3. Press [Menu] [Tools] [Send Link]
4. Select Message or E-mail account.
5. A new message is created with the page address inserted in the message body.
and select Internet Explorer.
Adjust the scrolling speed
You will use the scrolling feature of the phone to view web pages – it can be adjusted to scroll as slowly or as
quickly as you need.
1. From the Home screen, press [Start] [All Programs]
2. Open a Web page.
3. Do one of the following:
•
Press navigation key to scroll from link to link on the page.
• Press and hold navigation key for more than three seconds to accelerate scrolling.
See also,
Change Web page display options
and select Internet Explorer.
서식 있음: 글머리 기호 및
번호 매기기
88/142

CHAPTER 12. PC CONNECTIVITY, BLUETOOTH AND
ACTIVESYNC
This chapter addresses Bluetooth and ActiveSync functions.
ACTIVESYNC
BLUETOOTH
OVERVIEW OF BLUETOOTH VIRTUAL COM PORTS
89/142

ActiveSync
Microsoft ActiveSync synchronizes data between your phone and PC. ActiveSync is already installed on you
phone, but you need to install it on your PC before you can synchronize data.
Install and set up ActiveSync
Install ActiveSync on your PC as described on the Windows Mobile Getting Started Disc. After Setup
completes, the Sync Setup Wizard automatically starts when you connect your phone to the PC.
Follow the instructions on the screen to complete the wizard. In the Sync Setup Wizard, you can:
• Create a synchronization relationship between your PC and the phone.
• Configure an Exchange Server connection to synchronize directly with Exchange Server. To
synchronize your phone with Exchange Server, obtain the name of the Exchange Server, your user
name, password, and domain name from your administrator before completing the wizard.
• Choose information types
NOTE: When you finish the wizard, ActiveSync synchronizes your phone automatically. Once
synchronization completes, you can disconnect your phone from your PC.
See also
Connect the phone
Change ActiveSync settings
Set up an Exchange Server connection
To complete this configuration, you will need to get the name of the server and the server domain name from
your service provider or system administrator. You must also know your Exchange user name and password.
Before changing synchronization settings on the phone, disconnect it from your PC.
to synchronize.
1. In the phone Home screen, press left soft key [Start] [All Programs]
OK.
2. Press [Menu], select Configure Server and press OK. If you have not yet set up sync with
Exchange Server, this will say Add Server Source.
3. In Server address, enter the name of the server running Exchange Server, and press left soft key
[Next].
4. Enter your user name, password, and domain name, and press [Next].
5. If you want the phone to save your password so that you will not need to enter it again when
connecting, select the Save password check box and press OK.
6. Select the check boxes for the types of information items that you want to synchronize with
Exchange Server.
7. To change available synchronization settings, select the type of information, and press [Menu] select
Settings and press OK.
8. To change the rules for resolving synchronization conflicts, press [Menu] select Advanced and
press OK.
9. Press [Finish].
, select ActiveSync and press
Change ActiveSync settings
Once you set up synchronization using the Sync Setup wizard on the PC, you can later change your
synchronization settings:
• If you want to change ActiveSync settings for synchronizing with a PC, use ActiveSync on the PC.
For more information, see "Changing the amount of information synchronized" in ActiveSync Help
on the PC.
• If you want to change ActiveSync settings for synchronizing with Exchange Server, use ActiveSync
See also
on your phone, as described in "Change settings for an information type."
Install and set up ActiveSync
Connect the phone
Change settings for an information type
90/142

Schedule synchronization as items arrive
You can schedule automatic synchronization between your phone and Exchange Server every time an item
arrives or is changed in Exchange Server if your company is running Exchange Server with Exchange
ActiveSync, and after your first full synchronization with Exchange Server.
1. On the phone Home screen, press [Start] [All Programs]
2. Press the right soft key [Menu] to select Schedule and press OK.
3. Do one or both of the following:
•
In Peak times, select ‘As items arrive’. This is more cost-efficient to synchronize at regular
intervals when mail volume is high.
In Off-peak times, select ‘As items arrive’. This can be more cost-efficient than synchronizing
•
4. Press [Done].
NOTE: Before changing the phone settings for synchronization, disconnect the phone from your PC.
on a regular schedule when mail volume is low.
, select ActiveSync and press OK.
Change the synchronization schedule
Before changing synchronization settings, disconnect the phone from your PC.
1. On the phone Home screen, press [Start] [All Programs]
2. Press right soft key [Menu] select Schedule and press OK.
3. Do one or more of the following:
To s y nc Do this
When you are working, or e-mail volume is high
When e-mail volume is low
While roaming Select the Use above settings while roaming check
When you Press Send in Messaging on the phone Select the Send outgoing items immediately check
Important NOTE: The device power-down timer is reset each time you synchronize. If you schedule a
synchronization interval that is shorter than the time interval set for the device to automatically power down,
the device will never turn off to save battery power.
TIP: To change peak time settings to more accurately adjust to periods of e-mail volume for you, press
[Menu] [Peak Times].
Select an appropriately frequent interval in the Peak
times list.
Select a longer interval or As items arrive in the Offpeak times list.
box. To minimize roaming charges, clear the check
box, and synchronize manually while roaming.
box.
, select ActiveSync and press OK.
서식 있음: 글머리 기호 및
번호 매기기
Start and stop synchronization
The ActiveSync program allows you to access a PC to keep information on both the PC and the phone
current. There are several types of information you will want to keep updated on both.
1. On the phone Home screen, press [Start] [All Programs]
2. Press the left soft key [Sync] and press OK.
3. To stop synchronizing, press [Stop].
NOTE: You can start and stop synchronization only if your phone already has a sync relationship with a PC
or Exchange Server.
, select ActiveSync and press OK.
View information about Sync status
ActiveSync keeps synchronization status messages on a status page for you to view at any time. You can
view status in one of the following ways:
• When alert text is displayed on the ActiveSync main page, press the alert text to open the status
page.
• Press [Menu] to select Status and press OK.
91/142

NOTE: Some errors interfere with automatic synchronization. If you suspect that a scheduled
synchronization has not occurred, you should attempt to manually synchronize your information.
Successfully completing manual synchronization resets automatic synchronization. For more information,
see "Synchronizing Information" in ActiveSync Help on the PC.
Change settings for an information type
Before changing synchronization settings on the phone, disconnect it from your PC.
1. On the Home screen, press [Start] [All Programs]
2. Press [Menu], select Options and press OK.
3. Select one of the information types.
4. Do one of the following:
•
To view or change settings for an information type (when available), press Settings.
• To view or change settings for a computer or Exchange Server, press [Menu] select Settings
5. Change the amount of information to be synchronized or other settings.
6. Press [Done] (or Finish in the Exchange Server settings wizard).
and click OK.
, select ActiveSync, press OK.
Connect the phone
There are several options for connecting your phone to your PC. Both devices will need to use the
ActiveSync program.
Important NOTE: To synchronize using ActiveSync, you must install ActiveSync on your PC before
connecting your phone to the PC.
1. Turn on the phone.
2. Connect your phone to your PC using a serial cable, USB cable, or Bluetooth connection. For more
See also
detailed information, see "Connecting a mobile device to a PC" in ActiveSync Help on your PC.
Install and set up ActiveSync
Change ActiveSync settings
서식 있음: 글머리 기호 및
번호 매기기
Deactivate the USB modem
This will allow you to use the ActiveSync program.
1. On the Home screen, press [Start] [All Programs]
2. Scroll to Connections and press OK.
3. Select Modem Link and press OK.
4. Use the left and right Navigation Keys to select status.
5. Select Inactive.
6. Press [Done].
NOTE: You must deactivate the USB modem if you want to use ActiveSync.
, select Settings and press OK.
Connect to a PC using chargeable USB cable
The Pantech C820 provides a USB connector for transferring data to and from your computer via USB cable.
1. Plug the USB Data Cable into a standard USB connector of your computer.
2. Plug the other end of the USB Data Cable into the bottom of your phone.
Connect to a PC using Bluetooth
Follow the instructions in ActiveSync Help on the PC for configuring Bluetooth on your PC to support
ActiveSync.
1. In the phone Home screen, press [Start], select ActiveSync and press OK.
2. Press [Menu] [Connect via Bluetooth]. Ensure that the phone and PC are within close range.
3. If this is the first time you have connected to this PC via Bluetooth, you must complete the Bluetooth
92/142

wizard on the phone and set up a Bluetooth partnership with the PC before synchronizing.
4. Press Sync.
5. When finished, press [Menu] and select Disconnect Bluetooth.
6. To preserve battery power, turn off Bluetooth.
Change e-mail security options
ActiveSync lets you s e t up S/MIME e-mail encryption and signing. You will have to obtain a valid certificate
for signing or encrypting e-mail before you will be able to sign or encrypt e-mail successfully.
1. In the phone Home screen, press [Start] [All Programs]
2. Press the right soft key [Menu] select Options and press OK.
3. Scroll to E-mail and press the right soft key Settings.
4. Press [Menu] to select Advanced and press OK.
5. Do one or both of the following:
6. To sign all outgoing messages so that a recipient can be certain that the message as received was
sent by the claimed sender, and has not been altered in any way, check Sign messages.
7. To encrypt all outgoing e-mails so as to protect the contents of the message from being viewed by
anyone other then the intended recipient, check Encrypt messages.
8. Press [Menu] and select Choose Certificate to select a certificate for signing or encrypting outgoing
e-mail. You can select certificates to sign or encrypt e-mails individually even if you do not want to
sign or encrypt all outgoing e-mail.
NOTE: Synchronizing e-mail using S/MIME encryption or signing is available only with Exchange Server
2003 Service Pack 2, or later.
, select ActiveSync and press OK.
Exclude an e-mail address from Reply All
ActiveSync can help you manage your e-mail by ignoring a specified e-mail address when you reply to all
senders from the phone. If you specify your own primary e-mail address, this can reduce the number of emails you receive by ensuring that you do not receive your own e-mail.
1. In the phone Home screen, press [Start] [All Programs]
2. Press [Menu] [Options].
3. Select E-mail, and press Settings.
4. Press [Menu] select Advanced and click OK.
5. Enter the e-mail address you want to remove when replying to all senders in Primary e-mail address.
, select ActiveSync and press OK.
Bluetooth
One remote networking option that is available to you with the Pantech C820 is Bluetooth wireless. By
activating Bluetooth you can exchange information easily with other devices.
Turn Bluetooth on and off
By default Bluetooth is turned off. If you turn it on, and then turn off your device, Bluetooth also turns off.
When you turn on your device again, Bluetooth turns on automatically.
1. On the Home screen, press [Start] [All Programs], select Settings, press OK.
2. Scroll to Connections and press OK.
3. Select Wireless Manager and press OK.
4. The Bluetooth function will be toggled.
5. Y o u can see the Bluetooth indicator in the home screen
See also
Make your device discoverable
End a Bluetooth partnership
Create a Bluetooth partnership
Turn wirele ss power on or off
93/142

Pair with a Bluetooth device
Ensure that the two devices are within close range and that both Bluetooth-enabled devices are discoverable.
1. On the Home screen, press [Start] [All Programs]
2. Scroll to Connections and press OK.
3. Select Wireless Manager and press OK
4. Press [Menu] and select Bluetooth Settings , press OK.
5. Select type of device which you want to connect and press OK
6. Press [Add] and press [Search]. Your phone searches for other Bluetooth-enabled devices and
displays them in the list.
7. Select the device which you want to connect
8. If your device supports other Bluetooth function too, you can configure other function connection as
well.
9. Enter an passkey between 1 and 16 characters, and press [Accept].
TIP: Once you pair with a Bluetooth device
beam information between them; Bluetooth needs only to be turned on.
You can connect your phone with multiple devices but only use it with one device at a time
, the Bluetooth-enabled devices don't need to be discoverable to
, select Settings, press OK.
and press [Select].
Disconnect Bluetooth connection.
Through the connections menu, all Bluetooth partnerships that have been enabled are displayed. You can
end a partnership at any time.
1. On the Home screen, press [Start] [All Programs]
2. Scroll to Connections and press OK.
3. Select Wireless Manager and press OK
4. Press [Menu] and select Bluetooth Settings, press OK.
5. Select kind of device which you want to disconnect and press OK.
6. Press [Disconnect].
See also
Make your device discoverable
Turn Bluetooth on and off
Create a Bluetooth partnership
, select Settings, press OK.
Make your device discoverable
To receive beamed information, beaming devices or computers must be able to detect
your device.
1. On the Home screen, press [Start] [All Programs], select Settings, press OK.
2. Scroll to Connections and press OK.
3. Select Wireless Manager and press OK.
4. Press [Menu] and select Bluetooth Settings, press OK.
5. Select Setting and press OK.
6. Enable Allow other Bluetooth devices to see this phone and click Done.
NOTE: Selecting Discoverable also turns on Bluetooth.
Turning off Bluetooth will make your device not discoverable, and it will also prevent you from sending a
Bluetooth beam.
See also
End a Bluetooth partnership
Create a Bluetooth partnership
Make your device visible (Chapter 14)
94/142

Rename a Bluetooth partnership
You can give a more meaningful name to a Bluetooth partnership to help you recognize it when selecting
from a list of partnerships.
1. On the Home screen, press [Start] [All Programs]
2. Scroll to Connections and press OK.
3. Select Wireless Manager and press OK
4. Select partnership to rename, press [Menu] and select [Properties], press OK.
5. Enter a new nickname for the Bluetooth partnership, and press [Done].
See also
Make your device discoverable
Turn Bluetooth on and off
End a Bluetooth partnership
Create a Bluetooth partnership
Pair with a Bluetooth devic
e
, select Settings, press OK.
Turn wireless power on or off
You can turn the power off to your wireless connections in a single location. This is a quick way to preserve
battery power or to prepare your device for an airplane flight.
1. Press the Recording briefly to display the Quick List.
2. Select Wireless Manager and press OK.
3. Do one of the following:
4. Press the button for a desired wireless connection type (such as Bluetooth or Phone) to turn it off or
on. If it is already turned off, the button is a lighter color and displays an icon marked with an X.
5. Press All to turn all wireless power on or off (available only when more than one wireless type exists
on your device).
NOTE: To change settings for one of the displayed wireless connection types, press [Menu] and press the
type of settings you want to change.
Connect to intranet URLs
Some companies use periods in their intranet URLs (for example, intranet.companyname.com). A Work URL
exception tells Internet Explorer Mobile to look on the Work network to find the URL instead of searching the
Internet.
1. On the Home screen, press [Start] [All Programs]
2. Scroll to Connections and press OK.
3. Press [Menu] to select Advanced and click OK.
4. Press [Menu] select Work URL Exceptions and press OK.
5. Press [Menu] then Add.
6. In URL Pattern, enter the URL, and press [Done]. Separate multiple URLs with a semicolon (;).
NOTE: You should not create URL exceptions for URLs on the Internet.
See also
Change an intranet URL
Delete an intranet URL
, select Settings, press OK.
Use a specific connection to connect to the Internet
When you create the connection, be sure to set the Connects to setting to The Internet.
1. On the Home screen, press [Start] [All Programs]
2. Scroll to Connections and press OK.
3. Press [Menu] then Advanced.
4. In Internet connection, select the connection you want to use and press [Done].
TIP: After you use the connection once, you may want to change your Internet Connection back to Automatic.
See also
Make your device discoverable
95/142
, select Settings, press OK.

Edit a VPN Connection
If you have access to a Virtual Private Network (VPN) you can use your phone on the VPN. You will want to
establish and edit the VPN connection first.
1. On the Home screen, press [Start] [All Programs]
2. Scroll to Connections and press OK.
3. Select VPN and press OK.
4. Select the connection to edit.
5. Press [Menu] [Edit].
6. Change any information, and press [Done].
, select Settings, press OK.
Overview of Bluetooth virtual COM ports
Some programs can connect only though a serial (COM) port. This can be true even if the device itself is
Bluetooth-enabled. To make it possible for such programs to use a Bluetooth connection, you must set up a
virtual COM port. Once created, this virtual port can be used like any other COM port. You can use a virtual
COM port for programs that, for example, or to connect to a Bluetooth-enabled printer.
Here are some examples of how to use incoming and outgoing virtual COM ports.
Outgoing COM port
You have a program on your device that cannot use Bluetooth directly but can print to a serial (COM) port.
You can create a Bluetooth partnership with a Bluetooth-enabled printer, and then set up an outgoing COM
port (for example, COM 1). The program can then send print data to COM 1, which reaches the Bluetoothenabled printer.
Set up an outgoing Bluetooth COM port
The New Outgoing Port menu command is available only if one or more Bluetooth-connected devices
support serial (COM) connections.
Make sure that your device is currently connected to the other device via Bluetooth.
1. On the Home screen, press [Start] [All Programs]
2. Scroll to Connections and press OK.
3. Select Wireless Manager and press OK.
4. Press [Menu] and select Bluetooth Settings, press OK.
5. Select Settings and press OK.
6. Press [Menu] and select Serial Ports and press OK.
7. You can see Bluetooth inbound and outbound COM Port.
See also
Overview of Bluetooth virtual COM ports
Set up an incoming Bluetooth COM port
Create a Bluetooth partnership
.
, select Settings, press OK.
Create a dial-up connection
Every network connection is different. You should gather all of the relevant information or network settings
you need before starting this process.
1. On the Home screen, press [Start] [All Programs]
2. Scroll to Connections and press OK.
3. Select Dial-up and press OK.
4. Press [Menu] and select Add.
Enter the following information and press [Done].
• Description: enter a name for the connection.
• Connects to: select the network.
• Phone number: enter the phone number to be used to dial the network.
96/142
, select Settings, press OK.

• User name: enter your network user name, if required.
• Password: enter your password, if required.
See also
• Domain: enter the domain name, if required.
Create a VPN connection
Create a proxy connection
Every network connection is different. You should gather all of the relevant information or network settings
you need before starting this process.
1. On the Home screen, press [Start] [All Programs]
2. Scroll to Connections and press OK.
3. Select Proxy and press OK.
4. Press [Menu] and select Add.
Enter the following information, and press [Done].
• Description: enter a name for the connection.
• Connects from: select the type of network from which you will connect.
• Connects to: select the type of network to which you will connect.
• Proxy [name:port]: enter the proxy server name and port number in this form: server
name:port number.
• Ty pe: select the type of proxy connection to create.
• User name: enter your user name for the network to which you will connect.
• Password: enter your password.
, select Settings, press OK.
Create a VPN connection
Every network connection is different. You should gather all of the relevant information or network settings
you need before starting this process.
1. On the Home screen, press [Start] [All Programs]
2. Scroll to Connections and press OK.
3. Select VPN and press OK.
4. Press [Menu] and select Add.
Enter the following information, and press [Done].
• Description: enter a name for the connection.
• VPN type: select the type of VPN.
• Server: enter the VPN server name.
• Connects from: select the type of network from which you will connect to the VPN (typically the
Internet).
• Connects to: select the type of network to which you will connect (typically My Corporate
Network).
• User name: enter your user name for the VPN.
• Password: enter your password.
• Domain: enter the domain name, if required.
• IPSec authentication: If you selected IPSec in VPN type, select the type of authentication:
Pre-Shared Key or Certificate.
• IPSec Pre-shared key: If you selected Pre-Shared Key in IPSec authentication, enter the key.
, select Settings, press OK.
Delete a dial-up connection
If a dial-up connection is no longer need, delete it from the Connections menu. As with all options, you can
control all the different connections possible through the phone.
1. On the Home screen, press [Start] [All Programs]
2. Scroll to Connections and press OK.
3. Select Dial-up and press OK.
4. Press [Menu] and select Delete.
5. Press Yes, and press [Done].
97/142
, select Settings, press OK.

Delete a proxy connection
If a proxy connection is no longer needed, delete the connection from the Connections menu.
1. On the Home screen, press [Start] [All Programs]
2. Scroll to Connections and press OK.
3. Select Proxy and press OK.
4. Press [Menu] and select Delete.
5. Press Yes, and press [Done].
, select Settings, press OK.
Delete an intranet URL
You may have stored URLs in your Work URL Exceptions list. When a URL is no longer needed there, delete
it through the Advanced Connections menu.
1. On the Home screen, press [Start] [All Programs]
2. Scroll to Connections and press OK.
3. Press [Menu], select Advanced and press OK.
4. Press [Menu] select Work URL Exceptions and press OK.
5. Press [Menu], and press Delete.
See also
Connect to intranet URLs
Change an intranet URL
, select Settings, press OK.
Delete a VPN connection
When you are sure a VPN connection will no longer be needed – delete it from the Connections menu.
1. On the Home screen, press [Start] [All Programs]
2. Scroll to Connections and press OK.
3. Select VPN and press OK.
4. Press [Menu] and select Delete.
5. Press Yes then press [Done].
, select Settings, press OK.
Edit a dial-up connection
To edit a Dial-up connect ion, go to the Connections menu and select the connection to delete.
1. On the Home screen, press [Start] [All Programs]
2. Scroll to Connections and press OK.
3. Select Dial-up and press OK.
4. Press [Menu] and select Edit.
5. Change information and press [Done].
, select Settings, press OK.
Edit a proxy connection
To edit a proxy connection, go to the Connections menu and select the connection to delete.
1. On the Home screen, press [Start] [All Programs]
2. Scroll to Connections and press OK.
3. Select Proxy and press OK.
4. Press [Menu] and select Edit.
5. Change information and press [Done].
, select Settings, press OK.
Edit an intranet URL
To edit an Intranet URL, go to the Connections menu and the Advance menu, and select the connection to
delete.
1. On the Home screen, press [Start] [All Programs]
2. Scroll to Connections and press OK.
3. Press [Menu], select Advanced and press OK.
4. Press [Menu] select Work URL Exceptions and press OK.
5. Press [Menu], and press Edit.
6. Edit the URL and press [Done].
See also
, select Settings, press OK.
98/142

Connect to intranet URLs
Delete an intranet URL
Connecting the GPS Intermediate Driver to GPS Hardware
Some programs can connect only though GPS Intermediate Driver to GPS Hardware. To make it possible for
such programs to use the GPS Intermediate Driver, you must set up a GPS COM port.
1. On the Home screen, press [Start] [All Programs]
2. Scroll to Connections and press OK.
3. Select More.. and press OK.
4. Select GPS COM Port Setting and press OK.
5. Select a numbered COM port from the list and press [Done]
NOTE: If the port cannot be created, it is in use. Select a different numbered port.
, select Settings, press OK.
서식 있음: 왼쪽, 들여쓰기:
왼쪽 1 글자, 단어 잘림 방지
99/142

CHAPTER 13. APPLICATIONS
CAMERA
CLEARVUE PDF
FILE EXPLORER
GET NAVIGATOR
SYSTEM INFO
SPEED DIAL
JAVA
TASK MANAGER
VOICE COMMAND
MY-CAST WEATHER
MYSPACE MOBILE
100/142
 Loading...