

Panasonic of North America 9TAWX CH2050 User Manual
All-in-One Headset
please read these instructions carefully and save this manual for future use.
Before attempting to connect or install this product,
CAUTION
It is a violation of Federal Law to begin operating this system prior to obtaining an FCC Radio License. The FCC ID
number for this radio equipment is listed below.
FCC ID: ACJ9TAWX-CH2050
ATTENTION:
A lithium-ion battery that is recyclable powers
the product you have purchased. Please call 1800-8-BATTERY for information on how to recycle this battery.
The serial number of this product may be found in the battery compartment of the unit.
You should note the serial number of this unit in the space
provided and retain this book as a permanent record of your
purchase to aid identification in the event of theft.
Model No. WX-CH2050
Serial No.
CONTENTS
INTRODUCTION ..................................................................1
FEATURES ...........................................................................1
PRECAUTIONS ....................................................................2
NAMES & FUNCTIONS ........................................................2
OPERATING PROCEDURES................................................4
● Preparations .................................................................4
● Communications with Customers [TALK] ....................5
● Communications with Other Store Personnel
[PAGE] .....................5
BATTERY LOADING & REPLACEMENT ..............................6
MAINTENANCE....................................................................6
TROUBLESHOOTING ..........................................................7
SPECIFICATIONS ................................................................7
STANDARD ACCESSORIES ................................................7
OPTIONAL ACCESSORIES..................................................7
SETUP PROCEDURES.........................................................8
● Opening the Switch Pocket..........................................8
● Channel Group Selection .............................................8
● DIP Switch Setup..........................................................9
● Channel Interference Check ........................................9
● Operation Mode Setup...............................................10
Model No. WX-CH2050
INTRODUCTION
The WX-CH2050 is an all-in-one headset designed for use
in wireless communication systems, which are use in Drivethru menu boards, etc. It incorporates such necessary
devices as the battery compartment and control buttons
besides the microphone and earphone. The built-in antennas, transmitter, and receiver enable you to communicate
with other store personnel and the customer by audio.
FEATURES
• Compatible center modules: WX-C1010, WX-C1011,
and WX-CC2010
• Less noise and interference thanks to the use of UHF
band
• Easy frequency setting by use of phase locked loop
(PLL)
• A/B channel selection available for convenience of double drive-through (DDT)
• Talk mode selectable between talk-lock and press-totalk
• Page mode selectable between page-lock and pressto-talk
• Easy-to-replace cushions: head pad cushion, earphone
cushion, and windproof cushion

PRECAUTIONS
• All setup procedures of this product should be performed by qualified service personnel or system
installers.
• Use only Panasonic authorized batteries like the
rechargeable Li-ion 3.7V normal type or long life type.
NAMES & FUNCTIONS
• Follow the battery care and handling instructions.
• Read the instructions included with the battery charger.
• Charge the battery when the power indicator lights up
in red and a beep is heard in the headset. Fully charge
the battery. Failure to do so may shorten the operating
time.
q
r
t
u
y
SERVICE
USE ONLY
FUNCTION
OF
N
O
F
GROUP
1
2
3
8
4
7
5
6
!1
VOL.
!2
!3
!4
A/B
!5
2
w
e
i
T
JEC
E
!0
o

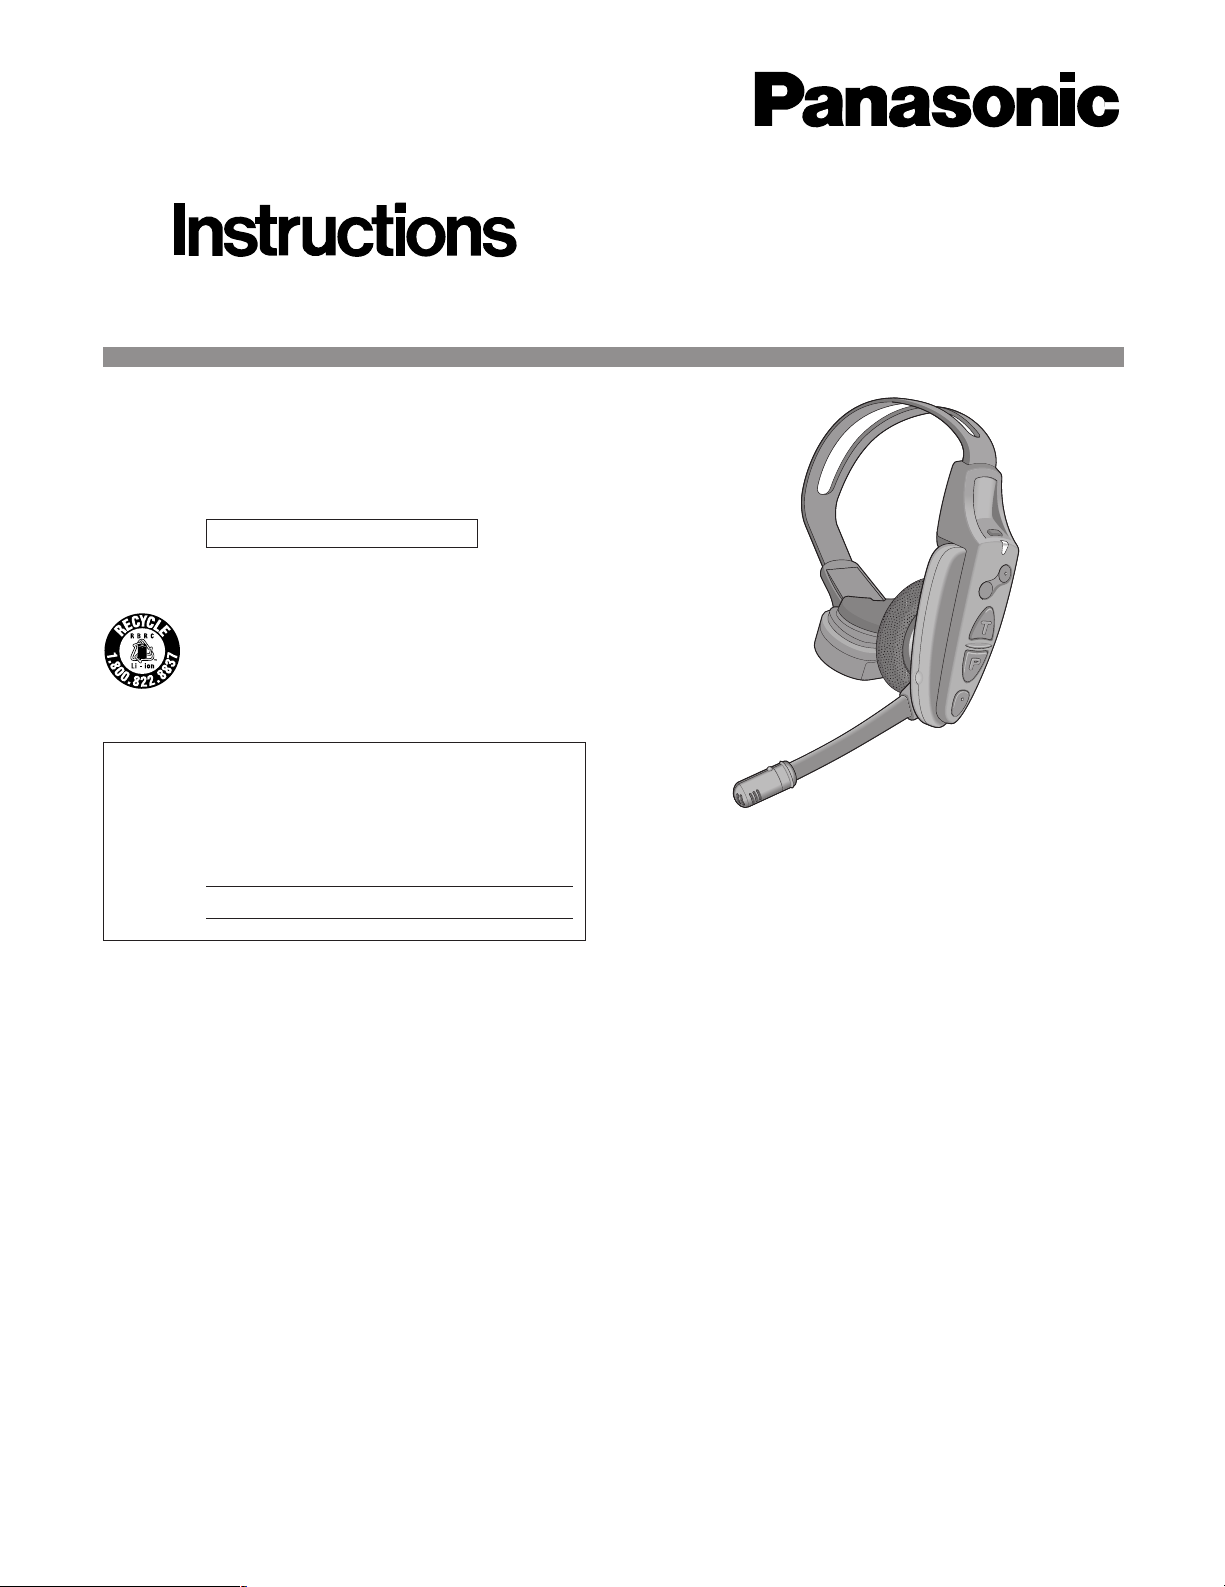
q Head Band and Head Pad
Adjustable to your head by sliding the head pad
w Battery Lock [EJECT]
When removing the battery, slide the lock to the outside.
When loading a new battery, insert the battery until the
lock clicks.
e Battery (Optional accessory)
See PRECAUTIONS.
r Head Pad Cushion
t Strap (Standard accessory)
y Switch Pocket
Do not open the lid. Only qualified service personnel or
system installers are allowed to change switch settings.
u Earphone Pad
!1 Power Button and Indicator [POWER]
Pressing the button for one second will turn on or off the
headset.
The indicator shows the status as follows.
Green On: Power is supplied, and the headset
operates.
Red On: The battery requires recharging.
Red Blink: The channel selector is set to a wrong
position.
!2 Volume Control Buttons [VOL ▲▼]
Pressing the respective buttons will increase or
decrease the sound level.
!3 Talk Button [T]
This button controls communications with the customer.
When the button is released, you can hear the cus-
tomer who is at the menu-board.
While the button is held down in the press-to-talk
mode, you can speak to the customer.
When the button is pressed in the talk-lock mode, you
can speak to the customer until you press the button
the second time.
i Microphone Boom
Adjustable to your mouth position by rotating and bending the boom
o Microphone and Windproof Cushion (Standard
accessory)
!0 Channel Indicator
Steadily lights up to indicate the operating channel in
different colors.
Red: Is lit when channel A is selected.
Green: Is lit when channel B is selected.
Blinks to indicate the Talk or Page mode.
Constant Blink: Talk mode
Random Blink: Page mode
!4 Page Button [P]
This button controls communications with store personnel.
When the button is released, you can hear the communications among store personnel.
While the button is held down in the press-to-talk
mode, you can speak to store personnel.
When the button is pressed in the page-lock mode,
you can speak to the store personnel until you press the
button the second time.
!5 A/B Channel Selection Button [A/B]
This button switches frequencies from channel A to B
and vice versa. The channel indicator displays the
selected channel in red (A) or green (B).
3

OPERATING PROCEDURES
Notes:
• Transmission using the talk [T] or page [P] button is
allowed for a single headset at a time. A continuous
beep or distorted sound will be heard in the headset
that tries to transmit while another person is operating.
• Distance a headset more than 0.3m (1 foot) from the
order taker, or more than 1m (3 ft) from the center module.
3. Wear the headset and route the strap behind your neck.
V
O
L
.
A
/B
● Preparations
Prior to operating the headset, confirm that the system
setup has been performed for the headset, center module,
and other devices.
1. If necessary, attach the supplied strap on to the headset. There are two strap buttons on the headset: one is
at the lower part of the head pad, and the other is
behind the ear cushion.
• Hook the tabs of the strap to the two strap buttons
on the headset.
4. Adjust the head pad so that the earphone is placed on
your ear.
5. Rotate and bend the microphone boom so that the
microphone is placed near your mouth.
V
O
L
.
A/B
2. Install a battery to the battery compartment, referring to
BATTERY LOADING & REPLACEMENT.
q
w
e
6. Press the power button to turn on the headset.
V
O
L
.
A
/B
4
 Loading...