

Panasonic of North America 96NKX TD7895 User Manual
Wireless Phone
Operating Instructions
Model No. KX-TD7895
POWER
IN USE
LOCATOR
SPREAD SPECTRUM
KX
-
TD
7895
Please read this Operating Instructions
before using the unit and keep this for
future reference.
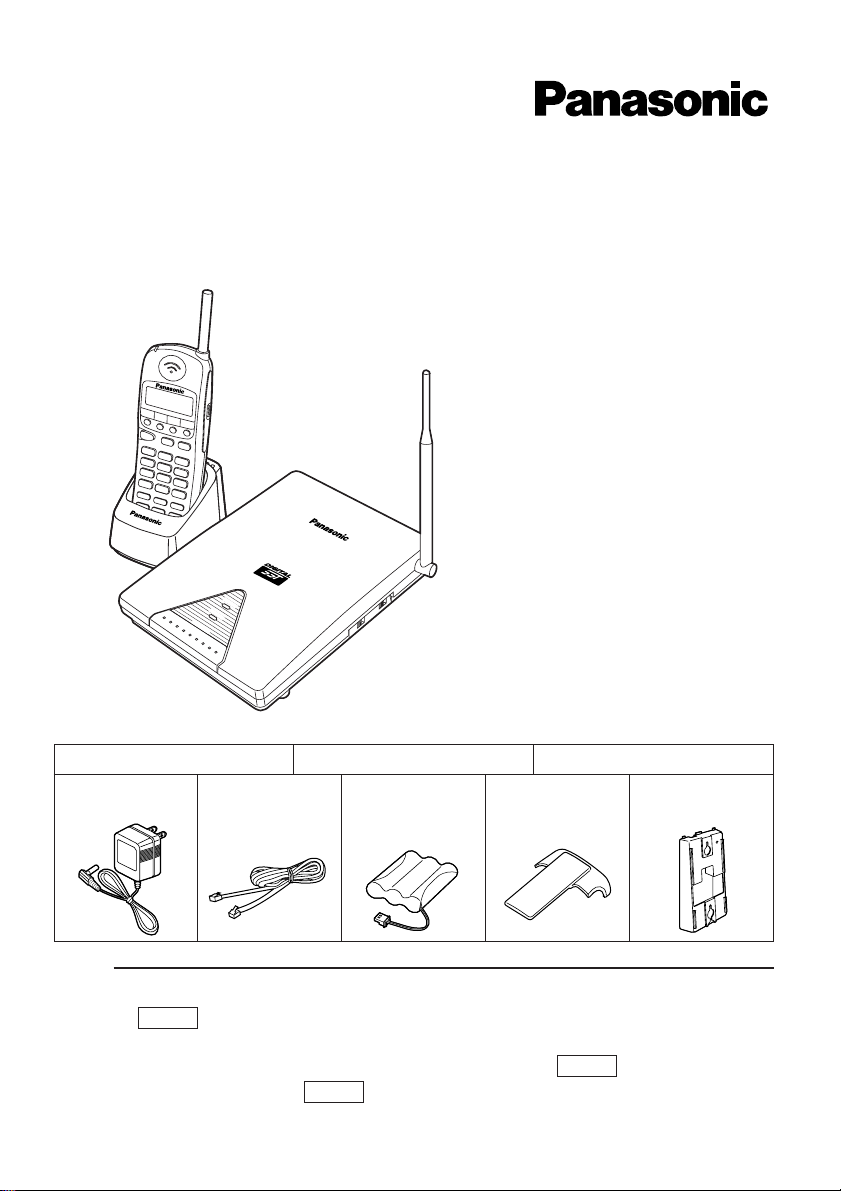
Accessories (Included)
UP
NOTE:
• The KX-TD7895 can be connected to a single line telephone for home use. This is
called mode.
The KX-TD7895 can be connected to Electronic Modular Switching System
(Panasonic KX-T, KX-TA or KX-TD series). This is called mode.
• The functions described in is available only when KX-TD7895 is connected
to the system.
• To order accessories, call toll free 1-800-332-5368.
EMSS
EMSS
SLT
Handset . . . . . . . . . . One
AC Adaptor
. . . . . . . . Two
Telephone
Line Cord
. . . . . . . . One
Battery
(PSPT3HRAAU)
. . . . . . . . One
Wall Mounting
Plate . . . . One
Handset Clip
. . . . . . . . One
Base Unit . . . . . . . . . One Charging Unit . . . . . One

2
Thank you for purchasing a Panasonic Telephone.
Noise
Calls are transmitted between the base unit and the handset using wireless radio waves.
For maximum distance and noise free operation, the recommended base unit location is:
• Wireless telephones, except for the 900 MHz telephone, can be used together.
Operating Distance
The handset should always be at least 3 m away from the base unit.
When using more than 2 base units, the distance between one unit and others must be at
least 3 m, or else proper radio transmission cannot be obtained.
Battery Charging
You must charge the battery for about 5 hours before initial use.
When charging is completed, the charge indicator of the handset turns green from red.
In a HIGH location, with no
obstructions or interference
from electrical appliances.
Raise the
antenna.
Away from electrical appliances
such as a fax, radio, or personal
computer.
3 m
3 m
FOR BEST PERFORMANCE

CONTENTS
Location of Controls and Connection ............................................................4
Handset ........................................................................................................................4
Base Unit ......................................................................................................................6
Getting Started .................................................................................................7
Battery ..........................................................................................................................7
Before using KX-TD7895 in EMSS mode ....................................................................9
Power ON/OFF .............................................................................................................10
Liquid Crystal Display (LCD) ........................................................................................11
Controlling the Volume .................................................................................................12
Making Calls .....................................................................................................14
Calling (EMSS) .............................................................................................................14
Calling (SLT) ................................................................................................................14
Dialing the last number you dialed (Last Number Redial) ...........................................15
Speed Dialing ...............................................................................................................16
One-touch Dialing .........................................................................................................17
Receiving Calls .................................................................................................18
Receiving (EMSS) ........................................................................................................18
Receiving (SLT) ............................................................................................................19
During a Conversation ....................................................................................20
Placing a call on hold ...................................................................................................20
Three-party Conversation (Conference) ......................................................................20
Transferring a call ........................................................................................................21
Message Waiting ..............................................................................................22
Leaving a call notification .............................................................................................22
Call back when you receive a notification ....................................................................23
Useful Features.................................................................................................24
Forwarding your calls (Call Forwarding [FWD]) ...........................................................24
Preventing others from disturbing you (Do Not Disturb [DND]) ...................................25
Flash .............................................................................................................................26
Key Lock .......................................................................................................................26
Programming ....................................................................................................27
PBX Station Programming ...........................................................................................27
Handset Programming .................................................................................................28
Vibrator and Ringer ......................................................................................................29
Ringer Pattern Selection ..............................................................................................29
Auto Answer .................................................................................................................30
Key Click Tone Set .......................................................................................................30
Up/Down Key Assignment ...........................................................................................31
Automatic Flexible Key Selection .................................................................................31
Back Light .....................................................................................................................32
Auto Talk ......................................................................................................................32
Any Key Answer ...........................................................................................................32
Flexible Key Name Set .................................................................................................33
Handset Programming Data Default Set ......................................................................34
Others ................................................................................................................35
Wall Mounting ...............................................................................................................35
Installing the Handset Clip ...........................................................................................36
Locating the Handset From the Base Unit ...................................................................36
Troubleshooting ...............................................................................................37
Important Safety Instructions .........................................................................38
Features List .....................................................................................................43
3
4
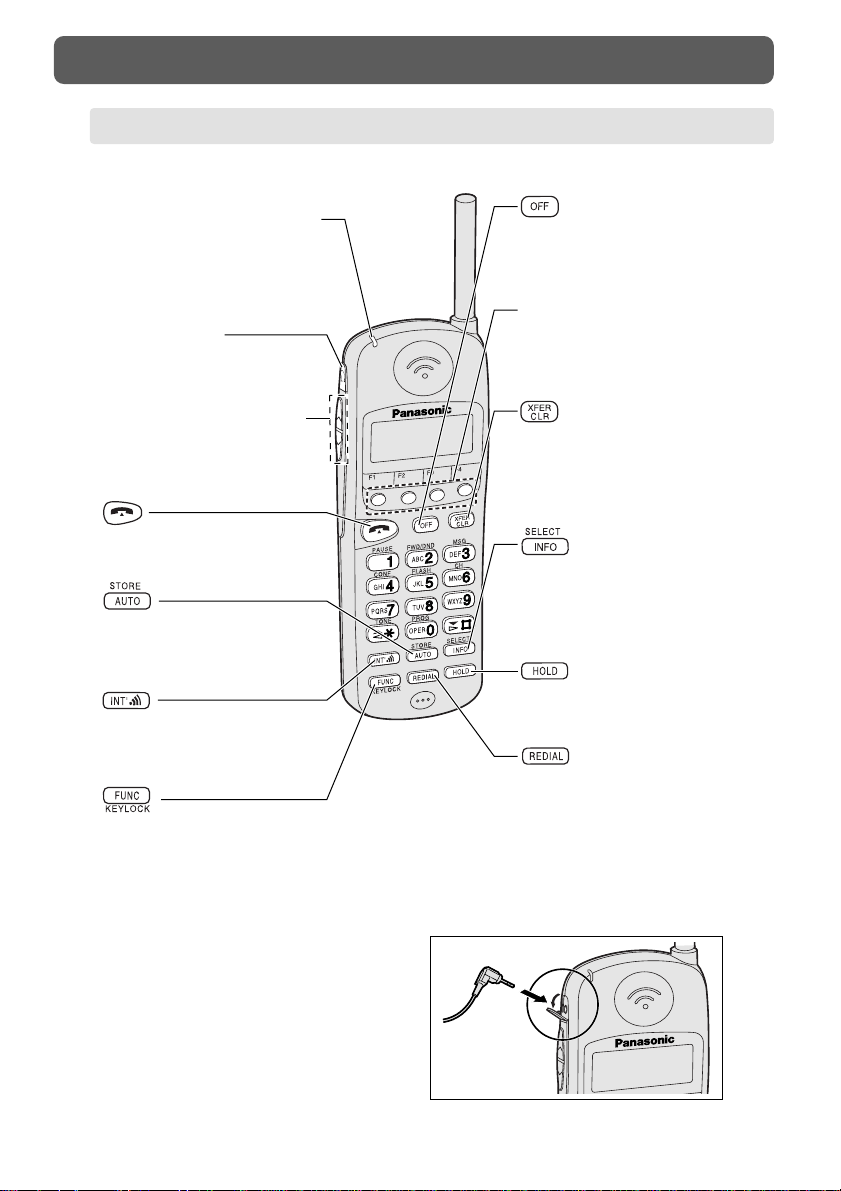
LOCATION OF CONTROLS AND CONNECTION
AUTO/STORE Button
Used for System Speed Dialing
or storing program changes.
Headset Jack
Connect a headset to talk
in the hands-free.*
Ringing/Charge Indicator
— Flashes green when an
incoming call is received.
— Turns red when charging
(except when receiving a call).
Volume Control Button
Used to select the ringer/
receiver volume, or select the
display of Flexible key.
Flexible CO Buttons
(F1 through F12)
Used to seize a CO line or
access several features.
TALK Button
Used to make a call.
INTERCOM Button
Used to make or receive
intercom calls.
FUNCTION/KEYLOCK Button
Used to enter Function mode, access
features by pressing additional keys or
lock/unlock the key in idle status.
OFF Button
Used to end calls or exit the
programming mode.
TRANSFER/CLEAR Button
Used to clear incorrect digits
while dialing, and transfer a
call to another extension.
INFO/SELECT Button
Used to refresh the LCD or
select an item in
programming mode.
HOLD Button
Used to place a call on hold.
REDIAL Button
Used to redial the last dialed
number.
The headset is optional.
Please use only Panasonic KX-TCA80,
KX-TCA87 or KX-TCA90 headset.
To order, call toll free 1-800-332-5368.
*
To use the headset
Open the
cover.
HANDSET
5
LOCATION OF CONTROLS AND CONNECTION
Combination Keys
PROG (Program)
PAUSE
FWD/DND
EMSS
MSG (Message)
EMSS
CONF (Conference)
EMSS
FLASH
Used to enter the programming mode.
Used to insert a pause in numbers.
Used to set Call Forwarding or Do Not
Disturb (DND) features.
Used to leave a notification to the
called party or call back the message
sender (Message Waiting).
Used to establish a three party
conversation.
Used to disconnect current call and
make another call.
Antenna
Liquid Crystal Display
(LCD)
Power Switch
ON OFF
ON
ON
Charging Stand
OFF
OFF
Numbering Sheet
You may write down the names
related to the one-touch dialing
on this sheet.
Microphone
Charge Contacts
Charge Contacts
Cord Holder
To AC Outlet
(120 V AC,
60 Hz)
AC Adaptor
(Use only the PQLV1)
6
LOCATION OF CONTROLS AND CONNECTION
NOTE:
• Use ONLY Panasonic AC ADAPTOR PQLV1. The adaptor must remain
connected at all times.
• The AC adaptor may feel warm. This is normal.
• The unit will not function during a power failure.
• This unit cannot be connected in parallel with a single line telephone.
• If the unit does not operate after connecting the AC Adaptor to the AC Outlet,
disconnect the AC Adaptor once and re-insert it.
THE AC OUTLET POWER SOCKET SHOULD BE LOCATED NEAR THIS
EQUIPMENT AND BE EASILY ACCESSIBLE.
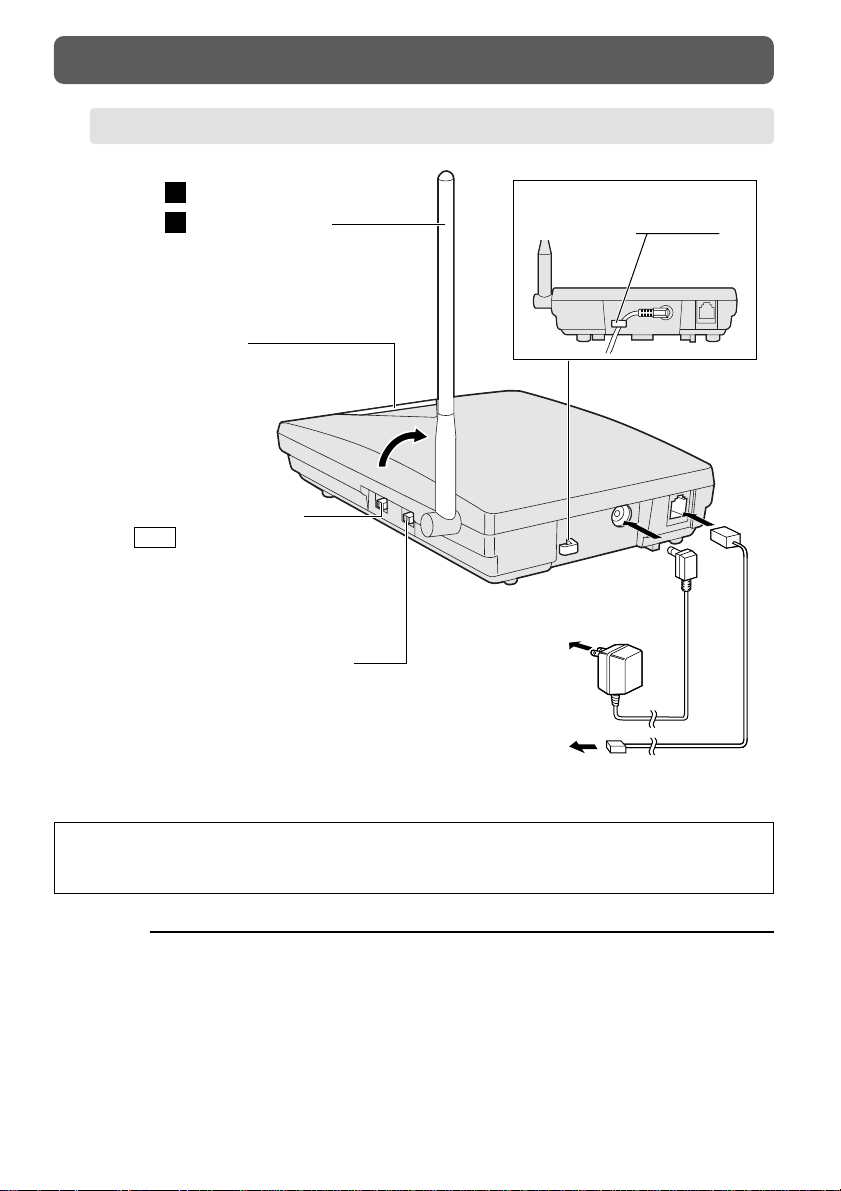
BASE UNIT
Fasten the AC adaptor
cord to the cord holder.
Telephone Line Cord
To Telephone
Line Jack (RJ14C)
or PBX.
AC Adaptor
(PQLV1)
To AC Outlet
(120 V AC, 60 Hz)
CONNECTION MODE Selector
If the unit is connected to a Telephone Line
Jack or a PBX (except for Panasonic KX-T,
KX-TA or KX-TD series), set to “SLT”.
If the unit is connected to Panasonic KX-T,
KX-TA or KX-TD series, set to “EMSS”.
Connect as shown.
Raise the antenna.
1
2
LOCATOR Button
Used to locate the handset.
DIALING MODE Selector
On
SLT mode:
If your telephone line leads to
touch tone service, set to “TONE”.
If your telephone line leads to rotary
service, set to “PULSE”.
Charging
You need to charge the battery before initial use and when the battery strength
becomes low.
Put the handset with the battery in the charging stand (see page 5).
Charge the battery for about 5 hours. When charging is completed, the charge
indicator turns green from red.
Standard Battery Life
If your Panasonic battery is fully charged [at 25 ˚C (77 ˚F)]:
7
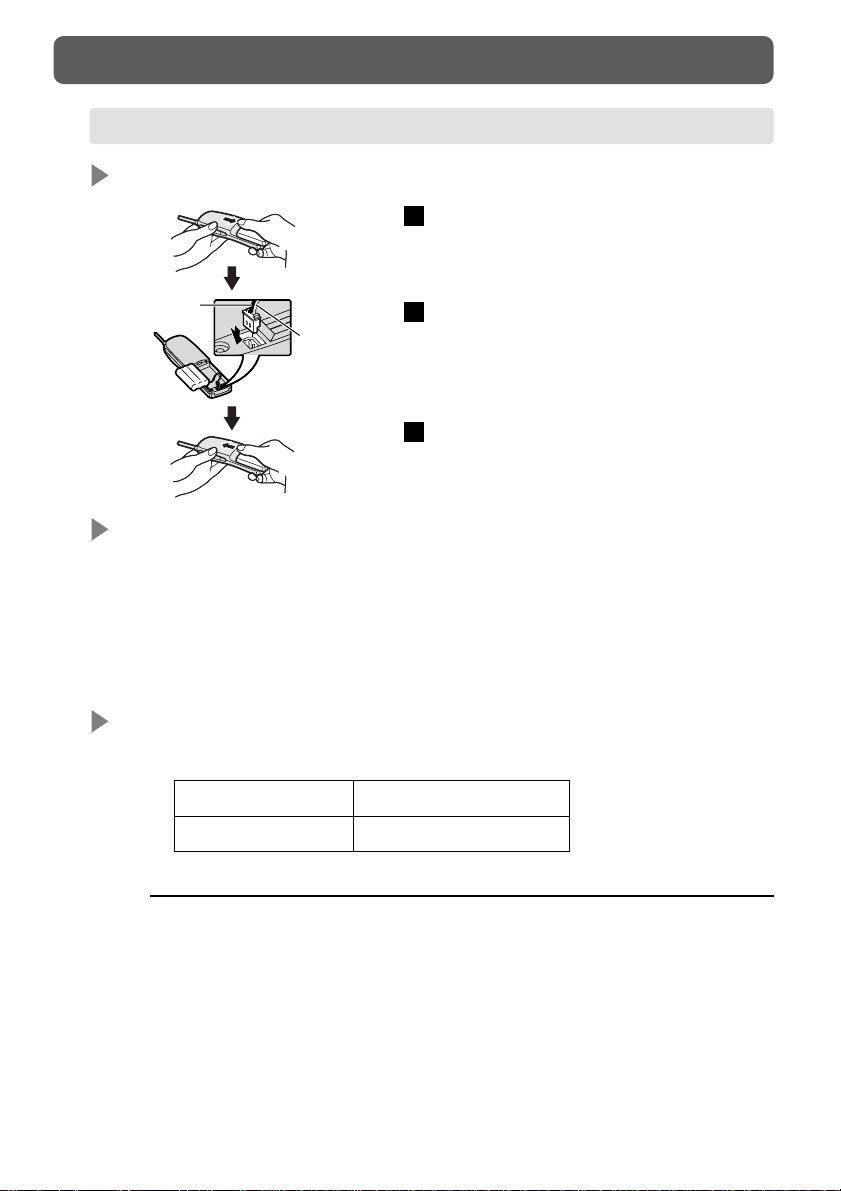
GETTING STARTED
Installing
Open the battery cover.
Connect the battery cord and install the
battery.
Close the cover.
3
2
1
Cord (Black)
Cord (Red)
In Talk mode Up to about 5 hours
In Stand-by mode Up to about 7 days
BATTERY
NOTE:
• Time to recharge the battery:
— when beep tones sound every 15 seconds,
— when BATT-LOW indicator flashes.
• When the battery strength becomes low, a call gets hang up within 3 minutes.
• If the charge indicator is green, even before charging the battery, remove the
battery and reinsert it after 5 seconds.
• The battery is used even while the handset’s power is OFF.
• Battery life may vary depending on usage conditions and ambient temperature.
• Please use only Panasonic PSPT3HRAAU battery (see page 1).

8
GETTING STARTED
Danger of explosion if battery is incorrectly replaced.
Replace only with the same or equivalent type recommended by the
manufacturer.
Dispose of used batteries according to the manufacturer’s instructions.
The product that you have purchased contains a rechargeable battery. The
battery is recyclable. At the end of its useful life, under various state and local
laws, it may be illegal to dispose of this battery into the municipal waste stream.
Check with your local solid waste officials for details in your area for recycling
options or proper disposal.
NOTE:
• Time to replace a new battery even the used battery is fully charged:
— when beep tones sound every 15 seconds,
— when battery low indicator ( ) is displayed.
• If you do not replace the battery within 5 minutes, memories (e.g., Redial data in
SLT mode, Flexible key position — F1–F4/F5–F8/F9–F12 and one-touch dialing
programming) may be lost.
• If you change the battery while on the phone, hold the call first.
CAUTION:
Replacing
Set the POWER switch to “OFF” to
prevent memory loss.
Open the battery cover and remove the
used battery.
Connect a new battery cord and install a
new battery.
Close the cover.
Set the POWER switch to “ON.”
5
4
3
2
1
ON
OFF
OFF
ON
OFF
ON
Cord (Black)
Cord (Red)
9
GETTING STARTED
This unit does not have speaker phone and monitor features. Therefore please take
care of the following contents before using KX-TD7895 in EMSS mode.
Please refer to your PBX manual for more information.
Alternative Calling
— Ring/Voice
This unit cannot receive alternative voice call. Please
inform another extension user not to use voice calling.
This unit cannot be connected in parallel with a single
line telephone in EMSS mode. If the parallel connection
mode of the PBX port is set to “Parallel ON (SLT
ringing is enabled)”, please set to “Parallel OFF (SLT
ringing is disabled)”. Please refer to your PBX manual
for more information.
Live Call Screening
(LCS)
Parallel Connection
Hands-free Mode:
LCS hands-free mode is not available on this unit.
Please set to private mode only, by station
programming. To change the setting, please refer to
your PBX manual.
Private Mode:
In this mode, the user can monitor or answer the call.
1) To monitor the call
Press when hearing alert tone.
2) To answer the call
Press LCS key* when monitoring the call or
hearing alert tone.
* The LCS key has to be assigned on a Flexible Key
before using this feature.
BEFORE USING KX-TD7895 IN EMSS MODE
Power ON
Turn the POWER switch to “ON”.
1
10
GETTING STARTED
Power OFF
Turn the POWER switch to “OFF”.
1
TUE MAY16 12:00P
F1 F2 F3 F4
F1 F2 F3 F4
The LCD shows the date and time of PBX or
your extension number (EMSS mode only).
10 seconds later
• If the following display appears, send the unit to your nearest authorized
service center.
Need Repair N
(N=1 – 3)
Power Switch
ON
OFF
ON
OFF
ON OFF
POWER ON/OFF

11
GETTING STARTED
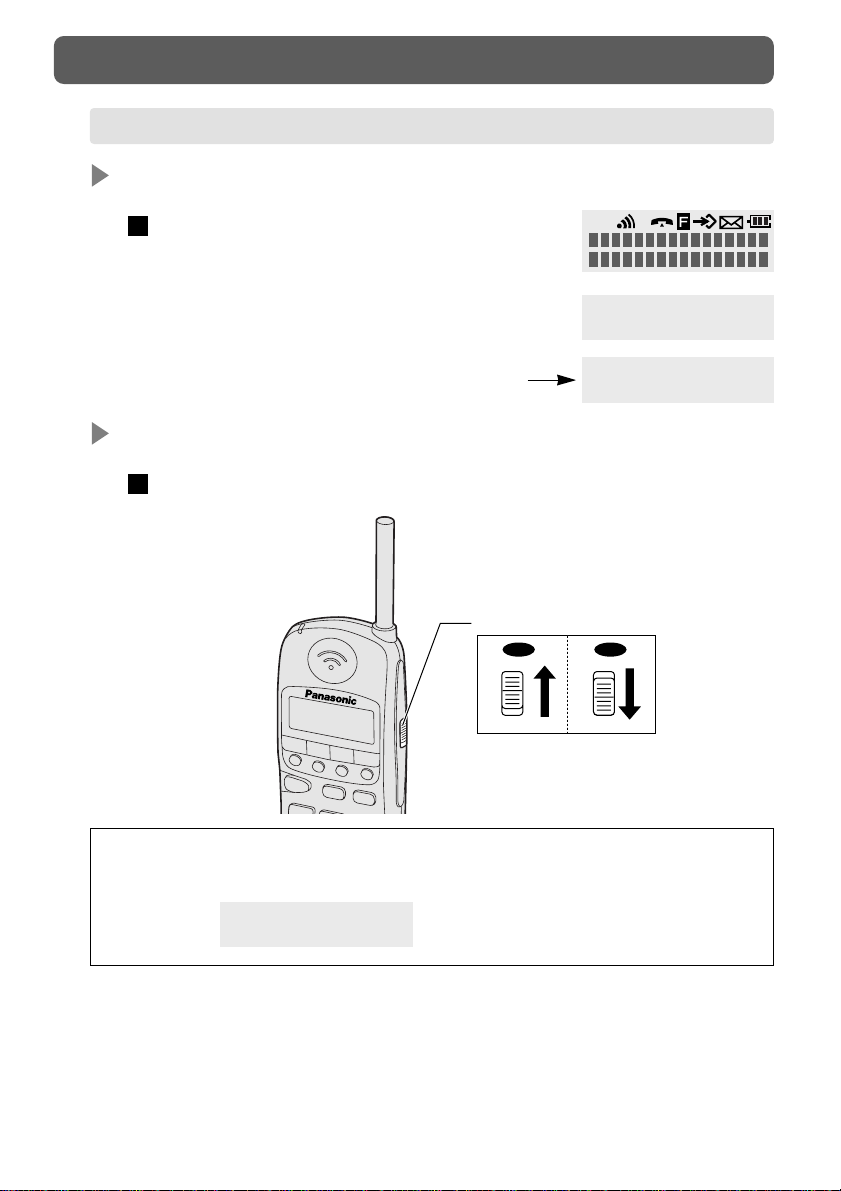
The display has 2 lines with 16 characters per line, and symbols to show
information are shown below.
Description of Symbols
The battery strength:
fully charged
medium
low
needs to be charged
In the Function mode
In idle status
In the Programming mode
Message Waiting notification
(You have a message.)
Intercom Indicator
NOTE:
• : When you press in on-hook status, the LCD shows the date and
time of PBX or your extension number for 10 seconds (On-hook
display).
How to change the LCD depends on your PBX. Please refer to your
PBX manual for more information.
1. Press .
The date and time (day/month/time) of PBX are
displayed.
2. Press .
Your extension number is displayed.
3. Press .
The date and time (day/month/time) of PBX are
displayed.
4. The PBX information disappears after 10 seconds.
EMSS
TUE MAY16 12:00P
F1 F2 F3 F4
123: ABCDEFGHIJ
F1 F2 F3 F4
TUE MAY16 12:00P
F1 F2 F3 F4
F1 F2 F3 F4
LIQUID CRYSTAL DISPLAY (LCD)
12
GETTING STARTED
Ringer Volume
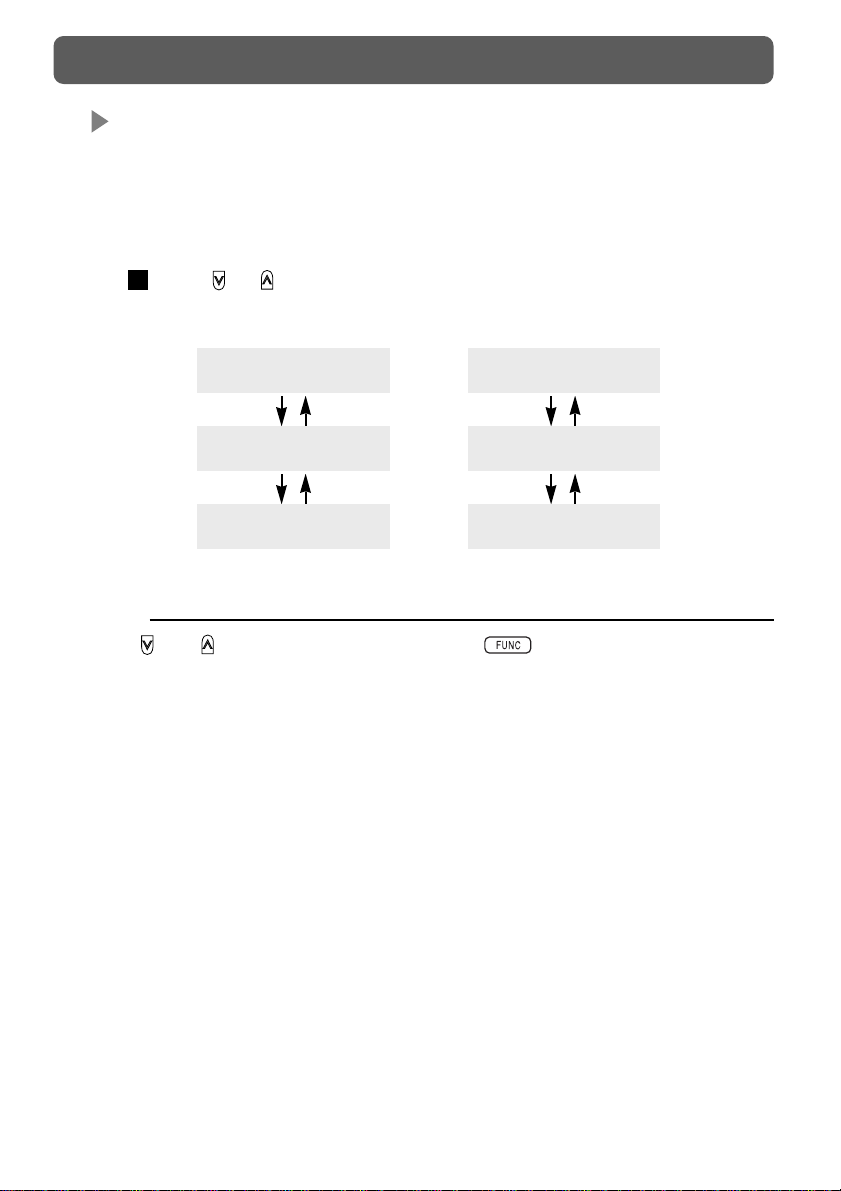
The ringer volume has three levels (Low/Middle/High). Moreover, you can
select the Step Ringer mode, Vibrator mode or Off mode. [Default: Middle]
Press or repeatedly to select
the desired mode.
• Step Ringer mode:
Rings progressively louder.
• Vibrator mode:
Does not ring but vibrates.
• Off mode:
Does not ring or vibrate.
Only the indicator flashes green.
1
Ringer Volume
=High
High
Middle
Low
Off mode
Vibrator
mode
Step Ringer
mode
Ringer Volume
=Middle
Ringer Volume
=Low
Ringer Volume
=Step
Ringer Volume
=Vibrate
Ringer Volume
=Off
NOTE:
• If and are set to “F-Key Select”, press
first (see page 31).
• If you select Vibrator mode, the display shows
“Vibrate” while on-hook.
If you select Off mode, the display shows
“Ringer OFF” while on-hook.
This is not available:
— when FWD/DND is set,
— while display shows your extension number or time,
— while display shows duration time after finishing the conversation,
— : when you set Auto Answer “On” with the headset.
• When charging, the handset rings for incoming calls (except Off mode).
• Vibrator and Ringer mode (vibrates several times and then rings) is also
available (see page 29).
EMSS
Vibrate
F1 F2 F3 F4
Ringer OFF
F1 F2 F3 F4
CONTROLLING THE VOLUME
(Press for more than 1 second.)
13
GETTING STARTED
Receiver/Headset Volume
The receiver/headset volume has three levels (Low/Middle/High). This can be
changed during a conversation. [Default: Middle]
Receiver volume: except when using a headset
Headset volume: when using a headset
Press or repeatedly during a conversation.
1
Receiver Volume
=High
Receiver Volume
=Middle
Receiver Volume
=Low
Headset Volume
=High
Headset Volume
=Middle
Headset Volume
=Low
High
Middle
Low
Ringer volume Headset volume
NOTE:
• If and are set to “F-Key Select”, press first (see page 31).

Intercom Calling
Press or .
Dial the extension number, then talk.
To hang up, press .
Outside Dialing, Line Access
Press (Flexible CO), or
press then line access number.
Dial the phone number, then talk.
To hang up, press .
3
2
1
3
2
1
14
MAKING CALLS
Press .
Dial the phone number, then talk.
To hang up, press .
3
2
1
101
F1 F2 F3 F4
F1 F2 F3 F4
F1 F2 F3 F4
F1 F2 F3 F4
CO02
F1 F2 F3 F4
0123456789
F1 F2 F3 F4
F1 F2 F3 F4
F1 F2 F3 F4
0123456789
F1 F2 F3 F4
0:00:10
F1 F2 F3 F4
CALLING EMSS
CALLING SLT

This unit saves the last number you dialed.
Press .
Press .
To hang up, press .
3
2
1
15
MAKING CALLS
NOTE:
• : You can also enter the phone number first and then press ,
or . (Predialing)
• Predialing is not available for 10 seconds after pressing .
• Press before dialing in the following cases:
— while display shows your extension number or time,
— while display shows duration time after finishing the conversation.
• : When you press , proprietary telephone is displayed
(LCD Refresh) while idle.
• : When you need to set to “TONE” mode during a call, press .
• Inserting a pause prevents misdialing. A pause can be inserted when you predial
or while storing a number for memory dialing. To insert a pause, press
then .
SLT
EMSS
EMSS
F1 F2 F3 F4
0123456789
F1 F2 F3 F4
F1 F2 F3 F4
DIALING THE LAST NUMBER YOU DIALED (LAST NUMBER REDIAL)
 Loading...