

Page 1

Page 2

CONTENTS
Highlights . . . . . . . . . . . . . . . . . . . . . . . . . . . . . . . . 1
Getting Started. . . . . . . . . . . . . . . . . . . . . . . . . . . . . 2
Phone Basics and Managing Calls . . . . . . . . . . . . 15
Entering Text. . . . . . . . . . . . . . . . . . . . . . . . . . . . . 24
Navigating the Applications . . . . . . . . . . . . . . . . . 27
Applications Menu Map . . . . . . . . . . . . . . . . . . . . 33
Contacts. . . . . . . . . . . . . . . . . . . . . . . . . . . . . . . . . 35
Calendar . . . . . . . . . . . . . . . . . . . . . . . . . . . . . . . . 43
Messages . . . . . . . . . . . . . . . . . . . . . . . . . . . . . . . . 48
Camera . . . . . . . . . . . . . . . . . . . . . . . . . . . . . . . . . 71
Media. . . . . . . . . . . . . . . . . . . . . . . . . . . . . . . . . . . 75
Connectivity . . . . . . . . . . . . . . . . . . . . . . . . . . . . . 90
Settings . . . . . . . . . . . . . . . . . . . . . . . . . . . . . . . . 112
Tools . . . . . . . . . . . . . . . . . . . . . . . . . . . . . . . . . . 137
Call Logs . . . . . . . . . . . . . . . . . . . . . . . . . . . . . . . 152
QuickOffice. . . . . . . . . . . . . . . . . . . . . . . . . . . . . 156
Games . . . . . . . . . . . . . . . . . . . . . . . . . . . . . . . . . 162
Favourites . . . . . . . . . . . . . . . . . . . . . . . . . . . . . . 164
Accessories . . . . . . . . . . . . . . . . . . . . . . . . . . . . . 166
Troubleshooting . . . . . . . . . . . . . . . . . . . . . . . . . 169
INDEX . . . . . . . . . . . . . . . . . . . . . . . . . . . . . . . . 172
i
Page 3

ii
Page 4

HIGHLIGHTS
Here are just some of the things you can do with the X700 mobile
phone.
• Send colour pictures and
video clips to friends and
family via Multimedia
messaging and e-mail
messaging.
• Send pictures, video,
electronic business cards,
and more using Bluetooth,
Infrared, or USB connections
to other phones or devices..
• See who is calling with
picture Caller Line ID on the
X700 external display.
• Download games, images,
themes, sounds, videos,
and Java
™
and Series 60
applications.
• View all your media files in
one place, the Media Gallery.
• Swap content between
appropriate devices with the
included miniSD Card and
adapter.
• Surf the Internet using your
XHTML configured wireless
Internet browser.
• Add frames, text, and pop
art to VGA size images.
• Capture video clips.
• Play 40 tone polyphonic
ringtones.
• No more wired headset!
Use a Bluetooth
®
wireless
headset.
• Synchronise your Contacts
and Calendar with your
other networked devices.
• Search for your files;
including games, images,
install packages, and video
and sound clips.
• Receive, edit, and view
Microsoft
PowerPoint
®
Word, Excel, and
®
files. Beam
documents to printers and
projectors (with appropriate
accessory).
• Speak a name or number to
dial the number using Voice
Commands.
• Say “open Messages” or
“open Camera” and your
phone will go directly to the
application using Voice
Commands.
1
Page 5
GETTING STARTED
The Panasonic X700 GSMTM/GPRS mobile phone operates on
Global System for Mobile Communications (GSM) networks
around the world, which provide integrated voice mail, text short
message service (SMS), multimedia messaging service (MMS),
fraud protection and superior voice quality. One of the most
important GSM advantages is the removable SIM (subscriber
identity module) card, containing personal information such as
subscription information, private encryption keys, and phone
numbers.
Feature Availability
Some features are network dependent or are available only if you
subscribe to the feature. Some functions are SIM card dependent.
Note that before you can use or activate many of the network
features, you must subscribe to the desired services. For more
information, contact your wireless service provider.
Before Using Your Phone
The SIM card must be installed in your phone for it to operate on
the cellular network. Insert SIM card, then attach battery and fully
charge it.
INSTALLING AND REMOVING SIM CARD
Caution: This product contains small parts. Keep out of reach of small
children.
Take care not to scratch or bend SIM card and gold contacts.
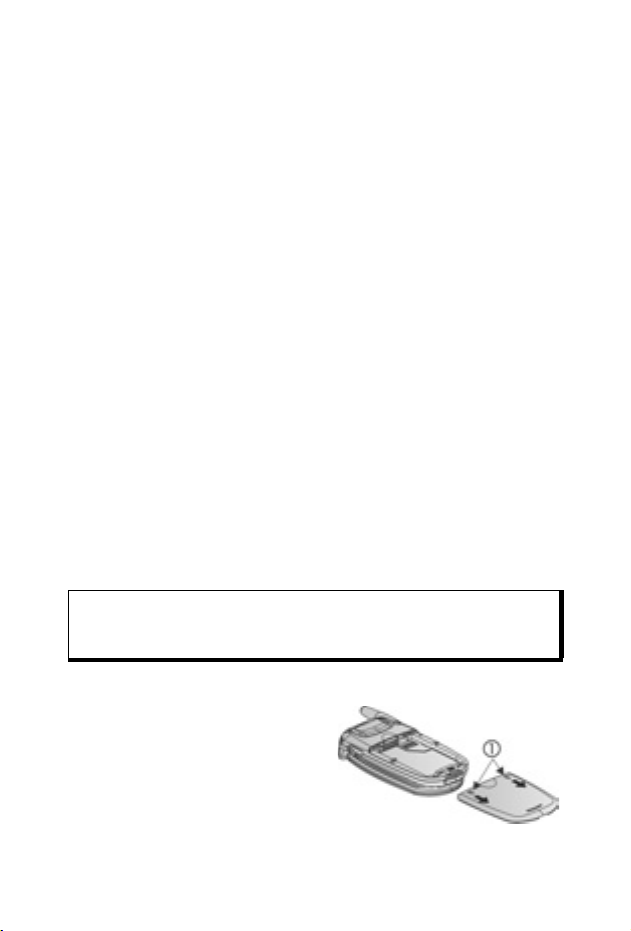
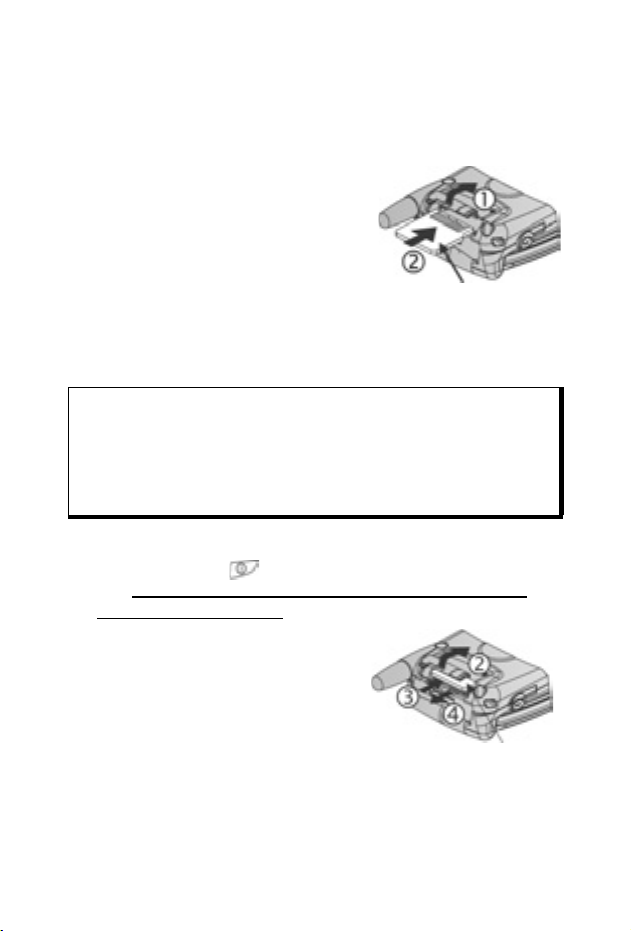
Installing SIM Card
1. Place thumbs at outer edges
of battery cover, press down,
then slide off battery cover
towards bottom of phone.
Remove battery (see page 4).
2
Page 6
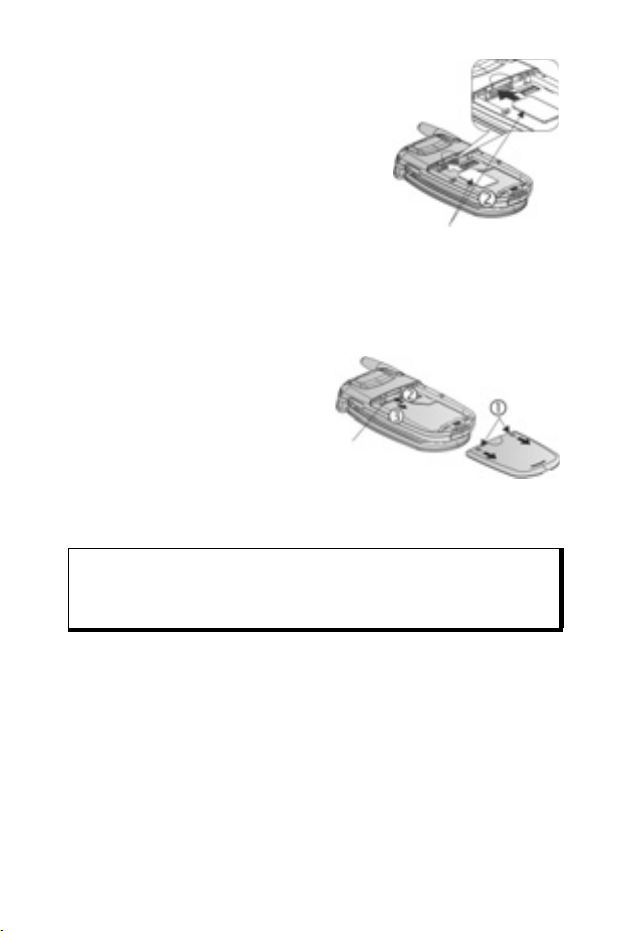
2. Position SIM card as shown, with
gold contacts facing phone and
notched corner entering phone first.
Carefully slide the SIM card into the
SIM card pocket until it clicks.
• If SIM card is inserted incorrectly
or damaged, Insert SIM card may
display. Remove SIM card, then
install again.
SIM Card
• If SIM card rejected message
appears, contact your wireless
service provider.
Removing SIM Card
1. Place thumbs at outer
edges of battery cover,
press down, then slide off
battery cover towards
bottom of phone. Remove
SIM Card
battery (see page 4).
2. Gently push bottom edge of
SIM card forward into SIM card pocket to release SIM card.
3. After SIM card is ejected, gently remove it.
Note: If you are upgrading your phone and your previous phone did not
support new services, such as MMS (Multimedia Messaging
Service), you may need to insert a new SIM card. Contact your
wireless service provider.
3
Page 7
INSTALLING AND REMOVING BATTERY
Caution: Using non-Panasonic accessories or accessories not
Installing Battery
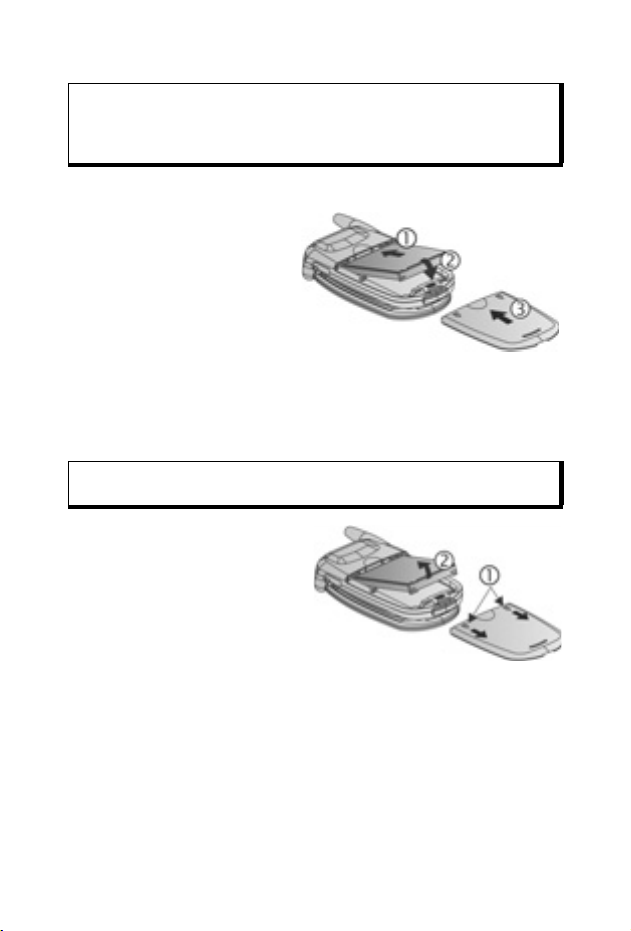
1. Hold battery at a 45º
2. Push bottom of battery
3. Replace battery cover
Removing Battery
Note: Before you remove the battery, switch off the phone and
1. Place thumbs at outer
2. Use tabs at bottom of
3. Replace battery cover.
recommended by your wireless service provider may result in
poor performance of your phone, or even cause an electrical
hazard.
angle; insert tabs on top
edge of battery into slots
along top edge of
battery area.
down until it clicks.
by sliding cover toward the bottom of the phone. Cover should
fit snugly with no gaps.
disconnect the phone from the charger or any other device.
edges of battery cover,
press down, then slide off
battery cover towards
bottom of phone.
battery to lift and remove
battery.
4
Page 8
CHARGING BATTERY
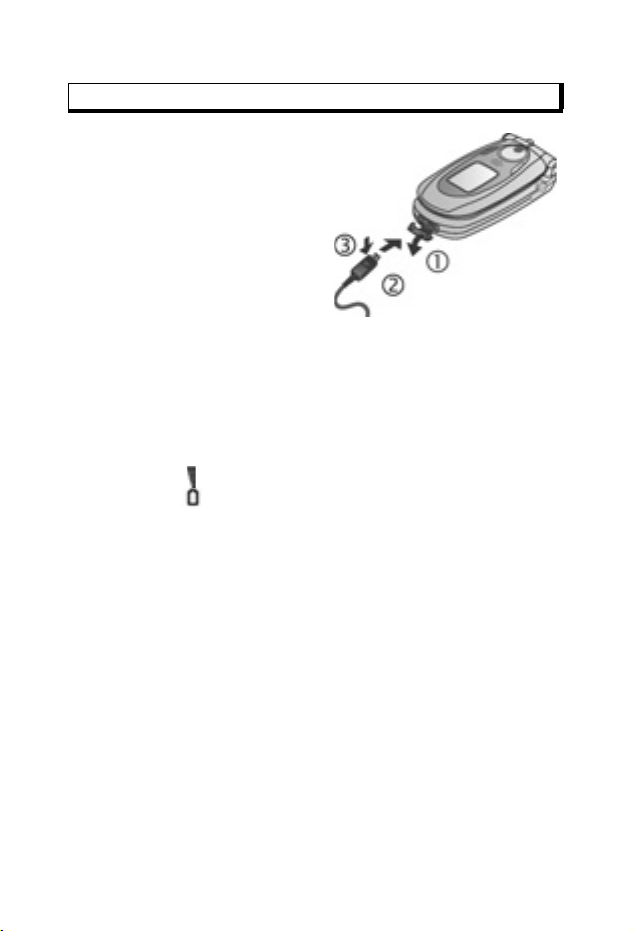
Note: First verify that battery is installed.
1. Open connector cover.
2. Insert connector into left side
(2 gold contacts) of
connector area at bottom
end of the phone. Connect
Travel Charger into mains
power socket.
3. When charging is complete,
remove from mains power
socket and press release
button to disconnect the charger from the phone.
• DO NOT force connector: it may damage phone or Travel
Charger.
Charging Icons on Main and External Display
bars scroll when charging
bars stop scrolling when charging is complete
• If the phone is switched on, Battery full message displays
when charging is complete.
Low Battery Warning
When the battery power is low, Battery low message displays
and a warning tone sounds; phone will automatically switch off.
Fully recharge the battery. If you receive the low battery warning
during a conversation, finish your call immediately.
5
Page 9
INSTALLING AND REMOVING miniSD CARD
The miniSD Card is a memory card used to expand phone
memory and a way to transfer files to other devices.
Installing miniSD Card
1. On top of phone, lift up miniSD
Card cover.
2. Slide miniSD Card, with notched
corner entering phone first and
gold contacts facing up, into the
miniSD Card pocket until it clicks.
Push down miniSD Card cover
until it clicks.
Note: Do not insert any object except a miniSD Card into the miniSD
Card pocket.
Do not place labels, etc., onto the miniSD Card. A fine difference
in card thickness may result in insertion or removal difficulty, loss
of contact or loss of data.
Take care not to scratch or bend miniSD Card and gold contacts.
Removing miniSD Card
1. Press Power key , scroll to Eject miniSD Card and press
OK. Before removing miniSD Card, wait for file saving or
copying process to finish.
2. On top of phone, lift up miniSD
Card cover.
3. To release miniSD Card, gently
push bottom edge of miniSD Card
forward into pocket.
4. After miniSD Card is ejected,
gently remove it. Push down
miniSD Card cover until it clicks.
MiniSD Card
MiniSD Card
6
Page 10

7
Page 11
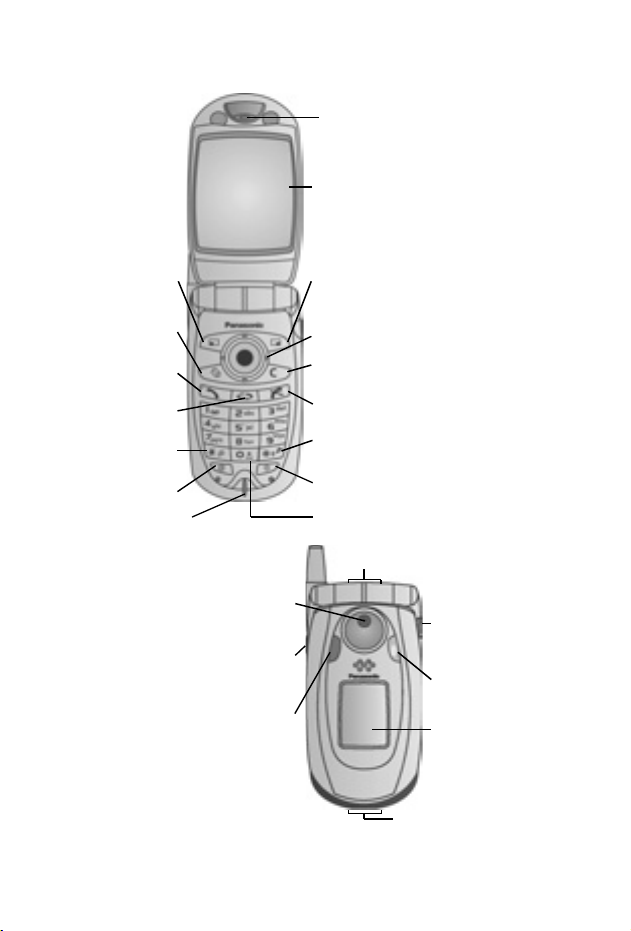
PHONE OVERVIEW
Earpiece
Main Display
Left
Softkey
Edit Key
Send Key
Application
Key
Asterisk Key
Browser
Key
Microphone
Camera Lens
Multibutton
Infrared Port
Right
Softkey
Navigation
Key
Clear Key
End Key
Silent Mode
Key
Power Key
Zero Key
miniSD Card Pocket
Accessory Connector
Personal
Handsfree and
TTY Connector
Indicator Light
and Photolight
External Display
and Viewfinder
8
Page 12
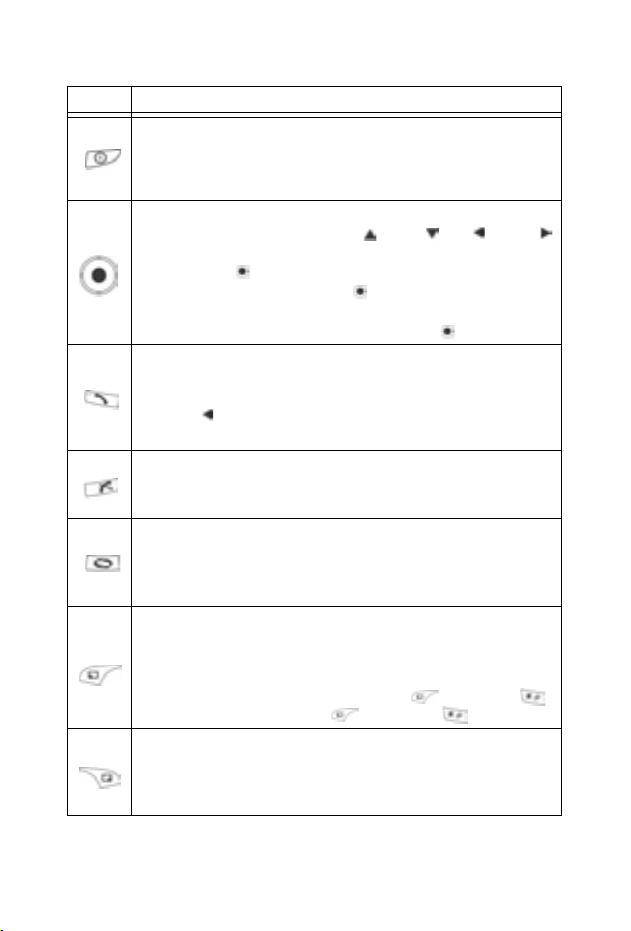
KEY FUNCTIONS
Key Function
Power Key
Press and hold to switch phone on or off.
Press to choose different ringtones, eject miniSD Card, lock
keypad, or lock the phone.
Navigation Key
Press outside edges to scroll up , down , left or right
to move through menus and text.
Press centre to select option.
In standby mode, press centre to enter main applications
menu area.
Take a picture in Camera mode by pressing .
Send Key
Make a call.
Press in standby mode to recall recently dialled numbers.
Scroll to see received and missed calls lists.
Press and hold in standby mode to activate voice commands.
End Key
Ends a call.
Return to standby mode.
Applications Key
Enter the main applications menu area.
Return to standby mode.
Press and hold to view currently open applications.
Left Softkey
Perform action named in lower left of display.
Shortcut to open preset application in standby mode. To
change shortcut, see Standby Mode Settings on page 117.
To lock the keys, in standby mode press , then press .
To unlock the keys, press , then press .
Right Softkey
Perform action named in lower right of display.
Shortcut to open preset application in standby mode. To
change shortcut, see Standby Mode Settings on page 117.
9
Page 13
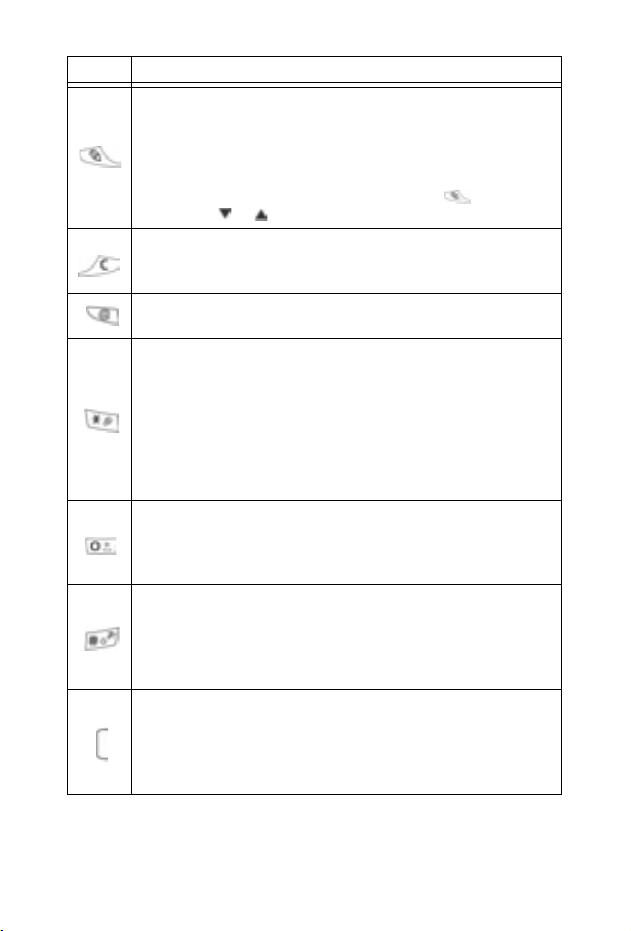
Key Function
Edit Key
Select Dictionary for predictive text including insert and edit
words, or alpha mode or number mode.
Insert numbers or symbols.
Change writing language.
Mark multiple items in a list by holding down , then
scrolling or .
Clear Key
Erase character in edit mode.
Delete highlighted entered item.
Browser Key
Opens Browser.
Asterisk Key
In standby mode, press and hold to switch Photolight or
flashlight on or off.
In numeric and standby modes, press repeatedly for *, +, p
and w characters.
In Dictionary mode, scroll to other word choices when word is
underlined.
In edit mode, press to open special character table.
Zero Key
In standby mode, press and hold to enter + character for
dialling.
In edit mode, enter space.
Silent Mode Key
In standby mode, press and hold to switch Silent mode on or
off.
In edit mode, shift to upper and lower case letters, or press
twice briefly to turn on/off Dictionary for predictive text.
Multibutton (on side of phone)
From external display, turns on backlight for 15 seconds or if
backlight is already on, brings up status icons.
Turns off ringer during incoming call.
Takes a picture when flip is closed.
10
Page 14
Symbols used in this manual
Press Power key. Press Applications key.
Press outside edges of
navigation key to scroll
up, down, left or right to
move through menus and
text.
Press Send key. Press End key.
Press Left softkey. Press Right softkey.
Press Edit key. Press Clear key.
- Press number keys. Press Browser key.
Press Asterisk key. Press Silent Mode key.
Press Multibutton key (on
side of phone).
Press navigation key
centre.
11
Page 15

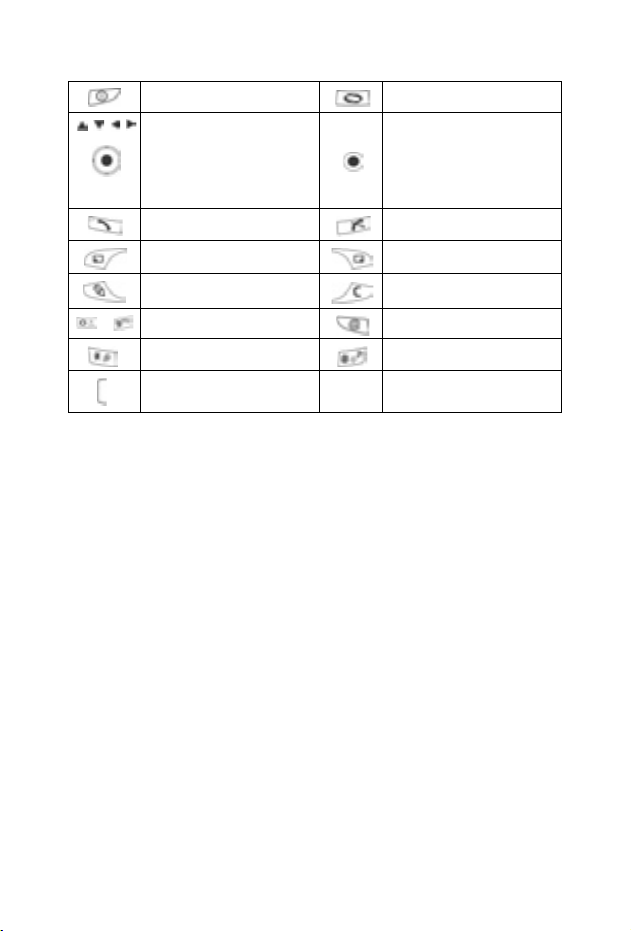
ICONS
Different icons appear depending on the features you are using
and the options you have selected.
Icon Indicates Icon Indicates
Seven levels indicate
battery charge level. Bars
scroll when battery is
charging.
Seven levels indicate
signal strength from
network on which phone is
currently registered
GPRS service is available New message received
Alarm is set
New voice mail message
received (if you have 2
lines, left circle is darkened
for line 1, right circle is
darkened for line 2)
GPRS service is on hold
during voice call
GPRS connection is active Bluetooth
Multiple GPRS connections
are active
Missed call
Call divert is active (if you
have 2 lines, 1 or 2 also
appears)
Line selection 2
(SIM card dependent, if you
have 2 phone lines)
Data call
12
Message in Outbox waiting
to be sent
®
is enabled
Bluetooth
Infrared is enabled (flashes
when active)
USB connection enabled
Navigation key - scroll and
move up or down options
Navigation key - scroll left
or right, move left or right to
view tabs
®
is active
Page 16

Icon Indicates Icon Indicates
Keypad is locked
Earpiece sound on
Loudspeaker sound on
All ringing tones/ring
volume are off (Silent
ringtone)
Private handsfree headset
attached
13
Page 17
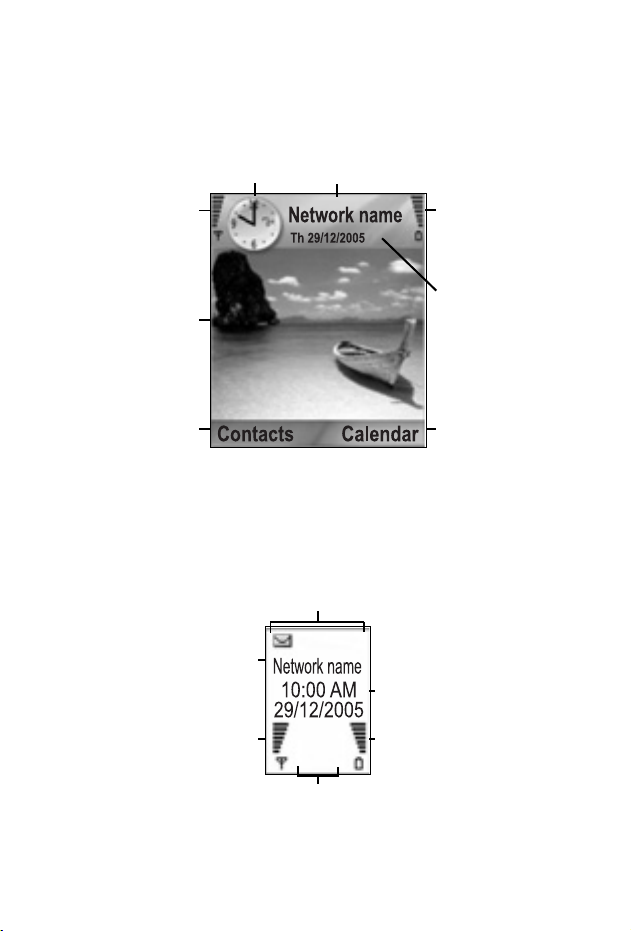
STANDBY MODE DISPLAYS
MAIN DISPLAY
Network that phone is
Time
currently using
Signal strength
selection area
icon
Wallpaper
Left Softkey
Battery charge
level icon
Date
Right Softkey
selection area
EXTERNAL DISPLAY
Press Multibutton once to switch on backlight, then press as
needed to toggle between clock and icon views.
Phone Status
icon area
Network that phone is
currently using
Signal strength
icon
Time an d date
area
Battery charge level
icon
14
Network Status
icon area
Page 18

PHONE BASICS AND MANAGING CALLS
SWITCHING THE PHONE ON AND OFF
Press and hold .
Note: If your SIM card is PIN protected, your PIN code will be
requested. Enter the PIN code and press
Settings on page 122.
OK. See Security
MAKING CALLS
Check that phone is switched on, signal strength icon displays at
least one bar , and your network operator logo displays before
dialling a call.
Type in the Phone Number to Dial
1. From standby mode, enter the area code and phone number,
and press .
2. To end the call, press .
Note: To erase a digit, press .
During a call, scroll or to adjust earpiece volume.
Warning: Closing the flip during a call DOES NOT END THE CALL,
when set to default. Opening the flip again allows you to
return to your previous conversation. To set the phone to end
the call when you close the flip, see Active clamshell in Call
Settings on page 117.
Use a Contact Card to Dial
From Contacts application:
1. Scroll to desired name card, press .
• If the card has several phone numbers stored, select the
one you wish to dial.
To add information to your Contacts, see page 35 .
15
Page 19

Use a SIM Directory Entry to Dial
From Contacts application:
1. Scroll to SIM directory view.
2. Scroll to desired name, press .
To add names and numbers to your SIM directory, see page 35.
Speak the Name to Dial
To dial by saying the name of the person you wish to call:
1. Press and hold .
2. After the prompt to “Say a command”, say “Voice Dial”.
3. After the prompt to “Say the name or number”, say the full
name of a person in your Contact list, including first name and
last name.
4. The name is repeated, and the phone will begin dialling.
See page 132 for more Voice Command options.
Speed Dialling
If you assigned speed dialling keys (see page 131) to your
frequently called numbers, you can dial them with 2 key presses.
1. From standby mode, press the preset speed dial digit key
- then press .
• If Speed dialling is set to On (see Call Settings on
page 117), just press and hold the preset speed dial digit
key to dial the assigned number.
Note: Location number 1 may be reserved for voice mailbox number.
Dialled Numbers, Received, or Missed Calls List
You can quickly dial previously dialled numbers, received call
numbers, or numbers of calls you missed.
1. From standby mode, press .
2. From the list of Dialled numbers, scroll to desired entry and
press to dial.
16
Page 20

•Scroll to move to Received calls tab and Missed calls
tab to select a number from either of those lists.
Automatic Redial
If you set Automatic redial to On in the Call Settings menu (see
page 117), your phone will automatically redial the number up to
10 times under certain conditions, such as no answer, destination
number is busy, network busy, or some connection errors.
Press Quit or to stop automatic redialling.
Dial from Messages
If a received message contains a phone number, you can dial it
from the Inbox message. You can also call the sender of an SMS
text message.
From Messages application:
1. Open Messages. Scroll to Inbox and open.
2. Scroll to desired message and open.
3. To find the phone number within a message, press Options
and select Find > Phone number, E-mail address, or Web
address. When found, text and numbers will be underlined.
• To call the sender of SMS text message from the open
message, press to dial the sender’s phone number.
International Calling
From standby mode, press and hold to enter +, the
international prefix, which is a shortcut for international dialling
access. Then type in the country code, area code, and phone
number. Press .
Note: Many countries/regions include an initial 0 in the area code. In
most cases, you should omit this when dialling international
numbers. For further help, contact your wireless service provider.
Emergency Calls
Dial the local emergency number used in your current location.
17
Page 21
1. Switch on the phone if it is off.
2. Verify that the antenna icon is displayed.
3. Enter the local emergency number (such as 112) and press
.
Note: You can call the local emergency number even if the keys are
locked.
Making emergency calls without SIM is country or network
operator dependent.
Send Service Command to Network
Ask your wireless service provider to activate a particular service
by sending a service command. These commands, which may be
called USSD commands, can activate services such as mobile
prepay and chat.
1. First, contact your wireless service provider for the proper
service command code.
2. Type in the supplied service command code. If the phone
recognises it as a supplementary service or USSD request,
press Send service comm.
ANSWERING CALLS
When there is an incoming call, the phone rings and flashes
green.
Note: If the phone is set to a ringtone with vibrating alert on, the phone
flashes green and vibrates instead of ringing.
1. Open flip to answer a call.
• If flip is open, press to answer a call.
Mute Ringing Tone
To mute ringing tone, press if flip is closed. If flip is open, press
Silence . Then answer the call by pressing
.
Change Answer Settings
To change the setting so a call will not be answered by opening
the flip, see Active clamshell in Call Settings on page 117.
18
Page 22
To answer by pressing any key except , , or , see
Anykey answer in Call Settings on page 117.
Divert Incoming Calls
To divert calls to your voice mailbox or another number, see Call
Divert on page 126. Then you can press or Reject softkey
and incoming calls will be diverted.
If you ignore the call by not pressing any keys, the call details
appear on the Missed calls list.
ACTIVE CALL OPTIONS
When on a call, you can put the call on hold, mute the
microphone, send touch tones for passwords, etc., and create
multi-party calls, depending on network support.
Place Calls on Hold
To put a call on hold or release the call from hold, press Options
and select Hold or Unhold.
If you are connected to 2 calls (an active call and a call on hold),
press Options and select:
Swap Put active call on hold and activate held call.
Transfer Connect an active call and a held call, or an
incoming call to an active or a held call, and disconnect yourself from both calls, leaving the two
callers to talk to each other.
Shortcuts: You can also press to switch between Hold and
Unhold on one call, or switch between one active and one
held call (Swap).
To end a held call and continue with the active call, press
and .
To end the active call and continue with the held call, press
and .
19
Page 23
HANDSFREE TALKING
To hear the caller’s voice from the handsfree loudspeaker, press
Loudsp.. Set the phone down nearby so you and several others
can have a conversation without holding the phone.
To go back to the earpiece, select Handset.
Loudspeaker icon - handsfree is active.
Earpiece icon - handsfree is not active.
If you have activated a Bluetooth
Options and select BT Accessory to hear the caller’s voice in
the Bluetooth® headset.
®
handsfree headset, press
Volume Control
Scroll or to increase or decrease volume of phone earpiece
, phone loudspeaker , or if a headset is attached. Note the
volume step bars change as you adjust volume.
To mute or unmute the microphone, press Options and select
Mute or Unmute. Mute switches off the phone’s microphone and
any accessory microphones if attached. Unmute switches
microphone back on.
CALL WAITING
If you activated Call waiting network service in Call Settings (see
page 117), you can answer an incoming call when on an active
call.
1. During an active call, press to answer an incoming call.
The active call is put on hold.
• To switch between the calls, press Swap or .
• To end the currently active call and answer the incoming
call, press Replace.
2. To end the currently active call, press . The held call
becomes active.
• Or to end both calls at once, press Options and select End
all calls.
20
Page 24

• If you press and hold , all calls and data connections
are ended.
To reject the incoming call, press Reject. The caller receives a
busy message or goes to voice mail.
Send DTMF Touch Tones
DTMF touch tones can be transmitted during a call just by
pressing the keys (0 to 9, #, *) on your phone. Touch tones are
often used to access services such as voice mailboxes, calling
card calls, and banking.
During a call, press Options and select Send DTMF if you stored
a DTMF touch tone sequence in a Contacts card. Press Find,
scroll to desired entry and select.
To dial or store touch tone sequences:
1. Type in access phone number.
2. Before entering touch tone digits, press repeatedly to
scroll through *, +, p, and w characters to:
• a short pause before the digits are transmitted (p
character).
• a manual wait period (w character) that requires you to
press Send during the call to transmit the digits.
• + character to send a touch tone sequence stored in a
speed dial location (see page 131).
3. Enter the touch tone digits, for example, the access codes for
your voice mailbox.
4. Press to immediately dial call, or press Options and
select Add to Contacts to store sequence in your Contacts
(see page 35).
Note: You can enter multiple instances of pause, wait, and speed dial
characters and touch tone sequences.
Open Applications during a Call
During a call, open the main application menu by pressing ,
then open the desired application, for example, check your
21
Page 25

Calendar for an upcoming meeting time. The active call remains
connected and is indicated by a small pop-up window. To return to
the active call window, exit the application.
If you press , an active call will always disconnect.
Play/Record Sound Clips during a Call
To play a sound clip during a call, open the sound clip from its
current location and play. The other person hears the sound clip.
To record the current call, see page 141.
Multi-Party Calls
In a multi-party call, you can have a conversation with up to 5
different parties at the same time if supported by the network.
1. Call the first party.
2. After the call is connected, press Options and select New
call to enter a number or press Find to go to the Contacts to
dial a number and press . The first call is put on hold.
3. After the new call is answered, press Options and select
Conference to join the held call and the active call together.
From then on, there is only one active call, which is the multiparty call.
4. To add another party to the call, repeat step 2, then press
Options and select Conference > Add to conference.
5. To have a private conversation with one of the parties, press
Options and select Conference > Private. Scroll to desired
party and press Private. The separated party becomes the
active call on your phone, the multi-party call is put on hold;
however, the remaining callers can continue with the multiparty call. To return to multi-call, press Swap. To return
Private call to multi-call, press Options and select
Conference.
6. To drop a party from the multi-party call, press Options and
select Conference > Drop participant. Scroll to desired
party and press Drop.
22
Page 26

7. To end the multi-party call, press .
Note: If you are on an active call and already have a held call, start at
step 3.
ENDING CALLS
There are several ways to end a call:
• Close the flip.
•Press .
•Press End call softkey.
•Press Options and select End active call.
To end all calls if there are more than one:
•Press Options and select End all calls.
If you press and hold , all calls and data connections are
ended.
See Active Call Options starting on page 19 for ending held calls,
waiting calls, and multi-party calls.
CLOSE THE PHONE DURING A CALL
Closing the flip clamshell ends the call. This is the default setting
for Active clamshell in Call settings. If you want to close the
phone and speak handsfree during a call, change the Active
Clamshell setting to Off. This setting switches the caller's voice
to the back loudspeaker so you can speak handsfree.
To keep calls connected when you close the flip clamshell and
prevent calls from being answered when the flip is opened, see
Active clamshell in Call Settings on page 117.
23
Page 27

ENTERING TEXT
There are two main ways to enter text: using the predictive text
dictionary to quickly enter words, or alpha mode in which each
key is tapped until the planned letter appears.
DICTIONARY FOR PREDICTIVE TEXT ENTRY
Dictionary uses a predictive text system to enter words by
pressing one key per letter to display the planned word, instead of
pressing keys multiple times until each planned letter appears.
For example, to enter “Call me.” in a message, press:
Ca l l me .
When you press the 6 key and the 3 key, the word “of” appears on
screen, because the English dictionary ranks “of” as the most
common word associated with the key presses 6 and 3. To
change the word “of” to “me”, press once, and the word
changes.
DISPLAY PLANNED WORD MATCHES
If the correct word does not display, press repeatedly to
scroll through an alternative word list. To choose from all the word
matches, press and select Dictionary > Matches.
ADD WORDS TO PREDICTIVE TEXT DICTIONARY
To add a word that is not already in the dictionary, press and
select Dictionary > Insert word. You can also add the word to
the dictionary when Spell softkey appears.
GENERAL TEXT ENTRY
Enter text and numbers in one of three ways:
Alpha mode - press each key repeatedly until planned
letter appears.
24
Page 28
Dictionary mode - press one key per letter for dictionary to
display planned word.
Numeric mode - enter numbers.
Shortcut: To enter numbers while in alpha or dictionary mode, press
and hold desired number key - .
In both alpha mode and dictionary mode, choose from:
First letter capital All capitals
Lower case
To enter symbols, press and select Insert symbol.
To enter text at a flashing cursor:
1. Press the number keys associated with the planned letters
repeatedly until the planned letters appear on screen.
• To enter text using the predictive text dictionary, press
and select Dictionary on, if it is not already active.
2. Editing actions for each key and shortcuts:
Enter space.
Enter punctuation by pressing repeatedly.
In Dictionary mode, press , then press
scroll to other punctuation.
Erase a character.
Press and hold to switch between text and number modes.
Press to scroll through upper case, lower case, and first let-
ter capital mode.
Press twice briefly to turn Dictionary on or off.
Turn Dictionary on or off.
Switch to number mode.
Insert symbols.
Change writing language.
In Dictionary mode, scroll to other word choices when word
is underlined.
repeatedly to
25
Page 29

Press outer edges to scroll up, down, left, and right through
text.
Cut, Copy, and Paste Text
1. To cut, copy, and paste text, move cursor to left of text you
wish to copy.
2. While holding down , press and hold to highlight text.
3. Release keys to stop highlighting.
4. Press and select Cut or Copy.
5. In message field, move cursor to new desired location, press
and select Paste.
26
Page 30

NAVIGATING THE APPLICATIONS
To view the main applications window, press .
Navigation Key
Press the left, right, top and bottom edges of the navigation
key to move around the display.
Press to:
• Open an application item
• Select a highlighted item
• Confirm a selection
• Take a picture with the camera
If an up or down arrow appears at the bottom of the display, scroll
or to go to additional items.
Shortcut: To jump to and open one of the first 9 application items (if you
have not yet scrolled), simply press the number key
corresponding to the desired item’s location on the grid view.
The grid view numbering system is:
123
456
789
Tabs
There may be more files, folders, or pages
associated with an application item, which
can be viewed by moving right and left
across the screen. This is indicated by tabs
, arrows , or numbers near
the top of the screen. For example, if you
are viewing page 5 of 12 pages associated
with a file, 5/12 and arrows are displayed.
• Scroll and to move through the tabs
and pages.
27
Page 31

Condensed Instructions
In this guide, to condense wording, statements are used such as
“Press Options and select Open”. This means to press Options,
highlight Open, and press Select. You may need to scroll within
the menu to reach Open. Many menu items are available within
Options menus and other menus; thus these shortcut statements
will be used throughout the guide to indicate the same type of
process.
In this guide, a statement such as “Select Send > Via
multimedia”, means to scroll to Send, then scroll to view the
pop-up menu containing Via multimedia, then press or Select
softkey to select Via multimedia. Within the pop-up menu, you
may need to scroll to highlight Via multimedia.
Options Softkey
At the first level of each menu item, Options appears as a
way to organise or customise the menu system. The options
change depending on the menu level you are viewing.
To open the Options menu:
•Press Options, scroll to highlight the desired action, then
press or press Select.
Open Open the item.
List view View the menu items in a list form. If you select
Move Move the item to another place within the
Move to folder Move the application item into a folder.
New folder Create and name a new folder.
Memory
details >
Exit Exit the menu item.
this, the option changes to Grid view to view the
menu items in a grid form.
application system.
View information about items stored in the phone
memory and memory card (also referred to as
miniSD Card).
28
Page 32

These additional actions may be available in the Options menu:
Remove or
Delete
Rename Give a new name to the item.
Edit Change information you have already entered.
Remove or delete an item or a marked item (see
Mark/Unmark on page 29) on a list or grid, or
press .
Mark/Unmark
In menu items containing many files, you can mark specific files in
which to perform an action. For example, you may wish to delete
5 images from your Images folder containing 29 images.
To mark an item or items:
1. Press Options and select Mark/Unmark > Mark to place a
checkmark next to the desired file. Scroll to mark more items
as needed, or select Mark all to mark all files.
2. Press Options, then select desired action such as Delete,
Send, Move.
To unmark an item or items:
1. Press Options and select Mark/Unmark > Unmark on a
marked file to remove the checkmark. To unmark all files,
select Unmark all.
Shortcuts: To mark or unmark an item, hold down then press .
To mark or unmark multiple items, hold down then
press and hold or of navigation key to scroll through
desired items. Release or to stop marking.
29
Page 33

Menus within a Menu
A pop-up menu appears when more than
one choice is available. For example, you
can send a Contacts entry several ways: via
text message, via multimedia, via e-mail, via
Bluetooth®, and via infrared.
To enter a pop-up menu:
• Scroll , or press , or Select softkey.
To close a pop-up menu:
• Scroll , or press Cancel softkey.
Save Changes
In many cases when editing text or numbers, or changing a
setting; press the Back softkey to automatically save changes.
MULTITASKING
You can work with more than one menu item simultaneously. For
example, you can start creating a new message, rename an
image, and begin creating a Contacts entry, all without losing the
data you have already entered.
To keep a menu item open:
Press to go to the standby screen. Pressing does not
close the open menu item.
Note: During a phone call, terminates the call instead of acting as
a shortcut to the standby screen.
Opening and closing menu items
There are several ways to open menu items:
•Press .
•Press Options and select Open.
There are several ways to close menu items:
•Press Options and select Exit.
30
Page 34

•Press Back until Exit softkey appears, then press Exit.
•Press Close.
Shortcut to swapping among open items
If you have several menu items open, you
can press and hold to view a pop-up
window and scroll to locate the desired open
item. When you open the item, you will begin
at the point where you were previously.
To close an open item from the pop-up
window, scroll to desired item, press
and select Yes.
SEARCH OPTION
In certain menu items, a magnifying glass icon
appears which allows you to search for a name, file or item.
To search, enter the first letter of the desired name or file. The
phone finds and displays matching entries. To refine the search,
enter two or more letters.
SHARED PHONE MEMORY
The phone’s memory capacity is shared by all images; text,
multimedia and e-mail messages; Contacts cards; video and
sound clips; ringtones; Calendar and Notepad notes; and
downloaded applications stored on your phone. If you keep more
files on the phone, then there is less memory available to store
new files or run certain applications.
To decrease the amount of phone memory used: (1) store data on
your miniSD Card; (2) delete data that is old, copied elsewhere or
not being used; (3) delete messages with attachments from your
Inbox after saving attachments to an application; (4) use the
portrait format to take pictures with the Camera whenever
possible. The portrait format file size is much smaller than
standard format.
31
Page 35

To view details of the phone memory and miniSD Card use, and
amount of free memory:
1. Press .
2. Press Options.
3. Scroll to Memory details.
4. Then scroll to chyoose phone memory or memory card
(also referred to as miniSD Card).
Also see File Manager on page 148.
32
Page 36

APPLICATIONS MENU MAP
The phone’s main application menus are listed below. The names
listed represent the names in list view. The names may be slightly
different in grid view.
Note: The menus may not appear in the order or with the same icons as
listed here. The order and icons vary according to your wireless
service provider, or if you have customised your settings.
Settings Camera Tools
Ringtone
Profiles
Themes
Settings
Clock
Speed Dialing
Voice Cmds
PrintBoy Setup
About product
Calendar Contacts Media
Calculator
Converter
Notepad
Voice recorder
miniSD Card
To-Do List
Application
Mgr
File manager
PhotoLight
SIM Tool Kit
(optional)
Media Gallery
PhotoBase
RealOne
Player
Video
Recorder
33
Page 37

Messages Call Logs Connectivity
Voice Mailbox
Messages
Recent calls
Call duration
GPRS
counter
Browser
Operator
Menu
Modem
Bluetooth
Infrared
USB
Connection
Mgr
SyncML
Device Mgr
Games Favourites Quickoffice
Micro Golf
Balloon-
Headed Boy
34
Page 38

CONTACTS
Store names, phone numbers, e-mail, web and street addresses,
even a thumbnail picture in a Contact card. Call and send
messages directly from Contacts. Numbers can also be stored on
your SIM card. See Entering Text page 24 to learn how to enter
text.
CREATE NEW CONTACT CARDS
From Contacts application:
1. Press Options and select New contact.
2. Enter information in main fields:
First name Telephone
Last name Mobile
Company Fax
Job title E-mail
3. From main fields, press Options to:
Add thumbnail Place picture from your Images folder into the
Add or Delete
detail
Edit label Change the field name.
4. Press Done to save entry.
card.
Choose desired fields and icons from list including
Job title, Telephone, Tel. (home), Tel. (business),
3 mobile, 3 fax, pager numbers, 3 E-mail fields, 3
Web addresses, 3 street address fields, DTMF
tones, Birthday, and Note.
Note: See SIM Directory to create and copy entries into your SIM
Directory.
SIM DIRECTORY
The SIM Directory shows you the names and numbers stored on
your SIM card. Your wireless service provider can program their
service numbers, your wireless phone number and other numbers
35
Page 39

into your SIM card. You can store personal numbers on your SIM
card as well.
Unlike a Contacts entry, a SIM Directory entry consists of only one
name and one phone number.
Copy Numbers to SIM Directory
1. From the Contacts list, highlight the desired card.
2. Press Options and select Copy to SIM direct.
3. Choose one of the phone number fields to copy, and press
OK.
• If you select All, the phone creates a separate SIM
directory entry for each phone number stored with that
Contacts entry name.
Note: To copy SIM entries to your Contacts, highlight the desired SIM
entry, then press Options and select Copy to Contacts.
The first time Contacts is opened after a different SIM card is
placed in the phone, press OK if you wish to copy SIM contacts
into the Contacts memory.
Create and Manage SIM Directory Entries
1. From the Contacts list, scroll to SIM directory tab.
2. Press Options and select from:
Call Call the highlighted entry.
New SIM contact
Edit Edit the highlighted SIM entry. Numbers stored by
Delete Delete the highlighted SIM entry. Numbers stored
Copy to Contacts
My numbers View your own phone numbers.
SIM details View the number of used and free SIM entries.
Create a new SIM contact entry. Open and enter
Name, then enter No. and press Done.
your wireless service provider cannot be edited.
by your wireless service provider cannot be
deleted.
Copy the highlighted SIM entry to your Contacts
list.
36
Page 40

FIND A CONTACT CARD
From Contacts application:
1. Scroll to desired entry, or enter the first letter of desired entry
in . Entries beginning with that letter will display.
2. Press to open entry.
MAKE A CALL
From Contacts application:
1. Scroll to desired Contacts entry and press .
Or, press Options and select Call.
• If entry contains more than one number, choose desired
number to dial before pressing .
Note: To make a call from the SIM directory, from Contacts application
scroll to SIM directory tab. Scroll to the desired entry and
press
.
CREATE A MESSAGE
From Contacts application:
1. Scroll to the desired Contacts entry and press Options.
2. Select Create message > Text message, Multimedia
message, or E-mail.
3. To complete Text messages, see page 50; or Multimedia
messages on page 51; or E-mail messages on page 53.
EDIT CONTACT CARDS
From Contacts application:
1. Highlight desired Contacts card.
2. Press Options and select Edit.
3. Scroll to desired field to edit, and begin entering data. If the
field already has information, scroll to move to editing point,
and press to clear a letter or digit.
37
Page 41

4. Press Options to:
Add thumbnail Place picture from Images folder in phone mem-
Add or Delete
detail
Edit label Change the field name.
ory or miniSD Card.
Choose desired fields and icons from list including
Job title, Telephone, Tel. (home), Tel. (business),
3 mobile, 3 fax, pager numbers, 3 E-mail fields, 3
Web addresses, 3 street address fields, DTMF
tones, Birthday, and Note.
5. Press Done to save entry.
Assign Default Number to Dial
For a Contact card, set a particular phone number or address that
the phone will use each time you wish to call or write messages to
that person.
From Contacts application:
1. Scroll to desired Contact card and open.
2. Press Options and select Defaults.
3. Highlight a field:
Phone number
Text msg. number
MMS number/address
E-mail address
4. Press Assign.
5. Scroll to the desired entry and press Select.
• Repeat steps 4 to 6 to assign default numbers to the other
fields.
Note: To remove a default assignment, select (no default).
Assign a Ringing Tone
From Contacts application:
1. Scroll to desired Contact card and open.
2. Press Options and select Ringing tone.
38
Page 42

3. Scroll to desired tone (after a brief pause tone will play). You
can use tones already supplied, sent in messages (see
page 56), downloaded (see page 95), or recorded (see
page 140).
Note: If tones do not play, change the phone's ringtone to General or
Outdoor to hear the tones.
To assign a ringing tone to a group, scroll to move to Groups
tab, scroll to desired group, and continue with step 3.
Assign Speed Dial
From Contacts application:
1. Scroll to desired Contact card and open.
2. Scroll to desired phone number field in which to assign the
speed dial key, press Options and select Assign speed dial.
3. Press or scroll to desired number key and press Assign. The
icon denotes that a speed dial key has been assigned to
this number field.
To make a call using speed dial, press the associated number
key, then press .
To remove an existing speed dial key, from Contacts application:
1. Scroll to desired Contact card and open.
2. Scroll to speed dial phone number field, then press Options
and select Remove speed dial.
See page 131 for speed dial options.
Go to Web Address
If a Contact card contains a web address, you can launch the
Browser and go directly to the web address.
From Contacts application:
1. Scroll to desired Contact card and open.
2. Press Options and select Go to web address.
39
Page 43

MANAGE CONTACTS LIST
From Contacts application:
1. Press Options and select Edit, Delete or Duplicate.
Note: See Mark/Unmark on page 29 to select more than one entry.
Memory Used in Contacts
To view number of cards, groups used and amount of memory
used, from Contacts application:
1. Press Options and select Contacts info > Memory.
Sort List by Last Name or by First Name
From Contacts application:
1. Press Options and select Settings.
2. Open the Name display field to sort the list either by Last
name first or First name first.
Note: This feature is not available if the phone contains Chinese
language.
SEND A CONTACT CARD
Before a Contact card can be sent by Messaging or to another
device, it is converted to an electronic business card format
known as vCard.
From Contacts application:
1. Scroll to desired Contact entry.
2. Press Options, scroll to Send > Via text message, Via
multimedia, Via e-mail, Via Bluetooth, or Via infrared.
3. To complete text messages, see page 50; or multimedia
messages on page 51; or e-mail messages on page 53; or
Bluetooth
®
on page 102; or Infrared on page 104.
SERVICE NUMBERS
If your wireless service provider has stored service numbers on
your SIM card, you can view and call the service numbers.
From Contacts application:
40
Page 44

1. Press Options and select Service numbers.
CREATE AND MANAGE GROUPS
Place Contact entries into one group. Select the group name
when addressing a new message, and your message is sent to
each member of the group. For example, set up Business or
Family group. See Messages starting on page 48 to learn how to
send messages.
Create New Group
From Contacts application:
1. Scroll to Groups tab.
2. Press Options and select New group.
3. Enter a name for the group and press OK.
4. Open the group name, press Options and select Add
members.
5. Select desired Contact cards to add.
• To remove a member from a group, scroll to desired name,
then press Options and select Remove from group.
Manage Groups
From Contacts application:
1. Scroll to Groups tab.
2. Scroll to desired group, then press Options and select from:
Open to view group, Delete group, Rename group, add
Ringing tone for group.
To see if a person belongs to a group, or to add a person to a
group, from Contacts application:
1. Scroll to desired Contact card.
2. Press Options and select Belongs to groups or Add to
group. When adding, select desired group and press Add.
41
Page 45

TAKE A PICTURE AND ADD TO CONTACT
CARD
From Camera application:
1. The main display acts as a viewfinder when the flip is open.
The external display acts as the viewfinder when the flip is
closed.
2. To snap the picture, press if the flip is open. Or press the
Multibutton on the side of the phone if the flip is closed.
• The image is saved in your Images folder in Media Gallery.
3. Open Contacts.
4. Highlight desired Contacts card.
5. Press Options and select Edit.
6. Press Options and select Add thumbnail.
7. Select Phone memory.
8. Open Images folder. Scroll to highlight the image, and press
Select.
9. Press Done.
42
Page 46

CALENDAR
Keep track of upcoming meetings, appointments and special
dates. Set alarms to remind you of upcoming events. Calendar
events can be sent and received as vCalendar messages and
synchronised with other devices to keep track of your schedule.
CREATE CALENDAR EVENTS
From Calendar application:
1. Press Options and select New entry > Meeting - events with
a start and end time, Memo - events such as trips or
vacations, or Anniversary - single day events such as
birthdays and anniversaries.
2. Enter information in most fields by entering numbers or letters:
Meeting Memo Anniversary
Subject Subject Occasion
Location Start date Date
Start time End date Alarm
End time Synchronisation Synchronisation
Start date
End date
Alarm
Repeat
Synchronisation
3. Press Done to save event.
Shortcut: If you start typing after opening the Calendar, you are
automatically entering the subject in a Meeting entry.
Set Calendar Alarm
When you set the alarm to On, scroll to set the alarm time and
date.
When the alarm rings, press Stop to stop the alarm. Press
Snooze or any other key to snooze the alarm.
43
Page 47

Set Event Repeat Cycle
When an event occurs regularly (for example, football practice or
music lessons), open the Repeat field to set interval time periods
such as Weekly or Monthly.
Set Synchronisation
If you synchronise your Calendar events with a PC, you can set
the privacy level.
•Set to Private to hide events from online viewers.
•Set to Public to allow online viewers to see the event.
•Set to None if you do not wish to synchronise the event with
your PC calendar. See Synchronisation on page 107.
BROWSE CALENDAR
View the calendar by day, by month, or by week.
To change view, press Options and select Month view or Week
view.
Shortcuts: Scroll to move around the calendar.
Press Options and select Go to date to go to a desired
date.
Press to go to today.
CALENDAR ICONS
Meeting Memo Anniversary
Month View
Scheduled event - triangle in the lower right
corner of a date.
Current date - underlined.
Selected date - boxed; date also appears in
the navigation bar.
Far left column - the year’s week number (see
Week view title in Settings).
44
Page 48

Week View
Days of the week are displayed in columns.
Each hour of a day is denoted by a cell.
Meeting events - a colour bar during the
scheduled time periods.
Memo and Anniversary icons - appear
between 7am and 8am
Current weekday - underlined (if you are
viewing the current week).
Selected date - boxed; date also appears in the navigation bar.
Screen title - either the week number or the week dates of the
current week, depending on Calendar setting.
Day View
To view a certain day, scroll to the date and
open.
Scheduled events are listed.
EDIT CALENDAR EVENTS
1. Scroll to desired date in any view and open.
2. Scroll to scheduled event and open. Edit desired fields.
3. Press Done when finished.
DELETE EVENTS
1. Scroll to desired date in Month or Week view, and time period
in Week view and open.
2. Press Options and select Delete or press .
To delete multiple events:
45
Page 49

1. View the calendar in Month view.
2. Press Options and select Delete entry > Before date to
delete entries before your specified date, or All entries.
CALENDAR SETTINGS
From Calendar application:
1. Press Options and select Settings. Open each option:
Calendar alarm
tone
Default view Select Month view, Week view, or Day view.
Week starts on Choose starting day of the week.
Week view title Choose Week number of the year (e.g. Week 12)
Note: Week view title setting is available only if Week starts on is set
to Monday. Week numbers are shown in layouts only if Week
starts on is set to Monday.
Scroll to select desired tone (after a brief pause
tone will play).
or Week dates (e.g. 20.03.05-26.03.05).
SEND CALENDAR EVENTS
Before a Calendar event can be sent by Messaging or to another
device, it is converted to an electronic scheduling exchange
format known as vCalendar.
1. From an open Calendar event in Day view, press Options
and select Send > Via text message, Via multimedia, Via e-
mail, Via Bluetooth or Via infrared.
2. To complete text messages, see page 50; or multimedia
messages on page 51; or e-mail messages on page 53; or
Bluetooth
®
on page 102; or Infrared on page 104.
46
Page 50

CHINESE LUNAR CALENDAR
Check Chinese Lunar Calendar dates and festivals when still
viewing western Calendar information.
Note: Chinese Lunar Calendar will appear only when a Chinese
language is selected as the phone display language.
To display Chinese Lunar Calendar information:
1. From the open Calendar, press Options and select Settings.
2. Scroll to Lunar Calendar.
3. Select On.
4. To view Chinese Lunar Calendar detail, press Options and
select View lunar data.
To turn off Chinese Lunar Calendar information:
1. From the open Calendar, press Options and select Settings.
2. Scroll to Lunar Calendar.
3. Select Off.
47
Page 51

MESSAGES
Messages menu contains these main options:
Voice mail Messages
VOICE MAIL
Voice mail service stores voice messages from callers who could
not reach you. The messages are stored on your wireless service
provider’s network, not on your phone. You must first subscribe to
voice mail from your wireless service provider before using this
service.
Listen to Voice Mail Messages
When you receive a new voice mail message, an alert sounds if
ringtone is not set to silent, and the voice mail icon displays.
1. Press and hold in standby mode to dial your voice mail
message centre.
• You can also press and in standby mode.
2. Follow the prompts to listen to your voice mail messages.
If the phone asks for the voice mailbox number, enter the voice
mail message centre phone number given to you by your wireless
service provider.
To change the voice mailbox number, from Messages application:
1. Open Voice Mail.
2. Press Options and select Change number.
MESSAGES
Send, receive, and store messages from text message (SMS),
multimedia (MMS), e-mail, service and cell broadcast.
48
Page 52

Messaging Types
SMS: Short Message Service allows you to send and receive
short text messages to mobile phones with short text message
capability on the same network or any network that has a roaming
agreement. A small black and white picture message can be
inserted in the message.
MMS: Multimedia Messaging Service allows you to send
messages containing images, video clips, sound clips and text.
Presentation templates are available to place media objects into
prearranged layouts. Multimedia messages can be sent to
another mobile phone with multimedia capability or to an e-mail
address.
E-mail: Create, send and receive e-mail messages, which can
have attachments.
Smart messages: Messages containing data such as electronic
business cards, ringing tones, Java
™
applications or configuration
data such as WAP and multimedia settings.
These services do not work by sending messages directly to the
recipient; instead they store and forward messages through
specifically designated network servers.
Before Using Messaging Services
Before you can use multimedia or e-mail messaging, your
connection settings must be configured.
Your multimedia configuration settings may already be set by your
wireless service provider. If settings are not available, contact
your wireless service provider.
Your e-mail configuration settings are provided by an Internet
Service Provider (ISP) that supports POP3/IMAP4/SMTP
protocols.
Before you can send and receive e-mail:
(1) you need a subscription for data services
(2) contract must be set up with an ISP
49
Page 53

(3) you must configure an Internet Access Point (see Access
Point Settings on page 118)
Messages Menu Main Options
New message
Create new messages
Inbox
Stores received messages except
e-mail and cell broadcast
My folders
Stores moved messages and
templates
Mailbox
Receives and stores e-mail
messages
Drafts
Stores unfinished messages
Sent
Stores sent messages
Outbox
Temporarily stores messages
waiting to be sent
Reports
Delivery status on text, multimedia,
and smart messages
In some main Messages options, icons indicate the message
type:
Text message
Multimedia Infrared Unknown
E-mail WAP push Attachment
Smart
Bluetooth
Cell broadcast
To view Cell Broadcast messages, see page 69.
CREATE NEW TEXT MESSAGES
From Messages application:
1. Open Messages.
2. Open New Message and select Tex t
message.
3. In the To field, type in recipient’s phone
number.
• To retrieve from Contacts card, press
, or Options and select Add
50
Page 54

recipient. Scroll to desired name and press OK. Select
desired number if entry has several numbers.
• To separate multiple recipients, enter a semicolon (;) by
pressing .
4. Scroll to move to text entry field, and enter text.
5. If desired, press Options and select Insert >
Picture Picture msg. from Media Gallery
Tem pla te Select from a list of sentences in which you fill in
the blank
6. To send, press or press Options and select Send.
Note: Text messages have a 160 character limit. The counter keeps
track of total characters available. If you use more than 160
characters, a new text message starts, but appears as one
message or more at destination. You may be charged for more
than one text message.
CREATE NEW MULTIMEDIA MESSAGES
From Messages application:
1. Open Messages.
2. Open New message and select
Multimedia message.
3. In the To field, type in recipient’s phone
number or e-mail address.
• To retrieve from Contacts card, press
, or Options, and select Add
recipient. Scroll to desired name and
press OK. Select desired number if entry has several
numbers. Card must have a phone number or e-mail
address to be visible.
• To separate multiple recipients, enter a semicolon (;) by
pressing .
4. Scroll to move to text entry field, and enter text.
5. If desired, press Options and select Insert >
Image Image from your Images folder
Sound clip Sound clip from your Sound clips folder
51
Page 55

Video clip Video clip from your Video clips folder
New image New image from Camera
New sound clip New sound clip from Recorder
Slide Add new slide to message
6. To send, press or press Options and select Send.
Note: If multimedia messages are sent to devices without multimedia or
e-mail capabilities, the recipient may receive a message
containing a link to a web page.
Create Presentation
Choose from four presentation templates to create an impressive
multimedia show.
1. Complete steps 1, 2 and 3 in Create New Multimedia
Messages on page 51.
2. Press Options and select Create presentation.
3. Select from the list of templates:
• Image template
• Video template
• Sm. image tem.
• Temp. with title
4. Highlight desired template, and press Select.
5. Scroll to the video, text, or image region of the template to
highlight it.
6. If desired, press Options and select Insert >
Image Image from your Images folder
Sound clip Sound to play at start of show
Video clip Video clip from your Video clips folder
Note Note from Notepad (if a text region is highlighted)
New image New image from Camera
New slide Add new slide to show
Note: Available choices depend on region highlighted.
52
Page 56

7. Press Options and select:
Send Send completed presentation
Full screen Edit in full screen view
Normal screen Edit in normal screen view with signal icon, slide
Edit text Start or stop text editing, change text colour
Preview
message
Remove > Remove image, sound clip, video clip, or current
Backgrnd.
settings >
Effect settings > Set transition effect between images and between
number, and softkey labels in view
Preview entire message before sending
slide
Set background colour, add background image to
current slide or entire presentation, remove
background image
slides
8. To send, press or press Options and select Send.
CREATE NEW E-MAIL MESSAGES
Before you can write an e-mail message, at least one mailbox
must be configured. See page 58.
From Messages application:
1. Open Messages.
2. Open New message and select E-mail.
3. In the To field, type in recipient’s e-mail
address.
• To retrieve from Contacts card, press
, or Options, and select Add
recipient. Scroll to desired name and
press OK. Card must have an e-mail
address to be visible.
• To separate multiple recipients, enter a semicolon (;) by
pressing .
4. Scroll to enter recipients in Cc (courtesy copy) field and
type subject in subject field (both fields optional).
53
Page 57

5. Scroll to move to text entry field, enter text.
6. If desired, press Options and select Insert >
Image Image from your Images folder
Sound clip Sound clip from Sound clips folder
Video clip Video clip from Video clips folder
Note Note from Notepad
Tem pla te Select from a list of sentences in which you fill in
the blank
7. To send, press , or press Options and select Send.
• To view, add, or remove attachments before sending, press
Options and select Attachments.
• If phone is set to send e-mail during next connection to
mailbox, then pending e-mail will be stored in Outbox.
Change setting by pressing Options and selecting
Sending options.
COMMON WRITING TASKS
• To cut, copy and paste text, see page 26.
• To save before sending, press Close. Message is
automatically stored in Drafts folder.
• To match names in To and Cc fields to names in Contacts,
press Options and select Check contacts.
RECEIVE NEW MESSAGES
When you receive a new message, the standby screen displays a
new message icon and a note indicating the number of new
messages. Press Show to read the message. If there is more
than one message, press Show to open the Inbox, then scroll to
the desired message header and open.
INBOX (RECEIVED MESSAGES)
Inbox stores received text, multimedia, and smart messages.
Incoming Bluetooth
mail waiting messages are also placed here.
54
®
, Infrared, WAP push, SIM, voicemail and e-
Page 58

The messages remain in the Inbox until you move them to My
folders or delete them.
Unread messages have incoming arrow appearing with icon that
identifies type of message.
Read messages have no arrow with icon.
Read or Play Inbox Messages
From Messages application:
1. Open Messages.
2. Scroll to Inbox and open.
3. A list of message headers displays, indicating type of
message sender (Multimedia, Bluetooth
®
, etc.) and icon.
Scroll to desired message header and open.
• The message may first need to be retrieved from the network
server depending on the message type or whether it contains
large files.
•Press Play if needed for video clips, sound clips and
presentations.
• If the message contains an image, it opens automatically.
Note: Scroll to decrease or increase audio volume.
Reply to and Forward Inbox Messages
From Messages application:
1. Open Messages.
2. Select Inbox.
3. Scroll to desired message, press Options and select Reply >
To send er or To all or Forward.
4. To reply, enter text in text field.
To forward, enter recipient(s) phone numbers or e-mail
addresses.
5. Press .
Note: The phone may not allow you to copy, modify, transfer, or forward
some copyrighted images, ringtones and other content.
55
Page 59

Store Inbox Messages
From Messages application:
1. Open Messages.
2. Select Inbox.
3. Highlight desired message.
4. Press Options and select Move to folder.
5. Choose a folder and press OK.
Save Attachment or Data
You can save images and media clips from messages.
Attachments to e-mail, links to streaming media, Contacts cards,
Calendar items, ringtones, and configuration data can also be
saved.
1. Open desired message.
2. Press Options and select Save.
• If needed, the data is directed to the appropriate
application.
3. If needed, select to save either in phone memory or miniSD
Card, and press OK.
4. If needed, scroll to desired folder to place object or
attachment, press Open or Save. If desired, rename the file.
Press Save.
Note: Received applications or games can be installed directly from the
Inbox. When you open the message, the phone asks if you want
to install it now.
An attachment or object remains in the Inbox after it is saved to
another application. To save memory space, delete message
from Inbox.
Find Phone number, E-mail or Web Address in Message
Within received messages, you can find a phone number, e-mail
or web address within message text and use it to call, write,
access a service or create a Contacts card.
From Messages application:
1. Open Messages.
56
Page 60

2. Scroll to Inbox or My folders and open.
3. Scroll to desired message and open.
4. Press Options and select Find > Phone number, E-mail
address, or Web address.
5. Text and numbers are highlighted when found. If more than
one is found, scroll to highlight desired item.
6. Press to Send a message, Add to Contacts to add or
update Contacts, Call a number, Go to web address, or Add
to bookmarks to add web address to bookmarks.
MY FOLDERS (ORGANISE MESSAGES)
Store your messages in My folders. You can also create and
name new folders. For example, create a folder for Friends and
one for Family messages. Folders can also be created by
message type or by subject.
From Messages application:
1. Open Messages.
2. Select My folders.
3. Press Options and select New folder.
4. Enter a name for your folder and press OK.
Note: You cannot create folders within a folder.
To rename or delete a folder, from Messages application:
1. Open Messages.
2. Select My folders.
3. Scroll to desired folder, press Options and select Rename
folder or Delete.
Templa tes
Templates are short sentences in which you fill in the blank, then
send the message. Template sentences can also be inserted into
longer messages.
From Messages application:
1. Open Messages.
2. Select My folders. Select Te mp lates.
57
Page 61

3. Scroll to desired text. Press Options and select Send > Via
text message, Via multimedia, or Via e-mail.
4. Press and a new message opens with template text
already placed.
5. Fill in needed information and press .
Note: In longer messages, at cursor, press Options and select Insert >
Tem pl ate. Template text is placed at cursor.
To create your own template text, from Messages application:
1. Open Messages.
2. Select My folders. Select Te mp lates.
3. Press Options and select New template.
4. Enter text, numbers, or symbols, and press Done.
MAILBOX (E-MAIL MESSAGES)
E-mail is received and stored in a separate mailbox. Once you set
up a mailbox, Mailbox will be renamed and appear with its new
name in the main Messages list. You can set up to 6 mailboxes;
each appears separately in the main Messages list.
After your e-mail is set up, use the mailbox to view and send email. Files such as images, sound and video clips can be attached
from phone memory or miniSD Card. Supported e-mail clients
include a standard POP3, IMAP4, SMTP, MIME client. E-mail
messaging takes place over CSD and GPRS bearerset using
standard Internet e-mail protocols over TCP/IP.
Note: Before you can send or retrieve e-mail, you must first set up a
mailbox.
Configure Mailboxes
From Messages application:
1. Open Messages.
2. Press Options and select Settings.
3. Scroll to E-mail and open.
4. Highlight Mailboxes and open.
58
Page 62

5. Press Options and select New mailbox.
6. Enter information in fields. Fields marked in the phone with a
red asterisk (*) must have an entry.
Mailbox name Use default name or enter a name for your
* Access point
in use
* My e-mail
address
* Outgoing mail
server
Send message Choose During next conn. or Immediately.
Send copy to
self
Include
signature
User name Enter a name to log into service provider remote
Password Enter password.
* Incoming mail
server
Mailbox type Select POP3 or IMAP4.
Security Select Off or On. Determined by Internet service
APOP secure
login
(POP3 only)
Retrieve
attachment
(IMAP4 only)
Retrieve
headers
(IMAP4 only)
mailbox and press OK.
Default Access Point supplied by wireless service
provider
Enter your own e-mail address and press OK.
May be supplied by wireless or Internet service
provider.
Enter SMTP mail server address.
Select Yes or No.
Select Yes to enter a signature for outgoing
messages.
mailbox.
Enter address of incoming mail server (POP or
IMAP), supplied by service provider.
provider.
Select Yes to use authenticated POP log in;
encrypts password.
Select Yes or No to automatically retrieve
attachment when message is fetched.
Select All to retrieve all message headers, or
select User defined and type in a number to
retrieve only the latest headers.
59
Page 63

Select Mailbox Name to Use to Send E-mail
To select which mailbox to use to send e-mail messages, see
page 67.
If you have more than one mailbox and you start to write a new
message, the phone notifies you of the mailbox name that is
currently in use. To change the mailbox, see page 67 to change
Mailbox in use setting.
Create a New E-mail Message
To create a new e-mail message, see page 53.
Retrieve E-mail
You can view your mailbox either online or offline. When you are
online, you see your messages stored on the remote server.
When you are offline, you see messages retrieved from the
remote server to your phone, or message headers if not yet
retrieved. IMAP4 protocol allows you to retrieve messages without
attachments, so large memory files can remain in your online
mailbox and not be stored in the phone.
You can mark as read or delete messages, or copy them to
another folder and view message details when offline. Your
mailbox is synchronised to the server when you go online.
When you receive a new e-mail message, a new message notice
appears on the standby screen.
To connect to your mailbox, from Messages application:
1. Open Messages.
2. Select Mailbox (or renamed mailbox).
3. Press Options and select Connect.
4. Once you are connected, press Options and select Retrieve
e-mail > New, Selected, or All.
• To select certain messages, use Mark/Unmark action.
5. Once messages are retrieved, you can read them offline.
Press Options and select Disconnect.
60
Page 64

Read Messages Offline
From Messages application:
1. Open Messages.
2. Select Mailbox (or renamed mailbox).
3. Press No when phone asks to connect to mailbox.
4. Scroll to desired message and open.
Reply to E-mail Messages
From Messages application:
1. Open Messages.
2. Select Mailbox (or renamed mailbox).
3. Highlight desired message.
4. Press Options and select Reply > To send er or To all .
Copy E-mail Messages
From Messages application:
1. Open Messages.
2. Select Mailbox (or renamed mailbox).
3. Highlight desired message.
4. Press Options and select Copy to folder.
5. Choose from the appropriate folders and press OK.
Sort Message List
From Messages application:
1. Open Messages.
2. Select Mailbox (or renamed mailbox).
3. Press Options and select Sort by > Date, Sender, or
Subject.
Save Attachment or Data
You can save attachments, such as Contacts cards, Calendar
items, links to streaming media, and configuration data.
1. Open desired message.
61
Page 65

2. Press Options and select Attachments >
Open Open attachment in read-only mode
Save Save attachment
®
Send Send attachment via Bluetooth
Note: Attachment cannot be opened, saved, or sent if it has not been
retrieved.
or Infrared
Add E-mail Address to Contacts Card
From Messages application:
1. Open Messages.
2. Select Mailbox (or renamed mailbox).
3. Open desired message.
4. Press Options and select Add to Contacts > Create new to
create a new Contacts card using the sender’s e-mail
address, or Update existing to place the sender’s
e-mail address in an existing Contacts card.
5. Continue with Create New Contact Cards on page 35 or Edit
Contact Cards on page 37.
Manage Mailboxes
From Messages application:
1. Open Messages.
2. Press Options and select Settings.
3. Scroll to E-mail and open.
4. Highlight Mailboxes and open.
5. Scroll to desired mailbox name and press Options and select
Edit or Delete.
DRAFTS
Your unfinished text (SMS), multimedia (MMS), and e-mail
messages that have not been sent are stored in the Drafts folder.
From Messages application:
1. Open Messages.
62
Page 66

2. Scroll to Drafts and open.
3. Scroll to desired message and open.
4. Enter the rest of the information.
5. Press , or if desired press Options and select:
Send Send message
Add recipient Send to more than one address
Insert > Insert items such as Picture, Image,
Attachments (E-mail)
Objects (Multimedia)
Edit presentation
(Multimedia)
Preview message
(Multimedia)
Check contacts Match names in To and Cc fields to names
Message details View details such as message size
Sending options View or change sending options depending
Sound clip, Video clip, or Template,
depending on what type of file the message
type supports
Open, insert, or remove attachments or
objects
Edit the presentation
Preview message before sending
in Contacts
on type of message
SENT
Text, multimedia, smart, and e-mail messages that have been
successfully sent are stored in the Sent folder, which stores the
last 15 sent messages.
Move Sent Messages to My Folders
From Messages application:
1. Open Messages.
2. Scroll to Sent and open.
3. Scroll to desired message, then press Options and select
Move to folder.
4. Select desired folder and press OK.
63
Page 67

View or Delete Sent Messages
To view or delete sent messages and objects or attachments,
from Messages application:
1. Open Messages.
2. Scroll to Sent and open.
3. Scroll to desired message and open.
4. Press Options and select:
Attachments (E-mail)
Objects (Multimedia)
Delete Delete message, object or attachment
Message details View details such as message size
Open, save, or send attachments or objects
OUTBOX
Outbox stores messages waiting to be sent, and messages that
could not be sent; for example, connection to the network failed.
®
It also temporarily stores Bluetooth
are waiting for connection to the receiving device. If the
connection fails, Outbox does not keep the message.
The Outbox icon appears on the standby screen when there
are messages in the Outbox.
Status of Outbox messages:
Sending Connecting to network Waiting Waiting to connect
Queued E-mail waiting for
connection
Deferred Suspend sending to
another time
and Infrared messages that
Resend atIf sending failed, resend
attempt
Failed Sending has not been
successful
Send, View, and Manage Outbox Messages
From Messages application:
1. Open Messages.
2. Scroll to Outbox and open.
3. Scroll to desired message. Press Options and select:
Defer sending Defer sending until you manually send
64
Page 68

Message details View details such as message size
Send Send message now
Move to Drafts Move message to Drafts folder, where it can be
edited and resent
Messages waiting in the Outbox are automatically resent (except
e-mail set to send during next connection), depending on network
availability.
To cancel resending, from Messages application:
1. Open Messages.
2. Scroll to Outbox and open.
3. Scroll to desired message. Press Options and select Delete.
65
Page 69

REPORTS
Delivery reports for text, multimedia, and smart messages can be
sent by your wireless service provider, and stored in the Reports
folder. Delivery reports are not available for e-mail messages.
From Messages application:
1. Open Messages.
2. Press Options and select Settings.
3. For text messages, open Text message, scroll to Receive
report and select Yes. For multimedia messages, open
Multimedia message, scroll to Receive report and select
Yes.
MESSAGE SETTINGS
Text Message Settings
From Messages application:
1. Open Messages.
2. Press Options and select Settings.
3. Open Text message. Open fields as needed:
Message
centres
Msg. centre in
use
Receive report Choose Yes or No. If Yes, delivery reports
Message
validity
Message sent asChoose Paging or E-mail if you wish to convert
Preferred
connection
Choose from provided list of network and SIM
message centres
Choose which message centre is used to deliver
text messages
showing status of sent text messages are stored
in Reports folder.
Choose a time period from 1 hour to maximum in
which text message delivery is attempted from the
message centre.
your text message to one of those forms for
sending. Available only if network can perform the
conversion.
Choose GSM or GPRS connection.
66
Page 70

Reply via same
ctr.
Select Yes to allow your text message recipients
to use your text message centre to reply to you
without having to subscribe to a text messaging
service.
Multimedia Message Settings
From Messages application:
1. Open Messages.
2. Press Options and select Settings.
3. Open Multimedia message. Open fields as needed:
* Access point
in use
Multimedia
reception
On receiving
msg.
Allow anon.
messages
Receive adverts Select Yes to receive advertisements.
Receive report Select Ye s to receive delivery reports.
Deny report
sending
Message
validity
Image size Select Small (default) for 160x120 (max) image
Default speaker Choose to play sound clips from Loudspeaker or
Choose from list of access points. See page 118
to create and edit access points.
Choose Only in home net., Always on or Off for
incoming messages.
Choose Retr. immediately, Defer retrieval or
Reject message for incoming messages.
Select Yes to receive messages from anonymous
(unknown) senders.
Select Yes so that your phone will not send a
delivery report to confirm receipt of a new
message.
Choose a time period for the message centre to
attempt message delivery.
size, or Large for 640x480 (max).
Handset speaker.
E-mail Message Settings
From Messages application:
1. Open Messages.
2. Press Options and select Settings.
67
Page 71

3. Open E-mail. Open fields as needed:
Mailboxes View list of mailboxes you have set up.
Mailbox in use Select mailbox to use to send e-mail.
Service Message Settings
From Messages application:
1. Open Messages.
2. Press Options and select Settings.
3. Open Service message. Open fields as needed:
Service
messages
Download
messages
Select On to receive service messages.
Select Manually to allow only authorised senders
to send service messages.
Cell Broadcast Message Settings
From Messages application:
1. Open Messages.
2. Press Options and select Settings.
3. Open Cell broadcast. Open fields as needed:
Reception Select On to receive cell broadcast messages
Language Select All to receive cell broadcasts in all possible
Topic detection Select On to view a list of topic indexes provided
languages, or Selected to choose from a list, or
Other if your preferred language is not listed.
by the network.
Other Message Settings
From Messages application:
1. Open Messages.
2. Press Options and select Settings.
3. Open Other. Open fields as needed:
Save sent
messages
Select Yes to save sent messages to the Sent
folder.
68
Page 72

No. of saved
msgs.
Type in a number to set maximum amount of
messages saved to Sent folder.
SIM MESSAGES
To view, copy, or delete text messages stored on the SIM card,
from Messages application:
1. Open Messages.
2. Press Options and select SIM messages.
3. A list of messages stored on the SIM card appears.
4. To view the messages, first copy them to the phone memory.
Before copying multiple messages, use Mark/Unmark > Mark
or Mark all to mark any or all desired messages to perform
copying at one time. Press Options and select Copy.
5. Choose the desired folder to place the copy and press OK.
6. If desired, press Options and select Delete to delete
messages from the SIM card.
CELL BROADCAST MESSAGES
Cell broadcast messages are sent by your wireless service
provider to GSM customers in a certain area. They provide
general information about topics such as weather reports, traffic
news, and customer services. Available topic names and
numbers are supplied by your wireless service provider.
Note: Leaving Cell broadcast set to On reduces battery life.
From Messages application:
1. Open Messages.
2. Press Options and select Cell broadcast.
3. Press Options and select:
Open Open topic
Subscribe or
Unsubscribe
Subscribe to selected topic to receive related
messages. Select Unsubscribe to stop receiving
related messages.
69
Page 73

Hotmark or
Remove
hotmark
Top ic > Choose Add manually to type in a topic name or
Settings See Cell Broadcast Message Settings on page 68
When topic is hotmarked, you will receive a notice
when related messages arrive.
topic number or Delete all.
to turn on or off Cell broadcast reception, choose
Cell broadcast language, and turn on or off topic
detection.
SERVICE COMMAND
Ask your wireless service provider to activate a particular service
by sending a service command. These commands, which may be
called USSD commands, can activate services such as mobile
prepay and chat.
1. Contact your wireless service provider for the proper service
command statement.
From Messages application:
2. Open Messages.
3. Press Options and select Service command.
4. Enter the service command, then press .
70
Page 74

CAMERA
Take pictures to send in a multimedia or e-mail message, or for
your Contacts cards. Pictures can also be sent via infrared or
Bluetooth®.
Note: Camera mode depletes battery power more rapidly. To conserve
your battery, the phone shifts to camera standby mode after 1
minute if no keys are pressed.
TAKE A PICTURE
From Camera application:
1. With the flip open, the main display acts
as a viewfinder. Move the phone around
to frame your subject.
2. To snap the picture, press .
• The image is automatically saved to
Images folder. See Gallery on
page 75.
To send the picture immediately, press .
Scroll to Via multimedia, Via e-mail, Via Bluetooth, or Via
infrared. To complete multimedia messages, see page 51; or Email messages on page 53; or Bluetooth
Infrared on page 104.
If you do not want to save it, either:
• Press and select Ye s
• Press Options and select Delete.
®
on page 102; or
Change Capture Modes
To choose different picture capture modes, scroll to select:
Standard Regular size landscape pictures (640x480 pixels
Portrait Smaller pictures that use much less memory and
[VGA])
can be placed in Contacts cards (80x96 pixels)
71
Page 75

• Red number in upper right corner indicates the amount of
pictures that can fit in phone memory, depending on selected
image size.
Zoom
You can zoom in on your subject before taking a picture.
1. When viewing your subject in the viewfinder, press once for
2x zoom, press again for 4x zoom. Press to step back
one zoom level.
2. Press to snap the picture.
Self-timer
Set the camera to take a picture after setting the timer to delay the
shutter.
1. From the viewfinder, press Options and select Self-timer >
10 seconds, 20 seconds, or 30 seconds.
2. Move the phone around to frame your subject.
3. Press Activate to start the timer.
• The shutter sounds when the picture is taken.
• The image is stored in the Media Gallery Images folder.
Photolight
Light up your subject before snapping a picture. See Photolight on
page 150.
TAKE A SELF-PORTRAIT
From Camera application:
1. Close the phone flip. The external display acts as a
viewfinder. Move the phone around to frame your subject.
2. Press Multibutton on side of phone to snap the picture.
3. Open the flip. The image appears on the main display.
• The image is automatically saved to Media Gallery Images
folder. To make changes to the image, press Options and
select Go to Gallery. See Gallery on page 75.
To send the picture immediately, see Send Pictures on page 74.
72
Page 76

If you do not want to save it, press Options and select Delete.
SAVE PICTURES
Pictures are automatically saved in the Images folder in Media
Gallery in phone memory, or you can save them on the miniSD
Card.
To save pictures to the miniSD Card, from Camera application:
1. Press Options and select Settings.
2. Scroll to Memory in use and open.
3. Select NO NAME or the name assigned to your miniSD Card.
• All pictures are saved to the miniSD Card until this setting
is changed to Phone memory, or miniSD Card is removed.
Note: To rename your miniSD Card, see miniSD Card (MEMORY
CARD) on page 143.
VIEW PICTURES
From Camera application:
1. Press Options and select Go to Gallery. A list of images
stored in phone memory displays. Scroll to desired image and
open.
• Or to view images in miniSD Card, press Back, scroll to
miniSD Card tab. Scroll to desired image or folder and
open.
NAME PICTURES
To change the name that is used as the default file name for new
images, from Camera application:
1. Press Options and select Settings.
2. Open Default image name and enter desired text.
• For example, if you change the Image Name to SkiTrip,
then your pictures will be named SkiTrip, SkiTrip(01),
SkiTrip(02), etc. until the default name is changed.
To rename an individual image when you have taken a picture:
1. With saved image on main display, press Options and select
Rename.
73
Page 77

2. Enter a new name for the image.
PICTURE QUALITY
To choose the compression level (memory size) of future pictures,
from Camera application:
1. Press Options and select Settings. Open Image quality.
2. Select High, Normal, or Basic. The higher the image quality
you choose, the larger the file size will be.
If you plan to view pictures on a computer, use High or Normal
picture quality so the quality will be better maintained when
enlarged on a computer screen.
Basic picture quality is best when the pictures are viewed on
phones and other small screens.
Note: All three levels are 640x480 pixels resolution (sharpness).
SEND PICTURES
Send the picture you just took to your family and friends.
1. With saved image on main display, press , or press
Options and select Send > Via multimedia, Via e-mail, Via
Bluetooth, or Via infrared.
2. To complete multimedia messages, see page 51; or E-mail
messages on page 53; or Bluetooth
on page 104.
Add a Picture to Contact Card
To add a picture to a Contact card, see Edit Contact Cards on
page 37.
®
on page 102; or Infrared
Incoming Calls when in Camera Mode
If you receive a call while in camera mode, the phone temporarily
suspends camera mode and switches to the incoming call display.
Once you answer the call, the screen returns to Camera mode
and a small active call icon displays. If a captured image is on the
preview screen, it is saved in the Media Gallery Images folder.
74
Page 78

MEDIA
Media menu contains these main options:
Gallery PhotoBase RealOne Player
Video Recorder
GALLERY
Store, play, and manage your pictures, images, video clips, sound
clips and streaming links (web addresses) in the phone memory
or miniSD Card. Send media files to friends and family via
multimedia, e-mail, Bluetooth
See Specifications in Part 2 of the User Guide for supported
media file formats.
VIEW IMAGE, SOUND, AND VIDEO FOLDERS
From Media application:
1. Open Gallery.
2. Phone icon tab shows data stored in phone memory, or scroll
to view data stored on miniSD Card.
3. Select folder:
Documents See File Manager on page 148 to view your
QuickOffice documents.
Images Scroll to desired image, or open Wallpapers folder
to view wallpaper files. Contact your network
operator for availability of Picture msg. service.
Sound clips Choose Digital sounds folder or Tones folder.
Video clips Video clips.
®
, or infrared.
VIEW IMAGES, ZOOM IN, AND SET AS
WALLPAPER
When an individual image is open, you can zoom in/out, rotate
and view images full screen, and do other actions as listed below.
From Media application:
75
Page 79

1. Open Gallery.
2. Phone icon tab shows data stored in phone memory, or scroll
to view data stored on miniSD Card.
3. Open Images folder, then scroll to and open desired image.
4. Press Options and select:
Send > Send file to another device.
Set as wallpaper Set image as wallpaper in standby mode.
Rotate > Rotate image Left or Right in 90 degree steps.
Zoom in / Zoom
out
Full screen Removes status bar and softkey text to see more
Normal screen When viewing full screen, press , then select
Rename Rename the image.
View details View details such as file format and size, and
Add to
favourites
Zoom in or out in steps from 12.5% to 800%.
of the image.
Normal screen to view status bar and softkey text.
image creation time and date.
Add a shortcut to view image from Favourites.
Zoom, Rotate, and Panning Shortcuts
Zoom zooms in; zooms out; zooms in; press
again to activate full screen
Pan and pan up; and pan down; and
pan left; and pan right
Rotate rotates clockwise; rotates counter clockwise
Original Press and hold to go back to original size view
Full screen switches between full screen view and original
size view
• If image is not zoomed, scroll to go to next image in the
current folder.
76
Page 80

PLAY VIDEO, SOUND CLIPS, AND STREAMING
MEDIA
Watch video clips and listen to sound clips, or play streaming
media. Streaming media is sound and video stored and played
back as it arrives from the Internet or your network servers; thus
the file is not stored on your phone, taking up valuable memory.
From Media application:
1. Open Gallery.
2. Phone icon tab shows data stored in phone memory, or scroll
to view data stored on miniSD Card.
3. Open desired folder(s), then scroll to and open desired video
or sound clip. When choosing a link to streaming media, the
phone begins connection process to the Internet or to your
network.
•See Player Controls on page 78.
Note: For streaming media, after the phone successfully connects to
the link (web address of streaming media), there is a short
loading period to prepare playback, then the streaming media
begins playing. See Player Controls
Press Options and select from these additional options:
Export to miniSD Copy or move file to miniSD Card.
Copy to Copy file to phone memory or miniSD Card.
Rename Rename clip.
Gallery downloads > Go to download link for images, videos, or
sounds in Browser.
Recieve via infared Receive a file via infrared.
View details View clip details such as file format, size, res-
olution, and duration.
Add to favourites Add a shortcut to view or listen to clip from
Favourites.
Settings Adjust multimedia settings (see page 85).
on page 78.
Note: Gallery downloads and Receive via infrared features may not
be available.
77
Page 81

PLAYER CONTROLS
Video controls
Play: Press Options and select Play. Video automatically
Stop: Press Stop softkey.
Pause: Press Pause softkey or press . To resume play,
Fast forward: Press and hold on navigation key during play.
Fast rewind: Press and hold on navigation key during play.
begins playing when first opened.
press and select Continue, or press Options and
select Continue.
Sound controls
To select buttons on screen, scroll or to move box to button
and press :
Play: Pause: Rewind:
Stop: Fast forward: Record:
Volume control
Scroll to increase volume; scroll to decrease volume (note
bar scale near top of screen).
To mute the sound in a video clip, scroll until muted speaker
icon appears. To turn sound back on, scroll . When playing
sound clips, the lowest volume setting is level 1.
SEND PICTURES, VIDEO AND SOUND CLIPS
From Media application:
1. Open Gallery.
2. Phone icon tab shows data stored in phone memory, or scroll
to view data stored on miniSD Card.
3. Open respective folder, then highlight desired file.
4. Press Options and select Send > Via multimedia, Via email, Via Bluetooth or Via infrared.
78
Page 82

5. To complete multimedia messages, see page 51; or E-mail
messages on page 53; or Bluetooth
®
on page 102; or Infrared
on page 104.
Note:The Send option is not available for streaming media.
DOWNLOAD PICTURES, VIDEO AND SOUND
CLIPS
From Media application:
1. Open Gallery.
2. Press Options and select Gallery downloads > Graphic
downloads, Video downloads, or Tone downloads.
3. The Browser opens. Choose a bookmark site to download the
desired media.
Note: Free content is available for your X700 phone. For downloading
information, visit www.panasonicbox.com. Availability of this
service is dependent on your country/ region or network. The
downloaded content is free, however there will be a
communication fee to download.
IMAGE UPLOADER
Store your personal pictures on an image server and share them
with family and friends. To use this service, (1) you must purchase
this service from your wireless service provider if it is available, (2)
you must configure an Internet Access Point.
Contact your wireless service provider to obtain the image server
settings. Enter the image server settings in the phone (see
page 79).
Note: Image Uploader service can support only JPG format files.
Set Up Image Server
From Media application:
1. Open Gallery.
2. Scroll to an image to highlight it.
3. Press Options and select Image uploader > Settings.
79
Page 83

4. Open Image servers. For the first time, select Yes to define
an image server.
5. Open each field to enter information:
Image server
name
* Access point
in use
User name Enter your user name for the uploader service
Password Enter your password for the uploader service
* Web address Enter the web address of the image server
Auto folder
naming
Enter a descriptive name for the image server
Choose desired access point from list. See
page 118.
Select On to have the current time and date as
the default name for your folders on the server
To edit or add more image servers, press Options and select Edit
or New image server after opening Image servers. You can also
delete Image servers here.
To change the image server in use if you have set up more than
one, open Image server in use setting and select desired image
server.
Upload Images
To upload images to an image uploader service, from Media
application:
1. Open Gallery.
2. Scroll to the desired image to upload to highlight it.
3. Press Options and select Image uploader > Upload.
PHOTOBASE
Take pictures, then show them to your friends in a slide show right
from your phone. Remove red eye, crop, rotate, or change
brightness and contrast of your pictures before sharing them. You
can also add frames, clip art, and text to your pictures.
Note: For customer support and more information on PhotoBase, visit
www.arcsoft.com.
80
Page 84

TAKE A PICTURE USING PHOTOBASE
From Media application:
1. Open PhotoBase.
2. Open Camera.
3. With the flip open, the main display acts as a viewfinder. Move
the phone around to frame your subject.
4. Press , or press Options and select Snap to take a picture.
The image appears on the display.
To keep the picture in your album, press Keep.
To delete the picture, press Discard.
Before Taking a Picture
To change the zoom, scroll or . To change contrast and
brightness, scroll or .
Before taking a picture, if desired, press Options and select:
Mode > Choose Frame to add a frame to the picture.
Picture folder > Choose the memory to store your pictures.
Settings Configure camera settings.
Go to album Go to your Album.
Horizontal Panorama and Vertical Panorama
allow you to stitch 3 pictures together.
Customize allows you to create a new folder.
VIEW PHOTOS
From Media application:
1. Open PhotoBase.
2. Open Album.
3. Scroll to desired photo and open.
• To zoom in or out, press Options and select Zoom In or
Zoom Out. Scroll , , , or to pan in zoomed
images.
• Scroll to view previous photo; scroll to view next
photo.
81
Page 85

Slide Show
To see a slide show of the photos in your Images folder, from
Media application:
1. Open PhotoBase.
2. Open Album.
3. Press Options and select Slide show.
4. Select a time interval between slides, and select a transition
effect, for example, Top to Bottom, to apply as each slide
advances to the next.
5. Press Play.
6. Press to exit.
EDIT PHOTOS
From Media application:
1. Open PhotoBase.
2. Open Album.
3. Scroll to highlight desired photo and open.
4. Press Options and select Edit.
5. Press Options and select:
Save Save edited photo in place of original photo
Save as Enter a new name for edited photo and save as a
Send > Send photo Via E-mail, Via Bluetooth, Via Infra-
Rotate left Rotate photo to left
Rotate right Rotate photo to right
Brightness&
Contrast
Remove red eye Removes red eye from the photo
Crop See Crop Photos on page 82.
Resize Resize photo by 200% or by 50%
new file
red, or Via MMS
(multimedia)
Scroll or to adjust brightness, scroll or
to adjust contrast
Crop Photos
1. With opened photo on screen, press Options and select Edit.
82
Page 86

2. Press Options and select Crop.
3. A dotted cropping box appears. Press to resize the
cropping box. Scroll to make the cropping box taller, scroll
to shorten the box. Scroll to widen the box, scroll to
narrow the box size.
4. To move the cropping box within the photo, press Options
and select Move. Scroll as desired to move the cropping box.
• If you have moved the box, select Resize to adjust the box
size again.
5. To apply the crop, press Options and select Crop it.
6. To save the cropped photo as a new photo, press Options
and select Save as. Enter a name for the new photo.
ADD CLIP ART, FRAMES TO PHOTOS
1. With opened photo on screen, scroll to go to Workshop
screen.
2. Select Clip Art to add clip art or Frame to add frames.
3. Scroll to desired clip art or frame and select.
4. Once the clip art or frame appears on the photo, press
Options and select:
Move Scroll , , or
Resize Scroll , to increase, , to decrease
Rotate Scroll , to rotate left, , to rotate right
5. Press Options and select Send for sending options.
Warp Photos
1. With opened photo on screen, scroll to go to Workshop
screen.
2. Select Warp.
3. A black crosshair mark appears on the photo. Scroll , ,
or to desired spot where the warp will start. Press to
change the mark to red, then scroll in direction you want the
warp to go.
83
Page 87

• To add more warp points, press as needed to toggle the
mark between black and red.
4. Press Options and select Save, Save as, or Send for desired
option.
Add Text to Photos
1. With opened photo on screen, scroll twice to go to Add Text
tab.
2. Press Options and select Add new line. Enter text as
desired. To edit text, press Options and select Edit current
line, Delete current line, Change text color, Change text
size, and Edit previous/next line.
3. Press Options and select Save, Save as, or Send for desired
option.
REALONE PLAYER
RealOne Player is a media player that plays your video clips,
sound clips and streaming media links (web addresses) stored in
the phone memory or miniSD Card. Video and sound clips
attached to messages are automatically played by RealOne
Player, without having to open the player first. Opening clips from
Media Gallery, File Manager, Browser, and Favourites
applications launches the RealOne Player.
See Specifications in Part 2 of the User Guide for supported
media file formats.
PLAY VIDEO CLIPS AND STREAMING MEDIA
From Media application:
1. Open RealOne.
2. Press Options and select Open > Most recent clips for the
last several opened media files, or Saved clip to locate
existing files and links in the phone memory or miniSD Card.
3. Open desired folder(s), then scroll to and open desired video
or sound clip. When choosing a link to streaming media, the
84
Page 88

phone begins connection process to the Internet or to your
network.
•See Player Controls on page 78.
Note: For streaming media, after the phone successfully connects to
the link (web address of streaming media), there is a short
loading period to prepare playback and then the streaming media
begins playing. See
Player Controls on page 78.
REALONE PLAYER SETTINGS
View and adjust settings for video playback and streaming media
links.
From Media application:
1. Open RealOne.
2. Press Options and select Settings.
3. Highlight Video and open.
4. Select from:
Contrast Open, then scroll or to change the percent-
Repeat Select On to repeat playback, or select Off to
To view and adjust streaming media settings, from Media
application:
1. Open RealOne.
2. Press Options and select Settings.
3. Scroll to Connection and open.
4. Select Proxy and select No or Yes.
• If you select Yes, then scroll down and enter the Proxy
serv. address and the Proxy port number.
5. Press Back and scroll to select Network. Open Network and
select from:
Default access
point
age
playback one time
Choose one of the access points you have set up.
See Access Point Settings on page 118.
85
Page 89

Online time Select Unlimited, or select User defined to spec-
Maximum bandwidth
Connection
time-out
Server time-out Select a maximum time period to wait for the
Lowest UDP
port
Highest UDP
port
ify the amount of time before phone will disconnect if there has been no activity
Select a maximum bandwidth for streaming media
to use
Select a maximum time period to wait from selecting a streaming link until it connects to the server.
Scroll left and right to move the slider and change
the time period.
media server to begin sending the streaming
media. Scroll left and right to move the slider and
change the time period
Type in a User Datagram Protocol port number
Type in a User Datagram Protocol port number
Incoming Call when Playing Video
If there is an incoming call during playback of video clips, the
player pauses the video. It remains paused in the background
during calls. To resume play, return to opened file and press
Options and select Continue.
The player also pauses when an alarm sounds, or a note
appears, or you open another application. When you return to the
player, press Options and select Continue.
If you open an application when streaming video is playing, the
streaming video pauses, and stops when the auto disconnect time
period is reached. See RealOne Player Settings on page 85.
86
Page 90

VIDEO RECORDER
Record video clips to send to others, or play clips on your phone.
Note: Video Recorder mode depletes battery power more rapidly. To
conserve your battery, the phone shifts to standby mode after 40
seconds if recording has not started. Press Options and select
Continue to return to viewfinder mode.
RECORD A VIDEO CLIP
To record nearby sound with the video, see Video Recorder
Settings on page 88.
From Media application:
1. Open Video Recorder.
2. The main display acts as a viewfinder. Move the phone
around to frame your subject.
3. Press Options and select Record to begin recording. Watch
the screen, then move the phone as needed to keep the
scene in view.
• Scroll to zoom in; scroll to zoom out if zoomed in.
•Press Pause to pause recording; press Resume to resume
recording.
4. The video recorder records until reaching the clip size limit
(specified in File Duration in Settings), or until you press Stop
softkey.
5. Wait for a few seconds while the video clip is saved to Media
Gallery Videos folder, or the miniSD Card according to Video
storage setting. The last still image of the recording remains
on screen.
To send the video clip immediately, see Send a Video Clip on
page 88.
87
Page 91

If you do not want to save it, press and select Yes, or press
Options and select Delete.
Note: The quality of display images may vary depending on the object
or environment.
Display images may distort when shooting moving objects,
especially in a fast moving environment.
SEND A VIDEO CLIP
1. With the video clip on screen, press , or press Options
and select Send > Via multimedia, Via e-mail, Via
Bluetooth, or Via infrared.
2. To complete Multimedia messages, see page 51; or E-mail
messages on page 53; or Bluetooth
®
on page 102; or Infrared
on page 104.
Play a Video Clip
To play the video clip that was just recorded, press Options and
select Play.
To play a stored video clip, from Media application:
1. Open Video Recorder.
2. Press Options and select Video Album.
3. Continue with step 3 in Play Video, Sound Clips, and
Streaming Media on page 77.
VIDEO RECORDER SETTINGS
From Media application:
1. Open Video Recorder.
2. Press Options and select Settings.
3. Select from:
Resolution Choose the size of the display on the screen to be
Audio
recording
Low or High.
Set to On to capture nearby sound as you record.
Off turns off the microphone.
88
Page 92

Video name
base
Video storage Choose whether video clips are stored in phone
File Duration Choose a fixed size for recorded clips, or unlim-
Video quality Choose Low or High.
Enter desired text. For example, if you change the
name to SkiTrip, then your video clips will be
named SkiTrip; SkiTrip(01); SkiTrip(02), etc. until
the default name is changed.
memory or on miniSD Card.
ited size.
PhotoLight
Light up your subject before recording a video clip. See Photolight
on page 150.
Incoming Calls when in Video Recorder Mode
If you receive a call while in video recorder mode, video recording
stops and the video clip is saved. After the call ends, the last
image of the recorded clip displays.
89
Page 93

CONNECTIVITY
Browse the Internet. View and manage your phone’s connections
to other devices that can be connected to the phone, wirelessly
and by cables. Synchronise your Contacts and Calendar entries
with your other networked devices. Your network, Internet, and email service providers can help you configure and manage your
connection settings using Device Manager. View your active
connections using Connection Manager.
Connectivity menu contains these main options:
Browser Operator
Modem
Bluetooth
Conn Mgr SyncML Dev Mgr
Infrared USB
BROWSER
Your phone has an XHTML configured wireless Internet browser,
allowing you access to services such as news, weather reports,
banking, sports, travel information and stock quotes.
Wireless web sites are designed to be viewed on mobile phone
screens, so they consist mostly of text and may contain simple
graphics. Wireless sites are written in Wireless Markup Language
(WML) and XHTML (Extensible Hypertext Markup Language),
which is different from Hypertext Markup Language (HTML) used
in computer Internet websites and cannot be accessed by
wireless phones.
Your phone browser can access WAP 2.0 sites and download
games, sound, software, WBMP images, vCard and vCalendar
events, and more.
Types of Data Connections
GPRS and data call (CSD) data bearer technologies are used to
access the Internet.
90
Page 94

GPRS is General Packet Radio Service, a packet based high
speed data transfer technology that allows continuous
connection, in which many users share a connection and packets
are transferred only as needed.
Data call, or CSD, is Circuit Switched Data, which uses a
dedicated connection much like ordinary voice phone service.
Note: The types of services and content offered when connected to the
Browser are supplied entirely by your wireless service provider.
SETUP TO CONNECT TO BROWSER
Before starting: (1) you need a subscription for data services from
your wireless service provider, and (2) you must configure an
Internet Access Point.
Your wireless service provider may have already completed the
Internet Access Point connection settings, or sent them to you in a
message. Contact your wireless service provider to find out how
setup information is furnished.
If you are setting up the Internet Access Point, see page 118.
CONNECT TO THE INTERNET
There are two main ways to store shortcuts to wireless Internet
sites. (1) Bookmark list stores web addresses that you or
your wireless service provider saved to the list. (2) Saved Pages
list stores actual WAP pages that you can view online or
offline.
Shortcut: Press to launch Browser.
From Connectivity application:
1. Open Browser.
2. A list of Internet Access Points and bookmarks appears, and
folders may appear. Your wireless service provider may have
loaded links to their services that appear as bookmarks. Scroll
to the desired connection or bookmark and select.
91
Page 95

• You can also scroll for the Saved pages list , which
stores WAP pages that you can view offline, and launch to
refresh pages.
3. The phone begins connection process.
Note: Your wireless service provider may have set your phone to go to
the Home page for their services when you launch Browser.
NAVIGATE THE INTERNET
In general, when connected to the Internet through the Browser:
Scroll up , down , left
navigation key through the page content.
Select a highlighted item or launch an underlined web page.
Press and hold to open Bookmarks list.
Erase character.
Back - Go backward in navigation history.
Close - Go to Bookmarks or Saved pages view.
Cancel - Ends current download.
Press and hold to disconnect the Browser at any time.
Indicates secure online browsing connection.
Note: If you go to a site with many graphics, it may take longer for the
images to load. To stop images from loading, see Show images
setting on page 95.
Secure Connections
A secure connection means that the connection to transmit data
between the phone and the network server has been secured and
encrypted. Your wireless service provider is responsible for
securing the connection between the network server and Internet
sites.
Ask your wireless service provider for details of their secure
connection capabilities. Proceed with caution when downloading
files and content or entering sensitive information.
or right by pressing outer edges of
92
Page 96

Online Options
During an Internet connection, you can add and refresh
bookmarks, reload pages, and view active session details.
Press Options and select:
Open Open highlighted link.
Accept Accept your text entry to the current page.
Service
Options >
Bookmarks View Bookmarks list.
Save as bookmark
View image If there are images on the page, open a list of
Navigation
options >
Advanced
options >
Show images Appears if you have set the Show images setting
Send
bookmark >
Find > Find phone number, e-mail address or web
Details View details and security of current session.
Settings See Browser Settings on page 95.
Service msg. Appears if you have unread WAP push mes-
Open a list of commands or actions for the page.
Save the web address to your Bookmarks.
images. To view a specific image, scroll to the
image and press OK.
Go to web address, History to select a previously viewed page during current session, Clear
cache to delete content in cache memory, Reload
to update current page.
Original screen to fit page into the display of your
phone, Save page to save current page to Saved
pages list, Disconnect to end connection.
to No in the Browser settings to allow the images
on current page to load.
Send current page via text message.
address on current page. Start typing for Find field
to appear.
sages.
93
Page 97

When online, you may have calling options from a current page.
You can click on a link to book tickets or order gifts, for example.
The link allows you to make a phone call directly from the
browser.
When viewing any Directory services an 'Add to Contacts' link
may appear. Click on the link, and a new Contacts entry form
displays. Save the entry to return to the browser.
Disconnect from Internet
To disconnect from the Internet, either press and hold , or
press Options and select Disconnect.
BOOKMARK OPTIONS
Manage your bookmarks when offline or online.
From Connectivity application:
1. Open Browser.
2. Press Options and select:
Download Connect to selected bookmark.
Bookmark manager >
Mark/Unmark > Select Mark or Mark all to perform actions to
Navigation
options >
Advanced
options >
Send > Send web address to another device.
Find bookmark Type in one or two characters to go to bookmark
Settings See Browser Settings on page 95.
Move to folder, New folder, Edit bookmark,
Add bookmark, Delete.
multiple items.
Go to web address or Clear cache.
Add to Favourites to add the bookmark to your
Favourites shortcuts.
titles beginning with that character.
94
Page 98

DOWNLOAD FILES FROM THE INTERNET
You can download ringtones, games, video and sound clips, and
applications to your phone through the Browser. After
downloading, the files are saved to the relevant menu application
in the phone.
Note: This feature may not be available.
From Connectivity application:
1. Open Browser.
2. Scroll to Download Applications, Download Images,
Download Skins, Download Sounds, or Download Videos,
and open.
3. Scroll to desired bookmark if there is more than one, then
open the bookmark. The phone begins connection process.
4. After connecting to the site, scroll to desired hotlink containing
the file and open.
5. After the file is downloaded, it is stored in the menu
application in which the file is opened; for example, a video
clip is stored in Gallery.
Note: Panasonic is not responsible for the performance of downloaded
content or possible corruption of phone software.
The phone may not allow you to copy, modify, transfer or forward
some copyrighted images, ringtones or other content.
BROWSER SETTINGS
Check your default access point, specify if you want images to be
automatically loaded, and allow cookies to be stored on the
phone.
From Connectivity application:
1. Open Browser.
2. Press Options and select Settings to reach:
Default access
point
Change default access point for connecting to the
Internet through the Browser.
95
Page 99

Show images For faster Internet surfing, select No to stop
Font size Select a font size for web page text to appear.
Default
encoding
Cookies Choose Allow to store cookies, which are short
Security warnings
Conf. DTMF
sending
images from automatically loading. When online,
press Options and select Show images on a
specific page to load an image.
For the Browser pages to display text characters
correctly, select one from: S. Chin., West. Europ.,
T. Chinese, Unicode (UTF-8), Central Eur., Baltic,
Cyrillic, Greek, Turkish, Heb. (ISO-Logical), Hebr.
(ISO-Visual), Arabic (ISO), Arabic (Windows),
Hebr. (Windows), Cent. Eur. (Wind.), Cyrillic (Windows), Greek (Windows), Turkish (Wind.), Baltic
(Windows) or Automatic.
text files that a web server places on your phone
for purposes such as presenting customised web
pages to you.
Choose Show or Hide for secure site notification.
Select First time only or Always before sending
DTMF touch tones during a call when online.
SAVED PAGES
Saved pages are web pages and folders you have stored on the
phone to view offline.
From Connectivity application:
1. Open Browser.
2. Scroll to open the Saved pages tab .
3. Scroll to the desired page and select.
4. Press Options and select:
Open View saved page or open folder.
Back to page Return to page you visited before opening Saved
Reload Download and store the latest version of the saved
pages.
page.
96
Page 100

Saved pages
mngr. >
Mark/Unmark >Select Mark or Mark all to perform actions to multi-
Navigation
options >
Advanced
options >
Settings See Browser Settings on page 95.
Move to folder to move a saved page to a different
folder, New folder, Rename or Delete.
ple items.
Clear cache to delete content in cache memory.
Add to Favourites to create shortcut to page from
Favourites application.
OPERATOR MENU
Your network operator may offer services that you can view using
the Browser. Contact your network operator for availability and
types of services offered.
From Connectivity application:
1. Open Operator.
2. In the page, press Options and select:
Open Open highlighted link.
Close
browser
Navigation
options >
Advanced
options >
Find > Find phone number, e-mail address or web address on
Details View details and security of current session.
Settings See Browser Settings on page 95.
Disconnect from your operator's service pages.
Go to web address to go to new address, History to
select a previously viewed page during current session,
Reload to update current page.
Original screen to fit page into the display of your
phone, Save page to save current page to Saved
pages list, Disconnect to end connection.
current page. Start typing for Find field to appear.
97
 Loading...