

Page 1

Before attempting to connect or operate this product,
please read these instructions carefully and save this manual for future use.
PC Software Package
Install Guide
Model No. WV-AS710AE
Page 2
2
CONTENTS
FEATURES ..................................................................................................................... 3
Installation ....................................................................................................................... 7
Procedures to Establish the Network Camera Server ................................................. 7
Selection of the System Type ...................................................................................... 8
Confirmation of the Directory Structure ........................................................................ 9
Installation of Red Hat Enterprise Linux ..................................................................... 11
Allocation of Disk Space (When "Live View & Recording" is Selected) ..................... 13
How to Allocate Disk Space ....................................................................................... 16
Installation of the WV-AS710A ................................................................................... 17
Starting up the Network Camera Server .................................................................... 18
After the Installation of the WV-AS710A .................................................................... 21
Stop the WV-AS710A ................................................................................................ 22
Uninstallation ............................................................................................................. 23
The model numbers listed in this Install Guide have no suffixed attached to it.
Page 3
3
FEATURES
■ Introduction
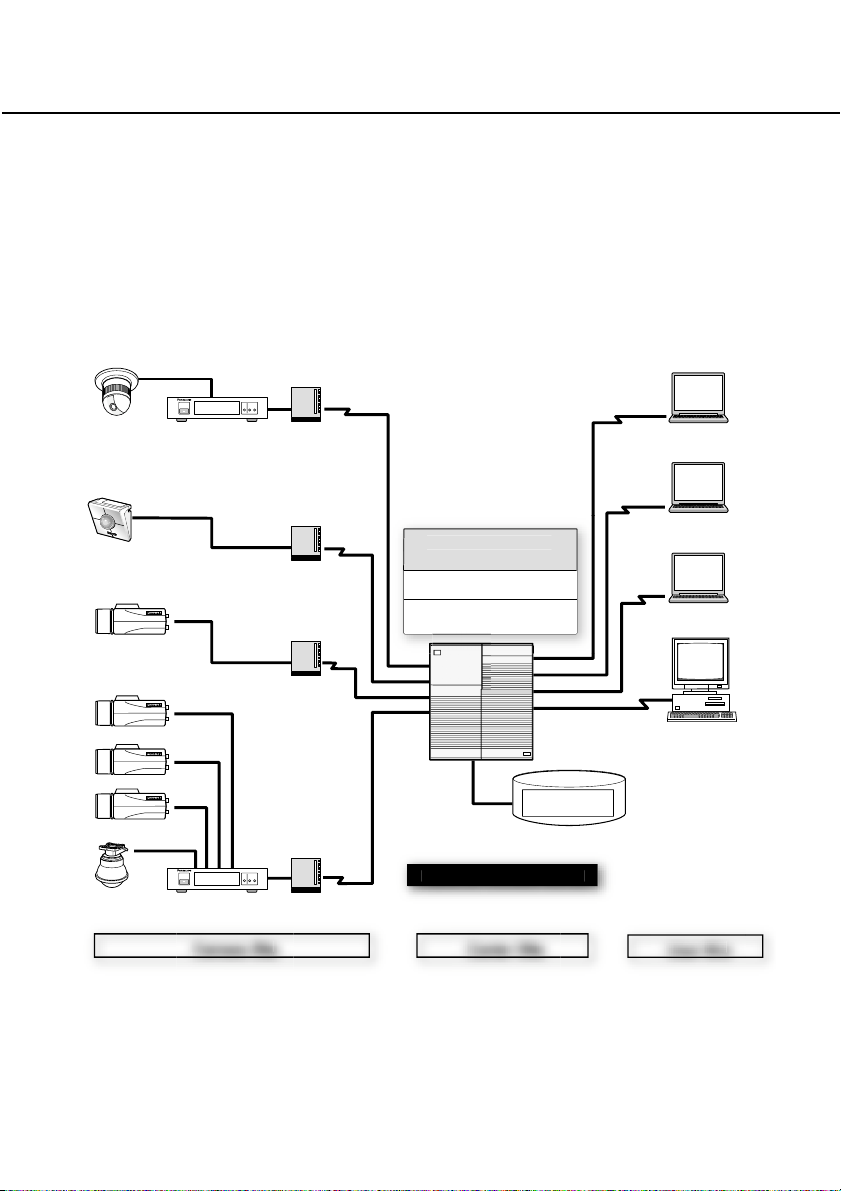
The PC Software Package WV-AS710A (hereinafter referred to as WV-AS710A) is
designed to monitor pictures from cameras at remote locations on personal computers
(PCs) via an IP network such as the Internet/Intranet. Install the WV-AS710A in a PC
server whose OS is Red Hat Enterprise Linux WS 3.0 to run the network camera server
(a PC server in which the WV-AS710A is installed is referred to as a network camera
server in this operating instructions). Users can monitor the pictures using web browsers
on PCs.
0A
e
0
ard
sk
ded
es
C
e
C
e
U
e
r
Coaxial Cable
Camera
Network Camera
Network Camera
Camera
Camera
Camera
Camera
Network Interface Unit WJ-NT104
Network Interface Unit
LAN Cable
LAN Cable
Coaxial Cable
Network Interface Unit WJ-NT104
Network Interface Unit
amera Sit
LAN Cable
Modem/Router
Hub etc.
LAN Cable
PC Software Package
WV-AS71
Web Server Apach
OS Red Hat Enterprise Linux WS 3.
PC Server
Network Camera Serve
enter Sit
Disk Space for
Recor
Pictur
Di
H
PC
ser Sit
Page 4

4
Network Monitoring
By using the network camera server, users can browse JPEG or MPEG-4 format pictures from cameras at remote locations in the same way they access web pages using
a web browser. Multiple users can browse pictures from the same camera simultaneously, and also each user can browse pictures from different cameras.
Recordings
Authenticated users can record camera pictures delivered to the network camera server
on to hard disks.
Alarm Recordings
When the network camera server receives an alarm signal from a camera, pictures from
the camera can be recorded on to a hard disk of the server. In this case, sending e-mail
to specified addresses to notify of an alarm occurring is also possible. The recipients of
the alarm mail can browse the recorded camera pictures by following a link contained in
the mail.
Note: The network camera server receives alarm signals only when cameras use the
Panasonic protocol to transmit alarm signals.
Administration
Administration of the network camera server (for example, setting of camera numbers)
can be performed using a web browser installed on a PC connected to the network.
It is unnecessary to install special software on a PC since the network camera server is
fully operable with a web browser.
FEATURES
Page 5

5
■ System Requirements
System requirements for using the network camera server differ depending on the sites,
as described below.
Center site
Prepare a PC meeting the following requirements to install the WV-AS710A on.
PC CPU: Intel
R
Xeon™ 2.8 GHz or higher
Memory 512 MB of RAM or more
LAN card 100BASE-TX controller or 1000BASE-T/TX/SX con-
troller (Installing three controllers is recommended: for
camera sites, for user sites, for maintenance)
OS Red Hat Enterprise Linux WS 3.0
CD-ROM drive Required to install the WV-AS710A
USB port Required to install the hardware key (using a USB hub
is available)
Hard disk Ultra 160 SCSI or Ultra 320 SCSI, 2 GB or more (except
disk space for recorded pictures)
Introducing a RAID is recommended for high tolerance
to disk failure.
Core Component As the web server, Apache HTTP Server included in
Red Hat Enterprise Linux WS 3.0 is required.
For the database server, mysgl-server-3.23.58 down-
loaded from Red Hat Network is required.
When using the function for alarm notification by e-mail, establishment of a mail system
including a mail server is required.
■ Standard Accessories
CD-ROM* ............................................................................................. 1
Installation guide .................................................................................. 1
Hardware key ....................................................................................... 1
Software License Agreement ............................................................... 1
* CD-ROM includes the install program of the WV-AS710A, the operating instructions
(PDF) and the Readme.txt. Before installation read the Readme.txt.
Page 6

6
■ Trademarks and Registered Trademarks
• Linux is a registered trademark of Linus Torvalds.
• RED HAT is a registered trademark of Red Hat, Inc.
• Java is a trademark or registered trademark of Sun Microsystems, Inc. in the United
States and other countries.
• Microsoft, and Windows are registered trademarks of Microsoft Corporation in the
U.S. and other countries.
• Intel and Pentium are trademarks of Intel Corporation.
• Other names of companies and products contained in these operating instructions
may be trademarks or registered trademarks of their respective owners.
• Distributing, copying, disassembling, reverse compiling, reverse engineering, and
also exporting in violation of export laws of the Software provided with this product,
is expressly prohibited.
About This Install Guide
This install guide describes how to install the WV-AS710A on a PC server on which Red
Hat Enterprise Linux WS 3.0 Professional is installed. Refer to the operating instructions
(PDF) on the supplied CD-ROM about how to perform the settings of the WV-AS710A
and how to access the WV-AS710A to view camera pictures.
To read the operating instructions (PDF) on the supplied CD-ROM, Adobe
®
Acrobat
®
Reader®is required. It is possible to download it from the web site of Adobe System
Incorporated.
Readers of This Install Guide
This install guide is written for users who know how to administrate Red Hat Enterprise
Linux WS 3.0 Professional and the Apache HTTP Server, and who also know how to
establish a backbone server.
Terms
Meanings of the terms used in these operating instructions are as follows:
Network camera server: A running PC server on which the WV-AS710A is installed.
Disk space for recorded pictures: Disk space used only for recording which is allocat-
ed on a mounted hard disk on the network camera server. (Partition or directory
name is /S3_DATAxx.)
Alarm picture: A picture captured when an alarm occurs.
Red Hat Enterprise Linux: Red Hat Enterprise Linux WS 3.0
Notes:
• Names of buttons are between square brackets (e.g. the [OK] button).
• Names of menus and items on menus are between double quotation marks (e.g. the
"System Properties" menu).
FEATURES
Page 7

7
To install the WV-AS710A, adequate knowledge of Red Hat Linux is required. Also,
adequate knowledge of Apache HTTP Server will be required to access the network
camera server from a network.
Note: Installation of the WV-AS710A on the Red Hat Linux server, allocation of disk
space for recorded pictures, and uninstallation of the WV-AS710A must be performed by a root user.
Procedures to Establish the Network Camera Server
To use the network camera server, perform the following.
1. Selection of the system type of the network camera server
2. Confirmation of the directory structure
3. Installation of Red Hat Enterprise Linux
4. Allocation of disk space for recorded pictures (when "Live View & Recording"
is selected)
5. Installation of the WV-AS710A (Execution of the installation script)
6. Startup of the WV-AS710A
7. System environment setting
Before running the network camera server, access the "Administrator’s Page" and
set the system environment. Refer to the operating instructions (PDF) on the supplied CD-ROM for further information.
8. Running of the network camera server
After setting the system environment, restart the WV-AS710A. The settings will be
validated and the network camera server will start running.
Installation
Page 8

8
Selection of the System Type
Depending on the system type, the network camera server works in different ways.
System Type Description
Live View & Recording Delivery of live camera pictures and recording can
be performed. (Allocation of disk space for recorded
pictures is required on the server.)
Recorded pictures can be searched for and played
when desired, and they can be downloaded on a
user's PC hard disk.
Live View Only Only delivery of live camera pictures is available
with this system type. Recording, playback, searching and the alarm function are not available with this
system type.
Note: The system type can be changed anytime if required. In case of switching from
the "Live View Only" to the "Live View & Recording", allocation of disk space for
recorded pictures will be required.
Design a system fulfilling all of the conditions below to run the network camera server in each system type.
Items Live View & Recording Live View Only
Camera Site Maximum camera number 64 128*
1
Maximum total bit rate 30 Mbps
*5
30 Mbps
User Site Maximum concurrent access*2100 200
(Live) Maximum total bit rate 30 Mbps 30 Mbps
User Site Maximum concurrent access 64 -
(Playback) Maximum concurrent playback*364
*5
-
Maximum total bit rate 15 Mbps
*5
-
User Site Maximum concurrent access 100 -
(Live & Playback)
*4
Maximum total bit rate 30 Mbps -
Maximum total frame rate of in & out 400 fps 400 fps
Installation
*1
To connect 128 cameras, it is required to set the maximum bit rate at less than
230kbps and the maximum frame rate at less than 1.5fps per a camera in the camera settings.
Refer to the following values for the maximum frame rate of cameras.
Page 9

9
The following values may differ depending on objects to be captured and the network environment. Also, depending on the traffic on the network, acquiring pictures
at the maximum frame rate may fail.
Size of a JPEG (QVGA): Approx.15 - 22 KB
Maximum frame rate of WJ-NT104: 5fps (Settings of WJ-NT104: JPEG, Fixed Input
Selection Mode, no limitation for maximum bit rate, QVGA).
Maximum frame rate of WV-NM100 (MPEG-4): 30fps (Settings of WV-NM100: bit
rate of 256kbps or more, QCIF).
*2
Regardless of JPEG or MPEG-4, the access number is regarded as the number of
split screens to be displayed. As an exception, when the JPEG type cameras that
are grouped into a multiscreen are accessed, the access number is considered as
one.
*3
One access enables the system to play back a number of multi-split screens. A
maximum concurrent playback of 64 is equivalent to the access of 16 users requesting the playback of different quad screens simultaneously.
*4
In the case where the user site obtains 64 accesses for playback, up to 36 accesses
for viewing live pictures are available.
*5
For recording and backing up the image data at the same time, design the system
so that the maximum total bit rate of the camera site for recording is 15 Mbps or
less, the maximum total bit rate of the user site (playback side) is 5 Mbps or less
and the maximum concurrent playback is 20 or less.
Confirmation of the Directory Structure
The network camera server uses the following directories. Disk space for recording pictures should be allocated by an administrator. Refer to the operating instructions (PDF)
on the supplied CD-ROM for further information. The other directories below are created
automatically when the WV-AS710A is installed.
Notes:
• The path of the directory to store the html documents and the CGI files will depend
on the user environment.
• Do not change the directory name.
• Do not delete the files installed in each directory or change their names.
Page 10

10
Directory name Description
/usr/local/s3/bin/ Executable files of the network camera server will be stored in
this directory. When the installation script is executed, this
directory will be
automatically created.
/usr/local/s3/ Setting files of the network camera server will be stored in this
directory. When the installation script is executed, this directory
will be automatically created.
$HTMLPath/s3/ HTML documents will be stored in this directory. When the
installation script is executed, this directory will be automatically created.
$CGIPath/s3/ CGI files to be used for administration will be stored in this
directory. When the installation script is executed, this directory
will be automatically created.
/var/run/ Process ID files will be created in this directory. When the
installation script is executed, this directory will be automatically created.
/var/log/s3/ Log files such as an alarm log file and an access log file will be
created in this directory. When the installation script is executed, this directory will be automatically created.
/var/s3/etc/ Administration information of the disk space for recorded pic-
tures will be stored in this directory. When the installation script
is executed, this directory will be automatically created.
/var/lib/mysql/ The database will be stored in this directory.
This directory will be used by the database server.
/S3_DATAxx/ When "Live View & Recording" is selected for the system type,
this directory will be required (xx: two digits number (e.g.
/S3_DATA00/, /S3_DATA01/, etc.)). The network camera server will use this as the disk space for recorded pictures. It is
required to allocate disk space for this as a partition when
installing Red Hat Enterprise Linux. To allocate disk space for
this after installing Red Hat Enterprise Linux, an administrator
has to allocate disk space for this manually. It is possible to
use up to 16 disks for this directory. Refer to the operating
instructions (PDF) on the supplied CD-ROM for further information.
Notes:
• $HTMLPath is an HTML storage path of Apache http server.
• $CGIPath is a CGI storage path of Apache http server.
Installation
Page 11

11
Installation of Red Hat Enterprise Linux
When installing Red Hat Enterprise Linux, take notice of the following.
About Disk Space for Recorded Pictures (When "Live View & Recording"
is Selected)
When "Live View & Recording" is selected as the system type, allocation of disk space
for recorded pictures will be required.
To allocate disk space for recorded pictures when installing Red Hat Enterprise Linux,
use the following mount name.
/S3_DATAxx (xx: 2 digit number)
Refer to the operating instructions (PDF) on the supplied CD-ROM for further information.
When it is required to allocate or add disk space after installing Red Hat Enterprise
Linux, use the name above as the mount name.
Cautions when Installing Red Hat Enterprise Linux
(1) It is recommended to install all the packages when selecting package groups during
the installation of Red Hat Enterprise Linux. Selecting all packages using "Custom
Install" can install all the packages included in Red Hat Enterprise Linux.
Install the following packages necessary to install and to run the network camera
server system.
• X Windows System
• GNOME Desktop Environment
• Editors
• Graphical Internet
• Text-based Internet
• Web Server
• Mail Server
• My SQL Database
• Administration Tools
(2) Take the necessary procedures shown below according to the instructions given by
your vender of Red Hat Enterprise Linux WS 3.0
• User registration
• Acquire a new account for Red Hat Network
• Activate the product
• System registration
Page 12

12
Notes:
• Procedures differ depending on the vender, e.g., "Activate the product" is unnecessary for the user who purchased from the US site of the Red Hat using a credit card.
For details, ask your vender.
• System registration is performed on the network camera server PC in which Red
Hat Enterprise Linux WS 3.0 is installed. Inquire the port number, etc of the Red Hat
Support to establish Internet connections and to communicate with Red Hat
Network.
(3) Download the mysql-server from Red Hat Network.
(a) Access the Red Hat Network page.
https://rhn.redhat.com/
(b) Sign in by using the account acquired in step (2) above if a dialog box requests
the user name and password due to SSL connection errors, etc. The dialog box
will not appear when correctly signed in.
(c) Double-click "Channels" and click "Red Hat Enterprise Linux WS (v.3 for 86)
Extras". When these items are not displayed, registration may be incorrect.
Repeat step (2) above or ask the Red Hat Support.
(d) Click "Packages" and click "mysql-server-3.23.58-1". When clicked, a minor ver-
sion may be updated.
(e) Click "Download RPM" to download "mysql-server-3.23.58-1. i386.rpm".
(f) Start up the terminal as a super user on Red Hat Enterprise Linux WS 3.0, and
execute the following commands in the directory containing these downloaded
files.
"rpm -i mysql-server-3.23.58-1. i386.rpm"
When using GNOME to start up the terminal, select "System Tool", "Terminal"
from the lower left menu.
Use "su" command to be a super user.
Note: Red Hat Inc. may change these procedures.
Installation
Page 13

13
Allocation of Disk Space (When "Live View & Recording" is Selected)
To allocate disk space for recorded pictures, refer to the following.
About Disk Space for Recorded Pictures
When the network camera server runs on the "Live View & Recording" system, it is
required to allocate disk space for recorded pictures. The following functions will be
available by allocating disk space for recorded pictures.
• Schedule recording
• Alarm recording
• Manual recording
Note: When the network camera server runs on a "Live View Only" system, allocating
disk space for recorded pictures is not necessary.
Cautions When Allocating Disk Space
Depending on the place the disk space for recorded pictures has been allocated, the
performance of the network camera server may deteriorate. To prevent deterioration of
the performance, refer to the following:
• It is recommended to prepare a hard disk exclusively for recorded pictures, and to
create a new partition as the disk space for recorded pictures.
• If data which is not recorded pictures is stored in the partition created as
disk space for recorded pictures, the performance of the network camera
server may deteriorate.
• After allocating disk space for recorded pictures, allocate disk space for
recorded pictures of each camera in the "Administrator's Page".
• It is recommended to prepare a hard disk exclusively for recorded pictures, and to
create a new partition as the disk space for recorded pictures.
• If data which is not recorded pictures is stored in the partition created as disk space
for recorded pictures, the performance of the network camera server may deteriorate.
• After allocating disk space for recorded pictures, allocate disk space for recorded
pictures of each camera in the "Administrator's Page".
For reference, the required disk capacities for JPEG cameras (320 x 240 pixels/Fine
mode) are shown below.
Page 14

Number of Cameras Number of Days Recording 15 fps 5 fps 1 fps 1 frame/3 seconds
1 185 62 12 4
8 7 1298 433 87 29
30 – 1854 371 124
1 – 124 25 8
16 7 – 865 173 58
30 ––742 247
1 ––99 33
64 7 ––692 231
30 ––– 989
Notes:
• All values are indicated in gigabytes.
• Settings "–" in the list are not recommended.
• When cameras supply 640 x 480 pixels, the required capacities will be
about 3.2 times of the list.
• The required capacity may vary depending on the captured picture and
environmental conditions.
• Prepare large-space drives.
It is recommended that you prepare larger drives that can contain 1.4 times
data than shown in the list.
• A 10 % redundant capacity beside the listed value is needed for database
administration of the recorded data.
More space other than described above is needed when backing up the
recorded picture data.
• Pre-recording pictures of alarm recording will be stored in the hard disk.
Required capacity will depend on the settings of "Duration" and "Interval" for
"Pre-Recording".
14
Installation
Page 15

15
q
root
Recording by the
cameras set on the
menus of "Recording".
S3_DATA00
Allocating disk space for
w
recorded pictures on the
menus of "Recording".
e
Creating disk space for
recorded pictures on the
server.
Setting cameras for recording on
the menus of "Recording".
Page 16

16
#mkdir /mnt2/S3_DATA02/
#ln -s /mnt2/S3_DATA02 /
Installation
How to Allocate Disk Space
There are two following ways to allocate disk space.
• Use a whole partition as disk space for recorded pictures.
• Use a directory as disk space for recorded pictures.
Creating a New Partition to Use as Disk Space for Recorded Pictures
When preparing a new hard disk or creating a new partition on a currently used hard
disk, the new partition must be the following name to mount. It is possible to create this
partition when installing Red Hat Enterprise Linux.
"/S3_DATAxx" xx: two digits number (e.g. /S3_DATA00, /S3_DATA01, etc.)
Notes:
• When a new hard disk is prepared exclusively for recorded pictures, do not create
any other partition than "/S3_DATAxx".
• Do not store any software or any data other than recorded pictures in the
"/s3_DATAxx" partition.
• Select "ext2" for the file system. If "ext3" or other file systems are selected, the performance of the network camera server may deteriorate.
• The network camera server will not recognize a partition if its name is not
"/S3_DATAxx".
Using an Existing Partition as Disk Space for Recorded Pictures
It is possible to create a new directory on an existing partition to use as disk space for
recorded pictures. In this case, proceed as follows:
1. Create a directory in the existing partition and name the new directory
"/S3_DATAxx" with the "mkdir" command.
Note:
The network camera server will not recognize a directory if its name is not
"/S3_DATAxx".
2. Set a symbolic link for the created directory to be recognized as
"/S3_DATAxx".
Example
If the "S3_DATA02" directory is created in the "/mnt2" partition, enter the following to set
a symbolic link for the "S3_DATA02" directory.
Page 17

17
Installation of the WV-AS710A
To install the WV-AS710A, do the followings.
Mounting the CD-ROM
Insert the CD-ROM that includes the WV-AS710A into the CD-ROM drive. Enter the following commands to mount the CD-ROM and change the current directory to the CDROM.
Execution of the Installation Script (Installation by Unpacking the Archive
Files)
Unpack the archive files in the mounted CD-ROM, and install the files.
1. Start up the installation script in the mounted CD-ROM.
2. Enter the environment parameter.
When the installation script is executed, the WV-AS710A requests the environment
parameters required for startup.
• To install not in the default path of Red Hat Enterprise Linux, enter a desired path
and press the return key.
• To install in the default path of Red Hat Enterprise Linux (displayed path between [
]), do not enter any path and press the return key.
• Enter "American" or "British" for the "Standard Language".
3. Enter a password for an administrator (admin).
The entered string of characters will be a password for an administrator who administrates the network camera server.
Enter the password (of more than 5 characters) to administrate the network camera
server and press the return key.
Entering the password will be required twice.
When the entered passwords do not match, execution of the installation script will
be interrupted. When interrupted, begin this procedure from step 1 again.
#mount /mnt/cdrom
#cd /mnt/cdrom
#./s3inst
Page 18

4. Decide whether or not to start up the WV-AS710A automatically when the
server on which Red Hat Enterprise Linux is installed starts up.
• To start up automatically, enter "y". When "y" is entered, the automatic startup
script will be added to "/etc/rc.d/rc.local".
• To not start up automatically, enter "n". In this case, start up the WV-AS710A
manually.
5. Confirm the entered parameters.
When entering the parameters has been completed, a confirmation message will be
displayed. To install after confirming the displayed parameters, enter "y"
To change the displayed parameters, enter "n". When "n" is entered, execution of
the installation script will be interrupted. In this case, begin this procedure from step
1 again.
6. Create disk space for recorded pictures.
When disk space for recorded pictures is not prepared in advance, a message asking whether to create or not disk space for recorded pictures on an existing partition
will be displayed. When "Live View & Recording" will be selected as the system type
and it will be required to create disk space for recorded pictures, enter "y". When it
is unnecessary to create disk space or when adding disk space later (for example,
installing a new hard disk later), enter "n".
Unmounting the CD-ROM
When the installation of the WV-AS710A on Red Hat Linux has been completed, enter
the following commands to unmount the CD-ROM.
18
#cd /
#umount /mnt/cdrom
Installation
Starting up the Network Camera Server
Installation of the Hardware Key
The WV-AS710A will not be started up if the provided hardware key is not installed on
the PC server.
Before starting up the WV-AS710A, insert the provided hardware key into a USB port on
the PC server.
It is also possible to insert the hardware key into a USB hub connected to the PC server.
Page 19

Start up from the "Administrator's Page"
After the installation of the WV-AS710A, the first startup of the WV-AS710A can be
made using the "Administrator's Page".
To display the "Administrator's Page", click the [Administrator's Page] button on the
"TOP MENU" page.
When the authentication dialog window is displayed, enter "admin" for user name and
the password entered when installing the WV-AS710A.
When the network camera server has not yet started up, the server start confirmation
page will be displayed.
Click the [Start WV-AS710A] button to start up the WV-AS710A.
19
"TOP MENU" page address: http://(server address)/s3/American/
http://(server address)/s3/British/
The server address differs depending on the user environment.
Page 20

Start up from Red Hat Enterprise Linux
Execute "s3" in the directory where the WV-AS710A is installed.
When the WV-AS710A is installed in the default path, it has been installed in
"/usr/local/s3/bin/".
Notes:
• Executing "s3" is not necessary if "Start WV-AS710A automatically when starting
Linux" is selected when the WV-AS710A is installed, and the server is restarted.
• When the automatic startup of the WV-AS710A or the manual restart of the WVAS710A by an administrator is performed, the WV-AS710A will start running in the
background. Therefore, nothing will be displayed in the terminal window.
The Settings of the Network Camera Server Just after Completing the Installation
are as Follows:
Item Parameter
System Type Live View & Recording
Camera A single camera
IP Address 192.168.0.10
Unit Type/ Image Format WJ-NT104/JPEG
Channel 1 CH
Minimum Access Interval/ 1 Sec. (1 fps)
Maximum Frame Rate
Access Mode Continuous
Disk Space Not allocated
User "admin" for level 1 users
"nobody" for level 4 users
Password Password entered when installing the WV-AS710A
Schedule None
Alarm Function None
20
#/usr/local/s3/bin/s3
Installation
Page 21

21
After the Installation of the WV-AS710A
To run the network camera server after installation, do the following.
E-Mail System Establishment
The network camera server can send e-mail to registered e-mail addresses when an
alarm occurs.
To use this function, establishment of a mail server system is required. Refer to the
operating instructions of the mail server software for further information.
Environment Settings of the Network Camera Server
Refer to the operating instructions (PDF) on the supplied CD-ROM for further information about the environment settings.
Page 22

22
Installation
Stop the WV-AS710A
To stop the WV-AS710A, click the [Stop] button on the "Stop and Restart" menu. Refer
to the operating instructions (PDF) on the supplied CD-ROM for further information.
Page 23

23
#cd /usr/local/s3/bin/uninstall/
#./s3uninst
Uninstallation
When uninstallation of the WV-AS710A is needed, execute the script for uninstallation.
When the script for uninstallation is executed, all directories created when the WVAS710A was installed will be deleted, except the newly created partitions or directories
for disk space named "S3_DATAxx" (their contents will be deleted.).
Note: The uninstallation of the WV-AS710A must be performed by a root user.
The script for uninstallation was installed in the following directory when the WVAS710A was installed.
/usr/local/s3/bin/uninstall/
To uninstall the WV-AS710A, enter the following commands.
Page 24

Matsushita Electric Industrial Co., Ltd.
Osaka, Japan
http://www.panasonic.co.jp/global/
2004 © Matsushita Electric Industrial Co., Ltd. All rights reserved. NM0604-1064 3TR002471BAA Printed in Japan
 Loading...