

Page 1

Disk Recorder Management Software
PC Software Package
Operating Instructions
Model No. WV-AS65
Before attempting to connect or operate this product,
please read these instructions carefully and save this manual for future use.
Page 2

Contents
ADMIN
ADMIN
ADMIN
ADMIN
ADMIN
ADMIN
ADMIN
ADMIN
Preface ............................................................................................................................ 3
System Configuration ...................................................................................................... 3
Features .......................................................................................................................... 5
About These Operating Instructions ................................................................................ 7
System Requirements ..................................................................................................... 7
Camera Settings Relating to MPEG-4 Image .................................................................. 8
Trademarks and Registered Trademarks ........................................................................ 8
Limitation of Liability .......................................................................................................8
Disclaimer of Warranty .................................................................................................... 9
Standard Accessories ..................................................................................................... 9
Terms Used in These Operating Instructions .................................................................. 10
Restrictions when operating MPEG-4 images ................................................................. 12
Installation / Uninstallation ............................................................................................... 15
Connecting with the Recorder ......................................................................................... 17
Main Application .............................................................................................................. 20
The Network Mode and the Local Mode ......................................................................... 22
User Management ........................................................................................................... 23
Switch user ...................................................................................................................... 24
Principal Window Chart.................................................................................................... 25
The Operation Window in the Network Mode .................................................................. 26
Monitor Live Images ........................................................................................................ 41
Switch the Pattern of the Screen ..................................................................................... 46
Control Cameras ............................................................................................................. 48
Save the Camera Channel Allocation for the Areas ........................................................ 49
Play Recorded Images on the Recorder ......................................................................... 52
Search and Play Recorded Images ................................................................................. 54
Download Recorded Images ........................................................................................... 64
Save as a Still Image File (JPEG) ................................................................................... 67
Print ................................................................................................................................. 68
Check the Log of the Recorder ....................................................................................... 69
Operate the Recorder ...................................................................................................... 70
Operation Windows in the Local Mode ............................................................................ 76
Browse the Downloaded Files in the Local Mode ........................................................... 86
Filter the Listed Files ....................................................................................................... 90
Play the Downloaded File ................................................................................................ 92
Playback Multiple Files Simultaneously .......................................................................... 95
Go to the Desired Point by Designating the Time and Date (JUMP) .............................. 97
Import Motion Images ...................................................................................................... 98
Save as a Motion Image File ........................................................................................... 99
Save as a Still Image File (JPEG) ................................................................................. 101
Print ............................................................................................................................... 102
Maintenance .................................................................................................................. 103
Notification of an Alarm Occurrence .............................................................................. 111
Notification of Error ........................................................................................................ 112
Start & Exit the Downloader .......................................................................................... 113
Check the Download Status........................................................................................... 114
Settings of the Recorder ................................................................................... 122
User Settings .................................................................................................... 131
Schedules Settings ........................................................................................... 136
Option Settings ................................................................................................. 141
Troubleshooting ............................................................................................................. 146
Displayed Message and Solutions ................................................................................ 150
2
Page 3
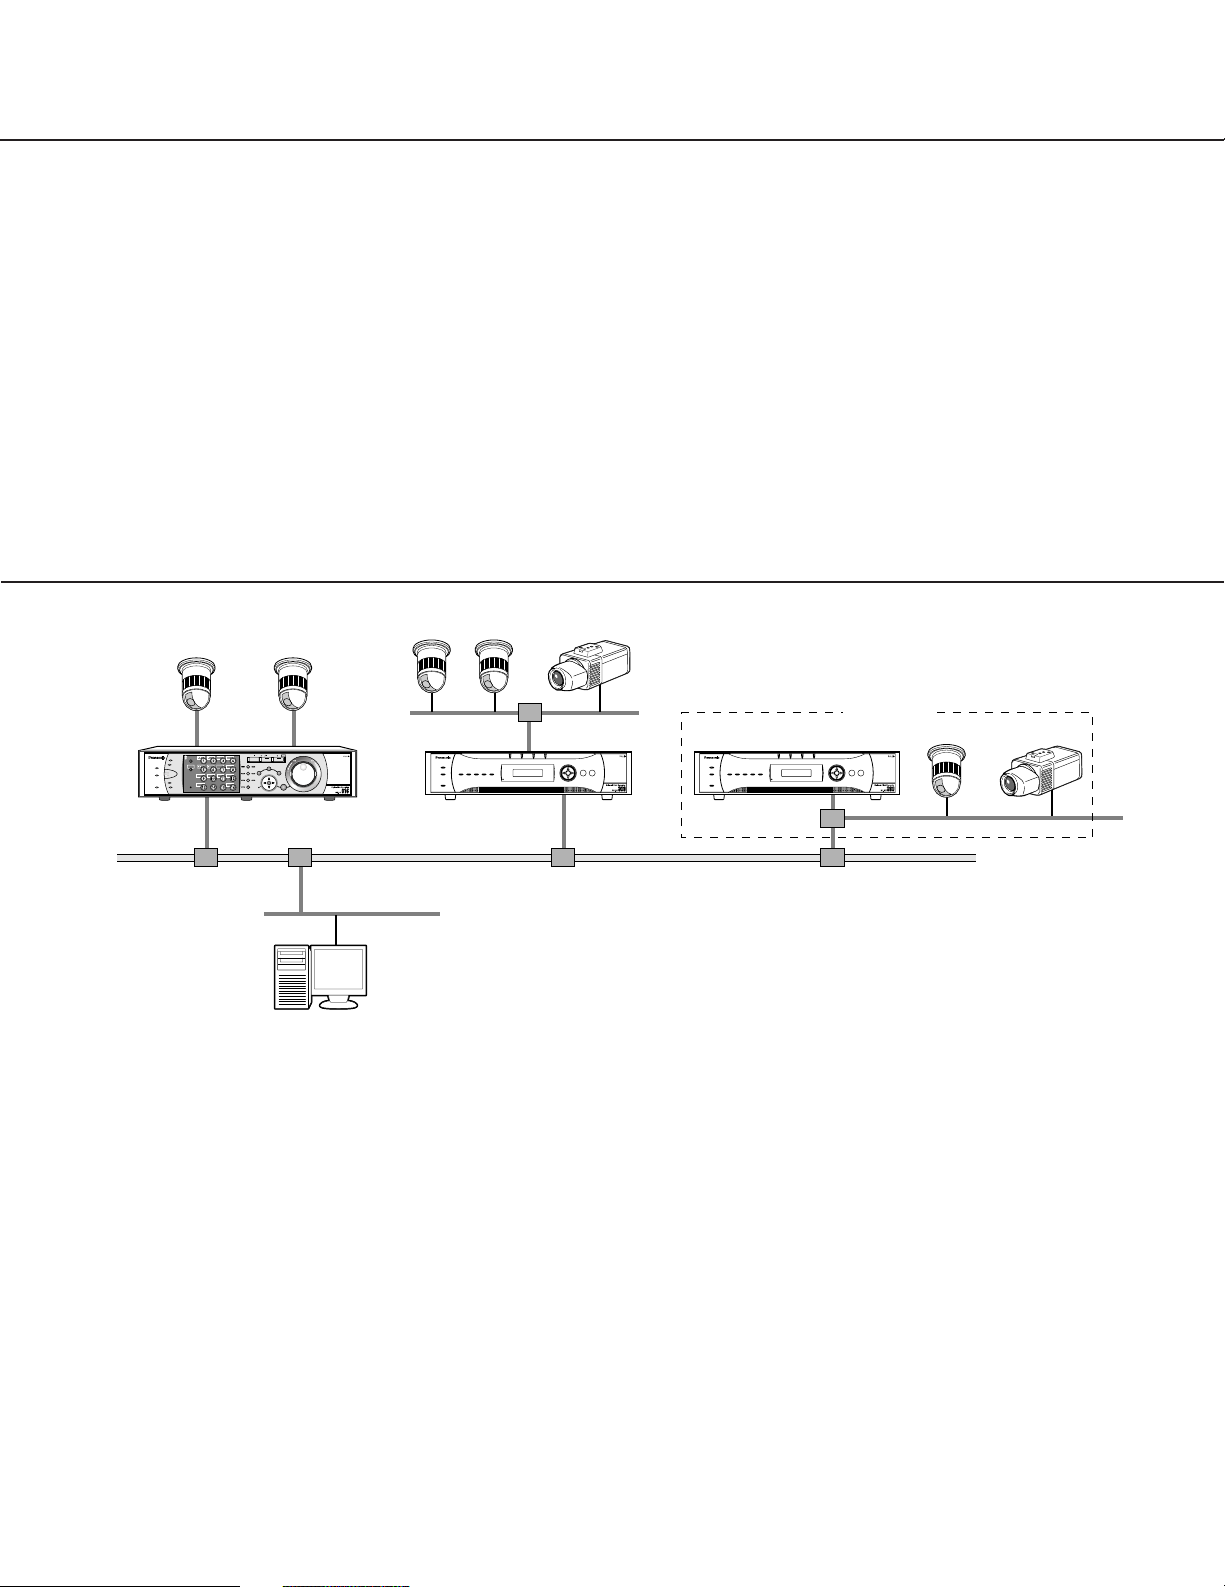
Preface
~
Network
System A
The PC Software Package WV-AS65 (hereinafter referred to as WV-AS65) is designed for integrated management
of up to 100 Panasonic WJ-ND300, WJ-ND200 network disk recorders and WJ-HD300 series digital disk recorders
(hereinafter referred to as recorders) connected to a network such as a LAN or the Internet, and runs on the
Microsoft®Windows®operating system.
By using this software on a personal computer (hereinafter PC) via a network, it is possible to display live images of
the cameras connected to the recorder, to play images stored on the recorder, and to download image files to the
hard disk drive of the PC. It is possible to search and play the downloaded images matching the specified conditions
such as recorded time, etc.
System Configuration
When the system is configured as "System A" in the illustration above, live
images can directly be monitored with this software. To monitor live
images, the followings are necessary:
• Register cameras in the recorder.
• Do not use two or more ports of the recorder.
• Select "MJPEG" for the live image transmission mode of the camera
when the camera in use is WV-NP472, WV-NS32x or WV-NW47x.
Refer to the operating instructions of the recorder for further information
about cameras can be connected to the recorder.
This software consists of the following 2 applications:
[Main application]: The main application runs in the following 2 modes.
<Network mode>
In this mode, it is possible to control a recorder remotely via a network.
Run this application in this mode to monitor live images from cameras connected to a
recorder or play the recorded images stored in a recorder.
<Local mode>
In this mode, it is possible to access downloaded recorded images saved onto the hard
disk drive of a PC.
Run this application in this mode to search and play downloaded recorded images.
3
Page 4

[Downloader]: This application downloads recorded images from a recorder.
This is the resident application (in the system tray). Once the PC is turned on, the downloader runs in the background of the PC.
It is possible to start the main application from the downloader.
The downloader will not close even though the main application is closed.
When using the schedule download function, activate the downloader.
When the downloader is closed, the main application will close automatically.
4
Page 5

Features
Image download
• Schedule download
Downloads images automatically according to the schedule set (start time and date of downloading, the recording time range of images to be downloaded) in advance.
• Manual download
Downloads the recorded images manually by designating the recording time range while playing the recorded
images stored in the recorder.
• Alarm download
Downloads the alarm images when an alarm occurrence is notified by the recorder.
Note:
It is impossible to download using an unregistered host PC when "ON" is selected for "Host Authentication" for
the recorder.
Remote control of the recorder
It is possible to operate the recorder via a network using this software. The available functions are displaying live
images, playback of recorded images, camera control, status indication, searching, etc.
Image file management
Downloaded images will be registered in the database. It is possible to play images, print images, save as a jpeg
image file, save as a motion image file and import motion images.
Alarm management
• Notification of an alarm occurrence
The alarm images will be displayed in the pop-up window to notify an alarm occurrence using the alarm notification function provided with the recorder.
• Alarm log management
The alarm log is created from the notification of an alarm occurrence and is managed. It is possible to play the
alarm images by clicking the status bar of the main application where the latest alarm log is displayed.
Note:
There are two selectable protocols for an alarm notification used by the recorder, Panasonic’s protocol (for WJND300 only) and FTP protocol. Refer to page 123 for descriptions of how to register the recorder. Refer to the
Operating Instructions of the recorder for descriptions of how to register the recorder.
Security
• It is possible to enhance security by using the user authentication function (requires entering a user name and
password). This software manages the administrator and the registered users. It is also possible to restrict operable functions by applying the user type to each user. In combination with the user authentication of this software
and the user level setting and the priority setting of the recorder, it is possible to have well-designed user management for remote operation.
5
Page 6

Note:
When using this software with the user authentication of "ON", select "ON" for the user authentication on the
recorder. When "OFF" is selected for the user authentication, all users accessing this recorder using this software will be regarded as administrators.
Refer to the Operating Instructions of the recorder about the settings of user authentication.
Local PC maintenance
• Management of the available disk space of a PC
It is possible to check the available disk space of the hard disk drive used to store downloaded images.
Downloading will not be performed when the available disk space is running out and there is no space to save
images.
• Deletion of image files recorded at a designating the time and date
It is possible to delete image files on the hard disk drive of a PC that were recorded at a designated time and
date.
• Deletion of image files by setting the file retention period
It is possible to delete recorded image files automatically when a preset number of days have passed from the
day the image was recorded.
• Operation log management
It is possible to create a log of user operations for later examination. It is possible to save the operation log in the
CSV format.
System specifications
• Up to 100 recorders can be registered.
• Up to 10 concurrent accesses for downloading are available.
• Up to 32 users can be registered.
• Displaying images from up to 16 cameras on a monitor is available.
• 5 user types are available.
• Displaying playback images of up to 4 files is available.
• Up to 400 schedules can be registered.
• Up to 10 000 file items can be displayed in the list.
• Up to 500 favorites can be registered.
• Up to 100 000 file items can be managed.
Notes:
• When 2 or more WV-AS65’s are used, up to 4 concurrent accesses (4 PCs) to a single recorder are available. (A
single recorder can accept up to 8 concurrent accesses by users, but the recorder counts a single access using
this software as 2 accesses.)
• When exceeding the maximum number of concurrent access due to an increase in the number of accesses using
web browsers or FTP accesses, connection to the recorder may be interrupted and a black screen may be displayed.
6
Page 7

About These Operating Instructions
HD300
This manual is composed of Preparations, Operations, Setup and References.
The descriptions in the following pages are based on the assumption that Windows®XP Professional runs on a PC.
Operation windows may not be the same as those appearing on the pages when a different OS is used or different
settings are applied.
Preparations (pages 15 - 24)
Contains descriptions of the required preparations to operate this software including descriptions of how to install
this software.
Operations (pages 25 - 121)
Contains descriptions of how to operate the applications.
Start with Principal Window Chart (page 25) to find out about operation windows first.
Start with Monitor Live Images (page 41) to find out about functions first.
Setup (pages 122 - 145)
Contains descriptions of how to perform the settings of the recorder, the user registration, the schedule recording
and the optional settings of the applications. Before running the applications, perform the required settings.
References (pages 146 - 155)
Contains descriptions such as how to solve problems and the messages displayed on a monitor.
System Requirements
It is recommended to install this software on a PC that meets the following system requirements.
OS Microsoft®Windows®2000 Professional SP4
Microsoft®Windows®XP Professional or Home Edition SP2
OS language Refer to page 2 of the Installation Guide
Computer IBM PC/AT Compatible
CPU Pentium®D 3.0 GHz or faster (Pentium®4 2.4 GHz minimum)
Memory 1 GB or more
Video memory 128 MB or more (64 MB minimum)
CD-ROM drive Necessary to install this software
Hard disk drive 80 MB of available disk space for installation*
Display 1024 x 768 pixels or more, 24-bit True color or better
(Full color environment recommended)
Network Interface 10/100/1000 Mbps Network interface card must be installed*
Web Browser Microsoft®Internet Explorer 6.0 SP1 or later
Other web browsers are not compatible with this unit.
*1 Update Microsoft Direct X to 9.0c or later. The latest Direct X can be downloaded from the web site of Microsoft
Corporation.
*2 It is necessary to prepare other disk space exclusively as storage for files downloaded from the recorder in addi-
tion to the required available disk space for installation.
*3 The network settings on the PC must meet those of the network environment where the PC is connected.
Important:
•
If a sound card is not installed on a PC in use, it is impossible to hear audio playback.
• This software must be installed or started by the administrator. Otherwise, any problems will not be covered by
the warranty.
• While running this software, the PC will not move to the system standby mode or the system hibernation mode.
• Run this software alone. Otherwise, the CPU overload and the shortage of resources will cause malfunction and
insufficient performance. Do not use other applications, especially heavy load types, while this software is running.
*1
2
3
7
Page 8

Camera Settings Relating to MPEG-4 Image
Set the "Max bit rate (per 1 client)" setting of the camera as below according to the setting of "Performance (Drawing
efficiency)". When the set value for "Max bit rate (per 1 client)" is larger than the values below, this software may not
work correctly. Refer to page 144 about the "Performance (Drawing efficiency)" setting.
Performance (Drawing efficiency)
High 1 024 kbps or less
Middle
Low
Max bit rate (per 1 client)
512 kbps or less
256 kbps or less
Trademarks and Registered Trademarks
• Microsoft®, Windows®and Windows®XP are registered trademarks of Microsoft Corporation in the U.S. and/or
other countries.
• Intel®and Pentium®are trademarks of Intel Corporation.
• Adobe®, Adobe logos, and Acrobat®are registered trademarks of Adobe Systems Incorporated in the U.S. and/
or other countries.
• Other names of companies and products contained in these operating instructions may be trademarks or registered trademarks of their respective owners.
Limitation of Liability
THIS PUBLICATION IS PROVIDED "AS IS" WITHOUT WARRANTY OF ANY KIND, EITHER EXPRESS OR
IMPLIED, INCLUDING BUT NOT LIMITED TO, THE IMPLIED WARRANTIES OF MERCHANTABILITY, FITNESS
FOR ANY PARTICULAR PURPOSE, OR NON-INFRINGEMENT OF THE THIRD PARTY’S RIGHT.
THIS PUBLICATION COULD INCLUDE TECHNICAL INACCURACIES OR TYPOGRAPHICAL ERRORS.
CHANGES ARE ADDED TO THE INFORMATION HEREIN, AT ANY TIME, FOR THE IMPROVEMENTS OF THIS
PUBLICATION AND/OR THE CORRESPONDING PRODUCT (S).
8
Page 9

Disclaimer of Warranty
IN NO EVENT SHALL MATSUSHITA ELECTRIC INDUSTRIAL CO., LTD. BE LIABLE TO ANY PARTY OR ANY
PERSON, EXCEPT FOR CERTAIN WARRANTY PROGRAM OFFERED BY THE LOCAL DEALER OF PANASONIC, FOR THE CASES INCLUDING BUT NOT LIMITED TO BELOW:
(1) ANY DAMAGE AND LOSS, INCLUDING WITHOUT LIMITATION, DIRECT OR INDIRECT, SPECIAL, CONSE-
QUENTIAL OR EXEMPLARY, ARISING OUT OF OR RELATING TO THE PRODUCT;
(2) PERSONAL INJURY OR ANY DAMAGE CAUSED BY INAPPROPRIATE USE OR NEGLIGENT OPERATION
OF THE USER;
(3) UNAUTHORIZED DISASSEMBLE, REPAIR OR MODIFICATION OF THE PRODUCT BY THE USER;
(4) ANY PROBLEM, CONSEQUENTIAL INCONVENIENCE, OR LOSS OR DAMAGE, ARISING OUT OF THE SYS-
TEM COMBINED BY THE DEVICES OF THIRD PARTY.
Standard Accessories
CD-ROM .................................................................. 1 pc.
Installation Guide ..................................................... 1 pc.
Label (with product key)........................................... 3 pcs.
Important:
• The provided CD-ROM contains the installer of this software, the operating instructions (these operating instructions) and the readme.txt. Prior to installation, read the readme.txt.
• Do not lose the label (containing the product key). It is essential when requesting support or trouble shooting.
Keep the label in a safe place. Attach the first one to the case of the CD-ROM. Attach the second one to the PC.
Keep the third one as a spare.
9
Page 10

HD300
HD300
ND300
Terms Used in These Operating Instructions
These are descriptions of the basic terms used in these operating instructions.
Terms
Recorder
Camera
Download
Schedule
Image file
Descriptions
Panasonic WJ-ND300, WJ-ND200 network disk recorders and WJ-HD300 series
digital disk recorders.
"WJ-HD300 Series" is the generic name of the models WJ-HD316/WJ-HD309 and
WJ-HD316A/WJ-HD309A. Also, "WJ-HD300 Series" will appear on the monitor
screen.
Indicates the camera connected to the recorder.
Transferring image files from the recorder to a PC. There are three ways to download recorded images.
Schedule download (download according to the schedule settings), manual download (download manually while monitoring playback images) and alarm download
(download alarm images when an alarm occurrence is notified) are available.
The set schedules to download image files from the recorder automatically. The
downloader will start downloading automatically by designating a download start
time and a recorded time range of image files to be downloaded.
Indicates the downloaded images recorded on the recorder. It is possible to play
them using this software.
Note:
An image file will contain images from multiple camera channels depending
on the channel selection for the schedule settings. Refer to page 136 for
further information.
Main application
Downloader
User
Event log
Event action
Recording event
Recording event list Indicates a list of recording events searched from the recorded images stored in
This is the core of the PC software package enabling the users to operate the system. Main application works in the network mode (operates the recorder via a network) and in the local mode (plays image files downloaded from the recorder). The
basic operation of this software can be performed using this application.
This is a resident application on a PC to download image files stored in the
recorder according to the programmed schedule and the user’s operation.
Operator of this software. A single user can be registered as the administrator. The
administrator can perform/manage the settings of this software.
Indicates the logs of the recording events detected by the recorder.
Indicates the actions that the recorder performs at an event occurrence. Refer to
the Operating Instructions of the recorder for further information.
Indicates the following events or operations that become the trigger for recording:
The following are types of recording events.
TERMINAL, CAM (site alarm) , VMD (video motion detection) ,
COMMAND, VIDEO LOSS , EMERGENCY, MANUAL, SCHEDULE.
the recorder. The recording event list contains the recording start time, the recording channel and the recording event type.
10
Page 11

ND300
Terms
HD300
ND300
ADMIN
ADMIN
Descriptions
Alarm notification with
Panasonic Alarm Protocol
FTP Send by Alarm
The WJ-ND300 or WJ-ND200 recorder sends a notification to the PC when an
alarm has occurred or an error has arisen.
The alarm information is added to the alarm log. The alarm images with a time
length preset by the Pre/Post time will be downloaded. (Alarm download) Error
information is added to the error log.
It is possible to update an alarm log by referring to information of the recorded
images transmitted to an FTP server directory on a PC. To do this, it is necessary
for IIS (Microsoft®Internet Information Services) to be running on the PC on which
this software is installed.
It is possible to run the FTP server of IIS on a PC whose OS is Windows®XP
Professional or Windows®2000 Professional. However, it is necessary to install
IIS additionally. Open "Control Panel", select "Add or Remove Programs", "Add/
Remove Windows Components", and finally add "Internet Information Services
(IIS)" on the "Windows Components Wizard".
When adding "Internet Information Services(IIS)", click the [Details…] button and
check the [File Transfer Protocol (FTP) Service] box.
After adding "Internet Information Services (IIS)", right click the icon of "My
Computer" and select "Manage" from the pop-up menu. Perform the settings of the
FTP server on the displayed window by selecting "Internet Information Services"
from "Services and Applications".
Refer to the operating instructions on the Windows operating system or "Help".
When using the Windows®XP Home Edition, install other FTP server software to
use this function.
Alarm log
Live image
SD memory recording/SD
memory data
Description of signs
: Represents the function that only an administrator (ADMIN user) can use. Refer to "User
Management" on page 23 for user management with this software.
: Represents the function or information applicable only to WJ-ND300 and WJ-ND200.
: Represents the function or information applicable only to WJ-HD300 series.
Log created by this software when a PC received alarm information from the
recorder. It is possible to directly access a corresponding image from this log.
Indicates live images from cameras connected to the recorder.
Function featured in some Panasonic’s cameras that saves images on the SD
memory card on the camera when communication with the camera failed in the
period set for the schedule recording of the unit. Images saved by the SD memory
recording are described as "SD memory data" on these operating instructions. The
recording time of SD memory data will be displayed based on the clock of the
camera.
: Represents information applicable only to MPEG-4 images.
11
Page 12

Restrictions when operating MPEG-4 images
There are following restrictions when MPEG-4 images are used with this software.
1. When displaying live images
q Black screen may be displayed for the first few seconds (*) when the following operations are performed while
displaying live images.
• When MPEG-4 live images are displayed (by switching camera channel, etc.)
• When MPEG-4 image is enlarged
w It may take several seconds (*) for refresh interval of MPEG-4 image depending on the configuration of the
option settings when displaying images on a multi-screen. Refer to page 141 for further information.
Example: When "3 seconds" is selected for the refresh interval on the camera, MPEG-4 image will be refreshed
in 3 seconds intervals.
e Even when the mouse pointer is moved onto the image display area (page 26), information supposed to be dis-
played as described on page 26 will not be displayed when displaying MPEG-4 live images.
2. When playing recorded images (Network mode)
q Displayed playback time may be fast for several seconds (*) when the following operations are performed while
playing recorded images.
• When MPEG-4 recorded images are played (by changing camera channels, etc.)
• When MPEG-4 image is enlarged
(When operating to enlarge a paused MPEG-4 recorded image, image of several seconds later than the
paused image may be enlarged.)
• When the [PLAY] button is clicked again while playing MPEG-4 image
w Playback may be performed in several seconds intervals (*) when the following operations are performed while
playing MPEG-4 image.
• REV PLAY
• FF/REW
• PREV IMAGE
Example: When "3 seconds" is selected for the refresh interval on the camera, MPEG-4 image will be played in 3
seconds intervals.
e When two records are played sequentially, the last few frames of the former record and the first few frames of the
next record may be displayed overlapped.
r When the [Skip] button or the [Skip reversely] button is clicked, a skipped point may be a few seconds later (*)
from a point to be skipped with the selected amount of time.
t Black screen may be displayed when the A-B repeat playback is performed.
When a black screen is displayed, the following operations will become inoperable.
• PLAY/REV PLAY
• FF/REW
• NEXT RECORD/REV RECORD
• Skip/Skip reversely
• NEXT IMAGE/PREV IMAGE
• PAUSE
12
Page 13

y When playing MPEG-4 image by designating time and date, playback may start from a point several seconds
after the designated time and date or from the first frame of the next record.
u Even when the mouse pointer is moved onto the image display area (page 26), information supposed to be dis-
played as described on page 26 will not be displayed when displaying MPEG-4 live images.
3. When playing recorded images (Local mode)
q Displayed playback time may be fast for several seconds (*) when the following operations are performed while
playing recorded images. It may also take several seconds to complete processing.
• When MPEG-4 recorded images are played (by changing camera channels, etc.)
• When MPEG-4 image is enlarged
(When operating to enlarge a paused MPEG-4 recorded image, image of several seconds later than the
paused image may be enlarged.)
• When the [PLAY] button is clicked again while playing MPEG-4 image
w Displayed playback time may not be refreshed for several seconds (*) even though the displayed image is
refreshed when the following operations are performed while playing MPEG-4 image.
• When the [PLAY] button is clicked after the time-line slider is moved while playing MPEG-4 images
• When starting playback MPEG-4 images newly
e Playback may be performed in several seconds intervals (*) when the following operations are performed while
playing MPEG-4 image.
• REV PLAY
• FF/REW
• PREV IMAGE
Example: When "3 seconds" is selected for the refresh interval on the camera, MPEG-4 image will be played in 3
seconds intervals.
r When two records are played sequentially, the last few frames of the former record and the first few frames of the
next record may be displayed overlapped.
t When playing MPEG-4 image by designating time and date (JUMP), an image of a point several seconds after
the designated time and date or the first frame of the next record will be displayed.
y When the "JUMP" window is displayed while playing MPEG-4, displayed image will be switched for a moment.
4. When copying images
Copying may start from a point several seconds later (*) than the designated start time when copying MPEG-4
images. To copy the desired images for sure, designate start time several seconds earlier than the time when the
desired images are recorded, and set time range for copying longer than the refresh interval set on the camera.
5. When downloading recorded images
Download of recorded images may start from a point several seconds earlier (*) than the designated start time. Set
time range for download longer than the refresh interval set on the camera.
13
Page 14

6. When using the Panasonic alarm protocol function
Duration of images to be downloaded when Panasonic alarm protocol is received may not be exactly same as the
duration set for "Duration-Pre" and "Duration-Post". Set "Duration-Pre" and "Duration-Post" longer than the refresh
interval set on the camera.
Important:
*: Time (seconds) and intervals differ depending on the refresh interval set on the camera (1 – 5 seconds). To
shorten time lag, set the refresh interval on the camera shorter. Refer to the operating instructions of the camera
for how to configure the refresh interval.
14
Page 15
Installation / Uninstallation
Install this software to a PC
The settings information previously configured for the
use of a WV-AS60 can be reused for a WV-AS65.
Important:
• Avoid installing both WV-AS60 and WV-AS65 on a
PC. The software on the PC will not work. First
uninstall the WV-AS60, then install the WV-AS65.
• When reinstallation is necessary, uninstall the
existing software before starting the reinstallation.
An overwrite installation may cause unstable operations.
Step 1
Insert the provided CD-ROM into the PC disk drive.
Step 2
Double-click "setup.exe" in the "Disk Recorder
Management Software" folder.
Step 3
Install the software by following the instructions on the
monitor.
When installing, entering of the "Product Key" will be
requested. Enter the 20-digit alphanumeric "Product
Key" indicated on the label attached to the provided
CD-ROM.
When installed with the ALL option, the executable
files (as65.exe, etc) will be copied on a newly created
folder "C:/Program Files/Panasonic/WV-AS65".
On completion of the installation, the as65.exe file will
be registered to the Start menu.
Installation procedures will be completed when no WVAS60 has been used or when settings information of
the WV-AS60 can be discarded.
Perform the following procedures when trying to apply
the settings information of the WV-AS60 to the WVAS65.
Step 4
Double-click "convert.exe" in the "Tool" folder.
The conversion tool will be launched and the two folders of the WV-AS60 and WV-AS65 will be selected.
[When not changing the destination folder as installing]
→ Go to step 5.
[When changing the destination folder as installing]
→ Go to step 1)
1) Click "Folder Select" button and select the folder
where the WV-AS65 is installed.
Step 5
Click the [START] button.*
"Completed" will be displayed when the conversion
has successfully ended.
Note:
Refer to the Error Code Reference Table below if
an error code is displayed.
Step 6
Click the [OK] button.
The conversion tool will be closed.
Error Code Reference Table
Error Code
Error (1) No [dat] file • Check whether there is any [dat] file in the folder selected
Error (2) Cannot save the converted
settings file.
Error (3)
Error (4)
A settings file already exists.
Conversion failed.
Description Solutions
in step 4.
• The installation folder for WV-AS65 is set to [Read Only].
Uncheck [Read Only].
• Available disk space is getting smaller. Check the available space.
• Another [dat] folder is contained in the installation folder
for WV-AS65.Delete the existing [dat] folder.
• Settings information cannot be converted for use of WVAS65. Perform settings manually.
15
Page 16

Uninstalling this software
Note:
The files downloaded from the recorder will not be
deleted.
Close the downloader before uninstalling. Refer to
"Exit the downloader" on page 113.
For Windows XP
For Windows 2000
Step 1
Open "Add or Remove Programs" in "Control Panel".
Step 2
Select "WV-AS65" (the program to be deleted) from
the presently installed programs and click the [Change/
Remove] button.
The uninstall program will be launched and the wizard
will be displayed.
Step 1
Open "Add or Remove Programs" in "Control Panel".
Step 2
Select "WV-AS65" (the program to be deleted) from
the presently installed programs and click the [Change/
Remove] button.
The uninstall program will be launched and the wizard
will be displayed.
Step 3
Uninstall the program by following the instructions on
the monitor.
Step 3
Uninstall the program by following the instructions on
the monitor.
16
Page 17
Connecting with the Recorder
Connect the recorder with PC and perform the network settings. Refer to the operating instructions of the recorder in
use.
Performing the network settings
With the following network environment, it is not necessary to perform network settings.
When connecting the PC with an WJ-ND300
IP Address: 192.168.1.2 - 192.168.1.249,
192.168.1.251 - 192.168.1.254
Subnet mask: 255.255.255.0
Gateway Address: 192.168.1.1
When the network settings are different from the settings above or when the WJ-ND300, WJ-HD300 and WJ-ND200
are in the same system, perform the network settings of the recorder and the PC.
When connecting the PC with an WJ-HD300 or WJND200
IP Address: 192.168.0.2 - 192.168.0.249,
192.168.0.251 - 192.168.0.254
Subnet mask: 255.255.255.0
Gateway Address: 192.168.0.1
Performing the network settings of the recorder
Perform the settings on the "SETUP MENU" of the recorder to conform to the network environment of the PC.
Refer to the Operating Instructions of the recorder for further information.
Performing the network settings of a PC
It is necessary to set the IP address of the PC to access the recorder as follows.
• To access the WJ-ND300: 192.168.1.xxx (a number from 2 to 254 except 1 and 250)
• To access the WJ-HD300 or the WJ-ND200: 192.168.0.xxx (a number from 2 to 254 except 1 and 250)
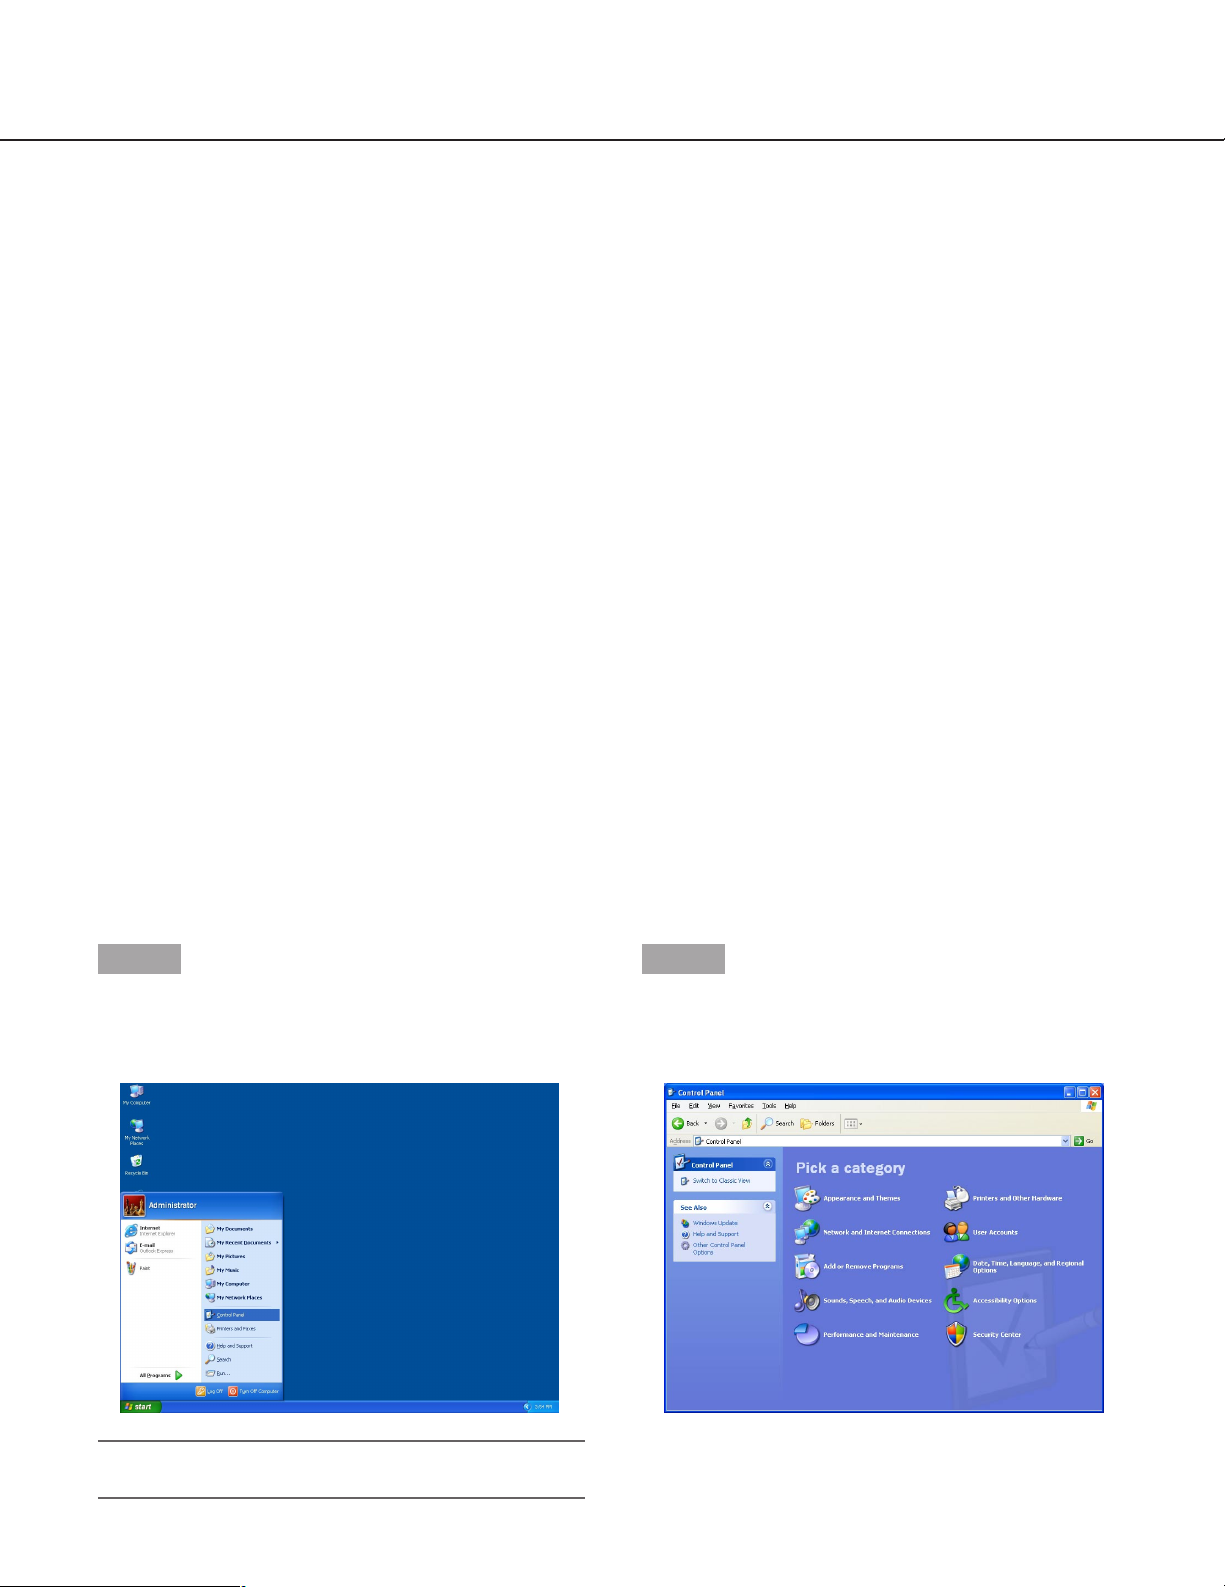
Start the following operations just after the PC is started up. The following procedures are to change the settings to
the default for the WJ-HD300 series.
Step 1
On the task bar, click "Start" and then click the "Control
Panel".
The control panel will be displayed.
Important:
Log in to the PC as an administrator.
Step 2
Click the "Network and Internet Connections" icon.
The "Network and Internet Connections" window will
be displayed.
17
Page 18
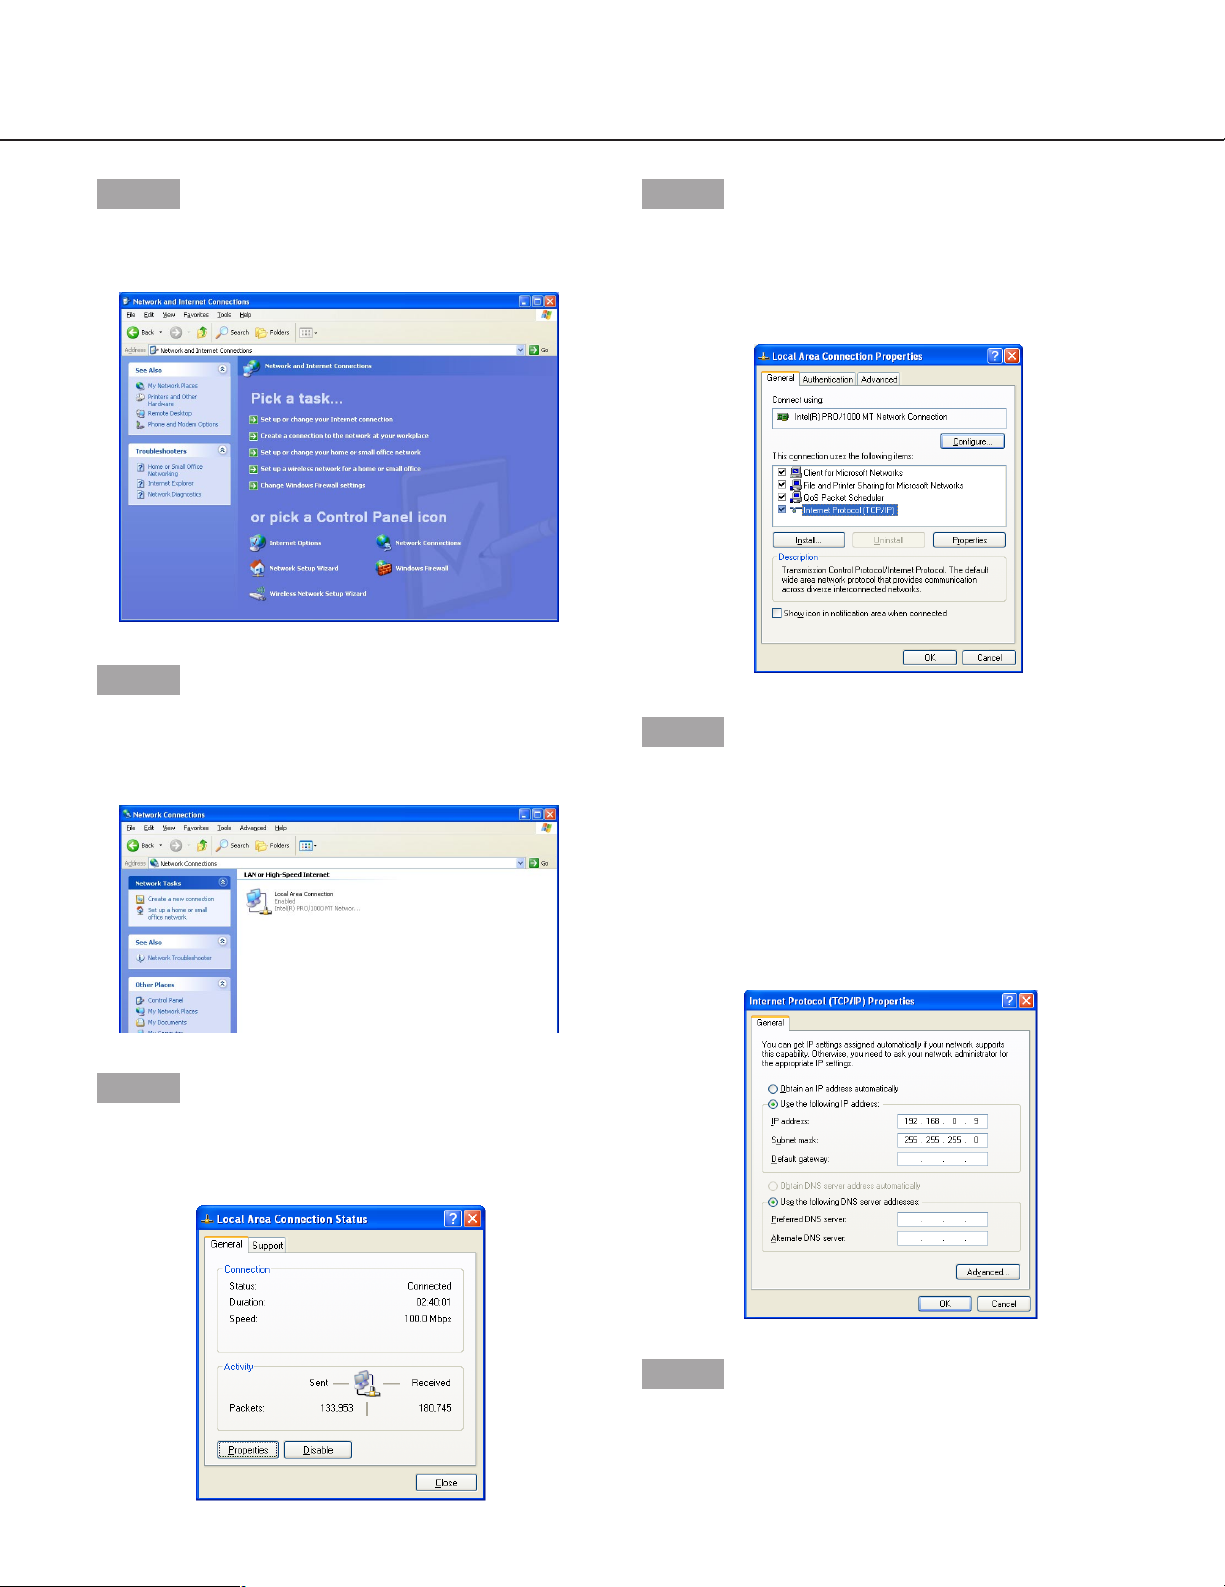
Step 3
Click "Network Connections".
The "Network Connections" window will be displayed.
Step 4
Double click "Local Area Connection".
The "Local Area Connection Status" window will be
displayed.
Step 6
Click "Internet Protocol (TCP/IP)"and then click the
[Properties] button.
The "Properties" window of "Internet Protocol
(TCP/IP)" will be displayed.
Step 7
Click "Use the following IP address" and enter the IP
address and the subnet mask as follows;
IP address: 192.168.0.9
Subnet mask: 255.255.255.0
Step 5
Click the [Properties] button.
The "Properties" window of "Local Area Connection"
will be displayed.
Default gateway may be requested to be set up
depending on the network environment. Refer to a system administrator for further information.
Step 8
Click the [OK] button.
The window will be closed.
18
Page 19

Registration of the recorder
It is necessary to register the recorder to play or download recorded images from the recorder. Refer to page
122 for descriptions of how to register the recorder.
Note:
It is necessary to perform the connection test to
complete the recorder registration. The connection
test checks whether the recorder is connected and
located in the registered IP address or the host
name. If the connection test fails, registration of the
recorder cannot be completed.
19
Page 20
Main Application
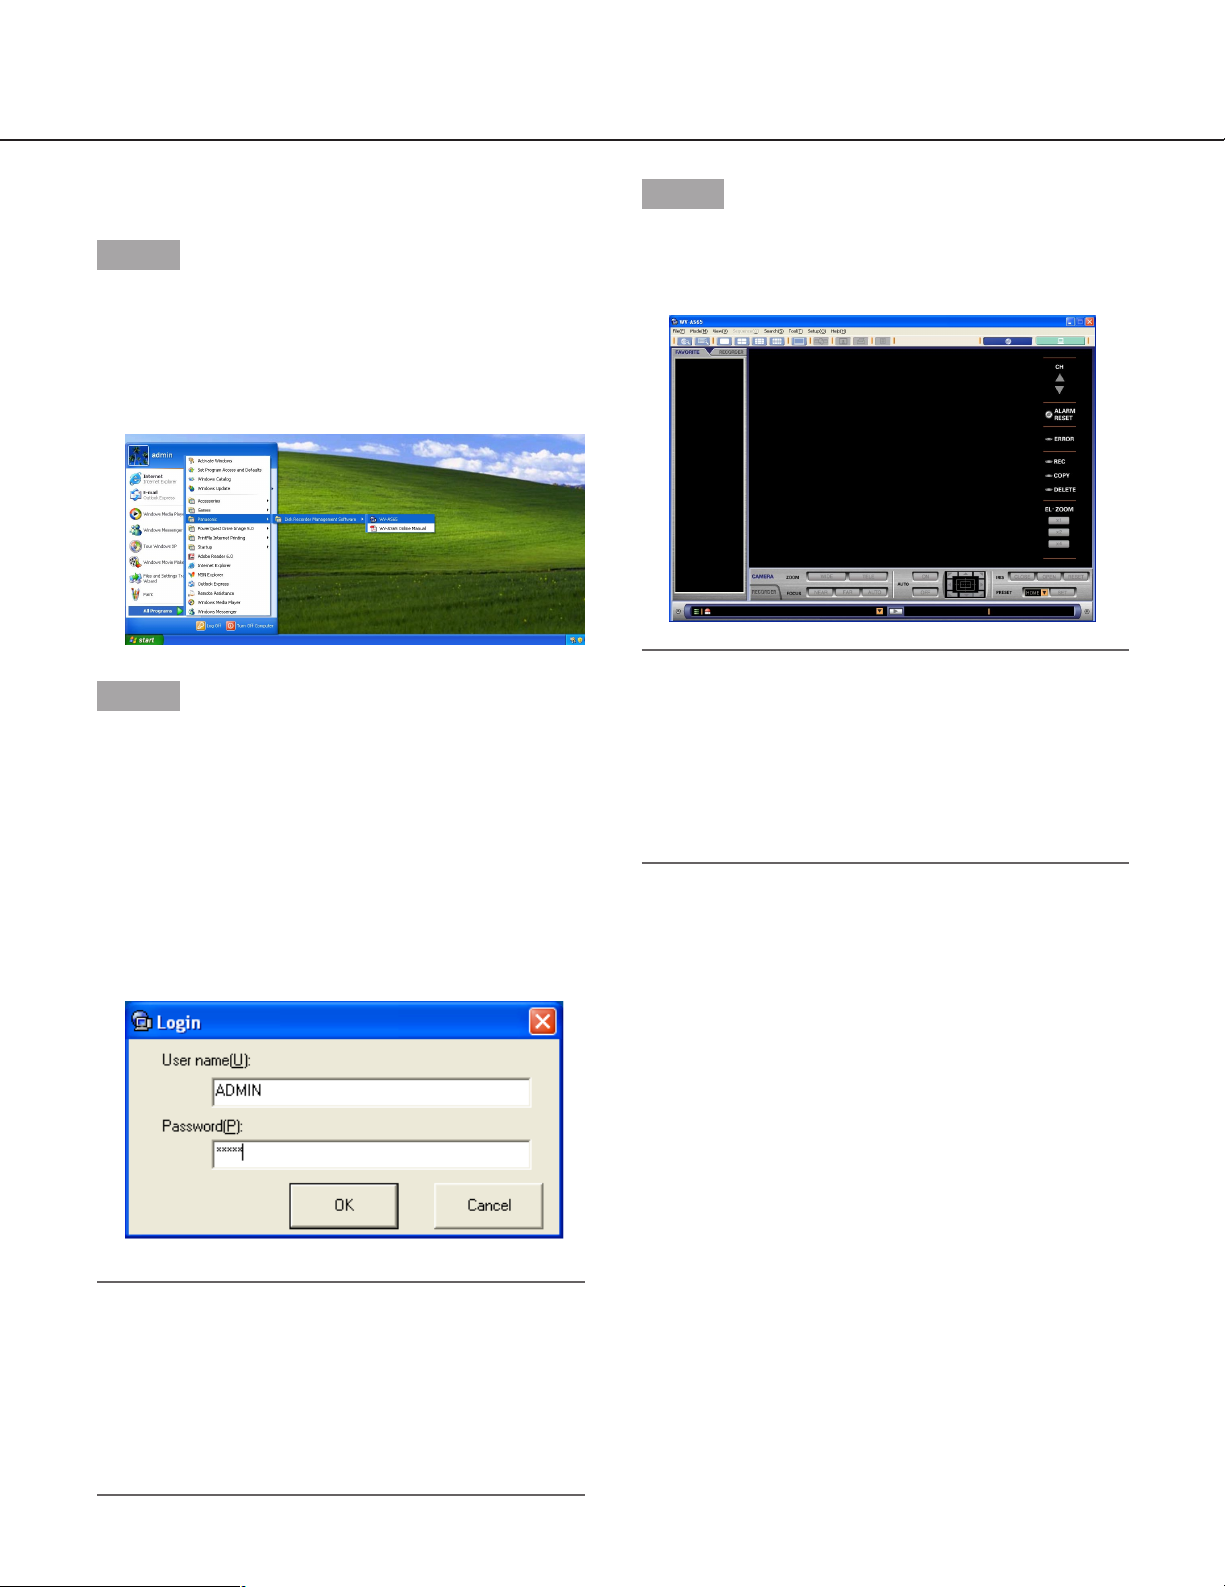
Start the main application (open the operation window)
Step 1
Select "WV-AS65" from the "Start" menu ("Start" - "All
Programs" - "Panasonic" - "Disk Recorder
Management Software" - "WV-AS65").
The login window will be displayed after the startup
splash image is displayed.
Step 2
Enter a user name and password.
When this software is installed, only the administrator
(ADMIN) is registered. When logging into the main
application just after the installation, enter "ADMIN" for
the user name and "12345" for the password.
To enhance the security, change the password for the
administrator before starting operation of the main
application. It is recommended to change the password for the administrator periodically. Refer to page
135 for descriptions of how to change the password.
Step 3
Click the [OK] button.
The operation window (in the network mode) will be
displayed.
Notes:
• When a combination of camera channels and a
multi-screen are registered as a favorite, the registered favorite will be displayed in the image display
area of the operation window.
• When "Local mode" is selected for default screen
of the optional settings (on the option window), the
local mode list window will be displayed.
The message window may be displayed when the [OK]
button is clicked. When the message window is displayed by clicking the [OK] button, refer to the page
150 and follow the descriptions.
20
Note:
Auto login, one of the options, enables the registered specific users to log into the system without
entering a password. The default setting of the user
authentication is ON. Changing the settings of the
user authentication is available on the option window. Refer to page 135 for descriptions of how to
perform the settings.
Page 21
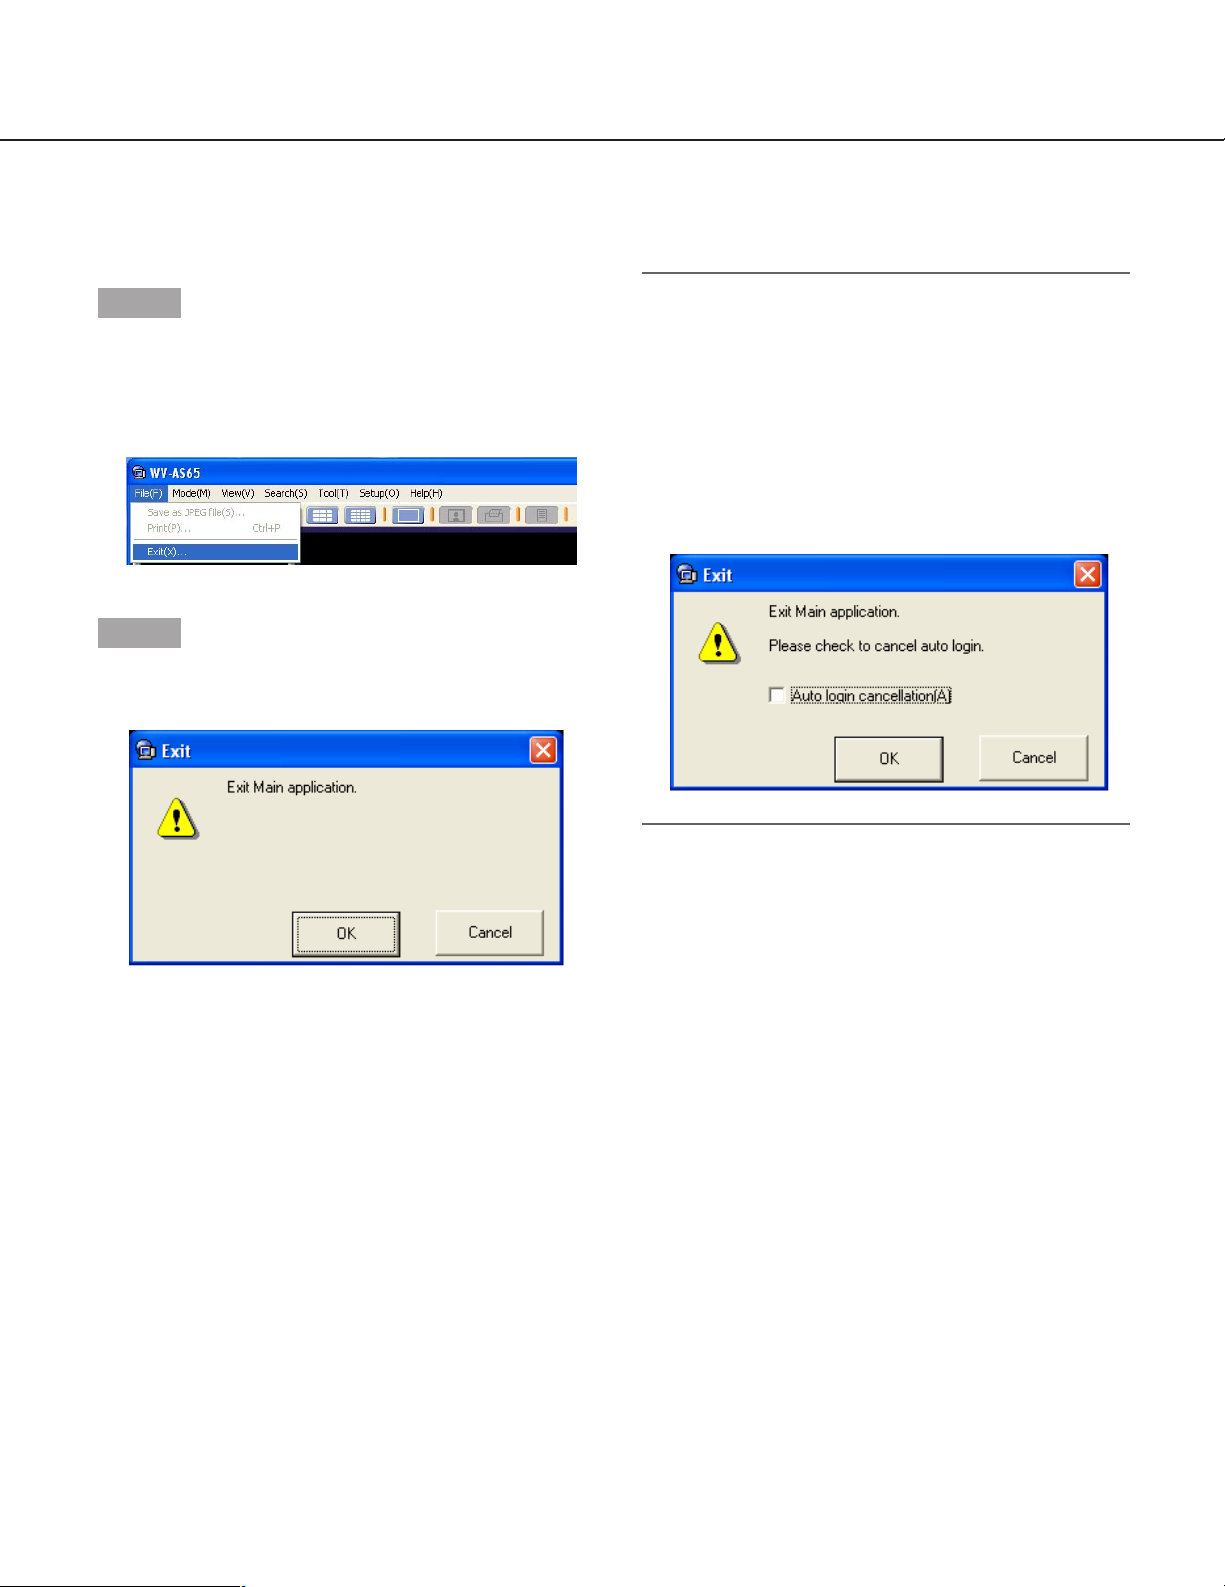
Exit the main application (close the operation window)
Step 1
Select "Exit(X)..." from "File(F)" on the menu bar or
close the operation window by clicking the [×] button at
the top right of the window.
The "Exit" window will be displayed.
Step 2
Click the [OK] button.
The operation window will be closed.
Notes:
• The downloader will not close even though the
main application is closed. Refer to page 113 for
descriptions of how to exit the downloader.
• When the auto login function is on, it is possible to
cancel the auto login function on the "Exit" window.
When canceling the auto login function, check the
box of "Auto login cancellation(A)" on the "Exit"
window and click the [OK] button. The login window
will be displayed when logging in the next time.
21
Page 22

The Network Mode and the Local Mode
ND300
HD300
HD300
The main application works in the network mode or the local mode.
Network mode
• It is possible to display live images from the cameras connected to the recorder or play the recorded images
stored in the recorder. Images of up to 16 channels can be simultaneously displayed (on a 16-split screen). It is
possible to switch to display images of 1/4/9/16 channels on a single/4-/9-/16-split screen respectively. It is possible to select the camera channels of a single recorder or multiple recorders.It is possible to operate the recorder
using functions such as starting/stopping manual recording, copying, etc.
• It is possible to register a "favorite (combinations of the camera channels and the areas of the multi-screen)" and
set it as the default screen. When "Local mode" is selected for "Default screen" of the optional settings (on the
option window), the local mode list window will be displayed.
• It is possible to search for images stored on the recorder. There are four ways of searching for images: using
recording event type, using time-and-date of video motion detection (VMD) , searching for marking
and searching for images saved on the SD memory card on the camera (SD memory data) . It is
possible to simultaneously search two or more recorders using the same conditions. (Only a single recorder can
be searched for VMD (page 56) and SD search (page 60).)
• It is possible to download a specific duration of recorded images while playing them by designating the start time
and the end time.
Local mode
• It is possible to play the recorded images downloaded from the recorder. Even though two or more channels are
selected for downloading, the recorded images of the selected channels will be saved as a single file.
• There are 2 methods to play the downloaded file: play a single file or play 4 files. When playing a single file, it is
possible to play the recorded images from multiple camera channels (selected in advance) on a 4-/9-/16-split
screens. When playing 4 files, only a single camera channel for each file can be played.
• It is possible to save a specific duration of a downloaded image as a file. It is possible to play the saved file using
the exclusive viewer software even on a PC on which the WV-AS65 is not installed. It is also possible to save the
recorded image as a still picture (JPEG).
How to switch the mode
Click the icons on the tool bar to switch the mode.
Click here to go to the network mode.
Click here to go to the local mode.
22
Page 23

User Management
ADMIN
ADMIN
Exclusive settings menus for the administrator
This software manages the administrator and the registered users. Only the administrator can perform the settings of
this software. When a registered user logs into this software, the menus for the settings of this software will not be
displayed.
The following operations are only available for the administrator:
• Browsing the system log (page 107)
• Browsing the operation log (page 109)
• Deletion of the downloaded images (page 104)
• Registration of recorders, editing or deletion of the registered recorder information (page 122)
• Registration of users, editing or deletion of the registered user information (page 131)
• Registration of schedules, editing or deletion of the registered schedule information (page 136)
• Optional settings (page 141)
Administrator
• At the default setting, a single administrator is registered so that all functions and setups can be operated.
• The default settings are as follows:
User name: ADMIN
Password: 12345
• To enhance the security, change the password for the administrator before starting operation of the main application. It is recommended to change the password for the administrator periodically. Refer to page 135 for descriptions of how to change the password.
• No administrator can be deleted or added.
• When the administrator of this software operates the recorder via a network after logging into this software, the
administrator can operate the recorder as the administrator of the recorder.
Note:
in this manual indicates that the function is available exclusively to the administrator.
User registration
• Up to 32 users can be registered
• No user is registered at the default settings(Register users according to your needs. (User Settings)
• It is possible to enable/disable operable functions to restrict users by applying the user type to them. Refer to
page 134 for further information about the possible operations and the user type window.
Important:
It is necessary to enter the user name and the password registered in this software when operating the recorder
via a network.
Therefore, the users registered in this software should also be registered in the recorder with the same user
name and password. When the user name or the password for this software is changed, it is also necessary to
change it for the recorder and vice versa. Otherwise, it is impossible to operate the recorder.
Note:
It is possible to perform the detailed user settings to restrict users via the user settings of this software and of the
recorder, such as setting operable cameras for users independently.
23
Page 24
<Example>
It is possible to perform the settings for a specific user as follows:
Recorder A: When registering the user, set all cameras as operable for this user.
Recorder B: When registering the user, set cameras 1, 2 and 3 as operable for this user.
Recorder C: Do not register any users.
PC: User1
Recorder A
HDD1 HDD2 HDD3 HDD4
All cameras are operable
PULL
Network Disk Recorder
WJ-ND
HDD 1
HDD 2
14
SHIFT
526
9
10/0
13 14 15 16
3
8
7
11 12
PULL
Digital Disk Recorder
WJ-HD
316
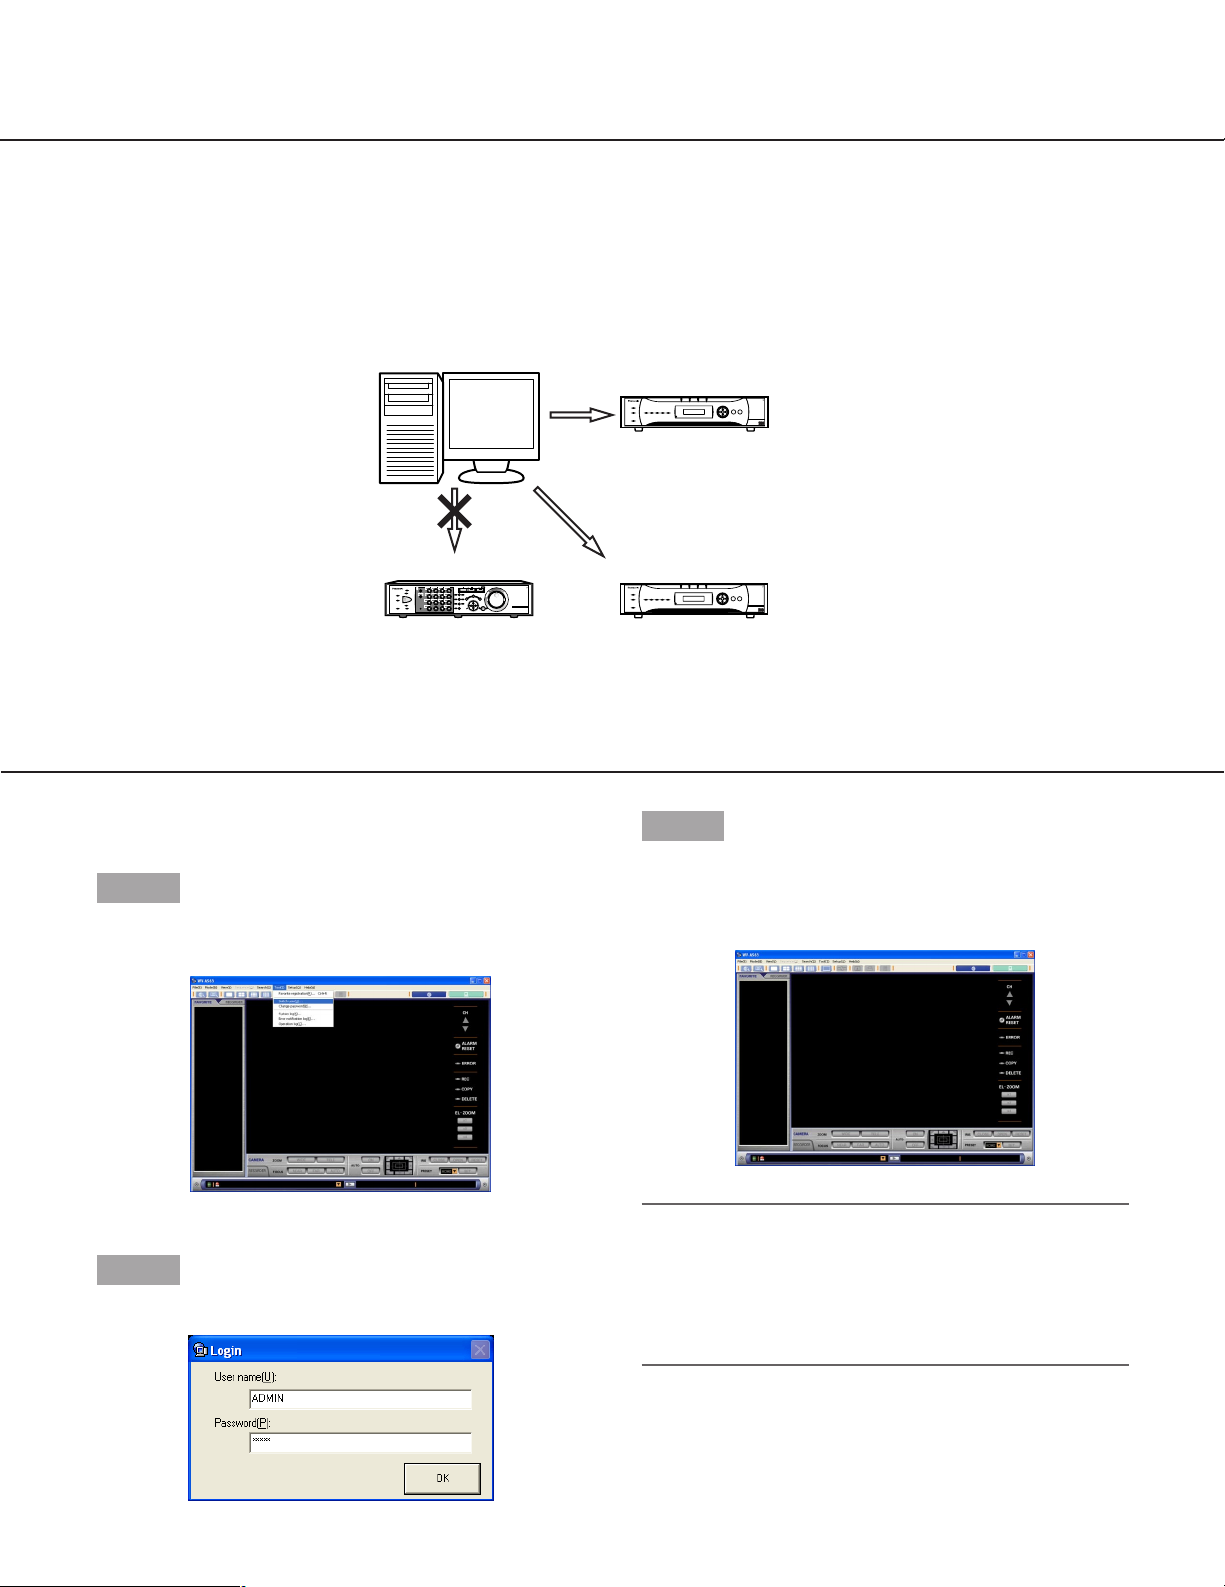
Switch user
It is possible to switch a user who is currently logging
in without exiting this software.
Step 1
Select "Switch user(U)…" from "Tool(T)…" on the
menu bar.
Recorder BRecorder C
HDD1 HDD2 HDD3 HDD4
PULL
Network Disk Recorder
WJ-ND
Only camera1, 2 and 3 are operableCannot log into the recorder
Step 3
Click the [OK] button.
The operation window in the network mode will be displayed.
The login window will be displayed.
Step 2
Enter the registered user name and the password.
24
Notes:
• When the logged in user had registered a favorite,
the registered favorite will be displayed.
• When "Local mode(L)" is selected for "Default
screen" on the general tab of the option window,
the list window in the local mode will be displayed.
When the message window is displayed after the [OK]
button is clicked, check the descriptions of "Displayed
Message and Solutions" on page 150.
Page 25
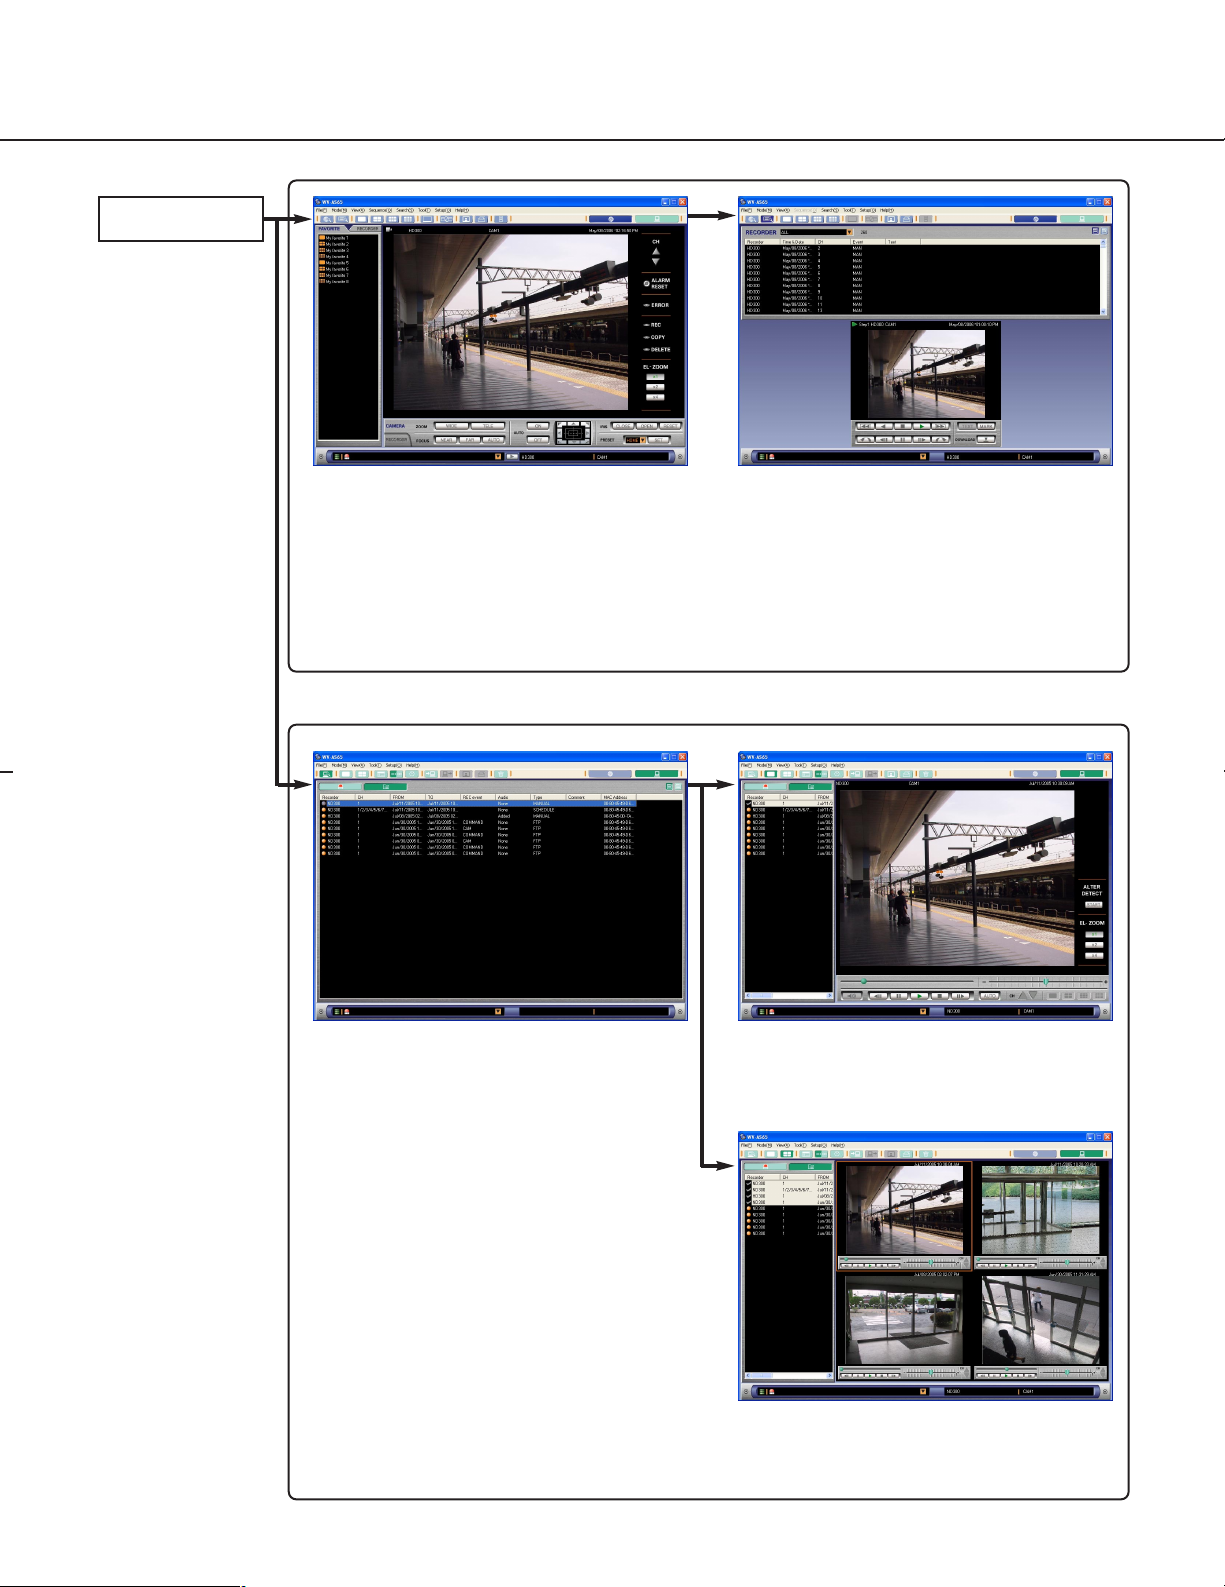
Principal Window Chart
Login
Network mode
Operation window (page 26) Search result list window (page 37)
When "Network mode(N)" is selected for
the default screen of the optional settings
(on the option window, page 141), this
window will be displayed after logging in.
Local mode
List display window (page 76)
When "Local mode(L)" is selected for the
default screen of the optional settings (on
the option window, page 141), this window will be displayed after logging in.
Playback window (displaying images
of a single file in the playback image
display area) (page 81)
Playback window (displaying images
of 4 files on the 4-split playback image
display area) (page 84)
25
Page 26
The Operation Window in the Network Mode
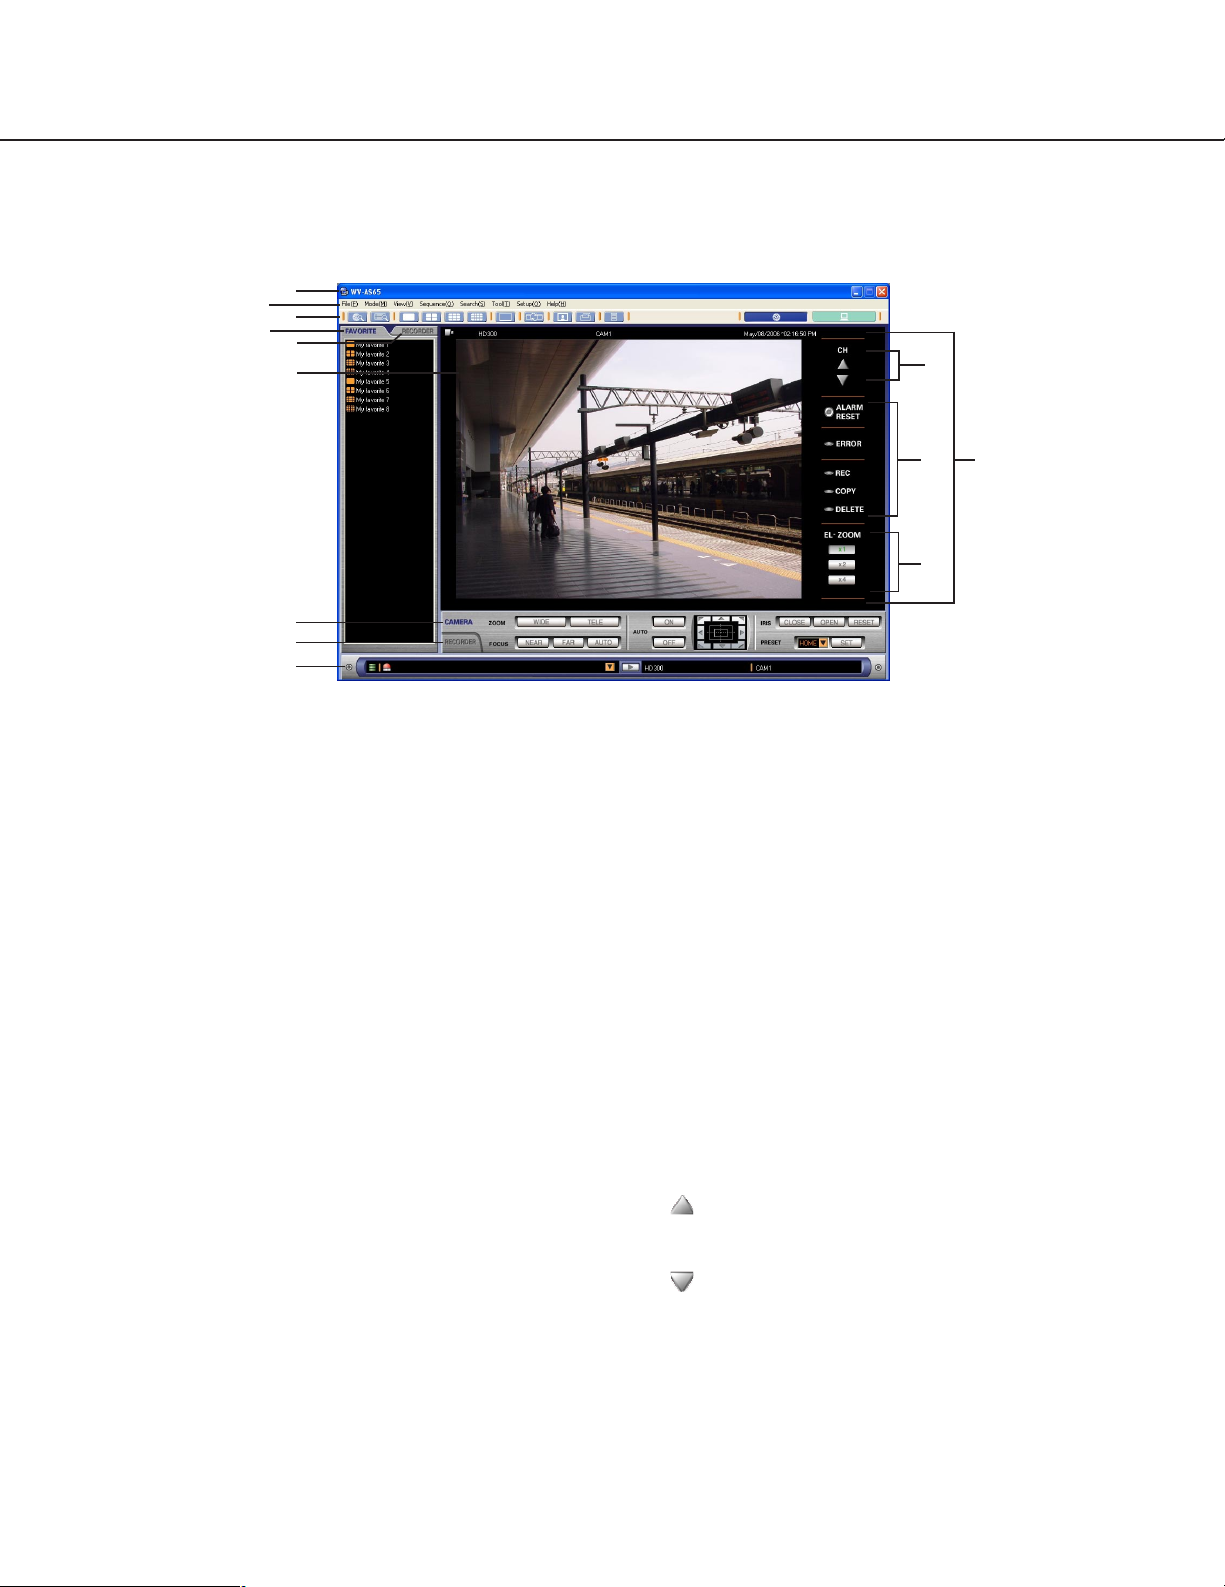
Operation window
q
w
e
r
t
y
!1
!2
!3
i
o
!0
u
q Title bar
The title of the main application will be displayed.
w Menu bar
The menu items will be displayed.
e Tool bar (Page 28)
The icons will be displayed.
r [FAVORITE] tab (Page 28)
A list of combinations of camera channels and
multi-screen types registered as favorites will be
displayed. It is possible to display images of a
desired favorite or change the names of favorites
on this tab.
t [RECORDER] tab (Page 29)
Recorders and cameras operable from this application via a network will be displayed. It is possible to
display live images by selecting a recorder or
change the registered information of recorders on
this tab.
y Image display area
It is possible to switch the pattern of the screen
(single or multi-screen (4-/9-/16-split screen)) to
display live or recorded images.
When the cursor sits on the displayed images, the
following information will be displayed in the pop-up
window.
• Recorder title
• Camera title
• Time and date
• Status of the displayed image
• Playback speed (only when playing back)
• Status of AB repeat playback (only when AB is
playing back repeatedly)
• Electronic zoom ratio (only when electronically
zooming)
• Start time/End time (only when designated)
u Information display area
Information of displayed images such as playback
speed, recorder title, camera title, the time and
date, the time range of downloading (the start point
and the end point) will be displayed in this area.
i Channel switch buttons
Previous channel button:
Click this button to display images of the previous channel.
Next channel button:
Click this button to display images of the next
channel.
o Recorder status display area (Page 31)
The indicators in this area will show the status of
the recorder (source of images currently displayed).
26
Page 27

!0 Electronic zoom operation area
It is possible to use the electronic zoom in this
area. Clicking a point in the zoomed image moves
the image by positioning the clicked point as the
center point.
[x1] button: Displays images in the original size.
[x2] button: Displays images in double size.
[x4] button: Displays images with four-fold size.
Note:
The electronic zoom operation area will be displayed only when displaying images on a single
screen.
!1 Camera control panel (Page 32)
Perform the camera operations such as zooming,
focusing, auto functions, etc. on this panel.
!2 Recorder control panel (Page 33)
Play the recorded images or control the recorder
on this panel.
!3 Status bar (Page 35)
The latest alarm status of the recorder or information of a disk designated as storage for downloaded images such as available disk space. The
name of the recorder currently selected or the camera also will be displayed on this bar.
27
Page 28
(1) Tool bar
q w
q [Search] button
Click this button to start searching the recorded
images on the recorder.
w [Search result list] button
Click this button to display the search result list.
e [SPOT] button
Click this button to display images on a single
screen in the image display area.
r [Quad screen] button
Click this button to split the image display area into
4 sections.
t [9 screen] button
Click this button to split the image display area into
9 sections.
y [16 Screen] button
Click this button to split the image display area into
16 sections.
e r t y u i o
!0
!1
u [Full screen display] button
Click this button to display images on a full screen.
i [Start sequential display] button
Click this button to start sequential display.
o [Save as JPEG file] button
Click this button to save the recorded images currently playing as a still image.
!0 [Print] button
Click this button to print an image of live images or
recorded images from the recorder.
!1 [Recorder log] button
Click this button to check the logs of the recorder.
!2 [Network mode] button
Click this button to run this application in the network mode.
!3 [Local mode] button
Click this button to run this application in the local
mode.
!2 !3
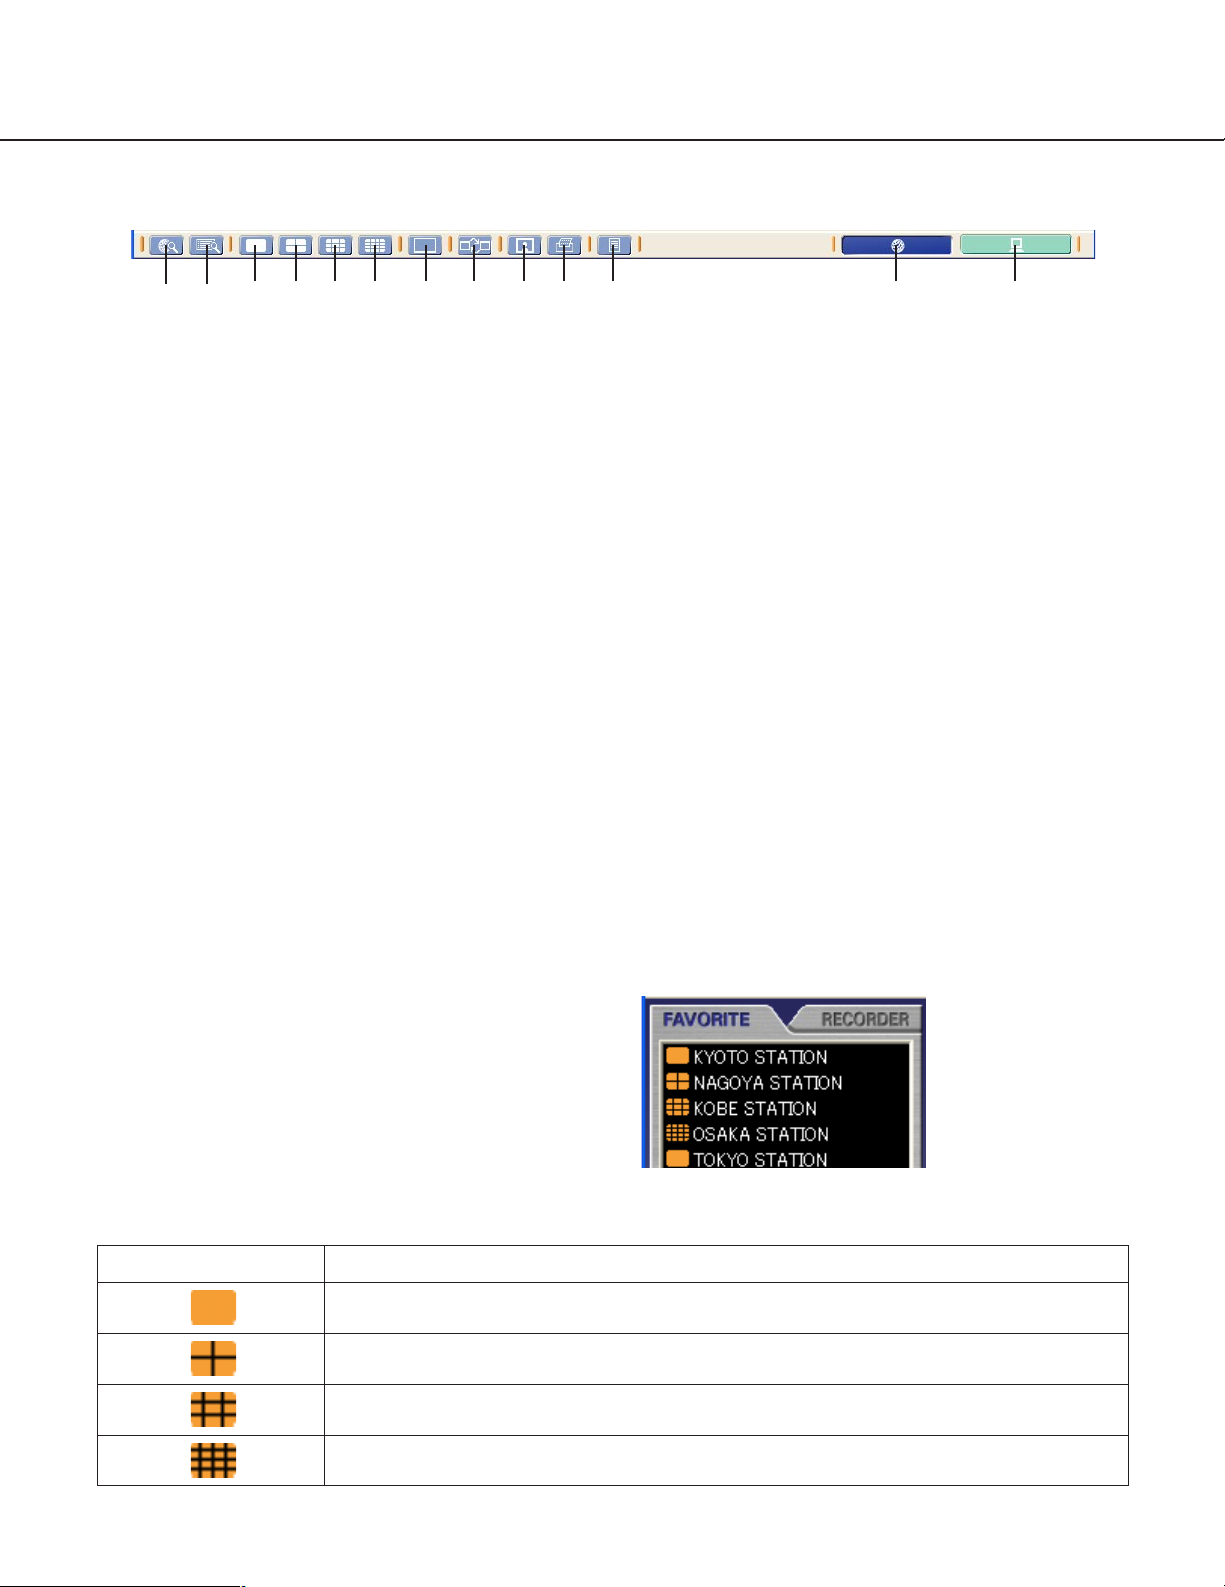
(2) [FAVORITE] tab
A list of the registered favorites (combinations of the
camera channels and the areas of the multi-screen)
will be displayed in list form when this tab is clicked.
An icon displayed next to the name of a favorite indicates the respective registered screen.
Icons Descriptions
Registered to display on a 1-split screen
Registered to display on a 4-split screen
Registered to display on a 9-split screen
Registered to display on a 16-split screen
28
Page 29
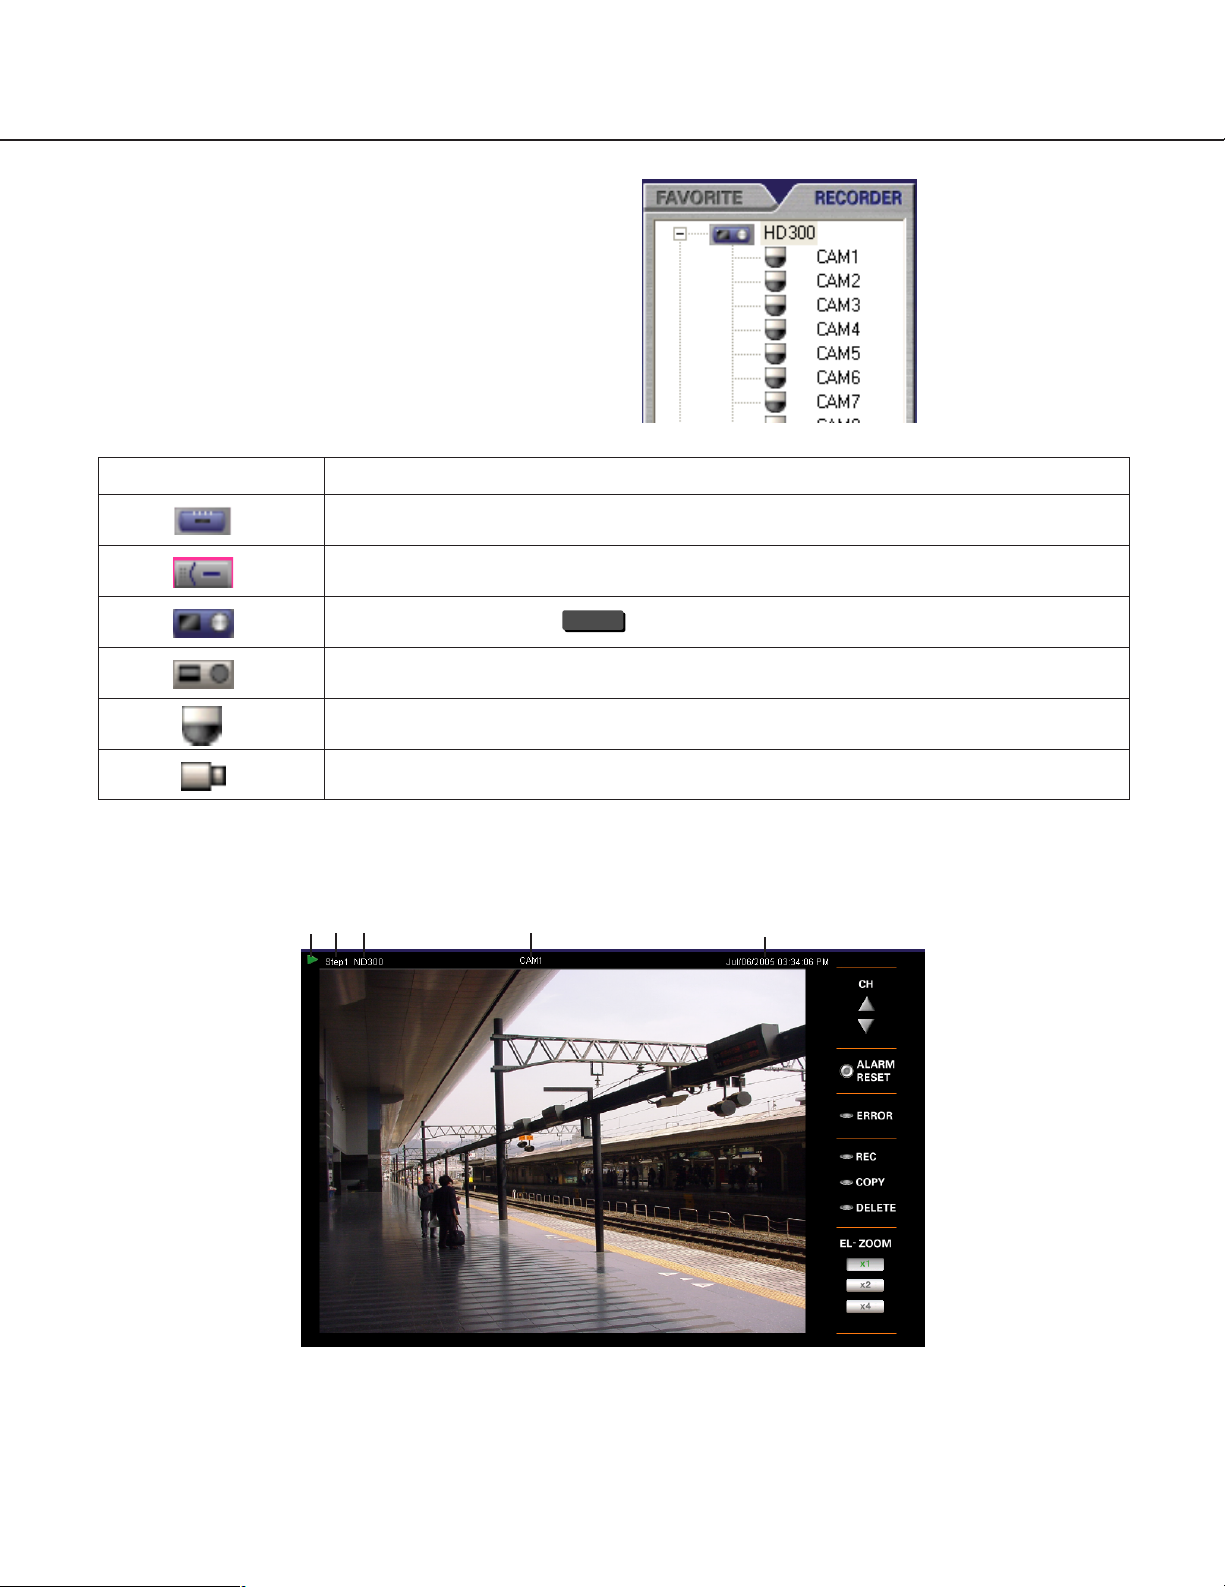
(3) [RECORDER] tab
HD300
Registered recorders and cameras will be displayed
when this tab is clicked.
Icons
Descriptions
Represents the recorder (WJ-ND300) that has been registered.
Represents the recorder (WJ-ND200) that has been registered.
Represents the recorder ( ) that has been registered.
Represents the recorder that has not been registered.
Represents the camera that can be panned and tilted.
Represents the immovable camera that cannot be panned or tilted.
(4) Information display area
w er
q
t
29
Page 30

q Status icons
Indicates that the status of the image currently displayed or the connection with the recorder.
Icons
Descriptions
Indicates that live images are being displayed
When failed to connect to the camera under the configuration that images from the camera are to be
received directly, a cause of failure will be displayed by moving the mouse pointer onto the operation
window (excluding the image display area).
<Connection failure: Camera connection failure>
The following may be possible.
• A wrong IP address of the camera is registered in the recorder.
• The network is down.
• Number of users who are currently accessing the camera is more than the possible access num-
ber.
<Connection failure: Port number duplication>
The port number used for multicast is also used for the other. Change the port number of the camera
for multicast not to be used for any other port.
<Connection failure: Camera authentication failure>
Failed to log in the camera. The user name and the password for the camera may be incorrectly registered in the recorder. Check the information of the camera registered in the recorder.
Indicates that recorded images are being displayed
A black screen may be displayed when the images of the selected camera cannot be seen due to the
settings (e.g. camera settings, etc) even though the icon indicates playback status. Live images will
be displayed for the channel with no recorded images even though the icon indicates playback status.
Indicates that the connection with the recorder has failed
It is possible to display the reason why the connection has failed by placing the cursor on this icon.
<Download failure: Time-out>
The network settings such as the IP address may be wrong or the connection may have been lost.
Check the settings of the recorder registration. (page 129)
<Download failure: Authentication failure>
Login to the recorder failed. When trying to log into the recorder as the administrator, check whether
the password for the administrator has been registered correctly when registering the recorder. (page
129) When trying to log into the recorder not as the administrator, check whether the user name and
the password have been registered on the recorder correctly.
* It is also possible that the recorder restarted after detecting a power outage, or the recorder is in the
process of SD memory data obtainment. In this case, display live images again by dragging and
dropping a recorder icon or a camera icon onto the image display area after the restart of the
recorder or the SD memory data obtainment is complete.
<Download failure: Maximum concurrent access>
Number of concurrent accessing users reached the maximum access number.
No icon Indicates that no images are being displayed (black screen).
30
Page 31

w Playback speed
Displays the playback speed (Step1 - Step7) during
playback.
e Recorder title
Displays the name of the recorder.
r Camera title
Displays the name of the camera.
t Time and date display
When displaying live images, the time and date of
the clock of the recorder or the camera will be displayed.
When displaying recorded images, the time and
date when the image was recorded will be displayed.
The time and date will be followed by an asterisk [*]
when daylight saving is applied.
Notes:
• When the information bar selection button is
clicked on a 4-split screen display, the information display area will alternately indicate the following information: "the recorder title and camera title", "the time-and-date and the time range
of downloading". When displaying images on a
9-/16-split screen, only the status icon will be
displayed.
• Only half of the camera title may be displayed
when too many characters have been input for
the recorder title and camera title. To confirm
the camera title, refer to the pop-up menu when
moving the cursor, or confirm the displayed
camera title on the status bar.
(5) Recorder status display area (Single/4-split screen)
Single
q [ALARM RESET] button
Lights when an alarm has occurred. It is possible to
reset the alarm status display by clicking this button.
w [ERROR] indicator
Lights when an error has occurred.
e [REC] indicator
Lights when recording images.
r [COPY] indicator
Lights when copying recorded images.
r
q
w
e
t
4-split screen
y
q
w
e
r
t
t [DELETE] indicator
Lights when deleting recorded images.
y [Information bar selection] button (only when
displaying a 4-split screen)
Click this button to change the information to be
displayed on the information display area.
When this button is clicked, the information display
area will alternately indicate the following information: "the recorder title and camera title", "the timeand-date and the time range of downloading".
31
Page 32

(6) Recorder status display area (9-split/16-split screen)
q
w
q Alarm indicator
Lights when an alarm has occurred. It is impossible
to reset the alarm status display when displaying
images on a 9-/16-split screen. Display images on
a single/4-split screen to reset the alarm status display.
(7) Camera control panel
q
w
q [ZOOM] box
Zooming can be adjusted by clicking the [WIDE]
button or the [TELE] button.
w [FOCUS] box
Focusing can be adjusted by clicking the [NEAR]
button or the [FAR] button.
The auto focus function can be performed by clicking the [AUTO] button.
w Recording indicator
Lights when recording images.
e r t
y
vertical/horizontal position (pan/tilt) of the displayed
image. Panning/tilting speed will be faster if a
clicked point gets farther from the center point of
the control pad.
t [IRIS] box
Iris can be adjusted by clicking the [CLOSE] button
or the [OPEN] button.
To reset the iris settings, click the [RESET] button.
e [AUTO] box
The auto function of the camera will start by clicking the [ON] button.
The auto function can be stopped by clicking the
[OFF] button.
r Control pad
Clicking the buttons around the control pad can
move (pan/tilt) a camera in the clicked direction.
Clicking inside the control pad also can adjust the
32
y [PRESET] box
Click the [SET] button after selecting a preset number by clicking the button. Registering preset positions is necessary to perform the preset function.
Note:
Refer to the operating instructions of the recorders
and cameras in use about preset settings.
Page 33

(8) Recorder control panel
w
e
Normally displayed
q
r
t
y
!3
!4
!8
!9
oiu
Displayed when the [REC] box (cover panel) is clicked
q [REW] button
Playback speed for the fast reverse playback will
be changed in the following order each time this
button is clicked: Step2 (approx. 4x) - Step3
(approx. 8x) - Step4 (approx. 16x) - Step5 (approx.
32x) - Step6 (approx. 48x) - Step7 (approx. 96x)
w [PREV RECORD] button
Skips to the previous recorded image and plays it.
e [REV PLAY] button
Reverse playback of a recorded image will be performed.
When using fast playback or fast reverse playback,
click this button to playback at normal speed.
Some frames of recorded images will not be displayed. Images will be played reversely with the set
refresh interval of the camera.
r [PLAY] button
Playback of a recorded image will be performed.
When using fast playback or fast reverse playback,
click this button to playback at normal speed.
!0
!1 !2
!6 !7 @0
!5
y [FF] button
Playback speed for the fast playback will be
changed in the following order each time this button is clicked: Step2 (approx. 4x) → Step3 (approx.
8x) → Step4 (approx. 16x) → Step5 (approx. 32x)
→ Step6 (approx. 48x) → Step7 (approx. 96x)
u [Skip reversely] button
Skips to a point a certain period of time earlier. It is
possible to select amount of time to skip. Rightclick on this button and select an amount of time to
skip from the pop-up menu.
A skipped point may be a few seconds earlier from
a point to be skipped with the selected amount of
time.
Notes:
• This button will become inoperable when the current point is the start point or the end point of a
record.
• This button may not work correctly if this button is
clicked around a point where is near a point to shift
to/from summertime.
@1
@2
@4
@3
@3
@5
t [NEXT RECORD] button
Skips to the next recorded image and plays it.
When there is no recorded image to skip to, the
current playback will continue.
i [PREV IMAGE] button
The previous frame will be displayed and then
paused when this button is clicked during pausing.
Some frames of recorded images will not be displayed. Frames will be played reversely with the
set refresh interval of the camera.
33
Page 34

o [PAUSE] button
ND300
ND300
HD300
The playback will be stopped when this button is
clicked during playback.
The playback will be resumed when this button is
clicked during pausing.
!0 [STOP] button
Stops playback and displays a live image.
!6 [MARK] button
Mark by clicking this button during playback.
• When marked, playback after searching for the
marked point is available.
• Up to 100 marked points can be registered.
When more than 100 markings are filed, the
older markings will be overwritten by the newer
markings.
!1 [NEXT IMAGE] button
The next frame will be displayed and then paused
when this button is clicked during pausing.
!2 [Skip] button
Skips to a point a certain period of time later. It is
possible to select amount of time to skip. Rightclick on this button and select an amount of time to
skip from the pop-up menu.
A skipped point may be a few seconds later from a
point to be skipped with the selected amount of
time.
Notes:
• This button will become inoperable when the current point is the start point or the end point of a
record.
• This button may not work correctly if this button is
clicked around a point where is near a point to shift
to/from summertime.
!3 [GO TO DATE] button
The search result window by date will be displayed.
Playback sometimes may start from a point that is
1 – 5 seconds before from the designated point.
!4 [GO TO LAST] button
Displays the latest recorded image by clicking this
button.
Note:
While displaying live images with the model WJHD309/HD316, do not click this button, or irregular
operations will occur.
!7 [COPY] button
Click this button to display the copy window.
Note:
This button will become unavailable when the
recorder in use is the WJ-ND200.
!8 [Start] button
The start point time will be displayed on the information bar when this button is clicked during playback.
!9 [End] button
The end point time will be displayed on the information bar when this button is clicked during playback.
@0 [DOWNLOAD] button
The image download window will be displayed
when this button is clicked during playback.
@1 [A-B REPEAT START] button
The playback will be performed repeatedly from the
designated start point (A) to the end point (B) when
this button is clicked. It is impossible to click this
button when the start time and the end time of the
time range of a desired recorded image to be
downloaded are not set. This button is available
when displaying a single screen or a 4-split screen.
Black screen will be displayed during the A – B
repeat playback.
Note:
This button will become unavailable when the
recorder in use is the WJ-ND200.
!5 [TEXT] button
The text information attached to images will be displayed and can be edited when this button is
clicked during pausing.
34
@2 [A-B REPEAT CANCEL] button
The playback repeat will be stopped when this button is clicked during AB playback.
Page 35

Note:
This button will become unavailable when the
recorder in use is the WJ-ND200.
The [REC] button and the [REC STOP] button will
be hidden by clicking the [REC] box when the
[REC] box (cover panel) is open.
@3 [REC] box (cover panel)
The [REC] button and the [REC STOP] button will
be shown by clicking the [REC] box when the
[REC] box (cover panel) is closed.
@4 [REC] button
Starts manual recording.
@5 [REC STOP] button
Stops manual recording.
(9) Status bar
q w
q Available disk space display Icons
Available disk space of a PC to save the downloaded images will be indicated with three levels.
Icons
Level 1
(normal)
Level 2
(warning)
Descriptions
Enough disk space
Available disk space is getting smaller. It is recommended to delete unwanted images or
move them to another hard disk.
e r
t
Level 3
(critical)
Access failed Accessing the hard disk failed. Confirm that the hard disk is operable.
w Alarm log update information display
Updated information on the latest 10 alarm
logs will be displayed by clicking the button.
The time and date of the selected alarm log, the
name of the recorder, the channel number and the
recording event will be displayed.
e Playback alarm image button (not available
when displaying the search results, or in the
local mode)
Click this button to play the images recorded when
the recording event selected from the alarm log
update list occurred.
Available disk space is running out. It is impossible to save the downloaded images. It is
necessary to delete unwanted images or move them to another hard disk.
r Recorder title display
The name of the recorder (source of the images
currently displayed) will be displayed.
When displaying images on a multi-screen, the
name of the recorder that is the source of the
images currently displayed in the selected area will
be displayed.
t Camera title display
The name of the camera (source of the images currently displayed) will be displayed.
When displaying images on a multi-screen, the
name of the camera that is the source of the
images currently displayed in the selected area will
be displayed.
35
Page 36

Exchange the allocated camera channels to the areas
When displaying images on a multi-split screen, it is possible to exchange the camera channel allocated to the display position with other camera channels. Drag and drop the desired image onto the desired area. The channel of
the dragged image and the channel allocated to the dragged area will be exchanged.
1234
5678
9101112
13 14 15 16
21
43
Note:
This operation exchanges only the allocation of the camera channels. The corresponding area numbers will not
be exchanged.
Drag and drop
14 on to 6
Drag and drop
1 on to 4
1234
5147 8
9101112
13 6 15 16
24
13
36
Page 37

Search result list window
ND300
q w
y
u
i
q [RECORDER] selection box
Select the desired recorder from this pull-down button. When "ALL" is selected, all the recorders can
be searched.
e r
t
t [Thumbnail view] button
Click this button to display the files or the alarm
logs with the thumbnails when displaying them in
list form. (page 38)
w Result number display area
The number of the search results will be displayed
in this area.
e Result list display area
A list of the search results will be displayed in this
area.
r [List view] button
Displays the search results in list form. (page 38)
Thumbnails will not be displayed.
y Playback information display area
The time and date when the image was recorded,
the name of the recorder and the camera will be
displayed in this area. Only half of the camera title
may be displayed when too many characters are
input for the recorder title and camera title. Confirm
the displayed camera title on the status bar.
u Playback image display area
Playback images will be displayed in this area.
i Playback control panel
Use the buttons on this panel to operate the
recorded images.
37
Page 38

<List View>
HD300
wq
q "Recorder"
The name of the recorder will be displayed.
w "Time & Date"*
The time and date when the image was recorded
will be displayed.
e "CH"
The camera channel will be displayed.
e
r t
<Thumbnail View>
r "Event"
The recording event will be displayed. Refer to
page 10 for further information about recording
events.
y "Text"
Indicates that the recorded images are with or without text information. When the text information is
attached, "Added" will be displayed.
q
w
q Thumbnail images
The first frame of the recorded image will be displayed.
The time and date will be followed by an asterisk [*] when daylight saving is applied.
*
It is not available with the following versions. Refer to the operating instructions of the recorder in use about version information.
WJ-HD316: Before V1.60
WJ-HD316A: Before V3.10
w Time & Date*
The time and date when the image was recorded
will be displayed.
38
Page 39

Playback control panel
q w
uy i o !0 !3
q [REW] button
Playback speed for the fast reverse playback will
be changed in the following order each time this
button is clicked: Step2 (approx. 4x) - Step3
(approx. 8x) - Step4 (approx. 16x) - Step5 (approx.
32x) - Step6 (approx. 48x) - Step7 (approx. 96x)
w [REV PLAY] button
Reverse playback of a recorded image will be performed.
When using fast playback or fast reverse playback,
click this button to playback at normal speed.
Some frames of recorded images will not be displayed. Frames will be played reversely with the
set refresh interval of the camera.
e [STOP] button
Stops playback and displays a live image. A black
screen will be displayed.
r [PLAY] button
Playback of a recorded image will be performed.
When using fast playback or fast reverse playback,
click this button to play back at normal speed.
e
r
y [Skip reversely] button
u [PREV IMAGE] button
t !1 !2
Skips to a point a certain period of time earlier. It is
possible to select amount of time to skip. Rightclick on this button and select an amount of time to
skip from the pop-up menu.
A skipped point may be a few seconds earlier from
a point to be skipped with the selected amount of
time.
Notes:
• This button will become inoperable when the current point is the start point or the end point of a
record.
• This button may not work correctly if this button is
clicked around a point where is near a point to shift
to/from summertime.
The previous frame will be displayed and then
paused when this button is clicked during pausing.
Some frames of recorded images will not be displayed. Frames will be played reversely with the
set refresh interval of the camera.
t [FF] button
Playback speed for the fast playback will be
changed in the following order each time this button is clicked: Step2 (approx. 4x) → Step3 (approx.
8x) → Step4 (approx. 16x) → Step5 (approx. 32x)
→ Step6 (approx. 48x) → Step7 (approx. 96x)
i [PAUSE] button
The playback will be stopped when this button is
clicked during playback.
The playback will be resumed when this button is
clicked during pausing.
o [NEXT IMAGE] button
The next frame will be displayed and then paused
when this button is clicked during pausing.
39
Page 40

!0 [Skip] button
HD300
Skips to a point a certain period of time later. It is
possible to select amount of time to skip. Rightclick on this button and select an amount of time to
skip from the pop-up menu.
A skipped point may be a few seconds later from a
point to be skipped with the selected amount of
time.
Notes:
• This button will become inoperable when the current point is the start point or the end point of a
record.
• This button may not work correctly if this button is
clicked around a point where is near a point to shift
to/from summertime.
!1 [TEXT] button
The text information attached to images will be displayed and can be edited when this button is
clicked during pausing.
!2 [MARK] button
Mark by clicking this button during playback.
When marked, playback after searching for the
marked point is available.
Up to 100 marked points can be registered. When
more than 100 markings are filed, the older markings will be overwritten by the newer markings.
!3 [Download] button
Click this button to display the download image file
window.
40
Page 41

Monitor Live Images
It is possible to monitor live images at the same time from up to 16 cameras connected to the selected recorder. It is
also possible to monitor live images only from a single recorder, or from multiple recorders.
Important:
When "Camera" is selected for "Live image reception" (page 127), take note of the following:
• Time and date will not be displayed.
• Even when "OFF" is selected for "LIVE VIDEO" on the recorder, live images can be monitored.
• To monitor live images in MPEG-4 format, it is necessary to select "ON" for the MPEG-4 image transmission
setting of the camera.
• When "ON" is selected for the user authentication setting of the camera, it is necessary to set the user password of the camera. When no password is set, it is impossible to monitor live images.
• When the camera and a PC on which this software is installed are connected through a proxy server, live
images cannot be monitored.
•
When trying to simultaneously monitor images from the cameras assigned the same IP address and whose
transmission type is "Multicast", images will be displayed in a single area of the multi-screen.
• The following recorder and cameras will work correctly when selected as a "Camera" for "Live image reception":
WJ-ND300: Ver. 3.00 or later WJ-ND200: Ver. 1.00 or later WV-NS32x: Ver. 2.20 or later
WV-NP24x: Ver. 1.20 or later WV-NP472: Ver. 2.20 or later WV-NW47x: Ver. 2.20 or later
WV-NP100x: Ver. 1.20 or later WV-NS202: Ver. 1.00 or later
Display images from the cameras connected to the recorder
Step 1
Click the [RECORDER] tab on the operation window in
the network mode.
The recorder and the connected cameras will be displayed in the tree view. Unregistered recorders will not
be displayed. Refer to page 122 for descriptions of
how to register the recorder.
Note:
The icon indicates that the recorder cleared the
connection test (the registration is completed). In
the tree view, all the cameras connected to the
recorder will be displayed below the recorder with
this icon.
,,
The recorder is registered.
In the tree view, unregistered recorders will be displayed with the icon and no camera icon will be displayed. When the recorder is displayed with this
icon, carry out the connection test on the recorder
registration window.
Refer to page 129 for the descriptions of how to
register the recorder.
The recorder is unregistered.
41
Page 42

Step 2
ND300
ND300
Drag and drop the icon of the recorder to which the
desired cameras are connected onto the image display
area of the operation window.
The image display area will be split into 9 or 16 sections according to the number of the connected cameras and live images from the connected cameras will
be displayed.
d
Notes:
• It is impossible to drag and drop the icon of an
unregistered recorder. Complete the registration.
• It is possible to display live images by pressing the
Enter key on the keyboard after selecting (by clicking) the icon of the recorder.
•
When displaying images from a channel of which
the "Model number" setting is "--", black screen will
be displayed (channel not assigned yet).
Images from 1 - 16 channels will be displayed on a 16split screen. Click the [16 Screen] button on the Tool
bar to display images from 17 - 32 channels. When the
recorder in use is the WJ-ND200, images only from 116 channels will be displayed.
42
Page 43

Monitor live images from the selected camera
It is possible to monitor live images from all cameras connected to the selected recorder. It is also possible to monitor live images only from the selected cameras, or from multiple recorders.
Display images from the camera on a
single screen
Step 1
Double click the icon of the desired camera.
Live images from the selected camera will be displayed on a single screen in the image display window.
Display images from the desired camera
channel in the desired area on a multiscreen
Display images from the camera on a
full screen
Step 1
Displays the images from the recorder.
Refer to "Monitor Live Images" on page 41 or "Play
Recorded Images on the Recorder" on page 52 for
descriptions of how to display images.
Step 2
Select "Full screen display(F)" from "View(V)" on the
menu bar or click the [Full screen display] button on
the tool bar.
Images will be displayed on a full screen only with the
status bar in view.
Step 1
Drag and drop the icon of the desired camera onto the
desired area on a multi-screen.
Live images from the selected camera will be displayed in the selected area on a multi-screen.
d
43
Page 44

Step 3
It is possible to return to the normal screen by selecting "Exit from the full screen display" from the pop-up
menu after right-clicking.
Display the images from the camera channels registered as a
favorite
Step 1
Click the [FAVORITE] tab on the operation window in
the network mode.
A list of the registered favorites will be displayed.
Refer to page 28 for further information about the displayed icons.
Note:
Refer to page 49 for further information for descriptions of how to register favorites.
Step 2
Drag and drop the desired icon onto the image display
area.
The registered favorite (combination of the camera
channels and the multi-screen) will be displayed in the
image display area.
d
44
Note:
It is also possible to display a favorite by selecting
a desired favorite with the cursor and pressing the
enter key on the keyboard.
Page 45

Displaying images from the camera channels registered as
favorites with automatically switching the camera channels
sequentially (sequential display)
It is possible to display images from the camera channels registered as favorites with a predetermined interval.
Switching interval (dwell time) can be changed as described below.
Notes:
• It is necessary to register favorites (page 49) to use this function.
• The default switching interval (dwell time) is "3 s".
• Switching interval (dwell time) may become longer when load to be processed for the recorder or the PC is get-
ting higher (such when many cameras are connected or when live/recorded images are displayed on multiple
windows).
• When network traffic is too heavy, images may not be displayed.
•
When using this function, set the refresh interval of the camera to "1 s"
• When using this function, it is recommended to use with less than 10 recorders.
Set the switching interval (dwell time)
Step 1
Select "Sequence(Q)" on the menu bar and select a
switching interval from the "Dwell time(D)" submenu.
Note:
"Dwell time" is the switching interval between the
moment when finished to display images of the current favorite and the moment when starting to display images of the next favorite.
Start sequential display
Step 1
Click the "Start sequential display" icon on the tool bar,
or select "SPOT(1)" or "Quad screen(2)" from the
"Dwell time(D)" submenu under "Sequence(Q)" on the
menu bar.
Images with the status bar will be displayed on full
screen, and sequential display will start.
Notes:
• When the "Start sequential display" icon on the tool
bar is right-clicked, the pop-up menu will be displayed. Select "SPOT(1)" or "Quad screen(2)" to be
displayed for sequential display.
• "SPOT" and "Quad screen" are available for
sequential display.
Step 2
When "Exit from the full screen display" is selected
from the pop-up menu displayed by right-click, sequential display will stop and the operation window will
return to the previously displayed size.
45
Page 46

Switch the Pattern of the Screen
Changing the number of display split
It is possible to switch the pattern of the screen (single or multi-screen (4-/9-/16-split screen)) to display live or
recorded images. There are two ways to switch the pattern of the screen, using the menu and using the tool bar.
Using the menu
Step 1
Select "View(V)" on the menu bar and select a desired
number from the "Number of area(N)" submenu.
The images will be displayed on the selected screen
pattern.
Using the tool bar
Step 1
Click the desired icon from [SPOT], [Quad Screen], [9
Screen] and [16 Screen] on the tool bar.
The images will be displayed on the selected screen
pattern. Images on a newly selected screen pattern will
include the channel that was selected when the
desired icon of the screen pattern was selected.
Note:
Each time the icon on the toolbar is clicked, the screen pattern will change as follows:
[SPOT] button
[Quad Screen] button
[9 Screen] button
[16 Screen] button
46
Area1 → Area2 → Area3 - - - - Area31 → Area32 → Area1 → …
4A (Area 1 - 4) → 4B (Area 5 - 8) → 4C (Area 9 - 12) → 4D (Area 13 - 16) →
4E (Area 17 - 20) → 4F (Area 21 -24) → 4G (Area 25 - 28) → 4H (Area 29 - 32) →
4A (Area 1 - 4) → …
9A (Area 1 - 9) → 9B (Area 8 - 16) → 9C (Area 17 - 25) → 9D (Area 24 - 32) →
9A (Area 1 - 9) → …
16A (Area 1 - 16) → 16B (Area 17 - 32) → 16A (Area 1 - 16) → …
Page 47

Clear the images displayed in
Select all areas
the desired area
Step 1
Select "Clear(C)" from "View(V)" on the menu bar
when the images to be cleared are displayed.
The displayed images will be cleared and a black
screen will be displayed.
d
Step 1
Select "Select all areas(A)" from "View(V)" on the
menu bar to select all the areas.
All the areas will be selected. The displayed images
will be cleared when the clear operation is carried out
(Select "Clear(C)" from "View(V)" on the menu bar).
d
Note:
When displaying a multi-screen, click the area
where the images to be cleared are being displayed before carrying out step 1. The clicked area
will be displayed with an orange frame.
47
Page 48

Control Cameras
It is possible to control cameras while monitoring live
images regardless of whether a single screen or a
multi- screen is being used.
Step 1
Display live images.
When displaying images on a multi-screen, click the
desired area. The clicked area will be displayed with
an orange frame.
Step 2
Click the [CAMERA] tab.
The camera control panel will be displayed.
Notes:
• When a user with higher priority is controlling the
selected camera, it may not be possible to control
the camera.
• When using the fixed camera, it is impossible to
carry out the following functions: Panning/tilting,
Preset function, Auto functions. The connected
camera type can be checked with the icons in the
tree view displayed by clicking in the [RECORDER]
tab.
Step 3
Click the buttons on the camera control panel to control the camera.
Refer to page 32 for descriptions about the buttons on
the camera control panel.
48
Page 49

Save the Camera Channel Allocation for the Areas
Register the displayed configuration as a favorite
Register the combination of the camera channels currently displayed and the multi-screen (4-/9-/16- split screen) as
a favorite in the following way. Using favorites is possible only for the registered users.
Step 1
Display live images from the desired camera channels.
Refer to page 41 for descriptions of how to display live
images.
Step 2
Select "Favorite registration(R)..." from "Tool(T)" on the
menu bar.
The "Favorite registration" window will be displayed.
Note:
When trying to register a favorite after reaching the
maximum possible number allowed, the following
message window will be displayed.
To perform new registrations, delete the registered
favorite. (page 51)
Step 3
Enter a desired name.
At first, "New favorite" will appear.
Enter up to 32 alphanumeric characters.
q
q Registered/Maximum number:
The number of registered favorites and the maximum number of registration are indicated.
Note:
The following characters are not available (\, /, :, *,
?, ", <, >, |).
49
Page 50

Step 4
Click the [OK] button.
The entered name will be registered and listed on the
[FAVORITE] tab.
It is possible to display the registered combination of
the cameras and the multi-screen as the favorite by
double clicking the entered name in the favorite list or
dragging and dropping it onto the image display area.
Note:
When the message window is displayed by clicking
the [OK] button in step 4, refer to the descriptions
in the table shown below.
Messages
Registered name is
already used.
Favorite registration
failed.
Solutions
Entered favorite name is already in use. Enter another name.
The registration of the favorite has failed. Register the favorite again.
50
Page 51

Edit the name of the registered favorite
Step 1
Right click the desired icon to be edited and select
"Rename(R)" from the right click pop-up menu.
The selected favorite name will be highlighted and can
be edited.
Delete the registered favorite
Step 2
Enter the new name for the favorite and press the
enter key of the keyboard.
The newly entered favorite name will be registered.
Note:
Enter up to 32 alphanumeric characters.
The following characters are not available (\, /, :, *,
?, ", <, >, |).
Step 1
Right click the desired icon to be edited and select
"Delete(D)…" from the right click pop-up menu.
The deletion confirmation window will be displayed.
Step 2
Click the [Yes] button.
The selected favorite will be deleted.
Note:
It may take a while when trying to delete a number
of favorites at one time.
51
Page 52

HD300
Play Recorded Images on the Recorder
Notes:
• Playback speed may become slow when load to be processed for the recorder or the PC is getting higher (such
when many cameras are connected or when live/recorded images are displayed on multiple windows).
• When the [NEXT IMAGE] button is repeatedly clicked, it may skip frames reversely and a frame of at a point several seconds before the point where the [NEXT IMAGE] button is clicked may be displayed.
• When displaying images on a multi-screen, it may cause out-of-sync between each channel.
Step 1
Display live images.
When displaying live images on a multi-screen, click
the desired area (camera channel). The clicked area
will be displayed with an orange frame.
Step 2
Click the [RECORDER] control tab.
The recorder control panel will be displayed.
Step 3
Click the [PLAY] button.
The recorded images of the selected camera channel
will be played. (The icon on the status bar indicating
that live images are being displayed will change to the
icon indicating that recorded images are being displayed.)
When displaying images on a single screen, refresh
interval of recorded images can be selected. Rightclick on the image currently being played and change
the value of "Video Rate(I)".
Note:
When the [PLAY] button is clicked, the latest
recorded images will be played.
52
Page 53

<Stopping playback>
Step 4
Click the [STOP] button.
Playback of the recorded images will be changed to
live images. (The icon on the status bar indicating that
recorded images are being displayed will change to
the icon indicating that live images are being displayed.)
d
Note:
Operate during playback using buttons on the
recorder control panel.
Refer to page 33 for descriptions about the buttons
on the recorder control panel.
When controlling the recorded images of one camera channel during the playback of recorded
images of multiple camera channels of the same
recorder, the recorded time of all the recorded
images of the other camera channels that are currently being played will be synchronized with the
recorded time of the recorded images of the selected camera channel. The areas displaying recorded
images with the synchronized recorded time will be
displayed with a pale orange frame.
53
Page 54

Search and Play Recorded Images
HD300
HD300
ND300
Search for the desired recorded images using any of
the following four methods.
Notes:
• Up to 10 000 recorded images can be searched.
When more than 10 000 recorded images are
found, a message window will be displayed. In this
case, search again with more detailed conditions.
• Up to 1 024 recorded images per a recorder can be
searched. When more than 1 024 recorded images
are found on a single recorder, a list of the latest
1 024 recorded images will be displayed in the
search result list window.
• It may take 10 minutes or more to complete
searching.
Search for a Recording Event
Search for the desired images with such parameters
as the date-and-time, the camera channel and the type
of events. (REC Event Search)
Step 1
Display the operation window in the network mode.
Step 2
Select "Search(S)..." from "Search(S)" on the menu
bar.
The search window will be displayed.
Step 3
Click the [REC Event Search] tab.
q
w
e
r
t
q "Recorder & Camera(R)"
Designate the desired recorder and the camera
channels to be searched.
w "FROM(F)"
Designate the start time of the time range to be
searched.
e "TO(T)"
Designate the end time of the time range to be
searched.
r "REC Event(E)"
Designate the recording event type to be searched
by checking the box next to the desired recording
event type.
"CAM(C)" : Recording performed when a
(camera) site alarm has been detected
"VMD(V)" : Recording performed when
motion has been detected
"TERMINAL(M)": Recording performed when a
terminal alarm has been detected
"COMMAND(O)": Recording performed when a
command alarm has been detected
"VIDEO LOSS(L)" : Recording performed
when video loss has occurred
"EMERGENCY(G)": Emergency recording
"MANUAL(A)": Manual recording
"SCHEDULE(H)": Schedule recording
t "Text(X)"
Search for only images recorded with or without
text information.
y [Search(S)…] button
Click this button to start searching with the selected
conditions.
u [Cancel] button
Click this button to cancel search with the selected
conditions and close the search window.
yu
54
Page 55

Note:
ND300
Channels of which the "Model number" setting is "-" will not be displayed in "Recorder & Camera".
Step 4
After designating the search conditions, click the
[Search(S)...] button.
The search status window will be displayed. The name
of the recorder to be searched will be displayed in the
result list. The check mark will be displayed next to the
name of the recorder to indicate that the search of the
recorder has finished.
When the check mark is displayed next to all the
recorders respectively, the search is complete.
Step 5
Click the [Search list view(S)] button.
The search result list window will be displayed.
Searched count
d
q
ew
q Recorder list
The recorder names to be searched are listed.
Search complete check: The check mark will be
displayed next to the name of the recorder to
indicate that the search of the recorder has finished.
Search result: The number of search result will be
displayed.
Status: The current status of search will be dis-
played.
w [Search list view(S)] button
When searching is completed, the button will be
operable. Click this button to display the search
results.
e [Cancel] button
Click this button to cancel searching and return to
the window where search conditions are set up.
Notes:
• About the search results
When "0" is displayed in the result column, no
recorded image was found with the selected conditions.
When "Search failed" is displayed in the result column, the search failed. Check whether the recorder
is connected and located in the registered IP
address or the host name by performing the connection test.
• When more than 10 000 recorded images are
found, a message window will be displayed. In this
case, search again with more detailed conditions.
• When searching for an event type that is not selected, "0" will be displayed in the result column.
55
Page 56

Search for a motion detected time and date from recorded
HD300
images
Search for a motion detected time and date from all the images recorded in the designated recorder. (VMD Search)
It is impossible to designate two or more recorders two or more camera channels.
Step 1
Display the operation window in the network mode.
Step 2
Select "Search(S)..." from "Search(S)" on the menu
bar.
The search window will be displayed.
Step 3
Click the [VMD Search] tab.
q "Recorder(R)"
Designate the desired recorder to be searched.
w "Camera(C)"
Designate the camera channel to be searched.
e "FROM(F)"
Designate the start time of the time range to be
searched.
r "TO(T)"
Designate the end time of the time range to be
searched.
t [VMD area setup(V)…] button
Click this button to display the VMD area setup
window.
y [Search(S)…] button
Click this button to start searching with the selected
conditions.
u [Cancel] button
Click this button to cancel search with the selected
conditions and close the search window.
Step 4
Designate the search conditions.
q
w
e
r
t
yu
56
Page 57

Step 5
When it is necessary to set the VMD areas, click the
[VMD area setup(V)…] button to display the VMD
setup window.
When the VMD areas have already been set, go to
step 9.
Note:
The VMD areas are registered for the respective
camera channel of each recorder.
Step 6
The VMD area setup window will be displayed.
q
e
w
r
t
y
u
i
o
!0
Perform the following settings:
q Recorder title and Camera title
The name of the selected recorder and the camera
channel number to be searched will be displayed.
w VMD area setup display
A still image from the selected camera channel will
be displayed. Set the VMD area in this display
area.
e Deletion checkbox
Select the desired VMD area to be deleted by
checking the box next to the desired VMD area.
r [DELETE AREA(D)] button
Click this button after checking the box next to the
desired VMD area to be deleted.
t "Sensitivity(S)"
Select the sensitivity for each VMD area from the
following:
"HIGH": High sensitivity
"MID": Middle sensitivity
"LOW": Low sensitivity
"OFF": Ignores motion in the selected area
The default setting is "OFF" for each area.
y "VMD mode"
Select the VMD mode to be searched from the following: The default setting is "ANY AREA".
"ANY AREA(A)"
u Mask period(M)
Select a masking duration from the following:
1s/ 1min/1h/24h (The default setting is "1s" for
each area.)
"VECTOR(V)"
i VMD area order
Select an order of the VMD areas.
o Detection time of vector mode
Select the duration of motion detection between
two VMD areas.
"DURATION(U)"
!0 Detection time of duration mode
Select a detection time for each area.
!1 [OK] button
Click this button to save the settings for the VMD
areas.
!2 [Cancel] button
Click this button to cancel to save the settings and
close the VMD setup window.
!1 !2
57
Page 58

Step 7
Perform the VMD area setup and detection parameter
setup.
VMD area setup
Set the motion detection areas by dragging the cursor. Up to 4 areas (A, B, C, D) can be set for the
detection areas.
A: White, B: Blue, C: Green, D: Red
To delete a detection area, click the [DELETE
AREA(D)] button after selecting a detection area by
checking the box of the desired area to be deleted.
"Sensitivity(S)"
Select the sensitivity for each VMD area from the
following: Click the button to select sensitivity
for the selected area from the following.
"HIGH": High sensitivity
"MID": Middle sensitivity
"LOW": Low sensitivity
"OFF": Ignores motion in the selected area
"VMD mode" setup
Perform the settings for the detection mode. It is
possible to set how motion is detected in the
motion detection area by performing the settings
for each detection mode.
Select the desired detection mode and perform the
settings by checking/not checking the radio buttons.
• <ANY AREA>
An event action will be performed according to
the settings when "motion" is detected in any of
the set motion detection areas.
• <VECTOR>
Click the button to create a series of VMD
areas in the desired order. Click the button
to select a moving duration for an object from
the following.
--/5s/10s/20s/30s/40s/50s/1min
<DURATION>
Click the button to select a detection time
for each area.
0s/5s/10s/20s/30s/40s/50s/1min
Note:
Refer to the Network Operating Instructions (PDF)
of the recorder for further information about the
VMD search.
Step 8
Click the [OK] button to save the settings for the VMD
areas.
The VMD setup window displayed on the search window will be closed.
Step 9
Click the [Search(S)...] button.
The search status window will be displayed.
Note:
When the VMD area is not yet set, a message window will be displayed.
Go to step 4 to set the VMD area.
Step 10
Click the [Search list view(S)] button.
The search result list window will be displayed.
Refer to page 61 for descriptions of how to operate on
the search result list window.
58
Page 59

Search for a marked point
HD300
Search for the point marked during playback the recorded images. (Marking Search)
Step 1
Display the operation window in the network mode.
Step 2
Select "Search(S)..." from "Search(S)" on the menu
bar .
The search window will be displayed.
w [Search(S)…] button
Click this button to start searching with the selected
conditions.
e [Cancel] button
Click this button to cancel search with the selected
conditions and close the search window.
Step 4
Designate the desired recorder subject to search.
Step 5
Click the [Search(S)...] button.
The search status window will be displayed.
Step 3
Click the [Marking Search] tab.
q
we
q "Recorder(R)"
Designate the desired recorder to be searched.
Step 6
Click the [Search list view(S)] button.
The search result list window will be displayed.
Refer to page 61 for descriptions of how to operate the
search result list window.
59
Page 60

Search for images saved on the SD memory card on the camera
ND300
(SD memory data)
It is possible to search for SD memory data (images saved on the SD memory card on the camera). (SD search)
To search for SD memory data, designate a single recorder and a single camera channel. It is impossible to designate multiple recorders or multiple channels.
Step 1
Display the operation window in the network mode.
Step 2
Select "Search(S)…" from "Search(S)" on the menu
bar.
The search window will be displayed.
q "Recorder(R)"
Designate a recorder to be searched.
w "Camera(C)"
Designate a camera channel to be searched.
e "FROM(F)"
Designate the start time of the time range to be
searched.
r "TO(T)"
Designate the end time of the time range to be
searched.
t [Search(S)…] button
Click this button to start searching with the selected
conditions.
y [Cancel] button
Click this button to cancel search with the selected
conditions and close the search window.
Step 4
After designating the search conditions, click the
[Search(S)…] button.
60
Step 3
Click the [SD search] tab.
q
w
e
r
The search status window will be displayed.
Step 5
When the search is completed, click the [Search list
view(S)] button.
The search result list window will be displayed.
Refer to page 61 for how to operate the search result
list window.
ty
Page 61

Play the images selected from the search results
ND300
ND300
HD300
HD300
Select the desired images from the search results to play them back. Only a single screen display is available when
selected from the search results. To play on a multi-screen, display the operation window in the network mode and
play the searched recorded images.
Notes:
•
There may be cases where thumbnail indication is not available depending on the status of the network and the
recorder. If this happens, retry.
•
Thumbnails will not be displayed.
•
When a result is selected from the search result list window of the SD search and the result contains not many
frames (recorded at a recording event) to play smoothly, a black screen may be displayed or it may take time to
refresh images. In this case, display the image with frame playback/reverse frame playback.
Play the recorded images of the selected
result
Step 1
Double click the desired result.
The recorded images of the selected result will be displayed in the playback image display area.
Play the recorded images of the selected
result on a multi-screen
It is possible to play the searched recorded images on
a multi-screen while playing images in the playback
image display area on the search result list window by
switching the search result list window to the operation
window in the network mode.
Step 1
Double click the desired result.
The recorded images of the selected result will be displayed in the playback image display area.
Refresh interval of recorded images can be selected.
Right-click on the image currently being played and
change the value of "Video Rate(I)".
61
Page 62

Step 2
Click the desired multi-screen button on the tool bar.
The search result list window will be switched to the
operation window in the network mode and the recorded images of the selected result will be displayed on
the selected multi-screen.
d
Notes:
• It is also possible to set the desired pattern of
screen by selecting "1(1)", "4(2)", "9(3)" or "16(4)"
("View(V)" - "Number of area(N)" - "1(1)"/"4(2)"/
"9(3)"/"16(4)") from the menu bar.
• To display the search result list window again,
select "Search(S)" - "Search result list(R)" in the
menu bar, or click the [Search result list] button on
the tool bar.
• It is impossible to play on a multi-screen by switching to the operation window in the network mode
while playing images selected from the search
result list window of the SD search.
62
Page 63

Download the images selected from the search results
ND300
ND300
ADMIN
ADMIN
It is possible to download images from the search results.
Notes:
•
When starting download on the search result list window of the SD search, SD memory data (images saved on
the SD memory card on the camera) will be downloaded.
•
Time length of downloaded images may sometimes be longer than the designated time range.
Download the images form the search
result list
Step 1
Right click on the desired item of the search results
and select "Download(D)…" in the pop-up menu.
The download image file window will be displayed.
Download after playback
Step 1
Play the recorded images of the selected result
Step 2
Click the [DOWNLOAD] button.
The download image file window will be displayed.
Step 2
Designate a time range (start and stop time) and click
the [Start download(D)] button.
Step 3
Designate a time range (start and end points) and click
the [Start download(D)] button.
63
Page 64

Download Recorded Images
Important:
When using Windows®XP Professional or Home Edition SP2, it may be possible that the "Windows Security
Alert" window is displayed. In this case, click the "Unblock" button on the displayed "Windows Security Alert" window.
Manually download recorded images from the recorder
It is possible to manually download recorded images during playback by designating the start and end points. Refer
to page 92 for descriptions of how to play the downloaded recorded images.
Step 1
Playback of a recorded image will be performed.
Refer to page 52 for descriptions of how to play the
recorded images.
Step 2
Click the [Start] button on the recorder control panel at
the desired point to set as the start point of the image
to be downloaded.
The time and date of the start point of the image to be
downloaded will be displayed at the bottom of the window.
Step 3
Click the [End] button on the recorder control panel at
the desired point to set as the end point of the image
to be downloaded.
The time and date of the end point of the image to be
downloaded will be displayed at the bottom of the window.
Note:
The image recorded at the designated end time will
not be downloaded.
64
Page 65

Step 4
ADMIN
ADMIN
ND300
Click the [DOWNLOAD] button.
The "Download image file" window will be displayed.
The time and date of the start point of the image to be
downloaded will be displayed in the "FROM(F)" boxes.
The time and date of the end point of the image to be
downloaded will be displayed in the "TO(T)" boxes.
Note:
There is another way to click the [DOWNLOAD]
button prior to using the [Start] and [End] buttons.
In this case, designate the start point "FROM(F)"
and the end point "TO(T)" in the "Download image
file" window.
Step 5
For ADMIN user
When an ADMIN user is operating, the "Download
image file" window for ADMIN user will be displayed.
After selecting the channels for download, click the
[Start download(D)] button.
"Download image file" window for ADMIN user
It is possible to select two channels or more to be used
for download.
Select a standard channel (Standard CH) from the
pull-down.
It is possible to select channels to be used for download.
Note:
It is impossible to select a standard channel when
the recorder in use is the WJ-ND200.
For normal user
When a user who is not ADMIN is operating, the following "Download image file" window will be displayed.
"Download image file" window for user
who is not ADMIN
65
Page 66

ADMIN
ADMIN
Click the [Start download(D)] button.
HD300
The download information (the start time and the end
time) will be registered in the downloader and a message window will be displayed when completing the
download information registration.
Notes:
• The time range (duration from the start point to the
end point) for downloading should be 24 hours or
less.
•
When downloading image files and audio files
recorded for a channel, set the time range of the
download schedule to 10 hours or less.
• When an error message is displayed, refer to
"Check the Download Status" on page 114.
Step 6
Click the [OK] button.
Automatically download recorded images at a designated time
(Schedule download)
This software will start the downloading of the images of a specific time range at a designated time according to the
created schedule.
Refer to page 136 for further information about the
Step 1
Select "Schedule(S)…" from "Setup(O)" on the menu
bar.
The schedule window will be displayed. It is possible to
display the schedule window both in the network mode
and the local mode.
schedule window.
The schedule set on the schedule window will be registered in the downloader at the download start time.
When the schedule is invalid, the download will not be
performed even though the settings are saved. Refer
to page 138 for further information.
Note:
When the downloader is closed, the schedule
download will not be performed. When using the
schedule download function, activate the downloader. The downloader icon will be displayed in
the system tray when the downloader is active.
66
Page 67

Save as a Still Image File (JPEG)
It is possible to save the live image or recorded image of the recorder as a JPEG image file.
Example: RECORDERA_1_20051008110340.jpg
Step 1
Display the images from the desired recorder.
Refer to "Monitor Live Images" on page 41 or "Play
Recorded Images on the Recorder" on page 52 for
descriptions of how to display images.
Note:
Saving an image as a JPEG is available only when
images are displayed on a single screen.
Step 2
Select "Save as JPEG file(S)…" from "File(F)" on the
menu bar or click the [Save as JPEG file] button on the
tool bar.
The "Save as JPEG file" window will be displayed.
(Recorder title: Recorder A, channel number: 1,
time and date: 2005/Oct/8, from 11:03:40)
Note:
When "Camera" is selected for "Live image reception", the time and date part of the default name will
be given from the clock of the PC.
e [Save] button
Click this button to save the file in the designated
folder and close the "Save as JPEG file" window.
r [Cancel] button
Click this button to cancel the file save and close
the "Save as JPEG file" window.
Step 3
Designate the folder and click the [Save] button.
The still image file will be saved with the given name in
the designated folder.
Notes:
• The image to be saved is the image displayed in
step 2.
• The image will be saved with the same size that it
had when transferred from the recorder.
• It is possible to save an image as JPEG image file
on the search result list window.
q
w
re
Perform the following settings:
q Folder where the file is to be saved
Designate the folder where the file is to be saved.
w "File name"
Enter the name of the file to be saved. The default
name to be given is as follows:
67
Page 68

It is possible to print an image of live images or recorded images from the recorder.
Step 1
Display the images from the desired recorder.
Refer to "Monitor Live Images" on page 41 or "Play
Recorded Images on the Recorder" on page 52 for
descriptions of how to display images.
Step 2
Select "Print(P)…" from "File(F)" on the menu bar or
click the [Print] button on the tool bar.
The "Print" window will be displayed.
Step 3
Perform the print settings and click the [Print] button on
the "Print" window.
The displayed image will be printed.
Notes:
• The image to be printed is the image displayed in
step 2.
• It is possible to print an image on the search result
list window.
• When "Camera" is selected for "Live image reception", the current time and date of the clock of the
PC will be printed.
Note:
Printing is available only when images are displayed on a single screen.
68
Page 69

Check the Log of the Recorder
The following logs can be checked.
• Event log (event occurred time and details)
• Error log
• Access log
• Network log
Obtain the log from the recorder
Step 1
Display live images from the desired recorder from
which the log was obtained.
Refer to "Monitor Live Images" on page 41 or "Play
Recorded Images on the Recorder" on page 52 for
descriptions of how to display images.
Step 2
Select "Recorder log(R)…" from "View(V)" on the
menu bar or click the recorder log button. The
"Recorder log" window will be displayed. Select a
desired tab from [Event log], [Error log], [Access log]
and [Network log].
<Save the log>
Step 3
Click the [Save as(S)…] button.
Designate the file name and the directory where the
file is to be saved. The event log will be saved as a
CSV format file.
Note:
When the application has failed to obtain the log
from the recorder, a message window will be displayed.
If the message window is displayed even after
repeating step 2, check whether the recorder is
connected and located in the registered IP address
or the host name by performing the connection
test.
d
69
Page 70

Operate the Recorder
HD300
HD300
Start/stop the manual recording
Step 1
Displays the images from the desired recorder.
Refer to page 43 for descriptions of how to display live
images.
Step 2
Click the [RECORDER] control tab.
The recorder control panel will be displayed.
Step 4
Click the [REC] button.
Recording will start and the [REC] indicator will light
red.
Note:
When the version of the recorder in use is the following, it is impossible to recognize which channel
is currently being recorded. (When recording starts
on a channel, the REC indicators of all channels
will light.) Refer to the operating instructions of the
recorder for how to check the version of the
recorder.
: Any version
WJ-ND300: Older than ver. 3.00
<Stop recording>
Step 5
Click the [REC STOP] button.
The recording will be stopped and the [REC] indicator
will go off.
Step 3
Click the shutter on the recorder control panel. The
[REC] button and the [REC STOP] button will be displayed.
When stopping manual recording while another recording with a different recording mode (eg. event recording) is being performed, the [REC] indicator will remain
lit and the other recording will continue. Refer to the
Network Operating Instructions (PDF) of the recorder
for further information about the recording mode.
70
Page 71

Copying (Duplicate)
HD300
It is possible to manually copy (duplicate) the recorded images to the HDD copy area or the external recording
device (DVD-RAM disk, DVD-R disk, CD-R disk, SD card, external HDD) connected to the recorder.
Step 1
Displays the images from the desired recorder.
Refer to page 43 for descriptions of how to display live
images.
Note:
When another user is copying or the current copying is not yet completed, it is impossible to start any
new copying. Check that the [COPY] indicator is
not lit.
When the [COPY] indicator is lit, copying is being
performed.
Step 2
Click the [RECORDER] control tab.
The recorder control panel will be displayed.
Step 4
Designate the time range "FROM(F)" - "TO(T)" of the
recorded images to be copied.
Notes:
• The available time range (duration from the start
point "FROM(F)" to the end point "TO(T)") for copying may differ depending on the model of the
recorder in use. Refer to the operating instructions
of the recorder in use.
• Do not designate a time range wider than the time
range described on the operating instructions.
Step 3
Click the [COPY] button.
The copy window will be displayed.
Note:
This button will become unavailable when the
recorder in use is the WJ-ND200.
Step 5
Select the camera channels used to record images to
be copied.
Note:
To select all the camera channels, check the "ALL
(A)" box. To select only the desired camera channels, check the "Per camera(P)" box. Check the
boxes of the desired camera channels from which
images are to be copied.
71
Page 72

Step 6
HD300
Select the disk drive to be used from the following.
Notes:
•
When selecting "COPY1(1)" or "COPY2(2)", check
the external recording device is connected to the
respective port.
• When the recorder in use is the WJ-ND300, it is
impossible to select "COPY1(1)" and "COPY2(2)".
Step 7
Click the [OK] button.
Copying will start and the [COPY] indicator lights
green.
d
Notes:
• The [COPY] indicator will not light immediately after
the [OK] button is clicked.
• When another user is accessing the destination
areas for copying, it is impossible to start any new
copying.
• Even though the auto copy function is set to be
performed, it is impossible to start any new copying
when another user is copying or the current copying is not yet completed.
72
Page 73

Cancel the alarm action
It is possible to reset the alarm actions.
Step 1
When an alarm has occurred and the [ALARM RESET]
indicator is lit red, click the [ALARM RESET] button to
cancel the alarm actions.
The alarm actions will be canceled and the [ALARM
RESET] indicator will go off.
d
Note:
It is impossible to reset the alarm status display
when displaying images on a 9-/16-split screen.
73
Page 74

Perform the settings of the recorder using a web browser
It is possible to access the setup page of the recorder via a network using the web browser.
Step 1
Display the operation window in the network mode.
Step 2
Click the [RECORDER] tab.
The recorder and the connected cameras will be displayed in the tree view.
Step 3
Right click the icon of the desired recorder for which
the settings are to be performed and select "Open
recorder setup(S)…" from the pop-up menu.
The web browser will start. Refer to the Network
Operating Instructions (PDF) and the Network Setup
Instructions (PDF) of the recorder for descriptions of
how to perform the settings of the recorder using the
web browser.
d
74
Notes:
• The setup menu of the recorder will be displayed in
the web browser window.
• Instead of the recorder setup menu, a white screen
will be displayed when logging into the recorder
with a user level that is not allowed to access the
setup menu.
Page 75

Display/edit text information
It is possible to attach text information to the recorded images.
Up to 200 characters can be entered.
Step 1
Playback of a recorded image will be performed.
Refer to page 52 for descriptions of how to play the
recorded images.
Step 2
Pause playback by clicking the [Pause] button.
Step 4
Edit text information.
About the available characters
The following characters can be entered:
A B C D E F G H I J K L M N O P Q R S T U V W X Y
Z a b c d e f g h i j k l m n o p q r s t u v w x y z 0 12 3
4 5 6 7 8 9 ! " # $ % &‘ ( ) * + ,- . / : ; < = > ? @ [ \ ] ^ _ `
{ | } ~ (space)
Step 3
Click the [TEXT] button on the recorder control panel.
Text information attached to the paused playback
image will be displayed in the text information window.
Step 5
Click the [Save(S)] button.
75
Page 76

Operation Windows in the Local Mode
List display window
y
q
w
e
r
t
q Title bar
The title of the main application will be displayed.
w Menu bar
The menu items will be displayed.
e Tool bar
The buttons of tools will be displayed.
r List display area
The list of downloaded image files or alarm logs will
be displayed. (page 78)
ui
o
y [Alarm log] button
Click this button to display the alarm logs.
(page 79)
u [File list] button
Click this button to display the list of the files.
(page 78)
i [List view] button
Click this button to change the display form to the
list form when the list with thumbnail form is displayed. (page 78)
t Status bar
76
Displays the latest alarm status of the recorder or
information of a disk designated as storage for
downloaded images such as available disk space.
The recorder title and the camera title of the
images currently playing will also be displayed.
o [Thumbnail view] button
Click this button to change the display form to the
list with thumbnail form when the list form is displayed. (page 87)
Page 77

(1) Tool bar
q w e r t y u i o
q [List view] button
Click this button to bring up the list display window
when displaying another window, such as the single file playback window, in the local mode. (page
76)
w [1 image file playback] button
The 1-file playback window will be displayed.
(page 81)
e [4 image file playback] button
The 4-file playback window will be displayed.
(page 84)
r [Filter setup] button
Click this button to display the filter setup window.
(page 90)
t [Filter] button
Click this button to turn on/off the filtering.
(page 91)
y [Jump] button
Click this button to display the jump window.
(page 97)
!0
!1
u [Import a motion image file] button
It is possible to import files of recorded motion
images from an external source to play them back
on this software. (page 98)
i [Save as a motion image file with viewer soft]
button
Click this button to save a part of the downloaded
recorded images with the viewer software.
(page 99)
o [Save as JPEG file] button
Click this button to save the recorded images currently playing as a still image. (page 101)
!0 [Print] button
Click this button to print an image of live images or
recorded images from the recorder. (page 102)
!1 [Delete] button
Click this button to delete the downloaded files.
(page 88)
!2 [Network mode] button
Click this button to run this application in the network mode. (page 22)
!2 !3
(2) Status bar
Refer to page 35 about the status bar.
!3 [Local mode] button
Click this button to run this application in the local
mode. (page 22)
77
Page 78

(3) List display window <List of the files>
HD300
HD300
w e r t y u i o
q
q File status icon
The icon displayed next to the recorder title indicates whether the file is being played or not.
Icons
!0
Descriptions
(New)
(Played)
w "Recorder"
The recorder title from which the file was downloaded will be displayed.
e "CH"
The camera channel from which the image was
recorded will be displayed.
r "FROM"*
The start time and date when the image was
recorded will be displayed.
t "TO"*
The end time and date when the image was
recorded will be displayed.
* The time and date will be followed by an asterisk [*]
when daylight saving is applied.
The file with this icon is not played after being downloaded.
The file with this icon has been played before.
y "REC event"
When the files were downloaded from the recorder
using the alarm notification transmission, the
recording event type will be displayed.
If the file is the image recorded on the pre-recording area on the hard disk drive, the recording event
type will not be displayed.
u "Audio"
When an audio file is attached to the recorded
image, "Added" will be displayed. (page 94)
When no audio file is attached, "None" will be displayed.
78
Page 79

i "Type"
ND300
The download method of the file will be displayed.
Indications
"SCHEDULE"
"MANUAL"
"Alarm"
"FTP"
"Import"
o "Comment"
The text information attached to the recorded
image will be displayed. (page 88)
The file was downloaded by the schedule download. (page 136)
The file was downloaded by manual download. (page 64)
The image file recorded at an alarm occurrence was downloaded by the alarm notification with Panasonic protocol. (page 111)
The file was downloaded using the FTP server transmission to download.(page 123)
The motion image file was imported from an external source (page 98).
<List of the alarm logs>
w e r t y
Descriptions
!0 "MAC Address"
The MAC address of the recorder from which the
file was downloaded will be displayed. When the
image file does not have a MAC address, no MAC
address will be displayed.
q Playback icon
Indications
No icon
q
Descriptions
The image file is ready to be played. Playback of the recorded images will start by
double clicking this icon.
The download process of the image file is not yet complete.
79
Page 80

w "Recorder"
HD300
The title of the recorder connecting the camera that
detected the alarm occurrence will be displayed.
e "CH"
The number of the camera channel connecting the
camera that detected the alarm occurrence will be
displayed.
r "Time & Date"*
The time and date of the event occurrence will be
displayed.
t "REC event"
An event type will be indicated.
If the file is the image recorded on the pre-recording area on the hard disk drive, the recording event
type will not be displayed. Refer to the Operating
Instructions of the recorder about the pre-recording
area on the hard disk drive
The time and date will be followed by an asterisk [*]
when daylight saving is applied.
y "MAC Address"
The MAC address of the recorder that detected the
alarm occurrence will be displayed. When the
image file does not have a MAC address, no MAC
address will be displayed.
80
Page 81

1 - File playback window
w
q
q List display area
The list of the files or the alarm logs will be displayed in this area. (page 78)
e
r
t
y
u
t [ALTER DETECT] button
It is possible to check whether the image file was
altered.
w [Alarm log] button
Click this button to display the alarm logs.
(page 89)
e [File list] button
Click this button to display the list of the files.
(page 86)
r Playback image display area
The recorded images will be displayed in this area
together with the camera title, recorder title, etc.
Note:
Up to 2 GB per file can be checked. Anything
beyond 2 GB will not be checked.
y [EL-ZOOM] buttons
[x1]: The recorded image will be displayed with
normal size.
[x2]: The recorded image will be displayed with x2
zoomed size.
[x4]: The recorded image will be displayed with x4
zoomed size.
Clicking a point in the zoomed image moves the
zoomed image by positioning the clicked point as
the center point.
u Playback control panel
Use the buttons on this panel to operate the
recorded images. (page 82)
81
Page 82

(1) Playback image display area
qw e
r
q Recorder title
The title of the recorder from which the recorded
image was downloaded will be displayed.
w Camera title
The title of the camera from which the image was
recorded will be displayed.
(2) Playback control panel
e r t y u r i
q Time-line slider
The left edge is the start time and the right edge is
the end time. The position of the knob indicates the
point on the time-line of the images currently playing. It is possible to go to the desired point of the
time-line by dragging the knob. When the knob is
released, the playback will be paused.
e Time & Date
The time and date when the image was recorded
will be displayed. The time and date will be followed by an asterisk [*] when daylight saving is
applied.
r Playback image display area
The recorded images will be played in this area.
wq
o
w Playback speed slider
The position of the knob indicates the playback
speed of the images currently playing. When the
knob is at the center point, the recorded images will
be played at the normal speed. When the knob is
moved to the right, the playback speed will be
changed as follows: x1/2, x1, x2, x5, x10, x20, x50,
x100
!0
82
Page 83

When the knob is moved to the left, the recorded
HD300
images will be played in reverse and the playback
speed will be changed as follows: x1/2, x1, x2, x5,
x10, x20, x50, x100
The indicated numbers of playback speed are for
reference.
When playing images reversely, some frames of
recorded images will not be displayed. Images will
be played reversely with the set refresh interval of
the camera.
e [Audio] button
Click this button to turn on/off audio when the audio
is attached to the images currently playing.
(page 94)
r Frame play/reverse frame play
The previous frame will be displayed and paused
when the [PREV IMAGE] button is clicked.
The previous frame will be displayed and paused
when the [NEXT IMAGE] button is clicked.
When playing frames reversely, some frames of
recorded images will not be displayed. Frames will
be played reversely with the set refresh interval of
the camera.
t [PAUSE] button
The playback will be stopped when this button is
clicked during playback.
y [PLAY] button
The playback will be resumed when this button is
clicked during pausing.
u [STOP] button
Stops playback and goes to the start point of the
recorded images by clicking this button during playback or pausing.
i [Auto playback] button
When this button is lit green, playback from the
start point to the end point of all of the recorded
images on the list shown in the list display area will
be performed sequentially. When playback of all
the recorded images has finished, the playback will
be automatically paused at the end point of the last
recorded image. (page 95)
o [CH] buttons
It is possible to switch the camera channel displayed on a single screen when an image file composed of multiple channels is being played back.
Previous channel button:
Click this button to display the recorded
images of the previous camera channel to the
camera channel of the images currently
playing.
Next channel button:
Click this button to display the recorded
images of the next camera channel to the
camera channel of the images currently
playing.
!0 [SPOT]/[Quad Screen]/[9 Screen]/[16 Screen]
buttons
• It is possible to switch the display pattern on a multi
screen when an image file composed of multiple
channels is being played back.
• Click the [SPOT] button and select the desired
camera channel to display the recorded images on
a single screen.
• Click the [Quad Screen] button to display the
desired recorded images on a 4-split screen. Each
time this button is clicked, the camera channels on
which the recorded images are to be displayed will
be changed as follows: CH 1 - 4 → CH 5 - 8 → CH
9 - 12 → CH 13 - 16 → CH 17 - 20…
• Click the [9 Screen] button to display the recorded
images on a 9-split screen. Each time this button is
clicked, the camera channels on which the recorded images are to be displayed will be changed as
follows: CH 1 - 9 → CH 10 - 18 → CH 19 - 27 →
CH 28 - 32 → CH 1 - 9…
• Click the [16 Screen] button to display the recorded
images on a 16-split screen. Each time this button
is clicked, the camera channels on which the
recorded images are to be displayed will be
changed as follows: CH 1 - 16 → CH 17 - 32 → CH
1 -16…
The usable numbers of camera channel is 16.
83
Page 84

4 - File playback window
we
q
r
t
q List display area
The list of the files or the alarm logs will be displayed in this area. (page 78)
w [Alarm log] button
Click this button to display the alarm logs.
(page 89)
(1) Playback image display area
e [File list] button
Click this button to display the list of the files.
(page 86)
r Playback image display area
The recorded images will be played in this area.
t Playback control panel
Use the buttons on this panel to operate the
recorded images. (page 85)
q
w
84
Page 85

q Time & Date
The time and date when the image was recorded
will be displayed. The time and date will be followed by an asterisk [*] when daylight saving is
applied.
(2) Playback control panel
w Playback image display area
The recorded images will be played in this area.
wq
e r t y e
q Time-line slider
The left edge is the start time and the right edge is
the end time. The position of the knob indicates the
point on the time-line of the images currently playing. It is possible to go to the desired point of the
time-line by dragging the knob. When the knob is
released, the playback will be paused.
w Playback speed slider
The position of the knob indicates the playback
speed of the images currently playing. When the
knob is at the center point, the recorded images will
be played at the normal speed. When the knob is
moved to the right, the playback speed will be
changed as follows: x1/2, x1, x2, x5, x10, x20, x50,
x100
When the knob is moved to the left, the recorded
images will be played in reverse and the playback
speed will be changed as follows: x1/2, x1, x2, x5,
x10, x20, x50, x100
The indicated numbers of playback speed are for
reference.
When playing images reversely, some frames of
recorded images will not be displayed. Images will
be played reversely with the set refresh interval of
the camera.
e Frame play/reverse frame play
The previous frame will be displayed and paused
when the [PREV IMAGE] button is clicked.
The previous frame will be displayed and paused
when the [NEXT IMAGE] button is clicked.
u
When playing frames reversely, some frames of
recorded images will not be displayed. Frames will
be played reversely with the set refresh interval of
the camera.
r [PAUSE] button
The playback will be stopped when this button is
clicked during playback.
t [PLAY] button
The playback will be resumed when this button is
clicked during pausing.
y [STOP] button
Stops playback and goes to the start point of the
recorded images by clicking this button during playback or pausing.
u [CH] buttons
It is possible to switch the camera channel displayed on a single screen when an image file composed of multiple channels is being played back.
Previous channel button:
Click this button to display the recorded
images of the previous camera channel to the
camera channel of the images currently playing.
Next channel button:
Click this button to display the recorded
images of the next camera channel to the
camera channel of the images currently playing.
85
Page 86

Browse the Downloaded Files in the Local Mode
Step 1
Run the main application in the local mode.
If the main application has not started, start the main
application. Refer to page 20 for descriptions of how to
start the main application.
Step 2
Select "Local(L)" from "Mode(M)" on the menu bar or
click the [Local mode] button.
The list display window will be displayed in the local
mode.
Note:
When "Local mode(L)" is selected for "Default
screen" of the optional settings (on the option window), the local mode list window will be displayed.
The operation window in the network mode will be
displayed immediately after logging in at the default
setting.
Display the list of the files downloaded from the recorder
Step 1
Select "List view(L)" from "View(V)" on the menu bar or
click the [List view] button on the tool bar. The list display window (in the local mode) will be displayed.
86
Page 87

Display the thumbnails of the files
downloaded from the recorder
Step 1
Display the list of files
Step 2
When displaying the downloaded files in list form, click
the [Thumbnail view] button.
The downloaded files will be displayed with the thumbnails.
Note:
The file status icon and the start time and date
when the image was recorded will be displayed
with the thumbnails. When the cursor is moved
onto the thumbnail, other information will be displayed in the pop-up window.
q
w
q Thumbnail
The first frame of the recorded image will be displayed.
The thumbnail display is not available for MPEG-4
image.
w FROM
The start time and date when the image was
recorded will be displayed.
87
Page 88

Delete the downloaded file
ADMIN
ADMIN
Step 1
Select the desired downloaded file to be deleted.
Select "Delete(D)…" from "File(F)" on the menu bar or
click the [Delete] button on the tool bar.
The deletion confirmation window will be displayed.
Step 2
Click the [Yes] button.
The selected downloaded file will be deleted.
Notes:
• It is possible to select two or more files to be deleted by clicking the desired files while holding down
the Shift key or the Control key (CTRL) on the keyboard.
When using the Shift key, all the files between the
first clicked file and the last clicked file will be
selected.
• It may take a while when trying to delete a number
of files at one time.
Attach a comment to the downloaded file
Step 1
Select the desired downloaded file to which a comment is to be attached.
Select "Edit comments(C)…" from "File(F)" on the
menu bar.
The "Edit comments" window will be displayed.
Step 2
Enter comments and click the [Save(S)] button.
The entered comment will be saved.
88
Page 89

Notes:
• Up to 200 characters can be entered.
• When the unit has failed to save the entered com-
ment, a message window will be displayed. In this
case, follow the instructions again from step 1.
Check the alarm log
Step 1
Select "List view(L)" from "View(V)" on the menu bar or
click the [List view] button on the tool bar. The list display window (in the local mode) will be displayed.
Step 2
Click the [Alarm log] button.
The alarm log will be displayed.
Refer to page 79 for further information about the list
display window.
89
Page 90

Filter the Listed Files
All the downloaded files will be shown in the list display window in the local mode. It is possible to find the desired
files from the listed files using filtering.
q "Source list(S)"
Step 1
Bring up the list display window in the local mode.
Select "List view(L)" from "View(V)" on the menu bar or
click the [List view] button on the toolbar to bring up
the list display window when displaying another window, such as the single file playback window, in the
local mode.
Step 2
Select "Filter setup(S)..." from "View(V)" on the menu
bar or click the [Filter setup] button on the tool bar.
The "Filter setup" window will be displayed.
Perform the following settings:
d
q
w
e
r
t
Designate the recorder from which the file was
downloaded.
w "Attribute(A)"
Designate the status of the downloaded file.
e "FROM(F)"
Designate the start time of the time range to be
used to filter the downloaded file.
r TO(T)
Designate the start time of the time range to be
used to filter the downloaded file.
t "REC event(N)"
Search for only images recorded with or without
recording event. Select "Event(E)" or "Non-event
(O)" whether or not to filter the downloaded file by
the recording event.
When selecting "Event(E)", designate the recording
event type from the following to be used to filter the
downloaded file.
• "CAM(C)"
• "VMD(V)"
• "TERMINAL(R)"
• "COMMAND(D)"
• "VIDEO LOSS(I)"
• "EMERGENCY(M)"
• "PRE(P)"
y "Comment(X)"
Enter the character string to be used for filtering.
u [OK] button
Click this button to start filtering with the set conditions.
i [Cancel] button
Click this button to cancel search with the selected
conditions and close the search window.
90
y
ui
Page 91

Step 3
Click the [OK] button after completing the settings.
The filter setup window will be closed and a list of the
applicable files will be displayed.
Notes:
• Depending on the set conditions, there may be no
applicable file. In this case, open the filter setup
window again and change the settings.
• The text lines such as file attribute and comments
in the alarm log will not be subject to filtering.
Turn on/off the filtering
It is possible to turn on/off the filtering without changing the settings.
Step 1
Select "Filter(F)" from "View(V)" on the menu bar or
click the [Filter] button on the tool bar.
The [Filter] button will be changed as follows:
Icons Descriptions
Filtering is off. Click again to turn on the filtering.
Filtering is on. Click again to turn off the filtering.
91
Page 92

Play the Downloaded File
ND300
Notes:
• Playback speed may become slow when load to be processed for the PC is getting higher (such when many
cameras are connected or when live/recorded images are displayed on multiple windows).
• When displaying images on a multi-screen, it may cause out-of-sync between each channel.
• When displaying the 1-file playback window or the 4-file playback window, the list displayed in the list display
window will not be renewed.
•
When playing an obtained SD memory data which contains not many frames (recorded at a recording event) to
play smoothly, a black screen may be displayed or it may take time to refresh images. In this case, display the
image with frame playback/reverse frame playback.
Playback from the list display window
Step 1
Bring up the list display window in the local mode.
Select "List view(L)" from "View(V)" on the menu bar or
click the [List view] button on the toolbar to bring up
the list display window when displaying another window, such as the single file playback window, in the
local mode.
Step 2
Double click the desired file to be played.
The list display window will be switched to the single
file playback window and the playback of the selected
file will start.
Note:
It is possible to play from the alarm log display.
Display the alarm logs and double click the desired
alarm log information. Refer to page 89 for descriptions of how to display the alarm log.
92
Page 93

Playback from the 1-file playback window
Step 1
Display the single file playback window in the local
mode.
Select "1 image file(1)" from "Playback view(P)" of
"View(V)" on the menu bar or click the [1 image file
playback] button on the toolbar to bring up the single
file playback window when displaying another window,
such as the list display window, in the local mode.
Step 2
Drag and drop the desired file onto the playback image
display area.
The selected file will be played from the beginning.
Note:
It is possible to play the desired file by double clicking it.
When the message window is displayed during playback, refer to page 154 and follow the descriptions.
Time display
• When the recorder in use is the WJ-ND300, the
time of the standard channel camera will be displayed. The standard channel is designated in the
schedule settings.
• When the cursor is moved outo the displayed
image, the camera title and the time information will
be displayed at the left bottom of the window.
Auto playback
It is possible to play back the image files continuously according to the listed order.
Step 1
Click the [AUTO] button on the playback control panel.
When playback of the file has finished, the playback of
the next listed file will start automatically.
Notes:
• It is impossible to manually change the order of the
image file in the list display when the auto playback
runs.
• Auto playback may stop when load to be processed for the PC is getting higher (such when many
cameras are connected or when live/recorded
images are displayed on multiple windows).
• A black screen will be displayed for a channel not
recorded or not downloaded.
• The time display may sometimes indicate a faster
time when switching camera channels or numbers
(areas) of multi-screen.
•
When displaying on a multi-screen, reverse frame
playback cannot reach the first frame.
93
Page 94

• Black screen will be displayed when playback is
HD300
HD300
reaching around the end of the file regardless of
whether a recorded data to be played successively
exists or not. Operations such as reverse playback,
fast reverse playback, reverse frame playback, etc.
may be unavailable when black screen is displayed.
•
A slight difference may be displayed between the
embedded time and the time display of playback.
Playback with audio
It is possible to play the file with audio when audio data is attached to the file.
Since the audio data is recorded for each channel, it is possible to hear it only when playing the file with audio data
on a single screen.
Step 1
Click the [Audio] button on the playback control panel.
Notes:
• When an audio file is attached to the recorded
image, "Added" will be displayed.
• The recorder can record audio of up to 4 channels.
When the file consists of recorded images from
multiple channels, audio data is not always
attached to recorded images of each channel.
When the [Audio] button is lit green, only the audio
data attached to one of the channels will be heard.
• Playback of audio is possible only when the playback speed is normal (ie. the speed slider knob is
at center). It may not be heard during reverse playback, fast playback or fast reverse playback.
94
Page 95

Playback Multiple Files Simultaneously
It is possible to simultaneously play up to 4 downloaded files.
Playback from the list display window
Step 1
Bring up the list display window in the local mode.
Select "List view(L)" from "View(V)" on the menu bar or
click the [List view] button on the toolbar to bring up
the list display window when displaying another window, such as the single file playback window, in the
local mode.
Step 2
Click up to 4 files to be played while holding down the
control (CTRL) key on the keyboard.
Press the Enter key on the keyboard.
The image display area will be changed to the 4-file
playback window and the selected files will be simultaneously played.
Notes:
• Select multiple files using the Shift key or Ctrl key.
(Click the start file and end file while holding down
the Shift key to select a series of files. Click individual files one by one while holding down the Ctrl
key.)
• Up to 4 files can be played at a time. When more
than four files have been selected, the first four on
the list will be played.
• When a list of alarm logs is shown in the list display
area, it is impossible to select two or more alarm
logs to play from the list display window. Play back
from the 4-file playback window. (Next page)
95
Page 96

Playback from the 4-file playback window
Step 1
Display the single file playback window in the local
mode.
Select "4 image files(4)" from "Playback view(P)" of
"View(V)" on the menu bar or click the [4 image files
playback] button on the toolbar to bring up the single
file playback window when displaying another window,
such as the list display window, in the local mode.
Step 2
Drag and drop the desired file onto the playback image
display area.
The selected files will be simultaneously played.
Note:
It is possible to play the desired file in the single file
playback window by double clicking the desired
displayed image.
Switch to a single file and playback
It is possible to switch a 4-file playback to a single file playback.
Step 1
Playback from the 4-file playback window.
Step 2
Double click the desired image display to enlarge. The
selected image will be played in a single file screen.
Note:
When audio data is recorded and the audio selection is set to ON, it will be reproduced.
96
Page 97

Go to the Desired Point by Designating the Time and Date (JUMP)
It is possible to search files by designating the time and date and to then play the file.
Step 1
Bring up the list display window in the local mode.
Select "List view(L)" from "View(V)" on the menu bar or
click the [List view] button on the toolbar to bring up
the list display window when displaying another window, such as the single file playback window, in the
local mode.
Step 2
Select "Jump(J)..." from "View(V)" on the menu bar or
click the [Jump] button on the tool bar. The jump window will be displayed.
Step 3
Click the [OK] button after designating the time and
date.
Searching will start. The jump window will be closed
and the applicable file (recorded at the designated
time) will be played in the single file playback window.
Depending on the designated time, there may be no
applicable file. In this case, one of the following message windows will be displayed.
• Change the designated date and time.
• Select OFF for filtering when trying to search from
all the files not from the displayed list.
q
w
e r
Perform the following settings:
q Date
Designate the date. Select the date from the pulldown menu displayed by clicking the button.
w Time (hour: minute: second)
Designate the time.
e [OK] button
Click this button to save the settings.
r [Cancel] button
The window will be closed.
Note:
It may be impossible to jump to the end time of the
file.
97
Page 98

Import Motion Images
HD300
ND300
HD300
ND300
It is possible to import files of recorded motion images from an external source to play them back on this software.
Step 1
Select "File(F)" - "Import a motion image file(I)…" from
the menu bar or click the [Import a motion image file]
button on the tool bar.
The "Import a motion image file" window will be displayed.
q
w
Perform the following settings:
q "File name"
The selected file name will be displayed.
w "Files of type"
Select a suitable file type to the recorder.
n3r file
h3r file
e [Open] button
The selected file will be imported.
r [Cancel] button
The file import will be cancelled and the window will
be closed.
e
r
Step 2
Select a desired file and click the [Open] button.
The selected file will be copied into the folder of this
software.
The imported files can be checked on the list window
or other windows.
Notes:
• The files will be copied in the directory of "C:\WVAS65DataFile\ImportData". Prior to importing,
check that the capacity of the C drive is enough to
hold the image file.
• The recorder title will not be displayed on the file
list window, playback window or others when the
motion image was imported from an unregistered
recorder.
• It is impossible to operate the unit while importing
images.
•
It is impossible to import an image file whose size
is 2 GB or more.
•
An audio attached file (extension .h3a) cannot be
selected alone. It is possible to import when a file
(h3a) is contained with the same name as the
selected motion image file (h3r) within a folder.
98
Page 99

Save as a Motion Image File
It is possible to save the downloaded images as a motion image file. The files are saved individually per channel.
The exclusive viewer software is necessary to play back the images. It can be saved optionally along with the image
file.
Step 1
Play the image from the desired channel to be saved
in the single playback window.
Note:
Only images from a single channel can be saved
as a motion image file.
Step 2
Designate the folder where the file is to be saved. Drag
the slider knob from the desired start point to the end
point while holding down the Shift key on the keyboard.
The highlighted range will be colored blue.
Step 3
Select an option for the viewer software and go to the
next respective step.
[When saving the viewer software together with the
file] Go to step 4.
[When not saving the viewer software together with the
file] Go to step 5.
Note:
• Refer to the Operating Instructions of the recorder
about descriptions of how to use the viewer software.
• If the size of a file downloaded using this software
is larger than 2 GB, the audio data attached to the
files may not be heard when using the viewer software.
Step 4
When saving the file with the exclusive viewer software, select "With viewer soft(V)..." from "Save as
motion image file(M)" of "File(F)" on the menu bar or
click the [Save as motion image file with viewer soft]
button on the tool bar.
The "Save as motion image file" window will be displayed.
Note:
If the highlighted range isn't colored blue, check the
following:
• Only a single channel being displayed. It is
impossible to designate the time range when
displaying a multi-channel screen.
• Do not display a 4-file playback window. It is
impossible to designate the time range when
displaying the 4-file playback window.
Note:
The viewer software will be automatically saved
together with the image file when operated from the
tool bar.
99
Page 100

Step 5
HD300
HD300
ND300
HD300
ND300
When saving the file without the viewer software,
select "Without viewer soft(N)…" from "Save as motion
image file(M)" of "File(F)" on the menu bar.
The "Save as motion image file" window will be displayed.
q
w
Step 6
Designate the folder and click the [Save] button.
The file will be saved with the given name in the designated folder.
When saving has failed, a message window will be displayed.
In this case, follow the instructions again from step 1.
re
Perform the following settings:
q Folder where the file is to be saved
Designate the folder where the file is to be saved.
The image file and the audio file will be saved in
the designated folder.
w "File name"
Enter the name of the file to be saved. The default
name to be given will be as the following example:
Example: 1_20051008110101_0239.n3r
(Channel number: 1, time and date:2005/Oct/8,
from 11:01:01, duration:2 minutes and 39 seconds)
The extension will be .n3r
The extension will be .h3r
e [Save] button
Click this button to save the file in the designated
folder and close the "Save as motion image file"
window.
r [Cancel] button
Click this button to cancel the file save and close
the "Save as motion image file" window.
Notes:
• Up to 2 GB per file can be saved. Anything beyond
2 GB will not be saved.
• When saving the image file together with the viewer software, the viewer software and the file will be
saved in the same folder. The name of the viewer
software will be "n3vsetup.exe" or
"Viewer.exe".
• Do not save the file onto a floppy disk. Otherwise,
saving may fail because of insufficient capacity.
• It is impossible to perform any operation during
saving.
•
When saving the audio together with the image
recorded from the same channel, only the audio file
in the same time range designated for the image
will be saved. The name of the audio file will be the
same as the image file, but the extension will be
"h3a".
•
Time range of saved image file will sometimes be
1-5 seconds longer than the designated time
range.
100
 Loading...