

Page 1
Before attempting to connect or install this product,
please read these instructions carefully and save this manual for future use.
Viewer Software
MODEL NO. WV-AS50A
■ General
The Viewer Software contains three applications: the DVD
Viewer Software, CD-R Viewer Software, and FTP Viewer
Software. On your PC, each application installed will enable
you to view the images that are backed up on DVDs or CDRs, or that are transmitted via FTP. The images are originally stored on the WJ-HD500A Digital Disk Recorder.
■ System Requirements
The following environment is required to run the Viewer
Software.
• OS: IBM-PC compatible with Microsoft Windows98/
Windows Me/ WindowsNT4.0/ Windows2000 Operating
System installed.
• CPU: Celeron 500 MHz or higher
• Memory: 64 MB or more
• 20 MB of Hard Disk space is recommended.
• Computer Display: 1 024 x 768 pixels or more, 65 000
colors or more
• CD-R Drive: Required to install the programs in the
supplied CD on the PC
• Sound Card: Sound Blaster compatible (required for
playing back audio)
•Microsoft Internet Explorer: Version 5.0 or higher
For DVD Viewer Software
• DVD-RAM Drive
• Media: DVD-RAM disk recorded with the WJ-DR200
DVD-RAM disk recorded with the WJ-HD500
(2.6 GB or 4.7 GB single sided)
For CD-R Viewer Software
• CD-ROM Drive
Note: A CD-ROM drive having forty times playback
speed or faster is recommended. Audio reproduction may be intermittent if a slower drive is used.
For FTP Viewer Software
• WJ-HDB502 Network Board: Required to have been
installed in the WJ-HD500A
• 10/100BASE-T Ethernet port: Required to connect the
PC with the WJ-HD500A
Note: For the network setup, refer to the manual included
with the WJ-HDB502 Network Board.
■ Software Contents
The software includes the applications below.
DVD Viewer Software
• DVD ViewerSoft
• DVD ViewerSoft Help
• Readme.txt
CD-R Viewer Software
• CD-R ViewerSoft
• CD-R ViewerSoft Help
• Readme.txt
FTP Viewer Software
• FTP ViewerSoft
• FTP ViewerSoft Help
• Readme.txt
■ Software Installation Procedures
Install the desired Viewer Software using the following
procedures. Only one program can be installed at one time.
Repeat the procedures when installing two or three Viewer
Software applications.
1. After the PC power up procedure, the Windows start
screen will be displayed.
2. Insert the supplied disc into the computer CD-ROM
Drive. Here this disk drive is called the d: drive but the
disk drive may be named differently.
3. Execute the Setup.exe contained in the supplied CDROM. The installer is included in each folder shown
below.
DVD Viewer Software: DVD
CD-R Viewer Software: CD-R
FTP Viewer Software: FTP
4. The initial setup window appears on the screen. Follow
the on-screen directions.
Notes:
• You will be requested to enter a password during
installation. Enter the 9-digit number following "K" found
on the code label attached to the CD-ROM.
• The software is normally installed in C:\Program Files.
Panasonic is added to the Programs in the taskbar.
• Microsoft, Windows, and WindowsNT are either registered trademarks or trademarks of Microsoft Corporation in the United
States of America and/or other countries.
• Sound Blaster is a trademark of Creative Technology, Ltd.
Installation Guide
Page 2
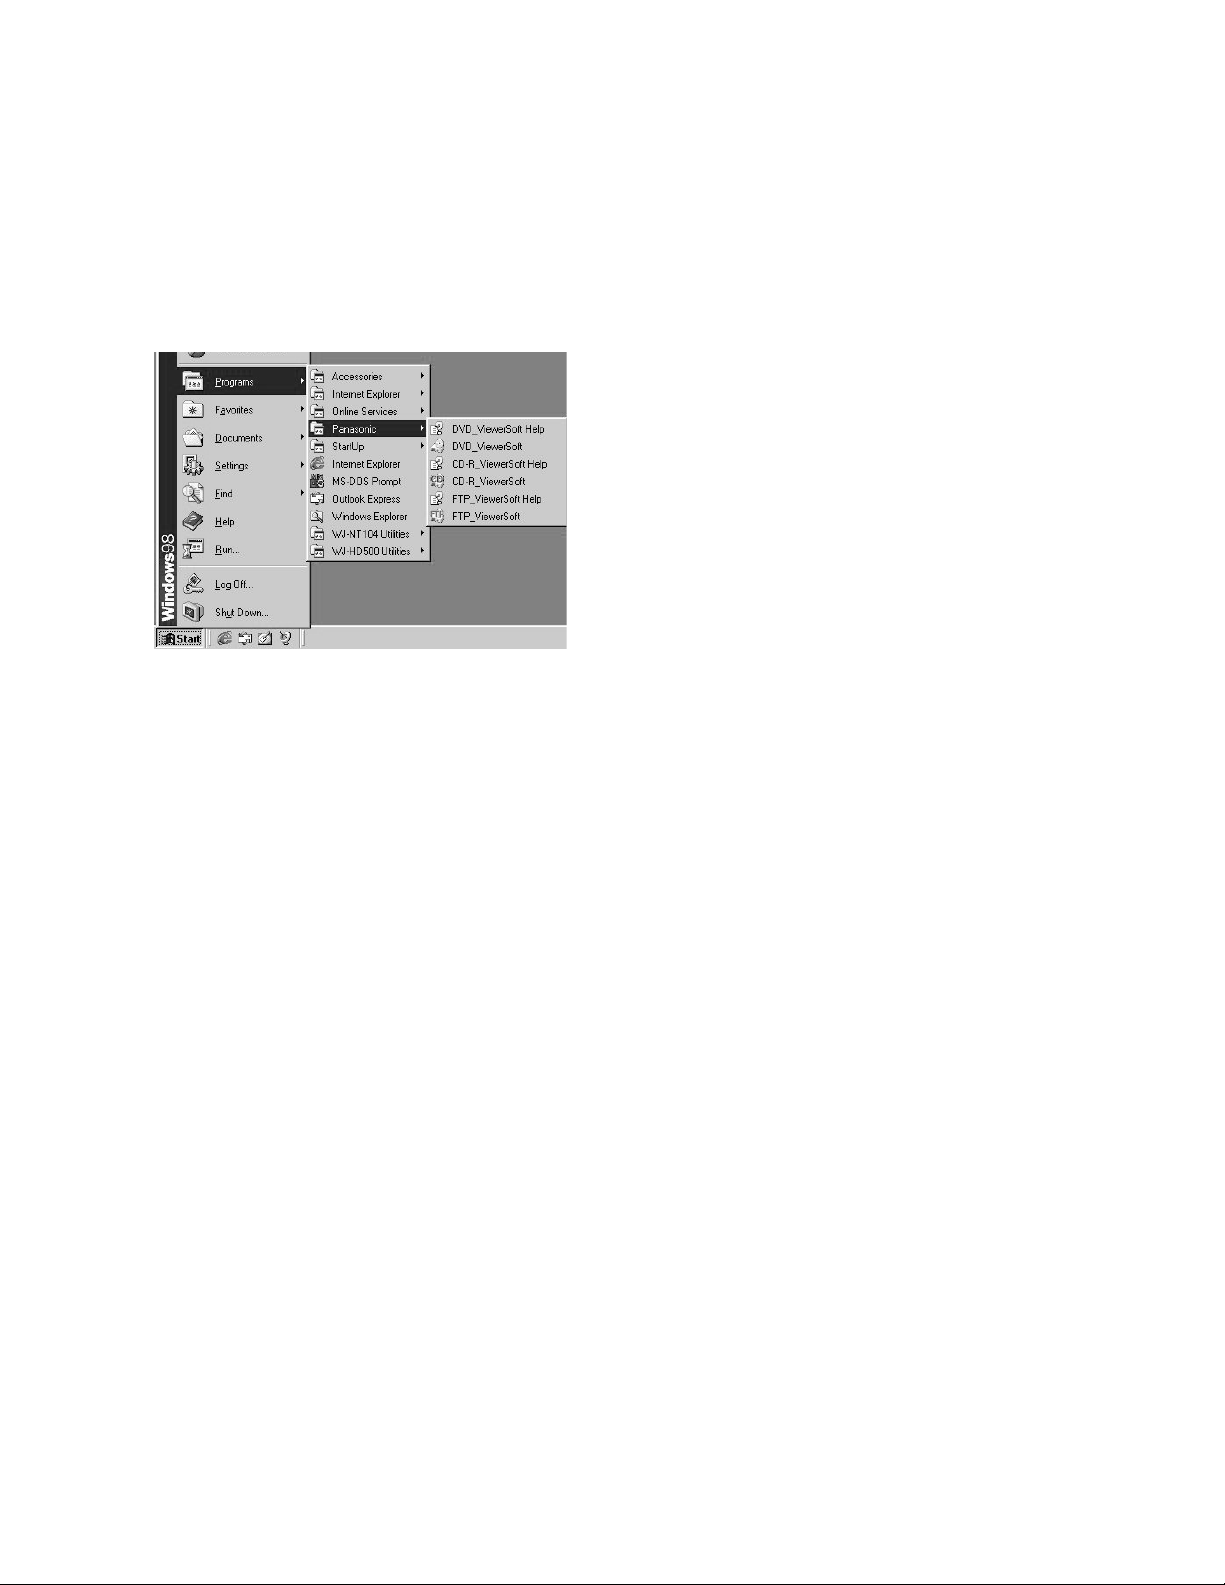
■ Start Program
Start the software using the following procedure.
1. After the PC power up procedure, the Windows start
start screen will be displayed.
2. Click the Start button. Then click Programs on the
Start menu. Point to the Panasonic menu, and click the
respective xxx ViewerSoft to activate the program.
Refer to the appropriate xxx ViewerSoft Help for
detailed operating instructions.
2
■ Uninstalling the Software
After all installations are completed, the software can be
removed with the following procedure if so desired.
1. Click the Start button, point to Settings, and then click
Control Panel in the menu. The Control Panel window
will appear.
2. Double click the Add/Remove Programs icon in the
Control Panel window.
3. In the Add/Remove Programs Properties dialog box,
click the Install/Uninstall tab.
4. Specify the appropriate “xxx ViewerSoft” to remove,
and then click the Add/Remove button.
The system will start to uninstall the program. Follow
the on-screen directions.
Page 3

3
■ Généralités
Le logiciel Viewer contient trois programmes d'application:
le logiciel DVD Viewer, le logiciel CD-R Viewer et le logiciel
FTP Viewer. Chaque programme d'application installé sur
votre ordinateur personnel vous permettra de visionner les
images sauvegardées sur des disques DVD ou CD-R ou
transmises par l'intermédiaire de FTP. Les images sont à
l'origine stockées sur l'enregistreur de disque numérique
WJ-HD500A.
■ Conditions système
L'environnement suivant est exigé pour faire tourner le
logiciel Viewer.
• Système d'exploitation: Compatible IBM-PC avec le
système d'exploitation Microsoft Windows98/ Windows
Me/ WindowsNT4.0/ Windows2000 installé.
• Unité centrale de traitement: Celeron 500 MHz ou
supérieur
•Mémoire: 64 Mo ou davantage
• 20 Mo d'espace sur le disque dur recommandé.
• Visuel d'ordinateur: 1 024 x 768 pixels ou davantage,
65 000 couleurs ou davantage
• Lecteur CD-R: Requis pour installer les programmes
inscrits sur le CD fourni sur l'ordinateur personnel
• Carte son: Sound Blaster compatible (requis pour la
reproduction du son)
•Microsoft Internet Explorer: Version 5.0 ou après
Pour le logiciel DVD-RAM Viewer
• Lecteur DVD-RAM
• Médias:
Disque DVD-RAM enregistré avec le WJ-DR200
Disque DVD-RAM enregistré avec le WJ-HD500
(2,6 Go ou 4,7 Go une seule face)
Pour le logiciel CD-R Viewer
• Lecteur CD-ROM
Remarque: Un lecteur de CD-ROM ayant une vitesse
de lecture 40 fois plus rapide ou supérieure est
recommandé. La reproduction du son risque d'être
entrecoupée avec un lecteur à vitesse plus lente.
Pour le logiciel FTP Viewer
• Carte réseau WJ-HDB502: Il est nécessaire qu'elle soit
installée dans le WJ-HD500A
• Port Ethernet 10/100BASE-T: Requis pour le raccordement à l'ordinateur personnel avec le WJ-HD500A
Remarque: En ce qui concerne le paramétrage réseau,
se réferer à la notice d'instructions qui accompagne
la carte réseau WJ-HDB502.
■ Contenu du logiciel
Le logiciel comprend les applications indiquées cidessous.
Logiciel DVD Viewer
• DVD ViewerSoft
• DVD ViewerSoft Help
• Fichier Readme.txt
Logiciel CD-R Viewer
• CD-R ViewerSoft
• CD-R ViewerSoft Help
• Fichier Readme.txt
Logiciel FTP Viewer
• FTP ViewerSoft
• FTP ViewerSoft Help
• Fichier Readme.txt
■ Procédure d'installation de logiciel
Installez le logiciel Viewer souhaité en utilisant les
procédures suivantes. Un seul programme peut être
installé à la fois. Refaire la procédure pour installer deux ou
trois programmes d'application Viewer.
1. Après avoir effectué la mise sous tension de
l'ordinateur personnel, la fenêtre de démarrage de
Windows apparaît.
2. Insérez le disque fourni dans le lecteur de CD-ROM de
l'ordinateur. Ici, ce lecteur de disque est appelé lecteur
d: mais ils est possible de lui attribuer un autre nom.
3. Exécutez le programme d'installation Setup.exe qui se
trouve sur le disque CD-ROM. Le programme d'installation se trouve dans chaque dossier mentionné cidessous.
Logiciel DVD Viewer: DVD
Logiciel CD-R Viewer: CD-R
Logiciel FTP Viewer: FTP
4. La fenêtre initiale d'installation apparaît sur l'écran.
Suivez les directives affichées sur l'écran.
Remarques:
• Il vous sera demander de saisir un mot de passe
pendant l'installation. Saisissez un nombre à 9 chiffres
suivant "K" qui est sur l'étiquette de code collée sur le
CD-ROM.
• Le logiciel est normalement installé dans le répertoire
"C:\Program Dossiers". "Panasonic" est ajouté aux
programmes dans la barre des tâches.
• Microsoft, Windows et Windows NT sont des marques déposées enregistrées ou des marques déposées de la firme
Microsoft Corporation aux États-Unis d'Amérique et/ou dans d'autres pays.
• Sound Blaster est une marque déposée de la firme Creative Technology, Ltd.
VERSION FRANÇAISE
(FRENCH VERSION)
Page 4

■ Démarrez le programme
Démarrez le logiciel en utilisant le procédé indiqué cidessous.
1. Après avoir effectué la mise sous tension de
l'ordinateur personnel, la fenêtre de démarrage de
Windows apparaît.
2. Cliquez le bouton Démarrer. Puis cliquez Programmes
du menu Démarrer. Pointez sur le menu Panasonic et
cliquez xxx ViewerSoft pour activer le programme.
Référez-vous à Aide (Help) respectif de xxx ViewerSoft
pour obtenir des instructions détaillées sur la façon de
procéder.
■ Désinstallation du logiciel
Après que toutes les opérations d'installation aient été
accomplies, le logiciel peut être supprimé avec le procédé
indiqué ci-dessous, le cas échéant.
1. Cliquez le bouton Démarrer, pointer sur Paramètres,
puis cliquez sur Panneau de configuration dans le
menu. La fenêtre Panneau de configuration apparaîtra.
2. Double-cliquez sur l'icône Ajout/Suppression de
programmes dans la fenêtre Panneau de configuration.
3. Dans la boîte de dialogue de propriétés de Ajout/Suppression de programmes, cliquez l'onglet Installer/
Désinstaller.
4. Spécifiez "xxx ViewerSoft" respectif, puis cliquez
Ajout/Suppression.
Le système démarre pour désinstaller le programme.
Suivez les directives qui s'affichent à l'écran.
Panasonic Canada Inc.
5770 Ambler Drive, Mississauga,
Ontario, L4W 2T3 Canada (905) 624-5010
Panasonic Sales Company
Division of Matsushita Electric of Puerto Rico Inc.
Ave. 65 de Infanteria. Km. 9.5
San Gabriel Industrial Park, Carolina,
Puerto Rico 00985 (809) 750-4300
Panasonic Security and Digital Imaging Company
A Division of Matsushita Electric Corporation of America
Executive Office: One Panasonic Way 3E-7, Secaucus, New Jersey 07094
Regional Offices:
Northeast: One Panasonic Way, Secaucus, NJ 07094 (201) 348-7303
Southern: 1225 Northbrook Parkway, Suite 1-160, Suwanee, GA 30024 (770) 338-6838
Midwest: 1707 North Randall Road, Elgin, IL 60123 (847) 468-5211
Western: 6550 Katella Ave., Cypress, CA 90630 (714) 373-7840
2002 © Matsushita Communication Industrial Co., Ltd. All rights reserved. NM0102-1042 V8QA5970BN Printed in Japan
N 19 Imprimé au Japon
 Loading...