

Panasonic WSLP1100, WSLS1100, WSLM1100 User Manual

www.GEAppliances.com
WSLS1100
WSLP1100
WSLM1100
Owner’s Manual &
Installation Instructions
Washers
175D1807P328 49-90063-2 12-02 JR
Safety Information . . . . . . . . . . 2, 3
Operating Instructions
Control and Indicator Settings . . .5, 6
Loading and Using the Washer . .7, 8
Special Washer Features . . . . . . . . .4
Installation Instructions
Alcove or Closet Installation . . . . 12
Electrical Requirements . . . . . . . . 10
Grounding Instructions . . . . . . . . 10
Installation Requirements . . . . . . . 9
Leveling the Washer . . . . . . . . . . . 10
Washer Connections for
Portable Model WSLP1100 . . . 13–16
Washer Connections for
Stationary Models WSLS1100
and WSLM1100 . . . . . . . . . . . 11, 12
Troubleshooting Tips
Before You Call For Service . . 17–20
Status Indicators . . . . . . . . . . . . . . 17
Consumer Support
Consumer Support . . . . . Back Cover
Product Registration . . . . . . . . 21, 22
Warranty . . . . . . . . . . . . . . . . . . . . 23
Write the model and serial
numbers here:
#
#
You can find them on a label
on the back of the washer.

2
■ Install or store where it will not be exposed
to temperatures below freezing or exposed
to the weather.
■ Properly ground washer to conform with all
governing codes and ordinances. Follow details
in Installation Instructions.
IMPORTANT SAFETY INFORMATION.
READ ALL INSTRUCTIONS BEFORE USING.
WARNING!
For your safety, the information in this manual must be followed to minimize the risk of fire
or explosion, electric shock, or to prevent property damage, personal injury, or loss of life.
WATER HEATER SAFETY
Under certain conditions hydrogen gas may be produced in a water heater that has not been used for
two weeks or more. Hydrogen gas can be explosive under these circumstances.
If the hot water has not been used for two weeks or more, prevent the possibility of damage or injury by
turning on
all hot water faucets and allowing them to run for several minutes. Do this before using any
electrical appliance
which is connected to the hot water system. This simple procedure will allow any
built-up hydrogen gas to escape. Since the gas is flammable, do not smoke or use an open flame or
appliance during this process.
PROPER INSTALLATION
This washer must be properly installed and located in accordance with the Installation Instructions before it is used.
■ Keep the area underneath and around your
appliances free of combustible materials such
as lint, paper, rags, chemicals, etc.
■ Close supervision is necessary if this appliance is
used by or near children. Do not allow children to
play on, with, or inside this or any other appliance.
YOUR LAUNDRY AREA
■ Never reach into washer while it is moving.
Wait until the machine has completely stopped
before opening the lid.
■ Do not use sharp objects around the control
panel. They may damage it.
■ Do not mix chlorine bleach with ammonia or
acids such as vinegar and/or rust remover. Mixing
different chemicals can produce a toxic gas which
may cause death.
■ Do not wash or dry articles that have been
cleaned in, washed in, soaked in, or spotted
with combustible or explosive substances (such as
wax, oil, paint, gasoline,
degreasers, dry-cleaning
solvents, kerosene, etc.) which may ignite or
explode. Do not add these substances to the wash
water. Do not use or place these substances around
your washer or dryer during operation.
■
The laundry process can reduce the flame
retardancy of fabrics. To avoid such a result,
carefully follow the garment manufacturer’s
wash and care instructions.
■ To minimize the possibility of electric shock, unplug
this appliance from the power supply or disconnect
the washer at the household distribution panel by
removing the fuse or switching off the circuit
breaker before attempting any maintenance or
cleaning. NOTE: Turning the washer off does NOT
disconnect the appliance from the power supply.
■ Never attempt to operate this appliance if it is
damaged, malfunctioning, partially disassembled,
or has missing or broken parts, including a damaged
cord or plug.
WHEN USING THE WASHER
Use this
appliance
only for its
intended
purpose as
described in
this Owner’s
Manual.
Consumer Support
Troubleshooting Tips Operating Instructions Safety InstructionsInstallation Instructions
3
Consumer SupportTroubleshooting TipsOperating InstructionsSafety Instructions Installation Instructions
www.GEAppliances.com
■ Turn off water faucets to relieve pressure on
hoses and valves and to minimize leakage if
a break or rupture should occur. Check the
condition of the fill hoses; they may need
replacement after 5 years.
■ Before discarding a washer, or removing
it from service, remove the washer lid to
prevent children from hiding inside.
■ Do not attempt to repair or replace any part of
this appliance unless specifically recommended
in this Owner’s Manual, or in published userrepair instructions that you understand and
have the skills to carry out.
■ Do not tamper with controls.
WHEN NOT IN USE
READ AND FOLLOW THIS SAFETY INFORMATION CAREFULLY.
SAVE THESE INSTRUCTIONS
4
Special washer features.
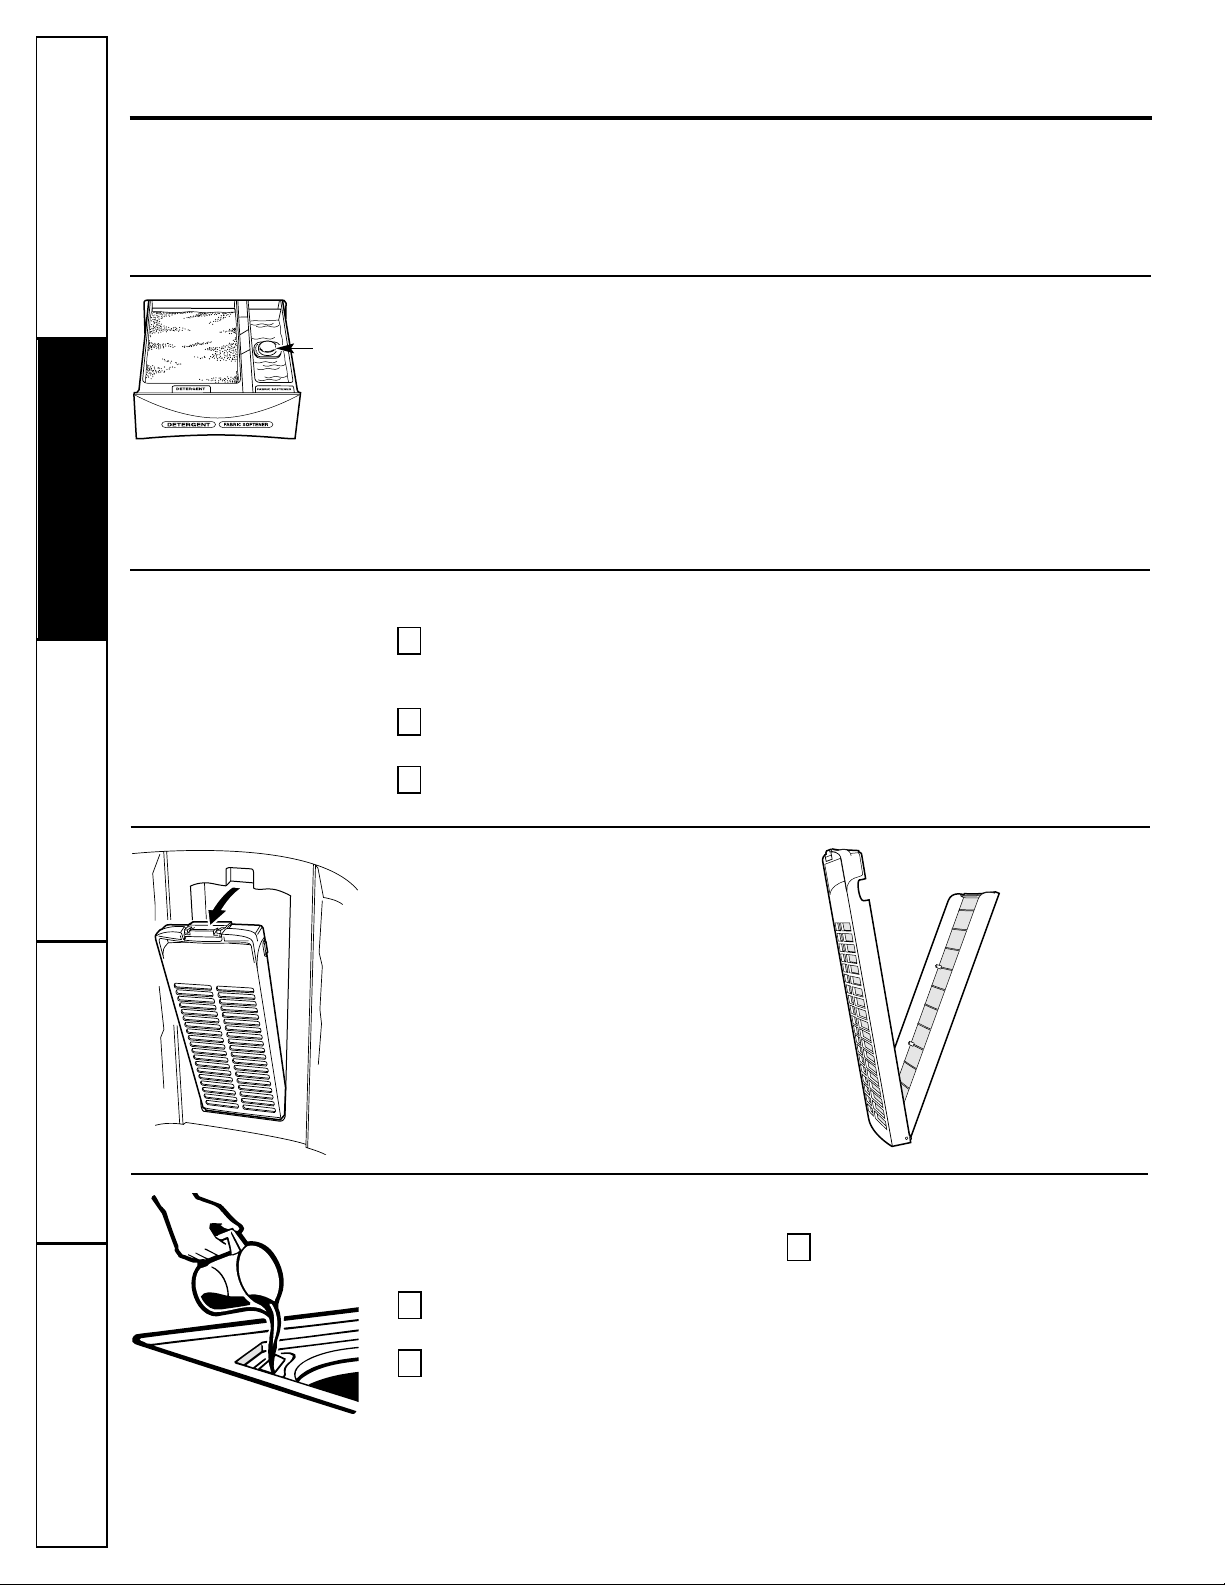
Detergent and Fabric Softener Dispenser Drawer
The detergent and fabric softener
dispensers will automatically release their
contents at the proper time during the
cycle.
To Use the Detergent Dispenser:
Add measured detergent to the dispenser.
Make sure detergent is spread evenly and
is level.
To Use the Fabric Softener Dispenser:
Use only liquid fabric softener. Pour into
dispenser, using amount recommended
on package.
■ Do not fill any higher than the top of the
maximum fill tower.
■ Never pour fabric softener directly on
clothes. It may stain them.
Cleaning the Detergent and Fabric Softener Dispenser Drawer
Remove the drawer by opening it fully
then tilting the front of the door down.
Pull out.
Rinse the drawer with water. If necessary
use a soft cloth to wipe off any debris.
Line up the drawer with the opening and
push the dispenser drawer straight in.
3
2
1
Lint Filters
Clean the lint filters inside the walls of
the wash basket once a week for best
filtering results.
To remove:
Press the tab at the top of the filter and
pull out.
To clean:
Open the filter. Clean the filter with
a toothbrush.
Maximum
Fill Tower
Liquid Bleach Dispenser
The dispenser dilutes liquid chlorine bleach
before it reaches into your wash load.
Check clothing care labels for special
instructions.
Measure liquid bleach carefully,
following instructions on the bottle.
■ Never pour undiluted liquid chlorine bleach
directly onto clothes or into the wash basket.
■ Do not pour powdered bleach into bleach
dispenser.
Before starting the washer, pour
measured amount of bleach directly
into bleach dispenser. Avoid splashing
or over-filling dispenser. If you prefer
to use powdered bleach, add it into the
wash basket with your detergent.
■ Do not mix chlorine bleach with ammonia or
acids such as vinegar and/or rust remover.
Mixing can produce a toxic gas which may
cause death.
3
2
1
Before starting the washer:
• Load the laundry in the washer.
• Add the detergent and fabric softener to the dispenser drawer.
• Add bleach (if needed) to the bleach dispenser.
Consumer Support
Troubleshooting Tips Operating Instructions Safety InstructionsInstallation InstructionsTroubleshooting Tips Installation Instructions Safety InstructionsOperating Instructions
5
Consumer SupportTroubleshooting TipsOperating InstructionsSafety Instructions Installation Instructions
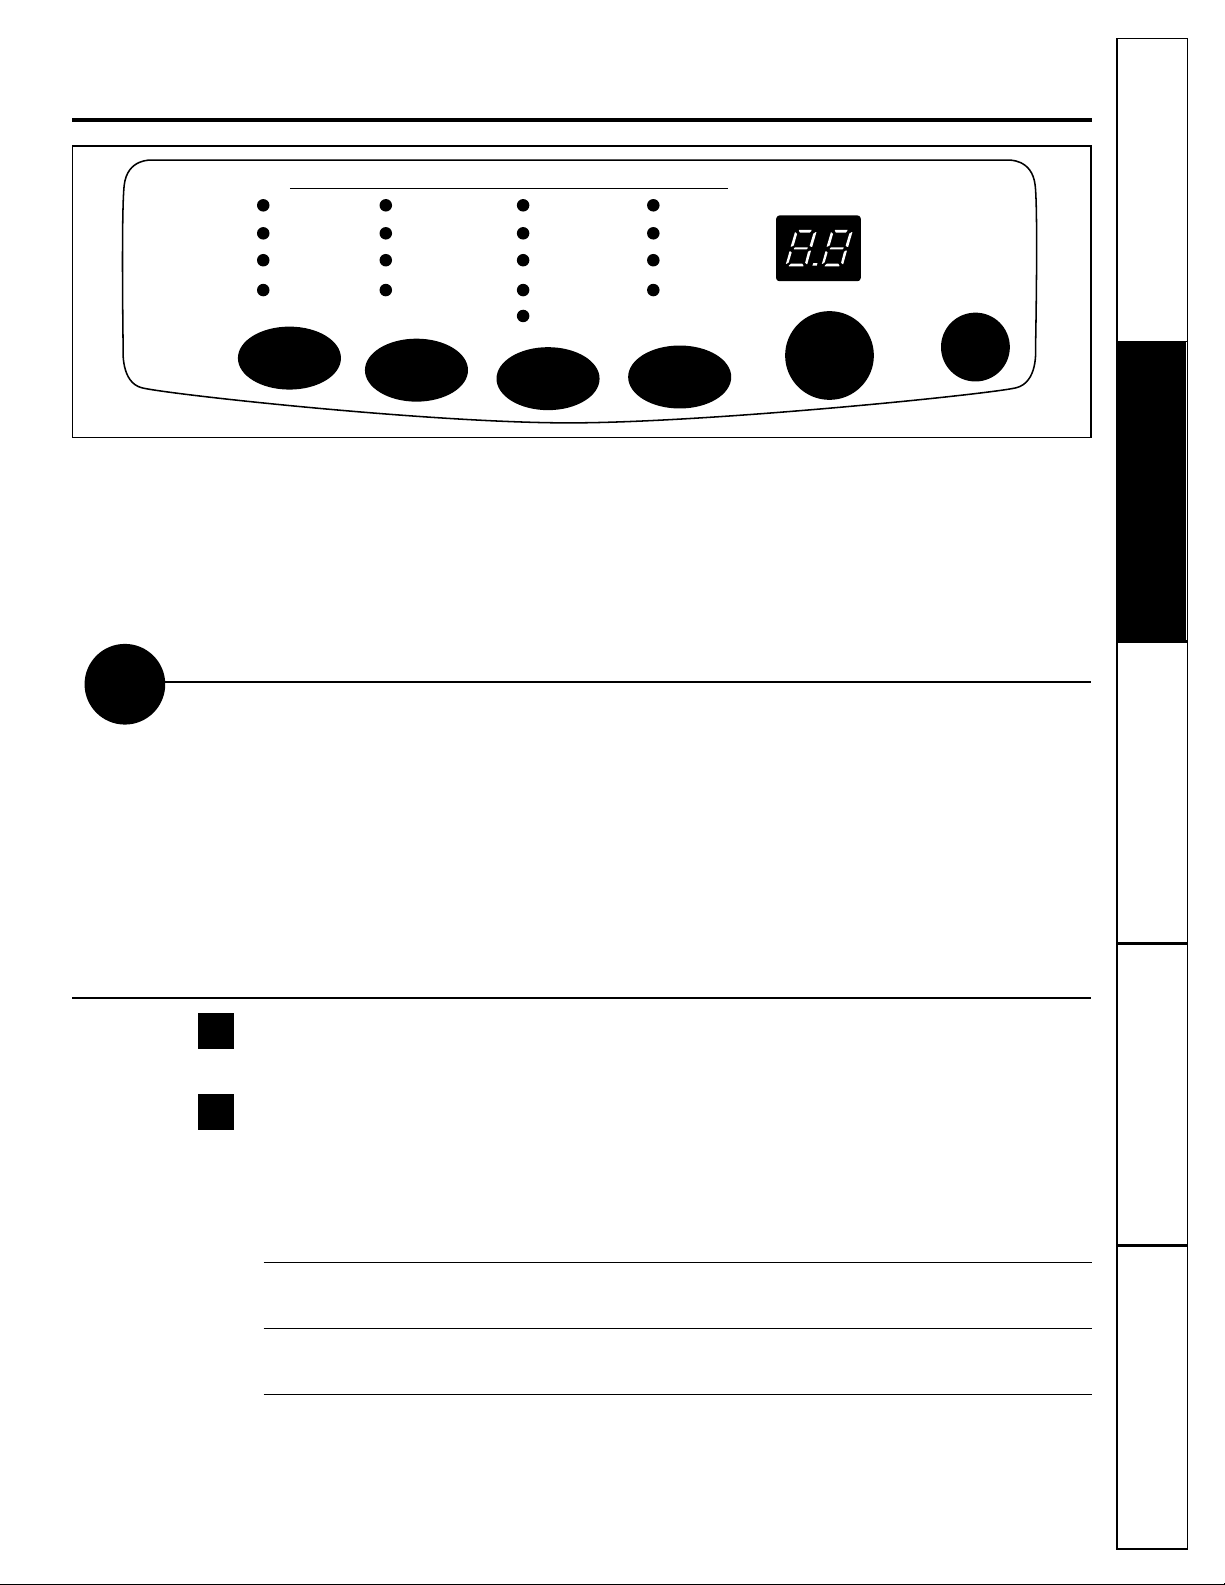
About the control and indicator settings. www.GEAppliances.com
POWER ON/OFF
Press the POWER ON/OFF button to turn on the control panel.
WASH OPTIONS
Choose the wash options you would like to include in the cycle. Press the WASH OPTIONS
button until all the options you want to include are lit. More than one option can be selected.
PRESOAK For heavily soiled clothes that need to be soaked before washing. This option can be used as
part of the WASH CYCLE you select.
NORMAL This option is automatically selected when you press POWER ON/OFF.
WASH
RINSE ONLY This option gives one rinse cycle only. For example: Use this cycle when you need to remove
excess detergent from your clothing.
SPIN ONLY This option gives one spin cycle only. For example: Use this cycle when you need to remove
excess water from your clothing.
2
1
To Use Automatic One-Touch Washing
START
PAUSE
The LOAD SENSING feature automatically senses the size of your load, fills with the appropriate
amount of water, and calculates the amount of wash time required to complete the cycle.
NOTE: When using the LOAD SENSING feature, it is normal for the agitator to rotate before water fills
in the tub.
To choose the automatic LOAD SENSING feature, press POWER ON/OFF.
The following indicators will light up automatically: NORMAL WASH, LOAD SENSING and COLD/COLD.
Then simply press START/PAUSE.
To Choose Your Own Cycle Selections
Before starting the washer:
• Load the laundry in the washer.
• Add the detergent and fabric softener to the dispenser drawer.
• Add bleach (if needed) to the bleach dispenser.
PRESOAK
NORMAL
WASH
RINSE ONLY
SPIN ONLY
WASH
OPTIONS
CLOTHES CARE CYCLE SELECTION
EXTRA LARGE
LARGE
MEDIUM
SMALL
LOAD
SIZE
COLORS
WHITES
DELICATES
QUICK WASH
LOAD SENSING
WASH
CYCLE
HOT/COLD
WARM/WARM
WARM/COLD
COLD/COLD
TEMP
WASH/RINSE
TIME
REMAINING
START
PAUSE
MIN
POWER
ON/OFF
6
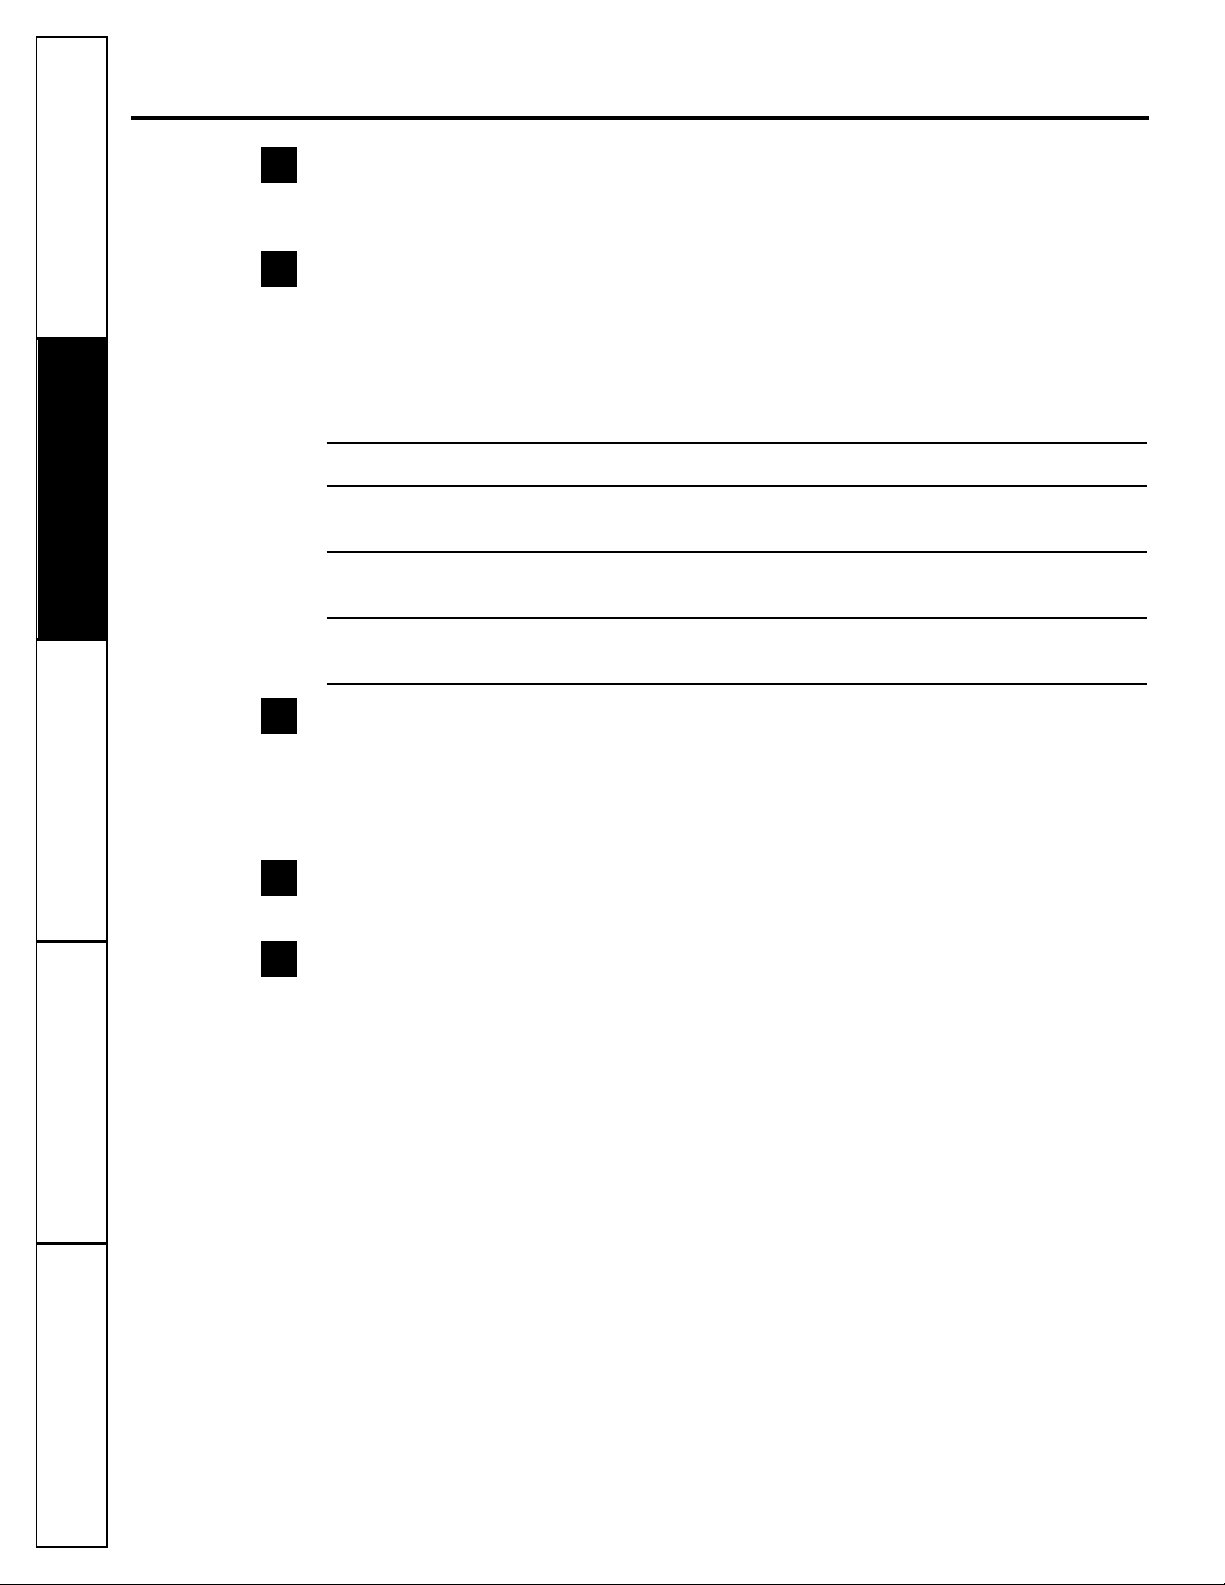
About the control and indicator settings.
LOAD SIZE
The water level should just cover the clothes. Adjust the load size accordingly. Loosely load
clothes no higher than the top row of holes in the washer basket.
WASH CYCLE
These wash cycles control the length of the washing process. The chart below will help match
the WASH CYCLE setting to your specific laundry needs. When a cycle is selected, the automatic
temperature that the machine defaults to, can be changed to whatever temperature you
desire.
Default Wash/Rinse Temperatures
COLORS For easy care and wrinkle-resistant items. WARM / COLD
WHITES For heavy to lightly soiled cotton, household HOT / COLD
linens, towels, work and play clothes.
DELICATES For lingerie and delicate fabrics with COLD / COLD
light to normal soils.
QUICK WASH For one or two lightly soiled items WARM / COLD
that are needed quickly.
TEMP WASH/RINSE
Select the water temperature for the wash and rinse cycles. Always follow fabric manufacturer’s
care label or instructions when laundering.
NOTE FOR PORTABLE MODELS: When using a one-faucet connection, adjust the water flow mix
and water temperature at the faucet.
START/PAUSE
Press the START/PAUSE button to start the wash cycle.
TIME REMAINING
Displays the time remaining in the wash cycle. It will also display Status Indicators.
See Troubleshooting Tips.
NOTE: When the cycle is complete the control panel will turn off automatically.
7
6
5
4
3
Consumer Support
Troubleshooting Tips Operating Instructions Safety InstructionsInstallation InstructionsTroubleshooting Tips Installation Instructions Safety InstructionsOperating Instructions
7
Consumer SupportTroubleshooting TipsOperating InstructionsSafety Instructions Installation Instructions
Loading and using the washer.
Always follow fabric manufacturer’s care label when laundering. www.GEAppliances.com
Sorting Wash Loads
Proper Use of Detergent
Add clothes and detergent, then start the washer.
Using too little or too much detergent is a common
cause of laundry problems.
You can use less detergent if you have soft water,
a smaller load, or a lightly soiled load.
Loading the Washer
Load dry items loosely, no higher than the top row
of holes in the washer tub. When loading wet items
make sure you set the load/water level high enough
to allow the items to move freely. Water level should
just cover the clothes. To add items after washer has
started, open the lid and add the additional items.
Close the lid. Washer will start automatically.
■ Do not wrap large items like sheets around the
agitator.
■ Do not wash fabrics containing flammable materials
(waxes, cleaning fluids, etc.).
■ When the lid is up, a signal will sound and “Lo” will
appear in the display. The washer will not agitate
with the lid up.
Colors
Whites
Lights
Darks
Soil
Heavy
Normal
Light
Fabric
Delicates
Easy Care
Sturdy Cottons
Lint
Lint Producers
Lint Collectors
Care and Cleaning of the Washer
Wash Basket: Leave the lid open after washing to
allow moisture to evaporate. If you want to clean the
basket use a clean soft cloth dampened with liquid
detergent, then rinse. (Do not use harsh
or gritty cleaners.)
Fill Hoses: Hoses connecting washer to faucet
should be replaced every 5 years.
Exterior: Immediately wipe off any spills. Wipe
with damp cloth. Try not to hit surface with
sharp objects.
Moving and Storage: Ask the service technician to
remove water from drain pump and hoses. Do not
store the washer where it will be exposed to the
weather.
Long Vacations: Be sure water supply is shut off at
faucets. Drain all water from hoses if weather will
be below freezing.
Loading and using the washer.
8
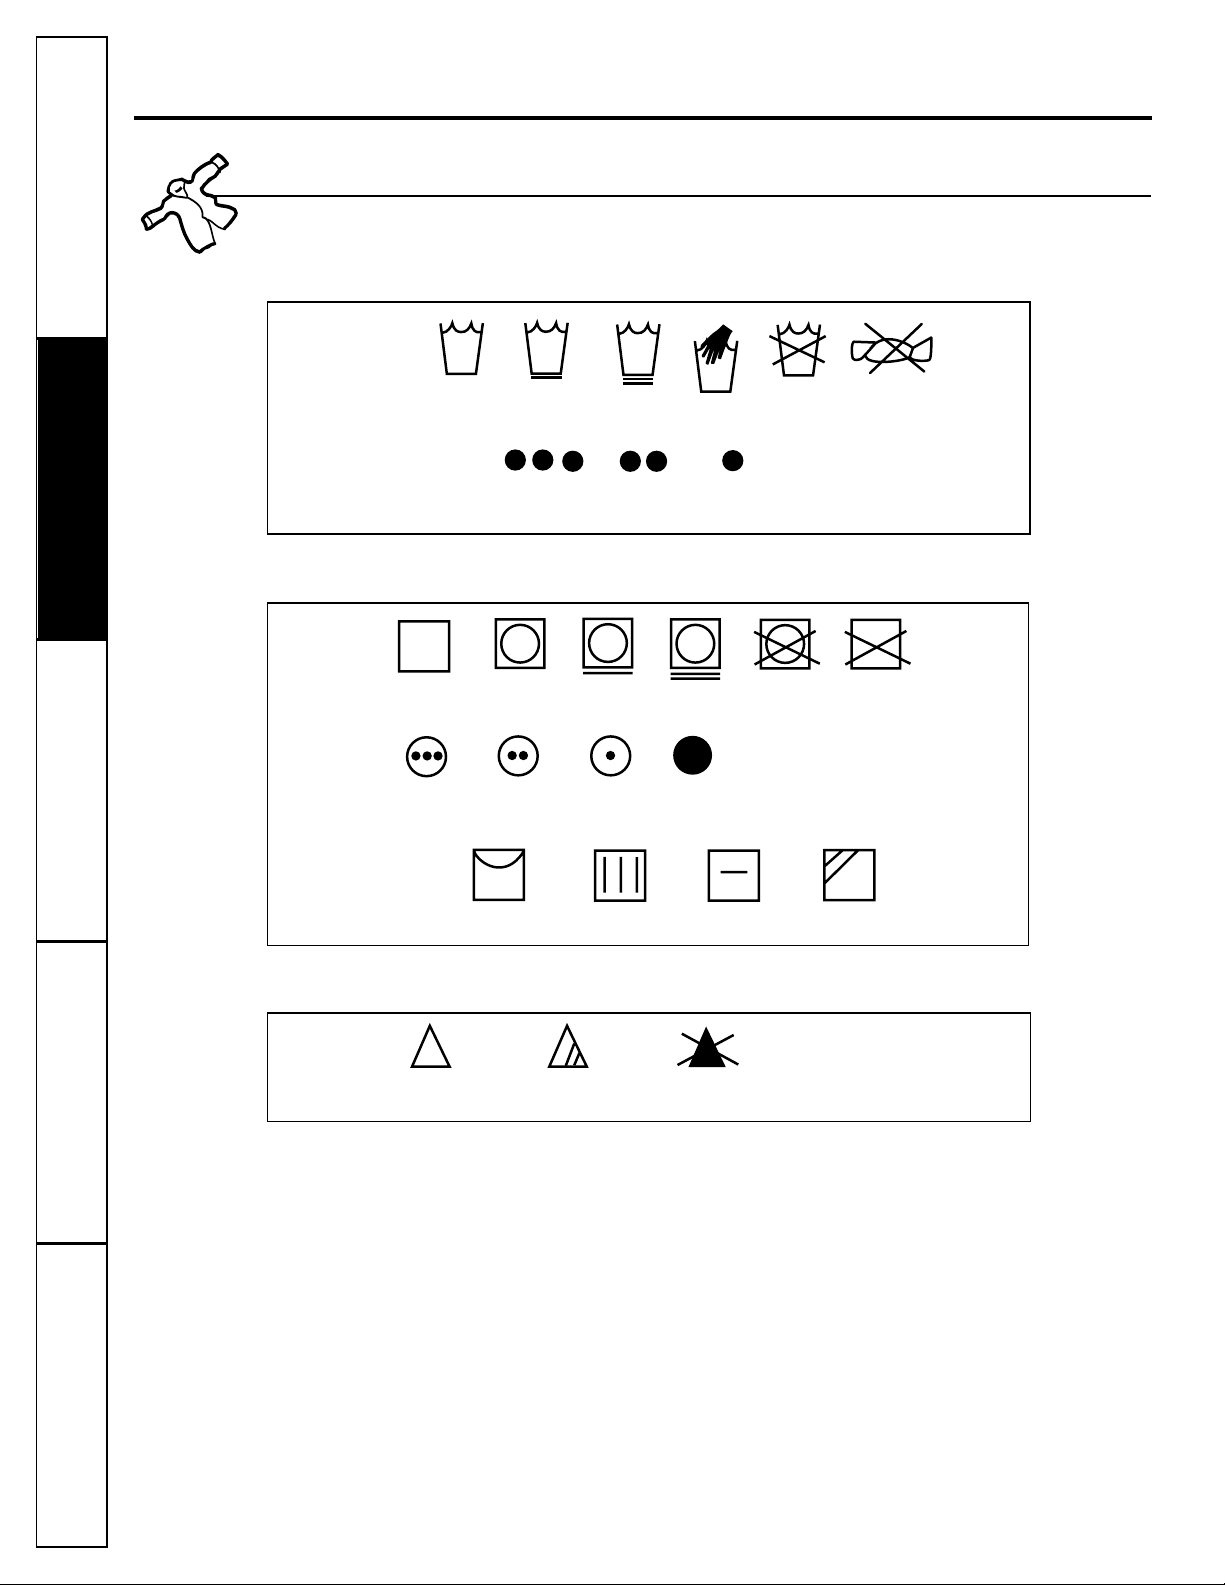
Fabric Care Labels
Machine
wash
cycle
Normal
Permanent Press/
wrinkle resistant
Gentle/
delicate
Hand wash
Do not wash Do not wring
Water
temperature
Hot
(50°C/120°F)
Warm
(40°C/105°F)
Cold/cool
(30°C/85°F)
Tumble
dry
Dry
Normal
Permanent Press/
wrinkle resistant
Gentle/
delicate
Do not tumble dry
Do not dry
(used with
do not wash)
Heat
setting
High
Medium
Low
No heat/air
Special
instructions
Line dry/
hang to dry
Drip dry
Dry flat
In the shade
Bleach
symbols
Any bleach
(when needed)
Only non-chlorine bleach
(when needed)
Do not bleach
WASH LABELS
DRY LABELS
BLEACH LABELS
Below are fabric care label “symbols” that affect the clothing you will be laundering.
Consumer Support
Troubleshooting Tips Operating Instructions Safety InstructionsInstallation InstructionsTroubleshooting Tips Installation Instructions Safety InstructionsOperating Instructions
 Loading...