

Panasonic WORKIO DP-CL21, DP-CL21M User Manual

Settings and Printing NetworkMaintenance and Spec.
Settings and Printing
Settings and Printing
Basics . . . . . . . . . . . . . . . . . . . . . . . . . . . . . . . . . . . . . . . . 3
Contents of Basics Section . . . . . . . . . . . . . . . . . . . . . . . . . . . . . . 3
Part Names . . . . . . . . . . . . . . . . . . . . . . . . . . . . . . . . . . . . . . . . . . . 5
About Media . . . . . . . . . . . . . . . . . . . . . . . . . . . . . . . . . . . . . . . . . . 6
Loading Media . . . . . . . . . . . . . . . . . . . . . . . . . . . . . . . . . . . . . . . . . 8
Using the Printer Panel (Menu Mode) . . . . . . . . . . . . . . . . . . . . . 21
Menu Table . . . . . . . . . . . . . . . . . . . . . . . . . . . . . . . . . . . . . . . . . . 24
1
Outline for Menus . . . . . . . . . . . . . . . . . . . . . . . . . . . . . . . . . . . . . 30
Outline for Operation . . . . . . . . . . . . . . . . . . . . . . . . . . . . . . . . . . 47
Performing Check and Print (Windows Only) . . . . . . . . . . . . . . 48
Performing Memory Print (Windows Only) . . . . . . . . . . . . . . . . 54
Performing Confidential Print (Windows-PCL Only) . . . . . . . . . 58
Adjusting the Color Density (Color Calibration) . . . . . . . . . . . . 63
Setting the “ADJ. to Media” (Windows Only) . . . . . . . . . . . . . . . 69
Manual Duplex Printing (Windows Only) . . . . . . . . . . . . . . . . . . 73
Using the HDD Maintenance Mode . . . . . . . . . . . . . . . . . . . . . . . 76
Index . . . . . . . . . . . . . . . . . . . . . . . . . . . . . . . . . . . . . . . . . . . . . . . 79
Windows . . . . . . . . . . . . . . . . . . . . . . . . . . . . . . . . . . . . 81
Contents of Windows Section . . . . . . . . . . . . . . . . . . . . . . . . . . . 81
Setting the PCL Printer Driver . . . . . . . . . . . . . . . . . . . . . . . . . . . 84
Setting the PS Printer Driver (DP-CL21M only) . . . . . . . . . . . . 145
Performing Automatic Duplex Printing . . . . . . . . . . . . . . . . . . 183
Watermark Printing . . . . . . . . . . . . . . . . . . . . . . . . . . . . . . . . . . . 185
Status Display . . . . . . . . . . . . . . . . . . . . . . . . . . . . . . . . . . . . . . . 187
HDD Utility . . . . . . . . . . . . . . . . . . . . . . . . . . . . . . . . . . . . . . . . . . 206
Settings and Printing NetworkMaintenance and Spec.
Settings and Printing
Remote Maintenance Setting Tool . . . . . . . . . . . . . . . . . . . . . . 231
Index . . . . . . . . . . . . . . . . . . . . . . . . . . . . . . . . . . . . . . . . . . . . . . 237
Macintosh . . . . . . . . . . . . . . . . . . . . . . . . . . . . . . . . . . 241
Contents of Macintosh Section . . . . . . . . . . . . . . . . . . . . . . . . . 241
Setting the PS Printer Driver (Mac OS 8.1 - Mac OS 9.2) . . . . 243
Setting the PS Printer Driver (Mac OS X 10.1) . . . . . . . . . . . . . 263
Status Display (Mac OS 8.1 - Mac OS 9.2) . . . . . . . . . . . . . . . . 282
Index . . . . . . . . . . . . . . . . . . . . . . . . . . . . . . . . . . . . . . . . . . . . . . 299
2

Basics
Basics
Windows
Macintosh
Contents of Basics Section
Contents of Basics Section
Contents of Basics Section . . . . . . . . . . . . . . . . . . . . . . . . . . . . . . 3
Part Names . . . . . . . . . . . . . . . . . . . . . . . . . . . . . . . . . . . . . . . . . . . 5
About Media . . . . . . . . . . . . . . . . . . . . . . . . . . . . . . . . . . . . . . . . . . 6
Available Media . . . . . . . . . . . . . . . . . . . . . . . . . . . . . . . . . . . . . . . . . 6
Recommended Media . . . . . . . . . . . . . . . . . . . . . . . . . . . . . . . . . . . . 7
Loading Media . . . . . . . . . . . . . . . . . . . . . . . . . . . . . . . . . . . . . . . . . 8
Using the Media Tray. . . . . . . . . . . . . . . . . . . . . . . . . . . . . . . . . . . . . 9
Using the Multi-purpose Tray. . . . . . . . . . . . . . . . . . . . . . . . . . . . . . 14
Using the Printer Panel (Menu Mode) . . . . . . . . . . . . . . . . . . . . . 21
Menu Table . . . . . . . . . . . . . . . . . . . . . . . . . . . . . . . . . . . . . . . . . . 24
3
Basics
Outline for Menus . . . . . . . . . . . . . . . . . . . . . . . . . . . . . . . . . . . . . 30
Check and Print . . . . . . . . . . . . . . . . . . . . . . . . . . . . . . . . . . . . . . . . 30
Memory Print . . . . . . . . . . . . . . . . . . . . . . . . . . . . . . . . . . . . . . . . . . 31
Confidential Print . . . . . . . . . . . . . . . . . . . . . . . . . . . . . . . . . . . . . . . 32
Test Page. . . . . . . . . . . . . . . . . . . . . . . . . . . . . . . . . . . . . . . . . . . . . 33
Color Calibration . . . . . . . . . . . . . . . . . . . . . . . . . . . . . . . . . . . . . . . 34
Maintenance . . . . . . . . . . . . . . . . . . . . . . . . . . . . . . . . . . . . . . . . . . 35
Tray . . . . . . . . . . . . . . . . . . . . . . . . . . . . . . . . . . . . . . . . . . . . . . . . . 37
Print . . . . . . . . . . . . . . . . . . . . . . . . . . . . . . . . . . . . . . . . . . . . . . . . . 40
PCL . . . . . . . . . . . . . . . . . . . . . . . . . . . . . . . . . . . . . . . . . . . . . . . . . 41
NW Protocol Setup (Network Protocol Setup) . . . . . . . . . . . . . . . . . 43
I/O Setting . . . . . . . . . . . . . . . . . . . . . . . . . . . . . . . . . . . . . . . . . . . . 44
ADJ. to Media . . . . . . . . . . . . . . . . . . . . . . . . . . . . . . . . . . . . . . . . . 45
Other . . . . . . . . . . . . . . . . . . . . . . . . . . . . . . . . . . . . . . . . . . . . . . . . 45
Mono Page Detect . . . . . . . . . . . . . . . . . . . . . . . . . . . . . . . . . . . . . . 46
Outline for Operation . . . . . . . . . . . . . . . . . . . . . . . . . . . . . . . . . . 47
Performing Check and Print (Windows Only) . . . . . . . . . . . . . . 48
Saving a Print Job . . . . . . . . . . . . . . . . . . . . . . . . . . . . . . . . . . . . . . 48
Printing a Check and Print Job . . . . . . . . . . . . . . . . . . . . . . . . . . . . 50
Deleting a Check and Print Job . . . . . . . . . . . . . . . . . . . . . . . . . . . . 52
Performing Memory Print (Windows Only) . . . . . . . . . . . . . . . . 54

Basics
Basics
Printing a Memory Print Job. . . . . . . . . . . . . . . . . . . . . . . . . . . . . . . 54
Deleting a Memory Print Job . . . . . . . . . . . . . . . . . . . . . . . . . . . . . . 56
Windows
Macintosh
Contents of Basics Section
Performing Confidential Print (Windows-PCL Only) . . . . . . . . . 58
Printing a Confidential Print Job. . . . . . . . . . . . . . . . . . . . . . . . . . . . 58
Deleting a Confidential Print Job . . . . . . . . . . . . . . . . . . . . . . . . . . . 61
Adjusting the Color Density (Color Calibration) . . . . . . . . . . . . 63
Printing a Color Calibration Test Print Page . . . . . . . . . . . . . . . . . . 63
Adjusting the Density for All Colors Simultaneously . . . . . . . . . . . . 66
Adjusting the Density for Each Color Independently . . . . . . . . . . . . 67
Setting the “ADJ. to Media” (Windows Only) . . . . . . . . . . . . . . . 69
Installing the Print Media Test Pattern. . . . . . . . . . . . . . . . . . . . . . . 69
Printing the Print Media Test Pattern. . . . . . . . . . . . . . . . . . . . . . . . 71
Setting the ADJ. to Media . . . . . . . . . . . . . . . . . . . . . . . . . . . . . . . . 72
Manual Duplex Printing (Windows Only) . . . . . . . . . . . . . . . . . . 73
4
Using the HDD Maintenance Mode . . . . . . . . . . . . . . . . . . . . . . . 76
Index . . . . . . . . . . . . . . . . . . . . . . . . . . . . . . . . . . . . . . . . . . . . . . . 79
Basics
Basics
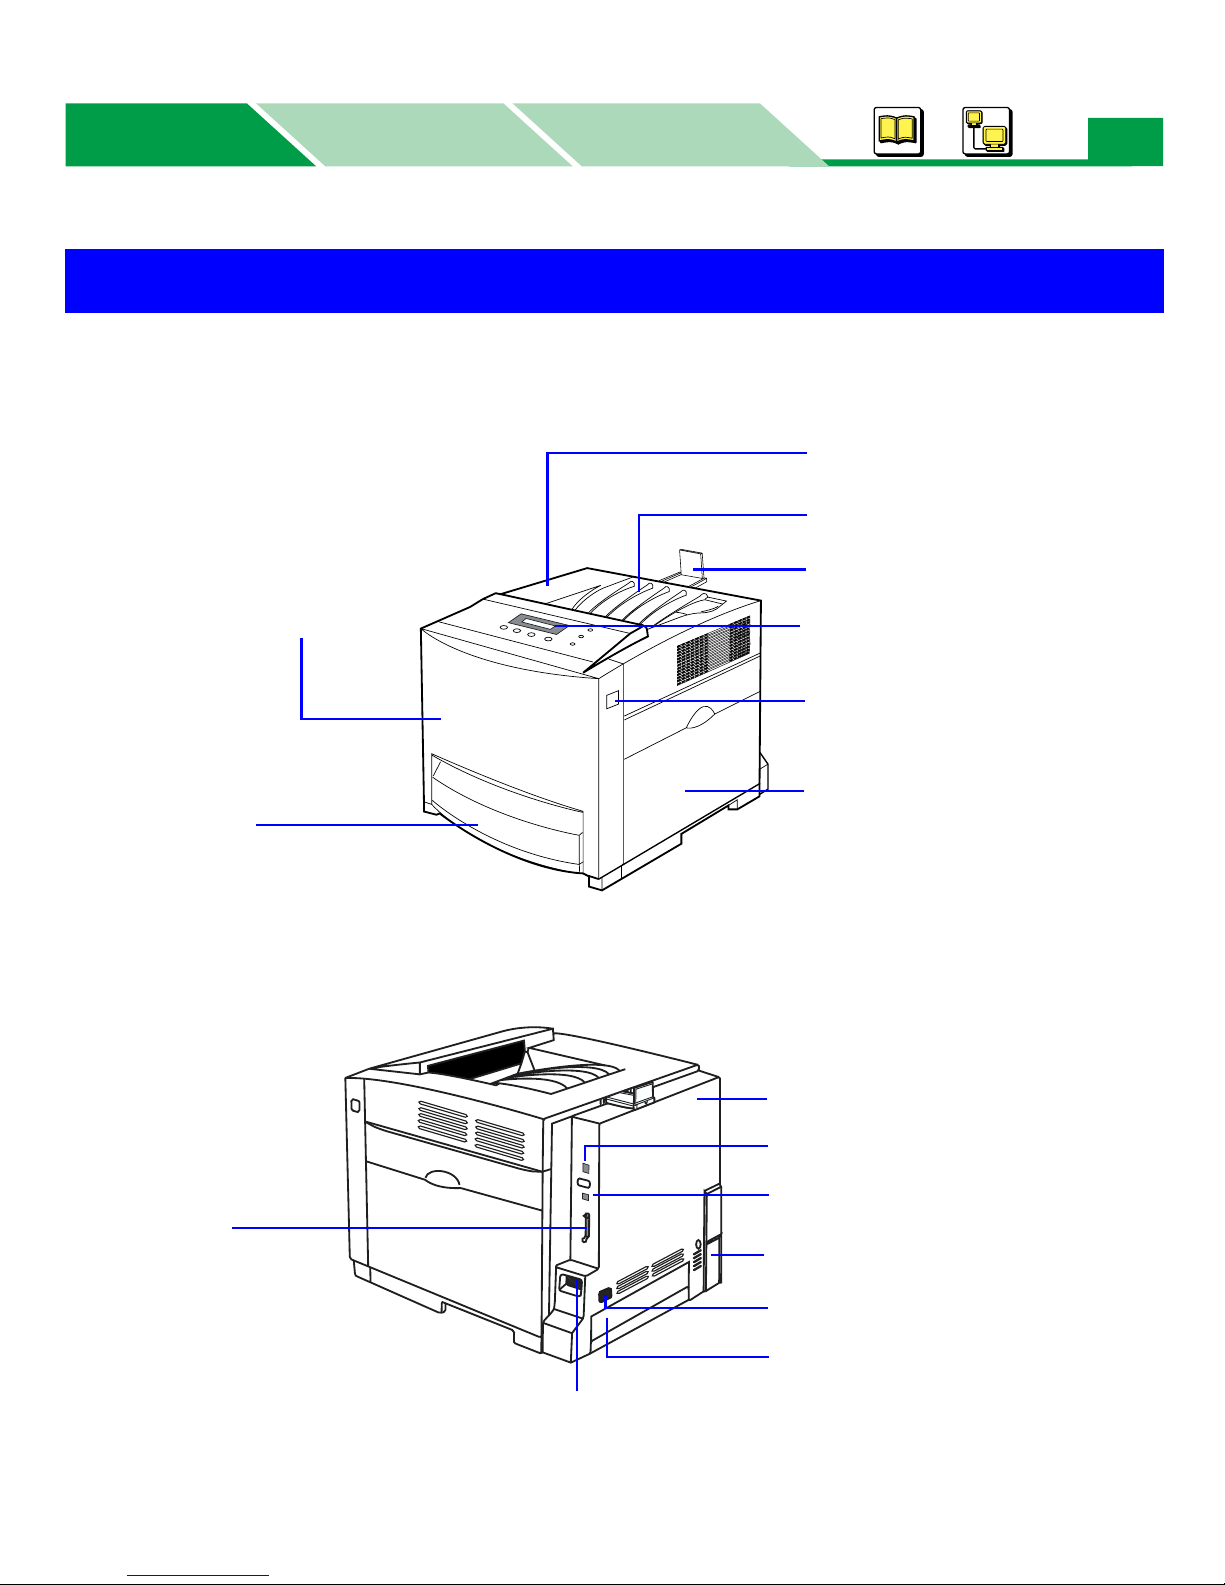
Part Names
■ Front View
Windows
Macintosh
5
Part Names
Toner door
Output tray
Paper support (see page 12, 16)
Front door
Media tray (see page 9) /
Multi-purpose tray
(see page 14)
■ Rear View
Parallel interface
connector
Printer panel (see page 21)
Front door release
Right side door
Rear cover
Network interface connector
USB interface connector
Optional paper feeder cable cover
AC inlet
Tray cover
Power switch
Basics
Basics
Windows
Macintosh
About Media
About Media
See the tables below for available media. For the notes and detailed media specification, refer to
“Media” on page 86 in “Maintenance and Specifications” section.
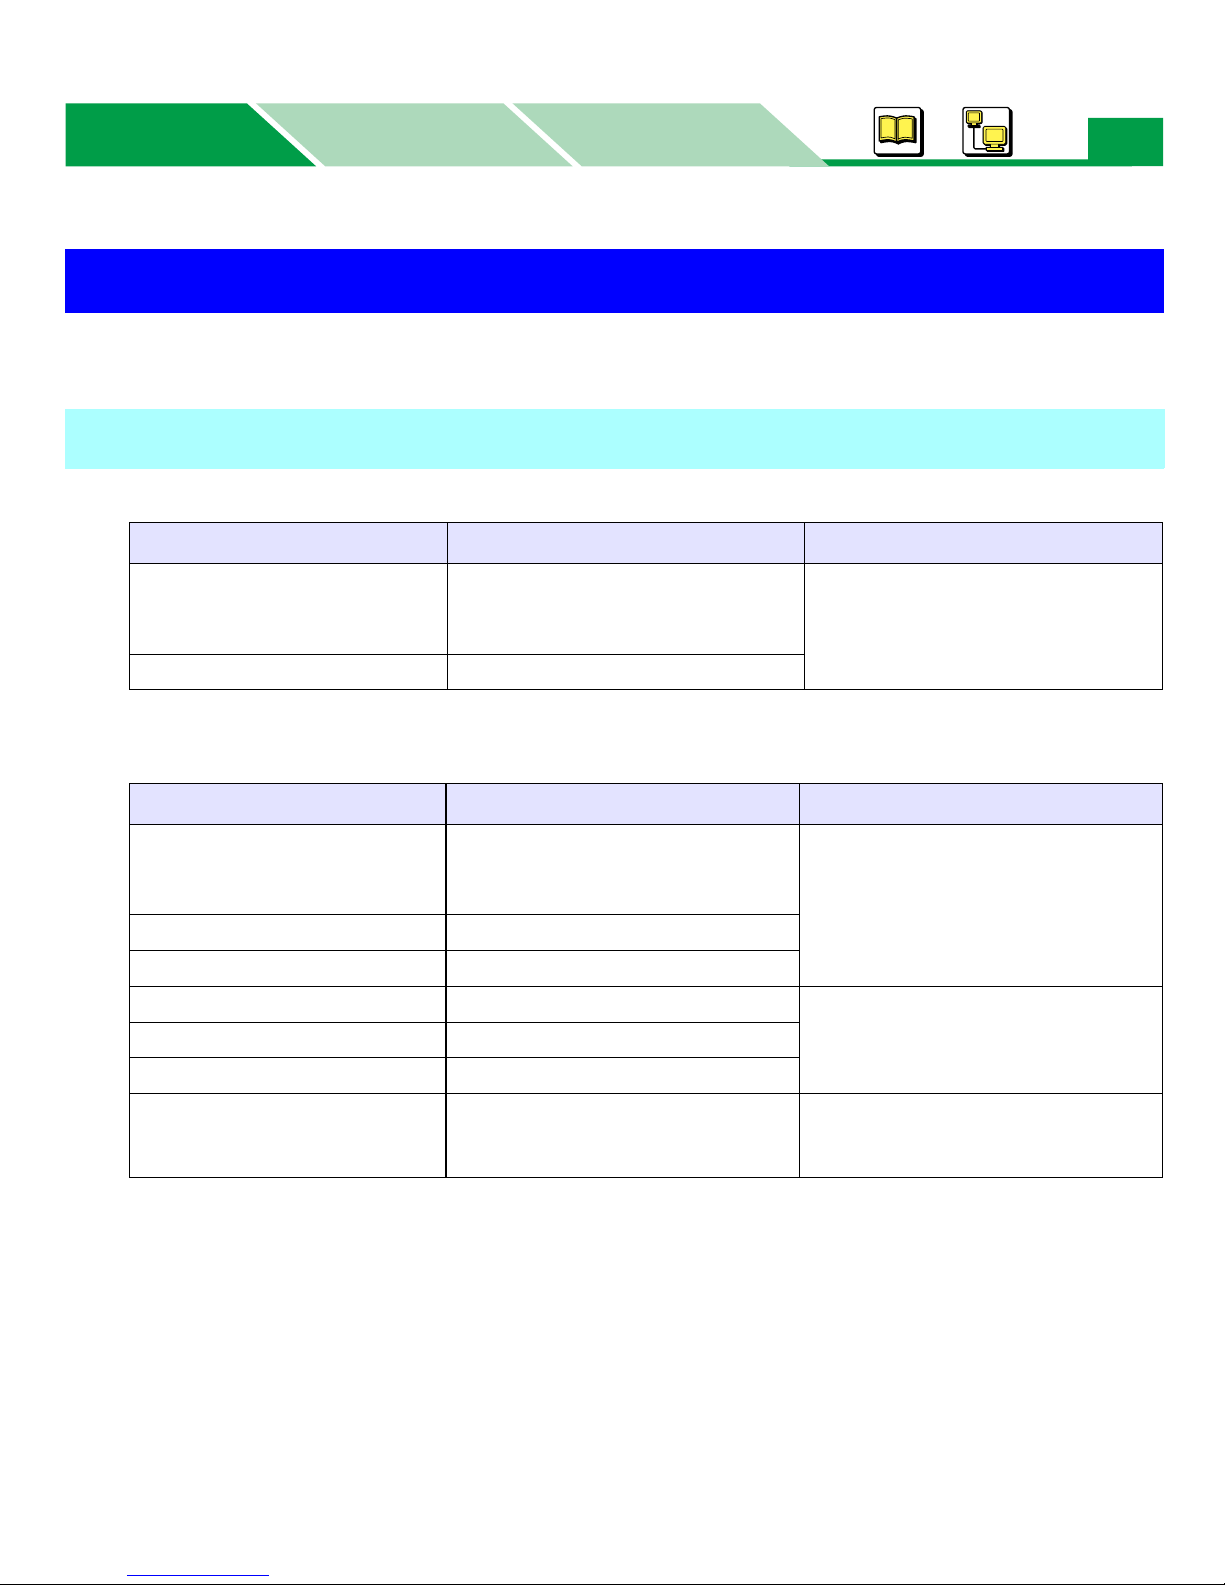
Available Media
■ For Tray 1 (Standard Media Tray)
Media Type Media Weight Media Size
Plain paper*
Bond/Letterhead
Recycled paper
Thin paper
1
75 - 105 g/m2 (20 - 28 lb.)
2
60 - 75 g/m
(16 - 20 lb.)
Letter, Legal, A4, B5 (JIS)
6
■ For Multi-purpose Tray
Media Type Media Weight Media Size
Plain paper*
Bond/Letterhead
Recycled paper
Thin paper
Thick paper/Card
Coated Paper
Transparency*
Label*
Envelope
*1See “Recommended Media” on page 7.
2
Available media size : Min. 90 x 148 mm (3.5 x 5.8 in.)
*
1
75 - 105 g/m2 (20 - 28 lb.)
60 - 75 g/m
105 - 165 g/m
120 g/m
1
1
: Max. 216 x 356 mm (8.5 x 14 in.)
–
–
75 - 90 g/m
2
(16 - 20 lb.)
2
2
(32 lb.)
2
(20 - 24 lb.)
(28 - 44 lb.)
Letter, Legal, Executive, A4, A5,
B5 (JIS), Envelope #9, Envelope
#10, Envelope Monarch,
Envelope C5, Envelope C6,
Envelope DL, Custom*
Letter, A4
Envelope #9, Envelope #10,
Envelope Monarch, Envelope
C5, Envelope C6, Envelope DL
2
Basics
Basics
Windows
Macintosh
About Media
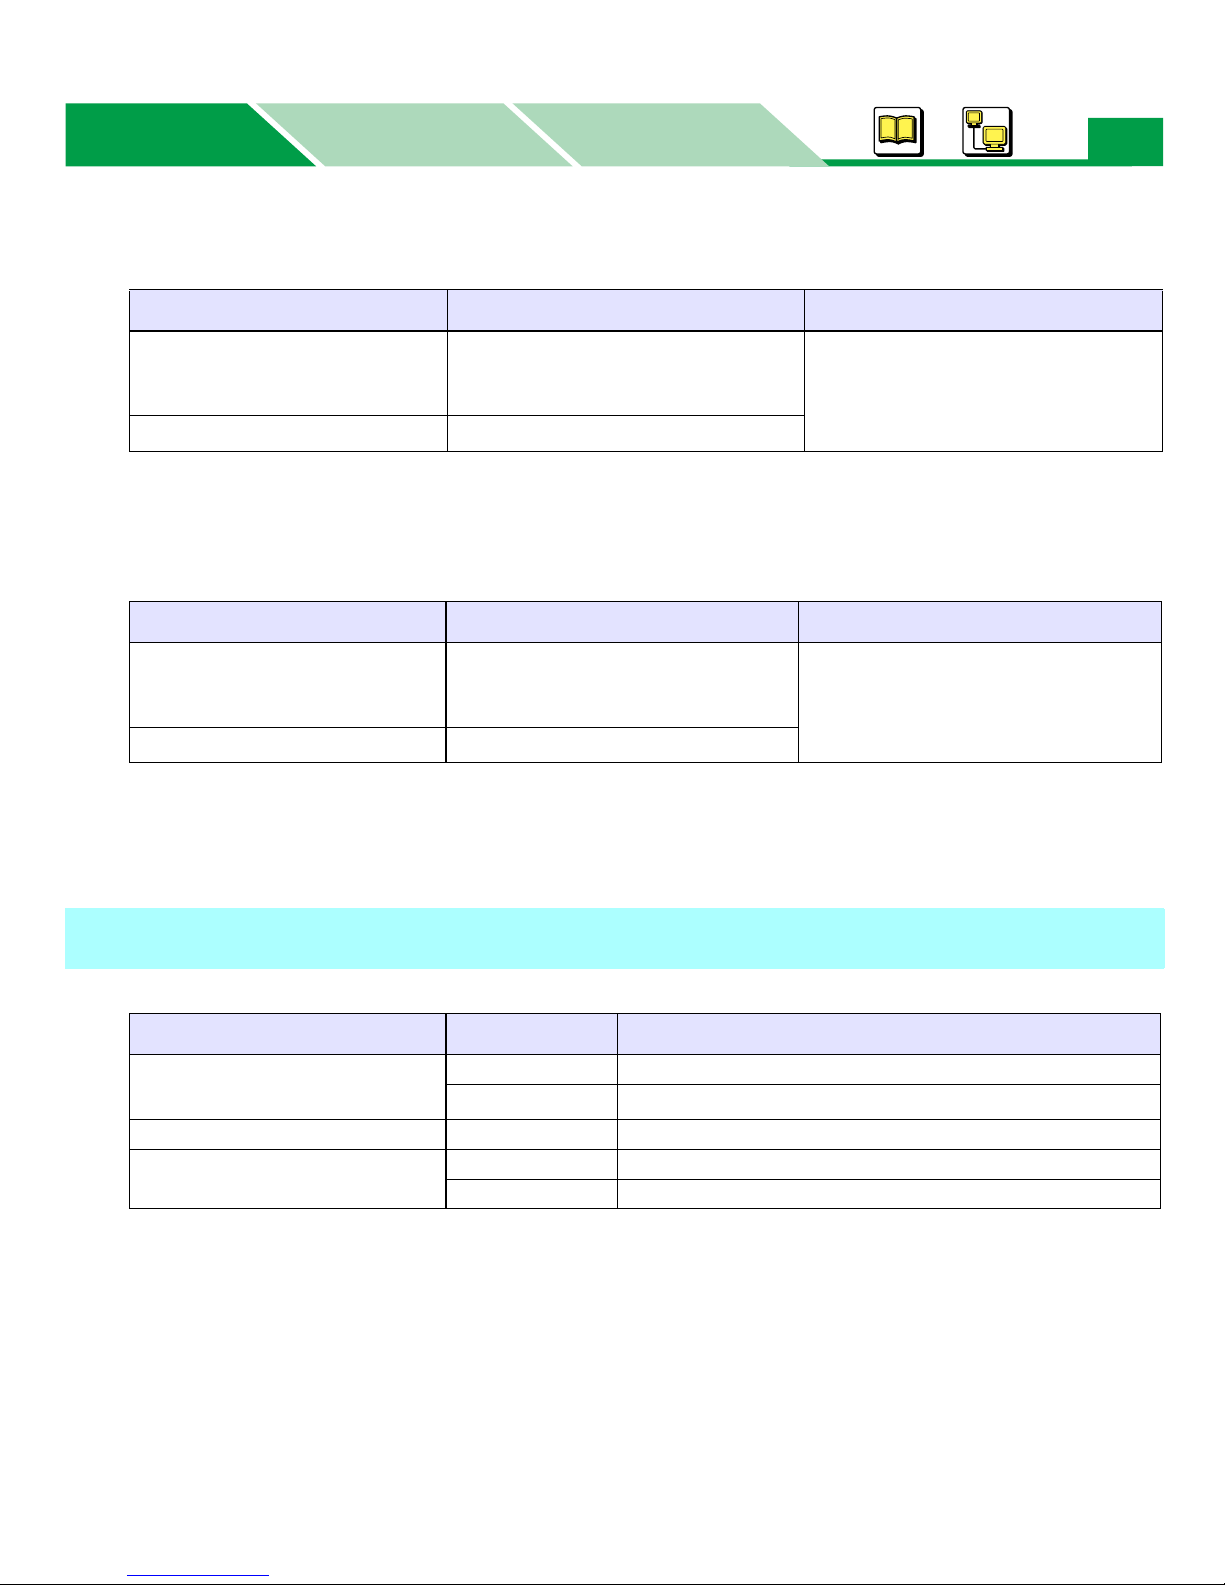
■ For Tray 2 / Tray 3 (Optional Paper Feeder)
Media Type Media Weight Media Size
Plain paper
Bond/Letterhead
Recycled paper
Thin paper
75 - 105 g/m
60 - 75 g/m
2
(20 - 28 lb.)
2
(16 - 20 lb.)
Letter, Legal, A4, B5 (JIS)
■ For Automatic Duplex Printing
To perform automatic duplex printing, the automatic duplex unit option must be installed in the printer.
Media Type Media Weight Media Size
Plain paper
Bond/Letterhead
Recycled paper
Thin paper
75 - 105 g/m
60 - 75 g/m
2
(20 - 28 lb.)
2
(16 - 20 lb.)
Letter, Legal, A4, B5 (JIS)
7
NOTE:
• Automatic duplex printing is not available from the multi-purpose tray.
Recommended Media
Media Type Media Size Recommendation
Plain paper
Transparency Letter / A4 3M CG3300
Label
Letter Hammermil Laser Print 24 lb.
A4
Letter Avery 5160 - Avery 5163, Avery 5660 - Avery 5663
A4 Avery L7159 - Avery L7164
ENSO 4CC Premium 80 g/m
2
Basics
Basics
Windows
Macintosh
8
Loading Media
Loading Media
See the Setup Guide for the following instructions:
• Installing the toner cartridges and print cartridges
• Connecting cables
• Installing the printer software
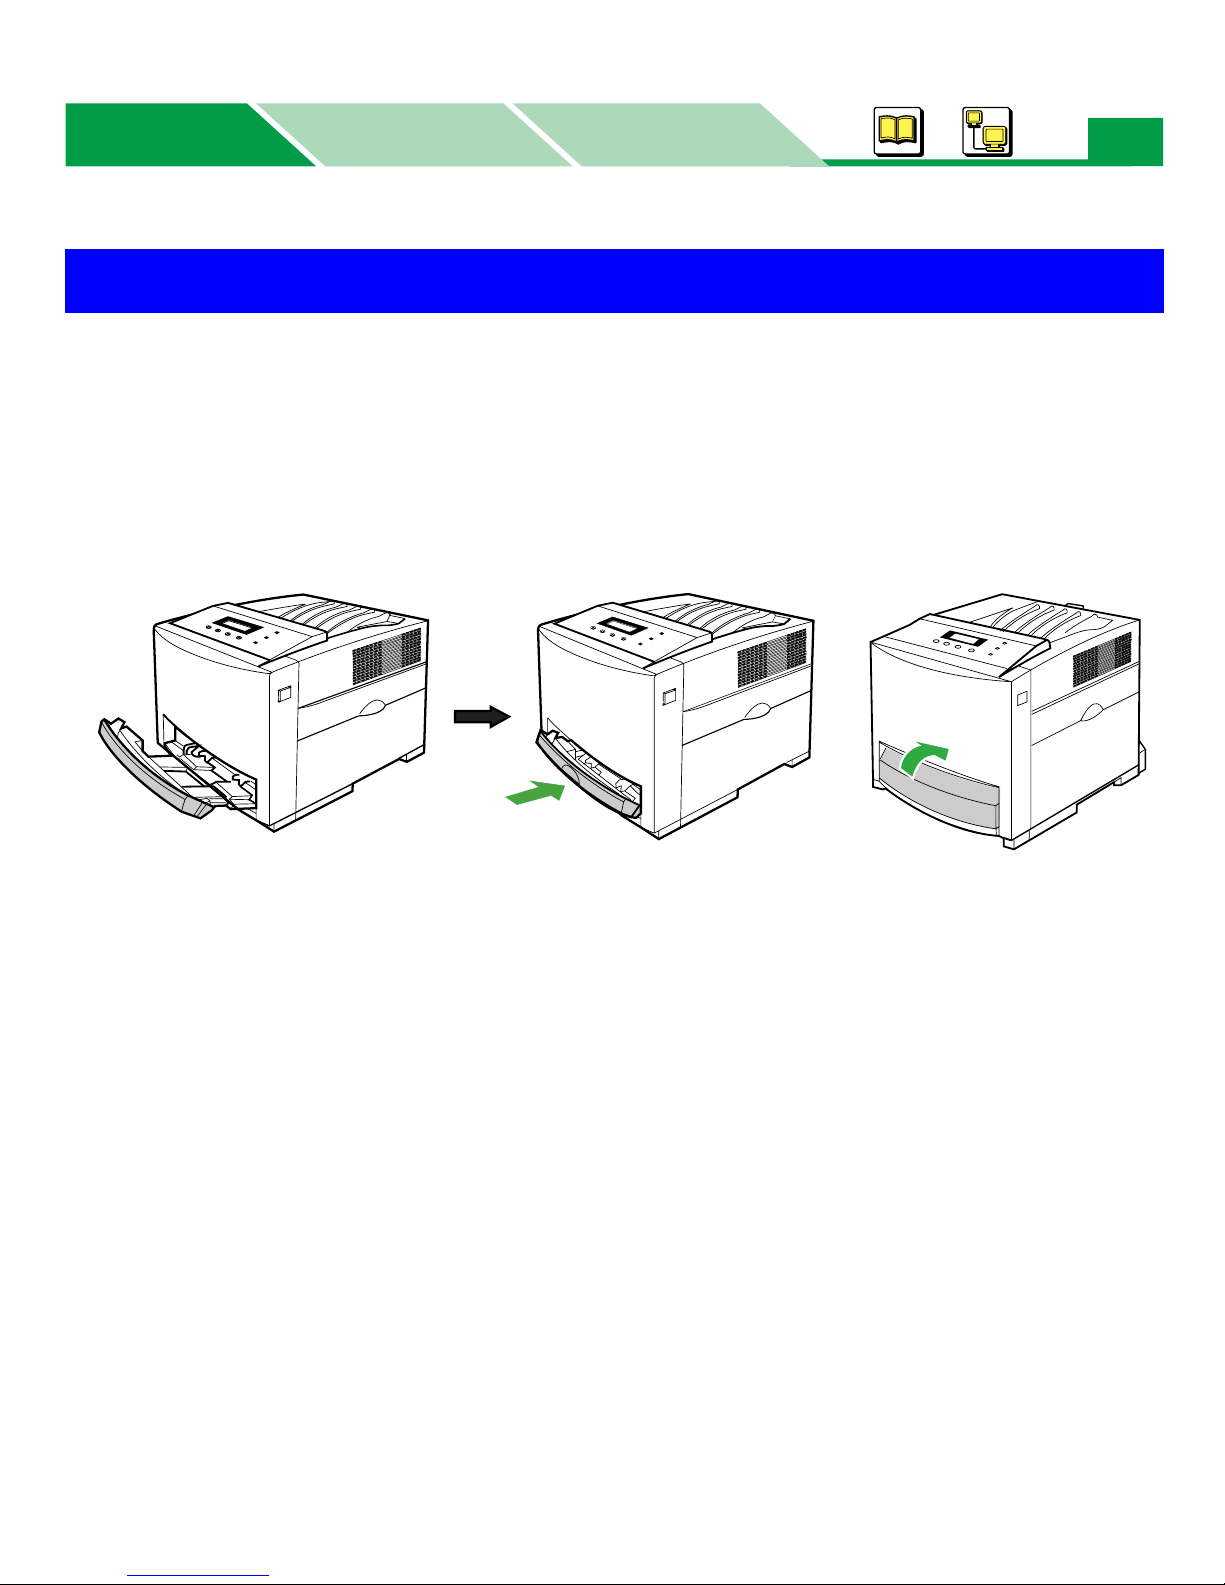
• When the tray cover is opened or the multi-purpose tray is used, you cannot pull the media tray out of
the printer. Be sure to push the multi-purpose tray (1) and close the tray cover (2) before you pull the
media tray out of the printer.
2
1
Basics
Basics
Windows
Macintosh
Loading Media
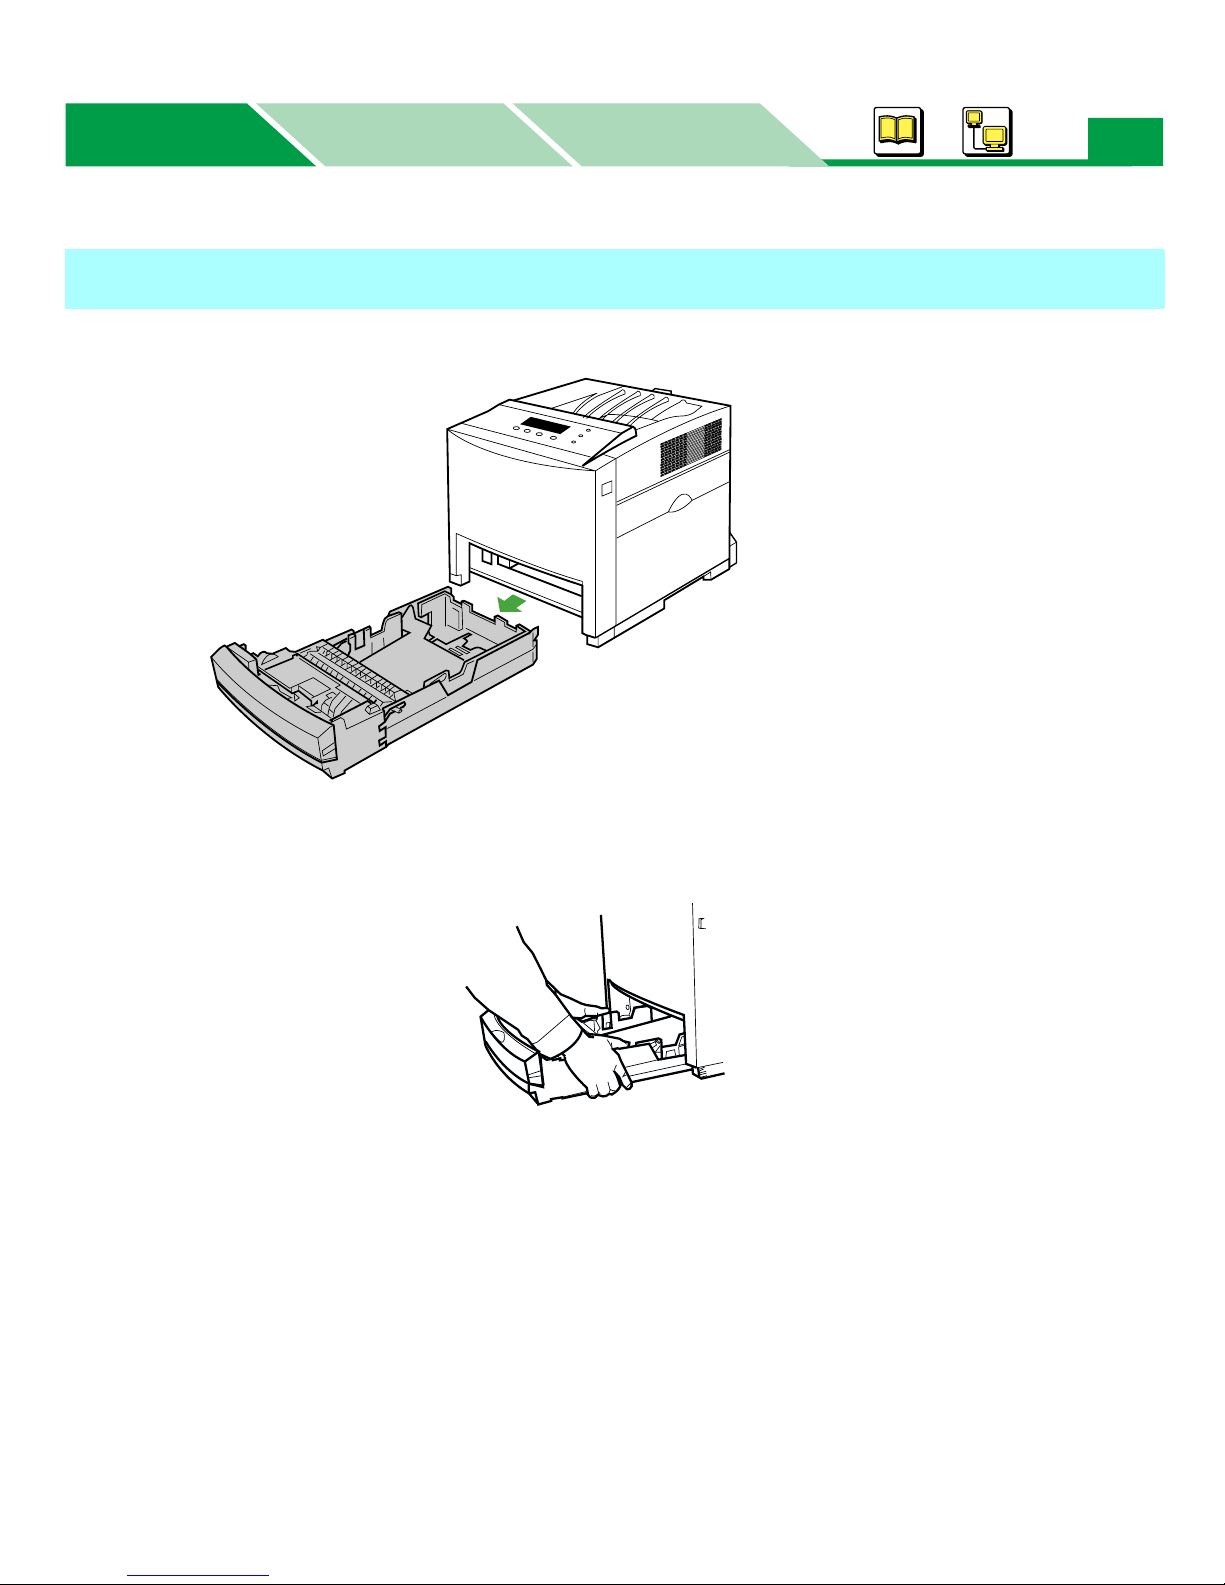
Using the Media Tray
1 Pull the media tray out of the printer while slightly raising its front portion.
9
CAUTION
• Be sure to hold the media tray with both hands so you do not drop it.
Basics
11
Basics
Windows
Macintosh
10
Loading Media
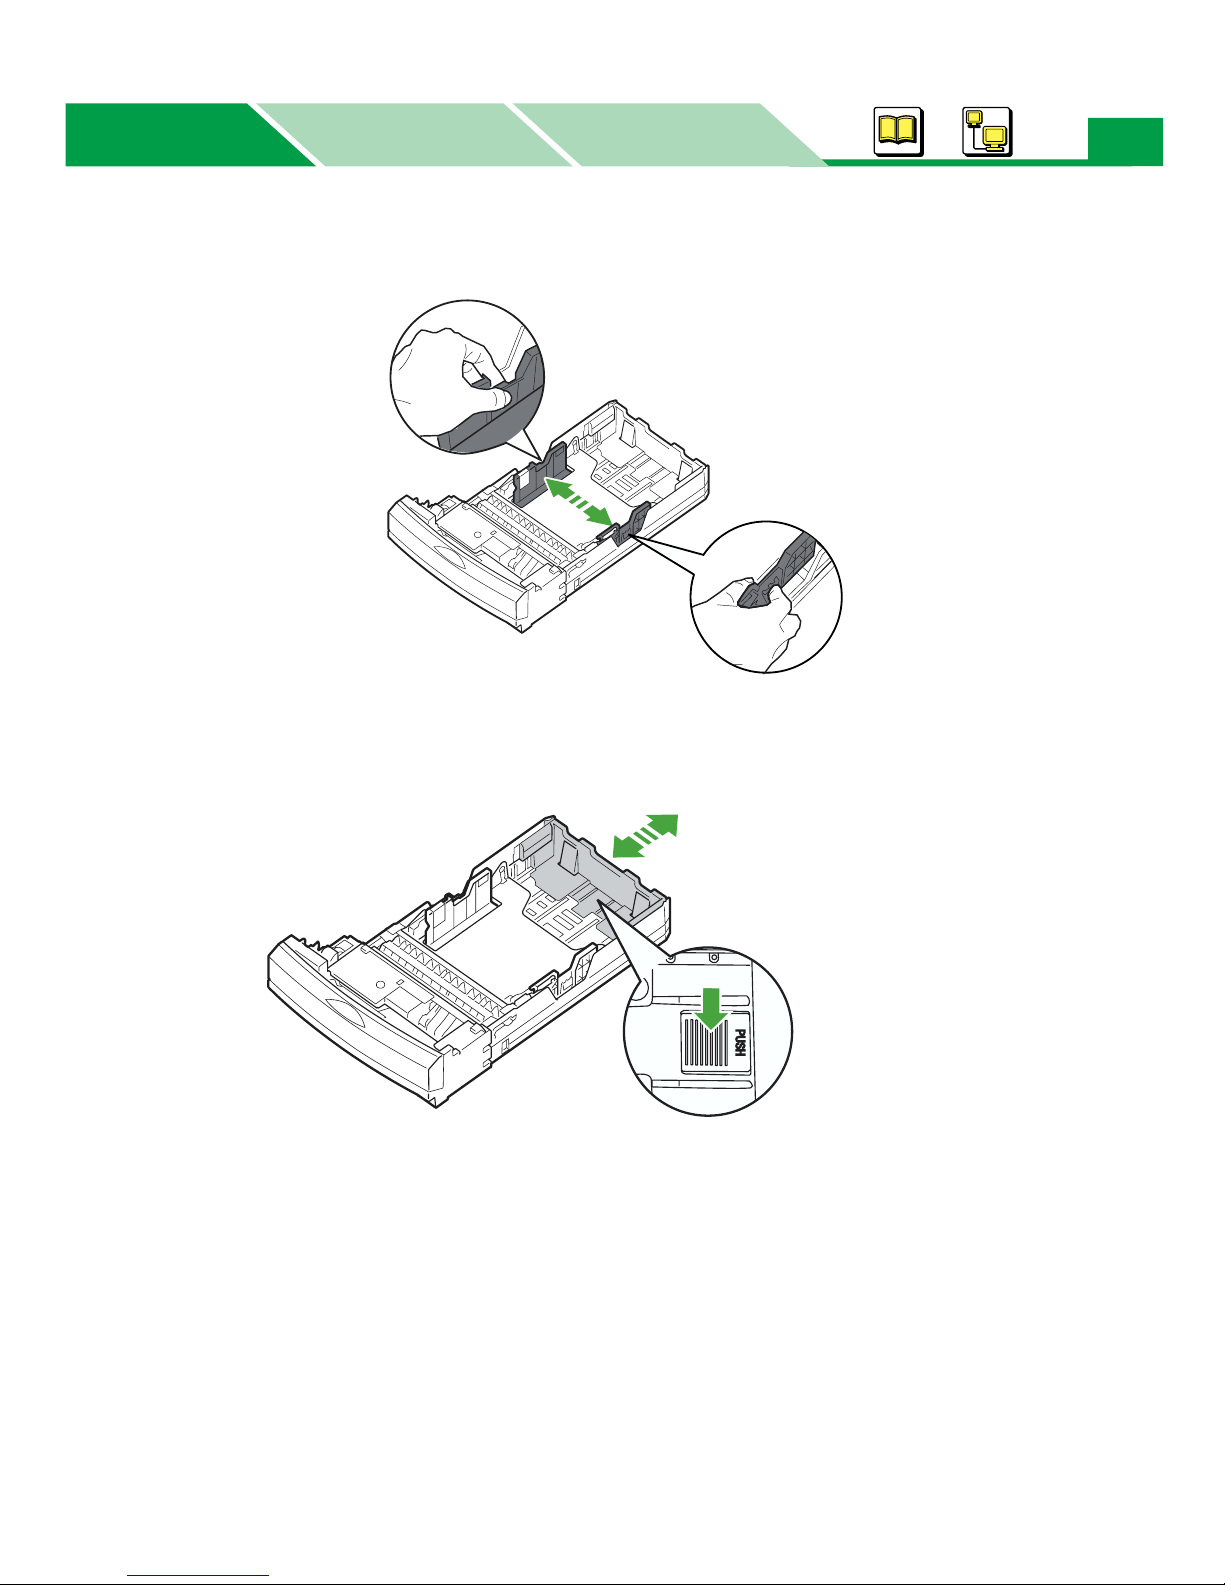
2 Pinch the media guides and slide them to the width of the media.
3 Slide the length guide unit to adjust it to the media length. Slide the length guide
unit (2) while pressing the PUSH mark (1) to extend it.
2
Basics
Basics
Windows
Macintosh
11
Loading Media
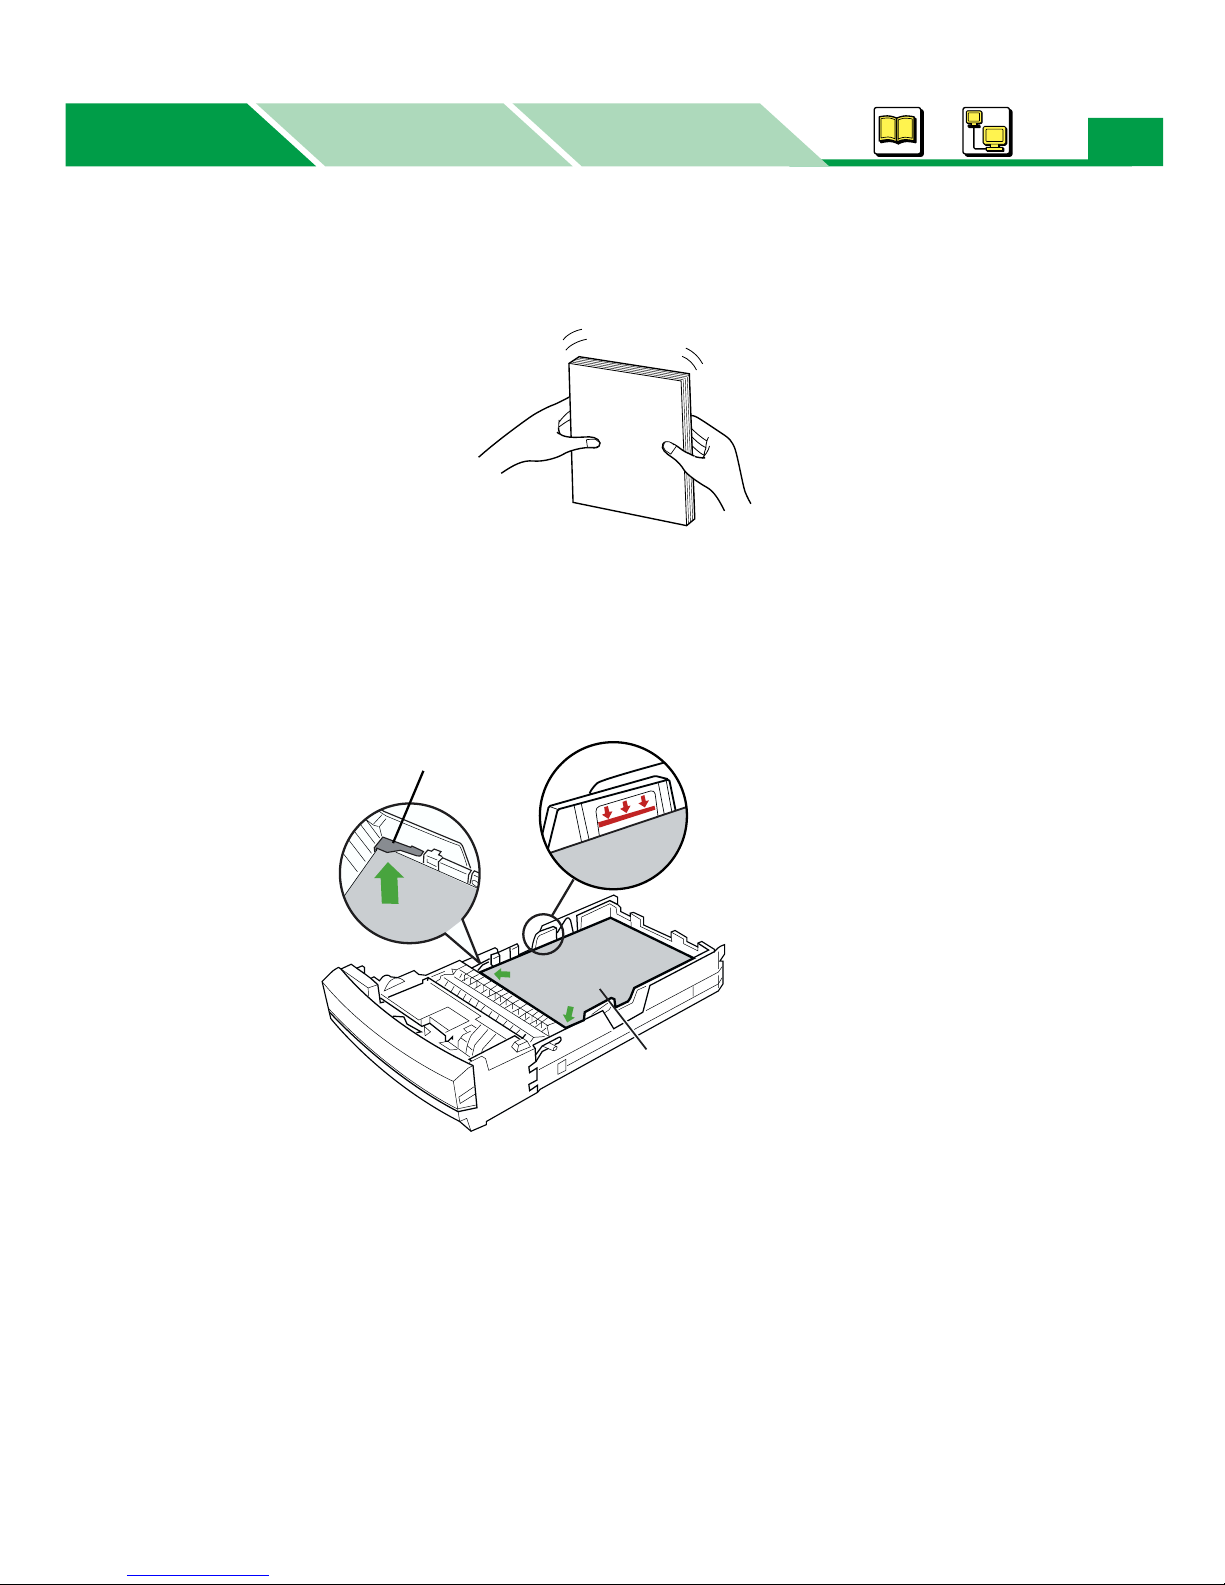
4 Tap the media stack on a level surface to avoid media jams or skewed printing.
NOTE:
• Be careful not to leave fingerprints on the media, which can result in a smudged print.
• Reusing media (used paper or jammed paper) that has been fed through the printer once may
reduce the life of the consumables and paper path components.
5 Place media with the print side up under the hooks in the tray.
Hook
Fill media up
to here.
Load media with
print side up.
NOTE:
• Most media has instructions recommending the side to be printed first.
• Do not mix different types or thickness of media in the media tray at one time; this may cause
a jam.
• Loading media exceeding the designated sheets may cause a media jam or shifting of print.
6 Confirm the media guides are adjusted to the media size.
Basics
Basics
Windows
Macintosh
Loading Media
7 Slide the media tray completely into the slot.
CAUTION
• Be sure to hold the media tray with both hands so that you do not drop it. The media tray
weighs approximately 6.4 kg (14lbs.) when it is fully loaded.
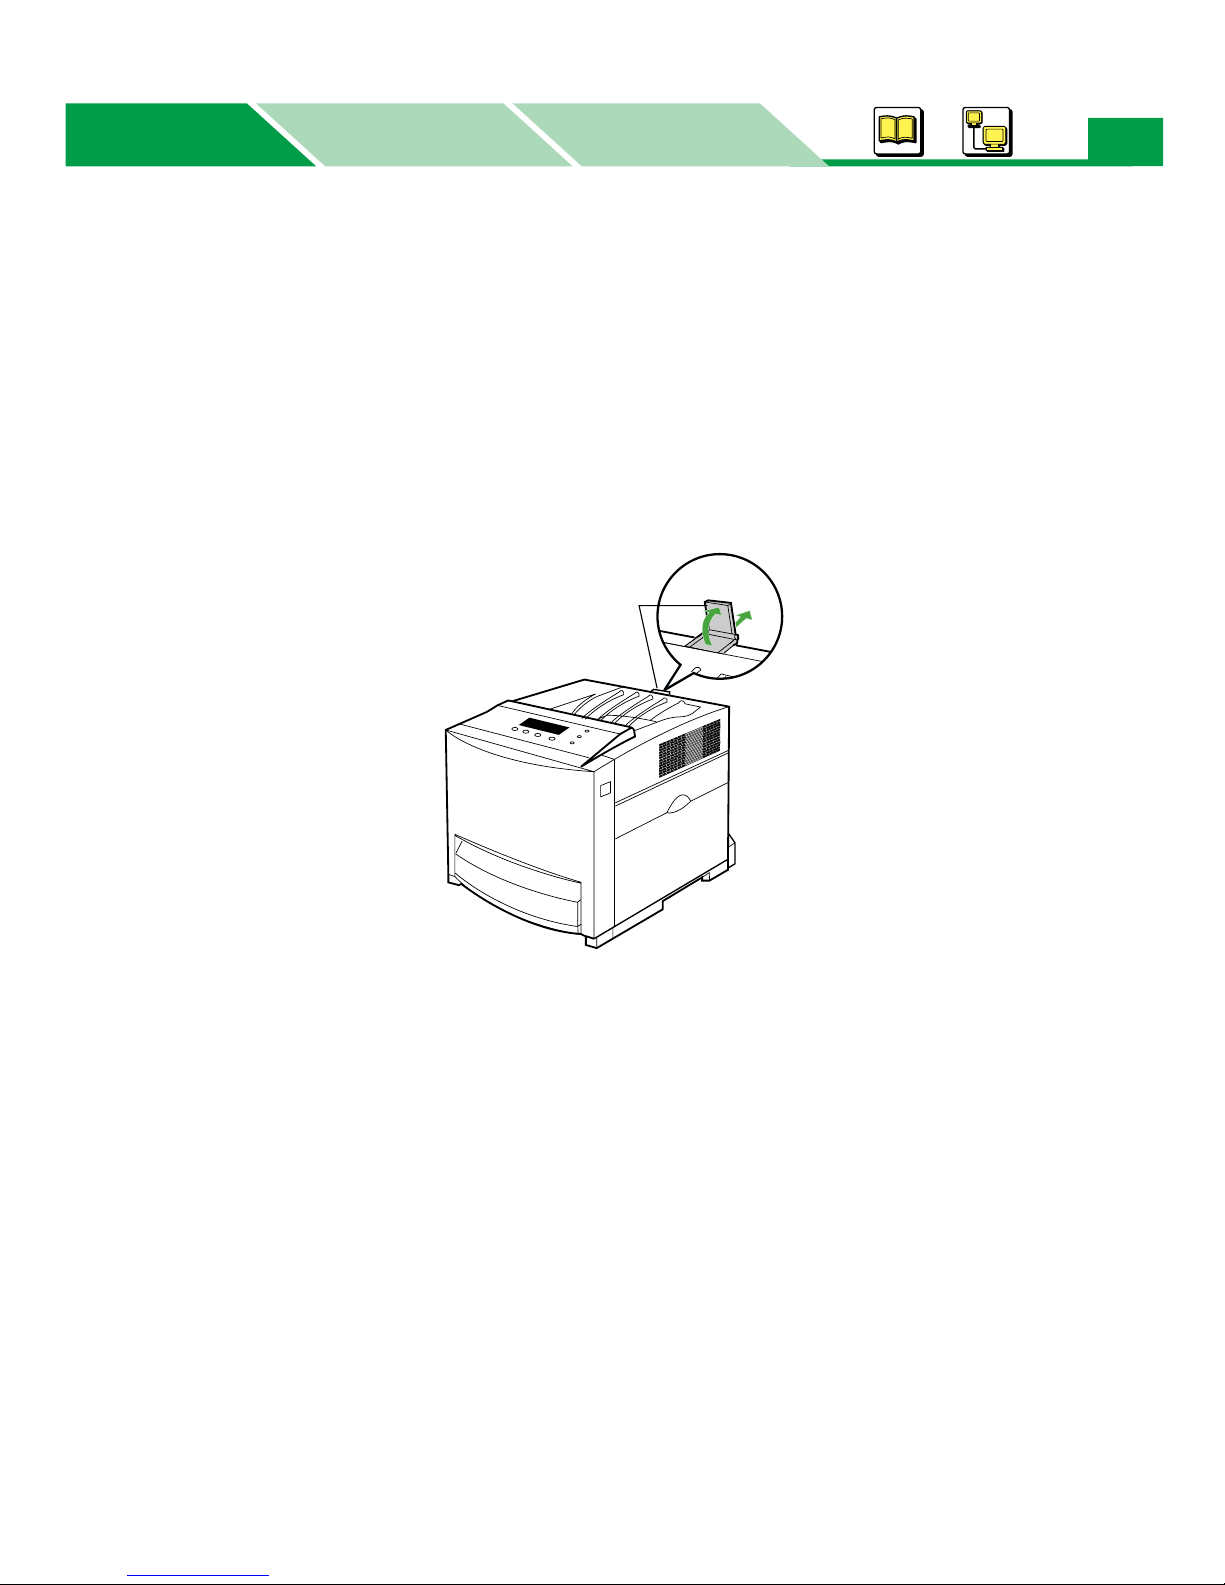
8 Pull (1) and raise (2) the paper support so that the media does not drop from
the output tray.
12
Paper support
1
2

Basics
Basics
Windows
Macintosh
Loading Media
9 Specify the printer driver’s setting depending on the operating system.
13
For Windows®*
(1) Display the print window in the application software.
(2) Select Panasonic DP-CL21P PCL 5c, Panasonic DP-CL21M PCL 5c or Panasonic
DP-CL21M PS printer.
(3) Click Properties ([Preferences] for Windows XP
(4) Specify the paper size, media type and paper source.
PCL printer driver: see “Setting the PCL Printer Driver” on page 84.
PS printer driver: see “Setting the PS Printer Driver (DP-CL21M only)” on page 145.
For Mac OS 8.1 - Mac OS 9.2 (For DP-CL21M only)
(1) Open a document to print.
(2) Select Page Setup... or Print... from the application’s File menu.
(3) Select your printer from the Printer menu.
(4) Specify the paper size (Page Attributes), media type (Printer Specific Options) and paper
source (General).
For the detailed information, see “Setting the PS Printer Driver (Mac OS 8.1 - Mac OS
9.2)” on page 243.
For Mac OS X 10.1 - Mac OS X 10.2 (For DP-CL21M only)
(1) Open a document to print.
(2) Select Page Setup... from the application’s File menu.
(3) Select your printer from the Format for menu and specify the paper size (Page Attributes).
(4) Select Print... from the application’s File menu.
(5) Select your printer from the Printer menu.
(6) Specify the media type (Printer Features) and paper source (Paper Feed).
For the detailed information, see “Setting the PS Printer Driver (Mac OS X 10.1)” on page
263.
1
2
*
) to display the printer properties window.
1
*
Microsoft® Windows® operating system (hereafter Windows)
2
*
Microsoft® Windows® XP operating system (hereafter Windows XP)

Basics
Basics
Windows
Macintosh
Loading Media
Using the Multi-purpose Tray
The multi-purpose tray serves as an additional tray for loading any type of media that ranges in size
from 90 mm x 148 mm to 216 mm x 356 mm (3.5″ x 5.8″ to 8.5″ x 14″).
When using thick paper/card, coated paper, transparency, labels or envelope, use the multi-purpose
tray.
1 Open the tray cover and pull it to expand the multi-purpose tray [(1) - (3)].
14
1
NOTE:
• When the tray cover is opened, you cannot pull the media tray out of the printer.
2
3
2 Separate the media guides to the approximate width of the media.
Basics
Basics
Windows
Macintosh
Loading Media
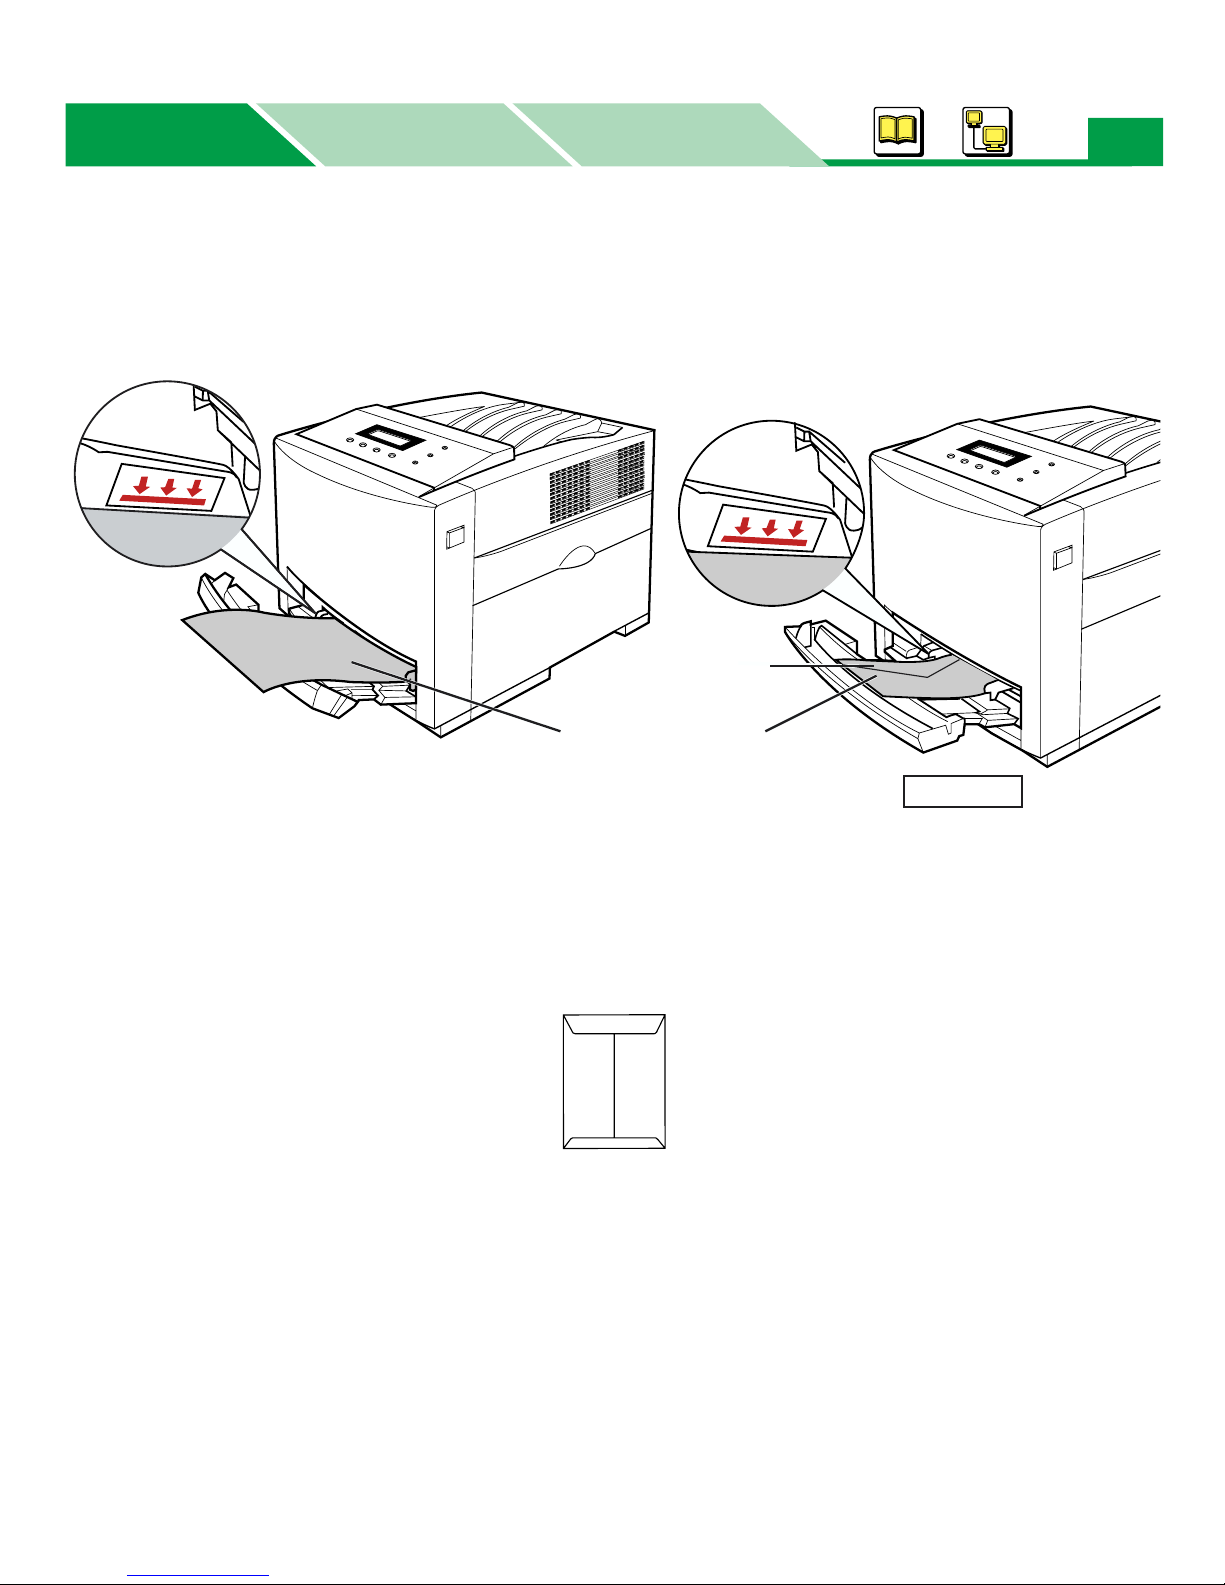
3 Insert media with the printing side down into the multi-purpose tray while
adjusting the media guides to the media width.
Fill media up to here.
Fill media up to here.
Flap
15
Load media with
print side down.
Envelope
NOTE:
• Loading media exceeding the designated sheets may cause a media jam or shifting of print.
• When printing on envelopes, close the flap and insert with the flap side on the left side into the
multi-purpose tray.
• Envelopes with opening on the shorter edge cannot be used.
• When printing on some type of envelope, a wrinkle may occur. For the detailed information,
refer to “Envelope Specifications” on page 94 in “Maintenance and Specifications”.
Basics
Basics
Windows
Macintosh
Loading Media
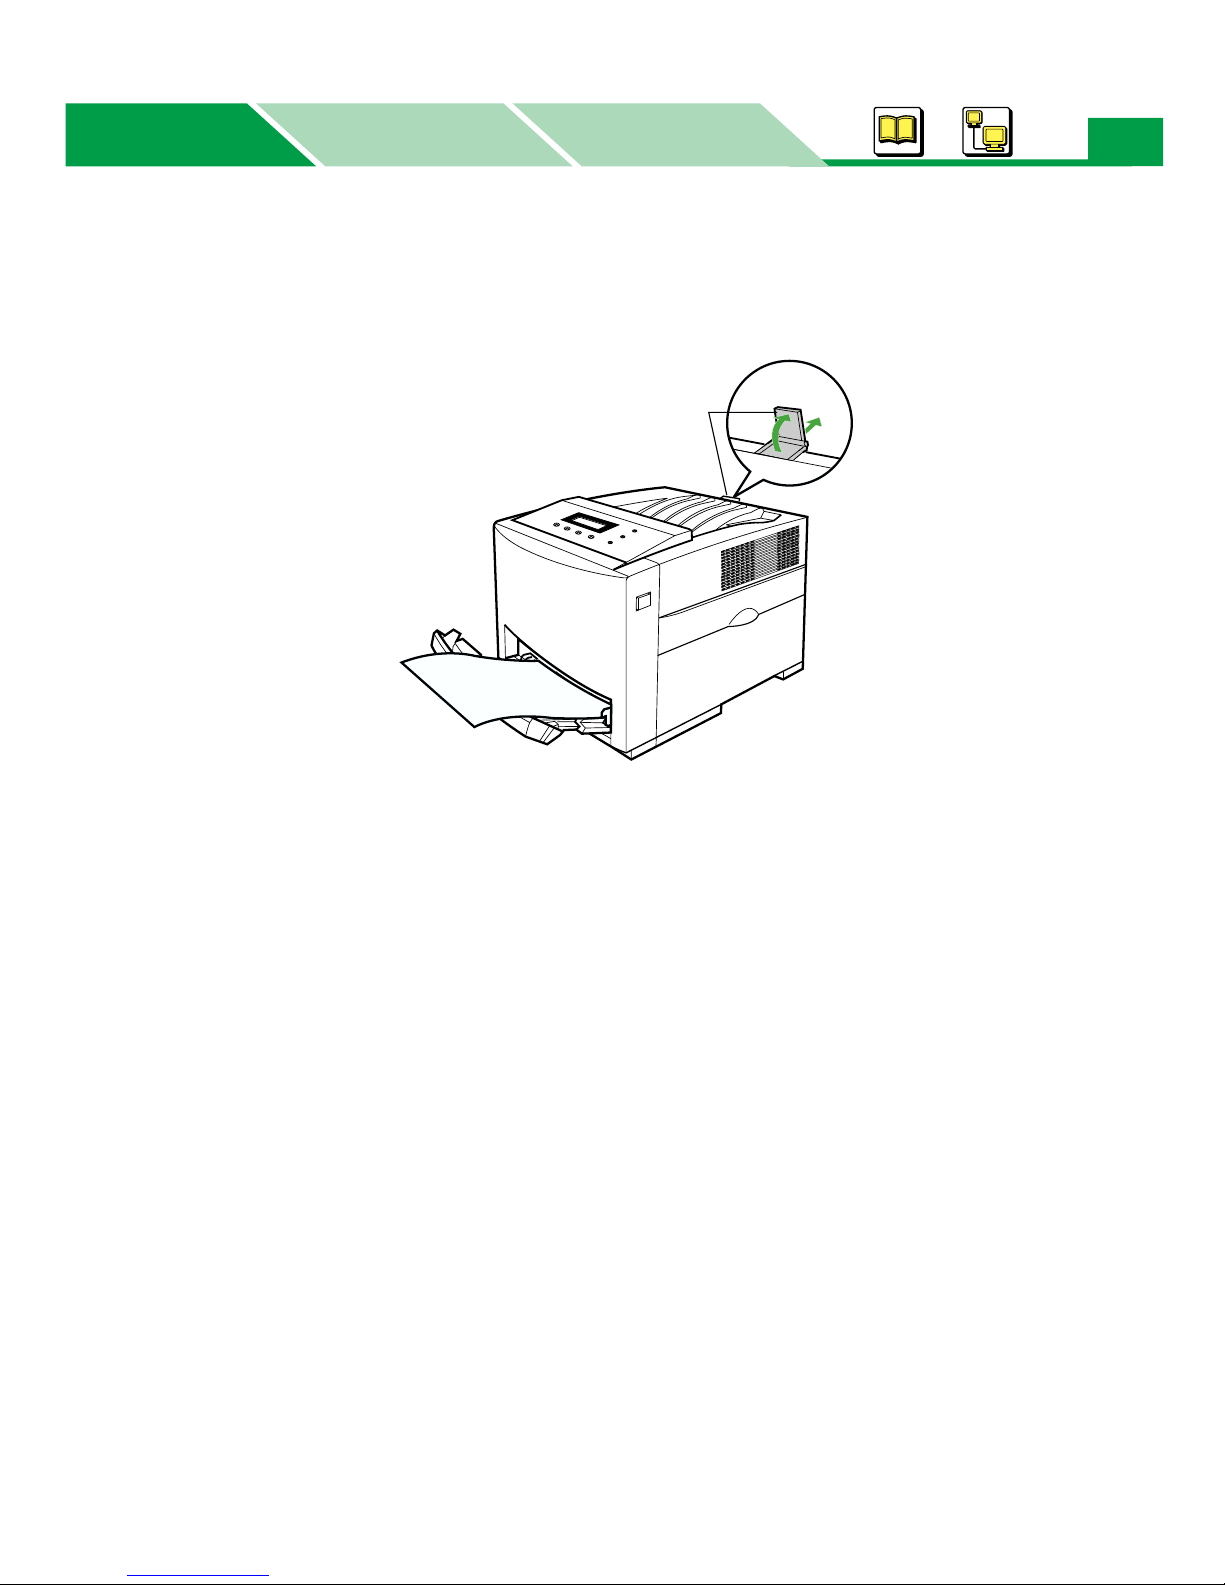
4 Pull and raise the paper support so that the media does not drop from the
output tray.
16
Paper support
1
2

Basics
Basics
Windows
Macintosh
Loading Media
5a When printing a paper, specify the printer driver’s setting depending on the
operating system. (When printing envelopes, see 5b on page 18.)
For Windows
(1) Display the print window in the application software.
(2) Select Panasonic DP-CL21P PCL 5c, Panasonic DP-CL21M PCL 5c or Panasonic
DP-CL21M PS printer.
(3) Click Properties ([Preferences] for Windows XP) to display the printer properties window.
(4) Specify the paper size, media type and paper source.
PCL printer driver: see “Setting the PCL Printer Driver” on page 84.
PS printer driver: see “Setting the PS Printer Driver (DP-CL21M only)” on page 145.
For Mac OS 8.1 - Mac OS 9.2 (For DP-CL21M only)
(1) Open a document to print.
(2) Select Page Setup... or Print... from the application’s File menu.
(3) Select your printer from the Printer menu.
(4) Specify the paper size (Page Attributes), media type (Printer Specific Options) and paper
source (General).
For the detailed information, see “Setting the PS Printer Driver (Mac OS 8.1 - Mac OS
9.2)” on page 243.
17
For Mac OS X 10.1 - Mac OS X 10.2 (For DP-CL21M only)
(1) Open a document to print.
(2) Select Page Setup... from the application’s File menu.
(3) Select your printer from the Format for menu and specify the paper size (Page Attributes).
(4) Select Print... from the application’s File menu.
(5) Select your printer from the Printer menu.
(6) Specify the media type (Printer Features) and paper source (Paper Feed).
For the detailed information, see “Setting the PS Printer Driver (Mac OS X 10.1)” on
page 263.

Basics
Basics
Windows
Macintosh
Loading Media
5b When using envelopes, specify the printer driver’s setting depending on the
operating system.
For Windows (DP-CL21P / DP-CL21M PCL)
(1) Display the print window in the application software.
(2) Select Panasonic DP-CL21P PCL 5c or Panasonic DP-CL21M PCL 5c printer.
(3) Click Properties ([Preferences] for Windows XP) to display the printer properties window.
(4) Click Setup tab.
(5) Click [Advanced...].
(6) Specify the paper size (Envelope #9, Envelope #10, Envelope Monarch, Envelope C5,
Envelope C6 or Envelope DL), orientation (Landscape and Rotate 180), media type
(Envelope) and paper source (Multi-Purpose Tray).
(7) Click [OK] to close the Advanced setting window.
(8) Click [OK] to exit the setting of the printer driver.
(9) Click [OK] to start the printing.
For Windows 2000
(1) Display the print window in the application software.
(2) Select Panasonic DP-CL21M PS printer.
(3) Click Properties or [Preferences] to display the printer properties window.
(4) Click Layout tab and click [Advanced...].
(5) Specify the paper size (Envelope #9, Envelope #10, Envelope Monarch, Envelope C5,
Envelope C6 or Envelope DL).
(6) Click [OK] to close the Advanced setting window.
(7) Click Layout tab and select Rotated Landscape.
(8) Click Paper/Quality tab and specify the paper source (Multi-Purpose Tray) and media type
(Envelope).
(9) Click [OK] to exit the setting of the printer driver.
(10) Click [OK] to start the printing.
For Windows NT
(1) Display the print window in the application software.
(2) Select Panasonic DP-CL21M PS printer.
(3) Click Properties to display the printer properties window.
(4) Click Page Setup tab.
(5) Specify the paper size (Envelope #9, Envelope #10, Envelope Monarch, Envelope C5,
Envelope C6 or Envelope DL), orientation (Rotated) and paper source (Multi-Purpose
Tray).
(6) Click Advanced tab and change the media under Paper/Output to Envelope.
(7) Click [OK] to exit the setting of the printer driver.
(8) Click [OK] to start the printing.
1
*
Microsoft® Windows® 2000 operating system (hereafter Windows 2000)
2
*
Microsoft® Windows NT® operating system Version 4.0 (hereafter Windows NT 4.0)
1
*
/ Windows XP (DP-CL21M PS)
® 4.0*
2
(DP-CL21M PS)
18

Basics
Basics
Windows
Macintosh
19
Loading Media
For Windows 95*1 / Windows 98*2 / Windows Me*3 (DP-CL21M PS)
The orientation’s Rotated function is effective when setting it from the printer properties window
under Windows for Windows 95, Windows 98 or Windows Me [see steps (1) - (5) below)].
(1) Display the printer properties window under Windows (Start - Settings - Printers).
(2) Click Panasonic DP-CL21M PS printer icon.
(3) Click the File menu, then click Properties.
(4) Click Paper tab and specify the orientation (Landscape and Rotated).
(5) Click [OK].
(6) Display the print window in the application software.
(7) Select Panasonic DP-CL21M PS printer.
(8) Click Properties to display the printer properties window.
(9) Click Paper tab.
(10) Specify the paper size (Envelope #9, Envelope #10, Envelope Monarch, Envelope C5,
Envelope C6 or Envelope DL), paper type (Envelope) and paper source (Multi-Purpose
Tray).
(11) Click [OK] to exit the setting of the printer driver.
(12) Click [OK] to start the printing.
1
*
Microsoft® Windows® 95 operating system (hereafter Windows 95)
2
*
Microsoft® Windows® 98 operating system (hereafter Windows 98)
3
*
Microsoft® Windows® Millennium Edition operating system (hereafter Windows Me)

Basics
Basics
Windows
Macintosh
20
Loading Media
For Mac OS 8.1 - Mac OS 9.2 (DP-CL21M PS)
(1) Open a document to print.
(2) Select Page Setup... from the application’s File menu.
(3) Specify the paper size (Envelope #9, Envelope #10, Envelope Monarch, Envelope C5,
Envelope C6 or Envelope DL) and orientation (Landscape).
(4) Click Page Attributes list box and select PostScript(TM) Options.
(5) Click on the both check boxes of Visual Effects: Flip Horizontal, Flip Vertical.
(6) Click [OK] to exit the Page Setup window.
(7) Select Print... from the application’s File menu.
(8) Click General list box and select Printer Specific Options.
(9) Change the media type to Envelope.
(10) Start printing.
For Mac OS X 10.1 (DP-CL21M PS)
(1) Open a document to print.
(2) Select Page Setup... from the application’s File menu.
(3) Select your printer from the Format for menu and specify the paper size (Envelope #9, #10
Envelope, Monarch Envelope, C5 Envelope, C6 Envelope or Long Envelope) and
orientation (Landscape).
(4) Select Print... from the application’s File menu.
(5) Select your printer from the Printer menu.
(6) Change the media type to Envelope (Printer Features) and specify the paper source
(Paper Feed).
For the detailed information, see “Setting the PS Printer Driver (Mac OS X 10.1)” on
page 263.
For Mac OS X 10.2 (DP-CL21M PS)
(1) Open a document to print.
(2) Select Page Setup... from the application’s File menu.
(3) Select your printer from the Format for menu and specify the paper size (Envelope #9, #10
Envelope, Monarch Envelope, C5 Envelope, C6 Envelope or Long Envelope) and
orientation (Rotated Landscape).
(4) Select Print... from the application’s File menu.
(5) Select your printer from the Printer menu.
(6) Change the media type to Envelope (Printer Features) and specify the paper source
(Paper Feed).
For the detailed information, see “Setting the PS Printer Driver (Mac OS X 10.1)” on
page 263.
Basics
Basics
Windows
Macintosh
Using the Printer Panel (Menu Mode)
Using the Printer Panel (Menu Mode)
21
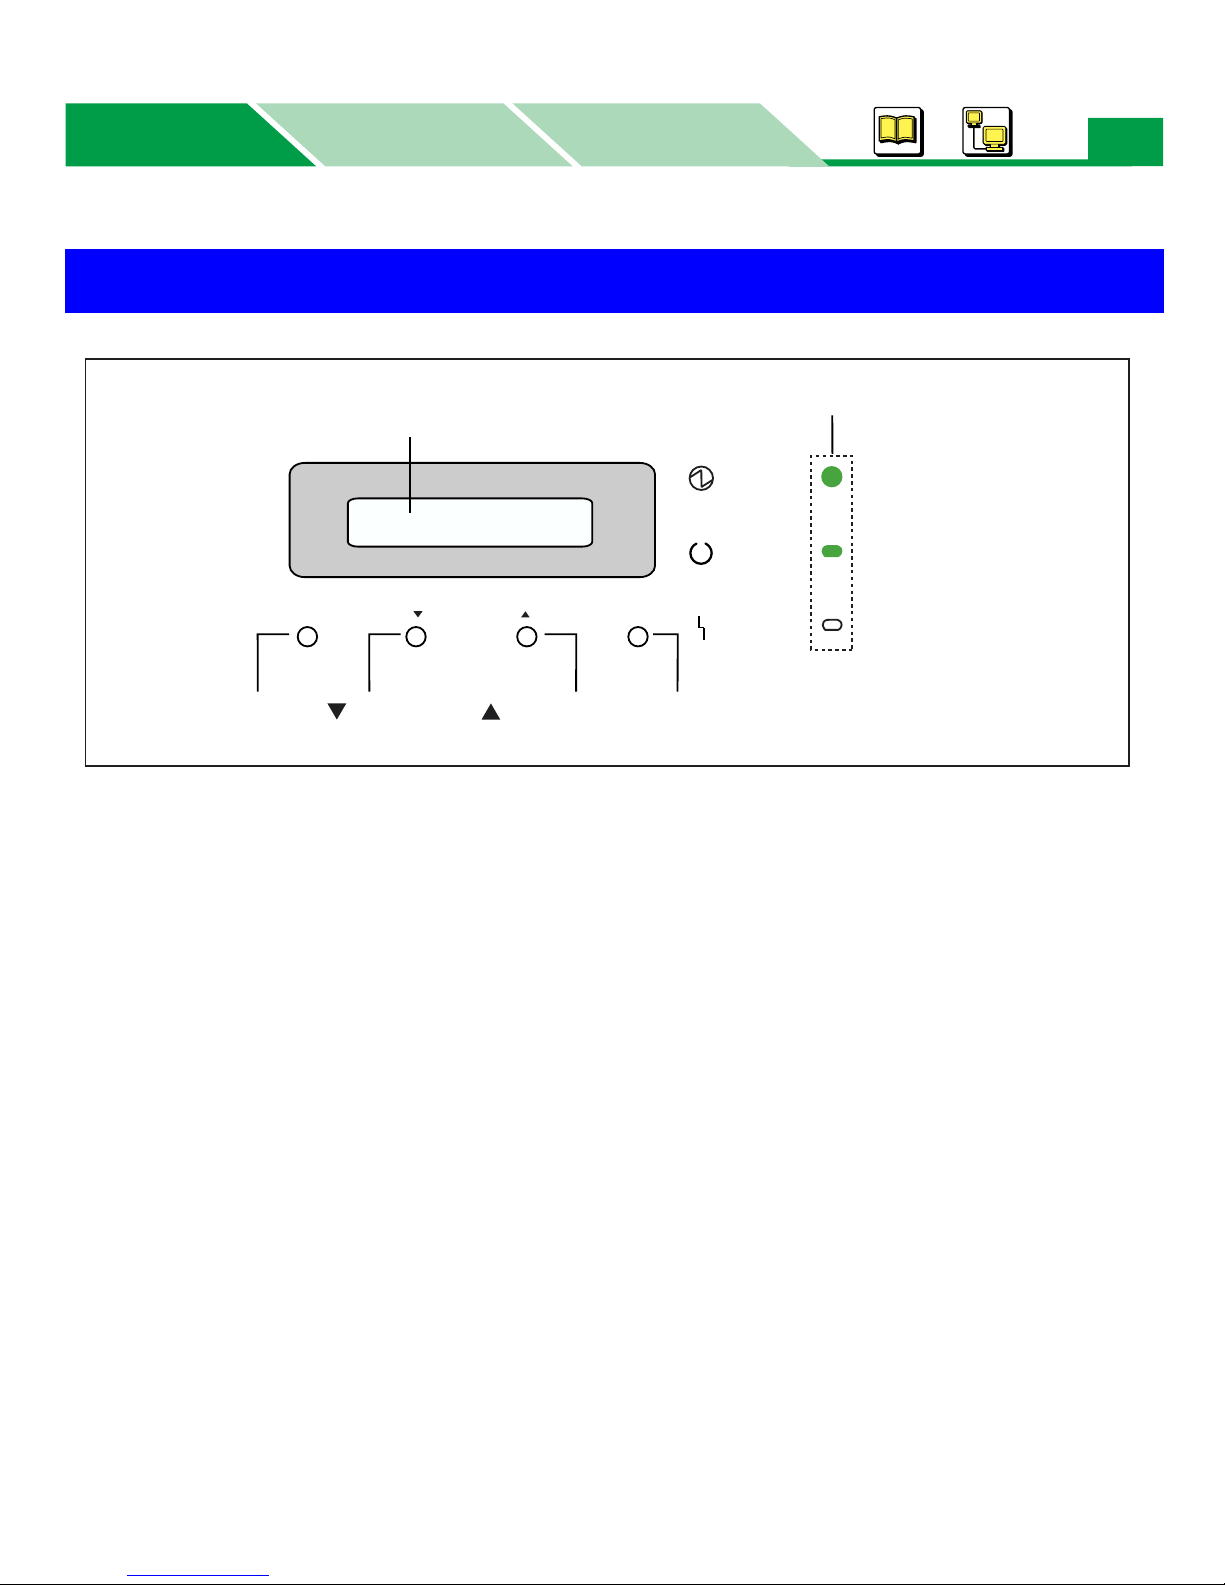
LCD Panel
Indicators
(2-line/40-character)
POWER
READY
MENU/EXIT
ENTER
ERROR
PAUSE
MENU/EXIT
(PAUSE) button
CANCEL
(CANCEL)
button
CONTINUE
(CONTINUE)
button
ENTER
button
■ LCD Panel:
LCD panel shows the messages of the Menu mode. The Menu mode includes a Main menu, Item
menu, Selection 1 menu and Selection 2 menu which can be changed from the printer panel.
Basics
Basics
Windows
Macintosh
Using the Printer Panel (Menu Mode)
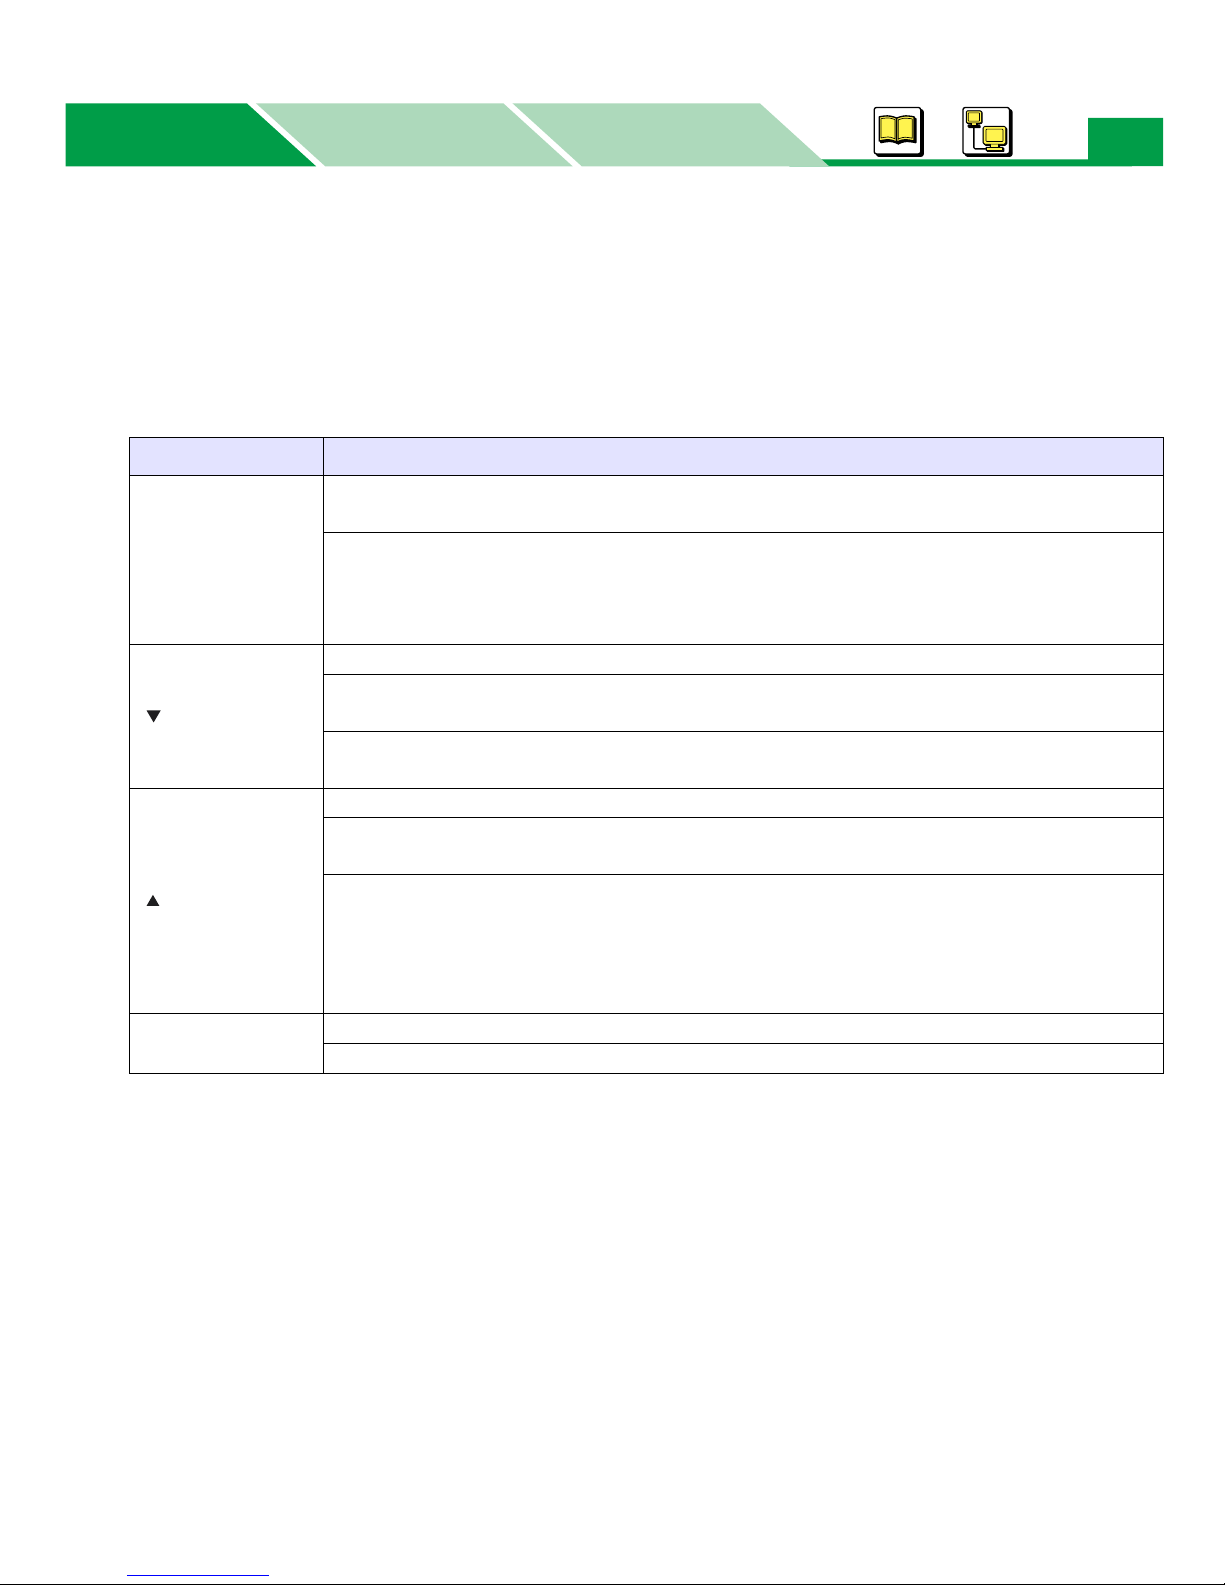
■ Button Operation:
When Ready or Ready (PCM)*1 is displayed in the upper line of the LCD panel, pressing the
MENU/EXIT (PAUSE) button will allow you to enter the Menu mode. Once in the Menu mode, you
can set the printer using the following buttons:
1
*
It is displayed when the Print Count Manager is turned on.
Button Operation
In the Menu mode, pressing the MENU/EXIT (PAUSE) button will allow you to
exit the Menu mode and Ready is displayed.
MENU/EXIT
(PAUSE)
(CANCEL)
(CONTINUE)
ENTER
When Processing or Printing is displayed in the upper line of the LCD, pressing
the MENU/EXIT (PAUSE) button will allow you to pause printing.
While Pause printing is displayed, pressing the MENU/EXIT (PAUSE) button
will allow you to resume printing.
Displays the previous menu or item.
Decreases the numerical value of the selection by 1. Hold down this button to
scroll faster.
While the printer prints, pressing this button will allow you to stop printing or
processing the current job.
Displays the next menu or item.
Increases the numerical value of the selection by 1. Hold down this button to
scroll faster.
When performing the manual duplex printing function, after even pages are
printed, odd pages are printed by pressing this button (see “Manual Duplex
Printing (Windows Only)” on page 73).
When “LOAD XX” appears on the LCD, you can print the current job anyhow by
pressing this button.
Enters a sub-menu.
Activates a selection.
22
Basics
Basics
Windows
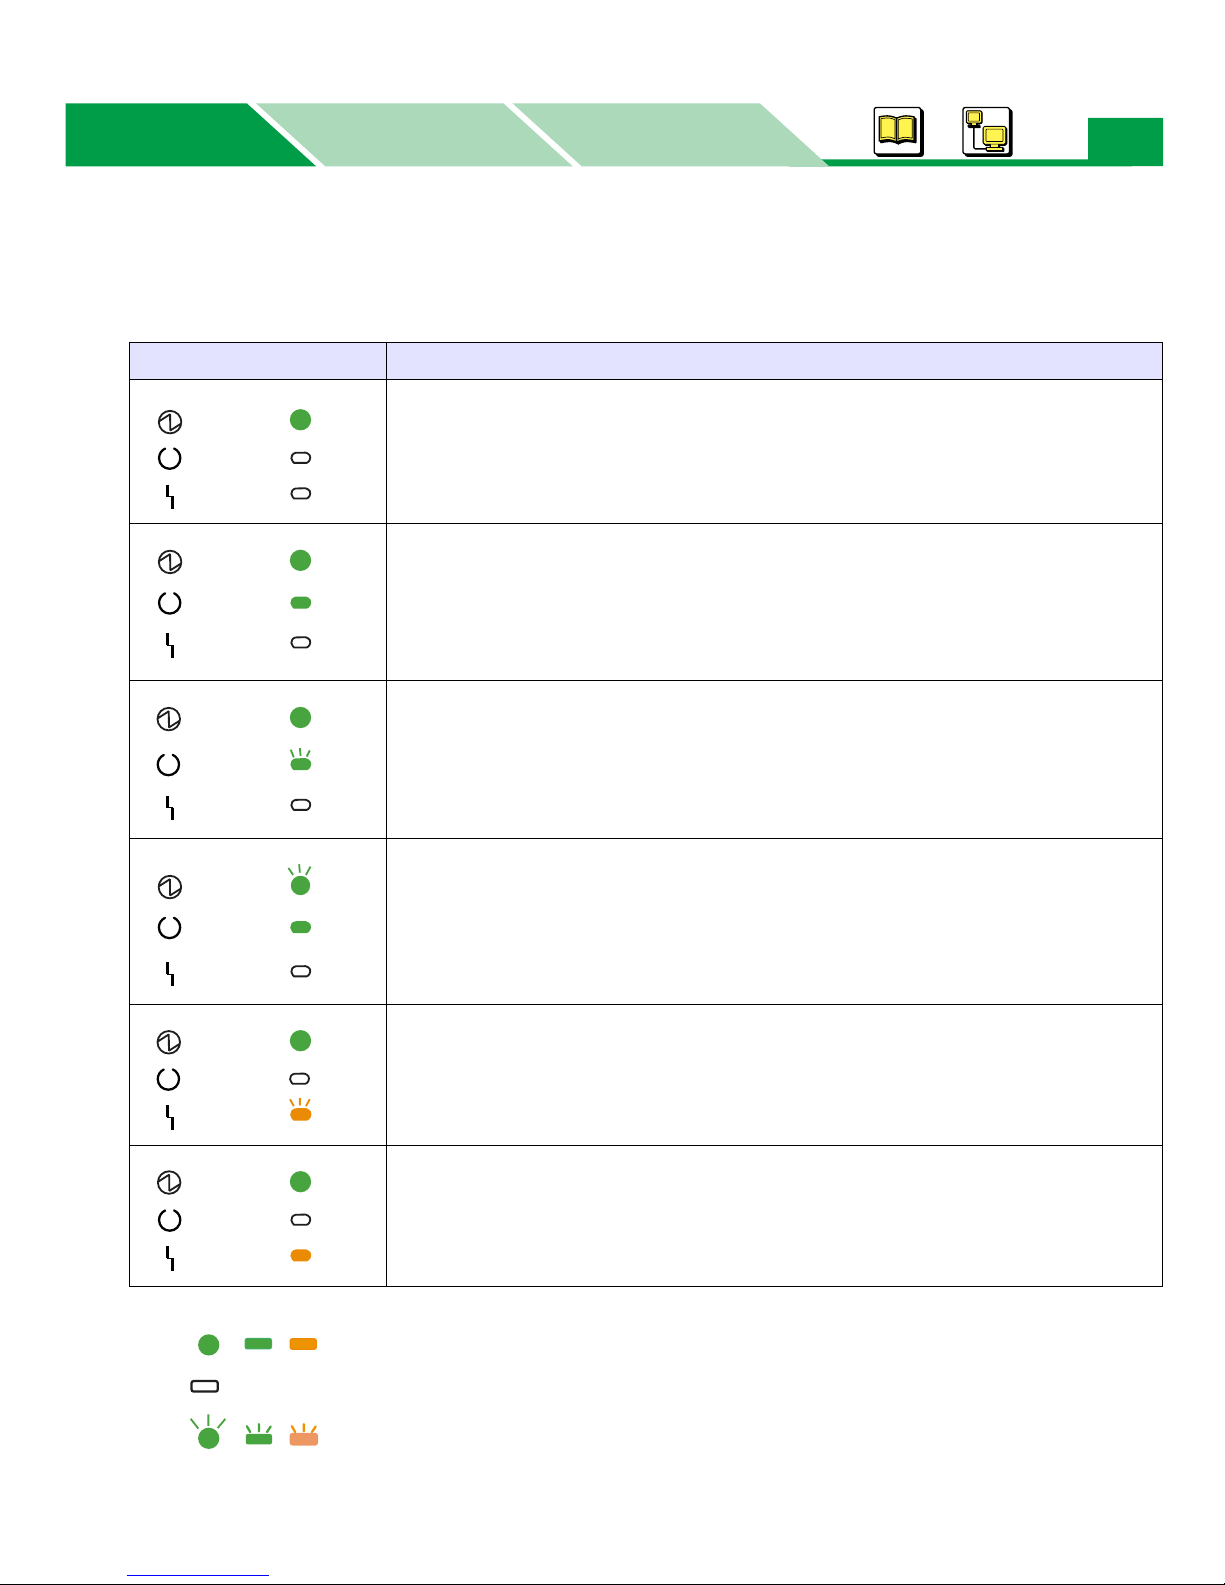
■ LED indication:
Three indicators show the following printer’s status.
Macintosh
Using the Printer Panel (Menu Mode)
23
Indicators
POWER
READY
ERROR
POWER
READY
ERROR
POWER
READY
ERROR
POWER
READY
Printer Status
Printer is warming up.
Printer is ready for printing.
Printer is receiving data, printing or data remains in the memory.
Printer is in the Menu mode.
Printer is in the Power Save mode.
ERROR
POWER
READY
ERROR
POWER
READY
ERROR
Indicator is lit.
Indicator is turned off.
Indicator is blinking.
Printer recoverable errors (media jam, media empty, etc.) has occurred.
An internal error (Call for Service Error) has occurred.
Basics
Basics
Windows
Macintosh
24
Menu Table
Menu Table
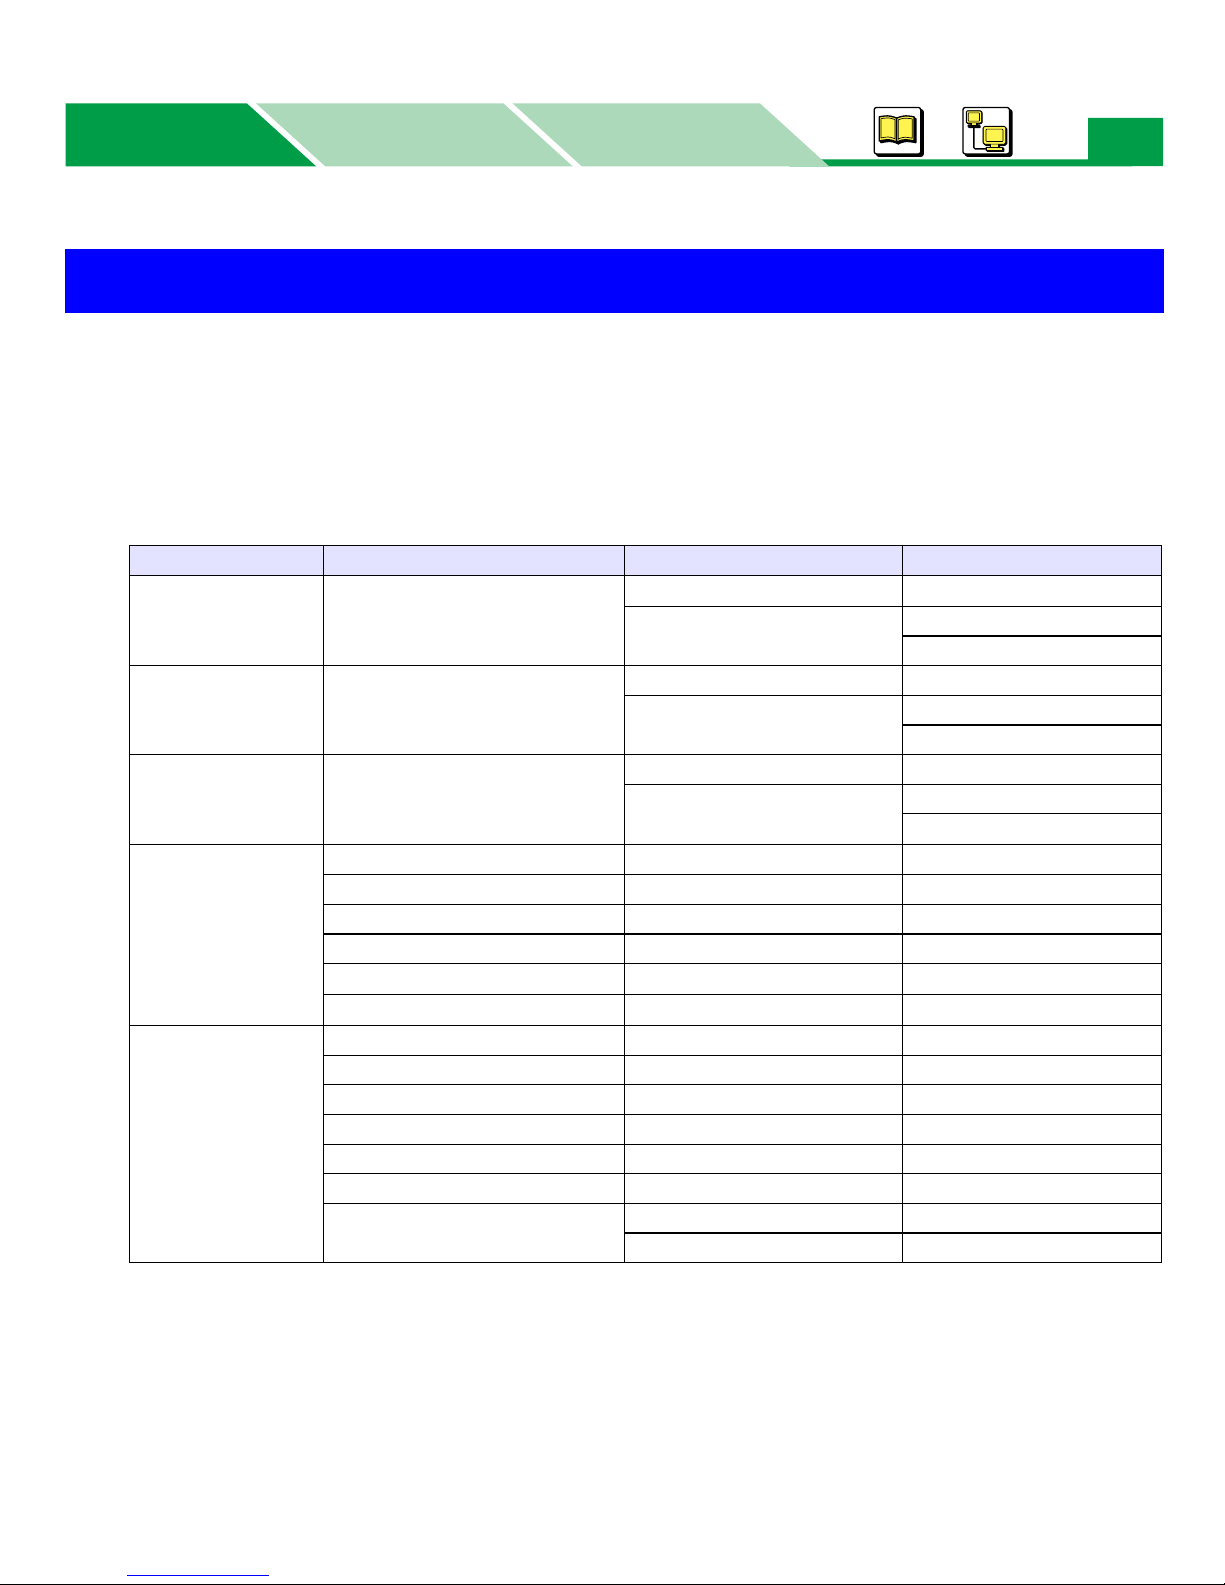
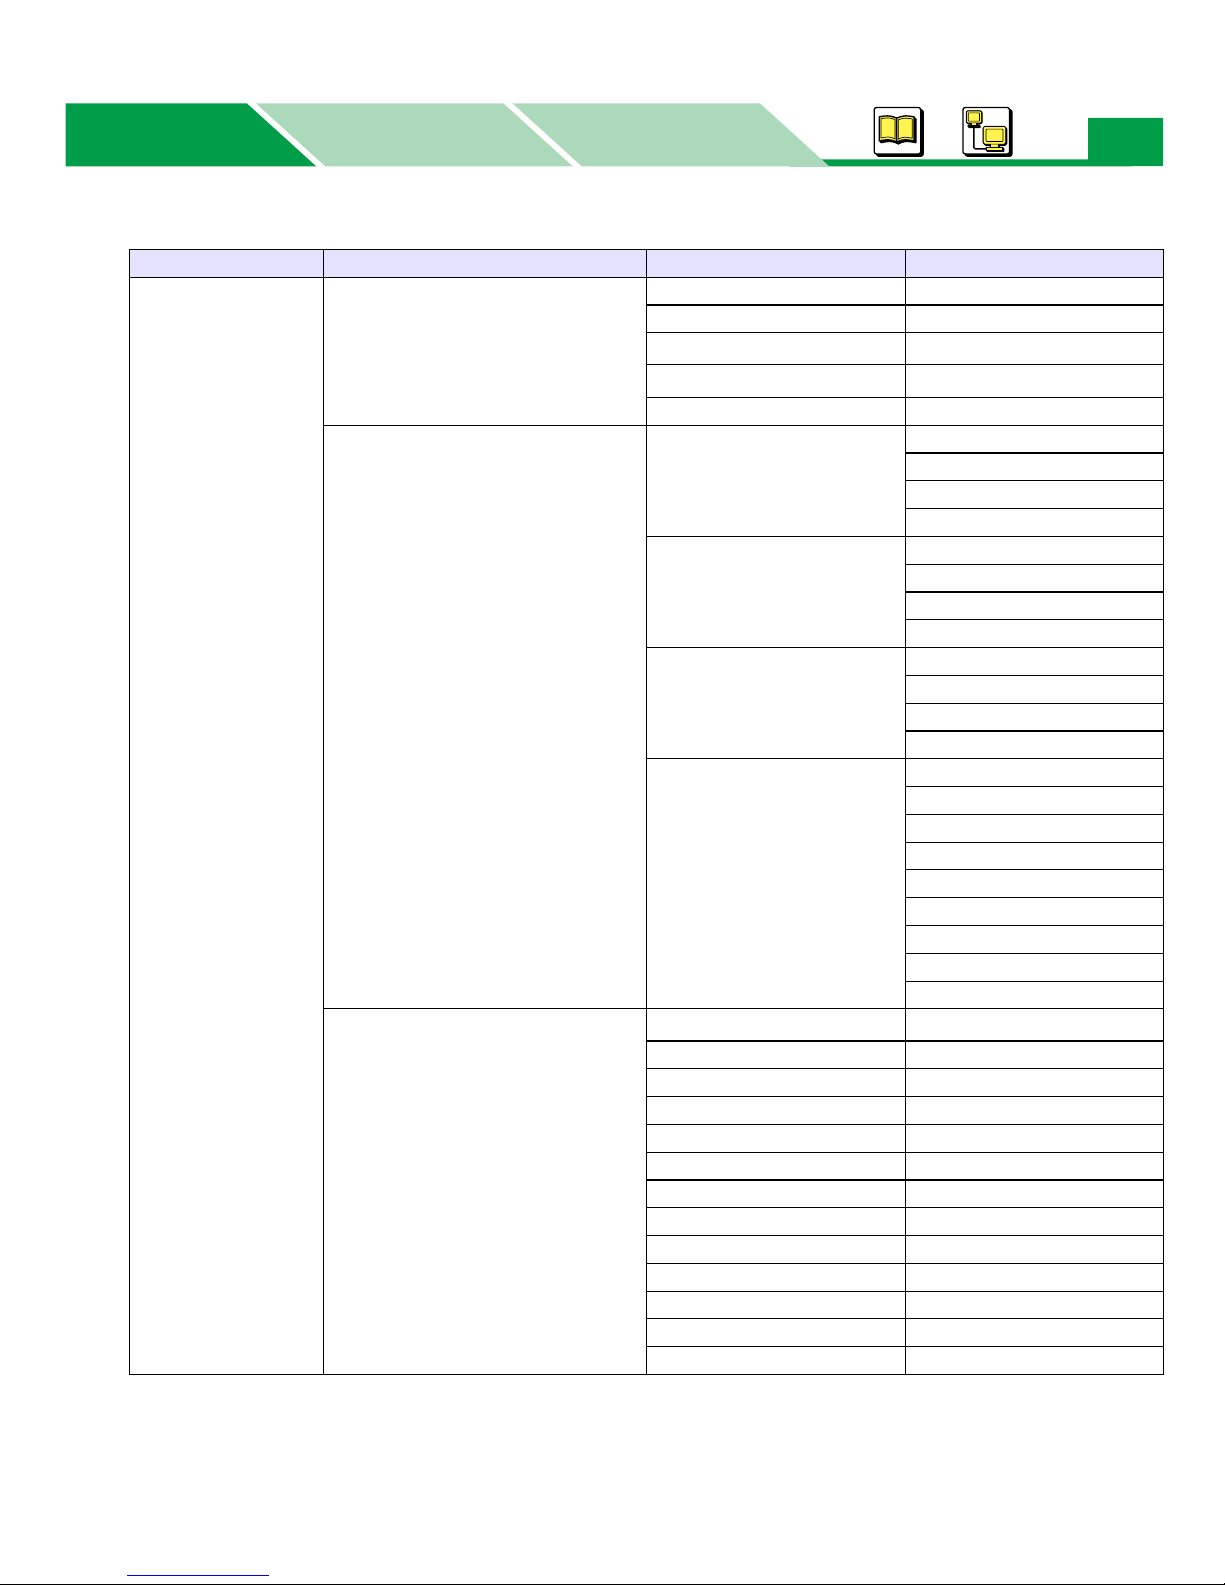
Before you attempt to change any settings, check the default settings in the following table. For details
on changing the settings, refer to “Outline for Operation” on page 47.
Once you have changed the printer panel settings, they are saved automatically as user default
settings even if the power is turned off. However, the settings of the printer driver override the printer
panel’s settings.
* denotes the default setting. It is also shown on the LCD panel.
Main Menu Item Menu Selection 1 Menu Selection 2 Menu
Check and
1
Print*
Memory Print*
Confidential
1
Print*
##:######## (Job name)
or
No Job Available
1
##:######## (Job name)
or
No Job Available
##:######## (Job name)*
or
No Job Available
Copies
n* (1 - 999)*
Delete No *
Yes
Print 1* (1 - 999)
Delete No*
Yes
Print 1* (1 - 999)
2
Delete No *
Yes
Test Page Menu Map
Configuration Page
Tes t Pr i nt
PCL Font List
3
1
Color
Calibration
PS Font List*
Spool List*
Calibration Offset 0* (-5 to 5)
CYAN 0* (-5 to 5)
MAGENTA 0* (-5 to 5)
YELLOW 0* (-5 to 5)
BLACK 0* (-5 to 5)
Calib.Test Prn.
Reset Calibration No*
Yes
1
*
The menu is displayed only when a hard disk drive is installed in the printer.
2
To enter the lower-level menu, the password must be entered (see “Performing Confidential Print
*
(Windows-PCL Only)” on page 58).
3
The menu is displayed for DP-CL21M only
*
4
The number of copies “n (digit set with the printer driver)” is displayed.
*
4
Basics
Basics
Windows
Macintosh
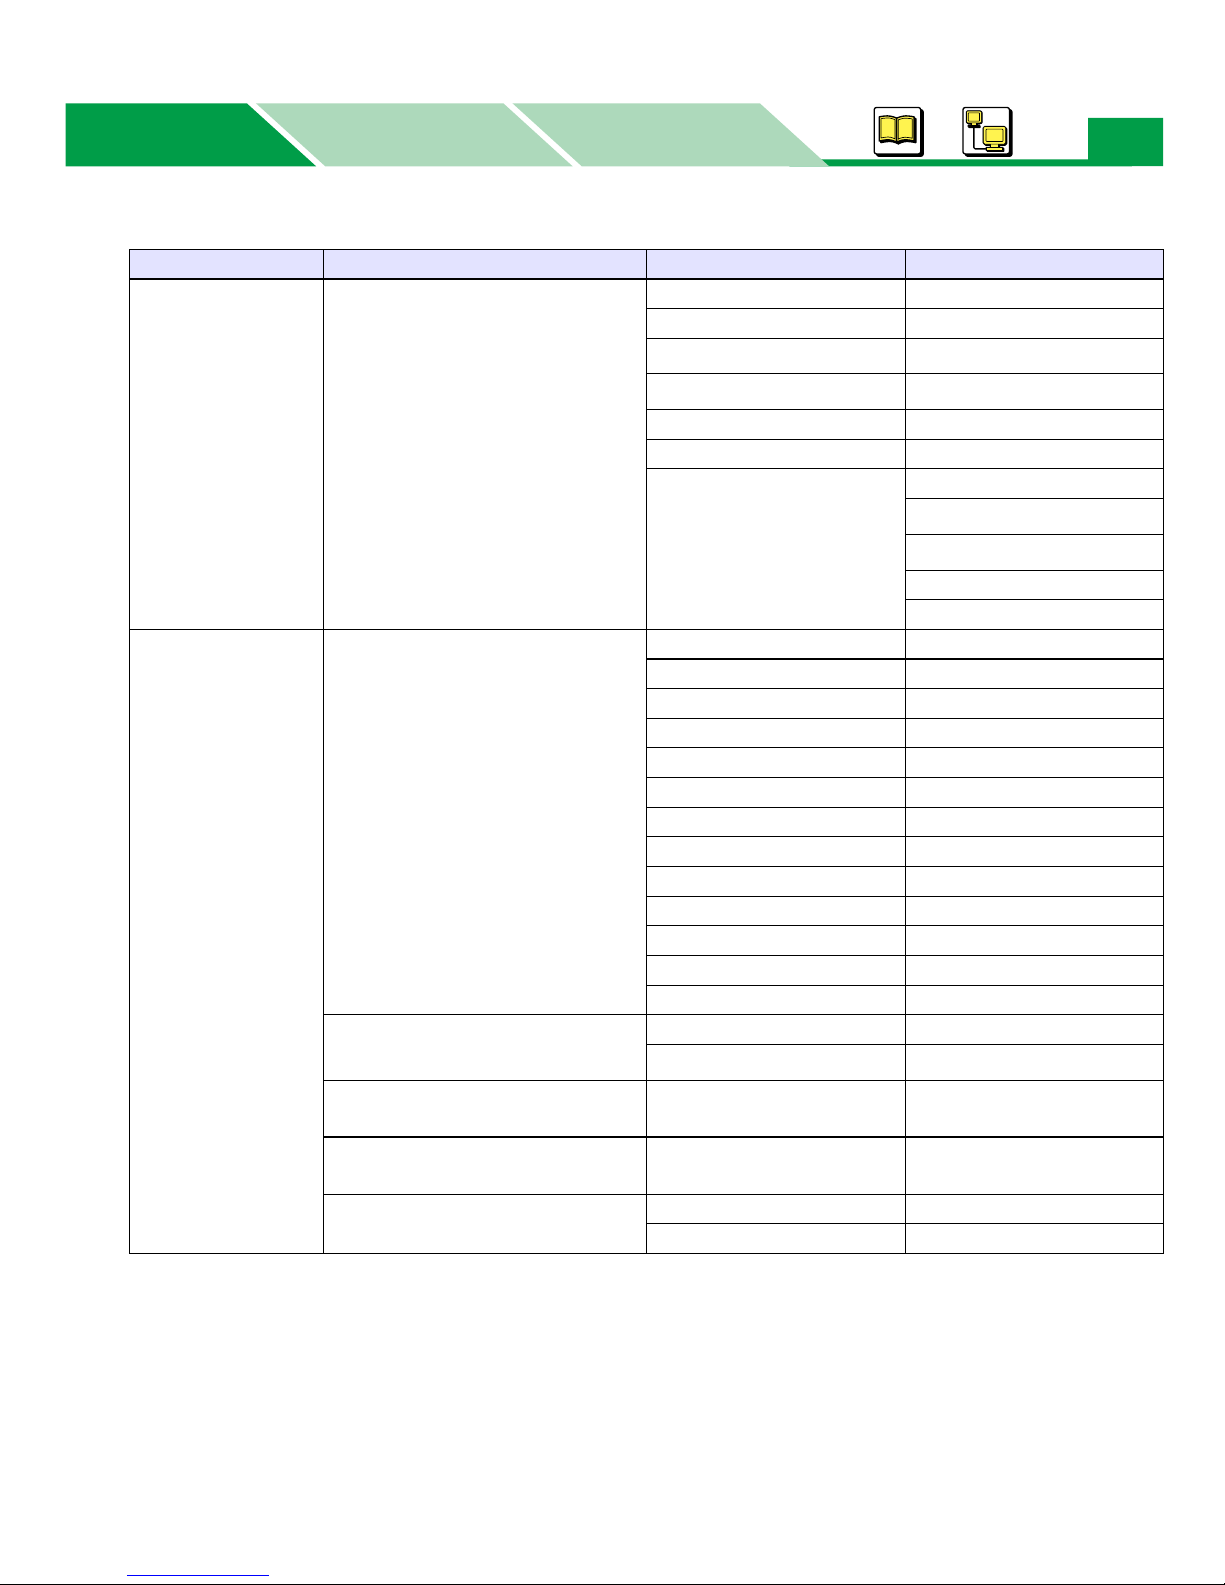
Menu Table
Main Menu Item Menu Selection 1 Menu Selection 2 Menu
Maintenance Page Count Total Page: #####
Color Page: #####
Mono Page: #####
Simulated Page Color Page: #####
Mono Page: #####
Image Area(Last) CYAN : ### %
MAGENTA : ### %
YELLOW : ### %
BLACK : ### %
Image Area(Average) CYAN : ### %
MAGENTA : ### %
YELLOW : ### %
BLACK : ### %
Reset Counter New TC-C ? No*
Yes
New TC-M ? No*
Yes
New TC-Y ? No*
Yes
New TC-K ? No*
Yes
New AU ? No*
Yes
New TR ? No*
Yes
New FSR ? No*
Yes
25
Basics
Basics
Windows
Macintosh
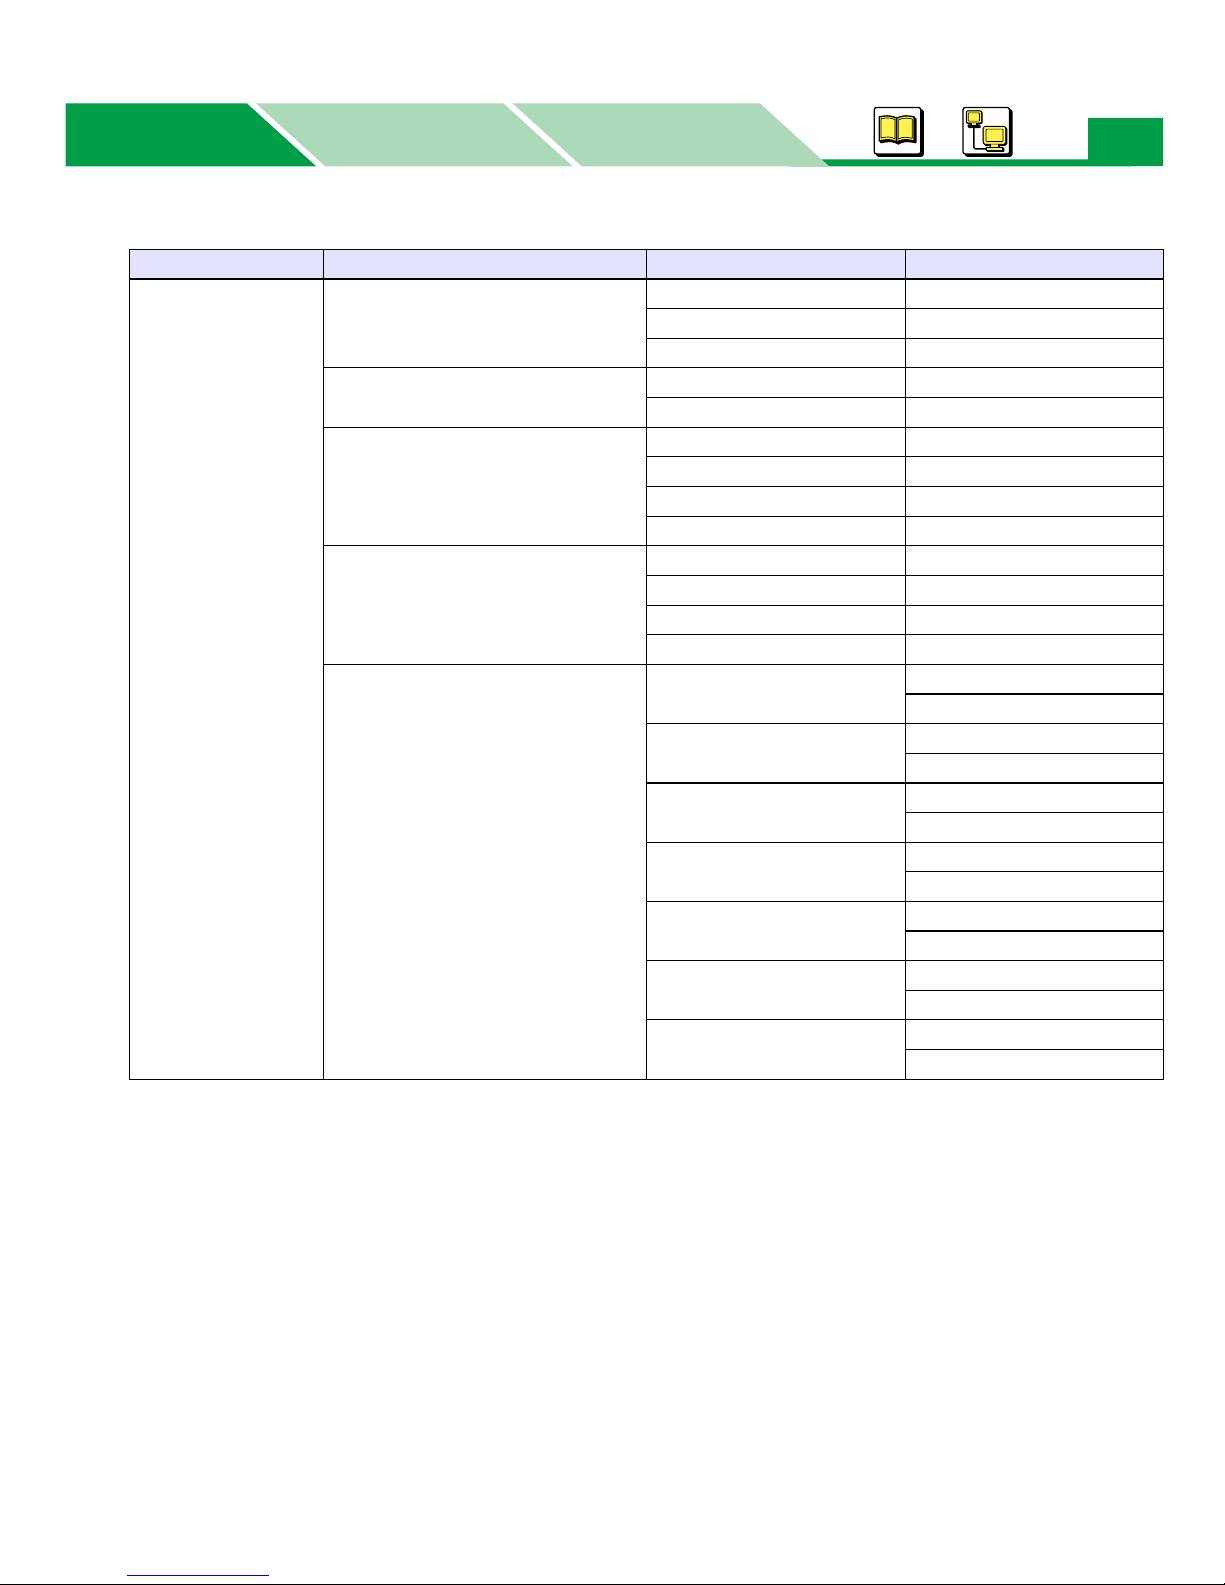
Menu Table
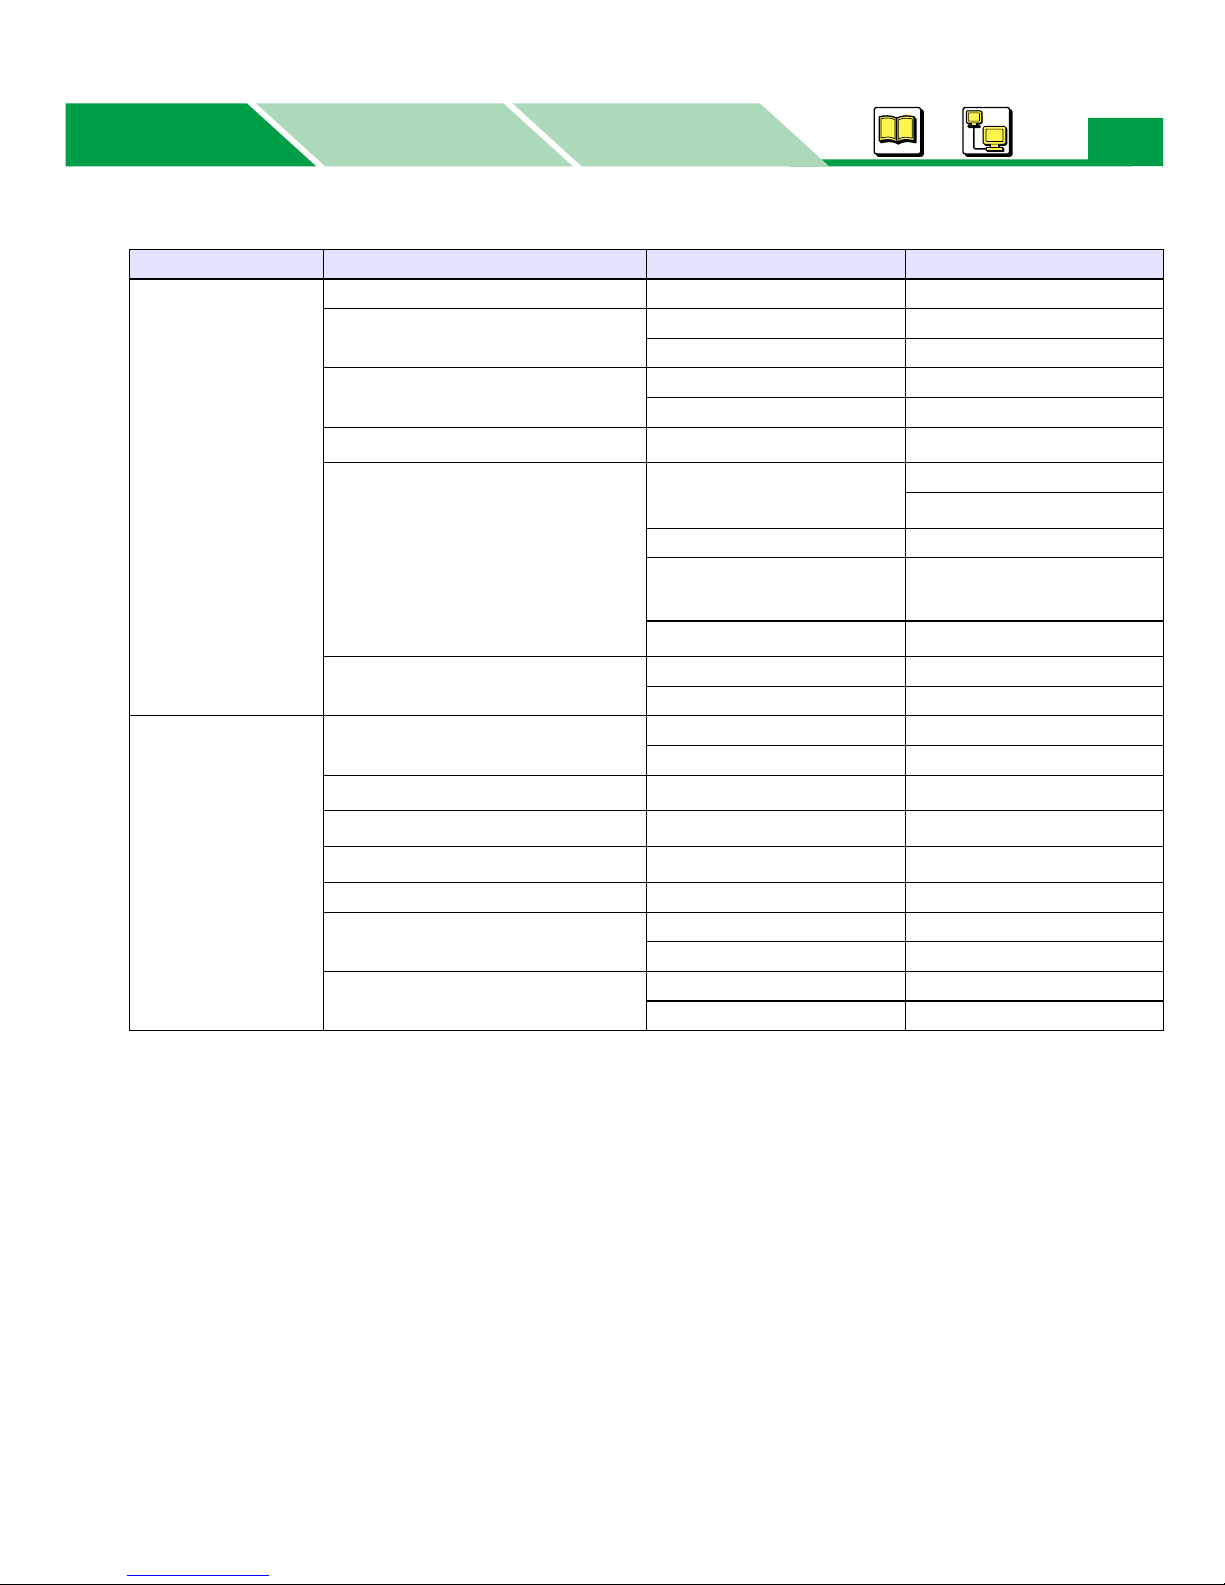
Main Menu Item Menu Selection 1 Menu Selection 2 Menu
Tray Paper Source Auto*
Tray1
Tray2*
Tray3*
MPT
Tray Media Type Tray1 Plain Paper*
Tray2*
Tray3*
MPT Plain Paper*
MPT Paper Size
Letter*
Legal
Executive
A4
A5
B5(JIS)
ENV. #9
ENV. #10
ENV. Monarch
ENV. C5
ENV. C6
ENV. DL
Custom
5
5
Thin Paper
Bond/Letterhead
Recycled Paper
5
5
Plain Paper*
Thin Paper
Bond/Letterhead
Recycled Paper
Plain Paper*
Thin Paper
Bond/Letterhead
Recycled Paper
Thin Paper
Transparency
Label
Coated Paper
Envelope
Thick Paper/Card
Bond/Letterhead
Recycled Paper
26
*5Tray2 is displayed when an optional paper feeder is installed to the printer. Tray3 is displayed when
installing the 2nd optional paper feeder.
Basics
Basics
Windows
Macintosh
Menu Table
Main Menu Item Menu Selection 1 Menu Selection 2 Menu
Tray Position Setting Top 0* (-30 to 30)
Tray1 Left 0* (-15 to 15)
Print
Tray2 Left*
Tray3 Left*
MPT Left 0* (-15 to 15)
Duplex Left 0* (-15 to 15)
Test Print Tray1/Top
Print Format*
7
Letter*
Legal
Executive
A4
A5
B5(JIS)
ENV. #9
ENV. #10
ENV. Monarch
ENV. C5
ENV. C6
ENV. DL
Custom
Custom Size Unit Inch*
6
6
0* (-15 to 15)
0* (-15 to 15)
Tray2*
Tray3*
6
6
MPT
Duplex
27
Custom X Size 8.5* Inch /
Custom Y Size 14.0* Inch /
Image Reduction On*
*6Tray2 is displayed when an optional paper feeder is installed to the printer. Tray3 is displayed when
installing the 2nd optional paper feeder.
7
If the menu except MPT is selected in the Paper Source menu, Letter, Legal, A4 or B5(JIS) can be
*
selected in the Selection 1 menu.
mm
216 mm
356 mm
Off
Basics
Basics
Windows
Macintosh
Menu Table
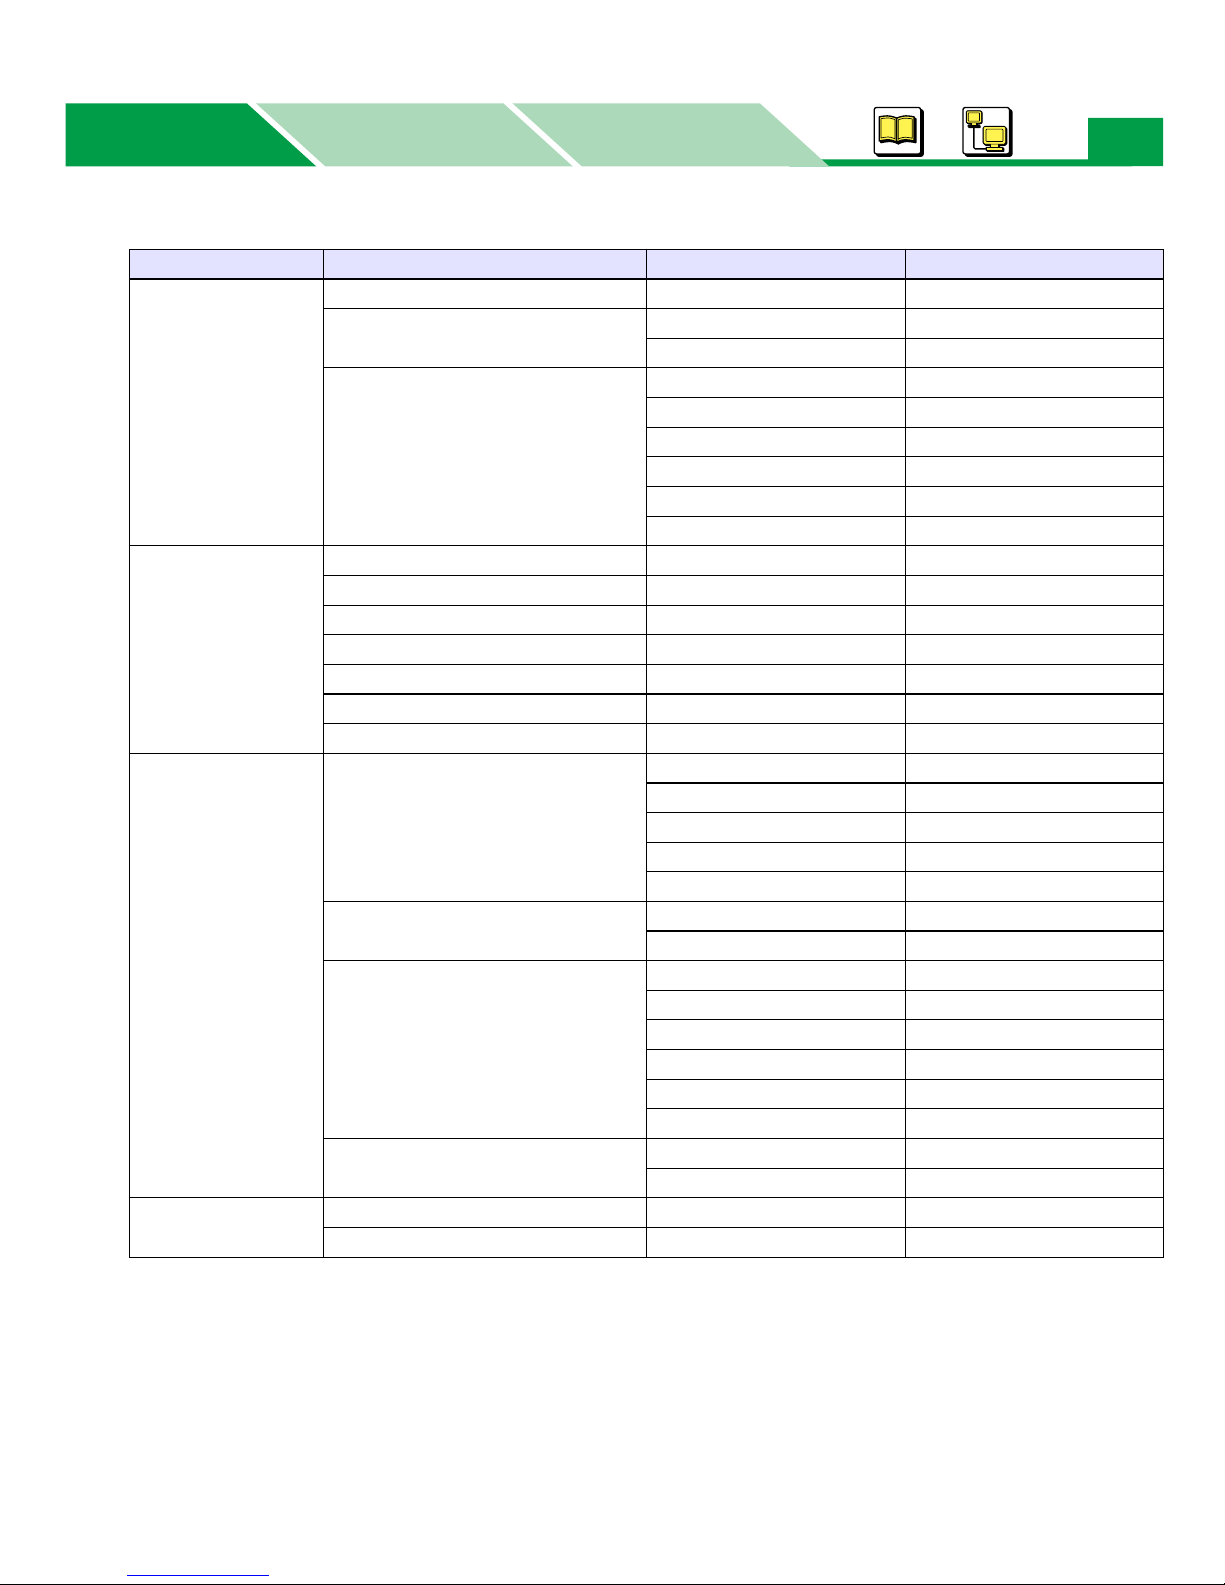
Main Menu Item Menu Selection 1 Menu Selection 2 Menu
PCL Copies 1* (1 - 999)
A4 Wide No*
Yes
Orientation Portrait*
Landscape
NW Protocol
Setup
Lines Per Page*
8
PCL Font Menu PCL Font Source Resident*
Toner Save Off*
DHCP Enable*
IP Address*
Subnet Mask*
Default Gateway*
11
11
11
Session Time Out 60* (0 to 2400s)
Password Reset No*
Factory Reset No*
60*
Download Font*
PCL Font Number 0*
PCL Font Pitch /
PCL Font Point*
PCL Symbol Set
10
(Pitch) 10.00*
(Point) 12.00*
PC-8*
On
Disable
000.000.000.000*
000.000.000.000*
000.000.000.000*
Yes
Yes
28
9
*8The default setting is changed depending on the Orientation and/or Print Format.
9
This menu is displayed only when download fonts are available.
*
10
*
PCL Font Pitch is changed to PCL Font Point depending on the selected PCL Font Number.
11
When DHCP is disabled, the menu is displayed.
*
Basics
Basics
Windows
Macintosh
Menu Table
Main Menu Item Menu Selection 1 Menu Selection 2 Menu
I/O Setting Time Out 30* (5 to 300 s)
Parallel Speed High*
Low
I/O Buffer Setting Auto*
512 KB
1 MB
1.5 MB
2 MB
4 MB
ADJ. to Media Plain Paper 0* (-15 to 15)
Thin Paper 0* (-15 to 15)
Transparency 0* (-15 to 15)
Label 0* (-15 to 15)
Coated Paper 0* (-15 to 15)
Thick Paper/Card 0* (-15 to 15)
Envelope 0* (-15 to 15)
Other Language English*
French
German
Spanish
Italian
Power Save On*
Off
Auto Continue Off*
20 sec
30 sec
60 sec
90 sec
120 sec
Factory Reset No*
Yes
Mono Page
Detect
On*
Off
29

Basics
Basics
Windows
Macintosh
Outline for Menus
Outline for Menus
Check and Print
This function is available in Windows only (not available in Macintosh).
If Check and Print is turned on when printing a document, the print job is saved in the printer’s hard disk
drive after printing a copy of your document. You can print copies of your document by using the job
saved in the printer’s hard disk drive after confirming the printing result. The saved job can be printed
with the Menu Mode of the printer (see “Performing Check and Print (Windows Only)” on page 48)
or HDD Utility (see “Performing Check and Print” on page 217).
To perform Check and Print,
• The hard disk drive must be installed in the printer and within the “Device” tab in the printer driver.
30
PCL printer driver: See “Device Tab” on page 137.
PS printer driver: See “Device Options Tab (Windows 95 / Windows 98 / Windows Me)” on
page 162 or “Device Settings Tab (Windows NT 4.0 / Windows 2000 /
Windows XP)” on page 181.
■ Document name
Displays the sequential number and document name performed Check and Print. When no print
job is saved in the printer’s hard disk drive, “No Job Available” is displayed.
• Copies
Sets the number of copies when printing the print job saved in the printer’s hard disk drive.
•Delete
Deletes the print job saved in the printer’s hard disk drive.
NOTE:
• After having finished printing the Check and Print job, it will be removed from the printer’s hard disk
drive.
 Loading...