

Panasonic WORKIO DP-C106, DA-TL28C, DA-TL26C, DA-RM64C, DA-RM128C Operating Instructions Manual
...
DP-C106
Digital Color Imaging System
Operating Instructions
Model No.
Operating Instructions
DP-C106
Options
DA-TL28C/TL26C/RM64C/RM128C/DU26C/SM112C/S27C
English
Before operating this machine, please read
these instructions completely and keep these
operating instructions for future reference.

TRADEMARKS/COPYRIGHTS
The following trademarks and registered trademarks are used throughout this manual.
Microsoft, MS-DOS, Windows, and Windows NT are either registered trademarks or trademarks
of Microsoft Corporation in the United States and/or other countries.
i386, i486, and Pentium are either registered trademarks or trademarks of Intel Corporation.
Adobe, the Adobe logo, Adobe PostScript, Acrobat, Acrobat Reader, and Acrobat logo are either
registered trademarks or trademarks of Adobe Systems Incorporated in the United States and/or
other countries.
Apple, the Apple logo, ColorSync, FireWire, LaserWriter, Mac, Mac logo, Macintosh, Power
Macintosh, and TrueType are either registered trademarks or trademarks of Apple Computer, Inc.
in the United States and/or other countries.
Fiery, the Fiery logo, Fiery Driven, Fiery Link, ColorWise, NetWise, RIP-While-Print, VisualCal,
WebTools, WebSpooler, WebInstaller, and WebStatus are either registered trademarks or
trademarks of Electronics For Imaging, Inc., in the United States and certain other foreign
jurisdictions.
Novell, Novell Client, Novell Directory Services, Novell Distributed Print Services, Netware,
intraNetware, NDPS, NDS, , IPX, IPX/SPX, NDS Admin, NDS Administrator are either registered
trademarks or trademarks of Novell, Inc., in the United States and/or other countries.
Panasonic Document Imaging Company has made every effort to supply trademark information
about company names, products and services mentioned in this documentation. All third party
and/or other trademarks identified herein are the property of their respective owners.
Copyright © 2001 by Matsushita Graphic Communication Systems, Inc.
All rights reserved.
Copyright protection claimed includes all forms and matters of copyrightable material and
information now allowed by statutory or judicial law or hereinafter granted, including without
limitation, material generated from the software programs that are displayed on the screen such
as styles, templates, icons, screen displays, looks, etc.
Contents are subject to change without notice.
Printed in Japan.

iii
Safety Notes, Compliances
Certifications, and Other Notices
Panasonic reserves the right to change this information without notice, and
makes no warranty, express or implied, with respect to this information.
Panasonic shall not be liable for any loss or damage, including consequential
or special damages, resulting from the use of this information, even if loss or
damage is caused by Panasonic's negligence or other fault.
Safety Notes
Your DP-C106 and its supplies have been designed and tested to meet strict
safety requirements. These include safety agency examination and approval,
and compliance with established environmental standards. Please read the
following instructions carefully before operating the DP-C106.
Failure to follow the recommendations in this section may result in personal
injury or rescinding of the Dealer's Warranty/Maintenance Agreement.
WARNING
An improper connection to the DP-C106 grounding conductor can result in
electrical shock. Always connect the copier to a properly grounded wall
outlet. If in doubt, have the outlet checked by a qualified electrician.
Never use an extension cord between the copier power cord and an electrical
outlet.
Do not allow anything to rest on the power cord.
Do not place the DP-C106 where people may step on the power cord.
Follow all warnings and instructions that are marked on or supplied with the
DP-C106.
Never override or "cheat" electrical or mechanical interlock devices.
Always locate the DP-C106 on a solid support surface with adequate
strength for the weight of the copier.
Do not use the DP-C106 near water, wet locations, or outdoors.

Safety Notes, Compliances, Certifications, and Other Notices
iv
Never push objects of any kind into the slots in the covers, as they may touch
dangerous voltage points or short out parts that could result in a risk of fire or
electric shock.
The DP-C106 is designed to prevent user access to unsafe areas and to
ensure that the device will not operate with the covers opened. Never attempt
any maintenance function that is not specified in the DP-C106 Operating
Instructions.
Never remove any covers or guards that require a tool for removal, unless
you are instructed to do so. Ensure that you read all Warnings and Cautions,
and follow each step in the instructions exactly as they are written.
Never attempt any activity that is not specified in the DP-C106 Operating
Instructions, or on the User Interface, or that is not specifically directed by an
authorized Panasonic representative.
Do not look directly at the exposure lamps. The exposure lamps are not
harmful but they are very bright and may cause discomfort. It is
recommended that the Scanner Cover be closed when the DP-C106 is in use.
Never operate the DP-C106 if unusual noises or odors are detected.
Disconnect the power cord from the wall outlet and call your local authorized
Panasonic service representative to correct any problems.
Maintenance Safety
Refer to these instructions as needed in order to ensure the safe operation
of the Copier/Printer.
Always use materials that are supplied or approved by Panasonic. Use of
other materials may result in poor performance and could create a hazardous
situation.
Do not use aerosol cleaners. Follow the instructions in the DP-C106
Operating Instructions for the appropriate cleaning methods.
Never use supplies or cleaning materials for purposes other than what they
were intended. Keep all supplies and cleaning materials out of the reach of
children.
Never place coffee or other liquids on the machine.
Never spill liquid of any kind on the machine.
The DP-C106 is equipped with an energy-saving device to conserve power
when not in use.

Safety Notes, Compliances, Certifications, and Other Notices
v
Unplug the DP-C106 from the wall outlet and refer servicing to qualified
service personnel under the following conditions:
• When the power cord is damaged or frayed
• If liquid has been spilled into the DP-C106
• If the DP-C106 has been exposed to rain or water
• If the DP-C106 is producing unusual noises or odors
If the system does not work or continues to malfunction after following the
Problem Solving procedures in the DP-C106 Operating Instructions, call your
local authorized Panasonic service representative.
Ozone Safety
Make sure that the machine is installed in a spacious or well-ventilated room
so as not to increase the amount of ozone in the air, since ozone is heavier
than air, it is recommended that air at floor level be ventilated.
Laser Safety
Use of controls, adjustments or performance procedures other than those
specified herein, may result in hazardous laser radiation exposure.
This equipment complies with safety standards. With specific regard to laser
safety, the equipment complies with performance standards for laser products
set by government agencies as a Class I laser product and does not emit
hazardous lights, the beam is totally enclosed during all modes of customer
operation and maintenance.
.

Safety Notes, Compliances, Certifications, and Other Notices
vi
Safety Notes
FCC
This equipment has been tested and found to comply with the limits for a
Class A digital device, pursuant to Part 15 of the FCC Rules. These limits
are designed to provide reasonable protection against harmful interference
when the equipment is operated in a commercial environment. This
equipment generates, uses, and can radiate radio frequency energy and, if
not installed and used in accordance with the instruction manual, may cause
harmful interference to radio communications. Operation of this equipment
in a residential area is likely to cause harmful interference in which case the
user will be required to correct the interference at his own expense.
Responsible Party: Matsushita Electric Corporation of America
One Panasonic Way, Secaucus, NJ 07094
Technical Support: Panasonic Document Imaging Company/
Technical Support Department
Two Panasonic Way, Secaucus, NJ 07094
1-800-225-5329
Email: consumerproducts@panasonic.com
The user could lose the authority to operate this equipment if any
unauthorized changes or modifications are made to this equipment.
Shielded cables must be used with this equipment to maintain compliance
with FCC regulations.
European Union
This product complies with the requirements of EC Council Directives
73/23/EEC amended by 93/68/EEC, and 89/336/EEC amended by
92/31/EEC and 93/68/EEC.
Safety Notes, Compliances, Certifications, and Other Notices
vii
WARNING
This product is certified, manufactured and tested in compliance with strict
safety and radio frequency interference regulations. Any unauthorized
alteration, which includes the addition of new functions or the connection of
external devices, may impact this certification. Please contact your local
authorized Panasonic representative for a list of approved accessories.
WARNING
In order to allow this equipment to operate in proximity to Industrial, Scientific
and Medical (ISM) equipment, the external radiation from the ISM equipment
may have to be limited or special mitigation measures taken.
Safety Notes, Compliances, Certifications, and Other Notices
viii
WARNING
This is a Class A product. In a domestic environment this product may
cause radio frequency interference in which case the user may be required
to take adequate measures.
The user could lose the authority to operate this equipment if any
unauthorized changes or modifications are made to this equipment.
Shielded cables must be used with this equipment to maintain compliance
with the Radio Communications Act of 1992.
Documentation Conventions
The following conventions are used throughout the Operating Instructions.
WARNING
Warnings alert you to potential hazard that could result in serious injury or
death.
CAUTION
Cautions alert you to operations that may result in minor injury or damage to
the machine.
Notes contain additional information, explanations, and helpful suggestions.
Keypoints provide techniques or shortcuts.

ix
Table of Contents
1. Getting to Know the DP-C106 ................................................................................. 1
Printer, Front View....................................................................................................... 1
Printer, Rear View........................................................................................................2
Printer, Internal View ................................................................................................... 3
Printer Control Panel ................................................................................................... 4
Scanner and Automatic Document Feeder (ADF) Components.................................. 5
Scanner Control Panel.................................................................................................7
Options and Supplies...................................................................................................9
Options..................................................................................................................... 9
Supplies ................................................................................................................. 10
2. Basic Copying........................................................................................................11
The Copier Control Panel..........................................................................................11
Copy Mode ................................................................................................................ 13
Auto Start............................................................................................................... 14
The Copier Main Screen........................................................................................ 14
Positioning the Originals............................................................................................ 15
The Document Glass .............................................................................................15
The Automatic Document Feeder (ADF)................................................................17
Making a Copy........................................................................................................... 20
3. Copy Features........................................................................................................21
Reduce/Enlarge......................................................................................................... 21
Using the Reduce/Enlarge Feature........................................................................22
Paper Supply.............................................................................................................24
Using Paper Trays 1, 2, and 3 ...............................................................................24
Using the Bypass Tray........................................................................................... 25
Loading the Bypass Tray.................................................................................... 25

Table of contents Operating Instructions
x
Loading Transparencies into the Bypass Tray....................................................28
Loading Postcards into the Bypass Tray ............................................................ 29
Loading Envelopes in the Bypass Tray ..............................................................30
Making a Copy Using the Bypass Tray...............................................................31
Color Mode................................................................................................................32
Using the Color Mode Feature............................................................................... 34
Lighten/Darken .......................................................................................................... 35
Using the Lighten/Darken Feature ......................................................................... 35
Quality Adjustment.....................................................................................................36
Using the Sharpness Option.................................................................................. 36
Using the Color Level Adjustment..........................................................................37
Using the Background Mask Feature.....................................................................38
Advanced Features....................................................................................................39
Using the Output Feature....................................................................................... 40
Determining the Output with the Optional 10 Bin Sorter.........................................41
Using the Erase Feature........................................................................................ 42
Using the 2-Sided Feature..................................................................................... 43
Using the 2 Up Feature.......................................................................................... 45
4. Tools Mode .............................................................................................................47
Meter Check .............................................................................................................. 47
Administrative Features............................................................................................. 48
Defaults for Copy ...................................................................................................50
Color ......................................................................................................................53
Auto Color Adjust...................................................................................................55
Detect Document Size ...........................................................................................57
Auto Mode Change................................................................................................58
Limit Copy Set........................................................................................................ 59
Timer Preset ..........................................................................................................60
Sound Preset ......................................................................................................... 62
User Password....................................................................................................... 63
ADMIN Password................................................................................................... 65
Version Info............................................................................................................ 66
Self Diagnostics .....................................................................................................67

Operating Instructions Table of contents
xi
Transporting the Scanner.......................................................................................68
5. Problem Solving..................................................................................................... 69
Avoiding Paper Jams................................................................................................. 69
Printer Jam Clearance Areas.....................................................................................70
Document Feeder (ADF) Jam Clearance Area.......................................................... 71
Clearing a Paper Tray Jam........................................................................................ 73
Clearing a Duplex Unit/Kit Jam..................................................................................75
Clearing Area 1 Jams................................................................................................77
Clearing Area 2 Jams................................................................................................81
Clearing Area 3 Jams................................................................................................83
Clearing Area 4 Jams................................................................................................85
Clearing Area 5 Jams................................................................................................87
Clearing the Fuser Area......................................................................................... 87
Clearing the Upper Inverter.................................................................................... 89
Clearing Area 6 Jams................................................................................................93
Clearing Jams in the 10 Bin Sorter............................................................................ 94
Copy/Print Quality Problems......................................................................................95
Adjusting The Printer Color........................................................................................97
VisualCal................................................................................................................ 97
1. Print Limits Page ........................................................................................... 97
2. Gray Balance Page ....................................................................................... 99
3. Comparison Page........................................................................................ 100
Printer Error Messages............................................................................................ 101
Printer Error Codes.................................................................................................. 105
Scanner Error Codes............................................................................................... 107
10 Bin Sorter Error Messages .................................................................................109
Network Problem Solving ........................................................................................111
Troubleshooting During Setup from the Control Panel......................................... 111
Network Protocol Setup Messages...................................................................... 112
Novell Problems During Network Setup............................................................... 116
Novell Error Messages......................................................................................... 117
Runtime Printer Error Messages.......................................................................... 119
Name Table ......................................................................................................... 121

Table of contents Operating Instructions
xii
Printing Problems ....................................................................................................122
On a Windows Workstation.................................................................................. 122
On a Mac OS Workstation ................................................................................... 123
General Printing Problems................................................................................... 124
Problems with Print Quality.................................................................................. 127
Job Management Problem Solving.......................................................................... 129
Job Management Error Messages ....................................................................... 129
Unexpected Printing Results................................................................................ 131
Clearing the Printer.............................................................................................. 132
Users are Unable to Connect to the DP-C106 ..................................................... 132
6. Maintenance .........................................................................................................133
Cleaning Procedures...............................................................................................133
Cleaning the Printer Covers................................................................................. 133
Cleaning the Scanner...........................................................................................134
Document Glass and ADF Cover ..................................................................... 134
Cleaning the Automatic Document Feeder (ADF) ............................................ 135
Replacing the Toner Cartridges............................................................................... 137
Replacing the Print/Copy Cartridge .........................................................................141
Replacing the Toner Waste Container.....................................................................147
Storing the Supplies.................................................................................................149
Toner Cartridges.................................................................................................. 149
Handling Precautions .......................................................................................149
Print/Copy Cartridge............................................................................................. 150
Handling Precautions .......................................................................................150
Types of Paper .......................................................................................................... 151
1
Getting to Know the DP-C106
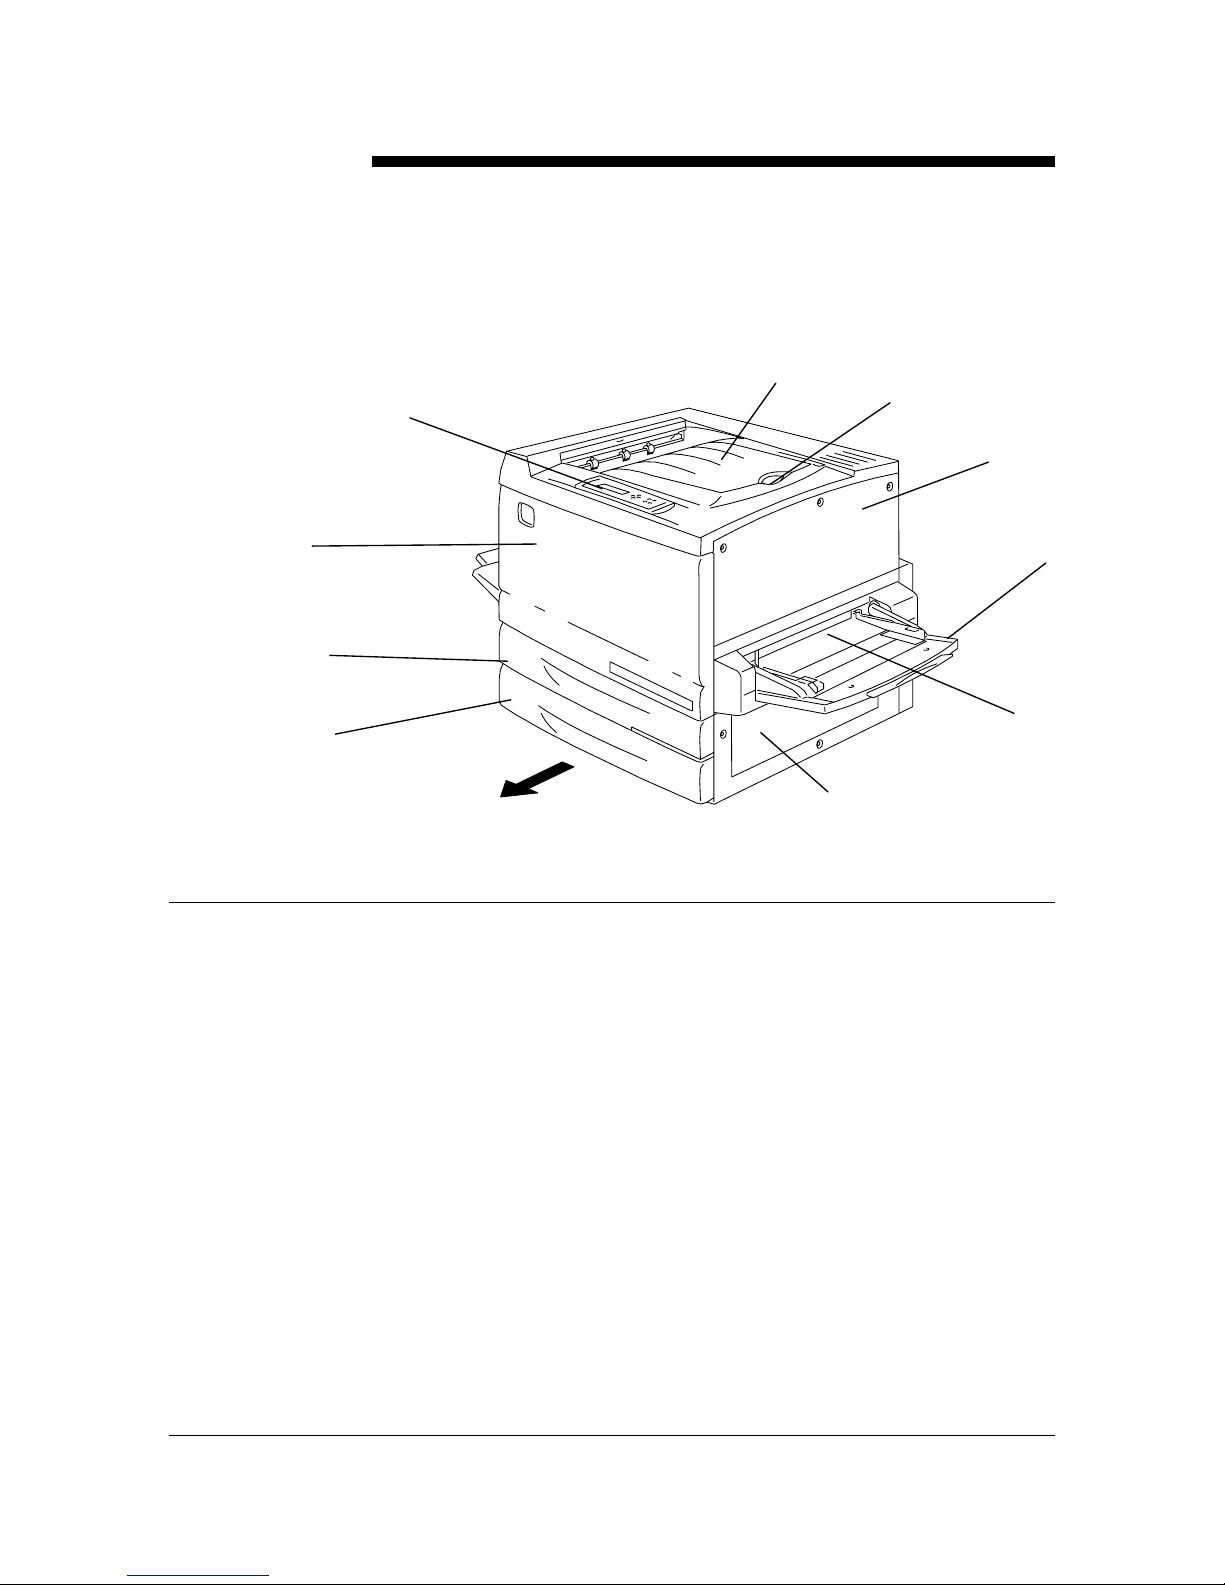
Printer, Front View
1. Paper Tray 1 – place paper supply here
2. Duplex Unit/Kit – option that allows two-sided printing
3. Front Cover – open to access the Toner Cartridges and the Print/Copy
Cartridge
4. Control Panel – use to access the Printer menus and to view messages
5. Printer Output Top Tray – the prints are delivered here
6. Paper Stop – use to stop oversized prints from being pushed out of the
Output Tray. The Paper Stop is adjustable up to 17 x 11 inch (B4) paper
7. Top Right-hand Cover – open to add additional memory
8. Bypass Tray – use for transparencies, envelopes, postcards, or other
stock
9. Bypass Transport – open to access paper jams
10. Paper Feed Area – open to access paper jams
1
3
4
5
6
7
10
9
8
1
2
Getting to Know the DP-C106 Printer, Rear View
2
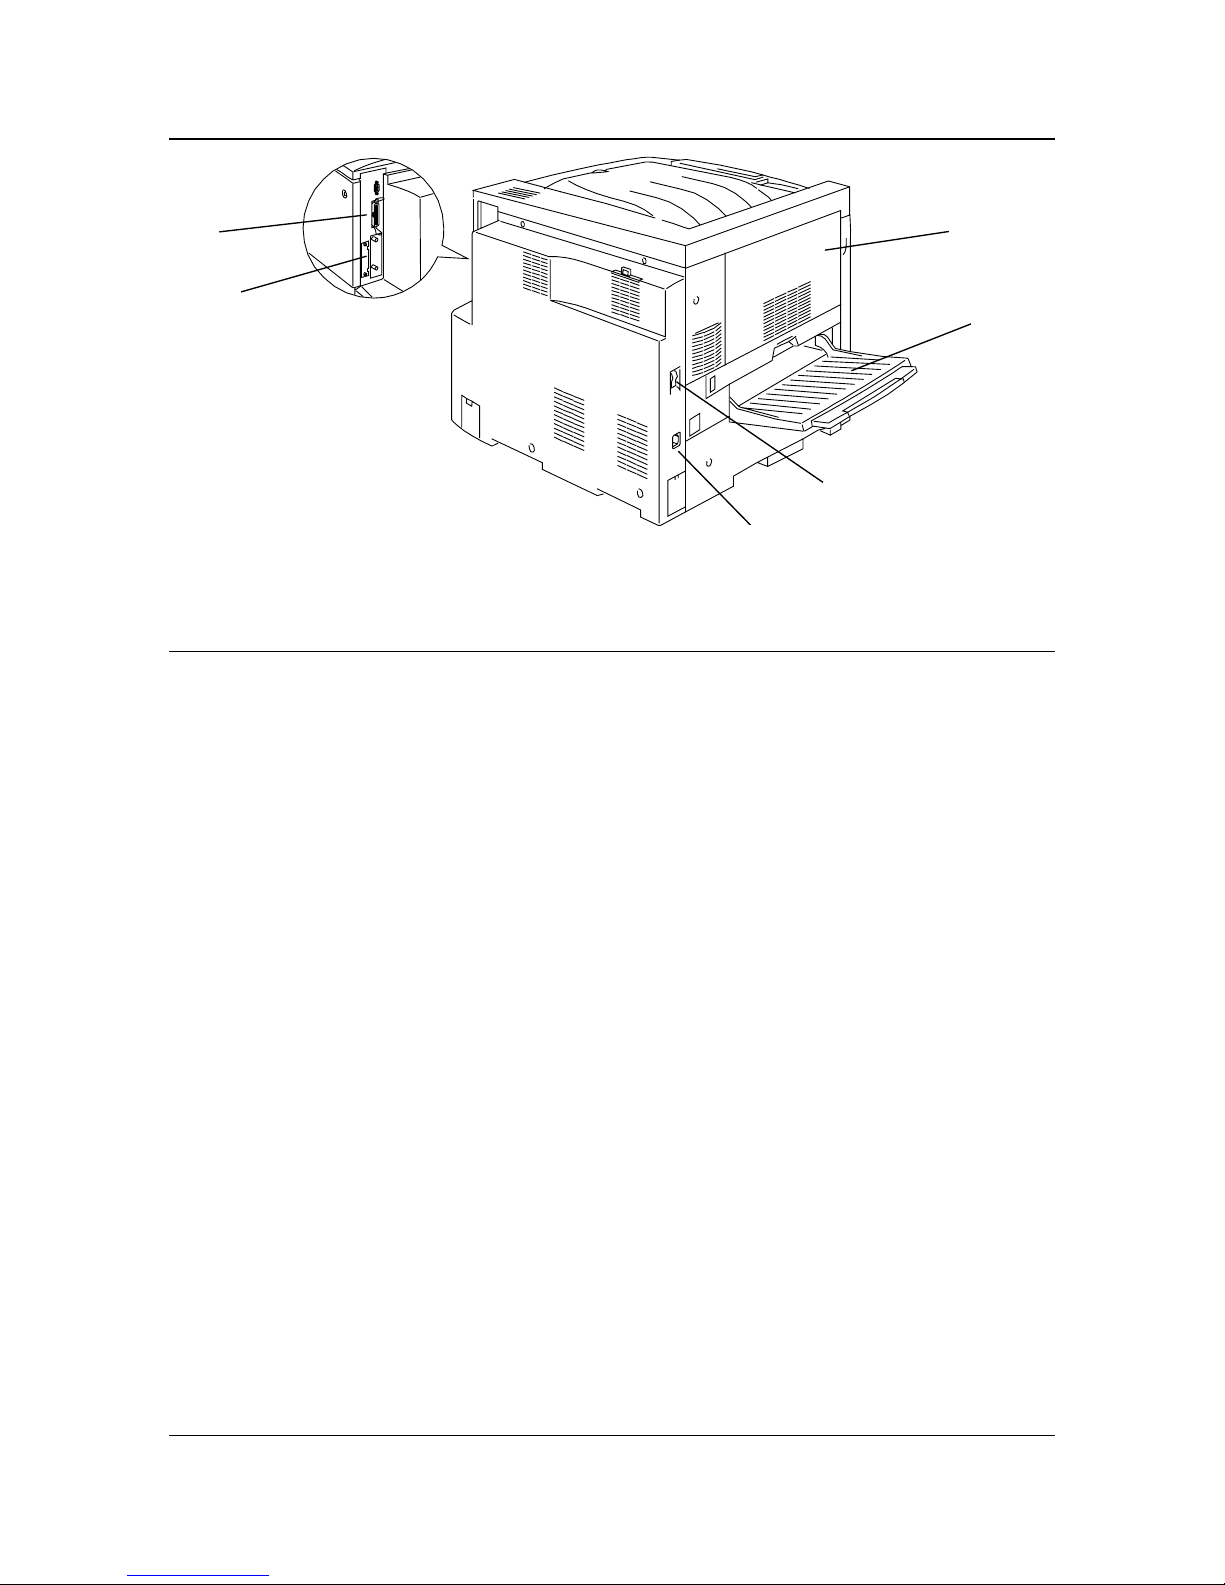
Printer, Rear View
11. Scanner Power Connector –provides power to the Scanner
12. Scanner Interface Connector – provides interface to the Scanner
13. Area 4 Access Cover – open to access paper jams
14. Printer Side Output Tray – copies are delivered to this tray
15. Printer Power Switch – use to switch the Printer power Off and On
16. Printer Power Cable Connector – connect the Printer Power Cable
here
12
11
13
15
16
14
Printer, Internal View Getting to Know the DP-C106
3
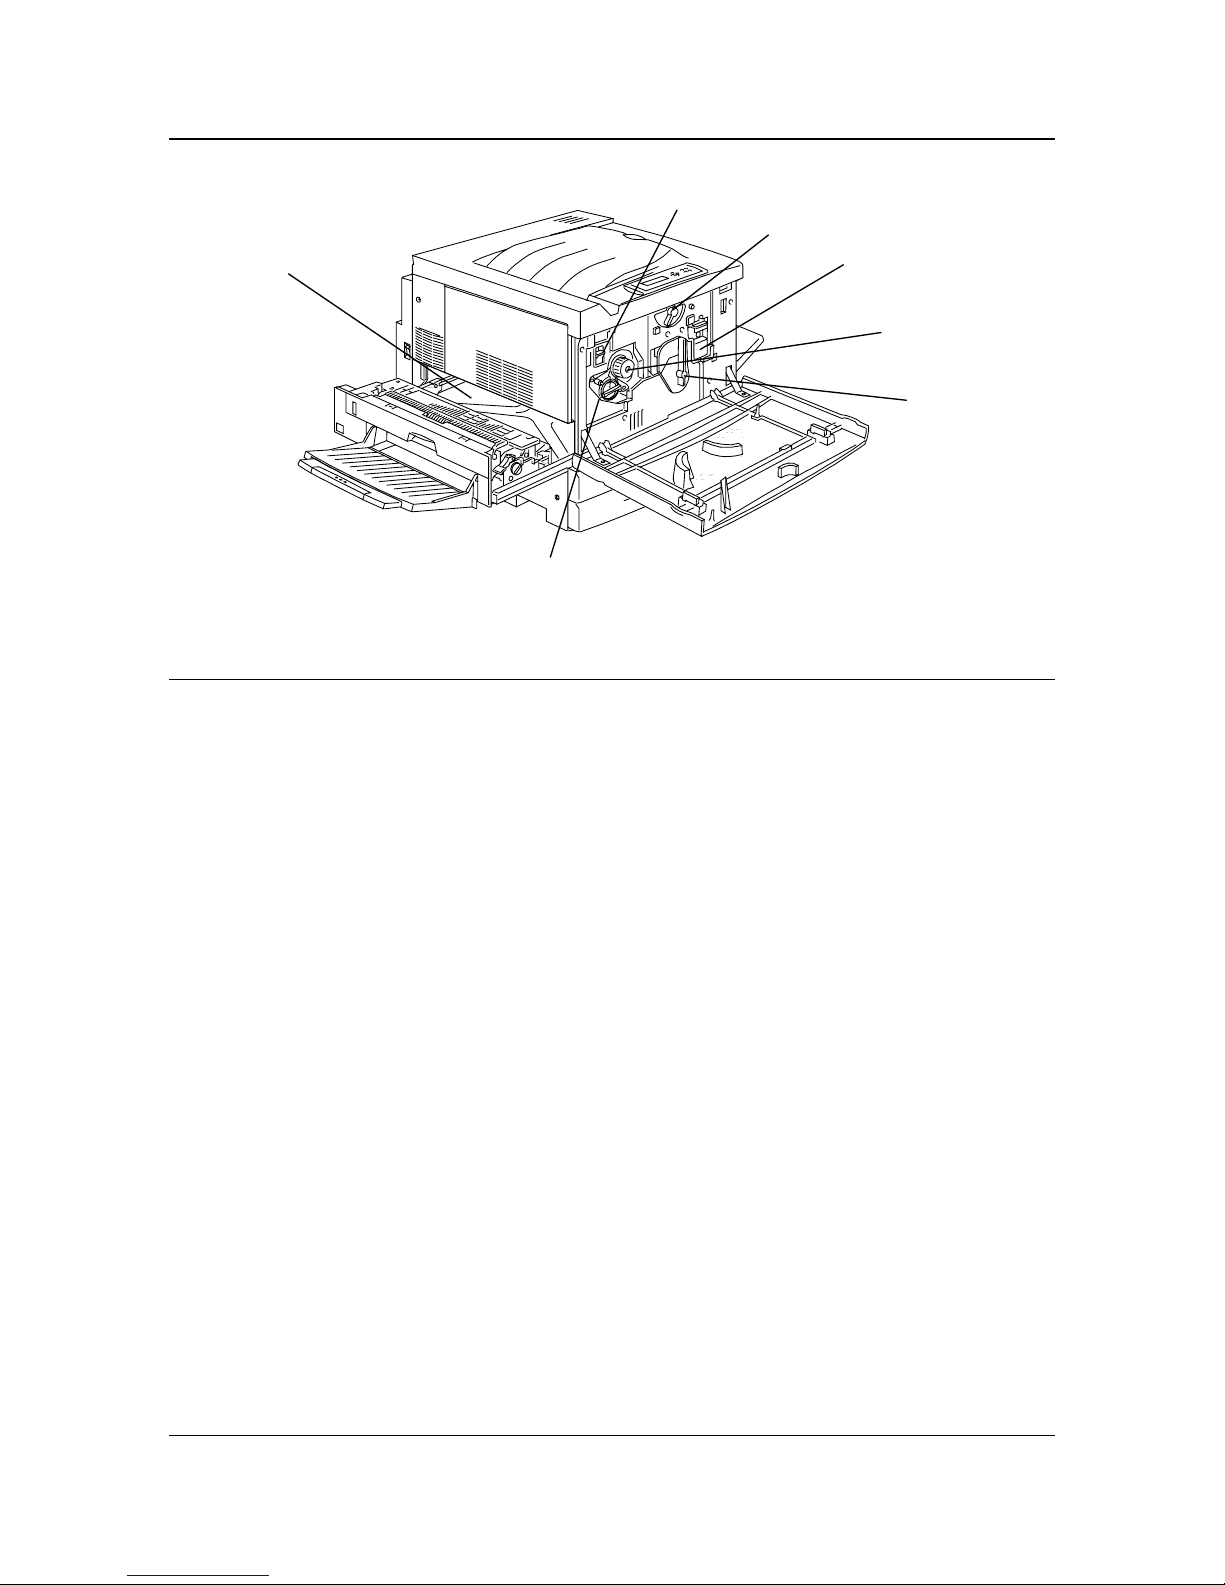
Printer, Internal View
17. Toner Carousel Access – the four Toner Cartridges are installed one at
a time, through this opening
18. Fuser Jam Clearance Area – the Fuser applies heat to the Toner in
order to adhere it to the paper
19. Anti-rotation Lever – use to release the Toner Carousel in order to
remove and replace the Toner Cartridges
20. Lever B – used to lock the Print/Copy cartridge in position
21. Print/Copy Cartridge – use to transfer copy/print image to media
22. Knob – used to manually turn the carousel in order to access the Toner
Cartridges
23. Lever A – the Print/Copy Cartridge is accessed through here
18
17
19
20
21
22
23
Getting to Know the DP-C106 Printer Control Panel
4
C/
101
0
0
101
0010
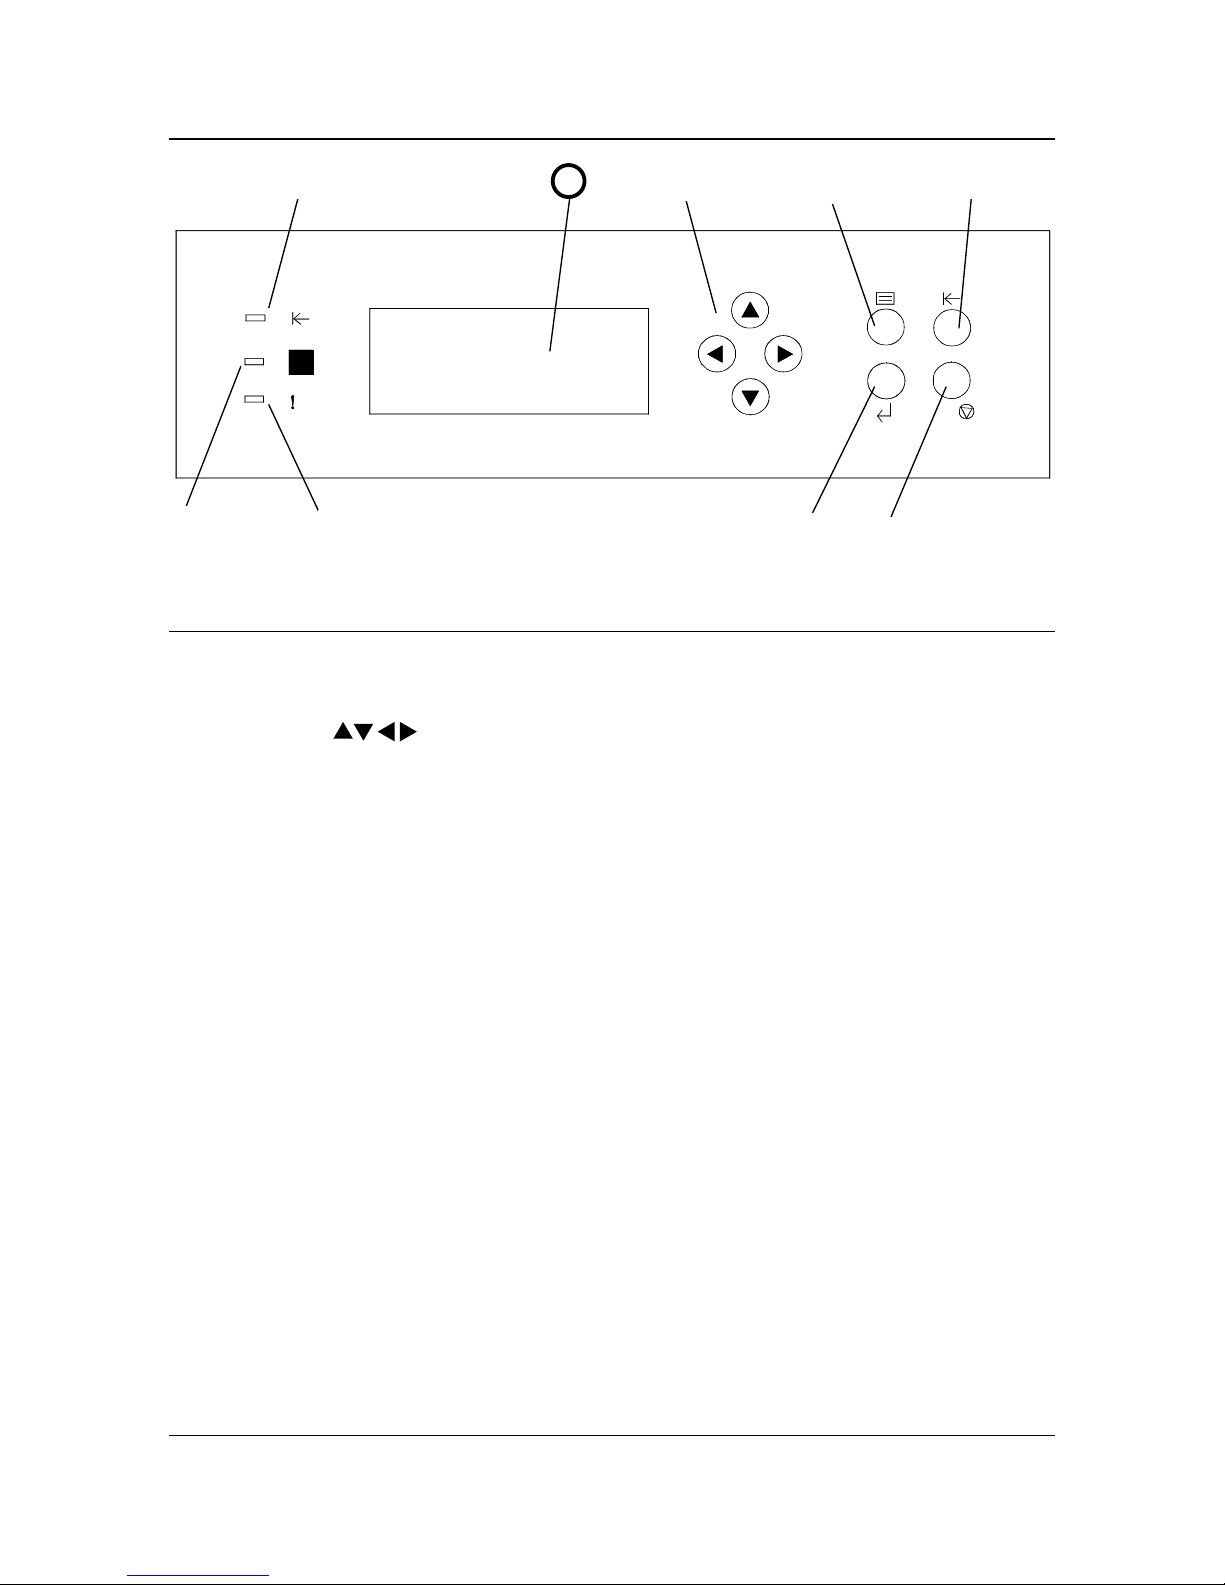
Printer Control Panel
1. Control Panel Screen – use to view the system status, menu options,
problem messages, and fault codes
2. ( ) ARROW buttons – use to view listed options in a menu
3. MENU button – use to step through the Printer menus
4. OFFLINE button– use this button to change the system status from on-
line to off-line and back again
5. CLEAR/STOP button – use this button to Clear an entry, Stop a
procedure or Cancel an operation and to return to the READY menu
6. ITEM/ENTER button– use this button to select options displayed on the
screen
7. ERROR Indicator – this indicator is lit when an error has occurred
8. PROCESSING Indicator – this indicator is lit when Printer is processing
a job
9. ONLINE Indicator – this indicator is lit when the system is on-line
1
2
3
4
5
6
7
8
9
Scanner and Automatic Document Feeder (ADF) Components Getting to Know the DP-C106
5
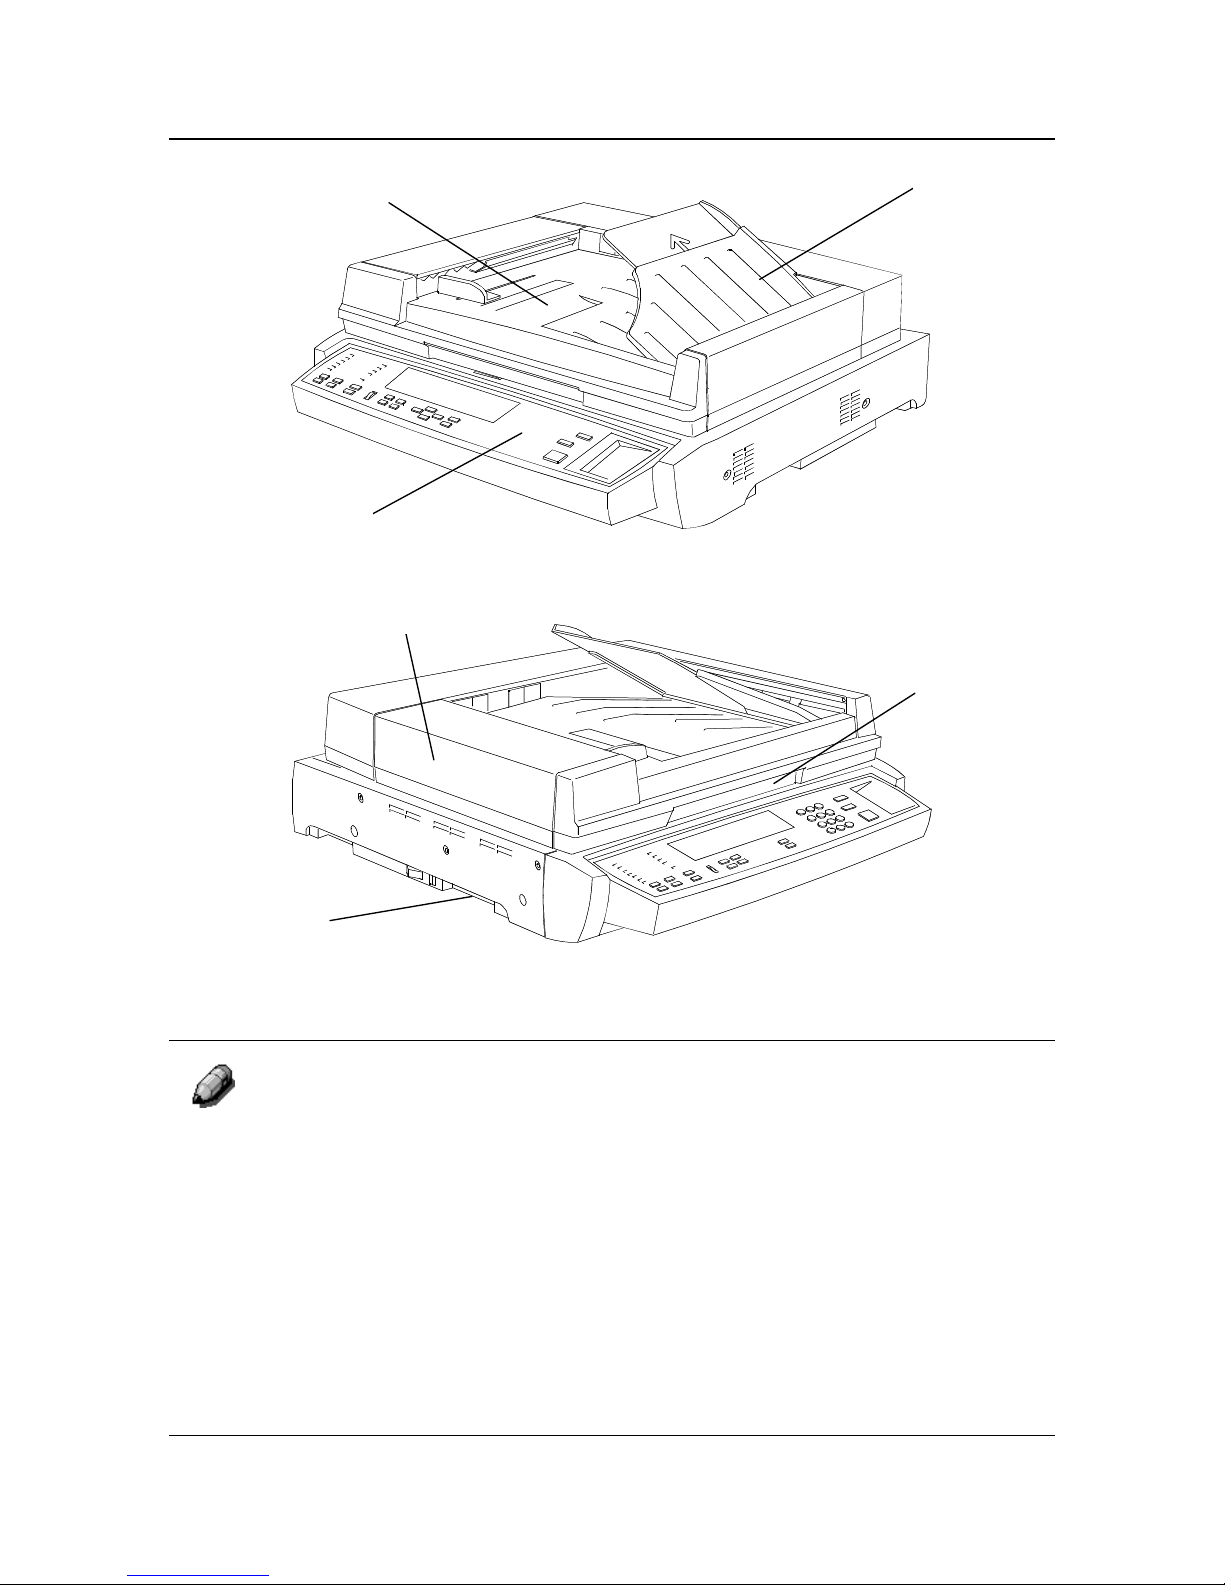
Scanner and Automatic Document Feeder (ADF) Components
The ADF comes mounted to the Scanner. Its components are illustrated and
described by numbers 3 through 6.
1. Scanner Control Panel – use to access the DP-C106 features and
options
2. Memory Expansion Slot – provided for the 1 to 2 Side Copy option
3. Document Input Tray – place the originals to be scanned here
4. Original Exit Tray – scanned originals are delivered here
5. Document Cover Handle – use to access the Document Glass
6. Access Cover – raise to access the feed rollers and to clear jams
1
3
4
2
6
5
Getting to Know the DP-C106 Scanner and Automatic Document Feeder (ADF) Components
6
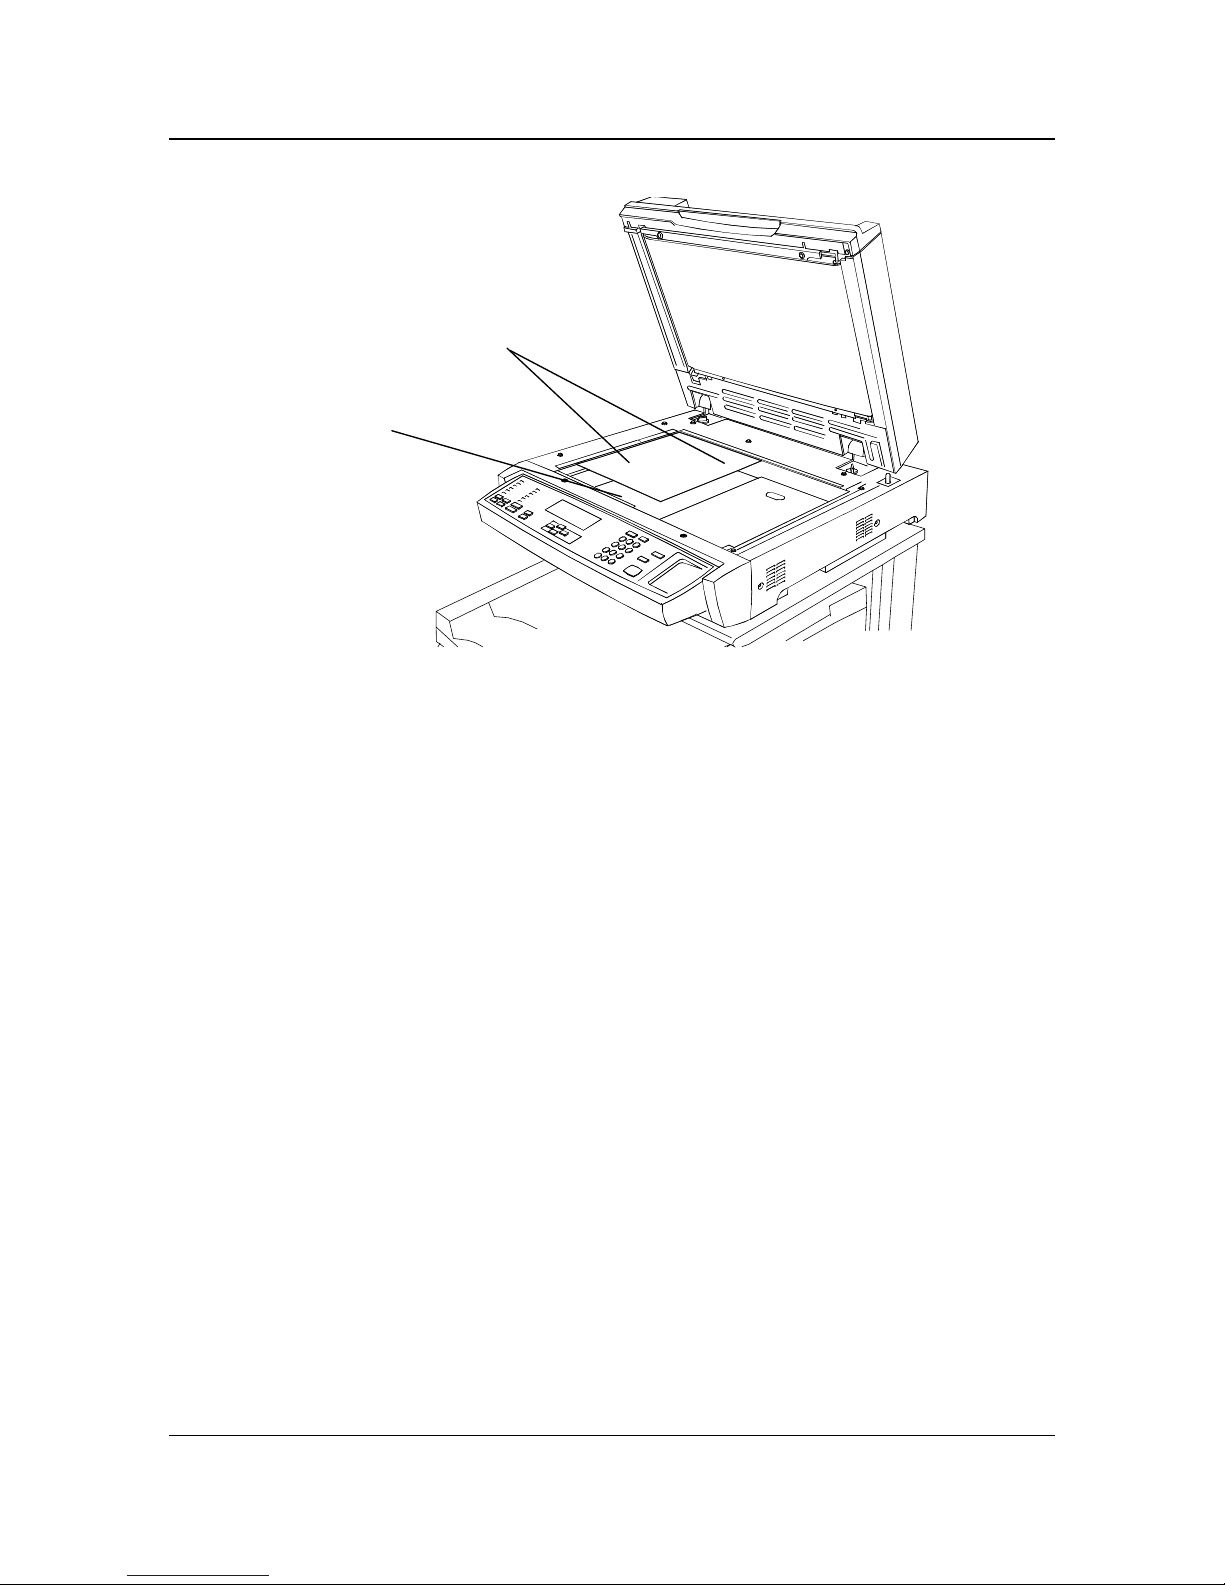
7. Registration Guide– align the original with the Registration Guide
8. Document Glass – supports the original for scanning
7
8
Scanner Control Panel Getting to Know the DP-C106
7
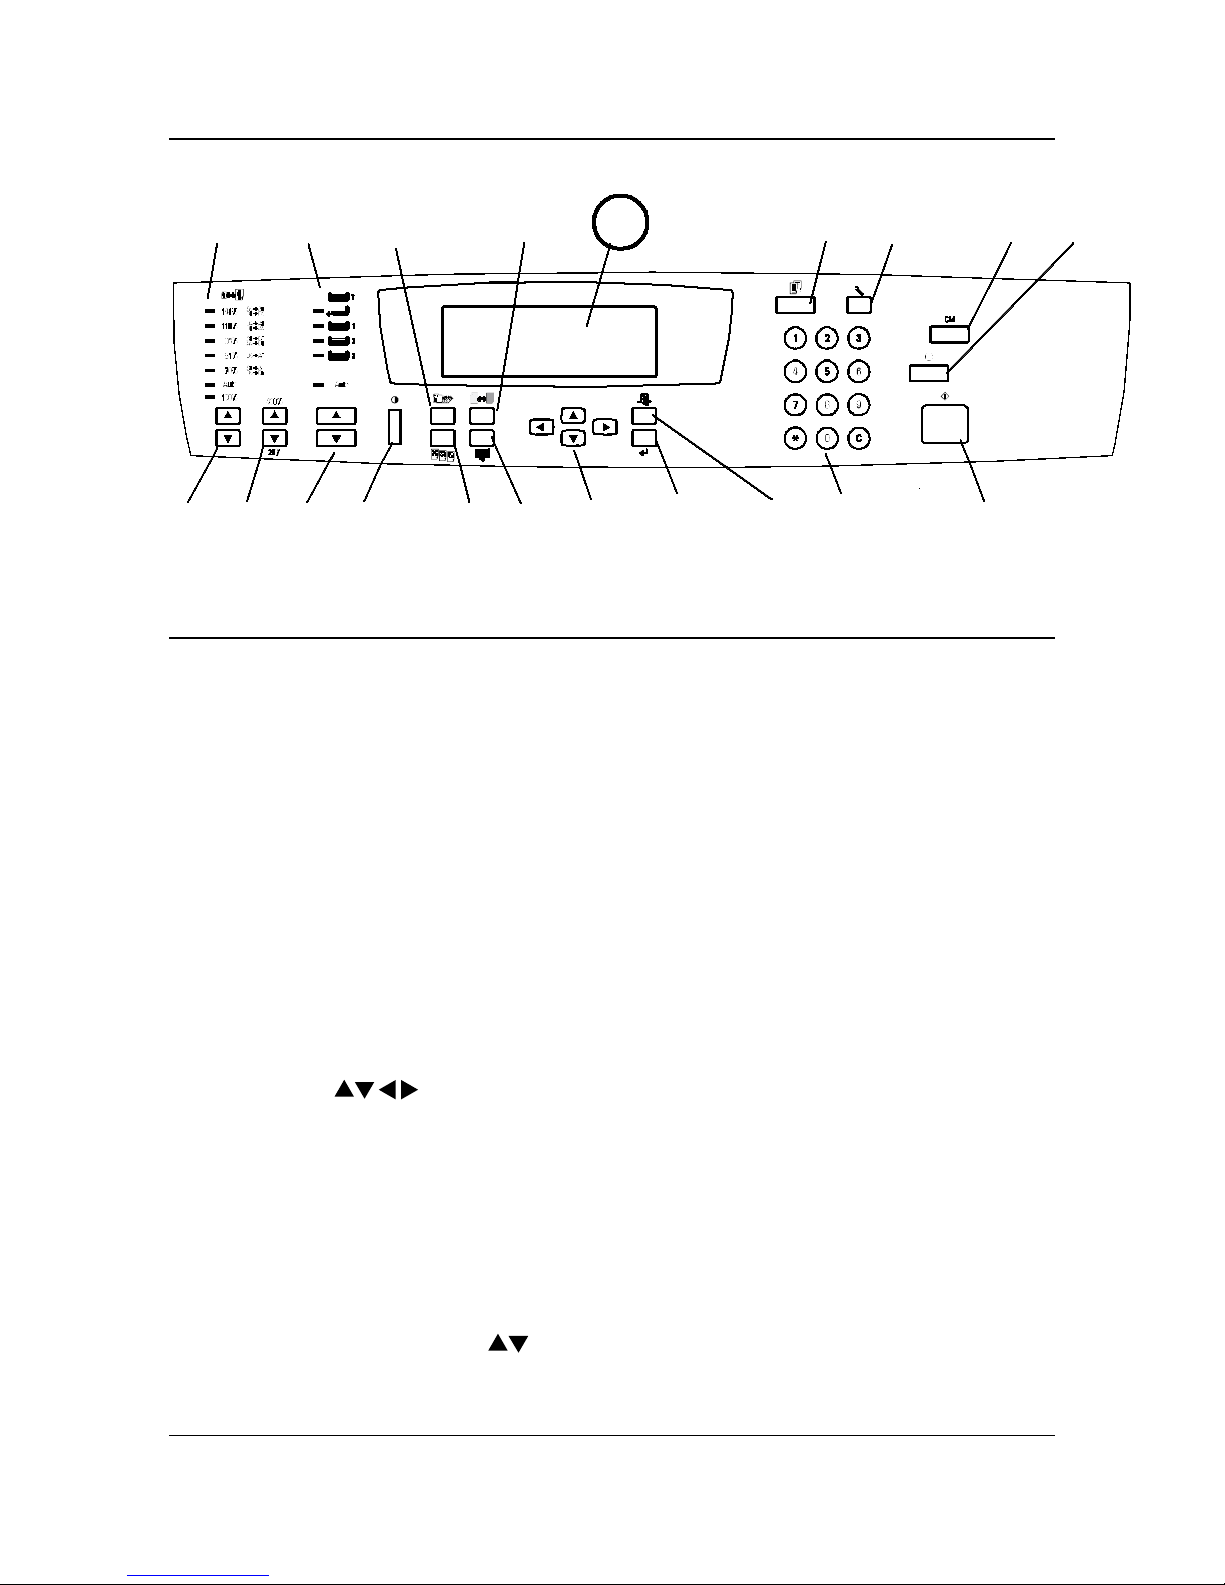
Scanner Control Panel
1. Control Panel Screen – use to view the system status, menu options,
problem messages, and fault codes
2. Copy button – use to change the system from the on-line mode to
copying mode
3. Tools button – provides access to the administration features
4. Clear All button – use to clear the selected option and reset the system
to the defaults
5. Stop button – use to stop the copying process
6. Start button – use to start the copying process
7. Numeric Keypad – use to enter copy quantity and passwords
8. Exit button – use to return to the previously displayed screen message
9. Select button – use to save the currently selected features and options
10. ( ) ARROW (Menu) buttons – use to view listed options in a
menu
11. Advanced Features button – use to access the Output, Erase, 2-sided,
and 2 Up features
12. Quality Adjustment buttons – use to access the quality adjustment
screen in order to change the Sharpness and the Color Level of the
copies
13. Contrast Dial – use to lighten or darken the Control Panel Screen
14. Paper Supply ( )ARROW buttons – use to select the desired paper
tray
1 2
3 4 5
68
9
1011
7
1213141516
17 18
19
20

Getting to Know the DP-C106 Scanner Control Panel
8
15. Zoom ( ) ARROW buttons – use to select Reduce/Enlarge from 25400%
16. Reduce/Enlarge ( ) ARROW buttons – use to select one of the
preset reduction or enlargement settings
17. Reduce/Enlarge indicators – indicates which setting is currently
selected
18. Paper Supply indicators – indicates which paper tray is currently
selected
19. Color Mode button – use to access color mode options
20. Lighten/Darken button – use to lighten or darken the output
Options and Supplies Getting to Know the DP-C106
9
Options and Supplies
The DP-C106 is a digital Color Copier/Printer which can produce images with
great color and clarity. Furthermore, its copying/printing functionality can also
be greatly enhanced by the addition of the following options and supplies.
We hope you find that the wide ranging capabilities will make your officeplace more productive and efficient.
Options
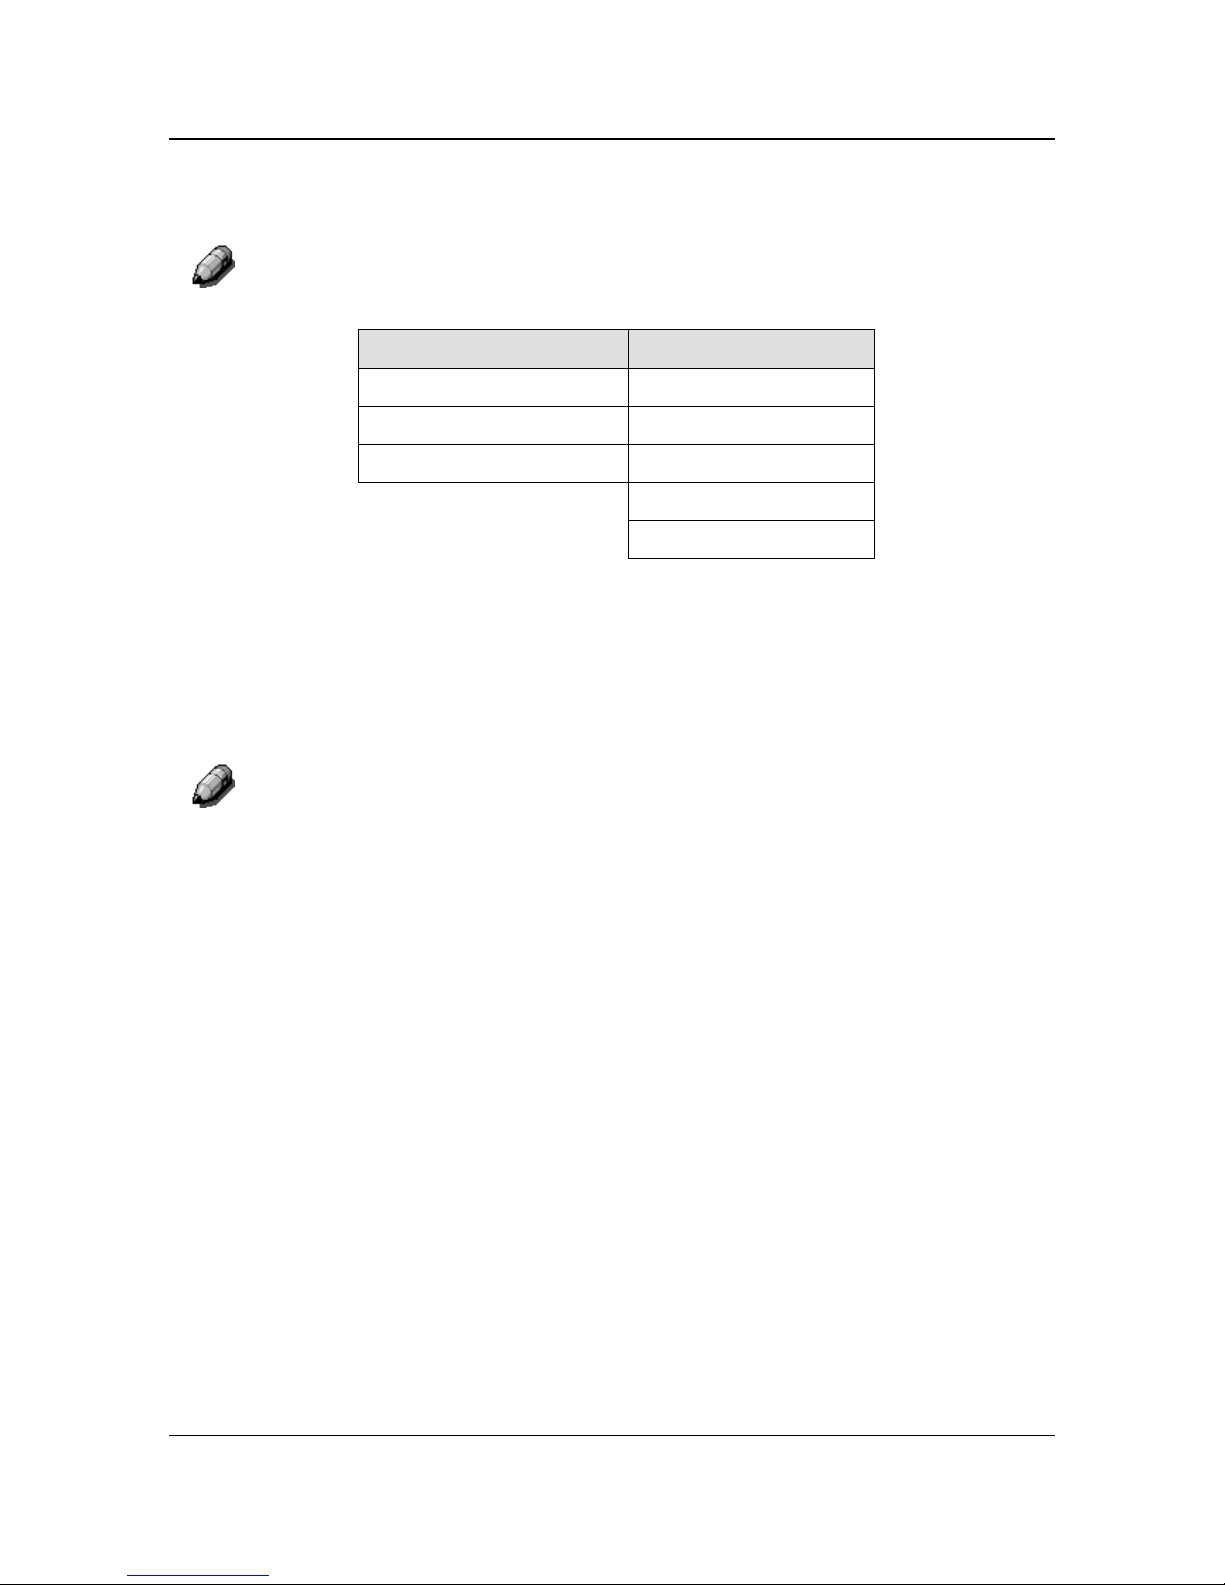
Part Name Part No. Description
10 Bin Sorter DA-S27C The 10 Bin Sorter can sort or stack up
to 10 sets of copies in the bins. It can
also be used to stack up to 500 sheets
in the high capacity bin. The ADF is
required for full functionality.
112MB Image
Memory
Upgrade
DA-SM112C Add 112MB of memory to scanner for 2
sided copying.
64MB Memory
Upgrade
128MB Memory
Upgrade
DA-RM64C
DA-RM128C
Up to 256MB capacity of memory for
the Printer.
(Except Europe)
Duplex Unit
(Except North
America: Duplex
Kit )
DA-DU26C
(For North
America)
DA-DU27C
(Except North
America)
Enables 2-Sided printing.
Oversize Paper
Tray
DA-TL28C This tray handles paper stock up to
12 x 18 inches in size.
Transparency
Tray
DA-TL26C This tray can handle up to 100
transparencies. (8.5 x 11" only)

Getting to Know the DP-C106 Options and Supplies
10
Supplies
Part Name Part No.
1 Black Toner Cartridge DQ-UR26K
1 Cyan Toner Cartridge DQ-UR26C
1 Magenta Toner Cartridge DQ-UR26M
1 Yellow Toner Cartridge DQ-UR26Y
1 Print/Copy Cartridge DQ-UH26X
1 Toner Waste Container DQ-BF28X
11
Basic Copying
This chapter contains the elements and basic function descriptions of the DPC106 Copier Control Panel. Also included are guidelines for placing the DPC106 in copier mode, positioning the originals on the Document Glass and in
the ADF, and a procedure for making a basic copy using the Copier/Printer
default settings.
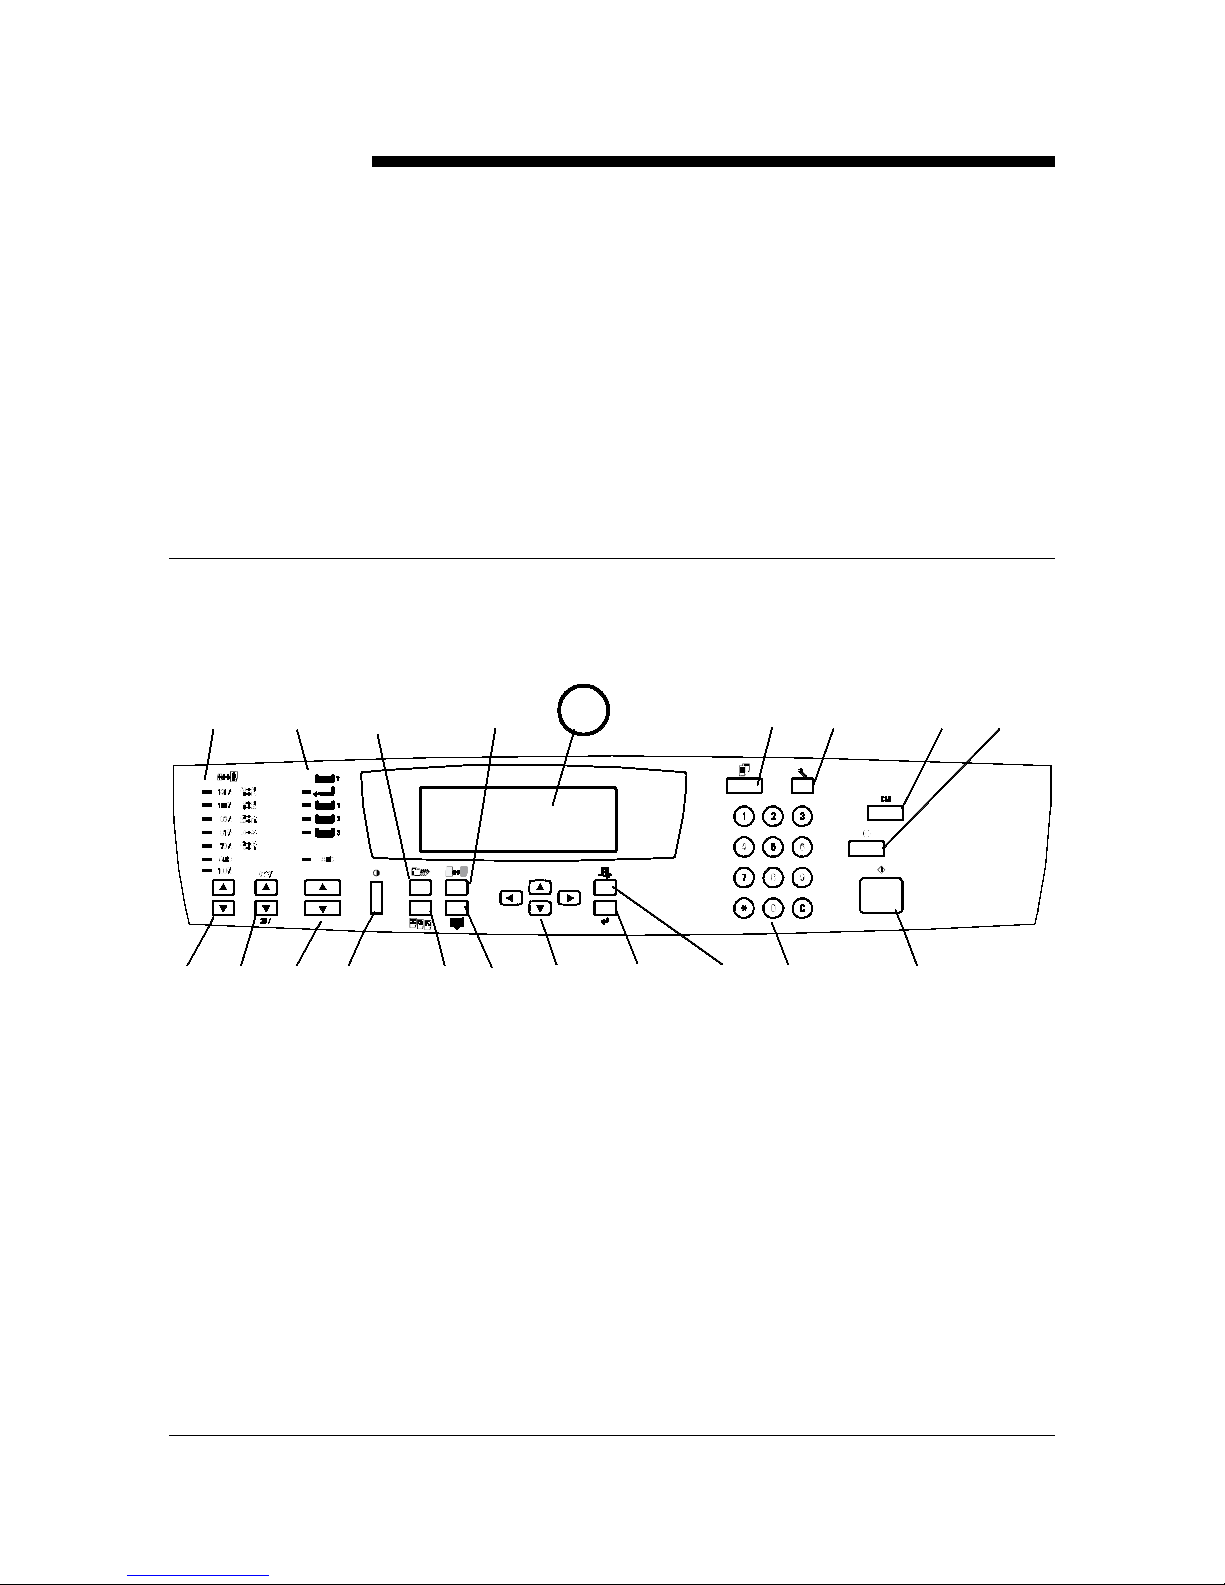
The Copier Control Panel
Use the Copier Control Panel to program the DP-C106 for your copy jobs.
The following is a list of the various components on the Copier Control Panel
and their functions.
1. Copier Screen – use to displays programmable features, available
options, and the current settings.
2. Copy – use to change the DP-C106 Copier/Printer from the On-Line
mode to the copy mode.
3. Tools – use to access the Administration features.
4. Clear All – use to reset the selected options to the default settings.
5. Stop – use to stop the copy operation. You can not restart a job after
you press the Stop button. To complete a job, you must reprogram the
Copier/Printer settings and reload any uncopied originals.
6. Start – use to begin a copy job.
2
17
18 19 20 1
23 4
5
6
78910111213141516
Basic Copying
12
7. Numeric Keypad
• Use buttons 0-9 to select the copy quantity, enter personal
passwords, and specify particular feature settings.
• Use the Clear button to reset copy quantity back to 1 or to clear an
incorrect numeric setting.
8. Exit – use to return to the previous screen.
9. Select – use to save copy settings other than the default settings.
10. ( ) ARROW buttons – use to highlight a specific setting on the
Copier Screen for a feature.
11. Advanced Features – use to access the advanced features screen in
order to specify the Output location, the Erase, the 2-Sided, and the 2
Up options.
12. Quality Adjustment – use to access the quality adjustment screen in
order to change the Sharpness and the Color Level of the copies.
13. Contrast Dial – use to lighten or darken the Copier Screen.
14. Paper Supply ( ) ARROW buttons – use to select the desired paper
tray.
15. Zoom ( ) ARROW buttons – use to select a desired percentage for
a reduction or enlargement setting.
16. Reduce/Enlarge ( ) ARROW buttons – use to specify a preset
reduction or enlargement setting.
17. Reduce/Enlarge Indicators – The green light next to each option is lit
when it is selected.
18. Paper Supply Indicators – The green light next to a tray is lit when it is
selected.
19. Color Mode button – use to access the color mode screen.
20. Lighten/Darken button – use to access the copy density screen and
adjust the saturation levels of the copies.
For more information on the copy features introduced above, go to the Copy
Features. For more information on the Tools Option, go to the Tools Mode.

Basic Copying
13
Copy Mode
The default setting for the DP-C106 is the printer mode. To make a copy you
must change the Copier/Printer to the copier mode.
When the DP-C106 Copier/Printer is in the printer mode, a message displays
in the Copier Screen that says
To Enter Copy Mode Press Copy Button
This message is referring to the Copy button on the Copier Control Panel.
After you press the Copy button, one of the following occurs:
• The Ready to Copy message appears on the Copier Control Panel
indicating that you have successfully entered copy mode. The copier is
ready to begin processing jobs.
• If the User Password option is enabled, the Copier Control Panel
prompts you to enter your user password.
Enter your password using the Numeric Keypad. If you enter the wrong
number, press the Clear button.
If your password is correct, the Ready to Copy message automatically
appears on the Copier Screen. This indicates that you have
successfully entered copy mode. The copier is ready to begin
processing jobs.
If you entered an incorrect password, the Incorrect Pass word message
appears and the copier prompts you to enter your password again.
For information on Setting Up or Changing the User Password, see the
Tools Mode.
Using the Auto Mode Change feature enables the DP-C106 Copier/Printer to
automatically enter the copy mode when originals are loaded in the ADF.
For more information on the Auto Mode Change feature, go to the Tools
Mode.

Basic Copying
14
Auto S tart
While the Please Wait message appears on the Copier Screen, you cannot
start copy operations. You may, however, program your copy job. Once the
Copier/Printer has successfully entered copy mode, your copy job will
automatically begin to print.
While the Please Wait message is displayed, position your originals, select
the desired options and press the Start button. The Copier/Printer continues
to show the Please Wait message until it enters the copy mode.
Once the DP-C106 enters the copy mode, the copy job begins to print.
If you wish to cancel the copy job before it begins, press the Stop button.
The Copier Main Screen
Once the DP-C106 enters the copy mode, the Copier Screen displays the
Main Screen. The message Ready to Copy appears on the Main Screen.
The Main Screen also displays the copy quantity and the settings for the
following features:
• Reduce/Enlarge
• Paper Supply
• Color Mode
When you first enter copy mode, each of these features is programmed at the
factory default setting. Should you make any changes to these settings, the
Main Screen will reflect these changes.
For information on the Reduce/Enlarge feature, the Paper Supply feature
and the Color Mode feature, go to the Copy Features. For information on
changing the default settings for each of these features, go to the Tools
Mode.
To view any changes made to the other features available through the DPC106 Copier/Printer, access the corresponding feature screen. For
information on the available features and for directions on accessing feature
screens, go to the Copy Features screen.
Basic Copying
15
Positioning the Originals
There are two ways to position originals on the DP-C106: on the Document
Glass or in the ADF.
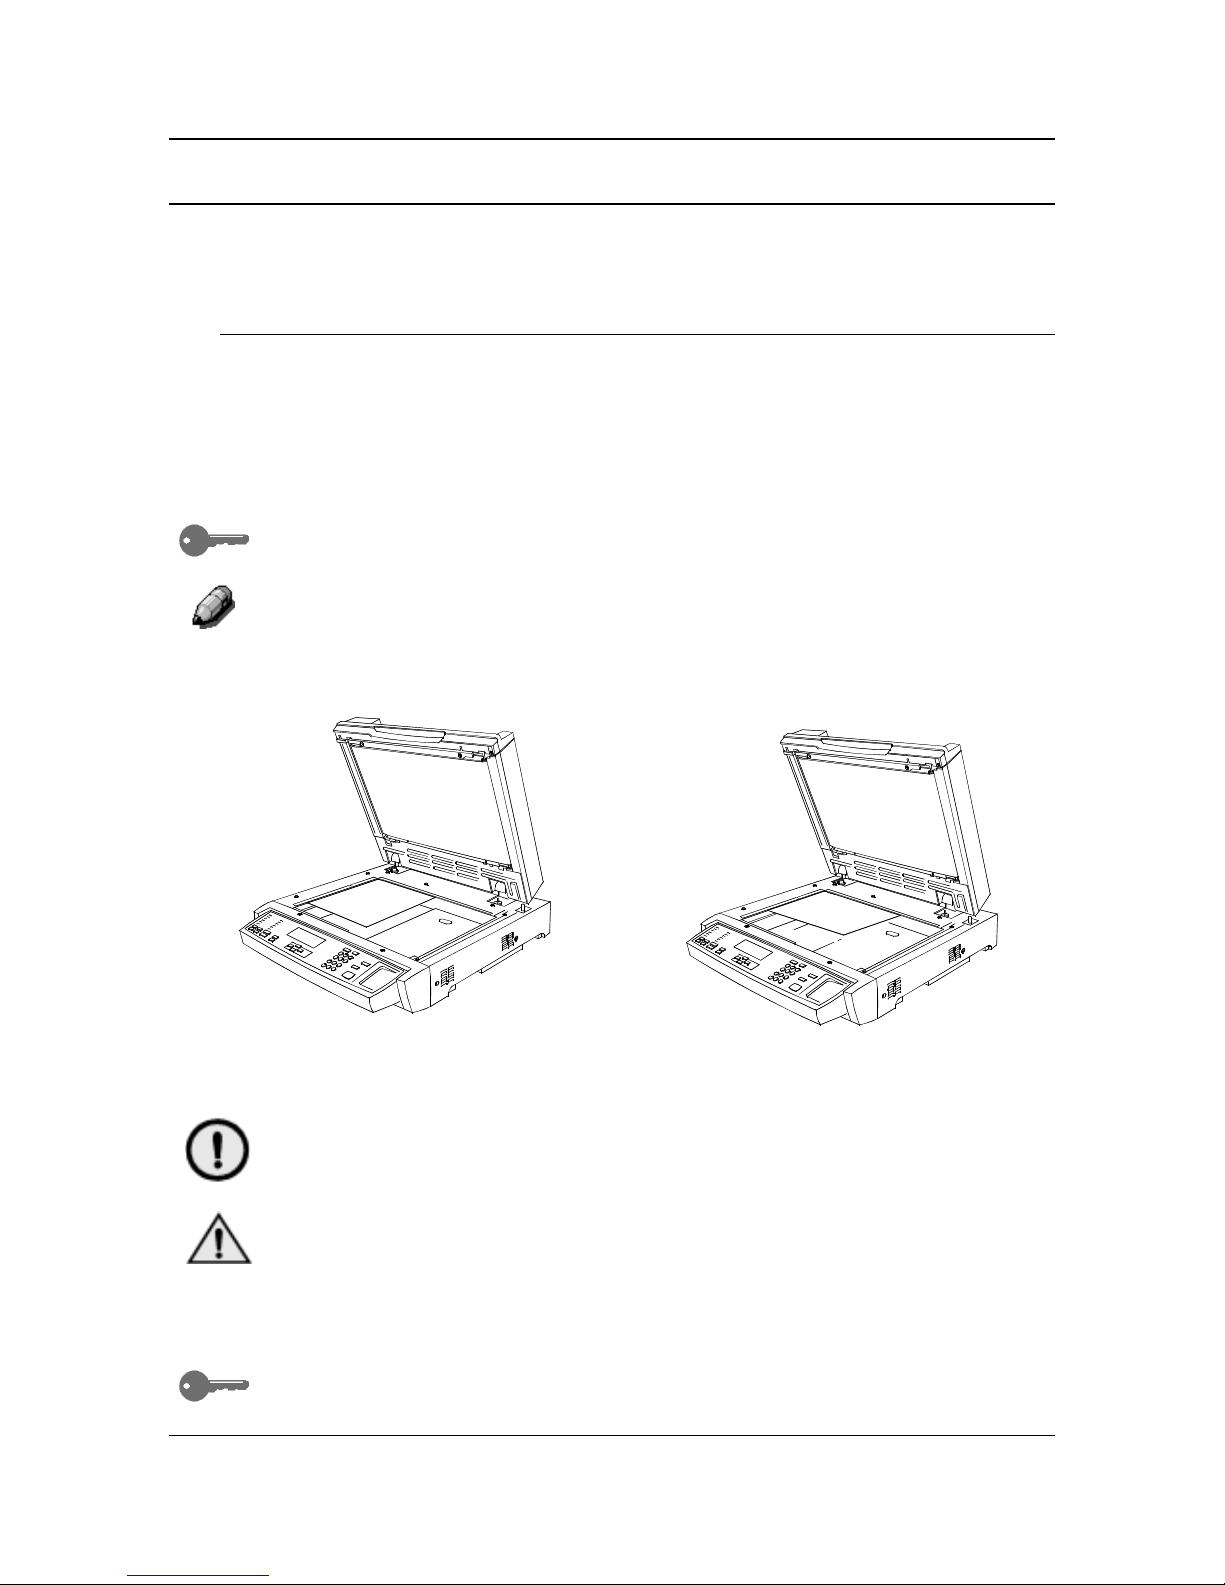
The Document Glass
Perform the following steps to use the Document Glass:
1. Raise the ADF.
2. Align the original into the rear, left-hand corner of the Document Glass
face down. Place your original in the same orientation that the paper is
loaded in your selected Paper Tray.
For transparency sheets, tracing paper or other types of thin paper, place a
blank, white sheet over the original on the Document Glass.
For information on the Paper Supply button, see Chapter 3, “Copy
Features”. For information on loading paper into a Paper Tray, see "Setting
Up the DP-C106" in Installation Instructions.
3. Close the ADF.
CAUTION
When copying a thick document, do not force the ADF down. The Document
Glass may break if under too much pressure.
WARNING
If you must perform a copy operation with the ADF open, do not look at the
scanner light.
The maximum original size that the Document Glass can scan is 11 inch x 17
inch or A3 (297 mm x 420 mm).
If you should try to register an original document larger than the maximum
size on the ADF, the image will be cut off on your copy output.
Long Edge Feed (LEF)
Short Edge Feed (SEF)
Basic Copying
16
The DP-C106 detects original sizes in either inches or millimeters. The table
below lists the various paper sizes that the DP-C106 can automatically detect
when configured to inches and to millimeters.
For information on changing the copier configuration between inches and
millimeters, go to the Tools Mode.
LEF = Long Edge Feed; SEF = Short Edge Feed
Inch Configuration Metric Configuration
8.5 x 11 in. (SEF/LEF) B5 (SEF/LEF)
8.5 x 14 in (SEF) A4 (SEF/LEF)
11 x 17 in. (SEF) B4 (LEF)
A3 (SEF)
A5 (LEF, EU only)
You must manually select the Paper Supply for documents that do not fall
within the sizes listed in the table and for documents that are difficult to detect,
such as transparencies and tracing paper. If the copier cannot detect the size
of your original, an error message appears on the Copier Screen. The error
message appears each time you attempt to copy the original until you
manually select the appropriate Paper Supply.
For directions on using the Paper Supply button, go to the Copy Features.
Basic Copying
17
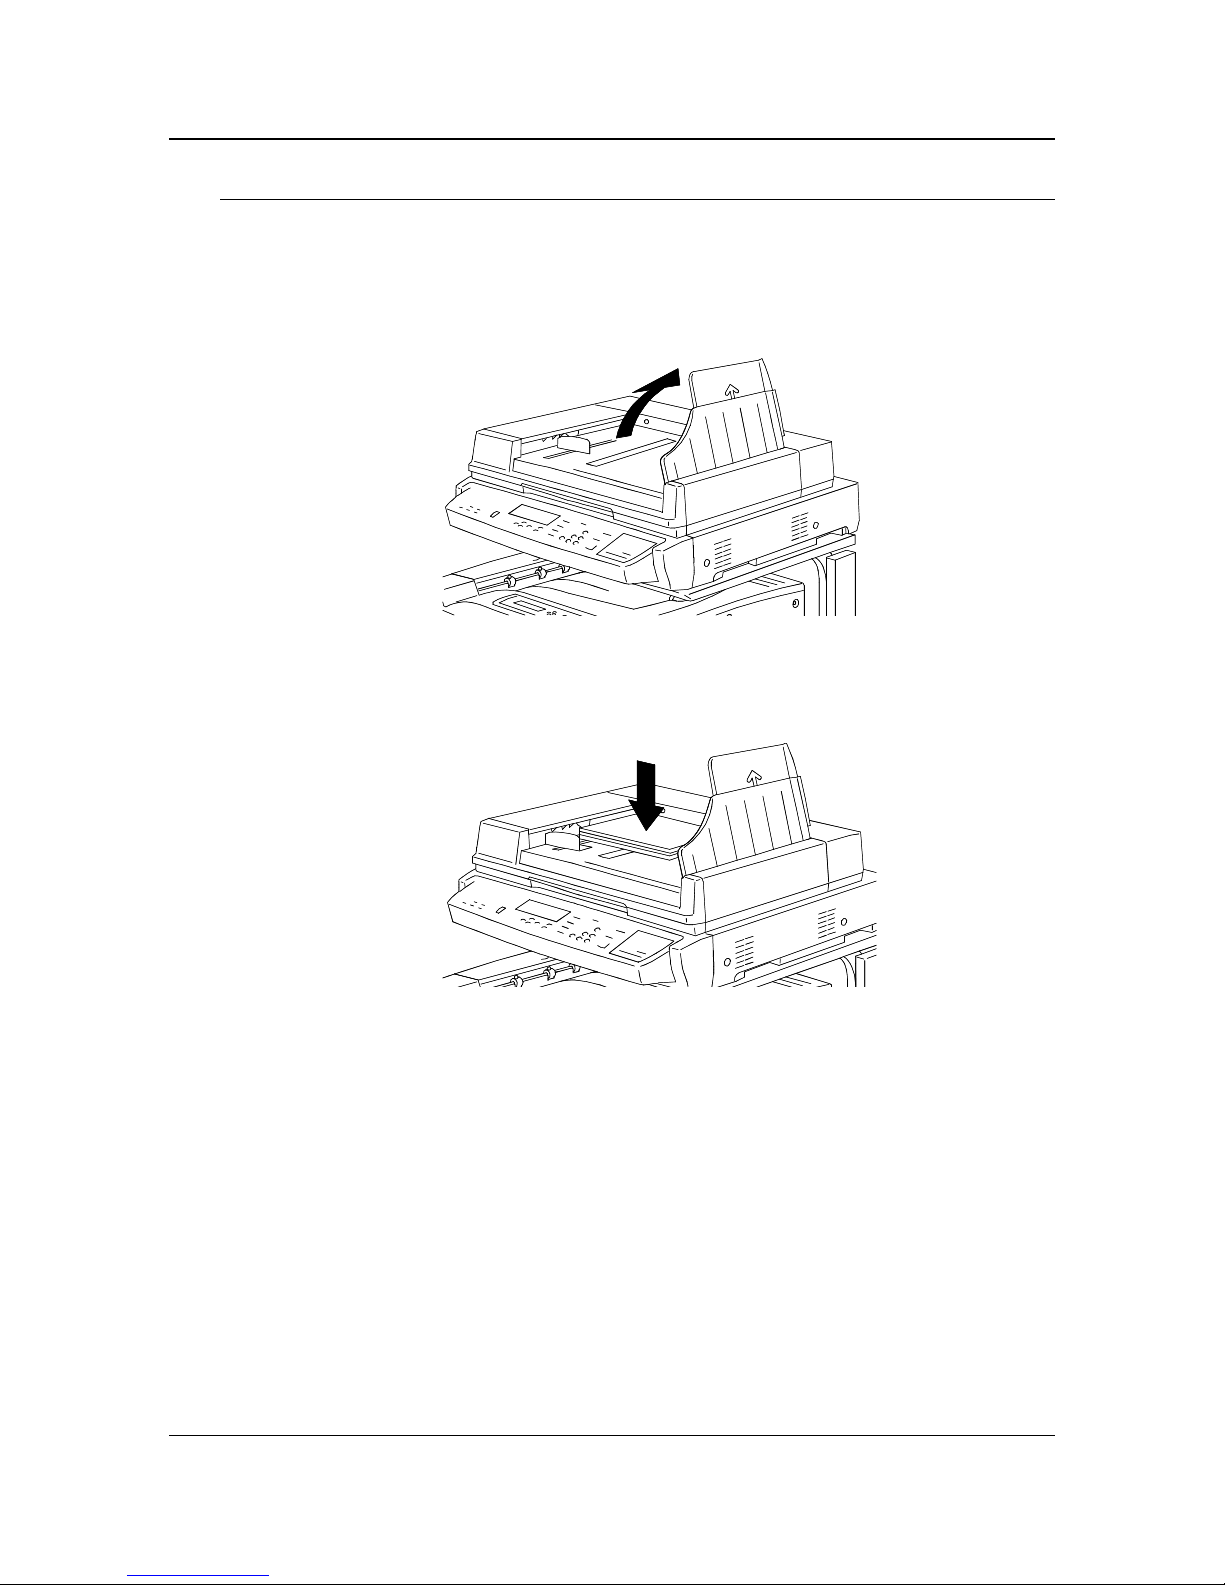
The Automatic Document Feeder (ADF)
The ADF allows you to load up to 30 originals into the DP-C106 for continuous
scanning. Each original is scanned individually, beginning with the bottom sheet.
To use the ADF perform the following steps:
1. Raise the document handler to the right.
2. Place the originals into the ADF face up and in the same orientation as
the paper in the Paper Tray.
Basic Copying
18
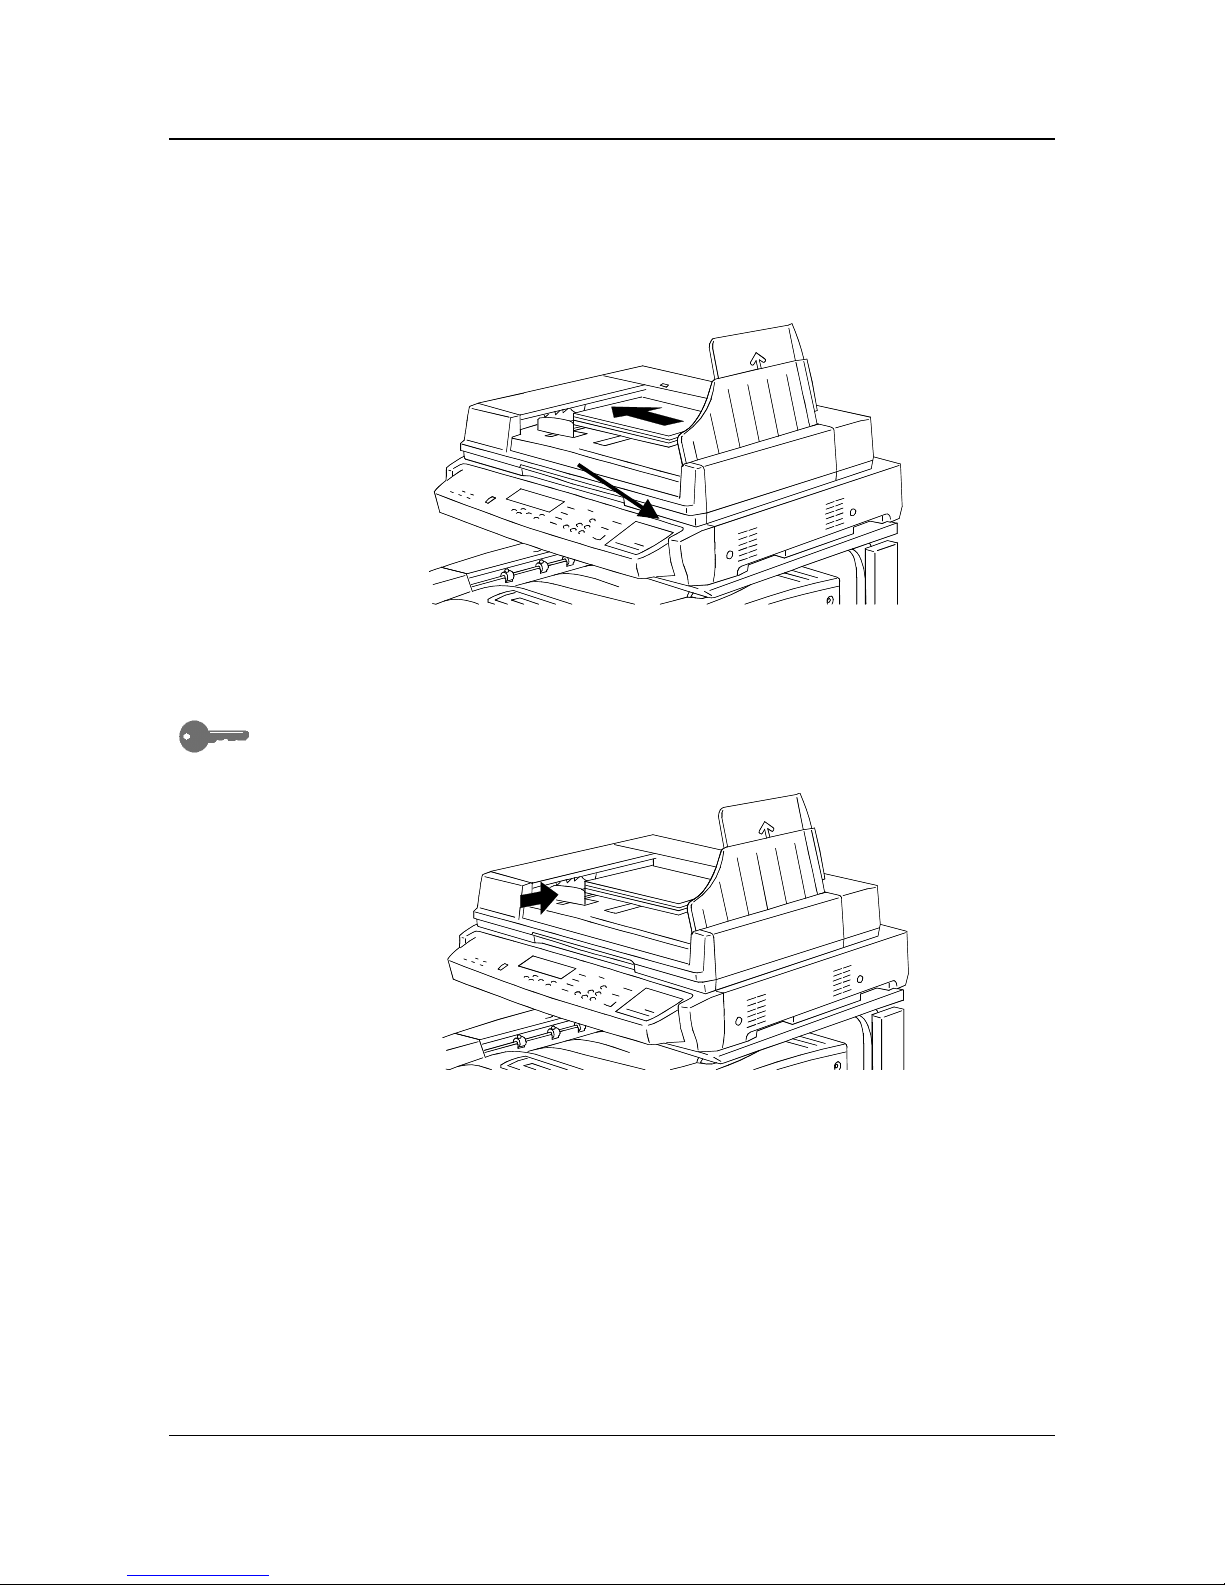
3. Gently push the originals into the ADF, as shown below, until the ADF
Light illuminates.
To prevent paper jams, ensure that the original documents rest against the
rear edge of the ADF. Make sure that the ADF Light illuminates.
4. Adjust the Document Guide to gently touch the edges of the originals, as
shown below.
Pushing the Document Guide too tightly against the originals may cause a
ADF jam.
0302512A-WOL
ADF Light
 Loading...