

Panasonic DP-3000, WORKIO DP-3000E Operating Instructions Manual
Digital Copier
Before operating this copier, please read
these instructions completely and keep these
operating instructions for future reference.
Digital copier with options
(See P.48)
Getting T o Know Y our
Machine
J
?
I
Before StartingMaking CopiesOptionsOthers
DP-2500/3000
Options
DA-AR250/AS200/DS200/DS205/DS210/DS215/FG230/FG231/FK200/FK210/FS200/MD200
DA-NE200/PC200/PC210/SM08B/SM16B/SM28B/UC200/XN200/XT200; UE-410047/410048/403171
Operating Instructions (For Copier)
English

2
CONTRAST
LCD
REDIAL/
PAUSE
LINE
SELECT
FLASH/
SUB-ADDR
SET
ORIGINAL COPY
SIZE SIZE
LEDGER
LEGAL
INVOICE
LETTER
LETTER
MONITOR
RESET
START
START
123
456
789
0
PQRS
GHI
TUV
JKL
ABC
WXYZ
MNO
DEF
STOP
ON LINE
ON LINE
DATA
FAX
INTERNET
PRINTER
MULTI-SIZE
FEED
SORT
ALARM ACTIVE
CLEAR
ENERGY SAVER
DP-3000
INTERRUPT
FUNCTION
TONE
TONE
COPY
ADD TONER
MON. VOL.
Operation Chart
Common Features and Usage
■■
■■
■ Basic Operation
NOTE
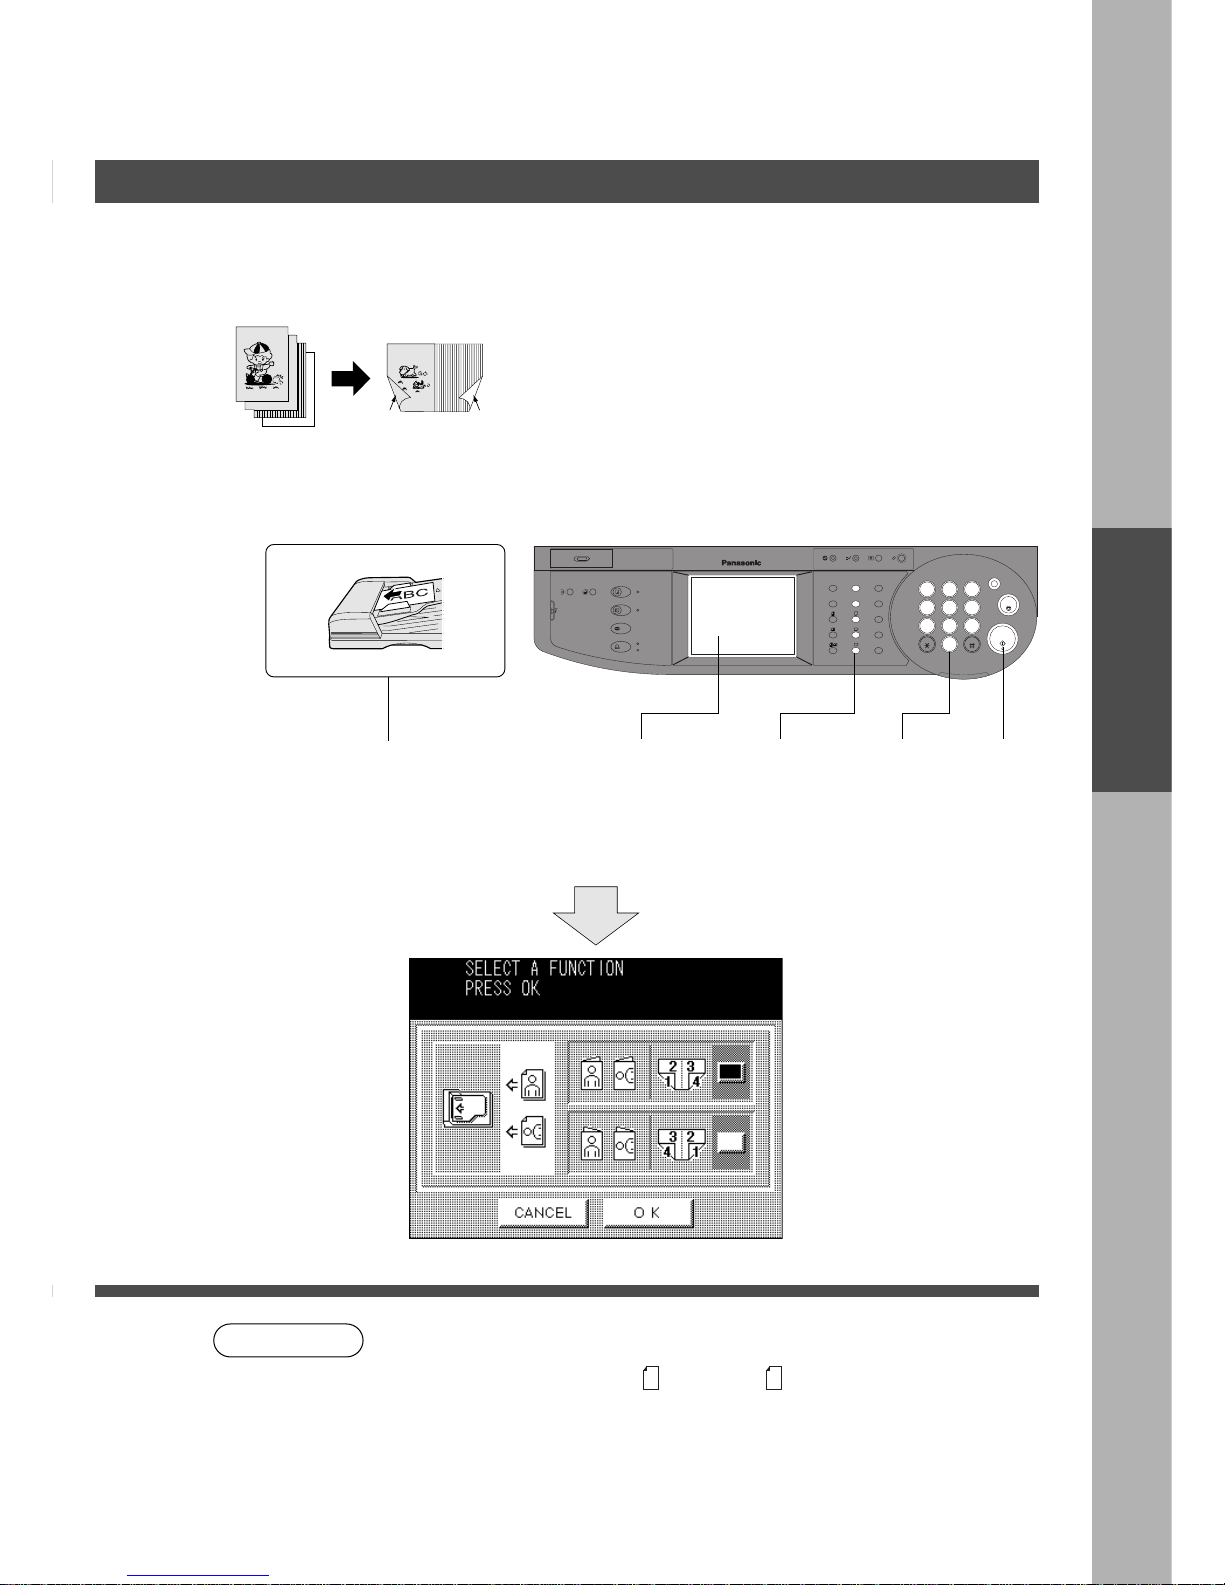
Original
1
Place the
Original
2
Press the
COPY Key
3
COPY SIZE
(Reduction/
Enlargement Only)
4
Number
of Copies
5
Press
START
■■
■■
■ Position of the Original
Load Paper
Tur n Pow er
Switch On
INV
INV
LTR
LGL
LDR
LTR
LDR
INV
LTR
LGL
INV
INVOICE
INVOICE R
LETTER R
LEGAL
LEDGER
Original Guide
C Place originals face down on the platen or face up on
the ADF/i-ADF.
C If the original is not positioned properly, a portion of the
original may not be copied.
C For originals smaller than invoice size, position the
original within the area of INVOICE and select invoice.
■■
■■
■ Commonly Used Functions and Operating Procedures
Full Size
Makes a copy that is the same
size as the original
1452
Reduction or Enlargement
Copies the original at a fixed
reduction or enlargement ratio
13425
C During the copy operation and after making copies, the fan motor may start spinning.
This is a normal operation and is used to cool down the copier.
■■
■■
■ Memory Capacity
When the memory becomes full during original scanning, the message “OUT OF MEMORY” will
be displayed on the LCD. In this case, follow the operating instruction on the LCD.
When additional memory is required, consult with an authorized servicing dealer.
(See page 13)
(See page 14)
3
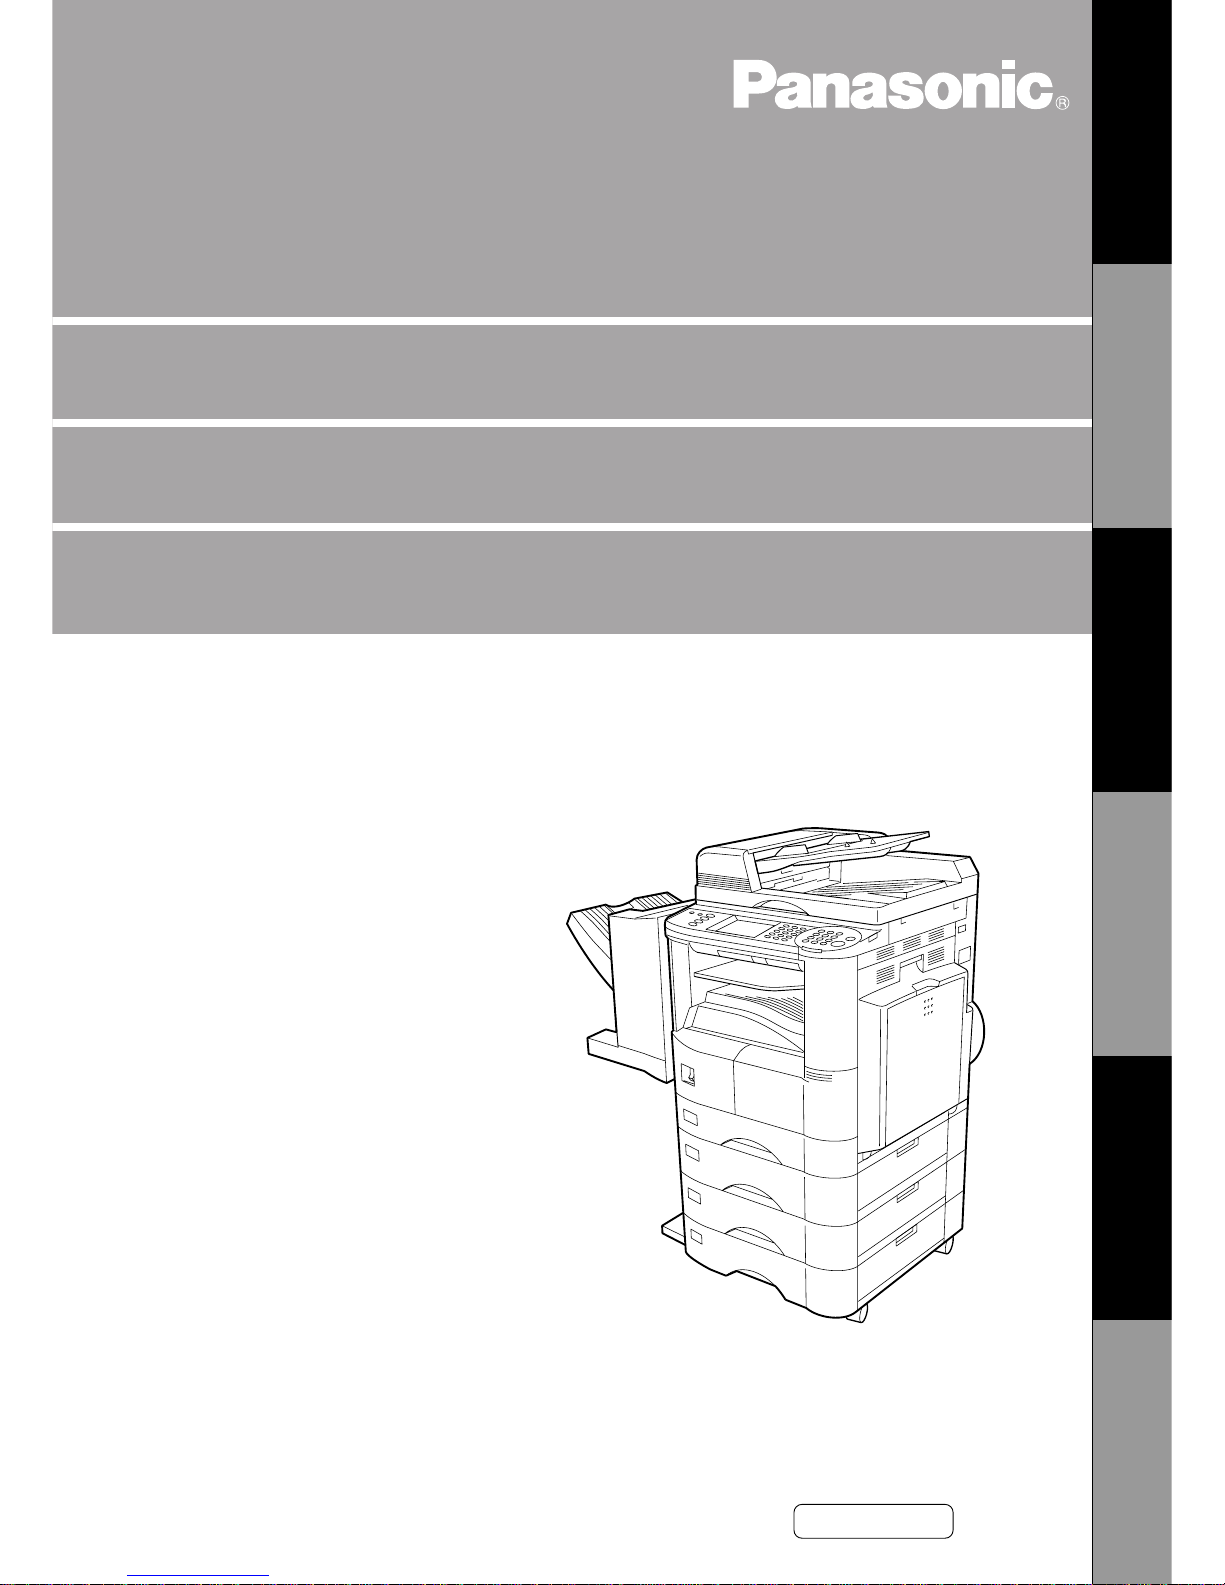
Touch Panel Display
■■
■■
■ Function Categories
A
Basic Menu (See page 13)
# Text, Text/Photo, Photo Mode Key
$ Exposure Control Keys
% Output Tray Indication
& Output Tray Select Key
( Paper Tray Indication
) Paper Tray Selection Key
* JOB STATUS Key
B
2-Sided/Original
HH
HH
H Copy (See page 16)
# 1 \ 2 Copy Key
$ 2 \ 1 Copy Key
% 2 \ 2 Copy key
& Book \ 2 Copy Key
( 2 Page Copy Key
) N in 1 Copy Key
* Booklet Copy key
+ SADF Key
C
Zoom/Effects (See page 23)
# Zoom Key
$ Page Numbering Mode Key
% Margin Mode Key
& Book Mode Key
( Edge Mode Key
D
Insertion/Overlay (See page 27)
# OHP Interleaving Mode Key
$ Overlay Mode Key
E
Job Memory (See page 31)
# M1, M2, M3, M4, M5 Key
$ Memory In Key
Operation Chart
Getting T o Know Y our
Machine

4
Energy Star
The DP-2500/3000 copier complies with Tier 2 of the Environmental Protection Agency’s Energy
Star Program. This voluntary program specifies specific energy consumption and usage
standards for copiers. These copiers will automatically “power down” after a specified period of
non-use. The use of these Energy Star compliant copiers will reduce energy consumption and
ultimately benefit the environment.
The default functions can be adjusted depending on your office requirements. Please see your
authorized Panasonic copier dealer for more details.

5
Table of Contents
Getting T o Know Y our Machine
Operation Chart .............................................................................................................................. 2
■ Common Features and Usage ..............................................................2
■ Touch Panel Display ............................................................................. 3
Before Starting
Precautions..................................................................................................................................... 7
Control Panel ................................................................................................................................10
■ Touch Panel Display ........................................................................... 11
Making Copies
Basic Menu ................................................................................................................................... 13
■ Full Size Copying ................................................................................13
■ Reduction or Enlargement Copying .................................................... 14
■ Using the Sheet Bypass ..................................................................... 15
2-Sided/Original
HH
HH
H Copy.............................................................................................................. 16
■ 2-Sided/Orig. H Copy Key .................................................................. 16
■ 1 \ 2/2 \ 1/2 \ 2 Copy.................................................................... 17
■ Book \ 2 Copy .................................................................................. 18
■ 2 Page Copy ....................................................................................... 19
■ N in 1 Copy ......................................................................................... 20
■ Booklet Copy ...................................................................................... 21
■ SADF Mode ........................................................................................22
Zoom/Effects................................................................................................................................. 23
■ Zoom/Effects Key ............................................................................... 23
■ Zoom Copying .................................................................................... 24
■ Page Numbering .................................................................................25
■ Margin/Book/Edge ..............................................................................26
Insertion/Overlay .......................................................................................................................... 27
■ Insertion/Overlay Key ......................................................................... 27
■ OHP Interleaving ................................................................................ 28
■ Overlay ............................................................................................... 29
Job Memory .................................................................................................................................. 31
Other Features.............................................................................................................................. 32
■ Energy Saver/Interrupt........................................................................ 32
■ Manual Skyshot Mode/Digital Skyshot Mode ......................................33
Combined Function Table ............................................................................................................ 35
Function ........................................................................................................................................ 36
■ General Functions .............................................................................. 37
■ Copier Settings ................................................................................... 38
■ General Functions for Key Operator ................................................... 39
■ Copier Settings for Key Operator ........................................................41
■ Function Setting ..................................................................................43
■ Function Setting for Key Operator....................................................... 44
Table of Contents

6
Table of Contents
Options
Accessories .................................................................................................................................. 48
■ Components .......................................................................................48
■ Automatic Document Feeder .............................................................. 49
■ Finisher/Exit Guide Unit ...................................................................... 51
Problem Solving
Problem Solving ........................................................................................................................... 55
■ Adding Paper (J) ...............................................................................55
■ Replacing the Toner Cartridge and Waste Toner Box (?) ................... 56
■ Removing a Misfed Paper................................................................... 58
Troubleshooting............................................................................................................................ 66
■ Before Calling Service ........................................................................ 66
■ Replacing the Battery ......................................................................... 68
Others
Specifications ............................................................................................................................... 69
Options and Supplies................................................................................................................... 71

7
Precautions
For Y our Safety
■■
■■
■ Laser Safety
LASER SAFETY
This unit employs a laser. Only qualified service personnel should
attempt to service this device due to possible eye injury.
CAUTION:
USE OF CONTROLS, ADJUSTMENTS OR PERFORMANCE
PROCEDURES OTHER THAN THOSE SPECIFIED HEREIN MAY
RESULT IN HAZARDOUS RADIATION EXPOSURE.
■■
■■
■ Caution Labels
Before Starting
DANGER-Invisible and hazardous laser
radiation when open and interlocks defeated.
AVOID DIRECT EXPOSURE TO BEAM.
ATTENTION-Rayonnement laser invisible
dangereux en cas d’ouverture et
lorsque la sécurité est neutralisée.
EXPOSITION DANGEREUSE AU FAISCEAU.
VORSICHT-Unsichtbare Laserstrahlung.
wenn Abdeckung geöffnet und
Sicherheitsverriegelung überbrückt.
NICHT DEM STRAHL AUSSETZEN.
FBE8998A
8
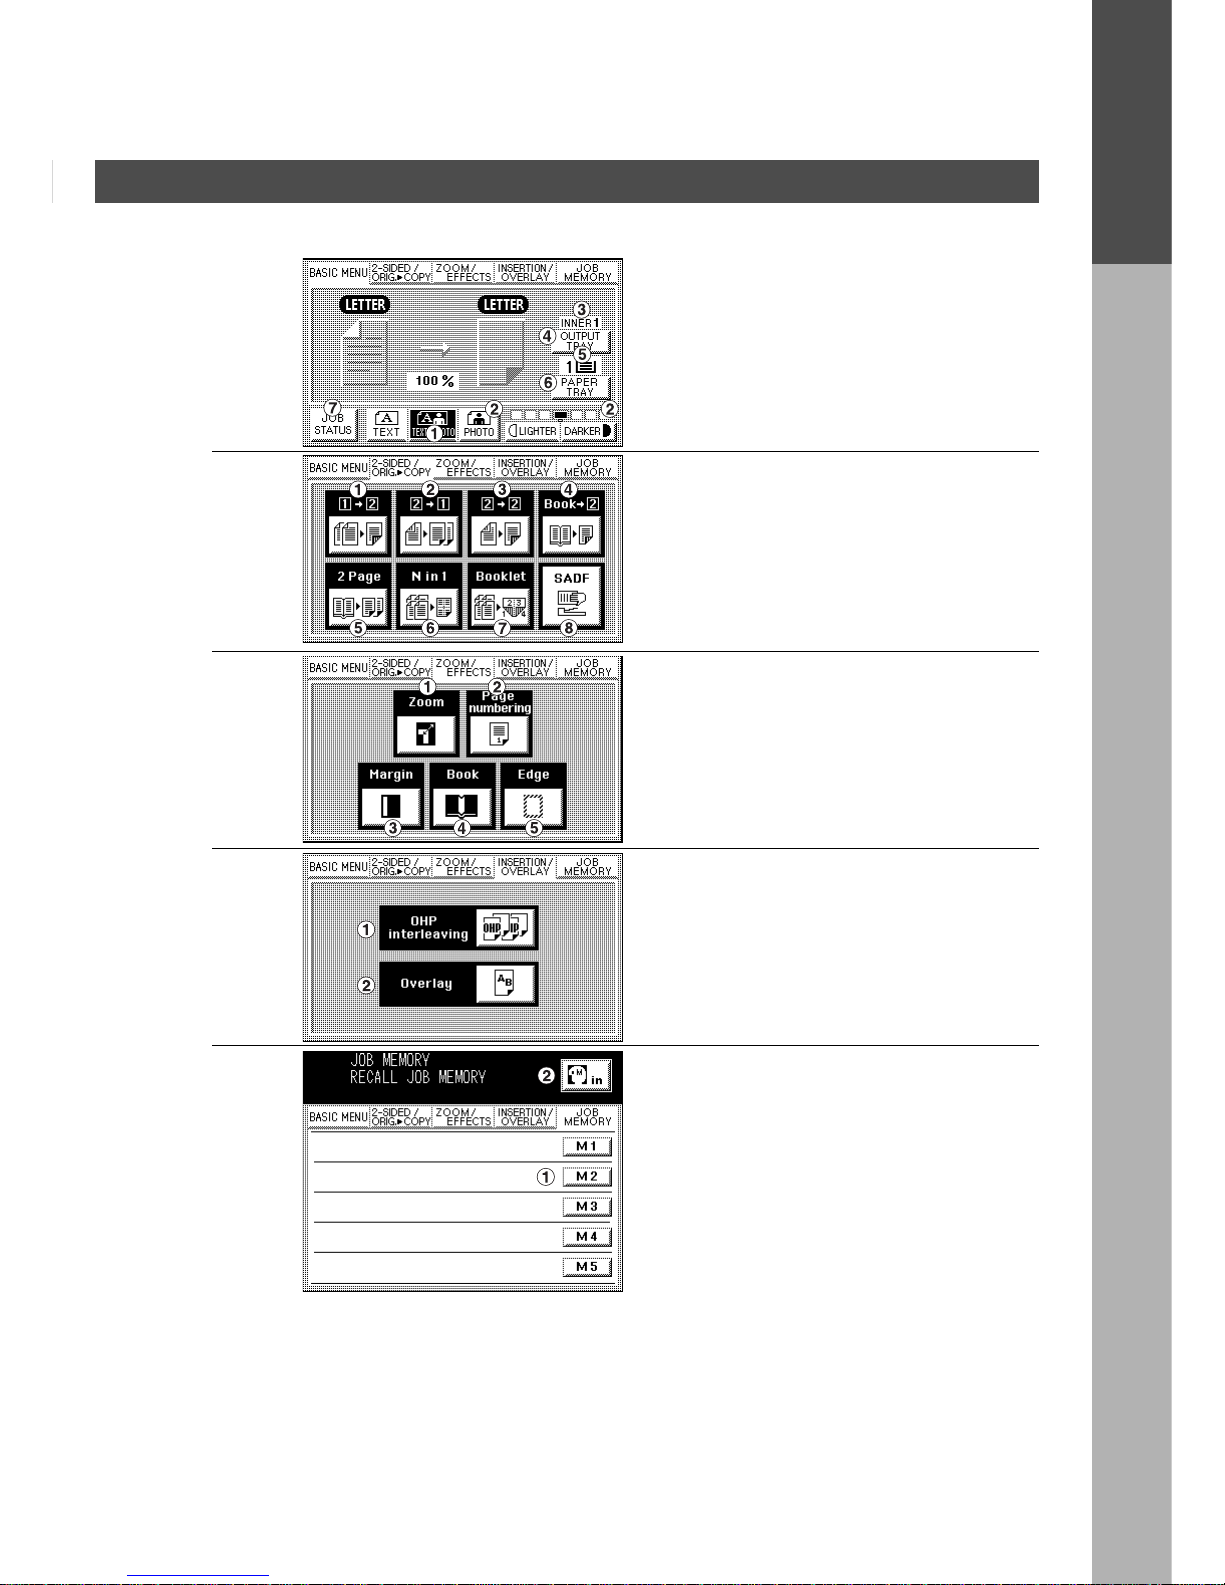
Precautions
Handling
■ Do not look directly at the exposure lamp when
copying.
■ Do not turn the power switch off or open the front
panel during copying.
C Do not drop paper clips or other metal objects into
the copier.
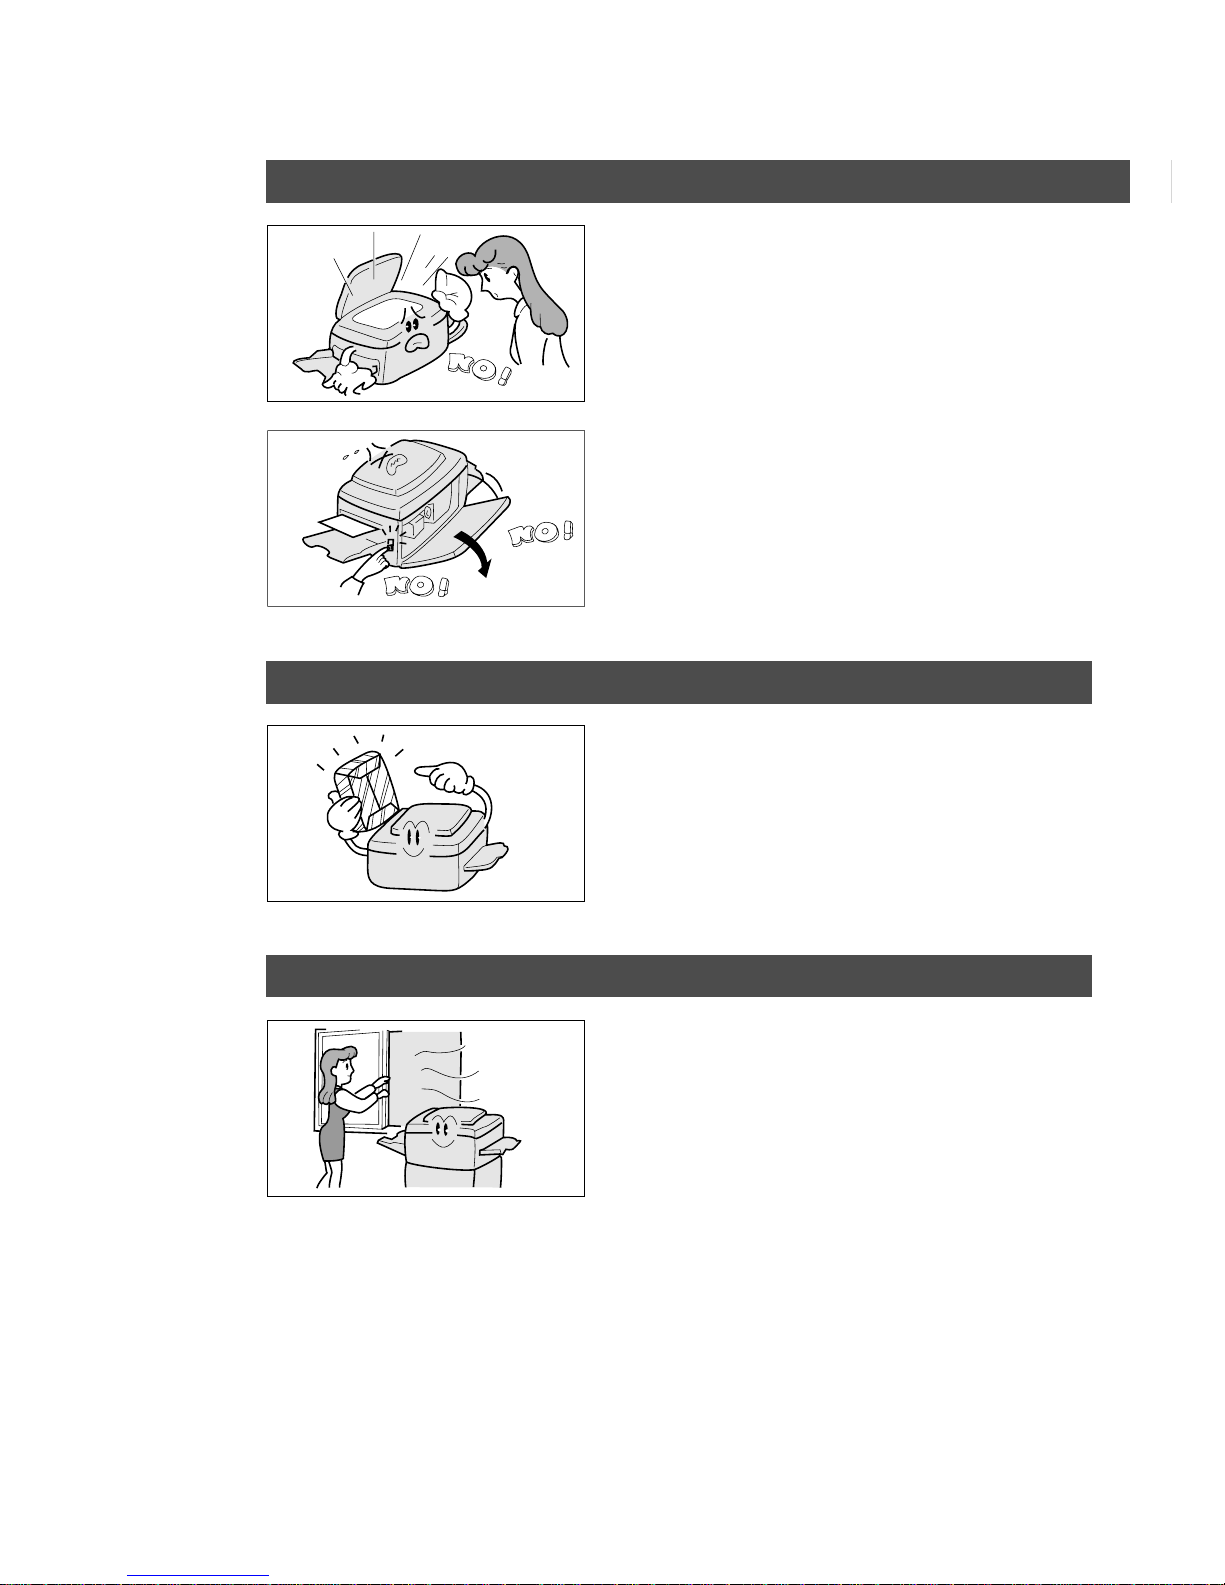
Toner and Paper
■ Store toner, drum and paper in cool areas with low
humidity.
C High quality paper of 16 lbs - 24 lbs (15 – 34 lbs via
sheet bypass) may be used.
C For optimum performance, it is recommended that
only Panasonic Brand supplies are used in the
copier.
Ventilation
■ The copier should be installed in a well-ventilated
area to minimize the ozone density in the air.
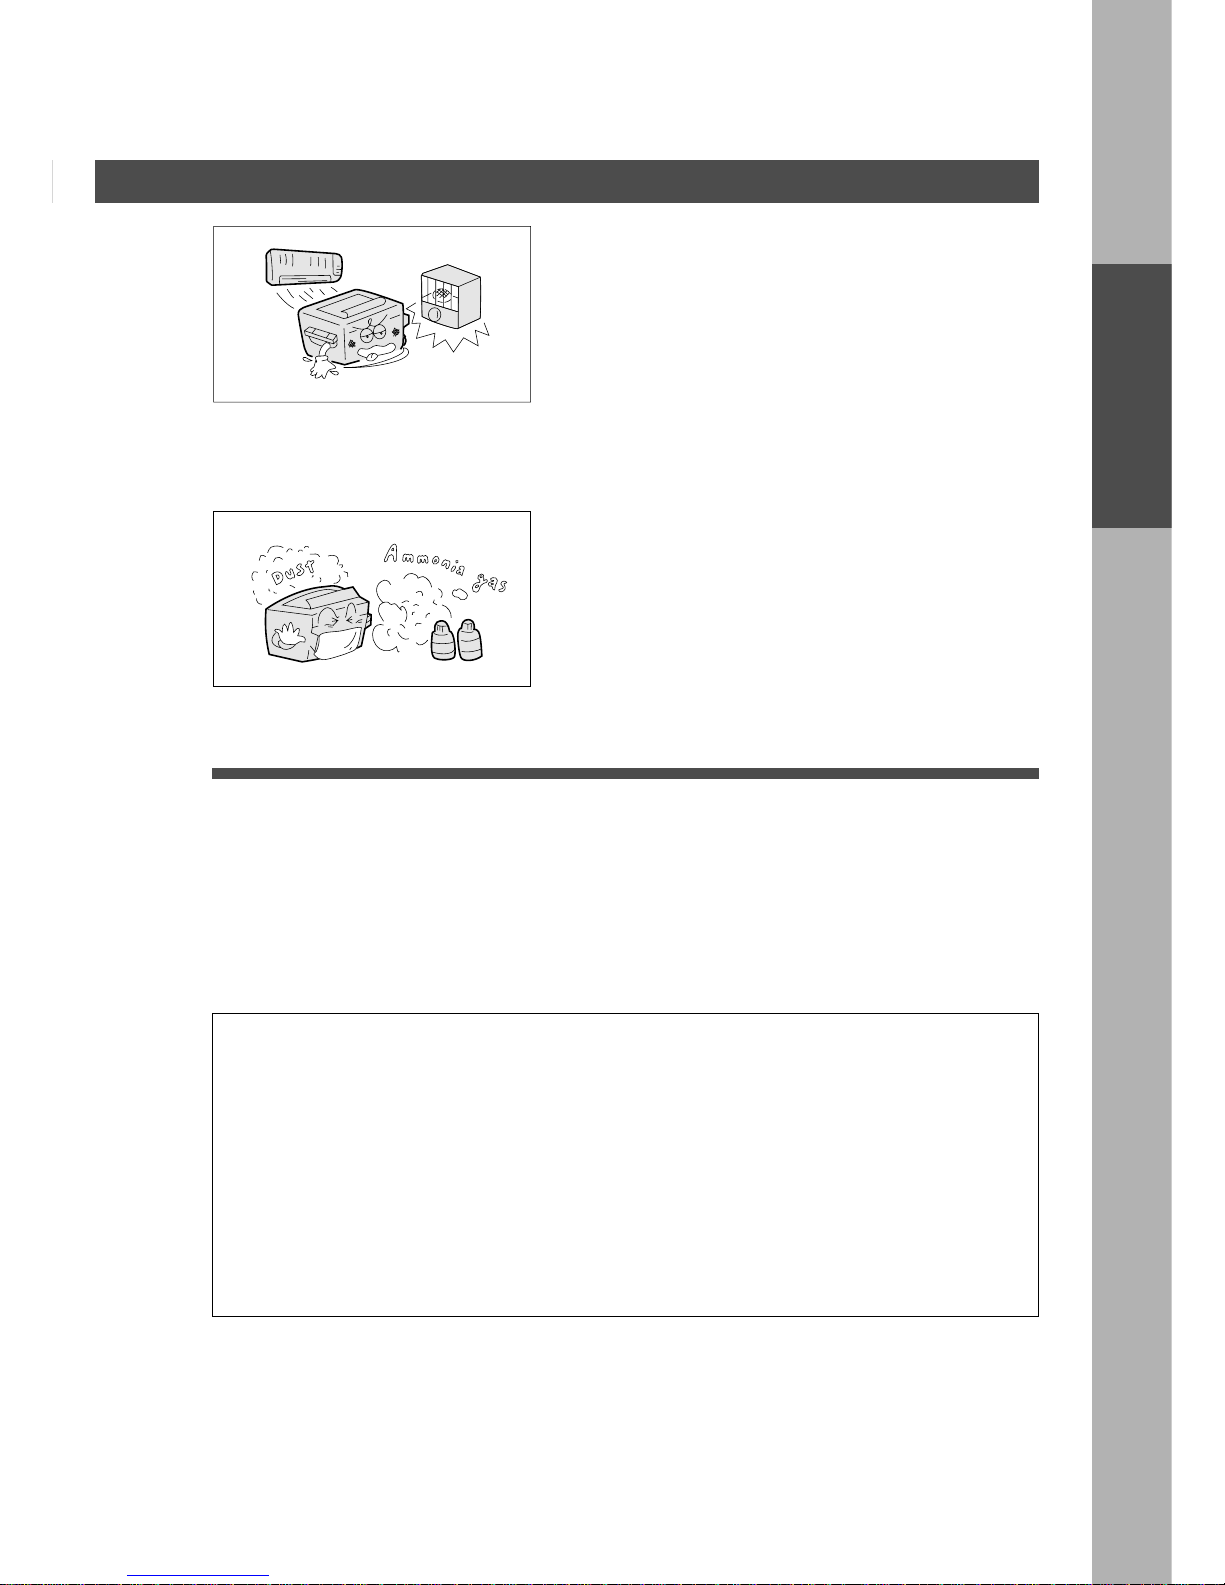
9
Before Starting
■ The copier should not be installed in areas with the
following conditions:
C Extremely high or low temperature and humidity.
Ambient conditions
Temperature: 50°F – 95° F (10°C – 35° C)
Relative humidity: 45% – 85%
C Where temperature and humidity can change
rapidly, causing condensation.
C Direct exposure to sunlight.
C Directly in the air conditioning flow.
C In areas of high dust concentration.
C In areas of poor ventilation.
C In areas with chemical fume concentration.
C In areas with extreme vibration.
C With unstable or uneven conditions (floors, etc.).
■ The maximum power consumption is 1.4 kW.
A properly wired (grounded), dedicated, 12A, 120V AC outlet is required. Do not use an extension
cord.
The main plug on this equipment must be used to disconnect the main power. Please ensure that
the socket outlet is installed near the equipment and is easily accessible.
FCC WARNING For U.S.A.
FCC W ARNING:
This equipment has been tested and found to comply with the limits for a Class A digital device,
pursuant to part 15 of the FCC Rules. These limits are designed to provide reasonable
protection against harmful interference when the equipment is operated in a commercial
environment. This equipment generates, uses, and can radiate radio frequency energy and, if
not installed and used in accordance with the instruction manual, may cause harmful
interference to radio communications. Operation of this equipment in a residential area is likely
to cause harmful interference in which case the user will be required to correct the interference
at his/her own expense.
The user could lose the authority to operate this equipment if any unauthorized changes or
modifications are made to this equipment.
Installation
Precautions
10
CONTRAST
LCD
REDIAL/
PAUSE
LINE
SELECT
FLASH/
SUB-ADDR
SET
ORIGINAL COPY
SIZE SIZE
LEDGER
LEGAL
INVOICE
LETTER
LETTER
MONITOR
RESET
START
123
456
789
0
PQRS
GHI
TUV
JKL
ABC
WXYZ
MNO
DEF
STOP
ON LINE
ON LINE
DATA
FAX
INTERNET
PRINTER
MULTI-SIZE
FEED
SORT
ALARM ACTIVE
CLEAR
ENERGY SAVER
DP-3000
INTERRUPT
FUNCTION
TONE
COPY
ADD TONER
MON. VOL.
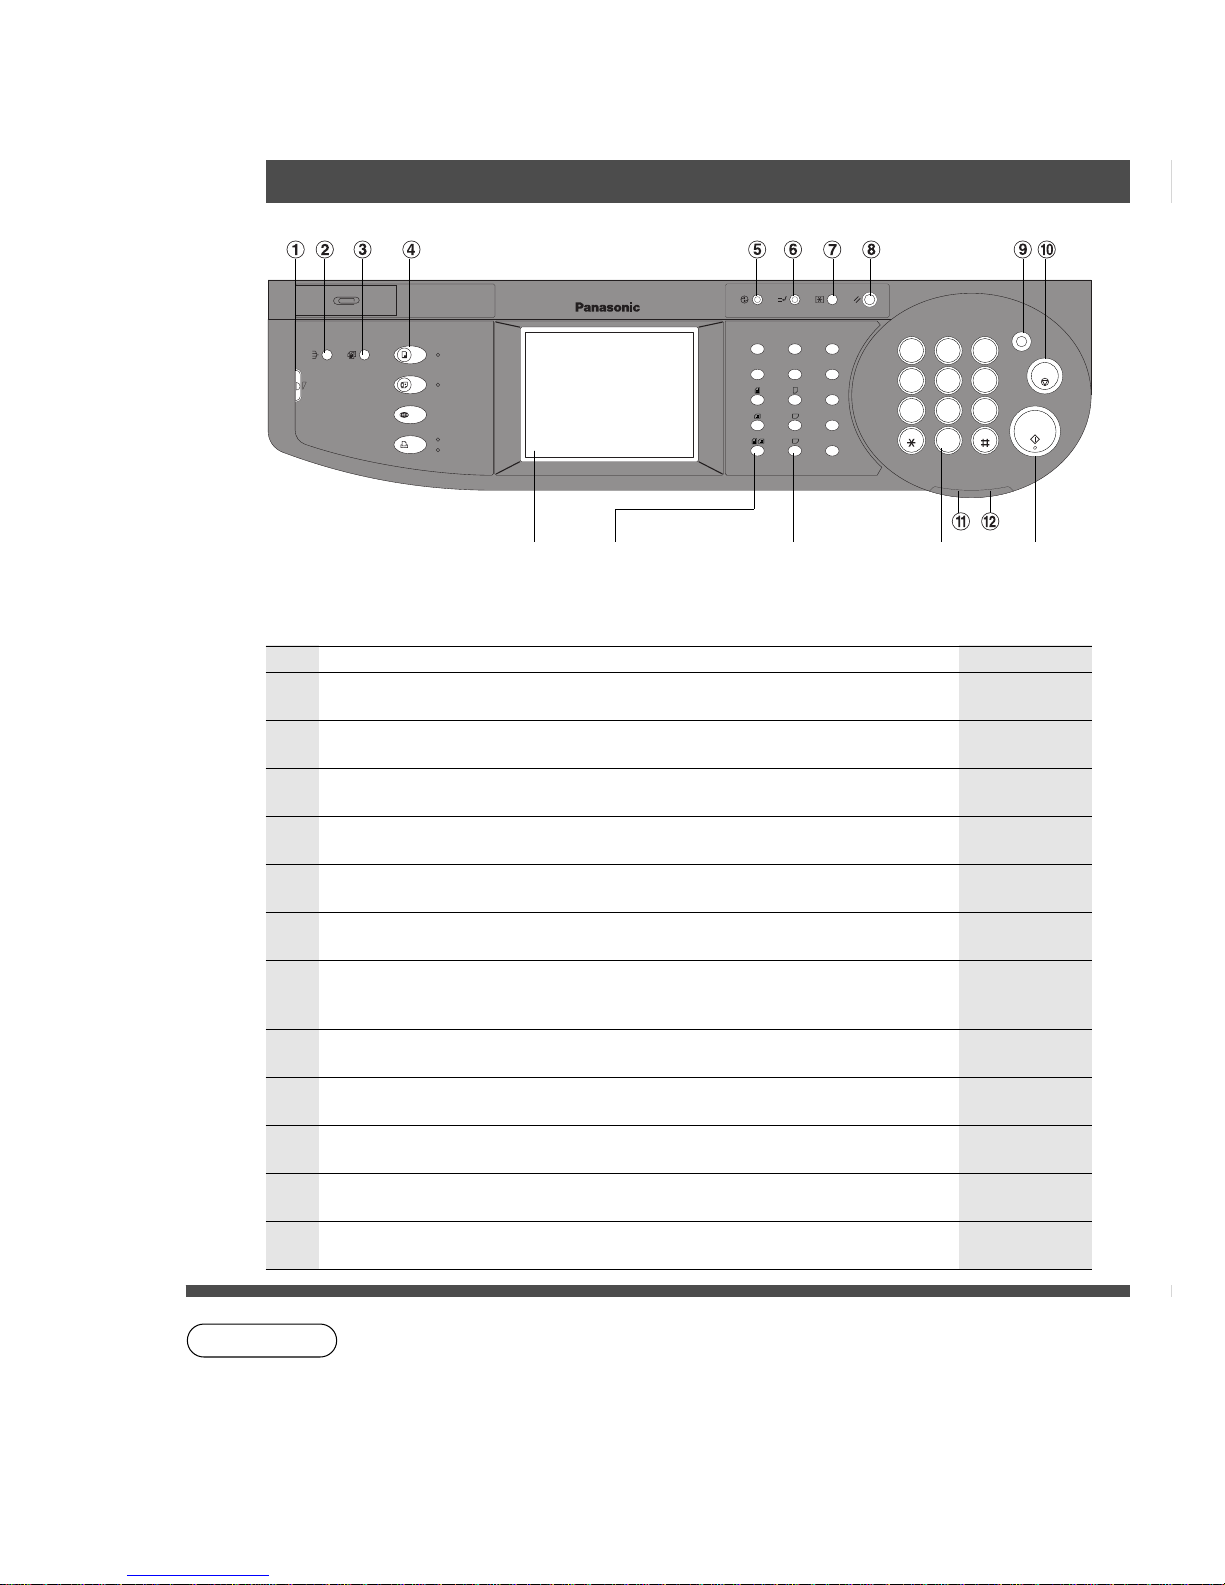
T ouc h P anel
Display
ORIGINAL
SIZE Keys
COPY SIZE Keys Keypad START
Key
No. Contents Refer to
#
LCD CONTRAST Key
C Adjusts the contrast of the touch panel display.
——
NOTE
$
SORT/FINISH Key
C When sorting and stapling with Finisher (Option).
Page 51
%
MUL TI-SIZE FEED K e y
C When Multi-sized originals are copied using ADF/i-ADF (Option).
Page 50
&
COPY Key
C Press when using the unit as a photocopier.
——
(
ENERGY SA VER K e y
C Can save power while the copier is not in use.
Page 32
)
INTERRUPT Ke y
C Interrupts other copy or print jobs while making copies.
Page 32
*
FUNCTION Key
C Use when changing the paper size, initial values for functions (default
values) and key operator settings.
Pages 36 - 47
+
RESET Key
C Resets all features to the initial power-on state.
——
.
STOP K e y
C Stops the copy run.
——
/
ALARM LED
C Lights when trouble occurs.
——
0
ACTIVE LED
C Lights when machine is active.
——
C The Control Panel displayed above shows only copier functions. Please refer to the
proper operating instructions for Facsimile/Internet/Printer control panel functions.
(Refer to page 14 for details on the Original Size/Copy Size Keys.)
-
CLEAR Key
C Clears the copy count in the display.
——
Control Panel
11
CONTRAST
LCD
REDIAL/
PAUSE
LINE
SELECT
FLASH/
SUB-ADDR
SET
ORIGINAL COPY
SIZE SIZE
LEDGER
LEGAL
INVOICE
LETTER
LETTER
MONITOR
RESET
START
START
123
456
789
0
PQRS
GHI
TUV
JKL
ABC
WXYZ
MNO
DEF
STOP
ON LINE
ON LINE
DATA
FAX
INTERNET
PRINTER
MULTI-SIZE
FEED
SORT
ALARM ACTIVE
CLEAR
ENERGY SAVER
DP-3000
INTERRUPT
FUNCTION
TONE
TONE
COPY
ADD TONER
MON. VOL.
Control Panel
Touch Panel Display
ATTENTION
T ouc h P anel
Display
C Use only soft finger pressure to activate the Touch Panel Display. DO NOT
USE SHARP OBJECTS such as pens, fingernails etc., as this may damage
the panel.
Before Starting

12
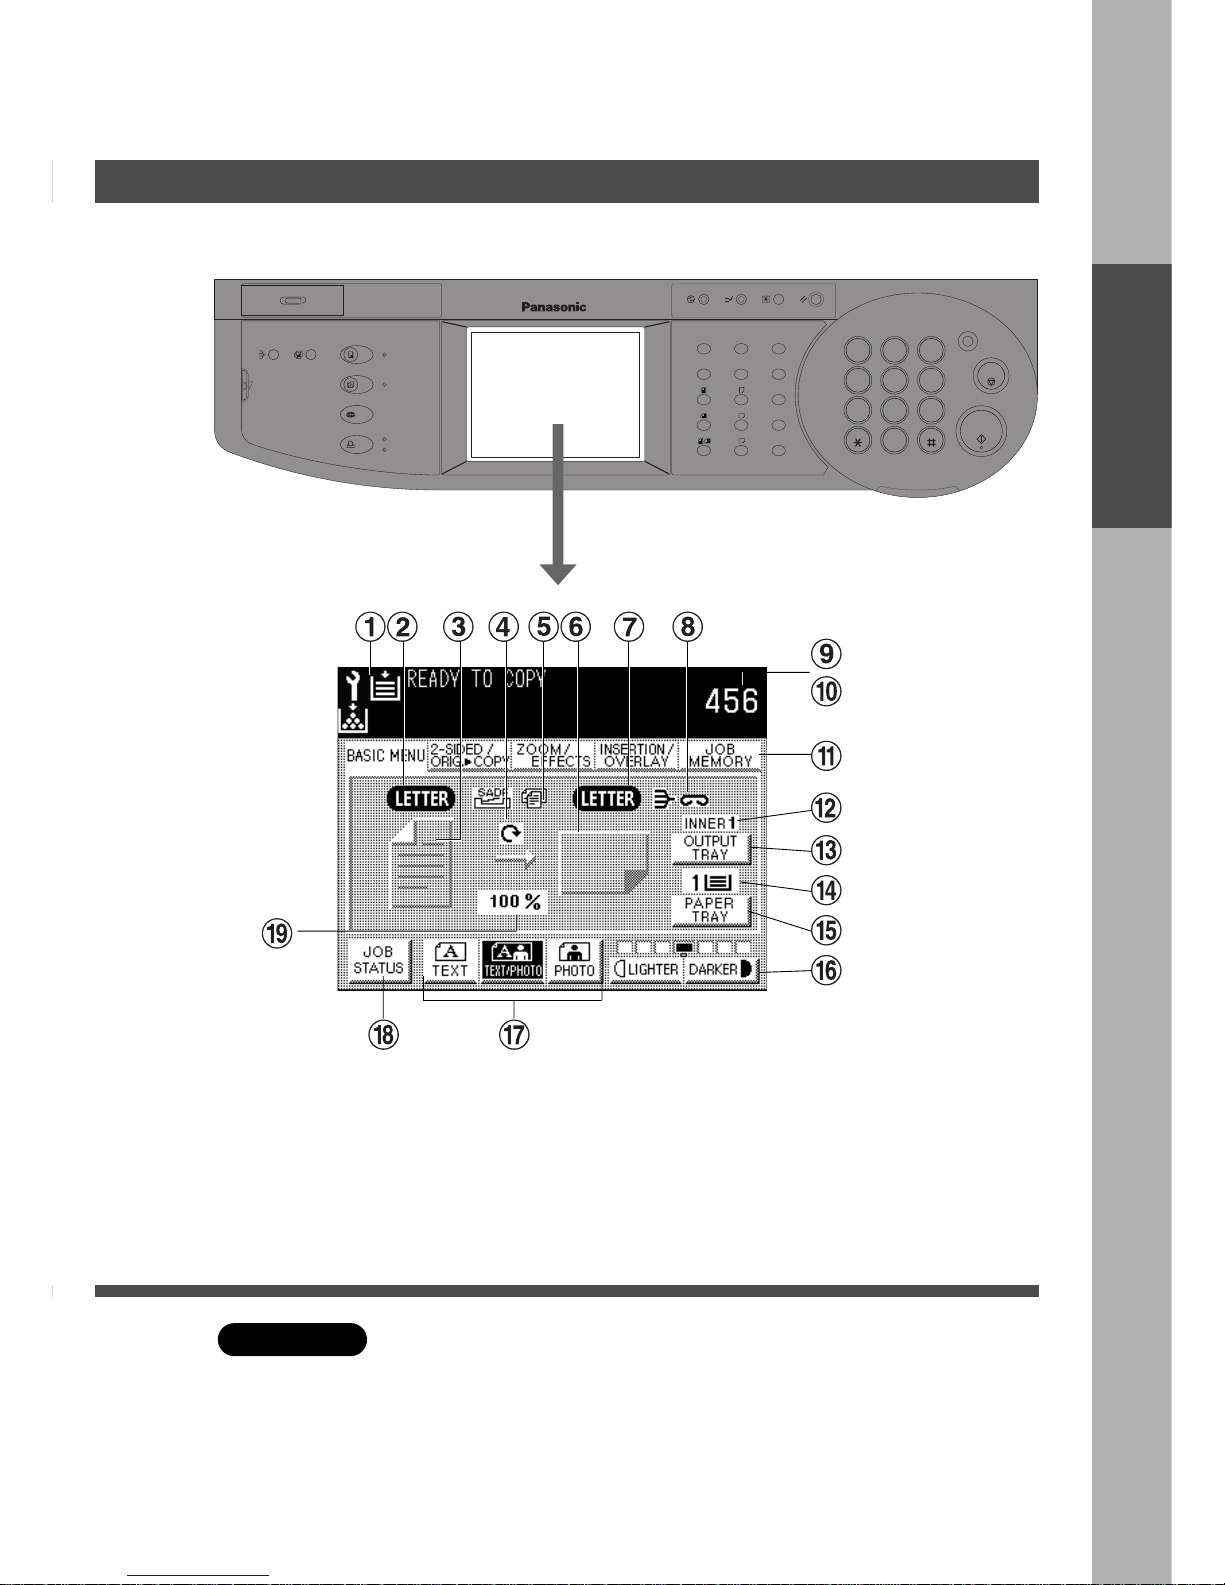
■ Touch Panel Display Indications
No. Contents Refer to
#
Warning Indications
?: Add Toner J: Add Paper 2: Call Service 2: Replace Drum
$ Original Size Indication
% Copy Image Indication
& Rotate Mode Indication
( SADF/Multi-Size Feed Mode Indication
) Copy Paper Indication
* Copy Paper Size Indication
+ Finisher Functions Indication
- Number of Copies
. Machine/User Error Code Indication (E1-01, U13, etc.,)
/ Function Categories
0 Output Tray Indication
1 Output Tray Select Key
2 Paper Tray Indication
3 Paper Tray Selection Key
4 Manual Exposure Select Keys (LIGHTER and DARKER) (7 steps)
5 Original Mode Select Key (TEXT; TEXT/PHOTO; PHOTO)
6 JOB STATUS Key
7 Copy Ratio Indication
Pages 55 - 67
Page 13
———
———
Pages 22 - 49
———
Page 14
Page 51
———
Page 66
Pages 16 - 31
———
———
———
Page 14
Page 13
Page 13
Page 13
Pages 14 and 24
Control Panel
13
CONTRAST
LCD
REDIAL/
PAUSE
LINE
SELECT
FLASH/
SUB-ADDR
SET
ORIGINAL COPY
SIZE SIZE
LEDGER
LEGAL
INVOICE
LETTER
LETTER
MONITOR
RESET
START
123
456
789
0
PQRS
GHI
TUV
JKL
ABC
WXYZ
MNO
DEF
STOP
ON LINE
ON LINE
DATA
FAX
INTERNET
PRINTER
MULTI-SIZE
FEED
SORT
ALARM ACTIVE
CLEAR
ENERGY SAVER
DP-3000
INTERRUPT
FUNCTION
TONE
TONE
COPY
ADD TONER
MON. VOL.
LEDGER
COPY
SIZE
ORIGINAL
SIZE
LEGAL
INVOICE
LETTER
LETTER
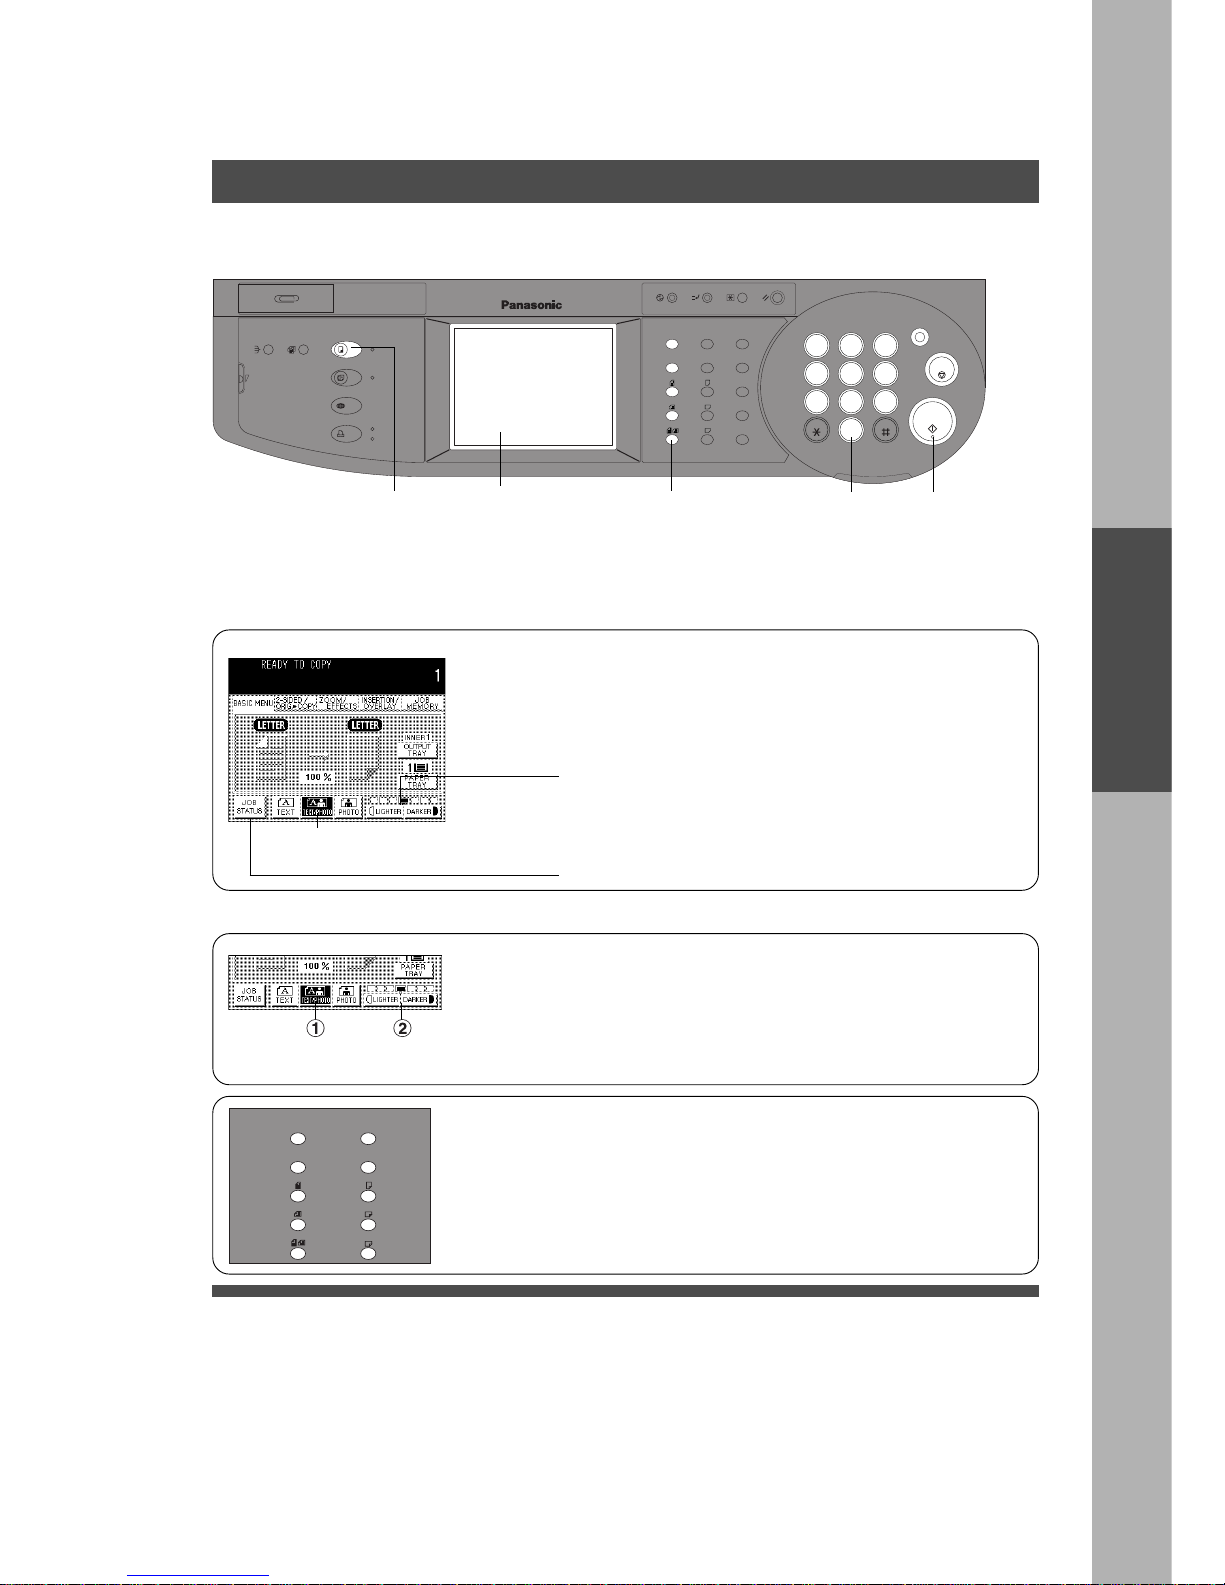
Basic Menu
Full Size Copying
■■
■■
■ Copying the Same Size Originals (1:1)
Copy size is automatically selected.
1
Place the Original
T ouc h P anel
Display
ORIGINAL SIZE Keys
3
Number of Copies
Up to 999
4
Press START
■■
■■
■ Initial Screen
(When placing Letter size originals)
Select the ORIGINAL SIZE
Invoice size can be switched between Portrait and
Landscape mode.
Manual Exposure Select Keys (LIGHTER and DARKER)
# Select the original(s)
TEXT : Originals are mainly composed of text.
TEXT/PHOTO: Combined originals with text and photo.
PHOTO : Originals are mainly composed of photo.
$ Select exposure control
Touch the LIGHTER or DARKER key.
JOB STATUS Key
C Each setting selected will be indicated on the display.
■■
■■
■ Manually Selecting Exposure Control or Original Size
Original Mode Select Key
(TEXT; TEXT/PHOTO; PHOT O)
2
Press the COPY Key
Making Copies
14
CONTRAST
LCD
REDIAL/
PAUSE
LINE
SELECT
FLASH/
SUB-ADDR
SET
ORIGINAL COPY
SIZE SIZE
LEDGER
LEGAL
INVOICE
LETTER
LETTER
MONITOR
RESET
START
123
456
789
0
PQRS
GHI
TUV
JKL
ABC
WXYZ
MNO
DEF
STOP
ON LINE
ON LINE
DATA
FAX
INTERNET
PRINTER
MULTI-SIZE
FEED
SORT
ALARM ACTIVE
CLEAR
ENERGY SAVER
DP-3000
INTERRUPT
FUNCTION
TONE
TONE
COPY
ADD TONER
MON. VOL.
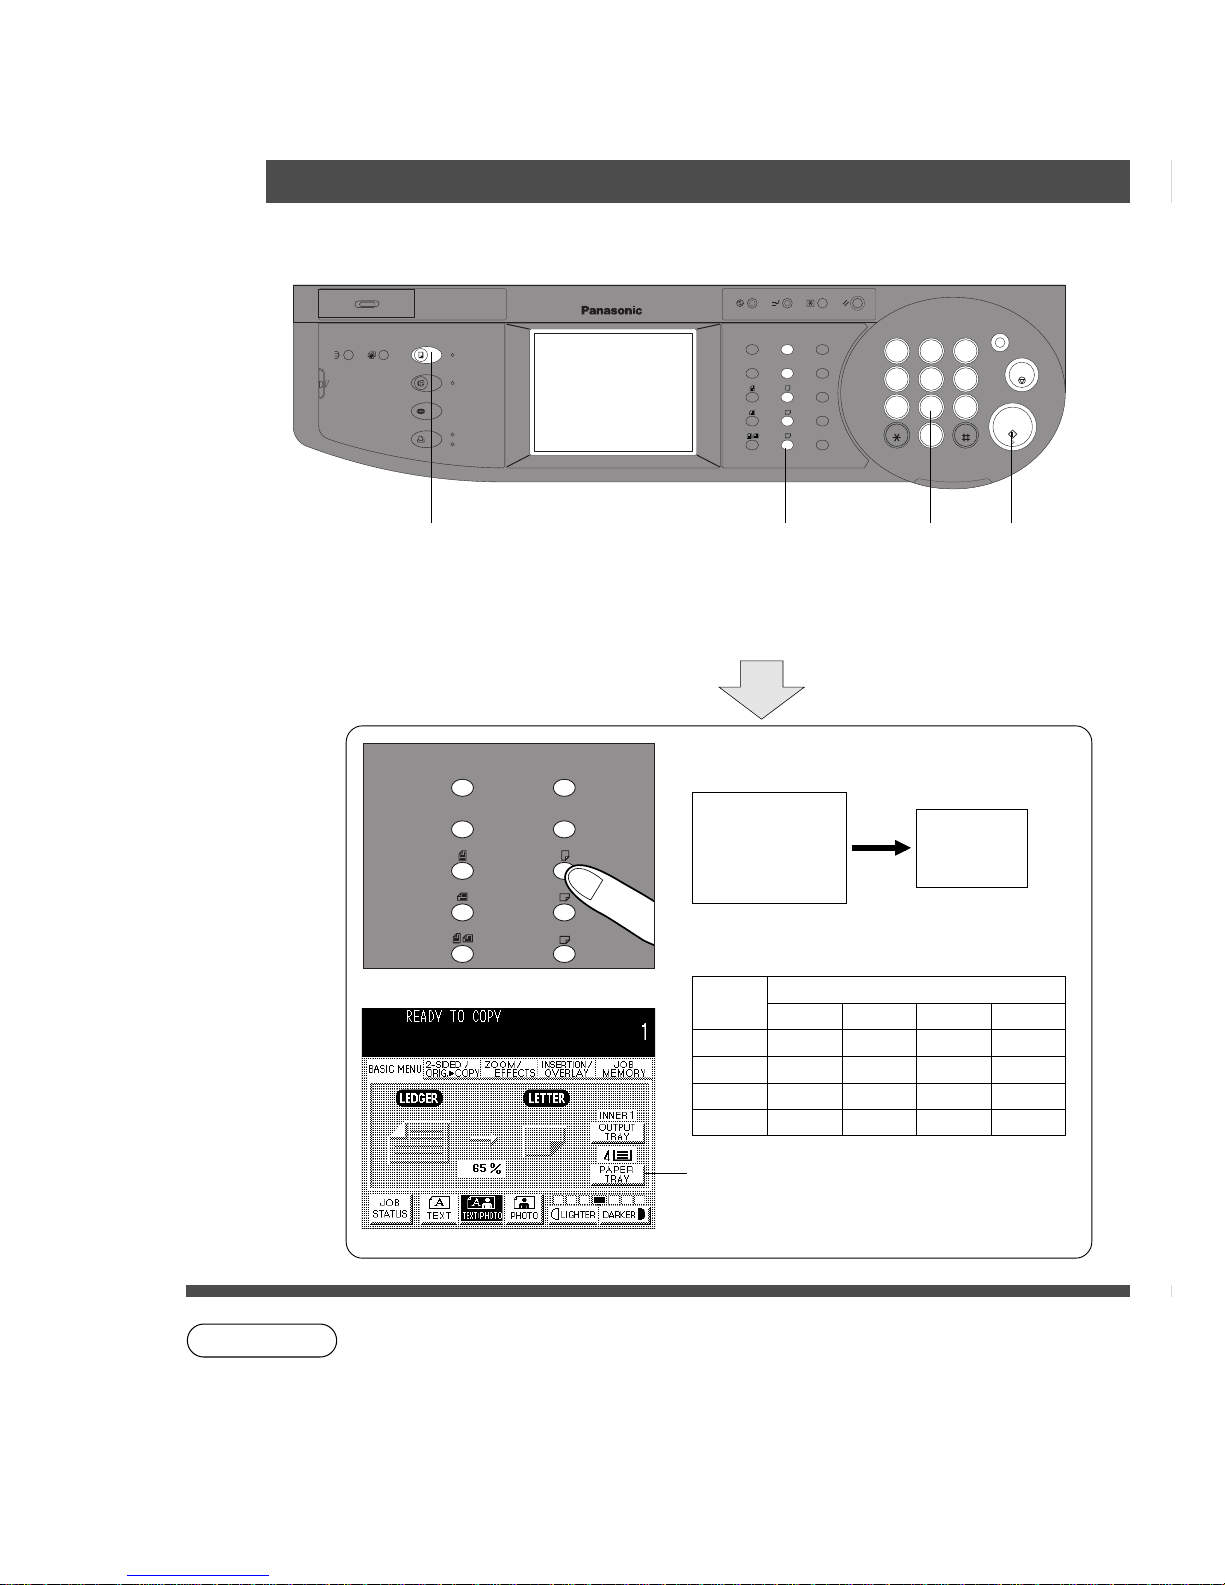
Reduction or Enlargement Copying
LEDGER
COPY
SIZE
ORIGINAL
SIZE
LEGAL
INVOICE
LETTER
LETTER
NOTE
■■
■■
■ Copying with Preset Ratios
Basic Menu
1
Place the
Original
2
Press the COPY Key
3
Select the COPY
SIZE
4
Number of
Copies
C If the desired copy size is different from the paper size loaded in the paper tray, use
sheet bypass. (See page 15)
C Press the RESET key to cancel the reduction or enlargement mode.
5
Press START
Example: Reduction
ORIGINAL SIZE COPY SIZE
LEDGER LETTER
The correct ratio is automatically selected.
Reduction and enlargement ratios (%)
ORIGINAL
SIZE
COPY SIZE
Ledger Legal Letter Invoice
Ledger
Legal
Letter
Invoice
C When changing the paper size, touch
the P APER TRA Y key.
100 77 65 50
121 100 79 61
129 100 100 65
200 155 129 100
15
# Place approximately 50
sheets of paper into the tray.
NOTE
ATTENTION
Basic Menu
Using the Sheet Bypass
■■
■■
■ Copying on Special Paper, etc.
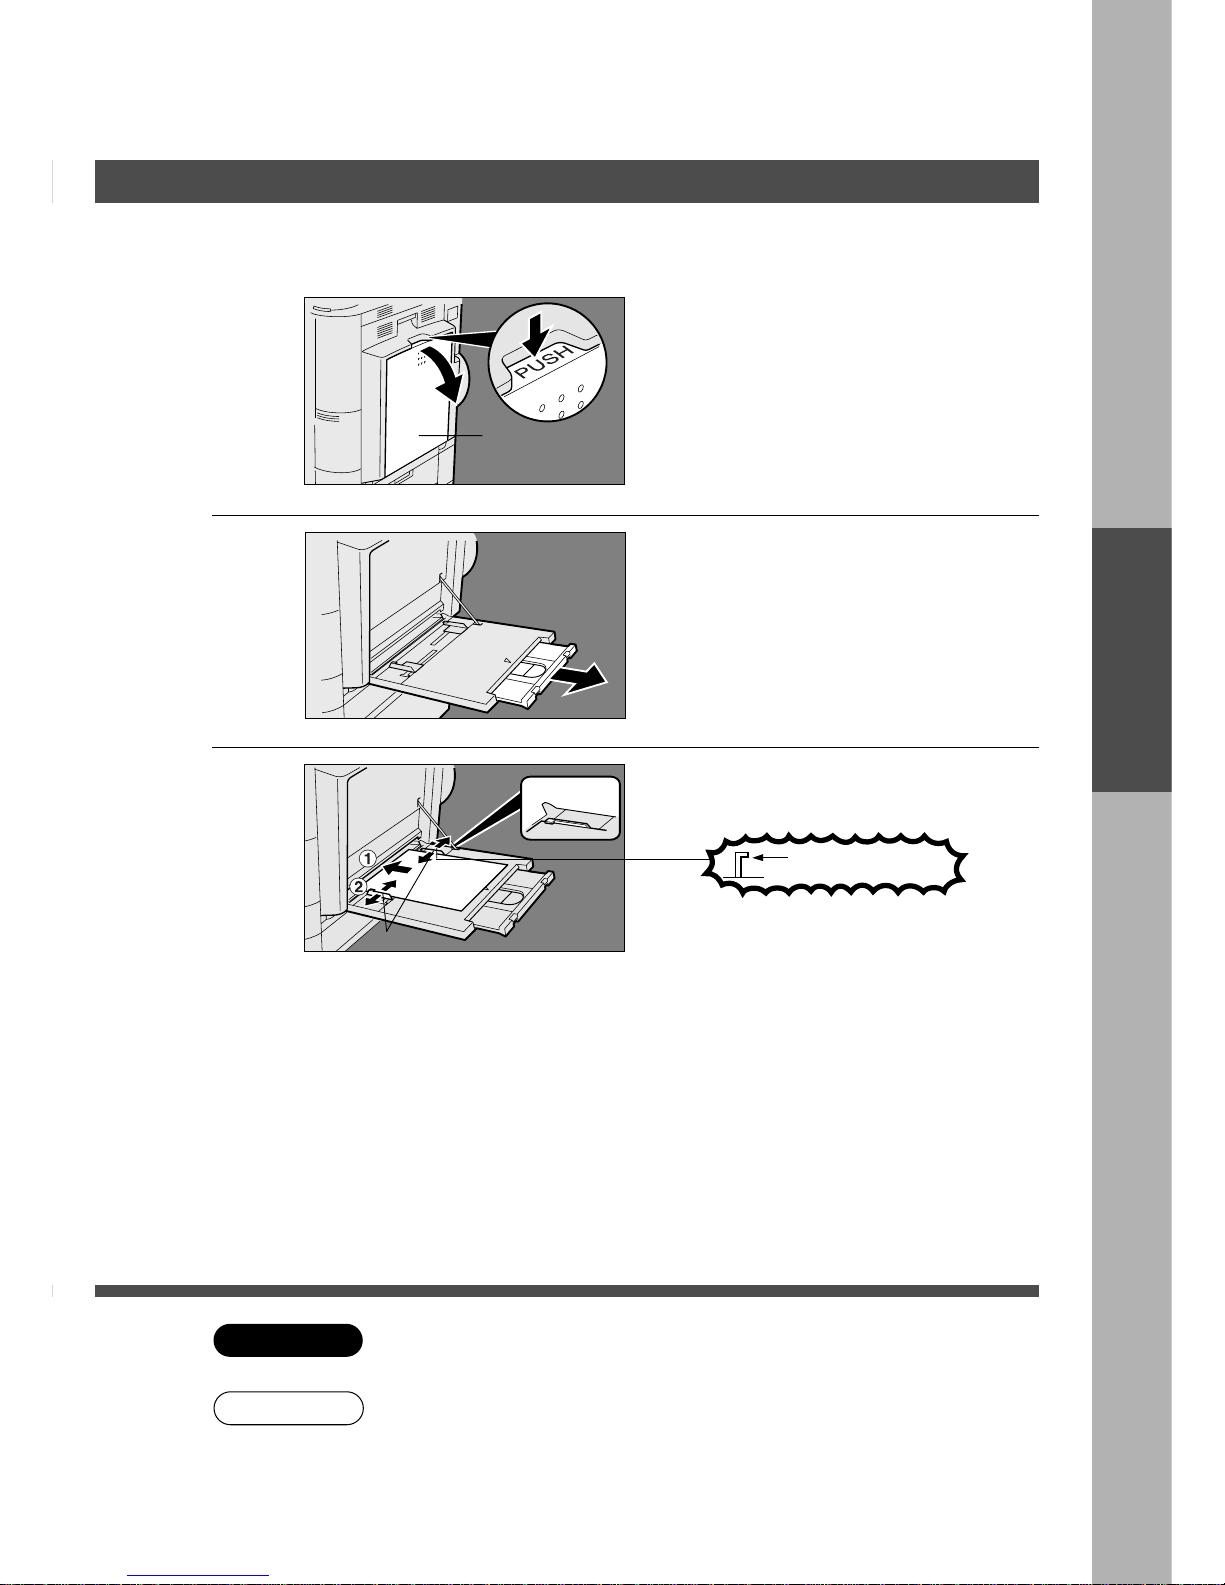
1
Place the original.
Open the sheet bypass.
Sheet Bypass
2
Pull out the sheet bypass tray
until it stops.
(For Ledger size only)
3
Insert the paper until it stops.
$ Adjust the side guides.
Incorrect adjustment may cause the
paper to wrinkle, misfeed or skew.
Press ST AR T.
Side Guides
C Adjust the side guides properly to avoid skewing, wrinkling or misfeeding.
C Do not feed curled paper through the sheet bypass to avoid misfeed.
Making Copies
Do not fill above.

16
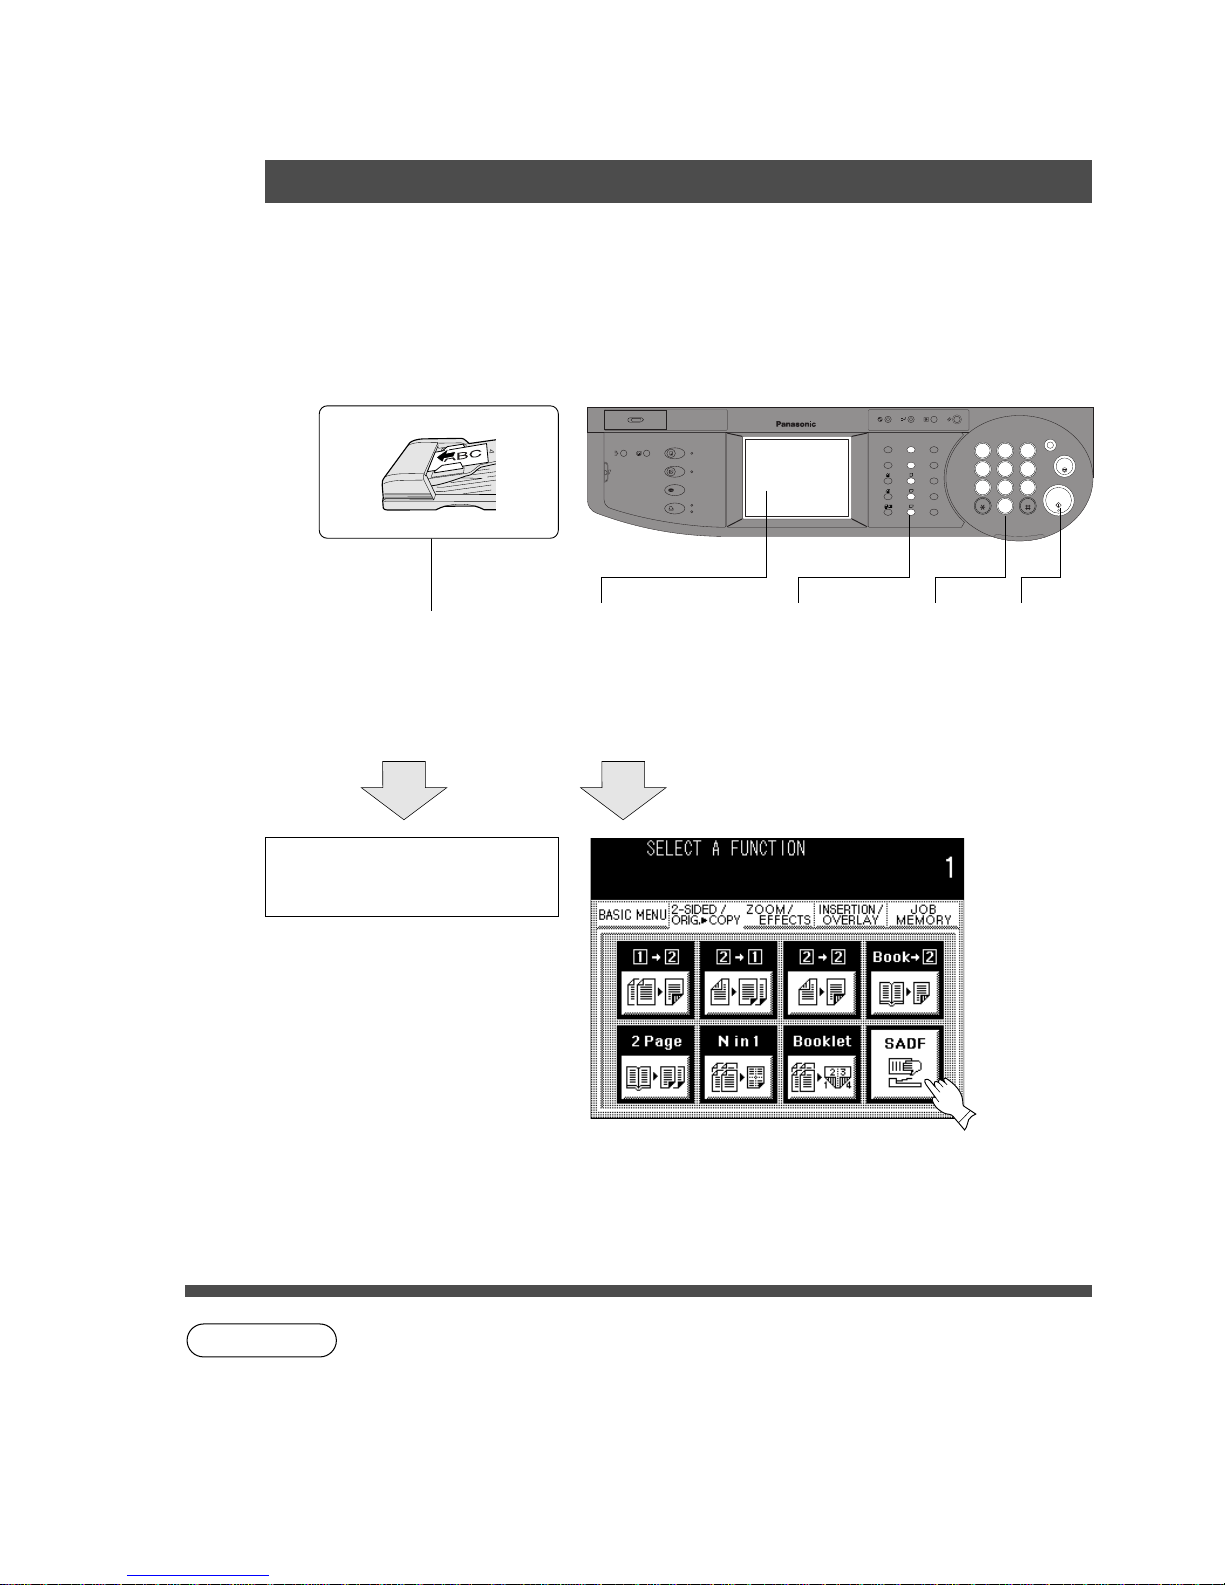
2-Sided/Orig.
HH
HH
H Copy Key
2-Sided/Original
HH
HH
H Copy
■■
■■
■ Initial Screen
C Touch the desired key to select a function.
C 2-Sided originals may be handled either manually or automatically using the i-ADF
(DA-AR250).
C An ADU (Automatic Duplex Unit) is required when making a 2-Sided copy using an
ADF (Automatic Document Feeder).
1 \ 2
From 1-Sided originals to 2-Sided
copies.
(See page 17)
2 \ 1
From 2-Sided originals to 1-Sided
copies.
(See page 17)
2 \ 2
From 2-Sided originals to 2-Sided
copies.
(See page 17)
Book \ 2
From book originals to 2-Sided copies. (See page 18)
2 Page
Copying two facing pages or a Ledger
size original on two separate Letter size
sheets.
(See page 19)
N in 1
From two (or four) 1-Sided originals, side
by side, to 1-Sided copies.
(See page 20)
Booklet
From four or more 1-Sided pages to both
sides of a single page.
(See page 21)
SADF
A special original (like a thin paper etc.,)
can be fed from the ADF/i-ADF original
tray. This mode adds a delay to allow
another original to be placed on the ADF
within a specific period of time.
(See page 22)
NOTE
17
1
\\
\\
\ 2/2
\\
\\
\ 1/2
\\
\\
\ 2 Copy
CONTRAST
LCD
REDIAL/
PAUSE
LINE
SELECT
FLASH/
SUB-ADDR
SET
ORIGINAL COPY
SIZE SIZE
LEDGER
LEGAL
INVOICE
LETTER
LETTER
MONITOR
RESET
START
START
123
456
789
0
PQRS
GHI
TUV
JKL
ABC
WXYZ
MNO
DEF
STOP
ON LINE
ON LINE
DATA
FAX
INTERNET
PRINTER
MULTI-SIZE
FEED
SORT
ALARM ACTIVE
CLEAR
ENERGY SAVER
DP-3000
INTERRUPT
FUNCTION
TONE
TONE
COPY
ADD TONER
MON. VOL.
■ 1
\\
\\
\ 2 Copy
From 1-Sided originals to 2Sided copies.
(From Copier Platen & i-ADF/
ADF/ADU)
■ 2
\\
\\
\ 1 Copy
From 2-Sided originals to 1Sided copies.
(Using i-ADF)
■■
■■
■ Procedure
ADF/i-ADF
Face-Up
1
Place the
Originals
2
Touch 1
\\
\\
\ 2,
2
\\
\\
\ 1 or
2
\\
\\
\ 2
(3)
COPY SIZE
(Reduction/
Enlargement
Only)
4
Number of
Copies
5
Press
START
NOTE
C To reset each mode menu, touch the CANCEL key on the touch panel.
(Example: 2 \ 2 Copy)
2-Sided/Original
HH
HH
H Copy
■ 2
\\
\\
\ 2 Copy
From 2-Sided originals to
2-Sided copies.
(Using i-ADF/ADU)
Making Copies
18
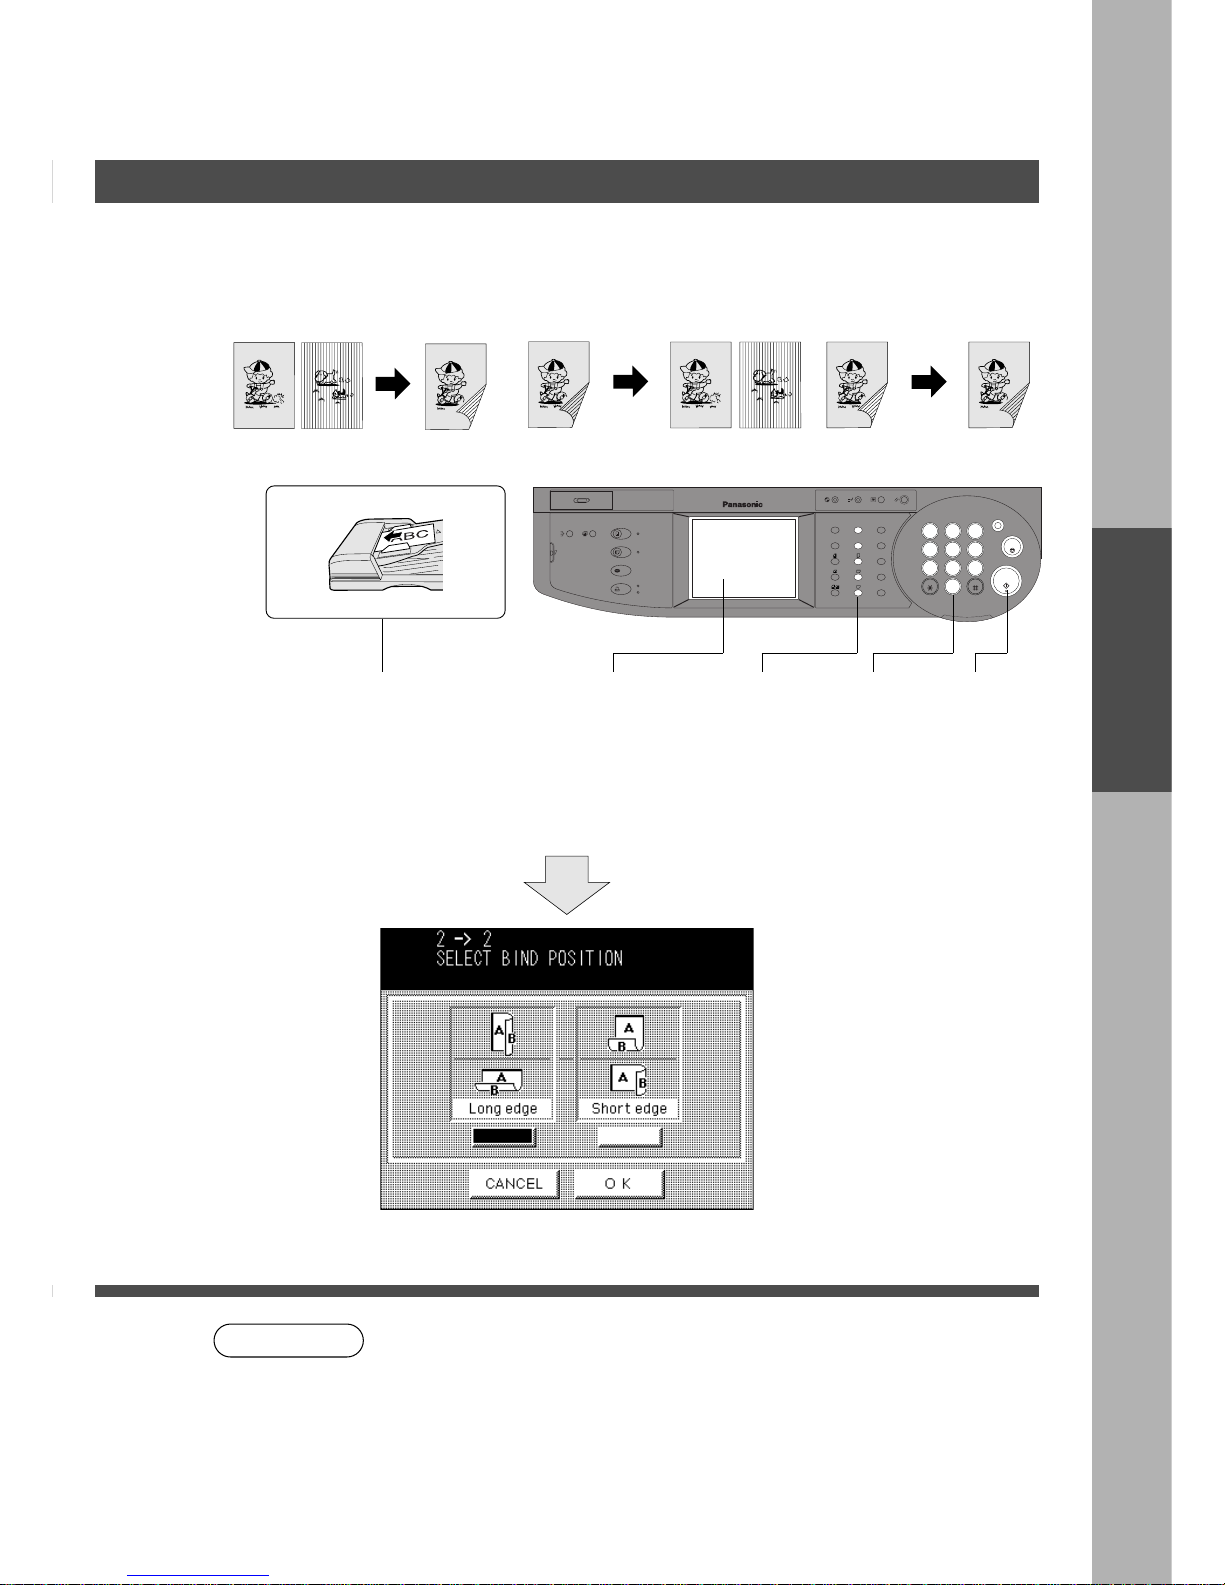
Book
\\
\\
\ 2 Copy
CONTRAST
LCD
REDIAL/
PAUSE
LINE
SELECT
FLASH/
SUB-ADDR
SET
ORIGINAL COPY
SIZE SIZE
LEDGER
LEGAL
INVOICE
LETTER
LETTER
MONITOR
RESET
START
123
456
789
0
PQRS
GHI
TUV
JKL
ABC
WXYZ
MNO
DEF
STOP
ON LINE
ON LINE
DATA
FAX
INTERNET
PRINTER
MULTI-SIZE
FEED
SORT
ALARM ACTIVE
CLEAR
ENERGY SAVER
DP-3000
INTERRUPT
FUNCTION
TONE
COPY
ADD TONER
MON. VOL.
NOTE
■ Book
\\
\\
\ 2 Copy
From book originals to 2-Sided copies.
Ledger size originals only. (Using ADU)
(Book Format) (Facing Pages)
1
Place the Original
on the Platen
2
Select Book
\\
\\
\ 2
Mode and Copy
Format
(3)
COPY SIZE
(Reduction/
Enlargement Only*)
4
Number of
Copies
5
Press
START
C To reset each mode menu, touch the CANCEL key on the touch panel.
∗
Ledger and Legal copy sizes cannot be selected.
Platen
Ledger size original
2-Sided/Original
HH
HH
H Copy
Letter
Ledger

19
CONTRAST
LCD
REDIAL/
PAUSE
LINE
SELECT
FLASH/
SUB-ADDR
SET
ORIGINAL COPY
SIZE SIZE
LEDGER
LEGAL
INVOICE
LETTER
LETTER
MONITOR
RESET
START
START
123
456
789
0
PQRS
GHI
TUV
JKL
ABC
WXYZ
MNO
DEF
STOP
ON LINE
ON LINE
DATA
FAX
INTERNET
PRINTER
MULTI-SIZE
FEED
SORT
ALARM ACTIVE
CLEAR
ENERGY SAVER
DP-3000
INTERRUPT
FUNCTION
TONE
TONE
COPY
ADD TONER
MON. VOL.
NOTE
C To reset each mode menu, touch the CANCEL key on the touch panel.
∗
Ledger and Legal copy sizes cannot be selected.
■ 2 Page Copy
Copying two facing pages or a Ledger size
original on two separate Letter size sheets.
■■
■■
■ Procedure
1
Place the
Originals
2
Touch
2 Page Mode
(3)
COPY SIZE
(Reduction/
Enlargement Only*)
4
Number of
Copies
5
Press
START
Platen Ledger size original
2 Page Copy
2-Sided/Original
HH
HH
H Copy
Making Copies
Letter
Ledger
20
CONTRAST
LCD
REDIAL/
PAUSE
LINE
SELECT
FLASH/
SUB-ADDR
SET
ORIGINAL COPY
SIZE SIZE
LEDGER
LEGAL
INVOICE
LETTER
LETTER
MONITOR
RESET
START
START
123
456
789
0
PQRS
GHI
TUV
JKL
ABC
WXYZ
MNO
DEF
STOP
ON LINE
ON LINE
DATA
FAX
INTERNET
PRINTER
MULTI-SIZE
FEED
SORT
ALARM ACTIVE
CLEAR
ENERGY SAVER
DP-3000
INTERRUPT
FUNCTION
TONE
TONE
COPY
ADD TONER
MON. VOL.
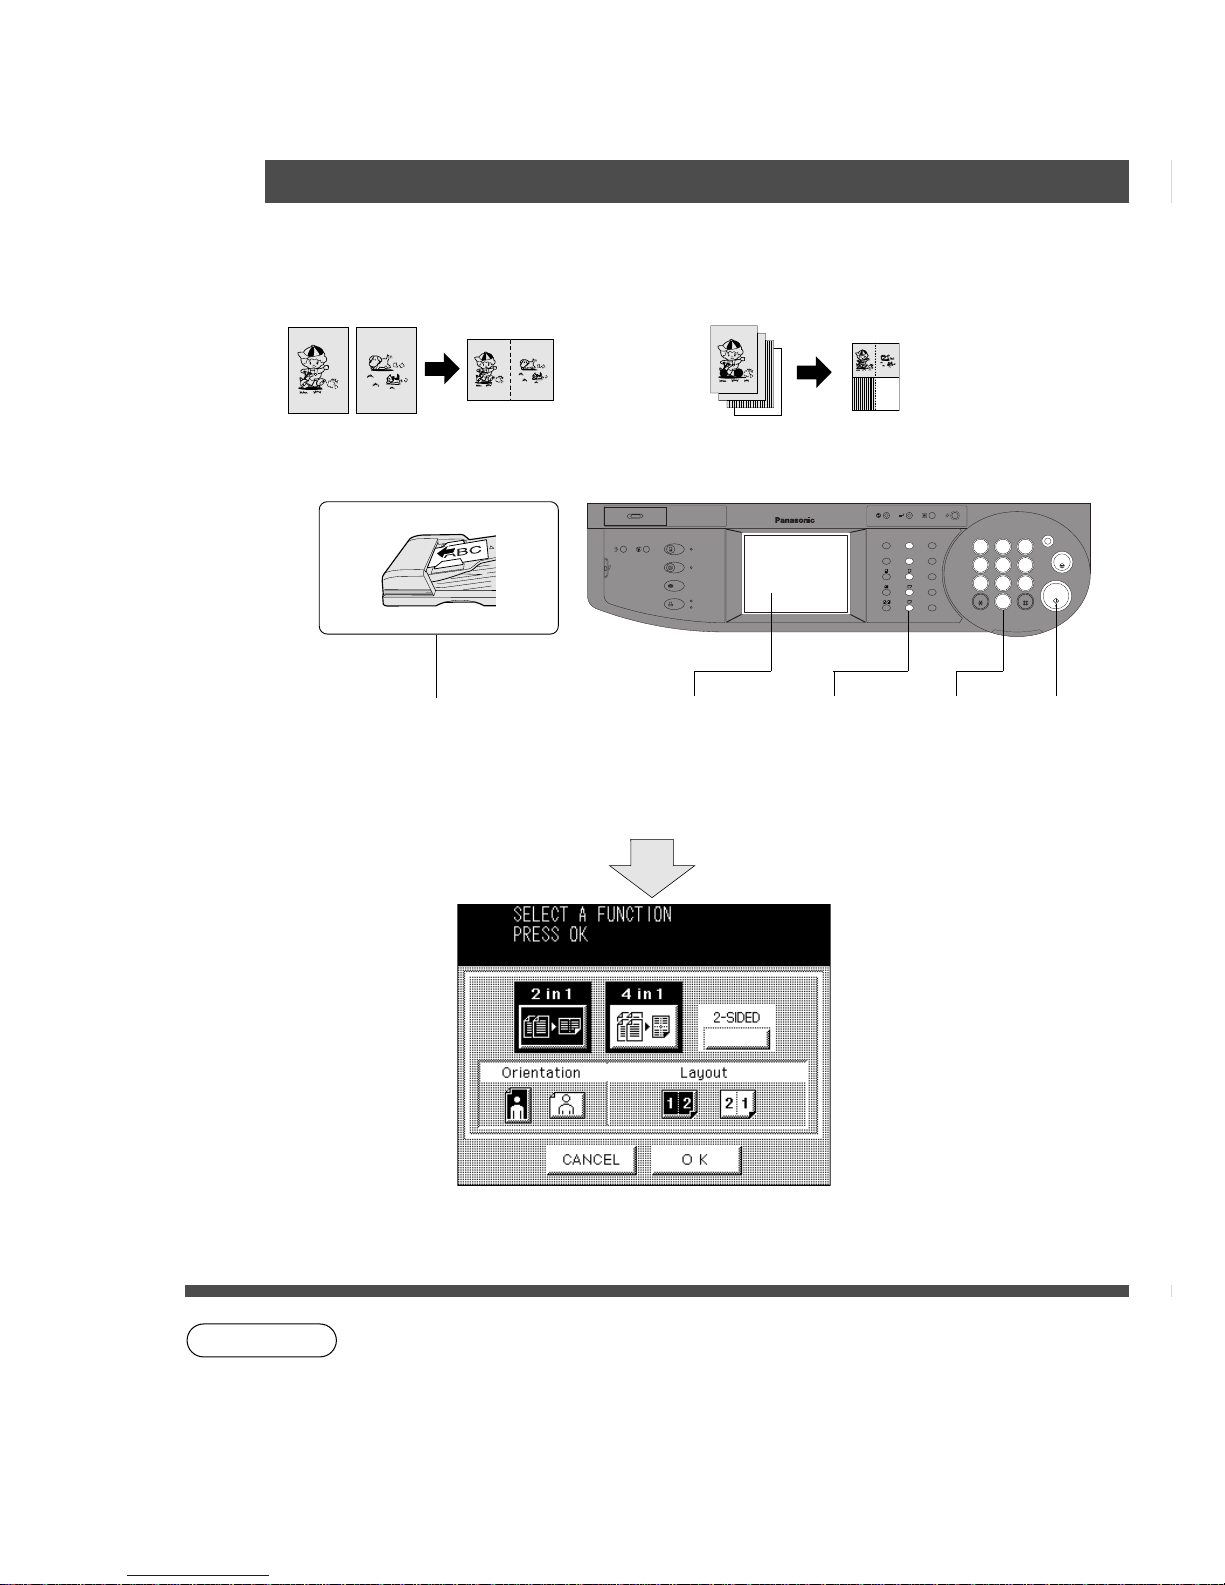
N in 1 Copy
■ 2 in 1 Copy
From two 1-Sided originals, side by
side, to 1-Sided pages.
■ 4 in 1 Copy
From four 1-Sided originals, side by
side, to 1-Sided copies.
NOTE
2-Sided/Original
HH
HH
H Copy
3
4
12
43
1
2
■■
■■
■ Procedure
ADF/i-ADF
Face-Up
1
Place the
Originals
2
Touch N in 1 Mode
and Make Selection
(3)
COPY SIZE
(Reduction/
Enlargement
Only)
4
Number of
Copies
5
Press
START
Copy is automatically reduced.
C 2 in 1: 65%, 4 in 1: 50%
(ex. Letter to Letter size)
C The ADF/i-ADF is required for N in 1 copy.
C To reset each mode menu, touch the CANCEL key on the touch panel.
21
CONTRAST
LCD
REDIAL/
PAUSE
LINE
SELECT
FLASH/
SUB-ADDR
SET
ORIGINAL COPY
SIZE SIZE
LEDGER
LEGAL
INVOICE
LETTER
LETTER
MONITOR
RESET
START
START
123
456
789
0
PQRS
GHI
TUV
JKL
ABC
WXYZ
MNO
DEF
STOP
ON LINE
ON LINE
DATA
FAX
INTERNET
PRINTER
MULTI-SIZE
FEED
SORT
ALARM ACTIVE
CLEAR
ENERGY SAVER
DP-3000
INTERRUPT
FUNCTION
TONE
TONE
COPY
ADD TONER
MON. VOL.
2-Sided/Original
HH
HH
H Copy
Booklet Copy
■ Booklet Copy
From four or more 1-Sided originals, side
by side, to 2-Sided copies.
■■
■■
■ Procedure
ADF/i-ADF
NOTE
Face-Up
1
Place the
Originals
C The ADF/i-ADF is required for Booklet copy.
C For Booklet Copy, use Letter and Invoice originals only.
C To reset each mode menu, touch the CANCEL key on the touch panel.
2
Touch Booklet
Mode
(3)
COPY SIZE
(Reduction/
Enlargement
Only)
4
Number of
Copies
5
Press
START
Making Copies
3
4
14
23
1
2
C Select Left or Top Edge
binding
C Select Right or Bottom
Edge binding
22
CONTRAST
LCD
REDIAL/
PAUSE
LINE
SELECT
FLASH/
SUB-ADDR
SET
ORIGINAL COPY
SIZE SIZE
LEDGER
LEGAL
INVOICE
LETTER
LETTER
MONITOR
RESET
START
START
123
456
789
0
PQRS
GHI
TUV
JKL
ABC
WXYZ
MNO
DEF
STOP
ON LINE
ON LINE
DATA
FAX
INTERNET
PRINTER
MULTI-SIZE
FEED
SORT
ALARM ACTIVE
CLEAR
ENERGY SAVER
DP-3000
INTERRUPT
FUNCTION
TONE
TONE
COPY
ADD TONER
MON. VOL.
NOTE
■■
■■
■ SADF (Single Sheet Automatic Document Feeder) Function
A special original (like a thin paper etc.,) can be fed from the ADF/i-ADF original tray and copied
continuously with manual operation.
Before using this feature, the SADF Mode must be enabled in the copier function settings.
(See P.41)
■■
■■
■ Procedure
SADF Mode
2-Sided/Original
HH
HH
H Copy
ADF/i-ADF
Face-Up
1
A
7
Place the Original
One at a Time
2
Select
[[
[[
[
Function
(3)
COPY SIZE
(Reduction/
Enlargement Only)
4
Number of
Copies
5
Press
START
6
Copy
C SADF function cannot be combined with 2
\\
\\
\ 1 and 2
\\
\\
\ 2.
Timing to place the next original
C Within 5 sec. of last copy exit.
 Loading...