

Panasonic WORKIO DP-150, WORKIO DP-150A, DP-150FX, WORKIO DP-150PA Operating Instructions Manual
2
English
Operating Instructions (For Facsimile)
Digital Copier
Before operating this equipment, please read
these instructions completely and keep these
operating instructions for future reference.
DP-150FX
Options
UE-403171-AU
UE-410045/410046/410047
BASIC
OPERATIONS
ADVANCED
FEATURES
NETWORK
FEATURES
PRINTING
JOURNALS AND
LISTS
MAINTENANCEAPPENDIX
GETTING TO
KNOW YOUR
MACHINE
INSTALLING
YOUR MACHINE
PROGRAMMING
YOUR MACHINE
IMPORTANT INFORMATION
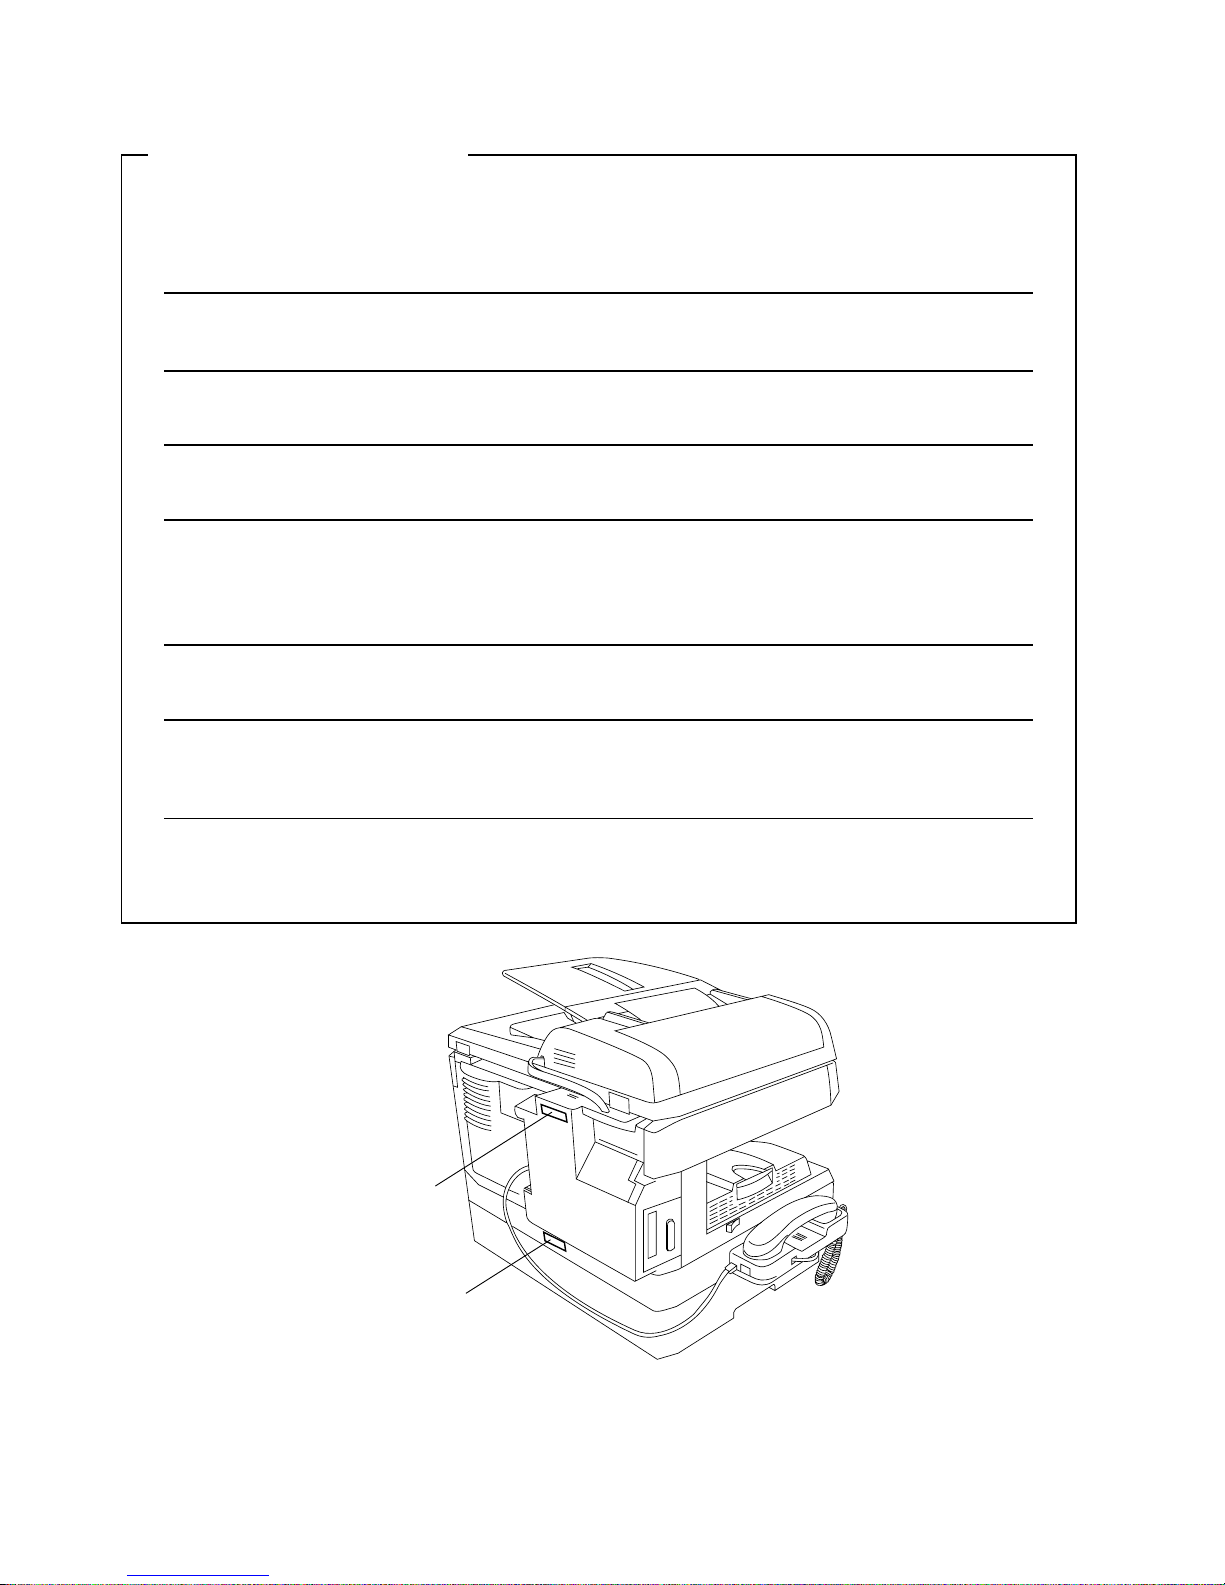
When requesting information, supplies or service always refer to the model and serial number of your
machine. The model and serial number plate (Main Name Plate) is located on the machine as shown below.
For your convenience, space is provided below to record information you may need in the future.
Model No.
Serial No.
Date of Purchase
Dealer
Address
Telephone Number
() -
Supplies Telephone Number
() -
Service Telephone Number
() -
Model Number
Serial
Number
Copyright © 2000 by Matsushita Graphic Communication Systems, Inc.
All rights reserved. Unauthorized copying and distribution is a violation of law. Printed in Japan.
The contents of these Operating Instructions are subject to change without notice.

INSTALLING YOUR MACHINE
3
This copier includes 3 operating instruction manuals, please use the correct manual when operator intervention is
necessary.
<Copier> Use the information provided in this manual whenever a copier functio n requires
intervention. For example: how to make copies, add paper, replace the toner
cartridge, etc...
<Facsimile> Use the information provided in the DP-150FX Facimile Operating Instructions
manual whenever a fax function requires inter vention. For example: how to send/
receive a fax, or when a trouble message appears, etc...
<Printer> Use the information provided on the enclosed CD for an explanation of
how to
& use as a Printer, Scanner, Edit Directory Dialing Feature, Device Settings, Status
<Other Advanced Functions> Monitor, and/or Document Management System.
Copier
• Can copy up to Legal size.
• Available to copy text/photos/halftones originals.
Facsimile
• Plain paper Super G3 compatible Fax.
• Can be used as a regular telephone with optional
handset.
Printer
• Digital printer co ntrol ler stan dard, pr i nter reso lution
300 or 600 dpi.
Scanner
• Black & White original scanner standard, scan
resolution at up to 400 dpi.
Application Software
• Includes: Standard as well are, an Edit Directory
Dialing Feature, Deviception).
Settings, Status Monitor and
Document
Management System.
DP-150FX Operating Instructions
1
2
3
4
5
Useful for office, more than 4 functions
INSTALLING YOUR MACHINE
4
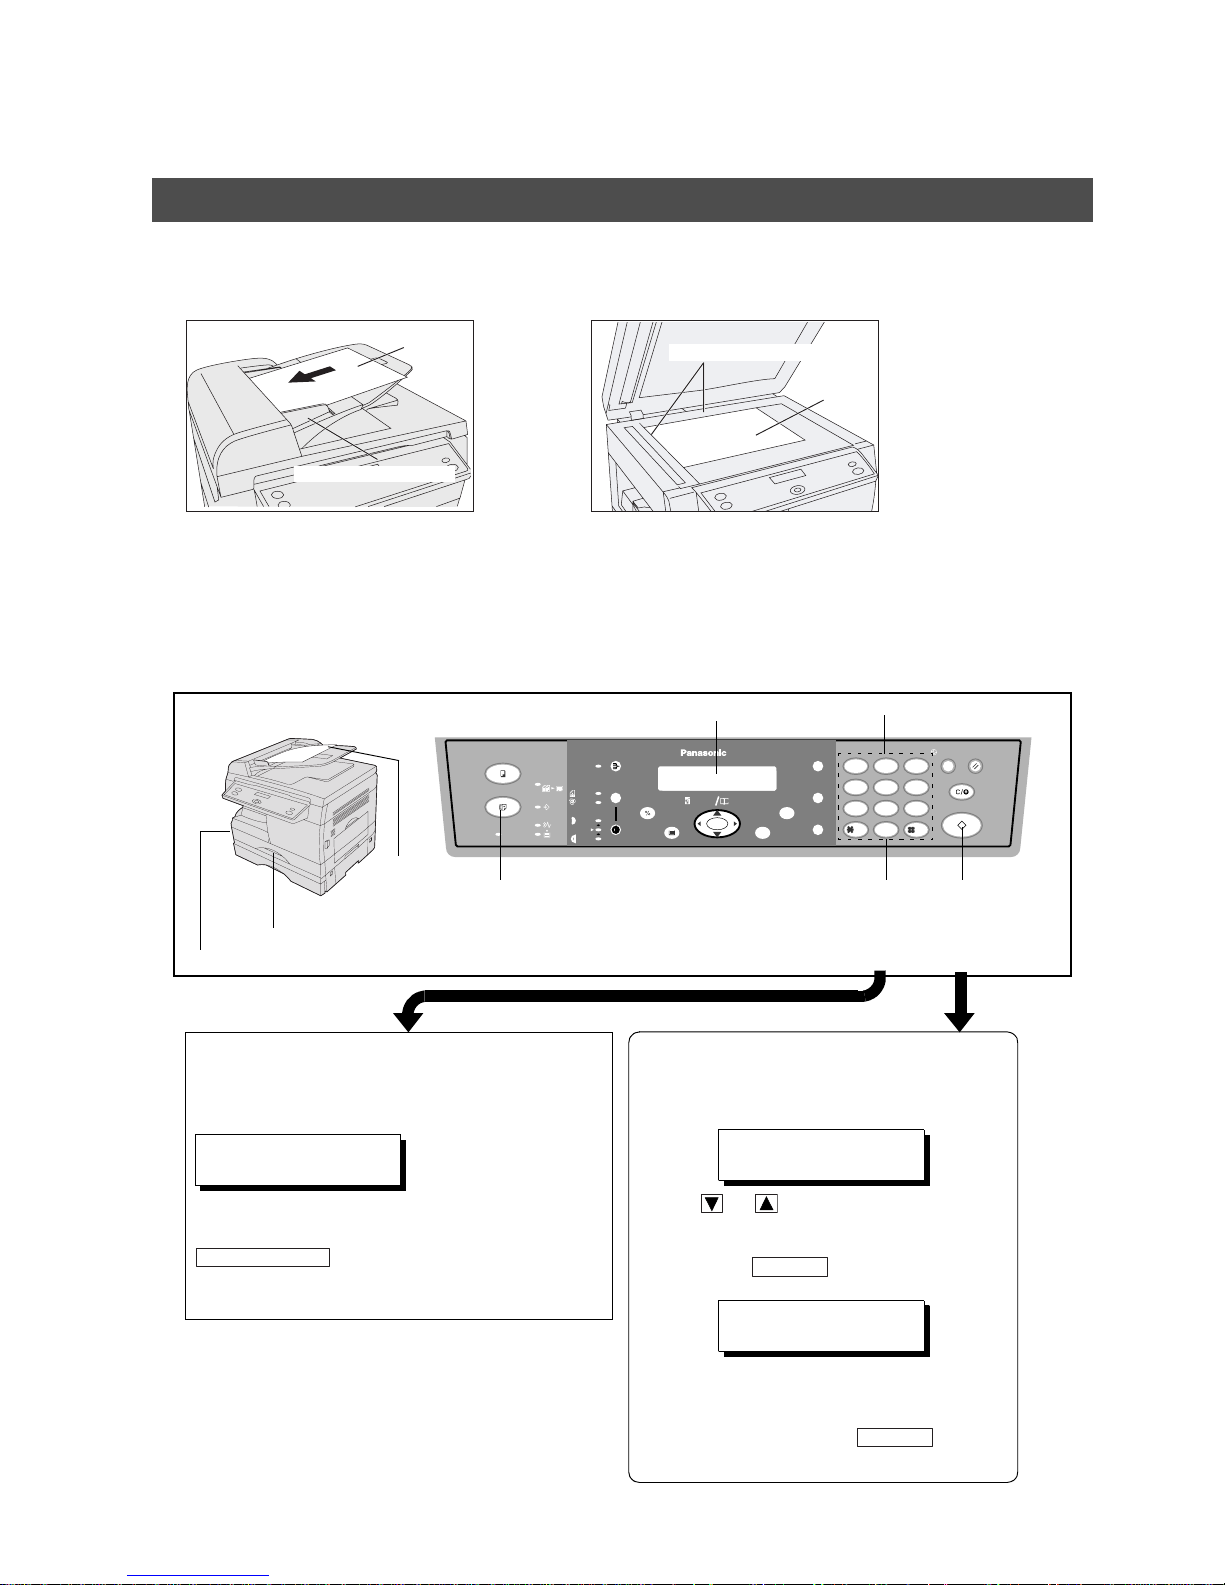
Operation Chart (For Facsimile)
■■■■
How to Load Originals
■■■■
Basic Operation
(1) On the ADF (2) On the Platen Glass (Flatbed)
Place the original(s) Face Up on the
ADF until the leading edge placed
into the machine stops.
Adjust the Original Width Guides to
center the original(s) on the ADF.
Place a book or an original Face
Down on t he Platen Glass, aligning
it with the arrow mark on the
Original Size Guides.
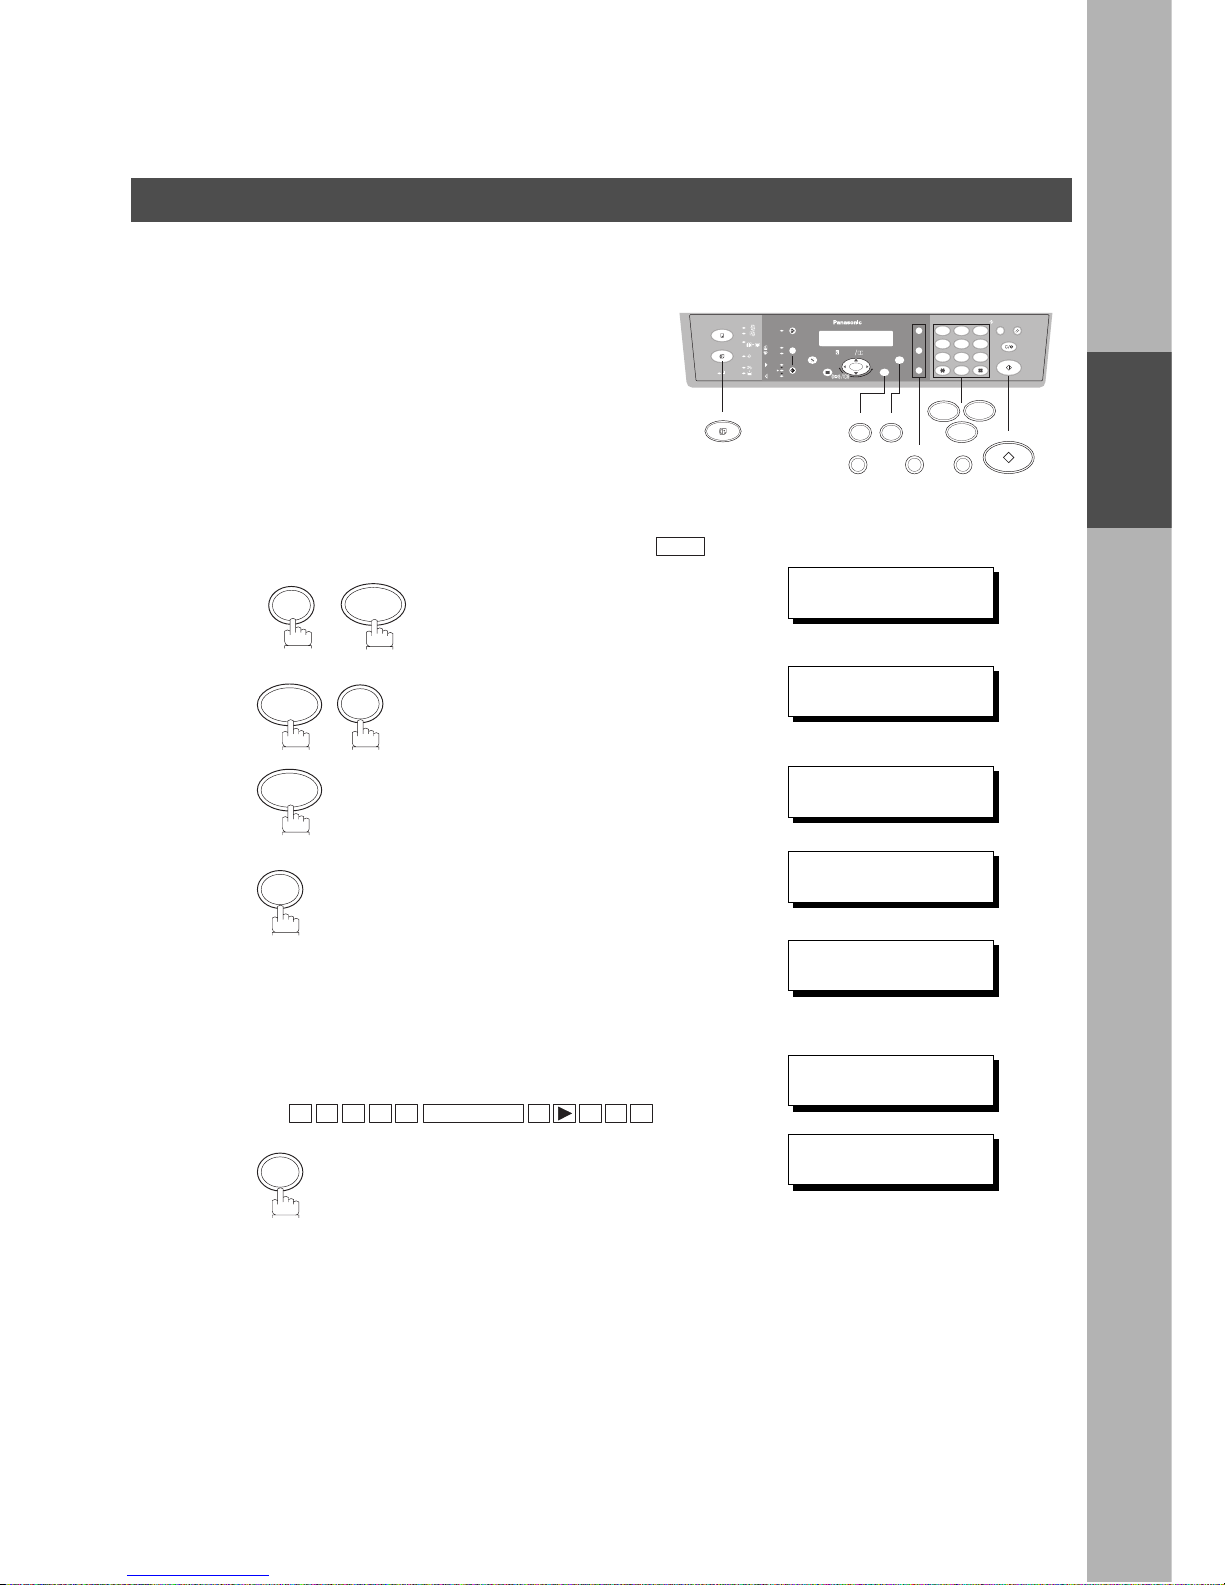
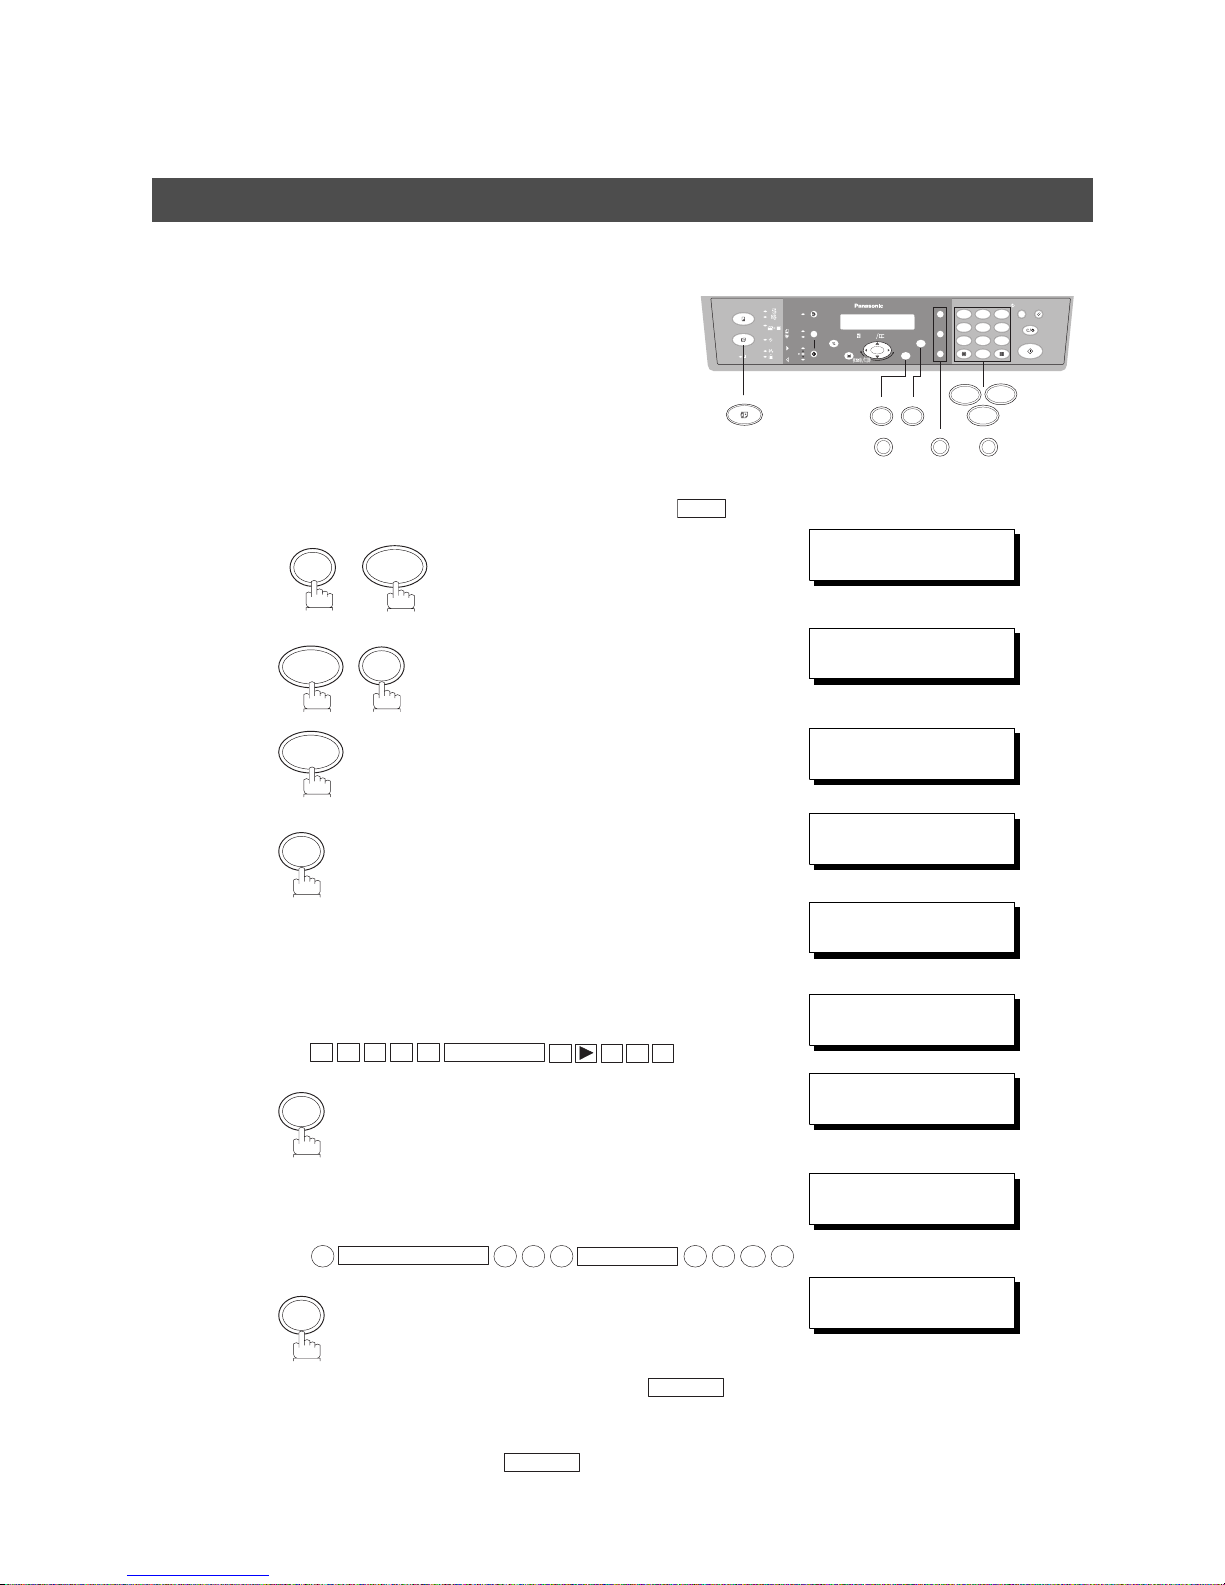
How to Dial (Manual Number Dialing)
Enter the station number using the keypad.
If you enter an incorrect number, press
to delete the last entry then re-
enter the correct number.
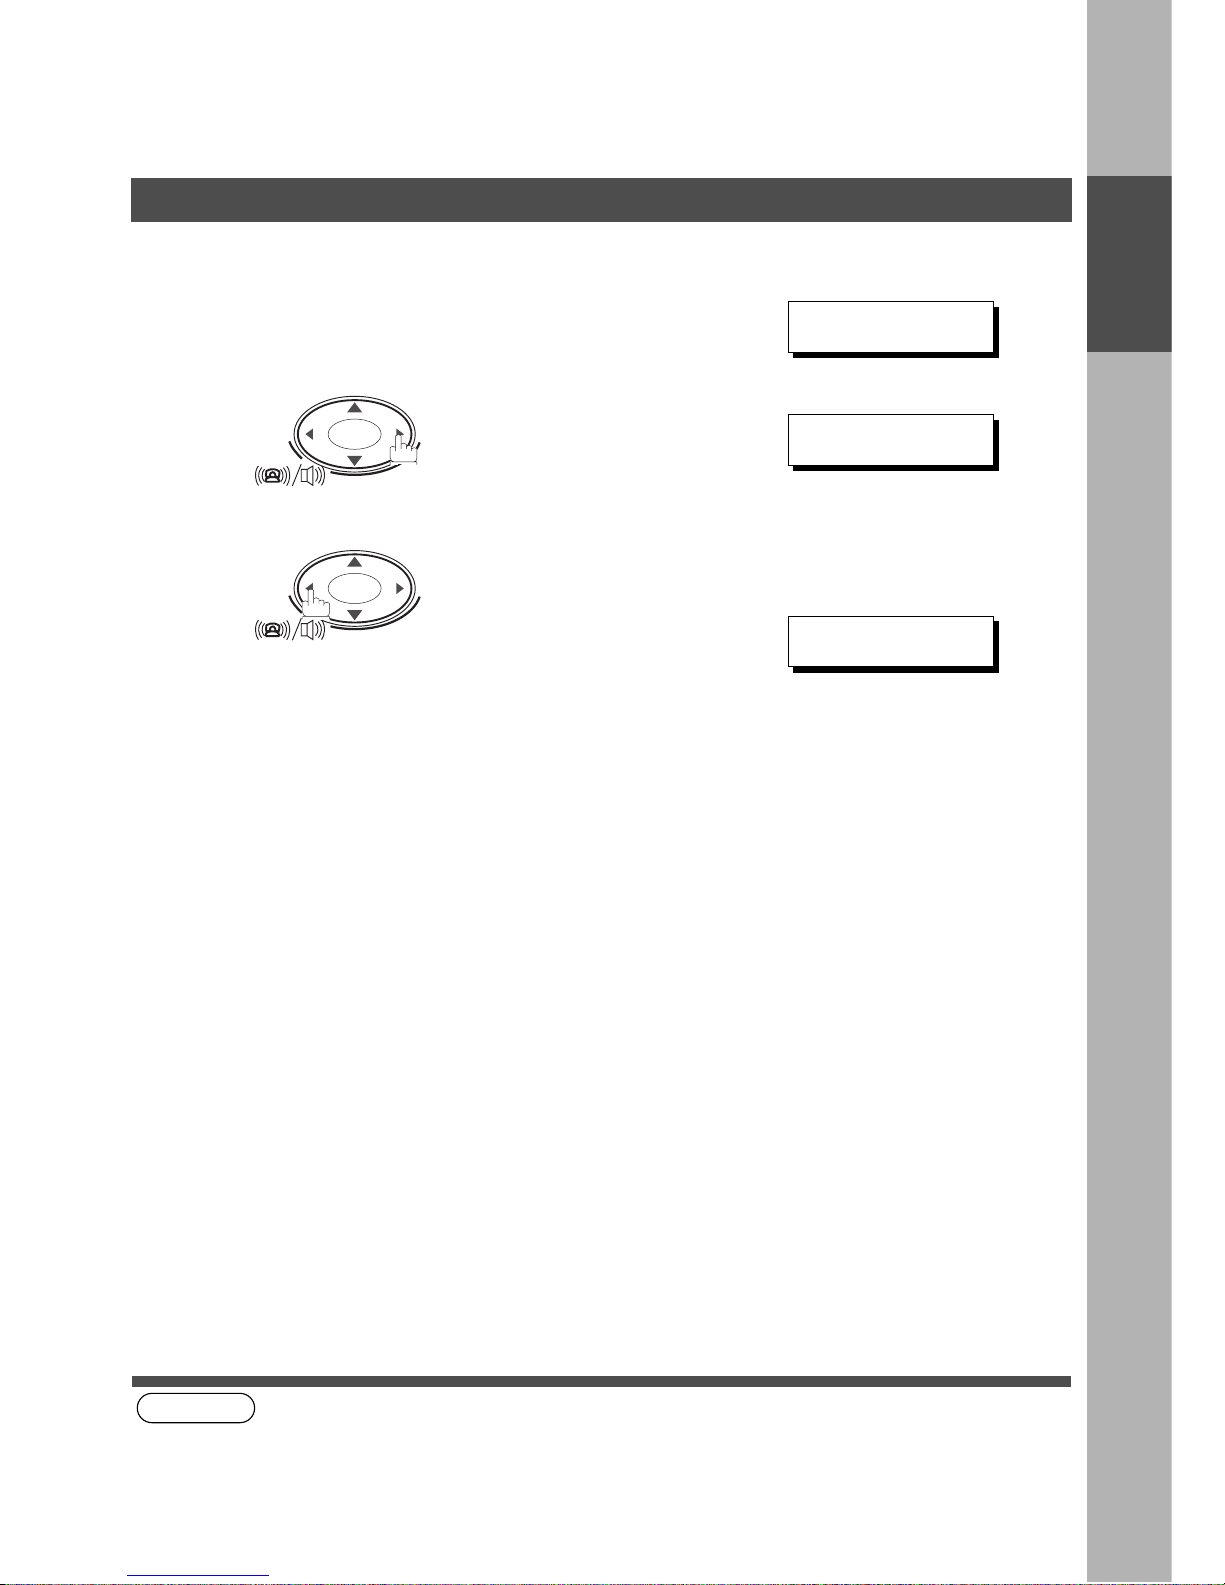
When the original is placed on the Platen
Glass.
This message appears.
Press or to select the size of the
original.
Then, press to start scanning.
If you have more than one original, press "1"
(YES) and place another original on the
Platen Glass, then press . If there
are no other originals, press "2" (NO).
Face Up
Original Width Guide
Face Down
Original Size Guides
2SIDED
DP-150FX
START
12
45
78
0
3
6
9
ABC DEF
GHI JKL MNO
PQRS
TUV
WXYZ
PAPER TRAY
SELECT FUNCTION
CLEAR/STOP
SET
2 in 1
ZOOM
(50~200%) SEARCH
DIRECTORY
abc..
DATA
COPY
FAX
PHOTO
AUTO
SORT
REDIAL/
PAUSE
FLASH/
MONITOR
SAVER
ENERGY
RESET
DARKER
LIGHTER
ON LINE
Press
432
1
EnterSelect Fax
Place
the Original(s)
Load Paper
Turn the Power Switch On
Keypad
Message Display
Station(s) START
TEL. NO.
5551234
(Max: 36 digits)
CLEAR/STOP
ORIGINAL=LETTER
PRESS START
START
SCAN ANOTHER PAGE?
1:YES 2:NO
START

5
Table of Contents
OPrecautions
............................................................................................................................................. 9
■ For your safety .............................................................................................. 9
Overview
.................................................................................................................................................... 12
■ External View ................................................................................................ 12
■ Control panel ................................................................................................. 14
Function Selection
.................................................................................................................................... 16
■ Selecting the Fax or Copy Mode ................................................................... 16
Setting the Dialing Method (Tone or Pulse)
............................................................................................ 17
Adjusting the Volume
................................................................................................................................18
■ Setting the Monitor and / or Ringer Volume .................................................. 18
■ Setting the Monitor Volume ........................................................................... 18
■ Setting the Ringer Volume ............................................................................ 19
How To Enter Characters
.......................................................................................................................... 20
User Parameters
........................................................................................................................................ 21
■ Setting the Date and Time .................................... ...... ....... ...... ....... ...... ....... . 21
■ Setting Your LOGO ..................................................... ....... ...... ....... ...... ....... . 22
■ Setting Your Character ID .................................................. ...... ....... ...... ....... . 23
■ Setting Your ID Number (Fax Telephone Number) ....................................... 24
Directory Search Dialing
........................................................................................................................... 25
■ Entering the Directory Search Dialing ........................................................... 25
■ Changing Directory Search Dialing ............................................................... 27
■ Erasing the Directory Search Dialing ............................................................ 29
■ Setting Up Group Dialing ............................................................................... 30
■ Changing Group Dialing ................................................................................ 31
■ Erasing Group Dialing ................................................. ....... ...... ....... ...... ........ 33
Fax Parameters
.......................................................................................................................................... 34
■ Setting the Fax Parameters ........................................................................... 34
■ Fax Parameter Table ..................................................................................... 35
Getting To Know Your Machine
Installing Your Machine
Programming Your Machine

Table of Contents
6
Loading Documents
................................................................................................................................. 39
Basic Transmission Settings
................................................................................................................... 40
■ Original (Photo/Text)/Contrast/Resolution .................................................... 40
■ Resolution ..................................................................................................... 41
Basic Transmission Settings
................................................................................................................... 41
■ Communication Journal (COMM. JOURNAL) ............................................... 42
Sending Documents
................................................................................................................................. 43
■ Memory Transmission ................................................................................... 43
■ Manual Number Dialing ................................................................................. 45
■ Directory Search Dialing ............................................................................... 47
■ Multi-Station Transmission (Broadcasting) ................................................... 49
■ Direct Transmission ...................................................................................... 51
■ Manual Number Dialing (Direct Transmission) ............................................. 51
■ Directory Search Dialing (Direct Transmission) ............................................ 53
■ Voice Mode Transmission ............................................................................. 54
■ Off-Hook Dialing ............................................................................................ 54
■ On-Hook Dialing ............................................................................................ 55
■ Transmission Reservation ............................................................................. 56
■ Memory Transmission Reservation (Multi-tasking) ....................................... 56
■ Redialing ....................................................................................................... 57
■ Automatic Redialing ...................................................................................... 57
■ Manual Redialing .......................................................................................... 57
Receiving Documents
.............................................................................................................................. 58
■ Reception .............. .......................................................... .............................. 58
■ Automatic Reception ..................................................................................... 58
■ Manual Reception ......................................................................................... 58
■ Print Reduction .............................................................................................. 59
■ Selecting the Print Reduction Mode .............................................................. 59
■ Receiving Oversize Documents ................................ ...... ....... ...... ....... ...... .... 60
■ Substitute Memory Reception ....................................................................... 61
Polling
........................................................................................................................................................ 63
■ Setting the Polling Password ........................................................................ 63
■ To Poll Documents from Another Station ..................................................... 64
Edit File Mode
............................................................................................................................................ 66
■ Deleting a File ............................................................................................... 66
Receive To Memory
................................................................................................................................... 67
■ Setting RCV To Memory Password/Setting RCV to Memory ........................ 67
■ Setting the RCV To Memory Password ........................................................ 67
■ Setting RCV To Memory ............................................................................... 68
■ Printing Out Documents ................................................................................ 69
Distinctive Ring Detector (DRD)
.............................................................................................................. 71
PIN Code Access
...................................................................................................................................... 72
■ Selecting the Access Method (Prefix or Suffix) ............................................. 72
■ Dialing with a PIN Code ................................................................................ 73
Sub-Addressing
........................................................................................................................................ 75
■ General Description ...................................................................................... 75
■ Setting the Sub-Address into the Directory Search Dialing Numbers ........... 76
■ Sending a FAX with Sub-Address ................................................................. 77
■ Using Manual Number Dialing ...................................................................... 78
Basic Operations
Advanced Features
Network Features

Table of Contents
7
Journals and Lists
.................................................................................................................................... 79
■ Transaction Journal ....................................................................................... 79
■ Communication Journal (COMM. JOURNAL) .............................................. 83
■ Directory Search Dialing List ......................................................................... 85
Journals and Lists
.................................................................................................................................... 87
■ FAX Parameter List ....................................................................................... 87
Troubleshooting
........................................................................................................................................ 89
■ Information Codes ......................................................................................... 89
■ If You Have Any of These Problems ............................................................. 91
■ Adding Paper ..................................... ...... ...... ....... ...... .................................. 92
■ Adding Toner ..... ....... ...... ....... ...... ....... ...... ...... ............................................... 92
■ Removing Paper Jams .................................................................................. 92
■ Replacing the Lithium Battery ............ ...... ...... ............................................... 93
■ Cleaning the Document Scanning Area ........................................................ 94
■ Cleaning the Printer Roller ............................................................................ 95
■ Checking the Telephone Line ....................................................................... 97
Specifications
............................................................................................................................................ 99
Options and Supplies
............................................................................................................................... 101
■ Installing the Handset Kit .............................................................................. 102
■ Expansion Flash Memory Card ..................................................................... 102
Options and Supplies
............................................................................................................................... 103
FCC Notice for User in USA
..................................................................................................................... 104
Notice for User in Canada
........................................................................................................................ 106
Glossary
..................................................................................................................................................... 108
ITU-T Image No.1
....................................................................................................................................... 111
Printout Journals And Lists
Maintenance
Appendix

INSTALLING YOUR MACHINE
8
Energy Star
The DP-150FX complies with Tier 2 of the Environmental Protection Agency's Energy Star
Program. This voluntary program specifies certain energy consumption and usage standards
for copiers. These copiers will automatically “power down” after a specified period of non-use.
The use of these Energy Star compliant copiers will reduce energy consumption and ultimately
benefit the environment.
The default functions can be adjusted depending on your office requirements. Please see your
authorized Panasonic dealer for more details.

9
GETTING TO
KNOW YOUR
MACHINE
GETTING TO KNOW YOUR MACHINE
Precautions
For your safety
■■■■
Laser safety
■■■■
Caution Labels
LASER SAFETY
This unit employs a laser. Only qualified service personnel should
attempt to service this device due to possible ey e injury.
CAUTION:
USE OF CONTROLS, ADJUSTMENTS OR PERFORMANCE
PROCEDURES O THER THAN THOSE SPECIFIED HEREIN MAY
RESULT IN HAZARDOUS RADIATION EXPOSURE.
Product complies with DHHS Rules 21
CFR Subchapter J in eff
ect at date
of manufacture.
Utsunomiya, Tochigi, Japan
Product complies with DHHS Rules 21
CFR Subchapter J in effe
ct at date
of manufacture.
Tayta
Matsushita Business Machine Corporation of the
Philippines
y, Rizal, Philippines
FFPTE2479
DANGER-Invisible laser
radiation when open and
interlock defeated.
AVOID DIRECT EXPOSURE
TO BEAM.
Label when manufactured in Japan.
Label when manufactured in Philippines.
GETTING TO KNOW YOUR MACHINE
10
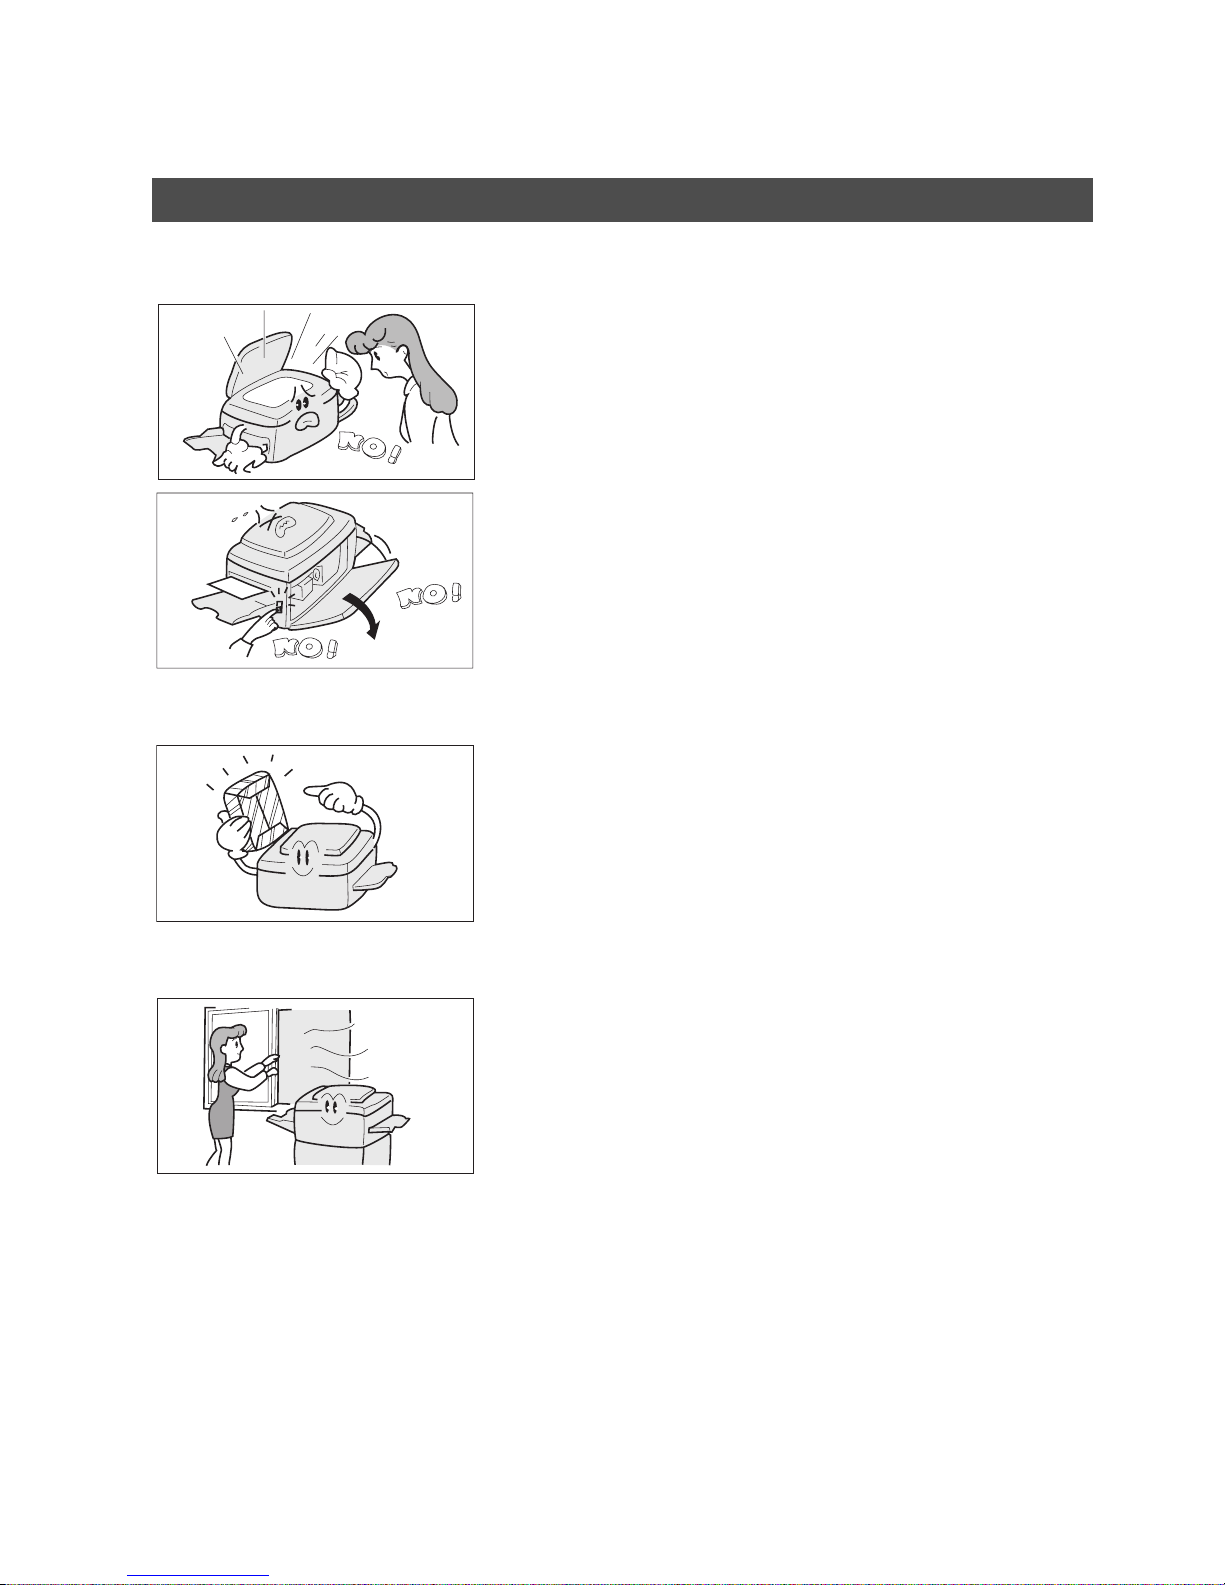
Handing
Toner and Paper
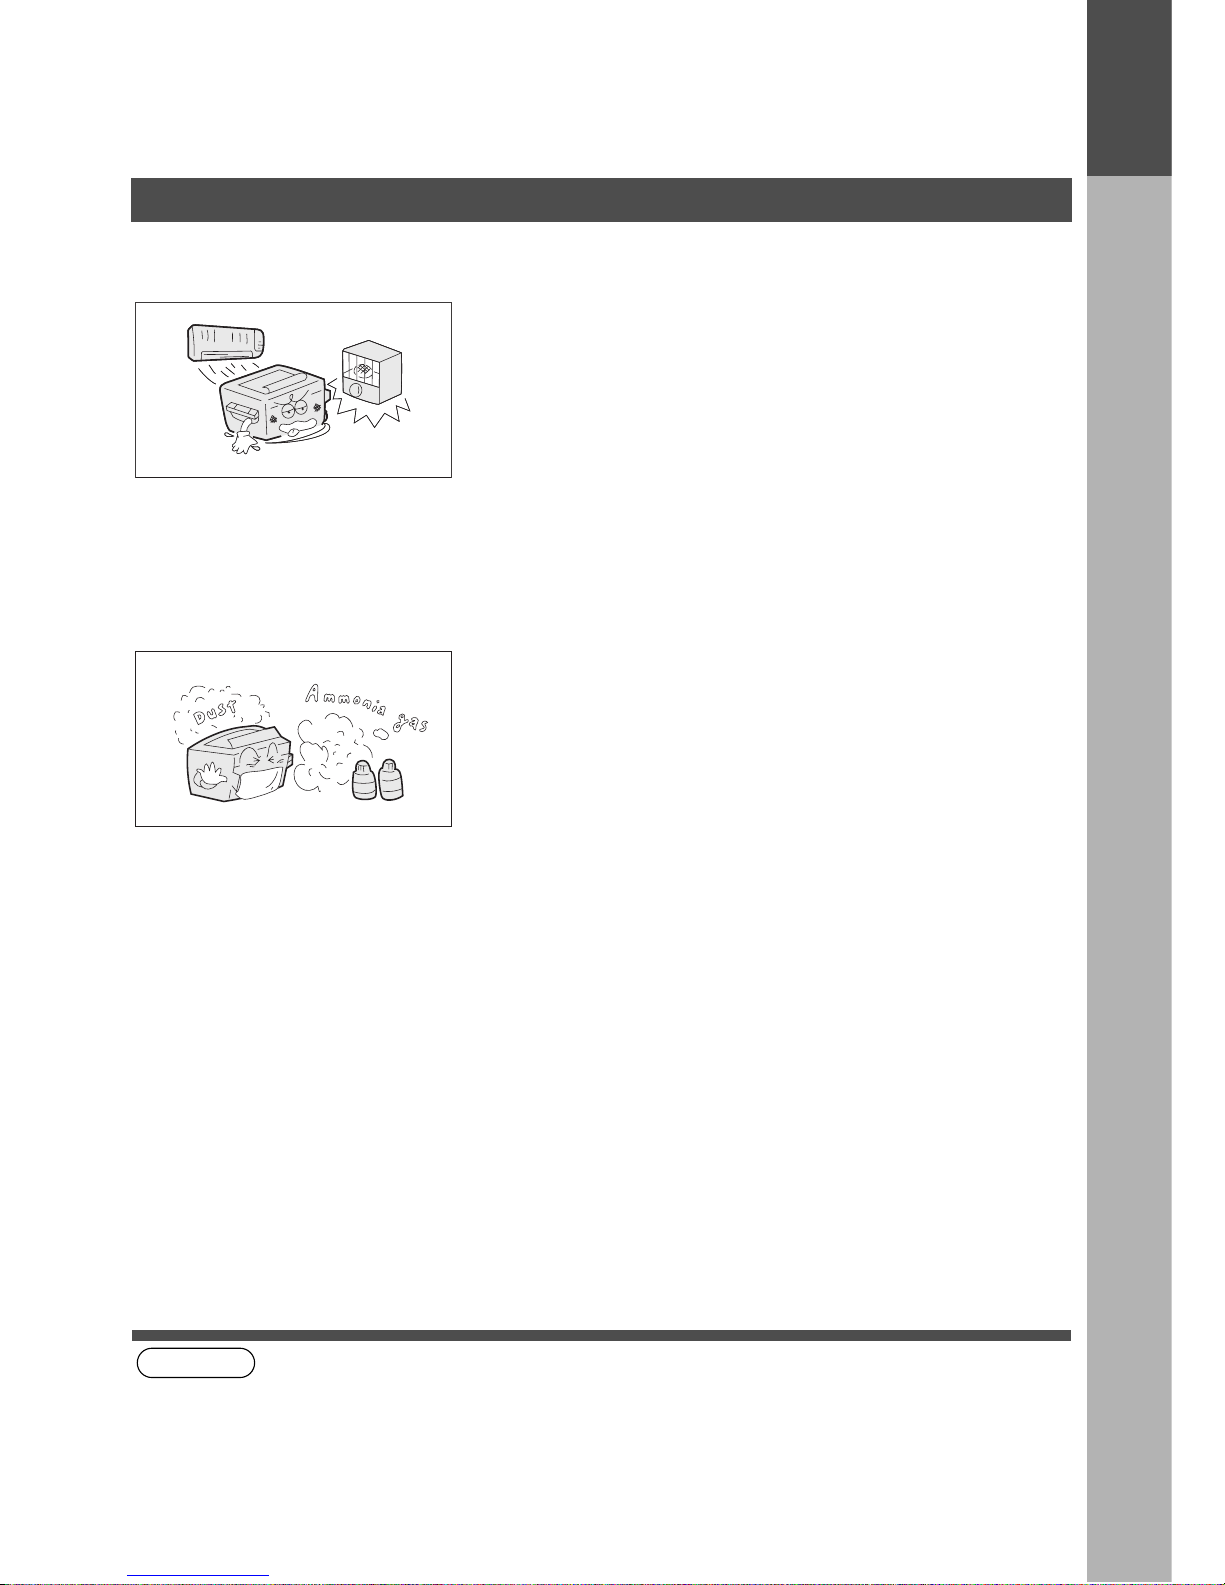
Ventilation
• Do not look directly at exposure lamp when copying.
• Do not turn the power switch off or open the front panel
during copying or printing.
• Do not drop paper clips or other metal objects into the
copier.
• Store toner, developer and paper in cool areas with low
humidity.
• High quality paper of 16 lbs. - 24 lbs. (15 - 34 lbs. via sheet
bypass) may be used.
• For optimum performance, it is recommended that only
Panasonic Brand supplies be used in the copier.
• The copier should be installed in a well-ventilated area to
minimize the ozone density in the air.
Precautions
GETTING TO KNOW YOUR MACHINE
11
GETTING TO
KNOW YOUR
MACHINE
Installation
(see Note 1)
■■■■
The copier should not be installed in areas with the
following conditions:
• Extremely high or low temperature and humidity.
Proper ambient conditions are:
Temperature: 50ºF - 86ºF
Relative humidity: 30% - 80%
• Where temperature and humidity can change rapidly,
causing condensation.
• Direct exposure to sunlight.
• Directly in the air conditioning flow.
• In areas of high dust concentration.
• In areas of poor ventilation.
• In areas with chemical fume concentration.
• In areas with extreme vibration.
• With unstable or uneven conditions (floors, etc.).
NOTE
1. The power consumption is 1.0 kW.
A properly wired (with ground), dedicated, 15A, 120V AC outlet is required. Do not use an extension cord.
The main plug on this equipment must be used to disconnect the main power. Please ensure that the socket
outlet is installed near the equipment and shall be easily accessible.
Precautions
GETTING TO KNOW YOUR MACHINE
12
Overview
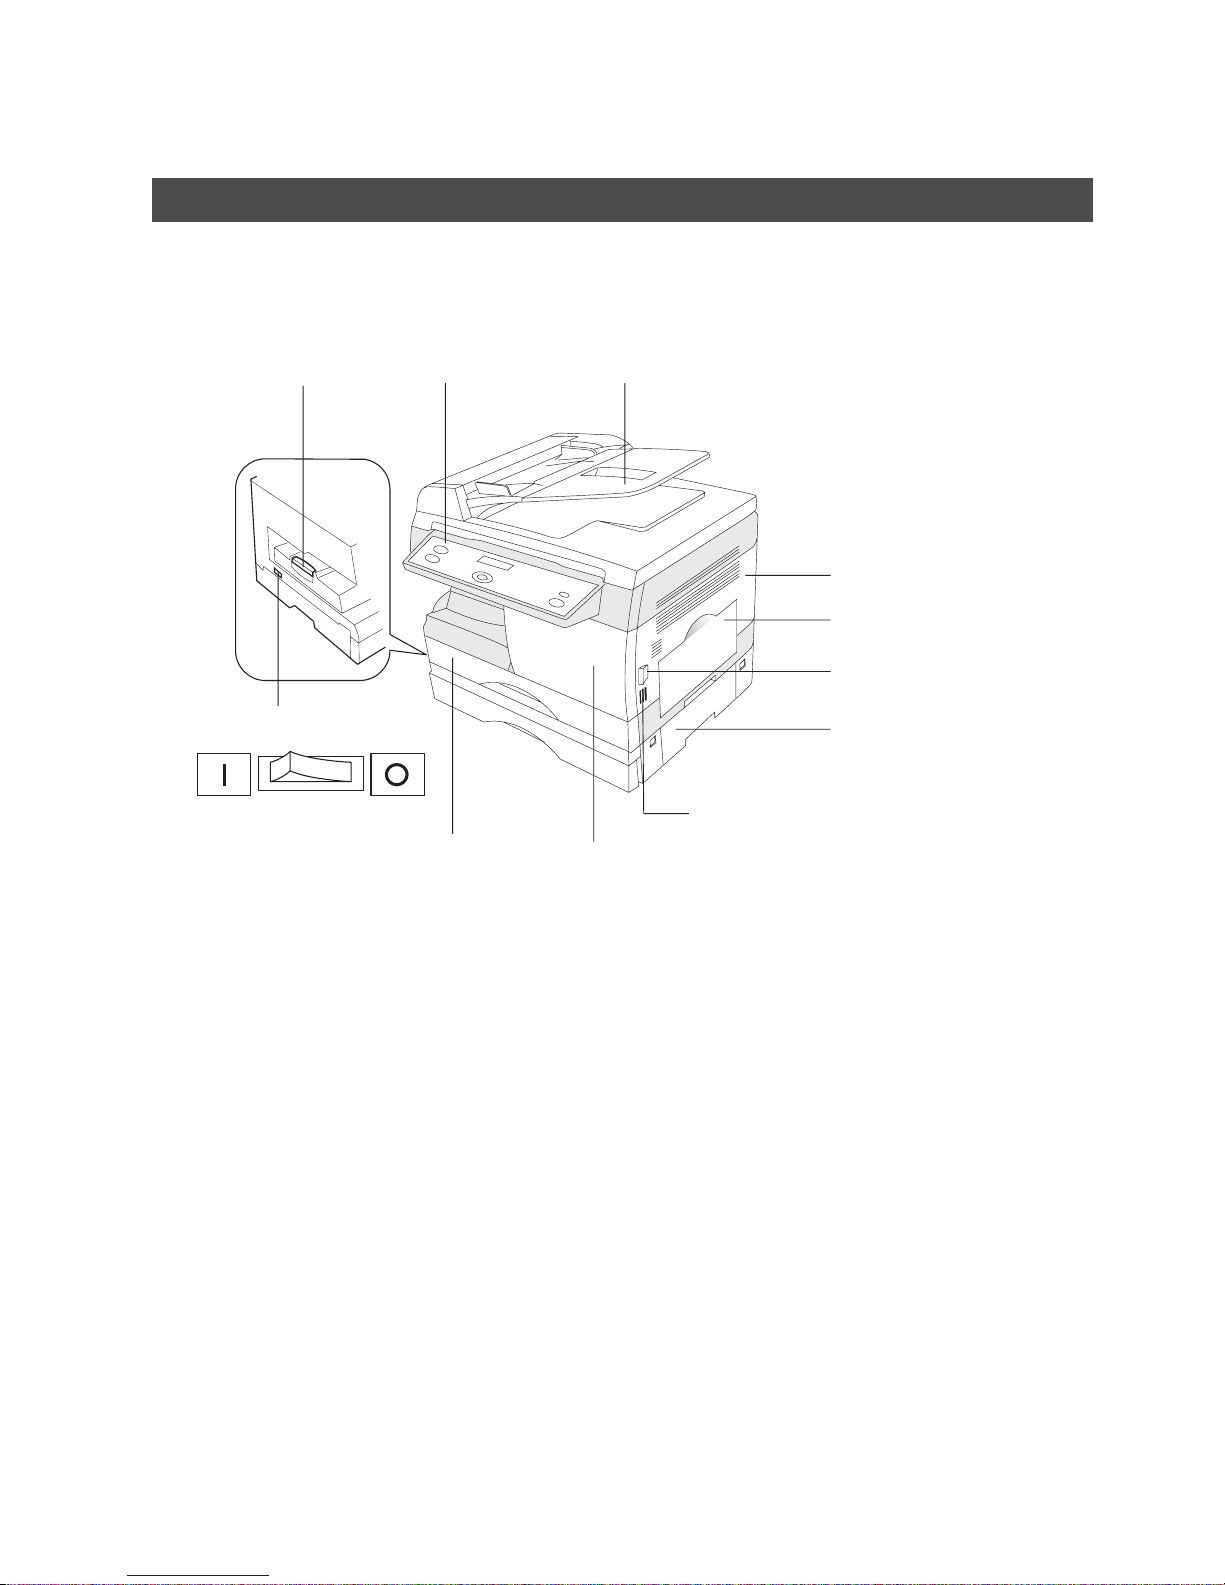
External View
■■■■ Front & Right Side View
Exit Tray Control Panel ADF (Automatic Document Feeder)
Right Cover
Sheet Bypass
Release Button
2nd Paper Feed Module
(Optional)
Push here when closing the Right Cover
Front Cover
Paper T ray
Power Switch
ON OFF
GETTING TO KNOW YOUR MACHINE
13
GETTING TO
KNOW YOUR
MACHINE
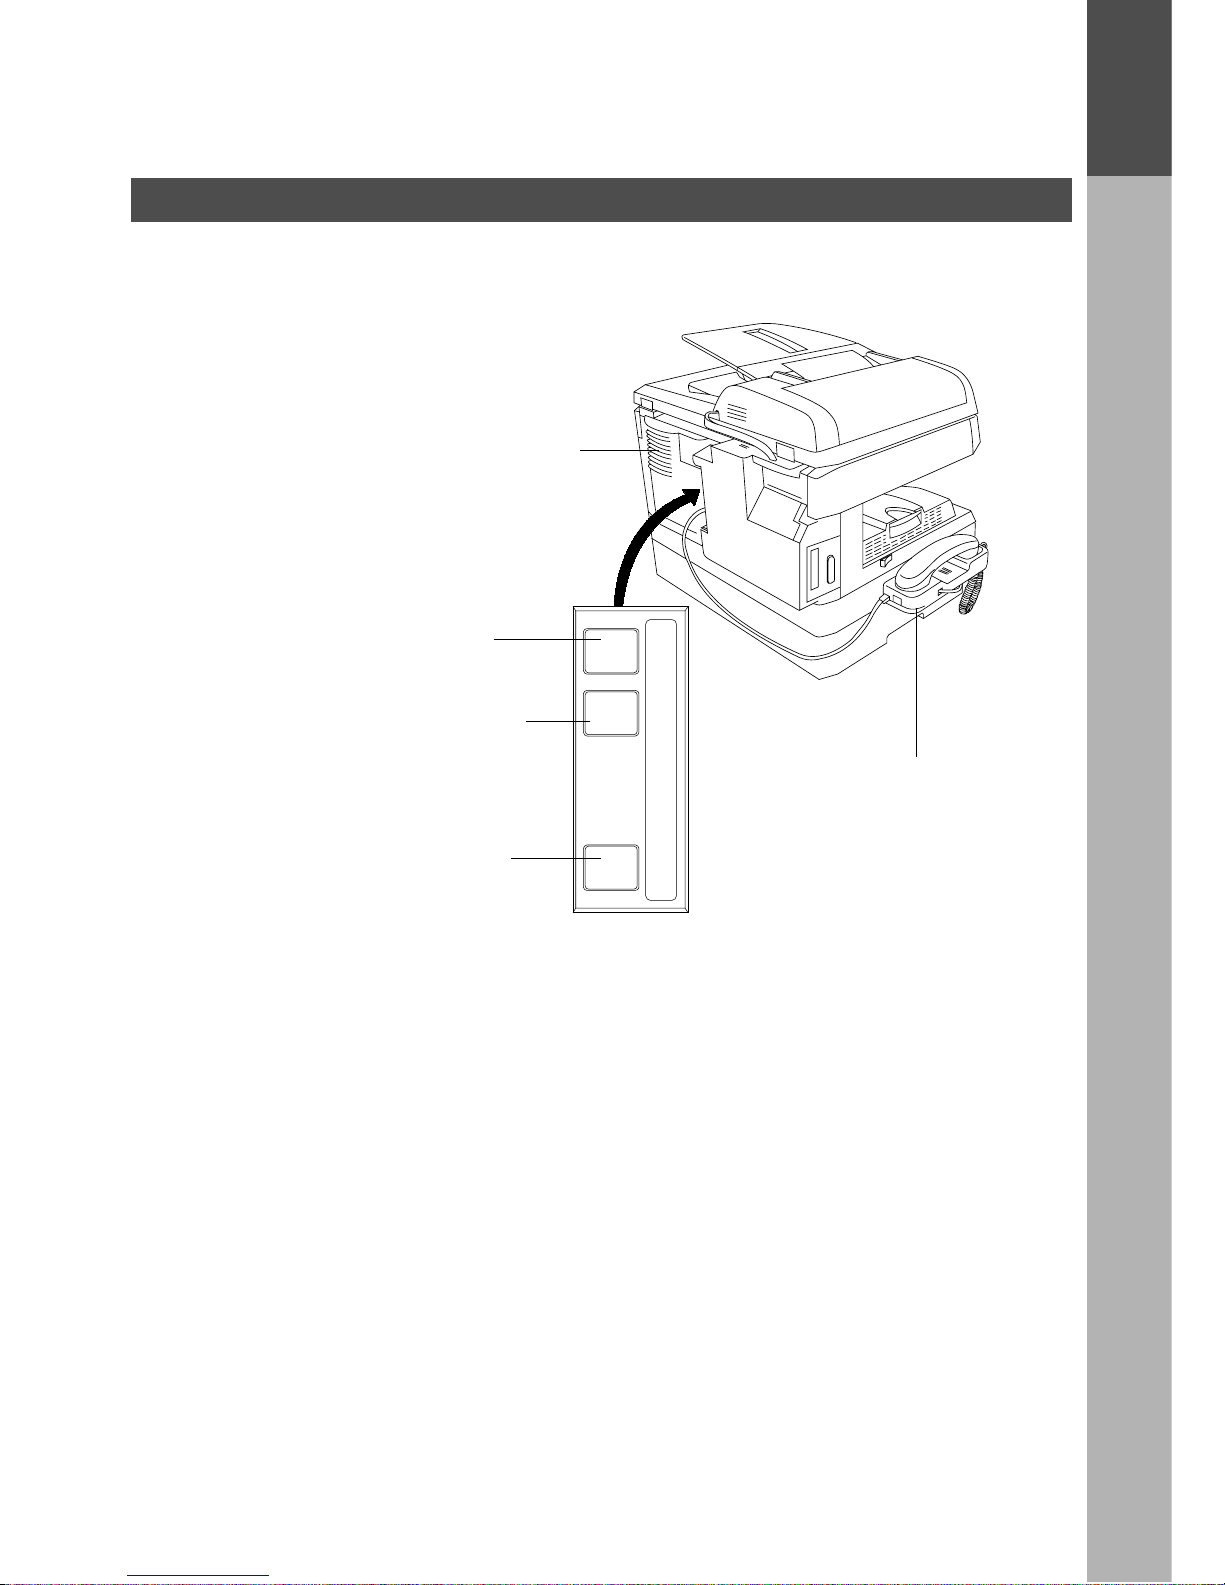
■■■■ Rear & Left Side View
Do not block the ventilation
openings
Handset Kit
(Optional)
Telephone Line Jack
External Telephone Jack
Optional Telephone Handset Jack
LINETELHANDSET
Overview
GETTING TO KNOW YOUR MACHINE
14
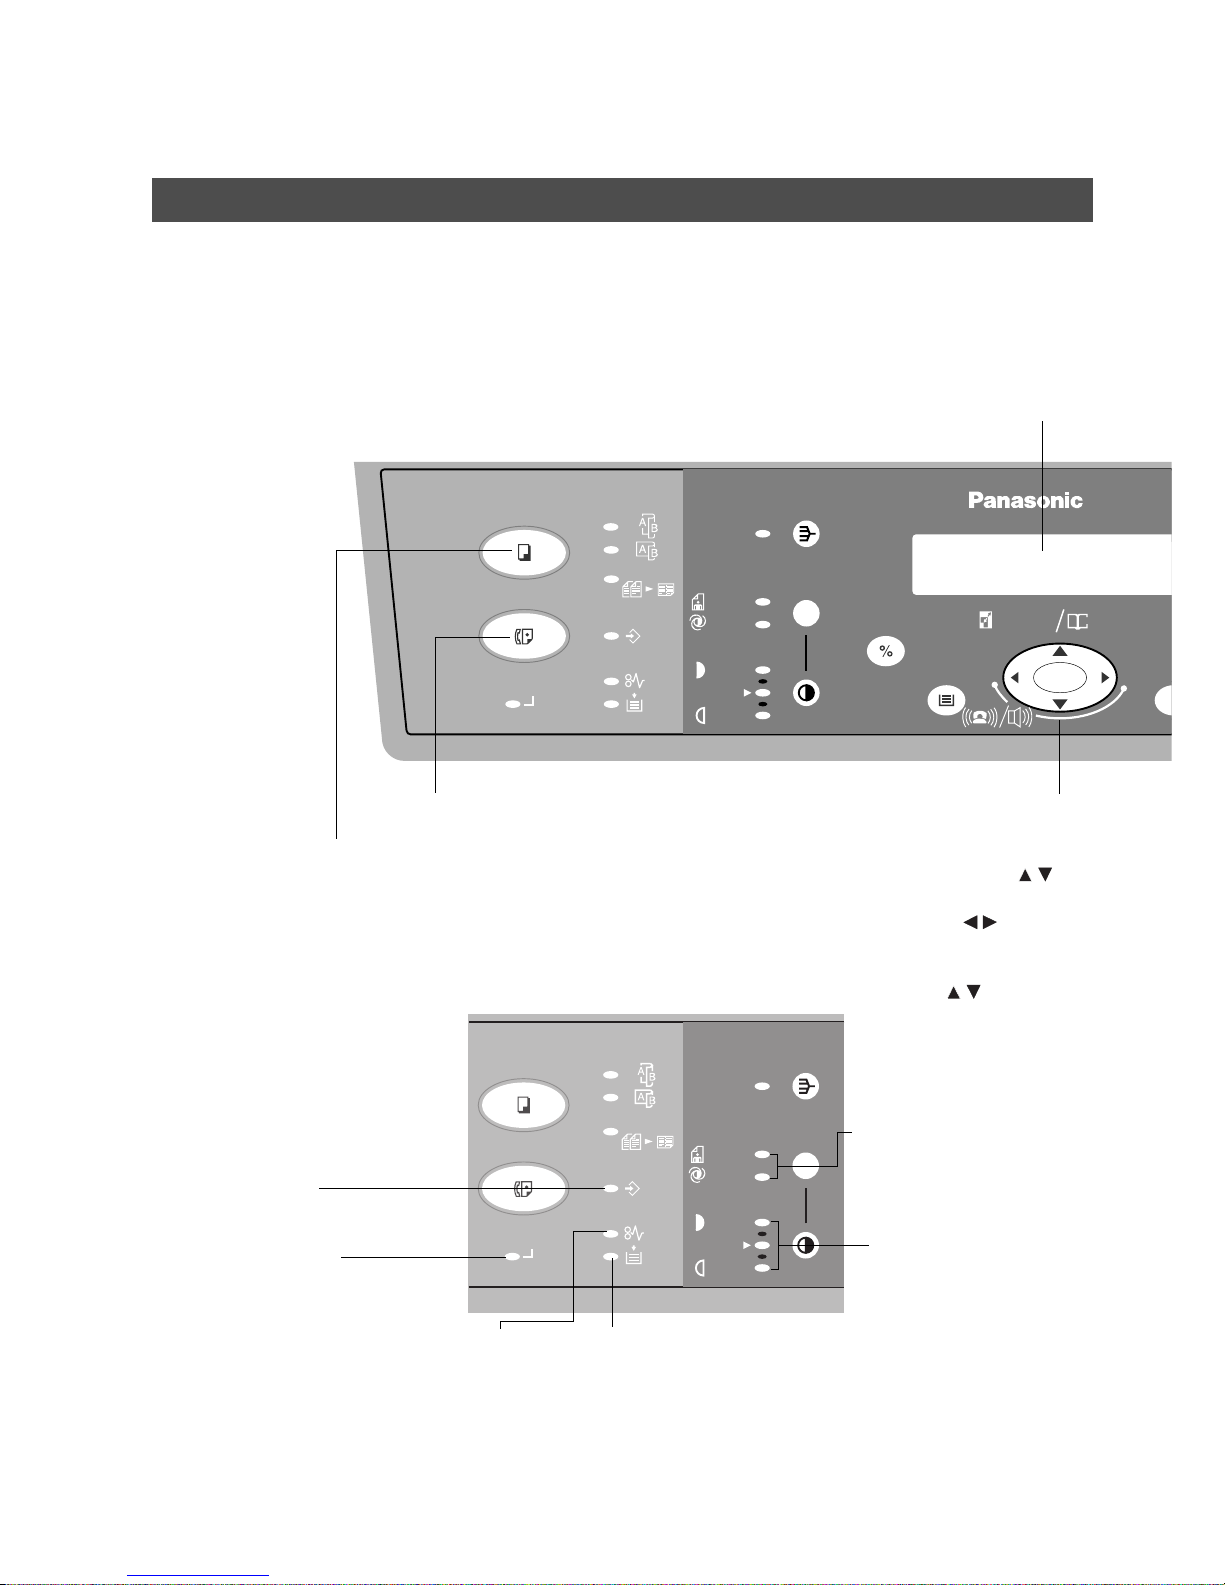
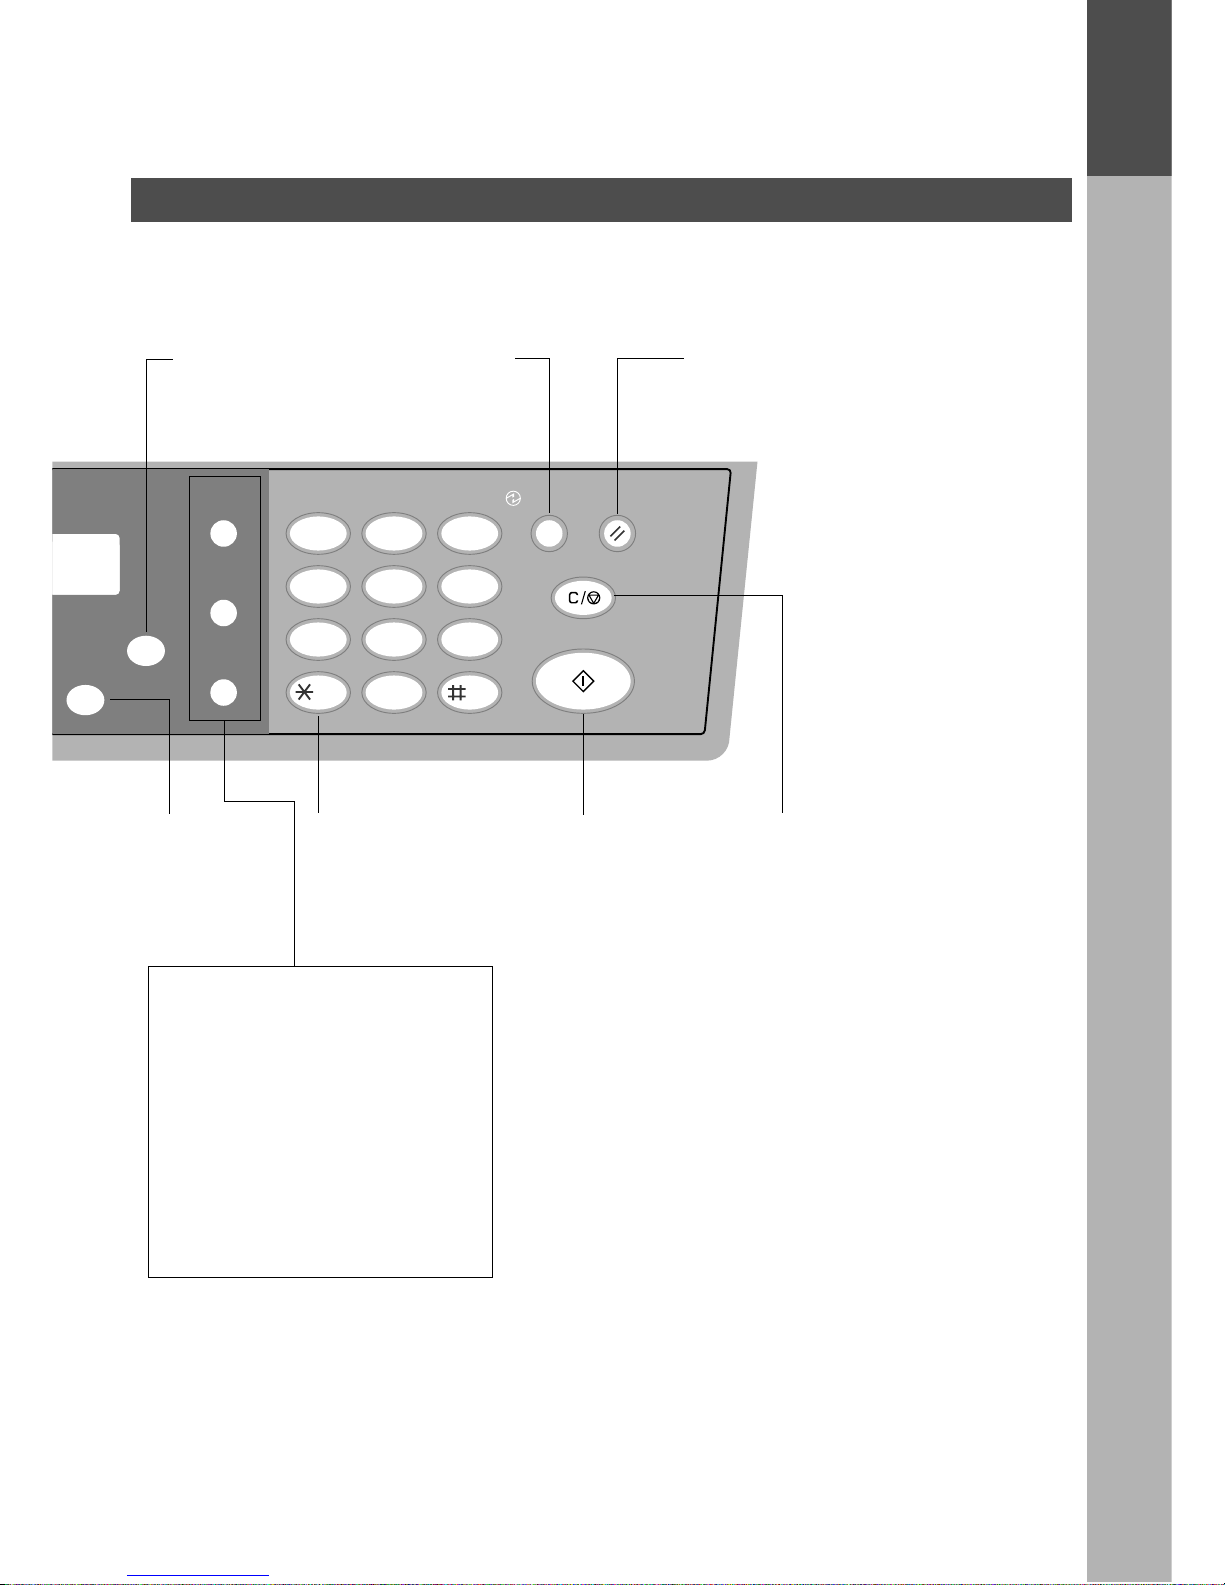
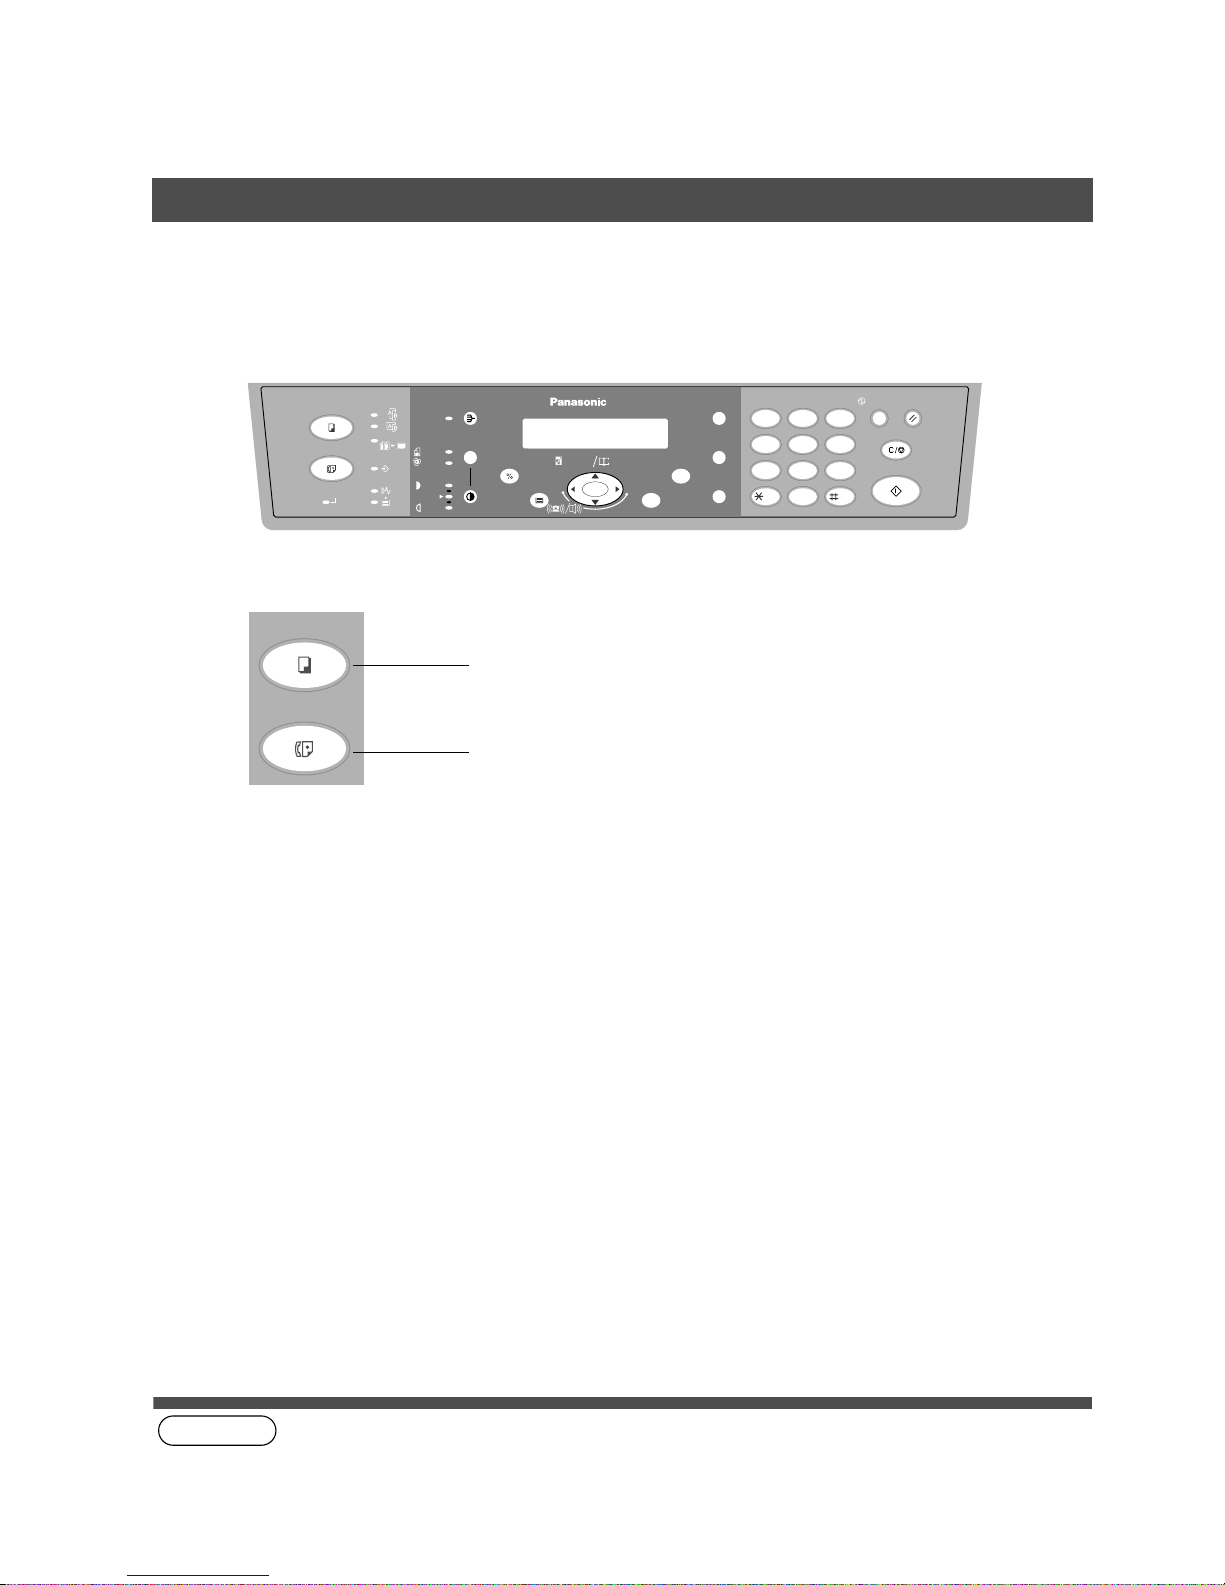
Control panel
■■■■ Keys and Indicators (For Facsimile)
2SIDED
DP-150FX
P APER TRAY
SELECT
SE
2 in 1
ZOOM
(50~200%) SEARCH
DIRECTORY
abc..
DATA
COPY
FAX
PHOTO
AUTO
SORT
DARKER
LIGHTER
ON LINE
+-
2 SIDED
2 in 1
DATA
COPY
FAX
PHOTO
AUTO
SORT
ON LINE
2 SIDED
DARKER
LIGHTER
MESSAGE DISPLAY
• Displays the date and
time, or the current
COPY
• Used to select the COPY mode.
FAX
• Used to select the FAX mode.
ZOOM/DIRECTORY SEARCH/
VOLUME
• Used to adjuct the Copy Zoom
ratio from 50 - 200%. (
)
• Used to adjust the monitor and
ringer volume. ( )
• Used to search the station
name for Directory Search
Dialing. (
)
Original (Photo/Auto)
• Used to adjust the halftone
to Photo or Auto.
(See page 40)
ADD PAPER Indicator
• Lights when paper runs out.
PAPER MISFEED Indicator
• Lights when paper misfeeds.
ON LINE Indicator
• Lights when sending
and receiving faxes or
Data.
DATA Indicator
• Lights when the data is
stored in memory.
CONTRAST
• Used to adjust the
contrast to Normal,
Darker or Lighter.
(See page 40)
Overview
GETTING TO KNOW YOUR MACHINE
15
GETTING TO
KNOW YOUR
MACHINE
FX
START
12
45
78
0
3
6
9
ABC DEF
GHI JKL MNO
PQRS
TUV
WXYZ
FUNCTION
CLEAR/STOP
SET
H
ORY
PAUSE
REDIAL/
FLASH/
MONITOR
SAVER
ENERGY
RESET
SUB-ADDR
TONE
-/()
ENERGY SAVER
• Used to switch the
machine into energy
saving mode.
RESET
• Used to reset all temporary
settings to the initial power-on
default.
CLEAR/STOP
• Used to cancel
operations.
START
• Used to start
operations.
TONE
• Used to temporarily
change the dialing
mode to Tone when
pulse mode is set.
SET
• Used to set
operations.
FUNCTION
• Used to start or
select functions.
REDIAL/PAUSE
• Used to enter a pause when
recording or dialing a telephone
number, or to redial the last dialed
number.
FLASH/SUB-ADDR
• Used to separate the Sub-address
from the telephone number when
dialing, or to acc ess som e f eatur es of
your PBX.
MONITOR
• Used to start On -H ook Diali ng .
Overview
GETTING TO KNOW YOUR MACHINE
16
Function Selection
Selecting the Fax or Copy Mode
You can set the Power ON default mode to either Fax or Copy Mode. (See page 37)
Factory Standard Setting is Copy Mode.
(see Note 1)
NOTE
1. Beep sound indicates unavailable combined operations.
2SIDED
DP-150FX
START
12
45
78
0
3
6
9
ABC DEF
GHI JKL MNO
PQRS
TUV
WXYZ
PAPER TRA Y
SELECT
FUNCTION
CLEAR/STOP
SET
2 in 1
ZOOM
(50~200%) SEARCH
DIRECTORY
abc..
DATA
COPY
FAX
PHOTO
AUTO
SORT PAUSE
REDIAL/
FLASH/
MONITOR
SAVER
ENERGY
RESET
DARKER
LIGHTER
ON LINE
SUB-ADDR
+-
2 SIDED
TONE
-/()
COPY
FAX
Copy Mode indicator
• Can receive Fax documents while Copy key is lit.
Fax Mode indicator
• Can send document(s) when the fax function is selected.
17
INSTALLING
YOUR MACHINE
INSTALLING YOUR MACHINE
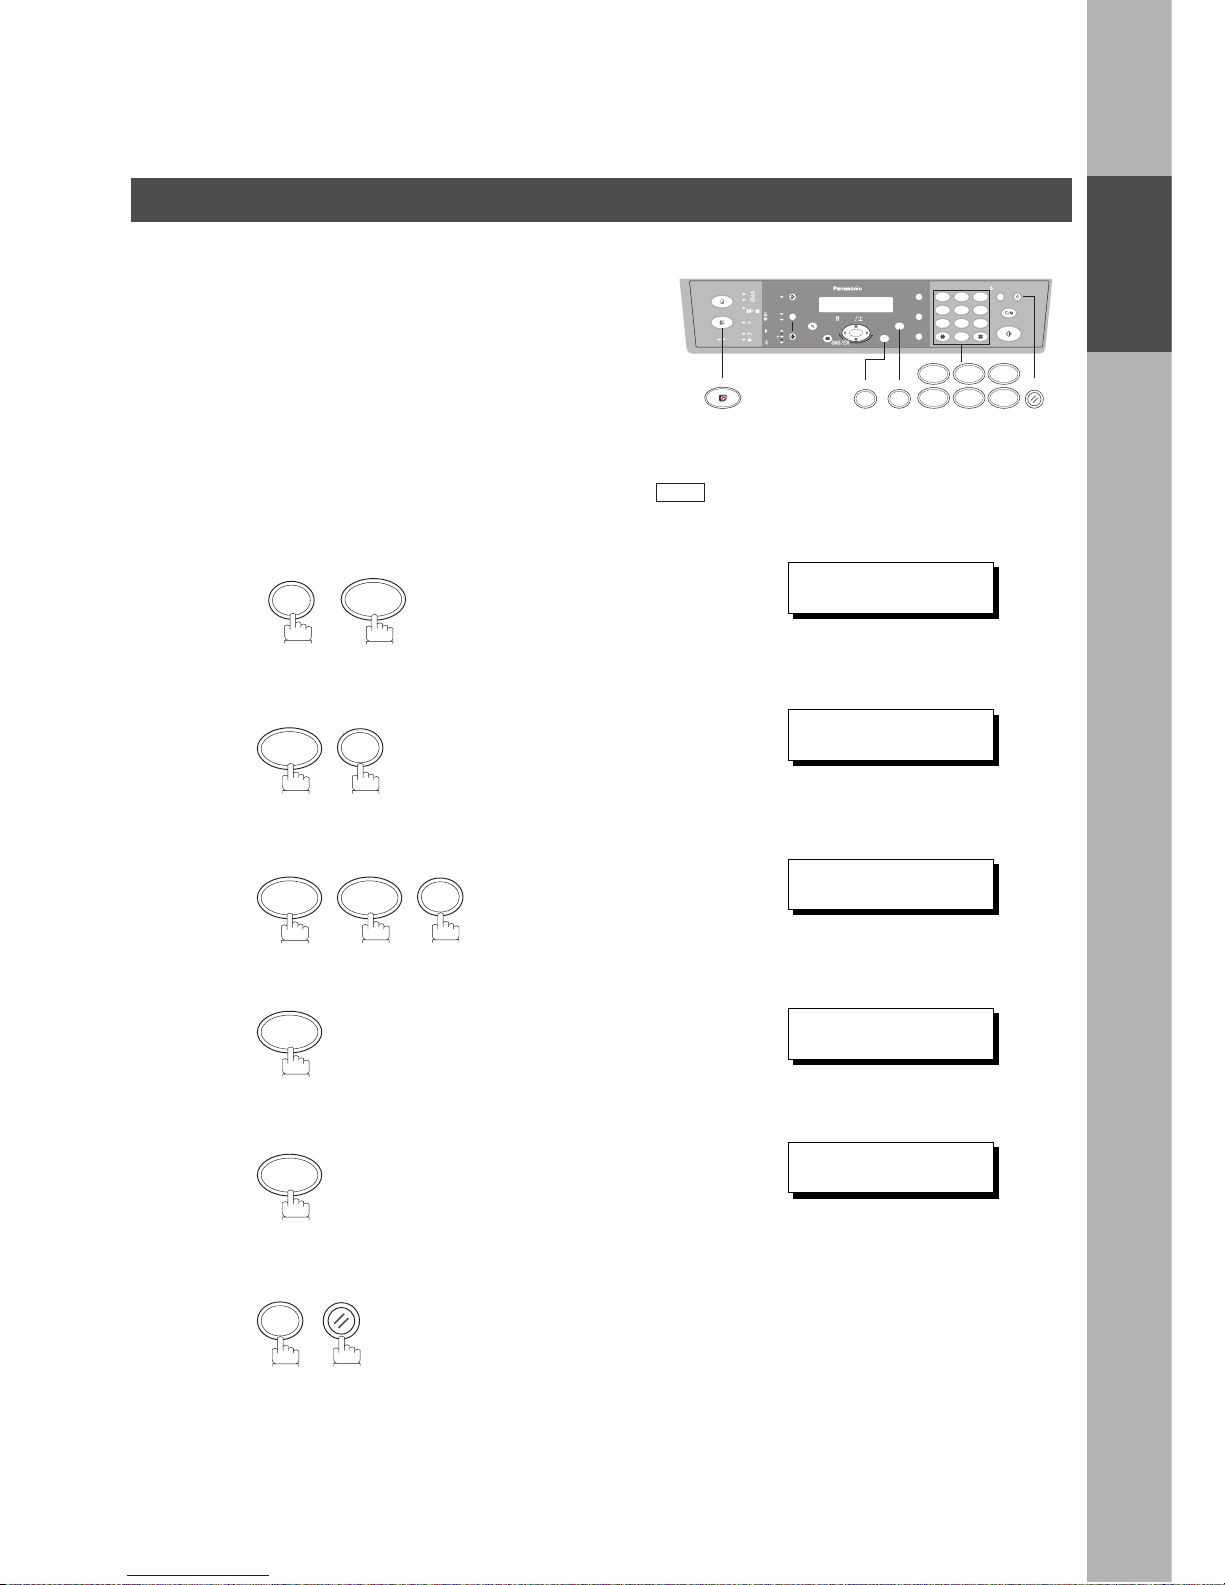
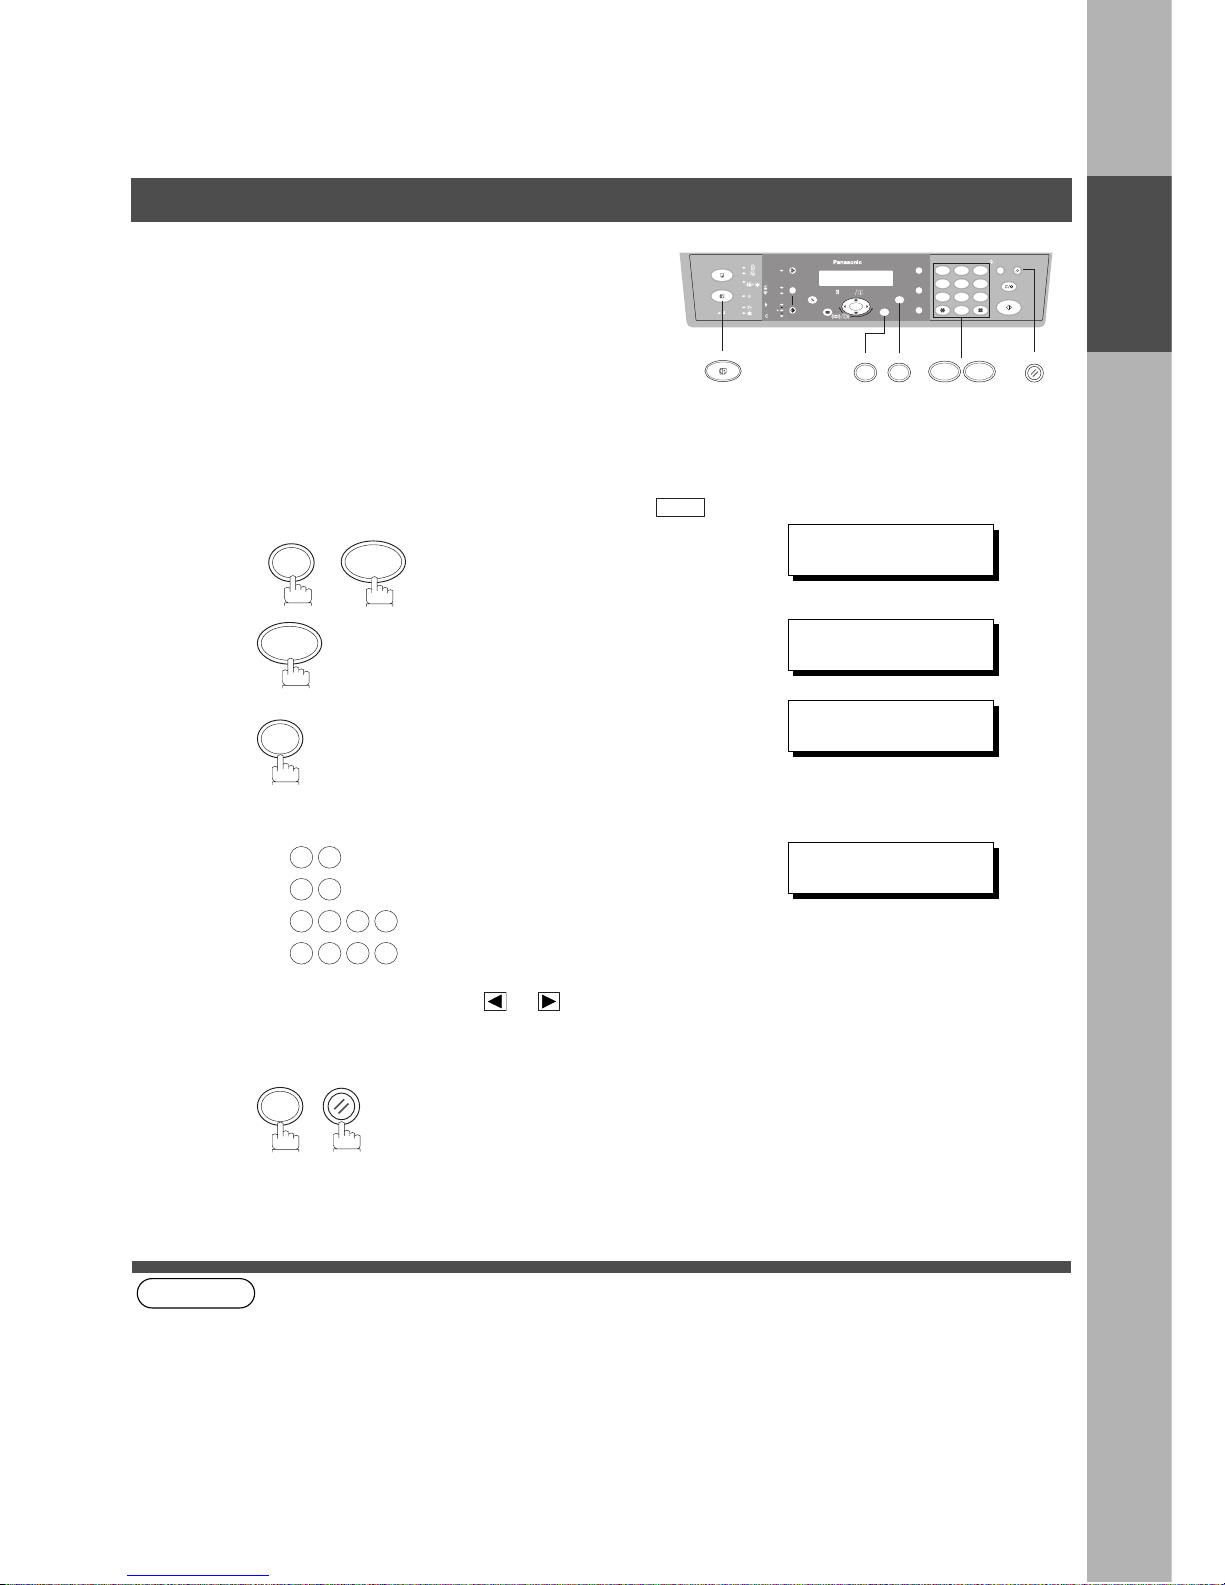
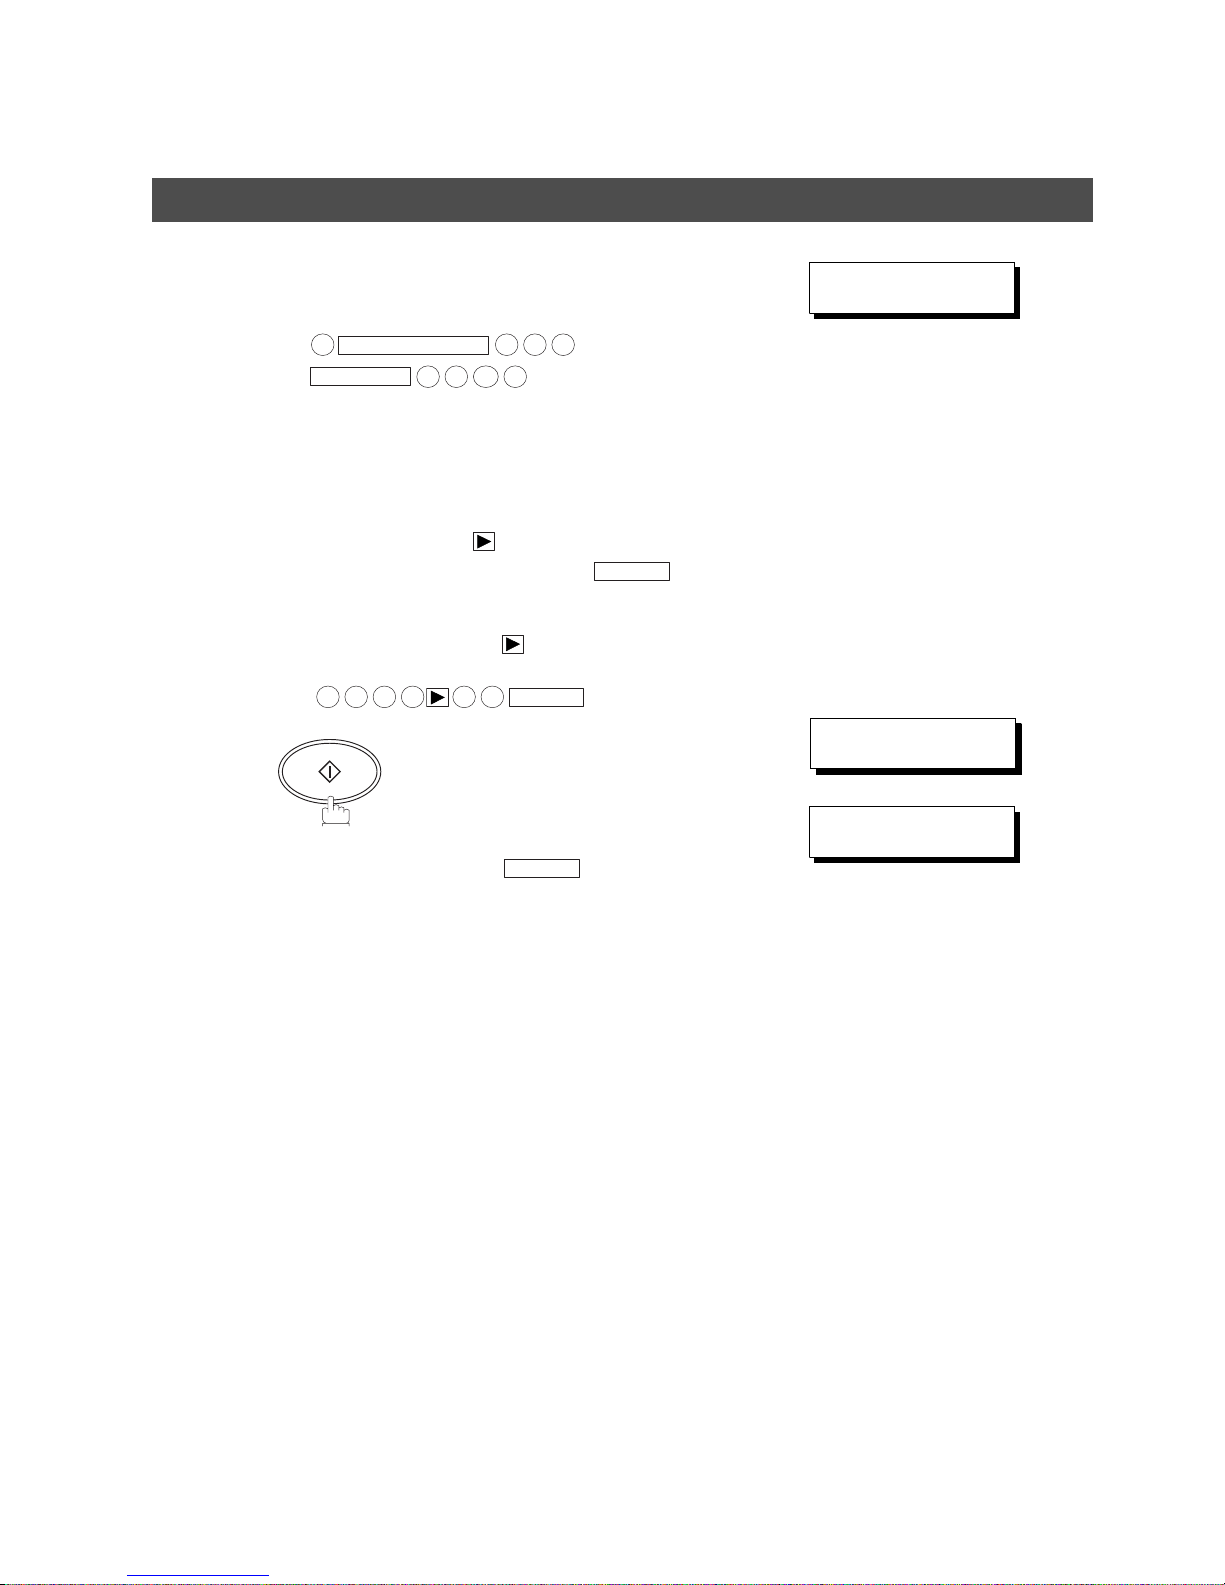
Setting the Dialing Method (Tone or Pulse)
Your machine can operate with either of two dialing methods
(Tone or Pulse), depe nding on the type of telephone line you
are connected to. If you need to change the dialing metho d to
Tone or Pulse, follow the procedure below
Make sure that the FAX Mode indicator is ON. If not, press to select the "FAX MODE".
1
2
3
4
for "PULSE".
or
for "TONE".
or
5
12
45
78
0
3
6
9
abc..
+-
FUNCTION
SET
7406
1 2
FAX
RESET
FAX
FUNCTION
7
SET MODE (1-6)
ENTER NO. OR
∨ ∧
4
SET
FAX PARAMETER(02-99)
NO.=
❚
0 6
SET
06 DIALING METHOD
2:TONE
1
2
06 DIALING METHOD
1:PULSE
06 DIALING METHOD
2:TONE
SET
RESET
INSTALLING YOUR MACHINE
18
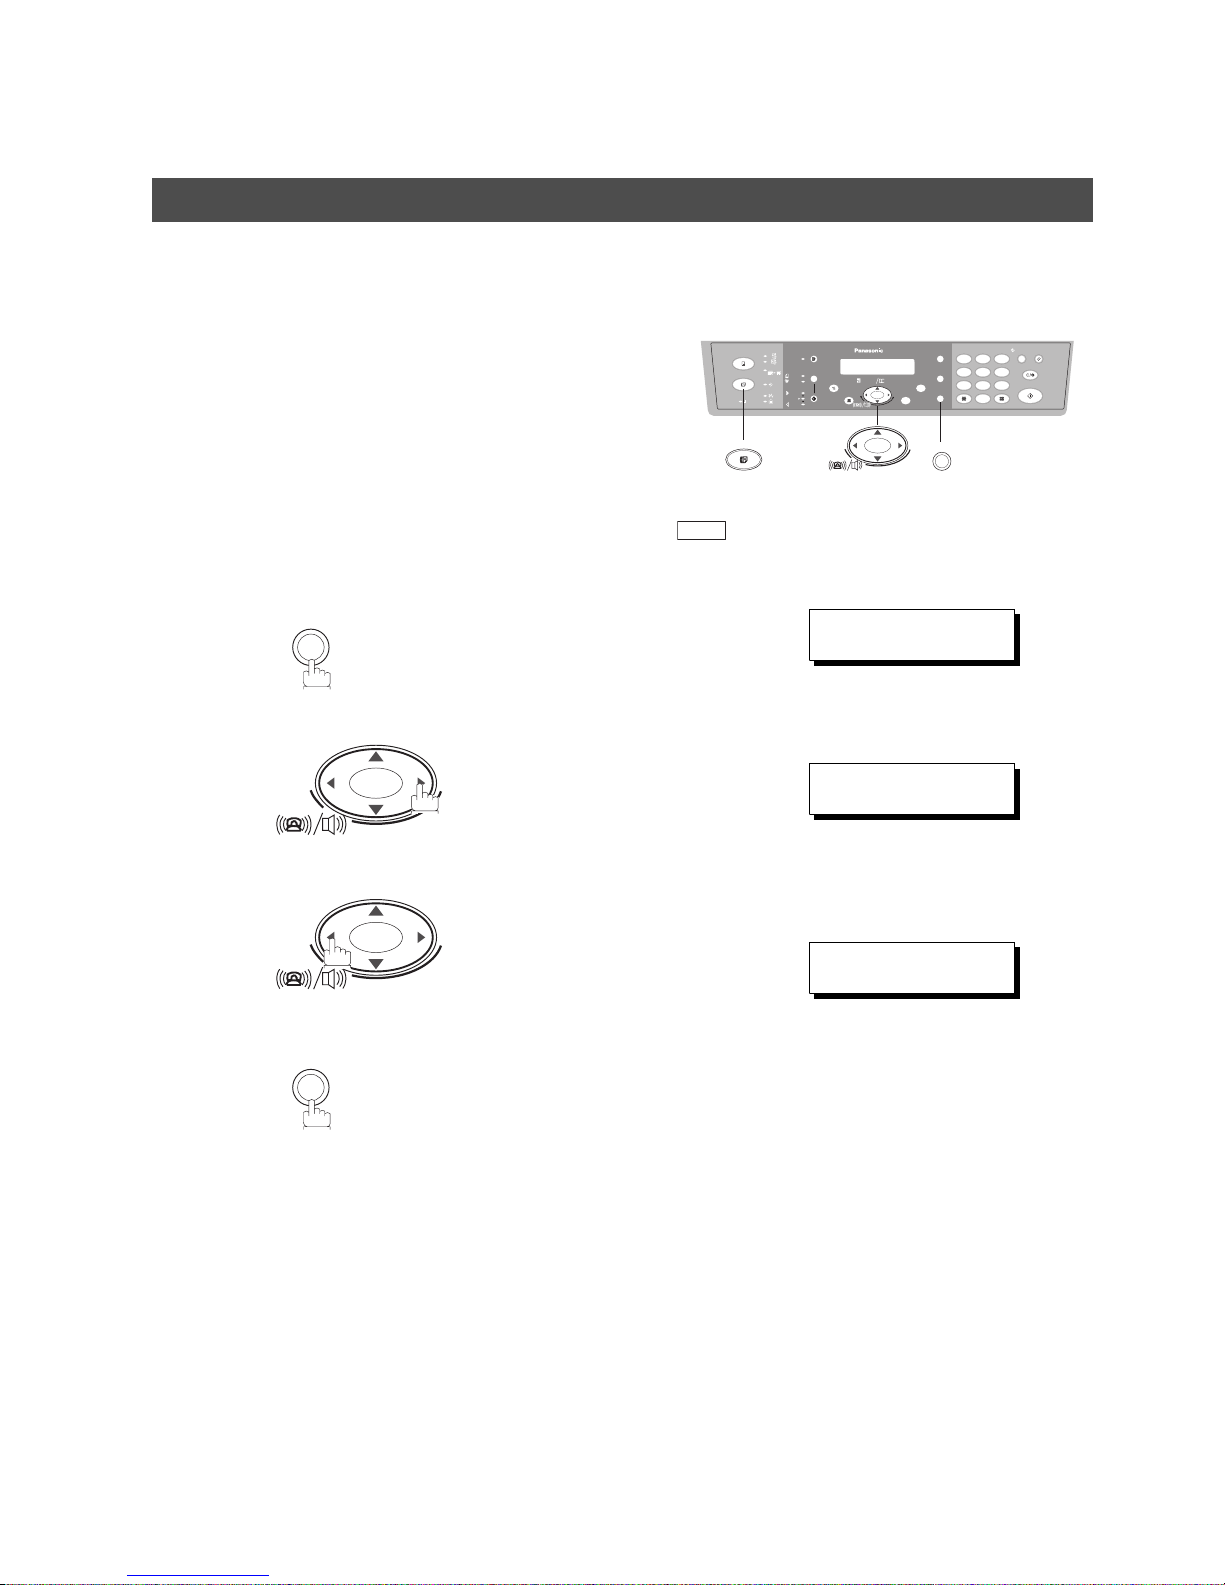
Adjusting the Volume
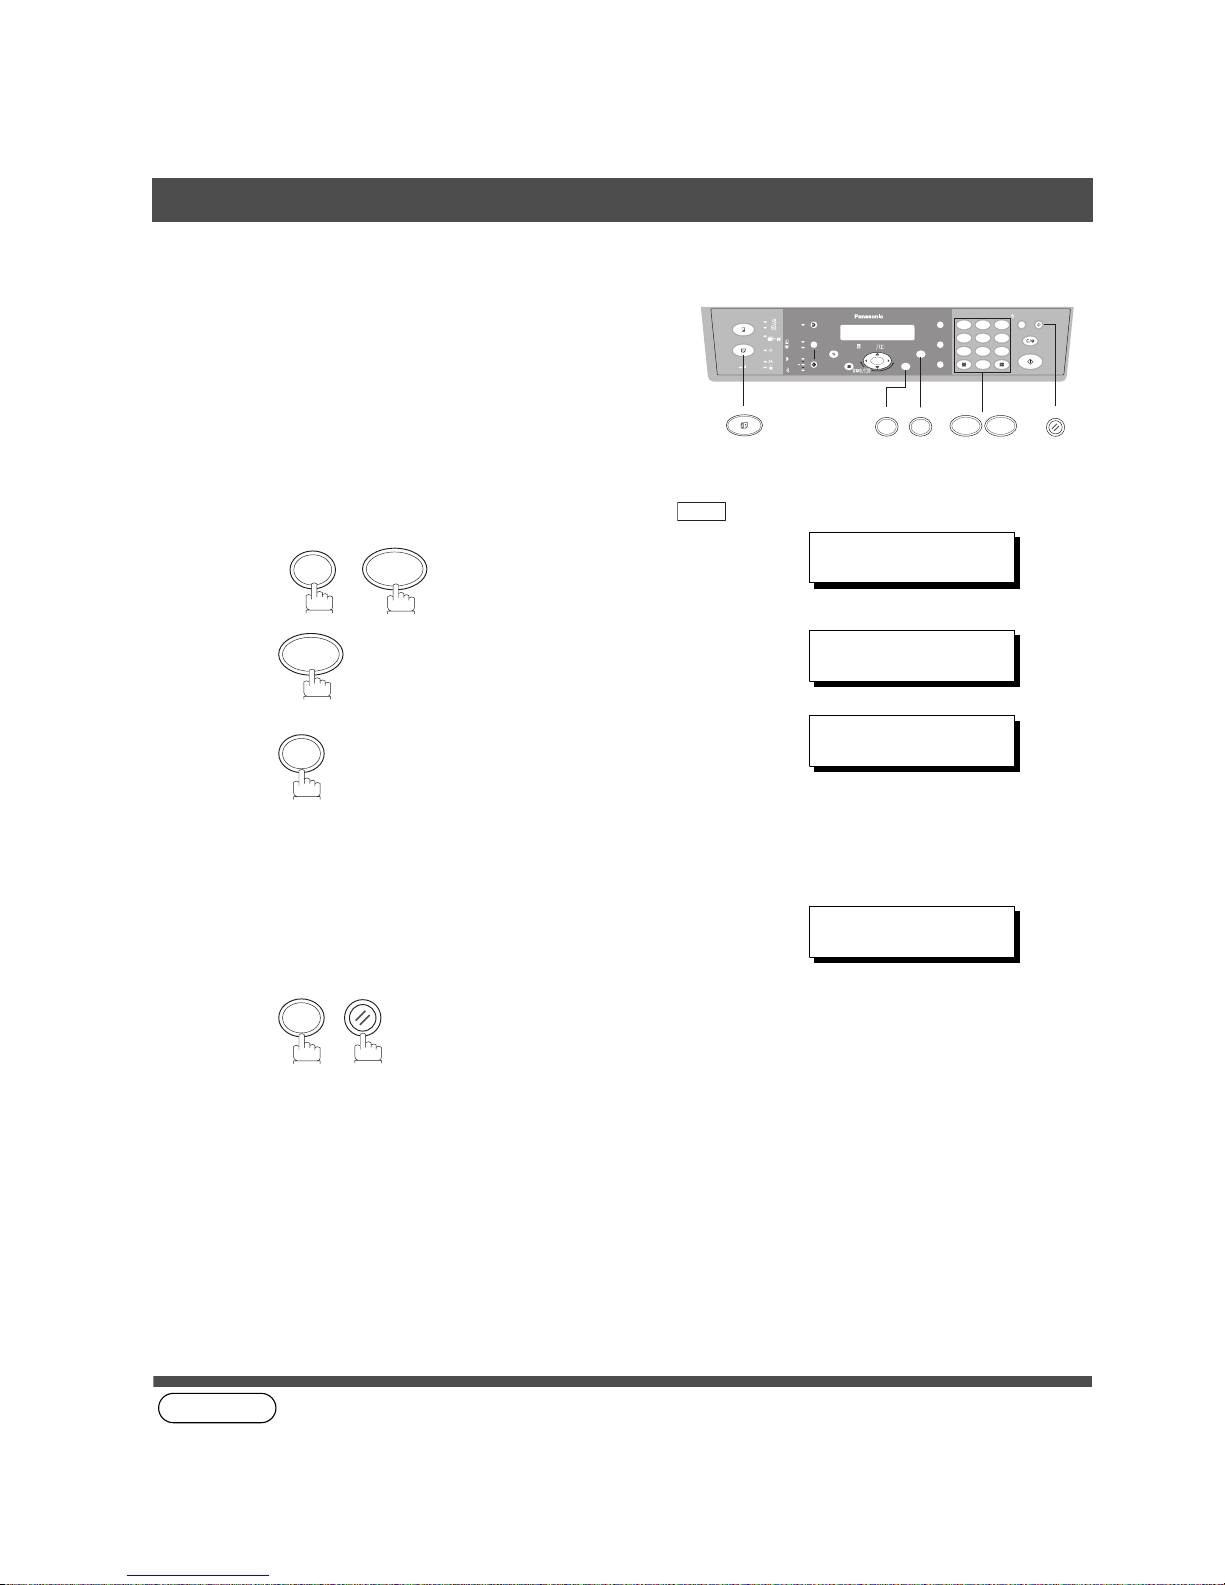
Setting the Monitor and / or Ringer Volume
Make sure that the FAX Mode indicator is ON. If not, press to select the "FAX MODE".
Setting the Monitor Volume
You can adjust the monitor and ri nger volume on your machine.
The built-in speaker enables you to hear the dial tone, dial ing
signals, and busy tone. The ringer sounds when your machin e
receives a call.
1
You will hear the dial tone through the speaker.
2
repeatedly to raise the volume.
or
repeatedly to lower the volume.
3
12
45
78
0
3
6
9
abc..
+-
MONITOR
+-
FAX
FAX
MONITOR
* MONITOR *
❚
+-
+-
MONITOR VOLUME
LOW [
❚❚❚❚❚❚❚
] HIGH
MONITOR VOLUME
LOW [ ] HIGH
MONITOR
INSTALLING YOUR MACHINE
19
INSTALLING
YOUR MACHINE
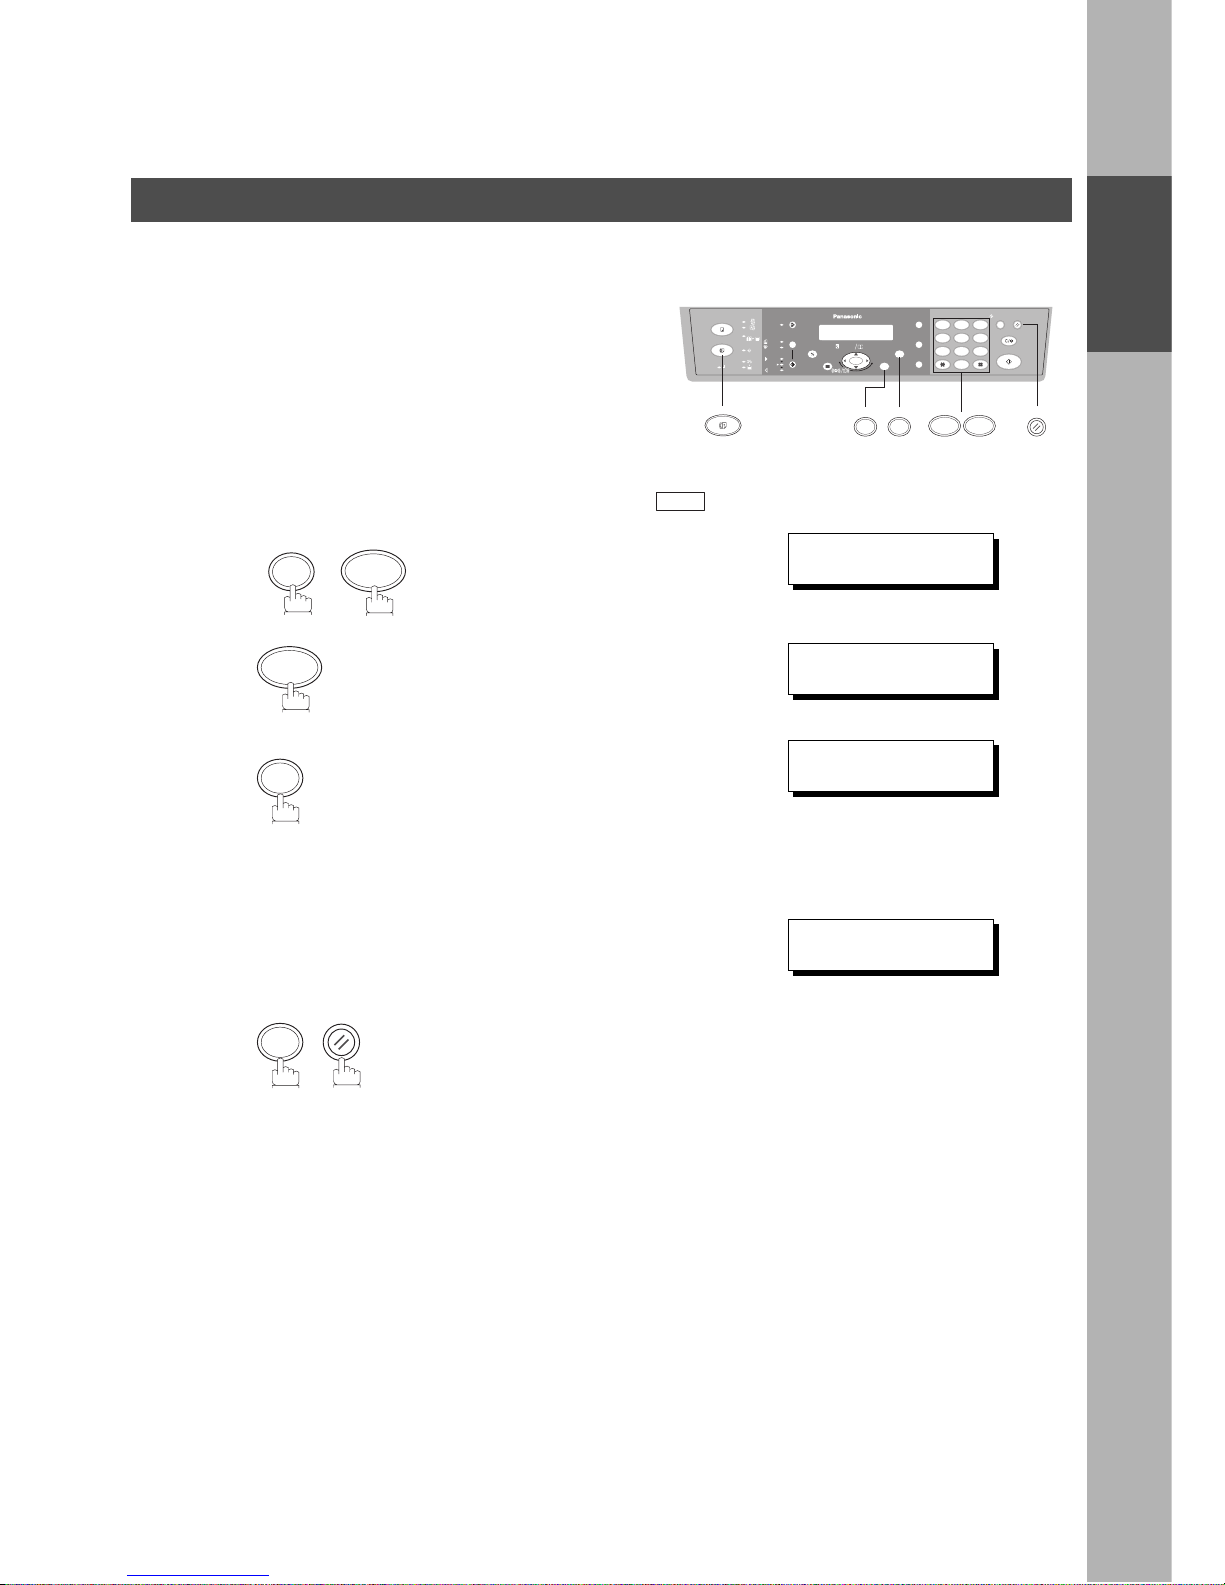
Setting the Ringer Volume
(see Note 1)
1
Standby
2
repeatedly to raise the volume.
or
repeatedly to lower the volume.
NOTE
1. You can also adjust the volume of the key touc h tone and the volume of th e buzzer in the Fax Paramete r N o. 10
(KEY/BUZZER VOLUME). (See page 35)
OCT-12-2000 15:00
00%
+-
+-
RINGER VOLUME
(((
☎
)))
RINGER VOLUME
☎
Adjusting the Volume

INSTALLING YOUR MACHINE
20
How To Enter Characters
To enter characters or sym bols for the Station Name (See page 25), Logo ( See page 22), Character ID (See
page 23), etc., follow the steps below.
2SIDED
DP-150FX
START
12
45
78
0
3
6
9
ABC DEF
GHI JKL MNO
PQRS
TUV
WXYZ
PAPER TRA Y
SELECT
FUNCTION
CLEAR/STOP
SET
2 in 1
ZOOM
(50~200%) SEARCH
DIRECTORY
abc..
DATA
COPY
FAX
PHOTO
AUTO
SORT PAUSE
REDIAL/
FLASH/
MONITOR
SAVER
ENERGY
RESET
DARKER
LIGHTER
ON LINE
SUB-ADDR
+-
2 SIDED
TONE
-/()
FAX
SET MONITOR
• Select and continue pressing the appropriate key on the keypad until
the desired Character / Symbol is displayed, then select another key on
the keypad to enter other Characters / Symbols. If the next Character /
Symbol that you wish to enter falls on the same key, press , to set
the first Character / Symbol first before continuing. Press to
complete the registration.
Ex: To set "O" and "N", the key is used for both
Characters. Set as follows:
• To delete a Character / Symbol, press
• To enter a space, press
Characters and number of key strokes
1234567891011121314
1
ABCabc2
DEFde f 3
GH I gh i 4
JKLj k l5
MNOmno6
PQRSpq r s 7
TUVt uv8
WXYZwxyz9
-/().,’ :;&+=0
1
2
3
4
5
6
7
8
9
0
-/()
SET
6
6 6 6 6 6
SET
CLEAR/STOP
MONITOR
• Use to to enter characters
and symbols. The keypad
assignment for the characters and
symbols is shown below.
Ex:
LOGO
Cursor
To enter "PANASONIC"
Character Keypad
Key
Strokes
P1
A1
N2
A1
S4
O3
N2
I3
C3
0 9
LOGO
PANASONIC
❚
7
2
6
2
7
6
6
4
2
SET
CLEAR/STOP
INSTALLING YOUR MACHINE
21
INSTALLING
YOUR MACHINE
User Parameters
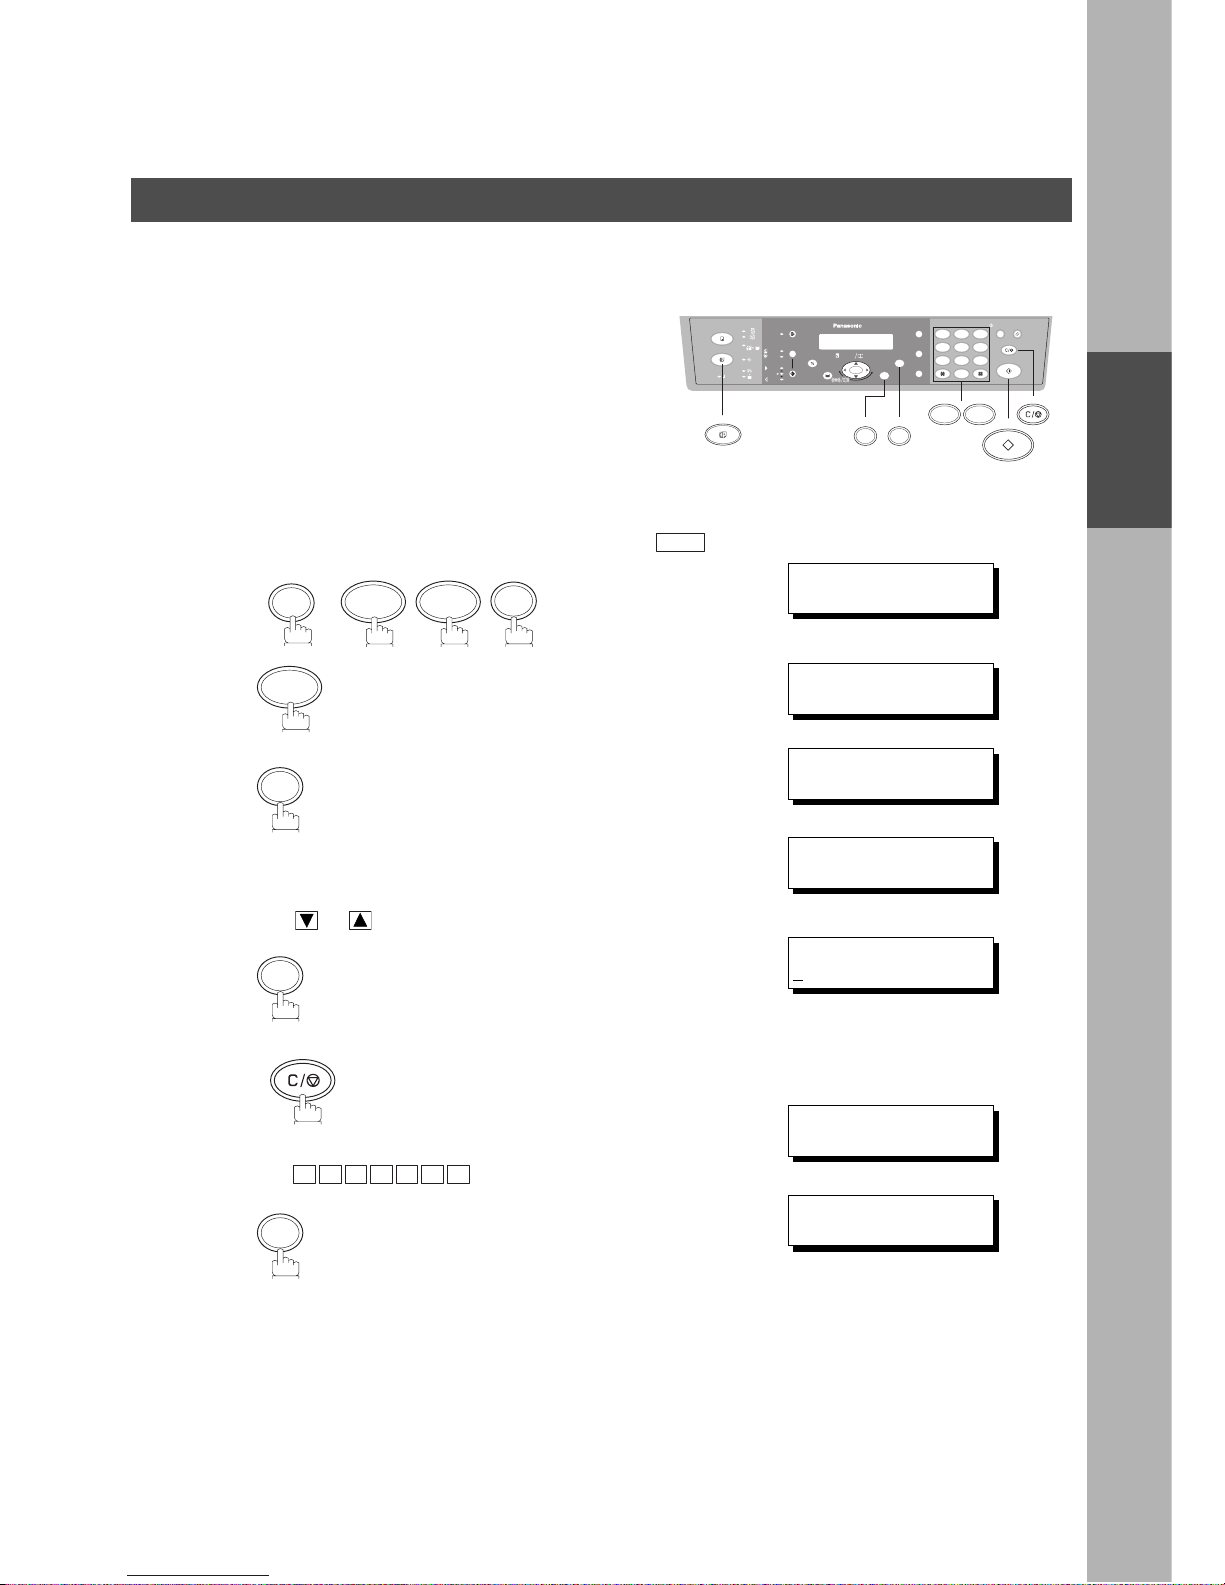
Setting the Date and Time
At standby the display will show the d ate and time. Once the stan dby display is set, it will automatical ly be
updated.
(see Note 1)
(see Note 2)
Your facsimile machine has several basic settings (User
Parameters) to help you keep records of the documents you
send or receive. For example, the built-in clock keeps the
current date and time, and your LOGO and ID Number help to
identify you when you send or receive documents.
Make sure that the FAX Mode indicator is ON. If not, press to select the "FAX MODE".
1
2
3
4
Enter the new date and time.
Ex:
Month : October
Date : 12th
Year : 2000
Time : 3:00 PM
If you make a mistake, use or to move the cursor
over the incorrect number, then overwrite it with a correct
one.
5
NOTE
1. The clock of your machine is equipped with D.S.T. (Daylight Saving Time) system. So, your clock will
automatically set the time forward from 2:00 AM to 3:00 AM on the first Sunday of April and set the time back
from 2:00 AM to 1:00 AM on the last Sunday of October.
If your state does not use the D.S.T. system, change the Fax Parameter No. 35 (DAYLIGHT TIME) to "Invalid" .
(See page 36)
2. The current Date & Tim e must be set be cause it is r equired by the Tel ephone Con sumer Act of 1991 . (For details,
see FCC NOTICE at the end of this Operating Instructions)
12
45
78
0
3
6
9
abc..
+-
FUNCTION
SET
71
FAX
RESET
FAX
FUNCTION
7
SET MODE (1-6)
ENTER NO. OR
∨ ∧
1
1:USER PARAME TER S?
PRESS SET TO SELECT
SET
DATE & TIME
❚
1-01-1999 00:00
1 0
1 2
2 0 0 0
1 5 0 0
DATE & TIME
10-12-2000 15:00
SET
RESET
INSTALLING YOUR MACHINE
22
Setting Your LOGO
(see Note 1)
When you send a document, your LOGO a ppears on the t op o f
the copy printed out at the other station.
The LOGO helps to identify you to someone who recei ves your
document.
Make sure that the FAX Mode indicator is ON. If not, press to select the "FAX MODE".
1
2
3
repeatedly until display shows;
4
Enter your LOGO (max. 25 characters and digits) by using
the keypad (See page 20).
Ex:
PANASONIC
5
NOTE
1. Your Company Name or your name must be set as your LOGO because it is required by the Telephone
Consumer Act of 1991. (For details, see FCC NOTICE at the end of this Operating Instructions)
12
45
78
0
3
6
9
abc..
+-
FUNCTION
SET
71
FAX
RESET
FAX
FUNCTION
7
SET MODE (1-6)
ENTER NO. OR
∨ ∧
1
1:USER PARAME TER S?
PRESS SET TO SELECT
SET
LOGO
❚
LOGO
PANASONIC
❚
SET
RESET
User Parameters
INSTALLING YOUR MACHINE
23
INSTALLING
YOUR MACHINE
Setting Your Character ID
.
20
If the remote machin e has Character ID capabilities, when you
are sending or receiving, your Character ID will appear on the
remote machine's display and the remote machine's Character
ID will appear on your display.
Make sure that the FAX Mode indicator is ON. If not, press to select the "FAX MODE".
1
2
3
repeatedly until display shows;
4
Enter your Character ID (max. 16 characters and digits)
by using the keypad (See page 20).
Ex:
HEAD OFFICE
5
12
45
78
0
3
6
9
abc..
+-
FUNCTION
SET
71
FAX
RESET
FAX
FUNCTION
7
SET MODE (1-6)
ENTER NO. OR
∨ ∧
1
1:USER PARAME TER S?
PRESS SET TO SELECT
SET
CHARACTER ID
❚
CHARACTER ID
HEAD OFFICE
❚
SET
RESET
User Parameters

INSTALLING YOUR MACHINE
24
Setting Your ID Number (Fax Telephone Number)
(see Note 1)
(see Note 2)
If the remote machine does not have a Character ID but has
an ID Number, when sending or receiving, your ID Number
will appear on the remote machine's display and their ID
Number will appear on your display.
We suggest you use your facsimile telephone number as
your ID number. (max. 20 digits)
Make sure that the FAX Mode indicator is ON. If not, press to select the "FAX MODE".
1
2
3
repeatedly until display shows;
4
Enter your ID (max. 20 digits) by using the keypad and
.
Ex:
If you make a mistake, use or to move the cursor
beyond the incorrect number, press
then re-enter the new number.
5
NOTE
1. You may use to enter a "+" character at the beginning of the ID number to indicate the following digit(s) for
your country code.
Ex :+1 201 555 1212 +1 for U.S.A. country code.
+81 3 111 2345 +81 for Japan country code.
2. Your Fax Telephone Numb er mus t be s et as your ID N umb er bec ause i t is re quired by the Telep hone Con sume r
Act of 1991. (For details, see FCC NOTICE at the end of this Operating Instructions)
12
45
78
0
3
6
9
abc..
+-
FUNCTION
SET
71
FAX
RESET
FAX
FUNCTION
7
SET MODE (1-6)
ENTER NO. OR
∨ ∧
1
1:USER PARAME TER S?
PRESS SET TO SELECT
SET
ID NO.
❚
MONITOR
2 0 1
MONITOR
5 5 5
MONITOR
1 2 1 2
CLEAR/STOP
ID NO.
201 555 1212
❚
SET
RESET
User Parameters
25
PROGRAMMING
YOUR MACHINE
PROGRAMMING YOUR MACHINE
Directory Search Dialing
Entering the Directory Search Dialing
To use the Directory Search Dialing, you must first store the
station names and t heir telephone numbers using the following
procedure.
Make sure that the FAX Mode indicator is ON. If not, press to select the "FAX MODE".
1
2
3
4
↓3 sec. later
5
Enter the station name from the keypad
(up to 15 characters). (See Note below and page
20)
Ex:
6
12
45
78
0
3
6
9
abc..
+-
FUNCTION
SET
7
1
2
FAX
MONITORFLASH/SUB-ADDRREDIAL/PAUSE
START
FAX
FUNCTION
7
SET MODE (1-6)
ENTER NO. OR
∨ ∧
2
SET
DIR. STN. DIAL (1-3)
ENTER NO. OR
∨ ∧
1
1:ADD STATION
PRESS SET TO SELECT
SET
REGISTERED ENTRIES
STN(S):0 GROUPS:0
ENTER NAME
❚
S
A L E S
MONITOR
E P TD
ENTER NAME
SALES DEPT
❚
SET
ENTER TEL. NO.
❚
PROGRAMMING YOUR MACHINE
26
7
Enter the telephone number
(up to 36 digits including pauses and spaces).
Ex:
Select and continue pressing the approp riate key on the
keypad until the desired Character / Symbol is displayed,
then select another key on the keypad to enter other
Characters / Symbols.
If the next Character / Symbol that you wish to enter falls
on the same key, press , to set the first Character /
Symbol first before continuing. Press to
complete the registration.
Ex:
To set "O" and "N", the key is used for both
Characters. Set as follows:
8
To record another station, repeat steps 5 to 8.
To return to standby, press .
↓
3.0 sec. later
9
REDIAL/PAUSE
5 5 5
MONITOR
1 2
3
4
SET
6 6 6 6 6 6
SET
ENTER TEL. NO.
9-555 1234
❚
START
RESET
REGISTERED ENTRIES
STN(S):1 GROUPS:0
ENTER NAME
❚
Directory Search Dialing
PROGRAMMING YOUR MACHINE
27
PROGRAMMING
YOUR MACHINE
Changing Directory Search Dialing
If you have to change any of the Directory Search Dialing
Stations, follow the steps below.
Make sure that the FAX Mode indicator is ON. If not, press to select the "FAX MODE".
1
2
3
↓
3.0 sec. later
4
Use or to search the station you wish to change.
5
then enter a new station name. (See Note 1)
Ex:
6
12
45
78
0
3
6
9
abc..
+-
FUNCTION
SET
72
FAX
START
CLEAR/STOP
FAX
FUNCTION
7 2
SET
DIR. STN. DI AL (1- 3)
ENTER NO. OR
∨ ∧
2
2:MODIFY STAT ION
PRESS SET TO SELECT
SET
REGISTERED ENTRIES
STN(S):15 GROUPS:3
PRESS
∨ ∧
TO SELECT
THEN SET TO MEMORY
SET
ENTER NAME
P
ANASONIC
CLEAR/STOP
P A N A F A X
ENTER NAME
PANAFAX
SET
ENTER TEL. NO.
9-555 1234
Directory Search Dialing
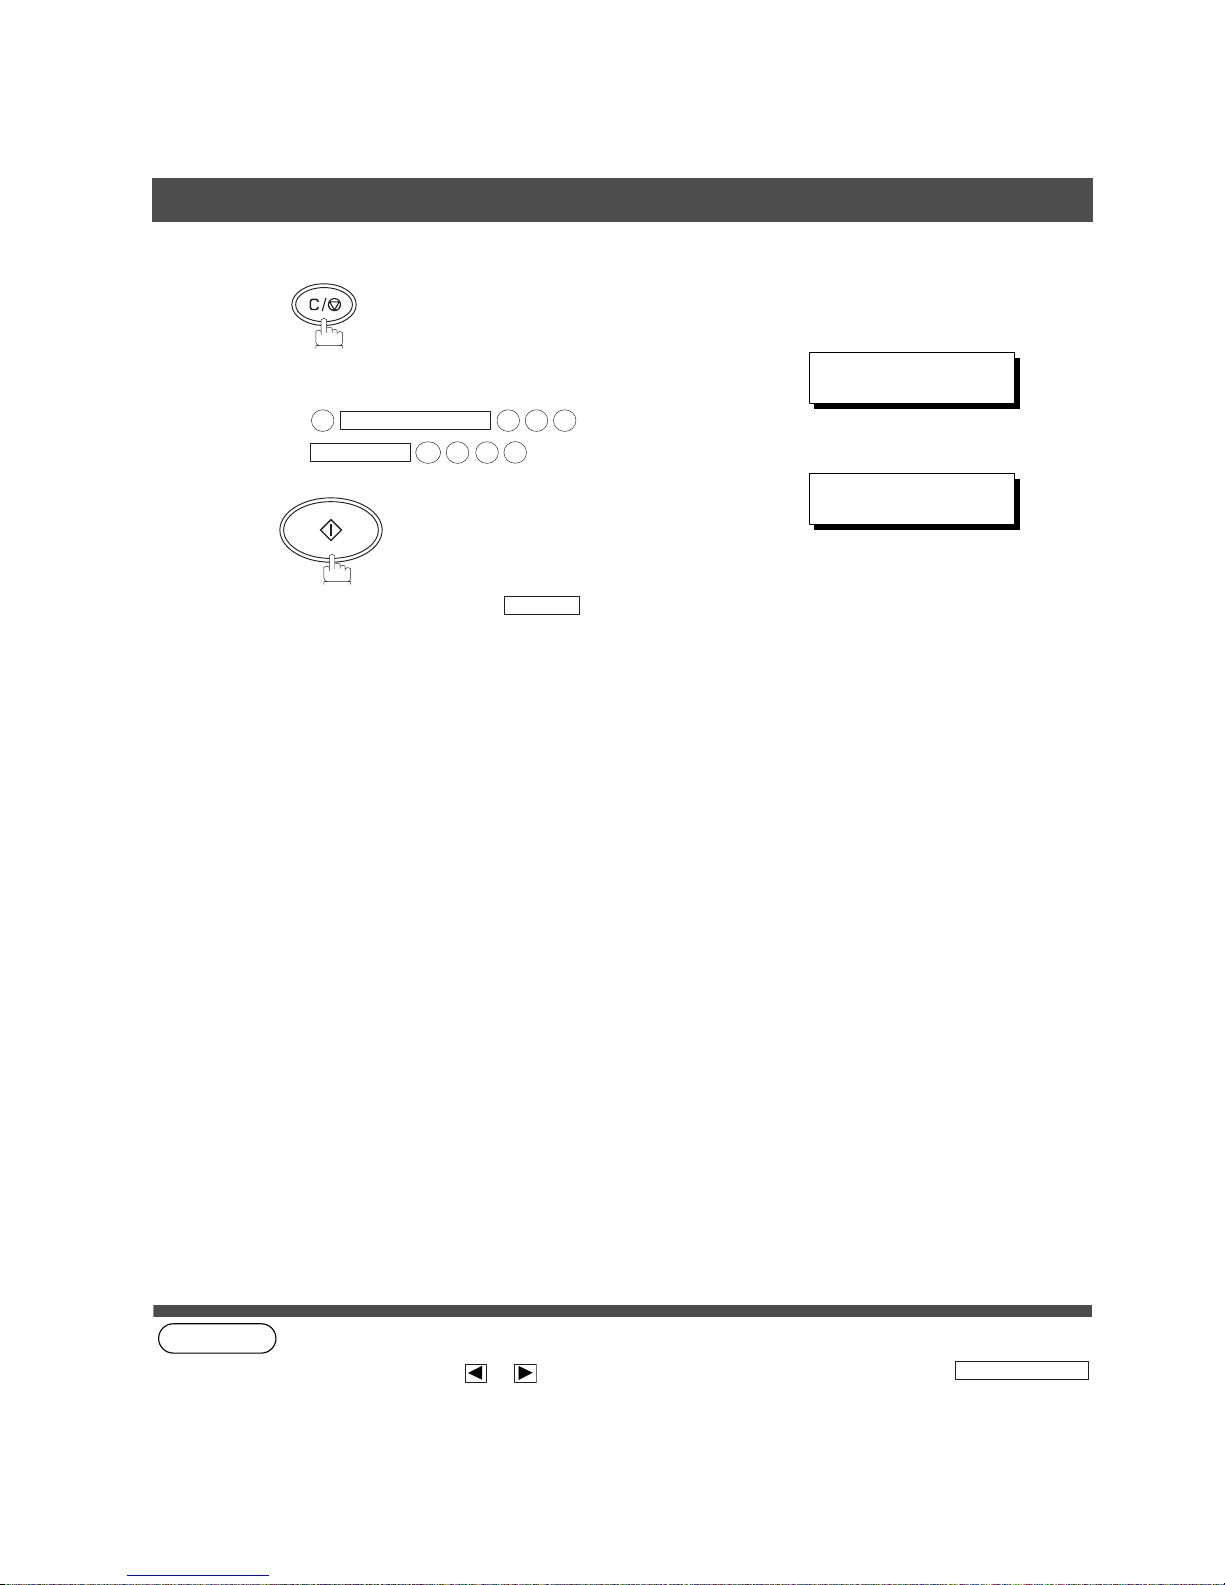
PROGRAMMING YOUR MACHINE
28
(see Note 1)
(see Note 2)
7
then enter a new telephone number.
(See Note 1)
Ex:
8
To return to standby, press
NOTE
1. If you make a mistake, use or to move the cursor beyond the incorrect nu mber, press
then re-enter the new number.
2. If the Directory Search Dialing Station has been used for a communication reservation, the settings cannot be
changed or erased until the communication has finished.
To change or erase the settings, cancel the communication first by Edit File Mode. (See page 66)
CLEAR/STOP
9
REDIAL/PAUSE
5 5 5
MONITOR
3
4
5
6
ENTER TEL. NO.
9-555-3456
START
RESET
PANAFAX
9-555 3456
CLEAR/STOP
Directory Search Dialing

PROGRAMMING YOUR MACHINE
29
PROGRAMMING
YOUR MACHINE
Erasing the
Directory Searc h Dialing
(see Note 1)
If you have to erase any of the Directory Search Dialing
Stations, follow the steps below.
Make sure that the FAX Mode indicator is ON. If not, press to select the "FAX MODE".
1
2
3
↓
3.0 sec. later
4
Use or to search the station you wish to delete.
5
To return to standby, press .
↓
3.0 sec. later
(When all stations were
deleted)
NOTE
1. If the Directory Search Dialing Station has been used for a communication reservation, the settings cannot be
changed or erased until the communication has finished.
To change or erase the settings, cancel the communication first by Edit File Mode. (See page 66)
12
45
78
0
3
6
9
abc..
+-
FUNCTION
SET
3
7
2
FAX
12
45
78
0
3
6
9
abc..
+-
FUNCTION
SET
3
7
2
FAX
FAX
FUNCTION
7 2
SET
DIR. STN. DI AL (1- 3)
ENTER NO. OR
∨ ∧
3
3:DELETE STAT ION
PRESS SET TO SELECT
SET
REGISTERED ENTRIES
STN(S):15 GROUPS:3
PRESS
∨ ∧
TO SELECT
THEN SET TO DELETE
SET
PANAFAX
PRESS SET TO CONFI RM
SET
RESET
REGISTERED ENTRIES
STN(S):14 GROUPS:3
PRESS
∨ ∧
TO SELECT
THEN SET TO DELETE
3:DELETE STAT ION
PRESS SET TO SELECT
Directory Search Dialing
PROGRAMMING YOUR MACHINE
30
Setting Up Group Dialing
To set a Group Dialing, follow the steps below.
Make sure that the FAX Mode indicator is ON. If not, press to select the "FAX MODE".
1
2
3
4
↓
3.0 sec. later
5
Enter a Group name using character keys
(up to 15 characters). (See page 20)
Ex:
6
7
Enter the telephone number
(up to 36 digits including pauses and spaces).
Ex:
8
Enter the next telephone number and press (up to 10
telephone numbers).
To record another Group, repeat steps 5 to 8 (up to 10 Groups).
To return to standby, press .
12
45
78
0
3
6
9
abc..
+-
FUNCTION
SET
7
1
2
FAX
MONITORFLASH/SUB-ADDRREDIAL/PAUSE
FAX
FUNCTION
7
SET MODE (1-6)
ENTER NO. OR
∨ ∧
3
SET
DIR. GROUP DIAL(1-3)
ENTER NO. OR
∨ ∧
1
1:ADD GROUP
PRESS SET TO SELECT
SET
REGISTERED ENTRIES
STN(S):0 GROUPS:0
ENTER NAME
❚
S
A L E S
MONITOR
E P TD
ENTER NAME
SALES DEPT
SET
ENTER TEL. N O. 01/ 01
❚
9
REDIAL/PAUSE
5 5 5
MONITOR
1 2
3
4
ENTER TEL. N O. 01/ 01
9-555 1234
❚
SET
START
RESET
ENTER TEL. N O. 02/ 02
❚
Directory Search Dialing
 Loading...